


PORTABLE CD PLAYER
with CASSETTE RECORDER
and AM/FM STEREO RADIO
INSTRUCTION MANUAL RCD 310
-1-
PREPARATION FOR USE
Unpacking and Setup
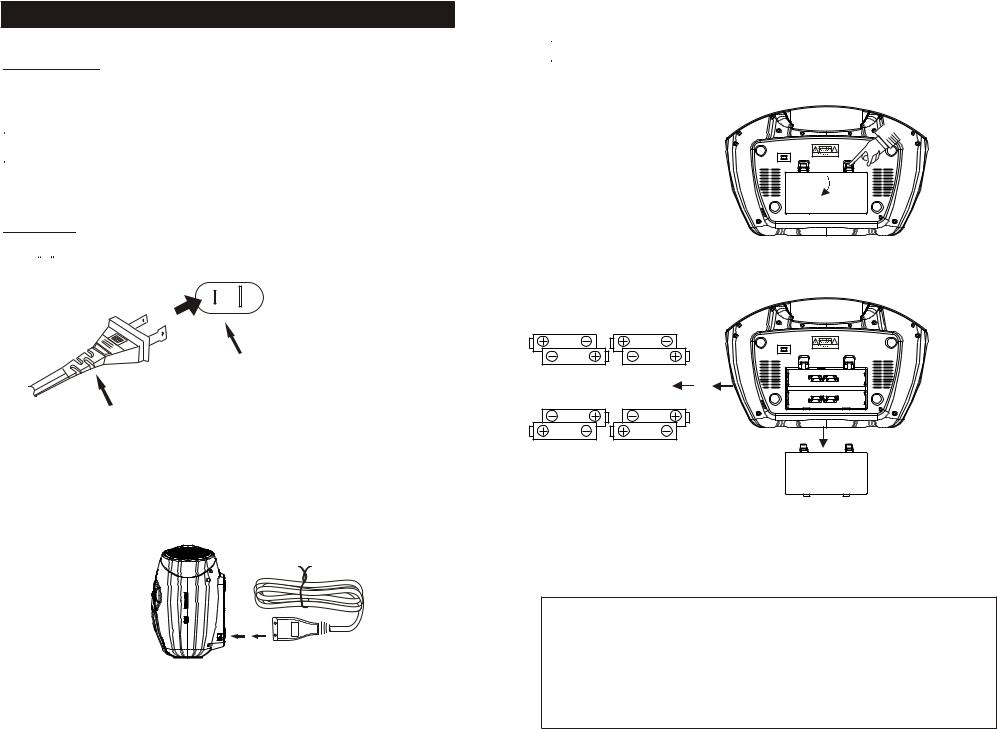
 Carefully remove the unit from the display carton and remove all packing material from the unit itself.
 Remove any descriptive labels that may be found on either the front or top cabinet of the unit. Do not remove any labels located on either the back or bottom cabinet of the unit.
The detachable AC power cord is packed in the carton separately from the unit. Make sure that the AC power cord is not accidentally discarded with the carton or packing material.
CD |
open |
compartment door. |
There is a white card in the |
CD |
compartment which is intended to |
prevent |
the CD pickup from |
moving during shipment of |
the |
product. Remove this card from |
|
the |
CD compartment before use. |
|
|
||
Power Sources
This portable audio system is designed to operate on either AC 120V 60Hz house current or 12V DC, using 8 D batteries (UM-1), not included. Attempting to operate this unit from any other power source may cause damage to unit, which is not covered by your warranty.
AC Outlet
AC Plug
AC Operation
Unwind the AC cord and extend it to its full length, Insert the small end of the AC cord into the AC socket on the back cabinet of the unit. Insert the other and of the AC cord into any convenient AC 120V 60Hz household outlet .
Battery Operation
The battery compartment is located on the bottom of the cabinet.
Remove the battery compartment door by pressing downward on the two tabs as shown in Figure 1 below.
Insert 8 D
D size (UM-1) batteries into the battery compartment as shown in figure 2 below. Be sure to observe the polarity markings which are engraved inside the battery compartment. If the batteries are inserted incorrectly, the unit will not operate.
Figure 1
1.5V |
1.5V |
|
|
1.5V |
1.5V |
|
|
|
|
1.5V |
1.5V |
8XR20 D CELL UM-1 |
1.5V |
1.5V |
|
8XR20 D CELL UM-1 |
|||
|
|
1.5V |
1.5V |
|
|
1.5V |
1.5V |
1.5V |
1.5V |
|
|
1.5V |
1.5V |
|
|
Figure 2
 Replace the battery compartment door.
NOTE: The AC power cord must be disconnected from the AC socket on the back of the unit in order for the unit to operate on battery power.
BATTERY PRECAUTIONS
Follow these precautions when using batteries in this device.
1.Use only the size and type of batteries specified .
2.Be sure to follow the correct polarity when installing the batteries as indicated in the battery compartment. Reversed batteries may cause damage to the device.
3.Do not mix different types of batteries together (e.g. Alkaline and Carbon-zinc) or old batteries
with fresh ones.
4. If the device is not to be used for a long period of time, remove the batteries to prevent damage or injury from possible battery leakage.
5.Do not try to recharge batteries not intended to be recharged; they can overheat and rupture. (Follow battery manufacturer,s directions.)
-2- |
-3- |
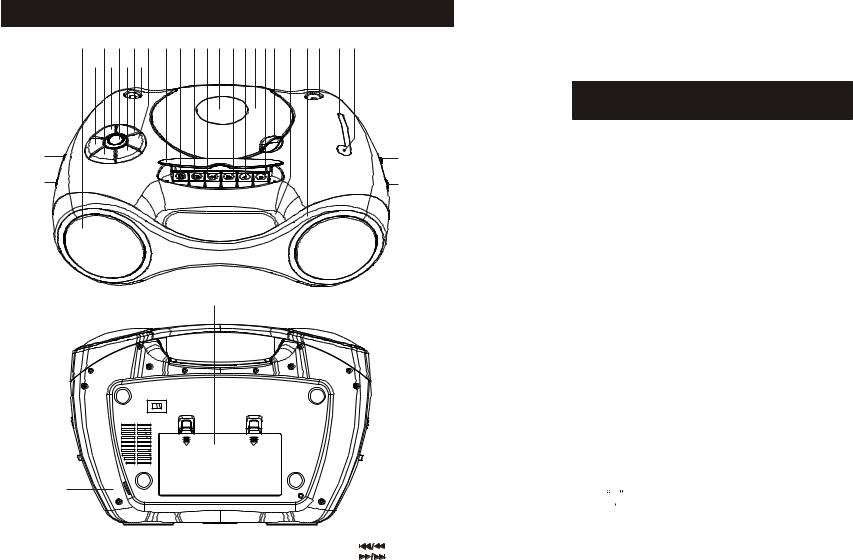
LOCATION OF CONTROLS AND INDICATORS |
NOTE: The manufacturer is not responsible for any RADIO interference |
||||
cause by unauthorized modifications to this equipment. Such |
|||||
|
21 25 29 17 2413 12 11 2010 9 4 8 5 |
23 |
3 2 |
19 30 |
modifications could void the user’s authority to operate the |
15 |
equipment. |
||||
16 18 22 26
|
|
WARNING : TO PREVENT FIRE OR SHOCK HAZARD. |
|
|
DO NOT EXPOSE THIS UNIT TO RAIN OR MOISTURE. |
1 |
6 |
AVOID INSTALLING THE UNIT IN LOCATIONS |
14 |
7 |
DESCRIBED BELOW: |
|
||
|
|
* Areas exposed to direct sunlight or close to heat radiating appliances |
|
|
such as electric heaters. |
|
|
- On top of other stereo equipment that radiates too much heat. |
|
|
- Places lacking ventilation or dusty place. |
|
|
- Areas subject to constant vibration. |
|
|
- Humid or moist locations |
|
|
- Operate controls and switches as described in the manual. |
|
|
- Before tuning the power switch on for the first time, make certain the |
|
28 |
batteries and power cords are properly installed. |
|
* Store your tapes and CDs in cool area to avoid damage from the heat. |
|
|
|
|
|
|
AC POWER CONNECTION |
|
|
Connect one end of the AC cord to the AC INPUT socket (27) on the back of |
|
|
the unit, then connect other end to the wall outlet. The unit is now ready to |
|
|
operate by AC power supply. |
|
|
Disconnect AC cord from wall outlet when the unit is not in use. |
|
|
BATTERY INSTALLATION |
|
27 |
|
|
|
1. Open the battery compartment cover. |
|
|
|
|
, |
|
|
|
|
|
|
2. Insert 8 pcs. D R20 UM-1x8 or type batteries into battery compartment. |
|
|
|
|
|
Be sure to insert battery s polarity as shown in the diagram engraved on |
|
|
|
|
|
the battery compartment. |
|
|
|
|
|
3. Place the battery compartment cover. |
1. |
FUNCTION SWITCH |
16. |
CD SKIP/SEARCH ( |
) BUTTON |
4. The unit is now ready for operation. |
|
|||||
2. |
FM ANTENNA |
17. |
CD SKIP/SEARCH ( |
) BUTTON |
|
3. |
HANDLE |
18. |
CD REPEAT ONE/ALL BUTTON |
NOTE: The battery circuits is disconnected automatically when the AC |
|
4. |
CD DOOR |
19. RADIO DIAL WINDOW |
|
||
|
cord is inserted to the AC INPUT socket when operate by AC. |
||||
5. |
CD DOOR OPEN |
20. |
CD TRACK(S) INDICATOR |
||
6. |
BAND SWITCH |
21. CD STOP BUTTON |
|
Remove all the batteries from battery compartment, when the |
|
7. |
TUNING KNOB |
22. |
CD PLAY/PAUSE BUTTON |
|
unit is longer operate by battery. |
8. |
CASSETTE RECORD BUTTON |
23. CASSETTE DOOR |
|
|
|
9. |
CASSETTE PLAY BUTTON |
24. CASSETTE KNOB COVER |
|
|
|
10. CASSETTE REWIND BUTTON |
25. DBBS BUTTON |
|
DO NOT EXPOSE THE RADIO TO DRIPPING OR SPLASHING! |
||
11. CASSETTE F.FWD BUTTON |
26. PHONES SOCKET |
|
BATTERIES MUST BE DISPOSED OF PROPERLY |
||
12. CASSETTE STOP/EJECT BUTTON |
27. AC INPUT SOCKET |
|
|
||
13. CASSETTE PAUSE BUTTON |
28. BATTERY COMPARTMENT |
|
|||
14. VOLUME KNOB |
29. PROGRAM BUTTON |
|
|
||
15. SPEAKERS |
30. |
FM STEREO INDICATOR |
|
|
|
-4- |
-5- |
 Loading...