

Page 1
FUNDA DE
2 289
6
7
1 3
5
4
MÓVIL PARA
BICICLETA
FUNDA DE MÓVIL
PARA BICICLETA
Instrucciones de montaje
BICYCLE MOBILE PHONE
HOLDER
Assembly instructions
MOBILTELEFON-
FAHRRADTASCHE
Montageanleitung
IAN 88689
A
B D
C
¡Enhorabuena! Al comprar este
artículo ha adquirido un producto de excelente calidad. Familiarícese
con él antes de instalarlo y ponerlo en
funcionamiento leyendo atentamente
las siguientes instrucciones de instalación y advertencias de seguridad.
Utilice el producto solo según lo indicado aquí y únicamente para los ámbitos de uso previstos. Conserve estas
instrucciones para futuras consultas y,
en el caso de que en algún momento
entregara el producto a terceros, no
se olvide de adjuntar también toda su
documentación.
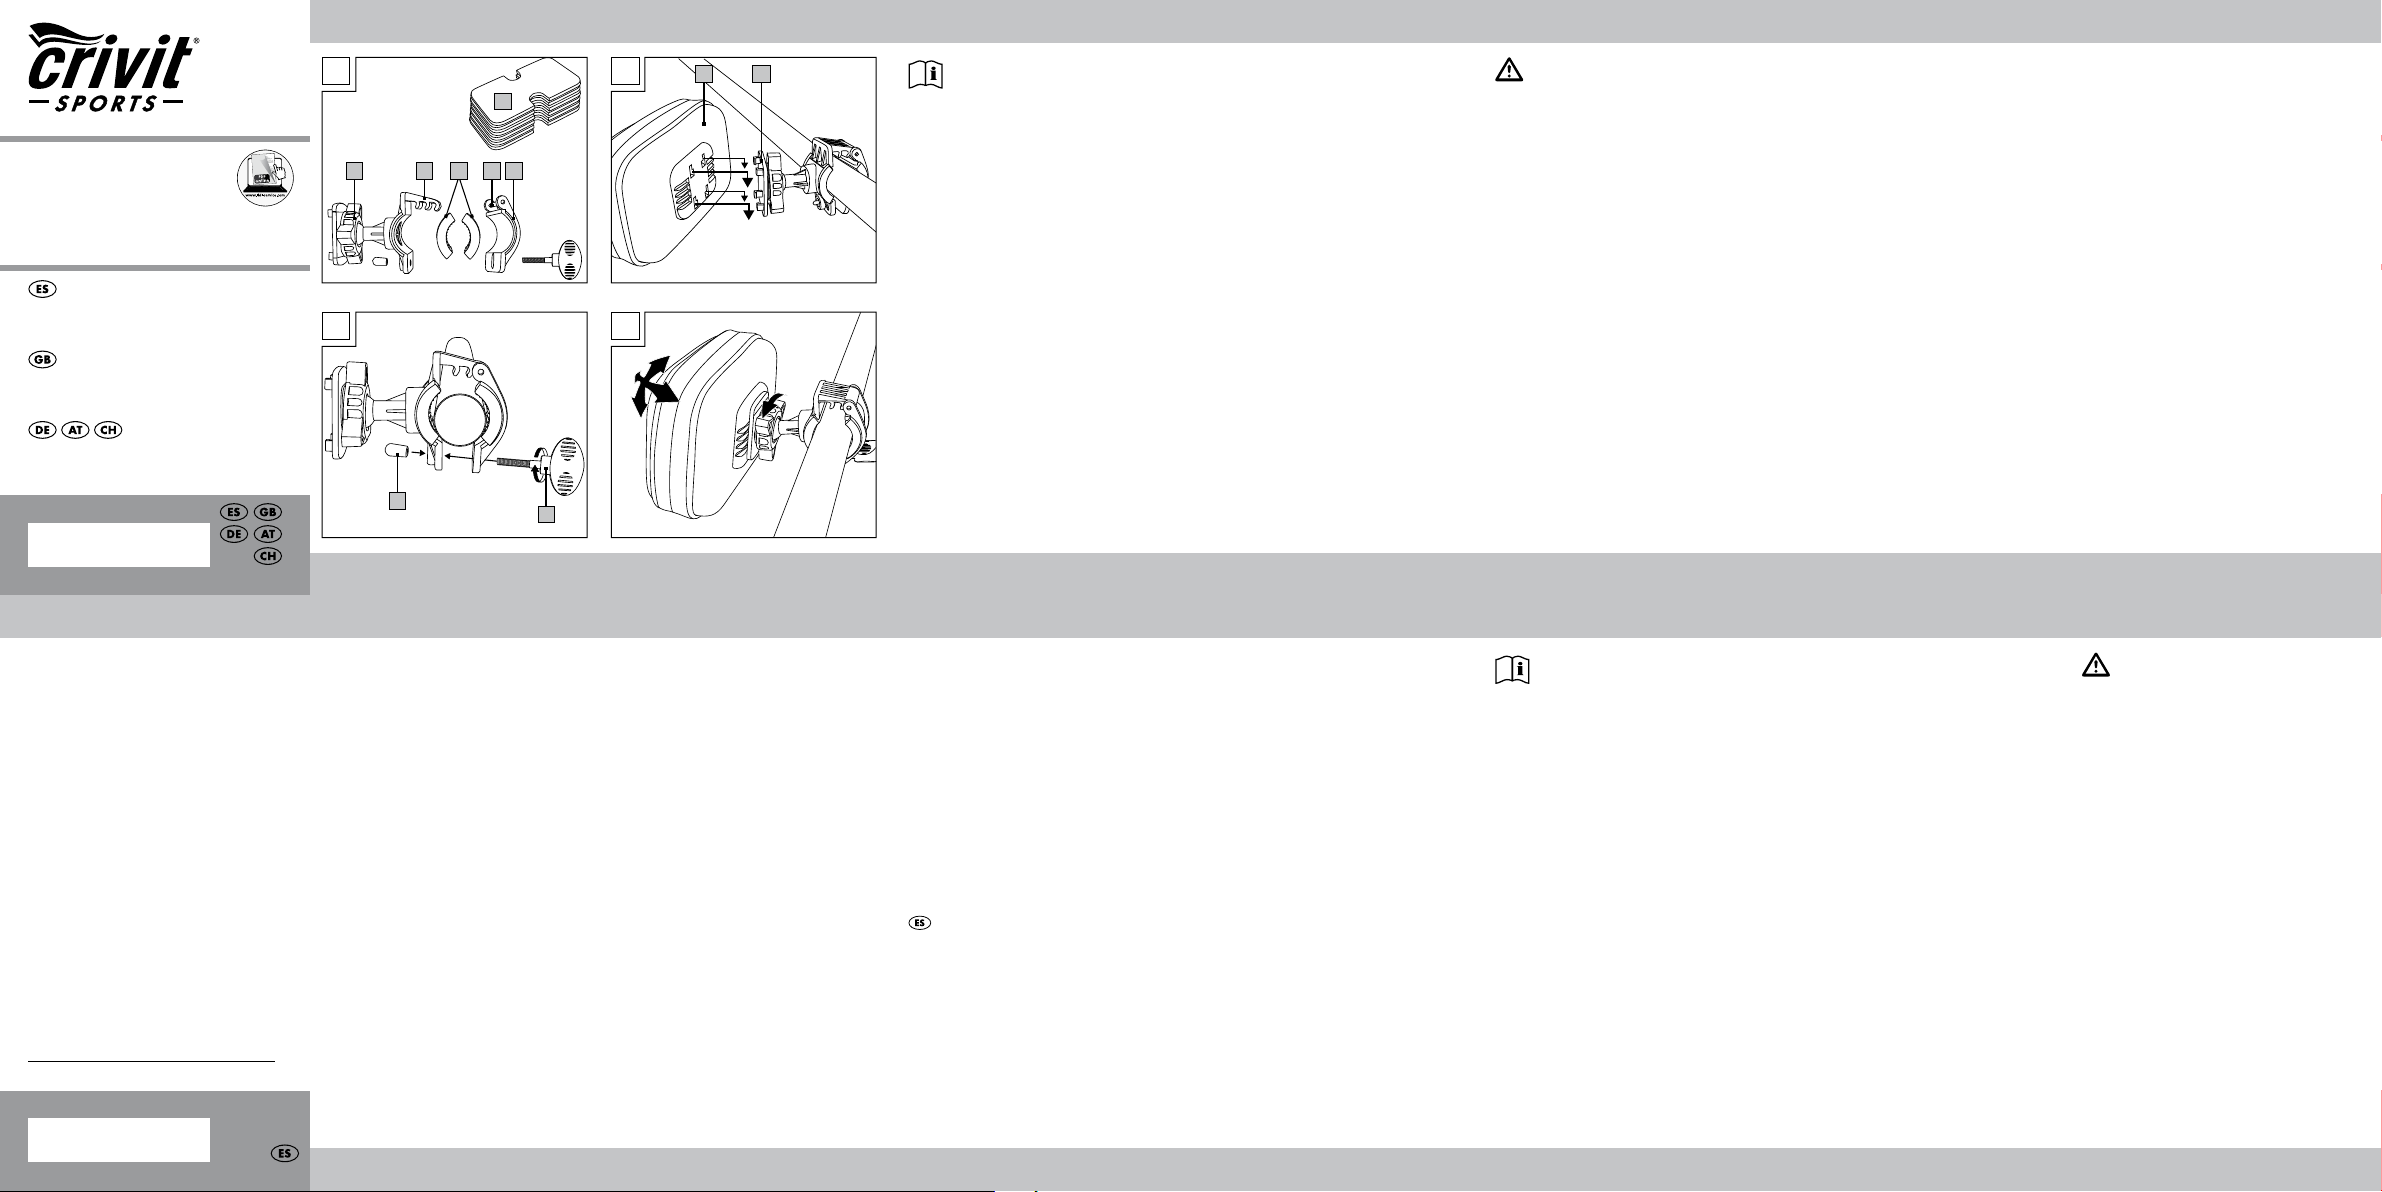
Material provisto/Denominación de piezas
(1) Estuche
(2) Adaptador
(3) Placa de fijación
(4) Tornillo
(5) Capuchón
(6) 2 Piezas adicionales de adaptación
(7) 6 Piezas adicionales para el estuche
(8) Barra de enganche
(9) Enganche con regulación
1 x Instrucciones de instalación
Uso adecuado
Este artículo ha sido diseñado como
estuche para guardar teléfonos móviles y aparatos de navegación en la
bicicleta, para uso particular.
No es adecuado para la fijación
en motos, motocicletas y vehículos
similares.
Datos técnicos
Adecuado para manillares de
aprox. 16,5 – 35 mm de diámetro
Para teléfonos móviles y aparatos de
navegación de un tamaño de hasta
130 x 80 mm
A prueba de salpicaduras
ES ES ES
Indicaciones de
seguridad
• El uso de un teléfono mientras se
maneja una bicicleta limita la capa cidad de prestar atención y está
prohibido. Antes de contestar una
llamada o de hacer uso del apa rato, diríjase al arcén de la calle y
estacione.
• El uso de auriculares limita la cap
acidad de atención y está prohibi do en algunos países. Infórmese
sobre la reglamentación y normas
de los países en los que usará la
bicicleta y aténgase a las mismas.
• El distribuidor no se responsabiliza
de posibles daños en teléfonos o
aparatos de navegación que surjan
a través el uso del artículo.
• Antes de cada uso, verifique que el
artículo no tenga daños o des gastes.
Además controle que los tornillos
estén bien ajustados y apriételos en
caso de que estén sueltos. ¡El artí culo solo debe utilizarse en condi ciones óptimas!
• La fijación del artículo no debe
limitar el funcionamiento de la bi cicleta. No deben cubrirse los re flectores o artefactos de ilumina ción. Los cables Bowden no deben
doblarse ni atascarse.
• Siempre realice el montaje y des montaje del artículo sin el teléfono
o el aparato de navegación en el
estuche. De lo contrario, podría
dañarse.
Instalación
1. Inserto para adaptación
El adaptador (2) puede utilizarse con
ambos insertos (6), con uno o con
ninguno.
ES ES
Además, la mitad del adaptador con
la barra de enganche (8) puede fijarse en tres posiciones diferentes en
el enganche con regulación (9) de la
otra mitad del adaptador.
De acuerdo con el diámetro y la
forma del manillar, elija cuántos
insertos necesita, así como la posición
del enganche con regulación en que
fijará la barra (Fig. A).
Siempre asegúrese de que el
adaptador esté bien montado
en el manillar.
2. Montaje del adaptador
en el manillar
Retire el capuchón (5) del tornillo (4).
Afloje el tornillo del adaptador y coloque ambas mitades del mismo (con los
insertos de adaptación, si corresponde) alrededor del manillar (Fig. B).
A continuación, fije el tornillo y vuelva
a colocar el capuchón.
DELTA-SPORT HANDELSKONTOR GMBH
Wragekamp 6 • D-22397 Hamburg
Version: 06/2013
Delta-Sport-Nr.: MT-1651
IAN 88689
3. Fijación del estuche al
adaptador
Controle la orientación del estuche
y de la placa de fijación, y presione
con la suficiente fuerza hacia abajo,
tan cerca como sea posible o sobre
el soporte del estuche, hasta que
éste encaje, produciendo un sonido
notable (Fig. C).
Sugerencia: Ya que al encajar y
desmontar (tirar del estuche hacia arriba) se requiere un poco
más de presión, sostenga la
placa de fijación con una mano
para ayudarse.
4. Ajustar el ángulo
Para ajustar el ángulo del estuche de
manera individual, suelte el tornillo
de fijación y ajuste de acuerdo con la
posición deseada (Fig. D).
A continuación, vuelva a apretar el
tornillo.
5. Retirar el estuche
Deslice el estuche de la placa de
fijación y retírelo del adaptador.
6. Piezas adicionales para el
estuche
El estuche incluye seis piezas adicionales (7). Si fuera necesario, ajuste
la profundidad del estuche retirando
las piezas de una a una del teléfono
móvil o del aparato de navegación
hasta que éste quede acomodado de
manera segura en el estuche.
Cuidados,
almacenamiento
Almacenar el artículo siempre seco y
limpio en un lugar a temperatura ambiente. No limpiar nunca con productos
de limpieza corrosivos, limpiar solo
con un trapo seco.
Advertencias sobre la
eliminación de desechos
Por favor, ¡deseche el embalaje y el
artículo separando correctamente y
acorde con el medio ambiente!
Deseche el artículo en una empresa
eliminadora de basuras certificada o
a través de su ad-ministración municipal. Cumpla con la reglamentación
actualmente vigente.
IAN: 88689
Servicio España
Tel.: 902 59 99 22
(0,08 EUR/Min. +
0,11 EUR/llamada
(tarifa normal))
(0,05 EUR/Min. +
0,11 EUR/llamada
(tarifa reducida))
E-Mail: deltasport@lidl.es
ES
Encontrará también recambios para su
producto en: www.delta-sport.com, rúbrica
Servicio - servicio de recambios Lidl
ESESES GB GBGB
Congratulations on purchasing
this high-quality product. Be sure
to familiarise yourself with the assembly instructions prior to use.
Please take the time to carefully read
through the following assembly instructions and safety notes.
Only use the product as described
and for the intended use. Please retain
these instructions for future reference
and ensure that they are passed on to
any third party.
Purchased parts
package /
Description of the parts
(1) 1 x Case
(2) 1 x Adapter
(3) 1 x Mounting plate
(4) 1 x Screw
(5) 1 x Cap
(6) 2 x Adapter inserts
(7) 6 x Case inserts
(8) Mounting bar
(9) Mounting notches
1 x Assembly instructions
Intended use
This item has been developed as a
storage case for mobile phones and
navigation devices on a bicycle for
personal use. It is not suitable as an
attachment to motorcycles, motor
scooters and similar modes of transportation.
Technical data
Suitable for handlebars approximately
16.5 – 35mm in diameter
For cell phones and navigation
devices up to 130 x 80mm in size
Splashproof
Safety instructions
• Using a telephone while riding a
bicycle impairs attention and is pro hibited. Ride to the edge of the
street and park your bicycle before
taking or making a call.
• Using headphones impairs attention
and is prohibited in some countries.
Familiarise yourself about the laws
and regulations in the countries
where you ride your bicycle and
always abide by the applicable
rules.
• The distributing company is not
responsible for any damages to
telephones or navigation devices
that may arise as a result of using
the item.
• Check the item for damage or wear
and tear before every use.
Page 2

Before each use, examine all of the
screwed connections for a tight fit
and tighten any loose connections
when necessary. Only use the item
if it is in perfect condition!
• The attachment of the item may not
impair the functionality of the bicy cle. Do not cover any of the reflec tors or lights. Do not snap off or
sandwich any of the bowden
cables.
• Always assemble or disassemble
the item when the telephone or the
navigation device is not in the case.
Otherwise, they may become
damaged.
Assembly
1. Adapter inserts
The adapter (2) may be used with
both inserts (6), with one insert, or with
no inserts.
The half of the adapter with the hanging notches (8) may also be used in
three different hanging positions (9) to
the other half of the adapter.
Select whether or how many inserts
you need, as well as onto which hanging notch you position the hang-ing
bars (Figure A), depending on the
diameter and the shape of your
handlebar.
Please make sure that the adapter is securely mounted onto
the handlebar.
2. Mounting the adapter on
the handlebar
Remove the cap (5) from the screw
(4). Loosen the screw on the adapter
and place both halves of the adapter
(using the adapter inserts if necessary) around the handlebar (Figure B).
Next, fasten the screw in place and
replace the cap.
3. Connect the case to the
adapter
Check the way the case and the mounting plate are set up, and then exert
enough downward pressure as closely
as possible or directly onto the bracket
of the case, until it clicks audibly into
place (Figure C).
Note: Since quite a substantial
pressure is required for locking
the case into place and for disassembly (pulling the pocket
upward), hold the mounting
plate firmly with one hand if
necessary.
4. Adjust the angle
To customise the angle of the case,
loosen the locating screw, and adjust
the case to the desired position (Figure
D). Then tighten the screw again.
5. Remove the case
Push the case away from the mounting
plate, and pull it out of the adapter.
6. Case inserts
The case is fitted with six inserts (7).
Adjust the depth of the case when
required to suit your cell phone or
navigation device, by removing the
individual inserts until it sits securely
and tightly in the case.
Care and storage
Always store the article in a clean, dry
place at room temperature.
Never clean with abrasive cleaning
materials, only wipe clean with a dry
cleaning cloth.
Disposal
Please dispose of the product and packaging in an environmentally friendly
manner, separating different materials
for recycling as required!
Dispose of this item through an authorised disposal company or through your
local waste disposal facilities - ask
your local authority for information if
further guidance is required.
Ensure that you comply with all regulations currently in force.
IAN: 88689
Service Great Britain
Tel.: 0871 5000 720
(£ 0.10/Min.)
E-Mail: deltasport@lidl.co.uk
You can also find spare parts for your
product at: www.delta-sport.com, category
Service - Lidl Spare Parts Service - Ersatzteilservice Lidl
Herzlichen Glückwunsch!
Mit Ihrem Kauf haben Sie sich
für ein hochwertiges Produkt entschieden. Machen Sie sich vor der Montage und der ersten Inbetriebnahme mit
dem Produkt vertraut. Lesen Sie hierzu
aufmerksam die nachfolgende Montageanleitung und die Sicherheitshinweise. Benutzen Sie das Produkt nur wie
beschrieben und für die angegebenen
Einsatzbereiche. Bewahren Sie diese
Anleitung gut auf. Händigen Sie alle
Unterlagen bei Weitergabe des Produkts an Dritte ebenfalls mit aus.
Lieferumfang/
Teilebezeichnung
(1) 1 x Tasche
(2) 1 x Adapter
(3) 1 x Befestigungsplatte
(4) 1 x Schraube
(5) 1 x Kappe
(6) 2 x Adaptereinlage
(7) 6 x Tascheneinlage
(8) Einhängstange
(9) Einhängstufen
1 x Montageanleitung
Bestimmungsgemäße
Verwendung
Dieser Artikel ist als Aufbewahrungstasche für Mobiltelefone und Navigationsgeräte am Fahrrad für den privaten
Gebrauch entwickelt worden.
Er ist nicht geeignet für die Anbringung
an Motorrädern, Motorrollern und
ähnlichen Fahrzeugen.
Technische Daten
Passend für Lenkerstangen von
ca. 16,5 – 35 mm Durchmesser
Für Mobiltelefone und Navigationsgeräte bis zu einer Größe von
130 x 80 mm
Spritzwassergeschützt
Sicherheitshinweise
• Die Verwendung eines Telefons
beim Fahrrad fahren beeinträchtigt
die Aufmerksamkeit und ist unter sagt. Fahren Sie an den Straßen rand und stellen Sie Ihr Fahrrad ab,
bevor Sie einen Anruf annehmen
oder tätigen.
• Die Verwendung von Kopfhörern
beeinträchtigt die Aufmerksamkeit
und ist in einigen Ländern verboten.
Informieren Sie sich über Gesetze
und Vorschriften in den Ländern,
in denen Sie Ihr Fahrrad verwen den und halten Sie sich immer an
die jeweiligen Vorschriften.
• Der Inverkehrbringer haftet nicht
für eventuelle Schäden an Tele fonen oder Navigationsgeräten,
die durch die Verwendung des
Artikels entstanden sind.
GB
• Prüfen Sie den Artikel vor jedem
Gebrauch auf Beschädigungen
oder Abnutzungen.
Kontrollieren Sie vor jeder Verwen dung den festen Sitz aller Schraub
verbindungen und ziehen Sie
lockere Schraubverbindungen ge gebenenfalls nach. Der Artikel darf
nur in einwandfreiem Zustand ver wendet werden!
• Die Anbringung des Artikels darf
die Funktionalität des Fahrrads
nicht beeinträchtigen. Es dürfen
keine Reflektoren oder Leuchten
verdeckt werden. Es dürfen keine
Bowdenzüge abgeknickt oder
eingeklemmt werden.
• Führen Sie die Montage und De montage des Artikels immer durch,
ohne dass sich ein Telefon oder
Navigationsgerät in der Tasche
befindet. Dieses könnte ansonsten
beschädigt werden.
Montage
1. Adaptereinlagen
Der Adapter (2) kann mit beiden Einlagen (6), einer oder keiner Einlage
verwendet werden. Zusätzlich kann
die Hälfte des Adapters mit Einhängestange (8) in drei verschiedene
Einhängstufen (9)der anderen Adapterhälfte platziert werden.
Wählen Sie entsprechend des Durchmessers und der Form Ihrer Lenkerstange aus, ob bzw. wie viele Einlagen Sie
benötigen sowie auf welche Einhängstufe Sie die Einhängtstange positionieren (Abb. A).
Achten Sie in jedem Fall darauf,
dass der Adapter fest an der
Lenkerstange montiert ist.
2. Adapter an Lenkerstange
montieren
Ziehen Sie die Kappe (5) von der
Schraube (4).
Lockern Sie die Schraube am Adapter
und legen Sie beide Adapterhälften
(ggf. mit Adaptereinlagen) um die
Lenkerstange (Abb. B).
Fixieren Sie die Schraube anschließend und stecken die Kappe wieder
auf.
3. Tasche mit Adapter
verbinden
Kontrollieren Sie die Ausrichtung der
Tasche und der Befestigungsplatte
und üben Sie dann ausreichend Druck
möglichst nahe bzw. auf die Halterung
der Tasche nach unten aus, bis diese
deutlich hörbar einrastet (Abb. C).
Hinweis: Da zum Einrasten und
zum Demontieren (Tasche nach
oben ziehen) ein etwas stärker
Druck notwendig ist, halten Sie
die Befestigungsplatte ggf. mit
einer Hand unterstützend fest.
4. Winkel einstellen
Um den Winkel der Tasche individuell
anzupassen, lösen Sie die Fixierschraube und stellen die gewünschte
Position ein (Abb. D).
Ziehen Sie die Schraube anschließend
wieder fest.
5. Tasche abnehmen
Schieben Sie die Tasche von der
Befestigungsplatte und ziehen sie vom
Adapter ab.
6. Tascheneinlagen
Die Tasche ist mit sechs Einlagen (7)
ausgestattet. Passen Sie die Taschentiefe gegebenenfalls durch Entnahme
einzelner Einlagen an Ihr Mobiltelefon
oder Navigationsgerät an, bis es
sicher und fest in der Tasche liegt.
Pflege, Lagerung
Den Artikel immer trocken und sauber
in einem temperierten Raum lagern.
GBGBGBGB DE/AT/CH DE/AT/CHDE/AT/CH
Nie mit scharfen Pflegemitteln reinigen,
nur mit einem trockenen Reinigungstuch sauber wischen.
Hinweise zur
Entsorgung
Verpackung und Artikel bitte umweltgerecht und sortenrein entsorgen!
Entsorgen Sie den Artikel über einen
zugelassenen Entsorgungsbetrieb
oder über Ihre kommunale Gemeindeverwaltung. Beachten Sie die aktuell
geltenden Vorschriften.
IAN: 88689
Service Deutschland
Tel.: 0800-5435111
E-Mail: deltasport@lidl.de
Service Österreich
Tel.: 0820 201 222
(0,15 EUR/Min.)
E-Mail: deltasport@lidl.at
Service Schweiz
Tel.: 0842 665566
(0,08 CHF/Min.,
Mobilfunk max.
0,40 CHF/Min.)
E-Mail: deltasport@lidl.ch
Ersatzteile zu Ihrem Produkt finden Sie auch
unter: www.delta-sport.com, Rubrik Service
- Ersatzteilservice Lidl
DE/AT/CH
DE/AT/CH DE/AT/CHDE/AT/CH DE/AT/CH
DE/AT/CH
 Loading...