

Page 1
RUBBER DINGHY
Instructions for use – 6 - 13
Łódka ponton – Instrukcja obsługi – 14 - 21
Felfújható csónak – Használati útmutató – 22 - 29
Gumijasti čoln – Navodilo za uporabo – 30 - 38
Nafukovací člun – Návod k obsluze – 39 - 46
Nafukovací čln – Návod na obsluhu – 47 - 54
Badeboot – Bedienungsanleitung – 55 - 62
Conforms with ISO 6185-1, Category I, Design Category D
Odpowiada ISO 6185-1, Kategoria I, Kategoria projektu D
ISO 6185-1 szabvány, I. kategória, D tervezési kategória
V skladu z ISO 6185-1, kategorija I, kategorija namembnosti D
Odpovídá normě ISO 6185-1, kategorie I, kategorie návrhu D
Zodpovedá norme ISO 6185-1, kategória I, návrhová kategória D
Entspricht der ISO 6185-1, Kategorie I, Entwurfskategorie D
Page 2

Contents
Parts Overview . . . . . . . . . . . . . . . . . . . . . . . . . . . . . . . . . . . . . . . . . . . . . . . . . . . . . . . . . . . . . . . . . . . . . 6
Technical Data / Symbols Used . . . . . . . . . . . . . . . . . . . . . . . . . . . . . . . . . . . . . . . . . . . . . . . . . . . . . . . 7
Parts Overview / Contents . . . . . . . . . . . . . . . . . . . . . . . . . . . . . . . . . . . . . . . . . . . . . . . . . . . . . . . . . . . . 7
Intended Use . . . . . . . . . . . . . . . . . . . . . . . . . . . . . . . . . . . . . . . . . . . . . . . . . . . . . . . . . . . . . . . . . . . . . . 7
Code of Conduct / Safety Notice . . . . . . . . . . . . . . . . . . . . . . . . . . . . . . . . . . . . . . . . . . . . . . . . . . . . . . 8
Danger of Injury . . . . . . . . . . . . . . . . . . . . . . . . . . . . . . . . . . . . . . . . . . . . . . . . . . . . . . . . . . . . . . . . . 8
Minimising Damage . . . . . . . . . . . . . . . . . . . . . . . . . . . . . . . . . . . . . . . . . . . . . . . . . . . . . . . . . . . . . . 9
Assembly . . . . . . . . . . . . . . . . . . . . . . . . . . . . . . . . . . . . . . . . . . . . . . . . . . . . . . . . . . . . . . . . . . . . . . . . . 9
Assembly of the paddles . . . . . . . . . . . . . . . . . . . . . . . . . . . . . . . . . . . . . . . . . . . . . . . . . . . . . . . . . . . . 10
Assembling the Screw Valve . . . . . . . . . . . . . . . . . . . . . . . . . . . . . . . . . . . . . . . . . . . . . . . . . . . . . . . . . 10
Inflating . . . . . . . . . . . . . . . . . . . . . . . . . . . . . . . . . . . . . . . . . . . . . . . . . . . . . . . . . . . . . . . . . . . . . . . . . 10
Inflation Sequence . . . . . . . . . . . . . . . . . . . . . . . . . . . . . . . . . . . . . . . . . . . . . . . . . . . . . . . . . . . . . . 10
Monitoring the Operating Pressure . . . . . . . . . . . . . . . . . . . . . . . . . . . . . . . . . . . . . . . . . . . . . . . . . 11
Measuring Strips and Monitoring Ruler . . . . . . . . . . . . . . . . . . . . . . . . . . . . . . . . . . . . . . . . . . . . . . 11
Inflating the Air Chambers . . . . . . . . . . . . . . . . . . . . . . . . . . . . . . . . . . . . . . . . . . . . . . . . . . . . . . . . 11
Cords . . . . . . . . . . . . . . . . . . . . . . . . . . . . . . . . . . . . . . . . . . . . . . . . . . . . . . . . . . . . . . . . . . . . . . . . . . . 11
Dismantling the bathing boat . . . . . . . . . . . . . . . . . . . . . . . . . . . . . . . . . . . . . . . . . . . . . . . . . . . . . . . . . 12
Kit bag . . . . . . . . . . . . . . . . . . . . . . . . . . . . . . . . . . . . . . . . . . . . . . . . . . . . . . . . . . . . . . . . . . . . . . . . . . 12
Storage bag . . . . . . . . . . . . . . . . . . . . . . . . . . . . . . . . . . . . . . . . . . . . . . . . . . . . . . . . . . . . . . . . . . . . . . 12
Transport . . . . . . . . . . . . . . . . . . . . . . . . . . . . . . . . . . . . . . . . . . . . . . . . . . . . . . . . . . . . . . . . . . . . . . . . 12
Care / Maintenance / Storage . . . . . . . . . . . . . . . . . . . . . . . . . . . . . . . . . . . . . . . . . . . . . . . . . . . . . . . 12
Repairs . . . . . . . . . . . . . . . . . . . . . . . . . . . . . . . . . . . . . . . . . . . . . . . . . . . . . . . . . . . . . . . . . . . . . . . . . . 13
Disposal . . . . . . . . . . . . . . . . . . . . . . . . . . . . . . . . . . . . . . . . . . . . . . . . . . . . . . . . . . . . . . . . . . . . . . . . . 13
3 Years Warranty . . . . . . . . . . . . . . . . . . . . . . . . . . . . . . . . . . . . . . . . . . . . . . . . . . . . . . . . . . . . . . . . . . 13
Instrukcja obsługi
Przegląd części . . . . . . . . . . . . . . . . . . . . . . . . . . . . . . . . . . . . . . . . . . . . . . . . . . . . . . . . . . . . . . . . . . . 14
Dane techniczne / użyte symbole . . . . . . . . . . . . . . . . . . . . . . . . . . . . . . . . . . . . . . . . . . . . . . . . . . . . . 15
Opis elementów / zawartość . . . . . . . . . . . . . . . . . . . . . . . . . . . . . . . . . . . . . . . . . . . . . . . . . . . . . . . . 15
Zastosowanie zgodne z przeznaczeniem . . . . . . . . . . . . . . . . . . . . . . . . . . . . . . . . . . . . . . . . . . . . . . . 15
Zasady postępowania / wskazówki bezpieczeństwa . . . . . . . . . . . . . . . . . . . . . . . . . . . . . . . . . . . . . 16
Niebezpieczeństwo urazu . . . . . . . . . . . . . . . . . . . . . . . . . . . . . . . . . . . . . . . . . . . . . . . . . . . . . . . . 16
Unikanie szkód . . . . . . . . . . . . . . . . . . . . . . . . . . . . . . . . . . . . . . . . . . . . . . . . . . . . . . . . . . . . . . . . . 17
Montaż . . . . . . . . . . . . . . . . . . . . . . . . . . . . . . . . . . . . . . . . . . . . . . . . . . . . . . . . . . . . . . . . . . . . . . . . . . 17
Montaż wioseł . . . . . . . . . . . . . . . . . . . . . . . . . . . . . . . . . . . . . . . . . . . . . . . . . . . . . . . . . . . . . . . . . . . . 18
Montaż zaworu . . . . . . . . . . . . . . . . . . . . . . . . . . . . . . . . . . . . . . . . . . . . . . . . . . . . . . . . . . . . . . . . . . . 18
Nadmuchiwanie . . . . . . . . . . . . . . . . . . . . . . . . . . . . . . . . . . . . . . . . . . . . . . . . . . . . . . . . . . . . . . . . . . . 18
Kolejność nadmuchiwania . . . . . . . . . . . . . . . . . . . . . . . . . . . . . . . . . . . . . . . . . . . . . . . . . . . . . . . . 18
Kontrola ciśnienia użytkowego . . . . . . . . . . . . . . . . . . . . . . . . . . . . . . . . . . . . . . . . . . . . . . . . . . . . . 19
Skala i linijka kontrolna . . . . . . . . . . . . . . . . . . . . . . . . . . . . . . . . . . . . . . . . . . . . . . . . . . . . . . . . . . 19
Napełnianie komór powietrznych . . . . . . . . . . . . . . . . . . . . . . . . . . . . . . . . . . . . . . . . . . . . . . . . . . 19
Sznurek . . . . . . . . . . . . . . . . . . . . . . . . . . . . . . . . . . . . . . . . . . . . . . . . . . . . . . . . . . . . . . . . . . . . . . . . . . 19
Składanie pontonu . . . . . . . . . . . . . . . . . . . . . . . . . . . . . . . . . . . . . . . . . . . . . . . . . . . . . . . . . . . . . . . . . 20
Worek marynarski . . . . . . . . . . . . . . . . . . . . . . . . . . . . . . . . . . . . . . . . . . . . . . . . . . . . . . . . . . . . . . . . . 20
Torba do przechowywania . . . . . . . . . . . . . . . . . . . . . . . . . . . . . . . . . . . . . . . . . . . . . . . . . . . . . . . . . . 20
Transport . . . . . . . . . . . . . . . . . . . . . . . . . . . . . . . . . . . . . . . . . . . . . . . . . . . . . . . . . . . . . . . . . . . . . . . . 20
Pielęgnacja / konserwacja / przechowywanie . . . . . . . . . . . . . . . . . . . . . . . . . . . . . . . . . . . . . . . . . . 20
Naprawy . . . . . . . . . . . . . . . . . . . . . . . . . . . . . . . . . . . . . . . . . . . . . . . . . . . . . . . . . . . . . . . . . . . . . . . . 21
Uwagi odnośnie recyklingu . . . . . . . . . . . . . . . . . . . . . . . . . . . . . . . . . . . . . . . . . . . . . . . . . . . . . . . . . . 21
3 lata gwarancji . . . . . . . . . . . . . . . . . . . . . . . . . . . . . . . . . . . . . . . . . . . . . . . . . . . . . . . . . . . . . . . . . . . 21
2
Page 3

Tartalomjegyzék
Alkotórészek áttekintése . . . . . . . . . . . . . . . . . . . . . . . . . . . . . . . . . . . . . . . . . . . . . . . . . . . . . . . . . . . . . 22
Műszaki adatok / alkalmazott jelölések . . . . . . . . . . . . . . . . . . . . . . . . . . . . . . . . . . . . . . . . . . . . . . . . 23
Alkotórészek megnevezése / a csomag tartalma . . . . . . . . . . . . . . . . . . . . . . . . . . . . . . . . . . . . . . . . . 23
Rendeltetésszerű használat . . . . . . . . . . . . . . . . . . . . . . . . . . . . . . . . . . . . . . . . . . . . . . . . . . . . . . . . . . 23
Viselkedési szabályok / biztonsági utasítások . . . . . . . . . . . . . . . . . . . . . . . . . . . . . . . . . . . . . . . . . . . 24
Sérülésveszély . . . . . . . . . . . . . . . . . . . . . . . . . . . . . . . . . . . . . . . . . . . . . . . . . . . . . . . . . . . . . . . . . . 24
Sérülések elkerülése . . . . . . . . . . . . . . . . . . . . . . . . . . . . . . . . . . . . . . . . . . . . . . . . . . . . . . . . . . . . . 25
Összeszerelés . . . . . . . . . . . . . . . . . . . . . . . . . . . . . . . . . . . . . . . . . . . . . . . . . . . . . . . . . . . . . . . . . . . . 25
Az evezők felszerelése . . . . . . . . . . . . . . . . . . . . . . . . . . . . . . . . . . . . . . . . . . . . . . . . . . . . . . . . . . . . . 26
A csavarszelep összeszerelése . . . . . . . . . . . . . . . . . . . . . . . . . . . . . . . . . . . . . . . . . . . . . . . . . . . . . . . 26
Felpumpálás . . . . . . . . . . . . . . . . . . . . . . . . . . . . . . . . . . . . . . . . . . . . . . . . . . . . . . . . . . . . . . . . . . . . . . 26
A felpumpálás sorrendje . . . . . . . . . . . . . . . . . . . . . . . . . . . . . . . . . . . . . . . . . . . . . . . . . . . . . . . . . 26
Az üzemi nyomás ellenőrzése . . . . . . . . . . . . . . . . . . . . . . . . . . . . . . . . . . . . . . . . . . . . . . . . . . . . . 27
Mérőcsíkok és kontroll-vonalzó . . . . . . . . . . . . . . . . . . . . . . . . . . . . . . . . . . . . . . . . . . . . . . . . . . . . 27
A légkamrák feltöltése . . . . . . . . . . . . . . . . . . . . . . . . . . . . . . . . . . . . . . . . . . . . . . . . . . . . . . . . . . . 27
Kötél . . . . . . . . . . . . . . . . . . . . . . . . . . . . . . . . . . . . . . . . . . . . . . . . . . . . . . . . . . . . . . . . . . . . . . . . . . . . 27
A csónak leeresztése . . . . . . . . . . . . . . . . . . . . . . . . . . . . . . . . . . . . . . . . . . . . . . . . . . . . . . . . . . . . . . . 28
Tengerészzsák . . . . . . . . . . . . . . . . . . . . . . . . . . . . . . . . . . . . . . . . . . . . . . . . . . . . . . . . . . . . . . . . . . . . 28
Tároló táska . . . . . . . . . . . . . . . . . . . . . . . . . . . . . . . . . . . . . . . . . . . . . . . . . . . . . . . . . . . . . . . . . . . . . . 28
Szállítás . . . . . . . . . . . . . . . . . . . . . . . . . . . . . . . . . . . . . . . . . . . . . . . . . . . . . . . . . . . . . . . . . . . . . . . . . 28
Ápolás / karbantartás / tárolás . . . . . . . . . . . . . . . . . . . . . . . . . . . . . . . . . . . . . . . . . . . . . . . . . . . . . . 28
Javítások . . . . . . . . . . . . . . . . . . . . . . . . . . . . . . . . . . . . . . . . . . . . . . . . . . . . . . . . . . . . . . . . . . . . . . . . . 29
Tudnivalók a hulladékkezeléshez . . . . . . . . . . . . . . . . . . . . . . . . . . . . . . . . . . . . . . . . . . . . . . . . . . . . . 29
3 év garancia . . . . . . . . . . . . . . . . . . . . . . . . . . . . . . . . . . . . . . . . . . . . . . . . . . . . . . . . . . . . . . . . . . . . . 29
Kazalo
Pregled delov . . . . . . . . . . . . . . . . . . . . . . . . . . . . . . . . . . . . . . . . . . . . . . . . . . . . . . . . . . . . . . . . . . . . . 30
Tehnični podatki / Uporabljeni simboli . . . . . . . . . . . . . . . . . . . . . . . . . . . . . . . . . . . . . . . . . . . . . . . . . 31
Oznaka delov /obseg dobave . . . . . . . . . . . . . . . . . . . . . . . . . . . . . . . . . . . . . . . . . . . . . . . . . . . . . . . 31
Predvidena uporaba . . . . . . . . . . . . . . . . . . . . . . . . . . . . . . . . . . . . . . . . . . . . . . . . . . . . . . . . . . . . . . . 31
Pravila obnašanja / varnostni napotki . . . . . . . . . . . . . . . . . . . . . . . . . . . . . . . . . . . . . . . . . . . . . . . . . 32
Nevarnost poškodbe . . . . . . . . . . . . . . . . . . . . . . . . . . . . . . . . . . . . . . . . . . . . . . . . . . . . . . . . . . . . 32
Preprečevanje nastanka materialne škode . . . . . . . . . . . . . . . . . . . . . . . . . . . . . . . . . . . . . . . . . . . . 33
Sestavitev . . . . . . . . . . . . . . . . . . . . . . . . . . . . . . . . . . . . . . . . . . . . . . . . . . . . . . . . . . . . . . . . . . . . . . . . 33
Montaža vesel . . . . . . . . . . . . . . . . . . . . . . . . . . . . . . . . . . . . . . . . . . . . . . . . . . . . . . . . . . . . . . . . . . . . 34
Montaža vijačnih ventilov . . . . . . . . . . . . . . . . . . . . . . . . . . . . . . . . . . . . . . . . . . . . . . . . . . . . . . . . . . . 34
Napihovanje . . . . . . . . . . . . . . . . . . . . . . . . . . . . . . . . . . . . . . . . . . . . . . . . . . . . . . . . . . . . . . . . . . . . . 34
Vrstni red polnjenja . . . . . . . . . . . . . . . . . . . . . . . . . . . . . . . . . . . . . . . . . . . . . . . . . . . . . . . . . . . . . 34
Kontrola pritiska . . . . . . . . . . . . . . . . . . . . . . . . . . . . . . . . . . . . . . . . . . . . . . . . . . . . . . . . . . . . . . . . 35
Merilni trak in kontrolno ravnilo . . . . . . . . . . . . . . . . . . . . . . . . . . . . . . . . . . . . . . . . . . . . . . . . . . . 35
Polnjenje zračnih prekatov . . . . . . . . . . . . . . . . . . . . . . . . . . . . . . . . . . . . . . . . . . . . . . . . . . . . . . . . 35
Vrvica . . . . . . . . . . . . . . . . . . . . . . . . . . . . . . . . . . . . . . . . . . . . . . . . . . . . . . . . . . . . . . . . . . . . . . . . . . . 35
Razstavitev kopalnega čolna . . . . . . . . . . . . . . . . . . . . . . . . . . . . . . . . . . . . . . . . . . . . . . . . . . . . . . . . . 36
Mornarska vreča . . . . . . . . . . . . . . . . . . . . . . . . . . . . . . . . . . . . . . . . . . . . . . . . . . . . . . . . . . . . . . . . . . 36
Torba za shranjevanje . . . . . . . . . . . . . . . . . . . . . . . . . . . . . . . . . . . . . . . . . . . . . . . . . . . . . . . . . . . . . . 36
Transport . . . . . . . . . . . . . . . . . . . . . . . . . . . . . . . . . . . . . . . . . . . . . . . . . . . . . . . . . . . . . . . . . . . . . . . . 36
Nega / vzdrževanje / skladiščenje . . . . . . . . . . . . . . . . . . . . . . . . . . . . . . . . . . . . . . . . . . . . . . . . . . . 36
Popravila . . . . . . . . . . . . . . . . . . . . . . . . . . . . . . . . . . . . . . . . . . . . . . . . . . . . . . . . . . . . . . . . . . . . . . . . 37
Napotki za odstranjevanje odpadkov . . . . . . . . . . . . . . . . . . . . . . . . . . . . . . . . . . . . . . . . . . . . . . . . . . 37
3 leta garancije . . . . . . . . . . . . . . . . . . . . . . . . . . . . . . . . . . . . . . . . . . . . . . . . . . . . . . . . . . . . . . . 37 - 38
3
Page 4

Obsah
Přehled dílů . . . . . . . . . . . . . . . . . . . . . . . . . . . . . . . . . . . . . . . . . . . . . . . . . . . . . . . . . . . . . . . . . . . . . . 39
Technické údaje / Použité symboly . . . . . . . . . . . . . . . . . . . . . . . . . . . . . . . . . . . . . . . . . . . . . . . . . . . . 40
Názvy dílů / Obsah dodávky . . . . . . . . . . . . . . . . . . . . . . . . . . . . . . . . . . . . . . . . . . . . . . . . . . . . . . . . 40
Použití k určenému účelu . . . . . . . . . . . . . . . . . . . . . . . . . . . . . . . . . . . . . . . . . . . . . . . . . . . . . . . . . . . . 40
Pravidla chování / Bezpečnostní upozornění . . . . . . . . . . . . . . . . . . . . . . . . . . . . . . . . . . . . . . . . . . . . 41
Nebezpečí zranění . . . . . . . . . . . . . . . . . . . . . . . . . . . . . . . . . . . . . . . . . . . . . . . . . . . . . . . . . . . . . . 41
Zabránění věcným škodám . . . . . . . . . . . . . . . . . . . . . . . . . . . . . . . . . . . . . . . . . . . . . . . . . . . . . . . 42
Sestavení . . . . . . . . . . . . . . . . . . . . . . . . . . . . . . . . . . . . . . . . . . . . . . . . . . . . . . . . . . . . . . . . . . . . . . . . 42
Montáž vesel . . . . . . . . . . . . . . . . . . . . . . . . . . . . . . . . . . . . . . . . . . . . . . . . . . . . . . . . . . . . . . . . . . . . . 43
Montáž šroubovacích ventilů . . . . . . . . . . . . . . . . . . . . . . . . . . . . . . . . . . . . . . . . . . . . . . . . . . . . . . . . . 43
Napumpování . . . . . . . . . . . . . . . . . . . . . . . . . . . . . . . . . . . . . . . . . . . . . . . . . . . . . . . . . . . . . . . . . . . . 43
Pořadí pumpování . . . . . . . . . . . . . . . . . . . . . . . . . . . . . . . . . . . . . . . . . . . . . . . . . . . . . . . . . . . . . . . 43
Kontrola provozního tlaku . . . . . . . . . . . . . . . . . . . . . . . . . . . . . . . . . . . . . . . . . . . . . . . . . . . . . . . . 44
Měřící proužek a kontrolní pravítko . . . . . . . . . . . . . . . . . . . . . . . . . . . . . . . . . . . . . . . . . . . . . . . . . . . . 44
Plnění vzduchových komor . . . . . . . . . . . . . . . . . . . . . . . . . . . . . . . . . . . . . . . . . . . . . . . . . . . . . . . . 44
Šňůra . . . . . . . . . . . . . . . . . . . . . . . . . . . . . . . . . . . . . . . . . . . . . . . . . . . . . . . . . . . . . . . . . . . . . . . . . . . 44
Složení člunu . . . . . . . . . . . . . . . . . . . . . . . . . . . . . . . . . . . . . . . . . . . . . . . . . . . . . . . . . . . . . . . . . . . . . 45
Lodní pytel . . . . . . . . . . . . . . . . . . . . . . . . . . . . . . . . . . . . . . . . . . . . . . . . . . . . . . . . . . . . . . . . . . . . . . . 45
Taška na uchovávání předmětů . . . . . . . . . . . . . . . . . . . . . . . . . . . . . . . . . . . . . . . . . . . . . . . . . . . . . . . 45
Přeprava . . . . . . . . . . . . . . . . . . . . . . . . . . . . . . . . . . . . . . . . . . . . . . . . . . . . . . . . . . . . . . . . . . . . . . . . . 45
Ošetřování / Údržba / Skladování . . . . . . . . . . . . . . . . . . . . . . . . . . . . . . . . . . . . . . . . . . . . . . . . . . . 45
Opravy . . . . . . . . . . . . . . . . . . . . . . . . . . . . . . . . . . . . . . . . . . . . . . . . . . . . . . . . . . . . . . . . . . . . . . . . . . 46
Pokyny pro odstranění do odpadu . . . . . . . . . . . . . . . . . . . . . . . . . . . . . . . . . . . . . . . . . . . . . . . . . . . . 46
3 roky záruka . . . . . . . . . . . . . . . . . . . . . . . . . . . . . . . . . . . . . . . . . . . . . . . . . . . . . . . . . . . . . . . . . . . . . 46
Obsah
Prehľad častí . . . . . . . . . . . . . . . . . . . . . . . . . . . . . . . . . . . . . . . . . . . . . . . . . . . . . . . . . . . . . . . . . . . . . 47
Technické údaje/použité symboly . . . . . . . . . . . . . . . . . . . . . . . . . . . . . . . . . . . . . . . . . . . . . . . . . . . . . 48
Označenie častí/obsah . . . . . . . . . . . . . . . . . . . . . . . . . . . . . . . . . . . . . . . . . . . . . . . . . . . . . . . . . . . . . 48
Použitie podľa predpisov . . . . . . . . . . . . . . . . . . . . . . . . . . . . . . . . . . . . . . . . . . . . . . . . . . . . . . . . . . . . 48
Pravidlá správania/bezpečnostné predpisy . . . . . . . . . . . . . . . . . . . . . . . . . . . . . . . . . . . . . . . . . . . . . 49
Nebezpečenstvo zranenia . . . . . . . . . . . . . . . . . . . . . . . . . . . . . . . . . . . . . . . . . . . . . . . . . . . . . . . . 49
Prevencia proti vzniku vecných škôd . . . . . . . . . . . . . . . . . . . . . . . . . . . . . . . . . . . . . . . . . . . . . . . . 50
Montáž . . . . . . . . . . . . . . . . . . . . . . . . . . . . . . . . . . . . . . . . . . . . . . . . . . . . . . . . . . . . . . . . . . . . . . . . . . 50
Montáž vesiel . . . . . . . . . . . . . . . . . . . . . . . . . . . . . . . . . . . . . . . . . . . . . . . . . . . . . . . . . . . . . . . . . . . . . 51
Montáž skrutkových ventilov . . . . . . . . . . . . . . . . . . . . . . . . . . . . . . . . . . . . . . . . . . . . . . . . . . . . . . . . . 51
Fúkanie . . . . . . . . . . . . . . . . . . . . . . . . . . . . . . . . . . . . . . . . . . . . . . . . . . . . . . . . . . . . . . . . . . . . . . . . . . 51
Poradie fúkania . . . . . . . . . . . . . . . . . . . . . . . . . . . . . . . . . . . . . . . . . . . . . . . . . . . . . . . . . . . . . . . . . 51
Kontrola prevádzkového tlaku . . . . . . . . . . . . . . . . . . . . . . . . . . . . . . . . . . . . . . . . . . . . . . . . . . . . . 52
Merný prúžok a kontrolné pravítko . . . . . . . . . . . . . . . . . . . . . . . . . . . . . . . . . . . . . . . . . . . . . . . . . 52
Plnenie vzduchových komôr . . . . . . . . . . . . . . . . . . . . . . . . . . . . . . . . . . . . . . . . . . . . . . . . . . . . . . . 52
Šnúra . . . . . . . . . . . . . . . . . . . . . . . . . . . . . . . . . . . . . . . . . . . . . . . . . . . . . . . . . . . . . . . . . . . . . . . . . . . 52
Demontáž člna . . . . . . . . . . . . . . . . . . . . . . . . . . . . . . . . . . . . . . . . . . . . . . . . . . . . . . . . . . . . . . . . . . . . 53
Námornícky vak . . . . . . . . . . . . . . . . . . . . . . . . . . . . . . . . . . . . . . . . . . . . . . . . . . . . . . . . . . . . . . . . . . . 53
Úschovná taška . . . . . . . . . . . . . . . . . . . . . . . . . . . . . . . . . . . . . . . . . . . . . . . . . . . . . . . . . . . . . . . . . . . 53
Transport . . . . . . . . . . . . . . . . . . . . . . . . . . . . . . . . . . . . . . . . . . . . . . . . . . . . . . . . . . . . . . . . . . . . . . . . 53
Ošetrovanie/údržba/skladovanie . . . . . . . . . . . . . . . . . . . . . . . . . . . . . . . . . . . . . . . . . . . . . . . . . . . . . 53
Opravy . . . . . . . . . . . . . . . . . . . . . . . . . . . . . . . . . . . . . . . . . . . . . . . . . . . . . . . . . . . . . . . . . . . . . . . . . . 54
Pokyny na likvidáciu . . . . . . . . . . . . . . . . . . . . . . . . . . . . . . . . . . . . . . . . . . . . . . . . . . . . . . . . . . . . . . . . 54
3 roky záruka . . . . . . . . . . . . . . . . . . . . . . . . . . . . . . . . . . . . . . . . . . . . . . . . . . . . . . . . . . . . . . . . . . . . . 54
4
Page 5

Inhaltsverzeichnis
Teileübersicht . . . . . . . . . . . . . . . . . . . . . . . . . . . . . . . . . . . . . . . . . . . . . . . . . . . . . . . . . . . . . . . . . . . . . 55
Technische Daten / Verwendete Symbole . . . . . . . . . . . . . . . . . . . . . . . . . . . . . . . . . . . . . . . . . . . . . . 56
Teilebezeichnung / Lieferumfang . . . . . . . . . . . . . . . . . . . . . . . . . . . . . . . . . . . . . . . . . . . . . . . . . . . . . 56
Bestimmungsgemäße Verwendung . . . . . . . . . . . . . . . . . . . . . . . . . . . . . . . . . . . . . . . . . . . . . . . . . . . . 56
Verhaltensregeln / Sicherheitshinweise . . . . . . . . . . . . . . . . . . . . . . . . . . . . . . . . . . . . . . . . . . . . . . . . . 57
Verletzungsgefahr . . . . . . . . . . . . . . . . . . . . . . . . . . . . . . . . . . . . . . . . . . . . . . . . . . . . . . . . . . . . . . . 57
Vermeidung von Sachschäden . . . . . . . . . . . . . . . . . . . . . . . . . . . . . . . . . . . . . . . . . . . . . . . . . . . . . 58
Aufbau . . . . . . . . . . . . . . . . . . . . . . . . . . . . . . . . . . . . . . . . . . . . . . . . . . . . . . . . . . . . . . . . . . . . . . . . . . 58
Montage der Ruder . . . . . . . . . . . . . . . . . . . . . . . . . . . . . . . . . . . . . . . . . . . . . . . . . . . . . . . . . . . . . . . . 59
Montage der Schraubventile . . . . . . . . . . . . . . . . . . . . . . . . . . . . . . . . . . . . . . . . . . . . . . . . . . . . . . . . . 59
Aufpumpen . . . . . . . . . . . . . . . . . . . . . . . . . . . . . . . . . . . . . . . . . . . . . . . . . . . . . . . . . . . . . . . . . . . . . . . 59
Reihenfolge des Aufpumpens . . . . . . . . . . . . . . . . . . . . . . . . . . . . . . . . . . . . . . . . . . . . . . . . . . . . . . 59
Kontrolle des Betriebsdrucks . . . . . . . . . . . . . . . . . . . . . . . . . . . . . . . . . . . . . . . . . . . . . . . . . . . . . . . 60
Messstreifen und Kontroll-Lineal . . . . . . . . . . . . . . . . . . . . . . . . . . . . . . . . . . . . . . . . . . . . . . . . . . . . 60
Befüllen der Luftkammern . . . . . . . . . . . . . . . . . . . . . . . . . . . . . . . . . . . . . . . . . . . . . . . . . . . . . . . . . 60
Kordel . . . . . . . . . . . . . . . . . . . . . . . . . . . . . . . . . . . . . . . . . . . . . . . . . . . . . . . . . . . . . . . . . . . . . . . . . . . 60
Abbau des Badeboots . . . . . . . . . . . . . . . . . . . . . . . . . . . . . . . . . . . . . . . . . . . . . . . . . . . . . . . . . . . . . . 61
Seesack . . . . . . . . . . . . . . . . . . . . . . . . . . . . . . . . . . . . . . . . . . . . . . . . . . . . . . . . . . . . . . . . . . . . . . . . . 61
Aufbewahrungstasche . . . . . . . . . . . . . . . . . . . . . . . . . . . . . . . . . . . . . . . . . . . . . . . . . . . . . . . . . . . . . . 61
Transport . . . . . . . . . . . . . . . . . . . . . . . . . . . . . . . . . . . . . . . . . . . . . . . . . . . . . . . . . . . . . . . . . . . . . . . . 61
Pflege / Wartung / Lagerung . . . . . . . . . . . . . . . . . . . . . . . . . . . . . . . . . . . . . . . . . . . . . . . . . . . . . . . . 61
Reparaturen . . . . . . . . . . . . . . . . . . . . . . . . . . . . . . . . . . . . . . . . . . . . . . . . . . . . . . . . . . . . . . . . . . . . . . 62
Hinweis zur Entsorgung . . . . . . . . . . . . . . . . . . . . . . . . . . . . . . . . . . . . . . . . . . . . . . . . . . . . . . . . . . . . . 62
3 Jahre Garantie . . . . . . . . . . . . . . . . . . . . . . . . . . . . . . . . . . . . . . . . . . . . . . . . . . . . . . . . . . . . . . . . . . 62
5
Page 6
INSHORE 290
PARTS OVERVIEW INSHORE 290
Push button
01
0
Instructions
6
Page 7
INSHORE 290
Please read these instructions thoroughly before construction and use of the article and retain
for future reference! It contains important information regarding the product, its construction,
the company and care of, as well as safety instructions. Because water sports always have a
certain risk involved, exact knowledge about the product could prevent possible personal injury or even
death.
Technical Data / Symbols Used
Maximum number of persons: ........... 2 adults / 2 children
Maximum load: ........................................ 260 kg (573,30 lbs.)
Maximum air pressure: ........................................... 0,04 bar (0,58 psi)
Length: ............................................................................................ approx. 272 cm
Width: ........................................................................................... approx. 141,5 cm
Height: ............................................................................................... approx. 62 cm
Weight: .................................................................................................. approx. 6kg
Parts Overview / Contents
.............. Safety chamber with screw-on-valve
.............. Garret with plug-valve
.............. Flotation chamber with screw-on-valve
.............. Screw-on-valve (2 x)
.............. Paddle locks (4 x)
.............. Handle (1 x)
.............. Eyelets for Cords (9 x)
.............. Cords (2 x) ( 1 x 600 cm / 1 x 200 cm )
.................................... Paddles (2 x)
................................... Drip-ring (2 x)
................................... Sea-sack (1 x)
............................ Storage bag (1 x)
................................ Repair set (1 x)
............................. Control-ruler (1 x)
........................... Venting pipes (2 x)
............................... Instructions (1 x)
Intended Use
This article was developed for private use.
Design category D “sheltered waters”: designed for use in protected, near coastal waters.
Designed for voyages on sheltered coastal waters, small bays, small lakes, rivers and canals where
conditions up to, and including, wind force 4 and significant wave heights up to, and including, 0.3m
may be experienced, with occasional waves of 0.5m maximum height, for example from passing
vessels.
7
Page 8
INSHORE 290
Code of Conduct / Safety Notice
The bathing boat is a tested and safe water sports device. However, we strongly request that you adhere
to the following rules and regulations:
WARNING!
Your prudence and self-assessment when on water is highly important. Never overe-
stimate your strength and steering abilities! Always keep close to shores! Take note
of the weather situation, storm warnings or possible light signals!
WARNING!
Please always adhere to the safety regulations and valid legal provisions for lakes
and open waters. For your own safety, always wear a certified life vest.
WARNING!
Danger of suffocation for children! Do not let children play with the packaging material or the item itself unsupervised.
WARNING!
Should a person have fallen over board, the re-entry into the boat must take place
via the bow or the stern as the risk of capsizing when re-entering on the side (entering from the side) is very high.
Risk of injury!
Caution with offshore winds!
Caution with offshore currents!
• Ensure that persons and cargo are always evenly distributed in the boat; otherwise
there is a risk of capsizing.
• Take note of the information on the type plate, the admissible load capacity and number of persons
as well as the warning notice.
• Always adhere to the public shipping regulations.
• Do not carry any sharp or pointy items with you.
• The bathing boat should be protected from contact with precarious liquids or acids. Irreparable
damages may occur if not adhered to.
• Protect the bathing boat from heat and fire! Take caution with lit cigarettes!
• Take caution not to get in contact with rocky underground surfaces to avoid damaging the boats hull.
• Do not under any circumstances leave the bathing boat if damages to one of the three inner
chambers occur while on water. The buoyant force of the four intact inner chambers is sufficient to
keep the bathing boat afloat.
• Do not under any circumstances transport the bathing boat in an inflated condition on a vehicle.
• Never leave your bathing boat unoccupied on waters. It will drift off faster than it can be reached
through swimming.
• Before use always make sure to take the paddles with you, as otherwise you will not be able to
manoeuvre the bathing boat adequately.
• Do not undertake any technical changes to your bathing boat. Changes of all kinds endanger the
driving characteristics of the sports device.
8
Page 9

INSHORE 290
• Never use your bathing boat under the influence of alcohol, drugs or medication.
• Never overestimate your strengths and always distribute your muscle strength when paddling in such
away, that the distance travelled can be effortlessly paddled back again. Stay within 300m of
sheltered shore zones and take note of changing wind and current conditions that can greatly impede
forward motion.
Avoiding property damage!
• All inflatable items are cold-sensitive. Therefore never unfold or inflate the item under temperatures of
15° C!
• Should the air pressure increase in direct sunlight, then it must be counterbalanced by letting air out.
• Ensure that the item – especially whilst in an inflated condition – does not come into contact with
stones, gravel or pointy objects and that it does not get rubbed or grinded as otherwise damages
may occur on the foil.
• Insert only suitable pump adapters into the safety valves. Otherwise the valves may get damaged.
• Do not over-inflate as otherwise there is a risk that the welded joints may tear. Seal the valves
thoroughly after inflation.
• Avoid contact with sharp, hot, pointy or dangerous objects.
Assembly
Due to the size of the item, the assembly should always be carried out by two
adults. Please adhere to the individual steps of assembly in the stipulated order.
This especially applies for the inflating of the three air chambers as otherwise
irregular pressure distribution may occur, which will lead to instability of the
bathing boat and can lead to impairments of its handling characteristics.
1. Choose a flat and clean surface with enough space to unpack and unfold the bathing boat.
Make sure that all parts are available and are in good order and condition.
2. Spread out the boat hull. Starting with the second assembly of the bathing boat, check for possible
damages, holes or tears and seal these as described below. Possible damages cannot be repaired
once you are on the water.
9
Page 10
INSHORE 290
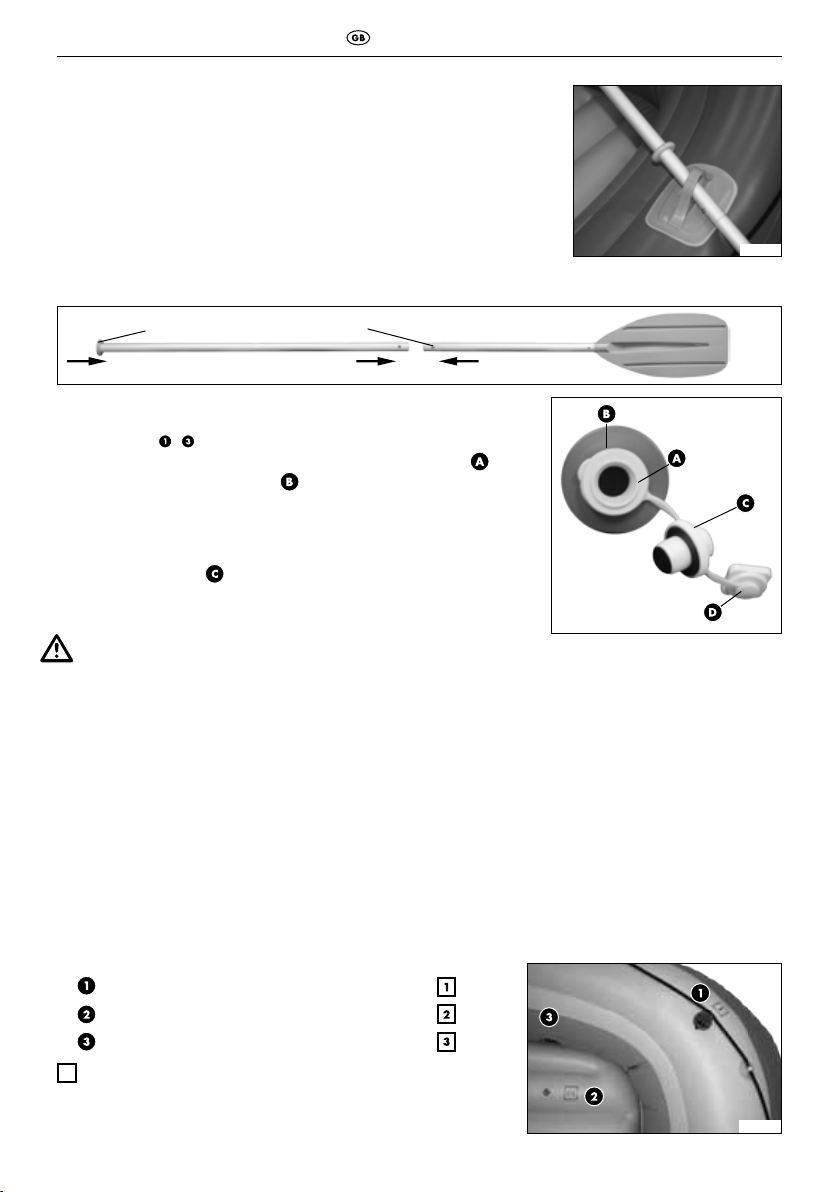
Assembly of the paddles (ill. 1, 2)
Important!
While using the boat on the water, the paddles must not
detach from the paddle-locks, but must be secured with
paddle-locks to avoid loosening!
• Connect the two paddle pipes whereby the press studs must audibly
and visibly snap in properly. Push the end of the pipe through the
paddle lock and secure the paddle by sliding on the drip-ring.
Repeat the procedure for the second paddle for the other side of the boat.
Drip ring
Push button
Assembling the Screw Valve:
The chambers / of the bathing boat are equipped with a threaded opening for the supplied screw-on-valves. Pull the sling
vent over the threaded opening
lie on the intended groove. This procedure requires a bit of tact and
patience, it must however be done diligently so that a later loosening
and subsequent opening of the valve is avoided.
Now screw the base
clockwise into the threaded opening.
in such a way that they securely
of the
ill. 1
ill. 2
Inflating
CAUTION!
• Adhere to the correct sequence when inflating the air chambers.
• The recommended operating pressure is 0.04 bar (= 40 mbar = 0.58 psi).
• Avoid over-inflating the air chambers as otherwise there is a risk that the welded joints may tear or be
overstretched.
• Make use of standard foot pumps or piston pumps with corresponding attachments and if necessary a
manometer.
• Do not make use of compressors or compressed air bottles for inflating the item.
This can cause damages to the item.
• Always inflate all air chambers completely!
ill. 3
Inflation Sequence (ill. 4)
Always check the air pressure after inflating an air chamber as described on page 11
“checking operating pressure”.
Inflate the air chambers in the following sequence:
Safety chamber with screw-on-valve
1.
2. Garret with plug-valve
3. Flotation chamber with screw-on-valve
= marking on boat
ill. 4
10
Page 11
Measuring tape
INSHORE 290
Monitoring the Operating Pressure
IMPORTANT!
The PVC material stretches after the first inflation of the item a bit further and will not
go back into its original state.
Please bear in mind that the information may vary slightly
depending on load and outside temperature.
Inflate the air chamber
in the material. The thumb should still sink in somewhat when pressing on
the relevant air chamber.
until it feels firm and until no wrinkles are visible
01
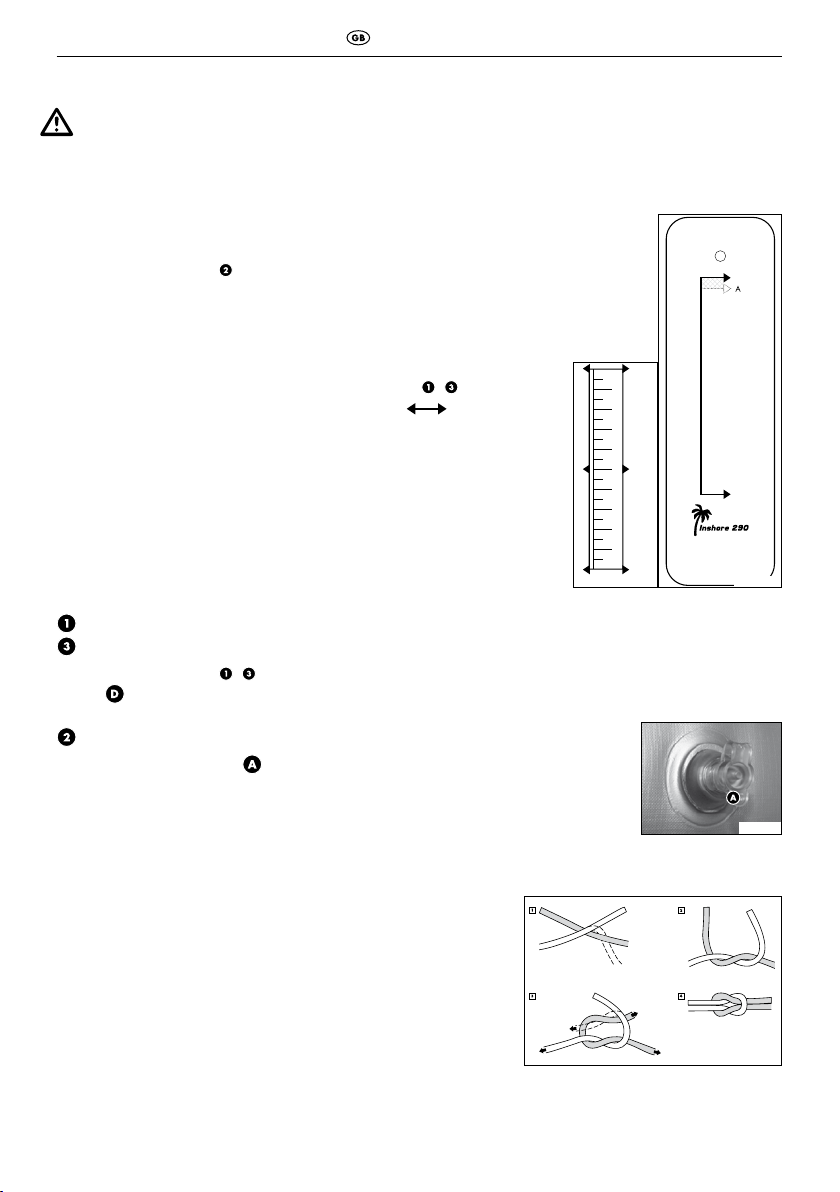
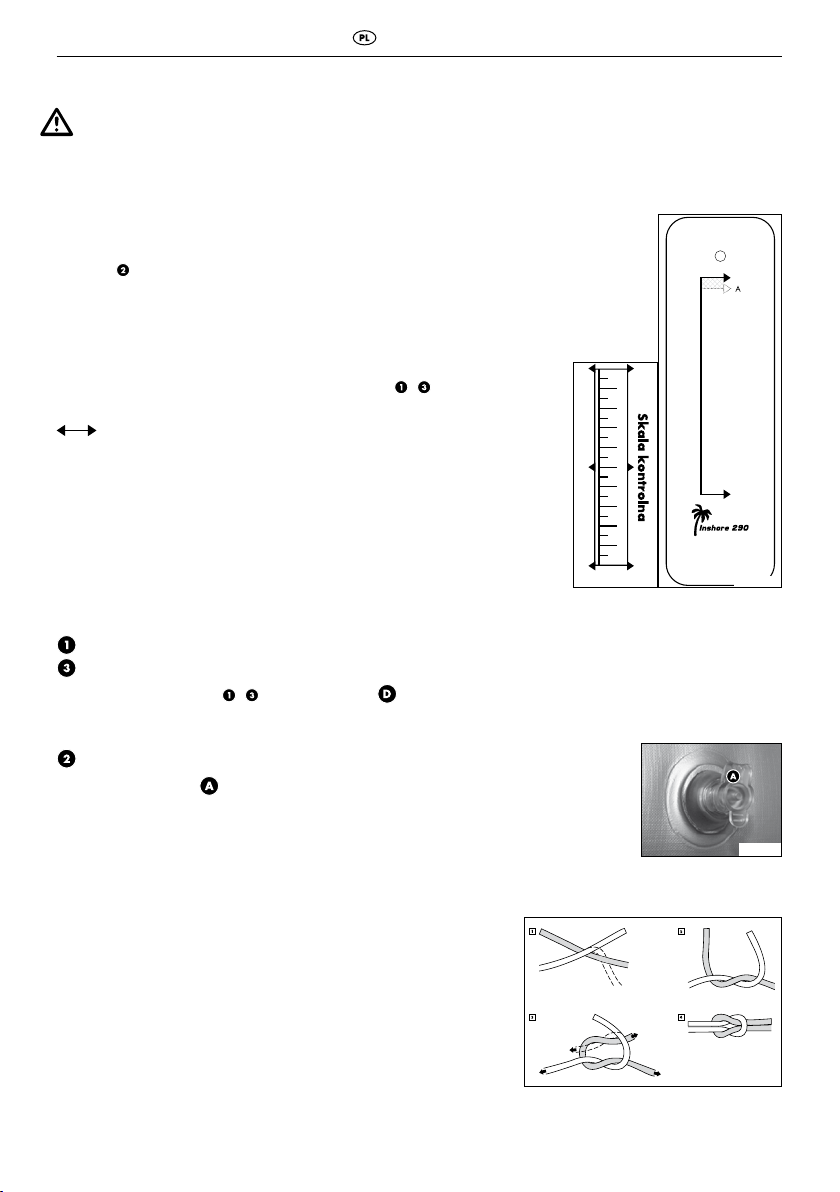
Measuring Strips and Monitoring Ruler (ill. 5a, b)
To check the operating pressure of the air chambers / ,
place the 0 of the control-ruler (ill. 5b) over the 0 of
the measuring strip (ill. 5a) on the item.
With the first and initial inflation, the maximum expansion of the
measuring strip may NOT exceed position A of the control-ruler.
After first use always inflate so far, that the 10 of the measuring strip
is between position A and position 10 of the control-ruler.
Inflating the Air Chambers (ill. 6)
Safety chamber with screw-on-valve
Flotation chamber with screw-on-valve
1. Inflate the chambers
/ with air and seal it with the
cap (ill. 3, page 10) in a clockwise direction.
Garret with plug-valve
1. Open the valve closure
.
2. Inflate the relevant air chambers.
3. Seal the valve closure and countersink the valve with a bit of pressure.
Cords
Affix the cords 600 cm to the eyelets of the boat.
Secure the cords with a reef knot (ill. 7).
01
9
8
7
6
5
4
3
2
1
0
ill. 5a
0
ill. 5b
ill. 6
ill. 7
11
Page 12
INSHORE 290
Dismantling the bathing boat
Deflating
Deflate the bathing boat as follows:
1. To deflate the garret pull out the plug-valve and slightly push the shaft together or use the venting
pipes .
2. To deflate the safety and flotation chamber / unscrew the screw-on-valve from the base
completely.
Kit bag
A duffle bag is delivered with the item in which the bathing boat can be transported and stored in.
Use the cord 200cm to close it.
In addition the duffle bag can be taken on board to protect provisions, cloths etc. from splashes of
water. Please take into consideration though that the item is not waterproof.
Therefore do not store sensitive objects such as cameras in it.
To make use of it on board it is recommended to remove the cords, to roll up the top end flat and to
close it up with the Velcro closure.
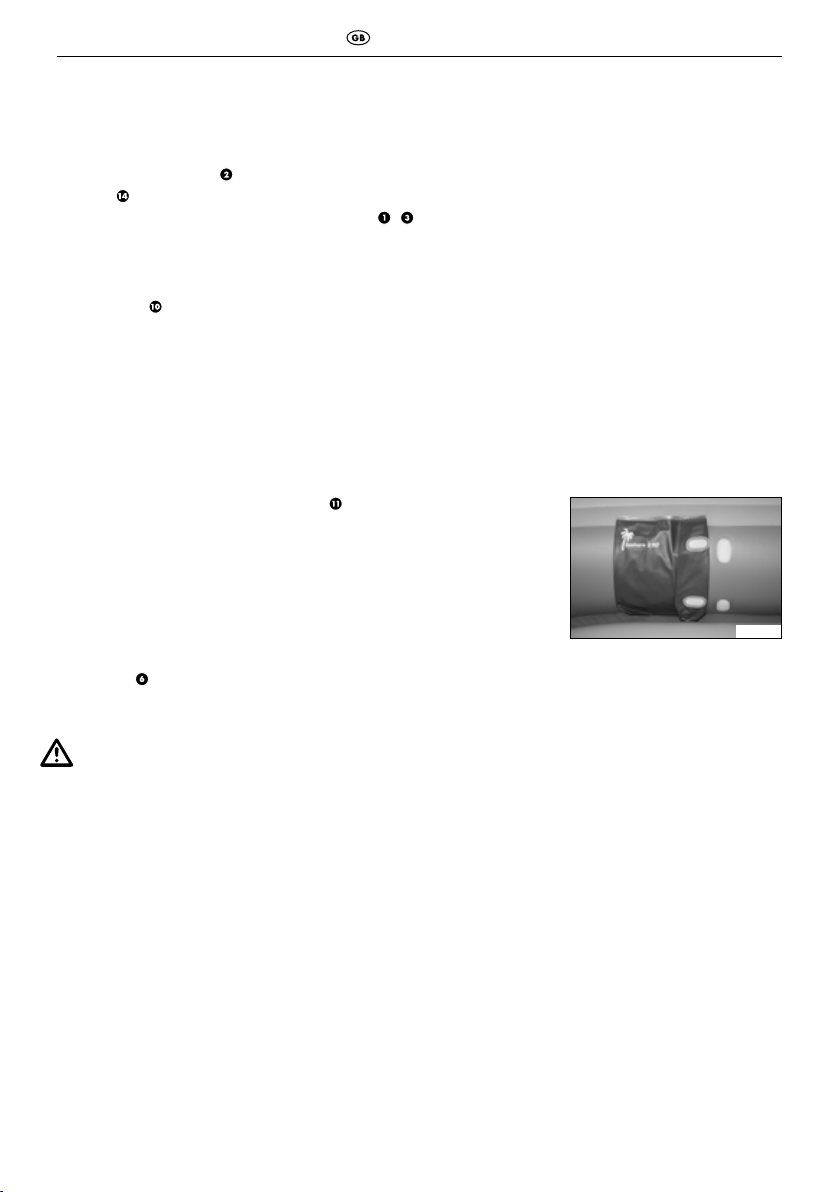
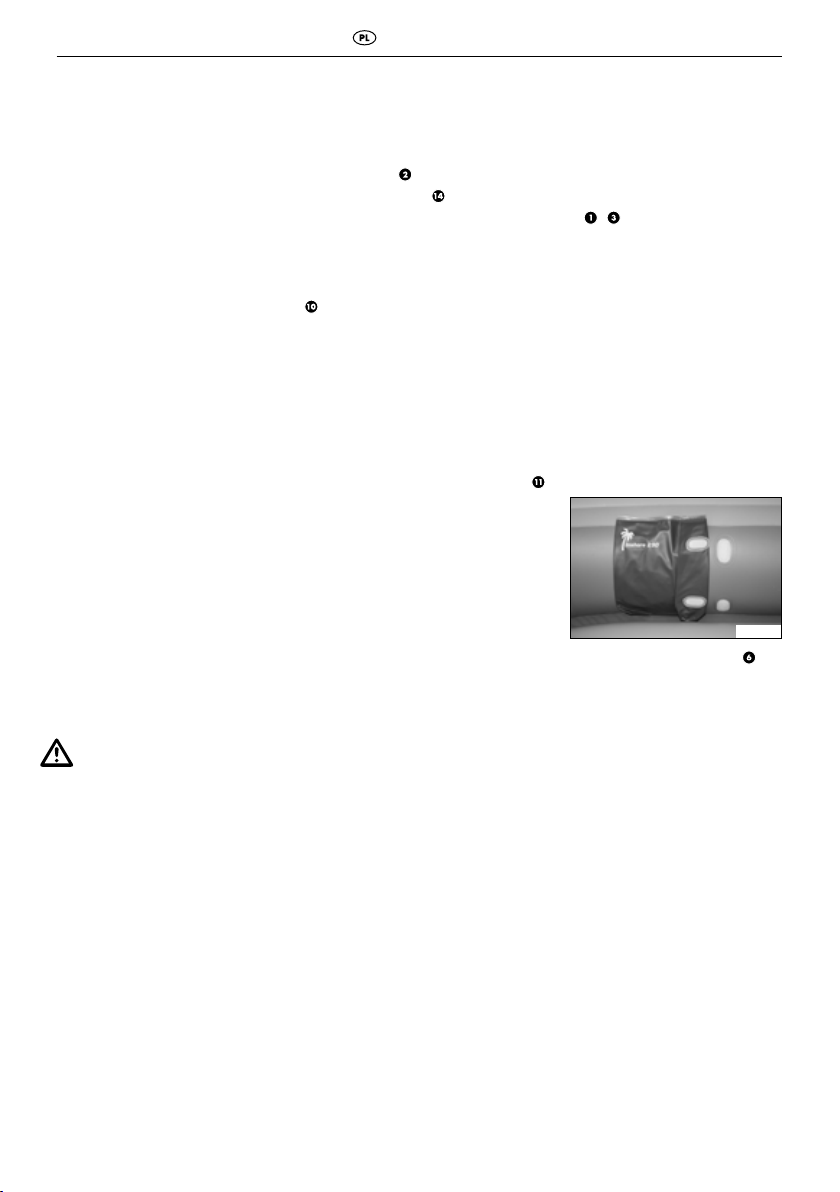
Storage bag (ill. 8)
In addition a splash-proof storage bag is also supplied, which
can be attached to the inner wall of the boat with Velcro closures.
Smaller items can be stowed in it to keep them dry; this item however
is also not entirely waterproof. Therefore, do not place any sensitive
items in it either.
Transport
Always transport the bathing boat with two persons and make use of the cords on the stern as well as
the handle bow.
ill. 8
Care / Maintenance / Storage
CAUTION!
Only make use of detergents that do not contain acids or petrol and never make use
of products based on silicone.
1. Thoroughly clean your bathing boat after every use by rinsing it with fresh water and a mild soap to
remove salt crystals, grains of sand and other small impurities. Allow to dry completely afterwards.
2. Fold up the boat with care.
3. Store the bathing boat in a clean and dry area out of direct sunlight and at which it is not subject to
large temperature fluctuations. Make sure that it is not deformed and stored level and out of the reach
of rodents.
12
Page 13

INSHORE 290
Repairs
WARNING!
You should under no circumstances carry out repairs by yourself with larger
damages. You can repair smaller damages with the provided repair kit.
1. Completely deflate the bathing boat and clean the relevant area with the solution on alcohol basis.
Lightly roughen the area of the tear or the hole with fine sandpaper.
2. Now cut out a patch that covers the damaged area and protrudes all sides about 1,25cm.
3. Apply the glue on the area of the boat as well as the patch. Allow the glue to dry for
approx. 3 minutes.
4. Press the patch on firmly with a soft object. Make sure to work on a level surface without wrinkles or
folds. Gently remove possible bubbles with a rounded object from the inside outward.
5. Wait for at least 12 hours after repairing before re-inflating.
Disposal
Please dispose of the product and packaging in an environmentally friendly manner, separating
different materials for recycling as required! Dispose of this item through an authorised disposal
company or through your local waste disposal facilities - ask your local authority for information
if further guidance is required. Ensure that you comply with all regulations currently in force.
3 Years Warranty
The product was manufactured with the greatest care and regular testing.
This product comes with a 3-year warranty as of the date of purchase. Please keep the receipt.
The warranty only covers material and production errors and will not cover improper or inappropriate
handling. Your legal rights, in particular statutory rights are not restricted with this warranty.
In the event of a warranty matter, please contact us free of charge via our Service-Hotline or send us
an email. In any case, we will be more than happy to provide you with personal advice. In the event
of a warranty matter, defect parts can be shipped cash on delivery to the indicated service-address in
coordination with our service-colleagues. Subsequently you will promptly receive a new or repaired part
free of charge.
The warranty period will not be extended due to any repairs based on warranty, statutory guarantee or
fair dealing. This also applies to replaced and repaired parts.
Any repairs required after the warranty has expired are chargeable.
IAN: 61553
Service-address
Product hotline 00800-88080808 (Mon.-Fri. 10am – 4pm, free phone)
PSB LOGISTICS MANAGEMENT LTD • Unit B3 site b
The Bowman Centre Arncott, OX25 1NZ Oxon
gb@nws-service.com
- www.nws-service.com -
13
Page 14

INSHORE 290
PRZEGLĄD CZĘŚCI INSHORE 290
Zatrzask
14
01
0
Instrukcja obsługi
Page 15

INSHORE 290
Przed montażem i użyciem prosimy w całości przeczytać instrukcję i zachować ją w celu
późniejszego sprawdzenia! Zawiera ona ważne szczegóły dotyczące produktu, jego
montażu, obsługi i pielęgnacji jak również zasad bezpieczeństwa. Ponieważ sporty wodne
zawsze wiążą się z ryzykiem, dokładna znajomość produktu zmniejsza ewentualne kontuzje lub nawet
przypadki śmierci.
Dane techniczne / użyte symbole
dopuszczona ilość osób: ........ 2 osoby dorosłe / 2 dzieci
dopuszczony ciężar użyteczny: ............. 260 kg (573,30 lbs.)
maks. ciśnienie powietrza: ...................................... 0,04 bar (0,58 psi)
Długość: .................................................................................................. ok. 272 cm
Szerokość: ............................................................................................ ok. 141,5 cm
Wysokość: ................................................................................................. ok. 62 cm
Waga: ............................................................................................................ ok. 6kg
Opis elementów / zawartość
.......... Komora bezpieczeństwa z zaworem śrubowym
.......... Komora przy podłożu z zaworem z zatyczką
.......... Komora wyporowa z zaworem śrubowym
.......... Zawór śrubowy (2 x)
.......... Dulki do wioseł (4 x)
.......... Uchwyty (1 x)
.......... Oczka na sznurki (9 x)
.......... Sznurek (2 x) ( 1 x 600 cm / 1 x 200 cm )
...................................... Wiosła (2 x)
........................... Ochraniacze (2 x)
...................................... Worek (1 x)
... Torba do przechowywania (1 x)
.............. Komplet do naprawy (1 x)
...................... Linijka kontrolna (1 x)
... Rurka do odpowietrzniania (2 x)
.................... Instrukcja obsługi (1 x)
Zastosowanie zgodne z przeznaczeniem
Niniejszy artykuł przeznaczony jest do użytku prywatnego.
Kategoria projektu D „wody chronione“. Artykuł został zaprojektowany do korzystania w wodach
przybrzeżnych, małych zatokach, na małych jeziorach, wąskich rzekach i kanałach na których
występują warunki atmosferyczne z siłą wiatru nie przekraczającą 4 stopni i większych fal do łącznie
0,3 m i czasami do 0,5 m, np. przy przepływających statkach.
15
Page 16
INSHORE 290
Zasady postępowania / wskazówki bezpieczeństwa
Bezpieczny i kontrolowany ponton przeznaczony jest do sportu wodnego. Jednakże uprasza się o
zachowania następujących zasad i przepisów:
UWAGA!
Wasza rozwaga i samoocena na wodzie jest bardzo ważna.
Nigdy nie należy przeceniać swoich sił i wiedzy sterowniczej! Przebywać zawsze
w pobliżu brzegu! Zwracać uwagę na stan pogody, ostrzeżenia o niepogodzie lub
ewentualne sygnały świetlne!
UWAGA!
Prosimy o przestrzeganie zawsze zasad bezpieczeństwa i obowiązujących prze-
pisów dotyczących jezior i otwartych wód. Dla własnego bezpieczeństwa należy
zawsze zakładać sprawdzona kamizelkę ratunkową.
OSTRZEŻENIE!
Niebezpieczeństwo zaduszenia się przez dzieci! Nie pozwalać dzieciom bawić się bez
nadzoru materiałem opakunkowym lub artykułem.
OSTRZEŻENIE!
W przypadku gdy ktoś wypadnie za burtę, ponowne wejście musi się odbyć na
dziobie lub rufie, ponieważ z boku istnieje bardzo wysokie ryzyko wywrócenia się
kajaku.
Niebezpieczeństwo urazu!
Uwaga przy wietrze od lądu!
Uwaga przy prądzie od lądu!
• Należy zwrócić uwagę na równe rozłożenie osób i towaru, ponieważ możliwe jest
przewrócenie ponotu.
• Należy przestrzegać danych na szyldzie, dopuszczonego ciężaru użytecznego i liczbę osób oraz
ostrzeżeń.
• Zawsze należy dostosować się do miejscowych przepisów żeglugi.
• Nie przewozić z sobą ostrych i spiczastych przedmiotów.
• Ponton należy chronić przed kontaktem z wątpliwymi cieczami lub kwasami. Kontakt taki może
doprowadzić do nienaprawialnych szkód.
• Chronić ponton przed ukropem i ogniem! Zachować ostrożność podczas palenia papierosów!
• Należy unikać kamiennego dna, kamienie mogą uszkodzić dno pontonu.
• Jeżeli podczas pobytu na wodzie dojdzie do uszkodzenia jednej z trzech komór wewnętrznych, nie
należy opuszczać pontonu. Siła napędowa pozostałych czterech nienaruszonych komór wystarczy,
aby utrzymać ponton na wodzie.
• Nie transportować na pojazdach pontonu w stanie nadmuchanym.
• Nie pozostawiać pontonu na wodzie bez nadzoru. Ponton szybciej zostanie zniesiony niż będzie
można do niego dopłynąć.
• Przed użyciem należy sprawdzić, czy w pontonie znajduje się wiosło, w innym razie sterowanie
pontonem jest utrudnione.
• Nie dokonywać żadnych zmian technicznych. Każda zmiana prowadzi do uszkodzenia działania
pontonu.
16
Page 17

INSHORE 290
• Nigdy nie korzystać z pontonu pod wpływem alkoholu, narkotyków i lekarstw.
• Nie przeceniach własnych sił i tak rozłożyć siły, aby możliwe było pokonanie drogi powrotnej.
Należy pamiętać, aby nie odpływać dalej niż 300 m od brzegu i zwracać uwagę na warunki
atmosferyczne, które mogą doprowadzić do utrudnień w poruszaniu łodzi.
Unikanie szkód!
• Wszystkie artykuły dmuchane wrażliwe są na działanie niskich temperatur.
Nie rozkładać i nadmuchiwać zatem artykułu w temperaturze poniżej 15° C!
• Jeżeli wskutek nasłonecznienia ciśnienie w komorach wzrośnie należy odpowiednio je wyrównać.
• Należy zwrócić uwagę – w szczególności w nadmuchanym stanie – aby artykuł nie miał kontaktu
z kamieniami, żwirem i ostrymi przedmiotami, aby nigdzie nie obcierał i tarł, ponieważ może dojść
do uszkodzenia materiału.
• Stosować jedynie odpowiednie adaptery do pompki. W innym przypadku można uszkodzić zawory.
• Nie nadmuchiwać zbyt mocno, ponieważ może doprowadzić to do uszkodzenia spoin.
Po nadmuchaniu dobrze zamknąć zawory.
• Unikać kontaktu z ostrymi, gorącymi, szpicastymi i niebezpiecznymi przedmiotami.
Montaż
Ze względu na rozmiar artykułu, montaż powinny przeprowadzać dwie dorosłe
osoby. Należy przestrzegać wskazanej kolejności. Dotyczy to przede wszystkim nadmuchiwania komór powietrznych, w innym przypadku może dojść do nierównomiernego rozprowadzenia ciśnienia i tym samym doprowadzić do niestabilności pontonu
i pogorszenia możliwości sterowania.
1. Montaż należy wykonywać na czystej i gładkiej powierzchni o dużej przestrzeni, aby mieć miejsce
do rozpakowania i rozłożenia pontonu. Należy upewnić się, czy wszystkie części znajdują się w
opakowaniu i czy artykuł znajduje się w nienagannym stanie.
2. Artykuł rozłożyć na podłożu. Przed każdym następnym składaniem, należy skontrolować artykuł
pod względem ewentualnych szkód, dziur i rozdarć, aby je naprawić, jak opisano poniżej.
W razie kontaktu z wodą szkód tych nie można już więcej usunąć.
17
Page 18

INSHORE 290
Montaż wioseł (rys. 1, 2)
Ważne!
Podczas korzystania pontonu wiosła powinny zawsze
znajdować się w dulkach i należy je zabezpieczyć w
delkach przd ich zgubieniem!
• Połączyć dwie rurki wioseł i zwrócić uwagę aby zamknięcia dobrze
zaskoczyły. Koniec rurki przeprowadzić przez dulkę i zabezpieczyć
przy pomocy ochraniacza. Drugie wiosło zamontować z drugiej
strony pontonu w ten sam sposób.
Pierścień chroniący przed skapywaniem Zatrzask
rys. 1
rys. 2
Montaż zaworu:
Każda komora / pontonu wyposażona jest w otwarcie zaworowe, pasujące do zaworów śrubowych. Wyciągnąć pętlę
na otwarciem zaworowym w ten sposób, aby dokładnie osiadła
w przeznaczonym ku temu rowku. Czynność ta wymaga cierpliwości
i dokładności, i należy przeprowadzić ja bardzo starannie, aby
później uniknąć poluzowania się zaworu w otworze.
Przekręcić korek
otworze zaworu.
zgodnie z ruchem wskazówek zegara w
Nadmuchiwanie
UWAGA!
• Należy zachować kolejnoć przy pompowaniu komór.
• Zalecane ciśnienie robocze wynosi 0,04 bar ( = 40 mbar = 0,58 psi).
• Należy unikać zbyt mocnego nadmuchiwania komór, ponieważ może doprowadzić to do
naciągnięcia materiału lub zerwania spoin.
• W celu pompowania artykułu należy stosować przyjęte w handlu pompki nożne lub pompki tłokowe
z podwójnym stokiem posiadające odpowiednie nasadki i ewent. manometr.
• Nie wolno stosować kompresorów lub zbiorników pneumatycznych.
Może prowadzić to do uszkodzenia artykułu.
• Należy całkowicie wypełnić powietrzem wszystkie komory!
zaworu
rys. 3
Kolejność nadmuchiwania (rys. 4)
Przed pompowaniem należy zawsze skontrolować ciśnienie, jak opisano w rozdziale
„Kontrola ciśnienia roboczego“ na str. 19.
Komory należy nadmuchać w następującej kolejności:
Komora bezpieczeństwa z zaworem śrubowym
1.
2. Komora przy dnie z zaworem z zatyczką
3. Komora wyporowa z zaworem śrubowym
= oznaczenie na kajaku
rys. 4
18
Page 19
INSHORE 290
Kontrola ciśnienia użytkowego
WAŻNE!
Po pierwszym nadmuchaniu, materiał PVC rozciąga się i nie wraca
do swojego stanu pierwotnego.
Należy zwrócić uwagę, że odstępstwa danych uzależnione są od
temperatury powietrza i transportu.
Komory
zmarszczeń w materiale. Przy przyduszeniu komory kciukiem musi być możliwe
lekkie wgniecenie.
należy nadmuchać tak mocno, aby nie było widocznych żadnych
01
Skala i linijka kontrolna (rys. 5a, b)
W celu kontroli ciśnienia roboczego w komorze / należy
położyć na artykule 0 w linijce kontrolnej (rys. 5b) ponad
0 w miarce (rys. 5a).
Przy pierwszym nadmuchaniu maksymalne rozszerzenie miarki
NIE może przekroczyć pozycji A na linijce kontrolnej.
Po pierwszym użyciu nadmuchiwać zawsze w ten sposób,
aby 10 na miarce znajdowała się między pozycją A i pozycją 1
0 na linijce kontrolnej.
Napełnianie komór powietrznych (rys. 6)
Komora bezpieczeństwa z zaworem śrubowym
Komora wyporowa z zaworem śrubowym
1. Nadmuchać komory
/ i zamknąć korki przekręcając je zgodnie ze wskazówkami ruchu
zegara (rys. 3, Str. 18).
Komora w podłopu z zaworem z korkiem
1. Otworzyć zawór
.
2. Nadmuchać komorę.
3. Zamknąć zawór z korkiem i zaglębić lekko wduszając.
Sznurek
600 cm sznurka należy umocować w oczkach na sznurki
przy pontonie. Sznurek należy zabezpieczyć węzłem
krzyżowym (rys. 7).
01
9
8
7
6
5
4
3
2
1
0
rys. 5a
0
rys. 5b
rys. 6
19
rys. 7
Page 20
INSHORE 290
Składanie pontonu
Wypuszczanie powietrza
Powietrze należy wypuszczać w następującej kolejności:
1. Aby wypuścić powietrze z komory w podłożu należy wyciągnąć zawór z korkiem i lekko
przydusić rdzeń lub użyć rurkę do odpowietrzania .
2. Aby wypuścić powietrze z komory bezpieczeństwa i komory wyporowej / należy całkowicie
odkręcić zawory śrubowe z korka.
Worek marynarski
W opakowaniu znajduje się worek , który przeznaczony jest do przechowywania i transportu
artykułu. W celu zamknięcia worka należy użyć 200 m sznurka. Ponadto worek może służyć do
przechowywania prowiantu, ubrań itd. na pokładzie, chroniąc je przed wodą.
Należy jednak pamiętać, że worek nie jest wodoszczelny. Dlatego nie wolno przechowywać w nim
przedmiotów delikatnych jak np. aparaty fotograficzne. Podczas przewozu na pokładzie zaleca się
wyciągnięcie sznurka, aby możliwe było złożenie górnej części i zamknięcie przy pomocy rzepu.
Torba do przechowywania (rys. 8)
W opakowaniu znajduje się dodatkowo torba do przechowywania ,
która umocowana jest przy pomocy rzepu na wewnętrznej stronie
pontonu. Można w niej przechowywać przedmioty.
Należy jednak pamiętać, że i tak torba nie jest całkowicie
wodoszczelna. Dlatego i w niej nie należy przechowywać
delikatnych przedmiotów.
Transport
Ponton należy transportować najlepiej w dwie osoby przy pomocy sznurka na czubie i uchwytów na
rufie.
ilu. 8
Pielęgnacja / konserwacja / przechowywanie
UWAGA!
Używać jedynie środków czyszczących nie zawierających kwasów lub benzyny i
nigdy produktów na bazie sylikonu.
1. Po każdym użycie ponton należy dokładnie wyczyścić przy pomocy wody i delikatnego mydła, aby
zmyć sól, piasek i zabrudzenia. Następnie pozostawić do wyschnięcia.
2. Ponton dokładnie złożyć.
3. Ponton przechowywać w suchym i czystym miejscu, unikać bezpośredniego kontaktu z
promieniowaniem słonecznym i wahań temperatury. Należy pamiętać aby nie deformować
artykułu i przechowywać z dala od gryniozów.
20
Page 21

INSHORE 290
Naprawy
UWAGA!
Przy dużych uszkodzeniach nie należy przeprowadzać własnoręcznie napraw.
Małe uszkodzenia można naprawić przy pomocy dołączonego zestawu do napraw.
1. Należy całkowicie usunąć powietrze z pontonu i wyczyścić uszkodzone miejsce rozpuszczalnikiem z
alkoholem. Następnie zetrzeć miejsce i jego okolice delikatnym papierem ściernym.
2. Przyciąć łatkę tak aby całkowicie przykrywała uszkodzone miejsce a jej brzegi wystawały ze
wszystkich stron o 1,25 cm.
3. Nałożyć klej na uszkodzone miejsce i na łatkę. Pozostawić klej przez ok. 3 min. do wyschnięcia.
4. Łatkę przydusić przy pomocy miękkiej ściereczki. Należy pamiętać aby dokonywać naprawy na
gładkiej powierzchni bez zmarszeń i nierówności. Usunąć możliwe bańki powietrzne przy pomocy
zaokrąglonego przemiotu z wewnątrz na zewnątrz.
5. Po dokonanej naprawie odczekać przynajmniej 12 godzin do następnego pompowania.
Uwagi odnośnie recyklingu
Opakowanie i artykuł usunąć zgodnie z przepisami o ochronie środowiska!
Artykuł oddać do utylizacji w autoryzowanym zakładzie oczyszczania i przetwarzania odpadów lub
do odpowiedniej jednostki w gminie. Prosimy stosować się do aktualnie obowiązujących przepisów.
3 lata gwarancji
Produkt został wyprodukowany z dużą starannością i pod ciągłą kontrolą. Otrzymują Państwo na ten
produkt 3 lata gwarancji od daty zakupu. Prosimy o zachowanie paragonu.
Gwarancja obowiązuje jedynie w razie wad materiałowych i fabrycznych, przy nieodpowiedniej
obsłudze przepada. Państwa ustawowe prawa, w szczególności prawa do gwarancji, nie zostaną
ograniczone tą gwarancją.
W razie gwarancji należy się z nami skontaktować telefonicznie przez bezpłatny numer naszej
Service-Hotline lub mailowo. W każdym przypadku otrzymają Państwo osobistą pomoc.
W przypadku gwarancji można wysyłać nieodpłatnie uszkodzone elementy na nasz adres serwisowy
po wcześniejszym porozumieniu z naszym pracownikiem. Bezzwłocznie otrzymają Państwo bezpłatnie
z powrotem nowy lub naprawiony element.
Czas gwarancji nie jest przedłużany w razie ewentualnych napraw w oparciu o gwarancję lub
naprawę poza gwarancyjną. Obowiązuje to również przy wymienionych lub naprawionych
elementach. Po upływie gwarancji zaistniałe naprawy są płatne.
IAN: 61553
Adres Service
Infolinia ds. Produktu 00800-4911384 (poniedziałek - piątek w godzinach 10 - 16, bezpłatnie)
Bogusław Możdżonek • ul.Jawirskiego 21B / 28 • 05-520 Konstancin - Jeziorna
pl@nws-service.com
- www.nws-service.com -
21
Page 22

INSHORE 290
ALKOTÓRÉSZEK ÁTTEKINTÉSE INSHORE 290
Nyomógomb
22
01
0
Használati utasítás
Page 23

INSHORE 290
Kérjük, hogy a termék összeszerelése és használata előtt olvassa át alaposan a
használati utasítást és őrizze azt meg! Fontos részleteket tartalmaz a termékkel, annak
összeszerelésével, használatával és ápolásával, valamint a biztonsági szabályokkal
kapcsolatban. Mivel a vízi sportok kockázatosak, a termék pontos ismerete által az esetleges
személyi sérülések, vagy akár halálos balesetek is megelőzhetőek.
Műszaki adatok / alkalmazott jelölések
Megengedett személyek: .............. 2 felnőtt / 2 gyermek
Megengedett hasznos terhelés: .......... 260 kg (573,30 lbs.)
Max. légnyomás: .................................................. 0,04 bar (0,58 psi)
Hosszúság: ........................................................................................... kb. 272 cm
Szélesség: ......................................................................................... kb. 141,5 cm
Magasság: ............................................................................................. kb. 62 cm
Súlya: .......................................................................................................... kb. 6kg
Alkotórészek megnevezése / a csomag tartalma
.............. Biztonsági kamra csavaros szeleppel
.............. Padlókamra dugaszos szeleppel
.............. Felhajtó kamra csavaros szeleppel
.............. Csavaros szelep (2 x)
.............. Evezőtartó (4 x)
.............. Hordfogantyú (1 x)
.............. Rögzítőgyűrűk a kötél számára (9 x)
.............. Kötél (2 x) ( 1 x 600 cm / 1 x 200 cm )
....................................... Evező (2 x)
......................... Biztosító gyűrű (2 x)
.............................. Tárolótáska (1 x)
....................................... Tároló (1 x)
............................ Javító készlet (1 x)
................... Ellenőrző vonalzó (1 x)
......................... Légtelenítő cső (2 x)
................ Használati útmutató (1 x)
Rendeltetésszerű használat
Ez a termék privát jellegű használatra lett kifejlesztve.
D kategória „Védett vizek“: Védett, partközeli vizekre, kisebb öblökbe, kis tavakra , keskeny folyókra
és csatornákra, legfeljebb négyes erősségű szélben, max. 0 ,3 m magas állandó, illetve 0 ,5 m magas
alkalmi hullámverésben (pl . az elhaladó hajók által).
23
Page 24

INSHORE 290
Viselkedési szabályok / biztonsági utasítások
A csónak egy vizsgált és biztonságos vízi sporteszköz. Ennek ellenére elengedhetetlen a következő
szabályok és előírások betartása:
FIGYELEM!
A körültekintés és a helyes önértékelés különösen fontos a vízen.
Ne értékelje túl erejét és manőverezési képességét! Maradjon partközelben!
Legyen tekintettel az időjárási helyzetre, a viharjelzésre, vagy az esetleges
fényjelzésekre!
FIGYELEM!
Kérjük, vegye mindig figyelembe a biztonsági szabályokat és a tavakra és nyílt
vizekre érvényes törvényi előírásokat, valamint saját biztonsága érdekében
viseljen bevizsgált mentőmellényt!
FIGYELMEZTETÉS!
Gyermekek fulladásának veszélye! Ne hagyjon gyermeket felügyelet nélkül játszani
a csomagolóanyaggal, vagy a termékkel.
FIGYELMEZTETÉS!
Amennyiben egy személy kiesne a csónakból, úgy a csónak elején, vagy a tatnál
(hátul) szálljon vissza, mivel oldalról nagy a felborulás veszélye.
Sérülésveszély!
Figyelem a partról fújó szél esetén!
Figyelem a partról irányuló áramlás esetén!
• Kérjük az utasokat és a rakományt mindig egyenletesen ossza el a csónakban,
más esetben borulásveszély áll fenn.
• Kérjük vegye figyelembe a típustáblán feltüntetet adatokat, a megengedett hasznos terhelést és
személyeket valamint a figyelmeztetést.
• Mindig tartsa magát a helyi hajóforgalmi előírásokhoz.
• Ne vigyen magával éles vagy hegyes tárgyakat.
• A csónakot óvni kell kétes folyadékokkal vagy savakkal történő érintkezéssel szemben.
Ezek javíthatatlan károkat okozhatnak.
• A csónakot hővel és nyílt lánggal szemben óvni kell! Vigyázat izzó cigaretták eseten!
• A csónaktest károsodásának elkerülésére ügyeljen arra, hogy a csónak ne kerüljön érintkezésbe
kavicsos vízfenékkel.
• Amennyiben a használat során a vízen a három belső kamra egyike károsodna, akkor semmi esetre
se hagyja el a csónakot. A négy sértetlen belső kamra felhajtóereje elég ahhoz, hogy biztonságosan
a víz felett tartsák a csónakot.
• Tilos a felfújt csónakot járműveken szállítani.
• Ne hagyja a csónakot utas nélkül a vízen. Gyorsabban elviszi a víz, mint az úszva ismét utolérhető
lenne.
• Használat előtt mindig ügyeljen arra, hogy az evezők a csónakban legyenek, más esetben nem tudja
a csónakot megfelelően manőverezni.
• Ne hajtson végre műszaki változtatásokat a csónakon. Bármilyen változtatás veszélyezteti a
sporteszköz közlekedésbiztonságát.
24
Page 25

INSHORE 290
• Soha ne használja a csónakot alkohol, kábítószer vagy gyógyszerek hatása alatt.
• Soha ne értékelje túl a saját erejét és evezéshez ossza be úgy izomerejét, hogy a megtett úton
fáradtság nélkül vissza is tudjon evezni. Védett, partközeli vizekben tartózkodjon a parttól legfeljebb
300 m távolságban és ügyeljen a változó szél- és áramlásviszonyokra, amelyek erősen
megnehezíthetik a továbbjutást.
Sérülések elkerülése!
• Minden felfújható termék hidegre érzékeny. Ezért soha ne hajtsa szét és pumpálja fel a terméket
15° C alatti hőmérsékleten!
• Amennyiben a tűző napon megnövekszik a légnyomás, ezt a levegő kiengedése útján megfelelően
ki kell egyenlíteni.
• Ügyeljen arra, hogy a termék – kiváltképpen felpumpált állapotban – ne kerüljön érintkezésbe
kövekkel, kaviccsal vagy hegyes tárgyakkal és ne dörzsölődjön vagy súrlódjon sehol, mivel ezeknek
következtében a fólia károsodhat.
• Csakis a biztonsági szelepekhez megfelelő adapterrel rendelkező pumpát használjon.
Más esetben a szelepek megsérülhetnek.
• Ne fújja túl a terméket, más esetben fennáll annak a veszélye, hogy felszakadnak a
hegesztővarratok. A felpumpálást követően jól zárja le a szelepet.
• Kerülni kell az éles, forró, hegyes vagy veszélyes tárgyakkal való érintkezést.
Összeszerelés
A felépítést a termék méretére tekintettel mindig két felnőtt személy végezze.
Kérjük kövesse a felépítés egyes lépéseit a megadott sorrendben. Ez kiváltképpen a
három légkamra felpumpálására érvényes, mivel máskülönben egyenlőtlen nyomáselosztás alakul ki, ami a csónak instabilitásához vezethet és károsan befolyásolhatja annak menettulajdonságait.
1. Válasszon egy sima, tiszta és elegendő helyet kínáló felületet a csónak kicsomagolására és
széthajtására. Győződjön meg arról, hogy minden alkatrész rendelkezésre áll és kifogástalan
állapotban van.
2. Fektesse le a hajótestet. A második felpumpálásától kezdődően mindig ellenőrizze a csónakot
esetleges károsodások, lyukak és szakadások szempontjából és ezeket tömítse a lent leírtaknak
megfelelően. Az esetleges károsodások a vízen már nem javíthatóak ki.
25
Page 26

INSHORE 290
Az evezők felszerelése (1./2. ábra)
Utasítás!
A csónak használata során a vízen az evezőket nem szabad eltávolítani a tartókból,
azoknak elveszés ellen biztosított állapotban a tartókban kell maradniuk!
• Kösse össze az evezőrudakat, a nyomógomboknak jól hallhatóan
és láthatóan be kell kattanniuk. Tolja a rúd végét a tartóba és
biztosítsa az evezőt a biztosító gyűrű feltolása útján. Ismételje meg
a folyamatot a második evezővel a csónak másik oldalán.
Gyűrű
Nyomógomb
1. ábra
2. ábra
A csavarszelep összeszerelése:
A csónak kamrái / egy-egy csavarmenetes nyílással vannak
felszerelve a mellékelt csavaros szelepek számára. Húzza a szelep
hurkát
illeszkedjen a megfelelő mélyedésbe. Ehhez a tevékenységhez finom
érzékre és némi türelemre van szükség, azonban gondosan kell
elvégezni annak érdekében, hogy megakadályozza a szelep
későbbi leválását a nyílásról.
Most csavarja a bázist
irányban szorosan a csavarmenetes nyílásba.
Felpumpálás
FIGYELEM!
• Tartsa be a légkamrák felpumpálásának helyes sorrendjét.
• Az ajánlott üzemi nyomás 0,04 bar ( = 40 mbar = 0,58 psi).
• Kerülni kell a légkamrák túlzott felpumpálását, más esetben fennáll a túlnyúlás vagy a hegesztő
varratok felszakadásának veszélye.
• A termék felpumpálásához használjon a kereskedelemben szokványos lábhajtású pumpát vagy
dugattyús pumpát megfelelő rátétekkel és adott esetben manométerrel.
• Ne használjon kompresszort vagy sűrítettlevegő-palackot a termék felpumpálásához.
Ezek károsíthatják a terméket.
• A légkamrákat mindig teljesen fel kell pumpálni!
úgy a csavarmenetes nyílásra , hogy az szorosan
az óramutató járásával megegyező
3. ábra
A felpumpálás sorrendje (4. ábra)
Az egyes légkamrák felpumpálását követően ellenőrizze a légnyomást a 27. oldalon
az „Az üzemi nyomás ellenőrzése“ című fejezetben foglaltaknak megfelelően.
Pumpálja fel a légkamrákat a következő sorrendben:
Biztonsági kamra csavaros szeleppel
1.
2. Padlókamra dugaszos szeleppel
3. Felhajtó kamra csavaros szeleppel
= jelölés a csónakon
4. ábra
26
Page 27

INSHORE 290
Az üzemi nyomás ellenőrzése
FONTOS!
A PVC anyag az első felpumpálást követően még kissé kinyúlik és nem tér vissza
eredeti állapotába.
Kérjük vegye figyelembe, hogy az adatok a terheléstől és a
külső hőmérséklettől függően enyhén ingadozhatnak.
Pumpálja fel úgy a légkamrákat
látszódjanak ráncok az anyagban. A légkamrák legyenek a hüvelykujjal
még enyhén benyomhatóak.
, hogy kemények legyenek és ne
01
Mérőcsíkok és kontroll-vonalzó (5a./5b. ábra)
A légkamrák / üzemi nyomásának ellenőrzésére helyezze az
ellenőrző vonalzó 0 pontját (5.b ábra) a mérőcsík 0 pontja
fölött (5.a ábra) a termékre.
Az első felpumpálásnál a mérőcsík maximális megnyúlása NEM
lépheti túl az ellenőrző vonalzó A pozícióját.
Az első használatot követően a csónakot mindig úgy kell felpumpálni,
hogy a mérőcsík 10-es értéke az ellenőrző vonalzó A és 10-es pozíciója
között legyen.
A légkamrák feltöltése (6. ábra)
Biztonsági kamra csavaros szeleppel
Felhajtó kamra csavaros szeleppel
1. Töltse fel a kamrákat
/ levegővel és zárja le a zárókupakot (3. ábra, 26. oldal) az óramutató
járásával megegyező irányban.
Padlókamra dugaszos szeleppel
1. Nyissa ki a szelep zárját
.
2. Pumpálja fel a mindenkori légkamrát.
3. Zárja le a szelep zárját és enyhe nyomással süllyessze le a szelepet.
Kötél
Rögzítse a 600 cm-es kötelet a csónak rögzítőgyűrűin.
Biztosítsa a kötelet egy egyszerű nyolcas csomóval (7. ábra).
01
9
8
7
6
5
4
3
2
1
0
5a. ábra
Mércecsík
0
5b. ábra
6. ábra
27
7. ábra
Page 28

INSHORE 290
A csónak leeresztése
Leengedés
Légtelenítse a csónakot a következőképpen:
1. A padlókamra légtelenítésére húzza ki a zárószelepet a mélyedésből és nyomja enyhén össze a
szárat vagy használja a légtelenítő csövet .
2. A biztonsági- és felhajtókamrák / légtelenítésére csavarja ki a csavaros szelepeket teljesen a
bázisból.
Tengerészzsák
A termékhez mellékelve van egy tárolótáska , amelyben ez szállításhoz és tároláshoz elcsomagolható. Ennek lezárására használja a 200 cm-es kötelet. A tárolótáska a fedélzeten élelmiszer, ruházat
stb. fröccsenő víz ellen védett tárolására is használható. Azonban gondoljon arra, hogy a termék nem
vízálló.
Ezért semmi esetben se tároljon benne érzékeny tárgyakat mint pl. fényképezőgépeket.
A csónakban való használathoz ajánlott a kötelet eltávolítani, a tárolótáska felső szélét laposan
összecsavarni és a tépőzárak segítségével rögzíteni.
Tároló táska (8. ábra)
A termék plusz még rendelkezik egy fröccsenő víz ellen védett
tárolóval , amely tépőzárakkal rögzíthető a csónak belső oldalán.
Ez lehetőséget biztosít kisebb tárgyak száraz tárolására, azonban ez
a termék sem teljesen vízálló. Kérjük itt se tároljon érzékeny tárgyakat.
Szállítás
A csónakot mindig két személy szállítsa, szállításhoz a csónak farán rögzített kötelet és az orrán
található hordfogantyút kell használni.
8. ábra
Ápolás / karbantartás / tárolás
FIGYELEM!
Csak sav- és benzinmentes ápolószert használjon és soha ne alkalmazzon szilikon
alapú termékeket.
1. Öblítse le csónakot minden használat után friss vízzel és enyhe szappannal annak érdekében, hogy
megtisztítsa sókristályoktól, homokszemcséktől és más apró szennyeződésektől. Ezt követően hagyja
teljesen megszáradni.
2. Hajtsa össze gondosan a csónakot.
3. A csónakot tiszta és száraz, közvetlen napsugárzástól és nagyobb hőmérsékletingadozásoktól védett
helyen tárolja. Ügyeljen arra, hogy ne deformálódjon el és rágcsálók ne férhessenek hozzá.
28
Page 29

INSHORE 290
Javítások
FIGYELEM!
A kisebb sérüléseket kijavíthatja a mellékelt javítókészlettel.
Kisebb sérülések megjavíthatóak a mellékelt javító készlet segítségével.
1. Légtelenítse teljesen a csónakot és tisztítsa meg a megfelelő helyet egy alkohol alapú oldattal.
Enyhén érdesítse fel a szakadás vagy a lyuk körülötti területet egy finom csiszolópapírral.
2. Vágjon ki egy foltot úgy, hogy az takarja le a sérült részt és minden oldalon érjen azon túl
1,25 cm-rel.
3. Vigye fel a ragasztót a csónak érintett pontjára és a foltra is. Hagyja a ragasztót kb. 3 percig
száradni.
4. Nyomja oda erősen a foltot egy puha tárgy segítségével. Ügyeljen arra, hogy egy gyűrődés és
ráncok nélküli alátéten dolgozzon. Az esetleges légbuborékokat egy lekerekített tárggyal, óvatosan
belülről kifelé eljárva távolítsa el.
5. A javítást követően várjon legalább 12 órát, mielőtt ismét felpumpálja a csónakot.
Tudnivalók a hulladékkezelésről
Kérjük, hogy a terméket és a csomagolást a környezetet kímélve, fajta szerint válogatva kezelje!
A terméket csak engedélyezett hulladékkezelő üzemen, vagy a kommunális szemétfeldolgozón
keresztül semmisítse meg. Vegye figyelembe az érvényes előírásokat.
3 év garancia
Ezen termék gyártása nagy gondossággal és folyamatos ellenőrzés mellett történt.
Ön a termékre három év garanciát kap a vásárlás időpontjától. Kérjük őrizze meg a pénztárblokkot.
A garancia csak anyag- és gyártási hibákra érvényes, visszaélésszerű vagy szakszerűtlen kezelés esetén
teljesen megszűnik. Az Ön törvényes jogait, kiváltképpen a szavatosságra vonatkozó jogait,
ez a garancia nem korlátozza.
Garanciális esetben kérjük forduljon hozzánk ingyenes szerviz-forróvonalunk vagy e-mail útján.
Minden esetben személyes fogunk Önnek tanácsot adni. Garanciális esetben szerviz-munkatársainkkal
történő egyeztetés mellett a meghibásodott alkatrészeket bérmentesítve a megjelölt szerviz-címre
küldheti. Akkor Ön azonnal egy új vagy megjavított alkatrészt kap vissza ingyen.
A garanciális időt garancia, törvényes szavatosság vagy kulantéria alapján történő esetleges
javítások nem hosszabbítják meg. Ez a pótolt vagy megjavított alkatrészekre is érvényes.
A garancia lejárta után felmerülő javítások költségeit Önnek kell fedezni.
IAN: 61553
Szerviz Cím
Termék hotline 00800-88080808 (H-P 10 - 16 óráig, díjmentes)
H.I.D. Sport Kft • Mester ut. 10a • H-5000 Szolnok
hu@nws-service.com
- www.nws-service.com -
29
Page 30

PREGLED DELOV INSHORE 290
INSHORE 290
Gumb
30
01
0
navodilo za uporabo
Page 31

INSHORE 290
Prosimo, da navodila za uporabo preberete v celoti, preden začnete izdelek sestavljati
in ga uporabljati ter da jih shranite za kasnejše branje! Vsebuje pomembne podrobnosti
o izdelku, njegovi sestavi, uporabi in vzdrževanju ter varnostne napotke. Ker ukvarjanje z
vodnim športom vedno predstavlja določeno tveganje, natančno poznavanje izdelka pomaga preprečiti
morebitne poškodbe oseb ali celo smrtne primere.
Tehnični podatki / Uporabljeni simboli
dovoljeno število oseb: ...................... 2 odrasla / 2 otroka
dovoljena obremenitev: .......................... 260 kg (573,30 lbs.)
maks. zračni tlak: .................................................. 0,04 bara (0,58 psi)
dolžina: ................................................................................................ pribl. 272 cm
širina: ................................................................................................ pribl. 141,5 cm
višina: ..................................................................................................... pribl. 62 cm
teža: ............................................................................................................ pribl. 6kg
Oznaka delov /obseg dobave
.............. varnostni prekat z vijačnim ventilom
.............. prekat v dnu s čepnim ventilom
.............. vzgonski prekat z vijačnim ventilom
.............. vijačni ventil (2 x)
.............. vilice za vesla (4 x)
.............. ročaj za nošenje (1 x)
.............. rinke za vrvico (9 x)
.............. vrvica (2 x) ( 1 x 600 cm / 1 x 200 cm )
......................................... veslo (2 x)
........................................ obroč (2 x)
..................... mornarska vreča (1 x)
............. torba za shranjevanje (1 x)
............ set za popravilo čolna (1 x)
..................... kontrolno ravnilo (1 x)
...... cevka za spuščanje zraka (2 x)
.............. navodilo za uporabo (1 x)
Predvidena uporaba
Ta izdelek je bil razvit za osebno uporabo.
Kategorija namembnosti D „varovane vode“: Plovila so bila načrtovana za plovbo v varovanih
vodah blizu obale,majhnih zalivih, na majhnih jezerih, ozkih rekah in kanalih, v katerih moč vetra
ne presega 4, višina valov ne presega 0,3 m oz. samo občasno dosega višino 0,5 m, na primer
zaradi mimo vozečih ladij.
31
Page 32

INSHORE 290
Pravila obnašanja / varnostni napotki
Kopalni čoln je preverjeno in varno vodno športno orodje. Kljub temu Vas prosimo, da se držite
naslednjih pravil in predpisov:
POZOR!
Vaša preudarnost in presoja samega sebe na vodi sta izjemno pomembni.
Nikoli ne precenite Vaših moči in sposobnosti krmarjenja! Vedno ostanite v bližini
obale! Upoštevajte vreme, opozorila za neurja ali morebitne svetlobne signale!
POZOR!
Prosimo, da vedno upoštevate varnostna navodila in veljavna zakonska določila za
jezera in odprte vode ter zaradi lastne varnosti vedno nosite testiran reševalni jopič.
POZOR
Nevarnost zadušitve za otroke! Otroci naj se nikoli ne igrajo nenadzorovano z
z ovojnim materialom ali izdelkom.
POZOR
V primeru, da oseba pade v vodo, se mora le-ta vedno povzpeti na kajak spredaj ali
zadaj, saj drugače obstoja nevarnost prevrnitve.
Nevarnost poškodbe!
Pozor ob vetru s kopnega!
Pozor ob toku v smeri proti odprtemu morju!
• Pazite na to, da bodo osebe in tovor v čolnu vedno enakomerno porazdeljene,
v nasprotnem primeru obstaja nevarnost prevrnitve.
• Upoštevajte podatke na tipski ploščici, dovoljeno obremenitev in število oseb ter opozorilo.
• Vedno se držite krajevnih določil za plovbo.
• Nikoli s seboj ne vozite ostrih in špičastih predmetov.
• Kopalni čoln ne sme priti v stik s problematičnimi tekočinami ali kislinami.
Nastane lahko nepopravljiva škoda.
• Kopalni čoln varujte pred vročino in ognjem! Previdno z žarečimi cigaretami!
• Pazite, da ne pridete v stik s kamnito podlago, saj boste le-tako preprečili nastanek poškodb na čolnu.
• Če se med uporabo na vodi poškoduje eden od treh notranjih prekatov, opalnega čolna ne smete
zapustiti. Plovnost štirih nepoškodovanih notranjih prekatov zadostuje, da se kopalni čoln varno
obdrži nad vodo.
• Napihnjenega kopalnega čolna nikakor ne smete prevažati na motornih vozilih.
• Kopalni čoln na vodi nikoli ne sme biti brez oseb. Zelo hitro ga bo odneslo, tako da ga boste s
plavanjem težko ujeli.
• Pred uporabo vedno preverite, če imate s seboj vesl, saj v nasprotnem primeru kopalnega čolna ne
boste mogli v zadostni meri krmariti.
• Na Vašem kopalnem čolnu ne izvedite nobenih tehničnih sprememb. Kakršnekoli spremembe
poslabšujejo plovnost in krmarjenje športne naprave.
32
Page 33

INSHORE 290
• Vašega kopalnega čolna nikoli ne uporabljajte pod vplivom alkohola, drog ali zdravil.
• Nikoli ne precenjujte svojih moči in Vaše moči pri veslanju vedno porazdelite tako, da se boste po
prevoženi poti brez težav tudi vrnili. Zadržujte se v območju varovane priobalne cone do 300 m in
bodite pozorni na spreminjajoč veter in tokove, ki lahko premikanje občutno oteži.
Preprečevanje nastanka materialne škode!
• Vsi napihljivi izdelki so občutljivi na mraz. Izdelka zato pod temperaturo, nižjo od 15° C nikoli ne
razgrinjajte in napihujte!
• V primeru povišanja zračnega tlaka na žgočem soncu, ga morate ustrezno uravnati tako, da zrak
spustite.
• Pazite, da izdelek - še posebej, ko je napihnjen – ne bo prišel v stik s kamni, peskom ali ostrimi
predmeti in da se ne bo nikjer drgnil ali brusil, saj se lahko poškoduje folija.
• V varnostne ventile vtaknite samo ustrezne nastavke za tlačilko. V nasprotnem primeru se ventili lahko
poškodujejo.
• Ne napihnite preveč, saj obstaja nevarnost, da bodo vari popustili. Ventile po polnjenju dobro
zaprite.
• Preprečite stik z ostrimi, vročimi ali nevarnimi predmeti.
Sestavitev
Zaradi velikosti izdelka morata čoln sestavljati vedno dve odrasli osebi.
Prosimo, da ravnate v skladu s posameznimi koraki in v navedenem vrstnem redu.
To velja še posebej za napihovanje petih zračnih prekatov, saj lahko v nasprotnem
primeru pride do neenakomerne porazdelitve pritiska, kar lahko povzroči
nestabilnost in slabo vpliva na vozne lastnosti kajaka.
1. Za razpakiranje in razgrnitev izberite gladko in čisto površino z veliko prostora.
Prepričajte se, da ne manjka noben sestavni del in da so v brezhibnem stanju.
2. Čoln položite. Pri vsakem naslednjem sestavljanju kopalni čoln preglejte za Eventualnimi poškodbami,
luknjami in razpokanimi mesti in jih, tako kot je opisano kasneje, zatesnite.
Ko ste enkrat na vodi, morebitnih poškodb ne boste mogli več popraviti.
33
Page 34

INSHORE 290
Montaža vesel (slika 1, 2)
Važno!
Vesli se pri uporabi čolna ne smeta ločiti od vilic, temveč
morata biti zavarovani tako, da ju ne boste mogli izgubiti!
• Povežite obe cevi vesla, pri čemer se morajo pritiskači dobro slišno
in vidno zaskočiti. Konec cevi potisnite skozi vilico in zavarujte veslo
tako, da nanjo nataknete obroč. Ponovite postopek pri drugem veslu
na drugi strani čolna.
Obroč
Gumb
Montaža vijačnih ventilov:
Prekata na kopalnem čolnu / sta opremljena z odprtino z
navojem za priložene vijačne ventile. Zanko na ventilu potegnite
skozi odprtino z navojem
v za to predvideni zarezi. Ta postopek zahteva nekaj občutka in
potrpežljivosti, izveden mora biti skrbno, saj se le-tako prepreči
kasnejša možnost odvitja ventila.
Sedaj zavrtite bazo
kazalca.
tako, da bo le-ta trdno nameščena
trdno v odprtino z navojem v smeri urinega
slika 1
slika 2
Napihovanje
POZOR!
• Držite se pravega vrstnega reda pri napihovanju zračnih prekatov.
• Priporočljiv pritisk znaša 0,04 barov ( = 40 mbar = 0,58 psi).
• Preprečite prekomerno polnjenje zračnih prekatov, saj obstaja nevarnost čezmernega nategovanja al
celo raztrganje varov.
• Za napihovanje izdelka uporabljajte običajno zračno tlačilko ali tlačilko z dvojnim hodom z
ustreznimi nastavki in eventualno manometrom.
• Za napihovanje izdelka ne uporabljajte kompresorja ali steklenice s stisnjenim zrakom.
Le-to lahko poškoduje izdelek.
• Vse zračne prekate morate popolnoma napihniti!
slika 3
Vrstni red polnjenja (slika 4)
Po napolnitvi zračnega prekata prekontrolirajte zračni tlak vedno tako kot je
opisano pod „Kontrola zračnega tlaka“ na strani 35.
Zračne prekate napihnite v naslednjem vrstnem redu:
Varnostni prekat z vijačnim ventilom
1.
2. Prekat v dnu s čepnim ventilom
3. Vzgonski prekat z vijačnim ventilom
= oznaka na čolnu
slika 4
34
Page 35

INSHORE 290
Merilna črta
Kontrola pritiska
VAŽNO!
Material PVC se po prvem polnjenju izdelka še nekoliko bolj raztegne, zato ne
doseže njegovega prvotnega stanja.
Upoštevajte, da se podatki glede na zunanjo temperaturo lahko
rahlo spreminjajo.
Zračni prekat
nobenih gub. Ob pritisku s palcem na posamezen zračni prekat, se mora le-ta
rahlo podati.
napolnite tako, da bo na otip trd in na materialu ne bo vidnih
01
Merilni trak in kontrolno ravnilo (slika 5a, b)
Za kontrolo pritiska v zračnih prekatih / položite 0 na
kontrolnem ravnilu (slika 5b)na 0 na merilnem traku (slika 5a)
na izdelku.
Ob prvem polnjenju z zrakom največji raztezek merilnega traku NE
sme prekoračiti položaja A na kontrolnem ravnilu.
Po prvi uporabi napolnite vedno tako, da bo ležala 10 merilnega traku
med položajem A in položajem 10 kontrolnega ravnila.
Polnjenje zračnih prekatov (slika 6)
Varnostni prekat z vijačnim ventilom
Vzgonski prekat z vijačnim ventilom
1. Napolnite prekata
/ z zrakom in zaprite zapiralni čep (slike 3, str. 34) v smeri urinega
kazalca.
Prekat v dnu s čepnim ventilom
1. Odprite zapiralo na ventilu
.
2. Napolnite vsak posamezen zračni prekat.
3. Zaprite ventil in ga z rahlim pritiskom pogreznite.
Vrvica
Vrvico 600 cm pritrdite na obročke na čolnu.
Vrvico zavežite s križnim vozlom (slika 7).
01
9
8
7
6
5
4
3
2
1
0
slika 5a
0
slika 5b
slika 6
slika 7
35
Page 36

INSHORE 290
Razstavitev kopalnega čolna
Spuščanje zraka
Iz kopalnega čolna zrak spustite tako kot sledi:
1. Če želite spustiti zrak iz prekata v dnu izvlecite ventil s čepom stisnite zgonji del ali uporabite cevko
za spuščanje zraka .
2. Če želite spustiti zrak iz varnostnega in vzgonskega prekata / odvijte vijačne ventile popolnoma
iz baze.
Mornarska vreča
Izdelku je priložena mornarska vreča , v katero lahko kopalni čoln spravite za prevoz ali za
skladiščenje. Za zapiranje uporabite vrvico 200 cm.
Mornarsko vrečo lahko uporabljate na čolnu za varno shranjevanje pred škropljenjem z vodo hrane,
oblačil itd.. Vsekakor pa upoštevajte, da izdelek ni neprepusten za vodo. Zato v nobenem primeru ne
shranjujte občutljive predmete kot so: „fotoaparati“. Za uporabo na krovu priporočamo odstranitev
vrvice, zgornji konec se plosko zvije in s pomočjo sprijemalnih zapiral zapre.
Torba za shranjevanje (slika 8)
Izdelku je dodatno priložena torba za shranjevanje z zaščito pred
škropljenjem z vodo , ki so s pomočjo sprijemalnih zapiral pritrjeni
na notranji steni čolna. V njej se lahko shranijo manjši predmeti, vendar
tudi ta izdelek ni v celoti neprepusten za vodo. Zato v njej ne shranjujte
občutljivih predmetov.
slika 8
Transport
Kopalni čoln naj vedno prenašata dve osebi. Pri tem ga držite za vrvico na zadnjem delu in ročaj za
nošenje na prednjem delu.
Nega / vzdrževanje / skladiščenje
POZOR!
Uporabljajte samo negovalna sredstva, ki ne vsebujejo kislin ali bencina in nikoli
izdelkov na osnovi silikona.
1. Vaš kopalni čoln po vsaki uporabi temeljito očistite tako, da ga sperete z vodo in blago milnico, saj
tako odstranite kristale soli, zrnca peska in drugo ostalo umazanijo. Nato pustite, da se popolnoma
posuši.
2. Čoln skrbno zvijte.
3. Vaš kopalni čoln hranite v suhem in čistem prostoru brez neposrednega sončnega sevanja, kjer ne
bo izpostavljen velikim temperaturnim nihanjem. Pazite na to, da se ne bo deformiral, temveč bo
shranjen na ravni podlagi in ne bo dosegljiv glodalcem.
36
Page 37

INSHORE 290
Popravila
POZOR!
V primeru večjih poškodb popravil ne izvajajte sami.
Manjše poškodbe lahko popravite s priloženim setom za popravila.
1. Popolnoma spustite zrak iz čolna in mesto poškodbe očistite z raztopino na osnovi alkohola.
Neposredno bližino razpoke ali luknje naredite rahlo hrapavo s smirkovim papirjem.
2. Obrežite sedaj krpico za popravilo, ki pokrije poškodovani predel in je na vseh straneh večji za
1,25 cm od poškodovaneg mesta.
3. Lepilo nanesite tako na poškodovano mesto na kopalnem čolnu, kot tudi na krpico za popravilo.
Lepilo naj se suši pribl. 3 minute.
4. Na krpico za popravilo pritisnite z mehkim predmetom. Pazite na to, da
delate na ravni podlagi brez gub in nagrbančenih mest. Odstranite zračne mehurčke z zaobljenim
predmetom nežno od znotraj navzven.
5. Po popravilu počakajte najmanj 12 ur do naslednjega polnjenja z zrakom.
Napotki za odlaganje v smeti
Embalažo in proizvod odložite v skladu z varovanjem okolja! Proizvod lahko v smeti odložite pri
pooblaščenem podjetju za odlaganje ali pri Vaši občinski komunalni službi. Upoštevajte trenutno
veljavne predpise.
3 leta garancije
Izdelek je bil izdelan z veliko skrbnostjo in pod stalnim nadzorom. Za ta izdelek dobite 3 leta garancije
od dneva nakupa. Prosimo, shranite račun.
Garancija velja samo za napake na materialu in proizvodne napake in ne velja v primeru zlorabe ali
nepravilne uporabe. Vaših zakonskih pravic, še posebej pravic glede odgovornosti za stvarne in pravne
napake, ta garancija ne omejuje.
V primeru uveljavljanja garancije nas prosimo pokličite na našo brezplačno telefonsko številko servisa
ali nam pišite na naš elektronski naslov. Deležni boste osebne obravnave. V primeru garancije boste
lahko na podlagi dogovora z našimi sodelavci na servisu pokvarjene dele nefrankirano poslali na
navedeni naslov servisnega mesta. Nato boste nemudoma brezplačno prejeli nov ali popravljen del.
Garancijski čas se zaradi morebitnih popravil na osnovi garancije, zakonske odgovornosti za stvarne in
pravne napake izpolnitve ali kulantnosti ne podaljša. To velja tudi za nadomestne ali popravljene dele.
Morebitna popravila po izteku garancije so plačljiva.
IAN: 61553
Service Naslov
Telefonska vroča linija 00800-88080808 (pon.–pet. 10 - 16 h, brezplačno)
Deutsch-Slowenische Industrie- und Handelskammer • Tomšičeva 3 • SI-1000 Ljubljana
si@nws-service.com
- www.nws-service.com -
37
Page 38

INSHORE 290
Garancijski list
1. S tem garancijskim listom jamčimo DELTA-SPORT HANDELSKONTOR GMBH, da bo izdelek v
garancijskem roku ob normalni in pravilni uporabi brezhibno deloval in se zavezujemo, da bomo
ob izpolnjenih spodaj navedenih pogojih odpravili morebitne pomanjkljivosti in okvare zaradi napak
v materialu ali izdelavi oz. po svoji presoji izdelek zamenjali ali vrnili kupnino.
2. Garancijski rok za proizvod je 3 lega od dneva nabave.
3. Kupec je dolžan okvaro javiti pooblaščenemu servisu oz. se informirati o nadaljnih postopkih na
zgoraj navedeni telefonski številki. Svetujemo vam, da pred tem natančno preberete navodila o sesta
vi in uporabi izdelka.
4. Kupec je dolžan pooblaščenemu servisu predložiti garancijski list in račun, kot potrdilo in dokazilo o
nakupu.
5. V primeru, da proizvod popravlja nepooblaščeni servis ali oseba, kupec ne more uveljavl jati
zahtevkov iz te garancije.
6. Vzroki za okvaro oz. nedelovanje izdelka morajo biti lastnosti stvari same, in ne vzroki, ki so zunaj
proizvajalčeve oz. prodajalčeve sfere. Kupec ne more uveljavljati zahtevkov iz te garancije, če se ni
držal priloženih navodil za sestavo in uporabo izdelka ali, če je izdelek kakorkoli spremenjen ali
nepravilno vzdrževan.
7. Jamčimo servisiranje in rezervne dele za dobo, ki je minimalno zahtevana s strani zakono daje.
8. Obrabni deli oz. potrošni material so izvzeti iz garancije.
9. Vsi potrebni podatki za uveljaljanje garancije se nahajajo na dveh ločenih dokumentih
(garancijski list, račun).
Prodajalec: Lidl d.o.o.k.d., Žeje pri Komendi 100, SI-1218 Komenda
38
Page 39

PŘEHLED DÍLŮ INSHORE 290
INSHORE 290
Druckknopf
39
01
0
Návod k obsluze
Page 40

INSHORE 290
Prosím, přečtěte si před sestavením a použitím artiklu nejdříve úplně návod k použití a uschovejte si ho pro případné, pozdější nahlédnutí! Návod k použití obsahuje důležité, podrobné
údaje k výrobku, sestavení, provozu, ošetřování a bezpečnostním pravidlům. Vodní sport
přináší vždy určitá rizika a podrobná znalost produktu může zabránit eventuálním škodám způsobeným
osobám anebo dokonce jejich usmrcení.
Technické údaje / Použité symboly
dovolený počet osob: ................ 2 dospělé osoby / 2 děti
přípustné zatížení: .................................... 260 kg (573,30 lbs.)
maximální tlak vzduchu: .......................................... 0,04 bar (0,58 psi)
Délka: ...................................................................................................... cca 272 cm
Šířka: .................................................................................................... cca 141,5 cm
Výška: ....................................................................................................... cca 62 cm
Váha: ............................................................................................................ cca 6 kg
Názvy dílů / Obsah dodávky
.......... Bezpečnostní komora se šroubovacím ventilem
.......... Podlahová komora s ventilem se zátkou
.......... Vztlaková komora se šroubovacím ventilem
.......... Šroubovací ventil (2 x)
.......... Uchycení vesel (4 x)
.......... Ucho na nošení (1 x)
.......... Oka pro šňůru (9 x)
.......... Šňůra (2 x) ( 1 x 600 cm / 1 x 200 cm )
............................................... Veslo (2 x)
......... Kroužek proti stékající vodě (2 x)
...................................... Lodní pytel (1 x)
.............................................. Taška (1 x)
................... Opravářská souprava (1 x)
.......................... Kontrolní pravítko (1 x)
............... Odvzdušňovací trubička (2 x)
........................... Návod k obsluze (1 x)
Použití k určenému účelu
Tento artikl je určený k privátnímu používání.
Kategorie návrhu D „chráněné vodní toky“: Vyvinuté pro jízdy v chráněných vodách blízko břehu,
malých zátokách, na malých jezerech, úzkých řekách a kanálech, na kterých se vyskytují povětrnostní
podmínky s větrem do síly 4 a signifikantní výšky vln do 0,3 m nebo příležitostně výšky nejvýše 0,5 m,
způsobené např. projíždějící lodí.
40
Page 41

INSHORE 290
Pravidla chování / Bezpečnostní upozornění
Člun je přezkoušený a bezpečný výrobek pro vodní sport. Přesto prosíme o zachování následujících
pravidel a předpisů:
POZOR!
Vaše ohleduplnost a sebe ohodnocení na vodě jsou velmi důležité.
Nikdy nepřeceňujte Vaše síly a řidičské umění! Držte se neustále v blízkosti břehu!
Dbejte na povětrnostní podmínky, varování před bouřemi nebo na eventuální
světelná znamení!
POZOR!
Prosíme, dodržujte vždy bezpečnostní pravidla, platné, zákonné předpisy pro jezera,
otevřené vody a noste vždy v zájmu vlastní bezpečnosti přezkoušenou záchranou
vestu.
VAROVÁNÍ!
Nebezpečí uškrcení dětí! Nenechávejte si hrát děti bez dozoru s obalovým
materiálem nebo artiklem.
VAROVÁNÍ!
Jestliže vypadla osoba z člunu, musí nastupovat zpátky vždy jen přes záď nebo příď
člunu, jinak hrozí nebezpečí jeho převržení.
Nebezpečí zranění!
Pozor při větru směrem od pevniny!
Pozor při proudění vody směrem od pevniny!
• Dbejte na rovnoměrné rozmístění osob a nákladu ve člunu, jinak hrozí nebezpečí
převržení.
• Dbejte na údaje na typovém štítku, přípustné zatížení, povolený počet osob a výstražná upozornění.
• Dodržujte vždy místní předpisy pro provoz lodí.
• Nepřepravujte ve člunu žádné ostré nebo špičaté předměty.
• Chraňte člun před pochybnými tekutinami nebo kyselinami. Mohou vzniknout neopravitelné škody.
• Chraňte člun před horkem a ohněm! Pozor na zapálené cigarety!
• Dávejte pozor na kamenité dno, aby jste zabránili poškození člunu.
• Jestliže dojde při jízdě na vodě k poškození jedné ze tří vnitřních, vzduchových komor, neopouštějte
člun. Vztlaková síla zbývajících čtyř neporušených vnitřních komor je dostačující k udržení člunu na
vodě.
• Nepřepravujte v žádném případě nafouknutý člun na vozidlech.
• Nenechávejte nikdy prázdný člun na vodě. Voda ho může odnést rychleji než je ho možné
dosáhnout plaváním.
• Před použitím zajistěte, aby byla ve člunu pádla, jinak není možné jeho dostatečné řízení.
• Neprovádějte na člunu žádné technické změny. Jakékoliv změny ohrožují jeho provozuschopnost.
41
Page 42

INSHORE 290
• Nepoužívejte člun nikdy pod vlivem alkoholu, drog nebo léků.
• Nepřeceňujte svoje síly a rozdělte si je tak, aby Vám vystačily při pádlování i na zpáteční trasu.
Zdržujte se s člunem v chráněných pobřežních oblastech do vzdálenosti 300 m od břehu, dávejte
pozor na měnící se větrné podmínky a změny proudění vody, která mohou ztížit Vaší jízdu.
Zabránění věcným škodám!
• Všechny nafukovací artikly jsou choulostivé na chlad. Nerozbalujte a nenafukujte artikl nikdy při nižší
teplotě než 15° C.
• Při zvýšení tlaku vzduchu v komorách člunu vlivem slunečního záření je nutno odpustit část vzduchu,
aby nedošlo k jeho roztržení.
• Dávejte pozor, aby se obzvlášť nafouknutý člun nedotýkal kamenů, písku, ostrých předmětů nebo se
neodíral – jinak může dojít k poškození fólie.
• Používejte jen vhodné adaptéry pro bezpečnostní ventily. V opačném případě může dojít k poškození
ventilů.
• Nenafukujte člun větším tlakem vzduchu, může dojít k roztržení svařených švů. Po nafouknutí člunu
nezapomeňte uzavřít řádně všechny ventily.
• Zabraňte kontaktu s ostrými, horkými, špičatými nebo nebezpečnými předměty.
Sestavení
Sestavení artiklu mají provádět, z důvodů jeho velikosti, vždy dvě dospělé osoby.
Prosíme, postupujte při sestavování v popsaném pořadí. Toto platí obzvlášť pro
pořadí při nafukování tří vzduchových komor, jinak může dojít k nerovnoměrnému
rozdělení tlaku a tím k nestabilitě člunu a negativnímu ovlivnění jeho jízdních vlastností.
1. Zvolte si pro vybalení a rozložení člunu hladkou a čistou plochu s dostatečným okolním prostorem.
Zkontrolujte, jestli jsou v balení všechny díly a jestli jsou v bezvadném stavu.
2. Rozložte korpus člunu. Od druhého sestavování kontrolujte člun, jestli není poškozený, nemá díry
nebo trhliny, které je nutné opravit – jak je dále popsáno. Za provozu, na vodě nejsou opravy možné.
42
Page 43

INSHORE 290
Montáž vesel (obr. 1, 2)
Důležité!
Při používání člunu se nesmí vesla vyjímat z jejich uchycení,
vesla musí zůstat uchycená, tzn. zajištěná proti ztrátě!
• Spojte obě trubky vesla, jistící kolíky musí slyšitelně a znatelně zaskočit.
Prostrčte konec trubky uchycením vesla a zajistěte veslo nasunutím
kroužku proti stékající vodě. U druhého vesla opakujte postup na
druhé straně člunu
Kroužek proti stékající vodě
Patentní uzávěr
Montáž šroubovacích ventilů:
Komory / člunu jsou vybavené otvorem se závitem pro
přiložené šroubovací ventily. Přetáhněte smyčku ventilu přes
otvor se závitem tak, aby pevně zapadla do příslušné drážky.
Tento úkon vyžaduje trochu šikovnosti, trpělivost a důkladné
provedení aby bylo zajištěné fixování ventilu proti ztrátě při jeho
vytažení.
Nyní zašroubujte základnu
do závitového otvoru.
ve směru otáčení hodinových ručiček
obr. 1
obr. 2
Napumpování
POZOR!
• Dodržte správné pořadí nafukování vzduchových komor.
• Provozní tlak je stanovený na 0,04 bar ( = 40 mbar = 0,58 psi).
• Nafukujte vzduchové komory jen stanoveným tlakem, v opačném případě hrozí nebezpečí přepětí
materiálu anebo dokonce roztržení svařovaných švů.
• Pro napumpování artiklu používejte jen běžné nožní pumpy nebo pumpy s dvojitými válci, obojí jen s
vhodnými adaptéry a popřípadě s manometrem.
• Nepoužívejte k napumpování artiklu kompresor nebo hadice napájené ze systému tlakového
vzduchu. Obojí může vést k poškození artiklu.
• Napumpujte vždy úplně všechny komory!
obr. 3
Pořadí pumpování (obr. 4)
Po napumpování jedné vzduchové komory kontrolujte vždy tlak vzduchu, jak je
popsáno na stránce 44 v odstavci „Kontrola provozního tlaku“.
Pumpujte vzduchové komory v následujícím pořadí:
Bezpečnostní komoru se šroubovacím ventilem
1.
2. Podlahovou komoru s ventilem se zátkou
3. Vztlakovou komoru se šroubovacím ventilem
= značení na člunu
obr. 4
43
Page 44

INSHORE 290
Měřící proužek
Kontrola provozního tlaku
DŮLEŽITÉ!
Při prvním napumpováním se materiál PVC roztáhne a později nedosáhne jeho
původní rozměr.
Dbejte na to, že mohou být uvedené údaje odlišné
např. vlivem zatížení a venkovní teploty.
Napumpujte vzduchovou komoru
až je na omak pevná a bez záhybů
materiálu. Zatlačení palcem do materiálu musí být ještě možné.
Měřící proužek a kontrolní pravítko (obr. 5a, b)
Pro kontrolu provozního tlaku vzduchových komor / přiložte
znaménko 0 kontrolního pravítka (obr. 5b) k označení 0
měřícího proužku na artiklu (obr. 5a).
Při prvním napumpování NESMÍ přesáhnout roztažení měřícího
proužku pozici A na kontrolním pravítku.
Po prvním použití pumpujte vždy tak, aby se nacházelo značení 10
na měřícím proužku mezi pozicemi A a 10 na kontrolním pravítku.
Plnění vzduchových komor (obr. 6)
Bezpečnostní komora se šroubovacím ventilem
Vztlaková komora se šroubovacím ventilem
1. Naplňte komory
hodinových ručiček.
/ vzduchem a uzavřete čepičku (obr. 3, s. 43), otáčením ve směru otáčení
01
9
8
7
6
5
4
3
2
1
0
obr. 5a
01
0
obr. 5b
Podlahová komora s ventilem se zátkou
1. Otevřete ventilový uzávěr
.
2. Napumpujte příslušnou vzduchovou komoru.
3. Uzavřete ventil a zatlačte ho mírným tlakem do komory člunu.
Šňůra
Připevněte šňůru o délce 600 cm do ok člunu.
Zajistěte šňůru křížovým uzlem (obr. 7).
44
obr. 6
obr. 7
Page 45

INSHORE 290
Složení člunu
Odvzdušnění
Vypusťte vzduch ze člunu následujícím způsobem:
1. Pro vypuštění podlahové komory vytáhněte ventil ze zapuštění a stlačte lehce jeho dřík nebo
použijte odvzdušňovací trubičku .
2. Pro vypuštění bezpečnostní a vztlakové komory / vyšroubujte kompletně ventily ze základu.
Lodní pyte
K artiklu je přiložený lodní pytel , do kterého je možné složit člun pro přepravu nebo jeho skladování.
K jeho uzavření použijte šňůru o délce 200 cm. Mimoto je možné používat lodní pytel ve člunu na
uchovávání potravin, oblečení, atd.. Nezapomeňte ale, že není tento artikl vodotěsný.
Proto do něho neukládejte v žádném případě choulostivé předměty jako např. kameru.
Pro použití ve člunu se doporučuje uzavření bez šňůry, horní konec srolovaný na plocho a uzavřený
pomocí suchého zipu.
Taška na uchovávání předmětů (obr. 8)
Přídavně je k artiklu přiložená ještě taška , chráněná proti stříkající
vodě, připevnitelná pomocí suchých zipů na vnitřní stranu člunu.
Do tašky je možné také uložit menší předměty, ale ani tato taška není
vodotěsná. Proto do ní také neumisťujte žádné choulostivé předměty.
Přeprava
Přepravujte člun vždy ve dvou a používejte k tomu šňůru na zádi a ucho na nošení na přídi.
obr. 8
Ošetřování / Údržba / Skladováníg
POZOR!
Používejte jen ošetřovací prostředky bez podílů kyselin, benzínu a nikdy výrobky se
silikonovou bází.
1. Omývejte člun důkladně po každém použití čerstvou vodou a slabým mýdlovým roztokem, aby jste
odstranili zrnka soli, písku a jiná podobná znečištění. Nakonec nechte člun úplně vyschnout.
2. Člun pečlivě složte.
3. Skladujte člun na čistém, suchém místě, bez přímého slunečního záření a velkých tepelných výkyvů.
Dbejte na to, aby se nezmačkal a nebyl v dosahu hlodavců.
45
Page 46

INSHORE 290
Opravy
POZOR!
Větší poškození by jste neměli vlastnoručně opravovat.
Malá poškození můžete opravit dodanou opravářskou soupravou.
1. Člun úplně vypusťte a vyčistěte postižené místo roztokem s obsahem alkoholu. Zdrsněte okolí díry
nebo trhliny jemným smirkovým papírem.
2. Přistřihněte si záplatu tak, aby při přiložení překrývala na všech stranách poškozené místo kolem
dokola o 1,25 cm.
3. Naneste lepidlo zároveň na poškozené místo člunu i záplatu. Nechte lepidlo 3 minuty zaschnout.
4. Přitlačte pevně záplatu přes měkký hadr na povrch člunu. Dbejte na to, aby jste pracovali na rovné
podložce bez záhybů. Případně vzniklé vzduchové bubliny vytlačte zakulaceným předmětem směrem
ze středu ven.
5. Po opravě můžete člun napumpovat nejdříve až za 12 hodin.
Pokyny k likvidaci
Obal a výrobek prosím roztřiďte a ekologicky zlikvidujte! Výrobek zlikvidujte prostřednictvím
uznávaného likvidačního podniku nebo vašeho komunálního sběrného střediska Dodržujte
aktuálně platné předpisy.
3 roky záruka
Produkt byl vyrobený s velkou pečlivostí a byl během výroby neustále kontrolovaný.
Dostáváte na něj tři roky záruku od dne zakoupení. Uschovejte si pokladní stvrzenku.
Záruka platí na chyby výroby nebo materiálu a zaniká v případě nedovoleného nebo neodborného
zacházení s výrobkem. Záruka neomezuje Vaše zákonná práva ani práva ze záruky.
Jestliže chcete uplatnit nárok ze záruky kontaktujte nás přes naší bezplatnou servisní horkou linku
nebo emailem. V každém případě Vám osobně poradíme. V případě záruky je možné, po dohodě s
pracovníkem našeho servisu, zaslat závadné součástky bezplatně na uvedenou adresu.
Okamžitě obdržíte zpátky nový nebo opravený díl.
Opravy během záruční doby, na základě zákonného ručení nebo v rámci kulanční likvidace
neprodlužují záruku. Toto platí i pro nahrazené nebo opravené díly.
Po uplynutí záruční doby provádíme opravy za úhradu.
IAN: 61553
Adresa služby
Hotline výrobku 00800-142025 (po. - pá. 10 - 16 hod., zdarma)
Firma BOHEMIA Troppau • Masarykova 342/39 • CZ-74601 Opava
cz@nws-service.com
- www.nws-service.com -
46
Page 47

PREHĽAD ČASTÍ INSHORE 290
INSHORE 290
Tlačidlo
47
01
0
Návod na obsluhu
Page 48

INSHORE 290
Pred montážou a použitím produktu si najskôr prečítajte kompletný návod na použitie a tento
si odložte! V návode sú uvedené dôležité podrobnosti ohľadom montáže, prevádzky, údržby
a bezpečnostných pokynov. Keďže vodné športy sú spojené vždy s rizikami, vďaka Vašim
presným poznatkom o produkte predídete eventuálnym zraneniam alebo dokonca smrteľným prípadom.
Technické údaje / použité symboly
Prípustný počet osôb: ................. 2 dospelé osoby / 2 deti
Prípustné užitočné zaťaženie: .................. 260 kg (573,30 lb)
Max. tlak vzduchu: ............................................... 0,04 baru (0,58 psi)
Dĺžka: ...................................................................................................... cca 272 cm
Šírka: .................................................................................................... cca 141,5 cm
Výška: ....................................................................................................... cca 62 cm
Hmotnosť: .................................................................................................... cca 6 kg
Označenie častí / obsah
.............. Bezpečnostná komora so skrutkovým ventilom
.............. Dno s kolíkovým ventilom
.............. Vztlaková komora so skrutkovým ventilom
.............. Skrutkový ventil (2 x)
.............. Násady pre veslá (4 x)
.............. Rukoväť (1 x)
.............. Očká pre šnúru (9 x)
.............. Šnúra (2 x) ( 1 x 600 cm / 1 x 200 cm )
......................................... Veslo (2 x)
............ Odkvapkávací krúžok (2 x)
...................... Námornícky vak (1 x)
....................... Úschovná taška (1 x)
...................... Lepiaca súprava (1 x)
................... Kontrolné pravítko (1 x)
........ Odvzdušňovacia trubica (2 x)
.................. Návod na obsluhu (1 x)
Použitie podľa predpisov
Tento artikel bol vyvinutý na súkromné použitie.
Návrhová kategória D „chránené vodstvá“: Navrhnutý pre plavby v chránených pobrežných vodách,
vodstvách, v malých zálivoch, úzkych riekach a kanáloch, kde sa v dôsledku vetra o sile do 4 môžu
vytvoriť vlny do výšky 0,3 m a ojedinele až do výšky 0,5 m, napríklad v dôsledku okolo plávajúcich
lodí.
48
Page 49

INSHORE 290
Pravidlá správania / bezpečnostné pokyny
Tento čln bol testovaný a pri vodných športoch je bezpečný. Napriek tomu Vás naliehavo prosíme, aby
ste dodržiavali nasledovné pravidlá a predpisy:
UPOZORNENIE!
Je mimoriadne dôležité, aby ste boli na vode obozretní a sebakritickí.
Nikdy nepreceňujte svoje sily a ovládacie schopnosti! Vždy sa zdržiavajte v blízkosti brehu! Sledujte poveternostnú situáciu, upozornenia týkajúce sa nepriaznivého
počasia alebo eventuálne svetelné signály!
UPOZORNENIE!
Vždy rešpektujte bezpečnostné pravidlá a platné zákonné predpisy vzťahujúce
sa na jazerá a otvorené vodstvá a v záujme Vašej vlastnej bezpečnosti noste vždy
otestovanú záchrannú vestu.
VÝSTRAŽNÉ UPOZORNENIE!
Nebezpečenstvo ohrozenia života detí udusením! Deťom nedovoľte hrať sa s
obalovým materiálom a nenechávajte ich bez dozoru hrať sa s produktom.
VÝSTRAŽNÉ UPOZORNENIE!
Ak niekto z člna vypadne, do člna sa musí dostať výlučne prednou alebo zadnou
časťou, pretože pri nástupe do člna z boku, hrozí vysoké riziko prevrátenia člna.
Nebezpečenstvo zranenia!
Pozor na vietor prúdiaci z pevniny!
Pozor na prúdy od pevniny!
• Zaťaženie člna osobami a nákladom musí byť vždy rovnomerné, pretože čln by sa
inak mohol prevrátiť.
• Rešpektujte pokyny na typovom štítku, prípustné užitočné zaťaženie, počet osôb a varovný pokyn.
• Vždy sa riaďte lokálnymi ustanoveniami pre lodnú plavbu.
• So sebou si neberte žiadne ostré alebo špicaté predmety.
• Čln chráňte pred kontaktom s podozrivými tekutinami alebo kyselinami. Čln by sa mohol navždy
poškodiť.
• Čln nevystavujte vysokej teplote ani ohňu! Pozor na tlejúce cigarety!
• Dajte pozor, aby ste sa nedostali na kamenistý podklad, mohol by sa poškodiť trup člna.
• Ak sa počas plavby poškodí jedna z troch vnútorných komôr, čln neopúšťajte. Vztlaková sila štyroch
vnútorných nepoškodených komôr čln bezpečne udrží nad vodou.
• Čln v žiadnom prípade neprepravujte na motorových vozidlách vtedy, keď je nafúkaný.
• Čln nikdy nenechajte na vode neobsadený. Čln odpláva rýchlejšie, než by ste ho plávaním opäť
dostihli.
• Pred plavbou si zoberte vždy aj veslá, pretože bez vesiel nebudete môcť čln dostatočne ovládať.
• Na Vašom člne nevykonávajte žiadne technické zmeny. Realizáciou akýchkoľvek zmien ohrozíte
prevádzkyschopnosť člna.
49
Page 50

INSHORE 290
• Čln nikdy nepoužite pod vplyvom alkoholu, drog alebo liekov.
• Svoje sily nikdy nepreceňujte a sily si pri veslovaní rozdeľte tak, aby ste vládali doveslovať späť k
brehu. V chránených pobrežných zónach sa zdržiavajte vo vzdialenosti do 300 m od brehu a
všímajte si meniace sa pomery prúdenia vetra a vody, v dôsledku ktorých sa pohyb člna vpred
výrazne sťaží.
Prevencia proti vzniku vecných škôd!
• Všetky nafukovacie produkty sú citlivé na chlad. Produkt preto nikdy nerozkladajte ani nenafukujte pri
teplote nižšej ako 15° C!
• Ak tlak vzduchu v člne na silnom slnku vzrastie, znížte ho adekvátnym vypustením vzduchu.
• Dajte pozor, aby sa čln – hlavne vtedy keď je nafúkaný, nedotkol kameňov, štrku alebo špicatých
predmetov, aby sa nikde o kamene nedrel alebo sa po nich nekĺzal, pretože sa môže poškodiť fólia.
• Pri nafukovaní člna použite vždy len vhodné adaptéry, tieto zasuňte do bezpečnostných ventilov.
V opačnom prípade môžete poškodiť ventily.
• Čln nenafukujte príliš, pretože by mohli prasknúť švy. Ventily potom dobre uzatvorte.
• Člna sa nedotýkajte ostrými, horúcimi, špicatými alebo nebezpečnými predmetmi.
Montáž
Čln by mali vzhľadom na jeho rozmery montovať vždy dve dospelé osoby.
Pri montáži postupujte podľa zadaného poradia. To platí zvlášť pre nafukovanie
troch vzduchových komôr, v opačnom prípade by sa tlak rozdelil nerovnomerne,
čo by spôsobilo nestabilitu člna a zhoršili by sa tým jeho plavebné vlastnosti.
1. Na vybalenie a rozloženie člna si zvoľte hladkú, čistú a priestrannú plochu. Skontrolujte kompletnosť
všetkých dielov, tieto nesmú byť poškodené.
2. Rozložte trup člna. Pri druhej montáži čln skontrolujte, čln nesmie byť poškodený, deravý, nesmú byť
na ňom trhliny, eventuálne poškodenia zalepte podľa návodu, ktorý je uvedený v nasledujúcom texte.
Keď sa dostanete s člnom na vodu, eventuálne poškodenia už neodstránite.
50
Page 51

INSHORE 290
Montáž vesiel (obr. 1, 2)
Dôležité upozornenie!
Veslá pri veslovaní nevyberajte z násad, vždy ich
nechajte vložené v násadách, aby sa nestratili!
• Spojte obidve rúrky vesiel, pričom patentné gombíky musia viditeľne
zapadnúť, zapadnutie gombíkov je počuť. Koniec rúrky presuňte
násadou a veslo zabezpečte nasunutím odkvapkávacieho krúžka.
Druhé veslo na druhej strane člna nasaďte rovnakým spôsobom.
Odkvapkávací krúžok
Tlačidlo
Montáž skrutkových ventilov:
V každej komore člna / sa nachádza závitový otvor pre
priložené skrutkové ventily. Očko ventilu priložte na otvor so
závitom , aby toto pevne priľahlo do určenej drážky.
Tento úkon si vyžaduje trochu citu v končekoch prstov a trochu
trpezlivosti, je potrebné vykonať to ale zodpovedne, aby sa ventil z
otvoru neskôr neuvoľnil.
Uzáver
ručičiek do otvoru so závitom.
teraz pevne zaskrutkujte v smere pohybu hodinových
obr. 1
obr. 2
Fúkanie
UPOZORNENIE!
• Vzduchové komory nafukujte v správnom poradí.
• Odporučená hodnota prevádzkového tlaku predstavuje 0,04 baru ( = 40 milibarov = 0,58 psi).
• Vzduchové komory príliš nenafukujte, švy by sa mohli príliš natiahnuť, ba dokonca aj prasknúť.
• Na nafúkanie člna použite bežné nožné pumpy alebo dvojzdvihové piestové pumpy s možnosťou
použitia násad a prípadne manometra.
• Nepoužite kompresor ani fľašu so stlačeným vzduchom. Čln by sa mohol poškodiť.
• Všetky vzduchové komory nafúkajte vždy dostatočne!
obr. 3
Poradie fúkania (obr. 4)
Po nafúkaní jednej vzduchovej komory vždy skontrolujte tlak, postupujte podľa
návodu „Kontrola prevádzkového tlaku“ na strane 52.
Vzduchové komory fúkajte v nasledovnom poradí:
Bezpečnostná komora so skrutkovým ventilom
1.
2. Dno s kolíkovým ventilom
3. Vztlaková komora so skrutkovým ventilom
= označenie na člne
obr. 4
51
Page 52

INSHORE 290
Merný prúžok
Kontrola prevádzkového tlaku
DÔLEŽITÉ UPOZORNENIE!
PVC materiál sa po prvom nafúkaní roztiahne ešte trochu viac a do svojho pôvodného stavu sa už nevráti.
Majte na pamäti, že údaje nemusia byť celkom presné, môžu
vykazovať odchýlky v závislosti od zaťaženia člna a vonkajšej
teploty.
Vzduchové komory
nafúkajte do tej miery, aby boli na dotyk pevné a na
povrchu materiálu neboli viditeľné záhyby. Keď na príslušnú vzduchovú komoru
zatlačíte palcom, túto by ste mali mierne stlačiť.
01
Merný prúžok a kontrolné pravítko (obr. 5a, b)
Pre kontrolu prevádzkového tlaku vo vzduchových komorách /
priložte 0 kontrolného pravítka (obr. 5b) na 0 merného
prúžka (obr. 5a).
Pri prvom nafúkaní sa merný prúžok NESMIE roztiahnuť viac, ako
označuje poloha A na kontrolnom pravítku.
Čln po prvom použití nafúkajte vždy tak, aby 10 merného prúžka
ležala medzi polohou A a polohou 10 kontrolného pravítka.
Plnenie vzduchových komôr (obr. 6)
Bezpečnostná komora so skrutkovým ventilom
Vztlaková komora so skrutkovým ventilom
1. Komory
/ naplňte vzduchom a uzáver (obr. 3, strana 51) uzatvorte v smere pohybu
hodinových ručičiek.
Bočné komory s kolíkovým ventilom
1. Otvorte uzáver ventilu
.
2. Nafúkajte príslušnú vzduchovú komoru.
3. Uzatvorte uzáver ventilu a ventil zľahka zatlačte.
Šnúra
600 cm šnúru upevnite na očkách člna.
Šnúru zabezpečte krížovým uzlom (obr. 7).
01
9
8
7
6
5
4
3
2
1
0
obr. 5a
0
obr. 5b
obr. 6
obr. 7
52
Page 53

INSHORE 290
Demontáž člna
Vypustenie vzduchu
Vzduch z člna vypustite nasledovne:
1. Pre odvzdušnenie dna vytiahnite kolíkový ventil a otvor zľahka stlačte, alebo použite
odvzdušňovaciu trubicu .
2. Pre odvzdušnenie bezpečnostných a vztlakových komôr / kompletne vyskrutkujte skrutkové
ventily.
Námornícky vak
K člnu patrí námornícky vak , do ktorého môžete čln vložiť kvôli preprave alebo skladovaniu.
Na uzatvorenie vaku použitie 200 cm šnúru. Vak môžete v člne ďalej použiť na uskladnenie potravín,
odevu atď., vak ich ochráni proti striekajúcej vode. Majte však na pamäti, že vak nie je vodotesný.
Z toho dôvodu ho nepoužívajte na prepravu citlivých predmetov ako sú napr. fotoaparáty.
V prípade používania vaku v člne sa odporúča odstrániť šnúru, vrchný koniec zvinúť do plochého tvaru
a vak uzatvoriť pomocou suchých zipsov.
Úschovná taška (obr. 8)
K člnu patrí aj úschovná taška poskytujúca ochranu proti striekajúcej
vode, ktorá sa upevní pomocou suchých zipsov na vnútornú stenu člna.
V nej je možné uchovať menšie predmety suché, taška nie je taktiež
vodotesná. Z toho dôvodu v nej neprevážajte citlivé predmety.
Transport
Čln prenášajte vždy vo dvojici a uchopte ho za zadnú šnúru a prednú rukoväť .
obr. 8
Ošetrovanie / údržba / skladovanie
UPOZORNENIE!
Na ošetrenie člna používajte len prostriedky neobsahujúce kyseliny alebo benzín a
nikdy nepoužite produkty na báze silikónu.
1. Čln po každom použití dôkladne vyčistite, opláchnite ho mydlovým roztokom, použite čerstvú
vodu a jemné mydlo, tak ho zbavíte kryštálov soli, zrniek piesku a iných drobných nečistôt.
Potom ho nechajte celkom vyschnúť.
2. Čln dôkladne zložte.
3. Čln skladujte na čistom a suchom mieste, kde nesvieti priame slnko a kde je pomerne stála teplota.
Čln nesmie byť zdeformovaný, musí byť vyrovnaný a skladovaný tak, aby k nemu nemali prístup
hlodavce.
53
Page 54

INSHORE 290
Opravy
UPOZORNENIE!
Kajak neopravujte v prípade rozsiahlejšieho poškodenia.
Drobnejšie poškodenia môžete opraviť pomocou priloženej lepiacej súpravy.
1. Z člna úplne vypustite vzduch a poškodené miesto vyčistite roztokom na báze alkoholu.
Okolie trhliny zľahka zdrsnite jemným brúsnym papierom.
2. Teraz vystrihnite primerane veľkú záplatku, ktorá poškodené miesto prekryje z každej strany
o 1,25 cm.
3. Lepidlo naneste na poškodené miesto na člne a aj na záplatku. Lepidlo nechajte cca 3 minúty schnúť.
4. Záplatku pevne pritlačte mäkkým predmetom. Pracujte na rovnom podklade bez výstupkov a
záhybov. Eventuálne vzduchové bubliny zľahka vytlačte zaobleným predmetom od stredu k okrajom.
5. Čln potom minimálne 12 hodín nenafukujte.
Pokyny k likvidácii
Obal a tovar zlikvidujte, prosím, adekvátne životnému prostrediu a roztriedený podľa druhu!
Tovar zlikvidujte prostredníctvom podniku schváleného na likvidáciu odpadu alebo prostredníctvom
vašej komunálnej správy obce. Dodržiavajte aktuálne platné predpisy.
3 roky záruka
Produkt bol vyrobený s maximálnou zodpovednosťou a pod neustálou kontrolou.
Na tento produkt sa vzťahuje trojročná záruka platná od dátumu kúpy. Pokladničný lístok si odložte.
Záruka sa vzťahuje len na materiálové a výrobné chyby a v prípade nesprávneho alebo neodborného
použitia zaniká. Vaše zákonné práva, najmä záručné práva nie sú touto zárukou obmedzené.
V prípade zistenia nedostatku v záruke sa s nami spojte prostredníctvom našej bezplatnej servisnej
horúcej linky alebo prostredníctvom e-mailu. V každom prípade Vám osobne poradíme.
V záruke môžete znehodnotené diely po dohovore s našimi servisnými pracovníkmi bezplatne zaslať na
uvedenú servisnú adresu. My Vám potom okamžite a bezplatne zašleme nový alebo opravený diel.
Záručná doba sa v dôsledku výkonu opráv na základe záruky, zákonného záručného plnenia alebo
ochoty nepredlžuje. Toto sa vzťahuje aj na náhradné a opravené diely.
Opravy uplatnené po uplynutí záručnej doby sú spoplatnené.
IAN: 61553
Adresa služby
Hotline výrobku 00800-88080808 (pon - pia 10 - 16 hod. bezplatne)
Delta-Sport c/o Rhenus Logistics s.r.o. • Trnavská cesta 104 • SK-821 01 Bratislava
sk@nws-service.com
- www.nws-service.com -
54
Page 55

TEILEÜBERSICHT INSHORE 290
INSHORE 290
Druckknopf
55
01
0
Bedienungsanleitung
Page 56

INSHORE 290
Bitte lesen Sie vor dem Aufbau und der Benutzung des Artikels die Gebrauchsanweisung
vollständig durch und bewahren sie für späteres Nachlesen auf! Sie enthält wichtige Einzel-
heiten zum Produkt, dessen Aufbau, Betrieb und Pflege sowie Sicherheitsregeln. Da Wassersport immer Risiken birgt, verhindern genaue Kenntnisse über das Produkt eventuelle Personenschäden
oder sogar Todesfälle.
Technische Daten / Verwendete Symbole
zulässige Personenanzahl: ............2 Erwachsene / 2 Kinder
zulässige Nutzlast: ....................................260 kg (573,30 lbs.)
max. Luftdruck: .......................................................... 0,04 bar (0,58 psi)
Länge: ........................................................................................................ ca. 272 cm
Breite: ......................................................................................................ca. 141,5 cm
Höhe: .......................................................................................................... ca. 62 cm
Gewicht: ..........................................................................................................ca. 6 kg
Teilebezeichnung / Lieferumfang
.............. Sicherheitskammer mit Schraubventil
.............. Bodenkammer mit Stöpselventil
.............. Auftriebskammer mit Schraubventil
.............. Schraubventil (2 x)
.............. Ruderdollen (4 x)
.............. Tragegriff (1 x)
.............. Ösen für Kordel (9 x)
.............. Kordel (2 x) ( 1 x 600 cm / 1 x 200 cm )
........................................ Ruder (2 x)
................................... Tropfring (2 x)
.................................... Seesack (1 x)
............ Aufbewahrungstasche (1 x)
............................ Reparaturset (1 x)
.......................... Kontroll-Lineal (1 x)
................. Entlüftungsröhrchen (2 x)
.............. Bedienungsanleitung (1 x)
Bestimmungsgemäße Verwendung
Dieser Artikel wurde für den privaten Gebrauch entwickelt.
Entwurfskategorie D „geschützte Gewässer“: Entworfen für Fahrten in geschützten küstennahen
Gewässern, kleinen Buchten, auf kleinen Seen, schmalen Flüssen und Kanälen, bei denen Wetterverhältnisse mit einer Windstärke bis einschließlich 4 und signifikanten Wellenhöhen bis einschließlich 0,3
m und gelegentlich Wellenhöhen von höchstens 0,5 m, beispielsweise aufgrund vorbeifahrender Schiffe,
auftreten können.
56
Page 57

INSHORE 290
Verhaltensregeln / Sicherheitshinweise
Das Badeboot ist ein geprüftes und sicheres Wassersportgerät. Dennoch bitten wir Sie eindringlich,
die folgenden Regeln und Vorschriften einzuhalten:
ACHTUNG!
Ihre Umsicht und Selbsteinschätzung auf dem Wasser ist enorm wichtig.
Überschätzen Sie Ihre Kräfte und Steuerkünste niemals! Halten Sie sich stets in
Ufernähe auf! Beachten Sie die Wetterlage, Unwetterwarnungen oder eventuelle
Leuchtsignale!
ACHTUNG!
Bitte beachten Sie immer die Sicherheitsregeln und die geltenden gesetzlichen
Vorschriften für Seen und offene Gewässer, und tragen Sie zu Ihrer eigenen Sicherheit
stets eine geprüfte Rettungsweste.
WARNUNG!
Erstickungsgefahr für Kinder! Lassen Sie Kinder nicht unbeaufsichtigt mit dem
Verpackungsmaterial oder dem Artikel spielen.
WARNUNG!
Sollte eine Person über Bord gegangen sein, so muss der Wiedereinstieg immer über
den Bug oder das Heck erfolgen, da beim Seiteneinstieg (Einstieg von den Seiten)
eine hohe Kenter-Gefahr besteht
Verletzungsgefahr!
Achtung bei ablandigem Wind!
Achtung bei ablandiger Strömung!
• Beachten Sie, dass Personen und Ladung immer gleichmäßig im Boot verteilt
werden, da ansonsten Kentergefahr besteht.
• Beachten Sie die Angaben auf dem Typenschild, die zulässige Nutzlast und Personenzahl sowie
den Warnhinweis.
• Halten Sie sich stets an die örtlichen Schifffahrtsbestimmungen.
• Führen Sie keine scharfen oder spitzen Gegenstände mit.
• Das Badeboot sollte vor dem Kontakt mit bedenklichen Flüssigkeiten oder Säuren geschützt werden.
Hierdurch können irreparable Schäden entstehen.
• Schützen Sie das Badeboot vor Hitze und Feuer! Vorsicht mit glühenden Zigaretten!
• Achten Sie darauf, dass Sie nicht an steinigen Untergrund gelangen, um Beschädigungen
am Bootskörper zu vermeiden.
• Sollte während des Betriebs auf dem Wasser ein Schaden an einer der drei Innenkammern entstehen,
verlassen Sie auf keinen Fall das Badeboot. Die Auftriebskraft der vier intakten Innenkammern reicht
aus, um das Badeboot sicher über Wasser zu halten.
• Das Badeboot auf keinen Fall im aufgeblasenen Zustand auf Fahrzeugen transportieren.
• Lassen Sie Ihr Badeboot auf dem Wasser nie unbesetzt. Es wird schneller abgetrieben,
als es schwimmend wieder erreicht werden kann.
• Beachten Sie vor dem Benutzen immer, dass Sie Paddel mitführen, da Sie ansonsten das Badeboot
nicht ausreichend manövrieren können.
• Nehmen Sie keine technischen Änderungen an Ihrem Badeboot vor. Änderungen jeder Art gefährden
den Fahrbetrieb des Sportgerätes.
57
Page 58

INSHORE 290
• Benutzen Sie Ihr Badeboot niemals unter Einfluss von Alkohol, Drogen oder Medikamenten.
• Überschätzen Sie niemals Ihre Kräfte und teilen Sie Ihre Muskelkraft beim Paddeln so ein,
dass die zurückgelegte Strecke mühelos wieder zurück gerudert werden kann. Halten Sie sich in
geschützten Uferzonen bis 300 m auf und achten Sie auf wechselnde Wind- und Strömungs verhältnisse, welche die Fortbewegung deutlich erschweren können.
Vermeidung von Sachschäden!
• Alle Aufblasartikel sind kälteempfindlich. Den Artikel daher nie unter einer Temperatur von 15° C
auseinanderfalten und aufpumpen!
• Falls der Luftdruck in der prallen Sonne zunimmt, muss dieser durch Ablassen der Luft entsprechend
ausgeglichen werden.
• Achten Sie darauf, dass der Artikel – besonders im aufgepumpten Zustand – nicht mit Steinen, Kies
oder spitzen Gegenständen in Berührung kommt und nirgends scheuert oder schleift,
da ansonsten Beschädigungen an der Folie auftreten können.
• Nur geeignete Pumpenadapter in die Sicherheitsventile einstecken. Andernfalls könnten die Ventile
beschädigt werden.
• Nicht zu prall aufpumpen, da ansonsten die Gefahr besteht, dass die Schweißnähte aufreißen.
Ventile nach dem Aufpumpen gut verschließen.
• Kontakt mit scharfen, heißen, spitzen oder gefährlichen Gegenständen vermeiden.
Aufbau
Der Aufbau sollte aufgrund der Größe des Artikels immer durch zwei erwachsene
Personen erfolgen. Bitte befolgen Sie die einzelnen Schritte des Aufbaus in der angegebenen Reihenfolge. Dies gilt besonders für das Aufblasen der drei Luftkammern, da
es sonst zu ungleichmäßiger Druckverteilung kommen kann, was zu einer Instabilität
des Badeboots und zur Beeinträchtigung seiner Fahreigenschaften führen kann.
1. Wählen Sie eine glatte und saubere Fläche mit genügend Platz aus, um das Badeboot
auszupacken und zu entfalten. Vergewissern Sie sich, dass alle Einzelteile vorhanden
und in einwandfreiem Zustand sind.
2. Legen Sie den Bootskörper aus. Ab dem zweiten Aufbau sollten Sie das Badeboot auf
eventuelle Schäden, Löcher und Risse untersuchen und diese, wie später beschrieben,
abdichten. Wenn Sie erst einmal auf dem Wasser sind, können eventuelle
Schäden nicht mehr behoben werden.
58
Page 59

INSHORE 290
Montage der Ruder (Abb. 1, 2)
Wichtig!
Die Ruder dürfen bei Verwendung des Boots auf dem
Wasser nicht aus den Dollen gelöst werden sondern
müssen gegen Verlieren gesichert in den Dollen verbleiben!
• Verbinden Sie die beiden Ruderrohre, wobei die Druckknöpfe gut
hör- und sichtbar einrasten müssen. Schieben Sie das Rohrende
durch die Dolle und sichern Sie das Ruder durch Aufschieben eines
Tropfringes. Wiederholen Sie den Vorgang für das zweite Ruder auf der anderen Seite des Boots.
Tropfring
Druckknopf
Montage der Schraubventile:
Die Kammern / des Badeboots sind jeweils mit einer Gewindeöffnung für die beiliegenden Schraubventile ausgestattet. Ziehen Sie
die Schlinge des Ventils so über die Gewindeöffnung , dass
diese fest in der dafür vorgesehenen Rille aufliegt.
Dieser Vorgang bedarf etwas Fingerspitzengefühl und Geduld,
er muss aber sorgfältig durchgeführt werden, damit ein späteres
Lösen des Ventils von der Öffnung ausgeschlossen wird.
Drehen Sie nun das die Basis
Gewindeöffung.
im Uhrzeigersinn fest in die
Aufpumpen
ACHTUNG!
• Halten Sie die richtige Reihenfolge beim Aufblasen der Luftkammern ein.
• Der empfohlene Betriebsdruck beträgt 0,04 bar ( = 40 mbar = 0,58 psi).
• Vermeiden Sie ein übermäßiges Aufblasen der Luftkammern, da ansonsten die Gefahr einer
Überdehnung oder gar ein Aufreißen der Schweißnähte besteht.
• Verwenden Sie zum Aufblasen des Artikels handelsübliche Fußpumpen oder
Doppelhub-Kolbenpumpen mit entsprechenden Aufsatzmöglichkeiten und ggf. Manometer.
• Verwenden Sie zum Aufpumpen des Artikels weder Kompressor noch Druckluftflasche.
Dies kann zu Beschädigung am Artikel führen.
• Alle Luftkammern immer vollständig aufpumpen!
Abb. 1
Abb. 2
Abb. 3
Reihenfolge des Aufpumpens (Abb. 4)
Kontrollieren Sie nach dem Aufpumpen einer Luftkammer stets den Luftdruck wie
unter „Kontrolle des Betriebsdrucks“ S. 60 beschrieben.
Pumpen Sie die Luftkammern in folgender Reihenfolge auf:
Sicherheitskammer mit Schraubventil
1.
2. Bodenkammer mit Stöpselventil
3. Auftriebskammer mit Schraubventil
= Kennzeichnung am Boot
59
Abb. 4
Page 60

INSHORE 290
Messstreifen
Kontrolle des Betriebsdrucks
WICHTIG!
Das PVC Material dehnt sich nach erstmaligem Aufpumpen des
Artikels noch etwas weiter aus und erreicht nicht wieder seinen
Ursprungszustand.
Bedenken Sie, dass die Angaben je nach Zulandung und
Außentemperatur leicht schwanken können.
Pumpen Sie die Luftkammer
so weit auf, bis sie sich fest
anfühlen und keine Falten mehr im Material zu sehen sind. Beim Druck
mit dem Daumen auf die jeweilige Luftkammer sollte sich diese noch
leicht eindrücken lassen.
Messstreifen und Kontroll-Lineal (Abb. 5a, b)
Legen Sie zur Kontrolle des Betriebsdrucks der Luftkammern /
die 0 des Kontroll-Lineals (Abb. 5b) über die 0 des
Messstreifens (Abb. 5a) auf dem Artikel.
Beim ersten Aufpumpen darf die maximale Ausdehnung des
Messstreifens NICHT Position A auf dem Kontroll-Lineal überschreiten.
Nach dem ersten Gebrauch immer so aufpumpen,
dass die 10 des Messstreifens zwischen Position A und Position 10
des Kontroll-Lineals liegt.
01
9
8
7
6
5
4
3
2
1
0
Abb. 5a
01
0
Abb. 5b
Befüllen der Luftkammern (Abb. 6)
Sicherheitskammer mit Schraubventil
Auftriebskammer mit Schraubventil
1. Befüllen Sie die Kammern
/ mit Luft und schließen
Sie die Verschlusskappe (Abb. 3, S. 59) im Uhrzeigersinn.
Bodenkammer mit Stöpselventil
1. Öffnen Sie den Ventilverschluss
.
2. Pumpen Sie die jeweilige Luftkammer auf.
3. Schließen Sie den Ventilverschluss und versenken Sie
das Ventil durch leichten Druck.
Kordel
Befestigen Sie die Kordel 600 cm an den Ösen des Boots.
Sichern Sie die Kordel mit einem Kreuzknoten (Abb. 7)
60
Abb. 6
Abb. 7
Page 61

INSHORE 290
Abbau des Badeboots
Entlüften
Entlüften Sie das Badeboot wie folgt:
1. Zum Entlüften der Bodenkammer ziehen Sie das Stöpselventil aus der Versenkung und
drücken Sie den Schaft leicht zusammen oder verwenden Sie das Entlüftungsröhrchen .
2. Zum Entlüften der Sicherheits- und Auftriebskammer / schrauben Sie die Schraubventile
aus der Basis komplett heraus.
Seesack
Dem Artikel liegt ein Seesack bei, in dem das Badeboot zum Transport und zur Lagerung verstaut
werden kann. Zum Verschließen verwenden Sie die Kordel 200 cm.
Des Weiteren kann der Seesack an Bord zur spritwassergeschützten Aufbewahrung von Proviant,
Kleidung etc. verwendet werden. Bedenken Sie jedoch, dass der Artikel nicht wasserdicht ist.
Daher auf keinen Fall empfindliche Gegenstände wie z.B. Fotoapparate darin verstauen.
Für die Verwendung an Bord empfiehlt es sich die Kordel zu entfernen, das obere Ende flach
zusammenzurollen und mittels der Klettverschlüsse zu verschließen.
Aufbewahrungstasche (Abb. 8)
Dem Artikel liegt zusätzlich noch eine spritzwassergeschützte
Aufbewahrungstasche bei, welche mittels der Klettverschlüsse an
der Innenwand des Boots angebracht wird. Hierin können
kleinere Gegenstände trocken verstaut werden, allerdings ist auch
dieser Artikel nicht komplett wasserdicht. Daher auch hier keine
empfindlichen Gegenstände verstauen.
Transport
Transportieren Sie das Badeboot immer zu zweit und verwenden Sie dazu
die Kordel am Heck sowie den Tragegriff am Bug.
Abb. 8
Pflege / Wartung / Lagerung
ACHTUNG!
Benutzen Sie nur Pflegemittel ohne Anteile von Säure oder Benzin und niemals
Produkte auf Silikonbasis.
1. Reinigen Sie Ihr Badeboot nach jedem Gebrauch gründlich, indem Sie es mit frischem
Wasser und milder Seife abspülen um es von Salzkristallen, Sandkörnchen und
anderen kleinsten Verschmutzungen zu befreien. Lassen Sie es anschließend
vollständig trocknen.
2. Falten Sie das Boot sorgfältig zusammen.
3. Lagern Sie Ihr Badeboot an einem sauberen und trockenen Ort ohne direkte Sonneneinstrahlung,
an dem es keinen größeren Temperaturschwankungen ausgesetzt ist. Achten Sie darauf, dass es
nicht deformiert, sondern eben und außerhalb der Reichweite von Nagetieren gelagert wird.
61
Page 62

INSHORE 290
Reparaturen
ACHTUNG!
Bei größeren Schäden sollten Sie auf keinen Fall selbst Reparaturen durchführen.
Kleinere Beschädigungen können Sie mit dem mitgelieferten Reparaturset reparieren.
1. Entlüften Sie das Badeboot vollständig und reinigen Sie die entsprechende Stelle mit
einer Lösung auf Alkoholbasis. Rauen Sie die Umgebung des Risses oder des
Loches mit feinem Schmirgelpapier leicht an.
2. Schneiden Sie nun einen Flicken zurecht, der den beschädigten Bereich abdeckt
und an allen Seiten um 1,25 cm übersteht.
3. Tragen Sie den Kleber sowohl auf die Stelle am Badeboot, als auch auf den Flicken
auf. Lassen Sie den Kleber ca. 3 Minuten antrocknen.
4. Den Flicken mit einem weichen Gegenstand fest andrücken. Achten Sie darauf, dass Sie auf
einer ebenen Unterlage ohne Knitter oder Falten arbeiten. Entfernen Sie mögliche Luftblasen mit
einem abgerundeten Gegenstand sanft von innen nach außen.
5. Nach der Reparatur mindestens 12 Stunden bis zum erneuten Aufpumpen warten.
Hinweis zur Entsorgung
Verpackung und Artikel bitte umweltgerecht und sortenrein entsorgen!
Entsorgen Sie den Artikel über einen zugelassenen Entsorgungsbetrieb oder über
Ihre kommunale Gemeindeverwaltung. Beachten Sie die aktuell geltenden Vorschriften.
3 Jahre Garantie
Das Produkt wurde mit großer Sorgfalt und unter ständiger Kontrolle produziert. Sie erhalten auf dieses
Produkt drei Jahre Garantie ab Kaufdatum. Bitte bewahren Sie den Kassenbon auf.
Die Garantie gilt nur für Material- und Fabrikationsfehler und entfällt bei missbräuchlicher oder unsachgemäßer Behandlung. Ihre gesetzlichen Rechte, insbesondere die Gewährleistungsrechte, werden durch
diese Garantie nicht eingeschränkt.
Im Garantiefall setzen Sie sich bitte über unsere kostenlose Service-Hotline oder per E-Mail mit uns in
Verbindung. Wir werden Sie in jedem Fall persönlich beraten. Im Garantiefall können in Absprache mit
unseren Service-Mitarbeitern defekte Teile unfrei an die aufgeführte Service-Adresse geschickt werden.
Sie erhalten dann unverzüglich ein neues oder repariertes Teil kostenlos zurück.
Die Garantiezeit wird durch etwaige Reparaturen aufgrund der Garantie, gesetzlicher Gewährleistung
oder Kulanz nicht verlängert. Dies gilt auch für ersetzte und reparierte Teile.
Nach Ablauf der Garantie anfallende Reparaturen sind kostenpflichtig.
IAN: 61553
Service-Adresse
Produkt-Hotline 00800-88080808 (Mo.- Fr., 10:00 - 16:00 Uhr, gebührenfrei)
NWS-Service • Wragekamp 6 • D-22397 Hamburg
de@nws-service.com
A.Hofer • Loebersdorfer Str. 42 • AT-2560 Berndorf
at@nws-service.com
Atlantic Forwarding Ltd. • Mühlemattstr. 22, C.P. No. 131
4104 Oberwil BL, Switzerland
ch@nws-service.com
www.nws-service.com
62
Page 63

63
Page 64

Version: 05/2011
Származási hely/Vyrobeno v/Vyrobené v: Kína/Čína/Číne
Gyártja/Výrobce/Výrobca:
DELTA-SPORT HANDELSKONTOR GMBH
Wragekamp 6 • D-22397 Hamburg
 Loading...