


Heart Rate Monitor 10/2014 · Art.-Nr.: 1-LD3875
Heart Rate Monitor |
Sporttester |
Usage and safety instructions
Hodinky na meranie srdcovej frekvencie
Pokyny k obsluze a bezpečnostní pokyny
Herzfrequenz-Messuhr
Bedienungsund Sicherheitshinweise
Návod na použitie a bezpečnostné pokyny
IAN 103142
Usage and safety instructions ........................................................................ |
- 1 |
- |
Pokyny k obsluze a bezpečnostní pokyny ................................................ |
- 22 |
- |
Návod na použitie a bezpečnostné pokyny................................................. |
- 44 |
- |
Bedienungsund Sicherheitshinweise................................. |
- 66 |
- |

 Usage and safety instructions
Table of contents
Table of contents......................................................................................................... |
- 1 - |
Introduction ................................................................................................................. |
- 3 - |
Intended use................................................................................................................ |
- 3 - |
Scope of delivery ....................................................................................................... |
- 3 - |
Technical specifications ............................................................................................. |
- 4 - |
Important safety information .................................................................................. |
- 4 - |
Batteries ............................................................................................................... |
- 4 - |
Heart rate monitor should not be in the hands of children ............................. |
- 5 - |
Chest belt..................................................................................................................... |
- 5 - |
Bicycle holder ............................................................................................................. |
- 7 - |
Light.............................................................................................................................. |
- 7 - |
Important Information regarding the use of the Heart rate monitor watch........... |
- 8 - |
Quick setting ....................................................................................................... |
- 8 - |
Setting up the heart rate monitor watch ................................................................... |
- 8 - |
Calibration .......................................................................................................... |
- 9 - |
The watch has 7 modes of operation ............................................................ |
- 10 - |
Time (ZEIt/TIME) ..................................................................................................... |
- 10 - |
Time setting....................................................................................................... |
- 11 - |
Alarm (ALARM) ....................................................................................................... |
- 11 - |
Stopwatch (St-UHR/CHRONO) ........................................................................... |
- 12 - |
Timer (TIMER) max. 9:59:00 ................................................................................. |
- 12 - |
Pedometer (PEDO) .................................................................................................. |
- 13 - |
Calibrating the pedometer ............................................................................. |
- 13 - |
Heart rate monitor (PULS/PULSE) ......................................................................... |
- 14 - |
Setting the heart rate target zone................................................................... |
- 14 - |
Activating/deactivating the heart rate alarm ............................................... |
- 15 - |
Resetting the heart rate data........................................................................... |
- 15 - |
Memory mode (SPEICH/MEMORY).................................................................... |
- 16 - |
Total memory (14 days) ................................................................................. |
- 16 - |
BMI (Body Mass Index).................................................................................. |
- 16 - |
- 1 - |
|
Troubleshooting ....................................................................................................... |
- 16 - |
Reset.......................................................................................................................... |
- 17 - |
Replacing the watch battery................................................................................... |
- 17 - |
Battery low indicator ............................................................................................... |
- 18 - |
Water resistance...................................................................................................... |
- 18 - |
Water resistance of the chest belt.......................................................................... |
- 18 - |
Cleaning instructions ............................................................................................... |
- 18 - |
Disposal of the electronic appliance ..................................................................... |
- 19 - |
Disposal of the batteries.......................................................................................... |
- 19 - |
Declaration of conformity ....................................................................................... |
- 19 - |
digi-tech gmbh warranty ........................................................................................ |
- 19 - |
Warranty conditions ............................................................................................... |
- 19 - |
Warranty period and defects liability ................................................................... |
- 20 - |
Scope of the warranty............................................................................................. |
- 20 - |
Warranty claim procedure..................................................................................... |
- 20 - |
Service ...................................................................................................................... |
- 21 - |
Supplier .................................................................................................................... |
- 21 - |
- 2 -
Heart Rate Monitor
Introduction
Congratulations on the purchase of your new heart rate monitor. You have chosen a high quality product. The instruction manual is part of the productit contains important information about safety, use and disposal. Read the manual with all usage and safety notes before using the watch. Only use the watch in the intended way and for the intended applications.
If the watch is given to someone else, include all documentation with the heart rate watch with chest belt.
Intended use
This heart rate monitor is intended for time display and the described additional features. Any other use or modification of the heart rate monitor does not comply with the intended uses. The manufacturer is not liable for damages caused by improper use or misuse. The device is not intended for commercial use.
Scope of delivery
Please note: Check the scope of delivery after purchase. Please ensure that all parts are included and undamaged.
•Heart rate monitor incl. battery (CR2032)
•Chest belt incl. battery (CR2032)
•Bicycle holder
•Instruction manual
- 3 -
Technical specifications
Heart rate monitor
Operating temperature |
0-50°C |
Dimensions |
4,4 x 5,2 x 1,5 cm |
Display |
2,5 x 2,5 cm |
Weight |
47g |
Battery |
CR 2032/3V |
Chest belt
Operating temperature |
0-50°C |
Dimensions |
7 x 3,4 x 1,2 cm |
Frequency |
5,3 kHz |
Weight |
53g |
Battery |
CR 2032/3V |
Important safety information
ATTENTION: Consult your doctor before you begin any training program. Your doctor can help you choose the proper training intensity and heart rate guidelines for your exercises.
This heart rate wrist watch is not a medical device and should only be used as a guide for your training.
Batteries
Keep batteries out of reach of small children. If a battery is swallowed, you must seek medical attention immediately. Batteries/rechargeable batteries must always be inserted in the correct polarity. If necessary, clean the battery and device contacts. Never attempt to recharge non-rechargeable batteries. Never shortcircuit or attempt to open batteries. Never throw batteries into fire as they may explode.
- 4 -

If the device will not be used for an extended time period, remove the battery and store the device in a dry and dust-free area. Improper use of the battery can lead to explosion or leakage.
If the battery leaks, avoid contact with skin, eyes and mucous membranes. Use gloves. If you are exposed to battery acid, rinse the affected areas with plenty of clean water and immediately seek medical attention. Remove discha-rged batteries from the device as they present an increased risk of leakage.
Heart rate monitor should not be in the hands of children
This device may be used by persons (including children over 8 years of age) with reduced physical, sensory or mental abilities or lack of experience and knowledge, if they are supervised or instructed regarding the safe use of the device and understand the dangers that may arise. Children may not play with the device. Cleaning and user maintenance of the device may not be performed by children without supervision. Keep packaging films out of the hands of children. There is a danger of suffocation.
Chest belt
 ATTENTION: Pacemaker patients should consult their physicians before using the chest belt.
Inserting the batteries into the chest belt
Use a coin to unscrew the battery cover on the back side of the chest belt and insert the 3V battery with the (+) sign facing up. Screw the battery compartment cover back into the case.
battery CR2032 |
- 5 - |
Wearing the chest belt
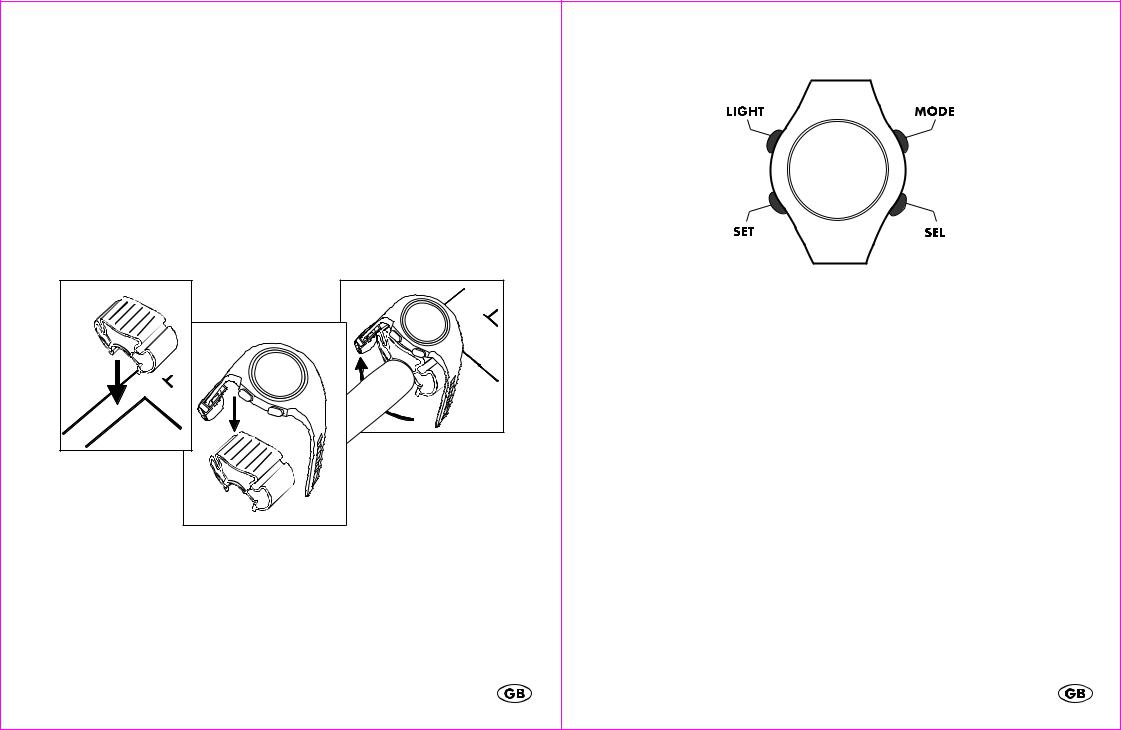
Adjust the chest belt so that it fits snugly directly below the chest muscles. Moisten the contact areas with water or ECG gel (ECG gel can be purchased at a pharmacy). Ensure that the contact areas constantly remain in skin contact. Position the chest belt as per the following illustration.
Please ensure that the chest belt is seated properly. When you have exhaled completely the chest belt should still have very slight tension pressing it to your chest.
High voltage power lines, Trains or moving vehicular traffic may interfere with the heart rate measurement. Please consider this when planning your exercise route.
contact area
- 6 -
Bicycle holder
Using the bicycle holder
The included bicycle holder can be used to attach the heart rate monitor to the handlebar of a bicycle. Press the bicycle holder onto the top of the handlebar. Handlebars with an especially large diameter may require the use of additional force to snap on the bicycle holder. The heart rate monitor can now be attached to the bicycle holder in the same way that you would attach it to your wrist.
The maximum range of 60cm between the heart rate monitor and the chest belt should not be exceeded.
Please note that the pedometer features of the heart rate monitor (distance, speed etc.) will not be functional while the watch is mounted on the bicycle holder.
Light |
Briefly press LIGHT to temporarily activate the light.
- 7 -
Important Information regarding the use of the Heart rate monitor watch.
Press MODE to select or exit the modes of the watch. Press SEL to enter your personal data and press SET to confirm the setting.
Press MODE to proceed within the menu.
Quick setting
Press and hold SEL when setting numerical values to use the quick setting feature.
Setting up the heart rate monitor watch
Remove the protective film from the display of the watch and press MODE, SEL or SET. The watch will now guide you through the initial settings menu.
Press SEL to select the English or German language (DEU/ENG) and confirm your setting by pressing SET. Select the unit (EINH/UNIT) of measurement KM or miles in the same way. Enter your year of birth (GEB/BIRtH). Press SEL to set the value and press SET to confirm the setting. Set the month and the day of your birth in the same way. Now select 12 or 24-hour time display mode (ZEIt/TIME) by pressing SEL and confirm your setting by pressing SET. Now set the hours, minutes and seconds. Set each value by pressing SEL and confirm each setting by pressing SET. Set the year, month and day in the same way and confirm each setting by pressing SET. The body weight setting now appears. Set your weight by pressing SEL and confirm by pressing SET. Set your height in the same way and confirm the setting
- 8 -
by pressing SET. The pedometer calibration option appears (KALI/CALI). Press SEL to select NEIN/NO or JA/YES and confirm your selection by pressing SET.
Notes on calibration:
Please calibrate the watch for walking and running even if you only intend to use the watch for walking. In this case, perform a fast walk during the calibration for running. The calibration can also be performed later when using the watch in pedometer mode.
If the pedometer is not calibrated, it will use the default settings and this may cause the values shown on the display during training to deviate strongly from the actual values. During calibration, the watch will record your personal movement profile.
Greater consistency of movement during the recording and longer duration of the recording will increase the precision of the pedometer during training. The calibration will allow the watch to automatically detect whether you are running or walking and adjust the displayed values automatically. The displayed values are more exact if your movement during training has the same rhythm and speed as during calibration. Wear the watch on the same wrist during calibration and during training.
Calibration
Press SEL to start the recording. KALI/CALI and JA/YES will appear on the display. Press SET to confirm. LAUFEN/RUN will appear on the display. Press SET to show the distance setting (DST). Press SEL to select the distance and confirm your setting by pressing SET. Now press SEL to start the calibration. After you are finished running the calibration distance, press SEL once again. ENDE/DONE or ERROR will appear on the display. If ERROR appears, the calibration must be repeated. After successful calibration, perform the calibration for GEHEN/WALK in the same way as for LAUFEN/RUN.
- 9 -
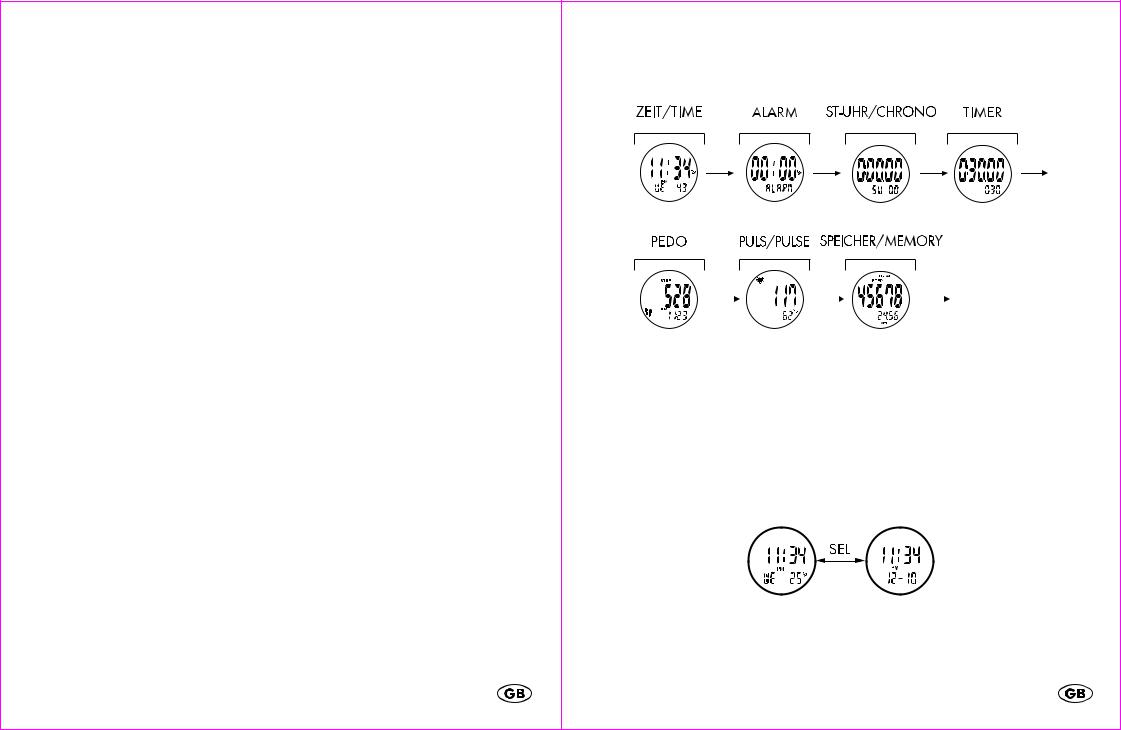
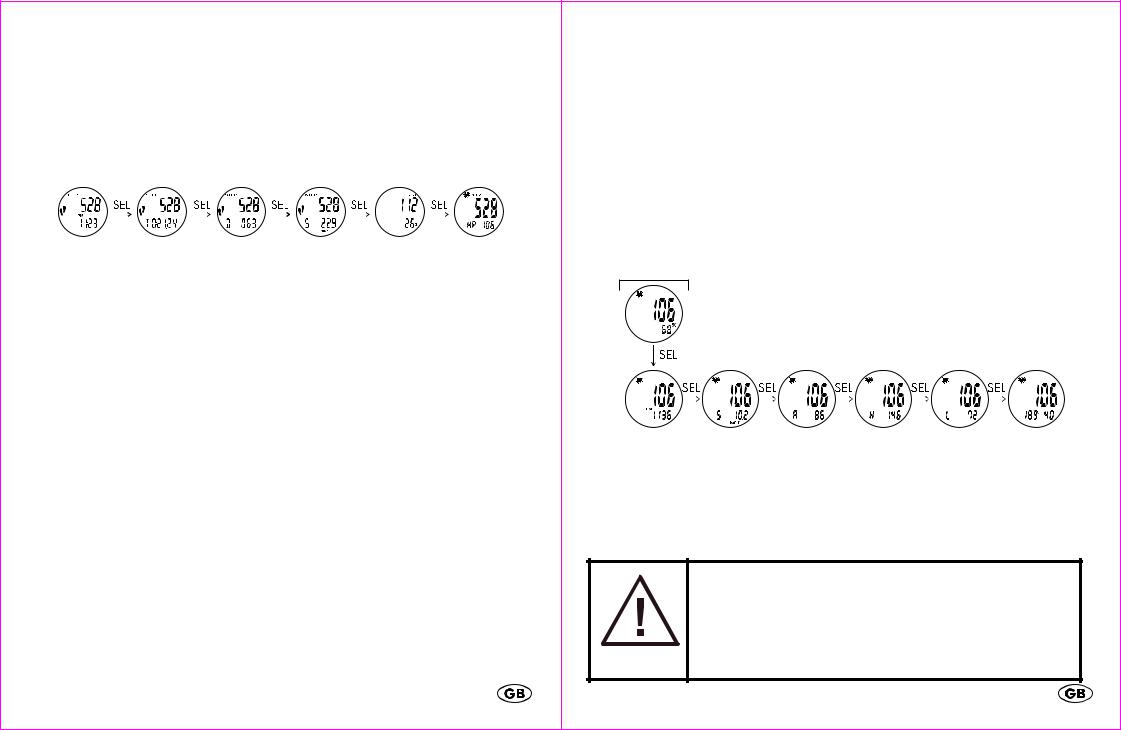
The watch has 7 modes of operation
Press MODE to select the mode of operation of the watch.
The order of the modes is:
Additionally, each mode of operation has several sub-features.
The sub-features can always be reached by pressing SEL.
Time (ZEIt/TIME)
Press MODE to select time mode (ZEIt-1/TIME-1). Press SEL to select the sub-
features of the time mode.
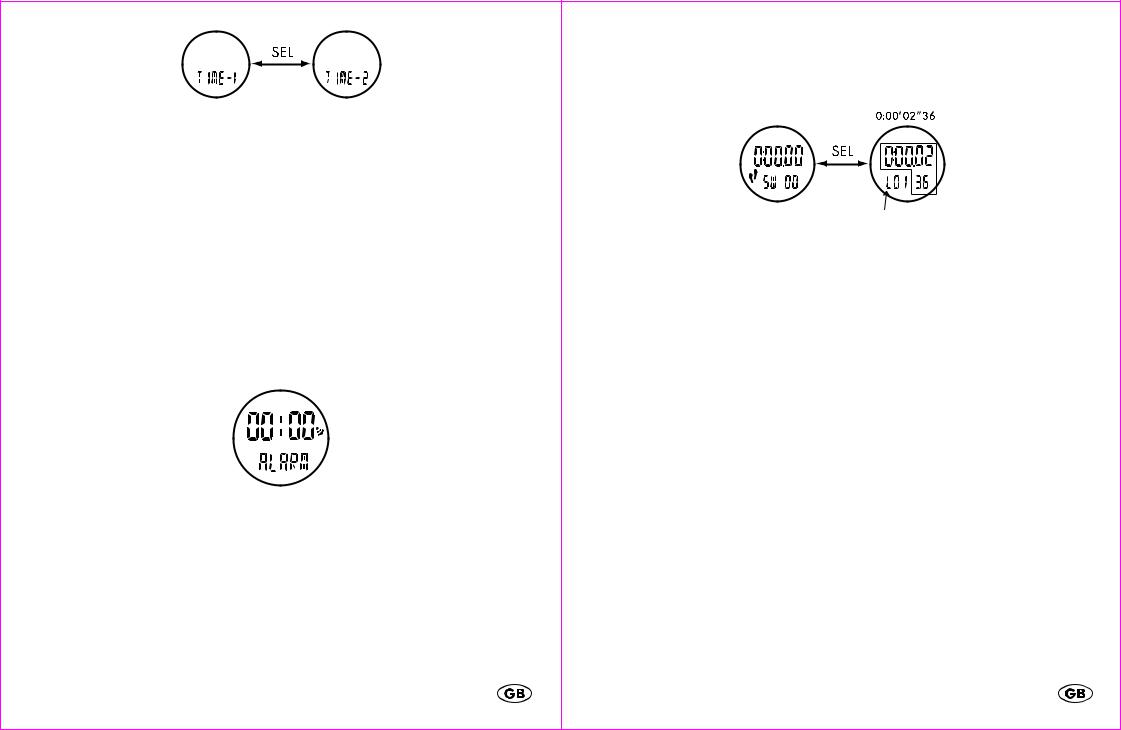
Time, day of the week and seconds <-> time and date.
Press and hold SEL to switch to the second time zone (ZEIt 2 / TIME-2).
- 10 -
Time setting
Press and hold SET. The 12/24 hour time mode indicator will appear. Select the preferred mode and confirm your selection by pressing SET. Now set the hours, minutes and seconds by pressing SEL to set each value and pressing SET to confirm each setting. Now set the year, month and day in the same way and confirm the setting with SET. Time zone 1 and time zone 2 may be set in the same way.
Alarm (ALARM)
Repeatedly press MODE to select alarm mode (ALARM). Press SEL to activate or deactivate the alarm. If the alarm is activated, the alarm symbol will appear.
Press and hold SET to enter setting mode. The hours of the alarm time will blink on the display.
Press SEL to set the hours and confirm your setting by pressing SET. Set the minutes in the same way.
Press any button when the alarm sounds to stop the alarm.
If no button is pressed, the alarm will sound for about 60 seconds and restart after 5 minutes.
- 11 -
Stopwatch (St-UHR/CHRONO)
Repeatedly press MODE to select the stop watch (ST-UHR/CHRONO). Press SEL to start or stop the stop watch.
Press SET while the stopwatch is running to record a lap time (L01). Up to 99 lap times (L99) can be recorded. VOLL/FULL will appear after reaching the maximum number of lap time recordings.
When the stopwatch is stopped, press SET to activate the memory feature (R) and display the best lap time (BESte/BEST LAP). Press SEL repeatedly to display the other lap times. Press SET to return to the stopwatch.
Press and hold SEL to reset the stopwatch.
Note: The memory feature can only be used if at least one lap time has been recorded.
Timer (TIMER) max. 9:59:00
First, press MODE repeatedly to select timer mode (TIMER). The pre-set time of 0:3000 seconds will appear on the display.
Press and hold SET to set the timer.
The hours of the timer time will appear blinking on the display. Press SEL to set the hours and press SET to confirm your setting. Set the minutes in the same way. Press SEL to start or stop the timer. After the set time has elapsed, an alarm will sound for 60 seconds. Press MODE, SEL or SET to stop the alarm.
- 12 -
Pedometer (PEDO)
First, press MODE repeatedly to select pedometer mode (PEDO). STEP will appear on the display along with the data that has been stored thus far. Press SEL to switch between the different features.
Steps (STEP) and time > steps (STEP) and training duration (T) > steps (STEP) and distance (D) > steps (STEP) and speed (S) > Calories (KCAL) and fat burn in gram (g), steps (STEP) and heart rate (HR).
Press SET to start the pedometer. A symbol showing two feet will appear on the display. Press SET again to stop the pedometer.
Pedometer reset
Press and hold SET to delete all data.
Calibrating the pedometer
If the pedometer has not been calibrated as described in the chapter “Setting up the heart rate monitor watch” or if you wish to recalibrate the pedometer, press and hold SET.
The body weight setting now appears. Set your weight by pressing SEL and confirm your setting by pressing SET. Now set your height in the same way and confirm the setting by pressing SET. The calibration option now appears (KALI/CALI).
Press SEL to start the recording. KALI/CALI and JA/YES will appear on the display. Press set to confirm. LAUFEN/RUN will appear on the display. Press SET to show the distance (DST) setting. Press SEL to select the distance and confirm your setting by pressing SET. Now press SEL to start the calibration. After you are finished running the calibration distance, press SEL once again. ENDE/DONE or ERROR will appear on the display. If ERROR appears, the calibration must be
- 13 -
repeated. After successful calibration, perform the calibration for GEHEN/WALK in the same way as for LAUFEN/RUN.
Heart rate monitor (PULS/PULSE)
Note: The heart rate monitor will only work while using the chest belt. The current heart rate and the blinking heart symbol will appear on the display.
First, press MODE repeatedly to select pulse mode (PULS/PULSE). Press SEL to select the different sub-features.
Current heart rate / MHR (%) > current heart rate / time (TIME) > current heart rate / current speed (km/h) > current heart rate / average heart rate (A) > current heart rate / maximum heart rate (H) > current heart rate / lowest heart rate (L) > current heart rate / target zone.
current heart
rate target zone
I
MHR – maximum heart rate
(Percent of the maximum heart rate. Maximum heart rate = 220 - your age in years)
Setting the heart rate target zone
ATTENTION: Consult your physician before selecting a target zone. The target zone presets are approximate guidelines and are not suitable for everyone.
- 14 -
While viewing the current heart rate and target zone sub-feature, press and hold SET to select a preset target zone or set the user defined target zone (ZN-P/ZN- U). The user defined target zone will appear on the display. Repeatedly press SEL to select the desired target zone: User defined (ZN-P/ZN-U), Leisure (ZN-1), Fitness (ZN-2), Sport (ZN-3). The following table contains an overview of the zones 1-3. To set the user defined target zone press set while displaying the user defined target zone (ZN-P/ZN-U) to enter setting mode. The lower limit will blink on the display. Set the lower limit by pressing SEL and confirm your setting by pressing SET. Set the upper limit in the same way.
Age |
> |
20 |
25 |
30 |
35 |
40 |
45 |
50 |
55 |
60 |
65 |
|
|
|
|
|
|
|
|
|
|
|
|
Zone 1 |
|
130 |
126 |
123 |
120 |
117 |
113 |
110 |
107 |
104 |
100 |
Leisure |
|
to |
to |
to |
to |
to |
to |
to |
to |
to |
to |
50-65 % |
|
100 |
97 |
95 |
92 |
90 |
87 |
85 |
82 |
80 |
77 |
MHR |
|
|
|
|
|
|
|
|
|
|
|
|
|
|
|
|
|
|
|
|
|
|
|
Zone 2 |
|
160 |
156 |
152 |
148 |
144 |
140 |
136 |
132 |
128 |
124 |
Fitness |
|
to |
to |
to |
to |
to |
to |
to |
to |
to |
to |
65-80 % |
|
130 |
126 |
123 |
120 |
117 |
113 |
110 |
107 |
104 |
100 |
MHR |
|
|
|
|
|
|
|
|
|
|
|
|
|
|
|
|
|
|
|
|
|
|
|
Zone 3 |
|
190 |
185 |
180 |
175 |
171 |
166 |
161 |
156 |
152 |
147 |
Sport |
|
to |
to |
to |
to |
to |
to |
to |
to |
to |
to |
80-95 |
|
160 |
156 |
152 |
148 |
144 |
140 |
136 |
132 |
128 |
124 |
MHR |
|
|
|
|
|
|
|
|
|
|
|
Activating/deactivating the heart rate alarm
Press SET while viewing the current heart rate and target zone sub-feature, press SET briefly to activate or deactivate the target heart rate alarm. If the alarm is activated, the symbol  will appear on the display.
Resetting the heart rate data
The heart rate data is reset daily at midnight.
- 15 -
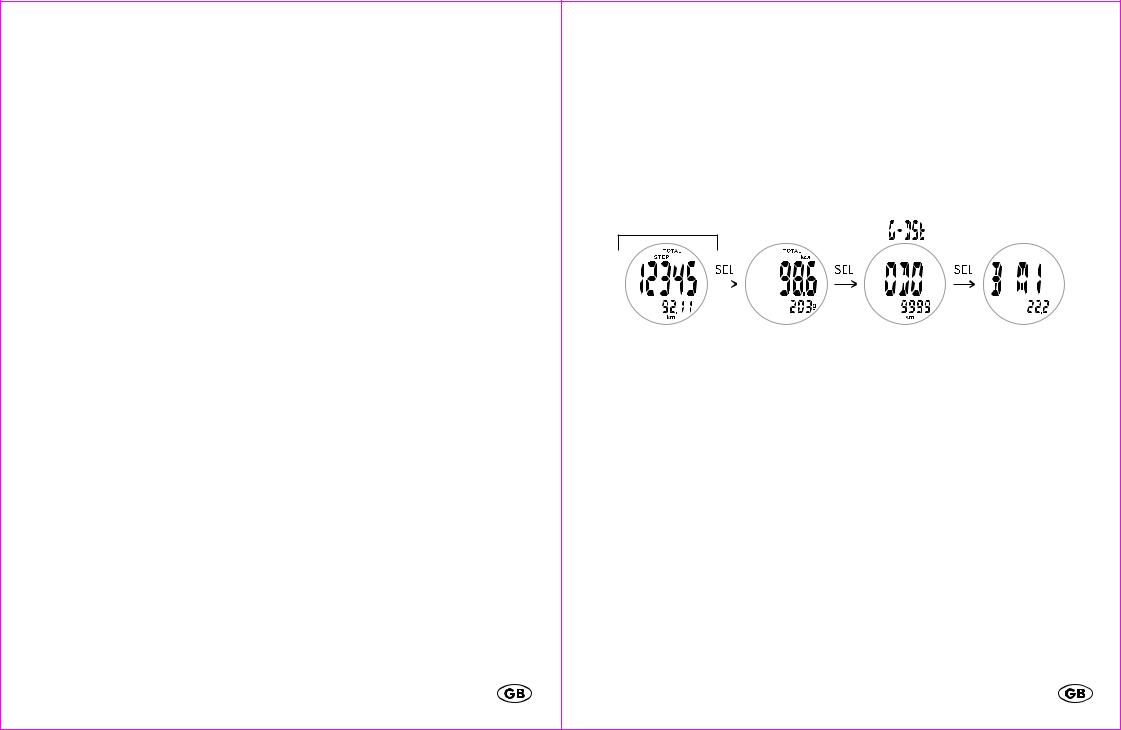
Memory mode (SPEICH/MEMORY)
First, press MODE to select memory mode (SPEICH/MEMORY). The data for the past 14 days can now be viewed. Press SEL to access the next feature. The data for steps, distance (km), calories, fat burn (g) and odometer (G-Dst/ODO) is saved for 14 days.
Total memory (14 days)
The order of the features is: Total Step/Total Distance (Total Step/Total Distance) > Total Calories/Total Fat Burn (Total Calories/Total Fat Burn) > Odometer (G- Dst/ODO) > BMI (BMI)
Note:
The stored daily values for calories, fat burn, average speed and maximum speed are reset nightly at 0:00 but are stored in the 14-day memory.
BMI (Body Mass Index)
The BMI is a statistical measurement that can be used to judge a persons weight. For adults, a value between 18.5 and 25 is considered normal. Values below 18.5 are considered "underweight". Values above 25 are considered "overweight". Values above 30 are considered "Obese".
The BMI is only a coarse guideline because it does not take a persons body type and body composition into consideration.
The watch automatically calculates your BMI from the values entered during setup.
Troubleshooting
The distance measurements are very imprecise
The watch uses the step length measured during calibration to estimate the traveled distance.
- 16 -
Recalibrate the step counter. Calibrate it for walking and for running and use extra care during the calibration.
Running on uneven surfaces may also result in bad calibration.
The heart rate is not shown or is shown incorrectly
Make sure the chest belt is positioned correctly and fits well Your skin should not be too dry or too cold.
The contact areas can be slightly moistened to improve function Electromagnetic interference may have an adverse effect on reception The distance between watch and chest belt must be under 60cm Other heart rate measuring devices within a 2m range may also cause interference.
Wireless bicycle computers may cause interference The batteries may be low and require replacing
The display is unreadable / the light does not work
Replace the batteries
Reset
Press SET and SEL simultaneously to totally reset the watch. All stored data will be lost. This is the only way to change language and the units of measurement. Set up the watch as described in the chapter “Setting up the heart rate monitor watch”.
Replacing the watch battery
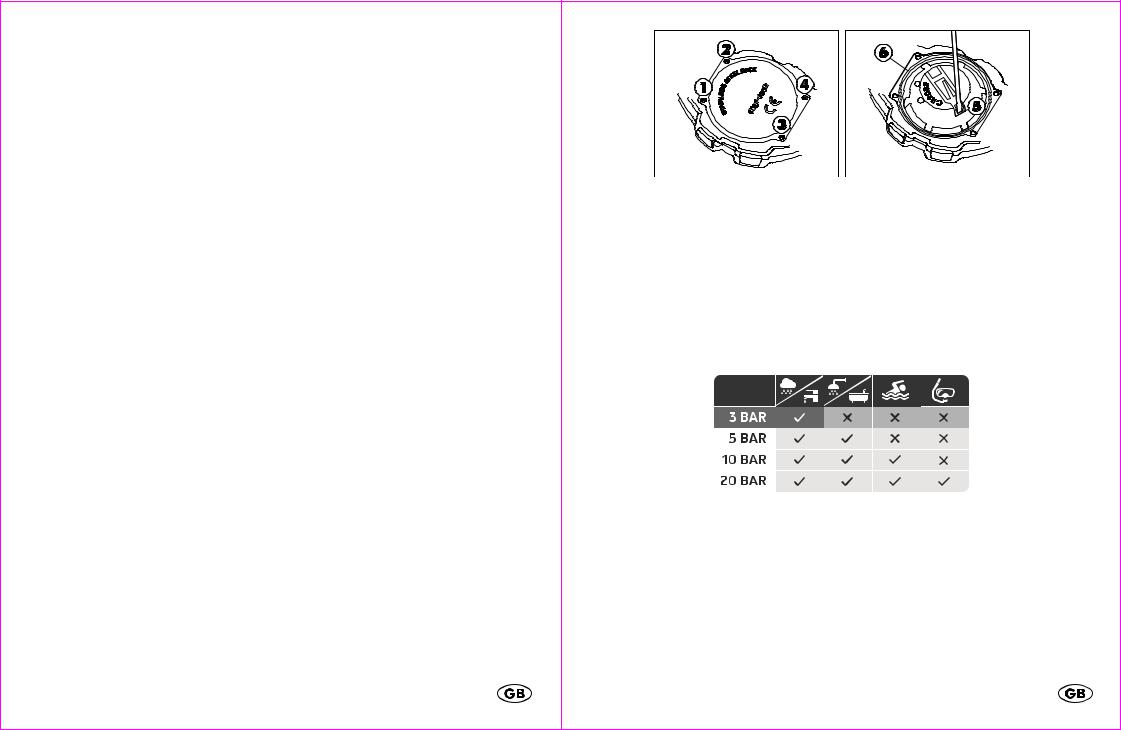
The battery replacement can be performed by a watch maker in addition to a water resistance test. To replace the battery yourself, please read the following instructions first:
Remove the screws (1, 2, 3 and 4) from the back side of the watch with a small Phillips screwdriver. Remove the caseback and the battery sticker. Use a small, flat tool to open the latch (5) of the battery holder. Remove the battery and insert a fresh 3V CR2032 battery with the (+) terminal facing upwards. Ensure that the gasket (6) is seated correctly. Close the latch of the battery holder. Replace the battery sticker and the caseback and replace the screws.
- 17 -
Battery low indicator
If the battery voltage on the chest belt battery drops below the voltage required for normal operation, (GURT/BELT) and (BATT/LO BAT) will appear on the display. Replace the battery of the chest belt as described in the chapter "Chest belt".
Water resistance
Water resistant up to 3 bar. The bar value specifies the atmospheric overpressure which is applied during testing (DIN 8310).
Water resistance of the chest belt
Water-resistant according to IEC 60529 IPX7.
Cleaning instructions
Clean the heart rate monitor with a soft, dry and lint-free cloth. A glasses cleaning cloth is ideal.
After each use, clean the chest belt and the watch strap using lukewarm water, mild soap solution and a sponge. Please take care not to get the watch wet.
- 18 -
Dry all parts with a towel and hang the chest belt to dry. Sweat and contaminants are detrimental to the function of the sensor.
Disposal of the electronic appliance
This heart rate monitor may not be disposed of with normal household waste. Dispose of the unit at an approved disposal facility or at your
local recycling centre. Please observe the current rules and regulations when disposing of the appliance. Contact the disposal system if in doubt.
Disposal of the batteries
Please dispose of your batteries properly in containers especially set up at retailers. Batteries do not belong in household waste. Dispose of the
batteries at an approved disposal facility or at your local recycling centre. Contact the disposal system if in doubt.
Declaration of conformity
If used as intended this product conforms to the basic standards of § 3 and the other relevant provisions of the FTEG (Section 3 of the R&TTE directive).
You can request the declaration of conformity here: conformity@digi-tech-gmbh.com
digi-tech gmbh warranty
This heart rate monitor includes a 3 year warranty starting on the day of purchase. In case of defects of this heart rate monitor you have, by law, certain rights regarding the vendor of the watch. These rights are not changed by the warranty which is described in the following paragraphs.
Warranty conditions
The warranty duration starts on the date of purchase. Please keep the original receipt in a safe place. The receipt is needed as a proof of purchase. If a defect occurs in the heart rate monitor within 3 years, the heart rate monitor will be repaired or replaced (according to our choice) free of charge. This warranty requires that, within the 3 year warranty period, the watch and the receipt can be
- 19 -
made available to us along with a short written description of the defect and when it occured. If the defect is covered by the warranty, you will receive the repaired heart rate monitor or a new heart rate monitor. Repair or replacement does not cause the warranty period to restart.
Warranty period and defects liability
The warranty period is not increased by the defect liability. This also applies to repaired or replaced parts. If defects are noticed at the time of purchase they must be reported immediately upon unpacking the item. Paid repair may be available after the end of the warranty period.
Scope of the warranty
The heart rate monitor was manufactured according to strict quality guidelines and was carefully inspected before delivery. The warranty does not include parts that experience normal wear and tear and can thus be seen as wear parts or fragile parts that are damaged. Examples include Switches, Batteries or parts made of glass.
This warranty becomes void if the heart rate monitor is damaged, is not used in the recommended way or is improperly repaired.
For proper use of the heart rate monitor all instructions in this manual must be adhered to exactly. Use of the heart rate monitor in a way that is discouraged in the manual must be avoided.
The heart rate monitor not intended for commercial use. Abusive or improper use, excessive force and changes that are made by non-authorized repair centers will void the warranty.
Warranty claim procedure
To ensure that your call is processed in a fast and efficient manner please note the following directions:
•Have your receipt (as proof of purchase) and the article number (103142) handy.
•The article number can be found on the type label, an engraving, the front page of the manual (bottom left) or a sticker on the back side or bottom side of the case.
- 20 -
•In case defects occur, please first contact the service center (see below) by phone or email.
Visit www.lidl-service.com to download this and many other manuals, product videos and software.
Service
Name: Inter-Quartz GmbH
Street: Valterweg 27A
Town: Eppstein 65817
Country: Germany
Email: support@inter-quartz.de
Telephone: +49 (0)6198 571825
 800 142 315
 0800 004449
IAN 103142
Supplier
Please note that the following address is not a service address. Please first contact the service address (see above).
Name: digi-tech gmbh
Street: Valterweg 27A
Town: Eppstein 65817
Country: Germany
- 21 -
 Pokyny k obsluze a bezpečnostní pokyny
Obsah
Obsah....................................................................................................................... |
- 22 - |
Úvod ......................................................................................................................... |
- 24 - |
Použití v souladu s určením..................................................................................... |
- 24 - |
Rozsah dodávky...................................................................................................... |
- 24 - |
Technické údaje....................................................................................................... |
- 25 - |
Důležité bezpečnostní upozornění .................................................................... |
- 25 - |
Baterie............................................................................................................... |
- 25 - |
Měřič srdečního tepu nepatří o rukou dětem................................................ |
- 26 - |
Hrudní pás................................................................................................................ |
- 26 - |
Držák na kolo .......................................................................................................... |
- 28 - |
Světlo ........................................................................................................................ |
- 28 - |
Důležitá upozornění k ovládání měřiče tepové frekvence.................................. |
- 29 - |
Rychlé nastavení .............................................................................................. |
- 29 - |
Uvedení měřiče tepové frekvence do provozu .................................................... |
- 29 - |
Kalibrace .......................................................................................................... |
- 30 - |
Hodinky znázorňují 7 funkcí .......................................................................... |
- 31 - |
Čas (ZEIt/TIME) ...................................................................................................... |
- 31 - |
Nastavení času ................................................................................................ |
- 32 - |
Budík (ALARM) ........................................................................................................ |
- 32 - |
Stopky (St-UHR/CHRONO) ................................................................................. |
- 33 - |
Časovač (TIMER) max. 9:59:00 ........................................................................... |
- 33 - |
Krokoměr (PEDO).................................................................................................... |
- 34 - |
Kalibrace krokoměru....................................................................................... |
- 34 - |
Měřič tepu (PULS/PULSE) ...................................................................................... |
- 35 - |
Nastavení hodnot cílového srdečního tepu .................................................. |
- 35 - |
Aktivace/deaktivace funkce tepového alarmu ............................................ |
- 36 - |
Vynulování tepových hodnot.......................................................................... |
- 36 - |
Funkce paměti (SPEICH/MEMORY) .................................................................... |
- 37 - |
Celkové uložení v paměti/Total memory (14 dnů) ..................................... |
- 37 - |
BMI (Body Mass Index).................................................................................. |
- 37 - |
- 22 - |
|

Odstránění závad ................................................................................................... |
- 38 - |
Uvedení do původního stavu (Reset)..................................................................... |
- 38 - |
Výměna baterie v hodinkách ................................................................................. |
- 38 - |
Varovný ukazatel stavu baterie ............................................................................ |
- 39 - |
Vodotěsnost.............................................................................................................. |
- 39 - |
Voděodolnost hrudního pásu ................................................................................. |
- 39 - |
Pokyn k čištění.......................................................................................................... |
- 40 - |
Likvidace elektrického přístroje .............................................................................. |
- 40 - |
Likvidace baterií....................................................................................................... |
- 40 - |
Prohlášení o shodě .................................................................................................. |
- 40 - |
Záruka společnosti digi-tech gmbh ....................................................................... |
- 40 - |
Záruční podmínky.................................................................................................... |
- 41 - |
Záruční doba a zákonné nároky vyplývající z vad ............................................. |
- 41 - |
Rozsah záruky ......................................................................................................... |
- 41 - |
Vyřízení záručního případu.................................................................................... |
- 41 - |
Servis......................................................................................................................... |
- 43 - |
Dodavatel................................................................................................................. |
- 43 - |
- 23 -
Sporttester
Úvod
Blahopřejeme ke koupi vašeho nového měřiče srdečního tepu. Rozhodli jste se k nákupu vysoce kvalitního přístroje. Návod k obsluze je součástí tohoto měřiče srdečního tepu. Obsahuje důležité pokyny pro bezpečnost, použití a likvidaci. Předtím, než začnete měřič používat, seznamte se prosím se všemi pokyny k obsluze a bezpečnostními pokyny. Měřič používejte jen popsaným způsobem a k uvedenému účelu použití.
Při předání měřiče třetím osobám současně předejte i všechny podklady.
Použití v souladu s určením
Měřič srdečního tepu je určen jen k měření času a k použití popsaných dodatečných funkcí. Jakékoli jiné použití nebo úprava není v souladu s jeho určením. Výrobce neodpovídá za škody způsobené užíváním v rozporu s daným určením nebo nesprávnou obsluhou. Měřič srdečního tepu není určený ke komerčnímu použití.
Rozsah dodávky
Upozornění: Prosím skontrolujte po koupi rozsah dodávky. Skontrolujte, jestli jsou všechny díly k dispozici a nepoškozené.
•Měřič srdečního tepu včetně baterie (CR2032)
•Náprsní pás včetně baterie (CR2032)
•Držák na kolo
•Návod k obsluze
- 24 -
Technické údaje
Měřiče srdečního tepu
|
rozsah teploty použití |
0-50°C |
|
rozměry |
4,4 x 5,2 x 1,5 cm |
|
displej |
2,5 x 2,5 cm |
|
hmotnost |
47g |
|
baterie |
CR 2032/3V |
Hrudní pás |
|
|
|
rozsah teploty použití |
0-50°C |
|
rozměry |
7 x 3,4 x 1,2 cm |
|
Frekvence |
5,3 kHz |
|
hmotnost |
53g |
|
baterie |
CR 2032/3V |
Důležité bezpečnostní upozornění
POZOR: Před zahájením tréninku doporučujeme konzultaci s lékařem. Vysvětlí vám vhodný trénink, intenzitu tréninku a údaje o tepu. Tento měřič srdečního tepu není lékařským přístrojem a slouží jen jako podpora vaší tréninkové koncepce.
Baterie
Uchovávejte baterie mimo dosah dětí. Pokud dojde ke spolknutí baterie, je třeba ihned vyhledat lékařskou pomoc.
Baterie / akumulátory musí být vždy vloženy podle správné polarity. V případě potřeby předem vyčistěte kontakty baterie i přístroje. Nepokoušejte se o dobíjení baterií, jejich zkratování nebo otvírání. Nikdy nevhazujte baterie do ohně, neboť hrozí nebezpečí výbuchu.
- 25 -
Nepoužíváte-li přístroj delší dobu, vyjměte baterie a přístroj uložte na suchém a bezprašném místě. Nesprávné použítí baterie může způsobit výbuch a vytečení baterie.
V případě vytečení baterie zabraňte kontaktu s kůží, očima a sliznicemi. Používejte ochranné rukavice. V případě kontaktu s kyselinou baterie opláchněte postižené místo čistou vodou a okamžitě vyhledejte lékaře.
Okamžitě vyjměte vybité baterie z přístroje, je zde zvýšené riziko vytečení.
Měřič srdečního tepu nepatří o rukou dětem
Toto zařízení může být používáno i osobami se sníženými fyzickými, smyslovými nebo duševními schopnostmi nebo bez patřičných zkušeností a znalostí (včetně dětí starších než 8 let), pokud jsou pod dohledem nebo pokud byly poučeny o bezpečném používání přístroje a jsou schopny pochopit z toho plynoucí rizika. Nedovolte dětem hrát si se spotřebičem. Čištění a uživatelskou údržbu nesmí provádět děti bez dozoru. Obaly uchovávejte mimo dosah dětí. Hrozí nebezpečí udušení.
Hrudní pás |
|
POZOR: Pacienti s kardiostimulátorem by měli užívání hrudního pásu |
|
konzultovat se svým lékařem. |
|
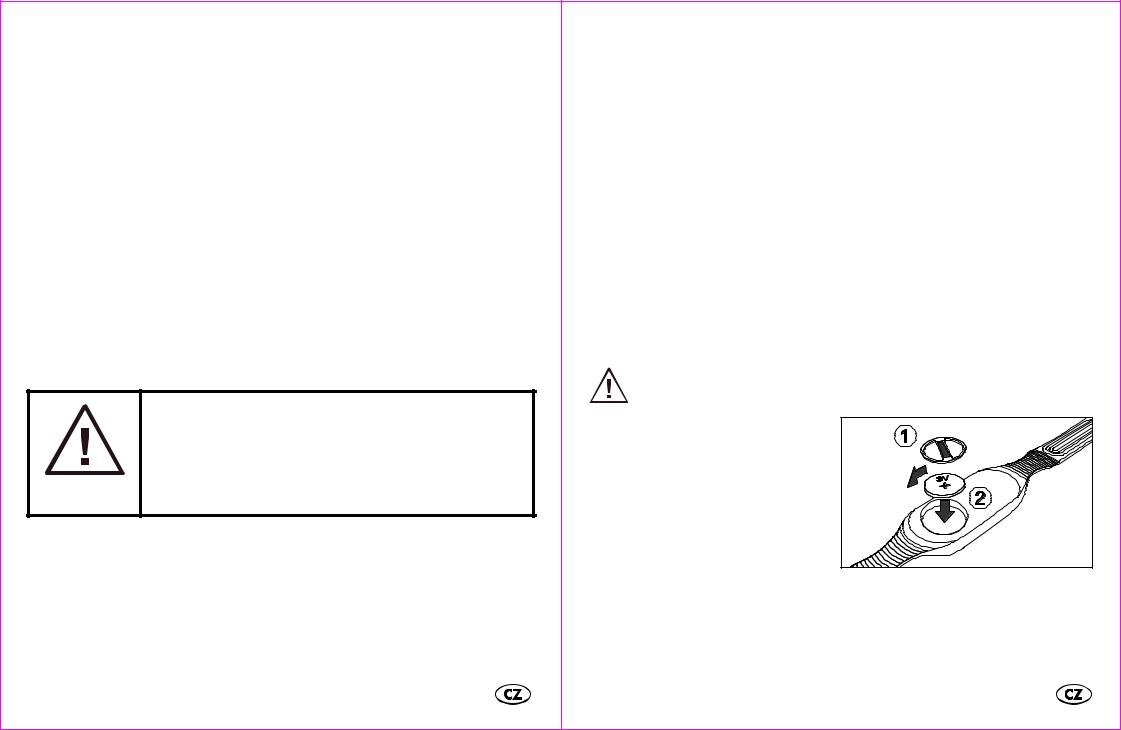
Vložení baterie do hrudního pásu |
|
Odšroubujte pomocí mince víčko z |
|
prostoru pro baterií na zadní straně |
|
hrudního pásu a vložte 3V baterií s |
|
(+)plus nahor. Víčko opět pevně |
|
zašroubujte. |
Baterie: CR2032 |
|
|
- 26 -
 Loading...