

Crivit 2-Person Kayak User Manual [cs, en, pl, de]
RubbeR Dinghy
Before reading, fold out the illustration page and get to know all of the functions of your unit.
Przed przeczytaniem należy rozłożyć bok z ilustracjami a następnie zapoznać się ze wszystkimi
funkcjami urządzenia.
Elolvasás előtt hajtsa ki az oldalt az ábrákkal és ezt követően ismerkedjen meg a készülék valamennyi
funkciójával.
Preden začnete brati, odprite stran s slikami in se seznanite z vsemi funkcijami naprave.
Před čtením si nejdříve vyklopte stránku s obrázky a seznamte se se všemi funkcemi přístroje.
Skôr než začnete návod čítať, si ho otvorte na strane s obrázkami a oboznámte sa so všetkými
funkciami prístroja.
DELTA-SPORT HANDELSKONTOR GMBH
Wragekamp 6
D-22397 Hamburg
Version: 05/2012
Delta-Sport-Nr.: Inshore 290 ll
RubbeR Dinghy
Instructions for use
FeLFÚJhATÓ CSÓnAK
Használati útmutató
nAFuKOVACÍ ČLun
Návod k obsluze
bADebOOT
Bedienungsanleitung
IAN 71536IAN 71536
POnTOn
Instrukcja obsługi
guMiJASTi ČOLn
Navodilo za uporabo
nAFuKOVACÍ ČLn
Návod na obsluhu
Klappen Sie vor dem Lesen die Seite mit den Abbildungen aus und machen Sie sich anschließend mit
allen Funktionen des Artikels vertraut.
GB Instructions and Safety Notice Page 04
PL Wskazówki bezpieczeństwa i obsługi Strona 10
HU Használati és biztonsági tudnivalók 16. Oldal
SI Navodila za uporabo in varnostni napotki Stran 22
CZ Pokyny k používání a bezpečnostní upozornění Stránka 28
SK Pokyny na obsluhu a bezpečnostné pokyny Strana 34
DE/AT/CH Bedienungs- und Sicherheitshinweise Seite 40
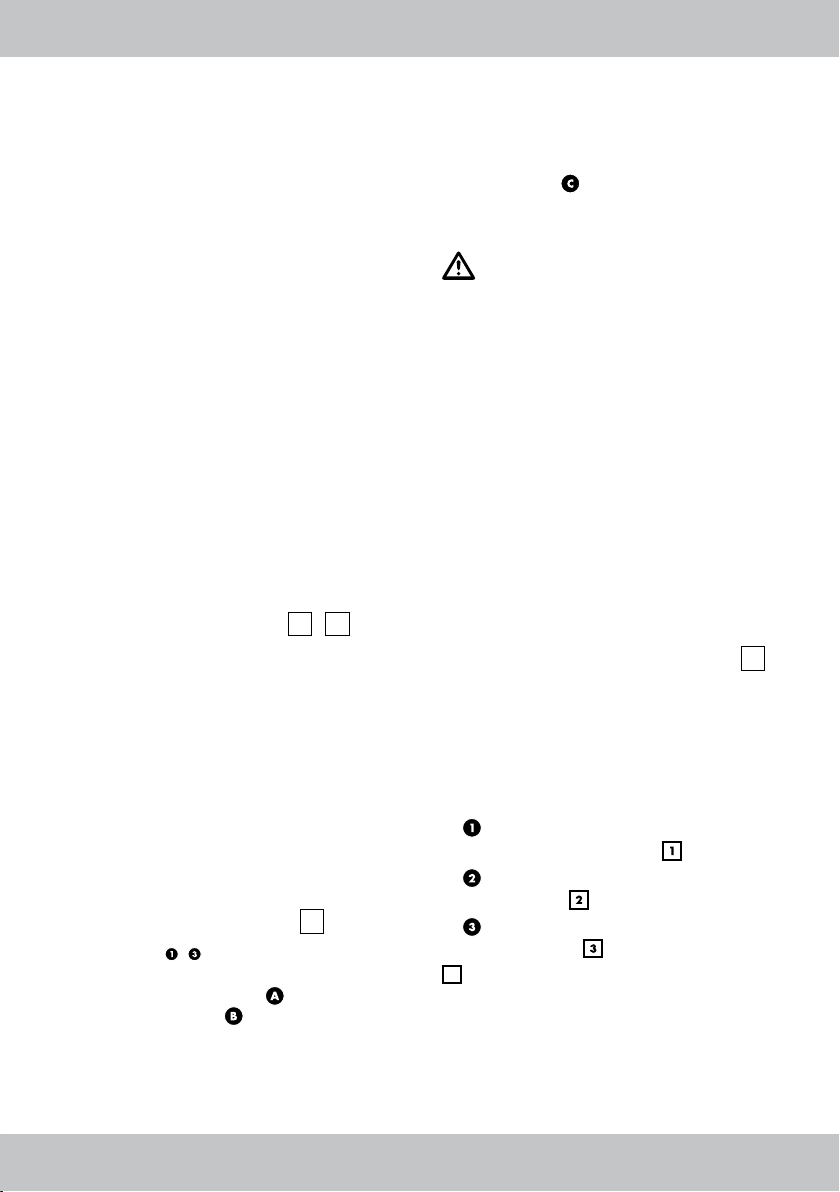
A
e F g
b
C
Push button / Zatrzask / Nyomógomb / Gumb /
Patentní uzávěr / Tlačidlo / Druckknopf
h
Drip-ring / Ochraniacze / Biztosító gyűrű / obroč /
Kroužek proti stékající vodě / Odkvapkávací krúžok / Tropfring
Push button / Zatrzask / Nyomógomb / Gumb /
Patentní uzávěr / Tlačidlo / Druckknopf
L
KJi
D
01
0

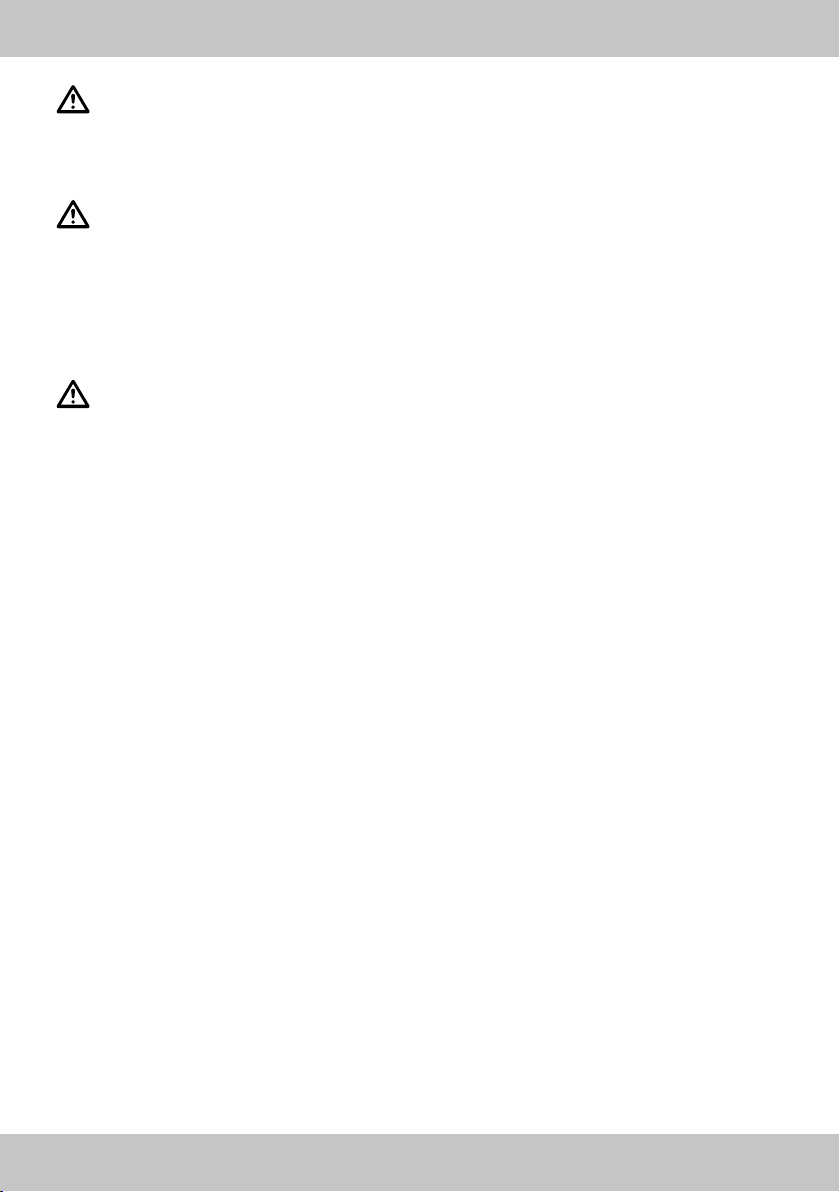
Contents
Technical Data / Symbols Used . . . . . . . . . . . . . . . . . . . . . . . . . . . . . . . . . . . . . . . . . . . . . . . . . . . . . . . 5
Parts Overview / Contents . . . . . . . . . . . . . . . . . . . . . . . . . . . . . . . . . . . . . . . . . . . . . . . . . . . . . . . . . . . . 5
Intended Use . . . . . . . . . . . . . . . . . . . . . . . . . . . . . . . . . . . . . . . . . . . . . . . . . . . . . . . . . . . . . . . . . . . . . . 5
Code of Conduct / Safety Notice . . . . . . . . . . . . . . . . . . . . . . . . . . . . . . . . . . . . . . . . . . . . . . . . . . . . . 5-6
Risk of injury . . . . . . . . . . . . . . . . . . . . . . . . . . . . . . . . . . . . . . . . . . . . . . . . . . . . . . . . . . . . . . . . . . . . 6
Avoiding property damage . . . . . . . . . . . . . . . . . . . . . . . . . . . . . . . . . . . . . . . . . . . . . . . . . . . . . . . . 6
Assembly . . . . . . . . . . . . . . . . . . . . . . . . . . . . . . . . . . . . . . . . . . . . . . . . . . . . . . . . . . . . . . . . . . . . . . . . . 7
Assembly of the paddles . . . . . . . . . . . . . . . . . . . . . . . . . . . . . . . . . . . . . . . . . . . . . . . . . . . . . . . . . . . . . 7
Assembling the Screw Valve . . . . . . . . . . . . . . . . . . . . . . . . . . . . . . . . . . . . . . . . . . . . . . . . . . . . . . . . . . 7
Inflating . . . . . . . . . . . . . . . . . . . . . . . . . . . . . . . . . . . . . . . . . . . . . . . . . . . . . . . . . . . . . . . . . . . . . . . . . 7-8
Inflation Sequence . . . . . . . . . . . . . . . . . . . . . . . . . . . . . . . . . . . . . . . . . . . . . . . . . . . . . . . . . . . . . . . 7
Monitoring the Operating Pressure . . . . . . . . . . . . . . . . . . . . . . . . . . . . . . . . . . . . . . . . . . . . . . . . . . 8
Measuring Strips and Monitoring Ruler . . . . . . . . . . . . . . . . . . . . . . . . . . . . . . . . . . . . . . . . . . . . . . . 8
Inflating the Air Chambers . . . . . . . . . . . . . . . . . . . . . . . . . . . . . . . . . . . . . . . . . . . . . . . . . . . . . . . . . 8
Cords . . . . . . . . . . . . . . . . . . . . . . . . . . . . . . . . . . . . . . . . . . . . . . . . . . . . . . . . . . . . . . . . . . . . . . . . . . . . 8
Dismantling the bathing boat . . . . . . . . . . . . . . . . . . . . . . . . . . . . . . . . . . . . . . . . . . . . . . . . . . . . . . . . . . 8
Kit bag . . . . . . . . . . . . . . . . . . . . . . . . . . . . . . . . . . . . . . . . . . . . . . . . . . . . . . . . . . . . . . . . . . . . . . . . . . . 8
Storage bag . . . . . . . . . . . . . . . . . . . . . . . . . . . . . . . . . . . . . . . . . . . . . . . . . . . . . . . . . . . . . . . . . . . . . . . 8
Transport . . . . . . . . . . . . . . . . . . . . . . . . . . . . . . . . . . . . . . . . . . . . . . . . . . . . . . . . . . . . . . . . . . . . . . . . . 8
Care / Maintenance / Storage . . . . . . . . . . . . . . . . . . . . . . . . . . . . . . . . . . . . . . . . . . . . . . . . . . . . . . . . 9
Repairs . . . . . . . . . . . . . . . . . . . . . . . . . . . . . . . . . . . . . . . . . . . . . . . . . . . . . . . . . . . . . . . . . . . . . . . . . . . 9
Disposal . . . . . . . . . . . . . . . . . . . . . . . . . . . . . . . . . . . . . . . . . . . . . . . . . . . . . . . . . . . . . . . . . . . . . . . . . . 9
3 Years Warranty . . . . . . . . . . . . . . . . . . . . . . . . . . . . . . . . . . . . . . . . . . . . . . . . . . . . . . . . . . . . . . . . . . . 9
Conforms with ISO 6185-1, Category I, Design Category D
4GB
Congratulations!
With your purchase you have decided on a
high-quality product. Get to know the product
before you start to use it. Carefully read the
following operating instructions. Use the product
only as described and only for the given areas
of application. Keep these instructions safe.
When passing the product on to a third party,
always make sure that the documentation is
included.
It contains important information regarding the
product, its construction, the company and care
of, as well as safety instructions. Because water
sports always have a certain risk involved, exact
knowledge about the product could prevent
possible personal injury or even death.
Technical Data /
Symbols Used
Maximum number of
persons: 2 adults / 2 children
Maximum load:
260kg (573,30 lbs.)
Max. air pressure: 0,04 bar (0,58 psi)
Length: approx. 272cm
Width: approx. 141.5cm
Height: approx. 62cm
Weight: approx. 6kg
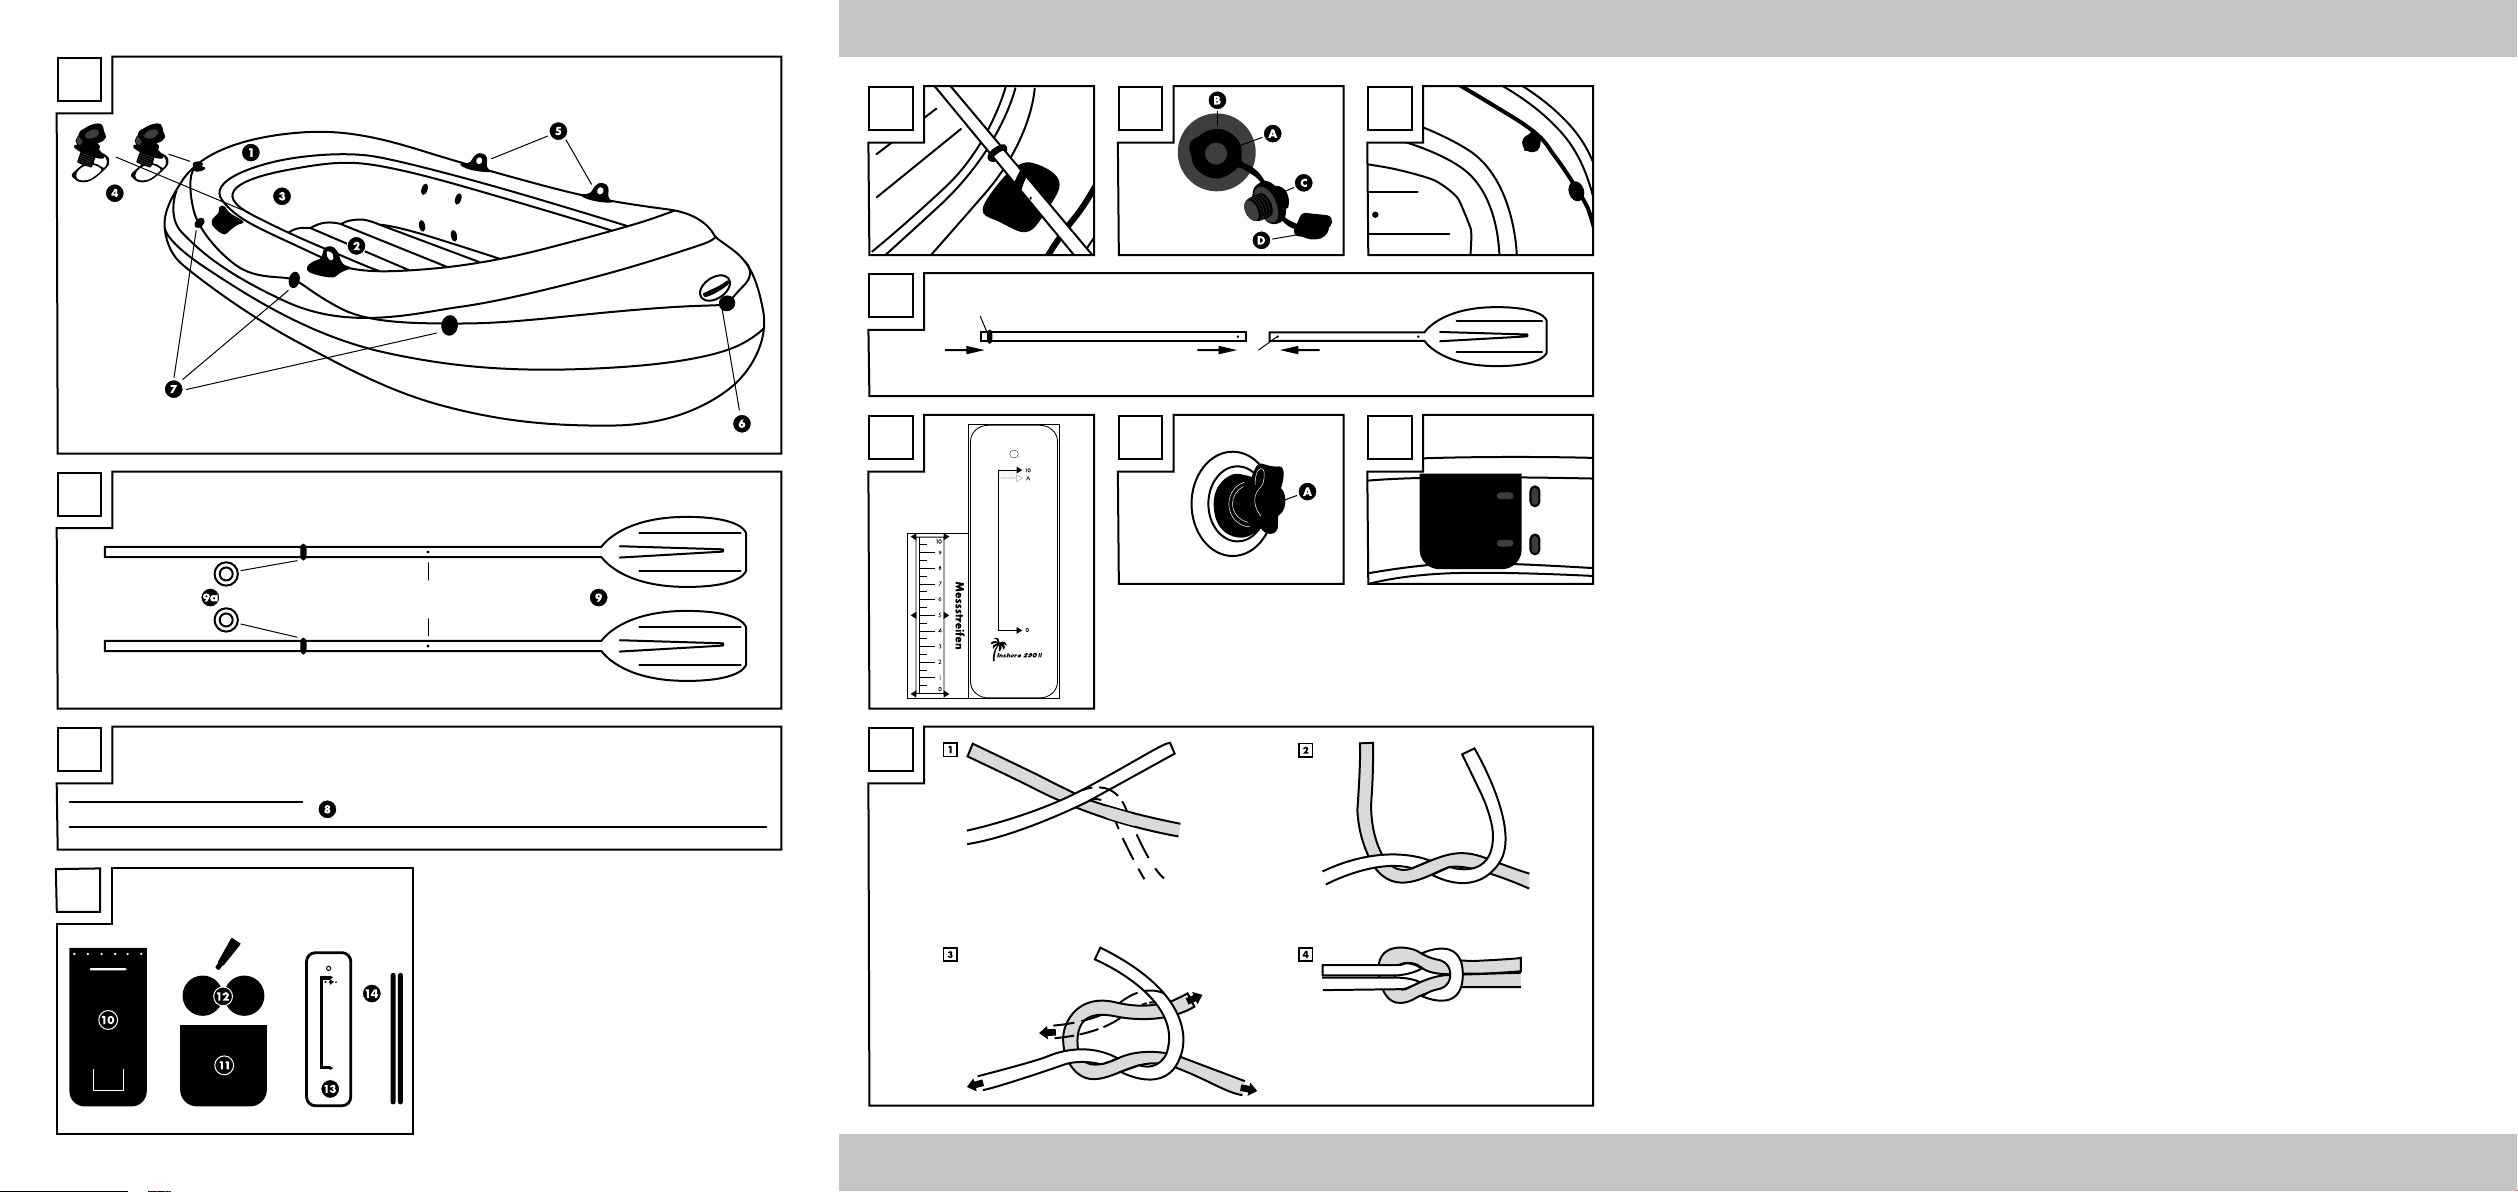
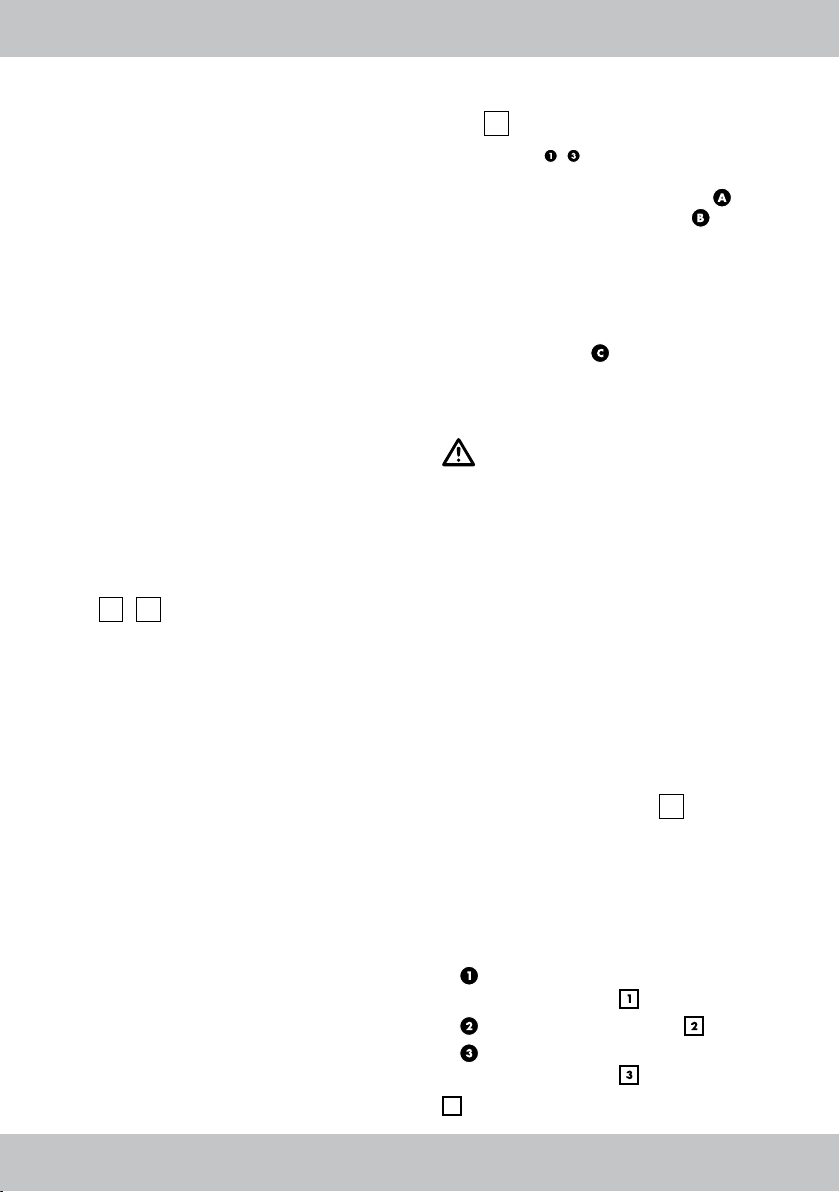
Parts Overview /
Contents (Ill.
Safety chamber with screw-on-valve
Garret with plug-valve
Flotation chamber with screw-on-valve
Screw-on-valve (2 x)
Paddle locks (4 x)
Handle (1 x)
Eyelets for Cords (9 x)
Cords (2 x) ( 1 x 600cm / 1 x 200cm )
A
- D)
Paddles (2 x)
Drip-ring (2 x)
Kit bag (1 x)
Storage bag (1 x)
Repair set (1 x)
Control-ruler (1 x)
Venting pipes (2 x)
Instructions (1 x)
Intended Use
This article was developed for private use.
Design category D “sheltered waters”: designed
for use in protected, near coastal waters.
Designed for voyages on sheltered coastal
waters, small bays, small lakes, rivers and canals
where conditions up to, and including, wind
force 4 and significant wave heights up to,
and including, 0.3m may be experienced, with
occasional waves of 0.5m maximum height, for
example from passing vessels.
Code of Conduct /
Safety Notice
The bathing boat is a tested and safe water
sports device. However, we strongly request that
you adhere to the following rules and regulations:
WARNING!
Your prudence and self-assessment
when on water is highly important.
Never overestimate your strength and
steering abilities! Always keep close
to shores! Take note of the weather
situation, storm warnings or possible
light signals!
WARNING!
Please always adhere to the safety regulations and valid legal provisions for
lakes and open waters. For your own
safety, always wear a certified life vest.
5 GB
WARNING!
Danger of suffocation for children! Do
not let children play with the packaging
material or the item itself unsupervised.
WARNING!
Should a person have fallen over
board, the re-entry into the boat must
take place via the bow or the stern as
the risk of capsizing when re-entering
on the side (entering from the side) is
very high.
Risk of injury!
Caution with offshore winds!
Caution with offshore currents!
• Ensure that persons and cargo are
always evenly distributed in the boat;
otherwise there is a risk of capsizing.
• Take note of the information on the type plate,
the admissible load capacity and number of
persons as well as the warning notice.
• Always adhere to the public shipping
regulations.
• Do not carry any sharp or pointy items with
you.
• The bathing boat should be protected from
contact with precarious liquids or acids.
Irreparable damages may occur if not
adhered to.
• Protect the bathing boat from heat and fire!
Take caution with lit cigarettes!
• Take caution not to get in contact with rocky
underground surfaces to avoid damaging the
boats hull.
• Do not under any circumstances leave the
bathing boat if damages to one of the three
inner chambers occur while on water. The
buoyancy of the two inner chambers will
safely keep the boat afloat.
• Do not under any circumstances transport
the bathing boat in an inflated condition on a
vehicle.
• Never leave your bathing boat unoccupied
on waters. It will drift off faster than it can be
reached through swimming.
• Before use always make sure to take the
paddles with you, as otherwise you will not be
able to manoeuvre the bathing boat adequa tely.
• Do not undertake any technical changes to
your bathing boat. Changes of all kinds
endanger the driving characteristics of the
sports device.
• Never use your bathing boat under the
influence of alcohol, drugs or medication.
• Never overestimate your strengths and always
distribute your muscle strength when paddling
in such away, that the distance travelled can
be effortlessly paddled back again.
Stay within 300m of sheltered shore zones
and take note of changing wind and current
conditions that can greatly impede forward
motion.
Avoiding property damage!
• All inflatable items are cold-sensitive.
Therefore never unfold or inflate the item
under temperatures of 15 °C!
• Should the air pressure increase in direct
sunlight, then it must be counterbalanced by
letting air out.
• Ensure that the item – especially whilst in an
inflated condition – does not come into
contact with stones, gravel or pointy objects
and that it does not get rubbed or grinded as
otherwise damages may occur on the foil.
• Insert only suitable pump adapters into the
safety valves. Otherwise the valves may get
damaged.
• Do not over-inflate as otherwise there is a risk
that the welded joints may tear. Seal the
valves thoroughly after inflation.
• Avoid contact with sharp, hot, pointy or
dangerous objects.
6GB
Assembly
Due to the size of the item, the assembly should always be carried out by
two adults. Please adhere to the individual steps of assembly in the stipulated
order.
This especially applies for the inflating
of the three air chambers as otherwise
irregular pressure distribution may occur, which will lead to instability of the
bathing boat and can lead to impairments of its handling characteristics.
1. Choose a flat and clean surface with enough
space to unpack and unfold the bathing boat.
Make sure that all parts are available and are in
good order and condition.
2. Spread out the boat hull. Starting with the
second assembly of the bathing boat, check for
possible damages, holes or tears and seal these
as described below. Possible damages cannot
be repaired once you are on the water.
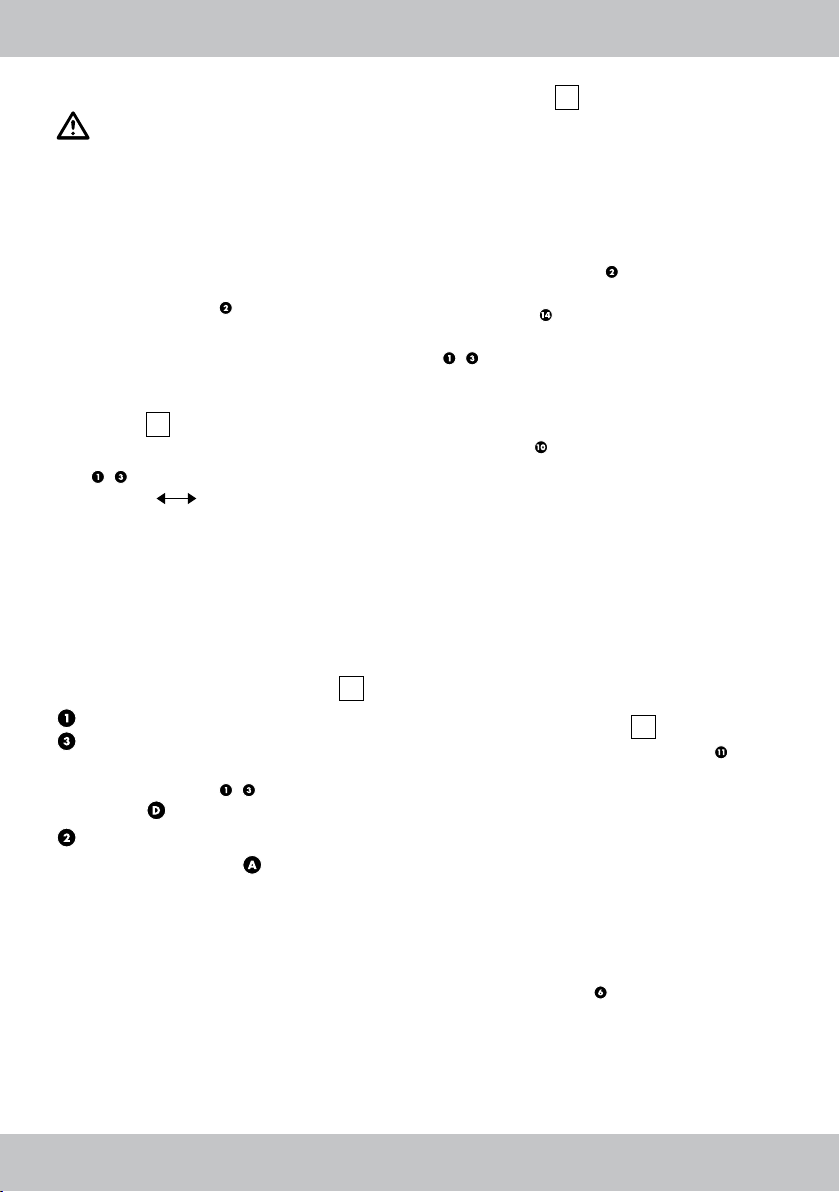
Assembly of the paddles
(Ill.
Important!
While using the boat on the water,
the paddles must not detach from the
paddle-locks, but must be secured with
paddle-locks to avoid loosening!
• Connect the two paddle pipes whereby the
press studs must audibly and visibly snap in
properly. Push the end of the pipe through the
paddle lock and secure the paddle by sliding
on the drip-ring.
Repeat the procedure for the second paddle
for the other side of the boat.
E, H
)
Assembling the Screw Valve
F
(Ill.
The chambers / of the bathing boat are
equipped with a threaded opening for the
supplied screw-on-valves. Pull the sling of
the vent over the threaded opening in such
a way that they securely lie on the intended
groove. This procedure requires a bit of tact and
patience, it must however be done diligently so
that a later loosening and subsequent opening
of the valve is avoided.
Now screw the base
threaded opening.
)
clockwise into the
Inflating
CAUTION!
• Adhere to the correct sequence when inflating
the air chambers.
• The recommended operating pressure is
0.04 bar (= 40 mbar = 0.58 psi).
• Avoid over-inflating the air chambers as
otherwise there is a risk that the welded joints
may tear or be overstretched.
• Make use of standard foot pumps or piston
pumps with corresponding attachments and if
necessary a manometer.
• Do not make use of compressors or
compressed air bottles for inflating the item.
This can cause damages to the item.
• Always inflate all air chambers completely!
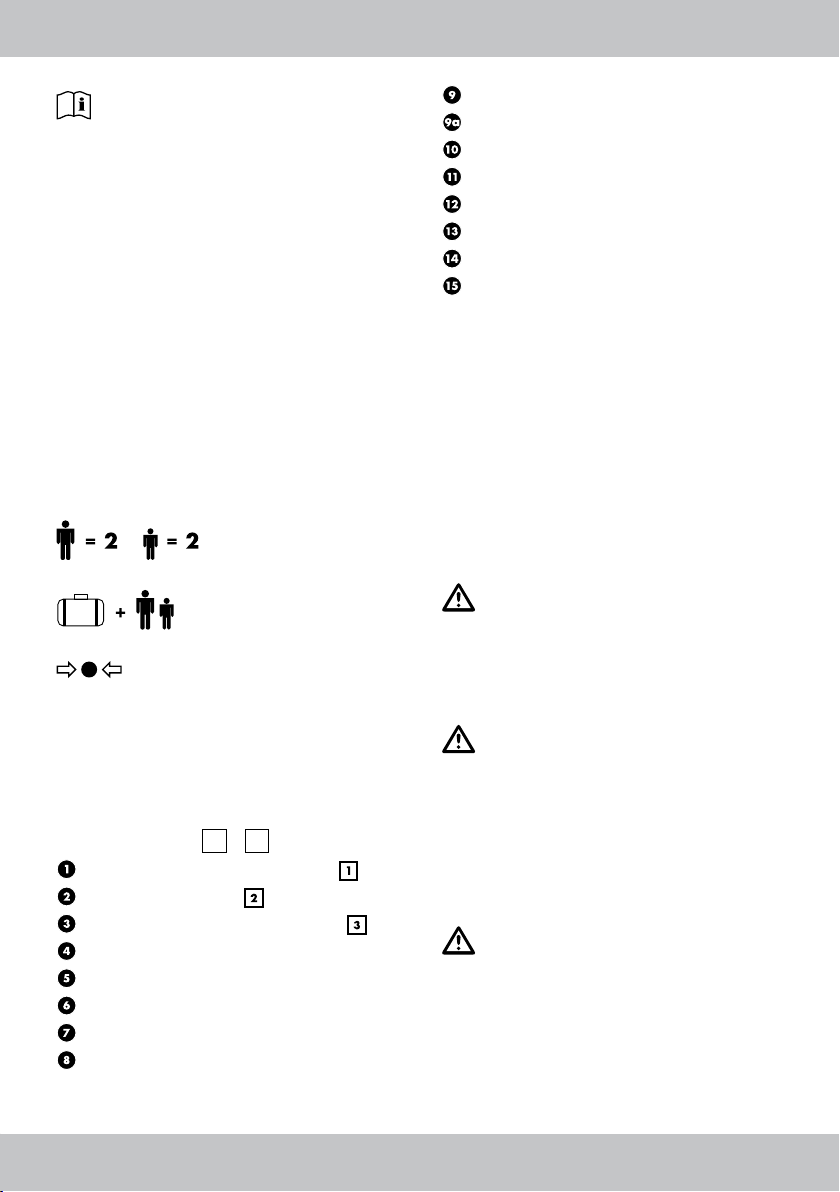
Inflation Sequence (Ill. G)
Always check the air pressure after
inflating an air chamber as described
on page 8 “Monitoring the Operating
Pressure”.
Inflate the air chambers in the following sequence:
Safety chamber with
1.
screw-on-valve
2. Garret with plug-valve
3. Flotation chamber with
screw-on-valve
= marking on boat
7 GB
Monitoring the Operating Pressure
IMPORTANT!
The PVC material stretches after the first
inflation of the item a bit further and
will not go back into its original state.
Please bear in mind that the information may vary slightly depending on load
and outside temperature.
Inflate the air chamber
until no wrinkles are visible in the material. The
thumb should still sink in somewhat when pressing on the relevant air chamber.
Measuring Strips and Monitoring
I
Ruler (Ill.
To check the operating pressure of the air chambers / , place the 0 of the control-ruler
(ill. I) over the
(ill. I) on the item.
With the first and initial inflation, the maximum
expansion of the measuring strip may NOT
exceed position A of the control-ruler.
After first use always inflate so far, that the 10
of the measuring strip is between position A and
position 10 of the control-ruler.
)
Inflating the Air Chambers (Ill. J)
Safety chamber with screw-on-valve
Flotation chamber with screw-on-
valve
1. Inflate the chambers
with the cap in a clockwise direction (Ill F).
Garret with plug-valve
1. Open the valve closure
2. Inflate the relevant air chambers.
3. Seal the valve closure and countersink the
valve with a bit of pressure.
until it feels firm and
0 of the measuring strip
/ with air and seal it
.
Cords (Ill.
Affix the cords 600cm to the eyelets of the boat.
Secure the cords with a reef knot.
L
)
Dismantling the bathing boat
Deflating
Deflate the bathing boat as follows:
1. To deflate the garret pull out the plug-valve
and slightly push the shaft together or use the
venting pipes .
2. To deflate the safety and flotation chamber
/ unscrew the screw-on-valve from the base
completely.
Kit bag
A duffle bag is delivered with the item in
which the bathing boat can be transported and
stored in. Use the cord 200cm to close it.
In addition the duffle bag can be taken on
board to protect provisions, cloths etc. from
splashes of water. Please take into consideration
though that the item is not waterproof.
Therefore do not store sensitive objects such as
cameras in it.
To make use of it on board it is recommended to
remove the cords, to roll up the top end flat and
to close it up with the hook and loop closure.
Storage bag (Ill.
In addition a splash-proof storage bag is also
supplied, which can be attached to the inner
wall of the boat with hook and loop closures.
Smaller items can be stowed in it to keep them
dry; this item however is also not entirely waterproof. Therefore, do not place any sensitive items
in it either.
K
)
Transport
Always transport the bathing boat with two
persons and make use of the cords on the stern
as well as the handle
bow.
8GB
Care / Maintenance / Storage
CAUTION!
Only make use of detergents that do
not contain acids or petrol and never
make use of products based on silicone.
1. Thoroughly clean your bathing boat after every use by rinsing it with fresh water and a mild
soap to remove salt crystals, grains of sand and
other small impurities. Allow to dry completely
afterwards.
2. Fold up the boat with care.
3. Store the bathing boat in a clean and dry
area out of direct sunlight and at which it is not
subject to large temperature fluctuations. Make
sure that it is not deformed and stored level and
out of the reach of rodents.
Repairs
WARNING!
You should under no circumstances carry out repairs by yourself with larger
damages. You can repair smaller damages with the provided repair kit.
1. Completely deflate the bathing boat and
clean the relevant area with the solution on alcohol basis. Lightly roughen the area of the tear or
the hole with fine sandpaper.
2. Now cut out a patch that covers the damaged
area and protrudes all sides about 1.25cm.
3. Apply the glue on the area of the boat as well
as the patch. Allow the glue to dry for approx. 3
minutes.
4. Press the patch on firmly with a soft object.
Make sure to work on a level surface without
wrinkles or folds. Gently remove possible
bubbles with a rounded object from the inside
outward.
5. Wait for at least 12 hours after repairing
before re-inflating.
Disposal
Please dispose of the product and packaging in
an environmentally friendly manner, separating
different materials for recycling as required!
Dispose of this item through an authorised
disposal company or through your local waste
disposal facilities - ask your local authority for
information if further guidance is required.
Ensure that you comply with all regulations
currently in force.
3-year warranty
The product was produced with great care and
under constant supervision. You receive a threeyear warranty for this product from the date of
purchase. Please retain your receipt.
The warranty applies only to material and
workmanship and does not apply to misuse or
improper handling. Your statutory rights, especially the warranty rights, are not affected by this
warranty.
With regard to complaints, please contact the
following service hotline or contact us by e-mail.
Our service employees will advise as to the
subsequent procedure as quickly as possible.
We will be personally available to discuss the
situation with you.
Any repairs under the warranty, statutory guarantees or through goodwill do not extend the
warranty period. This also applies to replaced
and repaired parts.
Repairs after the warranty are subject to a
charge.
IAN: 71536
Service Great Britain
Tel.: 0871 5000 720
(£ 0.10/Min.)
E-Mail: deltasport@lidl.co.uk
9 GB

Instrukcja obsługi
Dane techniczne / użyte symbole . . . . . . . . . . . . . . . . . . . . . . . . . . . . . . . . . . . . . . . . . . . . . . . . . . . . . 11
Opis elementów / zawartość . . . . . . . . . . . . . . . . . . . . . . . . . . . . . . . . . . . . . . . . . . . . . . . . . . . . . . . . 11
Zastosowanie zgodne z przeznaczeniem . . . . . . . . . . . . . . . . . . . . . . . . . . . . . . . . . . . . . . . . . . . . . . . 11
Zasady postępowania / wskazówki bezpieczeństwa . . . . . . . . . . . . . . . . . . . . . . . . . . . . . . . . . . . 11-12
Niebezpieczeństwo urazu . . . . . . . . . . . . . . . . . . . . . . . . . . . . . . . . . . . . . . . . . . . . . . . . . . . . . . . . 12
Unikanie szkód . . . . . . . . . . . . . . . . . . . . . . . . . . . . . . . . . . . . . . . . . . . . . . . . . . . . . . . . . . . . . . . . . 12
Montaż . . . . . . . . . . . . . . . . . . . . . . . . . . . . . . . . . . . . . . . . . . . . . . . . . . . . . . . . . . . . . . . . . . . . . . . . . . 13
Montaż wioseł . . . . . . . . . . . . . . . . . . . . . . . . . . . . . . . . . . . . . . . . . . . . . . . . . . . . . . . . . . . . . . . . . . . . 13
Montaż zaworu . . . . . . . . . . . . . . . . . . . . . . . . . . . . . . . . . . . . . . . . . . . . . . . . . . . . . . . . . . . . . . . . . . . 13
Nadmuchiwanie . . . . . . . . . . . . . . . . . . . . . . . . . . . . . . . . . . . . . . . . . . . . . . . . . . . . . . . . . . . . . . . . . 13-14
Kolejność nadmuchiwania . . . . . . . . . . . . . . . . . . . . . . . . . . . . . . . . . . . . . . . . . . . . . . . . . . . . . . . . 13
Kontrola ciśnienia użytkowego . . . . . . . . . . . . . . . . . . . . . . . . . . . . . . . . . . . . . . . . . . . . . . . . . . . . . 14
Skala i linijka kontrolna . . . . . . . . . . . . . . . . . . . . . . . . . . . . . . . . . . . . . . . . . . . . . . . . . . . . . . . . . . . 14
Napełnianie komór powietrznych . . . . . . . . . . . . . . . . . . . . . . . . . . . . . . . . . . . . . . . . . . . . . . . . . . 14
Sznurek . . . . . . . . . . . . . . . . . . . . . . . . . . . . . . . . . . . . . . . . . . . . . . . . . . . . . . . . . . . . . . . . . . . . . . . . . . 14
Składanie pontonu . . . . . . . . . . . . . . . . . . . . . . . . . . . . . . . . . . . . . . . . . . . . . . . . . . . . . . . . . . . . . . . . . 14
Worek marynarski . . . . . . . . . . . . . . . . . . . . . . . . . . . . . . . . . . . . . . . . . . . . . . . . . . . . . . . . . . . . . . . . . 14
Torba do przechowywania . . . . . . . . . . . . . . . . . . . . . . . . . . . . . . . . . . . . . . . . . . . . . . . . . . . . . . . . . . 14
Transport . . . . . . . . . . . . . . . . . . . . . . . . . . . . . . . . . . . . . . . . . . . . . . . . . . . . . . . . . . . . . . . . . . . . . . . . 14
Pielęgnacja / konserwacja / przechowywanie . . . . . . . . . . . . . . . . . . . . . . . . . . . . . . . . . . . . . . . . . . 15
Naprawy . . . . . . . . . . . . . . . . . . . . . . . . . . . . . . . . . . . . . . . . . . . . . . . . . . . . . . . . . . . . . . . . . . . . . . . . 15
Uwagi odnośnie recyklingu . . . . . . . . . . . . . . . . . . . . . . . . . . . . . . . . . . . . . . . . . . . . . . . . . . . . . . . . . . 15
3 lata gwarancji . . . . . . . . . . . . . . . . . . . . . . . . . . . . . . . . . . . . . . . . . . . . . . . . . . . . . . . . . . . . . . . . . . . 15
Odpowiada ISO 6185-1, Kategoria I, Kategoria projektu D
10PL

Gratulujemy!
Przez Państwa zakup wybraliście produkt o
wysokiej jakości. Przed pierwszym użyciem
zapoznajcie się z produktem. W tym celu przeczytajcie następującą instrukcję obsługi.
Z produktu należy korzystać jedynie jak to
zostało opisane i w podanych zakresach zastosowania. Zachować niniejszą instrukcję. W razie
przekazania produktu osobom trzecim dołączyć
do niego wszystkie dokumenty.
Zawiera ona ważne szczegóły dotyczące
produktu, jego montażu, obsługi i pielęgnacji
jak również zasad bezpieczeństwa. Ponieważ
sporty wodne zawsze wiążą się z ryzykiem,
dokładna znajomość produktu zmniejsza ewentualne kontuzje lub nawet przypadki śmierci.
Dane techniczne /
użyte symbole
dopuszczona ilość osób:
2 osoby dorosłe / 2 dzieci
dopuszczony ciężar
użyteczny: 260 kg (573,30 lbs.)
maks. ciśnienie powietrza:
0,04 bar (0,58 psi)
Długość: ok. 272 cm
Szerokość: ok. 141,5 cm
Wysokość: ok. 62 cm
Waga: ok. 6kg
Opis elementów / zawartość
(rys.
Komora bezpieczeństwa z zaworem
śrubowym
Komora przy podłożu z zaworem z
zatyczką
Komora wyporowa z zaworem śrubowym
Zawór śrubowy (2 x)
Dulki do wioseł (4 x)
Uchwyty (1 x)
Oczka na sznurki (9 x)
Sznurek (2 x) ( 1 x 600 cm / 1 x 200 cm )
A
- D)
Wiosła (2 x)
Ochraniacze (2 x)
Worek (1 x)
Torba do przechowywania (1 x)
Komplet do naprawy (1 x)
Linijka kontrolna (1 x)
Rurka do odpowietrzniania (2 x)
Instrukcja obsługi (1 x)
Zastosowanie zgodne z
przeznaczeniem
Niniejszy artykuł przeznaczony jest do użytku
prywatnego. Kategoria projektu D „wody
chronione“. Artykuł został zaprojektowany do
korzystania w wodach przybrzeżnych, małych
zatokach, na małych jeziorach, wąskich rzekach
i kanałach na których występują warunki atmosferyczne z siłą wiatru nie przekraczającą 4 stopni i większych fal do łącznie 0,3 m i czasami
do 0,5 m, np. przy przepływających statkach.
Zasady postępowania /
wskazówki bezpieczeństwa
Bezpieczny i kontrolowany ponton przeznaczony jest do sportu wodnego. Jednakże uprasza
się o zachowania następujących zasad i
przepisów:
UWAGA!
Wasza rozwaga i samoocena na
wodzie jest bardzo ważna. Nigdy nie
należy przeceniać swoich sił i wiedzy
sterowniczej! Przebywać zawsze w
pobliżu brzegu! Zwracać uwagę na
stan pogody, ostrzeżenia o niepogodzie lub ewentualne sygnały świetlne!
UWAGA!
Prosimy o przestrzeganie zawsze zasad
bezpieczeństwa i obowiązujących przepisów dotyczących jezior i otwartych
wód. Dla własnego bezpieczeństwa
należy zawsze zakładać sprawdzona
kamizelkę ratunkową.
11 PL
OSTRZEŻENIE!
Niebezpieczeństwo zaduszenia się
przez dzieci! Nie pozwalać dzieciom
bawić się bez nadzoru materiałem opakunkowym lub artykułem.
OSTRZEŻENIE!
W przypadku gdy ktoś wypadnie za
burtę, ponowne wejście musi się odbyć
na dziobie lub rufie, ponieważ z boku
istnieje bardzo wysokie ryzyko wywrócenia się kajaku.
Niebezpieczeństwo urazu!
Uwaga przy wietrze od lądu!
Uwaga przy prądzie od lądu!
• Należy zwrócić uwagę na równe
rozłożenie osób i towaru, ponieważ
możliwe jest przewrócenie ponotu.
• Należy przestrzegać danych na szyldzie,
dopuszczonego ciężaru użytecznego i liczbę
osób oraz ostrzeżeń.
• Zawsze należy dostosować się do miejs cowych przepisów żeglugi.
• Nie przewozić z sobą ostrych i spiczastych
przedmiotów.
• Ponton należy chronić przed kontaktem z
wątpliwymi cieczami lub kwasami. Kontakt
taki może doprowadzić do nienaprawialnych
szkód.
• Chronić ponton przed ukropem i ogniem!
Zachować ostrożność podczas palenia
papierosów!
• Należy unikać kamiennego dna, kamienie
mogą uszkodzić dno pontonu.
• Jeżeli podczas pobytu na wodzie dojd
zie do uszkodzenia jednej z trzech komór
wewnętrznych, nie należy opuszczać
pontonu. Siła napędowa dwóch komór
wewnętrznych wystarcza, aby łódkę utrzymać
na wodzie.
• Nie transportować na pojazdach pontonu w
stanie nadmuchanym.
• Nie pozostawiać pontonu na wodzie bez
nadzoru. Ponton szybciej zostanie zniesiony
niż będzie można do niego dopłynąć.
• Przed użyciem należy sprawdzić, czy w
pontonie znajduje się wiosło, w innym razie
sterowanie pontonem jest utrudnione.
• Nie dokonywać żadnych zmian technicz nych. Każda zmiana prowadzi do uszkodze nia działania pontonu.
• Nigdy nie korzystać z pontonu pod wpływem
alkoholu, narkotyków i lekarstw.
• Nie przeceniach własnych sił i tak rozłożyć
siły, aby możliwe było pokonanie drogi
powrotnej. Należy pamiętać, aby nie
odpływać dalej niż 300 m od brzegu i
zwracać uwagę na warunki atmosferyczne,
które mogą doprowadzić do utrudnień w
poruszaniu łodzi.
Unikanie szkód!
• Wszystkie artykuły dmuchane wrażliwe są na
działanie niskich temperatur.
Nie rozkładać i nadmuchiwać zatem artykułu
w temperaturze poniżej 15 °C!
• Jeżeli wskutek nasłonecznienia ciśnienie w
komorach wzrośnie należy odpowiednio je
wyrównać.
• Należy zwrócić uwagę – w szczególności
w nadmuchanym stanie – aby artykuł nie miał
kontaktu z kamieniami, żwirem i ostrymi
przedmiotami, aby nigdzie nie obcierał i tarł,
ponieważ może dojść do uszkodzenia
materiału.
• Stosować jedynie odpowiednie adaptery do
pompki. W innym przypadku można
uszkodzić zawory.
• Nie nadmuchiwać zbyt mocno, ponieważ
może doprowadzić to do uszkodzenia spoin.
Po nadmuchaniu dobrze zamknąć zawory.
• Unikać kontaktu z ostrymi, gorącymi, szpi castymi i niebezpiecznymi przedmiotami.
12PL
Montaż
Ze względu na rozmiar artykułu,
montaż powinny przeprowadzać dwie
dorosłe osoby. Należy przestrzegać
wskazanej kolejności. Dotyczy to przede wszystkim nadmuchiwania komór
powietrznych, w innym przypadku
może dojść do nierównomiernego
rozprowadzenia ciśnienia i tym samym
doprowadzić do niestabilności pontonu
i pogorszenia możliwości sterowania.
1. Montaż należy wykonywać na czystej i
gładkiej powierzchni o dużej przestrzeni, aby
mieć miejsce do rozpakowania i rozłożenia
pontonu. Należy upewnić się, czy wszystkie
części znajdują się w opakowaniu i czy artykuł
znajduje się w nienagannym stanie.
2. Artykuł rozłożyć na podłożu. Przed każdym
następnym składaniem, należy skontrolować
artykuł pod względem ewentualnych szkód,
dziur i rozdarć, aby je naprawić, jak opisano
poniżej. W razie kontaktu z wodą szkód tych
nie można już więcej usunąć.
Montaż wioseł (rys.
Ważne!
Podczas korzystania pontonu wiosła
powinny zawsze znajdować się w
dulkach i należy je zabezpieczyć w
delkach przd ich zgubieniem!
• Połączyć dwie rurki wioseł i zwrócić uwagę
aby zamknięcia dobrze zaskoczyły. Koniec
rurki przeprowadzić przez dulkę i
zabezpieczyć przy pomocy ochraniacza.
Drugie wiosło zamontować z drugiej strony
pontonu w ten sam sposób.
Montaż zaworu (rys.
Każda komora / pontonu wyposażona jest
w otwarcie zaworowe, pasujące do zaworów
śrubowych. Wyciągnąć pętlę zaworu na
otwarciem zaworowym w ten sposób, aby
dokładnie osiadła w przeznaczonym ku temu
rowku.
E, H
F
)
)
Czynność ta wymaga cierpliwości i dokładności,
i należy przeprowadzić ja bardzo starannie,
aby później uniknąć poluzowania się zaworu w
otworze.
Przekręcić korek
zówek zegara w otworze zaworu.
zgodnie z ruchem wska-
Nadmuchiwanie
UWAGA!
• Należy zachować kolejnoć przy pompowa niu komór.
• Zalecane ciśnienie robocze wynosi 0,04 bar
( = 40 mbar = 0,58 psi).
• Należy unikać zbyt mocnego nadmuchiwania
komór, ponieważ może doprowadzić to do
naciągnięcia materiału lub zerwania spoin.
• W celu pompowania artykułu należy stosować
przyjęte w handlu pompki nożne lub pompki
tłokowe z podwójnym stokiem posiadające
odpowiednie nasadki i ewent. manometr.
• Nie wolno stosować kompresorów lub zbior ników pneumatycznych. Może prowadzić to
do uszkodzenia artykułu.
• Należy całkowicie wypełnić powietrzem
wszystkie komory!
Kolejność nadmuchiwania (rys. G)
Przed pompowaniem należy zawsze
skontrolować ciśnienie, jak opisano w
rozdziale „Kontrola ciśnienia roboczego“ na str. 14.
Komory należy nadmuchać w następującej
kolejności:
Komora bezpieczeństwa z
1.
zaworem śrubowym
2. Komora przy dnie z zaworem z
zatyczką
3. Komora wyporowa z zaworem
śrubowym
= oznaczenie na kajaku
13 PL

Kontrola ciśnienia użytkowego
WAŻNE!
Po pierwszym nadmuchaniu, materiał
PVC rozciąga się i nie wraca do swojego stanu pierwotnego.
Należy zwrócić uwagę, że odstępstwa
danych uzależnione są od temperatury
powietrza i transportu.
Komory
nie było widocznych żadnych zmarszczeń w
materiale. Przy przyduszeniu komory kciukiem
musi być możliwe lekkie wgniecenie.
Skala i linijka kontrolna (rys. I)
W celu kontroli ciśnienia roboczego w komorze
kontrolnej (rys. I) ponad 0 w miarce
(rys. I).
Przy pierwszym nadmuchaniu maksymalne rozszerzenie miarki NIE może przekroczyć pozycji
A na linijce kontrolnej.
Po pierwszym użyciu nadmuchiwać zawsze
w ten sposób, aby 10 na miarce znajdowała
się między pozycją A i pozycją 10 na linijce
kontrolnej.
Napełnianie komór powietrznych
(rys. J)
śrubowym
śrubowym
1. Nadmuchać komory
przekręcając je zgodnie ze wskazówkami ruchu
zegara (rys. F).
korkiem
1. Otworzyć zawór
2. Nadmuchać komorę.
3. Zamknąć zawór z korkiem i zaglębić lekko
wduszając.
należy nadmuchać tak mocno, aby
/ należy położyć na artykule 0 w linijce
Komora bezpieczeństwa z zaworem
Komora wyporowa z zaworem
/ i zamknąć korki
Komora w podłopu z zaworem z
.
Sznurek (rys.
600 cm sznurka należy umocować w oczkach
na sznurki przy pontonie. Sznurek należy
zabezpieczyć węzłem krzyżowym.
L
)
Składanie pontonu
Wypuszczanie powietrza
Powietrze należy wypuszczać w następującej
kolejności:
1. Aby wypuścić powietrze z komory w podłożu
należy wyciągnąć zawór z korkiem i lekko
przydusić rdzeń lub użyć rurkę do odpowietrzania .
2. Aby wypuścić powietrze z komory
bezpieczeństwa i komory wyporowej / należy
całkowicie odkręcić zawory śrubowe z korka.
Worek marynarski
W opakowaniu znajduje się worek , który
przeznaczony jest do przechowywania i transportu artykułu. W celu zamknięcia worka należy
użyć 200 m sznurka. Ponadto worek może
służyć do przechowywania prowiantu, ubrań itd.
na pokładzie, chroniąc je przed wodą.
Należy jednak pamiętać, że worek nie jest wodoszczelny. Dlatego nie wolno przechowywać
w nim przedmiotów delikatnych jak np. aparaty
fotograficzne. Podczas przewozu na pokładzie
zaleca się wyciągnięcie sznurka, aby możliwe
było złożenie górnej części i zamknięcie przy
pomocy rzepu.
Torba do przechowywania
(rys.
W opakowaniu znajduje się dodatkowo torba
do przechowywania , która umocowana jest
przy pomocy rzepu na wewnętrznej stronie
pontonu. Można w niej przechowywać przedmioty. Należy jednak pamiętać, że i tak torba
nie jest całkowicie wodoszczelna. Dlatego i
w niej nie należy przechowywać delikatnych
przedmiotów.
K
)
Transport
Ponton należy transportować najlepiej w dwie
osoby przy pomocy sznurka na czubie i uchwytów na rufie.
14PL
Pielęgnacja / konserwacja /
przechowywanie
UWAGA!
Używać jedynie środków czyszczących
nie zawierających kwasów lub benzyny i nigdy produktów na bazie sylikonu.
1. Po każdym użycie ponton należy dokładnie
wyczyścić przy pomocy wody i delikatnego
mydła, aby zmyć sól, piasek i zabrudzenia.
Następnie pozostawić do wyschnięcia.
2. Ponton dokładnie złożyć.
3. Ponton przechowywać w suchym i czystym
miejscu, unikać bezpośredniego kontaktu z promieniowaniem słonecznym i wahań temperatury.
Należy pamiętać aby nie deformować artykułu i
przechowywać z dala od gryniozów.
Naprawy
UWAGA!
Przy dużych uszkodzeniach nie należy
przeprowadzać własnoręcznie napraw.
Małe uszkodzenia można naprawić przy pomocy dołączonego zestawu do napraw.
1. Należy całkowicie usunąć powietrze z pontonu i wyczyścić uszkodzone miejsce rozpuszczalnikiem z alkoholem. Następnie zetrzeć miejsce i
jego okolice delikatnym papierem ściernym.
2. Przyciąć łatkę tak aby całkowicie przykrywała
uszkodzone miejsce a jej brzegi wystawały ze
wszystkich stron o 1,25 cm.
3. Nałożyć klej na uszkodzone miejsce i na
łatkę. Pozostawić klej przez ok. 3 min. do
wyschnięcia.
4. Łatkę przydusić przy pomocy miękkiej
ściereczki. Należy pamiętać aby dokonywać
naprawy na gładkiej powierzchni bez zmarszeń
i nierówności. Usunąć możliwe bańki powietrzne przy pomocy zaokrąglonego przemiotu z
wewnątrz na zewnątrz.
5. Po dokonanej naprawie odczekać przynajmniej 12 godzin do następnego pompowania.
Uwagi odnośnie recyklingu
Opakowanie i artykuł usunąć zgodnie z przepisami o ochronie środowiska!
Artykuł oddać do utylizacji w autoryzowanym zakładzie oczyszczania i przetwarzania
odpadów lub do odpowiedniej jednostki w
gminie. Prosimy stosować się do aktualnie
obowiązujących przepisów.
3 lata gwarancji
Produkt został wyprodukowany bardzo starannie i podczas stałej kontroli. Państwo otrzymują
na ten produkt trzy lata gwarancji od daty
zakupu. Prosimy o zachowanie paragonu.
Gwarancja obejmuje tylko błędy materiałowe
lub fabryczne i traci ważność podczas
używania produktu nie właściwie i nie zgodnie z jego przeznaczeniem. Państwa prawa,
w szczególności zasady odpowiedzialności
z tytułu rękojmi, nie zostaną ograniczone tą
gwarancję.
W razie ewentualnych reklamacji należy
skontaktować się pod niżej podanym numerem
infolinii lub poprzez pocztę elektroniczną. Nasi
współpracownicy omówią z Państwem jak najszybciej dalszy przebieg sprawy. Z naszej strony
gwarantujemy doradztwo.
Czas gwarancji nie zostanie przedłużony przez
ewentualnie podjęte naprawy na podstawie
gwarancji, prawnej odpowiedzialności z tytułu
rękojmi czy dokonania bezpłatnej naprawy.
Dotyczy to również wymienionych i naprawionych części.
Po upłynięciu czasu gwarancji powstałe naprawy są płatne.
IAN: 71536
Serwis Polska
Tel.: 22 397 4996
E-Mail: deltasport@lidl.pl
15 PL
 Loading...