

Page 1

User’s Guide
Creative Sound Blaster Live!
Creative Audio Software
Information in this document is subject to change without notice and does not represent a commitment on the part of Creative Technology Ltd. No part of this manual
may be reproduced or transmitted in any form or by any means, electronic or mechanical, including photocopying and recording, for any purpose without the written
permission of Creative Technology Ltd. The software described in this document is furnished under a license agreement and may be used or copied only in
accordance with the terms of the license agreement. It is against the law to copy the software on any other medium except as specifically allowed in the license
agreement. The licensee may make one copy of the software for backup purposes.
Copyright © 1998-2003 Creative Technology Ltd. All rights reserved.
Version 1.5
September 2003
Sound Blaster and Blaster are registered trademarks, and the Sound Blaster Live! logo, the Sound Blaster PCI logo, EAX and Crea ti v e Multi Speak er Surround are
trademarks of Creative Technology Ltd. in the United States and/or other countries. E-Mu and SoundFont are registered trademarks of E-mu Systems, Inc..
Cambridge SoundW orks, Micr oWorks and PC Works are re gistered trademarks , and PC Works Fo urPointSurround is a tr ademark of Cambridge Soun dWorks, Inc..
Microsoft, MS-DOS, and Windows are registered trademarks of Microsoft Corporation. Manufactured under license from Dolby Laboratories. “Dolby”, “Pro
Logic” and the double-D symbol are trademarks of Dolby Laboratories. Confidential unpublished works. Copyright 1992-1997 Dolby Laboratories. All rights
reserved. All other products are trademarks or registered trademarks of their respective owners.
This product is covered by one or more of the following U.S. patents:
4,506,579; 4,699,038; 4,987,600; 5,0 13,105; 5,072,645; 5,111,727; 5,144,676; 5,170,369; 5,248,845; 5,298,671; 5,303,309; 5,317,104; 5,342,990; 5,430,244;
5,524,074; 5,698,803; 5,698,807; 5,7 48,747; 5,763,800; 5,790,837.
Page 2

Contents
Introduction
System Requirements...................................................................................................ii
Sound Blaster Live! card..................................................................................ii
Games and DVD viewing................................................................................ii
Getting More Information............................................................................................ii
Document Conventions.............................................................................................. iii
1 Installing Hardware
What You Need..................................................................................................................... 1-1
Your Sound Blaster Liv e! Card............................................................................................ 1-2
Step 1: Prepare your computer............................................................................................. 1-3
Step 2: Install the Sound Blaster Live! card.........................................................................1-4
Step 3: Install the CD-ROM/DVD-R OM dri v e................................................................... 1-5
Step 4: Connect to power supply.......................................................................................... 1-6
Enabling CDDA.................................................................................................................... 1-6
Connecting Related Peripherals........................................................................................... 1-8
Connecting Speaker Systems............................................................................................... 1-9
Connecting external consumer electronic devices.............................................................1-10
Positioning Your Speakers.................................................................................................. 1-11
2 Installing Software
Installing Drivers and Applications...................................................................................... 2-1
3 Using Sound Blaster Live!
Creative Software.................................................................................................................. 3-1
Creative Surround Mixer...................................................................................................... 3-2
Creative AudioHQ................................................................................................................3-2
Page 3

Creative Diagnostics............................................................................................................. 3-3
SoundFont Control....................................................................................................3-3
Creative Ke yboard....................................................................................................3-3
EAX Control............................................................................................................. 3-3
Creative Wave Studio............................................................................................................3-4
Creative PlayCenter.............................................................................................................. 3-4
Creative Recorder.................................................................................................................. 3-4
A General Specifications
Features................................................................................................................................. A-1
PCI Bus Mastering................................................................................................... A-1
EMU10K1................................................................................................................ A-1
Stereo Digitized Voice Channel.............................................................................. A-1
AC ’97 Codec Mixer............................................................................................... A-2
Volume Control........................................................................................................ A-2
Dolby Digital (AC-3) Decoding .............................................................................. A-2
Creative Multi Speaker Surround (CMSS) .............................................................A-2
Connectivity......................................................................................................................... A-3
Audio Inputs............................................................................................................. A-3
Audio Outputs.......................................................................................................... A-3
Interfaces.................................................................................................................. A-3
B Troubleshooting
Problems Installing Software................................................................................................B-1
Sound.....................................................................................................................................B-2
Problems with File Transfers on Some VIA Chipset Motherboards..................................B-5
Insufficient SoundFont Cache..............................................................................................B-6
Joystick..................................................................................................................................B-6
I/O Conflicts..........................................................................................................................B-7
Problems in Windows XP.....................................................................................................B-8
Page 4

Introduction
Sound Blaster Live! is an audio solution for games, movies, CDs, MP3 music, and Internet
entertainment. With its support for today’s leading audio standard—EAX—Sound Blaster
Live! creates real-life, multi-dimensional sound and multi-textured acoustical environments for
the most realistic 3D audio experience. Its powerful EMU10K1 audio processor delivers audio
at optimum CPU performance with the highest fidelity and absolute clarity. Combine it with a
four- or five-speaker setup and you’ll experience realistic 3D audio, EAX in supported games,
and enjoy your movies with true surround sound.
Introduction i
Page 5

System Requirements
Sound Blaster Live! card ❑ Genuine Intel
❑ Intel, AMD or 100%-Intel compatible motherboard chipset
❑ Windows 98 Second Edition (SE), Windows Millennium Edition (Me), Windows 2000 or
Windows XP
❑ 64 MB RAM for Windows 98 SE/Me
128 MB RAM for Windows 2000/XP
❑ 600 MB of free hard disk space
❑ Available PCI 2.1 compliant slot for the Sound Blaster Live! card
❑ Headphones or amplified speakers (available separately)
❑ CD-ROM drive installed
®
Pentium® II 350 MHz, AMD® K6 450 MHz or faster class processor
Games and DVD viewing ❑ Genuine Intel Pentium II 350 MHz, MMX or AMD 450 MHz processor/3Dnow!
❑ Games: 128 MB RAM recommended, 3D graphics accelerator with at least 8 MB of texture
RAM, available 300–500 MB of free hard disk space
❑ DVD: A second generation or later DVD-ROM drive with these recommended soft-DVD
players: InterVideo’s WinDVD2000 or CyberLink’s PowerDVD 3.0 or later
Sound Blaster Live! estimates the hard disk space required when you select it during
installation. Other applications may have higher system requirements or may require a
microphone. Refer to the individual application’s online Help for details.
Getting More Information
See the online User’s Guide for MIDI specifications and connector pin assignments, as well as
instructions on using the various applications in your audio package.
Visit http://www.creative.com for the latest drivers, applications and FAQs.
Introduction ii
Page 6
Document Conventions
This manual uses the following conventions to help you locate and identify the information that
you need.
T able i: Document conventions .
Text Element Use
This notepad icon indicates information that is of particular importance
and should be considered before continuing.
This alarm clock icon indicates that failure to adhere to directions may
result in loss of data or damage to your system.
The warning sign indicates that failure to adhere to directions may result
in bodily harm or life-threatening situations.
Introduction iii
Page 7
Installing Hardware
1
What You Need
Appearance may differ
depending on model and region
of purchase.
Some connectors shown here
may only be available with
certain cards.
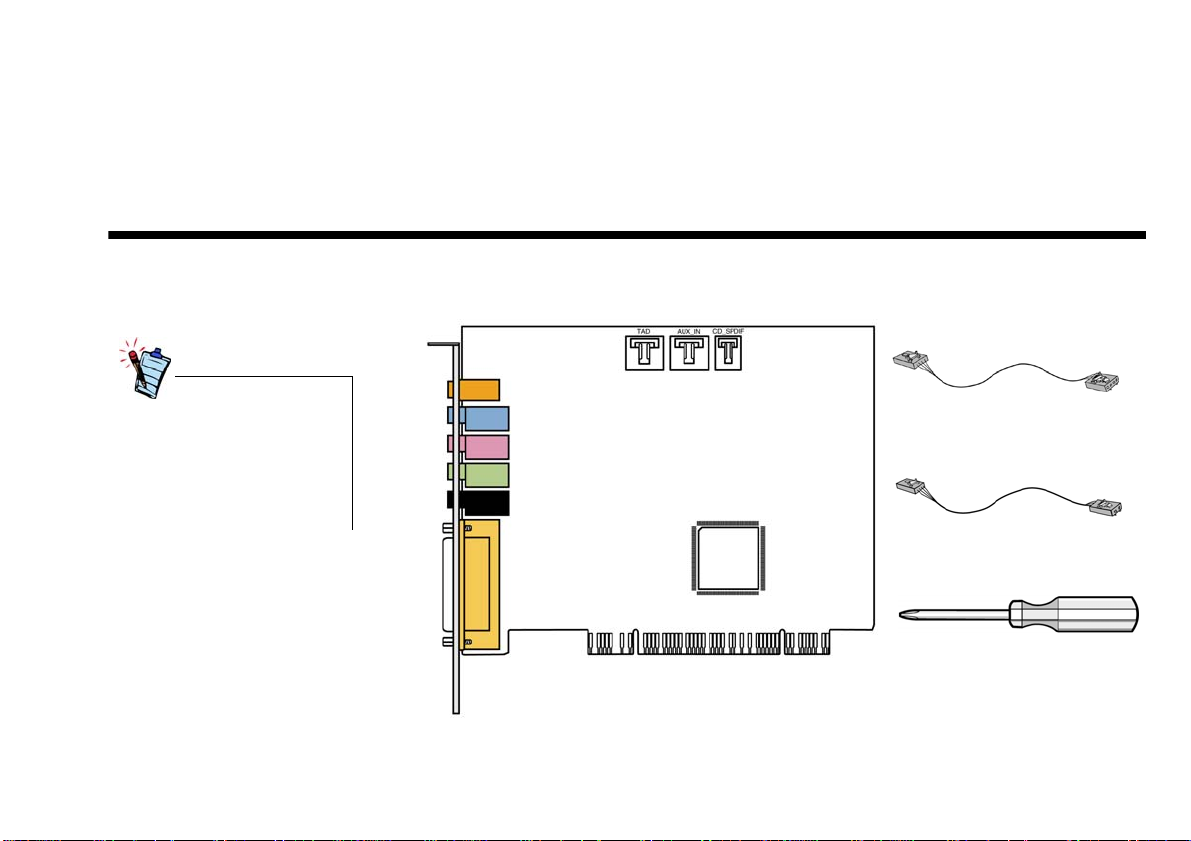
Before you begin installation, be sure that you have these:
Sound Blaster Live! card
*Available with some models of Sound Blaster Live! card.
MPC-to-MPC (4-pin) Analog CD audio cable*
MPC-to-MPC (2-pin)
Digital CD audio cable*
Phillips Screwdriver (not included)
Installing Hardware 1-1
Page 8
Your Sound Blaster Live! Card
Appearance may differ
depending on model and region
of purchase.
Some connectors shown here
may only be available with
certain cards.
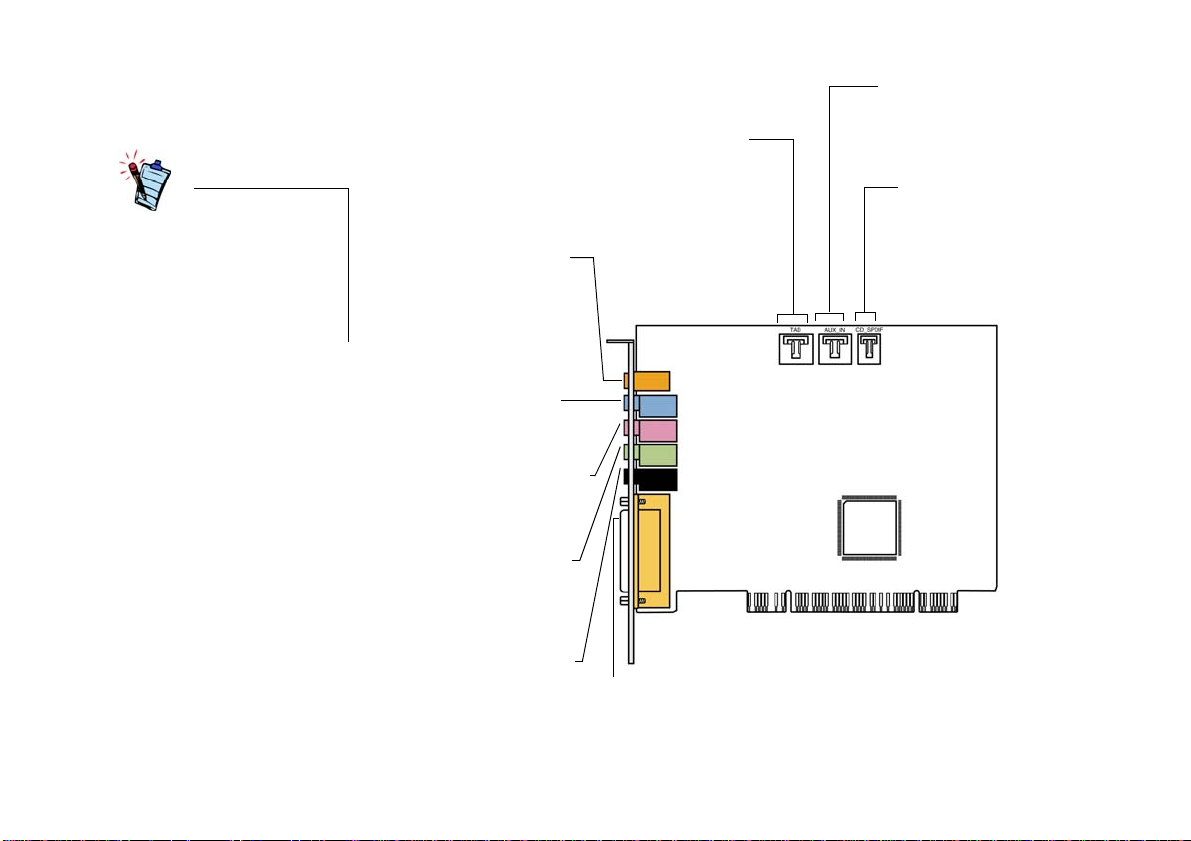
Your audio card has these connectors which allow you to attach other devices:
AUX/CD In connector (AUX_IN)
Connects to internal audio sources such as
TV Tuner, MPEG, or other similar cards.
Telephone Answering Device connector (TAD)
Provides a mono connection from a standard voice
modem, and transmits microphone signals to the
modem.
† Analog/Digital Out connector
6-channel or compressed AC-3
SPDIF output for connection to
external digital devices or digital
speaker systems.
Also supports Center and Subwoofer
(LFE) analog channels for
connection to 5.1 analog speaker
systems.
Line In connector (LIN_IN)
Connects to an external device
(such as a cassette, DAT or MiniDisc
player).
Microphone In connector (MIC_IN)
Connects to an external microphone
for voice input.
Line Out connector (LIN_OUT1)
Connects to powered speak ers or an
external amplifier for audio output.
Supports headphones. In analog
mode, used for 4.1 channel speaker
systems.
Rear Out connector (LIN_OUT2)
Connects to powered speakers or an
external amplifier for audio output. In
analog mode, used for 4.1 channel
speaker systems.
MIDI/Joystick connector
Connects to a joystick or MIDI device,
for example, MIDI keyboard
CD SPDIF connector (CD_SPDIF)
Connects to the SPDIF (Digital Audio)
output (where available) on a CD-ROM or
DVD-ROM drive.
† On some cards, this is the Digital Out
connector, which connects to digital devices
via a Digital Output module (available
separately), or to digital speaker systems
like Creative Inspire™ 5.1 Digital 5700.
Figure 1-1: Connectors on the Sound Blaster Live! card.
Installing Hardware 1-2
Page 9
Step 1: Prepare your computer
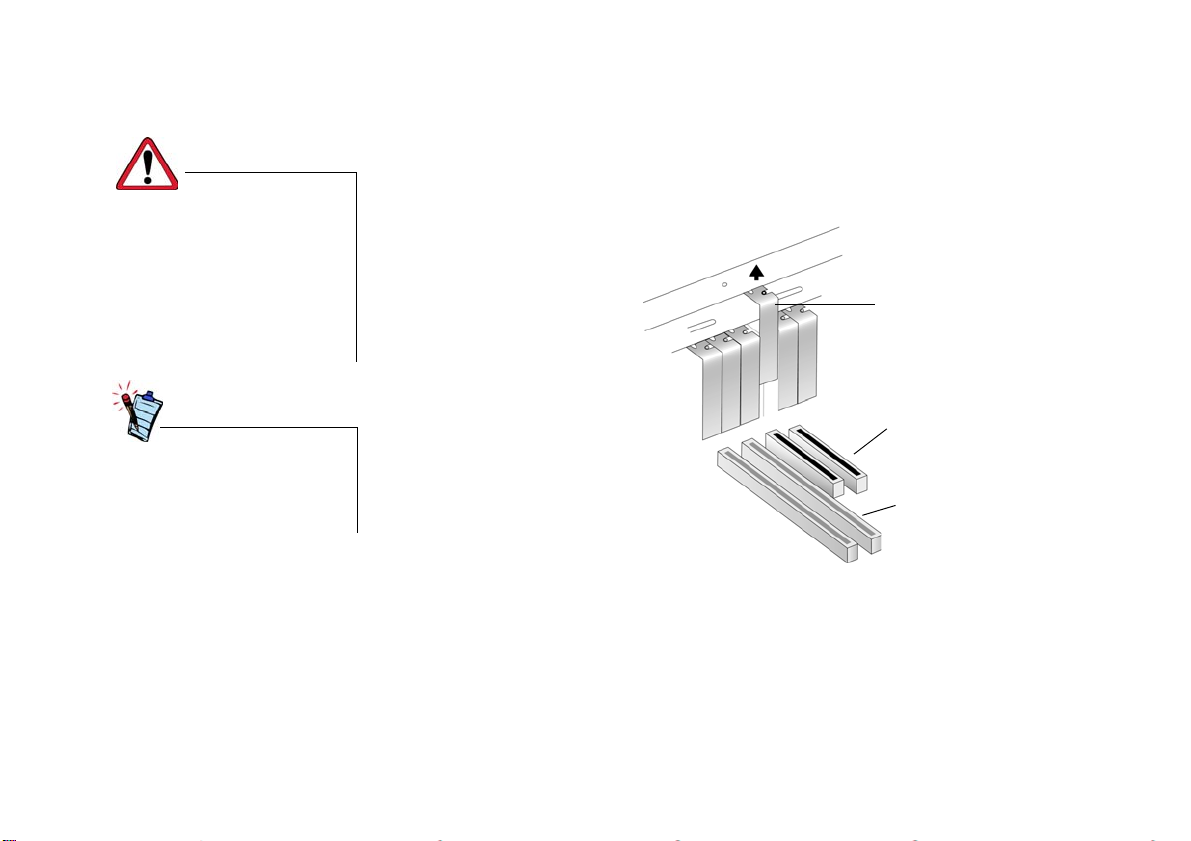
Turn off the main power supply
and disconnect your computer’s
power cord. Systems using an
A TX po wer supply unit with soft
power off may still be powering
the PCI slot. This can damage
your audio card when it is
inserted into the slot.
Remove any existing audio card
or disable the onboard audio.
Refer to the manufacturer’s
documentation for details.
1. Turn off your computer and all peripheral devices.
2. Touch a metal plate on your computer to ground yourself and to discharge any static
electricity, and then unplug the power cord from the wall outlet.
3. Remove the computer cover.
4. Remove the metal bracket from an unused PCI slot as shown in Figure 1-2.
metal bracket
PCI slot
ISA slot
Figure 1-2: Removing a metal bracket.
Installing Hardware 1-3
Page 10

Step 2: Install the
Sound Blaster Live!
1. Align the Sound Blaster Live! card with the PCI slot and press the card gently but firmly into
the slot as shown in Figure 1-3.
card
Do not force the audio card into
the slot. Make sure that the gold
connectors on the Sound Blaster
Live! card are aligned with the
PCI bus connector on the
motherboard before you insert
the card into the PCI expansion
slot.
If it does not fit properly, gently
remove it and try again, or try
the card in a different PCI slot
.
2
Unused brackets
1
PCI slot
ISA slot
Figure 1-3: Aligning the card against the slot.
2. Secure the Sound Blaster Live! card.
Installing Hardware 1-4
Page 11

Step 3: Install the
CD-ROM/DVDROM drive
• The MPC-to-MPC (4-pin)
Analog CD audio cable is
available only with some
models of the Sound Blaster
Live! card.
• If the Sound Blaster Live!
card is connected to both the
CD SPDIF and CD Audio
connectors on a CD-ROM or
DVD-ROM drive, do not
enable the CD Audio and CD
Digital options at the same
time in Surround Mixer .
• You may experience a
decrease in audio quality
when you use the AUX_IN
connector for analog audio.
Use CDDA instead for high
quality audio playback.
With Compact Disc Digital Audio (CDDA) extraction enabled for your computer's operating
system, you do not have to use an audio cable to connect your drive to your audio card.
For information on how to enable CDDA, see “Enabling CDDA” on page 1-6.
If you cannot enable CDDA on your computer, you should use an audio cable to connect your
drive to your audio card as shown below.
For analog CD audio output:
Connect an Analog CD audio cable from the Analog Audio connector on your CD-ROM/
DVD-ROM drive to the AUX_IN connector on the Sound Blaster Live! card as shown in
Figure 1-4.
For digital CD audio output (available on some cards):
Connect the Digital CD audio cable from the Digital Audio connector on your CD-ROM/
DVD-ROM drive to the CD_SPDIF connector on the Sound Blaster Live! card.
CD-ROM/DVD-ROM drive
OR
1 2
Sound Blaster Live! card
Figure 1-4: Connecting CD-ROM/DVD-ROM drives.
Installing Hardware 1-5
Page 12

Step 4: Connect to power supply
1. Replace the computer cover.
2. Plug the power cord back into the wall outlet, and turn on the computer.
To connect your Sound Blaster Live! card to other devices, see “Connecting Related
Peripherals” on page 1-8.
To install drivers and software, refer to “Installing Drivers and Applications” on page 2-1.
Enabling CDDA
For Windows 98 SE
1. Click Start -> Settings -> Control Panel.
2. In the Control Pan el window, double-click the Multimedia icon.
3. In the Multimedia Properties dialog box, click the CD Music tab.
4. Click the Enable digital CD audio for this CD-ROM device check box to select it.
5. Click the OK button.
For Windows Me
1. Click Start -> Settings -> Control Panel.
2. In the Control Pan el window, double-click the System icon.
3. In the System Properties dialog box, click the Device Manager tab.
4. Double-click the DVD/CD-ROM drives icon.
Your computer drives will appear.
5. Right-click the disk drive icon. A menu will appear.
6. Click Properties.
7. In the Digital CD Playback box of the next dialog box, click the Enable digital CD audio
for this CD-ROM device check box to select it.
8. Click the OK button.
For Windows 2000 and Windows XP
1. Click Start -> Settings -> Control Panel.
Installing Hardware 1-6
Page 13

2. In the Control Pan el window, double-click the System icon.
3. In the System Properties dialog box, click the Hardware tab.
4. Click the Device Manager button.
5. Double-click the DVD/CD-ROM drives icon.
Your computer drives will appear.
6. Right-click the disk drive icon. A menu will appear.
7. Click Properties.
8. In the Digital CD Playback box of the next dialog box, click the Enable digital CD audio
for this CD-ROM device check box to select it.
Installing Hardware 1-7
Page 14

Connecting Related Peripherals
The joystick connector is a
standard computer game control
adapter. You can connect any
analog joystick with a 15-pin Dshell connector or any device
compatible with the standard
PC joystick. To use two
joysticks, you need a Y-cable
splitter.
Microphone
Analog mode (where availabl e): Connects to Center and
Subwoofer channels by default.
Digital mode: Connects to digital speakers such as
Creative Inspire 5.1 Digital Speakers via the miniplug-toDIN adaptor (included with your speakers).
Connects to a telephone
answering device
Cassette or CD player , synth esize r , etc.
Line-out
Connects to powered speak ers
or an external amplifier for
audio output
Game pad
Figure 1-5: Connecting Sound Blaster Live! to other devices.
Line In
Mic In
Line Out
Rear Out
Sound Blaster Live! card
*For cards with the CD_SPDIF connector
DVD-ROM drive
*MPC-to-MPC (2-pin)
Digital CD audio cable
Installing Hardware 1-8
Page 15

Connecting Speaker Systems
Use a software DVD player with Sound Blaster Live! to watch movies with 5.1-channel
surround sound. For analog sound, connect your audio card to a Creative Inspire 5.1 speaker
system. Otherwise, use a Creative Inspire 5.1 Digital speak er sys tem.
Playing Games and Music, and Watching
Movies
with 5.1 Digital Speakers
Cambridge
DeskTop Theater
Digital or Creative
Inspire 5700
Speaker System
Playing Games and Watching Movies
with 5.1 Analog Speakers
Cambridge DeskTop
Theater Analog or
Creative Inspire 5300
Speaker System
Digital
DIN
Analog Front,
Rear and Center/
Sub Inputs
*Analog/Digital Out connector
Miniplug-to-DIN
cable
Triple stereo
audio cable
Sound Blaster Live! card
*Digital Out connector on some card models
Figure 1-6: Connecting speakers to the Sound Blaster Live! card.
Installing Hardware 1-9
Page 16

Connecting external consumer electronic devices
Connecting to External
Consumer Electronic Devices:
Dolby Digital Decoder/Amplifier
3.5mm(mono)-to-RCA
cable (not included)
Dolby Digital
(AC-3)
SPDIF In
Dolby Digital
Decoder/Amplifier
Connecting to External
Consumer Electronic Devices:
Discrete 6-channel Amplifier Input
Discrete
6-channel
Amplifier
Analog Front,
Rear and Center/
Sub Inputs
Figure 1-7: Connecting external consumer electronic devices to the Sound Blaster Live! card.
3 pairs of
3.5mm (stereo)to-RCA cable
(not included)
*Analog/Digital Out connector
Sound Blaster Live! card
Tip : Left / Center channel
Ring : Right / Subwoofer channel
Additional information:
For connection to Center and Subwoofer
channels using a 3.5mm (stereo)-to - RCA
cable, connect the white RCA connector to
the Center input and the red RCA connecto r
to the Subwoofer input of the amplifier.
*Digital Out connector on some card models
Installing Hardware 1-10
Page 17

Positioning Your Speakers
If you are using four speakers, place them to form the
corners of a square with you in the center. Angle the
speakers toward you with the computer monitor
Subwoofer
Center
speaker
positioned to not block the sound path of your front
speakers. For 5.1 speaker systems, the Center speaker
should be placed at ear level or as close to ear level as
possible. Adjust the positions of the speakers until you
get the best audio experience. If you have a
subwoofer, place the unit in a corner of the room.
With Cambridge DeskTop Theater 5.1 or Creative
Inspire 5.1 Digital Speakers, you can experience
Front-left
speaker
You
Rear-left
speaker
Figure 1-8: Recommended speaker positions.
Rear-right
speaker
Front-right
speaker
crystal clear gaming sequences or music from the
Digital DIN connection. A minijack-to-DIN cable is
bundled with the speaker set for this connection.
Or, where applicable, connect an analog 5.1 channel speaker system (such as Creative Inspire
5.1 Analog Speakers) or your 6-channel home theater speaker system. Sound Blaster Live!
allows you to connect center and subwoofer speakers.
Installing Hardware 1-11
Page 18

Installing Software
2
Installing Drivers and Applications
This manual reflects a software
installation in an unmodified
version of the operating system.
Your installation screens and
procedure may vary slightly from
what is shown and described. The
variations may be caused by other
software/hardware installed on
your computer, or the version of
the Windows operating sy stem.
Prior to using Sound Blaster Live!, you will need to install device drivers and supporting
applications. To install these drivers and the bundled applications, use the follow ing
instructions. The instructions are applicable to all supported Windows operating systems.
1. After you have installed the Sound Blaster Live! card, turn on your computer. Windows
automatically detects the audio card and device driv ers. If the New Hardware Found dial og
box appears, click the Cancel button.
2. Insert the Sound Blaster Live! Installation CD into your CD-ROM drive.
The disc supports Windows AutoPlay mode and starts running automatically. If not, you
need to enable your CD-ROM drive’s auto-insert notification feature. For more details, see
“Problems Installing Software” on page B-1.
3. Follow the instructions on the screen to complete the installation.
4. When prompted, restart your system.
Installing Software 2-1
Page 19

Using Sound Blaster Live!
3
Creative Software
The applications included with
Sound Blaster Live! may differ
from the ones described here.
Sound Blaster Live! is supported by a full range of applications to help you get the most from
your audio card. The following software is most important to the operation of your audio card:
❑ Creativ e Surround Mixer
❑ Creative AudioHQ
❑ Creativ e Diagnostics
❑ Creative Wave Studio
❑ Creative PlayCenter
❑ Creati ve Recorder
To run Creative PlayCenter:
1. Click Start -> Programs -> Creative -> Creative PlayCenter
2. Click Creative PlayCenter.
To run other Creative Software applications:
1. Click Start -> Programs -> Creative -> Sound Blaster Live!
2. Click the application that you want to open.
Using Sound Blaster Live! 3-1
Page 20

Creative Surround Mixer
To restore Surround Mixer to its
original settings, click Start ->
Programs -> Creative ->
Sound Blaster Live! ->
Creative Restore Defaults.
Creative Surround Mixer is the main application to use for the following tasks:
❑ Testing speakers
❑ Applying EAX-enabled audio effects
❑ Mixing sounds from various audio input sources
❑ Setting audio effects
Surround Mixer has two modes. Click the Basic Mode or Advanced Mode button to switch
between the two modes:
In basic mode, the Mixer panel is displayed. You can:
❑ mix sounds from various audio input sources when playing or recording
❑ control volume, bass, treble, balance and fade
In advanced mode, the Surround Mixer and Mixer panels are displayed. In Surround Mixer, you
can:
❑ select audio effects
❑ specify the speaker output
❑ perform a speaker test
For more information and usage details on Creative Surround Mixer, refer to its online Help.
Creative AudioHQ
AudioHQ is Creative's audio software control center.
The AudioHQ interface has the standard look and feel of the Windows Control Panel. It contains
several control applets that allow you to view, audition or set up the audio properties of one or
more audio devices on your computer.
As in Control Panel, you can view AudioHQ's control applets in the main window as large icons,
small icons, list items or detailed list items. You can also select all or invert the selection when
you are in the Applet view. The number of items in the main window, however, varies with the
control applet or device selected. The By Audio Device view shows only the control applets
supported by the selected device. The Applet view shows only the audio devices that support the
selected applet.
Using Sound Blaster Live! 3-2
Page 21

For more information and usage details on Creative AudioHQ, refer to its online Help.
Creative Diagnostics
Use Creative Diagnostics to quickly test your audio card’s Wave, MIDI or CD Audio playback
capability, recording function and speaker output. For more information and usage details on
Creative Diagnostics, refer to its online Help.
SoundFont Control SoundFont Control allows you to configure MIDI banks with SoundFont banks and
instruments or DLS and Wave files, as well as set the caching algorithm and space.
For more information and usage details on SoundFont Control, refer to its online Help.
Creative Keyboard Creative Keyboard is a virtual keyboard that allows you to audition or play musical notes
produced through MIDI devices.
EAX Control EAX Control allows you to configure the EMU10K1 chip's effects engine.
It allows you to specify to a low level the components that make up the audio elements that in
turn make up an audio effect.
It promises to deliver sounds that are so life-like, you can almost see them! It is the computer
industry's first system to recreate and deliver real-world, interactive audio experiences in
games, music, and other audio applications. These audio effects take your computer beyond
home-theater quality, immersing you in sound so vivid your imagination can almost "see it".
The effects go beyond today's surround-sound and 3D positional audio and actually model an
environment by taking into account room size, acoustic properties, reverb, echo and many
other effects that create a real-world experience.
For more information and usage details on EAX Control, refer to its online Help.
Using Sound Blaster Live! 3-3
Page 22

Creative Wave Studio
Creative WaveStudio allows you to perform the following sound editing functions easily:
❑ Play, edit, and record 8-bit (tape quality) and 16-bit (CD quality) wave data.
❑ Enhance wave data or create unique sounds with various special effects and editing
operations such as reverse, echo, mute, pan, cut, copy, and paste
❑ Open and edit several audio files at the same time
❑ Open Raw (.RAW) and MP3 (.MP3) data files
For more information and usage details on Creative WaveStudio, refer to its online Help.
Creative PlayCenter
Creative Recorder
Creative PlayCenter is a revolutionary audio CD and digital audio (such as MP3 or WMA)
player. Besides managing your favorite digital audio files on your computer, it is also an
integrated MP3/WMA encoder for ripping audio CD tracks into compressed digital audio files.
It can encode tracks many times faster than normal play speed and up to 320 kbps (for MP3).
For more information and usage details on Creative PlayCenter, refer to its online Help.
Note: Audio files that are secured through Microsoft’s Digital Rights Management (DRM) technology
can only be played back on an MS DRM supported audio player such as Creative PlayCenter. For
security against unauthorized duplication, Microsoft has advised the disabling of any digital or SPDIF
output from the audio card.
Recorder allows you to record sounds or music from various input sources like the microphone
or Audio CD, and save them as Wave (.WAV) files. For more information and usage details on
Creative Recorder, refer to its online Help.
Using Sound Blaster Live! 3-4
Page 23

General Specifications
Features
PCI Bus Mastering ❑ Half-length PCI Specification Version 2.1 compliant
❑ Bus mastering reduces latency and speeds up system performance
EMU10K1 ❑ Advanced hardware accelerated digital effects processing
❑ 32-bit digital processing while maintaining a 192 dB dynamic range
❑ Patented 8-point interpolation that achieves the highest quality of audio reproduction
❑ 64-voice hardware wavetable synthesizer
❑ Professional-quality digital mixing and equalization
❑ Up to 32 MB of sound RAM mapped to host memory
A
Stereo Digitized Voice Channel
❑ True 16-bit Full Duplex operation
❑ 16-bit and 8-bit digitizing in stereo and mono modes
❑ Playback of 64 audio channels, each at an arbitrary sample rate
❑ ADC recording sampling rates: 8, 11.025, 16, 22.05, 24, 32, 44.1 and 48 kHz
❑ Dithering for 8-bit and 16-bit recording
General Specifications A-1
Page 24

AC ’97 Codec Mixer ❑ Mixes EMU10K1 audio sources and analog sources such as CD Audio, Line In,
Microphone, Auxiliary and TAD
❑ Selectable input source or mixing of various audio sources for recording
❑ 16-bit Analog-to-Digital conversion of analog inputs at 48 kHz sample rate
Volum e C o n t ro l ❑ Software playback control of Line In, Auxiliary, TAD, Microphone In, Wave/MP3, MIDI
device, CD Digital (CD SPDIF)
❑ Software recording control of Line In, Auxiliary , TAD, Microphone In, Wave/MP3, MIDI
device, CD Digital (CD SPDIF)
❑ Selectable input source or mixing of various audio sources for recording
Some audio inputs may require
additional optional equipment.
❑ Adjustable master volume control
❑ Separate bass and treble control
❑ Front and rear balance control
❑ Muting and panning control for mixer sources
Dolby Digital (AC-3) Decoding
Creative Multi Speaker Surround (CMSS)
❑ Decodes Dolby Digital (AC-3) to 5.1 channels or pass-through compressed Dolby Digital
(AC-3) PCM SPDIF stream to external decoder
❑ Bass Redirection: Redirects bass to a subwoofer when the subwoofer is independent of the
satellite speaker system.
❑ Multi-speaker technology
❑ Professional-quality panning and mixing algorithm
❑ Independent multiple sounds can be moved and placed around a listener
General Specifications A-2
Page 25

Connectivity
Audio Inputs ❑ Line-level analog Line input via stereo connector on rear bracket
❑ Mono Microphone analog input via stereo connector on rear bracket
❑ CD_IN line-level analog input via 4-pin Molex connector on card (on some cards)
❑ AUX_IN line-level analog input via 4-pin Molex connector on card
❑ TAD line-level analog input via 4-pin Molex connector on card
❑ CD_SPDIF digital input via 2-pin Molex connector on card, accepting sampling rates of 32,
44.1, and 48 kHz
Audio Outputs ❑ ANALOG (center and subw oofer)/DIGITAL OUT (front and rear SPDIF digital outputs) or
DIGITAL OUT only via 4-pole 3.5 mm miniplug on rear bracket..
❑ Three line-level analog outputs via stereo connectors on rear bracket (Front, Rear and
Center/Subwoofer Line-Outs)
❑ Stereo headphone (32-ohm load) support on Front Line-Out
Interfaces ❑ D-Sub MIDI interface for connection to external for connection to external MIDI devices.
Doubles as Joystick port.
❑ PC_SPK 1x2 pin header (on some cards)
General Specifications A-3
Page 26

Troubleshooting
B
Problems Installing Software
The installation does not start automatically after the Sound Blaster Live! Installation CD is inserted.
The AutoPlay feature in your Windows system may not be enabled.
To start the installation program through the My Computer shortcut menu:
1. On your Windows desktop, click the My Computer icon.
2. Right-click the CD-ROM drive icon, and then click AutoPlay.
3. Follow the instructions on the screen.
To enable AutoPlay through Auto Insert Notification:
1. Click Start -> Settings -> Control Panel.
2. Double-click the System icon. The System Properties dialog box appears.
3. Click the Device Manager tab and click your CD-ROM drive.
4. Click the Properties button.
5. Click the Settings tab and click Auto Insert Notification.
6. Click the OK button.
Troubleshooting B-1
Page 27

Sound
IRQ conflicts.
To resolve IRQ conflicts, try the following.
❑ Place the audio card in another PCI slot.
❑ In your system BIOS, enable Advanced Control and Power Interface which allows IRQ
sharing.
There is unexpected, excessive environmental sound or effects when an audio file is being played.
The last selected preset is an inappropriate environment for the current audio file.
To switch to an appr opriate environment:
1. Open the Environmental Audio control utility.
2. Under Environment, click No effects or an appropriate environment.
No sound from the headphones.
Verify the following:
❑ The headphones are connected to the Line Out port.
❑ The master Volume of Surround Mixer is not set to mute.
❑ The Digital Output Only option is not selected.
Troubleshooting B-2
Page 28

In a 4 or 5.1-speaker configuration, there is no sound from the rear speakers.
Check the following:
❑ The rear speakers are connected to the audio card’s Rear Out port.
❑ If you are playing sound from one of these sources:
• CD Audio
•Line In
•TAD
• Auxiliary (AUX)
• Microphone
To solve the problem:
1. In Surround Mixer, make sure the source being played is unmuted, that is, enabled.
2. Select the same source as the record source.
For example, if you have a portable CD player plugged into the Line In connector, unmute Line
In in Surround Mixer, and select Line In as your record source.
❑ If you change environments, go to Surround Mixer and unmute your active sources.
No sound from the speakers.
Check the following:
❑ Speakers are correctly connected to your audio card's output.
❑ You have unmuted the correct source in Surround Mixer.
If both these conditions have been met and you still do not have sound, click the red plus sign
above the VOL button. If the Digital Output Only check box is selected, you are in Digital
Output Only mode and must connect to digital speakers to hear the sound from your audio card.
Troubleshooting B-3
Page 29

If digital CD audio is enabled, CD
volume is controlled by the Wave/
MP3 slider in Surround Mixer.
No audio output when playing digital files such as .WAV, MIDI files or AVI clips.
Possible causes:
❑ Speaker volume (if any) is not set properly.
❑ External amplifier or speakers are connected to the wrong port.
❑ Hardware conflict.
❑ Speakers selection in Surround Mixer is incorrectly selected.
❑ Original Sound in either the Master or Source tabs of EAX Control Panel is set at or near
0%.
Check the following:
❑ Speakers’ volume control, if any, is set at mid-range. Use Creative Mixer to adjust the
volume, if necessary.
❑ Powered speakers or external amplifier are connected to the card’s Line Out or Rear Out
port.
❑ No hardware conflict between the card and a peripheral de vice. See “I/O Conflicts” on page
B-7.
❑ Speakers selection in Surround Mixer corresponds to your speaker or headphone
configuration.
❑ Original Sound in either/both the Master and Source tabs of EAX Control Panel is set to
100%.
No audio output when playing CD-Audio.
To solve this problem, do one or more of the following:
❑ Make sure the Analog Audio connector on the CD-ROM drive and the AUX/CD In
connector on the audio card are connected.
❑ Enable digital CD Playback. See “Enabling CDDA” on page 1-6.
Troubleshooting B-4
Page 30

Problems with File Transfers on Some VIA Chipset Motherboards
After you install the Sound Blaster Live! card on a VIA chipset motherboard, you may have the
slight chance of seeing one of the following:
When transferring large amounts of data, the computer stops responding (‘hangs’) or restarts itself, OR
Files transferred from another drive are incomplete or corrupted.
These problems appear in a small number of computers, which contain the VIA VT82C686B
controller chipset on their motherboards.
To verify if your motherboard has the VT82C686B chipset:
❑ Refer to your computer or motherboard manual, or
❑ In Windows:
i. Click Start -> Settings -> Control Panel.
ii. Double-click the System icon.
iii. Click the Device Manager or Hardware tab.
iv. Click the Systems devices icon.
v. In the list that appears, see if the items highlighted
in Figure B-1 appear.
vi. If the items appear, remove your computer cov er and
locate the VIA chipset on your motherboard. (Take
note of the safety precautions on page 1-3.)
The VT82C686B chipset has its model number
inscribed on the chip.
If you have the VT82C686B chipset, Creative
recommends that you first contact your computer
vendor or motherboard manufacturer for the latest
solution.
Figure B-1: Device Manager tab.
Troubleshooting B-5
Page 31

Some users have solved the above problems by doing one or both of the following:
❑ downloading the latest VIA 4in1 drivers from http://www.viatech.com*,
❑ obtaining the most current BIOS for your motherboard from the manufacturer’s web site*.
*Content in these web sites is controlled by other companies. Creative bears no responsibility
for information or downloads obtained from them. This information is provided only as a
convenience to you.
Insufficient SoundFont Cache
Joystick
There is insufficient memory to load SoundFonts.
This may occur when a SoundFont-compatible MIDI file is loaded or played.
Cause: There is insufficient memory allocated to SoundFonts.
To allocate more SoundFont cache:
On the Options tab of SoundFont Control, drag the SoundFont Cache slider to the right.
The amount of SoundFont cache you can allocate depends on the system RAM available.
If there is still insufficient system RAM available:
On the Configure Banks tab of SoundFont Control, click a smaller SoundFont bank from
the Select Bank box. If not, you may need to increase your system’s RAM.
The joystick port is not working.
The audio card’s jo ystick port conflicts with the system’s joystick port.
To solve this problem:
Disable the audio card’s joystick port and use the system port instead.
The joystick is not working properly in some programs.
The program may use the system processor timing to calculate the joystick position. When the
processor is fast, the program may determine the position of the joystick incorrectly, assuming
that the position is out of range.
Troubleshooting B-6
Page 32

To solve this problem:
Increase your system’s 8 bit I/O recov ery time of the BIOS setting, usually under the Chipset
Feature Settings section. Or, if av ailable, you may adjust the A T Bus speed to a slo wer clock.
If the problem persists, try a different joystick.
I/O Conflicts
Conflicts between your audio card and another peripheral device may occur if your card and the
other device are set to use the same I/O address.
To resolve I/O conflicts, change the resource settings of your audio card or the conflicting
peripheral device in your system using Device Manager in Windows.
If you still do not know which card is causing the conflict, remove all cards except the audio
card and other essential cards (for example, disk controller and graphics cards). Add each card
back until Device Manager indicates that a conflict has occurred.
To resolve hardware conflicts in Windows:
1. Click Start -> Settings -> Control Panel.
2. Double-click the System icon. The System Properties dialog box appears.
3. Click the Device Manager tab.
4. Click Sound, video and game contr o llers , and then click the conf licting audio card dri ver
(indicated by an exclamation mark).
5. Click the Properties button.
6. Click the Resources tab.
7. Make sure that the Use automatic settings check box is selected, and click the OK button.
8. Restart your computer to allow Windo ws to reassign resources to your audio card and/or the
conflicting device.
Troubleshooting B-7
Page 33

Problems in Windows XP
At the time of this product's release, Microsoft strongly encouraged companies to submit their
hardware solutions for certification. If a hardware device driver is not submitted, or does not
qualify, for Microsoft certification, a warning message similar to the one shown here, appears.
You may see the message when installing th is driver. If you do, you may choose to click the
Continue Anyway button. Creative has tested this driv er on Windows XP, and it does not impair
or destablize your computer.
Troubleshooting B-8
 Loading...