

Page 1
Page 2
User’s Guide
Creative Sound Blaster
Information in this document is subject to change without notice and does not represent a commitment on the part of Creative Technology
Ltd. No part of this manual may be reproduced or transmitted in any form or by any means, electronic or mechanical, including
photocopying and recording, for any purpose without the written permission of Creative Technology Ltd. The software described in this
document is furnished under a license agreement and may be used or copied only in accordance with the terms of the license agreement.
It is against the law to copy the softwar e o n a ny ot her m ed iu m except as specifically allowed in the license agreement. The licensee may
make one copy of the software for backup purposes only.
The Software License Agreement is found in a separate folder on this installation CD.
Copyright © 2003 Creative Technology Ltd. All rights reserved.
November 2003
Version 1.1
Copyright © 2003 Creative Technology Ltd. Sound Blaster and Blaster are registered trademarks, the Sound Blaster logo, Creative Inspire
and Creative Multi Speaker Surround are trademarks of Creative Technology Ltd. in the United States and/or other countries. Microsoft,
MS-DOS, and Windows are registered trademarks of Microsoft Corporation. Apple, Macintosh, Mac and Mac OS are trademarks of Apple
Computer, Inc., registered in the U.S. and other countries. Manufactured under license from Dolby Laboratories. Dolby, Pro Logic and the
double-D symbol are trademarks of Dolby Laboratories. © 2001 Dolby Laboratories. All rights reserved. All other products are trademarks
or registered trademarks of their respective owners.
Page 3
Contents
Page 4

Contents
Contents
Introduction
Welcome to
high-quality digital audio entertainment.......................................... viii
Package Contents ........................................................................... ix
System Requirements ..................................................................... ix
Getting More Information.................................................................. x
Product Registration......................................................................... x
Technical Support and Warranty Information ...................................... x
Document Conventions..................................................................... x
1 About Sound Blaster
What You Need......................................................................................1-1
Sound Blaster........................................................................................ 1-2
Switching modes ........................................................................... 1-4
2 Installing Sound Blaster
Installing Hardware....................................................................... 2-1
Installing Software........................................................................ 2-2
In Windows 98 SE/Me/2000/XP............................................... 2-2
Verifying the software installation ....................................................2-3
In Windows 98 SE/Me ............................................................ 2-3
In Windows 2000/XP..............................................................2-3
Attaching Sound Blaster ................................................................. 2-4
Using a clip ........................................................................... 2-4
Using velcro strips ................................................................. 2-5
Connecting Microphones ................................................................ 2-6
Connecting Headphones ................................................................ 2-6
iv
Page 5

Adjusting Headphones Volume ................................................ 2-6
3 Using Sound Blaster
Connecting Peripherals ........................................................................... 3-1
Connecting Speaker Systems .................................................................. 3-2
Mixing analog inputs ..................................................................... 3-3
4 Sound Blaster Applications
Creative Sound Blaster Applications .........................................................4-1
Creative MediaSource Go! ....................................................................... 4-2
Creative MediaSource Go! Launcher................................................ 4-2
Creative MediaSource Player ...........................................................4-3
Creative MediaSource Organizer ..................................................... 4-3
Finding and organizing songs .................................................. 4-3
Keep your music database up to date ...................................... 4-4
Transferring songs.................................................................4-4
Automatically playing multimedia content................................. 4-4
Extracting and converting songs..............................................4-4
Storing music on recordable CD .............................................. 4-5
Creative Device Control .......................................................................... 4-5
Creative Diagnostics............................................................................... 4-5
Creative EAX Console ............................................................................. 4-6
Audio Effects: Environmental Sound Processing................................ 4-6
CMSS 3D: Simulating Surround Sound ............................................ 4-6
Audio Clean-up: Removing noise and distortion................................ 4-6
Time Scaling: Varying the speed of playback.................................... 4-7
Creative Surround Mixer .........................................................................4-7
Creative WaveStudio ..............................................................................4-7
Creative Speaker Settings....................................................................... 4-8
Creative MiniDisc Center .........................................................................4-8
Creative Graphic Equalizer ...................................................................... 4-8
v
Page 6

5 Using Applications
Multimedia Playback............................................................................... 5-1
Watching DVDs ............................................................................ 5-1
Playing MP3, WMA, WMV or Dolby Digital 5.1 files ............................ 5-1
Playing back Wave and CD Audio files ............................................. 5-2
Playing MIDI files.......................................................................... 5-2
Compiling personal albums ............................................................ 5-2
Content Creation.................................................................................... 5-3
Recording digital audio .................................................................. 5-3
Internet Entertainment ........................................................................... 5-3
Encoding CD songs to MP3/WMA format .......................................... 5-3
Downloading and playing MP3/WMA songs....................................... 5-3
Playing MP3/WMA songs with EAX .................................................. 5-3
Gaming Reference..................................................................................5-4
Enjoying EAX support.................................................................... 5-4
Enjoying DirectSound3D support .................................................... 5-4
Appendixes
A General Specifications
Inputs and Outputs................................................................A-1
Controls ...............................................................................A-1
Display Indicators..................................................................A-1
B Troubleshooting
Problems Installing Software ...................................................................B-1
Problems with Sound..............................................................................B-2
Problems With Hardware.........................................................................B-6
Problems with Software ..........................................................................B-6
Index
vi
Page 7

Introduction
Page 8
Introduction
Welcome to high-quality digital audio entertainment
The product name may
differ depending on your
region.
Thank you for purchasing Creative's external Sound Blaster® audio solution.
Sound Blaster is simple to set up via your USB port. The compact and portable
design is lightweight and requires no additional power adapter.
Sound Blaster delivers high quality stereo sound for digital music, movie and
gaming. Also with the Creative Multi-Speaker Surround
virtual surround sound with Dolby Digital
music on your stereo speaker systems or headphones.
Digital music lovers will be able to enjoy an enriched digital music experience with
the bundled Creative MediaSource Player that lets you play, record, organize and
burn your own audio CDs easily in this one-stop digital music center. The Smart
Volume Management (SVM) feature automatically adjusts the volume during
playback of MP3s encoded at different volume levels.
Use the Audio feature in the EAX console to remove pops, noise and hiss when
recording your old records and tapes. Bass Boost and EAX features such as audio
environment presets and Time Scaling will enhance your listening experience
through either headphones or stereo speakers. Bass Boost and EAX features such
as audio environment presets and Time Scaling features in Sound Blaster deliver an
exemplary 2.1-channel digital audio performance.
Use the 10-band Creative Graphic Equalizer to personalize and customize your audio
playback.
®
5.1 DVD movies, 3D games and MP3
TM
(CMSS), you can enjoy
Introduction viii
Page 9
Package Contents The package contains the following items:
❑ Sound Blaster
❑ One clip
❑ 2 velcro strips
The items listed here may
differ in certain countries.
❑ Y-sp litter cable
❑ USB cable
❑ Sound Blaster Installation CD
❑ Sound it! for Macintosh Application CD
❑ Quick Start leaflet
System Requirements
In Windows 2000, Service
Pack 3 may be necessary for
full and correct functionality.
In Windows XP, Service Pack
1 may be necessary for full
and correct functionality.
❑ Intel® Pentium® II 350 MHz, AMD K6® 450 MHz or faster processor
❑ Intel, AMD or 100% compatible motherboard chipset
❑ Windows
®
98 Second Edition (SE), Windows Millennium Edition (Me), Windows
2000 Service Pack 3 (SP3) or Windows XP Service Pack 1 (SP1)
❑ 64 MB RAM for Windows 98 SE
128 MB RAM for Windows Me/2000/XP
❑ 340 MB of free hard disk space
❑ Available USB port
❑ Headphones or amplified speakers (available separately)
❑ CD-ROM/DVD-ROM drive installed
Other applications may have higher system requirements or may require a
microphone. Refer to the individual application’s online Help for details.
Note:Your Sound Blaster can be used with Apple computers running Mac OS X v10.2 (up
to version 10.2.8) as well. It works with the native Mac OS X v10.2 audio driver and does
not require software installation from the Installation CD. For additional functions such as
recording within Mac OS X v10.2, use the bundled Sound it! application.
Introduction ix
Page 10
Getting More Information
View the contents of the Sound Blaster Installation CD for additional
demonstrations, libraries and other software. Visit the www.soundblaster.com site
for the latest Sound Blaster news and products. The site also includes information
on making purchases, technical help, and software and driver updates.
Product Registration Enjoy a host of benefits by registering your product during installation, or at
www.creative.com/register. Benefits include:
❑ Service and product support from Creative
❑ Exclusive updates on promotions and events
Technical Support and Warranty Information
Document Conventions
Technical Support information can be found in the installation CD.
Go to d:\support\<language>\support.pdf.
Warranty Information can be found in the installation CD as well.
Go to d:\warranty\<region>\<language>\warranty.pdf
(replace d:\ with the drive letter of your CD-ROM/DVD-ROM drive, <region> with
the region you are in and <language> with the language the document is in).
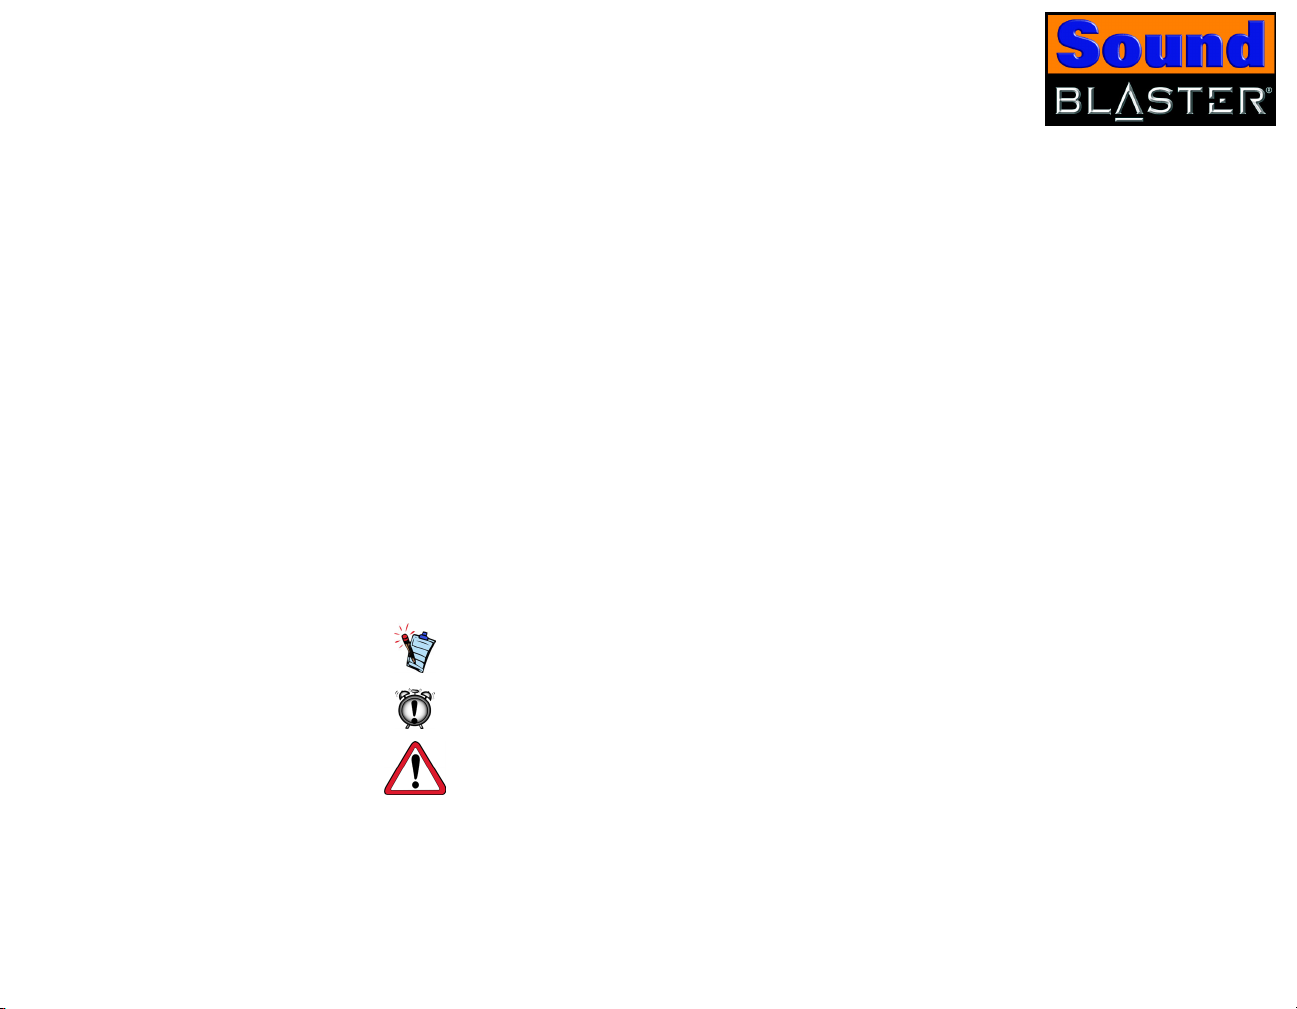
The following typographical conventions are used throughout this manual:
The notepad icon indicates information that is of particular
importance and should be considered before continuing.
The alarm clock designates a caution or warning that can help
you avoid situations involving risk.
The warning sign indicates that failure to adhere to directions
may result in bodily harm or life-threatening situations.
Introduction x
Page 11
About Sound Blaster
This chapter explains the physical features of your Creative Sound
Blaster
Page 12
About Sound Blaster
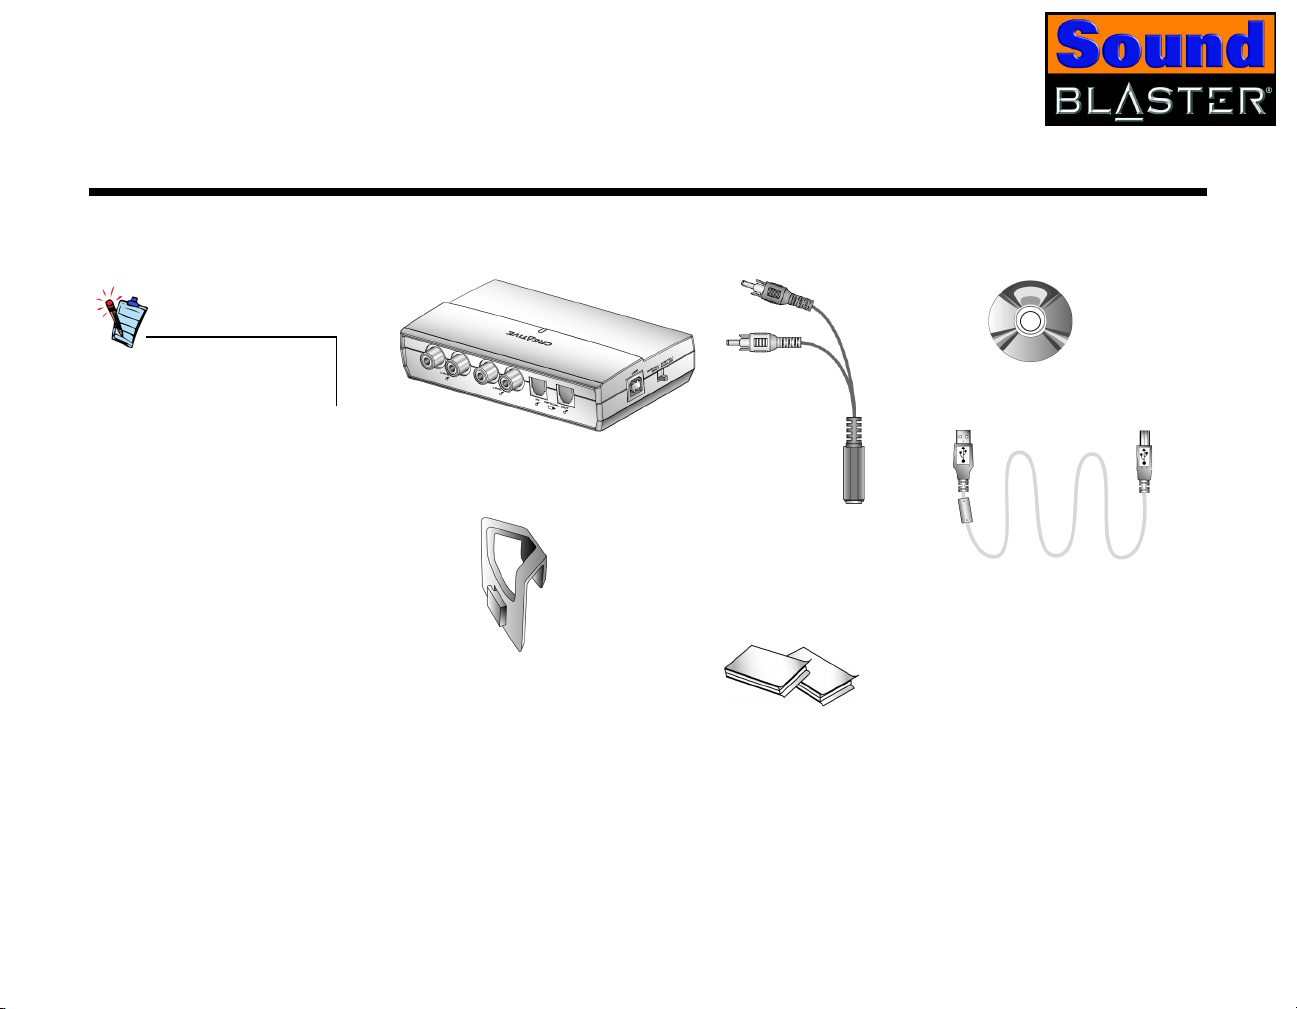
What You Need
In addition, you will also
need an available USB port
on your computer.
Before you begin installation, be sure that you have these:
Installation CD
Sound Blaster
Y-splitter cable
USB cable
Clip
2 velcro strips
Figure 1-1: Items needed for installation.
About Sound Blaster 1-1
Page 13
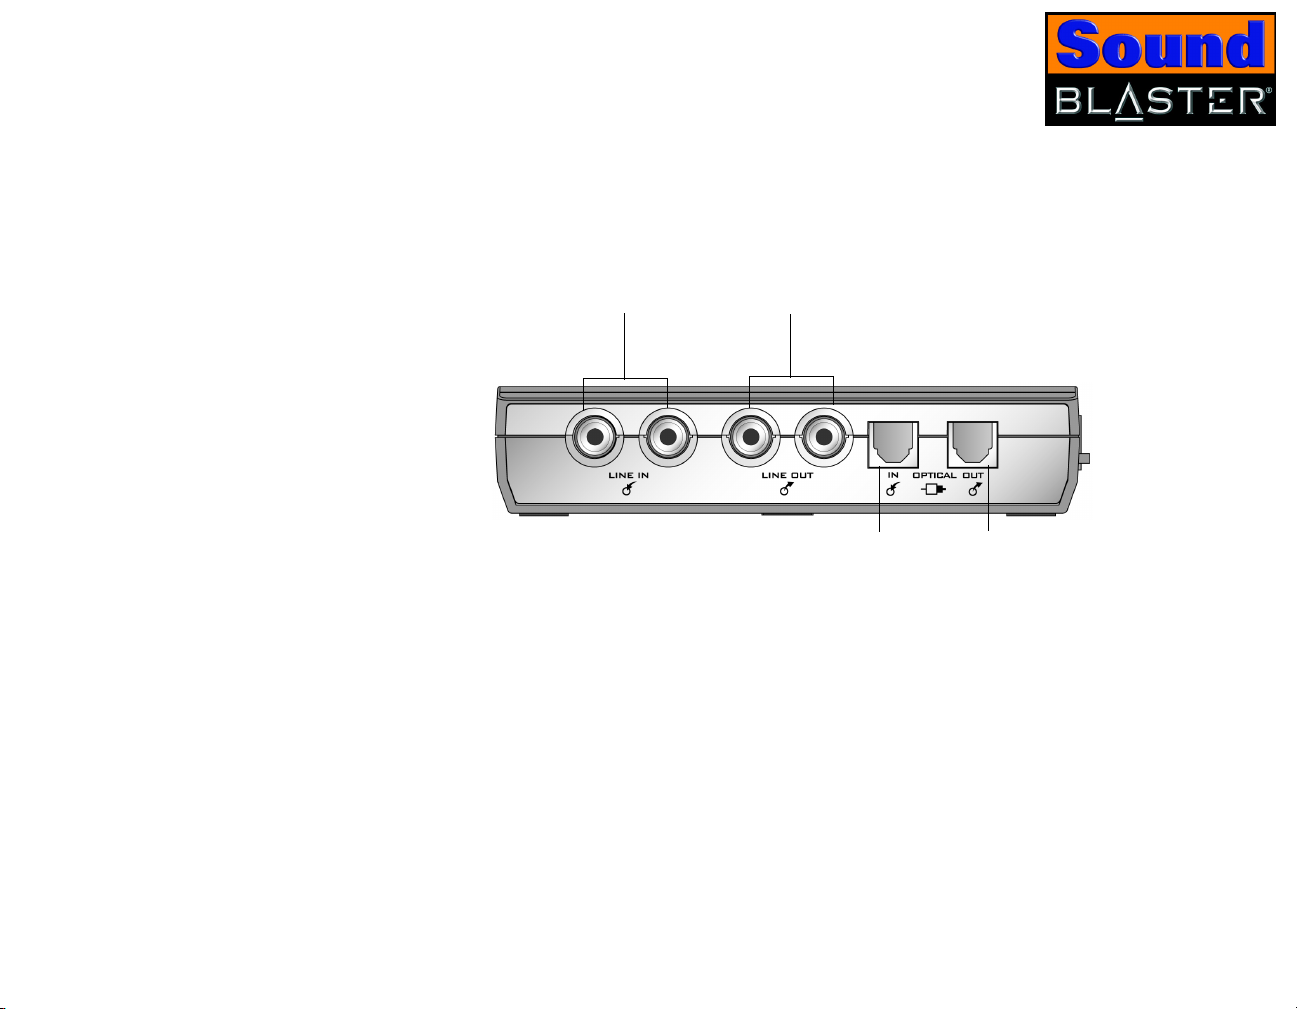
Sound Blaster
Sound Blaster has these jacks and connectors that allow you to attach other
devices:
Rear
Panel
Line In jacks
Connects to audio
devices such as tape
decks and audio players.
Line Out jacks
Connects to powered
speakers or an external
amplifier for audio output.
Optical In jack
Connects to
digital audio
devices such as
DAT and MiniDisc
players.
Optical Out jack
Connects to external
digital devices or digital
speaker systems.
Figure 1-2: Jacks, connectors and ports on Sound Blaster.
About Sound Blaster 1-2
Page 14
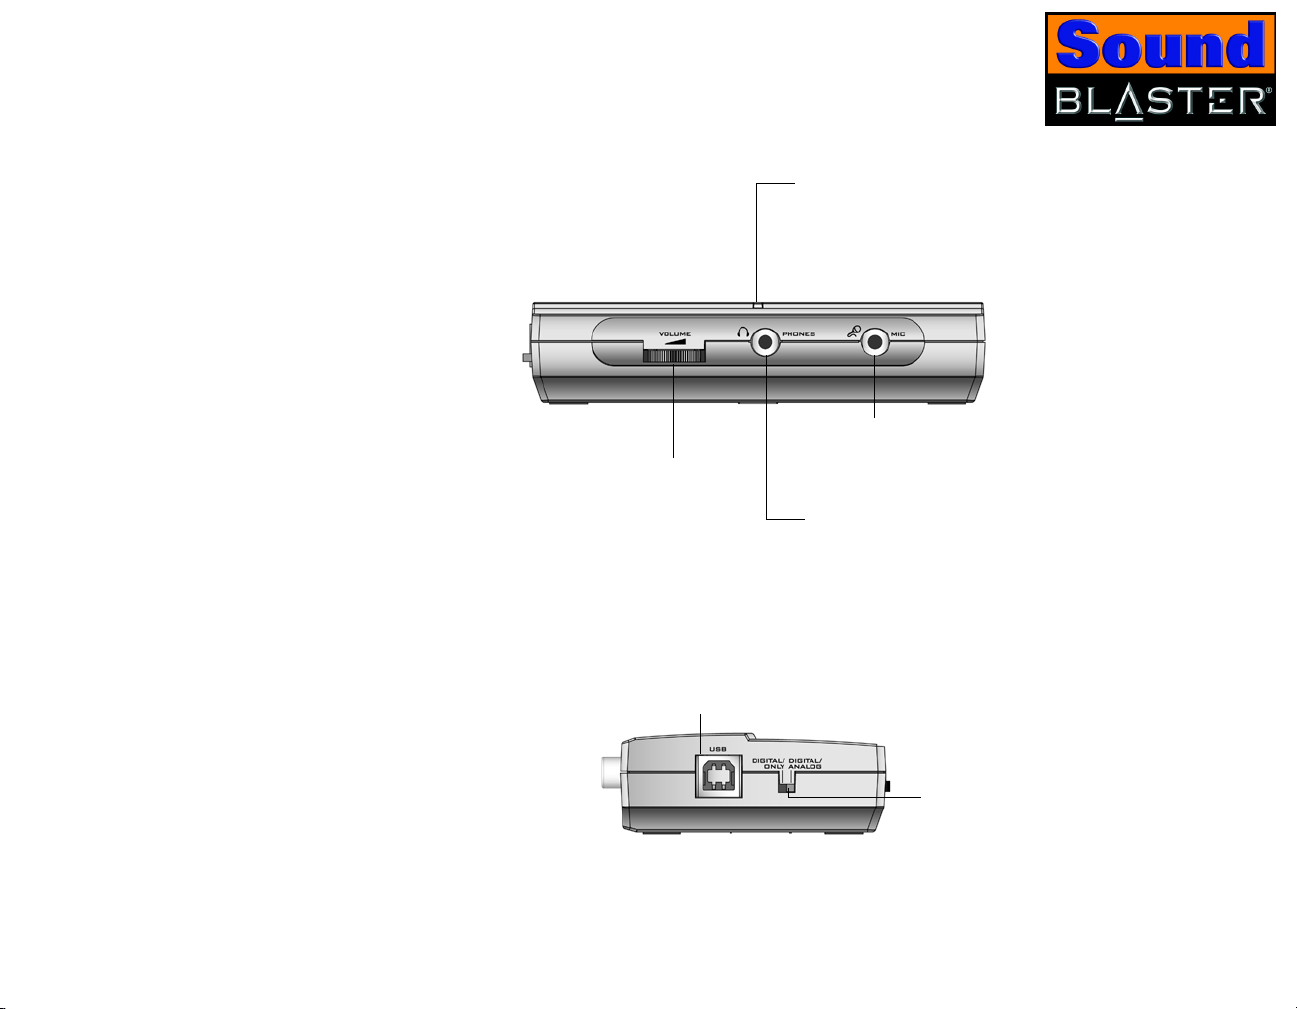
Front
Panel
Headphones Volume Control
Adjust the headphones volume
by turning this dial left or right.
USB port
Connects to the
computer’s USB port
using a USB cable.
Power LED
Lights up blue when Sound
Blaster is connected to your
computer.
Microphone jack
Connects to an external
microphone.
Headphones jack
Connects to a pair of
headphones. Your speaker
output is muted when you
connect the headphones to
Sound Blaster.
Side
Panel
Digital/Analog switch
Switches between Digital Only
and Digital/Analog modes.
Figure 1-3: Jacks, connectors and ports on Sound Blaster
About Sound Blaster 1-3
Page 15
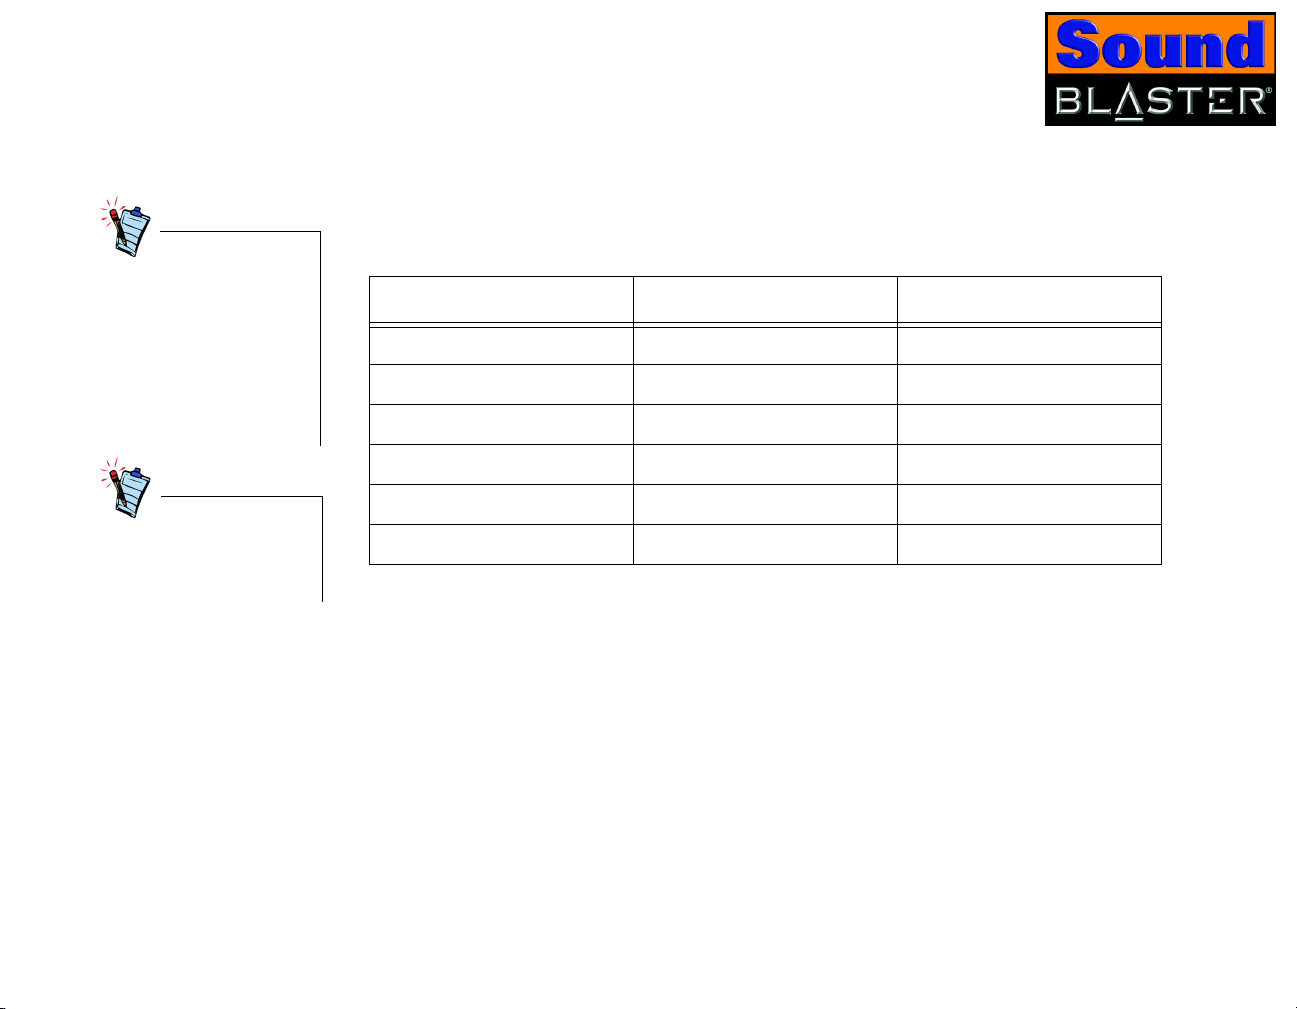
Switching modes You can switch between Digital Only and Digital/Analog mode using the Digital/
Analog switch located on the side panel of Sound Blaster. The table below illustrates
the different functions between each mode:
It is recommended that
you do not play any audio
files before switching
between Digital Only and
Digital/Analog mode.
Sometimes, you may
need to close and launch
the audio application after
switching modes for it to
function properly.
Dolby Digital 5.1 or DTS
pass-through is only
available in Digital Only
mode.
Table 1: Digital/Analog and Digital Only Mode
Connectors/Jacks Digital/Analog mode Digital Only mode
Line Out Available Not available
Line In Available Not available
Headphones Available Not available
Mic In Available Not available
Optical Out fixed at 48 kHz 44.1 and 48 kHz
Optical In 32, 44.1 and 48 kHz 32, 44.1 and 48 kHz
About Sound Blaster 1-4
Page 16
Installing Sound Blaster
This chapter tells you how to install Sound Blaster
Page 17
Installing Sound Blaster
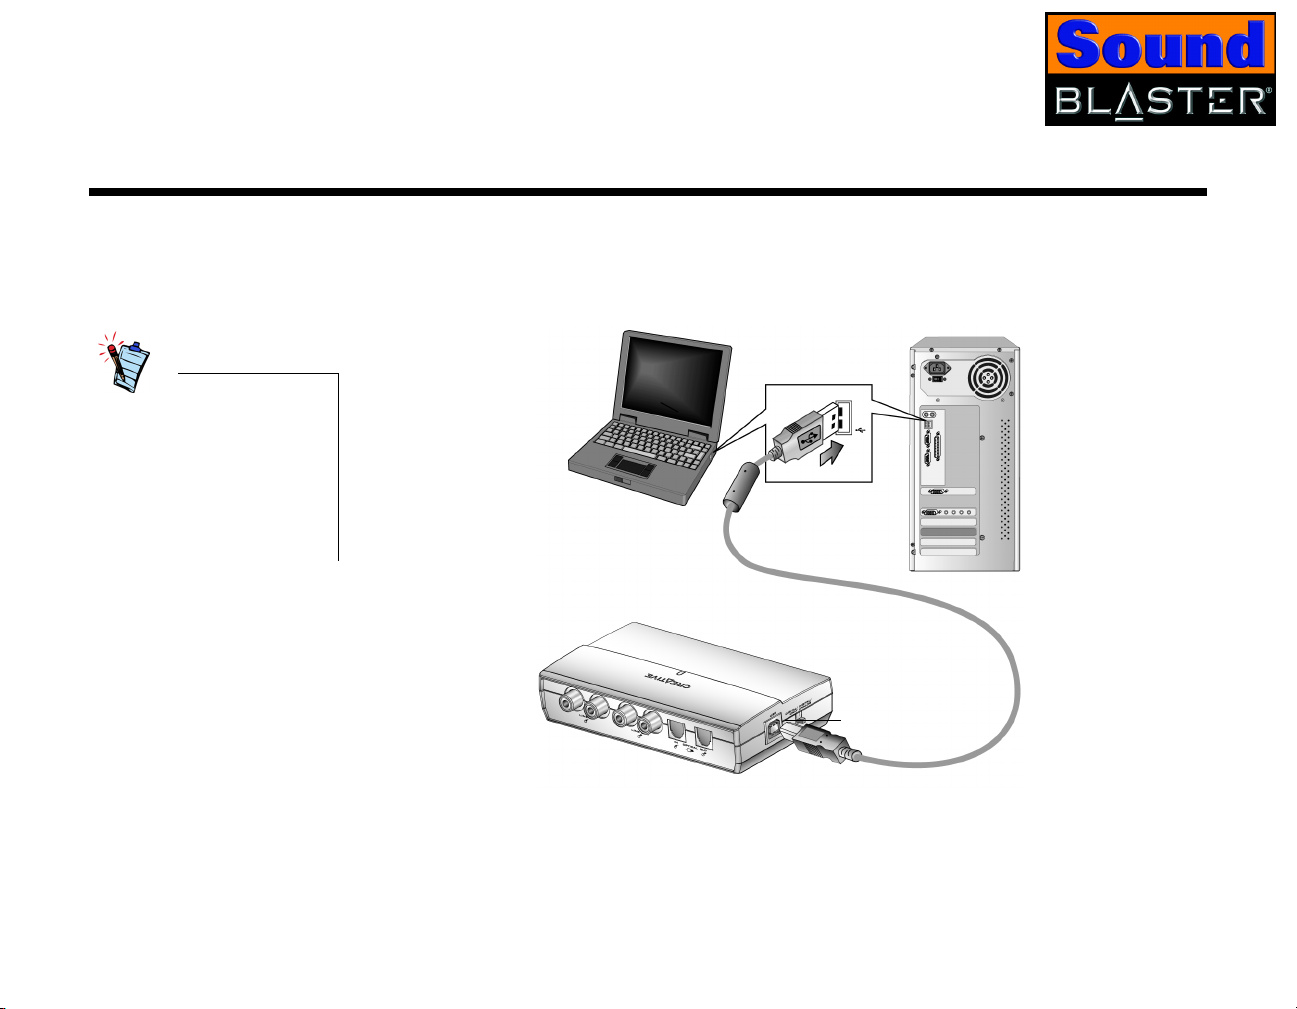
Installing Hardware 1. Turn on your computer.
2. Connect the supplied USB cable as shown in Figure 2-1.
Notebook computer
• The USB cable can be
connected to your
computer while the
computer is turned on.
• The USB port(s) on some
computers are located on
the front panel instead of
the back.
Desktop computer
USB port
USB port
Figure 2-1: Connecting Sound Blaster to the computer.
Installing Sound Blaster 2-1
Page 18

Installing Software Use the appropriate software installation procedure, depending on your computer’s
operating system.
In Windows 98 SE/Me/ 2000/XP
In Windows 98 SE/Me, if
Windows detects the new
hardware and prompts you to
install the USB device drivers,
click the Cancel button.
For Windows 98 SE systems,
the Windows 98 SE
Installation CD is required
during installation.
1. Insert the Sound Blaster Installation CD into your CD-ROM drive.
2. Follow the instructions on the screen to complete the drivers and applications
installation.
A dialog box appears prompting you to restart your computer.
3. Click the Finish button to restart your computer.
Installing Sound Blaster 2-2
Page 19

Verifying the
Follow the steps below to verify that Sound Blaster has been installed correctly.
software installation
In Windows 98 SE/Me 1. Right-click the My Computer icon on your desktop.
2. On the menu that appears, click Properties.
3. In the System Properties dialog box, click the Device Manager tab.
4. Click the plus (+) sign next to the Sound, video and game controllers icon.
The entry “Creative Sound Blaster” should appear. If the entry does not appear,
repeat the installation procedure on page 2-2.
In Windows 2000/XP 1. Right-click the My Computer icon on your desktop.
2. On the menu that appears, click Properties.
3. In the System Properties dialog box, click the Hardware tab.
In Windows XP, the My
Computer icon only appears
in Classic mode. If you are in
Default mode, click Start ->
Control Panel, and then click
the Switch to Classic View
button. Double-click the
System icon, and then follow
steps 3 to 5.
4. Click the Device Manager button.
5. Click the plus (+) sign next to the Sound, video and game controllers icon.
The entry “Creative Sound Blaster” should appear.
If the entry does not appear, repeat the installation procedure on page 2-2.
Installing Sound Blaster 2-3
Page 20

Attaching Sound Blaster
Using a clip 1. Insert the clip provided into the slot located at the
back of Sound Blaster, as shown in Figure 2-2.
2. Using the clip, place Sound Blaster onto the top
of your notebook’s LCD screen as shown in
Figure 2-3.
Figure 2-2: Connecting the clip to
Sound Blaster.
Figure 2-3: Connecting the clip to
your notebook.
Installing Sound Blaster 2-4
Page 21

Using velcro strips 1. Pull apart the velcro strips provided, as shown in
Figure 2-4.
Figure 2-4: Pulling apart velcro
2. Peel the stickers off the velcro strips as shown in
Figure 2-5.
Figure 2-5: Peeling the stickers
3. Attach Sound Blaster to your computer, as shown in Figure 2-6.
strips.
off velcro strips.
Figure 2-6: Attaching Sound Blaster using velcro strips.
Installing Sound Blaster 2-5
Page 22

Connecting Microphones
You can connect a condenser microphone, usually fitted with a 3.5 mm plug, to
Sound Blaster.
Connecting Headphones
Use a ¼ " to 3.5 mm adapter
for headphones or
microphones with ¼ " plugs.
Adjusting Headphones Volume
You can connect personal stereo headphones, usually fitted with a 3.5 mm stereo
plug, such as those used for portable audio players, to Sound Blaster.
Note: When headphones are plugged in, speaker output is muted. Headphones volume is
controlled by the headphones volume control, see Adjusting Headphones Volume below.
The volume output to the Headphones jack is a combination of the mixer output
volume from the system, and the Headphones Volume control on Sound Blaster.
You can adjust the headphones volume by using the Headphones Volume Control
or Creative Surround Mixer.
Figure 1-7: Headphones Volume Control.
Using the Headphones Volume control:
❑ Left to decrease the headphones volume.
❑ Right to increase the headphones volume.
Installing Sound Blaster 2-6
Page 23

To install Creative Surround
Mixer and other applications,
see “Installing Software” on
page 2-2.
Using Creative Surround Mixer:
1. Click Start -> Programs -> Creative -> Sound Blaster -> Creative
Surround Mixer.
2. On Surround Mixer, make sure that the Mute check box under the Volume slider
is clear. Otherwise, click the check box.
3. Drag the Volume slider up or down to adjust the headphones volume.
Installing Sound Blaster 2-7
Page 24

Using Sound Blaster
This chapter tells you how to use Sound Blaster
Page 25

Using Sound Blaster
Connecting Peripherals
Figure 3-1 shows you the various connectivity options for Sound Blaster.
Portable
Creative digital
audio player
cassette
player
Creative 2.1 Analog Speakers
MiniDisc recorder
Creative Inspire or Cambridge
SoundWorks 5.1 Digital Speaker Systems
Headphones
Figure 3-1: Connectivity options for Sound Blaster.
Optical cable
Microphone
Using Sound Blaster 3-1
Page 26

Connecting Speaker Systems
You can enjoy virtual surround sound with Dolby Digital 5.1 DVD movies using a
stereo speaker system by enabling the CMSS feature. Alternatively, you can
perform Dolby Digital 5.1 or DTS pass-through via SPDIF (Optical Out) to a 5.1
speaker system with a built-in Dolby Digital 5.1 or DTS decoder (for example,
Creative Inspire 5700 Speakers) to enjoy true surround sound experience. This is
only available in Digital Only mode.
Analog speaker cable
Y-splitter cable
Analog 2.1 channel speaker
system*
Optical Out jackOptical In jack
Optical cable
Creative Inspire or Cambridge
SoundWorks 5.1 Digital
Speaker Systems
Figure 3-2: Connecting speaker systems to Sound Blaster.
Using Sound Blaster 3-2
*For example, Creative
2.1 Analog Speakers
Page 27

Mixing analog inputs Mix music and microphone inputs to sing along with your favorite tunes.
Digital Audio Player / CD Player /
Cassette Player analog source.
Enjoy singing along to
your favorite tunes.
Figure 3-3: Mixing Analog Inputs.
Using Sound Blaster 3-3
Page 28

Sound Blaster Applications
This chapter tells you about the applications included with
Sound Blaster
Page 29

Sound Blaster Applications
Creative Sound Blaster Applications
These applications are meant
for use on computers running
Windows operating systems.
Mac OS X v10.2 users can use
the bundled Sound it!
application to perform tasks
such as recording audio.
Sound Blaster is supported by a full range of applications to help you get the most
from your audio device. The following set of software is most important to the
operation of Sound Blaster:
❑ Creative MediaSource Go!
❑ Creative MediaSource Go! Launcher
❑ Creative MediaSource Player
❑ Creative MediaSource Organizer
❑ Creative Device Control
❑ Creative Diagnostics
❑ Creative Surround Mixer
❑ Creative EAX Console
❑ Creative WaveStudio
❑ Creative Speaker Settings
❑ Creative MiniDisc Center
❑ Creative Graphic Equalizer
Sound Blaster Applications 4-1
Page 30

Creativ e MediaSource Go!
Creative MediaSource Go! is a convenient quickstart bar, not only for Creative
MediaSource Go!'s components, but also for your own frequently used applications.
If you have desktop shortcuts for your favorite applications, you can drag and drop
them into one central location, Creative MediaSource Go!.
Creative MediaSource Go! includes several components like the Launcher, Player,
Organizer.
For more information and usage details on Creative MediaSource Go!, refer to its
online Help.
Creative MediaSource Go! Launcher
Just like the Start button in Windows, Creative MediaSource Go! Launcher provides
a single point of access to most of the software programs you need, to control and
customize Sound Blaster.
Creative MediaSource Go! Launcher consists of four tabs: Programs, Product
Settings, Product Support and Companion Products.
❑ Programs houses shortcuts to Sound Blaster applications.
❑ Product Settings houses shortcuts to specific programs for changing Sound
Blaster’s hardware settings.
❑ Product Support contains diagnostic software, product update information,
product registration forms, demonstration software as well as helpful
documentation such as Getting Started guides.
❑ Companion Products allows viewing of information on other Creative products
and applications.
For more information and usage details on Creative MediaSource Go! Launcher,
refer to its online help.
Sound Blaster Applications 4-2
Page 31

Creative MediaSource Player
Creative MediaSource Player is the only software you will need for music and
multimedia entertainment. Unlike other media players, Creative MediaSource
Player is specially designed to access the power of Sound Blaster’s hardware. With
it, you can:
❑ play back music and multimedia files: MP3, WAV, WMA, WMV, NVF, VideoCD, etc
❑ enhance playback of ordinary music with surround effects using EAX
❑ vary the speed of audio playback without affecting the pitch (Time Scaling)
❑ use Smart Volume Management to play back a list of songs at a similar volume
level even if they were originally recorded at different loudness levels
❑ switch between Creative MediaSource Organizer and Creative MediaSource
Player with just a click of the mouse
❑ use the built-in Creative MediaSource Recorder to record audio (see the section
below)
Creative MediaSource Organizer
Finding and organizing songs
Managing a huge collection of audio CDs and MP3 files can be a headache. With
Creative MediaSource Organizer, you can find any recording easily, no matter where
it is stored on your hard disk or external storage devices. The following is a list of
tasks you can perform with Creative MediaSource Organizer.
Creative MediaSource Organizer searches your hard disk to compile a database of
songs available, called a “PC Music Library” or PCML. Once you have a PCML, you
can sort it and search for songs. Searching is very fast due to a sophisticated
engine and use of three search fields: artist, genre and album.
Once songs have been found, you can create playlists to automatically replay
them in any desired sequence. You can also enter and edit extra information about
each MP3 recording with ID3 tags.
Sound Blaster Applications 4-3
Page 32

Keep your music database up to date
As songs are added or deleted from your computer and other storage devices, your
PCML will need to be kept up to date. The Media Sniffer will monitor specified
folders on your hard disk for file changes, and update your PCML accordingly.
Transferring songs NOMAD users can use Creative MediaSource Organizer to transfer music files to
and from the computer and other compatible devices.
Automatically play ing multimedia content
Extracting and converting songs
Media Detector makes it easy for users to access multimedia content from various
internal or external media. There is no need to hunt through a maze of different
software to play different types of files.
Media Detector automatically recognizes the insertion or connection of CDs, VCDs,
and external devices like the NOMAD Jukebox and NOMAD MP3 players. Upon
recognition, the content in the media will automatically start playing without
further intervention from the user.
Storing hundreds of songs on your computer can consume much hard disk space.
WAV files and tracks from audio CDs can take up to 50 MB per song. To reduce
storage on your hard disk, you can convert tracks from audio CDs into smaller 4 to
5 MB MP3 files. Creative MediaSource Organizer’s built-in Rip Now module lets you
easily extract tracks from audio CDs, then convert them to MP3 and WMA formats
at high resolution bit rates of 320 Kbps and 160 Kbps, respectively.
To eliminate the need for you to manually type the track information of an audio CD’s
ripped tracks, a feature called CDDB can connect your computer to the Internet
(Gracenote’s CDDB service) and automatically retrieve the track names and other
useful track information for you.
Sound Blaster Applications 4-4
Page 33

Storing music on recordable CD
If you have a CD-writer, another way to reduce music storage on your computer’s
hard disk is to record audio tracks onto CD-R or CD-RW for playback on many
consumer hi-fi devices. Creative MediaSource Organizer’s Burn CD module lets you
create your own audio and MP3 CDs from WAV, MP3 and WMA files. The Burn CD
feature also lets you easily design, create, and print matching CD covers and liner
notes for your audio CDs.
For more information and usage details on Creative MediaSource Organizer, refer to
its online Help.
Creative Device Control
Creativ e Diagnostics
Creative Device Control is a utility that allows you to control the SPDIF output
sampling rate. Double-click the Device Control icon in Windows Control Panel to
open this applet. Alternatively, use the Creative MediaSource Go! Launcher to
launch Creative Device Control.
For more information and usage details on Creative Device Control, refer to its online
Help.
Creative Diagnostics is a simple but useful program for diagnosing and fixing any
problems that you may have with your audio hardware. The diagnostic tests will
check that the audio hardware is detected, the audio drivers are working, and the
mixer settings are correct. A speaker test is also provided to let you test the
physical connections from Sound Blaster to the speakers. If the test detects
problems, Creative Diagnostics will provide solutions. Use Creative Diagnostics to
help you have a trouble-free audio experience.
For more information and usage details on Creative Diagnostics, refer to its online
Help.
Sound Blaster Applications 4-5
Page 34

Creative EAX Console
EAX Console allows you to configure the processor's effects engine.
EAX ADVANCED HD promises to deliver sounds that are so life-like, you can almost
see them! It is the computer industry's first system to recreate and deliver realworld, interactive audio experiences in games, music, and other audio applications.
These audio effects take your computer beyond home-theater quality, immersing
you in sound so vivid, your imagination can almost “see” it. The effects go beyond
today's surround sound and 3D positional audio, to actually model an environment
by taking into a ccoun t room size, acous tic properties, reverb, echo, and many other
effects that create a real-world experience.
EAX Console consists of four sections: Audio Effects, CMSS 3D, Audio Clean-up,
and Time Scaling.
Audio Effects: Environmental Sound Processing
CMSS 3D: Simulating Surround Sound
Audio Clean-up: Removing noise and distortion
In Audio Effects, you can choose how you want to enhance all kinds of ordinary twochannel sounds.
Creative MultiSpeaker Surround (CMSS) 3D makes ordinary two-channel (Left and
Right Stereo) sound seem to surround you, even through only two speakers. This is
useful for watching DVDs and VCDs, which contain only stereo soundtracks.
Audio Clean-up allows you to process prerecorded as well as real-time audio, in
order to remove noise, click sounds and other artifacts. For example, when
recording music from old vinyl records, “click” and “pop” sounds can be removed
with the Clean-up feature. The Click Meter informs you whenever the noise cleanup feature is activated during recording and also how many clicks are removed.
Sound Blaster Applications 4-6
Page 35

Time Scaling: V arying the speed of playback
Karaoke fans and musicians may sometimes wish to slow a song down (or speed it
up) to catch the lyrics or play along with the music. However, varying the speed
usually also varies the pitch of the song. With the Time Scaling feature, Sound
Blaster users can maintain the pitch of a song while varying the playback speed.
For more information and usage details on EAX Console, refer to the Creative EAX
online Help.
Creativ e Surround Mixer
Creativ e WaveStudio
Creative Surround Mixer is a powerful audio mixer that allows you to have
complete control over all your audio sources. It is the main program used to adjust
your audio settings when you play music or when you record sound. With Creative
Surround Mixer, you can:
❑ Control the volume of an audio source.
❑ Select the recording source.
❑ Control the speaker balance.
For more information and usage details on Creative Surround Mixer, refer to its
online Help.
Creative WaveStudio allows you to perform the following sound editing functions
easily:
❑ Play, edit, and record 8-bit (tape quality) and 16-bit (CD quality) wave data
❑ Enhance wave data or create unique sounds with various special effects and
editing operations such as reverse, echo, mute, pan, cut, copy, and paste
❑ Open and edit several audio files at the same time
❑ Open Raw (.RAW) and MP3 (.MP3) data files
For more information and usage details on Creative WaveStudio, refer to its online
Help.
Sound Blaster Applications 4-7
Page 36

Creative Speaker Settings
This is the main application to use for the following tasks:
❑ Designating the number and configuration of speakers to use
❑ Testing your speakers
❑ Managing Bass Boost by selecting the cutoff frequency and level.
Creativ e MiniDisc Center
Creative Graphic Equalizer
Creative MiniDisc Center allows you to play back popular audio file formats and
compact discs for recording to DAT and MD recorders.
With MiniDisc Center, you can:
❑ put together an album of your favorite songs, each of which may be in a different
audio format
❑ insert a preset period of silence automatically after each track
❑ org a nize a se q uence of t racks to b e playe d back and t h en record ed to you r digital
recorder
For more information and usage details on Creative MiniDisc Center, refer to its
online Help.
Creative Graphic Equalizer (EQ) is designed to improve and fine-tune the audio
quality of your playback. Just select any one of the factory presets, or adjust the
boost or cut amount (up to 12 dB) for 10 preselected frequency bands. You can also
save the settings as a custom preset once you are satisfied with the adjustments.
For more information and usage details on Creative Graphic Equalizer, refer to its
online Help.
Sound Blaster Applications 4-8
Page 37

Using Applications
This chapter tells you which applications to use for content
creation, gaming and entertainment purposes
Page 38

Using Applications
Sound Blaster offers you high-quality multimedia playback, digital entertainment,
content creation capability, internet entertainment and gaming. The following
pages tell you which applications would best suit your needs.
Multimedia Playback
Watching DVDs Sound Blaster supports Dolby Digital 5.1/DTS SPDIF pass-through via the Optical
Out jack. It also supports 2-channel audio via a software DVD player. Dolby Digital
5.1 files, however, require an external decoder.
Dolby Digital 5.1/DTS
SPDIF pass-through is
only available in Digital
Only mode. Use the
Digital/Analog switch
located on Sound
Blaster’s side panel, to
switch to Digital Only
mode.
Playing MP3, WMA, WMV or Dolby Digital 5.1 files
Your software DVD Player can select 5.1 audio mode, which utilizes Sound Blaster’s
CMSS 3D to produce virtual surround sound with your stereo speaker system.
Creative MediaSource supports and plays MP3,WMA, WMV and Dolby Digital 5.1
files.
Using Applications 5-1
Page 39

Playing back Wave and CD Audio files
Creative MediaSource supports the playback of .MP3, .WMA, .WAV, and .CDA (CDAudio) files, in addtion to MIDI (.MID) files. Dolby Digital decoding of Dolby Digital
5.1 files and Dolby Digital content from DVDs are also managed through
MediaSource in conjunction with your software DVD player.
Playing MIDI files MIDI (*.MID) is a music format that uses a synthesizer for playback. Use Creative
MediaSource to play MIDI files.
Compiling personal albums
You can compile albums containing CD Audio, WAV or MIDI files using Creative
MediaSource.
Using Applications 5-2
Page 40

Content Creation
Recording digital audio
Internet Entertainment
Encoding CD songs to MP3/WMA format
Downloading and playing MP3/WMA songs
Playing MP3/WMA songs with EAX
You can do digital recording and editing on your computer with Sound Blaster using
Creative Wave Studio. Connect any SPDIF compatible device such as a DAT deck
and select SPDIF In in Creative Device Mixer.
With Creative MediaSource, you can encode or record all your favorite CD songs into
your computer’s hard drive, so that you have a database of customized song lists.
With Creative MediaSource, you can add current songs to your database by
downloading them from various sites on the Internet.
Use Creative MediaSource to create MP3 renditions with multi-dimensional and
multi-textured realism by adding environments such as “concert hall” or
“bathroom”! You can share these enhanced MP3 selections, even with someone
who does not own a Sound Blaster.
Using Applications 5-3
Page 41

Gaming Reference
Enjoying EAX support
Enjoying DirectSound3D support
Enjoy the many EAX titles designed by top game developers, which immerse you in
realistic environments. Visit http://www.eax.creative.com for a full list of
compatible titles.
DirectSound3D (DS3D) games are supported on Sound Blaster. You can hear
sounds positioned in 3D space to enhance your game experience. Use the CMSS 3D
feature to enjoy virtual 3D audio for your games.
Using Applications 5-4
Page 42

General Specifications
This section displays the specifications of your
Sound Blaster
Page 43

General Specifications
This section lists the specifications of Sound Blaster.
Inputs and Outputs ❑ TOSLink connector for Optical SPDIF input
❑ TOSLink connector for Optical SPDIF output
❑ Pair of RCA jacks for stereo line-level analog input
❑ Pair of RCA jacks for stereo line-level analog output
SPDIF output is not available
during playback of protected
digital audio contents
authored with Microsoft DRM
(Digital Rights Management)
technology.
Controls ❑ Volume control for headphones Display Indicators ❑ Blue LED to indicate power status. Lights up when the unit is connected.
❑ 3.5 mm (1/8 ") jack for mono analog Microphone input
❑ 3.5 mm (1/8 ") jack for stereo analog Headphones output. (When the
Headphones plug is inserted, the autodetect feature automatically mutes the
main speakers and the audio is redirected to Headphones output)
❑ Selector switch to switch between Digital Only and Digital/Analog modes
❑ USB port (Type B)
General Specifications A-1
Page 44

Troubleshooting
This section provides solutions to problems you may
encounter during installation or normal use
Page 45

Troubleshooting
This appendix provides solutions to problems you may encounter during installation
or normal use.
Problems Installing Software
The installation does not start automatically after the Sound Blaster Installation CD
is inserted.
The AutoPlay feature in your Windows system may not be enabled.
To start the installation program through the My Computer shortcut menu:
1. Double-click the My Computer icon on your Windows desktop.
2. In the My Computer window, right-click the CD-ROM drive icon.
3. On the shortcut menu, click AutoPlay and follow the instructions on the screen.
To enable AutoPlay through Auto Insert Notification:
1. Click Start -> Settings -> Control Panel.
2. In the Control Panel window, double-click the System icon.
3. In the System Properties dialog box, click the Device Manager tab and select
your CD-ROM drive.
4. Click the Properties button.
5. In the Properties dialog box, click the Settings tab and select Auto Insert
Notification.
6. Click the OK button to exit from the dialog box.
Troubleshooting B-1
Page 46

Problems with Sound
No sound from the headphones.
Check the following:
❑ The headphones are connected to the Headphones jack.
❑ Make sure that the Headphones Volume control is not muted.
❑ The Digital/Analog switch is set to Digital/Analog mode.
No sound from the speakers.
Check the following:
❑ You have connected your speakers to Sound Blaster's output.
❑ You have selected the correct source in Creative Surround Mixer.
❑ Headphones are not connected to Sound Blaster. Output to the speakers is
automatically cut off when headphones are connected.
❑ Make sure that in Creative Surround Mixer, the Mute check box for that source
does not have a check mark in it.
❑ The Digital/Analog switch is set to Digital/Analog mode.
No audio output when playing digital files such as .WAV, MIDI files or AVI clips.
Check the following:
❑ The speakers’ volume control knob, if any, is set at mid-range. Use Creative
Surround Mixer to adjust the volume, if necessary.
❑ The powered speakers or external amplifier are connected to Sound Blaster’s
output jacks.
❑ The Speaker selection in the Creative Speaker Console corresponds to your
speaker or headphone configuration.
❑ Make sure that in Creative Surround Mixer, the Mute check box for that source
does not have a check mark in it.
❑ The speakers are powered up and turned on.
Troubleshooting B-2
Page 47

Crackling sound heard when playing back media files.
Enable Direct Memory Access to your storage devices. Follow the steps below:
For Windows 98 SE and Windows Me users:
1. Click Start -> Settings -> Control Panel.
2. In the Control Panel dialog box, double-click the System icon.
3. In the System Properties dialog box, click the Device Manager tab.
4. Double-click the Disk drives icon.
Your computer drives will appear.
5. Double-click the hard disk drive icon.
6. In the box that appears, click the Settings tab.
7. Click the DMA (Direct Memory Access) check box to select it.
An alert message box appears.
8. Click the OK button.
9. Click the OK button in the next box.
10.Click the Close button on the System Properties dialog box.
11.When prompted to restart your computer, click the Yes button.
12.Repeat steps 4-11 if you have other drives, for example, other hard disk drives,
CD-ROM, CD-RW, and DVD-ROM drives. In step 4, double-click the respective
drive icon.
Troubleshooting B-3
Page 48

In Windows 2000, Service
Pack 3 may be necessary for
full and correct functionality.
In Windows XP, Service Pack
1 may be necessary for full
and correct functionality.
Digital CD Playback may not
be available on external
DVD/CD-ROM drives with
PCMCIA IDE controllers.
For Windows 2000 and Windows XP users:
1. Click Start -> Settings -> Control Panel.
2. In the Control Panel dialog box, double-click the System icon.
3. In the System Properties dialog box, click the Hardware tab.
4. Click the Device Manager button.
5. Double-click the ATA/ATAPI IDE Controllers icon.
You r IDE channels will appear.
6. If your storage device is connected to the primary IDE channel, right-click the
Primary IDE Channel icon.
If your storage device is connected to the secondary IDE channel, right-click the
Secondary IDE Channel icon.
7. Click Properties.
8. In the Properties dialog box, click the Advanced Settings tab.
9. Click the Use DMA if available check box, to select it.
10.Click the OK button.
No audio output when playing audio CDs.
Sound Blaster does not support analog CD audio playback. To listen to audio CDs,
digital CD playback must be enabled. Do the following to enable digital CD playback:
For Windows 98 SE users:
1. Click Start -> Settings -> Control Panel.
2. In the Control Panel dialog box, double-click the Multimedia icon.
3. In the Multimedia Properties dialog box, click the CD Music tab.
4. Click the Enable digital CD audio for this CD-ROM device check box to select
it.
5. Click the OK button.
Troubleshooting B-4
Page 49

For Windows Me users:
1. Click Start -> Settings -> Control Panel.
2. In the Control Panel dialog box, double-click the System icon.
3. In the System Properties dialog box, click the Device Manager tab.
4. Double-click the DVD/CD-ROM drives icon.
Your computer drives will appear.
5. Right-click the disk drive icon.
A menu will appear.
6. Click Properties.
7. In the Digital CD Playback box of the next dialog box, click the Enable digital
CD audio for this CD-ROM device check box to select it.
8. Click the OK button.
For Windows 2000 and Windows XP users:
1. Click Start -> Settings -> Control Panel.
2. In the Control Panel dialog box, double-click the System icon.
3. In the System Properties dialog box, click the Hardware tab.
4. Click the Device Manager button.
5. Double-click the DVD/CD-ROM drives icon.
Your computer drives will appear.
6. Right-click the disk drive icon.
A menu will appear.
7. Click Properties.
8. In the Digital CD Playback box of the next dialog box, click the Enable digital
CD audio for this CD-ROM device check box to select it.
Troubleshooting B-5
Page 50

Unable to record or transfer CD audio tracks from CD-ROM/DVD-ROM to MiniDisc
recorder, using the Creative MiniDisc application.
Enable digital CD playback. For more information, refer to the topic, “No audio
output when playing audio CDs.” on page B-4.
Problems With Hardware
Problems with Software
Sound Blaster is not detected or is not functioning properly.
Unplug and plug the USB cable from your computer or notebook to reset Sound
Blaster.
Sound Blaster does not function properly when used with a USB 2.0 hub connected
to your computer or notebook equipped with a USB 2.0 port.
Check for information availability at http://www.creative.com.
The Dolby Digital 5.1 or DTS pass-through via SPDIF (Optical Out) feature is not
available.
Check that the Digital/Analog switch is set to Digital Only mode. Dolby Digital 5.1 or
DTS pass-through via SPDIF (Optical Out) is only available in Digital Only mode.
EAX and CMSS 3D effects are not working when connecting related peripherals to
the Line In connector.
EAX and CMSS 3D effects are not available for Line In.
The Audio Clean-Up or Time-Scaling feature is not functioning properly.
The Audio Clean-Up or Time-Scale features require Creative MediaSource to function
properly. Make sure that the media files are played back using Creative MediaSource
Player before applying these features to them.
Troubleshooting B-6
Page 51

The media file player application does not function properly after switching
between Digital/Analog and Digital Only mode.
Close and launch the media file player application. It is recommended that you do
not play any audio files before switching between Digital Only and Digital/Analog
mode.
Troubleshooting B-7
Page 52

Index
Page 53

A
Adjusting
headphones volume
Applications
Attaching
using a clip
using velcro strips
Attaching your Sound Blaster
4-1
2-4
2-6
2-5
2-4
C
Compiling personal albums 5-2
Connecting
headphones
microphones
related peripherals
speaker systems
Content creation
Controls
Creative Device Control
Creative Diagnostics
Creative EAX Console
Creative Graphic Equalizer
Creative MediaSource Go!
Creative MediaSource Go!
Launcher
Creative MediaSource Organizer
4-3
Creative MediaSource Player
A-1
2-6
2-6
3-1
3-3
5-3
4-5
4-5
4-6
4-8
4-2
4-2
4-3
4-7
A-1
4-8
4-8
4-7
5-4
5-
I
Inputs A-1
Installation
hardware
software
verifying
Installing your Sound Blaster
Internet entertainment
2-1
2-2
2-3
5-3
J
Jacks
headphones
Line In
Line Out
Microphone
Optical In
Optical Out
1-3
1-2
1-2
1-3
1-2
1-2
M
Multimedia playback 5-1
2-1
Creative MiniDisc Center
Creative Speaker Settings
Creative Surround Mixer
Creative WaveStudio
D
Digital Rights Management A-1
Display indicators
Downloading MP3/WMA songs
3
A-1
E
Encoding CD songs to MP3/WMA
format
Enjoying
5-3
DirectSound3D support
EAX support
5-4
G
Gaming reference 5-4
General specifications
O
H
Headphones volume control 1-3
Online Help
Creative Device Control
Creative Diagnostics
Creative EAX
4-7
4-5
4-5
Index 1
Page 54

Creative Graphic Equalizer 4-
8
Creative MediaSource Go!
2
Creative MediaSource Go!
Launcher
Creative MediaSource
Organizer
Creative MiniDisc Center
Creative Surround Mixer
Creative WaveStudio
Outputs
A-1
4-2
4-5
4-7
4-
4-8
4-7
MP3/WMA songs with EAX
3
WMA files
WMV files
Playing back
CD Audio files
Wave files
Power LED
5-1
5-1
5-2
5-2
1-3
R
Recording digital audio 5-3
5-
T
Troubleshooting B-1
hardware
installing software
software
sound
B-6
B-6
B-2
U
USB port 1-3
B-1
P
Personal albums 5-2
Playing
MIDI files
MP3 files
MP3 songs
5-2
5-1
5-3
S
Sound Blaster 1-2
Sound Blaster applications
Sound Blaster web site
Switch
Digital/Analog
x
1-3
4-1
W
Watching
DVDs
5-1
Index 2
Page 55

 Loading...