

Creative X-Fi Sonic Carrier (Model MF8235)
Creative X-Fi Sonic Carrier Subwoofer (Model MF8240)
USER MANUAL (Firmware Version 1.6 onwards)
THE AUDIO OF TOMORROW

Unpacking 3
Package Contents 5
Setup and Care Information 6
Support Information 7
Overview 8
Inserting Remote Control Batteries 12
Connecting Electrical Power 12
Setting Up the Subwoofer 13
Connecting Your Sonic Carrier 14
Wi-Fi Setup 17
Mobile Apps 18
Performing Room Calibration 18
Specifications 20
Warranty 21
Appendix - Wall Mounting the Main Unit 22
Contents
3
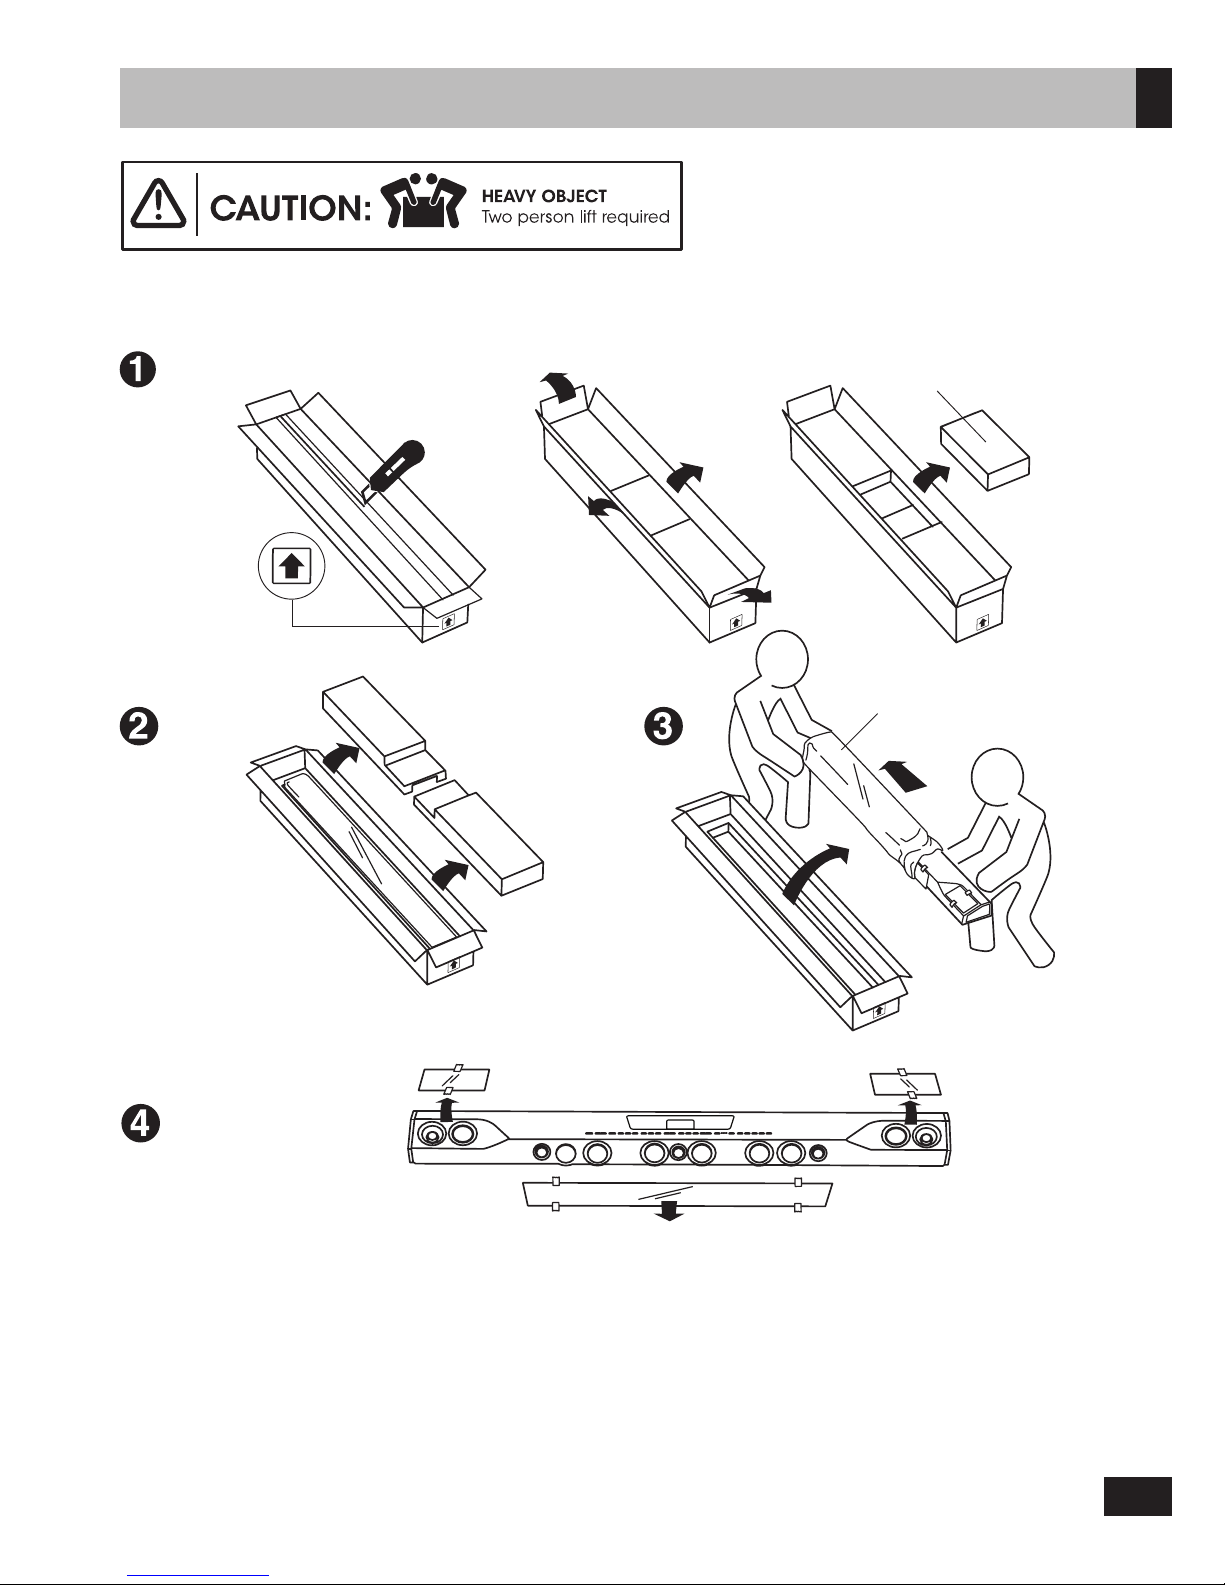
Unpacking
Note:
The Sonic Carrier main unit and subwoofer units are heavy and require 2 person for unpacking and setup.
While unpacking your Sonic Carrier main unit and subwoofer, inspect them thoroughly for possible shipping damage and
contact customer support immediately if you find any evidence of shipping damage.
Please keep the original shipping box and all packing material. This will ensure the main unit and subwoofer are protected for
future transport. In the unlikely event you have a problem and must return it for service, you must use the proper packing material.
Ship the equipment only in the original packing material, otherwise the unit is not insurable by carriers.
You may cut the taped seams on the bottom flaps to flatten the cardboard cartons for easier storage.
Ensure shipping box top faces upward
Remove protective covering
ONLY AFTER final installation
Main Unit
Remove
accessory box
Carefully remove
protective cover

4
Unpacking
Ensure shipping box top faces upward
Tip box over gently onto side,
then flip box gently over again
till top faces downward
Place subwoofer upright and
remove protective cover
Open protective cover to find
subwoofer feet
Push out, and remove transit
protection foam blocks
Subwoofer

5
Package Contents
Main Unit
User manual
Safety and regulatory leaflets
x8
IR remote control AAA battery x 2
for IR remote control
Wall mount brackets x 2
+ thumbscrews x 2
Driver décor rings x 8
Power cable IR transmitter
HDMI cable
(optional)
Subwoofer
Power cable
Link cable
Safety and regulatory leaflets

6
Setup Recommendation
The Sonic Carrier main unit is designed to be placed on top of a console in front of a TV or wall mounted. For optimum performance,
please observe the setup recommendation below. Wall mount information for Installers are included in the appendix at the end
of the manual.
1. In order to reproduce an immersive sound experience, the Sonic Carrier main unit radiates sound from the front, top and sides.
Ensuring that these sound waves are not obstructed by objects placed in their path would yield the best sound experience.
Do not place your Sonic Carrier within an enclosed fixture (cabinet, shelving unit, etc.), and make sure nothing is obstructing
the sides. The top firing speakers needs to have a clear line of sight to the ceiling as well.
2. Avoid positioning the Sonic Carrier so low that you are looking down at the top of the main unit, as this will disrupt the audio
and surround sound performance. If you are wall mounting the main unit, install the main unit with 15cm of space between
the top of the main unit and the bottom of the TV to avoid obscuring the top firing speaker.
3. For the best listening experience, the listening position should be at least 1.2 - 1.5m (4 - 5 ft) away from the Sonic Carrier.
4. The subwoofer unit produces non-directional sound and thus could be placed at your convenience around the room.
For optimum results, it would be best to locate the subwoofer equidistant to the main unit when measured from the listening
position, and to keep the subwoofer within 3m (10ft) of the main unit.
5. The subwoofer is equipped with a pair of ports that augments the sound output of the dual subwoofer drivers at the lowest
frequencies. Keep a distance of 10cm (4”) between the rear subwoofer enclosure and the adjacent wall to avoid turbulence
or air chuffing noises.
6. Room acoustics has a major influence on sound quality. The ear is particularly troubled by standing waves and echoes which
can be identified by moving around your room and loudly clapping your hands. Parallel surfaces such as opposite walls,
floor and ceiling encourage and sustain these problems. However, rearranging curtains, thick carpets, rugs, furniture and
bookcases can make a dramatic improvement as the sound waves are partially absorbed and diffused. As far as possible,
the Sonic Carrier main unit should be setup with equal distance from the left and right wall.
The Sonic Carrier uses side firing drivers to reproduce surround information; excessive or asymmetric amount of absorption
on the left and right sidewalls could adversely affect the surround sound performance. Or best results, keep the area of the left
and right walls between the main unit and the listening position free from absorptive material such as curtains and upholsteries.
7. The ceiling surface is an important contributor to how overhead (height) effects performs. The ideal ceiling height is between
2.3 - 4.3m (7.5 - 14ft). Ceiling should be constructed of an acoustically reflective material, such as wall board, plaster, hardwood,
or any rigid, non-sound absorbing material. Avoid treating ceilings with acoustic damping materials. For optimal playback, the
ceiling should be flat. A shallow vaulted ceiling will provide an acceptable performance. Chandeliers and can-style lighting
do not significantly interfere with or negatively impact the height effect.
Care for your Sonic Carrier Main Unit & Subwoofer
Cabinet
The Sonic Carrier main unit is finely crafted to last a lifetime from select metal alloys and engineering polymers; and should be
treated as you would fine furniture with similar materials and finishes.
The cabinet of the Sonic Carrier subwoofer is finely crafted from wood finished in vinyl laminate or high gloss lacquer; and should
be treated as you would furniture with similar materials and finishes.
Dust lightly with a soft lint-free cloth, avoiding abrasives and spirit based cleaners. If necessary, wipe carefully with a cloth slightly
dampened with glass cleaner to remove stubborn soil and marks.
Main Unit Grilles
The acoustically transparent fabric midrange driver grilles help protect the driver uits, and could be left in place during listening
with negligible acoustic effect. These could be taken off and cleaned using a lint brush. Should you choose to clean the grilles in
place, be careful not to press in and deform the drivers under the grille. Optional décor rings without fabric covers are provided
as a alternative to users who prefer the look of exposed midrange drivers. Take care to properly seat the décor rings on the rubber
isolation rings that holds the pre-installed fabric grilles in place.
Subwoofer Grilles
The acoustically transparent fabric grille protects the subwoofer driver units, and must not be removed. This could be carefully
cleaned using a lint brush, be careful not to press in and deform the drivers under the grille. The space between the grille and
the cabinet could be dusted very carefully with a soft dry brush. Avoid touching the woofer diaphragm.
Main Unit Drivers
Avoid touching the speaker diaphragms, particularly tweeters. The surface of the midrange driver could be dusted very carefully
with a soft dry brush.
Main Unit Display
The main unit display on the top panel can be tilted to your desired angle with minimum force. Do not force the display to swivel
further forward than 90 degrees vertical.
Front Panel
The front panel connectors are concealed by a magnetically latched flap that is hinged at the bottom. Avoid applying excessive
force to the flap; close the flap when access to the ports are not required, or when the unit needs to be moved. When tilting the
main unit forward to facilitate cable connection, remove all cables and USB devices first and ensure the front panel flap is closed
to avoid damage to the connectors and the flap hinge.
General Care Information
Avoid damp, direct sunlight and temperature extremes. The ventilation and ports should not be impeded by covering the
ventilation openings with items, such as newspapers, table-cloths, curtains, etc. No naked flame sources, such as lighted candles,
should be placed on the apparatus
Setup and Care Information

7
Updated User Manual
Download the latest version of the user manual here:
soniccarrier.com/support/manual
Instructional Videos
Learn about the Sonic Carrier by watching our instructional videos:
soniccarrier.com/support/videos
Firmware Updates
The Sonic Carrier automatically checks for the latest firmware update each time it is powered on.*
Follow the instructions on the main display to install the update. We strongly advise you to update to the
latest firmware.
* Internet connection required
Troubleshooting Guide
Need help setting up your Sonic Carrier? Access our troubleshooting guide at:
soniccarrier.com/support/troubleshooting
Support information
8
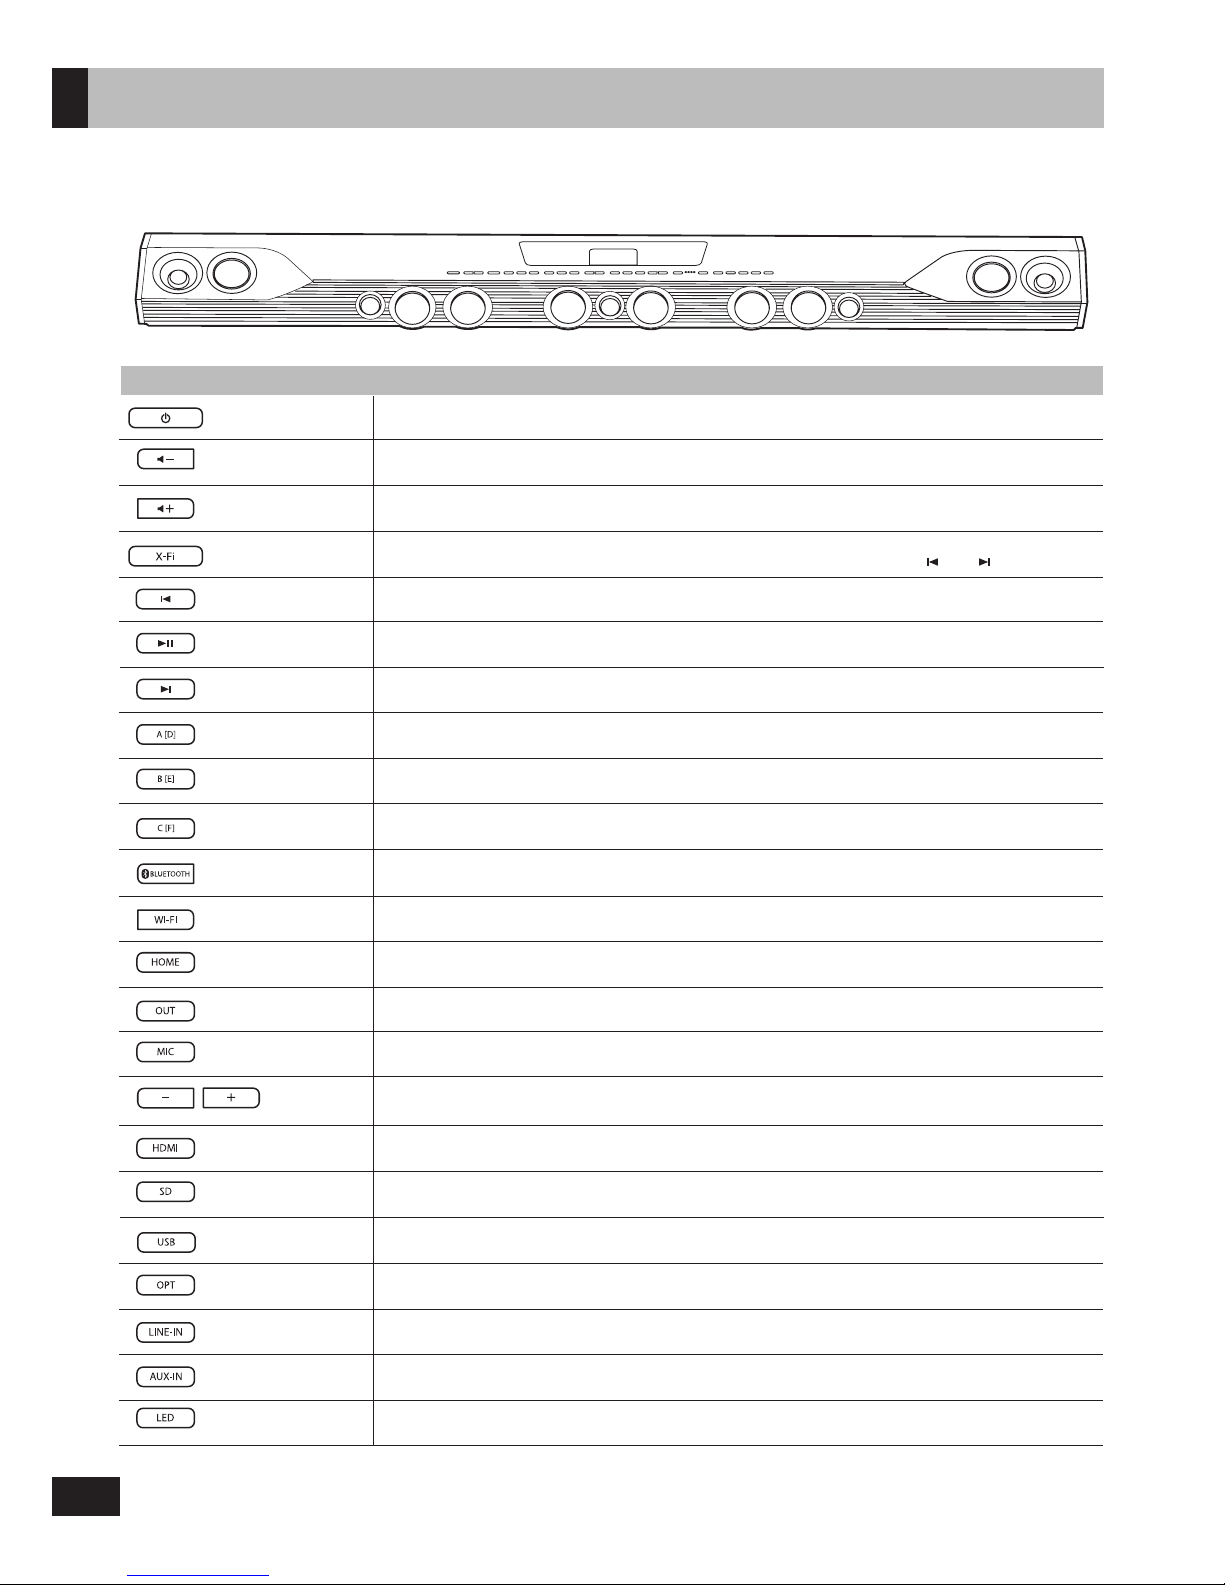
Overview
Top Panel
Button
Description
Volume -
Volume down.
On/off main power.
Power
Volume +
Volume up.
X-Fi
On/off SuperWide X-Fi processing. (Only affects stereo audio signals)
Press and hold to access the Sound Experience presets, then use and to select.
Previous Previous track. Operation under Android™ Video Engine depends on apps.
Play/Pause
A/D
B/E
C/F
Bluetooth
®
Wi-Fi
Home
Output
Mic
HDMI
SD/microSD
USB
Optical
Line-In
Aux-In
LED
Mic Control
Next
Play or pause playback. Operation under Android Video Engine depends on apps.
Reserved for future use.
Reserved for future use.
Reserved for future use.
Switch to Bluetooth mode.
Press and hold to enable Bluetooth pairing.
Switch to Wi-Fi mode.
Switch to Android OTT mode, and show home screen.
Switch between available outputs like Speaker, Line Output or Bluetooth headphone.*
Switch between mic adjustment modes: Volume, Key, Reverb, or Vocal Suppressor on/off.
Press and hold to turn on/off the microphone inputs.
Switch between available HDMI inputs. LED 1-4 will be lit to indicate input source.
LED 1-4 will be dimmed to indicate TV ARC mode.
Press to cycle through available SD/microSD cards. Press and hold to switch to SD direct
music playback mode.
Switch to the last accessed USB input, or cycle through available USB inputs.
Switch to the last accessed optical input, or cycle through available optical inputs.
Switch to Line input.
Switch to Aux input.
Cycle LED patterns on subwoofer. Press and hold to enter subwoofer pairing mode.
Adjust the volume, key, reverb, or turn on/off vocal suppressor for both microphones,
depending on the mic adjustment mode.
Next track. Operation under Android Video Engine depends on apps.
* via firmware update

9
Front Panel
Connector Description
¼” Microphone inputs (supports cardioid type dynamic microphone)
Auxilary input (3.5mm 4-pole)
SD Card Slot (supports up to 256GB. FAT32/NTFS file systems only)
microSD Card Slot (supports up to 256GB. FAT32/NTFS file systems only)
USB host (external hard disk, flash drive, keyboard/trackpad dongle)
USB power (5V 2A to power devices such as TV sticks. No data transfer.)
HDMI 2.0a input
Overview
CAUTION:
The front panel connectors are concealed by a magnetically latched flap that is hinged at the bottom. Avoid applying
excessive force to the flap. Close the flap when access to the ports are not required, or when the unit needs to be moved.
When tilting the main unit forward to facilitate cable connection, remove all cables and USB devices first and ensure the
front panel flap is closed to avoid damage to the connectors and the flap hinge.

10
Rear Panel
Overview
HDMI 2.0a inputs
RCA input
RCA output (to existing amplifier)
Subwoofer out
IR transmitter
HDMI 2.0a output to TV with Audio Return Channel (ARC)
USB host (external hard disk, flash drive, keyboard/mouse dongle)
Service Port. No user accessible features.
Gigabit Ethernet (to a wireless router/modem for high speed Internet)
Optical inputs (compatible with up to 24-bit/96kHz stereo PCM signals)
Power socket (fuse ratings T4AH 250V AC IN 100-240V)
Connector Description
Grounding post (for optional ground connection in the event of noise/interference
on the Mic and Analog connections)
Grounding post

11
Button
Description
On/off main power.
Cycle through LED presets on all connected
subwoofers.
Switch to Bluetooth. Press and hold to enable
Bluetooth pairing.
Bass boost.
Switch between mic adjustment modes: Volume,
Key, Reverb, or Vocal Suppressor on/off.
Press and hold to turn on/off the microphone inputs.
Adjusts levels for mic volume, key, reverb, or vocal
suppressor on/off.
On/off mouse mode.
Display Android Video Engine home screen.
Display any info in the Android Video Engine.
Reserved for future use.
Stop playback.
Reserved for future use.
Shuffle/repeat playback.
Navigate and select in the Android Video Engine.
Return to previous Android Video Engine menu display.
Android Video Engine menu button
Increase/decrease volume.
Mute/unmute audio.
On/off SuperWide X-Fi processing.
(Only affects stereo audio signals)
Press and hold to access the Sound Experience
presets, then use and to select.
Reserved for future use.
Switch to Wi-Fi audio.
Switch to Aux input.
Switch to the last accessed HDMI source, or cycle
through available HDMI sources (including TV ARC).
Cycle through available SD/microSD cards. Press and
hold to switch to SD direct music playback mode.
Switch to the last accessed USB input, or cycle
through available USB inputs.
Switch to the last accessed optical input, or cycle
through available optical inputs.
Output sound to main unit.
Mute line out and Bluetooth headphones out.*
Output sound to line out.
Mute main unit and Bluetooth headphones out.*
Previous track. Operation under Android Video
Engine depends on apps.
Play or pause playback.
Next track. Operation under Android Video Engine
depends on apps.
Output sound to connected Bluetooth headphones.
Mute main unit and line out.*
Switch to Line input.
Power
LED
Bluetooth
Bass+
Mic
Key/Reverb -/+
Mouse
Home
Info
Like
Stop
QuickPlay A-F
Shuffle
Cursor & OK
Return
Menu
Volume +/-
Mute
X-Fi
Channel +/-
Wi-Fi
Aux-In
HDMI
SD/microSD
USB
Optical
Speaker
Line-Out
Previous
Play/Pause
Next
Bluetooth
Heaphones Out
Line-In
3
4
1
2
7
8
6
5
10
9
1
2
3
4
5
6
7
8
9
10
11
12
13
14
15
16
17
18
19
20
21
22
23
24
25
26
27
28
29
30
31
32
33
11
12
15
16
16
14
13
17
18
19
20
21
22
23
24
26
25
33
27
28
30
29
32
31
Some buttons on the remote control
perform the same function as the main
unit buttons.
* via firmware update
Remote Control
Overview

12
1. Connect the power cords to the main unit and subwoofer. The sockets are located at the back of the units as
shown below.
2. Connect the power cords to the mains socket.
For more information about the power supply and power consumption, refer to the respective product label.
(Main Unit : bottom panel, Subwoofer : rear panel)
Main Unit
Subwoofer
Connecting Electrical Power
1. Slide the battery cover in the direction of the arrow until it is completely removed.
2. Insert two AAA/LR03 batteries (1.5V) in the correct +/- polarity.
3. Slide the battery cover back into position.
AAA/LR03 batteries
(included)
(1)
(2)
(3)
Insert Remote Control Batteries

13
Setting Up the Subwoofer
The Sonic Carrier subwoofer can be connected to the main unit via cable or wirelessly.
If your installation permits the use of a wired connection, this option will provide the best possible sound, reliability as
well as freedom from wireless interference.
To setup the subwoofer with cable or wirelessly, follow the steps below.
1. Place the main unit and subwoofer within 3m (10ft) for the setup process.
2. Connect the link cable (bundled with the subwoofer) to the main unit and the subwoofer.
If you wish to use a wired connection, no further action is required.
3. Ensure mains power is connected and switched on for both main unit and subwoofer.
4. Power on the main unit. The boot up process may take around a minute.
Link cable (included)
5. Press and hold LED button until the main display shows “Waiting for subwoofer connection”.
Upon successful setup, “Subwoofer Connected” will be displayed. The link cable can then be removed.

14
Connecting Sonic Carrier to your TV
Connect the provided HDMI cable as shown below.
If the Sonic Carrier is placed on a console in front of the TV, and it is
blocking the IR remote control sensor of the TV, install the bundled
IR transmitter.
The IR transmitter should face the TV’s IR sensor.
Connecting Your Sonic Carrier
IR Transmitter for TV
Note:
The Sonic Carrier has to be powered ON or in Standby mode for the
IR transmitter to work.
HDMI-IN (ARC)
HDMI cable (included)
1. The Sonic Carrier supports HDMI audio return channel (ARC). This allows the Sonic Carrier to play back audio from
the TV, or audio from sources connected to the TV. For the best audio quality, connect your source devices directly to
the Sonic Carrier instead of your TV.
2. Connect the HDMI Out of the Sonic Carrier to the HDMI input of the TV marked with ARC. Typically, only one of the TV
HDMI inputs will support ARC. If you can not find an input marked with ARC, please consult your TV user manual.
Note: If your TV does not support HDMI ARC, connect the Optical digital output of the TV to one of the
Optical Inputs of the Sonic Carrier, and configure the TV audio output to Optical Out.
3. Once the connection is made as described, your TV should automatically configure itself to output audio to the
Sonic Carrier.
4. For certain TVs, you need to manually configure the audio settings to enable ARC. Ensure the Sonic Carrier is
powered ON, and connected to the TV while the settings are being configured. These are typically located under
the Settings > Audio Settings. The settings should be selected as following
- TV audio output: HDMI ARC
- Digital audio format: PCM
- HDMI-CEC* for audio output: Enable
5. After the setup is complete, press the HDMI button on the main unit or remote control and select “TV ARC” to output
TV audio to the Sonic Carrier.**
* HDMI-CEC
Certain TV brands do not use standard names for the HDMI-CEC:
• AOC:E-link
• LG:SimpLink
• Mitsubishi:NetCommand
for HDMI
• Panasonic:HDAVIControl,
EZ-Sync, or VIERA Link
• Philips:EasyLink
• Pioneer:KuroLink
• RuncoInternational:
RuncoLink
• Samsung:Anynet+
• Sharp:AquosLink
• Sony:BRAVIASync
• Toshiba:CE-Linkor
Regza Link
** HDMI ARC auto switching
The Sonic Carrier can be set to automatically switch over
to TV ARC mode once an ARC request from the TV is
detected. To enable:
1. Ensure the Sonic Carrier is powered on and connected
to your TV.
2. Press HOME to display the Advanced Android Video
Engine home page.
3. Select Settings on the top right corner of the home
screen using the cursor and OK buttons on the
remote control.
4. Select HDMI.
5. Set Audio Return Channel (ARC) to On.
This option is dependent on the specific HDMI-CEC
implementation of your TV. If you encounter issues when
auto switching is enabled, disable this setting.
Having difficulty with your setup?
Visit soniccarrier.com/support/troubleshooting for the
latest tips and tricks on setting your Sonic Carrier.

15
Connecting External Devices
The Sonic Carrier features a wide range of connectivity options. Refer to the following sections to learn about the
connection possibilities, required cables and steps to connect.
1. HDMI
2. Optical
3. USB
Connect USB flash drives, external hard disk drives, wireless
keyboard or mouse dongles to the front and rear USB ports.
A wireless keyboard with built-in trackpad, such as
Microsoft® All-In-One Media Keyboard, is highly
recommended for ease of navigating the Android interface.
The USB port labeled “POWER” does not support data
transfer, but could be used to provide power to devices
such as TV sticks (maximum: 5V 2A).
Connecting Your Sonic Carrier
When a Dolby encoded input signal is detected, it is automatically
decoded and “Dolby ...” is displayed on the main display.
TOSLINK cable
Press HDMI to cycle through the available HDMI inputs.
HDMI cable
For the best possible audio quality, please connect all HDMI source devices directly to the Sonic Carrier, instead of the
TV (i.e. using HDMI ARC for audio input).
For Wi-Fi equipped dongles such as the Google Chromecast Ultra, we recommend connecting it to HDMI-IN 3 on the
back panel to allow more space around the device for the best Wi-Fi reception.
Two optical digital inputs capable of supporting 24-bit/96kHz PCM audio are available for connection to digital audio
source devices and to TV sets without compatible HDMI ARC support.
OR
OR

16
4. Bluetooth
1. Press
BLUETOOTH on the remote control to switch to Bluetooth mode.
2. Press and hold
BLUETOOTH until “Waiting for Bluetooth connection” is displayed.
3. Select Creative X-Fi Sonic Carrier from the list of discovered Bluetooth devices to pair and connect.
Connecting Your Sonic Carrier
A
B
C
Connect cardioid type dynamic microphones
using a ¼” stereo plug.
Press and hold MIC to turn on/off the
microphone inputs. (Default: off)
A
5. Microphone
Creative
X-Fi
Sonic
Carrier
Waiting for Bluetooth connection....
To set the correct microphone level, gradually increase the mic volume from the lowest setting, while the accompanying
music is played at the desired level.
If a ringing sound (microphone feedback) occurs, do not increase the mic volume any further; this is the highest
possible microphone signal level achievable at your position in the listening environment.
Microphone feedback is produced when the signal from the microphone is amplified, played back through the
speakers and picked up again by the microphone.
To reduce acoustic feedback:
1. Change the position and distance of the microphone relative to the Sonic Carrier. The microphone should be
pointed away from the Sonic Carrier at all times, and keeping the microphone further from the Sonic Carrier will
help prevent feedback.
2. Sing or speak close to the microphone.
3. When not in use, set the microphones down, pointed away from the Sonic Carrier. Then, press and hold MIC to
turn off the microphone inputs. This will minimize any added noise from the mic inputs for the best possible
audio quality.
4. Use a different microphone. Different microphones have different directional and noise/vibration isolation
characteristics, providing different results.
Use high-quality microphones (e.g. Shure SM58) with high quality, shielded microphone cables to ensure best results.

17
Connect any portable device easily using a 3.5mm 3-pole cable. This connector is located behind the front
panel flap for your convenience. (Optimized for 1Vrms Input levels)
6. Analog
c
7. SD/microSD Cards
B
Insert an SD or microSD card to playback media directly from
the Sonic Carrier.
Press SD on the remote control or main unit to select which
SD/microSD card to use.
Press and hold SD to switch to SD direct music playback mode.
SD
Micro
SD
Wi-Fi Setup
A pair of stereo Line In connectors are located on the back panel. (Optimized for 2Vrms input levels)
* Add the Sonic Carrier to the same Wi-Fi network as your phone, tablet or PC.
Connecting to your Wi-Fi Network
1. Ensure the Sonic Carrier is powered on and connected to your TV.
2. Press HOME to display the Android video engine home screen.
3. Select on the top right corner of the home screen using the cursor and OK buttons on the
remote control.
4. Select .
5. Select the desired Wi-Fi network* to connect to, enter the password and click Connect.
If the network connection is unsuccessful, please ensure that WPA/WPA2 encryption is used. This could be checked
and configured on your router.
3.5mm 4-pole cable (not included)
RCA cable (not included)
Wi-Fi Audio and Video
Once connected, select Wi-Fi to enjoy high quality audio over DLNA or from your mobile device using the X-Fi Cast app,
or press HOME to acccess the Android Video Engine.
A Wi-Fi connection is required to support the Sonic Carrier app and to perform auto room calibration.
Please perform the Wi-Fi setup even if you intent to use Ethernet as the primary network connection

18
Download Sonic Carrier Apps
Sonic Carrier
Gain full control over your Sonic Carrier and enhance your listening experience with
professionally tuned presets and customizable sound controls. The Sonic Carrier App also
features intelligent room calibration that automatically adjust the Sonic Carrier for the best
possible sound.
X-Fi Cast
Stream music losslessly from your mobile device’s music library to the Sonic Carrier over Wi-Fi.
Search for “Sonic Carrier” and “X-Fi Cast” on the App Store or Google Play.
Note:
For apps to work, your mobile device must be connected to the same Wi-Fi network as your Sonic Carrier.
Mobile Apps
Before performing room calibration, please ensure that:
• ThesubwooferhasbeenconnectedtotheSonicCarriermainunit,andthattheyarebothpoweredon.
• BoththeSonicCarriermainunitandsubwooferaresetupatthedesiredlocation.
• TheWi-FisetuphasbeencompletedandtheSonicCarrierisconnectedtothesameWi-Finetwork
as your mobile device.
Once the above has been checked, do the following:
1. Press HOME to view the Advanced Android Video Engine.
2. If there is a red dot on the icon of the home page
An updated Sonic Carrier Home firmware is available. Select and the subsequent menu items
demarcated with red dots to download and install the latest Sonic Carrier Home firmware.
3. Ensure the X-Fi feature is disabled.
4. Press the Wi-Fi button on the remote control to switch to Wi-Fi mode. Ensure the Sonic Carrier is connected to the
same Wi-Fi network as your mobile device.
5. Launch the Sonic Carrier mobile app.
Performing Room Calibration
Select the menu on the
top left corner
It may take a moment for the app to discover
the Sonic Carrier on your network, especially if
you’re launching the app for the first time.
After the Sonic Carrier has been found,
the blue bar at the bottom will disappear and
the screen should look like the next image.
Select Connect Speaker

19
Your Sonic Carrier should be shown
on this page. Select it and it will
appear under “My Speakers”.
Next, select for iOS, or
for Android.
Select Calibrate
When the calibration is
complete, a list of the calibrated
volume levels will be shown.
Follow on the onscreen
instructions to complete the
calibration.
While the calibrated levels are objectively correct for your setup, you might prefer a different balance from the
calibrated results.
Example:
To increase the amount of surround sound, you may want to increase the side left and side right levels. Often, small
0.5dB adjustments will yield significantly different results, so increase or decrease the levels in small steps. The following
table gives a few examples of which parameters to adjust, and how to adjust in order to obtain the sound you want.
Desired sound What to adjust Increase/Decrease?
Clearer, more prominent dialog Center Increase
Less forward dialog Center Decrease
More surround sound Side Left and Side Right Increase
More height information Top Left and Top Right Increase
(for Dolby Atmos encoded content)
More bass Subwoofer Increase
Less bass Subwoofer Decrease
OR

20
Main Unit
DIMENSIONS AND WEIGHT
Product name : CREATIVE X-FI SONIC CARRIER
Model number : MF8235
Input rating : 100-240V 50/60Hz 120W
Operating temperature range : 0°C to 45°C
Dimensions (L x W x H) : 1521 x 151 x 96mm (59.9” x 5.9” x 3.8”)
Weight : 16kg (35.3 lbs)
ELECTRONIC AND ACOUSTIC SPECIFICATIONS
• Amplifertype:ClassD
• Systempower:1000WRMS,2000Wpeak
• Mainunit:400WRMS,800Wpeak
• Subwoofer:600WRMS,1200Wpeak
ANDROID VIDEO PLAYBACK ENGINE
• Quad-core64-bithighperformanceARMCortexA-53with
NEON processor 2GHz
• MaliT720GPUwithOPENGLES3.1support
• 2GBRAM,16GBbuilt-inashstorage
• Supports4K60fpsvideoplayback
• SupportsH.265/HEVCcodec
DRIVERS AND ACOUSTICS
• Five1”coatedaluminumalloytweeters,capableof40kHzhigh
frequency reproduction
• Eight2.75”aluminum-magnesiumalloymidbassdriverswith
individually sealed enclosures
• Two2.25”aluminum-magnesiumalloyfull-rangedriversfor
surround channel reproduction with individually sealed enclosures
CONNECTIVITY
• Bluetooth
- Bluetooth codec : aptX®, aptX Low Latency, AAC, SBC
- Bluetooth profiles and features : A2DP receiver for audio playback
on Sonic Carrier, A2DP transmission for audio playback on
Bluetooth headphones, AVRCP (Bluetooth remote control)
- Bluetooth operating range : Up to 10m (33ft), measured in
open space
- Bluetooth (Audio Playback)
° Bluetooth version : 4.1
° Operating Frequency : 2402-2480MHz
° RF Output Power : <4dBm
- Bluetooth (Android Video Engine)
° Bluetooth version : 4.0+EDR
° Operating Frequency : 2402-2480MHz
° RF Output Power : <4dBm
• Wi-Fi2.4GHz
- 802.11b/g/n
- Security type : WPA2-PSK (AES)
- Operating Frequency : 2412-2464MHz
- RF Output Power : <20dBm
• Wi-Fi5GHz
- 802.11a/n/ac
- Security type: WPA2-PSK (AES)
- Operating Frequency : 5180-5825MHz
- RF Output Power: <18dBm
• Wirelessaudiolink
- Supports up to 4 wireless subwoofers
- Operating Frequency: 2412-2464MHz
- RF Output Power: <17dBm
- Operating Frequency: 5736-5814MHz
- RF Output Power: <10dBm
- Operating range: Up to 10m (33ft), measured in open space
Specifications
Keep this document for future reference.
• Linelevelinput:Stereo2VrmsanalogRCAconnectors
• Linelevelouput:Stereo2VrmsanalogRCAconnectors
• Auxiliaryinput:Stereo1Vrmsanalog3.5mmconnector
• Microphoneinputs:2x¼”microphoneconnectorsupporting
most dynamic microphones
• USBhost:2xUSB2.0typeAconnectorforUSBashdrives,
HDDs, keyboard, mouse
• USBpower:USBtypeAconnectorforprovidingpowertoperipheral
devices (Rated 5V 2A)
• SDcardslots:1xSDcardslot,3xmicroSDcardslots
(FAT 32 and NTFS)
• HDMIinputs:4xHDMI2.0awithHDCP2.2
• HDMIoutput:1xHDMI2.0awithHDCP2.2andARC
• Opticalinputs:2xTOSLINK supporting up to 24Bit/96Khz
• Ethernet:1xGigabitEthernet
• Decodersupport:DolbyAtmos,DolbyTrueHD,DolbyDigitalPlus,
DTS:X upgradeable via firmware update
Subwoofer
DIMENSIONS AND WEIGHT
Product name : CREATIVE X-FI SONIC CARRIER SUBWOOFER
Model Number : MF8240
Output Power : 600W
Input rating : 100 - 240V 50/60Hz 120W
Operating temperature range : 0°C to 45°C
Dimensions (L x W x H) : 531 x 306 x 582mm (20.9” x 12.0” x 22.9”)
Weight : 27kg (59.5 lbs)
CONNECTIVITY
Wireless audio link
- Operating Frequency: 2412-2464MHz
- RF Output Power: <17dBm
- Operating Frequency: 5736-5814MHz
- RF Output Power: <10dBm
Wireless performance is dependent on your device’s Bluetooth or Wi-Fi
wireless technology. Refer to your device manufacturer’s manual.
Creative will not be liable for any lost of data or leakages resulting
from the use of these devices.
Walls and structures may also affect range of device.
Specifications and features are subject to change without notice.
Product Registration
Registering your product ensures you receive the most appropriate
service and product support available. You can register your product
during installation or at www.creative.com/register. Please note that
your warranty rights are not dependent on registration.
Other Information
Supplementary documentation for this product includes a DoC
and safety and regulatory information. These documents can be
downloaded on the www.creative.com/support site.

21
Warranty
Creative X-Fi Sonic Carrier - Limited Hardware Warranty
Creative Labs Pte Ltd and its affiliates (“Creative”) warrants that the retail purchased Creative-branded hardware product herein (“Product”) is free of material defects
in materials and workmanship (“Defect(s)”) that result in Product failure during normal consumer usage for the Warranty Period, according to the following terms and
conditions:
1. This limited hardware warranty extends only to the original end-user purchaser and holder of this warranty (“You” or “Your”) and is not transferable or assignable to
any subsequent purchaser.
2. You must provide proof of original purchase of the Product by a dated itemized receipt to be eligible for this limited warranty.
3. The limited warranty is ONLY applicable in the country or territory where the Product was purchased from an authorized retailer/reseller and excludes any product that
has not been purchased as new or is obtained as a result of the purchase of a non-Creative product.
4. If a Defect arises and a valid claim is received during the Warranty Period (as provided below), Creative will at its sole option, service the Product at no charge using new
or refurbished replacement parts at our sole discretion. Please note that:
a. The limited warranty for the Product is for twenty-four (24) months (excluding all wear and tear), subject to certain exceptions as stated in the EU Directive 1999/44/
EC**) from the date of delivery (“Warranty Period”). The Warranty Period will be extended by each whole day that the Product is out of Your possession for repair under
this warranty.
b. Creative will cover the labor charges incurred by Creative in repairing or replacing the defective parts during the Warranty Period from the date of your purchase.
c. You will not have to pay for any such replacement parts.
d. Creative also warrants that the repaired or replaced parts will be free from defects in material and workmanship for the remainder of the Warranty Period.
e. For the limited warranty of the Product’s Liquid Crystal Display, please refer to the Creative Support Web Page at www.creative.com/support.
5. This warranty gives You specific legal rights. You may also have other rights, which vary from state to state and country to country. The terms of this warranty do
not exclude such rights or limit them. Your statutory rights are unaffected. Some states and countries do not allow (i) exclusions of, or limitations on, certain liabilities
or warranties, including but not limited to how long a warranty lasts, the exclusion or limitation of incidental or consequential damages, or the exclusion of liability for
injury (including death) caused by negligence, (ii) the inclusions of certain asymmetrical terms in warranties, or (iii) the expiration of all legal claims after a fixed time,
so certain of the above limitations, exclusions or asymmetrical terms may not apply to You depending on the relevant jurisdiction. If adjudged invalid, such term(s) would
be severable without affecting the validity of the other terms.
6. Creative does not warrant uninterrupted or error-free operation of the Product. Creative is not responsible for damage arising from failure to follow all or any instructions
relating to the Product’s use. Creative is not under any obligation to support the Product for all operating environments, including but not limited to, interoperability
with both current and future versions of software or hardware.
7. For Products that are capable of storing data: Creative is not responsible or liable for any data stored on the Product that is lost, deleted or becomes otherwise inaccessible.
All data may be deleted from the Product during servicing. You should remove or make a backup copy of any data stored on the Product before sending the Product
to Creative.
8. If a problem develops during the Warranty Period, please refer to www.creative.com/support or contact Your retailer/reseller. Please note that: (i) You must provide proof
of original purchase of the Product by a dated itemized receipt; (ii) You shall bear the cost of shipping (or otherwise transporting) the Product to Creative. Creative will bear
the cost of shipping (or otherwise transporting) the Product back to You after completing the warranty service; (iii) Before You send the Product to Creative, You must be
issued a Return Merchandise Authorisation (“RMA”) number from www.creative.com/support. Clearly write the RMA number on the outside of the package containing the
Product being sent to Creative. Creative will not accept a return that does not have a RMA number on the outer packaging; and (iv) You can only return the defective
Product(s) not excluded under Section 9 below. Creative is not responsible for other products or accessories returned with the defective Product(s). Creative reserves the
right to change the method by which Creative may provide warranty service to you, and your Product’s eligibility to receive a particular method of service. Service will be
limited to the options available in the country where service is requested. Service options, parts availability and response times may vary according to country. For further
details on Creative Warranty terms, Product returns and repair procedure, Creative customer support services and contact information, please refer to the support section
of Creative’s web site at www.creative.com/support.
9. The limited warranty does not apply to:
a. Consumable par ts, such as batteries or protective coatings that, due to their nature, tend to diminish over time, unless failure has occurred due to a defect in materials
or workmanship;
b. Damage caused by normal wear and tear, abnormal use or conditions, misuse, neglect, abuse, accident, improper handling or storage, defects or damages resulting
from service, testing, adjustment, installation, maintenance, alteration, including without limitation, software changes, or modification in any way by someone other
than Creative or its authorised service centres, improper use of any electrical source, undue physical or electrical stress, operator error, non-compliance with
instructions or other acts which are not the fault of Creative, including damage or loss during shipment or transit.
c. Damage from external causes such as floods, storms, fires, sand, dirt, earthquakes, an Act of God, exposure to sunlight, weather, moisture, heat, vibration or corrosive
environments, electrical surges, battery leakage, theft, or damage caused by the connection to other products not recommended for interconnection.
d. Damage or loss of data due to (i) interoperability with either or both current and future versions of operating systems or other current or future software and
hardware, (ii) a computer virus, worm, spyware, Trojan horse or memory content corruption, or (iii) malfunction or defect of the Product.
e. Counterfeit products/parts or any accompanying products/parts that are incompatible with the Product.
f. Any Product that: (i) has had its serial number altered, defaced or removed; (ii) shows evidence of tampering; (iii) mismatched board serial numbers; or (iv) has non conforming or non-Creative housing or casing.
g. Any accessories including but not limited to disposable alkaline batteries, removable fuses, screen protectors, plugs and pouches.
h. Any defect occurring after the expiration of the Warranty Period or where Creative was not advised in writing of an alleged defect or malfunction within seven (7) days
after the expiration of the Warranty Period.
10. Any Product determined by Creative to be warranty-expired, warranty-void or not in need of repair will be subject to a minimum non-refundable diagnostic and handling
fee. In the event that You fail to make the payment, Creative may, at its sole discretion, dispose of the Product without notice and liability to You.
11. Subject to any non-excludable limit under applicable law, the maximum liability under this limited warranty is the original price paid for the Product (excluding any shipping
and additional charges). Creative and its affiliated companies will not be liable for any other losses or damage unless liability is non-excludable under applicable law. The
remedy stated is Your exclusive remedy for breach of warranty. Any action or lawsuit for breach of this limited warranty must be commenced within eighteen (18) months
following the original purchase of the Product or within the limitation period under applicable law.
12. INSOFAR AS PERMITTED BY LAW, THE PRODUCT AND THE SERVICED PRODUCT IS PROVIDED “AS IS”. TO THE EXTENT PERMITTED BY APPLICABLE LAW, CREATIVE AND ITS
AFFILIATED COMPANIES HEREBY DISCLAIM THE APPLICABILITY OF ANY IMPLIED WARRANTY OF MERCHANTABILITY, FITNESS FOR A PARTICULAR PURPOSE OR USE FOR
THE PRODUCT AND/OR THE SERVICED PRODUCT. CREATIVE AND ITS AFFILIATED COMPANIES WILL NOT BE LIABLE FOR ANY INDIRECT, INCIDENTAL, SPECIAL, PUNITIVE OR
CONSEQUENTIAL DAMAGES, INCLUDING BUT NOT LIMITED TO ANY LOST PROFITS, SAVINGS, DATA, OR LOSS OF USE, ANY THIRD PARTY CLAIMS, AND ANY INJURY TO PROPERTY
OR BODILY INJURY (INCLUDING DEATH) TO ANY PERSON, ARISING FROM OR RELATING TO THE USE OF THE PRODUCT OR ARISING FROM BREACH OF THE WARRANTY, BREACH
OF CONTRACT, NEGLIGENCE, TORT, OR STRICT LIABILITY, EVEN IF CREATIVE OR ANY OF ITS AFFILIATED COMPANIES HAS BEEN ADVISED OF THE POSSIBILITY OF SUCH DAMAGES.
13. For Australia only: Our goods come with guarantees that cannot be excluded under the Australian Consumer Law. You are entitled to a replacement or refund for a major
failure and for compensation for any other reasonably foreseeable loss or damage. You are also entitled to have the goods repaired or replaced if the goods fail to be of
acceptable quality and the failure does not amount to a major failure. Goods presented for repair may be replaced by refurbished goods of the same type rather than being
repaired. Refurbished parts may be used to repair the goods. (Creative Technology Ltd, 31 International Business Park, #03-01 Creative Resource, Singapore 609921.
Telephone: +65 6895 4433 (standard international call charges apply.))
14. This is the entire warranty and supersedes all prior and contemporaneous agreements or understandings, oral or written, relating to warranty coverage for the Product,
and no representation, promise or condition not contained herein will modify these terms.
15. Update(s) of this Limited Hardware Warranty may be posted at www.creative.com/support. An Update will replace any earlier version upon posting on the web site. You
are advised to check for Update(s).
** A seller in the European Union (EU) may be entitled to refuse to repair or replace the goods if it is (i) impossible or (ii) disproportionate (eg. where the costs are
unreasonably high for the seller) to do so, taking into account the value the goods would have had (if there were no lack of conformity), the significance of the lack
of conformity and where an alternative remedy would be completed without significant inconvenience to the consumer. In such cases, the consumer may ask for an
appropriate reduction of the price or have the contract rescinded. The consumer is not entitled to have the contract rescinded if the lack of conformity (or defect or
fault) is minor. In which case, the seller is entitled to turn down a request for rescission of the contract in such a situation. For further details, please refer to Articles 3(3),
3(5) and 3(6) of the EU Directive 1999/44/EC.

22
Preparation Materials
* Screw and wall plugs are not supplied for mounting the unit.
Appendix - Wall Mounting the Main Unit
Concrete wall
Hollow & Drywall
M5 Screw
x8
Lock washer x8Plain washer
x8
Screwdriver Hammer Hand drill
Cavity anchor x8Lock washer x8Plain washer
x8
Screwdriver Hammer Hand drill
Cavity anchor
application
25 cm
89 cm
TV
Wall mount
brackets
1. Determine the mounting position of the Sonic Carrier main unit.
Ensure that it is properly centered relative to the TV and leveled horizontally.
WARNING!
Improper installation could lead to damage of the wall and equipment, and might lead to injury. The following information
does not constitute a complete set of wall mounting instruction, and are provided for use by qualified installers only.
Wall Mounting the Main Unit

23
Concrete Wall
Anchor Plug
Concrete Wall
Wall mount brackets
Lock Washer
Plain Washer
Cavity Anchor
Wall mount brackets
Lock Washer
Plain Washer
Hollow & Drywall
Recommended bolt
mounting positions
3. Drill according to the marked bolt locations.
4. Fasten the wall mount brackets using the appropriate
materials as shown above.
5. Place and center the Sonic Carrier main unit on the wall
mount brackets and attach the thumbscrews.
Wall Mounting the Main Unit
2. Note and mark out the recommended bolt locations.
Ensure that they do not intersect with buried pipes, conduits or cabling within the wall.
CAUTION:
Ensure that the wall is able to bear the weight of the Sonic
Carrier with adequate safety margins before proceeding.

© 2017 Creative Technology Ltd. All rights reserved. Creative, the Creative logo, X-Fi, the X-Fi logo, Sonic Carrier and SuperWide X-Fi are trademarks or registered trademarks of
Creative Technology Ltd in the United States and/or other countries. Dolby, Dolby Atmos, Dolby TrueHD, Dolby Digital Plus and the double-D symbol are registered trademarks of Dolby
Laboratories. Wi-Fi is a trademark of Wi-Fi Alliance. App Store is a trademark of Apple Inc. Android and Google Play are trademarks of Google Inc. The terms HDMI and HDMI HighDefinition Multimedia Interface, and the HDMI logo are trademarks or registered trademarks of HDMI Licensing LLC in the United States and other countries. DTS:X is a trademark of
DTS, Inc. The
Bluetooth
®
word mark and logos are registered trademarks owned by Bluetooth SIG, Inc. and any use of such marks by Creative Technology Ltd is under license. Other
trademarks and trade names are those of their respective owners. All specifications are subject to change without notice. Actual product may differ from slightly from images shown.
All images are for illustration purposes only. State of California Proposition 65 WARNING: This product may expose you to chemicals known to the State of California to cause cancer
and birth defects or other reproductive harm. Explanatory Note: To meet the requirements of Proposition 65, it is our responsibility to notify consumers in the State of California that
they may be exposed to chemicals that are known to cause cancer and/or reproductive toxicity. It does not mean that the product is in violation of any product-safety standards or
requirements. The exposure may be below the level of concern, or even zero. For additional information, visit www.P65Warnings.ca.gov.
PN 03MF823500000 RevB
soniccarrier.com
 Loading...