

Creative Sonic Carrier MF8235, Sonic Carrier MF8240 User Manual
Creative X-Fi Sonic Carrier (Model MF8235)
Creative X-Fi Sonic Carrier Subwoofer (Model MF8240)
USER MANUAL (Firmware Version 1.6 onwards)
THE AUDIO OF TOMORROW

Unpacking 3
Package Contents 5
Setup and Care Information 6
Support Information 7
Overview 8
Inserting Remote Control Batteries 12
Connecting Electrical Power 12
Setting Up the Subwoofer 13
Connecting Your Sonic Carrier 14
Wi-Fi Setup 17
Mobile Apps 18
Performing Room Calibration 18
Specifications 20
Warranty 21
Appendix - Wall Mounting the Main Unit 22
Contents
3
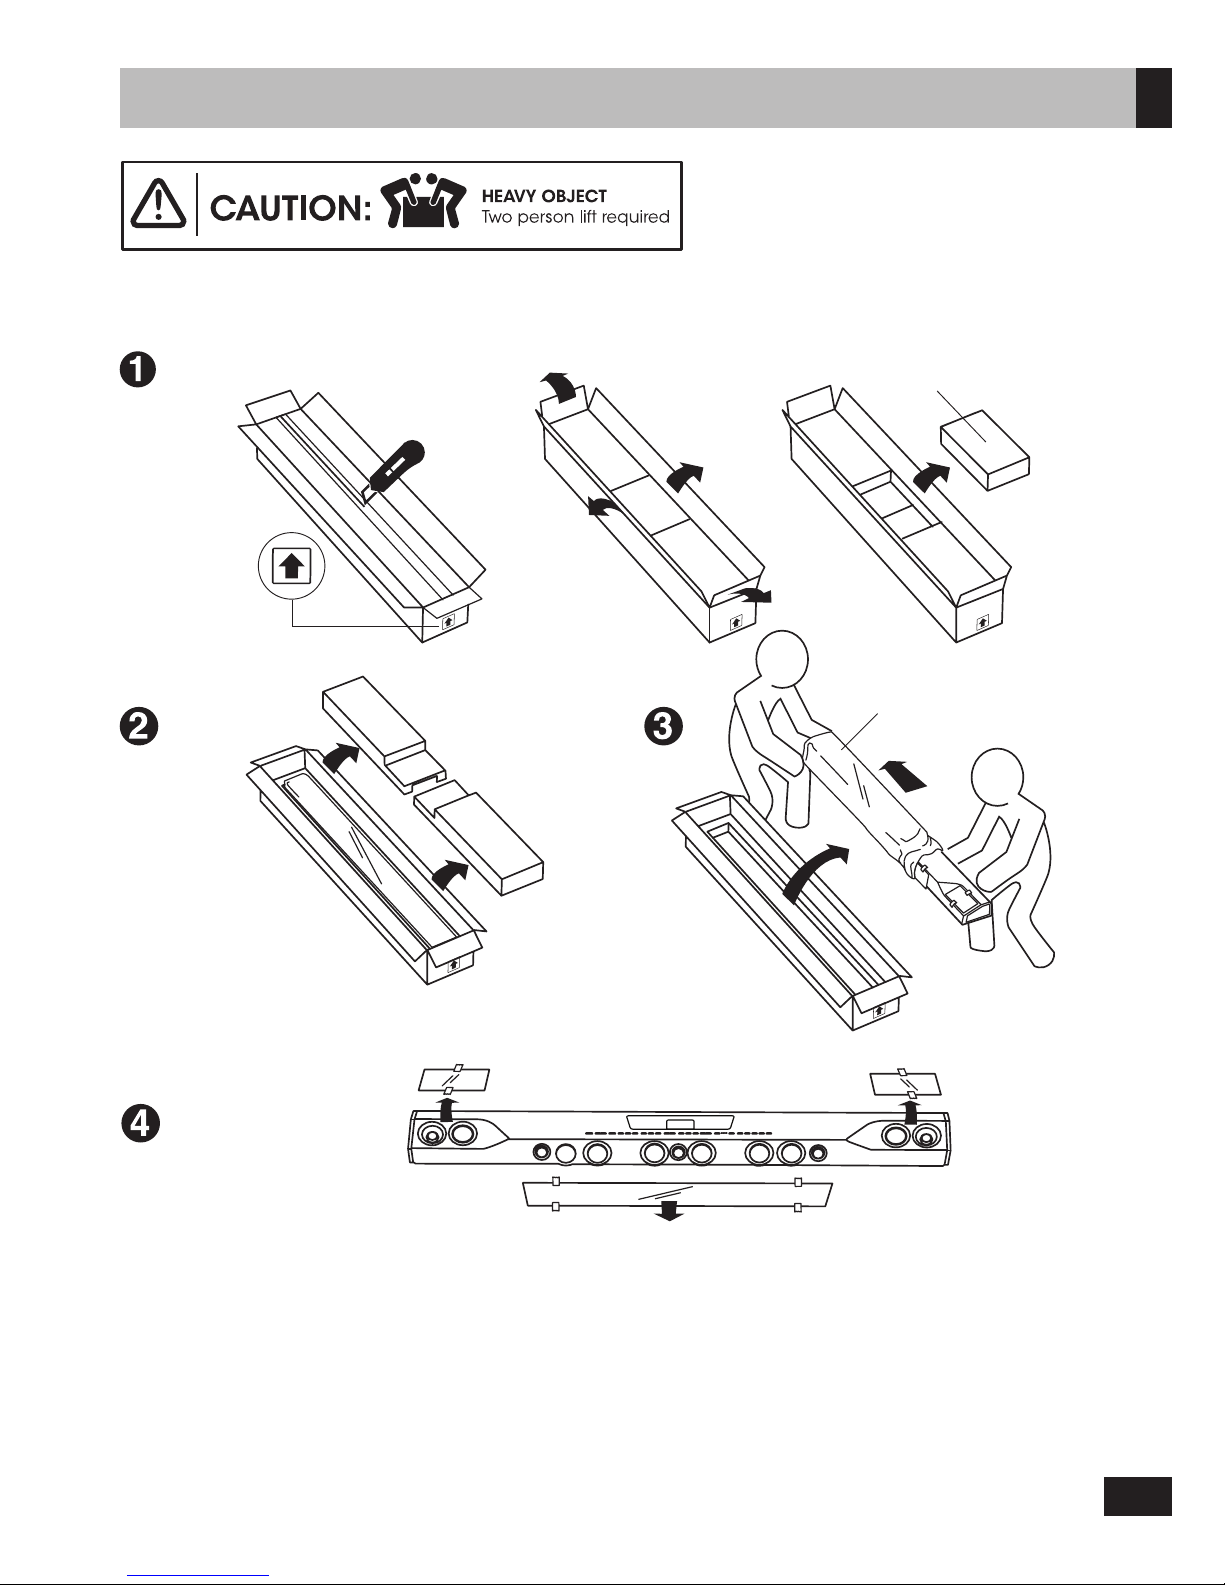
Unpacking
Note:
The Sonic Carrier main unit and subwoofer units are heavy and require 2 person for unpacking and setup.
While unpacking your Sonic Carrier main unit and subwoofer, inspect them thoroughly for possible shipping damage and
contact customer support immediately if you find any evidence of shipping damage.
Please keep the original shipping box and all packing material. This will ensure the main unit and subwoofer are protected for
future transport. In the unlikely event you have a problem and must return it for service, you must use the proper packing material.
Ship the equipment only in the original packing material, otherwise the unit is not insurable by carriers.
You may cut the taped seams on the bottom flaps to flatten the cardboard cartons for easier storage.
Ensure shipping box top faces upward
Remove protective covering
ONLY AFTER final installation
Main Unit
Remove
accessory box
Carefully remove
protective cover

4
Unpacking
Ensure shipping box top faces upward
Tip box over gently onto side,
then flip box gently over again
till top faces downward
Place subwoofer upright and
remove protective cover
Open protective cover to find
subwoofer feet
Push out, and remove transit
protection foam blocks
Subwoofer

5
Package Contents
Main Unit
User manual
Safety and regulatory leaflets
x8
IR remote control AAA battery x 2
for IR remote control
Wall mount brackets x 2
+ thumbscrews x 2
Driver décor rings x 8
Power cable IR transmitter
HDMI cable
(optional)
Subwoofer
Power cable
Link cable
Safety and regulatory leaflets

6
Setup Recommendation
The Sonic Carrier main unit is designed to be placed on top of a console in front of a TV or wall mounted. For optimum performance,
please observe the setup recommendation below. Wall mount information for Installers are included in the appendix at the end
of the manual.
1. In order to reproduce an immersive sound experience, the Sonic Carrier main unit radiates sound from the front, top and sides.
Ensuring that these sound waves are not obstructed by objects placed in their path would yield the best sound experience.
Do not place your Sonic Carrier within an enclosed fixture (cabinet, shelving unit, etc.), and make sure nothing is obstructing
the sides. The top firing speakers needs to have a clear line of sight to the ceiling as well.
2. Avoid positioning the Sonic Carrier so low that you are looking down at the top of the main unit, as this will disrupt the audio
and surround sound performance. If you are wall mounting the main unit, install the main unit with 15cm of space between
the top of the main unit and the bottom of the TV to avoid obscuring the top firing speaker.
3. For the best listening experience, the listening position should be at least 1.2 - 1.5m (4 - 5 ft) away from the Sonic Carrier.
4. The subwoofer unit produces non-directional sound and thus could be placed at your convenience around the room.
For optimum results, it would be best to locate the subwoofer equidistant to the main unit when measured from the listening
position, and to keep the subwoofer within 3m (10ft) of the main unit.
5. The subwoofer is equipped with a pair of ports that augments the sound output of the dual subwoofer drivers at the lowest
frequencies. Keep a distance of 10cm (4”) between the rear subwoofer enclosure and the adjacent wall to avoid turbulence
or air chuffing noises.
6. Room acoustics has a major influence on sound quality. The ear is particularly troubled by standing waves and echoes which
can be identified by moving around your room and loudly clapping your hands. Parallel surfaces such as opposite walls,
floor and ceiling encourage and sustain these problems. However, rearranging curtains, thick carpets, rugs, furniture and
bookcases can make a dramatic improvement as the sound waves are partially absorbed and diffused. As far as possible,
the Sonic Carrier main unit should be setup with equal distance from the left and right wall.
The Sonic Carrier uses side firing drivers to reproduce surround information; excessive or asymmetric amount of absorption
on the left and right sidewalls could adversely affect the surround sound performance. Or best results, keep the area of the left
and right walls between the main unit and the listening position free from absorptive material such as curtains and upholsteries.
7. The ceiling surface is an important contributor to how overhead (height) effects performs. The ideal ceiling height is between
2.3 - 4.3m (7.5 - 14ft). Ceiling should be constructed of an acoustically reflective material, such as wall board, plaster, hardwood,
or any rigid, non-sound absorbing material. Avoid treating ceilings with acoustic damping materials. For optimal playback, the
ceiling should be flat. A shallow vaulted ceiling will provide an acceptable performance. Chandeliers and can-style lighting
do not significantly interfere with or negatively impact the height effect.
Care for your Sonic Carrier Main Unit & Subwoofer
Cabinet
The Sonic Carrier main unit is finely crafted to last a lifetime from select metal alloys and engineering polymers; and should be
treated as you would fine furniture with similar materials and finishes.
The cabinet of the Sonic Carrier subwoofer is finely crafted from wood finished in vinyl laminate or high gloss lacquer; and should
be treated as you would furniture with similar materials and finishes.
Dust lightly with a soft lint-free cloth, avoiding abrasives and spirit based cleaners. If necessary, wipe carefully with a cloth slightly
dampened with glass cleaner to remove stubborn soil and marks.
Main Unit Grilles
The acoustically transparent fabric midrange driver grilles help protect the driver uits, and could be left in place during listening
with negligible acoustic effect. These could be taken off and cleaned using a lint brush. Should you choose to clean the grilles in
place, be careful not to press in and deform the drivers under the grille. Optional décor rings without fabric covers are provided
as a alternative to users who prefer the look of exposed midrange drivers. Take care to properly seat the décor rings on the rubber
isolation rings that holds the pre-installed fabric grilles in place.
Subwoofer Grilles
The acoustically transparent fabric grille protects the subwoofer driver units, and must not be removed. This could be carefully
cleaned using a lint brush, be careful not to press in and deform the drivers under the grille. The space between the grille and
the cabinet could be dusted very carefully with a soft dry brush. Avoid touching the woofer diaphragm.
Main Unit Drivers
Avoid touching the speaker diaphragms, particularly tweeters. The surface of the midrange driver could be dusted very carefully
with a soft dry brush.
Main Unit Display
The main unit display on the top panel can be tilted to your desired angle with minimum force. Do not force the display to swivel
further forward than 90 degrees vertical.
Front Panel
The front panel connectors are concealed by a magnetically latched flap that is hinged at the bottom. Avoid applying excessive
force to the flap; close the flap when access to the ports are not required, or when the unit needs to be moved. When tilting the
main unit forward to facilitate cable connection, remove all cables and USB devices first and ensure the front panel flap is closed
to avoid damage to the connectors and the flap hinge.
General Care Information
Avoid damp, direct sunlight and temperature extremes. The ventilation and ports should not be impeded by covering the
ventilation openings with items, such as newspapers, table-cloths, curtains, etc. No naked flame sources, such as lighted candles,
should be placed on the apparatus
Setup and Care Information

7
Updated User Manual
Download the latest version of the user manual here:
soniccarrier.com/support/manual
Instructional Videos
Learn about the Sonic Carrier by watching our instructional videos:
soniccarrier.com/support/videos
Firmware Updates
The Sonic Carrier automatically checks for the latest firmware update each time it is powered on.*
Follow the instructions on the main display to install the update. We strongly advise you to update to the
latest firmware.
* Internet connection required
Troubleshooting Guide
Need help setting up your Sonic Carrier? Access our troubleshooting guide at:
soniccarrier.com/support/troubleshooting
Support information
8
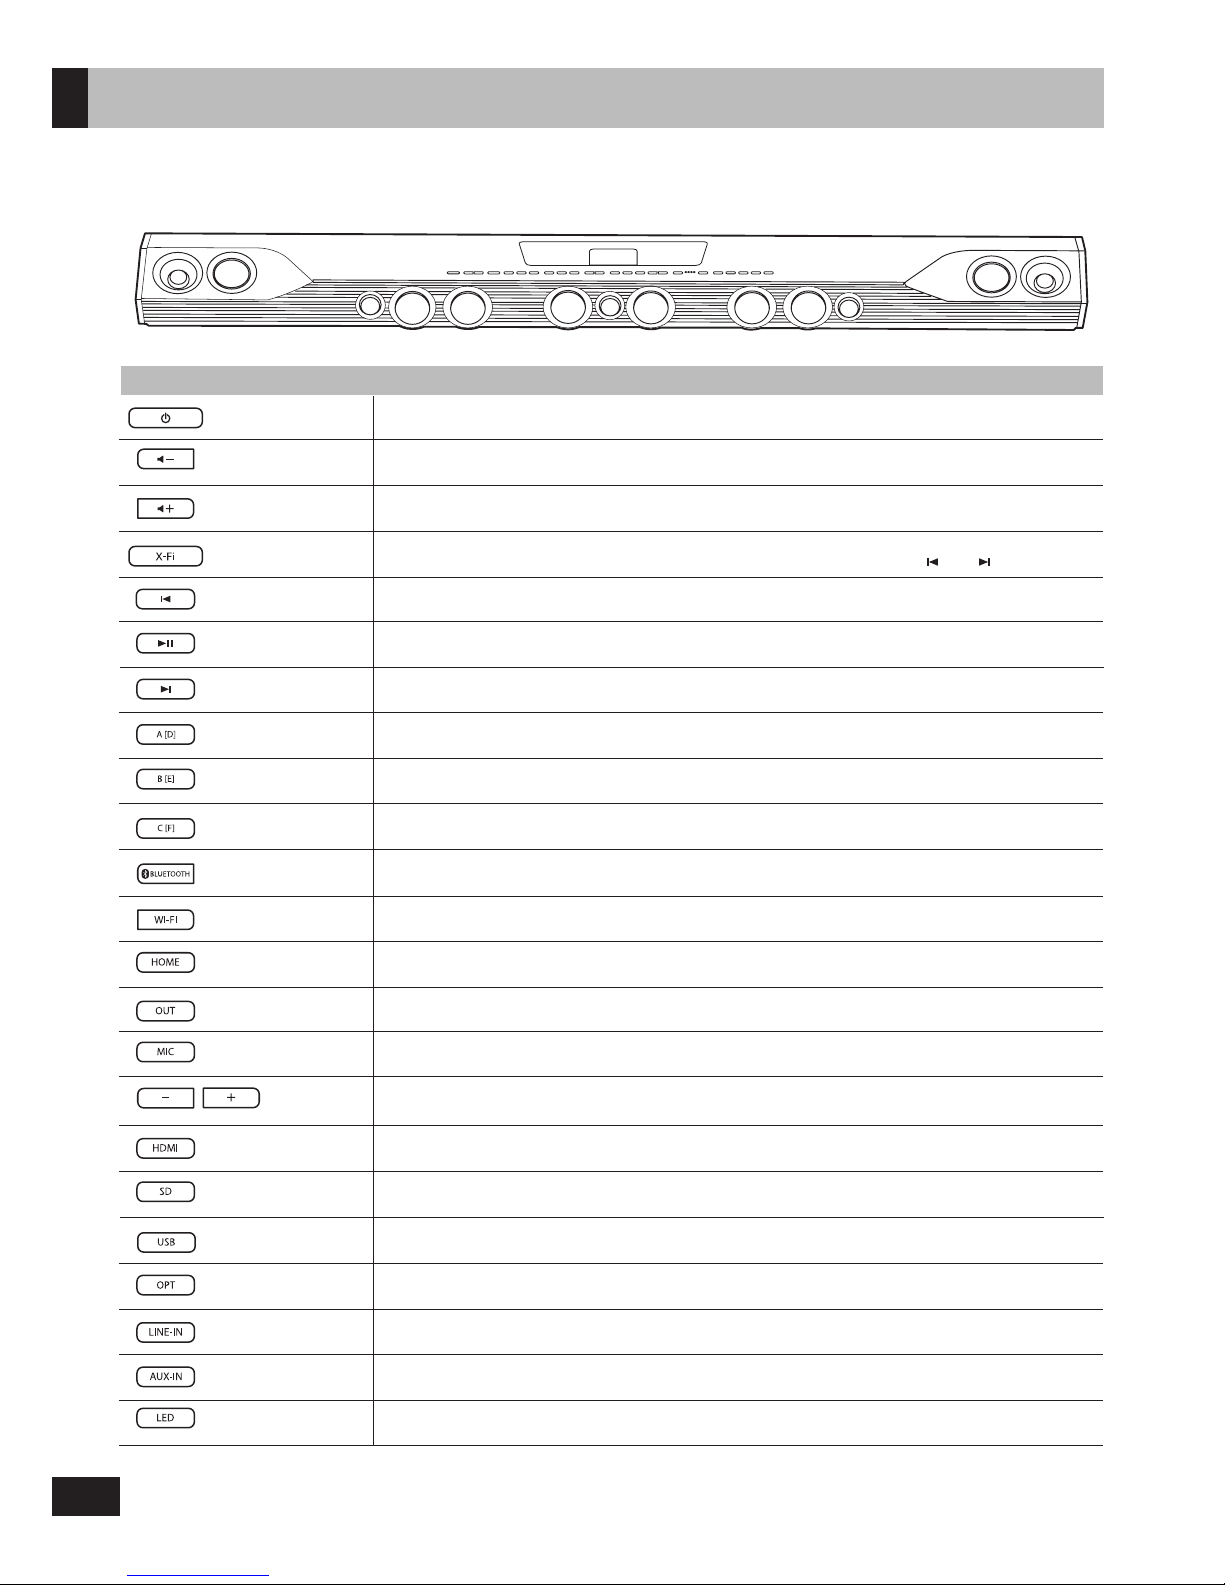
Overview
Top Panel
Button
Description
Volume -
Volume down.
On/off main power.
Power
Volume +
Volume up.
X-Fi
On/off SuperWide X-Fi processing. (Only affects stereo audio signals)
Press and hold to access the Sound Experience presets, then use and to select.
Previous Previous track. Operation under Android™ Video Engine depends on apps.
Play/Pause
A/D
B/E
C/F
Bluetooth
®
Wi-Fi
Home
Output
Mic
HDMI
SD/microSD
USB
Optical
Line-In
Aux-In
LED
Mic Control
Next
Play or pause playback. Operation under Android Video Engine depends on apps.
Reserved for future use.
Reserved for future use.
Reserved for future use.
Switch to Bluetooth mode.
Press and hold to enable Bluetooth pairing.
Switch to Wi-Fi mode.
Switch to Android OTT mode, and show home screen.
Switch between available outputs like Speaker, Line Output or Bluetooth headphone.*
Switch between mic adjustment modes: Volume, Key, Reverb, or Vocal Suppressor on/off.
Press and hold to turn on/off the microphone inputs.
Switch between available HDMI inputs. LED 1-4 will be lit to indicate input source.
LED 1-4 will be dimmed to indicate TV ARC mode.
Press to cycle through available SD/microSD cards. Press and hold to switch to SD direct
music playback mode.
Switch to the last accessed USB input, or cycle through available USB inputs.
Switch to the last accessed optical input, or cycle through available optical inputs.
Switch to Line input.
Switch to Aux input.
Cycle LED patterns on subwoofer. Press and hold to enter subwoofer pairing mode.
Adjust the volume, key, reverb, or turn on/off vocal suppressor for both microphones,
depending on the mic adjustment mode.
Next track. Operation under Android Video Engine depends on apps.
* via firmware update
 Loading...