

Creative SB1540 User Manual
User’s Guide
Model No: SB1540

Introduction
Congratulations on your purchase of Sound Blaster®R3/Audigy 6USB(Sound Blaster R3/A6U)! This
high performance USB sound module incorporates the advanced Sound Core3D™ audio processor -- the
next generation multi-core sound and voice processor for accelerating advanced audio and voice
processing technologies. It is designed to work perfectly with your computer and mobile devices,
making your voice sound simply amazing while giving you a truly immersive listening experience!
Package Checklist
Your Sound Blaster R3/A6U package comes with the following components.
l The Sound Blaster R3/A6U device
l 1.5m Micro-USB 2.0 Cable
l 1.2m 4-Pole Analog Cable
l 2.4m Dynamic Microphone
l 2.4m 3.5mm Clip Microphone
l Guitar clip for Clip Microphone
Note:
The dynamic microphone, clip microphone and guitar clip are available for selected countries only.
Minimum System Requirements
l Intel
®
Core™ 2 Duo or AMD®equivalent processor, 2.2 GHz or faster recommended
l Intel, AMD or 100% compatible motherboard
l Microsoft
®
Windows®8.1 32-bit or 64-bit, Windows 8 32-bit or 64-bit, Windows 7 32-bit or 64-bit,
Windows Vista®32-bit or 64-bit (Service Pack 1 or higher)
l Mac
®
OS X®10.6 or higher
l 1GB RAM
l >600 MB of free hard disk space
l CD-ROM or DVD-ROM drive for software installation
l Available USB 1.1 or USB 2.0 port
Registering Your Product
Registering your product ensures you receive the most appropriate service and product support
available. You can register your product during installation or at www.creative.com/register. Please
note that your warranty rights are not dependent on registration.
More Help
For the latest news and products for the Sound Blaster, please visit www.soundblaster.com. The site
also includes information on making purchases, technical help and the latest software updates.
Introduction - 1 -

Using Creative Software AutoUpdate
Locating, downloading and installing updates for your Creative products is now simpler and faster with
the web-based Creative Software AutoUpdate system.
When you connect to Creative Software AutoUpdate via the Internet, the website will analyze your
computer system to determine your operating system, language and which Creative products are
connected to your system.
When this analysis is completed, you will then be given a list of only the most relevant software updates
for your connected products. The files can then be retrieved and installed.
To learn more about the Creative Software AutoUpdate, please visit www.soundblaster.com/support.
Note:
First-time users of Creative Software AutoUpdate may be prompted to authorize the download of a
browser component required for system analysis. Check to ensure that this content is signed by
Creative Labs, Inc., then click the Yes button.
Please ensure that all your Creative products are connected and installed on the same computer
running Creative Software AutoUpdate.
Introduction - 2 -
About Your Hardware
Refer to the Quick Start leaflet for instructions on setting up your audio device. To learn more about
your product, refer to the section below.
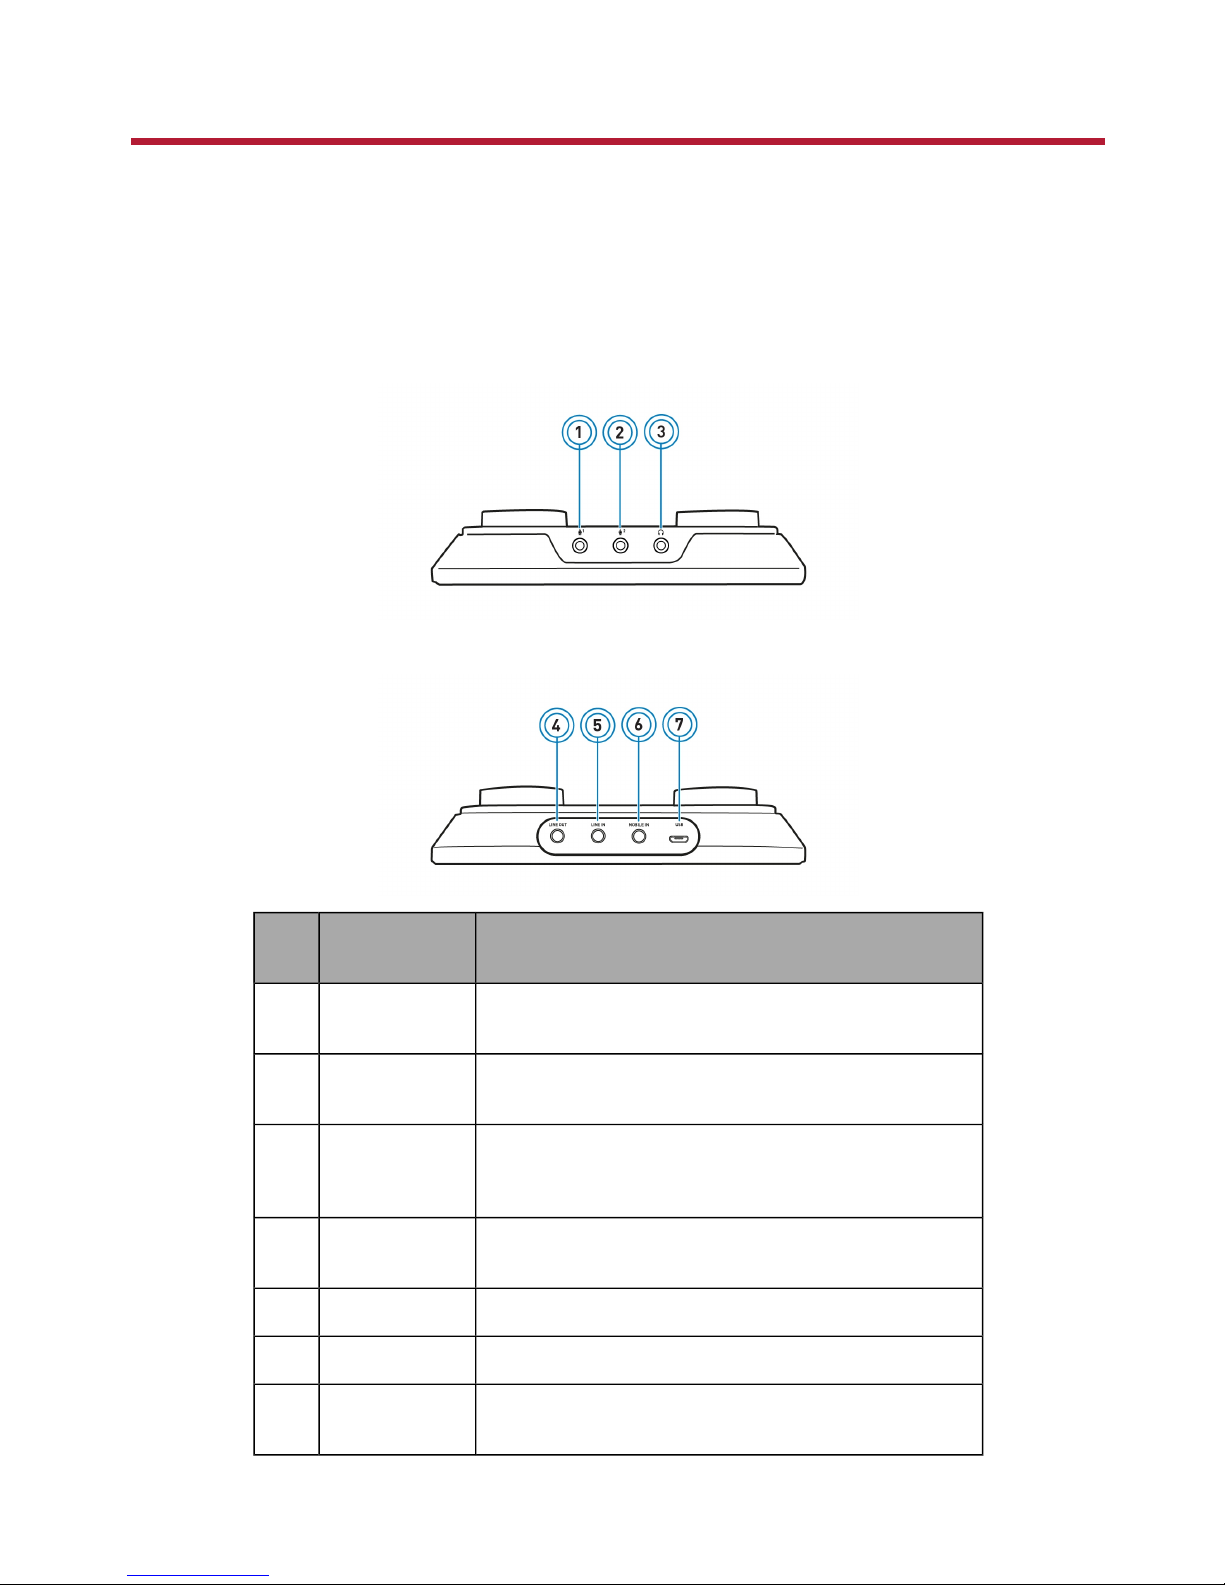
Your Audio Device
Your USB audio device has these jacks and connectors to enable the attachment of a wide variety of
devices.
Front
Back
Jack or
Connector
Description
1 Mic-in 1 jack Connects to a microphone using a 3.50 mm (1/8-inch)
mono jack.
2 Mic-in 2 jack Connects to a microphone using a 3.50 mm (1/8-inch)
mono jack.
3 Headphone
jack
Connects to stereo headphones using a 3.50 mm (1/8inch) stereo jack. Speaker output from the line-out jack is
muted when the headphone jack is connected.
4 Line-out jack Connects to the Left and Right inputs on powered analog
speakers or an A/V receiver.
5 Line-in jack Connects to line-level sources (for example, MP3 players).
6 Mobile-in jack Connects to a 4-pole analog jack of a mobile device.
7 USB port Connects to a computer with a USB cable, or to a 5V 1A
DC power adaptor for standalone operation.
About Your Hardware - 3 -
Note:
When devices are connected to mobile-in and line-in simultaneously, the device connected to the
mobile-in has higher priority.
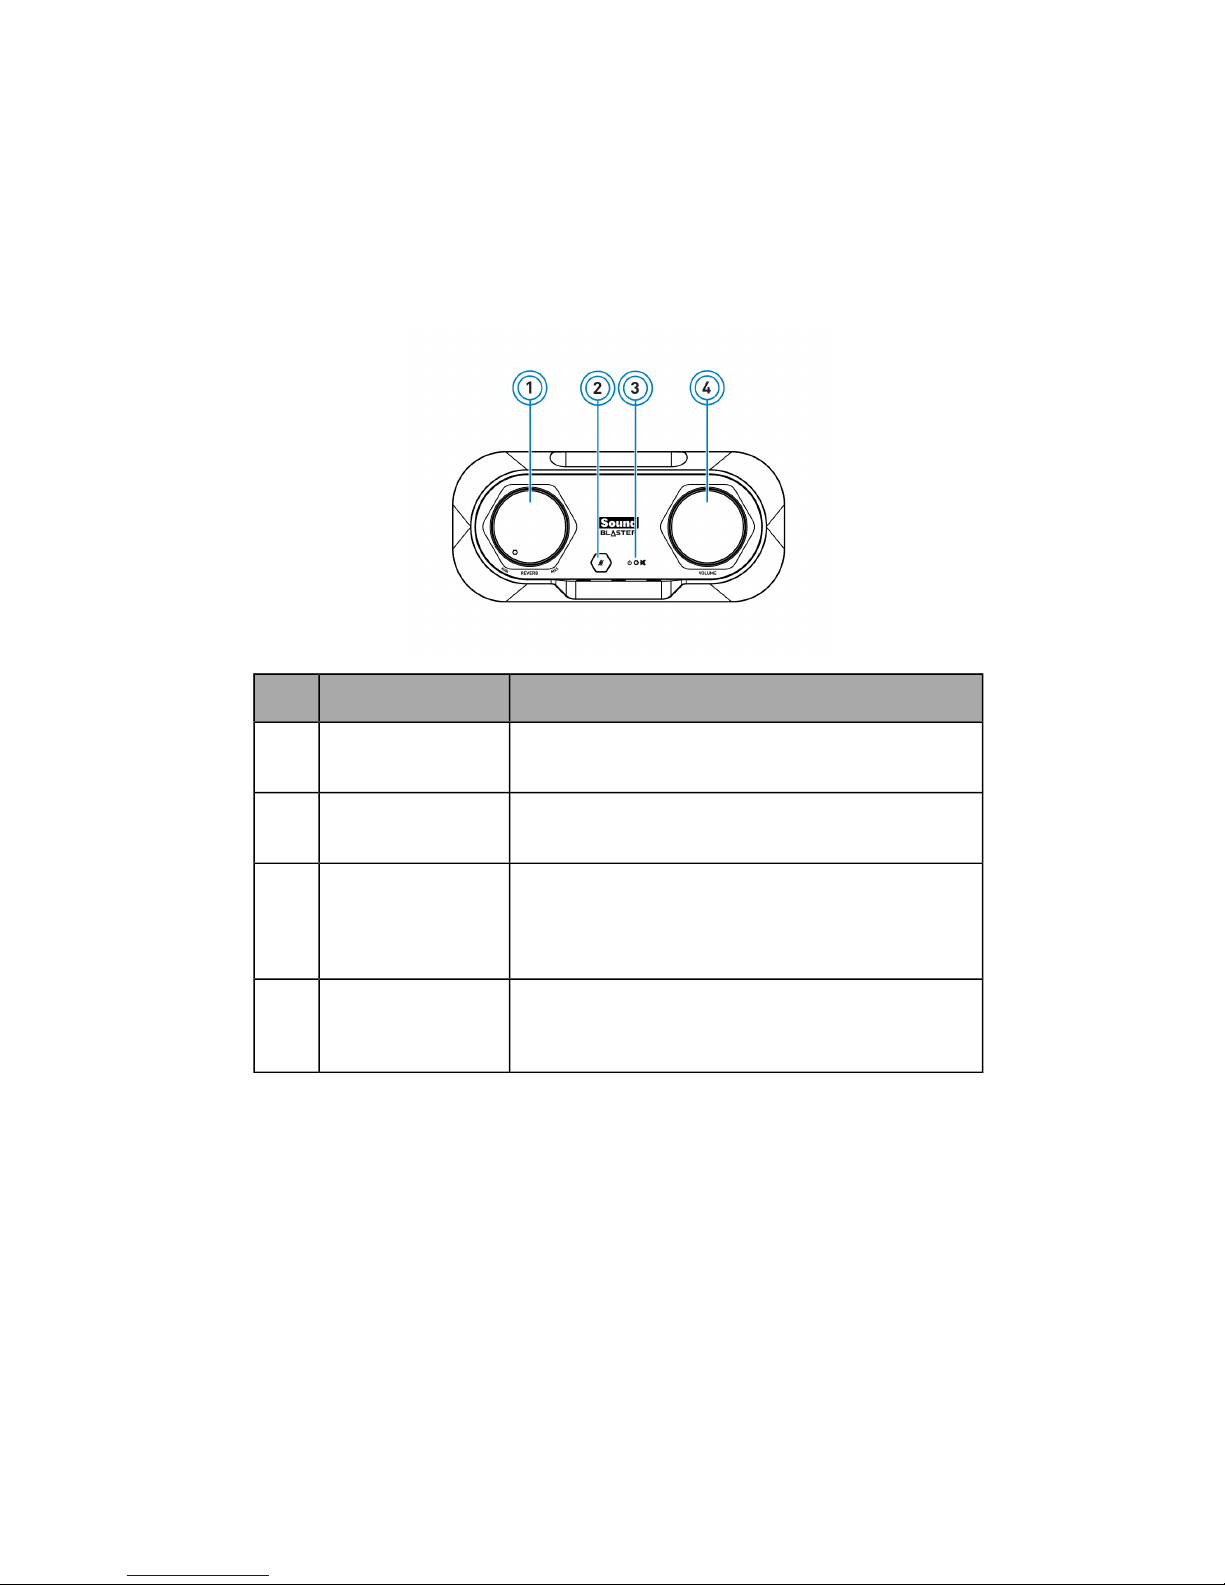
Using display indicators and control dials
Your USB audio device has the following indicators and control dials to adjust and monitor operational
status.
Control or Button Description
1 Reverb amount
knob
Turn clockwise or counterclockwise to increase or
decrease the reverb effect.
2 Microphone mute
button/indicator
Push to mute/unmute microphone volume.
Lights up in red when microphone is muted.
3 Power/playback
volume indicator
Lights up in red when USB power is detected.
Pulse in red when volume is muted.
Blinks rapidly in red 3 times when playback volume
knob is at maximum volume.
4 Playback volume/
mute knob
Turn clockwise or counterclockwise to increase or
decrease the playback volume. Push down to
mute/unmute.
About Your Hardware - 4 -
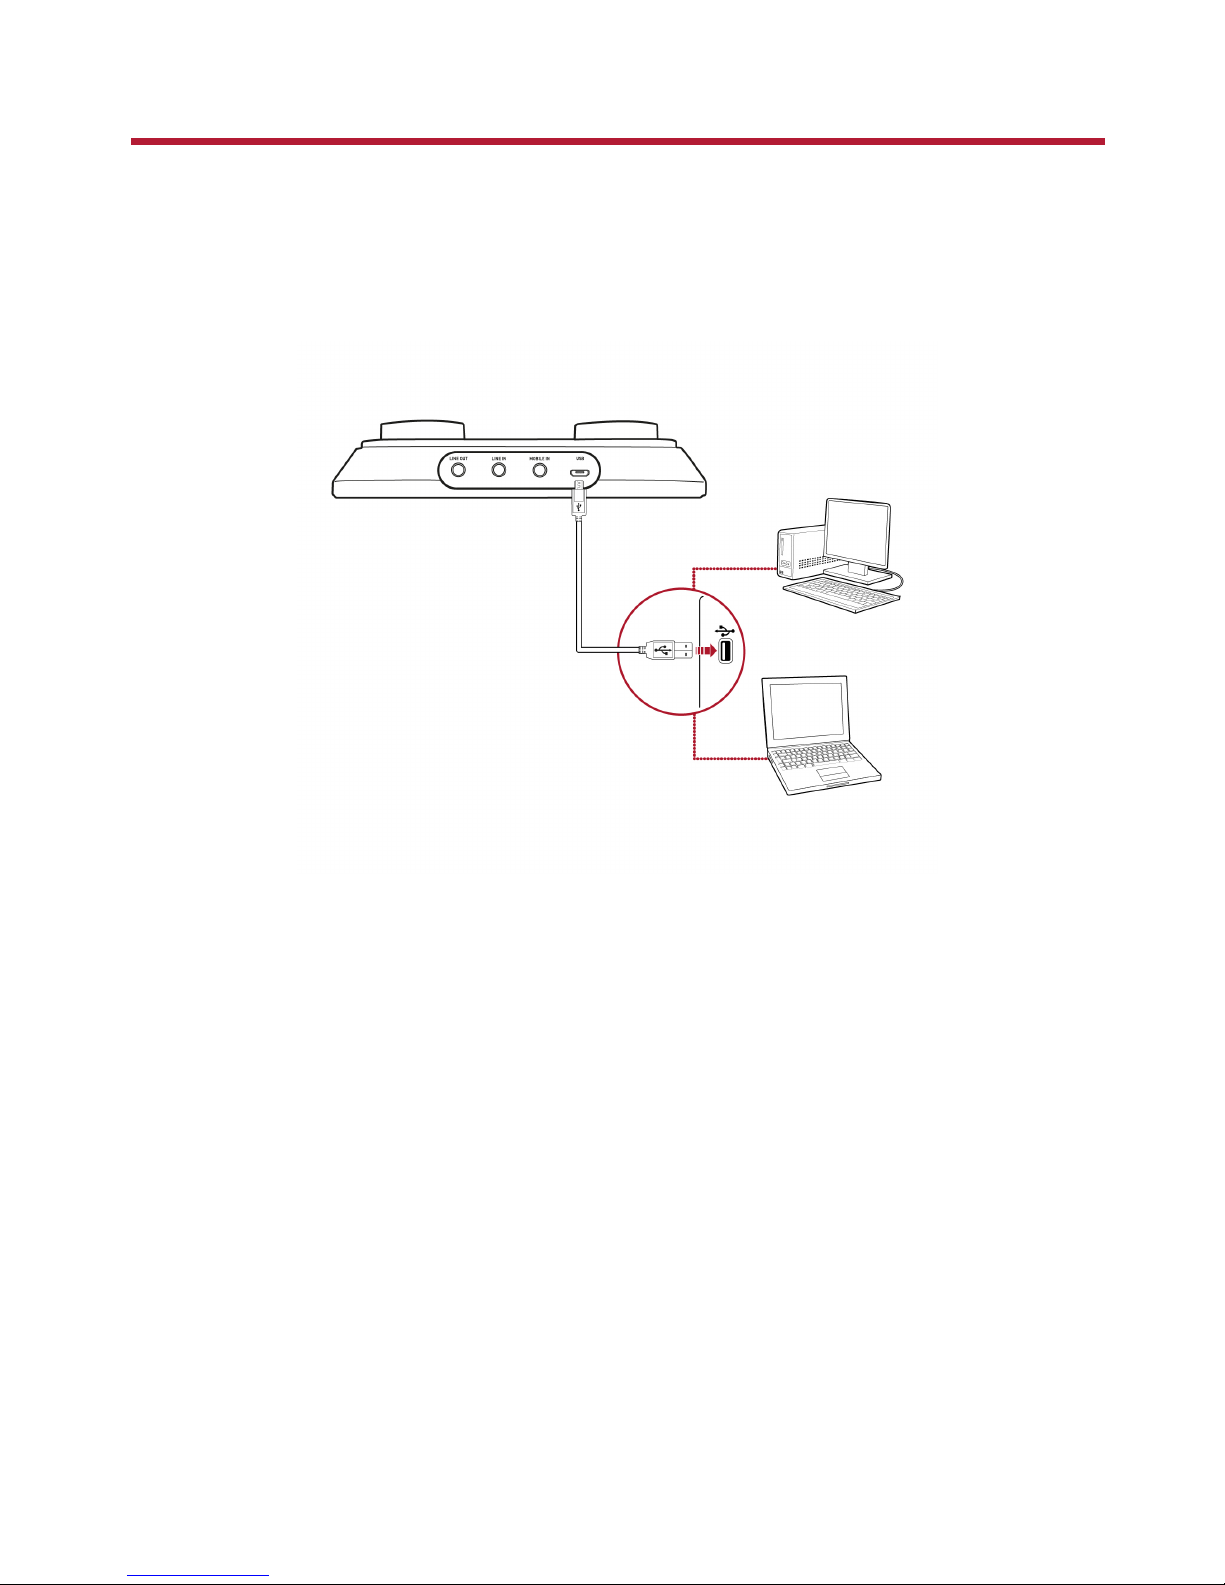
Setting Up Your Audio Device
Connecting to a Computer
Connect your USB audio device to a computer using the Micro-USB to USB cable provided. The power
indicator will light up in red once the device is properly connected.
Plug in your headphones or speakers to the device and experience the power of Sound Blaster with all
your audio and music played from your computer.
Setting the default audio device
For Windows:
After the Sound Blaster R3/A6U Control Panel is installed, Sound Blaster R3/A6U will be automatically
set as the default audio device. Alternatively, you can set the desired default audio device from the
Windows Sound Control Panel.
For Mac:
1. Go to System Preferences and click Sound.
2. Select Sound Blaster R3/A6U in both the Output and Input tabs.
Setting Up Your Audio Device - 5 -
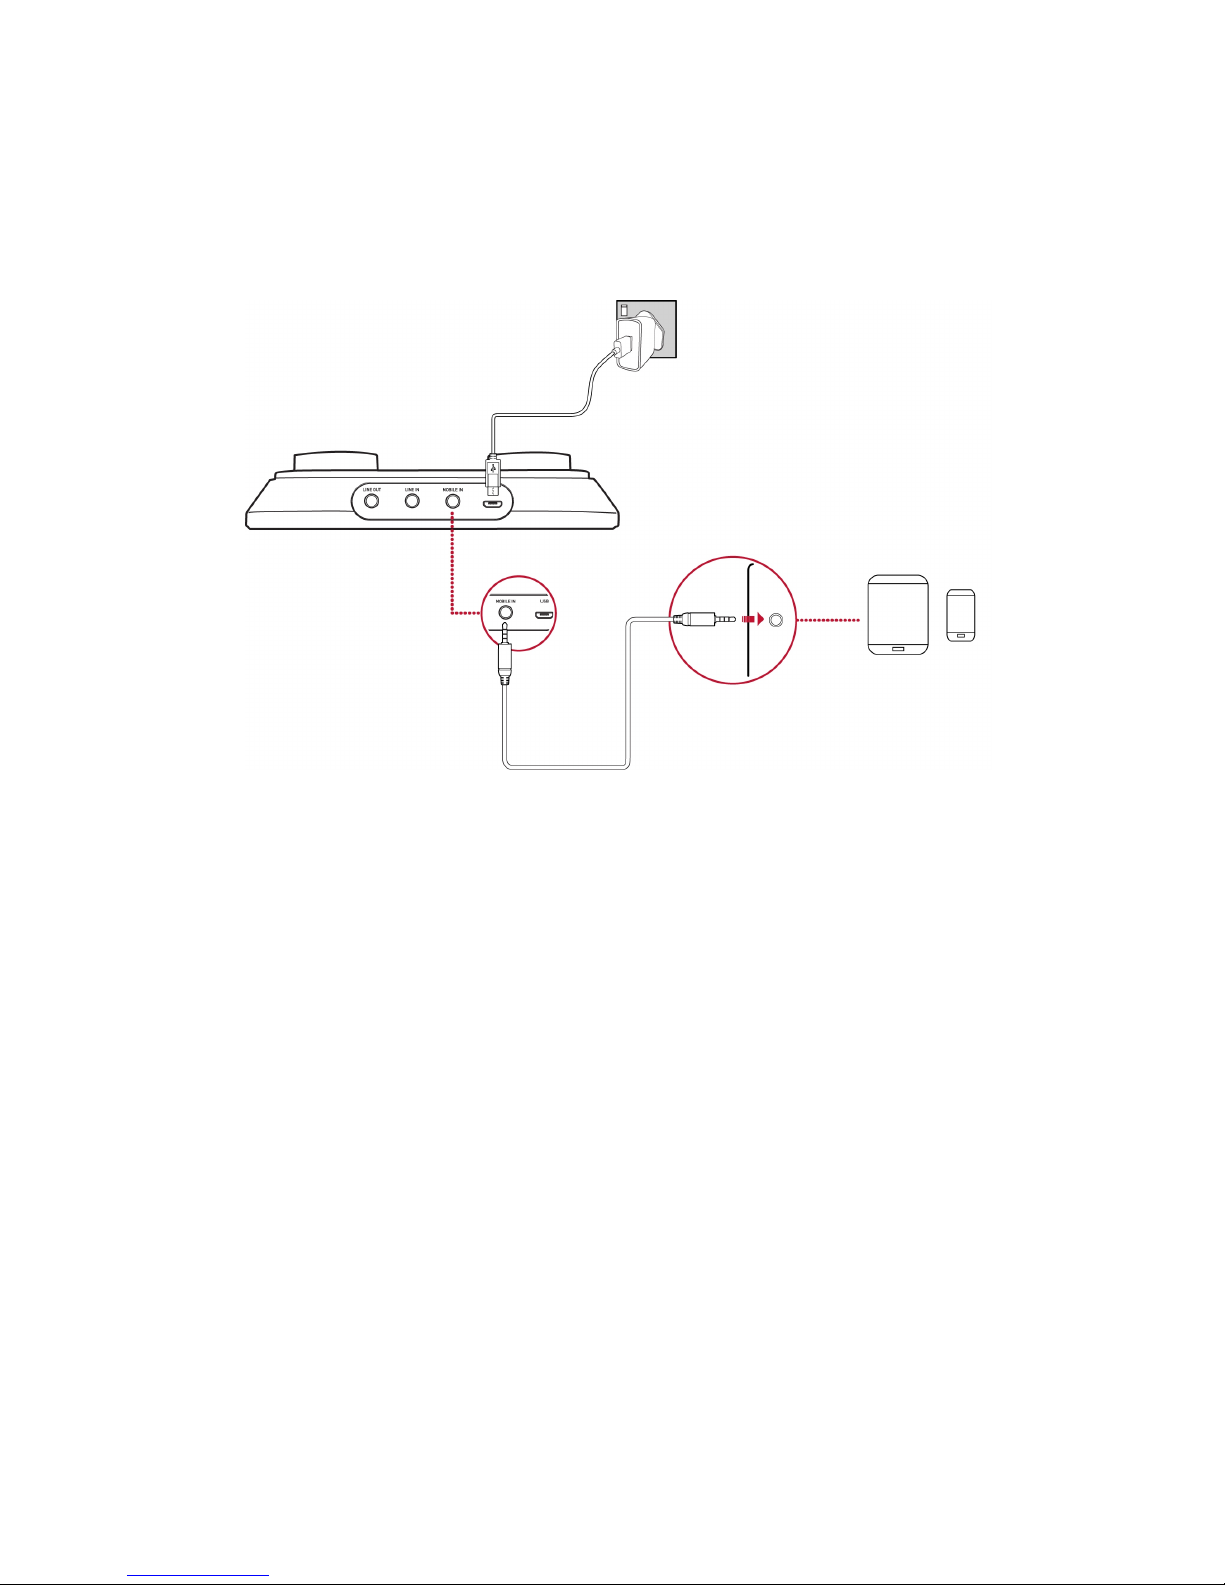
Connecting to a Mobile Device
Enjoy your favourite music from your mobile devices including iPhones, Android phones and tablets, by
connecting your mobile device to the mobile-in jack of the Sound Blaster R3/A6U using the 4-pole
analog cable provided.
To power up the USB audio device, connect an external power source, e.g. 5V 1A USBpower adapter to
the USBport.
Connect your microphone(s) and headphones/speakers to the audio device. You can now play music
directly from your mobile device and sing along to your favourite songs! For more information, refer to
Using Your Audio Device.
Setting Up Your Audio Device - 6 -
Using Your Audio Device
Your audio device works seamlessly with many external devices. To connect these peripherals, refer to
their relevant sections below:
l Playing Music
l Singing Karaoke
l Creating/Recording Music
l Broadcasting/Podcasting
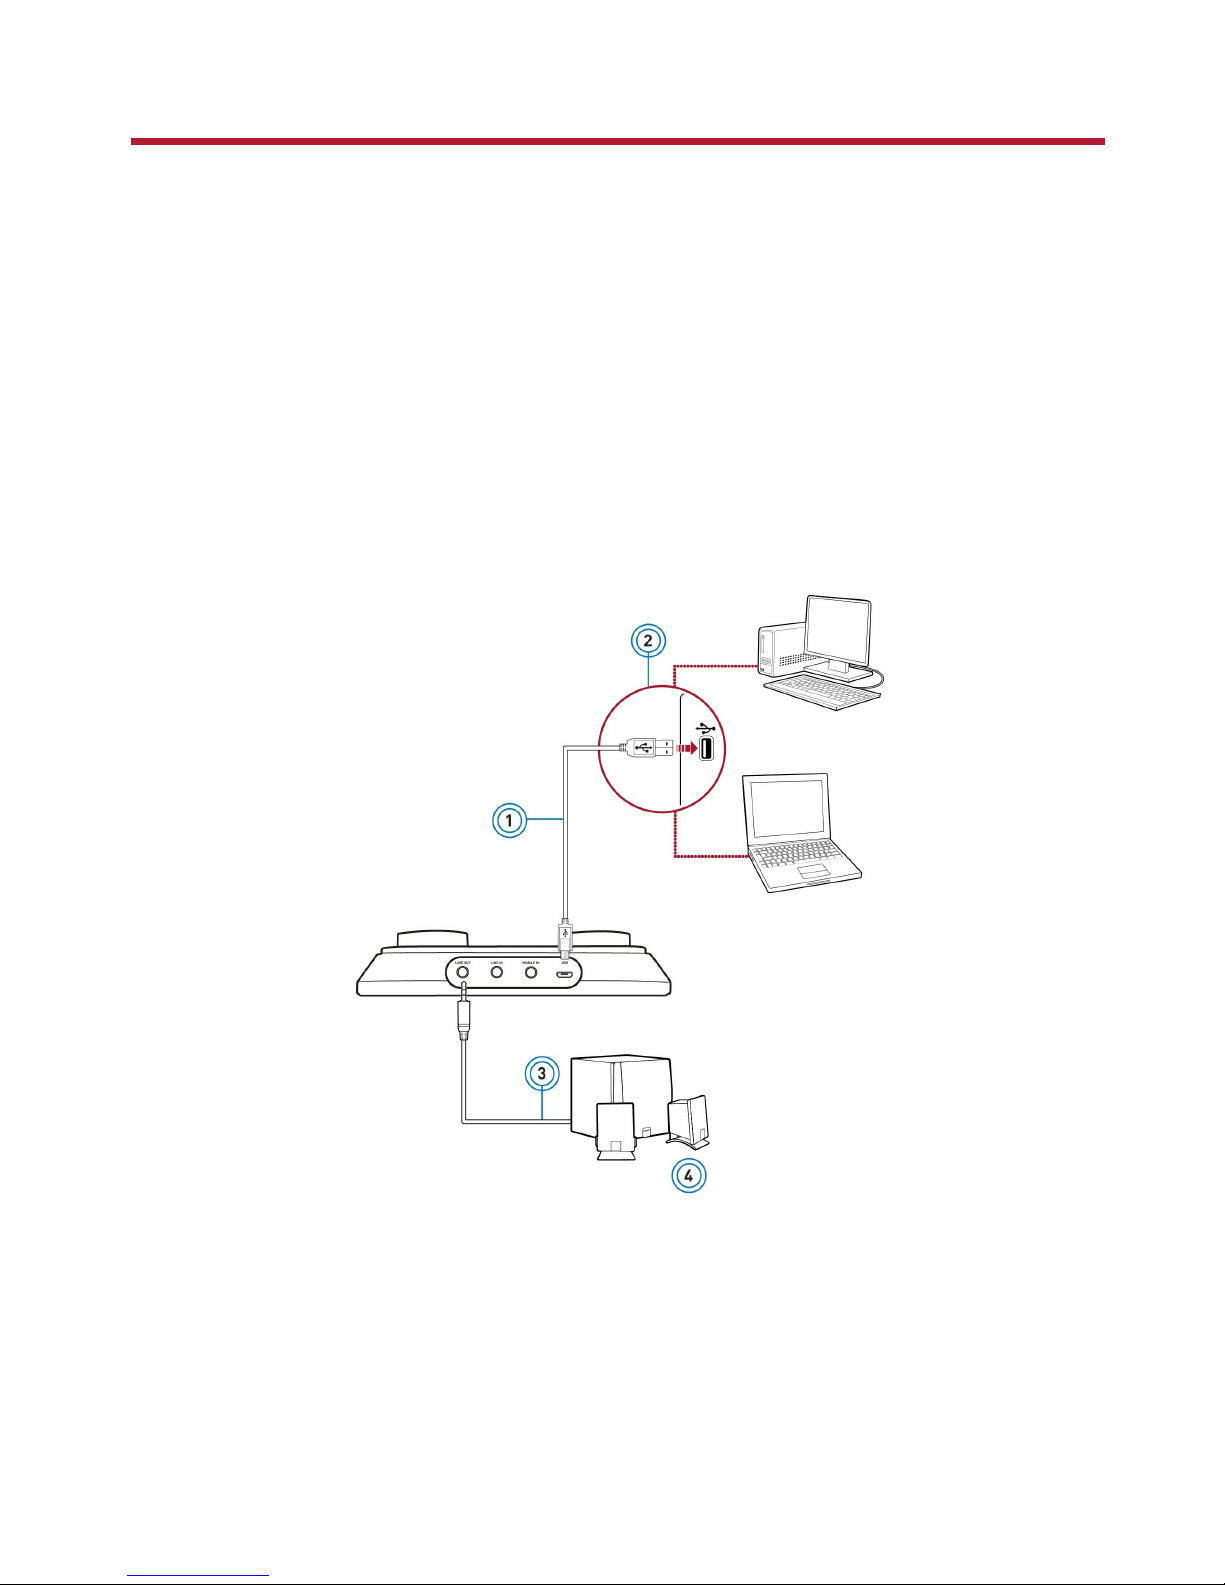
Playing Music
Experience enhanced audio from your computer or mobile device, by connecting analog stereo speakers
to the line-out jack or by connecting stereo headphones to the headphone jack of the Sound Blaster
R3/A6U.
Playing Music from a Computer
OR
Using Your Audio Device - 7 -
Component
1 MicroUSB-to-USB cable
2 USBport
3 Analog speaker cable
4 Analog stereo speakers
5 Headphones
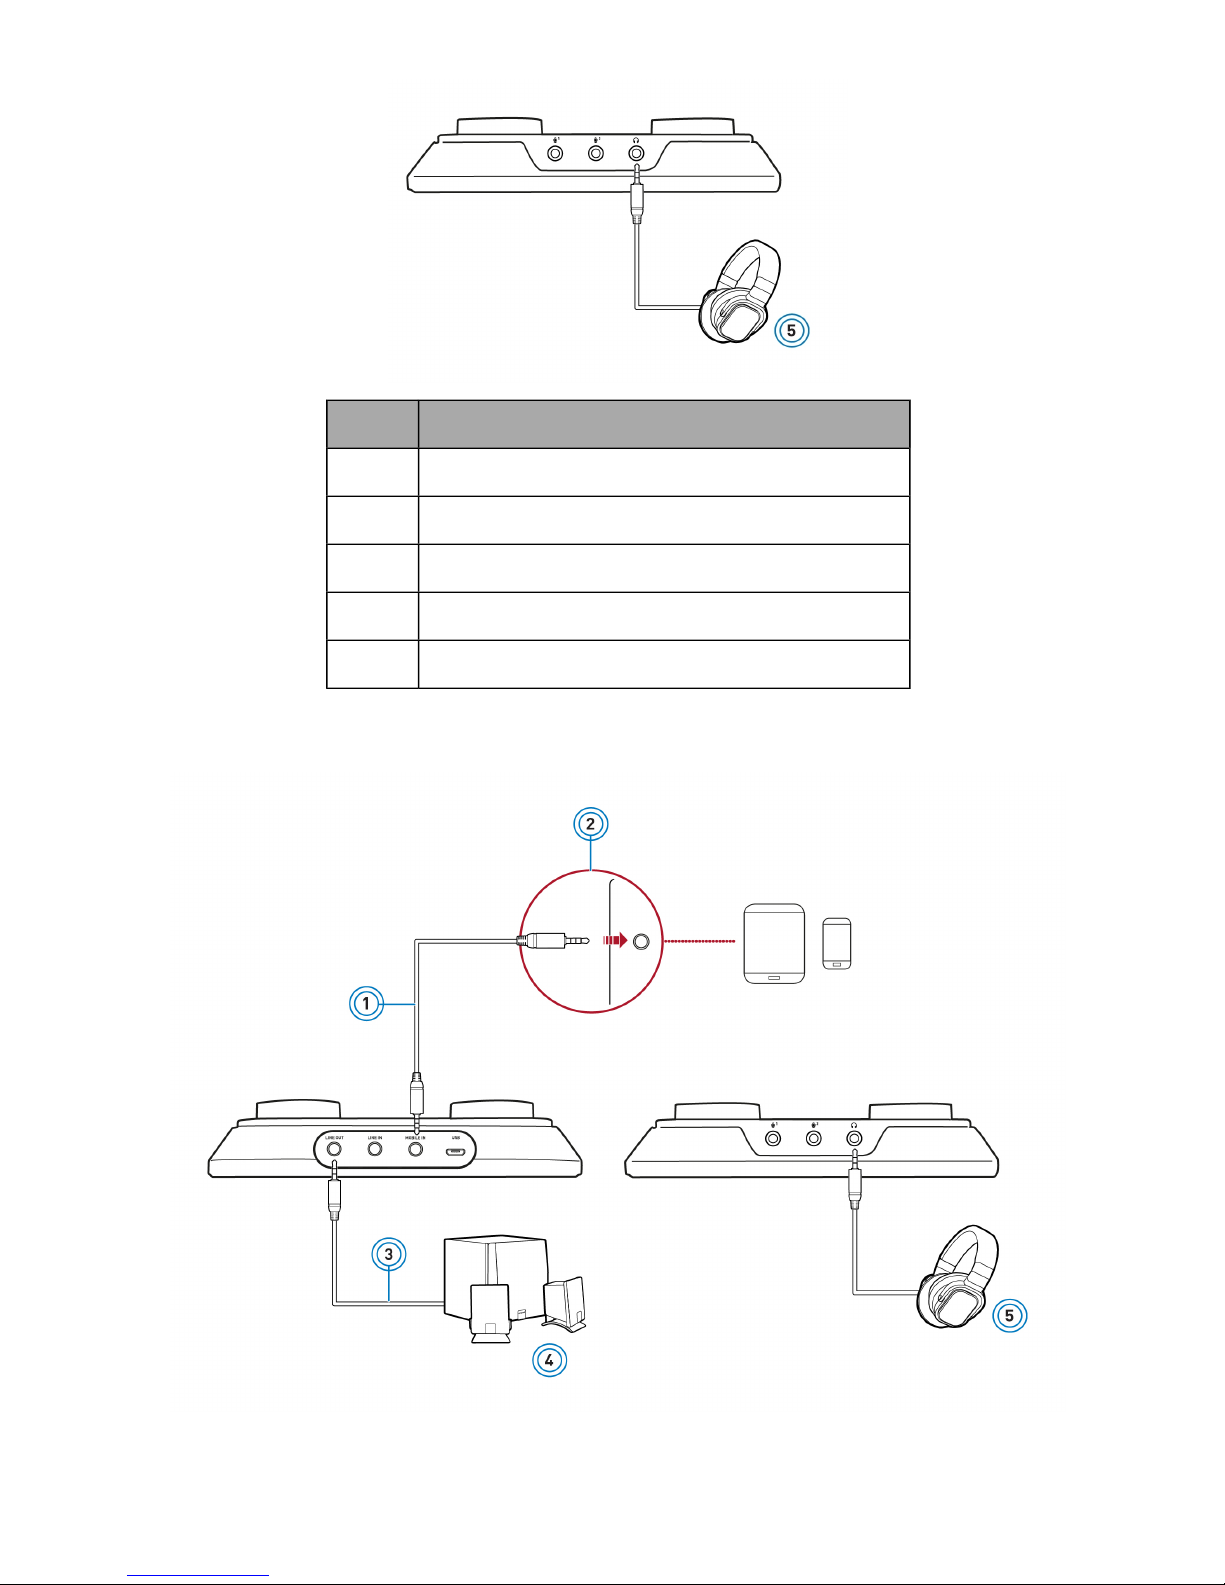
Playing Music from a Mobile Device
OR
Using Your Audio Device - 8 -
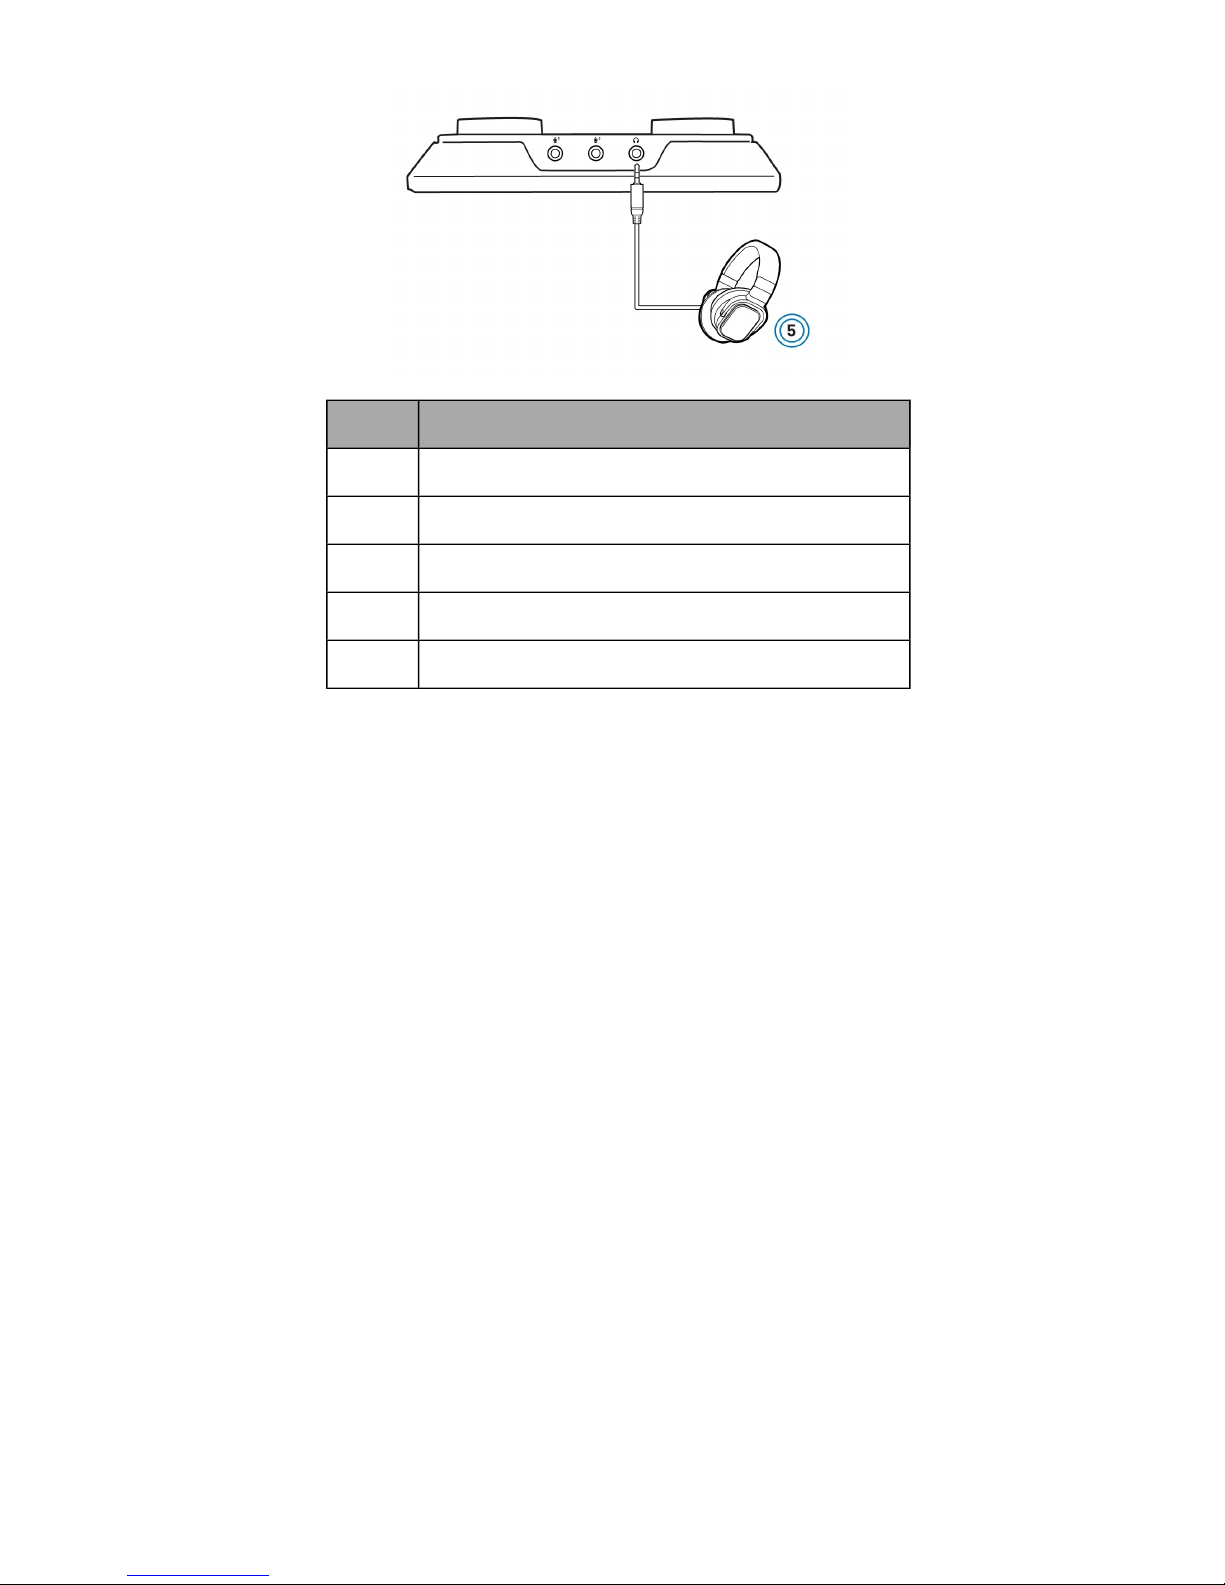
Component
1 4-pole analog cable
2 Headset jack
3 Analog speaker cable
4 Analog stereo speakers
5 Headphones
Using Your Audio Device - 9 -
 Loading...