

Creative Live! PLATINUM 5.1 Product Manual

Sound

Product Guid e
Information in this document is subject to change without noti ce and does not represent a
commitment on the part of Creative Technology Ltd. No part of this manual may be reproduced
or transmitted in an y for m or by any means , electr on i c or me c hanica l , i n cluding photo c op ying
and recording, for any purpose without the writte n per m ission of Creati ve Technology Ltd. The
softw are desc ri b ed in this do cu m ent is furnishe d un der a lice ns e agreem en t an d may be use d or
copied only in accordance with the terms of t he license agreement. It is against the law to copy
the software on any other medium except as specifically allowed in the license agreemen t. The
licensee may make one copy of the software for backup purposes.
Copyright © 2000 by Creative Technology Ltd. All rights reserved.
Version 2.0
Octo be r 2000
Sound Blaster and Blaster are registered trademarks, and the Sound Blaster Live! logo, the Sound Blaster PCI
logo, EMU10K1, E-mu Environmental Modeling, Environmental Audio, Creative Multi Speaker Surround,
and DynaRAM are trademarks of Creative T echnology Ltd. in the United States and/or other countries.
E-Mu and SoundFont are registered trademarks of E-mu Systems, Inc. PCWorks and F ourPointSurround are
trademarks of Cambridge SoundW orks, Inc. Microsoft, MS-DOS, and Windows are registered trademarks
of Microsoft Corporation. All other products are trademarks or registered trademarks of their
respective owners.
This product is covered by one or more of the following U.S. patents:
4,506,579; 4,699,038 ; 4, 987,600; 5,013,105; 5,072,645; 5,111,727; 5, 144,676; 5,170 ,369;
5,248,845; 5,298,671 ; 5, 303,309; 5,317,104; 5,342,990; 5,430,244; 5, 524,074; 5,698 ,803;
5,698,807; 5,748,747; 5,763,800; 5,790,837.

Regulatory Information
The follo w ing sections contain regulatory notices fo r Eur ope.
FCC Part 15: This equipment h as been tested and found to comply with t he limits for a Class B
digital device, pursuant to Part 15 of the FCC Rules. These limits are designed to provide
reasonable pro tection against harmful interference in a residential installation. This equipment
generates, uses, and can radiate radio frequency energy and, if not installed and used in
accordance with the instructions, may cause harmful interference to radio communications.
However, there is no guarantee that interference will not occur in a particular installation. If this
equipment do es caus e harmful interfere nce to radio or television reception, which can be
determin ed by tu rni ng the equ ipmen t of f and on , the use r is encour age d to try on e or more of the
following measures:
❑
Reorient or relocate the receiving antenna.
❑
Increase the distance between the equipment and receiver.
❑
Connect the equipment into an outlet on a circuit different from that to which the receiver
is connected.
❑
Consult the dealer or an experienced rad io/TV technician.
Caution
To comply with the limits for the Class B digital device, pursuant to Part 15 of the FCC Rules,
this device must be installed in computer equipment certified to comply with the Class B limits.
All cables used to connect the computer and peripherals must be shielded and grounded.
Operation with non-c ertif ied com puters or non-shi elded cab les may res ult in i nterfer ence to r adio
or tele vision reception.
Modifications
Any changes or modifi cations not expressl y approv ed by the grantee of thi s device could v oid the
user’s authority to operat e the device.
Safety Information
CAUTION: This device is intended to be installed by the user in a CSA/TUV/UL certified/listed
IBM AT or compatible pers onal computers in the manuf acturer’s defined operator access area.
Check the equipment operating/installation manual and/or with the equipment manufacturer to
verify/confirm if your equipment is suitable for us er-installed application cards.
Compliance
This product conforms to the following Council Directive:
❑
Directi ve 89/336/EEC, 92/31/EEC (EMC)
ii

Contents
Welcome to SB Live! Platinum 5.1
What’s in the Package ....... .. .. .......... ... ......... ... ......... ... .. .......... .. ..... 1
What You’ll Need..........................................................................1
Before You Start.................. ............ ........................ ....................... ............ .......2
What’s Next... Follow Easy St ep s 1 -2 -3 ....... .. ... ......... ... .. .......... ..3
Step 1: Installin g the Aud io Card............... .. .. ... ..... .. .. ... .... ... .. ... .... ... .. .. ..... ... .. ..4
Installi n g Live! Drive IR................. ........................ ....................... ............ .......5
Your Live! D rive IR...... ......... ... .......... .. .......... .. .......... .. ... ......... ... ..5
Insert the Live! Drive IR into the System .....................................6
Step 2: Installin g De vic e Dri v ers. ..... ... .. .. ..... .. ... ..... .. .. ... .... ... .. ... .... ... .. .. ..... ... .. ..8
Step 3: Installin g the Soft war e... .. ... .. ..... .. ... .. ..... .. ... .... ... .. .. ..... ... .. .. ..... .. ... .. .....10
If You Have a Problem............. ....................... ........................ ............ ............11
Returning a product for repair.....................................................11
Limited Warran ty........................................ ............ ....................... .................1 2
Creative European Help Line.........................199
Bienvenue dans SB Live! Platinum 5.1
Contenu du coffret d’installation.................................................15
Configuration du système............................................................15
A v ant de co mmenc er.. .. ..... .. .. ... .... ... .. ... .... ... .. .. ..... ... .. .. ..... .. ... .. ..... .. ... .. ..... .. ... ..16
Identification des connecteurs de votre carte audio ....................16
Ensuite... Suivez les étapes faciles 1-2-3....................................17
Etape 1 : Inst all ation de la car t e audio........... ... ..... .. .. ..... .. ... .. ..... .. ... .. ..... .. ... ..18
Installation Live! Drive IR......... ............ ........................ ............ .....................19
Votre Live! Drive IR....................................................................19
Insertion du Live! Dr ive IR dans le s ystème..............................20
Etape 2 : Installation des pilotes de périphérique..........................................22
Etape 3 : Inst all ation du logicie l.............. ... .. ..... .. ... .... ... .. .. ..... ... .. .. ..... .. ... .. .....24
En cas de problème.......................................................... ............ ...................25
Renvoi d’un produit pour réparation...........................................25
Garantie limitée................................. ............ ........................ ........................ ..26
Creative European Help Line.........................199

Willkommen bei SB Live! Platinum 5.1
Lieferumfang des Pakets.............................................................29
Systemanforderungen .................................................................29
Vor der Instal lat ion...... .. ... .... ... .. .. ..... .. ... .. ..... .. ... .. ..... .. ... .. ..... .. .. ... ..... .. .. ... .... ... .30
Funktion der Anschlüsse auf der Aud io k ar t e: .. .......... .. .......... ... . 30
Nach der Installation.. . Führe n Sie die 1-2-3-Kurzanleitung aus31
Schritt 1: Audiokarte i n stallieren....................................................................32
Live! Drive IR installieren................................................................... ...........33
Das Live! Drive IR......................................................................33
Einbau en des Live! Drive IR....... ... .......... .. .. .......... ... ......... ... ......34
Schritt 2: Treiber insta llieren ..........................................................................36
Schritt 3: Software installie ren ........ ...............................................................38
Falls Probleme auftreten.......................................... ........................ ........... ....39
Produkte zur Repara tur zurückgeben..........................................39
Beschränkte Gar anti e....... .. .. ... .... ... .. .. ..... ... .. .. ..... .. ... .. ..... .. ... .. ..... .. ... .. ..... .. .. ... .40
Creative European Help Line.........................199
Introduzione alla scheda SB Live! Platinum 5.1
Contenuto della confezione ........................................................43
Requisiti di sistema.....................................................................43
Prima di in iziare ............................................................ ....................... ...........44
Come identificare i connettori della scheda audio......................44
Procedure 1-2-3...........................................................................45
Procedura 1 : Installazione d ella scheda audio......................................... ......46
Installazione Live! Drive IR.................................. ............ ........................ ......47
Live! Drive IR............................................................................. 47
Inserimento di Live! Drive IR nel sistema..................................48
Procedura 2 : Installazione d ei driver della periferi ca....................................50
Procedura 3 : Installazione d el software ........................ ....................... ...........52
In caso di problemi........... ........... ........................ ........................ ............ ........53
Restituzione dei prodotti da riparare...........................................53
Garanzia limita ta........... ... .. .. ..... .. ... .. ..... .. ... .... ... .. .. ..... ... .. .. ..... .. ... .. ..... .. ... .. ..... .54
Creative European Help Line.........................199

Bienvenido a SB Live! Platinum 5.1
Contenido del lote .......................................................................57
Requisitos previos .......................................................................57
Antes de empezar.......................................... ........................ ........................ ..58
Identificación de conectores en la tarjeta de audio .....................58
Y ahora... siga simplemente los pasos 1, 2 y 3............................59
Paso 1: Instalación de la tarjeta de audio .......................................................60
Instalacíon Liv e! Dr i v e IR........... ..... ... .. .. ..... .. ... .. ..... .. ... .. ..... .. ... .. ..... .. .. ... ..... ..61
La unidad Live! Drive IR ............................................................61
Insertar la unidad Live! Drive IR en el sistema...........................62
Paso 2: Instalación de los controladores de dispositivo ................................64
Paso 3: Instalación del software ............................................. ........................66
Solución de problem as.................................... ............ ........................ ............67
Devolución de un producto para su reparación...........................67
Garantía limitada............ ... .... ... .. .. ..... ... .. .. ..... .. ... .. ..... .. ... .. ..... .. ... .. ..... .. .. ... ..... ..68
Creative European Help Line.........................199
Welkom bij SB Live! Platinum 5.1
Inhoud van het pakket .................................................................71
Benodigdheden............................................................................71
Voordat u begint................................... ....................... ........................ ............72
Connectors op de geluidskaart ....................................................72
Vervolgens… volg de stappen 1-2-3 ...........................................73
Stap 1: De geluidska art ins tall eren........ .. ... .... ... .. ... .... ... .. .. ..... ... .. ..... .. .. ... ..... ..74
Live! Drive IR installeren....................................................... ............ ............75
Uw Live! Dr ive IR .......... ... .. .......... .. .......... .. ... ......... ... .......... .. ..... 7 5
De Live! Drive I R in he t sy s t ee m plaatsen.............. ... .......... .. ..... 7 6
Stap 2: S tu u rprogramma's installeren .............................................. ..............78
Stap 3: De softwar e instal ler en....... ..... .. .. ... .... ... .. ..... .. ... .. ..... .. ... .. ..... .. .. ... ..... ..80
W at te doen bij prob lemen......... .. ... .. ..... .. ... .. ..... .. ... .. ..... .. .. ..... ... .. .. ..... .. ... .. .....81
Product ter reparatie aanbieden........... ............... .........................81
Beperkte gara ntie........... ..... .. ... .. ..... .. ... .. ..... .. .. ... ..... .. .. ... .... ... .. ... .... ... .. .. ..... ... ..82
Creative European Help Line.........................199

Bem-vindo à SB Live! Platinum 5.1
Conteúdo da embalagem............................................................. 85
Requisitos de sistema..................................................................85
Antes de começar.............................................................. ........................ ......86
Identificar os conectores da placa de som................................... 86
Primeiros passos ......................................................................... 87
Passo 1: Instalar a p l aca de som........ ............ ............ ........................ ............ .88
Instalar Live! Drive IR....................... ........................ ............ ........................ .89
A placa Live ! Dr ive IR.... ... .. .......... .. .......... .. ... .......... .. .......... .. ... . 8 9
Inserir a placa Live! Drive IR no sistema ................................... 90
Passo 2: Instalar os controladores d e dispositivo.............................. ............ .92
Passo 3: Instalar o software........................................ ............ ........................ .94
Se ti ver um problema.................. ........................ ............ ........................ ........95
Devolução de um produto para reparação................................... 95
Garantia limita da.............. .. .. ..... .. ... .. ..... .. ... .. ..... .. .. ... ..... .. .. ... .... ... .. ..... .. ... .. ..... .96
Creative European Help Line.........................199
Välkommen till SB Live! Platinum 5.1
Vad finns i paketet.......................................................................99
Vad som behövs ..........................................................................99
Innan du sätter igång............................. ........................ ....................... .........100
Identifiera ljudkortets kontakter................................................100
Nästa steg..................................................................................101
Steg 1: Installera ljud kortet........................................... ....................... .........102
Installer a Li v e! Dri v e IR......... .... ... .. .. ..... ... .. .. ..... .. ... .. ..... .. ... .. ..... .. ... .. ..... .. .. ..103
Live! Drive IR...........................................................................103
Sätt in Live! Drive IR-enheten i datorn.....................................104
Steg 2: Installera drivrutiner. ............ ........................ ........................ .............106
Steg 3: Installera programvaran............................... ............ ....................... ..108
Om du skulle få pro blem..... ..... .. ... .. ..... .. ... .. ..... .. .. ... ..... .. .. ... .... ... .. ... .... ... .. .. ..109
Så här lämnar du in en produkt för reparation:.........................109
Begränsad Gar anti......... ... .. ..... .. .. ... .... ... .. ... .... ... .. .. ..... ... .. .. ..... .. ... .. ..... .. ... .. ....110
Creative European Help Line.........................199

Velkommen til SB Live! Platinum 5.1
Innholdet i pakken.....................................................................113
Hva du tren g er.............. .. .......... .. ... ......... ... .......... .. .. .......... ... ..... 1 1 3
Før du s t arter........................................... ............ ........................ ...................114
Identifisere kontaktene på lyd ko rtet... .. .......... .. .......... .. .......... .. .114
Hva nå... Tre trinn for installering............................................115
Trinn 1 : Installere ly d kortet............................................... ........................ ...116
Installer e Li v e! Dri v e IR.......... .. .. ... ..... .. .. ... .. ..... .. ... .. ..... .. .. ... ..... .. .. ... .... ... .. ...117
Live! Drive IR ...........................................................................117
Sett inn Live! Drive IR i systemet.............................................118
Trinn 2 : Installere en h etsdriver e.................................... ....................... ........120
Trinn 3 : Installere p rogramvaren.................... ........................ ......................122
Hvis du ha r problemer...... ....................... ........................ ........................ .....123
Levere inn et produkt til reparasjon: .........................................123
Begrenset garantiansvar....................... ................................... ......................124
Creative European Help Line.........................199
Velkommen til SB Live! Platinum 5.1
Hvad indeh o lder pakken.... .. .. .......... ... .. .......... .. .......... .. ... ......... .127
Hvad skal du bruge....................................................................127
Inden du går i gang....... ..... .. .. ... .... ... .. ... .... ... .. .. ..... ... .. .. ..... .. ... .. ..... .. ... .. ..... .. ...128
Oversigt over stikkene på lydkortet...........................................128
Hvad skal du gøre nu... Følg starttr i ne n e 1- 2 - 3..... .. .......... ... ..... 1 2 9
Trin 1: Installatio n af lydkortet............................................. ........................130
Installation Live! Drive IR......... ............ ........................ ............ ...................131
Live! Drive IR ...........................................................................131
Placer Live! Drive IR i systemet ...............................................132
Trin 2: Installatio n af enhedsdrivere........... ............ ....................... ...............134
Trin 3: Installatio n af softwaren.................................. ........................ ..........136
Hvis der opstår et problem.................................................... ........................137
Returnering af produktet til reparation:.....................................137
Begrænset gar an ti....... .... ... .. .. ..... .. ... .. ..... .. ... .. ..... .. ... .. ..... .. .. ... ..... .. .. ... .... ... .. ...138
Creative European Help Line.........................199

SB Live! Platinum 5.1 -äänikortti
Pakkauksen sisältö ....................................................................141
Järjestelmävaatimukset .............................................................141
Alkutoimet...................................................... ............ ........................ ...........142
Äänikort in li it ti m e t ........ .. .......... .. .......... ... ......... ... ......... ... .........142
Seuraavaksi... Vaiheet 1-2-3......................................................143
Vaihe 1: Äänikortin asentaminen......................................... ....................... ..144
Äänikortin Li v e! Dr i ve IR....... .. ..... .. .. ... ..... .. .. ... .... ... .. ... .... ... .. .. ..... ... .. .. ..... .. ..145
Live! Drive IR -as e m a............. .. .. .......... ... ......... ... ......... ... .. .......145
Laita Live! Drive IR -asema tietokoneeseen.............................146
Vaihe 2: L aiteohjainten as en taminen............................................................148
Vaihe 3: Ohjelmiston asentaminen.......................................... .....................150
Ongelmatapau k sissa....................... ................................... ........................ ....151
Tuotteen p al au tt aminen kor j at tavak si : ..... .. .. .......... ... .. .......... .. .. 1 5 1
Rajoitettu Taku u............................................. ........................ .......................152
Creative European Help Line.........................199
Vítá vás SB Live! Platinum 5.1
Co je v balíku ............................................................................155
Co budete potøebovat ................................................................ 155
Ne zaènete....................................................................................................156
Identifikace konektorù na vaí zvukové kartì:.......................... 156
Jak pokraèovat... proveïte kroky 1-2-3 .................................... 158
Krok 1: Instalace zvukové karty...................................................................159
Jednotka Live! Drive IR................................................................................160
Vloení jednotky Live! Drive IR do poèitaèe ...........................161
Krok 2: Instalace ovladaèù............................................................................ 163
Krok 3: Instalace softwaru............................................................................165
Postup v pøípadì závad .................................................................................166
Vrácení výrobku k opravì......................................................... 166
Omezená záruka............................................................................................167
Creative European Help Line.........................199

Zapraszamy do u¿ycia karty SB Live! Platinum 5.1
Zawartoæ pakietu .....................................................................169
Co jest potrzebne? .....................................................................169
Zanim zaczniesz............................................................................................ 170
Identyfikacja konektorów i gniazdek karty dwiêkowej:..........170
Co dalej... Wykonaj kroki 1-2-3................................................171
Krok 1: Instalacja karty dwiêkowej............................................................172
Live! Drive ................................................................................173
Umieæ Live! Drive IR w obodowie komputera .......................174
Krok 2: Instalacja sterowników urz¹dzenia................................................. 176
Krok 3: Instalacja oprogramowania .............................................................178
Gdy wyst¹pi problem z produktem.............................................................. 179
Dokonywanie zwrotu produktu do naprawy .............................179
Ograniczona Gwarancja ...............................................................................180
Creative European Help Line.........................199
Первое знакомство с SB Live! Platinum 5.1
Что входит в пакет ............................................................ 183
Что необходимо иметь ...................................................... 183
Подготовка к установке ....................................................................... 185
Расположение разъемов на звуковой плате....................... 185
Что дальше... Выполните несложную процедуру из
трех шагов ....................................................................... 186
Шаг 1: Установка звуковой платы .......................................................187
Панель Live! Drive IR...........................................................................188
На передней панели Live! Drive IR расположены следующие
разъемы и регуляторы: ...................................................................... 188
Установка панели Live! Drive IR в систему ....................... 189
Шаг 2: Установка драйверов устройства............................................. 191
Шаг 3: Установка программного обеспечения ................................... 193
При возникновении неполадок............................................................194
Возврат платы для ремонта ............................................... 194
Ограниченная гарантия .......................................................................195
Creative European Help Line.........................199

Welcome to SB Live! Platinum 5.1
This
Product Guide
how to quickly ins tall and set up SB Live! Platinum 5.1 on your
computer.
What’s in the Packa ge
Your SB Live! Platinum 5.1 installation pack contains the following
hardware, software , and documen tat ion items:
SB Live! Platinum 5.1 audio card, Live! Drive IR, cables and
❑
headphone adapter
Software Pack (on CD-ROM only) containing Creative
❑
Utilities and Drivers for Windo ws
Windows
CD-ROM audio cable
❑
CD SP/DIF cable
❑
This
❑
❑
Product Guide
3rd Party softwar e (on CD-ROM only)
What You’ll Need
The system requirements for SB Liv e! Platinum 5.1 are as follows:
Genuine Intel® Pentium® class processor:
❑
166 MHz for W indows 95/98 or W indows Millennium E dition,
200 MHz for Windows NT 4.0 or Windows 2000
Intel or 100% compatible motherboard chipset
❑
Windows 95, 98 or Millennium Edition, Windows NT 4.0 or
❑
Windows 2000
16 MB RAM for Windows 95/98 or Millennium Edition
❑
(32 MB RAM recommended),
32 MB RAM for Windows NT 4.0,
64 MB RAM for Windows 2000
160 MB of free hard disk space
❑
Open half-length PCI 2.1 compliant slot
❑
Headphones or amplified speakers (available separately)
❑
CD-ROM drive required for software installation
❑
Open Drive Bay for Live! Drive IR
❑
provides easy-to-fol low instruct ions that describe
®
95/98,
®
NT 4.0/2000 and Windows® ME
English
3rd Party sof tware may have higher system requirements
Prod uct Guide 1
Before Y ou Start
Open the SB Live! P latinum 5.1 installation pack an d verify that you
have receiv ed all items on the packaging list. If any of these item s are
missing or damaged, cont act the dealer from whom you purchased
your SB Live! Platinum 5.1 installation pa ck.
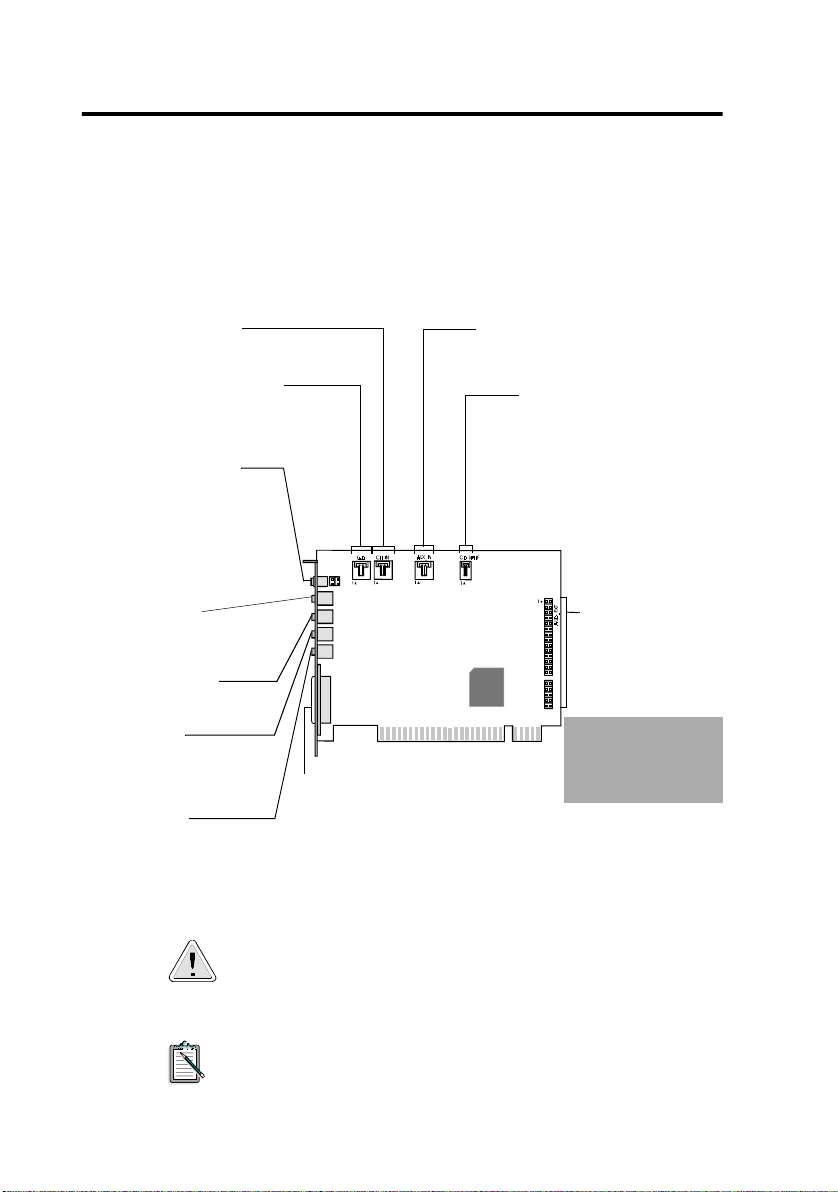
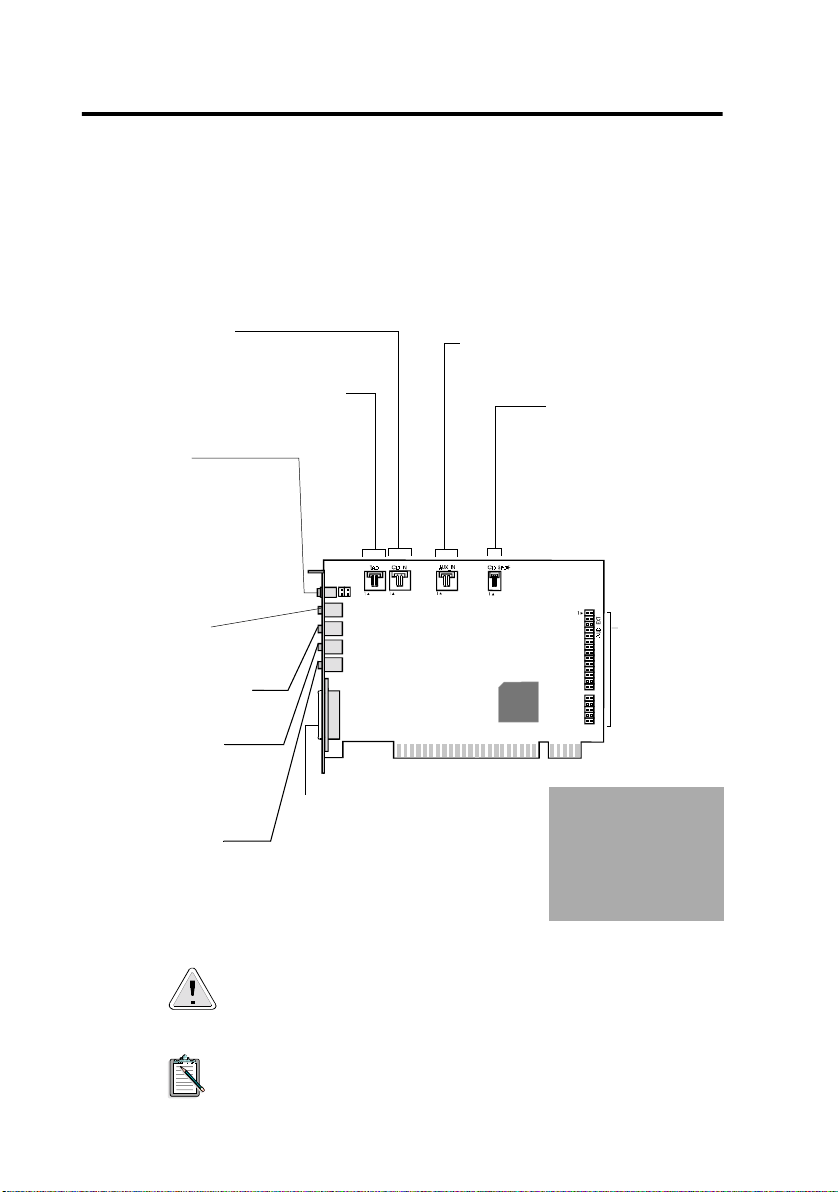
Identifyi n g Conn ect or s on your Audio Card
CD Audio connector
Connects to the Analog Audio output on a CD-ROM
or DVD-ROM drive using a CD audio cable.
Telephone Answering Device
connector
Provides a mono connection from a
standard voice modem, and transmits
microphone signals to the modem.
Analog/Digital Out jack
6-channel or compressed AC-3
SPDIF output for connection to
external digital devices or digital
spea ker sy st em s.
Also supports centre and
subwoofer analog channels for
connection to 5.1 analog speaker
systems.
Line In jack
Connects to an external device
(such as a cassette, DAT, or
isc
).
player
MiniD
Microphone In jack
Connects to an external
microphone for voice input.
Line Out jack
Connects to powered speakers
or an external amplifier for audio
output. Also supports
headphones.
Rear Out jack
Connects to powered speakers
or an external amplifier for audio
output.
Joystick/MIDI connector
Connects to a joystick or a MIDI device. You
can buy an optional MIDI kit that allows you
to plug in the joystick and MIDI device
simultaneously.
AUX connector
Connects to internal audio sources such
as TV Tuner, MPEG, or other similar
.
cards
CD SPDIF connector
Connects to the SPDIF
(Digital Audio) output (where
available) on a CD-ROM or
DVD-R OM dri ve
:
.
Audio Extension
(Digital I/O)
connector
Connects to the Digital
I/O card or Live! Drive
IR.
Warning:
an IDE interface. Do
not
IDE devi ces.
This is not
connect to your
Static electricity can damage sensi tiv e elect ronic components. Discha rge
your body’s static electric charge by touching a grounded surface, for
example, the meta l plate of your computer chassis, prior to installing the
SB Live! Platinum 5.1 audio card.
Line Out and Rear Out jacks can be used simultaneously to power 4.1
channel speaker systems,for example , FourPointSurround
systems from Cambridge SoundWorks.
2 SB Live! Platinum 5.1
Jacks and connectors on the Sound Blaster Live! Platinum 5.1 card
™
speaker

What’s Next... Follow Easy Steps 1-2-3
Follow Easy Steps 1-2-3 to quickly install the SB Live! Platinum 5.1
audio card on your computer:
English
Step 1
Step 2
Step 3
Installing the Hardware
• Install card in spare expans ion slot
• Install Live! Drive IR in vacant drive bay and
connect ca bles
• Connect powered speakers or headphones
For more information, refer to “Step 1: Installing
the Audio Card” on page 4.
Installi ng D evi ce Dri vers
• Insert installation disk in CD-ROM drive
• For Windows 95/98/ME installation, use
Update Device Driver Wizar d
instructions
• For Windows NT 4.0, 2000 installation, use
Creative Audio Software
instructions
• Check d evice dri vers are co r rectly insta lled
For more information, refer to “Step 2: Installing
Device Drivers” on page 8.
Installing the Software
• Insert installation disk in CD-ROM drive
• Use
Install Selected Components
follow in s t r u ct ions
For more information, refer to “Step 3: Installing
the Software” on page 10.
and follow
screen an d foll ow
screen and
Prod uct Guide 3
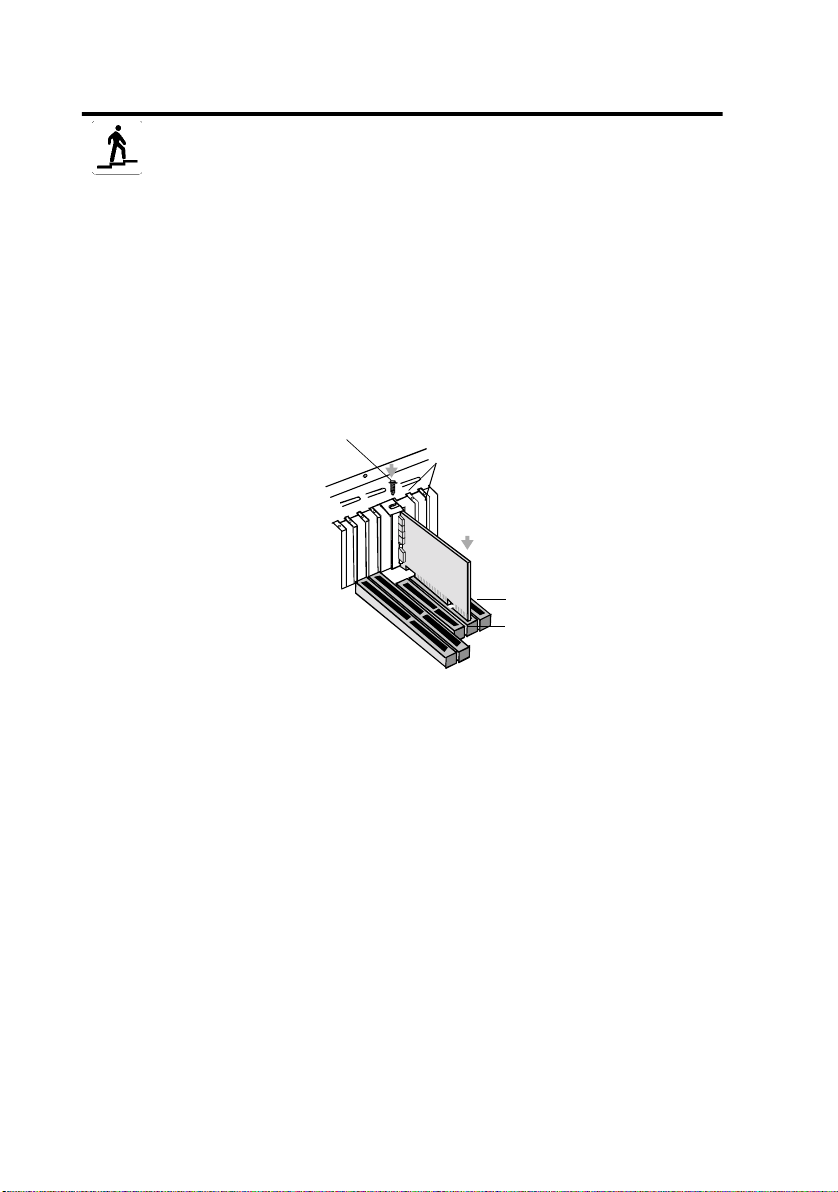
Step 1: Install ing the Audio Ca rd
To install the SB Live! P latinum 5.1 audio card, follow these steps:
1. Turn off and unplug your computer and all periphe ral devices.
2. Remove the computer cover . If necessary, co nsult your computer
manual for inst r uctions.
3. Locate a spare PCI expansion slot for the SB Live! Platinum 5.1
card. W ith the slot cove r remo ved, h old the card by its top edg e and
carefully press it firmly into the slot. Ensure card is fully inserted
into slot. Fasten the retaining bracket with a screw.
ii.Fasten the card to
the slot with a screw.
Unused brackets
i.Gently press the audio
card into the slot.
PCI slot
ISA slot
4. Plug one end of the CD-ROM audio cable into the CD Audio
connector on the card and plug the other end of the cable into the
internal audio conne ctor at the rear of the CD-ROM drive.
5. Connect po wered speakers or headpho nes into the appr opriate j ack
on the card. Refer to the section “Identifying Connectors on your
Audio Card:” on page 2.
6. Replace the compute r cover and turn on your computer and all
peripheral devices.
4 SB Live! Platinum 5.1

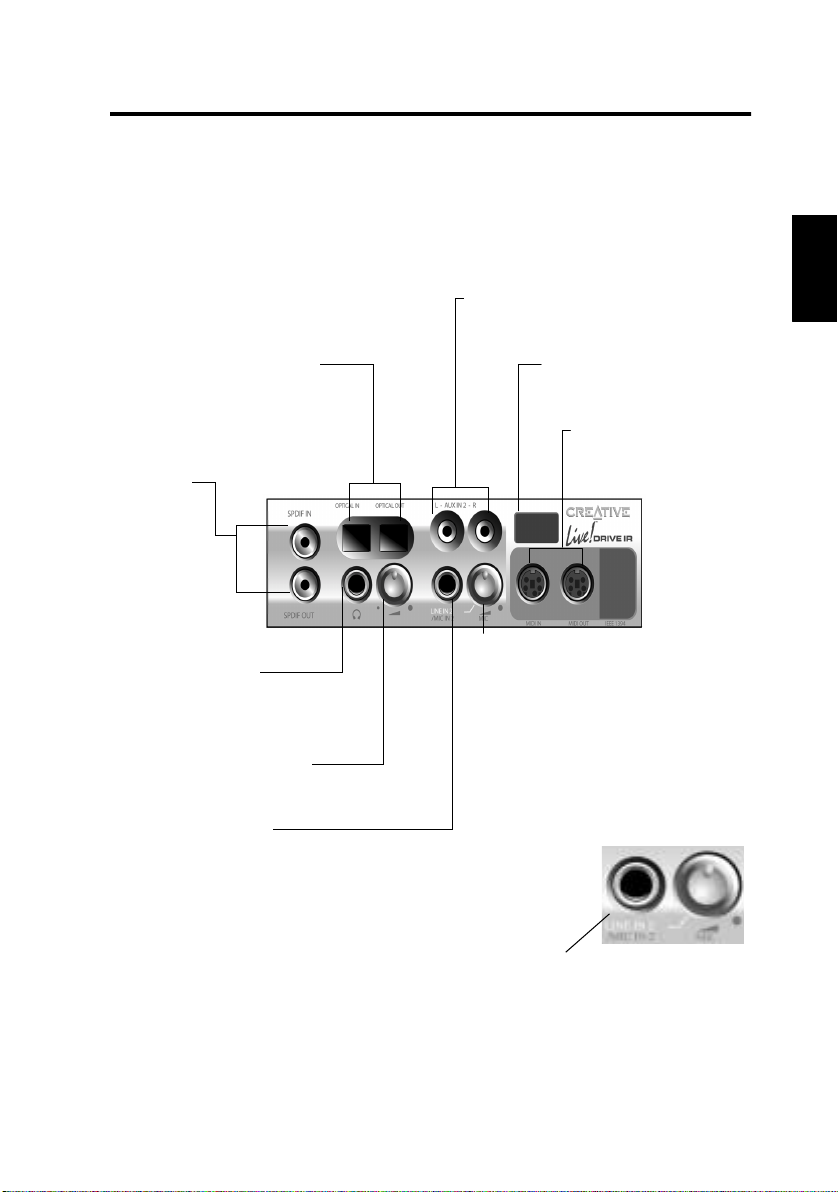
Installing Live! Driv e IR
Your Live! Drive IR
The front panel of your Live! Drive IR has these jacks, co nnec tors and controls:
Optical SPDIF In/Out
connectors
Connects to digital audio
devices such as DAT and
MiniDisc recorders, via
optical input/output.
RCA SPDIF In/Out
jacks
Connects to digital
audio devices such as
DAT and MiniDisc
record e rs, vi a RCA
input/output.
¼” Headphones jack
Allows you to connect to a pair
of high-quality headphones.
Your speaker output will be
muted when you connect the
headphones.
Headphones Volume Control
Controls the headphones output
volume.
¼” Line In 2/Mic In 2 jack
Allows you to connect to a
high-quality dynamic microphone
or audio device such as an electric
guitar, DAT, or MiniDisc player.
RCA Auxiliary In jacks
Connects to consumer equipment such as
VCR, TV and CD player, via RCA auxiliary
outputs.
Infrared Receiver
Lets you control your PC using the
RemoteCenter remote control.
MIDI In/Out connectors
Connects to MIDI devices
using the Mini
DIN-to-Standard DIN cable
provided.
Line In 2/Mic In 2 selector
(Microph one Gain Control)
To switch to Line In 2, turn the knob
anti-clockwise over the Line In 2/Mic
In 2 mode separator mark until a
“click” sound is heard. To switch back
to Mic In 2, turn the knob clockwise
over the separator mark until a “click”
sound is heard. To control the
microphone gain, continue to turn
clockwise.
English
Line In 2/Mic In 2 mode
separator mark
Prod uct Guide 5

If a particular INPUT source (for e xample, Li ne In 2) is supporte d by the
Live! Driv e IR as well as the Digital I /O card, only the input on the Li ve!
Drive wil l be enabled. However, using the microphone via the Line In
2/Mic In 2 input on the Live! Drive IR will also disable the Line In 2
input on the Digital I/O card.
T o connect to your exi sting computer he adphones and microphone t o the
Live! Drive IR, use the ¼” to 3.5mm adapter provided.
It is recomme nded to lower the gain level of the Mic In 2 jack to the
minimum before connecting a microphone.
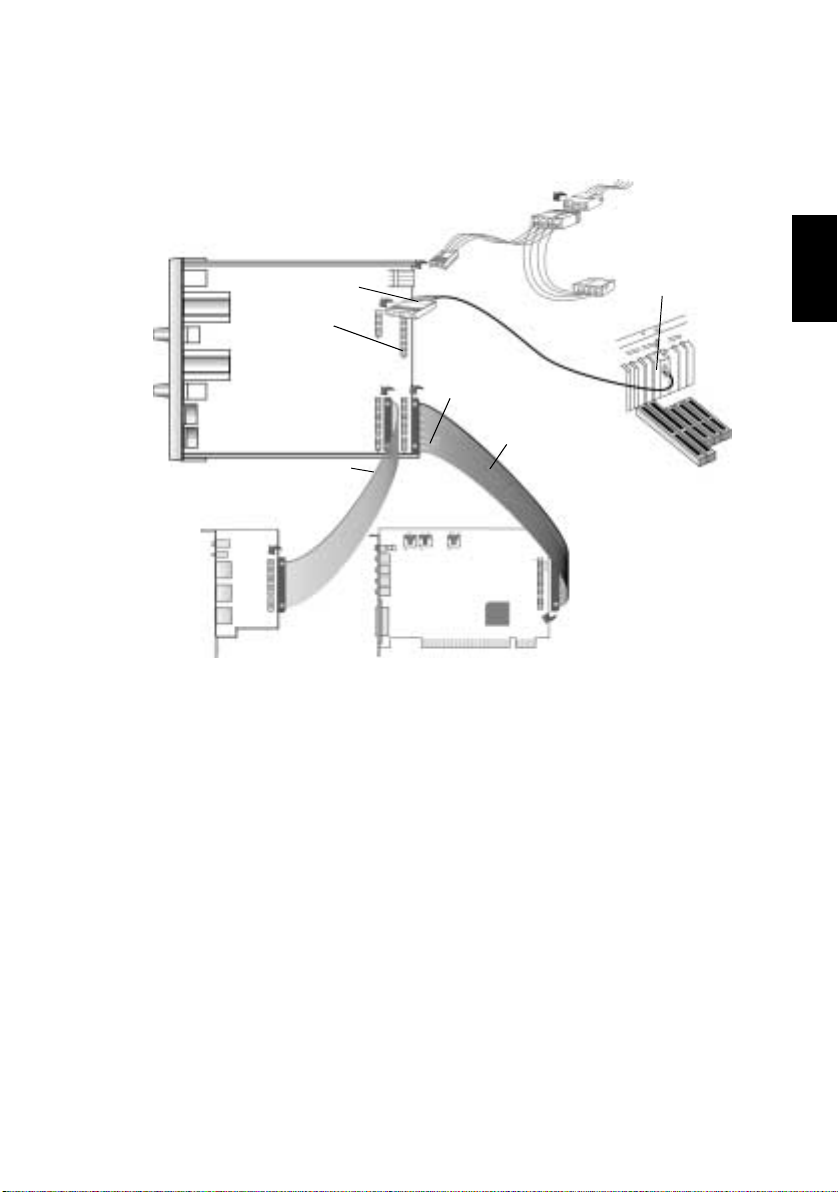
Insert the Live! Drive IR into the System
1. Pass the foll owing cable ends fr om the inside of the casi ng through
the vacant 5¼” drive bay, and then leave the cables dangling
halfway on the outside of the casing:
Smal le r end o f th e power spli tter cable
❑
Dark grey flat cable end with a black circle near the connector
❑
(Optional) Any end of the light grey flat cable (if you want to
❑
connect to a Digital I/O card from an earlier purchase)
(Optional) Cable end of the Digital DIN metal brack et (if you
❑
want to connect to F P S 2000, DTT2500 or DTT3500 speakers)
For optional accessories pl ease see the o n l i n e User’s Guide
6 SB Live! Platinum 5.1
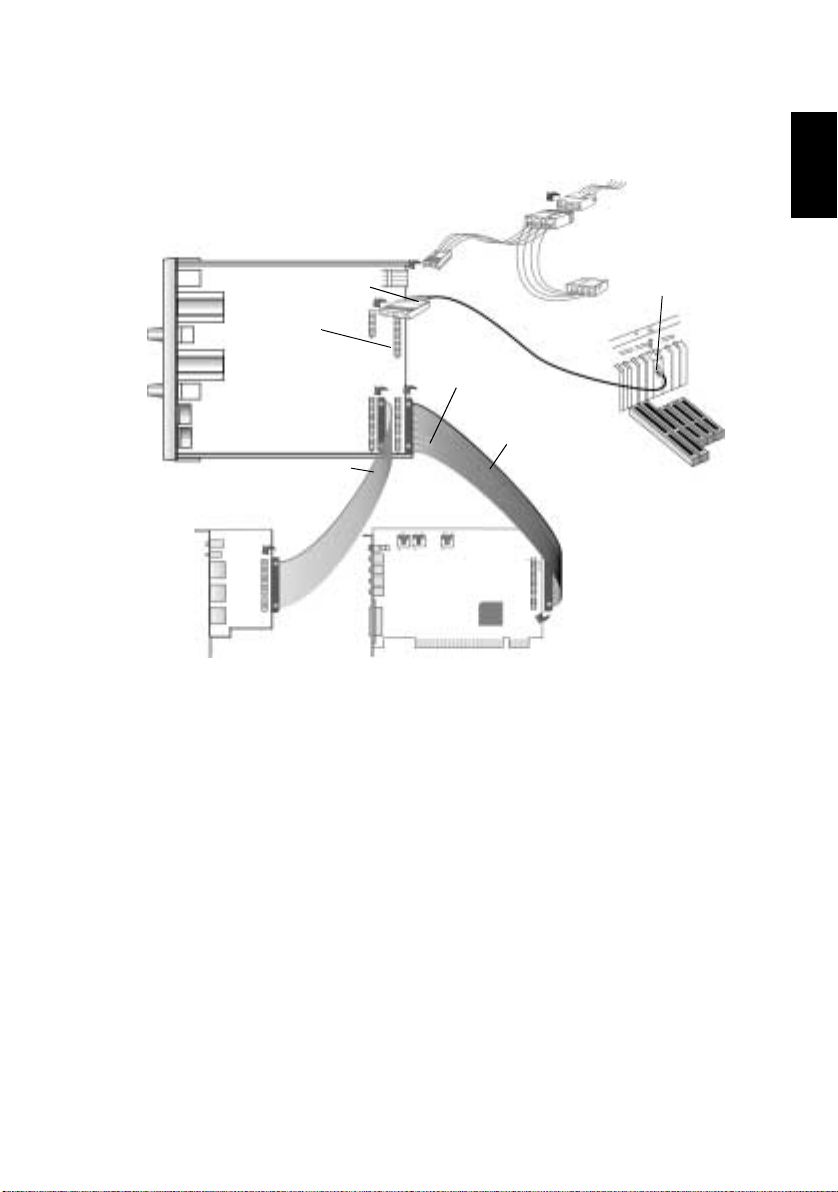
Live! Drive IR
(
Optical) Digital
I/O card
2. Connect the cables to the Live! Drive IR as shown.
Power splitter cable
Orange-coloured wire
Connector for
future upgrades
Red-coloured
wire
Light grey
flat cable
Digital
DIN cable
Black circle on the
underside of the cable
Sound Blaster Live! card
Red-coloured
wire
Dark grey
flat cable
To sy stem
power supply unit
Digital DIN
metal bracket
English
3. Slide the Live! Drive IR into the vacant 5¼” d rive bay, and then
secure its sides to the casing with the screws provided.
Prod uct Guide 7
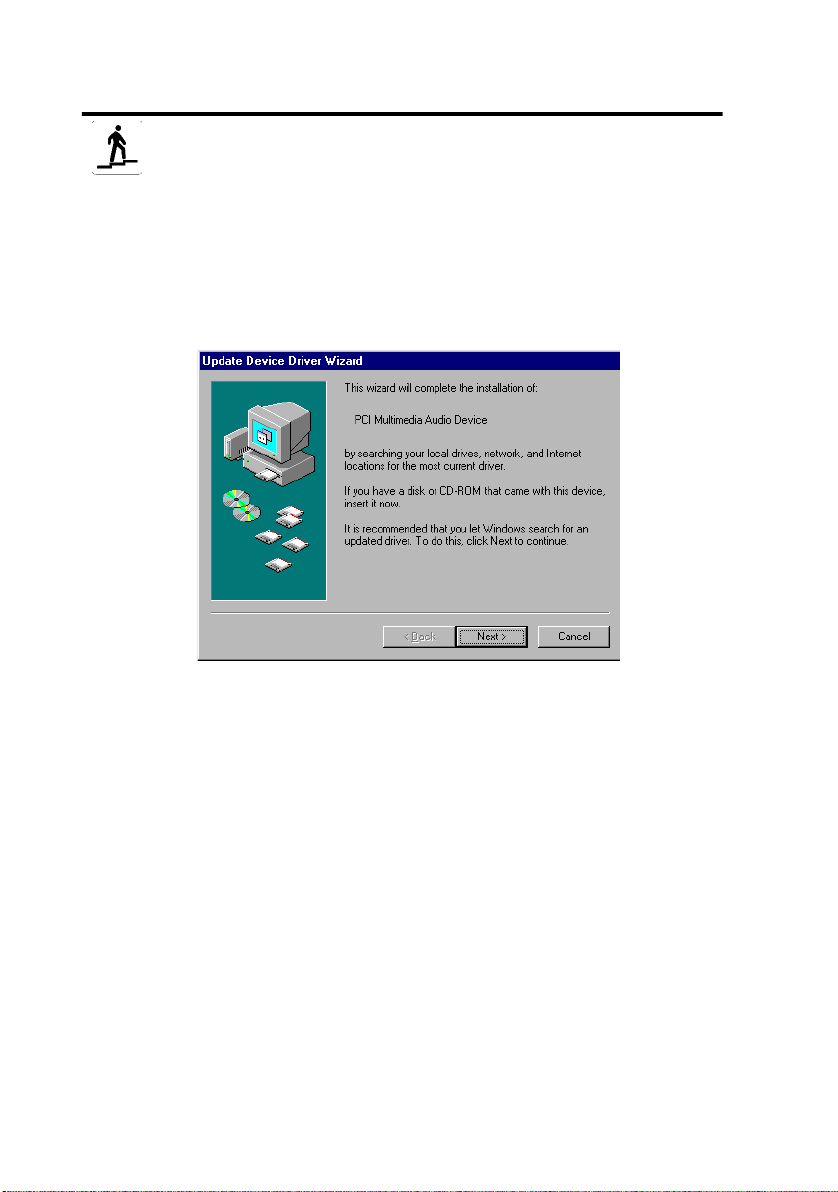
Step 2: Installi ng Device Driver s
If you are running Windo ws 95/98/Me, follow these
steps:
1. Turn on your computer.
Windows 95/98/Me starts and brie fly displays a message that the
new hardware (audio card) has been detected. Then the following
screen appears:
2. Read the instructions on screen and click Next.
Windows searches for the device driver. If none is found,
the
Update Device Driver Wizard
3. Click Other Locations. The
box appears.
4. Click Browse. The
5. Double-click th e CD-ROM drive icon and select the folder:
Audio\English\Win9xdrv or Wdmdrv.
6. Click OK twice and then cli ck Finish when the Update Device
Driver W izard dial og box re-appears. The required fi les are copied
to your computer’s hard disk.
7. If the Copying Files dialog box notifies you that the
cannot be found, then repe at steps 4 and 5, select the
and then click OK tw ice. The
computer’s hard disk.
Brow se for Fo lder
dialog box re-appears.
Select Other Locations
dialog box appears.
file is copi ed to your
a3d.dll
dialog
a3d.dll
a3d.dll
file
file,
8 SB Live! Platinum 5.1

8. Click Finish when the Update Device Dr iver W i zard dialog box
re-appears and then restart your computer.
To check that device drivers are correctl y installed, click on the System
icon in the Control P anel. Select Device Manager and double-click on
Sound, Vi deo and Game Controllers icon to view installed drivers. If a
!
icon appears beside the listed device driver, select the device, click
or
Remove and repeat steps 1-8.
If you are running Windows NT 4.0 /2000, follow these
steps:
1. Turn on your computer.
2. Insert the insta llation disc into your CD-ROM drive.
The
Creative Audio Software
3. Follow the instructions on screen to complete the installation, after
which you must reboot your PC.
To check that device drivers are correctly installed, click on the
Multimedia icon in the Control Panel. Select Devices and double-click
on Sound, V ideo and Game Controllers icon to view installed drivers. If
you encounter problems, select the de vice, click Remove and repea t steps
1-3.
screen appears.
English
?
Prod uct Guide 9

Step 3: Install ing the So ftware
To install the SB Li ve! Platinum 5.1 softwar e, follow these steps :
1. Turn on your computer.
2. Insert the insta llation disc into your CD-ROM drive, Windows
starts and the following screen appears.
3. Click OK.
4. Follow the instructions on screen to install the software.
If you need more detailed information on the installation and usage of
your SB Live! Platinum 5.1 card, refer to the online guide, SB Live!
Platinum 5.1
In Win do ws 95 /98/ NT 4. 0, 2000 an d ME dou ble c li ck the .e x e f il e
in
The Acrobat Reader 4.05 is now installed. Double-click the icon and
select
the online Guide.
10 SB Live! Platinum 5.1
User’s Guide
D:\MANUALS\ENGLISH\
File, Open
D:\MANUALS\ENGLISH\ENGLISH.PDF to access
on your installation CD.

If Y ou Have a Problem
Please retain all contents including packaging and proof of purchase
until you are fully s atisfied with the product.
If you find that you have a problem with your Creative product and
believe that it needs to be repaired or replaced, you s hould verify the
purchase date and take the appropriate action as detailed below:
Less than 30 days since date of pur c ha se
Should your store recei pt i ndica te tha t t he produc t is l ess than 30 days
old, you ha ve the o pti on of ca lling Techni cal Supp ort for as sistan ce or
returning the full product to the dealer/reatailer for a replacement or
credit (see Creative Technical Services section for contact numbers).
More than 30 days since date of purc ha se
First contact European Technical Support (see Creative Technical
Services section for contact numbers) to establish the nature of the
problem and details on our repair returns procedure. Creative Labs
requires that all retu rns for repai r/replace ment must f irst be iss ued with
an authorisation number.
Returning a product f or repair
Contact Technical Support to receive your authoris ation
❑
number for repair/replacement of product.
Te chnic al Suppo rt will c ommunica te h o w t o retu rn t he pro duct
❑
in question for repair/replacement.
You should only return the hardware item in question and
❑
return it to the address detailed by technical support. Please
retain all software, accessories and the original packaging.
Please quote th e aut horis ation number c learly o n t he out s ide o f
❑
the packaging, in which you return the hardware item in
question.
Upon receipt of the f aulty item, Crea tive Labs will process your
❑
request and arrange return.
English
Product Guide 11

Creative may replace or repair the product with ne w or reconditioned
parts, and the faulty parts will become the property of Creative. The
warranty period for your repaired/repl acement item is 90 days from the
date of shipment from Creati v e, or what is left on the origin al item ’s
warranty, whichever is longer.
T o avoid ta riffs when shipping a produc t to Creativ e Labs from outside
the E.U., you mus t complete the relevant customs d ocumentation
before shipping the product (please allow 30 days).
Limited Wa rranty
Creative Labs (Ireland) Limited (“Creative”) warrants to you, the
original purchaser only, that the hardware product will be free of defects
in materials and workmanship for a period of two years after the date of
purchase, or such other period as may be expressly specified by Creative
or required by applicable law (“Warranty Period”).
Creative’s entire liability a nd your r em edy will be, at Creative’s sole
discretion, the r epair or repla cement (wit h the same or simil ar model)
of any hardware or accompanying item(s) not meeting the “Limited
Warranty” explained above that is returned to Creative’s authorised
distribut or or dealer during the Warranty Period with a copy of
your receipt.
What this warranty does not cover
To the maximum extent permitted by applicable law, Creative
disclaims all other warranties and conditions, expressed or implied,
including the conditions of quality, merchantability or fitness for a
particular pu rpose with res pect to th e use of this product. Cre ativ e also
disclaims any obligation to support products for all operating
environments - for example, by ensuring interoperability with future
versions of software or hardware. In no event shall Creative or its
licensors be liable for any in direct, incidenta l, spe cial or cons equentia l
loss or for any lost profits, savings or data aris ing from or relating to
the use of this product , e ven if Creativ e or its licensors have been
advised of the possibility of such loss.
12 SB Live! Platinum 5.1

Specifically, this wa rranty does not cover fail ures of the product
which result from accident, abuse, misuse, alterations (by persons
other tha n Crea tive or it s a uthorised repai r agen ts), moistu re, c orrosi ve
environm ents, shipping, high voltage surges, or abnormal working
conditions. This warranty does not cover normal wea r and te ar.
You are specifically advised to take a backup copy of any software
provided with the Creative product for s ec urity purposes.
This warranty gives you specific legal rights. You may have other rights
which vary fr om country to country. Certain limitations in this w arranty
are not permitte d by the jurisdiction of some countries, so some
limitations here may not apply to you.
English
Product Guide 13

Bienvenue d a ns SB Live! Platin um
5.1
Ce
Guide du produit
installer et con figurer rapidement SB Live! Platinum 5.1
ordinateur.
fournit des instructions faciles à suivre pour
Contenu du coffret d’installati on
V ot re coffret d ’installat ion SB Live! Platinum 5.1 contient l e matériel,
le logiciel et la documentation suivants :
Carte audio SB Live! Platinum 5.1, Live! Drive IR, cables et
❑
adaptateur pour casques.
Le progiciel (sur CD-ROM uniquement) contenant les
❑
utilitaire s Crea tiv e ains i que les pi lot es pour Windows
Windows
Le câble audio de CD-ROM.
❑
Le câble CD SP/DIF
❑
Ce
❑
Les log i ci el d’autre fabricants (sur CD-ROM uniquement)
❑
®
NT 4.0/2000 et W indows® ME
Guide du pr oduit
.
Configuration du système
SB Live! Platinum 5.1 requiert la configuration suivante :
Processeur Pentium® :
❑
166 MHz pour Windo ws 95/98/ME,
200 MHz pour Windo ws NT 4.0/2000
Processeur de la carte-mère intel ou 100 % compatible.
❑
Windows 95, 98, ME ou Windows NT 4.0 ou 2000
❑
16 Mo de RAM pour Windows 95/98/ME
❑
(32 Mo de RAM recommandé),
32 Mo de RAM po ur Window s N T 4. 0
64 Mo de RAM pour Windo ws 2000
160 Mo d’espace disque disponible
❑
Emplacemement PCI 2.1demi-longueur
❑
Casq ue s ou ha u t-p ar l eu r s avec am p li fic at eu r
❑
Un lecteur de CD-ROM pour l’installation du logiciel
❑
Ouvrir la baie du lecteu r pour le le cteur à infra-rouge Live!
❑
sur votre
®
95/98,
Français
Les logiciels d’autres fabricants peuvent nécessi ter une configuration
plus puissante
Guide du produit 15
Avant de commencer
S
c
d
a
c
d
Ouvr ez le co ffre t d ’insta llation de SB Live! Platinum 5.1 et vérifiez
que tous les éléments répertoriés à la page précédente ont été livrés.
Si l’un de ces éléments est manquant ou défectueux, contactez le
revende ur de votre coffret d’installation SB Live! Platinum 5.1.
Identifica tion d es co nn ect eurs de votre carte audio
Connecteur CD Audio
Connexion à la sortie audio analogique d’un
lecteur de CD-ROM ou de DVD-ROM à l’aide
d’un câble audio.
Connecteur pour répondeur téléphonique
Connexion mono à partir d’un modem vocal
standard et transmission de signaux
microphone au modem.
ortie prise jack
numérique/analogique
Une sortie à 6 chaînes ou une sortie
ompressée AC-3 SPDIF (format de son
numérique dolby) pour une connection à
es appareils numériques externes ou à
un système de haut-parleurs numériques.
Prend aussi en charge les chaînes
nalogiques des enceintes basses et du
entre pour la connnection au système
e haut-parleurs analogi ques v ers ion 5.1.
Prise d’entrée ligne
Connexion d’appareils externes
(lecteur de cassettes, lecteur
DAT, lecteur MiniDisc).
Prise d’entrée microphone
Connexion d’un microphone
externe pour entrée vocale.
Prise de sortie arrière
Connexion de haut-parleurs
amplifiés ou d’un amplificateur
externe pour sortie audio.
Branchement possible d’un
casque.
Prise de sortie arrière
Connexion de haut-parleurs
amplifiés ou d’un amplificateur
externe pour sortie audio.
Connecteur manette de jeu/MIDI
Connexion d’une manette de jeu ou d’un
périphérique MIDI. Vous pouvez acheter
un kit MIDI optionnel vous perm ettant de
connecter simultanément la manette de
jeu et le périphérique MIDI.
Jacks et connecteu rs de la carte audio SB Live! Platinum 5.1
Connecteur AUX
Connexion à des sources audio internes
telles que tuner TV, MPEG, ou autres cartes.
Connecteur CD SPDIF
Connexion à la sortie SPDIF
(audio numérique) d’un lecteur
de CD-ROM ou de DVD-ROM.
Connecteur
d’extension
audio ( E /S
numérique)
Connexion à
la car te E/S
numérique ou à
la baie du lecteur
(disponible
séparément).
Avertissement :
Il ne
s’agit pas d’une
interface IDE. Ne
l’utilisez
pas
pour
connectcter vos
périphériques IDE.
L’électricité statiqu e peut e ndomma ger le s compo sants électroni ques sensibles .
Touchez un e pièce métallique du système afin de vous relier à la terre et vous
débarrasser de toute électricité statiqu e avant d’installer la Carte audio
SB Live! Platinum 5.1.
Les prises jack de sortie ligne et de sortie arrière peuvent être utilisées
simultanément pour connecter des systèmes de haut-parleurs (4.1), par
exemple, FourPointSurround
16 SB Live! Platinum 5.1
™
de Cambridge SoundW orks.

Ensuite... Suivez les étapes faciles 1-2-3
Suivez les étapes faciles 1-2-3 afin d’installer rapidement la carte
SB Live! Platinum 5.1 sur votre ordinateur :
Etape 1
Etape 2
Installation de la carte audio
• Installez la carte dans l’emplacement
d’extension libre,
• Installe z le Live! Drive IR dans une baie de
lecte u r libre et connectez les câbles.
• Connectez les haut-parleurs amplifiés ou
les c asques,
Pour plus d’informations, reportez-vous à
“Etape 1 : Installation de la carte audio” à
la page 18.
Installation des pilotes de périphérique
• Insérez le disque dans le lecteur de
CD-ROM,
• Pour une installation sous Windows
95/98/ME, u tilisez l’
pilote de périphérique
instructions,
• Pour une installation sous Windows NT 4.0/
2000, utilisez l’écran
et suivez les instructions,
audio
• Assurez-vous que les pilotes de périphériques
sont cor rectement installés,
Pour plus d’informations, reportez-vous à
“Etape 2 : Installa tion des pilotes de
périphérique” à la page 22.
Assistant Mise à jour du
et suivez les
du logiciel Creative
Français
Etape 3
Installation du logiciel
• Insérez le disque d’installa tion dans le lecteur
de CD-ROM,
• Utilisez l’écran
composants sélectionnés
instructions,
Pour plus d’informations, reportez-vous à
“Etape 3 : Installa tion du logiciel” à la page 24.
d’installation des
et suivez les
Guide du produit 17

Etape 1 : Installation de la carte audio
Pour installer la Carte audio SB Live! Platinum 5.1, suivez les
étapes ci-après:
1. Eteignez et débranchez votr e ordin ateur ai nsi que to us les
périphériques.
2. Retirez le ca pot de l’ordinateur. Consultez au besoin la
documentation re lative à votre ordinateur.
3. Recherchez un emplacement d’extension PCI libre pour la carte
SB Live! Platinum 5.1. Après avoir retiré la protection de
l’emplacement, saisissez la carte par le bord supérieur et insérez-la
avec précaution mais fermement dans l’e mplacement. Veillez à ce
que la car t e soit bien i nsérée dans l'e mplacemen t. Fi xez le support
restant à l’aide d ’une vis.
ii. Fixez la carte dans
l’emplacement à l’aide
d’une vis.
Supports inutilisés
i. Insérez doucement la
carte audio dans
l’emplacement.
Emplacement PCI
Emplacement ISA
4. Connectez l’une des extrémités du câble de CD-ROM dans le
connecteur audio CD de la carte et connectez l’autre extrémité du
câble dans le connecteur audio interne à l’arrière du lecteur
de CD-ROM.
5. Connectez l es haut-parleurs amplifiés ou les casques dans la fiche
appropriée de la carte. Reportez -vo us à la section “Identification
des connecteurs de v otre carte audio” à la page 16.
6. Replacez le capot de l’ordinateur puis allumez votre ordinateur et
tous ses périphériques.
18 SB Live! Platinum 5.1
Installation Live! Drive IR
D
Votre Live! Drive IR
Le panneau av ant du Live! Drive IR comprend les pris es, les connecteurs et les
contrôles suivants :
Prises d’entrée auxiliaires RCA
Connexion d’équipement électronique
grand public, tel que magnétoscope, TV et
Connecteurs d’entrée/sortie
SPDIF optiques
Connexion de périphériques audio
numériques, tels qu’enregistreurs DAT
et MiniDisc, via entrée/sor tie optique.
Prises
d’entrée/sortie
SPDIF RCA
Connexion de
périphériques audio
numériques, tels
qu’enregistreurs DA T
et MiniDisc, via
entrée/sortie RCA.
Prise ¼” pour casque
Permet la connexion d’un casque de
haute qualité. La sortie haut-parleurs
est coupée lorsqu’un casque est
connecté.
Contrôle du volume du casque
Contrôle le volume de sortie du
casque.
Prise ¼” d’entrée
ligne 2/éntrée microphone 2
Connexion d’un microphone dynamique de
haute qualité ou d’un périphérique audio, tel
qu’une guitare électrique, un lecteur DAT ou
MiniDisc.
lecteur de CD, via sorties auxiliaires RCA.
Récepteur infra-rouge à distance
Vous permet de commander votre
ordinateur grâce à la
télécommande RemoteCenter.
Connecteurs entrée/sortie MI
Connection aux appareils MIDI
en utilisant le câble aux deux
connecteurs DIN Mini et DIN
standard fournis.
Sélecteur d’entrée ligne 2/entrée
micr ophone 2 (comman de de ga in du
microphone)
Pour passer à l’entrée ligne 2, tournez le bouton
dans le sens inverse des aiguilles d’une montre
au-delà de la marque de séparation du mode
entrée ligne 2/entrée microphone 2 jusqu’à ce
que vous entendiez un “clic”. Pour repasser à
l’entrée microphone 2, tournez le bouton dans le
sens des aiguilles d’une montre au-delà de la
marque de séparation jusqu’à ce que vous
entendiez un “clic”. Pour contrôler le gain du
microphone, continuez à tourner
dans le sens des
aiguilles d’une
montre.
Marque de séparation
du mode entrée ligne
2/microphone 2
Français
Guide du produit 19

Si une sourc e d’ENTREE par ticulière (p ar e xample, entr ée lign e 2) est
prise en charge par le Liv e! Dr ive I R et la cart e d’E/S numérique, seule
l’entrée du Live! Drive IR sera activée. En revanche, l’utilisation du
microphon e via l’entrée ligne 2/ent rée microphone 2 du Live! Drive
IR désactive également l’entrée ligne 2 de la carte E/S numérique.
Pour connec ter le casque et le micr ophone existants de votre
ordinateur au Live! Drive IR, utilisez l’adaptateur ¼”-3,5 mm fourni.
Il est rec o m mandé de baisser le niveau de gain de la prise jack 2
d’entrée Micro phone au minimum avant de brancher un microphone.
Insertion du Live! Drive IR dans le système
1. Passez les extrémités de câble suiv antes de l’intérie ur du boîtier par
la baie de lecteur 5,25 pouces libre, puis laissez les câbles à demi
en de hors du boîtier :
Plus petite ex trémité du câble répartiteur d’alimentation
❑
Extrémité du câble plat gri s fon cé avec un cercle noir près du
❑
connecteur
(Facultatif) Toute extrémité du câble plat gris clair (si vous
❑
souhaitez conne cter une carte d’E/S audio achetée
précédemment)
(Facultatif) Extrémité du câble du support métallique DIN
❑
numérique (si vous souhaitez connecter des haut-parleurs
FPS2000, DTT2500 ou DTT3500)
Pour les accessoires en option, consultez le Guide de l'utilisateur
en ligne
20 SB Live! Platinum 5.1
2. Connectez le s câbles au Live! Drive IR comme illus tr é.
Câble répartiteur d’alimentation
Live! Drive IR
Fil orange
Connecteur pour
mises à niveau
futures
Fil rouge
Câble plat
gris clair
Câble DIN
numérique
Cercle noir sur le
dessous du câble
Fil rouge
Carte Sound Blaster Live!
Câble plat
gris foncé
Vers l’alimentation
du syst ème
Support
métallique DIN
numérique
Français
3. Faites gli sser le Liv e! Dr iv e IR da ns la baie de lect eur 5,25 pouces
libre, puis f ixez ses parois latérales au boîtier à l’aide des vis
fournies.
Guide du produit 21
 Loading...