


Language TOC.fm Page i Monday, May 31, 2004 2:40 PM
English. . . . . . . . . . . . . . . . . . . . . . . . . . . . . . . . . . . . . . . . . .1
Français. . . . . . . . . . . . . . . . . . . . . . . . . . . . . . . . . . . . . . . . .7
Español . . . . . . . . . . . . . . . . . . . . . . . . . . . . . . . . . . . . . . . .13
Brasileiro. . . . . . . . . . . . . . . . . . . . . . . . . . . . . . . . . . . . . . . 19
. . . . . . . . . . . . . . . . . . . . . . . . . . . . . . . . . . . . . . .25
. . . . . . . . . . . . . . . . . . . . . . . . . . . . . . . . . . . . . .31
. . . . . . . . . . . . . . . . . . . . . . . . . . . . . . . . . . . . . . . .37
Türkçe . . . . . . . . . . . . . . . . . . . . . . . . . . . . . . . . . . . . . . . .43
i

Language TOC.fm Page ii Monday, May 31, 2004 2:40 PM
ii

CLI_WebCam_Live!_QSB.book Page 1 Thursday, May 27, 2004 2:22 PM
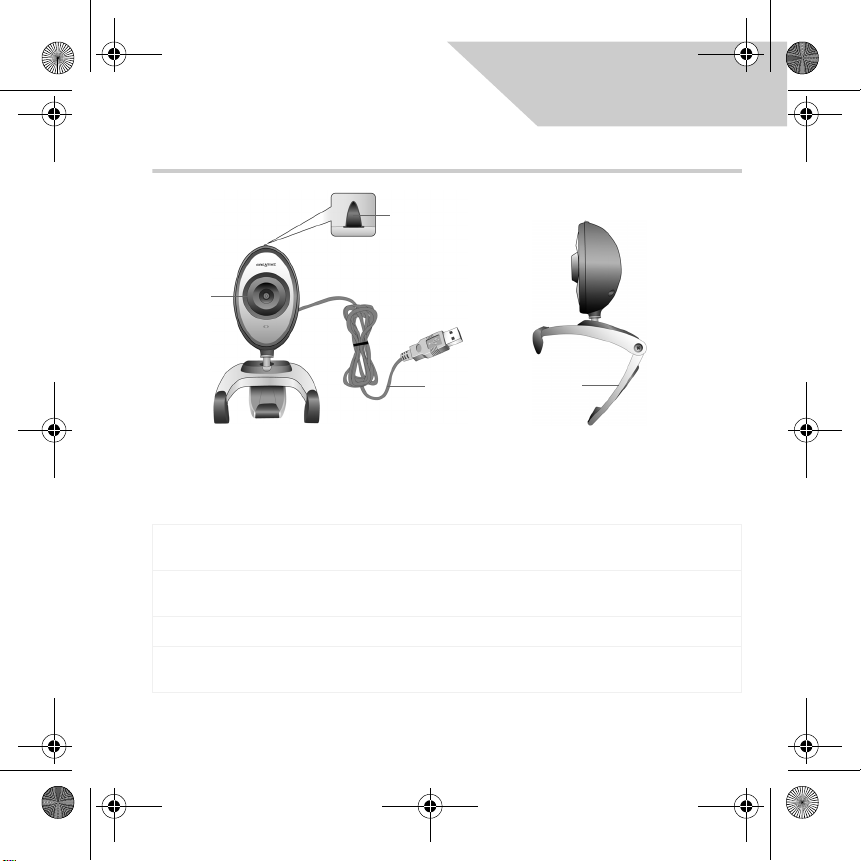
About Your Creative WebCam
Snapshot
button
Focus ring
English
USB cable
Hinged
lever
Front View Side View
Figure 1
Focus ring
Snapshot
button
USB cable Connect it to your computer's USB port.
Hinged lever Use this to mount your Creative WebCam on an LCD display panel.
Adjusts the view focus. Point the lens toward your subject and then rotate this ring in
a clockwise or counterclockwise motion until the image is in focus.
Press it to launch WebCam Center and capture images.
1
CLI_WebCam_Live!_QSB.book Page 2 Thursday, May 27, 2004 2:22 PM
Getting Started
Installing Your Creative WebCam
1
1
1. Do not connect Creative WebCam Live! to your computer before installing the
drivers. If you accidentally begin installation with Creative WebCam Live! connected
and the Add New Hardware Wizard or Found New Hardware Wizard dialog
box appears, click the Cancel button.
2. Insert the Creative WebCam Live! Installation CD into your CD-ROM drive. If it does
not run automatically, click Start → Run and type d:\setup.exe (replace d:\ with the
drive letter of your CD-ROM drive).
3. Click the options for installing drivers and applications.
4. Follow the instructions on the screen to complete the installation.
You may be asked, after an application is installed, if you want to restart your computer.
Select No until all the drivers and applications are installed.
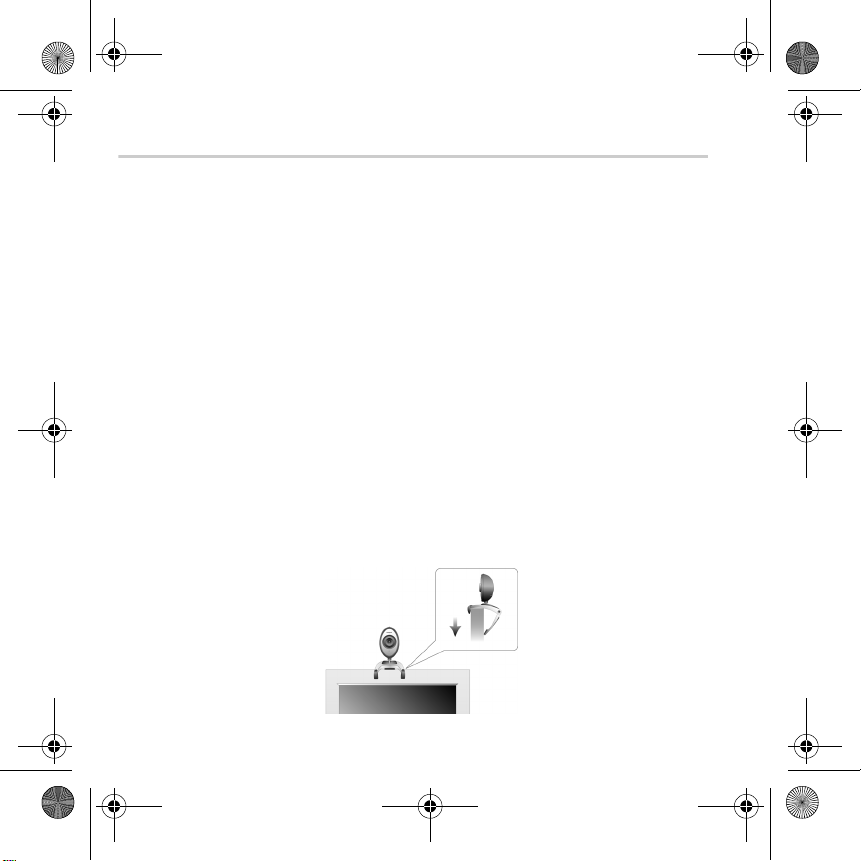
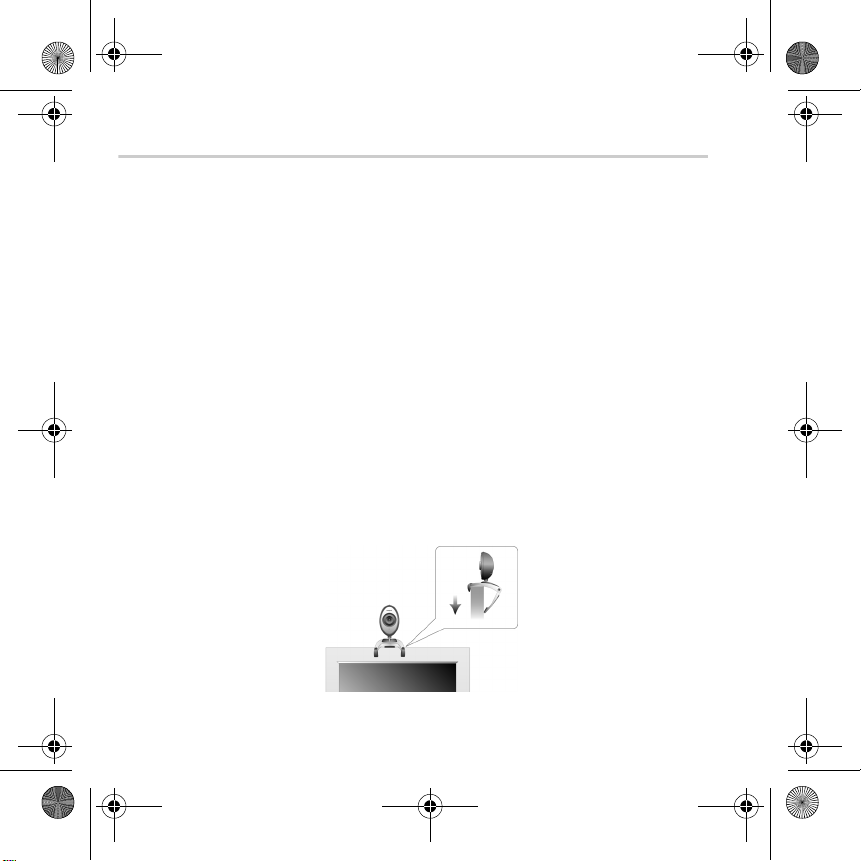
5. Place your Creative WebCam Live! on top of your computer monitor or other flat
surface. For LCD flat panel monitors or notebook computers, use the integrated
hinged lever to balance the Creative WebCam (see Figure 2).
Figure 2
2
CLI_WebCam_Live!_QSB.book Page 3 Thursday, May 27, 2004 2:22 PM
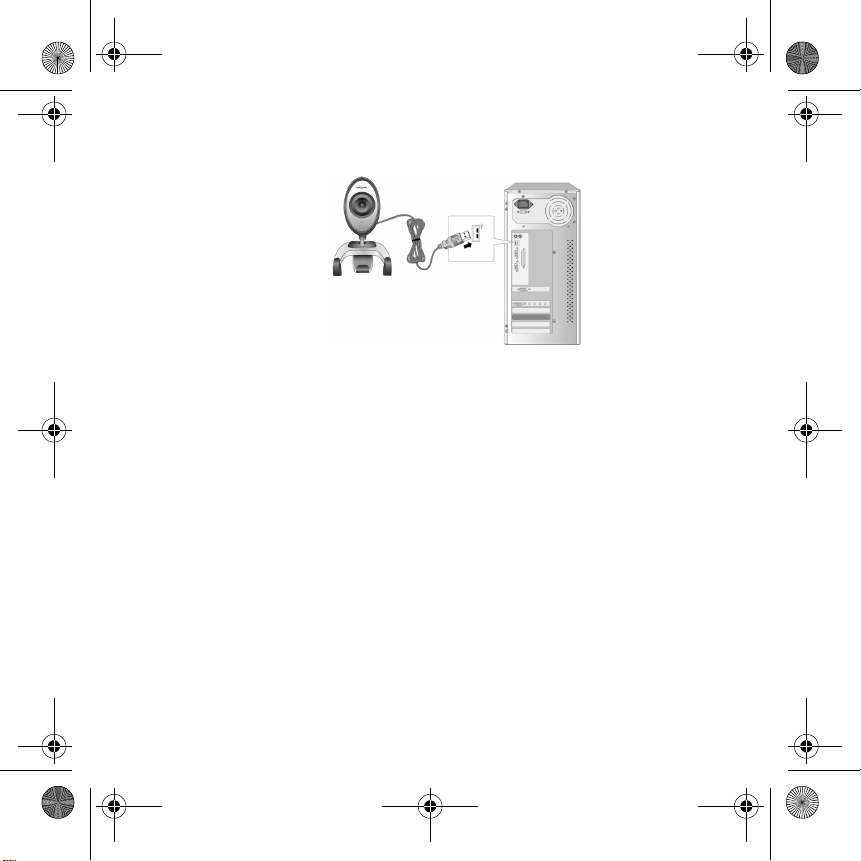
6. Connect your Creative WebCam Live!'s USB cable to an available USB port on your
computer (see Figure 3). Windows automatically detects the device.
Figure 3
In Windows
i. When the Found New Hardware Wizard dialog box appears, select Install the software
ii. When a Hardware Installation dialog box appears, click the Continue Anyway button.
®
XP only:
automatically (Recommended), and then click the Next button.
In Windows 2000 only:
When a Digital Signature Not Found dialog box appears, telling you that Creative WebCam
Live! has been detected, click the Yes button.
In Windows Me and Windows 98 SE only:
i. If you are prompted to insert the Windows 98 SE or Windows Me CD, replace the Creative
WebCam Live! Installation CD with the appropriate CD.
ii. In the Insert Disk dialog box, click the OK button.
7. Follow the instructions on screen to complete the installation.
8. Restart your computer if you are prompted to do so.
3

CLI_WebCam_Live!_QSB.book Page 4 Thursday, May 27, 2004 2:22 PM
Verifying the Installation
2
2
1. Right-click the My Computer icon on your desktop.
2. On the menu that appears, click Properties.
In Windows XP and Windows 2000 only:
In the System Properties dialog box, click the Hardware tab. Click the Device Manager
button.
In Windows Me and Windows 98 SE:
In the System Properties dialog box, click the Device Manager tab.
3. Click the plus (+) sign next to the Imaging Device icon. The entry “Creative
WebCam Live!” appears.
Using Your Creative WebCam
3
3
Taking a Photo
1. Click Start → Programs → Creative → Creative WebCam → Creative
Web C a m C e n t e r.
2. In the Creative WebCam Center window, click the Capture tab.
3. Click the Photo Resolution box and select the resolution that you want.
4. Click the Snap photo button to capture an image. Images are saved as files in the
default media folder.
To view the photos in the image viewer, double-click the image files in the Thumbnails/
Details pane.
4

CLI_WebCam_Live!_QSB.book Page 5 Thursday, May 27, 2004 2:22 PM
Recording a Video
1. Click Start → Programs → Creative → Creative WebCam → Creative
WebCam Center.
2. In the Creative WebCam Center window, click the Capture tab.
3. Click the Video Resolution box and select the resolution that you want.
4. Click the Record button to start and stop video recording. Videos are saved as files in
the default media folder when you stop recording.
To view the videos in the video viewer, double-click the video files in the Thumbnails/
Details pane.
For more information, read the User’s Guide on the Installation CD.
Go to d:\manual\<language>\manual.chm (replace d:\ with the drive letter of your CD-ROM/
DVD-ROM drive, and <language> for the language the document is in)
WAR NIN G: Handling the cord(s) on this product may expose you to lead, a chemical
known to the State of California to cause cancer and birth defects or other reproductive
harm. Wash hands after handling.
5

CLI_WebCam_Live!_QSB.book Page 6 Thursday, May 27, 2004 2:22 PM
More Information
Resolve and troubleshoot technical queries at Creative's 24-hour self-help
Knowledge Base. Go to www.creative.com and select your region.
Creative Knowledge Base
Register your product!
Enjoy a host of benefits by registering your product during installation, or at
www.creative.com/register. Benefits include:
• Service and product support from Creative
• Exclusive updates on promotions and events.
Customer Support Services and Warranty
You can find Customer Support Services, Warranty and other information in the
Installation CD.
Customer
Support Services
Warra nty d:\warranty\<region>\<language>\warranty.chm
Regulatory d:\fcc\<language>\doc.chm
User’s Guide d:\manual\<language>\manual.chm
(replace d:\ with the drive letter of your CD-ROM/DVD-ROM drive, <region> with the
region that you are in, and <language> with the language that your document is in)
Copyright © 2004 Creative Technology Ltd. All rights reserved. The Creative logo is a registered trademark of Creative
Technology Ltd. in the United States and/or other countries. Microsoft and Windows are registered trademarks of Microsoft
Corporation. All other products are trademarks or registered trademarks of their respective owners and are hereby
recognized as such. All specifications are subject to change without prior notice. Actual contents may differ slightly from
those pictured.
6
d:\support\<language>\support.chm
Please keep your Proof of Purchase for the duration of the warranty period.

CLI_WebCam_Live!_QSB.book Page 7 Thursday, May 27, 2004 2:22 PM
A propos de votre Creative
WebCam
Bouton
Vue
Bague de
mise au
point
Français
Câble
USB
Vue d e fac e Vue l a t éral e
Figure 1
Bague de
mise au
point
Bouton Vue Permet de lancer WebCam Center et de capturer des images.
Câble USB Permet de connecter la WebCam au port USB de l'ordinateur.
Levier à
charnière
Permet de régler la mise au point. Dirigez l'objectif vers votre sujet puis faites tourner
la bague vers la gauche ou vers la droite jusqu'à ce que l'image soit nette (mise au
point).
Utilisez-le pour monter votre Creative WebCam sur un écran d'affichage LCD.
Levier à
charnière
7
CLI_WebCam_Live!_QSB.book Page 8 Thursday, May 27, 2004 2:22 PM
Mise en route
Installation de votre Creative WebCam
1
1
1. Ne connectez pas la Creative WebCam Live! à votre ordinateur avant d'installer les
pilotes. Si, par erreur, vous avez commencé l'installation avec la Creative
WebCam Live! connectée et que la boîte de dialogue Assistant Ajout de nouveau
matériel ou Assistant Ajout de nouveau matériel détecté apparaît, cliquez sur
le bouton Annuler.
2. Insérez le CD-ROM d'installation de Creative WebCam Live! dans votre lecteur de
CD-ROM. S'il ne s'exécute pas automatiquement, cliquez sur Démarrer →
Exécuter et tapez d:\setup.exe (remplacez d:\ par la lettre de votre lecteur de
CD-ROM).
3. Cliquez sur les options pour installer les pilotes et les applications.
4. Suivez les instructions à l'écran pour terminer l'installation.
Vous serez peut-être invité à redémarrer l'ordinateur après l'installation d'une
application. Sélectionnez Non tant que tous les pilotes et toutes les applications ne
sont pas installés.
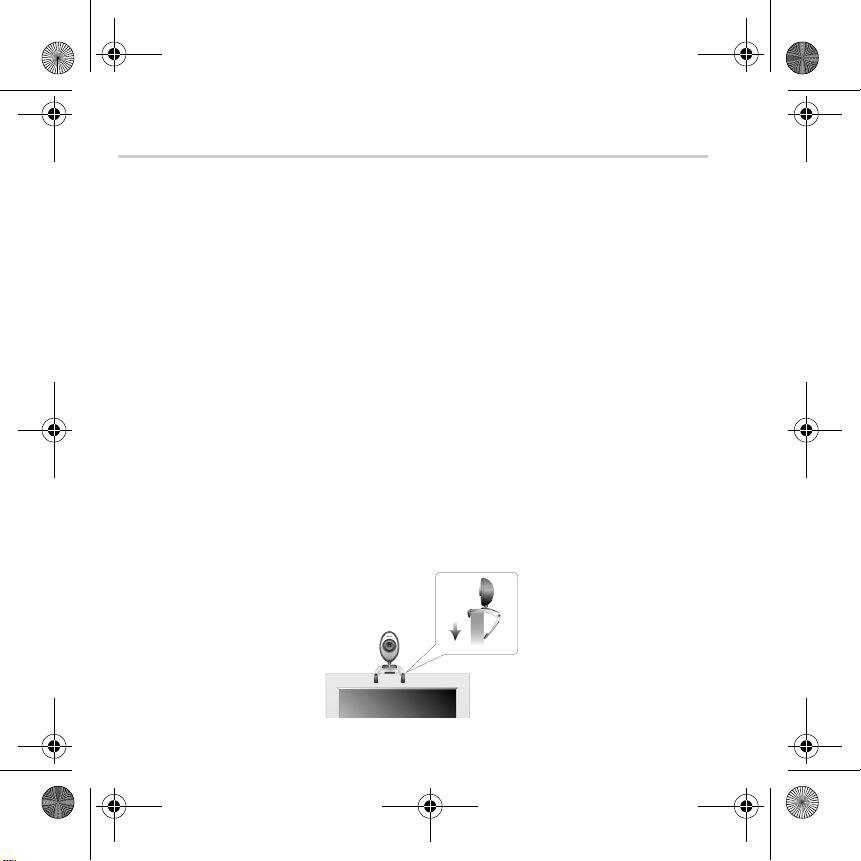
5. Placez la Creative WebCam Live! sur le haut de votre moniteur ou sur toute autre
surface plane. Pour les moniteurs à écran plat LCD ou les ordinateurs portables,
utilisez le levier à charnière intégré pour équilibrer la Creative WebCam
(voir Figure 2).
Figure 2
8
CLI_WebCam_Live!_QSB.book Page 9 Thursday, May 27, 2004 2:22 PM
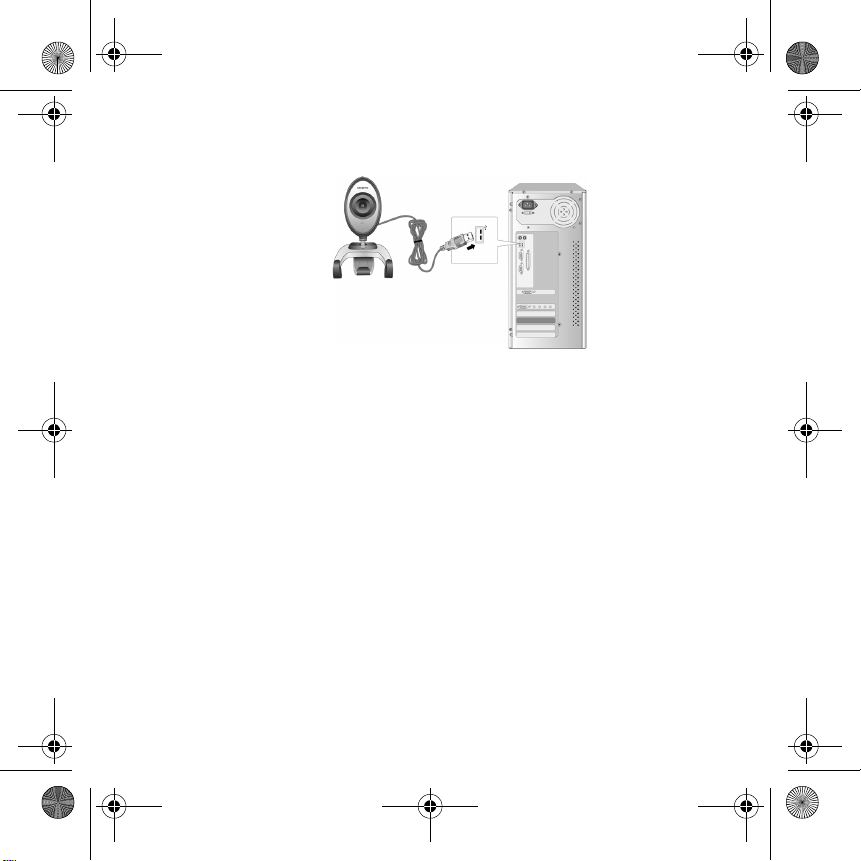
6. Connectez le câble USB de votre Creative WebCam Live! à un port USB disponible sur
votre ordinateur (voir Figure 3). Windows la détecte automatiquement.
Figure 3
Sous Windows
i. Lorsque la boîte de dialogue Assistant Ajout de nouveau matériel détecté s'affiche,
sélectionnez Installer le logiciel automatiquement (recommandé), puis cliquez sur le
bouton Suivant.
ii. Lorsque la boîte de dialogue Installation matérielle apparaît, cliquez sur le bouton
Continuer.
®
XP uniquement :
Sous Windows 2000 uniquement :
Lorsqu'une boîte de dialogue Signature numérique introuvable s'affiche pour indiquer que la
Creative WebCam Live! a été détectée, cliquez sur le bouton Oui.
Sous Windows Me et Windows 98 Deuxième Edition uniquement :
i. Si vous êtes invité à insérer le CD de Windows 98 Deuxième Edition ou Windows Me,
remplacez le CD d'installation Creative WebCam Live! par le CD approprié.
ii. Dans la boîte de dialogue Insérer un disque, cliquez sur le bouton OK.
7. Suivez les instructions à l'écran pour terminer l'installation.
8. Redémarrez votre ordinateur si vous y êtes invité.
9

CLI_WebCam_Live!_QSB.book Page 10 Thursday, May 27, 2004 2:22 PM
Vérification de l'installation
2
2
1. Cliquez avec le bouton droit sur l'icône Poste de travail de votre Bureau.
2. Dans le menu qui s'affiche, cliquez sur Propriétés.
Sous Windows XP et Windows 2000 uniquement :
Dans la boîte de dialogue des propriétés système, cliquez sur l'onglet Matériel. Cliquez sur le
bouton Gestionnaire de périphériques.
Sous Windows Me et Windows 98 Deuxième Edition :
Dans la boîte de dialogue Propriétés système, cliquez sur l'onglet Gestionnaire de
périphériques.
3. Cliquez sur le signe plus (+) situé en regard de l'icône Périphérique d'acquisition
d'images. L'entrée « Creative WebCam Live! » apparaît.
Utilisation de votre Creative WebCam
3
3
Prise d'une photo
1. Cliquez sur Démarrer → Programmes → Creative → Creative WebCam →
Creative WebCam Center.
2. Dans la boîte de dialogue Creative WebCam Center, cliquez sur l'onglet
Capturer.
3. Cliquez sur la zone de résolution Photo et sélectionnez la résolution souhaitée.
4. Cliquez sur le bouton Prendre une photo pour capturer une image. Les images sont
enregistrées en tant que fichiers dans le dossier de média par défaut.
Pour visualiser les photos dans l'afficheur d'images, double-cliquez sur les fichiers image
dans le volet Miniatures/Détails.
10

CLI_WebCam_Live!_QSB.book Page 11 Thursday, May 27, 2004 2:22 PM
Enregistrement d'une vidéo
1. Cliquez sur Démarrer → Programmes → Creative → Creative WebCam →
Creative WebCam Center.
2. Dans la boîte de dialogue Creative WebCam Center, cliquez sur l'onglet
Capturer.
3. Cliquez sur la zone de résolution Vidéo et sélectionnez la résolution souhaitée.
4. Cliquez sur le bouton Enregistrer pour commencer et arrêter l'enregistrement d'une
vidéo. Les vidéos sont enregistrées en tant que fichiers dans le dossier de média par
défaut lorsque vous arrêtez l'enregistrement.
Pour visualiser les vidéos dans l'afficheur de vidéos, double-cliquez sur les fichiers vidéo
dans le volet Miniatures/Détails.
Pour de plus amples informations, consultez le guide de l'utilisateur (User's Guide) sur le CD
d'installation.
Accédez à d:\manual\<langue>\manual.chm (remplacez d:\ par la lettre correspondant à votre
lecteur de CD-ROM/DVD-ROM, et <langue> par la langue du document)
11

CLI_WebCam_Live!_QSB.book Page 12 Thursday, May 27, 2004 2:22 PM
Informations complémentaires
Vous pouvez accéder, 24 heures sur 24, à la base de connaissances d'auto-consultation de
Creative pour obtenir un dépannage ou des solutions à vos requêtes techniques. Accédez
Enregistrez votre produit !
Bénéficiez de nombreux avantages en enregistrant votre produit durant l'installation ou
depuis notre site www.creative.com/register, entre autres :
• Service et support technique de Creative
• Mises à jour exclusives concernant les promotions et les événements.
Services de support client et garantie
Le CD d'installation contient des informations relatives au support client, à la garantie.
Services de
support client
Garantie d:\warranty\<région>\<langue>\warranty.chm
Regulatory d:\fcc\<langue>\doc.chm
Guide de
l'utilisateur
(User's Guide)
(remplacez d:\ par la lettre correspondant à votre lecteur de CD-ROM/DVD-ROM,
<région> par la région dans laquelle vous résidez, et <langue> par la langue de votre
documentation)
Copyright © 2004 Creative Technology Ltd. Tous droits réservés. Le logo Creative est une marque déposée de Creative
Technology Ltd. aux Etats-Unis et/ou dans d'autres pays. Microsoft et Windows sont des marques déposées de
Microsoft Corporation. Tous les autres produits sont des marques commerciales ou des marques déposées de leurs
propriétaires respectifs et sont reconnus par la présente en tant que tels. Toutes les spécifications peuvent faire l'objet de
modifications sans préavis. Le contenu réel peut être légèrement différent de celui illustré dans ce document.
12
Base de connaissances de Creative
au site www.creative.com et sélectionnez votre région.
d:\support\<langue>\support.chm
Veuillez conserver votre preuve d'achat durant toute la période de garantie.
d:\manual\<langue>\manual.chm
CLI_WebCam_Live!_QSB.book Page 13 Thursday, May 27, 2004 2:22 PM
Acerca de Creative WebCam
Botón
Instantánea
Aro de
enfoque
Español
Cable
USB
Soporte
articulado
Vista frontal Vista lateral
Figura 1
Aro de
enfoque
Botón
Instantánea
Cable USB Conecte la cámara directamente al puerto USB del ordenador.
Soporte
articulado
Ajusta el enfoque. Mire por la lente al sujeto que va a fotografiar y gire este aro hacia
la derecha y hacia la izquierda hasta que la imagen esté enfocada.
Púlselo para iniciar WebCam Center y capturar imágenes.
Utilícelo para colocar Creative WebCam sobre una pantalla de LCD.
13
CLI_WebCam_Live!_QSB.book Page 14 Thursday, May 27, 2004 2:22 PM
Introducción
Instalación de Creative WebCam
1
1
1. No conecte Creative WebCam Live! al ordenador antes de instalar los controladores.
En caso de que comience la instalación con Creative WebCam Live! conectada al
ordenador y se abra el cuadro de diálogo Asistente para agregar nuevo hardware
o Asistente para hardware nuevo encontrado, haga clic en el botón Cancelar.
2. Inserte el CD de instalación de Creative WebCam Live! en la unidad de CD-ROM. Si
no se ejecuta automáticamente, haga clic en Inicio → Ejecutar y escriba
d:\setup.exe (reemplace d:\ por la letra de la unidad de CD-ROM).
3. Haga clic en las opciones para instalar los controladores y las aplicaciones.
4. Siga las instrucciones que aparecen en pantalla para realizar la instalación.
Es posible que una vez instalada la aplicación se le pida que reinicie el ordenador.
Seleccione No hasta que haya instalado todas las aplicaciones y controladores.
5. Coloque Creative WebCam Live! sobre el monitor del ordenador o cualquier otra
superficie plana. Para ordenadores portátiles o monitores planos LCD, use el soporte
articulado para equilibrar Creative WebCam (véase la Figura 2).
14
Figura 2
 Loading...