

Craftsman 48624644 Owner’s Manual
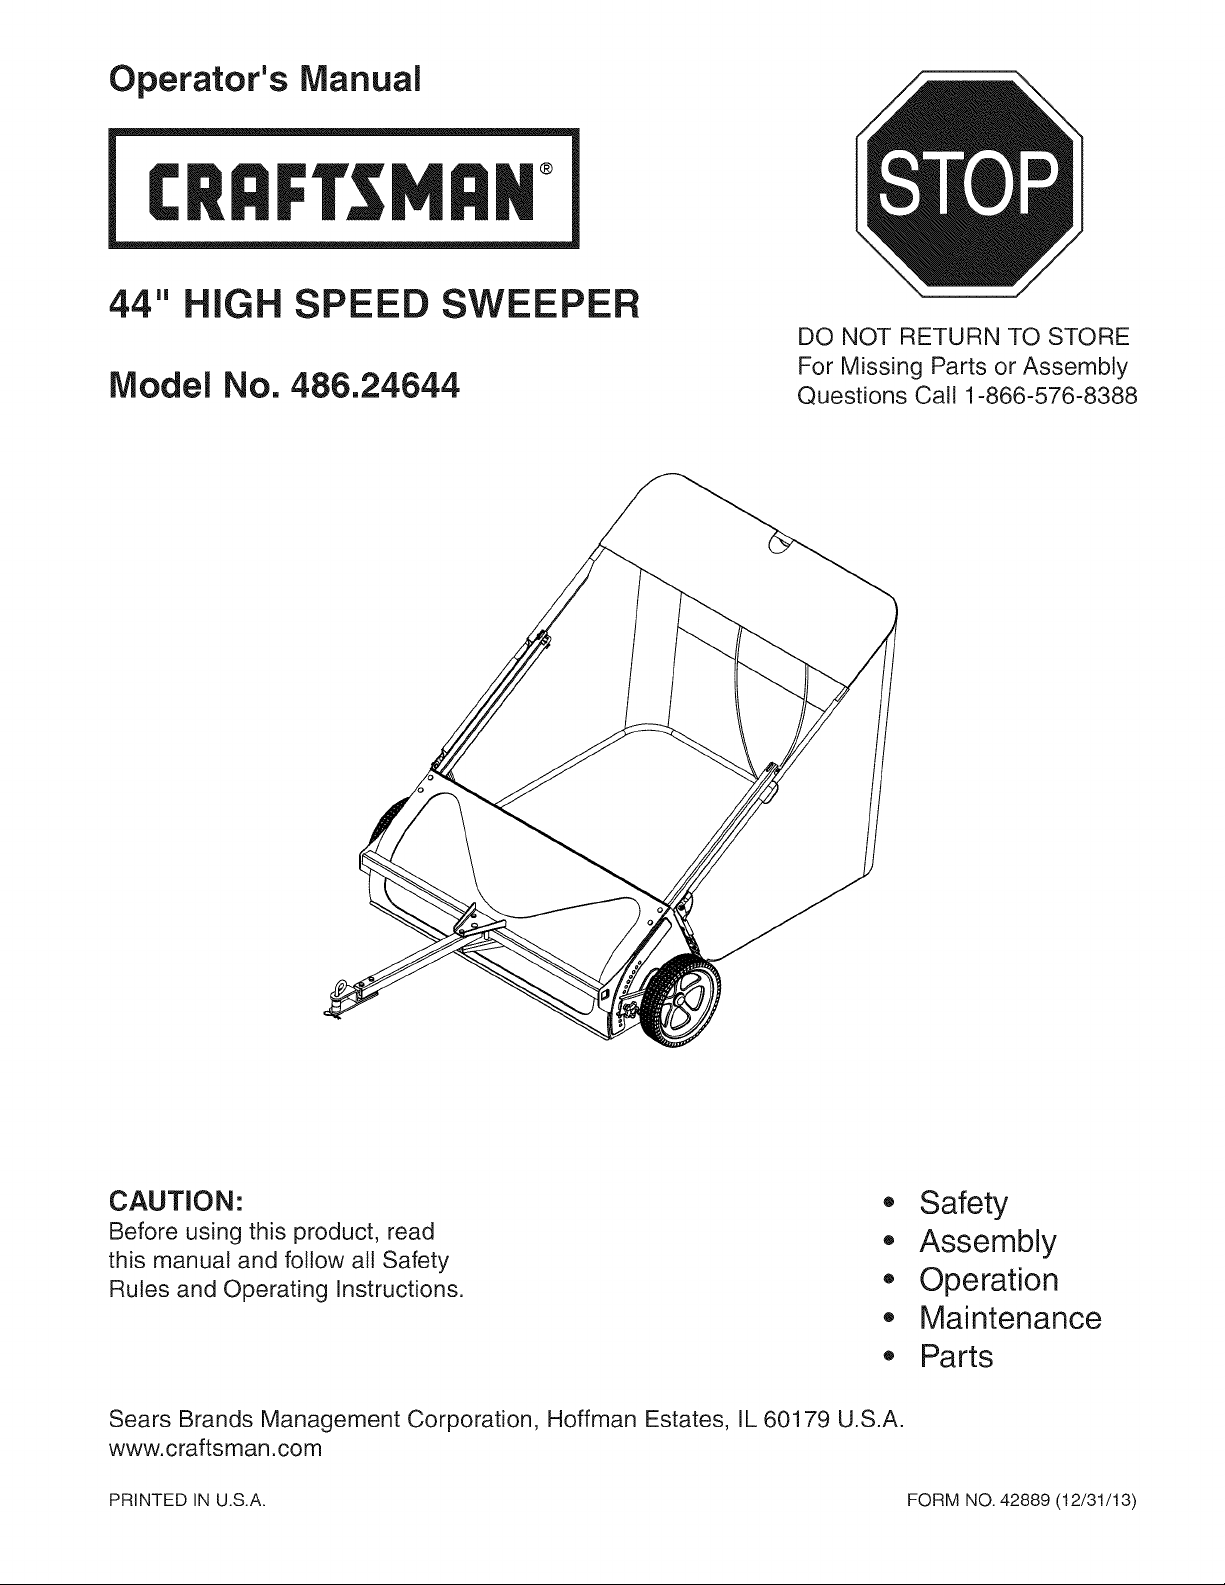
Operator's IVlanuai
44" HiGH SPEED SWEEPER
Model No. 486.24644
DO NOT RETURN TO STORE
For Missing Parts or Assembly
Questions Call 1-866-576-8388
CAUTION:
Before using this product, read
this manual and follow all Safety
Rules and Operating Instructions.
,, Safety
,, Assembly
,, Operation
,, Maintenance
,, Parts
Sears Brands Management Corporation, Hoffman Estates, IL 60179 U.S.A.
www.craftsman.com
PRINTED IN U.S.A. FORM NO. 42889 (12/31/13)

WARRANTY .................................................................... 2
SAFETY RULES .............................................................. 3
CARTON CONTENTS ..................................................... 3
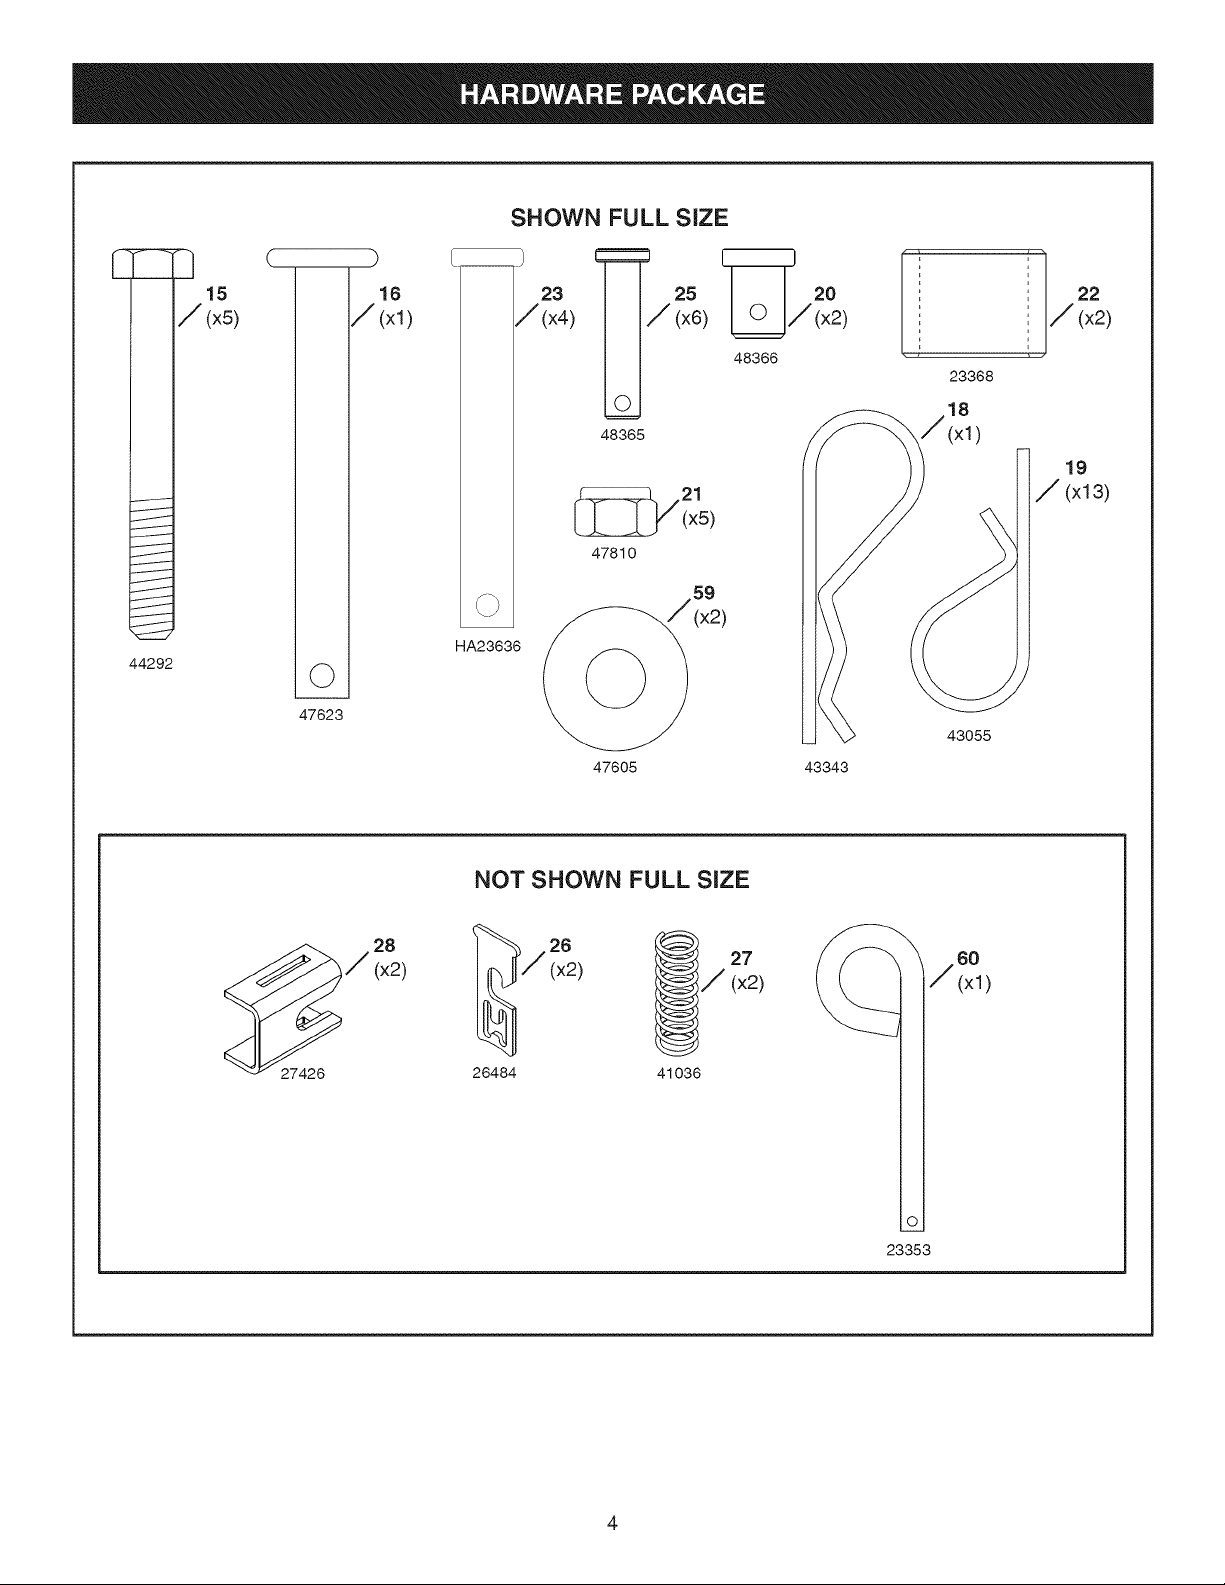
HARDWARE PACKAGE .................................................. 4
ASSEMBLY ...................................................................... 5
OPERATION .................................................................. 10
TROUBLESHOOTING ................................................... 11
MAINTENANCE ............................................................ 11
STORAGE ..................................................................... 11
SERVICE AND ADJUSTM ENTS ................................... 12
NOTES .......................................................................... 13
REPAI R PARTS ILLUSTRATION ................................... 14
REPAIR PARTS LIST..................................................... 15
PARTS ORDERING/SERVICE ..................... BACK PAGE
CRAFTSMAN ONE YEAR FULL WARRANTY
For one year from the date of purchase, this product is warranted against any defects in material or workmanship.
A defective product will be replaced free of charge.
For warranty coverage details to obtain free replacement, visit the web site: www.craftsman.com
This warranty is void if this product is ever used while providing commercial services or if rented to another person.
This warranty gives you specific legal rights, and you may also have other rights which vary from state to state.
Sears Brands Management Corporation, Hoffman Estates, IL 60179
The model number and serial numbers will be found on a
decal attached to the 44" High Speed Sweeper.
You should record both the serial number and the date of
purchase and keep in a safe place for future reference.
MODEL NUMBER:
SERIAL NUMBER:
DATE OF PURCHASE:
486.24644
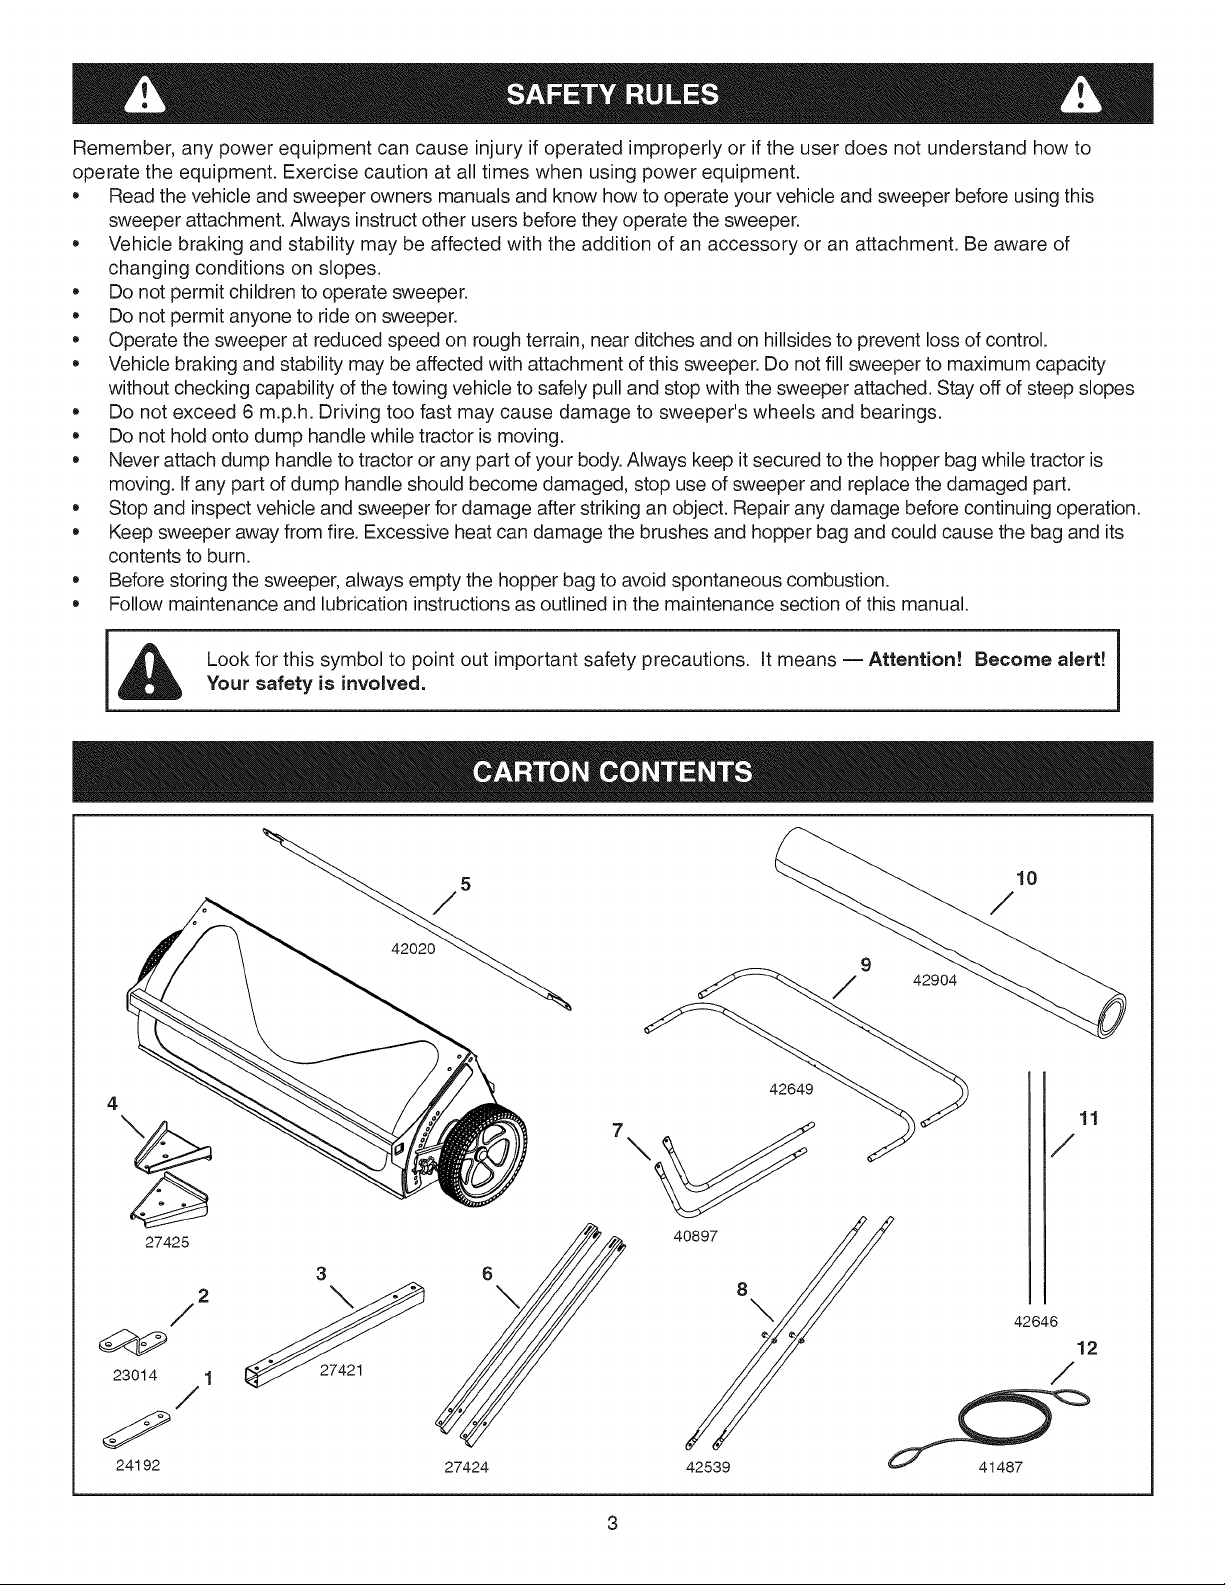
Remember,anypowerequipmentcancauseinjuryifoperatedimproperlyoriftheuserdoesnotunderstandhowto
operatetheequipment.Exercisecautionatalltimeswhenusingpowerequipment.
• Readthevehicleandsweeperownersmanualsandknowhowtooperateyourvehicleandsweeperbeforeusingthis
sweeperattachment.Alwaysinstructotherusersbeforetheyoperatethesweeper.
Vehiclebrakingandstabilitymaybeaffectedwiththeadditionofanaccessoryoranattachment.Beawareof
changingconditionsonslopes.
Donotpermitchildrentooperatesweeper.
Donotpermitanyonetorideonsweeper.
Operatethesweeperatreducedspeedonroughterrain,nearditchesandonhillsidestopreventlossofcontrol.
Vehiclebrakingandstabilitymaybeaffectedwithattachmentofthissweeper.Donotfillsweepertomaximumcapacity
withoutcheckingcapabilityofthetowingvehicletosafelypullandstopwiththesweeperattached.Stayoffofsteepslopes
Donotexceed6 m.p.h.Drivingtoofastmaycausedamagetosweeper'swheelsandbearings.
Donotholdontodumphandlewhiletractorismoving.
Neverattachdumphandletotractororanypartofyourbody.Alwayskeepitsecuredtothehopperbagwhiletractoris
moving.Ifanypartofdumphandleshouldbecomedamaged,stopuseofsweeperandreplacethedamagedpart.
Stopandinspectvehicleandsweeperfordamageafterstrikinganobject.Repairanydamagebeforecontinuingoperation.
Keepsweeperaway'fromfire.Excessiveheatcandamagethebrushesandhopperbagandcouldcausethebagandits
contentstoburn.
Beforestoringthesweeper,alwaysemptythehopperbagtoavoidspontaneouscombustion.
Followmaintenanceandlubricationinstructionsasoutlinedinthemaintenancesectionofthismanual.
Lookforthissymboltopointoutimportantsafetyprecautions.Itmeans-- Attention! Become alert!
Your safety is involved.
4
\
27425
/
23014 1
/
24192
3
2
\
27421
27424
40897 8
SHOWN FULL SIZE
F
f
/
J
i
i
f
J
J
i
J
J
J
J
f
/
44292
q
15
/(x5)
©
47623
16
/ (xl)
H!I23 C_3 25 [_ 20
(x4) /(x6) [_=J/(x2)
48366
48365
47810 59
i(x2)
47605 43343
22
/ (x2)
23368
18
/(xl)
19
/ (xl 3)
43055
NOT SHOWN FULL SiZE
/ (x2) (x2)
j26
26484 41036
27
(x2)
23353
60
/
(xl)
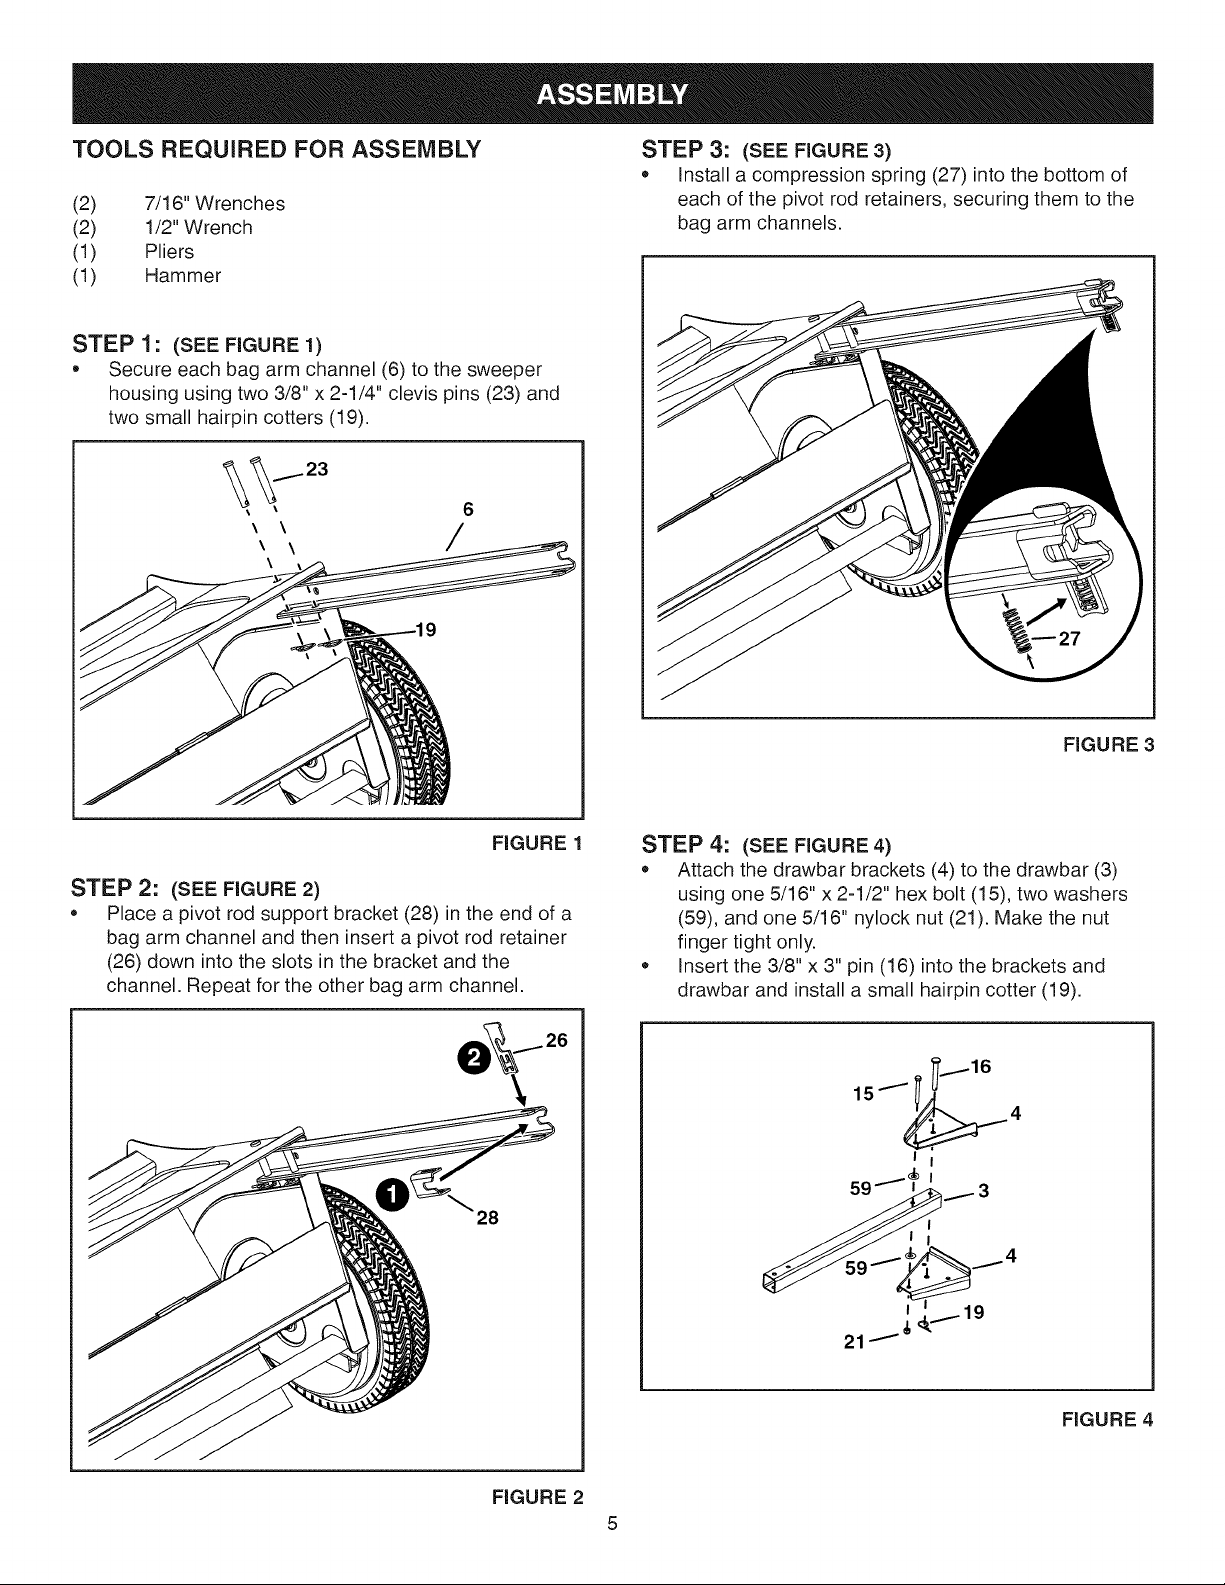
TOOLS REQUIRED FOR ASSEMBLY
(2) 7/16" Wrenches
(2) 1/2" Wrench
(1) Pliers
(1) Hammer
STEP 1: (SEE FIGURE 1)
Secure each bag arm channel (6) to the sweeper
housing using two 3/8" x 2-1/4" clevis pins (23) and
two small hairpin cotters (19).
STEP 3: (SEE FIGURE 3)
• Install a compression spring (27) into the bottom of
each of the pivot rod retainers, securing them to the
bag arm channels.
STEP 2: (SEE FIGURE 2)
Place a pivot rod support bracket (28) in the end of a
bag arm channel and then insert a pivot rod retainer
(26) down into the slots in the bracket and the
channel. Repeat for the other bag arm channel.
28
FIGURE 1
FIGURE 3
STEP 4: (SEE FIGURE4)
Attach the drawbar brackets (4) to the drawbar (3)
using one 5/16" x 2-1/2" hex bolt (15), two washers
(59), and one 5/16" nylock nut (21). Make the nut
finger tight only.
Insert the 3/8" x 3" pin (16) into the brackets and
drawbar and install a small hairpin cotter (19).
FIGURE 2
FIGURE 4
5
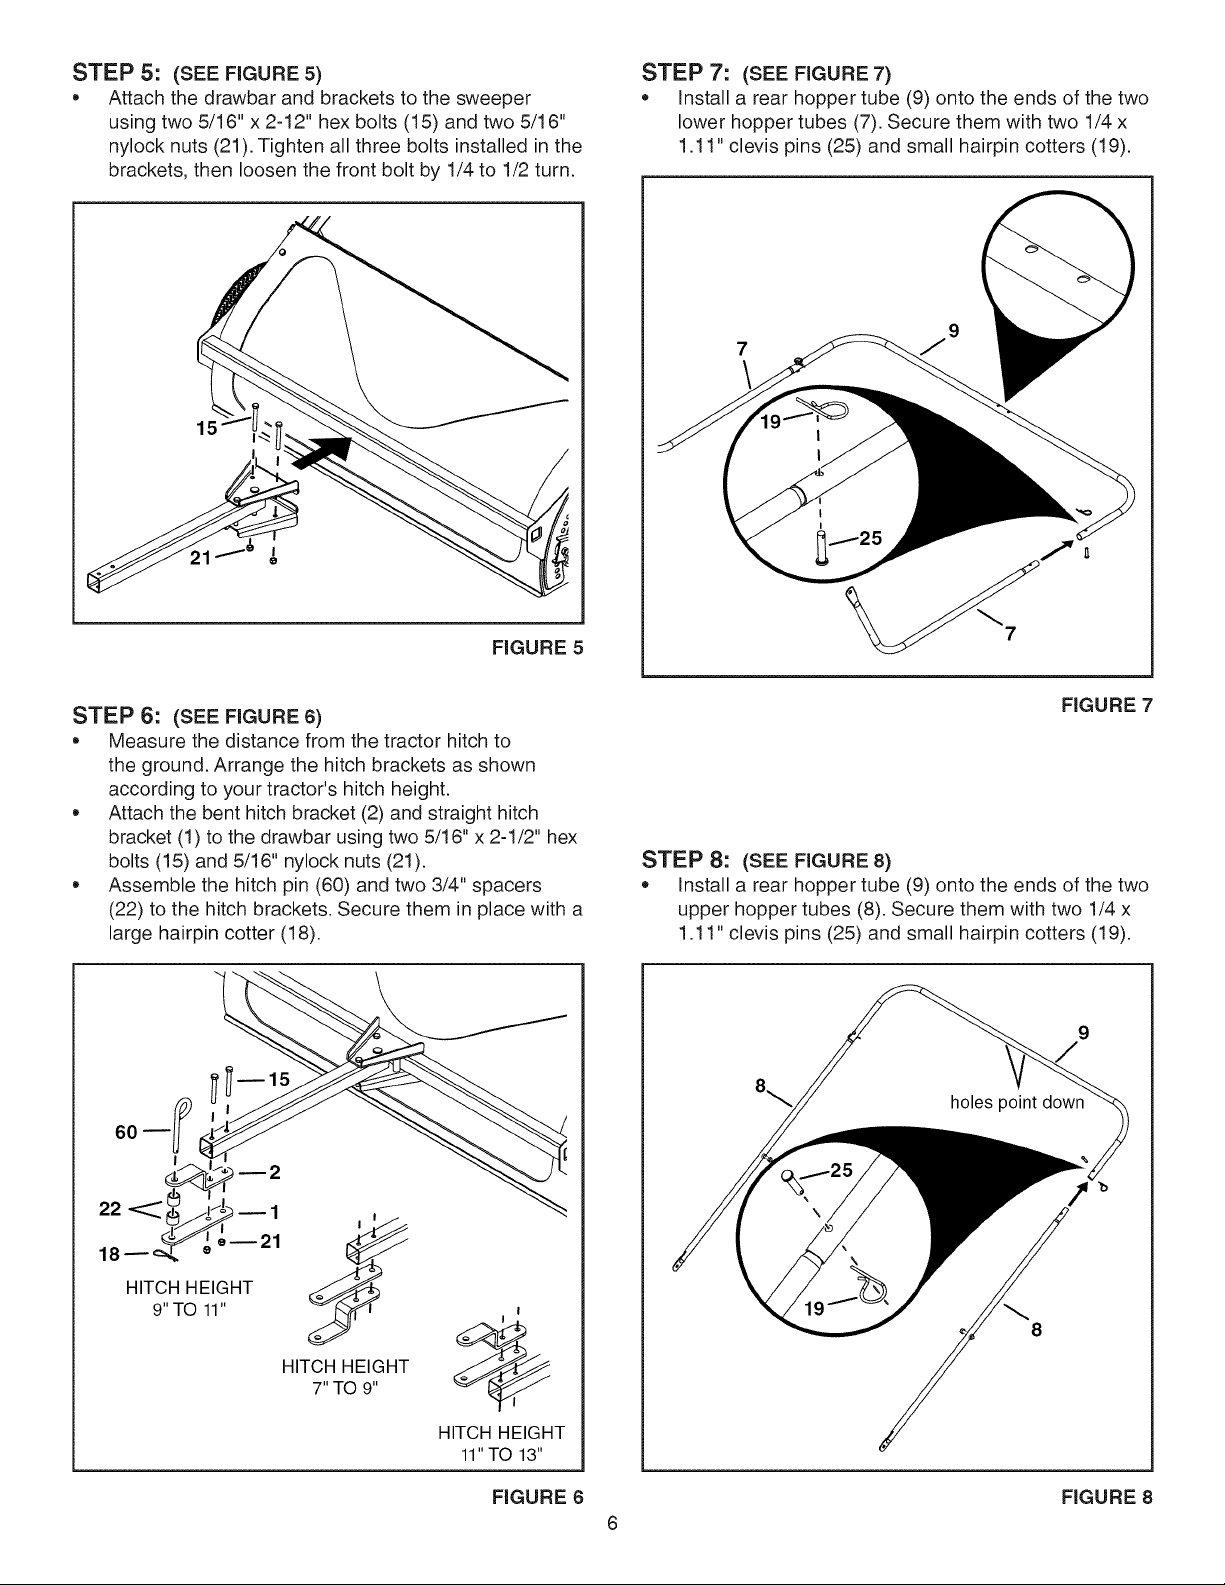
STEP 5: (SEE FIGURE 5)
* Attach the drawbar and brackets to the sweeper
using two 5/16" x 2-12" hex bolts (15) and two 5/16"
nylock nuts (21). Tighten all three bolts installed in the
brackets, then loosen the front bolt by 1/4 to 1/2 turn.
FIGURE 5
STEP 7: (SEE FIGURE 7)
* Install a rear hopper tube (9) onto the ends of the two
lower hopper tubes (7). Secure them with two 1/4 x
1.11" clevis pins (25) and small hairpin cotters (19).
STEP 6: (SEE FIGURE 6)
* Measure the distance from the tractor hitch to
the ground. Arrange the hitch brackets as shown
according to your tractor's hitch height.
* Attach the bent hitch bracket (2) and straight hitch
bracket (1) to the drawbar using two 5/16" x 2-1/2" hex
bolts (15) and 5/16" nylock nuts (21).
* Assemble the hitch pin (60) and two 3/4" spacers
(22) to the hitch brackets. Secure them in place with a
large hairpin cotter (18).
oo-
Ij.,
22 _
18--_
e--21
STEP 8:
e
Install a rear hopper tube (9) onto the ends of the two
upper hopper tubes (8). Secure them with two 1/4 x
1.11" clevis pins (25) and small hairpin cotters (19).
(SEE FIGURE 8)
holes point down
\
FIGURE 7
9
HITCH HEIGHT
9"TO 11"
J ,
HITCH HEIGHT
7"TO 9"
HITCH HEIGHT
11"TO 13"
FIGURE 6
8
FIGURE 8

STEP 9: (SEE FIGURE 9)
* Attach the upper and lower hopper tubes together
using two 3/8 x 1/2" clevis pins (20) and small hairpin
cotters (19).
holes point down
holes point up
2O
STEP 11" (SEE FIGURE 11)
* Slide the bag frame tube (1) through the front flap of
the hopper bag.
STEP 10: (SEE FIGURE 10)
* Slide the hopper tubes into the hopper bag.
FIGURE 9 FIGURE 11
STEP 12: (SEE FIGURE 12)
* insert the hopper support rods (11) into the holes of the
upper hopper tube. Then, flex and insert the rods into
the holes in the bottom rear hopper tubes.
FIGURE 10 FIGURE 12

STEP 13: (SEE FIGURE 13)
• Secure the bag frame tube to the lower hopper tubes
using two 1/4 x 1.11" clevis pins (25) and small
hairpin cotters (19).
STEP 15: (SEE FIGURE 15)
• Starting from the front of the bag, secure the hopper
bag to the bag frame using the velcro flaps.
FIGURE 13 FIGURE 15
STEP 14: (SEE FIGURE 14)
• Open up all the flaps on the hopper bag.
• Snap the lower front flaps of the hopper bag to the
front of the hopper bag bottom.
STEP 16: (SEE FIGURE 16)
• Tie the four tie straps tightly around the upper rear
hopper tube.
TIE
STRAPS
TIE
STRAPS
FIGURE 14
FIGURE 16
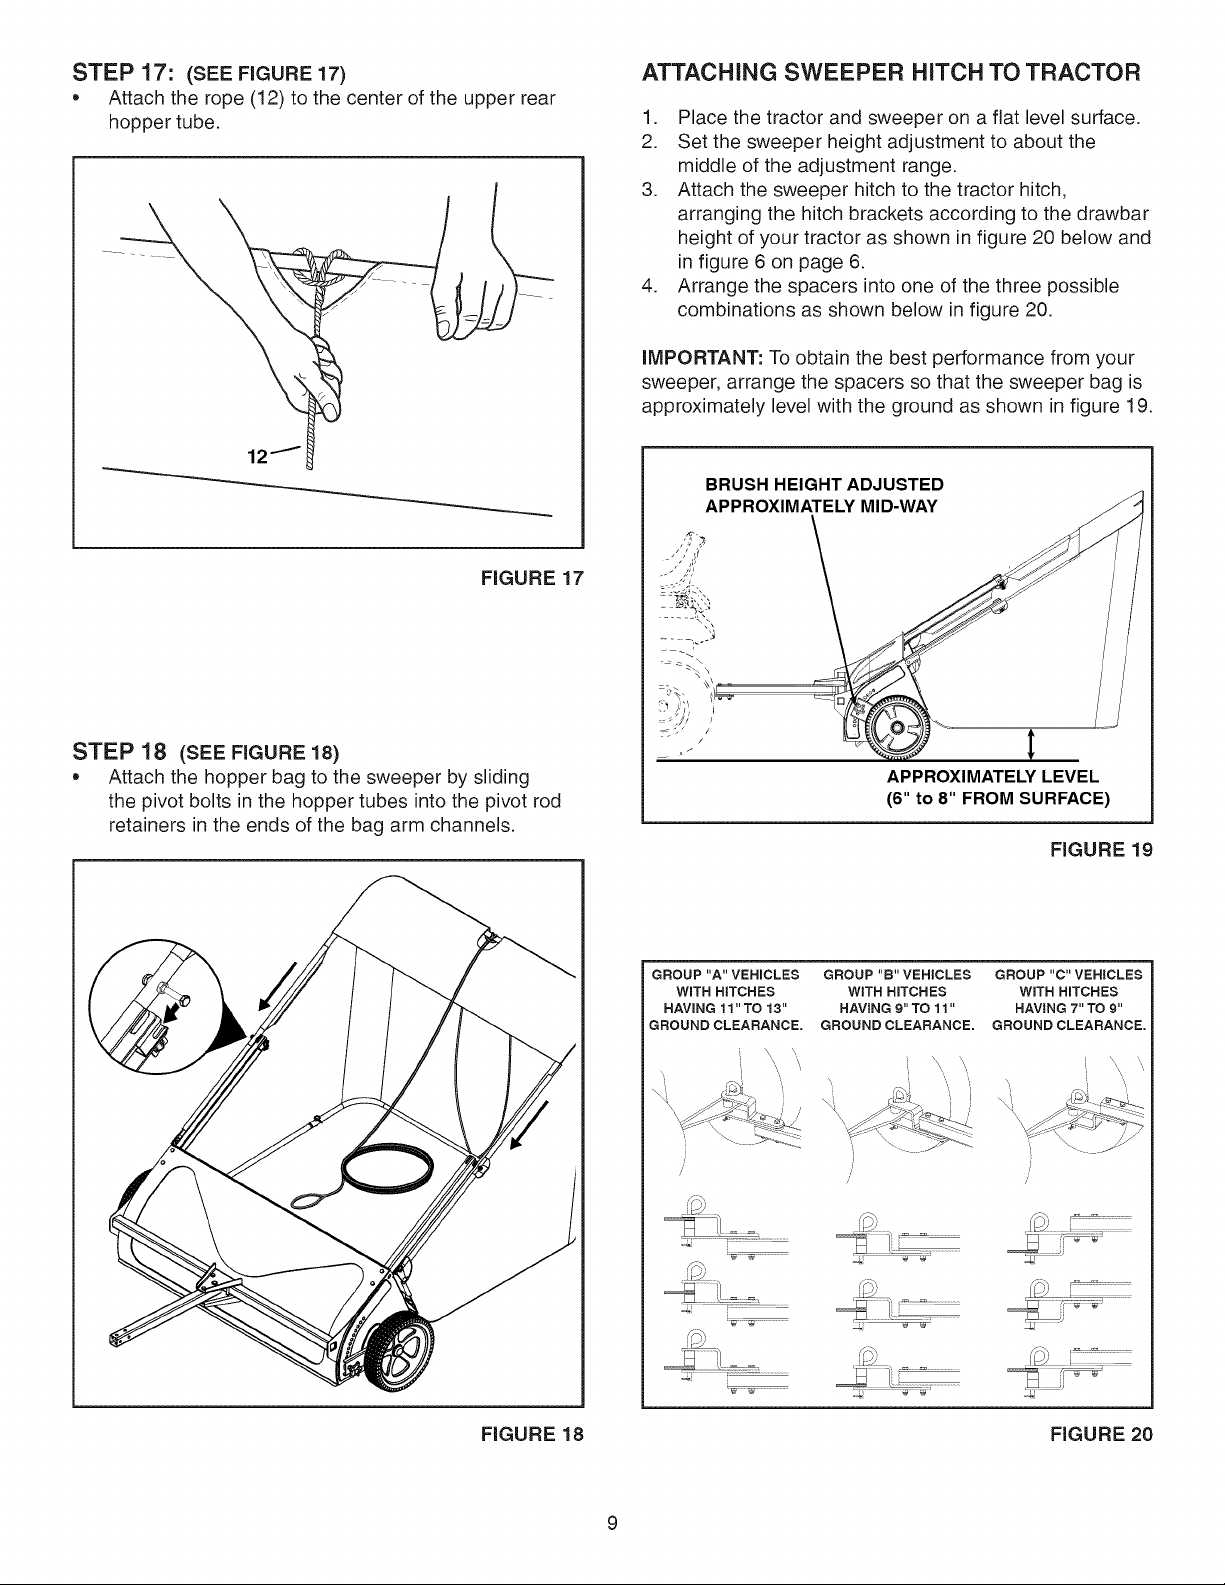
STEP 17: (SEE FIGURE 17)
* Attach the rope (12) to the center of the upper rear
hopper tube.
FIGURE 17
ATTACHING SWEEPER HITCH TO TRACTOR
1. Place the tractor and sweeper on a flat level surface.
2. Set the sweeper height adjustment to about the
middle of the adjustment range.
3. Attach the sweeper hitch to the tractor hitch,
arranging the hitch brackets according to the drawbar
height of your tractor as shown in figure 20 below and
in figure 6 on page 6.
4. Arrange the spacers into one of the three possible
combinations as shown below in figure 20.
iMPORTANT: To obtain the best performance from your
sweeper, arrange the spacers so that the sweeper bag is
approximately level with the ground as shown in figure 19.
BRUSH HEIGHT ADJUSTED
APPROXIMATELY MID-WAY
STEP 18 (SEEFIGURE 18)
* Attach the hopper bag to the sweeper by sliding
the pivot bolts in the hopper tubes into the pivot rod
retainers in the ends of the bag arm channels.
GROUP "A" VEHICLES
WiTH HITCHES
HAVING 11"TO 13"
GROUND CLEARANCE.
ky
iiiiiiiiiiii ...........
APPROXIMATELY LEVEL
(6" to 8" FROM SURFACE)
GROUP "B" VEHICLES
WITH HITCHES
HAVING 9" TO 11"
GROUND CLEARANCE.
FIGURE 19
GROUP "C" VEHICLES
WiTH HITCHES
HAVING 7" TO 9"
GROUND CLEARANCE.
\',\
FIGURE 18 FIGURE 20
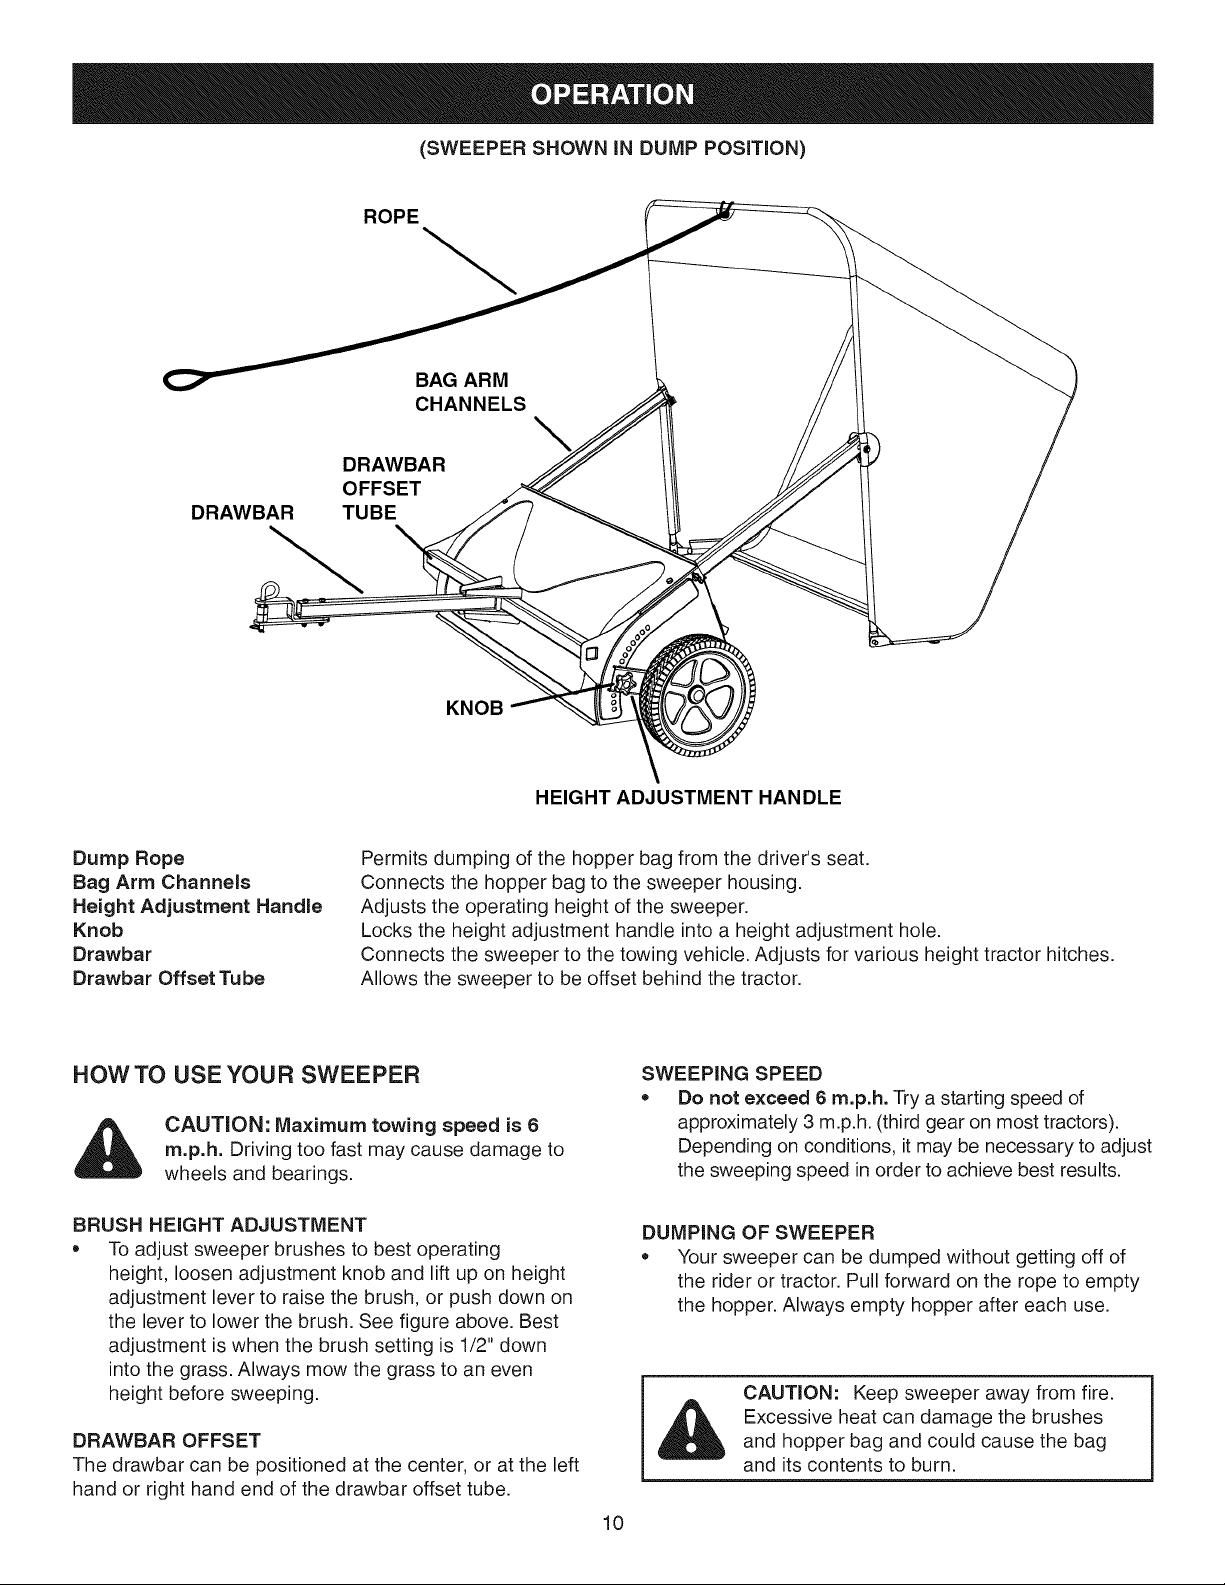
ROPE
DRAWBAR
OFFSET
DRAWBAR TUBE
(SWEEPER SHOWN iN DUMP POSiTiON)
BAG ARM
CHANNELS
KNOB
HEIGHT ADJUSTMENT HANDLE
Dump Rope
Bag Arm Channels
Height Adjustment Handle
Knob
Drawbar
Drawbar Offset Tube
Permits dumping of the hopper bag from the driver's seat.
Connects the hopper bag to the sweeper housing.
Adjusts the operating height of the sweeper.
Locks the height adjustment handle into a height adjustment hole.
Connects the sweeper to the towing vehicle. Adjusts for various height tractor hitches.
Allows the sweeper to be offset behind the tractor.
HOW TO USE YOUR SWEEPER
CAUTION: Maximum towing speed is 6
m.p.h. Driving too fast may cause damage to
wheels and bearings.
BRUSH HEIGHT ADJUSTMENT
• To adjust sweeper brushes to best operating
height, loosen adjustment knob and lift up on height
adjustment lever to raise the brush, or push down on
the lever to lower the brush. See figure above. Best
adjustment is when the brush setting is 1/2" down
into the grass. Always mow the grass to an even
height before sweeping.
DRAWBAR OFFSET
The drawbar can be positioned at the center, or at the left
hand or right hand end of the drawbar offset tube.
SWEEPING SPEED
Do not exceed 6 m.p.h. Try a starting speed of
approximately 3 m.p.h. (third gear on most tractors).
Depending on conditions, it may'be necessary to adjust
the sweeping speed in order to achieve best results.
DUMPING OF SWEEPER
Your sweeper can be dumped without getting off of
the rider or tractor. Pull forward on the rope to empty
the hopper. Always empty hopper after each use.
CAUTION: Keep sweeper away from fire.
Excessive heat can damage the brushes
and hopper bag and could cause the bag
and its contents to burn.
10
 Loading...