

Page 1

Owner's Manual
TRACTOR BRUSH GUARD
Model No. 486.24621
CAUTION:
Before using this product, read
this manual and follow all
Safety Rules and
Operating Instructions.
• Safety
• Assembly
• Operation
• Maintenance
• Parts
IMPORTANT - READ THIS FIRST!!!
For Missing Parts or Assembly Questions
Please Call 217-728-8388
Mon.-Fri. 7 am - 5 pm CST.
FAX 217-728-2032 or e-mail info@agri-fab.com
Missing parts will be sent UPS in 24 hours directly to your home.
Sears, Roebuck and Co., Hoffman Estates, IL 60179 U.S.A.
www.sears.com/craftsman
PRINTED IN U.S.A. FORM NO. 48748 (1/03)
Page 2
Any power equipment can cause injury if operated improperly or if the user does not understand how to operate
the equipment. Exercise caution at ai! times, when using power equipment.
• Refer to your tractor owners manual for "Rules
For Safe Operation".
Look for this symbol to point out important safety precautions. It mean-Attention!!
A
Become alert!! Your safety is involved.
full size hardware chart
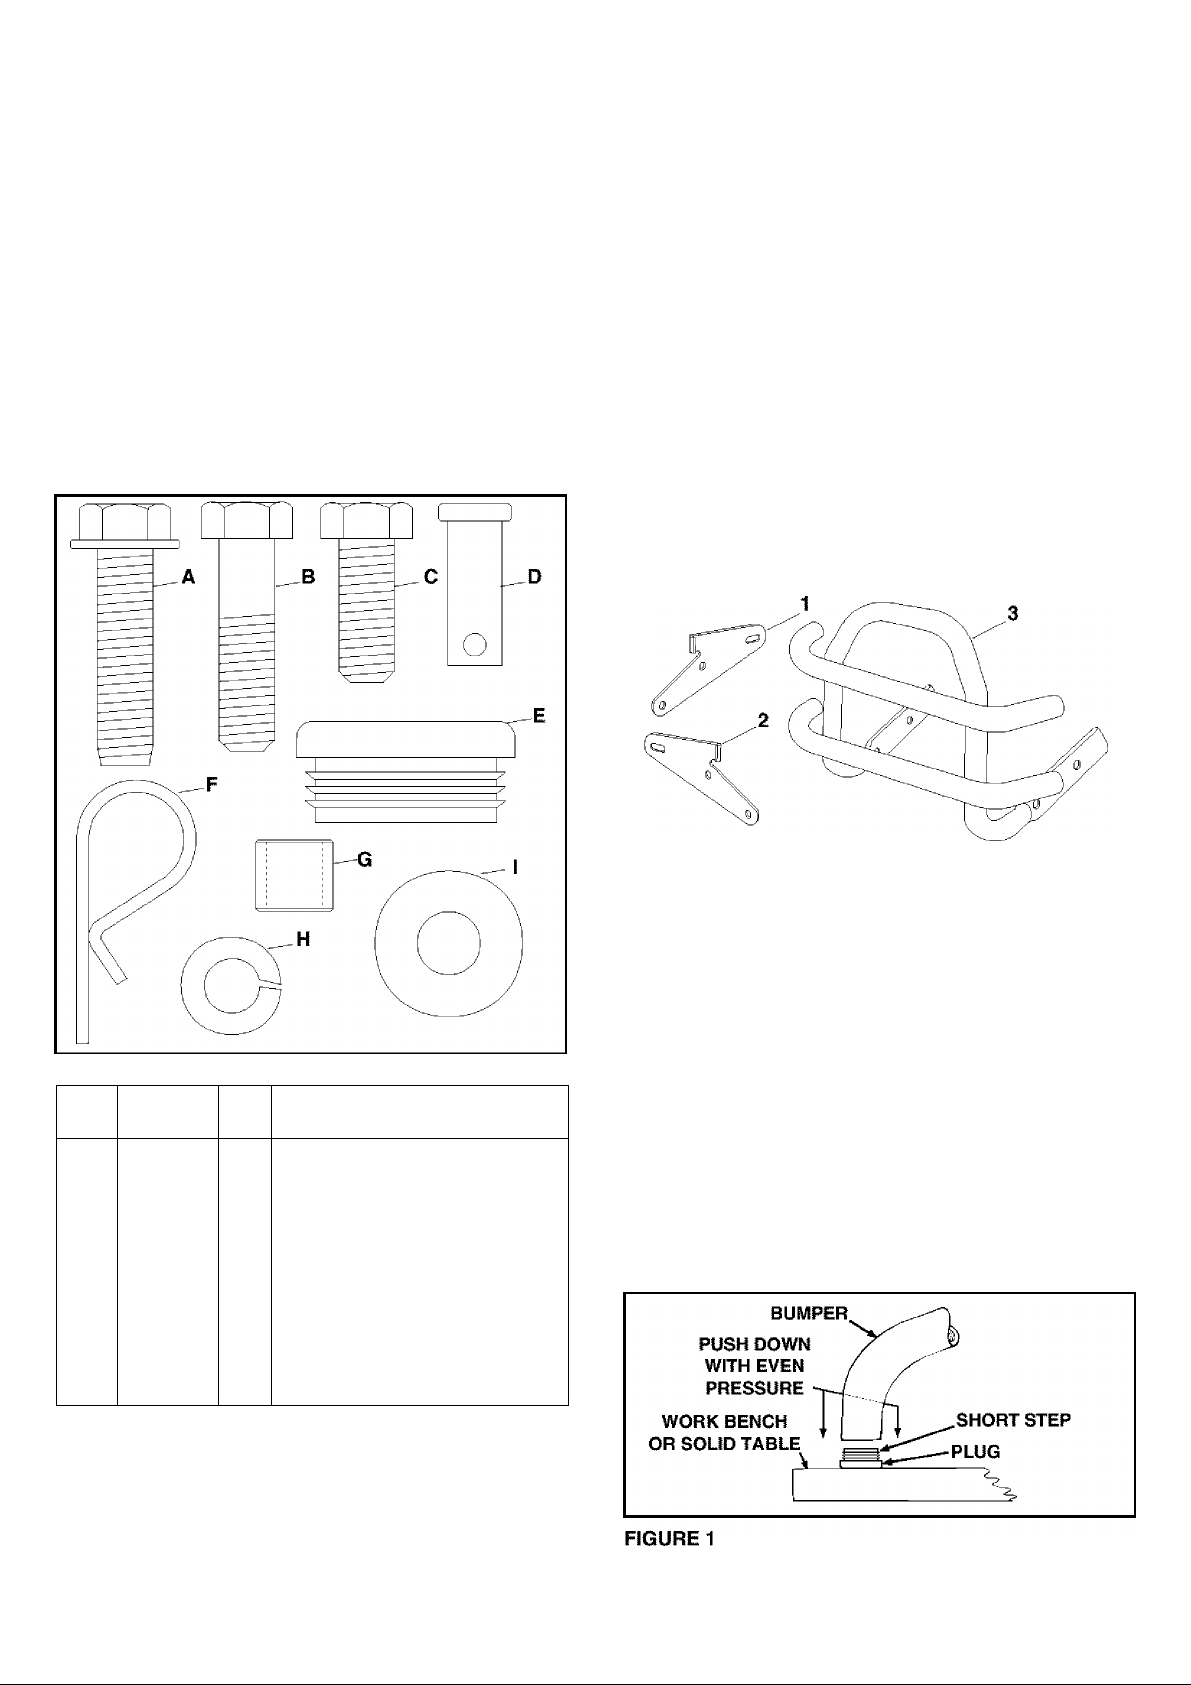
CARTON CONTENTS
1. L.H. Mounting Bracket #25037
2. R.H. Mounting Bracket #25038
3. Bumper #64614
ASSEMBLY INSTRUCTIONS
TOOLS REQUIRED
(2) 9/16" Open End or Box Wrenches
Ref.
No.
A 48894 2 Self Threading Screw,
B 43062 2
C 43001
D
E 44742 4
F
G 48866
H
1
Part
No.
45091
43055
43003
43070
Qty.
Description
3/8-16 X 1-1/2"
Hex Boit, 3/8-16 X 1-1/2"
2
Hex Bolt, 3/8-16 X 1"
2
Clevis Pin, 3/8" X 1"
Plug
2 Hair Cotter Pin, 3/32"
1
Pivot Spacer
4 Lock Washer, 3/8"
4 Washer, 3/8"
CAUTION! Muffler is hot! Ailow engine to
cool down before proceeding with bumper
▲
Place a plug on a work bench or solid table. Set
end of bumper onto plug until it rests on short
step of plug. Using even pressure, push down
on bumper until end of bumper slips over plug.
Assemble all four plugs. See figure 1.
installation.
Page 3

IMPORTANT: To heip avoid misalignment of holes in
tractor frame, lower the mower deck to the ground or
disconnect it from the front brackets before removing
any bolts from the tractor frame.
Front mower suspension brackets for both GT and LT
tractors are shown in figure 2. Use a bumper mounting
bracket to help identify the correct mounting holes.
• Lower the mower deck to the ground.
• Remove bolts on both sides of the tractor from
two holes shown in figure 2.
• Insert a pivot bushing into the rear hole in the
bumper. Align the rear hole in the bumper with
the middle hole in the L.H. mounting bracket and
assemble a 3/8" x 1-1/2" hex bolt, a 3/8" lock
washer and a 3/8" flat washer. Repeat on the
R.H. side, then tighten both bolts. See figure 4.
NOTE; Use the 3/8" x 1-1/2" seif threading screw in
place of the hex bolt if there was no bolt in the
front hole in the tractor frame and the hole is too
small.
• Insert a 3/8" x 1" clevis pin into the front hole in
the bumper and the front hole in the mounting
brackets. Secure the clevis pins with 3/32" hair
cotter pins. See figure 4.
IMPORTANT: Before raising the tractor's hood, you
must first remove the clevis pins and lower the
bumper down against the bumper stops on the
L.H. and R.H. mounting brackets.
Assemble the L.H. mounting bracket to the front
left side of the tractor frame. Fasten to the rear
hole using a 3/8" x 1" hex bolt, a 3/8" lock
washer and a 3/8" flat washer. Align the middle
hole in the mounting bracket with the hole in the
tractor frame. Tighten the bolt enough to hold
the bracket in place. Repeat for the R.H.
mounting bracket. See figure 3.
Page 4

)me
For repair of major brand appliances in your own home,
no matter who made it, no matter who sold it!
1 “800“4“MY“HOMAnytime, day or night
(1-800-469-4663)
www.sears.com
To bring in products such as vacuums, lawn equipment and electronics
for repair, call for the location of your nearest Sears Parts & Repair Center.
0AA /lOO HI AAA
1
-OUU*"^oo*" I Anytime, day or night
www.sears.com
For the replacement parts, accessories and owner’s manuals
that you need to do-it-yourself, call Sears PartsDirect®^!
1-800-366-PART 6am 11pm CST,
(1 -800-366-7278) 7 days a week
www.sears.com/partsdirect
To purchase or inquire about a Sears Service Agreement:
1 -800-827-6655
7 a.m. - 5 p.m. CST, Mon. - Sat.
Para pedir servicio de reparación a domicilio,
y para ordenar piezas con entrega a domicilio:
1-888-SU-HOGARS“
{1-888-784-6427)
HomeCentrar
Au Canada pour service en français:
1-877-LE-FOYER®^
(1-877-533-6937)
© Sears, Roebuck and Co.
® Registered Trademark / ™ Trademark of Sears, Roebuck and Co.
® Marca Registrada / Marca de Fábrica de Sears, Roebuck and Co.
 Loading...