

Craftsman 48624311 Owner’s Manual
8_6
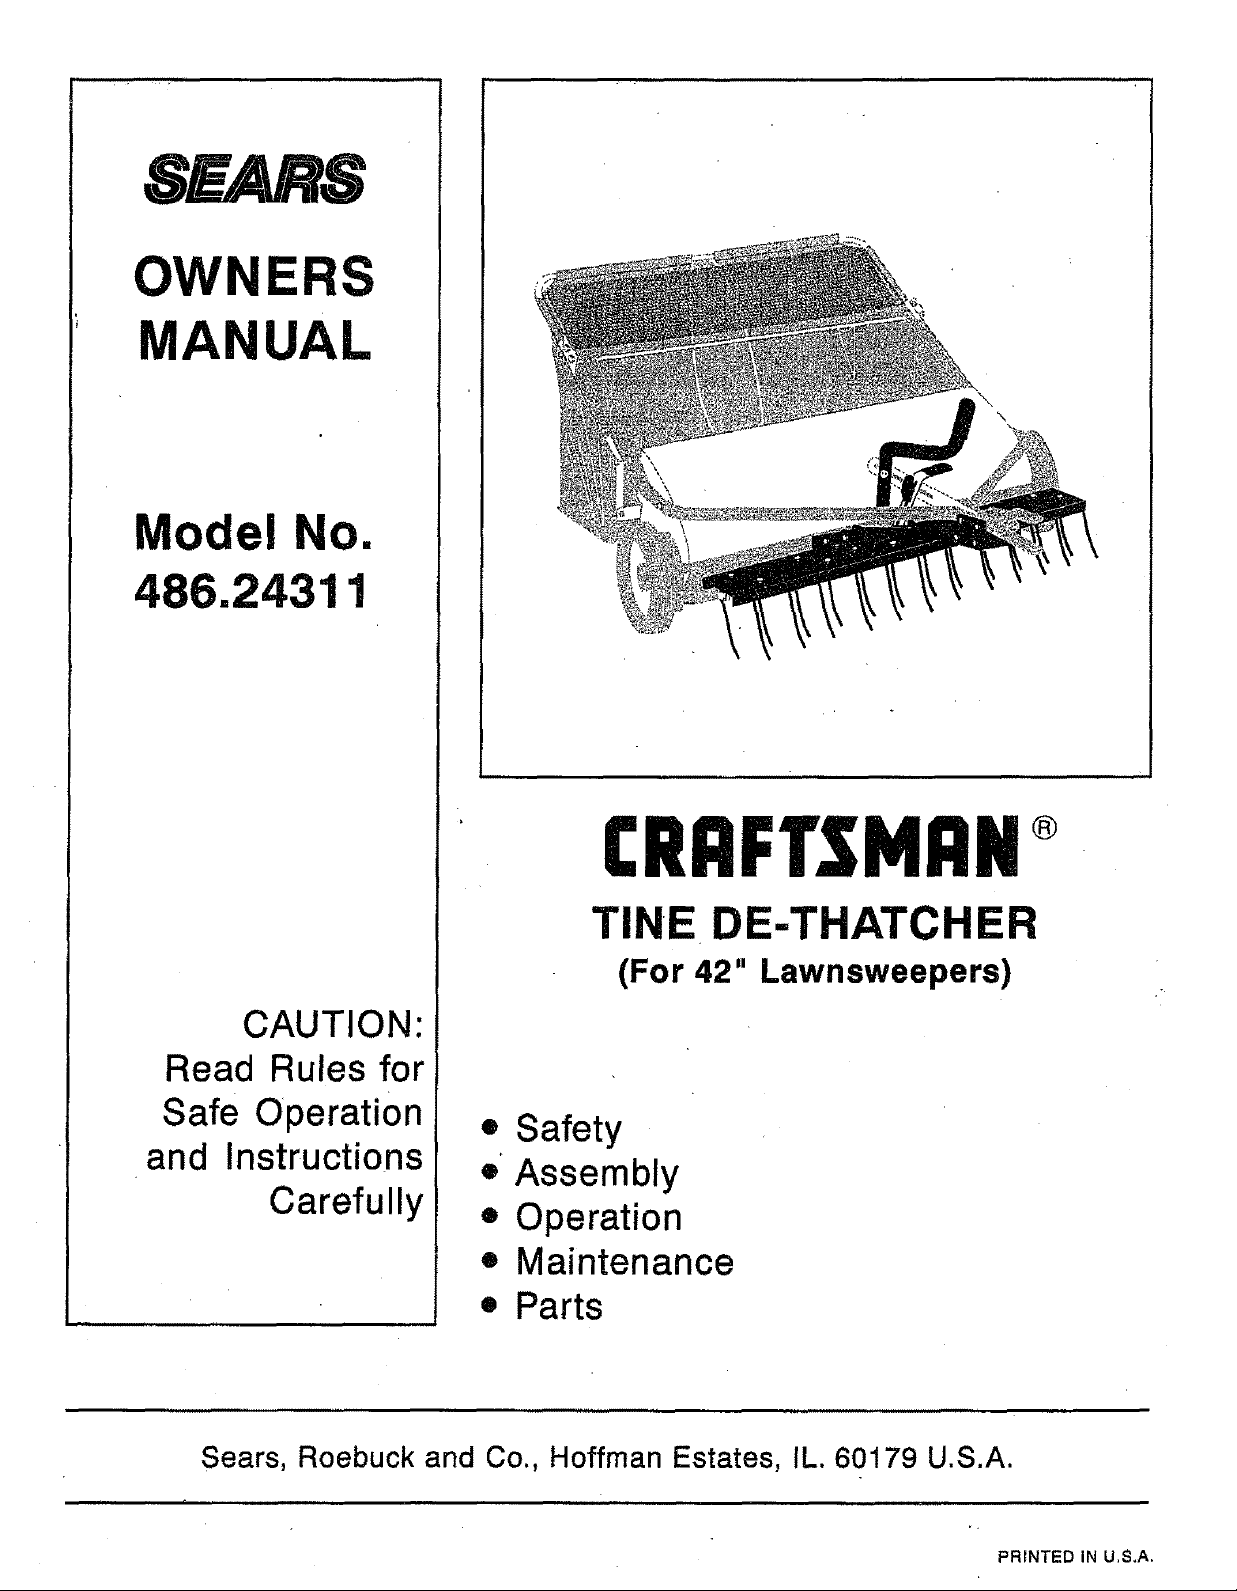
OWNERS
MANUAL
Model No.
486.24311
\
\
CAUTION'.
Read Rules for
Safe Operation
and Instructions
Carefully
CRRFTSI4RN
TINE DE-THATCHER
(For 42" Lawnsweepers)
• Safety
• Assembly
• Operation
• Maintenance
• Parts
Sears, Roebuck and Co., Hoffman Estates, IL. 60179 U.S.A.
F_RfNTED IN U,S,A.
Safety Rules .......................................................... 2
Warranty ................................................................ 2
Full Size Hardware Chart .................................... 3
Assembly ............................................................... 4
Operation ............................................................... 8
Any power equipment can cause injury if operated improperty or if the user does not understand how to
operate the equipment. Exercise caution at all times when using power equipment.
Malr_tenance .......................................................... 8
Storage ................................................................... 8
Troubleshooting .................................................... 8
Repair Parts Illustration ........................................ 9
Repair Parts List ............................................. _,..10
Parts Ordering/Service ...,.................. Back Cover
• Read this owners manual carefully for operating and
service instructions before attempting to assemble or
operate the de-thatcher. Be thoroughly familiar with
the proper use of the de-thatcher.
• Read the vehicle owners manual and vehicle safety
rules, and know how to operate the vehicle before
using the de-thatcher.
• Read the lawnsweeper owners manual and safety
rules, and know how to operate the lawnsweeper
before using the de-thatcher.
• Never allow children to operate the tractor or de-
thatcher attachment, and do not allow adults to
operate without proper instructions.
• This de-thatcher attachment has sharp tine points.
Always handle with care and wear substantialfoot
wear when operating this de-thatcher.
• Do not allow anyone to ride or sit on de-thatcher, the
lawnsweeper or on the towing vehicle.
• Keep the area of operation clear of all persons,
particularly small children, and also pets.
LOOK FOR THIS SYMBOL TO POINT OUT IMPORTANT SAFETY PRECAUTIONS. I
IT MEANS--ATTENTION!! BECOME ALERTI! YOUR SAFETY IS INVOLVED. J•
• Always begin with the transmission in first (low) gear
and engine at low speed, and gradually increase
speed as conditions permit,
= The vehicle braking and stability may be affected
with the attachment of this equipment. Be aware of
changing conditions on slopes. Refer to safety rules
in the vehicle owner's manual concerning safe
operation on slopes. STAY OFF OF STEEP
SLOPES.
• Always operate up and down a slop_, never across
the face of a slope
• This equipment should be operated at reduced
speed on rough terrain, along creeks and ditches
and on hillsides, to prevent tipping and loss of
control. Do not drive too close to a creek or a ditch.
o Do not tow this equipment on a highway or any other
public thoroughfare.
• Follow the maintenance instructions as outlined in
this owners manual,
1
LIMITED ONE YEAR WARRANTY ON TINE DETHATCHER
For one year from the date of purchase, when this tine dethatcher is maintained and lubricated according to
the operating and maintenance instructions in the owner's manual, Sears wiit repair any defect in material or
workmanship free of charge. If this tine dethatcher is used for commercial or rental purposes, this warranty
applies for only 90 days from the date of purchase.
This warranty does not cover repairs necessary because of operator negligence or abuse, including the failure
to maintain the equipment according to instructions contained in the owner's manual.
WARRANTY SERVICE iS AVAILABLE BY CONTACTING THE NEAREST SEARS SERVICE CENTER/
DEPARTMENT IN THE UNITED STATES.
This warranty applies only while this product is in the United States.
This warranty gives you specific legat rights, and you may also have other rights which vary from state to ststel
Sears, Roebuck and Co. D/817 WA. Hoffman Estates, Chicago, IL 60179
_fG
M
N
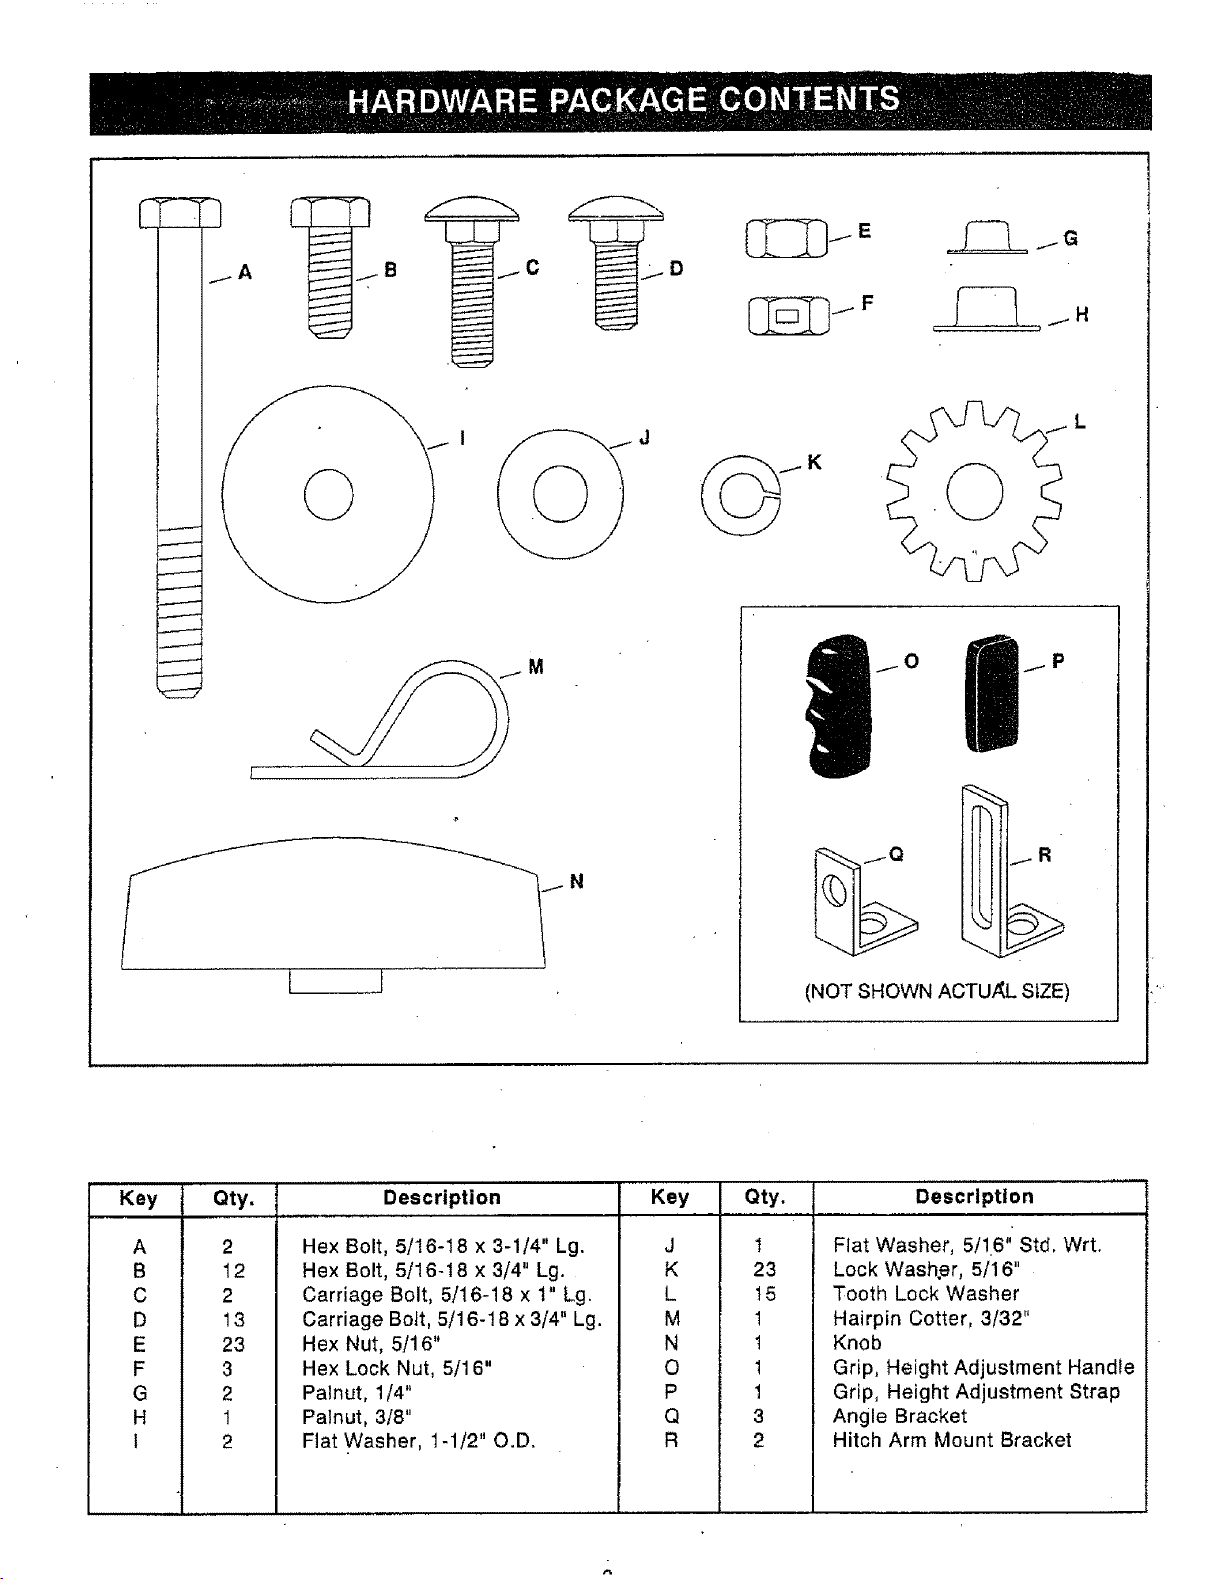
(NOT SHOWN ACTU/_L SIZE)
Key Qty, Description Key Qty. Descrlption
A
B
C
D
E
F
G
H
1
,., ...... i
2
12
2
13
23
3
2
1
2
Hex Bolt, 5/16-18 x 3-1/4" Lg.
Hex Bolt, 5/16-18 x 3/4" Lg.
Carriage Bolt, 5/16-18 x t" Lg.
Carriage Bolt, 5/16-18 x 3/4" Lg.
Hex Nut, 5/16"
Hex Lock Nut, 5/16"
Palnut, 1/4"
Palnut, 3/8"
Ftat Washer, 1-1/2" O.D.
J
K
L
M
N
O
P
Q
R
I
23
t5
1
t
1
1
3
2
Flat Washer, 5/16" Std, Wrt.
Lock Washer, 5/16"
Tooth Lock Washer
Hairpin Cotter, 3/32"
Knob
Grip, Height Adjustment Handte
Grip, Height Adjustment Strap
Angle Bracket
Hitch Arm Mount Bracket
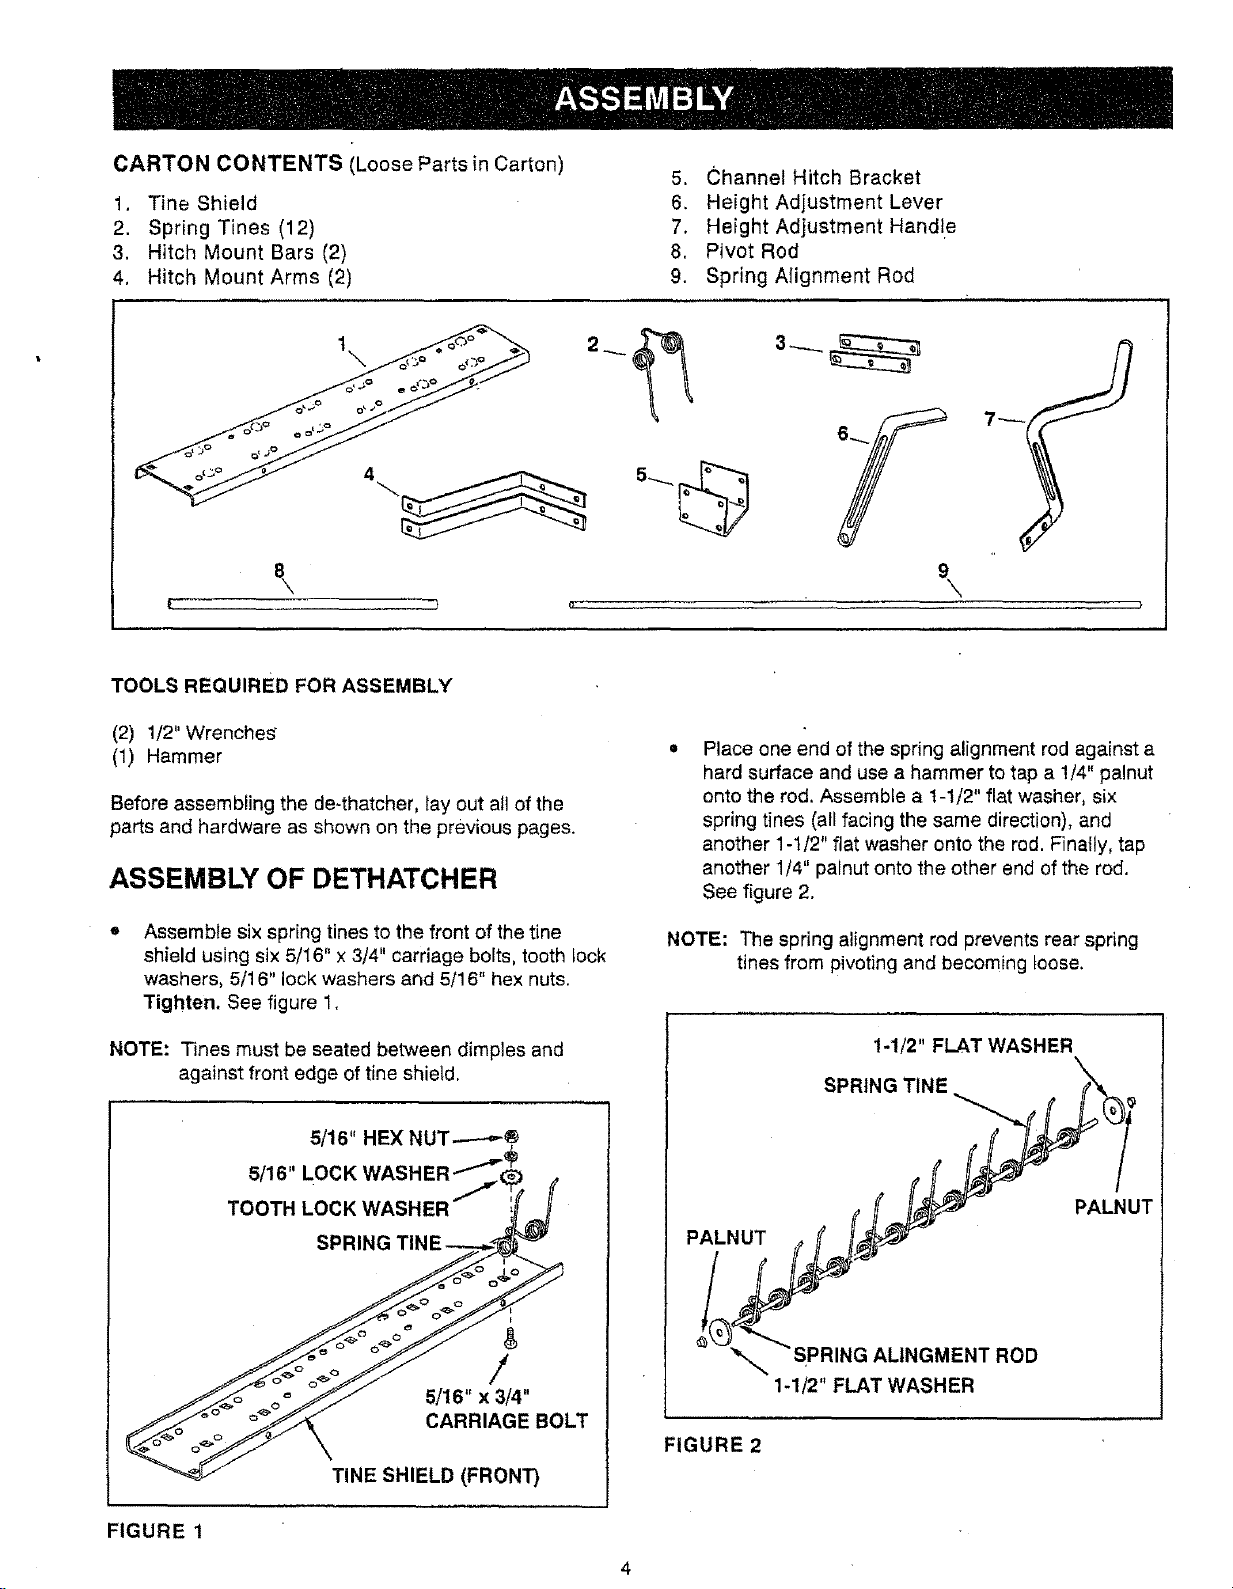
CARTONCONTENTS(LooseParts{nCarton) 5, ChannelHitchBracket
1, TineShield 6. HeightAdjustmentLever
2. SpringTines(12) 7, HeightAdjustmentHandle
3. HitchMountBars(2) 8, PivotRod
4, HitchMountArms(2) 9. SpringAlignmentRod
Y
\
TOOLS REQUIRED FOR ASSEMBLY
(2) 1/2" Wrenches "
(1) Hammer
Before assembling the de-thatcher, lay out all of the
parts and hardware as shown on the previous pages,
ASSEMBLY OF DETHATCHER
* Assemble six spring tines to the front of the tine
shield using six 5/I6" x 3/4" carriage bolts, tooth tock
washers, 5/16" lock washers and 5/16" hex nuts.
Tighten. See figure 1,
NOTE: Tines must be seated between dimples and
against front edge of tine shield,
TOOTH LOCK WAS_
SPRING
Place one end of the spring alignment rod against a
hard surface and use a hammer to tap a 1/4" palnut
onto the rod. Assemble a t-!/2" flat washer, six
spring tines (all facing the same direction), and
another 1-t/2" flat washer onto the rod. Finatly, tap
another 1/4" palnut onto the other end of the rod.
See figure 2.
NOTE: The spring alignment rod prevents rear spring
tines from pivotingand becoming loose.
1-1/2" FLAT WASHER
SPRING TINE
PALNUT
PALNUT
FIGURE 1
/
5/16" x 3/4"
CARRIAGE BOLT
TINE SHIELD (FRONT)
IGMENT ROD
1-1/2" FLAT WASH ER
FIGURE 2
 Loading...