

Craftsman 48624212 Owner’s Manual

Owner's Manual
I CRRFTSHAN I
46" LAWNSWEEPER
FOR SWEEPER/DETHATCHER COMBO
Model No. 486.24212
CAUTION:
Before using this product, read
this manual and follow all Safety
Rules and
Operating Instructions.
• Safety
• Assembly
• Operation
• Maintenance
• Parts
IMPORTANT - READ THIS FIRST!!!
For Missing Parts or Assembly Questions
Please Call 217-728-8388
Mon.-Fri. 7 am - 5 pm CST.
FAX 217-728-2032 or e-mail info@agri-fab.com
Missing parts will be sent UPS in 24 hours directly to your home.
Sears, Roebuck and Co., Hoffman Estates, IL 60179 U.S.A.
www.sears.com/craftsman
PRINTED IN U.S.A. FORM NO. 48825 (1/03)

Safety Rules ...................................................................... 2
Full Size Hardware Chart .................................................. 3
Carton Contents ................................................................ 4
Sweeper Assembly Instructions ........................................ 5
Hopper Assembly Instructions .......................................... 7
Operation ........................................................................ 11
Maintenance Schedule ................................................... 12
Storage ........................................................................... 12
Service and Adjustments ................................................ 13
Troubleshooting .............................................................. 13
Repair Parts Illustration .................................................... 14
Repair Parts List.............................................................. 15
Parts Ordering/Service ..................................... Back Cover
LIMITED ONE YEAR WARRANTY ON CRAFTSMAN LAWNSWEEPER
For one year from the date of purchase, when this Lawnsweeper is maintained and lubricated according to the
operating and maintenance instructions in the owner's manual, Sears will repair free of charge any defect in material
or workmanship.
This warranty does not cover repairs necessary because of operator abuse or negligence, including the failure to
maintain the equipment according to instructions contained in the owner's manual; and Lawnsweeper used for
commercial or rental purposes.
WARRANTY SERVICE IS AVAILABLE BY CONTACTING THE NEAREST SEARS SERVICE CENTER/DEPART-
MENT IN THE UNITED STATES.
This warranty applies only while this product is in the United States.
This warranty gives you specific legal rights, and you may also have other rights which vary from state to state.
Sears, Roebuck and Co. D/817WA, Hoffman Estates, Chicago, IL 60179
Any power equipment can cause injury if operated improperly or if the user does not understand how to operate
the equipment. Exercise caution at all times, when using power equipment.
• Read the vehicle and sweeper owners manuals and
know how to operate your vehicle and sweeper
before using this sweeper attachment. Always
instruct other users before they operate the sweeper.
• Do not permit children to operate sweeper.
• Do not permit anyone to ride on sweeper.
• Never attach the hopper rope to any part of your
body or clothing! Never hold onto the rope while
towing the sweeper! Attach the rope to the towing
vehicle to keep it away from wheels and rotating
parts.
• Operate the sweeper at reduced speed on rough
terrain, near ditches and on hillsides to prevent loss
of control.
,_ Look for this symbol to point out important safety precautions. It means--Attention!!
Become alert!! Your safety is involved.
• Vehicle braking and stability may be affected with the
attachment of this sweeper. Do not fill sweeper to
maximum capacity without checking the capability of
the towing vehicle to safely pull and stop with the
sweeper attached. Stay off of steep slopes.
• Stop and inspect vehicle and sweeper for damage
after striking an object. Repair any damage before
continuing operation.
• Keep sweeper away from fire. Excessive heat can
damage the brushes and hopper bag and could
cause the bag and its contents to burn.
• Before storing the sweeper, always empty the hopper
bag to avoid spontaneous combustion.
• Follow maintenance and lubrication instructions as
outlined in the maintenance section of this manual.
The model and serial numbers wilt be found on a decal
attached to the lawnsweeper.
You should record both the serial number and the date of
purchase and keep ina safe place for future reference.
MODEL NUMBER:
SERIAL NUMBER:
DATE OF PURCHASE:
2
486.24212
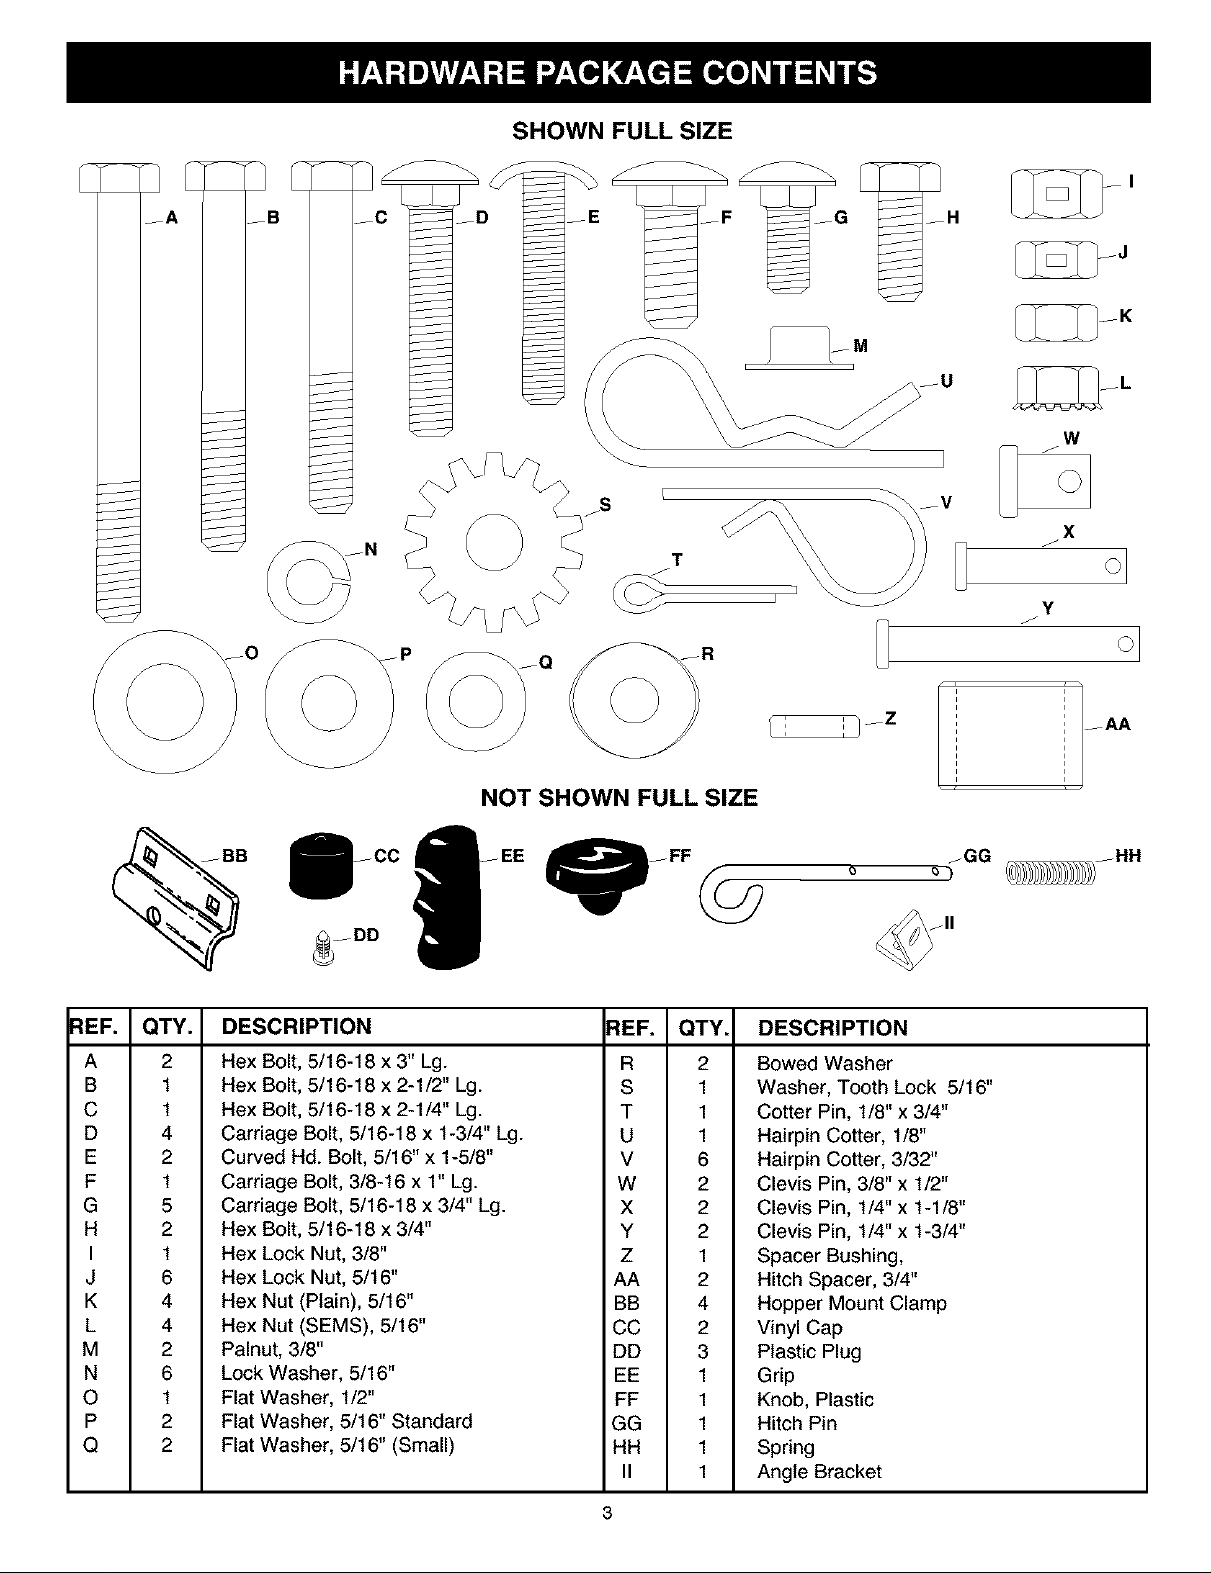
SHOWN FULL SIZE
A
/B
J
J
f
/
/
J
J
J
J
J
J
W
x
J
ol
Y
J
_Q
J
JR
REF. QTY.
A
B
C
D
E
F
G
H
I
J
K
L
M
N
O
P
Q
2
1
1
4
2
1
5
2
1
6
4
4
2
6
1
2
2
NOT SHOWN FULL SIZE
CC /--EE __FF _-_
_DD
DESCRIPTION REF. QTY.
Hex Bolt, 5/16-18 x 3" Lg.
Hex Bolt, 5/16-18 x 2-1/2" Lg.
Hex Bolt, 5/16-18 x 2-1/4" Lg.
Carriage Bolt, 5/16-18 x 1-3/4" Lg.
Curved Hd. Bolt, 5/16" x 1-5/8"
Carriage Bolt, 3/8-16 x 1" Lg.
Carriage Bolt, 5/16-18 x 3/4" Lg.
Hex Bolt, 5/16-18 x 3/4"
Hex Lock Nut, 3/8"
Hex Lock Nut, 5/16"
Hex Nut (Plain), 5/16"
Hex Nut (SEMS), 5/16"
Palnut, 3/8"
Lock Washer, 5/16"
Flat Washer, 1/2"
Flat Washer, 5/16" Standard
Flat Washer, 5/16" (Small)
R
S
T
U
V
W
X
Y
Z
AA
BB
CC
DD
EE
FF
GG
HH
II
2
1
1
1
6
2
2
2 Clevis Pin, 1/4" x 1-3/4"
1 Spacer Bushing,
2 Hitch Spacer, 3/4"
4 Hopper Mount Clamp
2 Vinyl Cap
3 Plastic Plug
1 Grip
1 Knob, Plastic
1 Hitch Pin
1 Spring
1 Angle Bracket
JGG
DESCRIPTION
Bowed Washer
Washer, Tooth Lock 5/16"
Cotter Pin, 1/8" x 3/4"
Hairpin Cotter, 1/8"
Hairpin Cotter, 3/32"
Clevis Pin, 3/8" x 1/2"
Clevis Pin, 1/4" x 1-1/8"
3
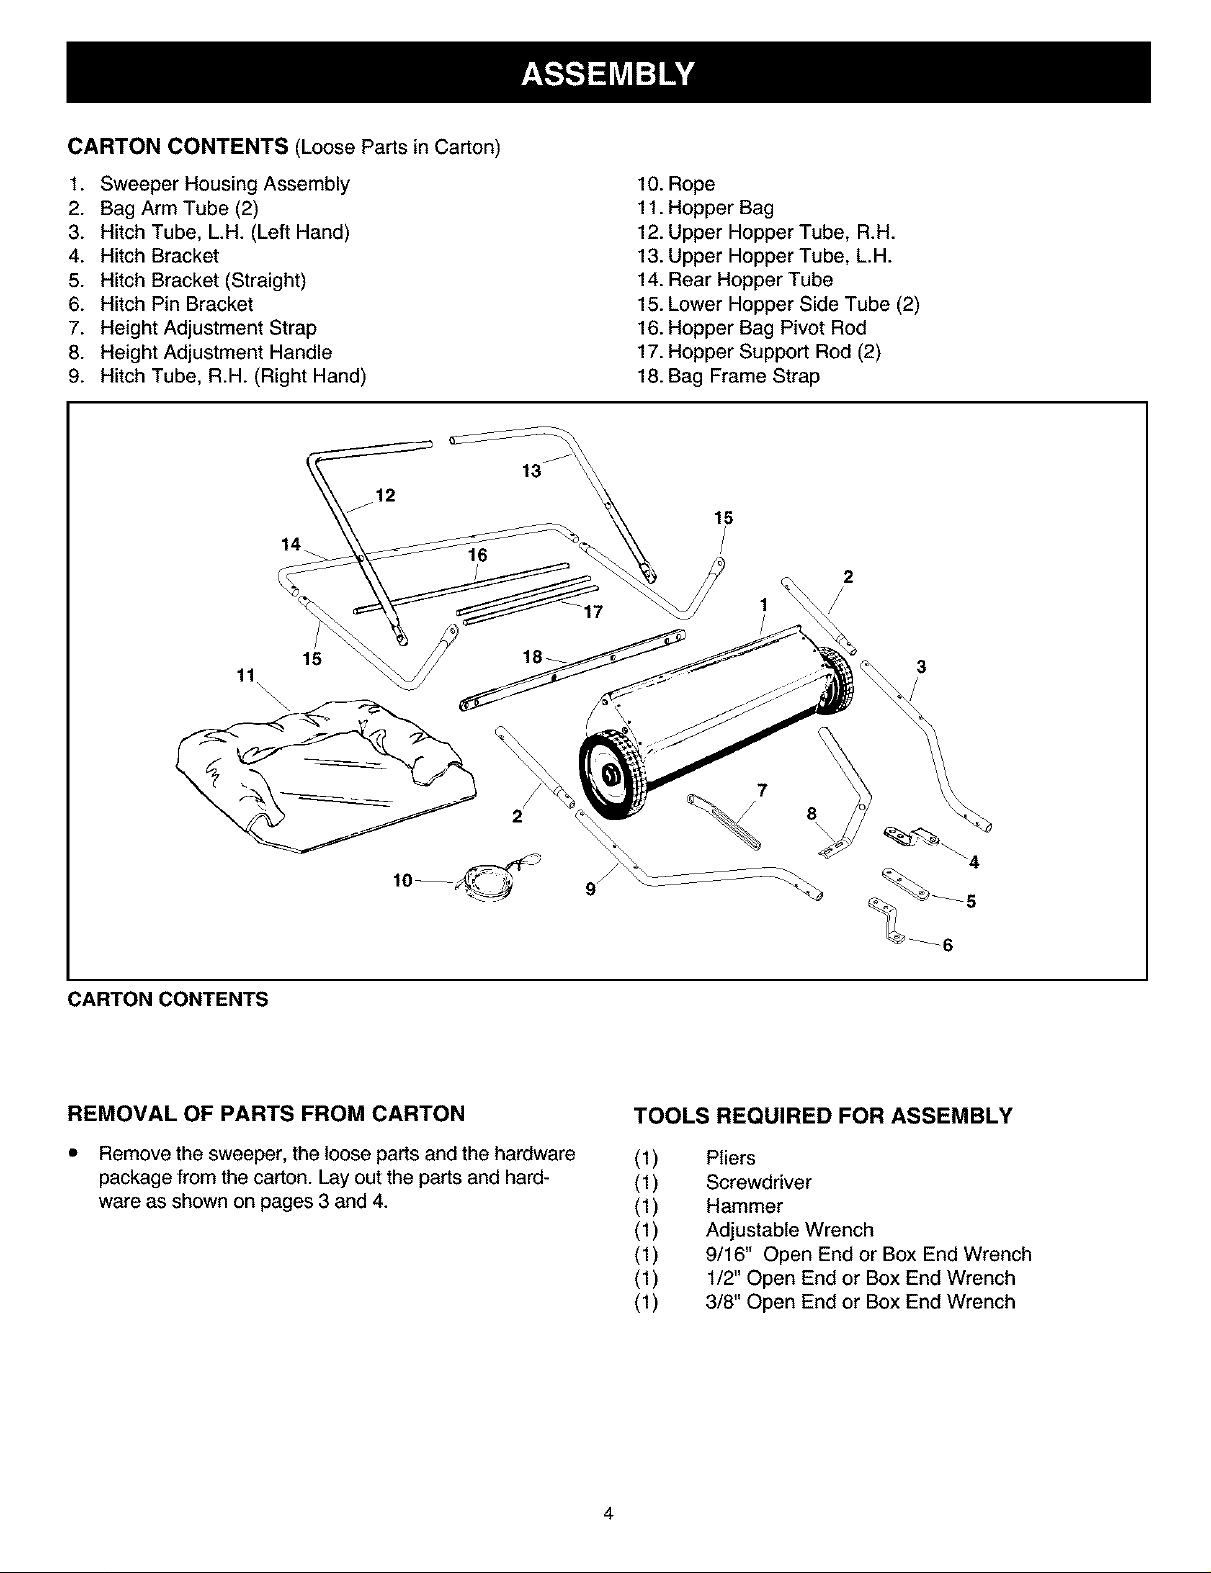
CARTON CONTENTS (Loose Parts in Carton)
1. Sweeper Housing Assembly
2. Bag Arm Tube (2)
3. Hitch Tube, L.H. (Left Hand)
4. Hitch Bracket
5. Hitch Bracket (Straight)
6. Hitch Pin Bracket
7. Height Adjustment Strap
8. Height Adjustment Handle
9. Hitch Tube, R.H. (Right Hand)
11
15
\\
10. Rope
11. Hopper Bag
12. Upper Hopper Tube, R.H.
13. Upper Hopper Tube, L.H.
14. Rear Hopper Tube
15. Lower Hopper Side Tube (2)
16. Hopper Bag Pivot Rod
17. Hopper Support Rod (2)
18. Bag Frame Strap
15
CARTON CONTENTS
REMOVAL OF PARTS FROM CARTON
• Remove the sweeper, the loose parts and the hardware
package from the carton. Lay out the parts and hard-
ware as shown on pages 3 and 4.
7
\4
5
TOOLS REQUIRED FOR ASSEMBLY
(1)
(1)
(1)
(1)
(1)
(1)
(1)
Pliers
Screwdriver
Hammer
Adjustable Wrench
9/16" Open End or Box End Wrench
1/2" Open End or Box End Wrench
3/8" Open End or Box End Wrench
4
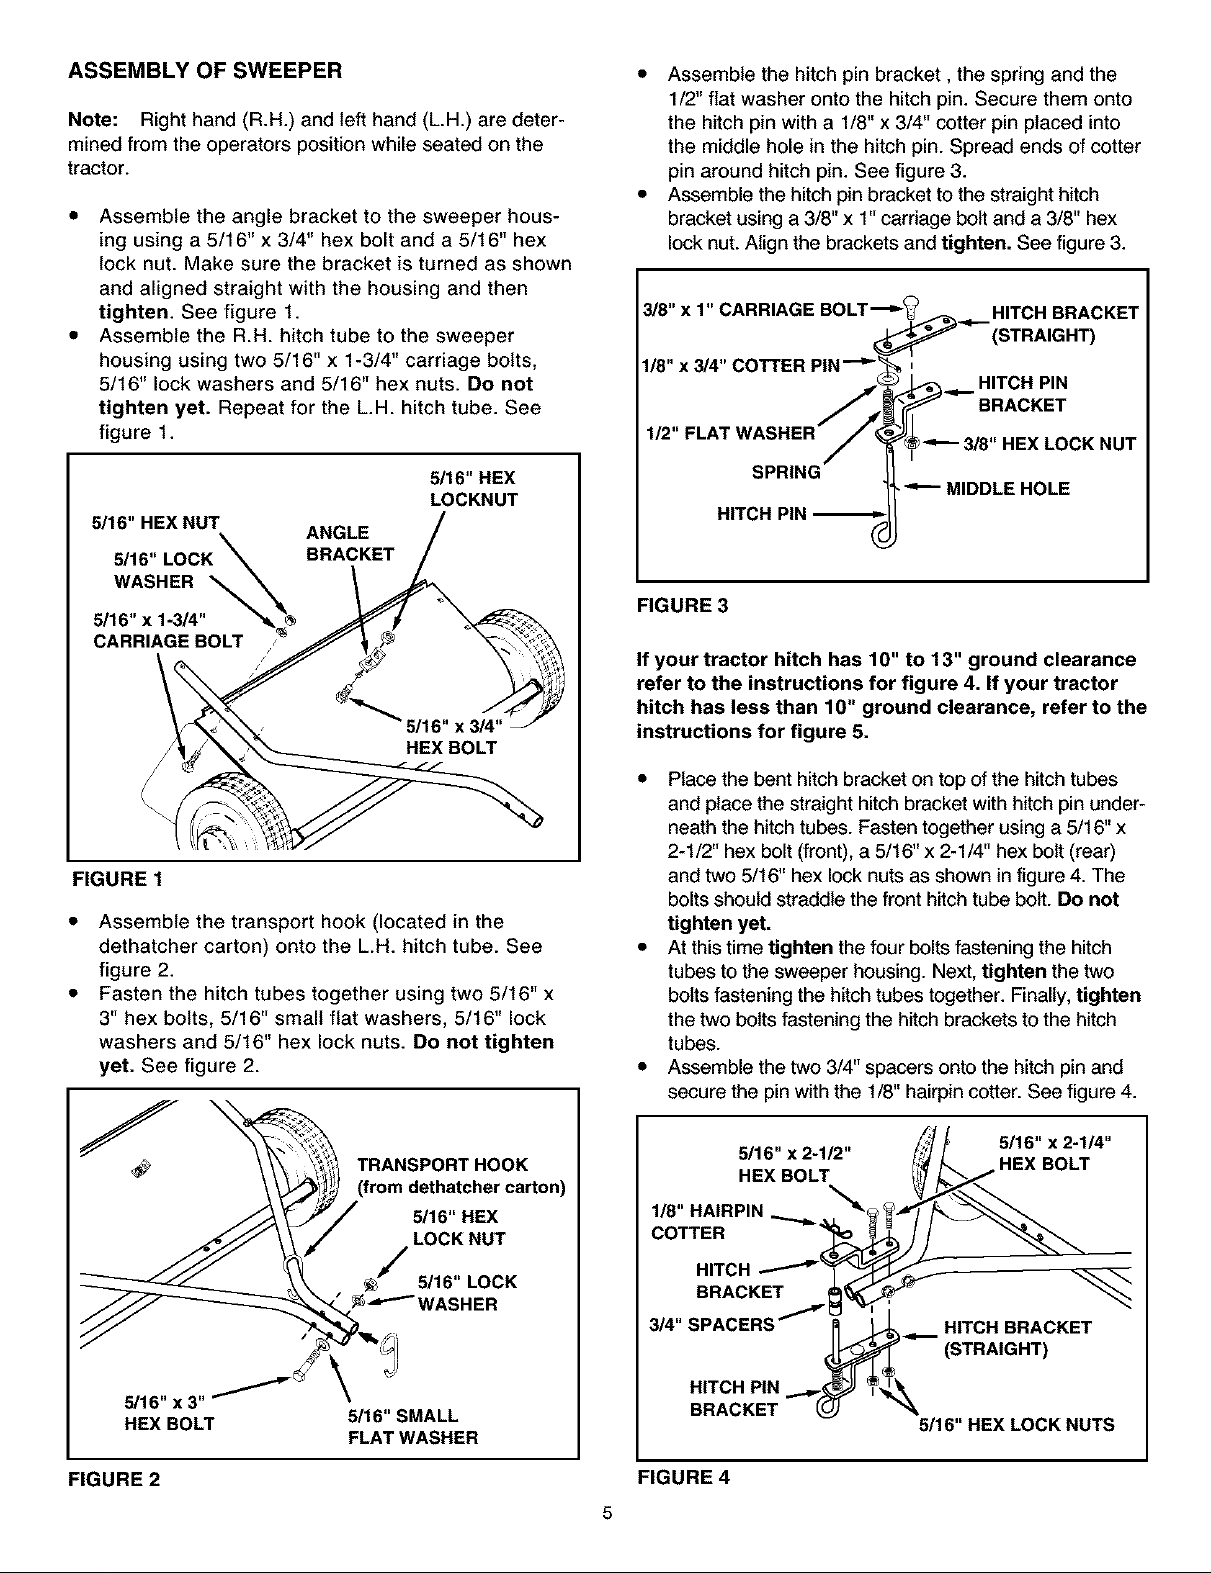
ASSEMBLY OF SWEEPER
Note: Right hand (R.H.) and left hand (L.H.) are deter-
mined from the operators position while seated on the
tractor.
• Assemble the angle bracket to the sweeper hous-
ing using a 5/16" x 3/4" hex bolt and a 5/16" hex
lock nut. Make sure the bracket is turned as shown
and aligned straight with the housing and then
tighten. See figure 1.
• Assemble the R.H. hitch tube to the sweeper
housing using two 5/16" x 1-3/4" carriage bolts,
5/16" lock washers and 5/16" hex nuts. Do not
tighten yet. Repeat for the L.H. hitch tube. See
figure 1.
5/16" HEX
LOCKNUT
5/16" HEX NUT
5/16"
WASHER _
5/16" x 1-3/4"
CARRIAGE BOLT
ANGLE
BRACKET
HEXBOLT
• Assemble the hitch pin bracket, the spring and the
1/2" flat washer onto the hitch pin. Secure them onto
the hitch pin with a 1/8" x 3/4" cotter pin placed into
the middle hole in the hitch pin. Spread ends of cotter
pin around hitch pin. See figure 3.
• Assemble the hitch pin bracket to the straight hitch
bracket using a 3/8" x 1" carriage bolt and a 3/8" hex
lock nut. Align the brackets and tighten. See figure 3.
3/8" x 1" CARRIAGE BOLT'_'_
1/8" x 3/4"
/"'---3/8"HEXLOCKNUT
HITCH PIN
FIGURE 3
If your tractor hitch has 10" to 13" ground clearance
refer to the instructions for figure 4. If your tractor
hitch has less than 10" ground clearance, refer to the
instructions for figure 5.
HITCH BRACKET
(STRAIGHT)
HITCH PIN
BRACKET
MIDDLE HOLE
FIGURE 1
Assemble the transport hook (located in the
dethatcher carton) onto the L.H. hitch tube. See
figure 2.
Fasten the hitch tubes together using two 5/16" x
3" hex bolts, 5/16" small flat washers, 5/16" lock
washers and 5/16" hex lock nuts. Do not tighten
yet. See figure 2.
TRANSPORTHOOK
_rom d_h_cherca_on)
_16"HEX
LOCKNUT
_16"LOCK
_A----'_WASHER
_16"x3"
HEXBOLT
_16"SMALL
FLAT WASHER
• Place the bent hitch bracket on top of the hitch tubes
and place the straight hitch bracket with hitch pin under-
neath the hitch tubes. Fasten together using a 5/16" x
2-1/2" hex bolt (front), a 5/16" x 2-1/4" hex bolt (rear)
and two 5/16" hex lock nuts as shown infigure 4. The
bolts should straddle the front hitch tube bolt. Do not
tighten yet.
• At this time tighten the four bolts fastening the hitch
tubes to the sweeper housing. Next, tighten the two
bolts fastening the hitch tubes together. Finally, tighten
the two bolts fastening the hitch brackets to the hitch
tubes.
• Assemble the two 3/4" spacers onto the hitch pin and
secure the pin with the 1/8" hairpin cotter. See figure 4.
............ 5/15"x2-1/4"
;,'x
1/6HA,RF,N"'+
HITCH .----""'__
BRACKET
3/4,,SFACERSf H,TCHORACKET
(STRAIGHT)
HITCH PIN ..,..,._.._ _,_,_
BRACKET _ "_-_
5/16" HEX LOCK NUTS
FIGURE 2
FIGURE 4
5
 Loading...