

Page 1
Operator's Manual
CRFIFISMFIN
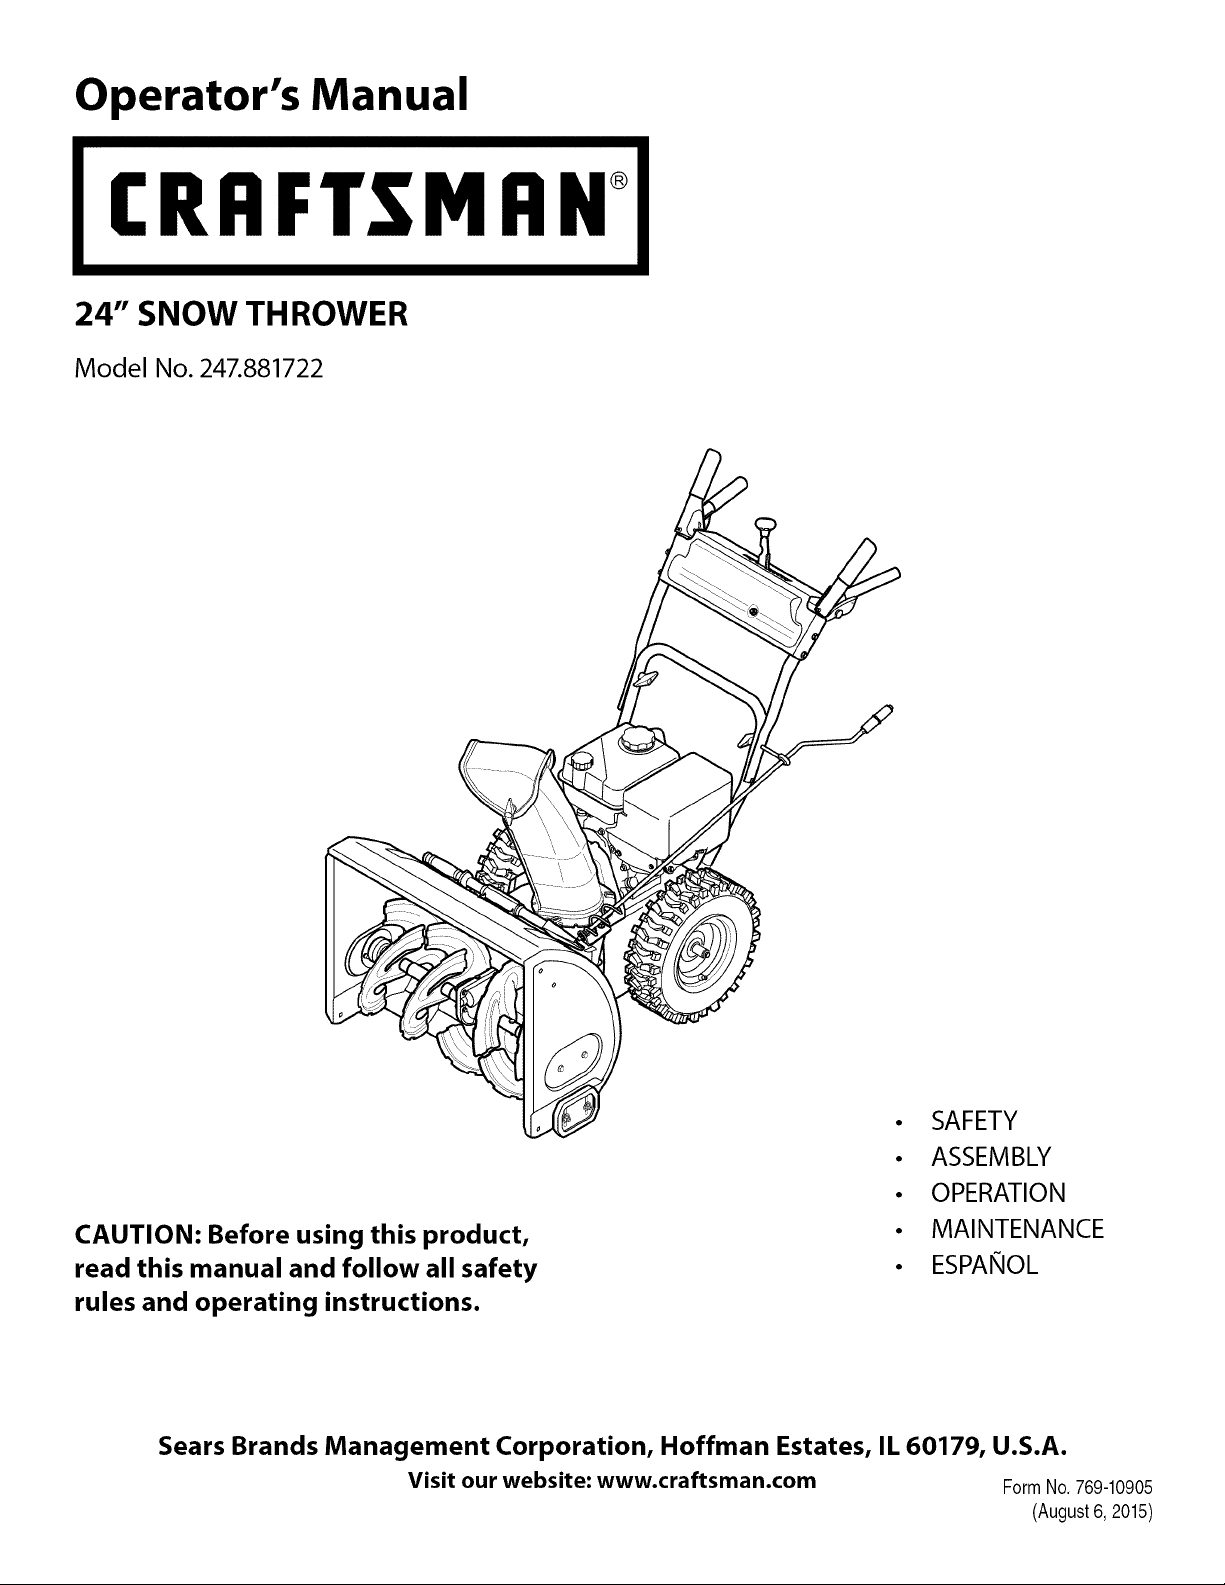
24" SNOW THROWER
Model No. 247.881722
CAUTION: Before using this product,
read this manual and follow all safety
rules and operating instructions.
Sears Brands Management Corporation, Hoffman Estates, IL 60179, U.S.A.
Visit our website: www.craftsman.com FormNo.769-10905
• SAFETY
• ASSEMBLY
• OPERATION
• MAINTENANCE
• ESPANOL
(August6,2015)
Page 2
WarrantyStatement.............................. Page2
SafeOperationPractices......................... Page3
Assembly........................................ Page8
Operation...................................... Page12
Off-SeasonStorage............................. Page23
Troubleshooting............................... Page24
RepairProtectionAgreement................... Page28
Espar_ol........................................ Page29
Service&Maintenance........................... Page16
CRAFTSMANLIMITEDWARRANTY
FORTWOYEARSfromthedateofsale,thisproductiswarrantedagainstanydefectsinmaterialorworkmanship.
WITHPROOFOFSALE,adefectiveproductwill receivefreerepairorreplacementatoptionofseller.
Forwarrantycoveragedetailstoobtainfreerepairorreplacement,visitthewebpage:www.craftsman.com/warranty
ThiswarrantycoversONLYdefectsinmaterialandworkmanship.WarrantycoveragedoesNOTinclude:
• Expendableitemsthat canwearoutfromnormalusewithinthewarrantyperiod,includingbutnotlimitedtoaugers,augerpaddles,driftcutters,skid
shoes,shaveplate,shearpins,sparkplug,aircleaner,belts,andoilfilter.
• Standardmaintenanceservicing,oilchanges,ortune-ups.
• Tirereplacementorrepaircausedbypuncturesfromoutsideobjects,suchasnails,thorns,stumps,orglass.
• Tireorwheelreplacementorrepairresultingfromnormalwear,accident,orimproperoperationormaintenance.
• Repairsnecessarybecauseofoperatorabuse,includingbutnotlimitedtodamagecausedbyover-speedingtheengine,orfromimpactingobjectsthat
bendtheframe,augershaft,etc.
• Repairsnecessarybecauseofoperatornegligence,includingbutnotlimitedto,electricalandmechanicaldamagecausedbyimproperstorage,failureto
usethepropergradeandamountofengineoil,orfailuretomaintaintheequipmentaccordingtotheinstructionscontainedintheoperator'smanual.
• Engine(fuelsystem)cleaningorrepairscausedbyfueldeterminedtobecontaminatedoroxidized(stale).Ingeneral,fuelshouldbeusedwithin30days
ofitspurchasedate.
• Normaldeteriorationandwearoftheexteriorfinishes,orproductlabelreplacement.
Thiswarrantyisvoidifthisproductiseverusedwhileprovidingcommercialservicesorifrentedtoanotherperson.
Thiswarrantygivesyouspecificlegalrights,andyoumayalsohaveotherrightswhichvaryfromstateto state.
SearsBrandsManagementCorporation,HoffmanEstates,IL60179
Engine Oil:
Oil Capacity:
Fuel:
5W-30
20 ounces
Unleaded Gasoline
Model Number
Serial Number
Date of Purchase
Fuel Capacity:
Spark Plug:
Spark Plug Gap:
© Sears Brands, LLC 2
2.3 quarts
F6RTC (Sears Part #951-10292)
.020" to 0.030"
Record the model number, serial number,
and date of purchase above.
Page 3
Thissymbolpointsout importantsafety instructionswhich,ifnot
followed,couldendangerthe personalsafetyand/orproperty of
yourselfandothers.Readandfollow all instructionsinthismanual
beforeattempting to operatethis machine.Failureto complywith these
instructionsmayresultinpersonalinjury.Whenyou seethissymbol,HEED
ITSWARNING!
Thismachinewasbuilt to beoperatedaccordingtothesafeoperation
practicesinthismanual.Aswith anytype of powerequipment,
carelessnessorerroronthe part of theoperatorcanresultinseriousinjury.
Thismachineiscapableof amputating fingers, hands,toesand feet and
throwingdebris.Failuretoobservethefollowing safety instructionscould
resultinseriousinjuryor death.
CALIFORNIA PROPOSITION 65
EngineExhaust,someofitsconstituents,and certainvehiclecomponents
containor emit chemicalsknowntoStateof Californiatocausecancerand
birth defectsorother reproductiveharm.
TRAINING
Read,understand,andfollowall instructionsonthemachineandinthe
manual(s)beforeattemptingtoassembleandoperate.Failuretodosocan
resultinseriousinjurytotheoperatorand/orbystanders.Keepthismanual
inasafeplaceforfutureandregularreferenceandfororderingreplacement
parts.
Befamiliarwith allcontrolsandtheirproperoperation.Knowhowto stop
themachineanddisengagethemquickly.
Neverallowchildrenunder14yearsof agetooperatethismachine.Children
14andovershouldreadandunderstandtheinstructionsandsafeoperation
practicesinthis manualandonthemachineandbetrainedandsupervised
byanadult.
Neverallowadultsto operatethismachinewithout properinstruction.
Thrownobjectscancauseseriouspersonalinjury.Planyoursnow-throwing
patterntoavoiddischargeof materialtowardroads,bystandersandthelike.
Keepbystanders,petsandchildrenatleast75feetfromthemachinewhileit
isin operation.Stopmachineif anyoneentersthearea.
Exercisecautiontoavoidslippingorfalling,especiallywhenoperatingin
reverse.
PREPARATION
Thoroughlyinspecttheareawheretheequipmentistobeused.Removeall
doormats,newspapers,sleds,boards,wiresandotherforeignobjects,which
couldbetrippedoverorthrownbytheauger/impeller.
Alwayswearsafetyglassesoreyeshieldsduringoperationandwhile
performinganadjustmentor repairto protectyoureyes.Thrownobjects
whichricochetcancauseseriousinjuryto theeyes.
Donotoperatewithout wearingadequatewinteroutergarments.Donot
wearjewelry,longscarvesorotherlooseclothing,whichcouldbecome
entangledinmovingparts.Wearfootwearwhichwill improvefootingon
slipperysurfaces.
Usea groundedthree-wireextensioncordandreceptacleforall machines
with electricstartengines.
Your Responsibility--Restrict theuseofthis power machineto
personswhoread,understandandfollow thewarningsandinstructionsin
thismanualandonthe machine.
SAVETHESEINSTRUCTIONS!
Disengageallcontrolleversbeforestartingtheengine.
Adjustcollectorhousingheightto cleargravelorcrushedrocksurfaces.
Neverattempttomakeanyadjustmentswhileengineisrunning,except
wherespecificallyrecommendedin theoperator'smanual.
Letengineandmachineadjusttooutdoortemperaturebeforestartingto
clearsnow.
Safe Handling of Gasoline:
Toavoidpersonalinjuryor property damageuseextremecareinhandling
gasoline.Gasolineisextremely flammableandthe vaporsareexplosive.
Seriouspersonalinjurycanoccurwhen gasolineisspilledonyourselforyour
clotheswhich canignite. Washyour skinandchangeclothesimmediately.
Useonlyanapprovedgasolinecontainer.
Neverfill containersinsidea vehicleorona truckortrailerbedwithaplastic
liner.Alwaysplacecontainersonthegroundawayfromyourvehiclebefore
filling.
Whenpractical,removegas-poweredequipmentfromthetruckor
trailerandrefuelitontheground.Ifthisis notpossible,thenrefuelsuch
equipmentonatrailerwith aportablecontainer,ratherthanfromagasoline
dispensernozzle.
Keepthenozzleincontactwiththerimofthefueltankorcontaineropening
atalltimesuntilfuelingiscomplete.Donotuseanozzlelock-opendevice.
Extinguishallcigarettes,cigars,pipesandothersourcesofignition.
Neverfuelmachineindoors.
Neverremovegascaporaddfuelwhiletheengineishotorrunning.Allow
enginetocoolatleasttwominutesbeforerefueling.
Neveroverfill fueltank.Filltanktonomorethan1/2inchbelowbottomof
fillernecktoallowspaceforfuelexpansion.
Replacegasolinecapandtightensecurely.
Ifgasolineisspilled,wipeit offtheengineandequipment.Moveunitto
anotherarea.Wait5 minutesbeforestartingtheengine.
Page 4
Toreducefirehazards,keepmachinefreeofgrass,leaves,orotherdebris
build-up.Cleanupoilorfuelspillageandremoveanyfuelsoakeddebris.
Neverstorethemachineorfuelcontainerinsidewherethereisanopen
flame,sparkorpilotlightasonawaterheater,spaceheater,furnace,clothes
dryerorothergasappliances.
OPERATION
Donotputhandsorfeetnearrotatingparts,intheauger/impellerhousing
orchuteassembly.Contactwith therotatingpartscanamputatehandsand
feet.
Theauger/impellercontrolleverisasafetydevice.Neverbypassits
operation.Doingsomakesthemachineunsafeandmaycausepersonal
injury.
Thecontrolleversmustoperateeasilyin bothdirectionsandautomatically
returntothedisengagedpositionwhenreleased.
Neveroperatewith amissingordamagedchuteassembly.Keepallsafety
devicesinplaceandworking.
Neverrunanengineindoorsor inapoorlyventilatedarea.Engineexhaust
containscarbonmonoxide,anodorlessanddeadlygas.
Donotoperatemachinewhileundertheinfluenceofalcoholordrugs.
Mufflerandenginebecomehotandcancauseaburn.Donottouch.Keep
childrenaway.
Exerciseextremecautionwhenoperatingonorcrossinggravelsurfaces.Stay
alertforhiddenhazardsortraffic.
Exercisecautionwhenchangingdirectionandwhileoperatingonslopes.Do
notoperateonsteepslopes.
Planyoursnow-throwingpatternto avoiddischargetowardswindows,
walls,carsetc.Thus,avoidingpossiblepropertydamageorpersonalinjury
causedbyaricochet.
Neverdirectdischargeatchildren,bystandersandpetsorallowanyonein
frontofthemachine.
Donotoverloadmachinecapacitybyattemptingtoclearsnowattoofastof
arate.
Neveroperatethismachinewithoutgoodvisibilityorlight.Alwaysbesureof
yourfootingandkeepafirmholdonthehandles.Walk,neverrun.
Disengagepowertotheauger/impellerwhentransportingornotin use.
Neveroperatemachineathightransportspeedsonslipperysurfaces.Look
downandbehindandusecarewhenbackingup.
Ifthemachineshouldstartto vibrateabnormally,stoptheengine,
disconnectthesparkplugwireandgrounditagainsttheengine.Inspect
thoroughlyfordamage.Repairanydamagebeforestartingandoperating.
Disengageallcontrolleversandstopenginebeforeyouleavetheoperating
position(behindthehandles).Waituntiltheauger/impellercomesto
acompletestopbeforeuncloggingthechuteassembly,makingany
adjustments,orinspections.
Neverputyourhandin thedischargeorcollectoropenings.Donotunclog
chuteassemblywhileengineisrunning.Shutoff engineandremainbehind
handlesuntilallmovingpartshavestoppedbeforeunclogging.
Useonlyattachmentsandaccessoriesapprovedbythemanufacturer(e.g.
wheelweights,tirechains,cabsetc.).
Whenstartingengine,pull cordslowlyuntil resistanceisfelt,thenpull
rapidly.Rapidretractionofstartercord(kickback)will pullhandandarm
towardenginefasterthanyoucanletgo.Brokenbones,fractures,bruisesor
sprainscouldresult.
Ifsituationsoccurwhicharenotcoveredinthismanual,usecareandgood
judgment.
CLEARING A CLOGGED DISCHARGE CHUTE
Handcontactwiththerotatingimpellerinsidethedischargechuteisthemost
commoncauseofinjuryassociatedwith snowthrowers.Neveruseyourhandto
cleanoutthedischargechute.
Toclearthechute:
a. SHUTTHEENGINEOFF!
b. Wait10secondsto besuretheimpellerbladeshavestopped
rotating.
c. Alwaysuseaclean-outtool,notyourhands.
MAINTENANCE & STORAGE
Nevertamperwithsafetydevices.Checktheir properoperationregularly.
Refertothemaintenanceandadjustmentsectionsofthismanual.
Beforecleaning,repairing,orinspectingmachinedisengageallcontrol
leversandstoptheengine.Waituntiltheauger/impellercometo acomplete
stop.Disconnectthesparkplugwireandgroundagainsttheengineto
preventunintendedstarting.
Checkboltsandscrewsforpropertightnessatfrequentintervalsto keepthe
machineinsafeworkingcondition.Also,visuallyinspectmachineforany
damage.
Donotchangetheenginegovernorsettingorover-speedtheengine.The
governorcontrolsthemaximumsafeoperatingspeedoftheengine.
Snowthrowershaveplatesandskidshoesaresubjecttowearanddamage.
Foryoursafetyprotection,frequentlycheckallcomponentsandreplace
with originalequipmentmanufacturer's(OEM)partsonlyaslistedinthe
Partspagesofthisoperator'smanual.Useofpartswhichdonot meetthe
originalequipmentspecificationsmayleadtoimproperperformanceand
compromisesafety!
Checkcontrolleversperiodicallytoverifytheyengageanddisengage
properlyandadjust,if necessary.Refertotheadjustmentsectioninthis
operator'smanualfor instructions.
Maintainorreplacesafetyandinstructionlabels,asnecessary.
Observeproperdisposallawsandregulationsforgas,oil,etc.toprotectthe
environment.
Priortostoring,runmachineafewminutestoclearsnowfrommachineand
preventfreezeupof auger/impeller.
Neverstorethemachineorfuelcontainerinsidewherethereisanopen
flame,sparkorpilotlight suchasawaterheater,furnace,clothesdryeretc.
Alwaysrefertotheoperator'smanualforproperinstructionsonoff-season
storage.
4
Page 5
Checkfuelline,tank,cap,andfittingsfrequentlyforcracksor leaks.Replace
if necessary.
Donotcrankenginewith sparkplugremoved.
Accordingto theConsumerProductsSafetyCommission(CPSC)andthe
U.S.EnvironmentalProtectionAgency(EPA),thisproducthasanAverage
Useful Lifeofseven(7)years,or60hoursofoperation.Attheendof
theAverage Useful Lifehavethemachineinspectedannuallybyan
authorizedservicedealertoensurethatallmechanicalandsafetysystems
areworkingproperlyandnotwornexcessively.Failureto dosocanresultin
accidents,injuriesordeath.
DO NOT MODIFY ENGINE
Toavoidseriousinjuryordeath,donot modifyengineinanyway. Tampering
with the governorsetting canleadto arunawayengineandcauseitto
operateat unsafespeeds.Nevertamperwith factorysetting of engine
governor.
NOTICE REGARDING EMISSIONS
Engineswhichare certifiedto complywith CaliforniaandfederalEPA
emissionregulationsfor SORE(Sinai[OffRoadEquipment)arecertified
tooperateonregularunleadedgasoline,andmayincludethe following
emissioncontrolsystems:EngineModification (EM),OxidizingCatalyst(0C),
SecondaryAirinjection(SAI)andThreeWayCatalyst(TWC)if soequipped.
Page 6
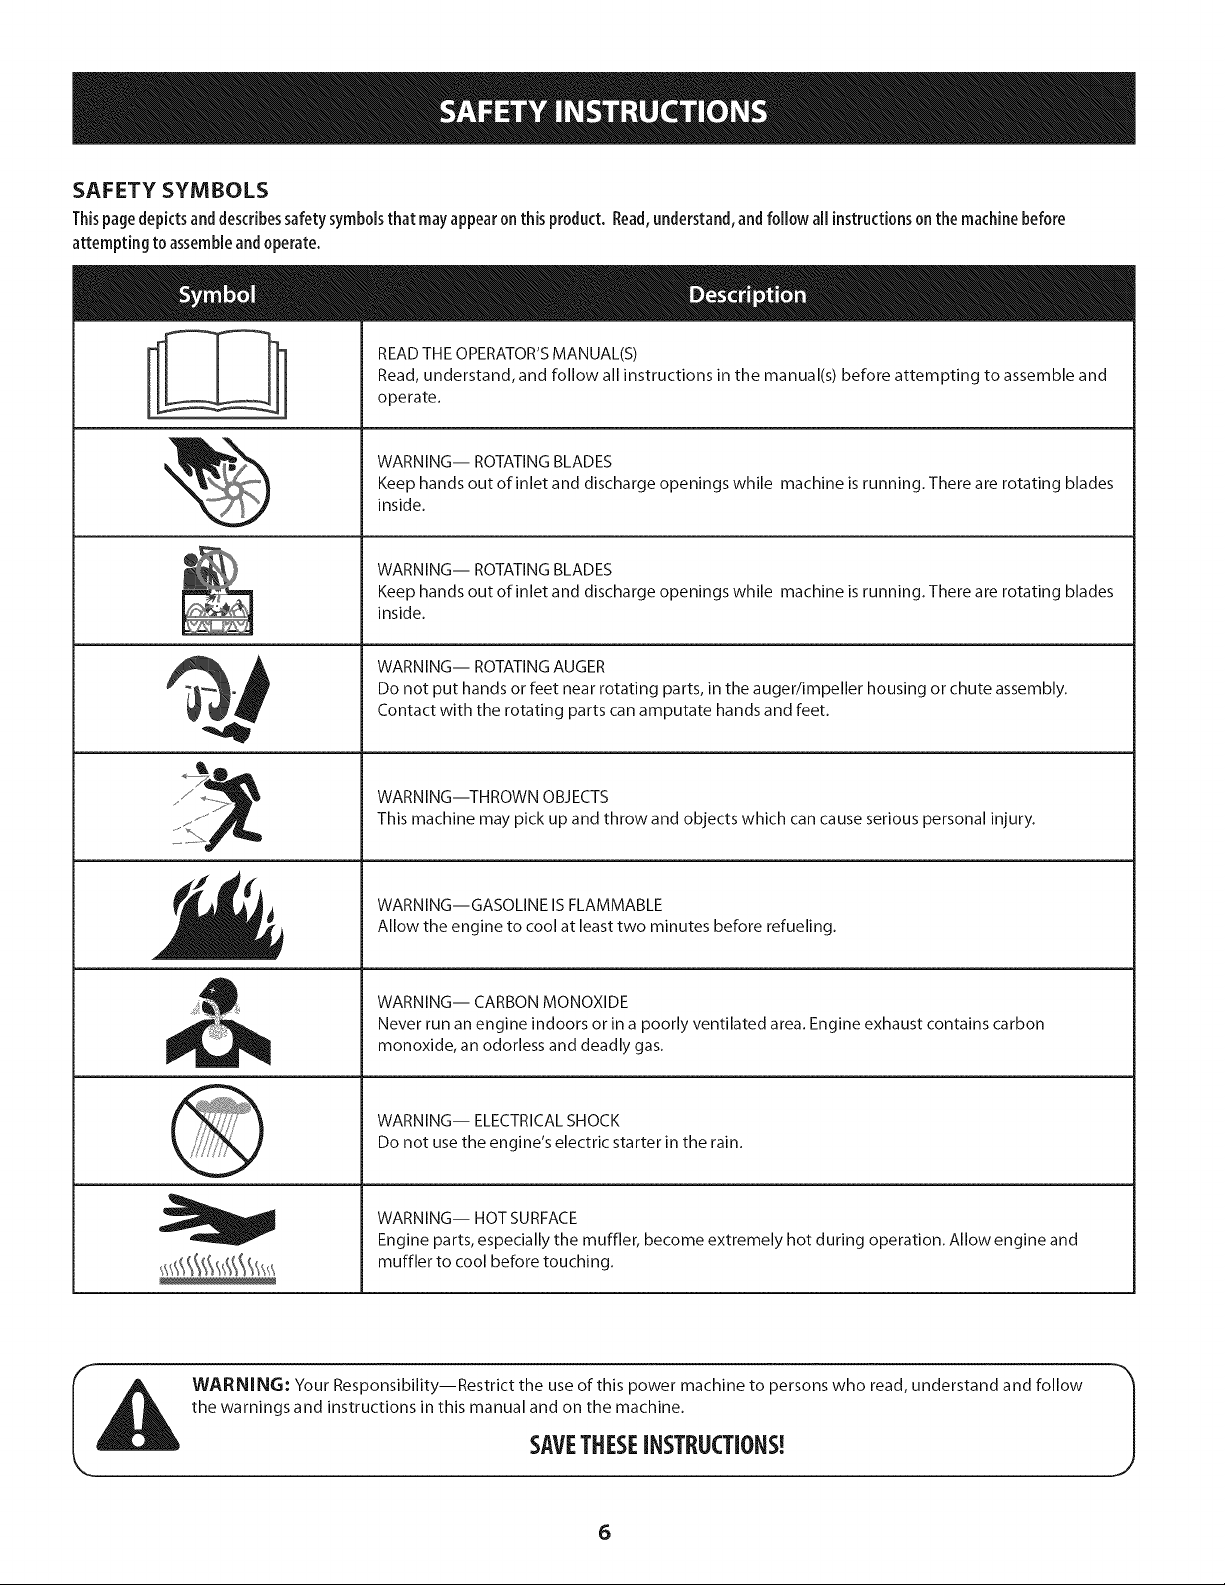
SAFETY SYMBOLS
Thispage depicts and describes safety symbols that may appear on this product. Read,understand, and follow all instructionson the machine before
attempting to assemble and operate.
READ THE OPERATOR'S MANUAL(S)
Read, understand, and follow all instructions in the manual(s) before attempting to assemble and
operate.
WARNING-- ROTATING BLADES
Keep hands out of inlet and discharge openings while machine is running. There are rotating blades
inside.
WARNING-- ROTATING BLADES
Keep hands out of inlet and discharge openings while machine is running. There are rotating blades
inside.
WARNING-- ROTATING AUGER
Do not put hands or feet near rotating parts, in the auger/impeller housing or chute assembly.
Contact with the rotating parts can amputate hands and feet.
WARNING--THROWN OBJECTS
This machine may pick up and throw and objects which cancause serious personal injury.
WARNING--GASOLINE IS FLAMMABLE
Allow the engine to cool at least two minutes before refueling.
WARNING-- CARBON MONOXIDE
Never run an engine indoors or in a poorly ventilated area. Engine exhaust contains carbon
monoxide, an odorless and deadly gas.
WARNING-- ELECTRICAL SHOCK
Do not use the engine's electric starter in the rain.
WARNING-- HOT SURFACE
Engine parts, especially the muffler, become extremely hot during operation. Allow engine and
muffler to cool before touching.
WARNING: Your Responsibility--Restrict the use of this power machine to persons who read, understand and follow
the warnings and instructions in this manual and on the machine.
SAVETHESEiNSTRUCTIONS!
6
Page 7

This page left intentionallyblank.
7
Page 8
NOTE:Referencestorightor leftsideofthesnowthroweraredeterminedfrom
behindtheunitin theoperatingposition(standingdirectlybehindthesnow
thrower,facingthehandlepanel).
Removing FromCarton
1. Cutthecornersofthecartonandlaythesidesflat ontheground.Remove
anddiscardallpackinginserts.
2. Movethesnowthroweroutof thecarton.
3. Makecertainthecartonhasbeencompletelyemptiedbeforediscardingit.
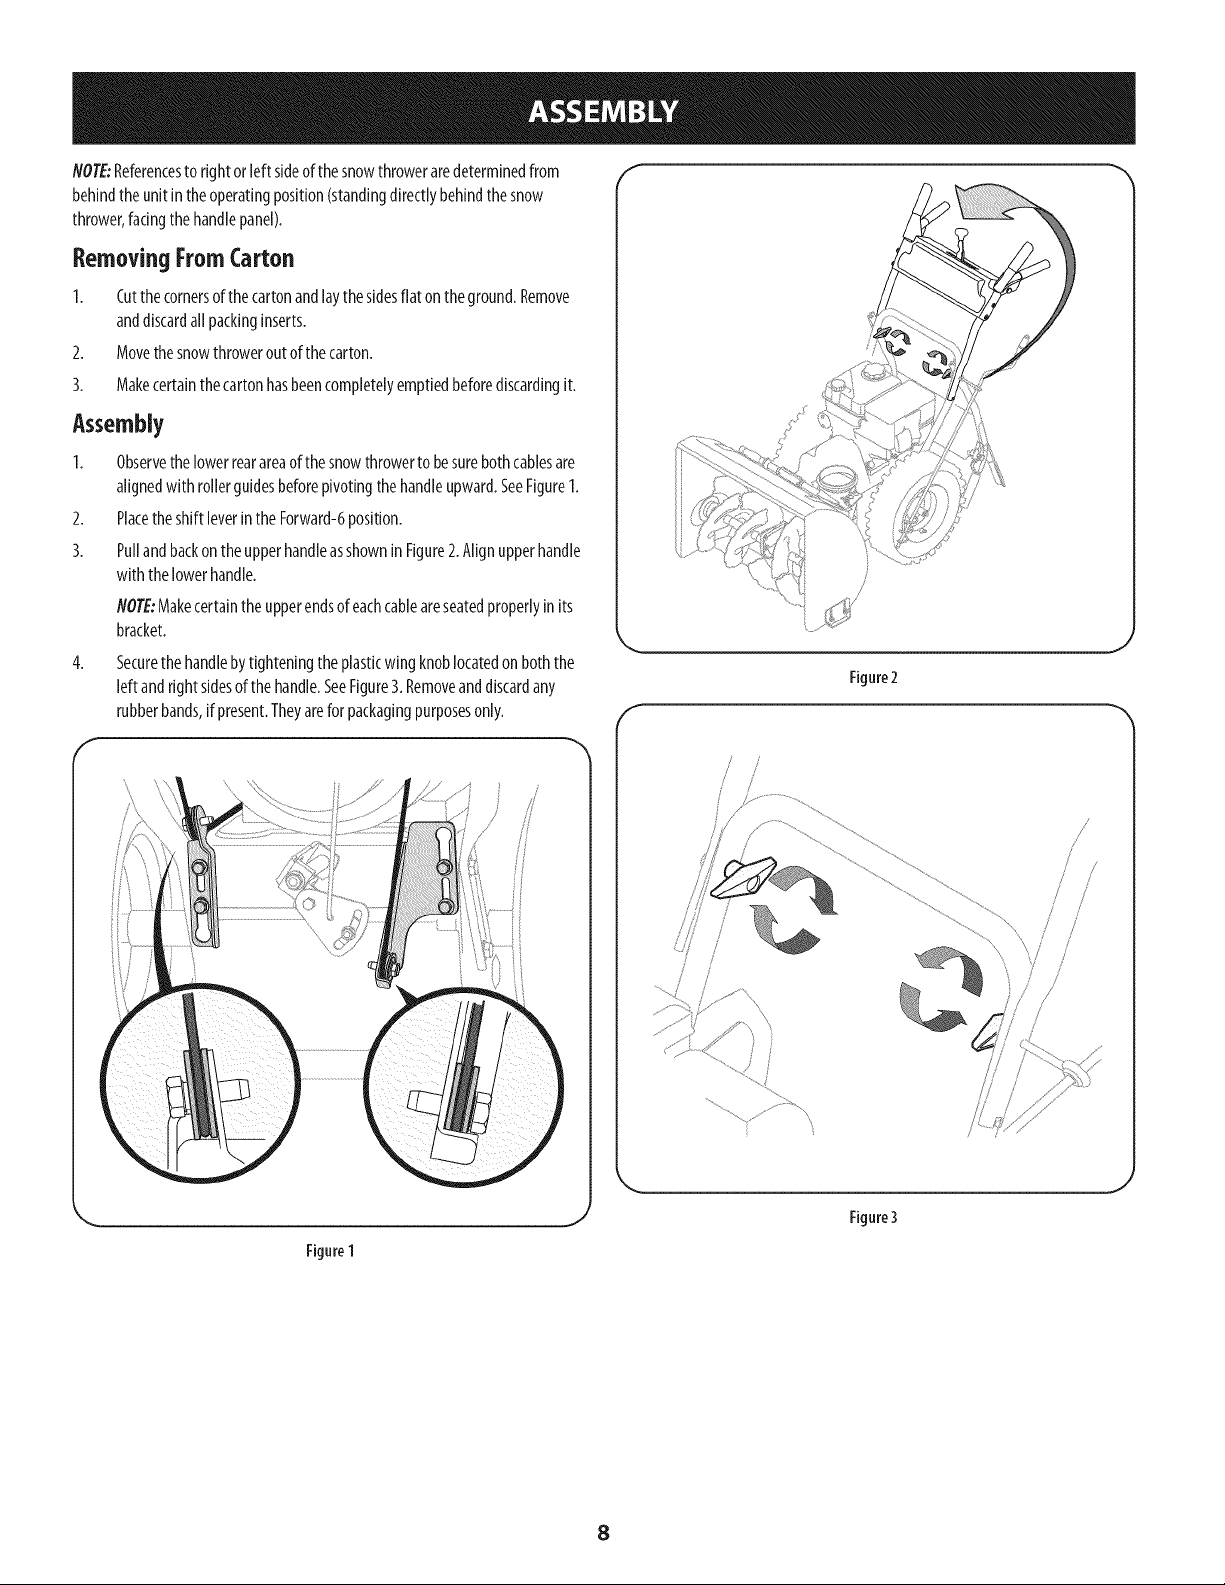
Assembly
1. Observethelowerrearareaofthesnowthrowertobesurebothcablesare
alignedwith rollerguidesbeforepivotingthehandleupward.SeeFigure1.
2. Placetheshift leverinthe Forward-6position.
3. Pullandbackontheupperhandleasshownin Figure2.Alignupperhandle
with thelowerhandle.
NOTE:Makecertaintheupperendsofeachcableareseatedproperlyin its
bracket.
4. Securethehandlebytighteningtheplasticwingknoblocatedonboththe
leftandrightsidesof thehandle.SeeFigure3.Removeanddiscardany
rubberbands,ifpresent.Theyareforpackagingpurposesonly.
f
k.
Figure2
Figure1
/
/
j
J
Figure3
8
Page 9
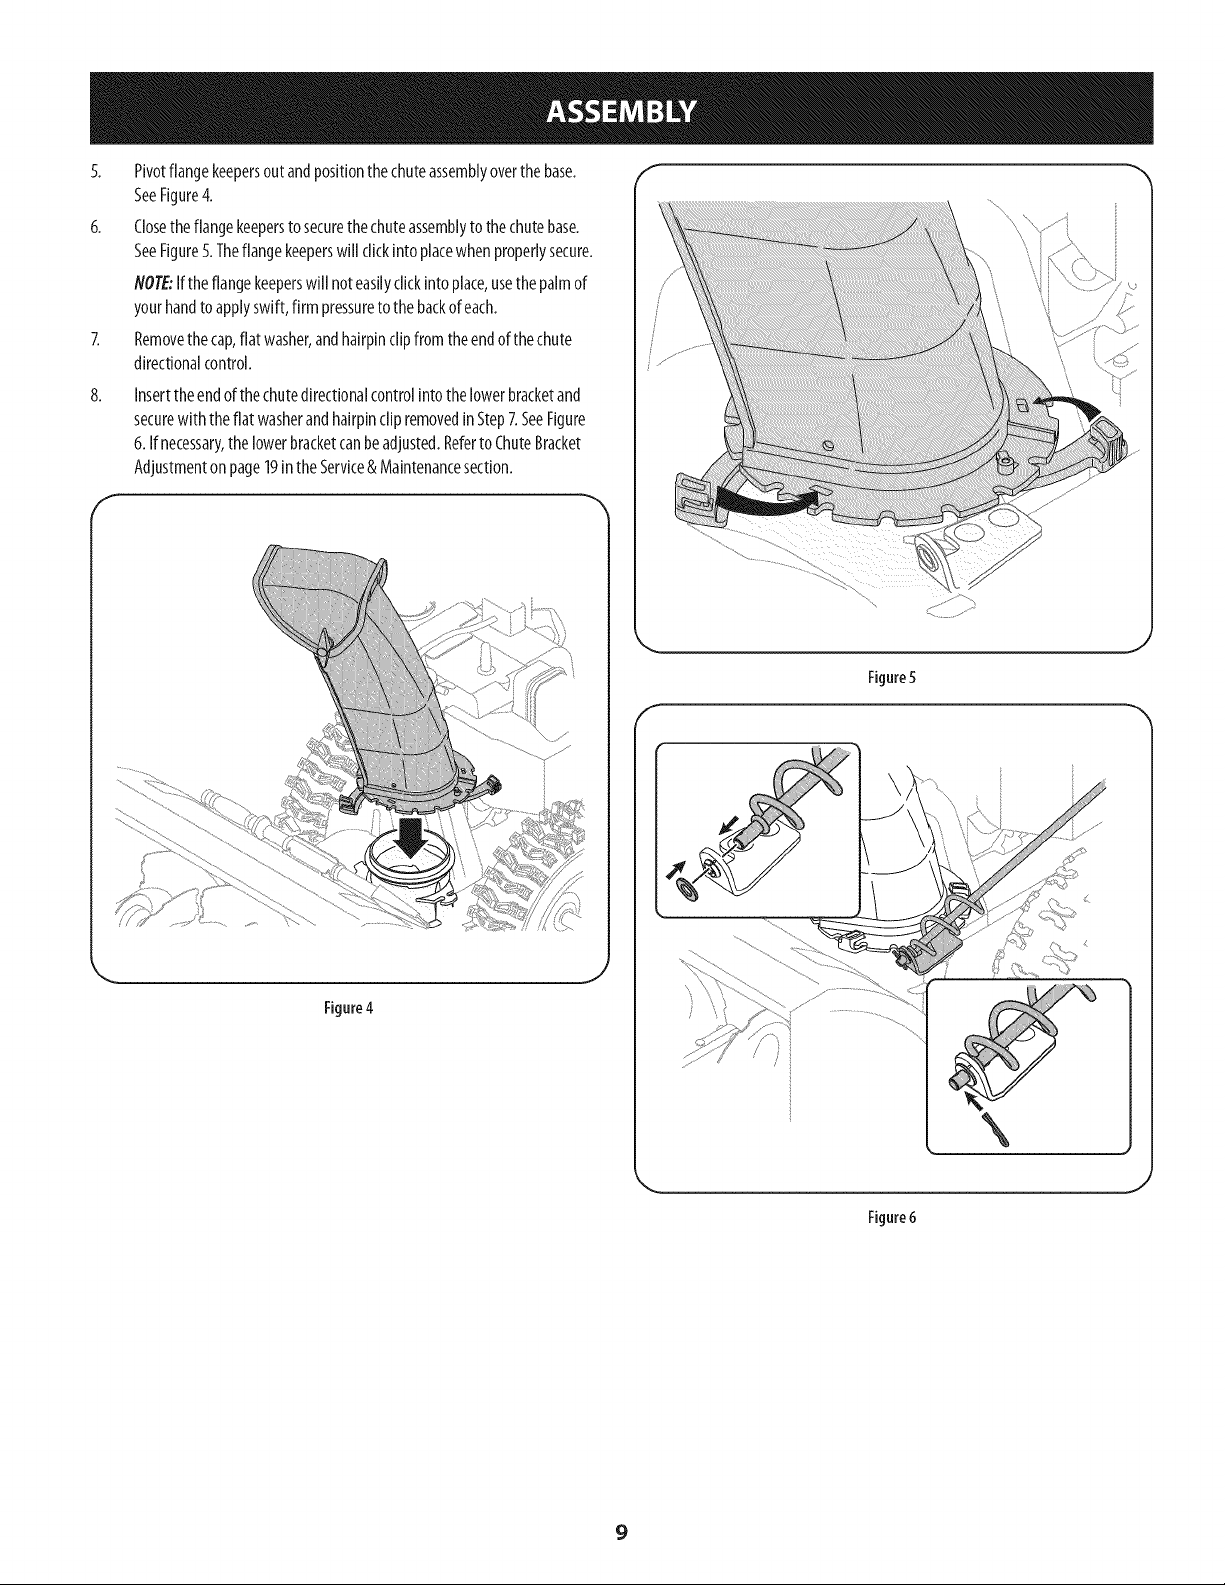
Pivotflangekeepersoutandpositionthechuteassemblyoverthe base.
SeeFigure4.
6.
Closetheflangekeeperstosecurethechuteassemblyto thechutebase.
SeeFigure5.Theflangekeeperswill clickintoplacewhenproperlysecure.
NOTE:Iftheflangekeeperswill noteasilyclickintoplace,usethepalmof
yourhandtoapplyswift,firm pressureto thebackofeach.
Removethecap,flat washer,andhairpinclipfromtheendofthechute
directionalcontrol.
8.
Inserttheendofthechutedirectionalcontrolintothelowerbracketand
securewith theflatwasherandhairpinclipremovedinStep7.SeeFigure
6.Ifnecessary,thelowerbracketcanbeadjusted.RefertoChuteBracket
Adjustmentonpage19in theService& Maintenancesection.
Figure5
f
Figure4
J
J
Figure6
9
Page 10
Set-Up f
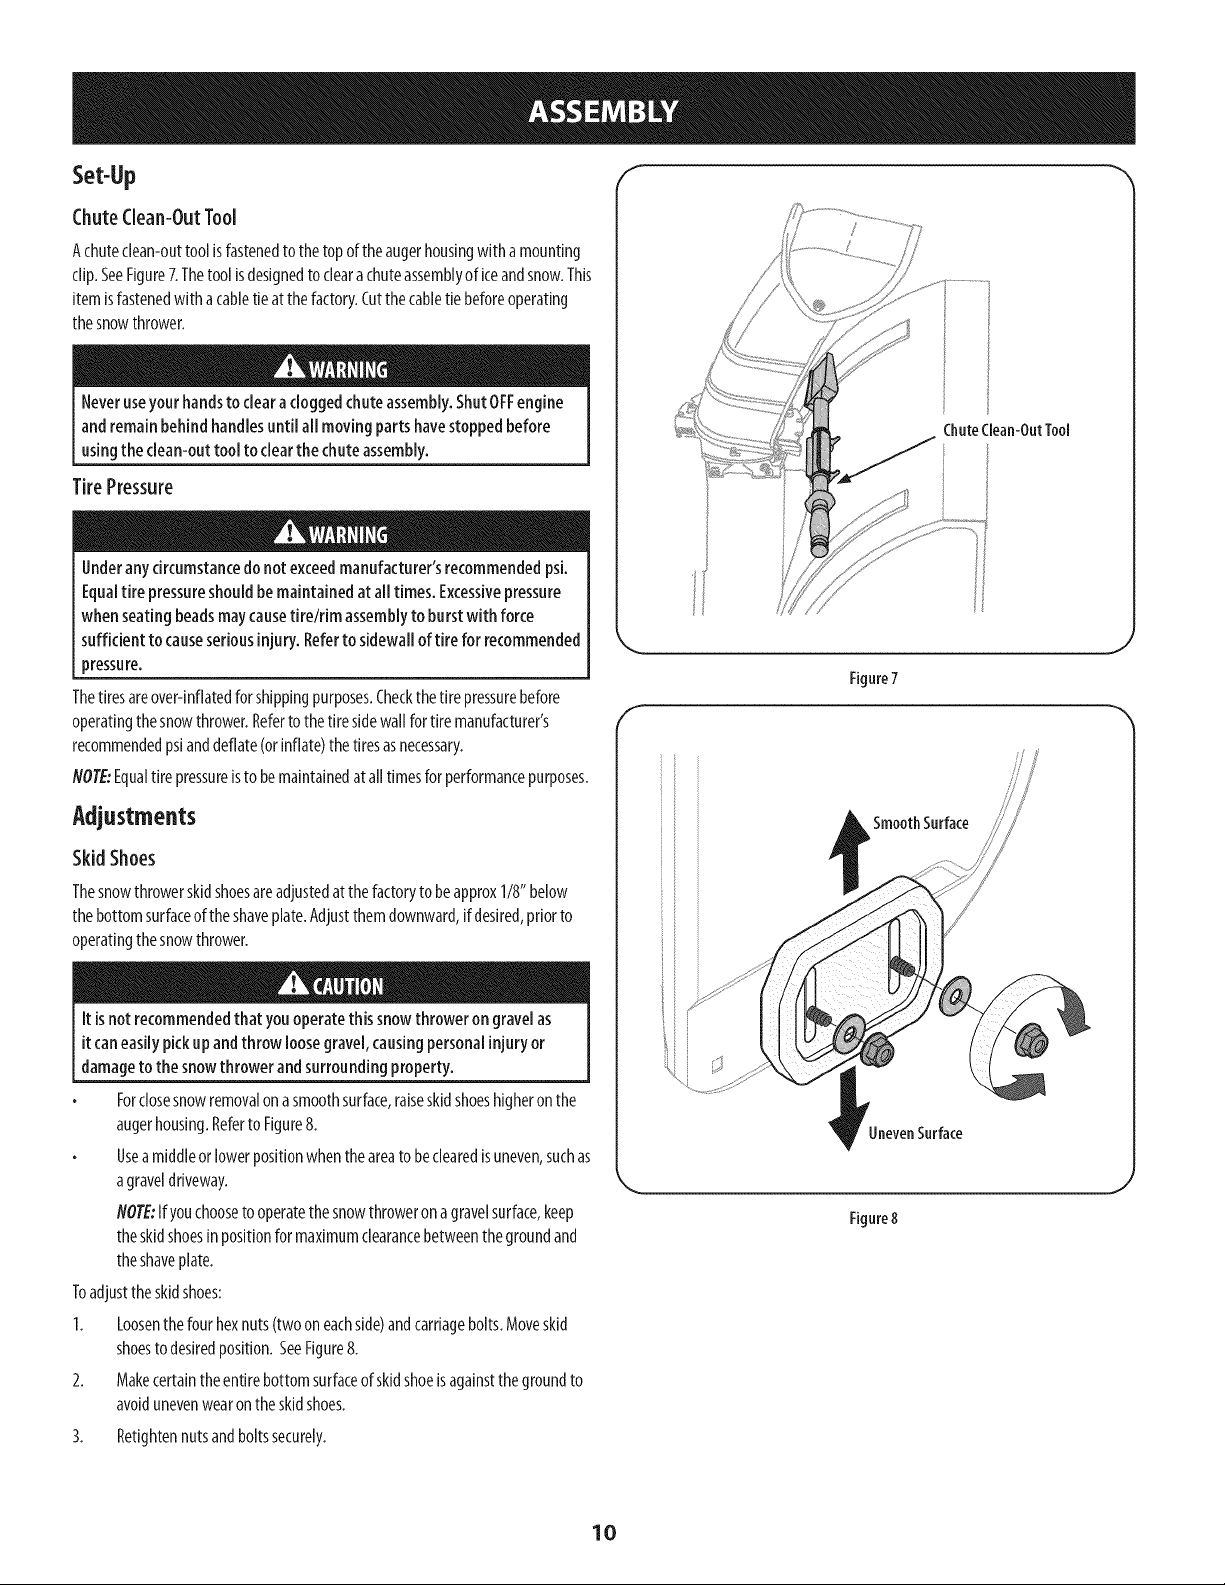
ChuteClean-OutTool
Achuteclean-outtoolisfastenedtothetopoftheaugerhousingwithamounting
clip.SeeFigure7.Thetoolisdesignedtoclearachuteassemblyof iceandsnow.This
itemisfastenedwitha cabletieatthefactory.Cutthecabletie beforeoperating
thesnowthrower.
Neveruseyour handstoclearacloggedchuteassembly.ShutOFFengine
andremainbehindhandlesuntil all movingparts havestoppedbefore
usingthe clean-outtool to clearthe chuteassembly.
TirePressure
Underanycircumstancedo notexceedmanufacturer'srecommendedpsi.
Equaltire pressureshouldbemaintainedat alltimes. Excessivepressure
when seatingbeadsmaycausetirelfim assemblyto burstwith force
sufficient tocauseseriousinjury. Refertosidewall oftire for recommended
pressure.
Thetiresareover-inflatedforshippingpurposes.Checkthetire pressurebefore
operatingthesnowthrower.Refertothetiresidewallfor tiremanufacturer's
recommendedpsianddeflate(orinflate)thetiresasnecessary.
NOTE:Equaltire pressureisto bemaintainedat alltimesforperformancepurposes.
ChuteClean-OutTool
J
Figure7
f
//
//
Adjustments
SkidShoes
Thesnowthrowerskidshoesareadjustedat thefactorytobeapprox1/8"below
thebottomsurfaceof theshaveplate.Adjustthemdownward,if desired,priorto
operatingthesnowthrower.
Itisnotrecommendedthat youoperatethis snowthroweron gravelas
itcaneasilypickupandthrow loosegravel,causingpersonalinjuryor
damageto thesnowthrower andsurroundingproperty.
Forclosesnowremovalon asmoothsurface,raiseskidshoeshigheronthe
augerhousing.Referto Figure8.
Useamiddleorlowerpositionwhentheareatobeclearedisuneven,suchas
agraveldriveway.
NOTE:Ifyouchoosetooperatethesnowthroweronagravelsurface,keep
theskidshoesinpositionformaximumclearancebetweenthegroundand
theshaveplate.
Toadjusttheskidshoes:
1. Loosenthefour hexnuts(twooneachside)andcarriagebolts.Moveskid
shoestodesiredposition.SeeFigure8.
2. Makecertaintheentirebottomsurfaceof skidshoeisagainstthegroundto
avoidunevenwearontheskidshoes.
SmoothSurface
UnevenSurface
\
Figure8
3. Retightennutsandboltssecurely.
10
Page 11
Chute f %
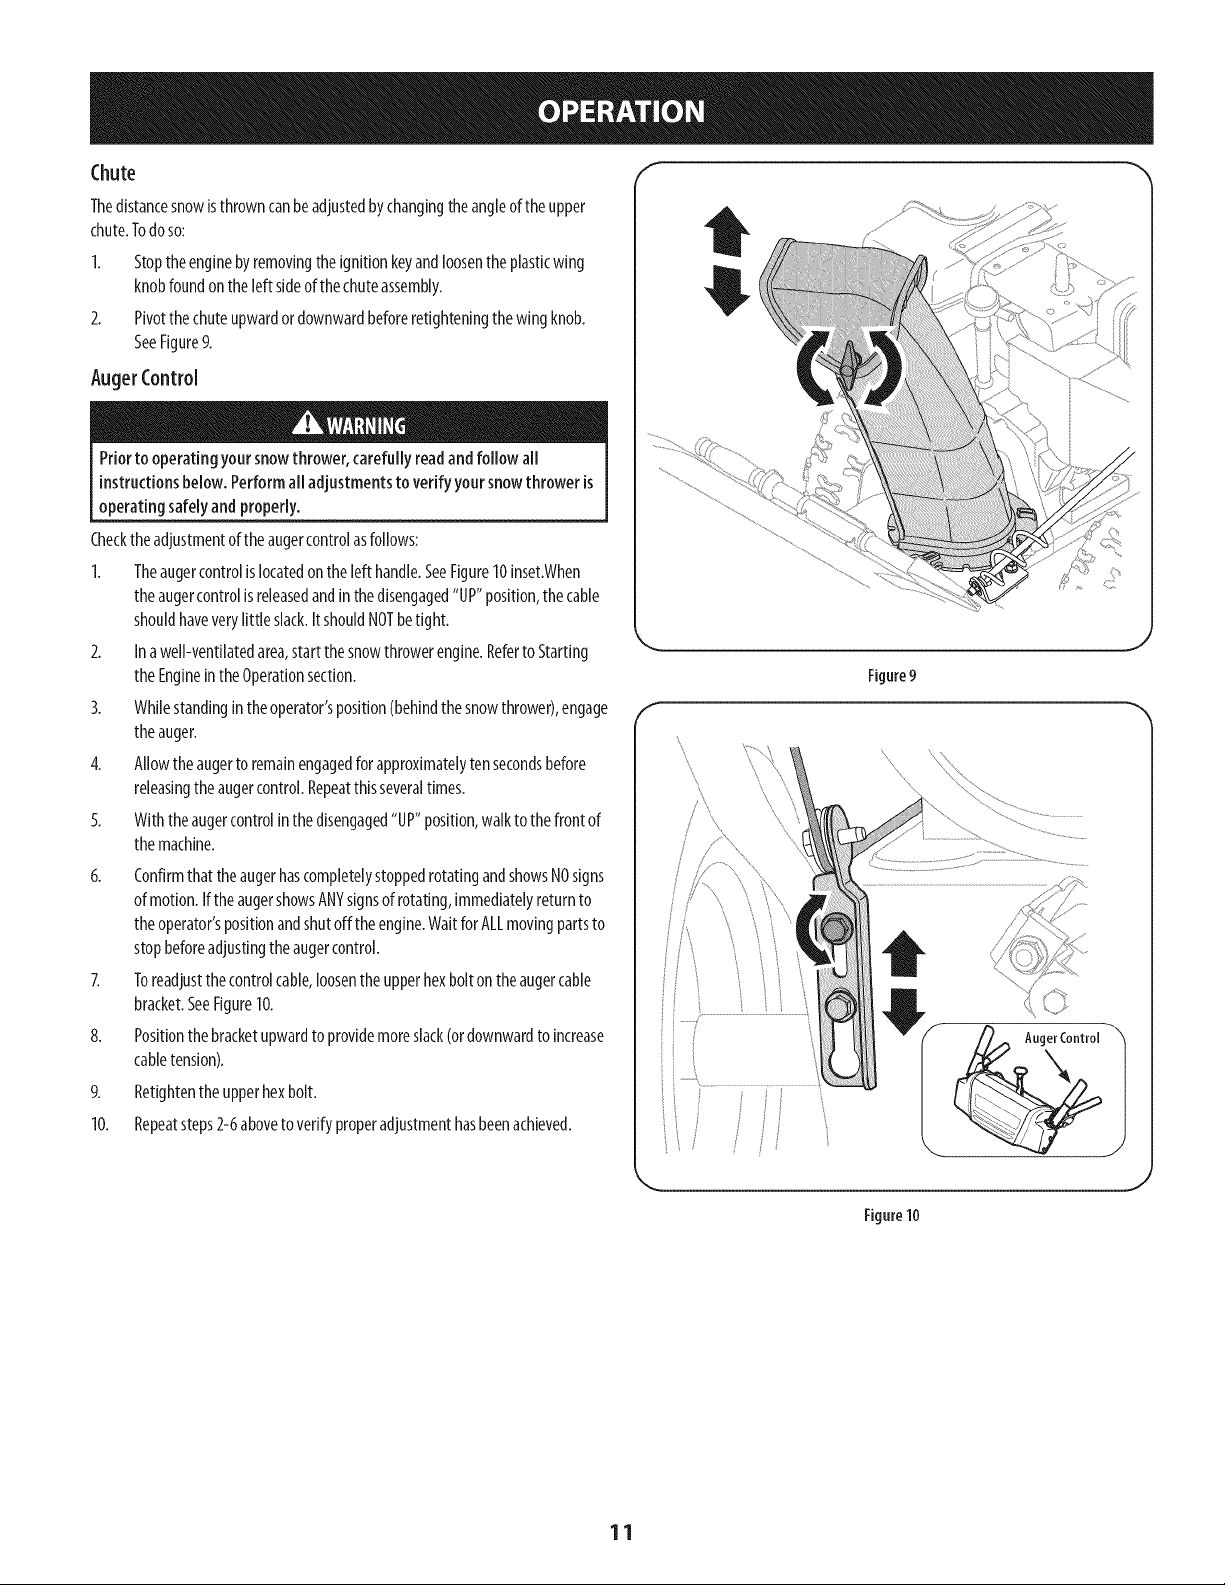
Thedistancesnowisthrowncanbeadjustedbychangingtheangleoftheupper
chute.Todoso:
Stoptheenginebyremovingtheignitionkeyandloosenthe plasticwing
knobfoundontheleft sideofthechuteassembly.
2_
Pivotthechuteupwardordownwardbeforeretighteningthewingknob.
SeeFigure9.
AugerControl
Priorto operatingyoursnowthrower, carefullyreadandfollow all
instructionsbelow.Performalladjustmentsto verifyyoursnowthrower is
operatingsafelyandproperly.
Checktheadjustmentoftheaugercontrolasfollows:
1. Theaugercontrolislocatedontheleft handle.SeeFigure10inset.When
theaugercontrolisreleasedandinthedisengaged"UP"position,thecable
shouldhaveverylittle slack.ItshouldNOTbetight.
2. Ina well-ventilatedarea,startthesnowthrowerengine.Referto Starting
theEngineintheOperationsection.
3. Whilestandingintheoperator'sposition(behindthesnowthrower),engage
theauger.
4. Allowtheaugerto remainengagedfor approximatelytensecondsbefore
releasingtheaugercontrol.Repeatthisseveraltimes.
5. Withtheaugercontrolin thedisengaged"UP"position,walktothefront of
themachine.
6. Confirmthat theaugerhascompletelystoppedrotatingandshowsNOsigns
ofmotion.IftheaugershowsANYsignsofrotating,immediatelyreturnto
theoperator'spositionandshutofftheengine.WaitforALLmovingpartsto
stopbeforeadjustingtheaugercontrol.
7. Toreadjustthecontrolcable,loosentheupperhexboltontheaugercable
bracket.SeeFigure10.
8. Positionthebracketupwardtoprovidemoreslack(ordownwardtoincrease
cabletension).
9. Retightentheupperhexbolt.
10. Repeatsteps2-6aboveto verifyproperadjustmenthasbeenachieved.
Figure9
f
\\
,J
11
J
Figure10
Page 12
Drive Control
Shift Lever
J
J
Auger Control
Chute Assembly
Clean Out
Auger
Housing
Tool
\
\
\
\,
\
Augers Starter
_'_" Skid Shoes Electric :/
Figure11
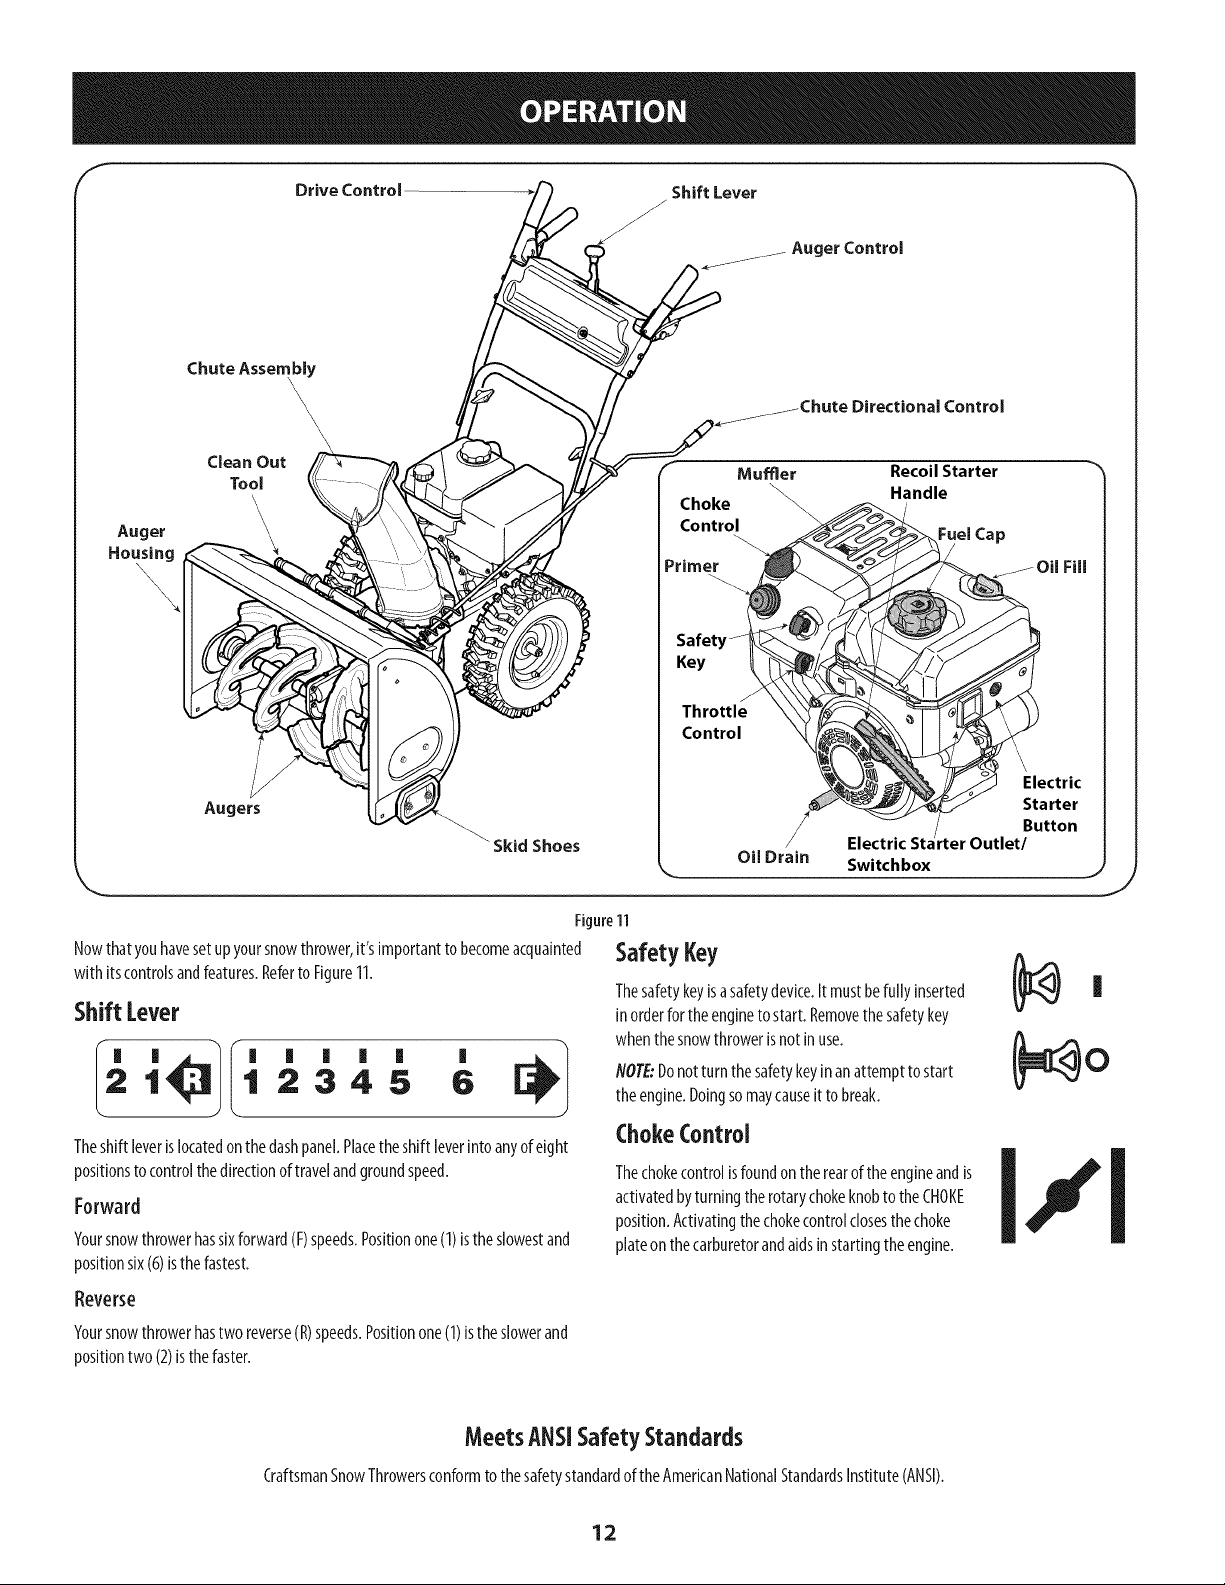
Nowthatyouhavesetupyoursnowthrower,it'simportanttobecomeacquainted
with itscontrolsandfeatures.Referto Figure11.
ShiftLever
JChute Directional Control
Mumer Recoil Starter
Choke
Control
)rimer
SafetyJ
Key
Throttle
Control
Oi[ Drain
Handle
e[ Cap
Switchbox
SafetyKey
Thesafetykeyisasafetydevice.Itmustbefullyinserted
inorderfortheengineto start.Removethesafetykey
whenthesnowthrowerisnotinuse.
Electric
Button
J
1 2345 6
I_ '_1 ' ' ' ' ' '
Theshiftleverislocatedonthedashpanel.Placetheshiftleverintoanyofeight
positionstocontrolthedirectionoftravelandgroundspeed.
Forward
Yoursnowthrowerhassixforward(F)speeds.Positionone(1)isthe slowestand
positionsix(6)isthe fastest.
Reverse
Yoursnowthrowerhastworeverse(R)speeds.Positionone(1)istheslowerand
positiontwo(2)isthefaster.
MeetsANSiSafetyStandards
CraftsmanSnowThrowersconformtothesafetystandardoftheAmericanNationalStandardsInstitute(ANSI).
flOTE:Donotturnthesafetykeyinanattempttostart
theengine.Doingsomaycauseittobreak.
ChokeControl
Thechokecontrolisfoundontherearoftheengineandis
activatedbyturningtherotarychokeknobtotheCHOKE
position.Activatingthechokecontrolclosesthechoke
plateonthecarburetorandaidsinstartingtheengine.
12
Page 13
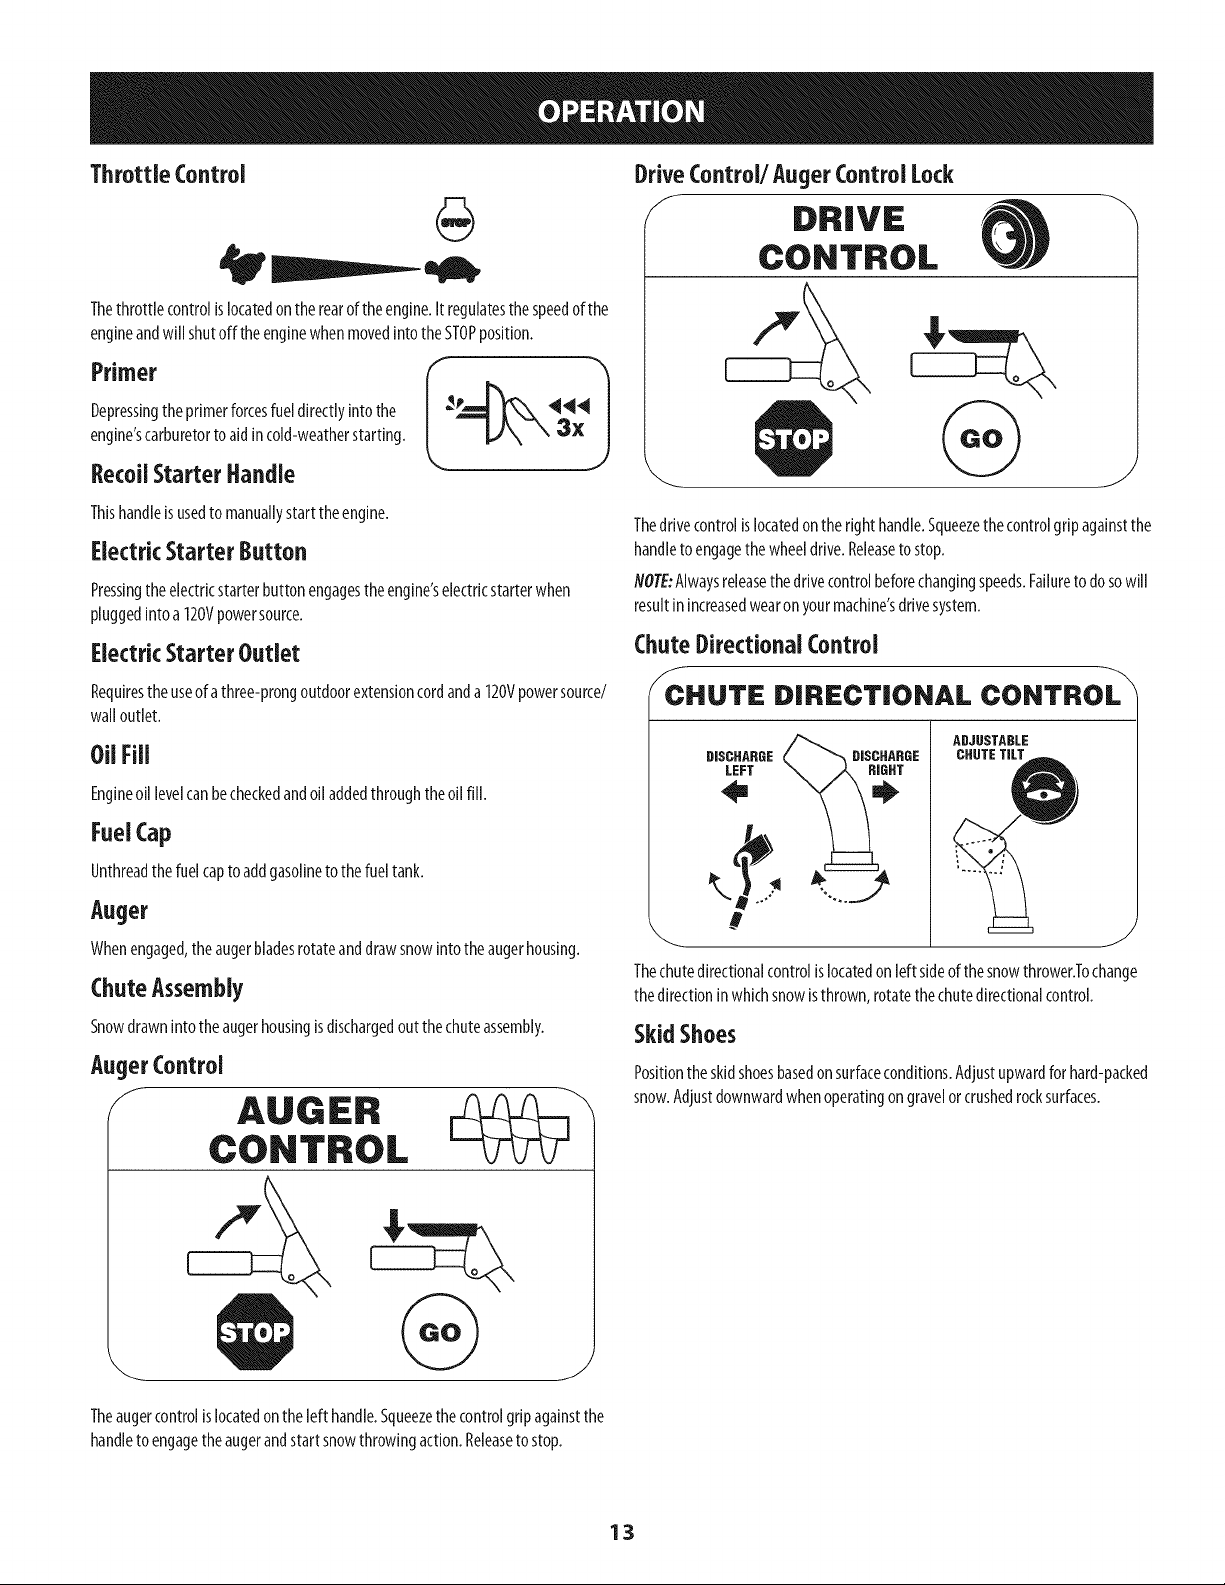
ThrottleControl
Thethrottlecontrolislocatedontherearoftheengine.It regulatesthespeedofthe
engineandwillshutoff theenginewhenmovedintotheSTOPposition.
Depressingtheprimerforcesfueldirectlyintothe _e 444
engine'scarburetorto aidincold-weatherstarting. 3 X
RecoilStarter Handle
DriveControl/Auger Control Lock
f DRIVE
CONTROL
Thishandleisusedto manuallystarttheengine.
ElectricStarter Button
Pressingtheelectricstarterbuttonengagestheengine'selectricstarterwhen
pluggedintoa 120Vpowersource.
ElectricStarter Outlet
Requirestheuseofathree-prongoutdoorextensioncordanda120Vpowersource/
walloutlet.
OilFill
Engineoil levelcanbecheckedandoiladdedthroughtheoil fill.
FuelCap
Unthreadthefuelcaptoaddgasolineto thefueltank.
Auger
Whenengaged,theaugerbladesrotateanddrawsnowintotheaugerhousing.
ChuteAssembly
Snowdrawnintotheaugerhousingisdischargedoutthechuteassembly.
AugerControl
f
AUGER
Thedrivecontrolislocatedontheright handle.Squeezethecontrolgripagainstthe
handletoengagethewheeldrive.Releasetostop.
NOTE:Alwaysreleasethedrivecontrolbeforechangingspeeds.Failuretodosowill
resultinincreasedwearonyourmachine'sdrivesystem.
ChuteDirectional Control
f
CHUTE DIRECTIONAL CONTROL
ADJUSTABLE
DISCHARGE
LEFT
Thechutedirectionalcontrolislocatedonleftsideofthesnowthrower.Tochange
thedirectioninwhichsnowisthrown,rotatethechutedirectionalcontrol.
SkidShoes
Positiontheskidshoesbasedonsurfaceconditions.Adjustupwardforhard-packed
snow.Adjustdownwardwhenoperatingongravelorcrushedrocksurfaces.
CHUTETILT
CONTROL
Theaugercontrolislocatedonthelefthandle.Squeezethecontrolgripagainstthe
handletoengagetheaugerandstartsnowthrowingaction.Releaseto stop.
13
Page 14
Clean-OutTool
Neveruseyour handstodear acloggedchuteassembly.ShutOFFengine
andremainbehindhandlesuntil all movingparts havestoppedbefore
usingthe clean-outtool to clearthe chuteassembly.
Thechuteclean-outtoolisconvenientlyfastenedto therearoftheaugerhousing
with amountingclip.Shouldsnowandicebecomelodgedinthechuteassembly
duringoperation,proceedasfollowstosafelycleanthechuteassemblyandchute
opening:
1. Releaseboththeaugercontrolandthedrivecontrol.
2. Stoptheenginebyremovingthesafetykeyorpositionthethrottletothe
STOPposition.
3. Removetheclean-outtoolfromtheclipwhichsecuresitto therearofthe
augerhousing.
4. Usetheshovel-shapedendoftheclean-outtool todislodgeandscoopany
snowandicewhichhasformedinandnearthechuteassembly.
5. Refastentheclean-outtooltothemountingclipontherearoftheauger
housing,reinserttheignitionkeyandstartthesnowthrower'sengine.
6. Whilestandingintheoperator'sposition(behindthesnowthrower),engage
theaugercontrolforafewsecondstoclearanyremainingsnowandicefrom
thechuteassembly.
BeforeStarting Engine
Read,understand,andfollow all instructionsandwarningsonthe
machineandin this manualbeforeoperating.
Oil
Theunitwasshippedwithoilintheengine.Checkoillevelbeforeeachoperationto
ensureadequateoilin theengine.
NOTE:Besuretochecktheengineonalevelsurfacewith theenginestopped.
1. Removetheoilfillercap/dipstickandwipethedipstickclean.
2. Insertthecap/dipstickintotheoilfillerneck,butdoNOTscrewitin.
3. Removetheoilfillercap/dipstick.Ifthelevelislow,slowlyaddoil(5W-30,
with aminimumclassificationof SF/SG)until oillevelregistersbetweenhigh
(N)andlow(L).
NOTE:Donotoverfill.Overfillingwith oil mayresultinenginesmoking,hard
startingorsparkplugfouling.
4.
Replaceandtightencap/dipstickfirmlybeforestartingengine.
Gasoline
Useautomotivegasoline(unleadedorlowleadedto minimizecombustionchamber
deposits)with aminimumof87octane.Gasolinewith upto10%ethanolor15%
MTBE(MethylTertiaryButylEther)canbeused.Neveruseanoil/gasolinemixture
ordirtygasoline.Avoidgettingdirt, dust,orwaterinthefueltank.DONOTuseE85
gasoline.
Refuelin awell-ventilatedareawith theenginestopped.Donotsmokeor
allowflamesorsparksin theareawheretheengineisrefueledorwhere
gasolineisstored.
Donotoverfillthefueltank.Afterrefueling,makesurethetankcapisclosed
properlyandsecurely.
Becarefulnottospillfuelwhenrefueling.Spilledfuelorfuelvapormay
ignite.Ifanyfuelisspilled,makesuretheareaisdry beforestartingthe
engine.
Avoidrepeatedorprolongedcontactwith skinorbreathingofvapor.
Useextremecarewhenhandlinggasoline.Gasolineisextremely
flammableandthevaporsare explosive.Neverfuel the machineindoorsor
while the engineishotor running.Extinguishcigarettes,cigars,pipesand
othersourcesof ignition.
1. Cleanaroundfuelfill beforeremovingcaptofuel.
2. Filltankuntilfuelreaches1/2inchbelowthebottomofthefillerneckto
allowspacefor fuelexpansion.Becarefulnottooverfill.
Starting Engine
Alwayskeephandsandfeet clearof movingparts.Donotuseapressurized
starting fluid. Vaporsareflammable.
NOTE:Allowtheenginetowarmupfor afewminutesafterstarting.Theenginewill
notdevelopfull poweruntilit reachesoperatingtemperatures.
1. Makecertainboththeaugercontrolanddrivecontrolarein thedisengaged
(released)position.
2. Insertsafetykeyintoslot.Makesureitsnapsintoplace.Donotattemptto
turnthesafetykey.
NOTE:Theenginecannotstartwithoutthesafetykeyfullyinsertedintothe
ignitionswitch.
ElectricStarter
Theelectric starteris equippedwith a groundedthree-wire plug,and
isdesignedto operateon120VAChouseholdcurrent. It must beused
with a properlygroundedthree-prongreceptacleat alltimes toavoid
the possibilityof electrk shock.Followall instructionscarefullypriorto
operatingthe electricstarter. DONOTuseelectric starterinthe rain.
Determinethatyourhome'swiringisathree-wiregroundedsystem.Aska licensed
electricianifyouarenotcertain.
Ifyouhavea groundedthree-prongreceptacle,proceedasfollows.Ifyoudonot
havetheproperhousewiring,DONOTusetheelectricstarterunderanyconditions.
1. Pluganextensioncordintotheoutletlocatedontheengine'ssurface.Plug
theotherendofextensioncordintoathree-prong120V,grounded,ACoutlet
inawell-ventilatedarea.
Theextensioncordcanbeany length, but must beratedfor 15Aat125V,
groundedandratedfor outdoor use.
14
Page 15

2. Movethrottlecontrolto FAST(rabbit)_Jl[r position.
3 MovechoketotheCHOKEI"I pos t on co,deng nestart ,feng ne s
warm,placechokein RUNposition.
4. Pushprimerthreetimes,makingsuretocoverventholeinprimerbulbwhen
pushing.Ifengineiswarm,pushprimeronlyonce.AIwayscoverventhole
whenpushing.Coolweathermayrequireprimingto berepeated.
5. Pushstarterbuttontostartengine.Oncetheenginestarts,immediately
releasestarterbutton.Electricstarterisequippedwiththermaloverload
protection;systemwill temporarilyshutdowntoallowstartertocoolif
electricstarterbecomesoverloaded.
6.
Astheenginewarms,slowlyrotatethechokecontrolto RUNposition.Ifthe
enginefalters,restartengineandrunwith chokeat half-chokepositionfor a
shortperiodoftime,andthenslowlyrotatethechokeinto RUNposition.
Afterengineisrunning,disconnectpowercordfromelectricstarter.When
disconnecting,alwaysunplugtheendatthewalloutletbeforeunplugging
theoppositeendfromtheengine.
ToEngageDrive
I. Withthethrottlecontrolinthe Fast(rabbit)_l_II position,moveshiftlever
NOTE:Whenselectingadrivespeed,usetheslowerspeedsuntilyouare
comfortableandfamiliarwiththeoperationofthesnowthrower.
2. Squeezethedrivecontrolagainstthe handleandthesnowthrowerwill
NOTE:NEVERrepositiontheshiftlever(changespeedsordirectionoftravel)
withoutfirst releasingthe drivecontrolandbringingthesnowthrowerto a
completestop.Doingsowillresultinprematureweartothesnowthrower'sdrive
system.
ToEngageAuger
RecoilStarter
Replacing Shear Pins
Eachaugerbladeissecuredtothespiralshaftwith ashearpinandbow-tieclip.If
Donotpullthe starterhandlewhilethe engineisrunning.
L
I. Movethrottle controlto FAST(rabbit)_J_II position.
2. MovechoketotheCHOKEI,.'Iposition(coldenginestart).Ifengineis
warm,placechokein RUNposition.
3. Pushprimerthreetimes,makingsuretocoverventholewhenpushing.
Ifengineiswarm,pushprimeronlyonce.AIwayscoverventholewhen
pushing.Coolweathermayrequireprimingtoberepeated.
4. Pullgentlyonthestarterhandleuntilit beginsto resist,then pullquickly
andforcefullytoovercomethecompression.Donotreleasethehandleand
allowit tosnapback.ReturnropeSLOWLYto originalposition.If required,
repeatthisstep.
5. Astheenginewarms,slowlyrotatethechokecontroltoRUNposition.Ifthe
enginefalters,restartengineandrunwith chokeat half-chokepositionfor a
shortperiodoftime,andthenslowlyrotatethechokeinto RUNposition.
anaugerbladestrikesa foreignobjectoricejam,thepinwill shearoff toprevent
damagetotheblade.Ifanaugerbladedoesnotturn,checkto seeif itspinhas
shearedoff. SeeFigure12.
intooneofthesixforward(F)positionsortwo reverse(R)positions.Selecta
speedappropriatefor thesnowconditionsandapaceyou'recomfortable
with.
move.Releaseit anddrivemotionwillstop.
Toengagetheaugerandstartthrowingsnow,squeezetheaugercontrol
againstthe lefthandle.Releaseto stoptheauger.
NEVERreplacetheaugershearpinswithanything otherthan SearsModel#
88389orOEMPartNo.738-04124Areplacementshearpins.Anydamageto
the augergearboxorothercomponentsasaresultof failing to dosowill
NOTbecoveredby yoursnowthrower'swarranty.
Alwaysturnoff the snowthrower'sengineandremovethesafetykeyprior
to replacingshearpins.
f
Toavoidunsupervisedengineoperation,neverleavethemachine
unattendedwith theenginerunning.Turntheengineoffafteruseand
removesafetykey.
StoppingEngine
Afteryouhavefinishedsnowthrowing,runengineforafew minutesbefore
stoppingto helpdryOFFanymoistureontheengine.
I. Movethrottle controlto OFFposition.
2. Removethesafetykey.Removingthesafetykeywillreducethepossibilityof
unauthorizedstartingoftheenginewhileequipmentisnotinuse.Keepthe
safetykeyinasafeplace.Theenginecannotstartwithoutthesafetykey.
3. Wipeanymoistureawayfromthecontrolsontheengine.
15
Figure12
Page 16
MAINTENANCESCHEDULE
Beforeperforminganytype of maintenance/service,disengageall controls
andstopthe engine.Wait until all movingparts havecometoa complete
stop.Disconnectsparkplug wire andground it againstthe engineto
preventunintendedstarting.
Followthemaintenanceschedulegivenbelow.Thischartdescribesservice
guidelinesonly.UsetheServiceLogcolumntokeeptrackofcompleted
maintenancetasks.TolocatethenearestSearsServiceCenterortoscheduleservice,
callthefollowingtollfreenumber:l-888-331-4569.
EachUseandevery5hours
First5hours
Annuallyor25hours
Annuallyor50hours
Annuallyor100hours
BeforeStorage
1. Engineoil level
2. Looseormissinghardware
3. Unitandengine.
I. Engineoil
I. Sparkplug
2. Controllinkagesandpivots
3. Wheels
4. GearshaftandAugershaft
I. Engineoil
I. Sparkplug
I. Fuelsystem
GENERALRECOMMENDATIONS
CheckingEngineOil
Beforelubricating, repairing,orinspecting,disengageall controlsandstop
engine.Waituntil all movingparts havecometo acompletestop.
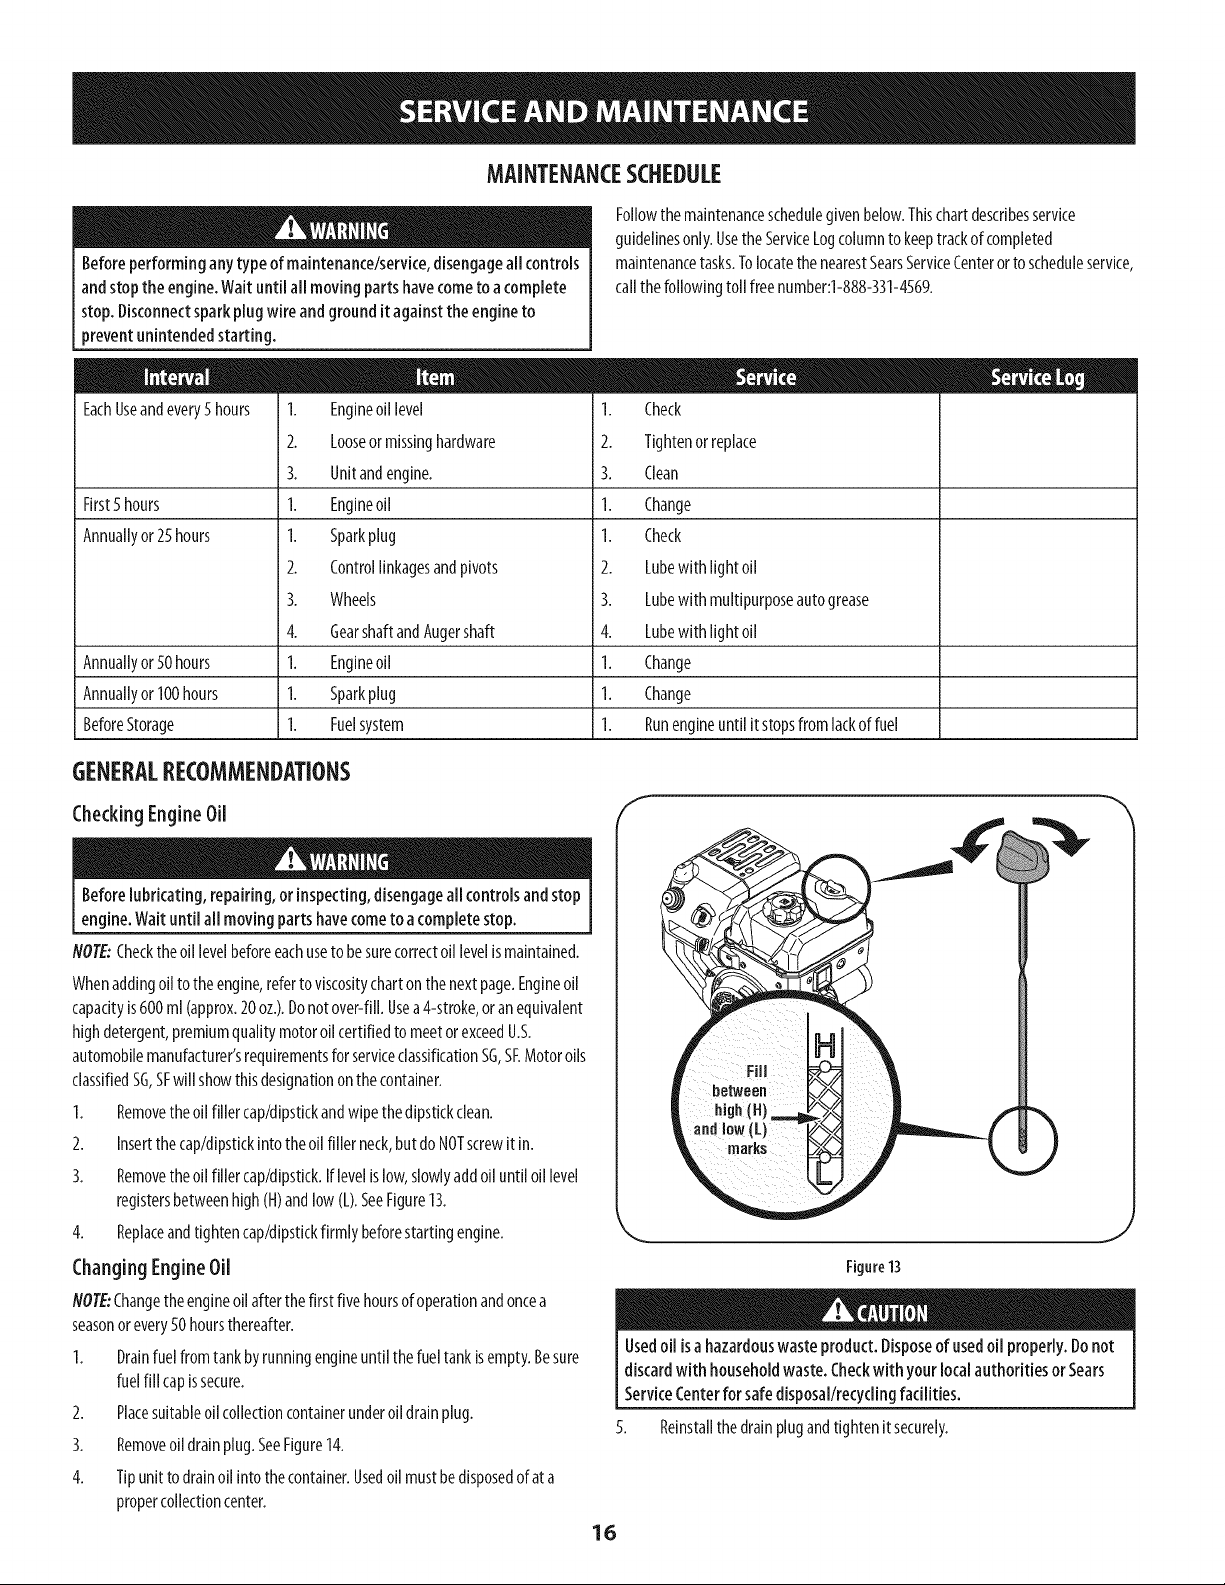
NOTE:Checktheoillevelbeforeeachusetobesurecorrectoillevelismaintained.
Whenaddingoiltotheengine,refertoviscositychartonthenextpage.Engineoil
capacityis600ml (approx.20oz.).Donotover-fill.Usea4-stroke,oranequivalent
highdetergent,premiumqualitymotoroilcertifiedtomeetorexceedU.S.
automobilemanufacturer'srequirementsfor serviceclassification%, SEMotoroils
classifiedSG,SFwill showthisdesignationonthecontainer.
1. Removetheoilfillercap/dipstkkandwipethedipstickclean.
2. Insertthecap/dipstkkintotheoilfillerneck,butdoNOTscrewitin.
3. Removetheoilfillercap/dipstick.Iflevelislow,slowlyaddoiluntiloillevel
registersbetweenhigh(H)andlow(L).SeeFigure13.
4. Replaceandtightencap/dipstkkfirmlybeforestartingengine.
ChangingEngineOil
NOTE"Changetheengineoilafterthefirstfivehoursofoperationandoncea
seasonorevery50hoursthereafter.
I. Drainfuelfromtankbyrunningengineuntil thefueltankisempty.Besure
fuelfill capissecure.
2. Placesuitableoilcollectioncontainerunderoil drainplug.
3. Removeoildrainplug.SeeFigure14.
4. Tipunittodrainoiiintothecontainer.Usedoiimustbedisposedofat a
propercollectioncenter.
1. Check
2. Tightenorreplace
3. Clean
1. Change
1. Check
2. Lubewithlight oil
3. Lubewithmultipurposeautogrease
4. Lubewithlight oil
1. Change
1. Change
1. Runengineuntilitstopsfromlackoffuel
f
)
J
Figure13
Usedoii isa hazardouswasteproduct.Disposeof usedoilproperly.Donot
discardwith householdwaste.Checkwith your localauthorities or Sears
ServiceCenterforsafedisposal/recyclingfacilities.
5. Reinstallthedrainplugandtightenitsecurely.
16
Page 17
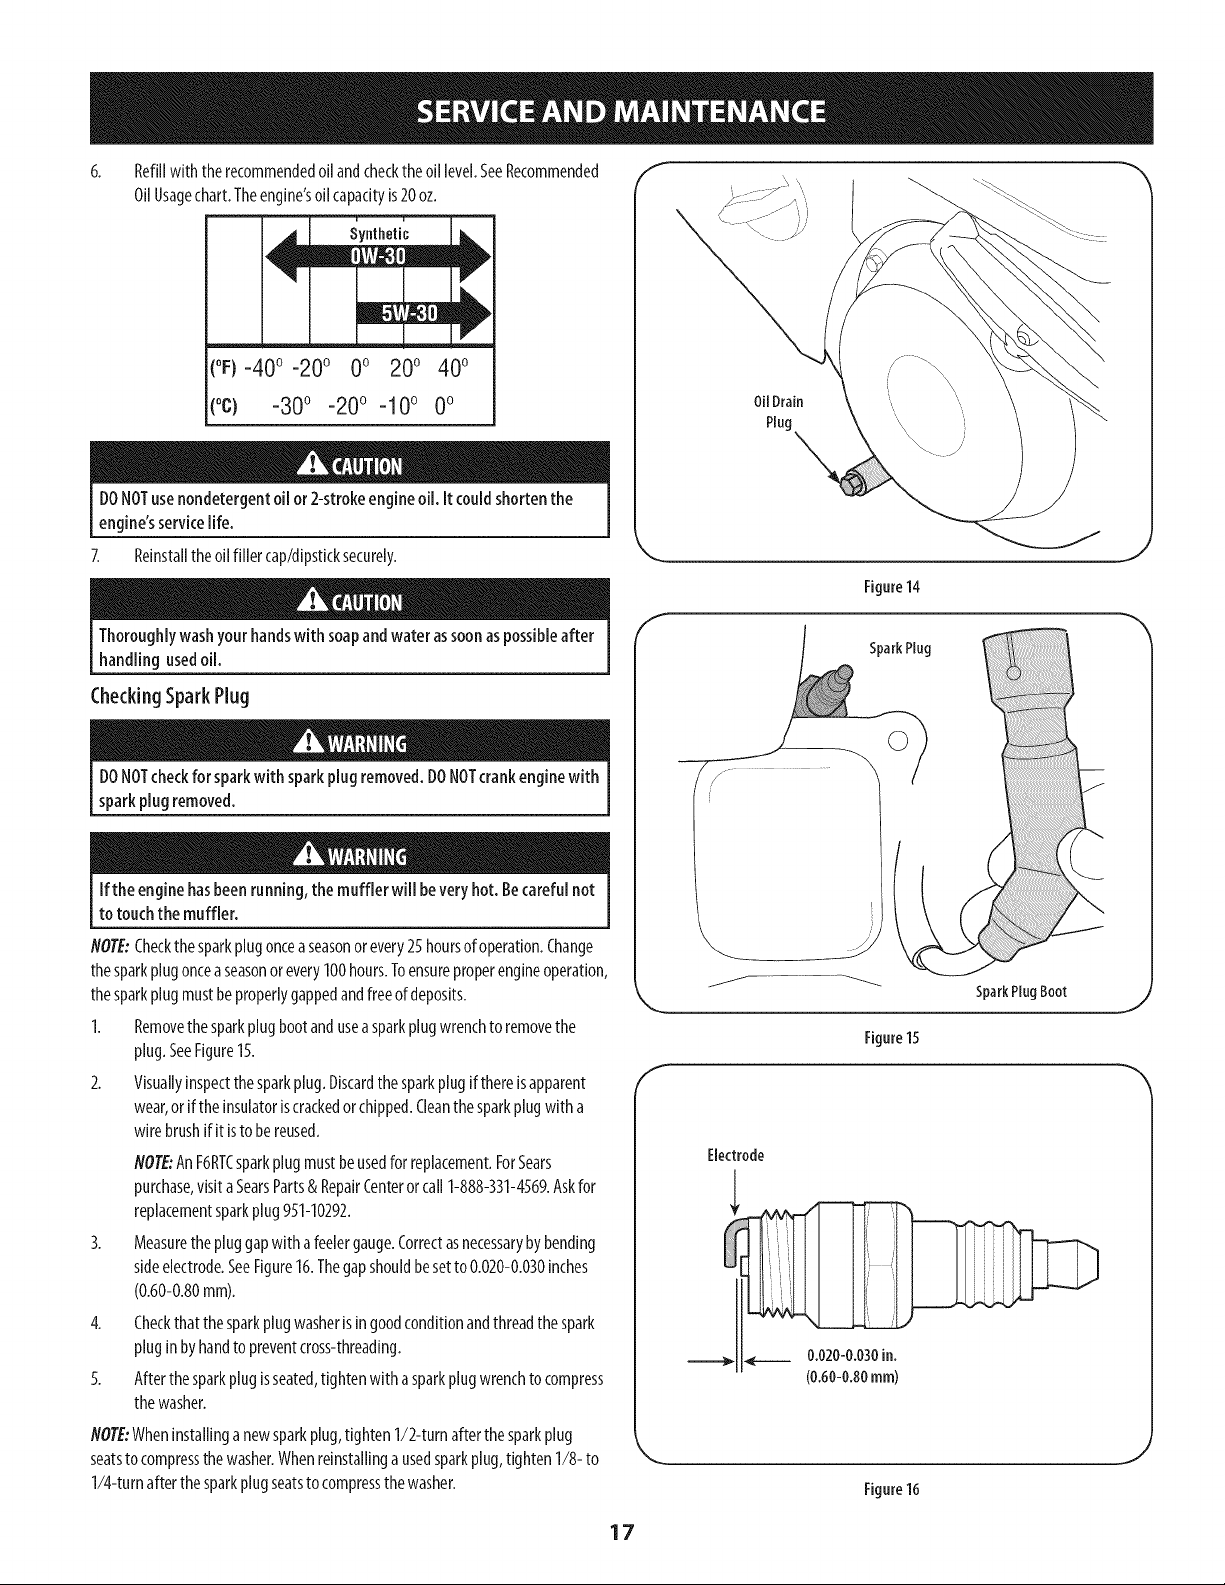
6. Refillwith therecommendedoilandchecktheoil level.SeeRecommended f _'_
OilUsagechart.Theengine'soilcapacityis20oz.
(°F)-40o-20 o 0o 200 400
("c) -30° -20° -10 ° 0°
DONOTusenondetergentoil or 2-strokeengineoil. It couldshortenthe
engine'sservicelife.
7. Reinstalltheoilfiller cap/dipsticksecurely.
E
Thoroughlywashyour handswith soapandwater assoonaspossibleafter
handling usedoil.
CheckingSparkPlug
OilDrain
Plug \
Figure14
SparkPlug
DONOTcheckfor sparkwith sparkplug removed.DONOTcrankenginewith
sparkplug removed.
Ifthe enginehasbeenrunning,the muffler will beveryhot. Becarefulnot
to touchthe muffler.
NOTE:Checkthe sparkplugonceaseasonorevery25hoursofoperation.Change
thesparkplugonceaseasonorevery100hours.Toensureproperengineoperation,
thesparkplugmustbeproperlygappedandfreeofdeposits.
1. Removethesparkplugbootandusea sparkplugwrenchtoremovethe
plug.SeeFigure15.
2. Visuallyinspectthesparkplug.Discardthesparkplugif thereisapparent
wear,orif theinsulatoriscrackedorchipped.Cleanthesparkplugwitha
wirebrushifit isto bereused.
NOTE:AnF6RTCsparkplugmustbeusedforreplacement.ForSears
purchase,visitaSearsParts& RepairCenterorcall1-888-331-4569.Askfor
replacementsparkplug951-10292.
3.
Measurethepluggapwithafeelergauge.Correctasnecessarybybending
sideelectrode.SeeFigure16.Thegapshouldbesetto0.020-0.030inches
(0.60-0.80mm).
4. Checkthatthesparkplugwasherisin goodconditionandthreadthespark
pluginbyhandtopreventcross-threading.
5. Afterthesparkplugisseated,tightenwith asparkplugwrenchtocompress
thewasher.
NOTE:Wheninstallinganewsparkplug,tighten1/2-turnafterthesparkplug
seatsto compressthewasher.Whenreinstallinga usedsparkplug,tighten1/8-to
1/4-turnafterthesparkplugseatsto compressthewasher.
SparkPLugBoot
Figure15
Electrode
Figure16
17
Page 18

Thesparkplugmustbetightenedsecurely.Aloosesparkplugcanbecome
veryhotandcandamagetheengine.
Lubrication
GearShaft
Thegear(hex)shaftshouldbelubricatedatleastonceaseasonorafterevery25
hoursofoperation.
I. Topreventspillage,removeallfuelfromtankbyrunningengineuntilit
stops.
2. Carefullypivotthesnowthrowerupandforwardsothatit restsontheauger
housing.
3. Removethelowerframecoverfromtheundersideof thesnowthrowerby
removingtheself-tappingscrewswhichsecureit.
4. Applya lightcoatingofBostikRegulargradeNever-Seez®tothehexshaft.
SeeFigure17.
NOTE:Whenlubricatingthehexshaft,becarefulnottogetanylubricantonthe
aluminumdriveplateorrubberfrictionwheel.Doingsowill hinderthesnow
thrower'sdrivesystem.WipeOFFanyexcessorspilledlubricant.
Wheels
Atleastonceaseason,removebothwheels.Cleanandcoatthe axleswith a
multipurposeautomotivegreasebeforereinstallingwheels.
ChuteDirectionalControl
Onceaseason,lubricatetheeyeboltbushingandthespiralwith 3-in-1oil.
J
Figure17
f
AugerShaft
Atleastonceaseason,removetheshearpinsonaugershaft.Sprayanygeneral
purposelubricantinsideshaft,andaroundthespacersandflangebearingsfoundat
eitherendoftheshaft.SeeFigure18.
ShavePlateand SkidShoes
Theshaveplateandskidshoesonthebottomofthesnowthroweraresubjectto
wear.Theyshouldbecheckedperiodicallyandreplacedwhennecessary.
NOTE:Theskidshoeson thismachinehavetwo wearedges.Whenonesidewears
out,theycanberotated180°tousetheotheredge.
Toremoveskidshoes:
Removethetwocarriagebolts,washers,andhexflangenutsthatsecure
eachskidshoeto thesnowthrower.
2. Reassemblenewskidshoeswith thefourcarriagebolts(twooneachside),
washers,andhexflangenuts.Referto Figure19.
Toremoveshaveplate:
I. Allowtheenginetorununtilit isoutoffuel.Donotattemptto pourfuel
fromtheengine.
2. Carefullypivotunit upandforwardsothatit restsontheaugerhousing.
3. Removethecarriageboltsandhexnutswhichattachit to thesnowthrower
housing.
4. Reassemblenewshaveplate,makingsureheadsofcarriageboltsaretothe
insideofhousing.Tightensecurely.SeeFigure19.
F
Figure18
NOTE:Augers not shown for clarity.
Figure19
/'
/
/
18
Page 19

Adjustments
Shift Cable
Ifthefull rangeofspeeds(forwardandreverse)cannotbeachieved,refertothe
figuretothefight andadjusttheshiftcableasfollows:
I. Placetheshiftlever[nthefastestforwardspeedposition(F6).
2. Loosenthehex nutontheshiftcableindexbracket.SeeFigure20.
3. Pivotthebracketdownwardtotakeupslackinthecable.
4. Retightenthehexnut.
DriveControl
Whenthedrivecontrol[sreleasedand[nthedisengaged"UP"position,thecable
shouldhaveverylittle slack.ItshouldNOTbetight. Also,[fthere[sexcessiveslack
[nthedrivecableor iftheunitexperiencesintermittentdrivewhileusing,thecable
mayneedtobeadjusted.Checktheadjustmentofthedrivecontrolasfollows:
I. Withthedrivecontrolreleased,pushthesnowthrowergentlyforward.The
unitshouldrollfreely.
2. Engagethedrivecontrolandgentlyattemptto pushthesnowthrower
forward.Thewheelsshouldnotturn.Theunitshouldnotroll freely.
3. Withthedrivecontrolreleased,movetheshift leverbackandforthbetween
theR2positionandtheF6positionseveraltimes.Thereshouldbeno
resistanceintheshiftlever.
f
/
t
/
Figure20
4. Ifanyoftheabovetestsfailed,thedrivecableisinneedofadjustment.
Proceedasfollows:
a. ShutOFFtheengineasinstructed[ntheOperationsection.
b. Loosenthelowerhexboltonthedrivecablebracket.SeeFigure21.
c. Positionthebracketupwardto providemoreslack(ordownwardto
increasecabletension).
d. Retightenthelowerhexbolt.
e. Performsteps1-3to confirmadjustment.
Chute Bracket
Ifthespiralatthebottomofthechutedirectionalcontrolisnotfullyengagingwith
thechuteassembly,thechutebracketcanbeadjusted.Todoso:
1. Loosenthetwo nutswhichsecurethechutebracketandrepositionit
slightly.SeeFigure22.
2. Retightenthenuts.
k..........................
Figure21
19
Figure22
Page 20

AugerControl
Refertopage11intheAssemblysectionfor instructionsonadjustingtheauger
controlcable.
SkidShoes
Refertopage10intheAssemblysectionfor instructionsonadjustingtheskid
shoes.
Belt Replacement
Auger Belt
Toremoveandreplaceyoursnowthrower'saugerbelt,proceedasfollows:
I. Topreventspillage,removeallfuelfromtankbyrunningengineuntilit
stops.
2. Removetheplasticbeltcoveronthefrontof theenginebyremovingthetwo
self-tappingscrews.SeeFigure23.
3. Loosenandremovethetwo boltsandflat washerssecuringthebeltguide.
SeeFigure24.Removebelt guide.
4. Rolltheaugerbeltofftheenginepulley.SeeFigure25.
5. Carefullypivotthesnowthrowerupandforwardsothatit restsontheauger
housing.
6. Removetheframecoverfromtheundersideofthesnowthrowerby
removingtheself-tappingscrewswhichsecureit. SeeFigure26.
f
J
Figure24
f
i i
Figure23
// /
Figure25
f
2O
Figure26
Page 21

Loosenandremovetheshoulderscrewwhichactsasabeltkeeper.
RefertoFigure27.
8.
Removethebeltfromaroundtheaugerpulley,andslipthebeltbetweenthe
supportbracketandtheaugerpulley.SeeFigure28.
NOTE:Engagingtheaugercontrolwill easeremovalandreinstallationof the
belt.
Reassembleaugerbeltbyfollowinginstructionsin reverseorder.
flO?E:DoNOTforgettoreinstalltheshoulderscrewandreconnectthespring
totheframeafterinstallingareplacementaugerbelt.SeeFigure27and
Figure28.
10.
PerformtheAugerControltestoutlinedintheAssemblysectionof this
manual.
Drive Belt
flOTE:Severalcomponentsmustberemovedandspecialtoolsarerequiredinorder
toreplacethesnowthrower'sdrivebelt.ContactthenearestSearsParts& Repair
Centerto havethedrivebeltreplaced.
//
Bracket
Friction Wheel Removal
Ifthesnowthrowerfailstodrivewiththedrivecontrolengaged,andperforming
thedrivecontrolcableadjustmentfailstocorrecttheproblem,thefrictionwheel
mayneedtobereplaced.Followtheinstructionsbelow.Examinethefrictionwheel
rubberfor signsofwearorcrackingandreplacewheelif necessary.
1. Topreventspillage,removeallfuelfromtankbyrunningengineuntil it
stops.
2. Placetheshiftleverinfirst Forward(F1)position.
3. Carefullypivotthesnowthrowerupandforwardsothatit restsontheauger
housing.
4. Removetheframecoverfromtheundersideofthesnowthrowerby
removingtheself-tappingscrewswhichsecureit.
5. Removetheright-handwheelbyremovingthescrewandbellwasherwhich
secureittotheaxle.SeeFigure29.
ioi
Figure28
Rgure29
Figure27
J
21
Page 22

6. Carefullyremovethehexnutandwasherwhichsecuresthehexshaftto
thesnowthrowerframeandlightlytaptheshaft'sendtodislodgetheball
bearingfromtherightsideoftheframe.SeeFigure30.
NOTE:Becarefulnottodamagethethreadsontheshaft.
7. Carefullypositionthehexshaftdownwardandtotheleftbeforecarefully
slidingthefrictionwheelassemblyoff theshaft.SeeFigure31.
NOTE:Ifyou'rereplacingthefrictionwheelassemblyasawhole,discardthe
wornpartandslidethe newpartontothehexshaft.
8. Followthestepsaboveinreverseorderto reassemblecomponents.
9. Performthetestpreviouslydescribedinthe DriveControlsection.
Ifyou'redisassemblingthefrictionwheelandreplacingonlytherubberring,
proceedasfollows:
NOTE:Notallfrictionwheelsareserviceable.Ifthisisthecase,simplyreplacethe
frictionwheelassembly.
1. Removethefourscrewswhichsecurethefrictionwheel'ssideplates
together.SeeFigure32.
2. Removetherubberringfrombetweenthe plates.
3. Reassemblethesideplateswith a newrubberring.
NOTE:Whenreassemblingthefrictionwheelassembly,makesurethatthe
rubberring iscenteredandseatedproperlybetweenthesideplates.Tighten
eachscrewonlyonerotationbeforeturningthewheelclockwiseand
proceedingwith thenextscrew.Repeatthisprocessseveraltimestoensure
theplatesaresecuredwith equalforce(between6ft-lbsand9ft-lbs).
4. Slidethefrictionwheelassemblybackontothehexshaftandfollowthe
stepsaboveinreverseorderto reassemblecomponents.
5,
Performthetestpreviouslydescribedinthe DriveControlsection.
f
f
J
Figure31
f
Figure30
J
Figure32
22
Page 23

Ifthesnowthrowerwill notbeusedfor 30daysorlonger,oriftheendofthesnowseason,theequipmentneedstobestoredproperly.Followstorageinstructionsbelowto
ensuretopperformancefromthesnowthrowerforfutureuse.
PreparingEngine
Enginesstoredover30daysneedto bedrainedoffuelto preventdeteriorationand
gumfromforminginfuelsystemoronessentialcarburetorparts.If thegasolinein
yourenginedeterioratesduringstorage,youmayneedtohavethecarburetor,and
otherfuelsystemcomponents,servicedorreplaced.
1. Removeallfuelfromtankbyrunningengineuntil it stops.Donotattemptto
pourfuelfromtheengine.
2. Changetheengineoil.
3. Removesparkplugandpourapproximately1oz.(30ml)ofcleanengineoil
intothecylinder.Pulltherecoilstarterseveraltimestodistributetheoil,and
reinstallthesparkplug.
4. Cleandebrisfromaroundengine,andunder,around,andbehindmuffler.
Applyalightfilm ofoilonanyareasthat aresusceptibleto rust.
Storeinaclean,dryandwellventilatedareaawayfromanyappliancethat
operateswith aflameorpilotlight,suchasa furnace,waterheater,or
clothesdryer.Avoidanyareawitha sparkproducingelectricmotor,orwhere
powertoolsareoperated.
Neverstoresnowthrowerwith fuel in tank indoorsor in poorlyventilated
areas,wherefuelfumesmayreachanopenflame,sparkor pilotlight ason
afurnace,water heater,clothesdryeror gasappliance.
PreparingSnowThrower
Whenstoringthe snowthrowerin anunventilatedormetalstorageshed,
careshouldbetakentorustprooftheequipment.Usingalightoilorsilicone,
coattheequipment,especiallyanychains,springs,bearingsandcables.
Removealldirt fromexteriorofengineandequipment.
Followlubricationrecommendations.
Storeequipmentinaclean,dryarea.
Inflatethetirestothetire manufacturersrecommendedpressure.Referto
tire sidewall.
Storesnowthrowerin operatingpositionwith bothwheelsandshaveplate
onlevelgroundsurface.
Ifpossible,avoidstorageareaswith highhumidity.
Keeptheenginelevelduringstorage.Tiltingcancausefueloroilleakage.
23
Page 24

Disconnectthe sparkplugwireandgrounditagainsttheenginetoprevent
unintendedstarting.Beforeperforminganytypeof maintenance/service,
disengageallcontrolsandstoptheengine.Waituntilall movingparts
havecometo acompletestop.Alwayswearsafetyglassesduringoperation
orwhileperforminganyadjustmentsorrepairs.
Thissectionaddressesminorserviceissues.TolocatethenearestSearsServiceCenterortoscheduleservice,callthe followingtoll free number:
1-888-331-4569.
Enginefailstostart
Enginerunningerratically/
inconsistentRPM(huntingor
surging)
Excessivevibration
Lossofpower
Unitfailstopropelitself
I. ChokecontrolnotinCHOKEposition.
2. Sparkplugwiredisconnected.
3. Faultysparkplug.
4. Fueltankemptyorstalefuel.
5. Enginenotprimed.
6. Safetykeynotinserted.
Extensioncordnotconnected(whenusingelectricstart
button,onmodelssoequipped).
I. EnginerunningonCHOKE.
2. Stalefuel.
3. Waterordirtinfuelsystem.
4. Carburetoroutofadjustment.
5. Over-governedengine.
I. Loosepartsordamagedaugerorimpeller.
I. Sparkplugwireloose.
2. Gascapventholeplugged.
I. Drivecableinneedofadjustment.
2. Drivebeltlooseordamaged.
3. Wornfrictionwheel.
I. MovechokecontroltoCHOKEposition.
2. Connectwiretosparkplug.
3. Clean,adjustgap,orreplace.
4. Filltankwithclean,freshgasoline.
5. PrimeengineasinstructedintheOperationsection.
6. Insertsafetykeyfullyintotheswitch.
7. Connectoneendoftheextensioncordtotheelectricstarter
outletandtheotherendtoathree-prong120V,grounded,AC
outlet.
I. Movechokecontrolto RUNposition.
2. Filltankwithclean,freshgasoline.
3. Drainfueltankbyrunningengineuntilitstops.Refillwith fresh
fuel.
4. ContactyourSearsParts& RepairCenter.
5. ContactyourSearsParts& RepairCenter.
I. Stopengineimmediatelyanddisconnectsparkplugwire.
Tightenallboltsandnuts.Ifvibrationcontinues,haveunit
servicedbyaSearsParts& RepairCenter.
I. Connectandtightensparkplugwire.
2. Removeiceandsnowfromgascap.Becertainventholeisclear.
I. Adjustdrivecontrolcable.Referto ServiceandMaintenance
section.
2. Havedrivebeltreplaced.ContactyourSearsParts& Repair
Center.
3. Replacefrictionwheel.RefertoServiceandMaintenance
section.
24
Page 25

Unitfailstodischargesnow 1. Chuteassemblyclogged. 1. Stopengineimmediatelyanddisconnectsparkplugwire.Clean
2. Foreignobjectlodgedinauger.
3. Augercableinneedofadjustment.
4. Augerbeltlooseordamaged.
5. Shearpin(s)sheared.
Chutefailstoeasilyrotate180-200
degrees
Unitplowssnowinsteadof 1. Low/slowgroundspeedinwet!slushysnow1-3"deep. 1. Increasegroundspeed.AlwaysoperateengineatFULLthrottle.
blowingit 2. Shearpin(s)sheared. 2. Replacewithnewshearpin(s).RefertoOperationsection.
1. Chuteassembledincorrectly.
chuteassemblyandinsideofaugerhousingwithclean-outtool.
2. Stopengineimmediatelyanddisconnectsparkplugwire.
Removeobjectfromaugerwithclean-outtool.
3. Adjustaugercontrolcable.RefertoAssemblysection.
4. Replaceaugerbelt.RefertoServiceandMaintenancesection.
5. Replacewithnewshearpin(s).RefertoOperationsection.
1. Disassemblechutecontrolandreassembleasdirectedinthe
Assemblysection.
25
Page 26

FEDERALand/or CALIFORNIAEMISSIONCONTROLWARRANTYSTATEMENT
YOURWARRANTYRIGHTSANDOBLIGATIONS
MTD Consumer Group Inc, the United States Environmental Protection Agency (EPA), and for those products certified for sale in the state
of California, the California Air Resources Board (CARB) are pleased to explain the emission control system (ECS) warranty on your 2014-
2015 small off-road spark-ignited engine and equipment (outdoor equipment). In California, new outdoor equipment must be designed,
built and equipped to meet the State's stringent anti-smog standards (in other states, outdoor equipment must be designed, built, and
equipped to meet the U.S. EPA small off-road spark ignition engine regulations). MTD Consumer Group Inc must warrant the ECSon your
outdoor equipment for the period of time listed below, provided there has been no abuse, neglect, or improper maintenance of the outdoor
equipment.
Your ECS may include parts such asthe carburetor, fuel-injection system, ignition system, catalytic converter, fuel tanks, fuel lines, fuel caps,
valves, canisters, filters, vapor hoses, clamps, connectors, and other associated emission-related components.
Where a warrantable condition exists, MTD Consumer Group Inc will repair your outdoor equipment at no cost to you including diagnosis,
parts, and labor.
MANUFACTURER'SWARRANTYCOVERAGE:
This emission control system is warranted for two years. If any emission-related part on your outdoor equipment is defective, the part will be
repaired or replaced by MTD Consumer Group Inc.
OWNER'SWARRANTYRESPONSIBILITIES:
As the outdoor equipment owner, you are responsible for performance of the required maintenance listed in your owner's manual. MTD
Consumer Group Inc recommends that you retain all receipts covering maintenance on your outdoor equipment, but MTD Consumer Group Inc
cannot deny warranty solely for the lack of receipts.
As the outdoor equipment owner, you should however be aware that MTD Consumer Group Inc may deny you warranty coverage if your
outdoor equipment or a part has failed due to abuse, neglect, improper maintenance, or unapproved modifications.
You are responsible for presenting your outdoor equipment to MTD Consumer Group Inc's distribution center or service center as soon as
the problem exists. The warranty repairs should be completed in a reasonable amount of time, not to exceed 30 days. If you have a question
regarding your warranty coverage, you should contact the MTD Consumer Group Inc Service Department at 1-800-800-7310 or at
http://su pport.mtd prod ucts.com.
GENERALEMISSIONSWARRANTYCOVERAGE:
MTD Consumer Group Inc warrants to the ultimate purchaser and each subsequent purchaser that the outdoor equipment is: (1) designed,
built, and equipped so as to conform with all applicable regulations; and (2) free from defects in materials and workmanship that cause the
failure of a wa rranted part for a period of two years.
The warranty period begins on the date the outdoor equipment is delivered to an ultimate purchaser or first placed into service.
Subject to certain conditions and exclusions as stated below, the warranty on emission-related parts is as follows:
1. Any warranted part that is not scheduled for replacement as required maintenance in the written instructions supplied is warranted for
the warranty period stated above. If the part fails during the period of warranty coverage, the part will be repaired or replaced by MTD
Consumer Group Inc according to subsection (4) below. Any such part repaired or replaced under warranty will be warranted for the
remainder of the period.
2. Any warranted part that is scheduled only for regular inspection in the written instructions supplied is warranted for the warranty period
stated above. Any such part repaired or replaced under warranty will be warranted for the remaining warranty period.
3. Any warranted part that is scheduled for replacement as required maintenance in the written instructions supplied is warranted for the
period of time before the first scheduled replacement date for that part. If the part fails before the first scheduled replacement, the part
will be repaired or replaced by MTD Consumer Group Inc according to subsection (4) below. Any such part repaired or replaced under
warranty will be warranted for the remainder of the period prior to the first scheduled replacement point for the part.
4.
Repair or replacement of any warranted part under the warranty provisions herein must be performed at a warranty station at no charge
to the owner.
5. Notwithstanding the provisions herein, warranty services or repairs will be provided at all of our distribution centers that are franchised to
service the subject engines or equipment.
6. The outdoor equipment owner will not be charged for diagnostic labor that is directly associated with diagnosis of a defective, emission-
related warranted part, provided that such diagnostic work is performed at a warranty station.
7. MTD Consumer Group Inc is liable for damages to other engine or equipment components proximately caused by a failure under
warranty of any warranted part.
8. Throughout the off-road engine and equipment warranty period stated above, MTD Consumer Group Inc will maintain a supply of
warranted parts sufficient to meet the expected demand for such parts.
9. Any replacement part may be used in the performance of any warranty maintenance or repairs and must be provided without charge to
the owner. Such use will not reduce the warranty obligations of MTD Consumer Group Inc.
Page 27

10. Add-onormodifiedpartsthatarenotexemptedbytheAirResourcesBoardmaynotbeused.Theuseofanynon-exemptedadd-onor
modifiedpartsbytheultimatepurchaserwillbegroundsfordisallowingawarrantyclaim.MTDConsumerGroupIncwillnotbeliableto
warrantfailuresofwarrantedpartscausedbytheuseofanon-exemptedadd-onormodifiedpart.
WARRANTEDPARTS:
The repair or replacement of any warranted part otherwise eligible for warranty coverage may be excluded from such warranty coverage if MTD
Consumer Group Inc demonstrates that the outdoor equipment has been abused, neglected, or improperly maintained, and that such abuse,
neglect, or improper maintenance was the direct cause of the need for repair or replacement of the part. That notwithstanding, any adjustment
of a component that has a factory installed, and properly operating, adjustment limiting device is still eligible for warranty coverage. Further,
the coverage under this warranty extends only to parts that were present on the off-road equipment purchased.
The following emission warranty parts are covered (if applicable):
1. Fuel Metering System
Cold start enrichment system (soft choke)
Carburetor and internal parts (or fuel injection system)
Fuel pump
Fuel tank
2. Air Induction System
Air cleaner
Intake manifold
3. Ignition System
Spark plug(s)
Magneto ignition system
4. Exhaust System
Catalytic converter
SAI (Reed valve)
5. Miscellaneous Items Used in Above System
Vacuum, temperature, position, time sensitive valves and switches
Connectors and assemblies
6. Evaporative Control
Fuel hose
Fuel hose clamps
Tethered fuel cap
Carbon canister
Vapor lines
050790Rev.C
Page 28

Congratulationsonmakingasmartpurchase.YournewCraftsman®productisdesignedandmanufacturedforyearsof
dependableoperation.Butlikeallproducts,it mayrequirerepairfromtimetotime.That'swhenhavingaRepairProtection
Agreementcansaveyoumoneyandaggravation.
Here'swhat the RepairProtectionAgreement*includes:
[] Expertservicebyour10,000professionalrepairspecialists
[] Unlimited serviceand nocharge forpartsandlaboronallcoveredrepairs
[] Productreplacementupto $1500ifyourcoveredproductcan'tbefixed
[] Discountof 25%fromregularpriceof serviceandrelatedinstalledpartsnotcoveredbytheagreement;also,25%off
regularpriceofpreventivemaintenancecheck
[] Fasthelpby phone - wecallitRapidResolution- phonesupportfromaSearsrepresentative.Thinkof usasa"talking
owner'smanual."
OnceyoupurchasetheRepairProtectionAgreement,asimplephonecallisallthatit takesforyoutoscheduleservice.You
cancallanytimedayornight,orscheduleaserviceappointmentonline.
TheRepairProtectionAgreementisa risk-freepurchase.Ifyoucancelforanyreasonduringtheproductwarrantyperiod,
wewill provideafull refund.Or,aproratedrefundanytimeaftertheproductwarrantyperiodexpires.PurchaseyourRepair
ProtectionAgreementtoday!
Somelimitations and exclusionsapply. Forpricesand additional informationinthe U.S.A.call 1-800-827-6655.
*Coveragein Canadavariesonsomeitems.Forfull detailscall SearsCanadaat 1-800-361-6665.
SearsInstallation Service
ForSearsprofessionalinstallationof homeappliances,garagedooropeners,waterheaters,andothermajorhomeitems,in
theU.S.A.call1-888-331-4569,andinCanadacall1-800-469-4663.
28
Page 29

Declarad6n de garantia ....................... P_gina 29
Pr_cticas operaci6n seguras ................... P_gina 30
Montaje ...................................... P_gina 34
Operad6n .................................... P_gina 38
Almacenamiento fuera de temporada ......... P_gina 50
Solucidn de problemas ........................ P_gina 51
Acuerdo de proteccidn para reparaciones ...... P_gina 55
Numero de servicio .................. Cubierta posterior
Servido y Mantenimiento ..................... P_gina 42
CRAFTSMANDEGARANTIALIMITADA
PORDOSANOSapartirdelafechadelacompra,esteproductoest_garantizadopordefectosenlosmaterialesylamanodeobra.
CONELCOMPROBANTEDEVENTA,unproductodefectuosorecibir_lareparaci6nosustituci6ngratuita,aopci6ndelvendedor.
GARANTIADEPORVIDALIMITADAADICIONALenla tolva de UPPERy LOWER
PARASIEMPREYCUANDOSEUTILIZAporelpropietariooriginaldespu_sdelsegundoahodesdelafechadecompra,elconductosuperioreinferiordeeste
quitanievesest_ngarantizadoscontracualquierdefectodematerialesomanodeobradebeserverificadoporunproveedordeservicioautorizadoSears.
CONELCOMPROBANTEDEVENTA,ustedrecibir_unarampanuevadeformagratuita.Ustedesresponsableporelcostodelamanodeobradeinstalaci6ny
otrosgastosocasionadosparaverificareldefect&
Paraobtenerinformaci6nsobreelalcancedelagarantiaysolicitarlareparaci6noelreemplazogratuita,visiteelsitioWeb:www.craftsman.com/warranty
EstagarantiacubreI]NICAMENTElosdefectosenlosmaterialesyen lamanodeobra.EstagarantiaNOcubre:
• Elementosnorenovablesquepuedendesgastarseporelusonormal,duranteelplazodelagarantia,incluyendoentreotros,lasbarrenas,laspaletasde
lasbarrenas,loscortadoresdedesplazamiento,laszapatasantideslizantes,laplacaderaspado,lospasadoresdecuchilla,labujia,elfiltrodeaire,las
correasyelfiltro deaceite.
Serviciosdemantenimientoest_ndar,cambiosdeaceiteoafinaci6n.
Cambiodeneum_ticosoreparacionesporpinchadurasconobjetosexternoscomoclavos,espinas,toconesovidrios.
Reemplazooreparaci6ndeneum_ticosoruedascomoresultadodeldesgastenormal,unaccidente,ofuncionamiento
omantenimientoincorrectos.
• Reparacionesrequeridascomoresultadodelusoinadecuadoporpartedeloperador,incluyendoentreotroseldahoocasionadoporobjetosque
impactanlam_quinayquetuercenelbastidor,elejedelabarrena,etc.,odebidoaqueelmotorrueaceleradoenexceso.
Reparacionesnecesariasdebidoanegligenciadeloperador,incluyendoentreotros,dahosmec_nicoyel_ctricoocasionadopor
unalmacenamientonoapropiado,fallaporelusodeaceitedegradoy/ocantidadnoapropiadosofallapornodarmantenimiento
alequipodeacuerdoconlasinstruccionescontenidasenelmanualdeloperador.
Limpiezaoreparacionesdelmotor(sistemadecombustible)debidasacombustiblequesedeterminaest_contaminadouoxidado(viejo).Engeneral,el
combustibledebeutilizarseenunperiodonomayorde30diasapartirdesuadquisici6n.
Eldeterioroydesgastenormaldelosacabadosexteriores,oreemplazodelaetiquetadelproducto.
LapresentegarantiaseanulasiseutilizaesteproductoalgunavezparaprestarservicioscomercialesosiseIoalquilaaotrapersona.
Estagarantialeotorgaderechoslegalesespecificos,peroustedpodriagozardeotrosderechosenraz6ndesulugarderesidencia.
SearsBrandsManagementCorporation,HoffmanEstates,IL60179
Aceite del motor: 5W-30
Combustible: Gasolina sin plomo
Motor: Craftsman
Numero de modelo
Numero de serie
Fecha de compra
© Sears Brands, LLC
Registre el numero de modelo, numero de serie y fecha
29
de compra m_s arriba.
Page 30

Lapresenciadeestesimboloindicacluesetrata deinstrucciones
importantesdeseguridadcluesedebenrespetarparaevitar poneren
peligrosuseguridadpersonaly/o materialy la deotraspersonas.Leaysiga
todaslasinstruccionesdeestemanualantesdeponer enfuncionamiento
estam_guina.Sinorespetaestasinstruccionespodriaprovocarlesiones
personales.Cuandoyeaestesimbolo,ipresteatenci6na laadvertencia!
Estam_quinafue construidaparaseroperadadeacuerdoconlasreglas
deseguridadcontenidasenestemanual.AIigualqueconcualquiertipo
deequipomotorizado,undescuidooerrorporparte del operadorpuede
produdr lesionesgraves.Estam_quinaescapazdeamputarmanosypies
ydearrojarobjetoscongranfuerza.Deno respetarlasinstrucdonesde
seguridadsiguientessepuedenprodudrlesionesgraveso la muerte.
PROPOSICION 65 DE CALiFORNiA
Elescapedel motor deesteproducto,algunosdesuscomponentesy
algunoscomponentesdel vehiculocontieneno liberansustanciasquimicas
queelestadodeCalifornia consideraquepuedenprodudrc_ncer,defectos
denadmiento uotros problemasreproductivos.
CAPACITACION
Lea,entiendaycumplatodaslasinstruccionesincluidasenlam_quinayen
losmanualesantesdemontarlayutilizarla.Guardeestemanualenunlugar
seguroparaconsultasfuturasy peri6dicas,asicomoparasolicitarrepuestos.
Leael Manualdel0peradorysigatodaslasadvertenciase instruccionesde
seguridad.Elfracasodehacerasipuedecausarlaheridaseriaaloperadory/o
personaspresentes.
Familiaricesecontodosloscontrolesyconelusoadecuadodelosmismos.
Sepac6modetenerlam_quinaydesactivarloscontrolesr_pidamente.
Nopermitanuncaquelosnifosmenoresde14afrosutilicenestam_quina.
Losniffosde14afrosenadelantedebenleeryentenderlasinstrucciones
deoperaci6nynormasdeseguridadcontenidasenestemanual,yenla
m_quinaydebenserentrenadosysupervisadosporunadulto.
Nuncapermitaquelosadultosoperenestam_quinasinrecibirantesla
instrucci6napropiada.
Losobjetosarrojadospotlam_quinapuedenproducirlesionesgraves.
Planifiqueel patr6nenelquevaairarrojandonieveparaevitarquela
descargadematerialserealicehacialoscaminos,losobservadores,etc.
Mantengaalosobservadores,ayudantes,mascotasynifospotIomenosa
75piesdelam_quinamientraslamismaest_enfuncionamiento.Detengala
m_quinasialguienseacerca.
Seaprecavidoparaevitarpatinarseo caerseespecialmentecuandooperala
m_quinaenreversa.
Su responsabilidad--Restrinja elusodeesta m_quinamotorizada
alaspersonasquelean,comprendanyrespetenlasadvertendase
instruccionesqueaparecenenestemanualyen lam_quina.
iGUARBEESTASINSTRUCCIONES!
PREPARATlVOS
Inspecdoneminudosamenteel_readondeutiiizar_el equipo.Saquetodoslos
felpudos,peri6dicos,trineos,tablas,cablesyotrosobjetosextraffosconlosque
podriatropezaroquepodrianserarrojadosporlabarrena/impulsor.
Paraprotegerselosojosutilicesiempreanteojosoantiparrasde seguridad
mientrasoperalam_quinaomientraslaajustaorepara.Losobjetos
arrojadosquerebotanpuedenproducirlesionesocularesgraves.
Nooperelam_quinasinlavestimentaadecuadaparaestaral airelibreen
inviemo.Noutilicealhajas,bufandaslargasuotrasprendassueltasque
podrianenredarseenlaspartesm6viles.Utiiiceuncalzadoespecialpara
superficiesresbaladizas.
Useunprolongadoryuntomacorrientedetrescablesconconexi6natierra
paratodaslasm_quinasconmotoresdeencendidoel_ctrico.
Ajustelaalturadelacajadeltomacorrienteparalimpiarlagravao las
superficiesconpiedrastrituradas.
Desengranetodaslaspalancasdecontrolantesdearrancarel motor.
Nuncaintenterealizarajustesmientraselmotorest_en marchaexceptoen
loscasosespecificamenterecomendadosenel manualdel operador.
Dejequeelmotorylam_quinaseadaptenalatemperaturaexteriorantes
decomenzarasacarlanieve.
30
Page 31

Manejo seguro de la gasolina
Paraevitariesionespersonalesodaffosmaterialestengamuchocuidadocuando
trabajecongasolina.Lagasolinaessumamenteinflamabley susvaporespueden
causarexplosiones.Sisederramagasolinaencimaosobrelaropasepuedelesionar
gravementeyaquesepuedeincendiar.L_veselapielyc_mbiesederopade
inmediato.
Utilices61olosrecipientesparagasolinaautorizados.
Apaguetodosloscigarrillos,cigarros,pipasyotrasfuentesdecombusti6n.
Nuncacarguecombustibleenlam_quinaenunespadocerrado.
Nuncasaquelatapadelcombustibleniagreguecombustiblemientrasel
motorest_calienteoenmarcha.
DejequeelmotorseenfrieporIomenosdosminutosantesdevolvera
cargarcombustible.
NuncaIleneenexcesoeldep6sitodecombustible.Lleneeltanqueanom_s
de1/2pulgadapordebajodelabasedelcuellodeIlenadodejandoespacio
paraladilataci6ndel combustible.
Vuelvaacolocarlatapadelagasolinayajt_stelabien.
Limpieelcombustiblequesehayaderramadosobreel motoryelequipo.
Trasladelam_quinaaotrazona.Espere5minutosantesdeencenderel
motor.
Nuncaalmacenelam_quinao elredpientedecombustibleenunespacio
cerradodondehayafuego,chispasoluzpiloto(porejemplo,hornos,
calentadoresdeagua,calefactores,secadoresderopa,etc.).
Dejequelam_quinaseenfrieporIomenos5minutosantesdeguardarla.
Nuncallenelosredpientesenelinteriordeunvehkuloocami6nocajade
remolqueconrecubrimientospl_sticos.Coloquesiemprelosrecipientesenel
pisoylejosdelvehkuloantesdellenarlos.
Siesposible,retireelequipoagasolinadelcami6noremolqueyll_neloen
elsuelo.Siestonoesposible,lleneelequipoenunremolqueconcontenedor
port_til,envezdedesdeunaboquilladispensadoradegasolina.
Mantengalaboquilladispensadoraencontactoconelbordedeldep6sito
decombustibleoconlaaberturadel redpienteentodo momento,hasta
terminarlacarga.Noutiliceundispositivodeapertura/cierredeboquilla.
FUNCIONAMIENTO
Nopongalasmanosolospiescercade[aspiezasrotatorias,enlacajadela
barrena/impulsoroenel montajedelcanaldedescarga.Hacercontactocon
piezasgiratoriaspuederesultarenlaamputad6ndemanoso pies.
Lapalancadecontroldelabarrena/impulsoresundispositivodeseguridad.
Nuncaevitesufundonamiento.Dehacerlolaoperad6ndelam_quinaes
riesgosaypuedeocasionarlesiones.
Laspalancasdecontroldebenfundonarbienenambasdirecdonesy
regresarautom_ticamentealaposid6ndedesengranecuandoselassuelta.
Nuncaoperelam_quinasifaltaunmontajedelcanalo sielmismoest_
daffado.Mantengatodoslosdispositivosdeseguridadensulugaryen
funcionamiento.
Nuncaendendaelmotorenespacioscerradoso enunazonaconpoca
ventilad6n.Elescapedelmotorcontienemon6xidodecarbono,ungas
inodoroyfetal.
Noutilicelam_quinabajolainfluenciadelalcoholo lasdrogas.
Elsilendadoryel motorsecalientany puedencausarquemaduras.Nolos
toque.Mantengaalosniffosalejados.
Seasumamenteprecavidocuandooperelam_quinasobreunasuperfide
congravaocuandolacruce.Mant_ngasealertaporsisepresentanpeligros
ocultosotr_nsito.
Tengacuidadocuandocambiededireccibnocuandooperelam_quinaen
pendientes.Nouselam_quinaenpendientespronundadas.
Planifiqueelpatr6nenelquevaair arrojandonieveparaevitarquela
descargadematerialseproduzcahadalasventanas,lasparedes,los
autom6viles,etc.yevitarasiposiblesdaffosmaterialeso lesionesproducidas
porlosrebotes.
Nuncadirijaladescargahacialosniffos,losobservadoreso lasmascotasni
dejequenadieseparedelantedelam_quina.
Nosobrecarguelacapacidaddelam_quinatratandodesacarlanievemuy
r_pidamente.
Nuncaopereestam_quinasinbuenavisibilidadoiluminad6n.Siempredebe
estarsegurodequeest_bienafirmadoysujetandofirmementelasmanijas.
Camine,nuncacorra.
Cortelacorrientealabarrena/impulsorcuandotransportelam_quinao
cuandolamismanoest_enuso.
Nuncaoperelam_quinaaaltaveloddaddedesplazamientosobre
superficiesresbaladizas.Mirehaciaabajoyhaciaarrasytengacuidado
cuandovayamarchaatr_s.
Silam_quinacomenzaraavibrardemaneraanormal,detengaelmotor,
desconecteelcabledelabujiayp6ngalademaneraquehagamasacontra
el motor.Inspeccionelam_quinaminudosamenteparaversiest_daffada.
Reparetodoslosdaffosantesdeencendery operarlam_quina.
Desengranetodaslaspalancasdecontrolydetengaelmotorantesdedejar
la posici6ndeoperaci6n(detr_sdelasmanijas).Espereaquelabarrena/
impulsorsedetengaporcompletoantesdedestaparelmontajedelcanalo
realizarajusteseinspecdones.
Nuncapongalasmanosenlasaberturasdedescargao derecolecci6n.Utilice
siemprelaherramientadelimpiezaqueseadjuntaparadestaparlaabertura
dedescarga.Nodestapeelmontajedelcanalmientrasel motorest_en
fundonamiento.Antesdedestaparlo,apagueel motorypermanezcadetr_s
delasmanijashastaquetodaslaspartesm6vilessehayandetenido.
Uses61ounionesyaccesoriosaprobadosporelfabricante(porejemplo,
pesasparalasruedas,cadenasparalosneum_ticos,cannas,etc.).Para
obtenerm_sinformaci6nacercadeestostemas,Ilameal1-800-469-4663.
31
Page 32

Paraencenderel motor,jaiedelacuerdalentamentehastaquesienta
resistenda,luegojaler_pidamente.Elreplieguer_pidodelacuerdade
arranque(tensi6nderetroceso)lejalar_lamanoyelbrazohadaelmotor
m_sr_pidodeIoqueustedpuedesoltar.Elresultadopuedenserhuesos
rotos,fracturas,hematomaso esguinces.
Sisepresentansituadonesquenoest_nprevistasenestemanual,sea
cuidadosoyuseelsentidocomfin.
Parapedirrepuestososerviciohorarioparaesteproducto,Ilamea1-800-
469-4663.
MANTENIMIENTO Y ALMACENAMIENTO
Nuncaalterelosdispositivosdeseguridad.Controleperi6dicamenteque
fundonencorrectamente.Rem[tasealasseccionesdemantenimientoy
ajustedeestemanual.
Antesderealizarlalimpieza,repararorevisarlam_quina,desengrane
todaslaspalancasdecontrolydetengaelmotor.Espereaquelabarrena/
impulsorsedetengaporcompleto.Desconecteelcabledelabujiayp6ngalo
haciendomasacontraelmotorparaevitarqueseenciendaaccidentalmente.
Controlefrecuentementequetodoslospernosytornillosest_nbien
ajustadosparacomprobarquelam_quinaseencuentraencondidones
segurasdefuncionamiento.Adem_s,hagaunainspecci6nvisualdela
m_quinaparaverificarsiest_dafrada.
Nocambielaconfigurad6ndelreguladordelmotorniaceleredemasiado
elmismo.Elreguladordel motorcontrolalaveloddadm_ximasegurade
funcionamientodel motor.
Lasplacasderaspadoylaszapatasantideslizantesqueseusanconla
m_quinaquitanievesedesgastanysedafran.Paraprotegersuseguridad,
verifiquefrecuentementetodosloscomponentesyreempl_celoss61ocon
partesdelosfabricantesdeequiposoriginales(OEM).iEIusodepiezasque
nocumplenconlasespecificadonesdelequipooriginalpuederesultaren
rendimientoinadecuadoadem_sdeponerenfresgolaseguridad!
Reviselaspalancasdecontrolperi6dicamenteparaverificarqueengraneny
desengranenadecuadamenteyajtistelossiesnecesario.Consulte[asecd6n
deajustesdeestemanualdeloperadorparaobtenerinstrucciones.
Mantengaoreemplacelasetiquetasdeseguridadeinstruccionessegtinsea
necesario.
SegunlaComisi6ndeSegufrdaddeProductosparaelConsumidordelos
EstadosUnidos(CPSC)ylaAgenciadeProtecci6nAmbientaldelosEstados
Unidos(EPA),esteproductotJeneunavidafitil mediadesiete(7)afros,6
60horasdefundonambnto.AI finalizarlavidafitil media,adquierauna
m_quinanuevaohagainspecdonaranualmente6staporundistribuidorde
servidoautofrzadoparacerciorarsedequetodoslossistemasmec_nkosyde
seguridadfundonancorrectamentey notienenexcesivodesgaste.SinoIo
hate,puedenproducirseaccidentes,lesionesomuerte
Nuncaalmacenelam_quinaoel recipientedecombustibleenunespacio
cerradodondehayafuego,chispasoluzpilotocomoporejemplo,
calentadoresdeagua,hornos,secadoresderopa,etc.
Consultesiempreelmanualdeloperadorparaobtenerinstrucdones
adecuadasparaelalmacenambntofueradetemporadaVerifique
frecuentementelaI[neadecombustible,eltanque,eltap6n,ylosaccesorios
buscandorajaduraso p6rdidas.Reemplacedesernecesario.
Nod6arranqueal motorsinoest_labujiadeencendido.
NO MODIFIQUE EL MOTOR
Paraevitarlesionesgraveso lamuerte,no modifiqueel motorbajoninguna
circunstancia.Sicambialaconfigurad6ndelreguladorelmotorpuede
descontrolarseyoperaravelocidadesinseguras.Nuncacambielaconfiguraci6nde
f_bricadelreguladordelmotor.
AVlSO REFERIDO A EMISIONES
Losmotoresqueest_ncertificadosycumplenconlasregulacionesdeemisiones
federalesEPAyde CaliforniaparaSORE(Equipospequefrostodoterreno)est_n
certificadosparaoperarcongasolinacomtinsinplomoypuedenincluirlos
siguientessistemasdecontroldeemisiones:Modificaci6ndemotor(EM)y
catalizadordetresv[as(TWC)siest_nequipadosdeesamanera.
Respetelasnormasreferentesa ladisposid6ncorrectay las
reglamentacionessobregasolina,aceite,etc.paraprotegerelmedio
ambiente.
Antesdealmacenarlam_quinaenci_ndalaunosminutosparasacarlanieve
quehayaquedadoenlamismayparaevitaras[quesecongelelabarrena/
impulsor.
32
Page 33

S|MBOLOSDESEGURIDAD
Estap_gina describe lossimbolosy figuras de seguridad internacionales que pueden aparecer en este producto. Leael manual del operador para obtener la
informaci6n terminada sobre seguridad, reunirse, operaci6n ymantenimiento y reparaci6n.
LEA EL MANUAL DEL OPERADOR (S)
Lea, entienda, y siga todas las instrucciones en el manual (es) antes de intentar reunirse y funcionar.
LA ADVERTENCIA -- PLATOS ROTATORIOS
Guarde manos de entrada y aperturas de la descarga mientras la m_quina corre. Alli ellos hacen para
girar platos dentro.
LA ADVERTENCIA -- LAMINAS ROTATIVAS
Guarde manos de entrada y aperturas de descarga mientras la m_quina corre. Alli hacen girar I_minas
dentro.
LA ADVERTENCIA -- TALADRO ROTATIVO
No ponga manos o pies cerca del giro de partes, en el alojamiento de taladro/aspa o asamblea de
tolva. Contacto con las partes rotativas puede amputar manos y pies.
OBJETOS LANZADOS POR ADVERTENClA
Esta m_quina puede recoger y lanzar objetos que pueden causar la herida personal seria.
GASOLINA DE ADVERTENClA ESINFLAMABLE
Permita que el motor se enfrie al menos dos minutos antes del reabastecimiento de combustible.
ADVERTENCIA -- MONOXIDO DE CARBONO
Nunca dirijas un motor dentro o en un _rea real ventilada. Los gases de combusti6n de motor
contienen el mon6xido de carbono, un gas inodoro y mortal.
ADVERTENCIA- ELECTROCHOQUE
No useel juez de salida el6ctrico del motor en la Iluvia.
ADVERTENCIA: Suresp0nsabilidad-Restdngirel us0deestam_quinam0t0dzadaalaspersonasqueLean,c0mprendany
respetenlasadvertendase instrucd0nesdeestemanualyenla m_quina.
GUARDEESTASINSTRUCCIONES!
33
J
Page 34

NOTA:lasreferendasal ladoderechooy ciertosdelam_quinaquitanievese
determinandesdelaparteposteriordelaunidadenposici6nde operaci6n
(permaneciendodirectamentedetr_sdelam_quinaquitanieve,mirandohaciael
paneldelamanija).
Extracci6nde ia UaidaddeiaCaja
1. Cortelasesquinasdelacajadecart6nyexti_ndaiaenel pisoQuiteydescarte
todoslosinsertosdeempaque.
2. Saque[am_quinaquitanievede[acaja.
3. Asegt_resedevaciarcompletamente[acajaantesdetiraria.
Montaje
1. Observeel_reainferiortraseradelam_quinaquitanieveparaasegurarsede
queamboscablesest_nalineadosconlasgufasrotatoriasantesdegirarla
manijahaciaarriba.Vea[aFigura1.
2. Co[oquelapaiancadecambiosenlaposici6ndeDelantero-6.
3. Tirehadaarribayhadaatr_sdelamanijasuperior,tal ycomosemuestraen
laFigura2.Alineelamanijasuperiorconlamanijainferior.
flO@:Asegt_resedequelosextremossuperioresdecadacableest_n
correctamenteasentadosensusoporte.
4. Asegurelamanijaajustandolaperillaamariposadepl_sticosituadaen los
ladosizquierdoyderechodedichamanija.VealaFigura3.Retireydescarte
todoslasbandasdepl_stico,silashubiera.Onicamenteseutilizanparael
empaque.
Figura2
Figura1
/
/
j
Figura3
34
Page 35

Sittieelmontajedelcanalsobrelabase.VealaFigura4.
Cierrelosfijadoresdelabridaparaasegurarelmontajedelcanala labase
delcanal.VealaFJgura5.Losfijadoresdelabridaemitenunchasquido
cuandoest4nbienasegurados.
NOT.4:silosfijadoresdelabridanoseajustanensulugarf4cilmente,utilice
lapalmadesumanoparaaplicarunapresi6nr@idayfirmeen laparte
posteriordecadauno.
Quitelaarandelaplanayelbrochedehorquilladelextremo
delcontroldireccionaldelcanal.
8.
InserteelextremodelcontroldJreccionaldelcanalenelsoporteinferiory
aseg@elomediantelaarandelaplanayelbrochedehorquillaqueacabade
retirar.VealaFigura6.SIesnecesario,puedeajustarseel soporteinferior.
ConsulteAjustedelsoportedel canalenpage46enlasecci6ndeServicio
rMantenimiento.
J
Figura5
f
,,. j
Figura4
J
Figura6
35
Page 36

Configuraci6n f
Herramienta de Limpieza del Canal
Hayuna herramientadeNmpiezadelcanaliajustadaala partesuperiordelacaja
delabarrenaconunpasadordeensamblado.Veala Figura7.Laherramientaest_
diseffadaparaNmpiarel hieloy lanievedelmontajedeuncanal.Esteproductose
sujetamedianteunauni6ndecableenlaf_brica.Cortelauni6ndecableantesde
operarlam_quinaquitanieve.
Nuncausesusmanosparaliberarun montajedecanaltapado.Apague
el motory permanezcadetr_sdelasmanijashastaquetodaslaspartes
m6vilessehayandetenidoantesdeutilizar laherramientadelimpieza
paralimpiar elmontajedelcanal.
Presi6nde losNeum_tkos
Bajoningunacircunstancianoexcedandel fabricanterecomiendapsi.
Laigualdaddelapresi6ndelosneum_ticosdebenmantenerseentodo
momento.Cuandola presi6nexcesivapuedecausarasientosbolas
neum_ticoI llanta de montajeparareventarconlafuerza suficientepara
causarundaffograve.Serefierena losflancosdelos neum_ticosdela
presi6nrecomendada.
Losneum_ticossondemasiadoinfladosparaprop6sitosdeenv[o.Reviselapresi6n
delosneum_ticosantesdela nievelanzador.Serefierenalaparedlateraldel
neum_ticoparaelfabricantedeneum_ticosrecomendadopsiydesinflar(oinflar)
losneum_ticos,segunseanecesario.
NOTt]:Laigualdaddelapresi6ndelosneum_ticosdebesermantenidaentodo
momentoparalosefectosdelaperformance.
Herramientadekimpiezadel
Canal
J
Fignra7
f
Snperfide lisa
Ajustes
Zapatasantideslizarites
LaszapatasantidesNzantesdelam_quinaquitanieveseajustanenlaf_brica
paraseraproximadamenteI/8 "pordebajodelasuperficieinferiordelaplaca
deraspado.SiIodesea,puedeajustarlashadaabajoantesdehacerfundonarla
m_quinaquitanieve.
Noserecomiendaqueopereestam_quinaquitanievesobregrava,ya que
esposiblequelam_quinaquitanievetome lagravasueltayla barrena
laexpulse,Iocualpodriacausarlesionespersonalesodaffarlam_quina
quitanieve.
Sideseaquitarnievealrasdelsuelo,elevem_slaszapatasantidesNzantesen
lacajadelabarrena.
UselasposkionesmediaobajacuandolasuperfidequedeseeNmpiarsea
despareja,comouncaminodegrava.
NOTII:Sitienequeusarlam_quinaquitanievesobregrava,mantengala
zapataantidesNzanteenlaposid6nm_selevadaparaIograrunaseparad6n
m_ximaentreelpisoylaplacaderaspado.
Superfide desigual
Fignra8
Paraajustarlaszapatasantideslizantes:
I. Aflojelascuatrostuercashexagonales(dosencadalado)ylospemosdel
carro.Muevalaszapatasantideslizantesalaposici6ndeseada.Veala Figura
8.
2. Compruebequetodalasuperfideinferiordelaszapatasantideslizantesest_
contraelsueloparaevitarundesgastedesparejodelosmismos.
3. Vuelvaaajustarbienlastuercasylospemos.
36
Page 37

Canal F -'_
Esposibleajustarladistandaa lacualsearrojalanievecambiandoel_ngulodel
canalsuperior.Parahacerlo:
I. Detengael motorquitandolallavedeencendidoyaflojelaperillaamariposa
depl_sticoqueseencuentraenel ladoizquierdodelmontajedelcanal.
2. Gireelcanalhaciaarribaohaciaabajoantesdeapretarlaperillaamariposa.
VealaFigura9.
PruebadeControlde la Barrena
Antesdeoperarsum_quinaquitanieve,leaatentamenteycumpla
todaslasinstruccionesqueaparecena continuaci6n.Realicetodos los
ajustesparaverificar quela m_quinaest_operandoconseguridady
correctamente.
Compruebeelajustedelcontroldelabarrenadelasiguienteforma:
1. Elcontroldelabarrenaseencuentraenelmangoizquierdo.Consultela
Figura10elrecuadro.Cuandosesueltaelcontroldelabarrenayest_ien
posici6ndesengranadaarriba,elcabledebetenermuypocojuego.NOdebe
estartenso.
2.
Enun_reabienventilada,arranqueelmotordelam_quinaquitanievesegun
seindicaanteriormenteenestamismasecci6n.
Figura9
f
J
3. Paradoenlaposici6ndeloperador(detkisdelam_iquinaquitanieve),
engranelabarrena.
4. Dejelabarrenaengranadaduranteaproximadamentediez(10)segundos
antesdesoltarelcontroldelabarrena.Repitaestaoperaci6nvariasveces.
5. Conlabarrenaenposici6ndesengranadaarriba,caminealfrentedela
m_iquina.
6. Confirmequelabarrenahadejadodegirarporcompletoynomuestra
NINGONsignodemovimiento.SilabarrenamuestraCUALQUIER
signoderotad6n,vuelvaa laposici6ndeloperadoryapagueel motor
inmediatamente.EspereaqueTODASlaspartesm6vilessedetenganantes
devolvera ajustarelcontroldelabarrena.
Z Paravolvera ajustarelcabledecontrol,aflojelatuercahexagonalsuperior
enlam_nsuladelcabledelabarrena.
8. Ubiquelam_nsulahadaarribaparabrindarm_isjuego(ohadaabajopara
aumentarlatensi6ndel cable).Veala Figura10.
9. Vuelvaaapretarlatuercahexagonalsuperior.
10. RepitalapruebadecontroldelabarrenaparaverificarquesehaIogradoel
ajusteadecuado.
\\
J
Figura10
37
Page 38

Control de Transmisi6n Palancade Cambios
J
Montaje del canal
\
\\
de la Barrena
Control d&eccional del canal
Herramienta de
limpieza del canal
Caja de la
barrena
\
\
Zapatas
antideslizantes
Figura11
Ahoraqueyahaajustadosulam_quinaquitanieveparalaoperacidn,familiarkese
consuscontrolesycaracteristicas.VealaFiguraII.
Palancade Cambios
21 2345 6
I' '
Lapalancadecambiosest_ubicadaenel paneldecarrera.Situelapalancade
cambiosencualquieradelasochoposicionesparacontrolarladirecci6ndel
desplazamientoylavelocidaddepiso.
Avarice
Hayseisposidonesdeavance(F).Laposici6nuno(1)eslam_slenta,ylaposici6n
seis(6)eslam_sr_pida.
Retroceso
Haydosvelocidadesderetroceso(R).Launo(I)eslam_slenta,ylados(2)eslam_s
r_pida.
Silenciador Manija del arrancador
_ontrolde _ de retroceso
_ _ / Tapdnde
O tu,a , om ust, ,o
Cebador _ _j_'j_Z Llenado
II
_F_ Botbn del
/ eldctrico
Uene clel ac/eite Salida del arlancador
I.lavedeSeguridad
LaIlavedeseguridadesundispositivodeseguridad.
Debeestarcompletamenteinsertadaparaqueel motor
arranque.RetirelaIlavecuandonouselam_quina
quitanieve.
NOTE:NogirelaHaveparaintentararrancarelmotor.AI
hacerlopodr[aromperla.
Control deObturaci6n
Elcontroldeobturaci6nseencuentraenlaparte
posteriordelmotor,yseactivahadendogirarelcontrol
deobturad6naposid6nCHOKE.AIactivarelcontrolde
obturaci6nsederralaplacadeobturaci6ndelcarburador
yseayudaaencenderel motor.
el_ctr!co j
Cumpleconlosest_ndaresdeseguridaddeANSI
Lasm_quinasquitanievedeCraftsmancumplenconlosest_ndaresdeseguridaddelinstitutoestadounidensedeest_ndaresnacionales(ANSI).
38
Page 39

Control del Regulador
@
Elcontroldel reguladorest_ubicadoenlapartetraseradelmotor.Regulala
velocidaddelmotor,yIoapagacuandoseIocolocaenla posid6nSTOP(detend6n).
Cebador
AIpresionarelcebadorseenviacombustible
directamentealcarburadordelmotorparaayudaral
encendidocuandoelclimaesffio.
ManijadeiArrancadorde Retroceso
Estamanijaseutilizaparaarrancarelmotormanualmente.
Bot6n delArrancadorEi_ctri¢o
Sioprimeelbot6ndelarrancadorel_ctricoseengranaelarrancadorel_ctricodel
motorcuandoseIoenchufaaunafuentedeenergiade120V.
Uenado deAceite
Esposiblecontrolarel niveldeaceitedel motor,as[comotambi_nagregaraceite,a
trav_sdelIlenadodeaceite.
Tap6ndeCombustible
Desenrosqueel tap6ndecombustibleparaagregargasolinaaltanquede
combustible.
SalidadeiArrancadorEi_ctrko
Esnecesafiousaruncord6nprolongadorparaextefioresdetresespigasyuna
fuentedeenergia/tomacorfientedeparedde120V.
Controlde iaTransmisi6n/Controlde ia Barrena de
Cerradura
f
CONTROL DiE LA
TRANSMISION
Elcontroldetransmisi6nest_ubkadoenlamanijaderecha.Presionela
empufiaduradecontrolcontralamanijaparaengranarlaruedadetransmisi6n.
Suelteparaquesedetenga.
NOTA:Sueltesiempreelcontroldelatransmisi6nantesdecambiardeveloddad.De
noprocederas[,aumentar_eldesgastedelsistemadetransmisi6ndesum_quina.
Montajedei Canal
Lanieveretiradaal interiordelacajadelabarrenasedescargaenelmontajedel
canal.
ControldirectionaldeiCanal
f
CONTROL DIRECCIONAIL DElL CANAL
INCLINACI6N DEL
CANALAJUSTABLE
IZQUIERDA
DESCARGADESCARGA
ZapatasAntideslizantes
Ubiquelaszapatasantideslizantesenfund6ndelascondidonesdelasuperfide.
Ajustehadaarfibasilanieveest_muycompactada.Ajt_stelashadaabajosiusala
m_quinaengravasosuperficiesconpiedrastrituradas.
Control dela Barrena
J CONTROL DE __
LA BARRENA
Elcontroldelabarrenaest_ubicadoenlamanijaizquierda.Apfietelaempufiadura
decontrolcontralamanijaparaengranarlabarrenayempieceaquitarnieve.
Suelteparaquesedetenga.
Paracambiarladirecddn hada lacualsearr_a la nieve,gireel controldirecdonal
delcanal.
39
Page 40

HerramientadeLimpieza
Nuncausesusmanosparaliberarun montajedecanaltapado.Antesde
destaparlo,apagueel motor y permanezcadetr_sdeJasmanijashastaque
todasJaspartesm6vilessehayandetenido.
Laherramientadelimpiezadelcanalest_ajustadaconvenientementealaparte
posteriorde[acajade[abarrenaconunpasadordeensamb[ado.Siseacumu[an
nieveyhie[oenelcanaldedescargadurante[aoperad6n,procedacomose[ndica
acontinuaci6npara[[mpiardemaneraseguraelmontajede[canaly[aaberturade[
canal
1. Suelteelcontroldelabarrenayel controldelatransmisi6n.
2. ParadetenerelmotorsaquelaIlavede encendido.
3. Saquelaherramientadelimpiezadelpasadorquelaajustaa laparte
posteriordelacajadelabarrena.
4. Useelextremoconformadepaladelaherramientadelimpiezapara
desplazaryrecogerlanieveyel hieloqueseformaroncercadelconjuntodel
canal.
5. Vuelvaaajustarlaherramientadelimpiezaalpasadordeensamblado
ubicadoenlaparteposteriordelacajadelabarrena,insertedenuevola
Ilavedeencendidoyenciendael motordelam&quinaquitanieve.
6. Paradoenla posici6ndeloperador(detr&sdelam&quinaquitanieve),
engraneelcontroldelabarrenaduranteunossegundosparaeliminarla
nleveoel hleloquehayanquedadoenelconjuntodelcanal.
Antesde EncenderelMotor
Aceite
Gasoiina
Utilicegasolinaparaautom6viles(sinplomooconbajocontenidodeplomopara
minimizarlosdep6sitosenlac_maradecombusti6n)conunoctanajem[nimode87.
Sepuedeusargasolinaconhastaun10%deetanoloun15%deMTBE(#termet[lico
terdario-but[lico).Nuncauseunamezcladeaceiteygasolinanigasolinasuda.Evite
queselntroduzcasuciedad,polvooaguaeneltanquedecombustible.NOutllice
gasollnaE85.
Carguecombustibleenun_reabienventiladayconelmotorapagado.No
fumenipermitallamasochispasenellugardondesecargacombustibleose
encuentraeldep6sitodecombustibledelmotor.
NoIleneenexcesoel tanquedecombustible.Despu#sde cargarcombustible,
aseguresedequeel tap6ndeltanqueest#biencerradoyasegurado.
Tengacuidadodenoderramarcombustibleal realizarla recarga.El
combustiblederramadoosusvaporessepuedenincendlar.Sisederrama
combustible,aseguresedequeel_reaest#secaantesdearrancarelmotor.
Eviteelcontactorepetidooprolongadoconlapielo inhalarlosvapores.
Tengaextremocuidadocuandomanipuiegasoiina.Lagasoiinaes
altamenteinflamabley susvaporespuedencausarexplosiones.Nunca
agreguecombustiblea[am_iquinaeninterioresomientrasel motorest_
calienteo enfuncionamiento.Apagueloscigarrillos,cigarros,pipasy otras
fuentesdecombusti6n.
].
Antesdesacarlatapaparacargarcombustible,limpiealrededor.
2.
Lleneeltanquehasta1/2pulgpordebajodeltope,dejandoas[espadopara
ladilatad6ndelcombustible.TengacuidadoparanoIlenareldep6sitoen
exceso.
Encendidodei Motor
Lea,comprendaysigatodas lasinstruccionesyadvertenciasqueaparecen
enla m_iquinayen estemanualantesdeoperarla.
Elmotorseenvi6conaceiteenelmotor.Controleelniveldeaceiteantesdecada
operaci6nparaasegurarsedequehayaaceitesuficienteenelmotor.
NOTA:Aseguresedecomprobarel motorsobreunasuperficieniveladayconel
motorapagado.
1. Retireeltap6ndeIlenado/la varillademedici6ndeniveldeaceiteylimpie
lavarilla.
Inserteeltap6n/lavarillademedici6nenelcuellodeIlenadodeaceite,pero
nolaatornille.
3. Extraigaeltap6ndeIlenado/la varilladeniveldeaceite.SielnJvelesbajo,
agregueaceite(5W-30,conunaclasificad6nminimadeSF/S6)lentamente
hastaqueelregistromarqueentrenivelalto(H)y bajo(L).
NO@-NoIoIleneenexceso.ElIlenadoexcesivode aceitepuedehacerqueelmotor
generehumo,quecuestearrancarloofallasenlabuj[a.
4. Vuelvaacolocareltap6n/la varilladeaceiteyajusteconfirmezaantesde
arrancarelmotor.
Siempremantengalasmanosylospiesalejadosdelaspartesm6viles.No
utilicefluidos comprimidosparaarrancar.Losvaporessoninflamables.
NOTA:Dejequeelmotorsecalienteduranteunosminutostraselarranque.Elmotor
nodesarrollar_todasupotendahastaquealcancetemperaturasoperativas.
1. Aseguresedequeelcontroldelabarrenayelcontroldelatransmisi6nest_n
enposici6ndesengranada(sinpresionar).
2. InsertelaIlaveenlaranura.Asegtiresedequeentreapresi6nensulugar.No
intentegirarlaIlave.
NOTA:ElmotornopuedearrancarsilaIlavenoest_completamenteinsertadaenel
[nterruptordeencendido.
4O
Page 41

ArrancadorEl ctri¢o
1. Muevalapalancadecontroldel reguladoralaposici6nFAST(r_pido,
representadaporunaIiebre_| !i ).
.b .
Elarrancadorei_ctricoest_equipadocon unenchufedetresterminales
conectadosatierray est_diseffadoparaoperarconcorrientedom_stica
de120voltios. Debesetutilizado conun recept_culodetresterminales
correctamenteconectadoa tierra entodo momentoparaevitar
laposibilidaddedescargasel_ctricas.Sigatodaslasinstrucciones
cuidadosamenteparaoperarelarrancadorel_ctrico.NOutilice el
arrancadorel_ctricobajola Iluvia.
Determinesielcableadodesuhogaresunsistemadetrescablesconectadoatierra.
Consulteconunelectricistamatriculadosinoest_seguro.
S[cuentaconunrecept_cu[odetrestermJna[es,sigalossJguJentespasos.S[el
cableadodesuhogarnoeseladecuado,NOuseelarrancadore[6ctrJcoennJnguna
circunstancia.
Conecteel prolongadora lasalidasituadaenlasuperficiedelmotor.Conecte
elotroextremodelprolongadorenunrecept_culodeCAconconexi6na
tierradetrestermlnalesde120voltios,enun_reabienventilada.
Elcabledeextensi6npuedeset decualquier[ongitud, perodebe ser
dasificadopara15amperiosa 125voltios,tierray dasificadoparasuuso
enexteriores.
2. Muevalapalancadecontroldelreguladoralaposici6nFAST(r_pido,
representadaporunaliebre)._ II
3. Muevalapalancadelcebadorhastalaposid6nCHOKE[,'_'1 (encendidocon
elmotorenif[o).S[elmotoryaest_callente,ublqueelcebadorenlaposicl6n
OFF.
4. Presioneelcebadortresveces,asegur_ndosedecubrirelorificiode
ventilacl6ncuandoIohaga.S[elmotorest_caliente,presioneelcebadoruna
solavez.Cubrasiempreel orlflc[odeventilad6ncuandooprlmaelbot6ndel
cebador.S[hacefr[opuederesultarnecesarlorepetirelcebado.
5. Presioneelbot6ndelarrancadorparaarrancarel motor.Unavezencendido
elmotor,suelte[nmedlatamenteelbot6ndelarrancador.Elarrancador
el_ctricotieneunaprotecci6ncontrasobrecargat_rmica;elsistemase
apagar_transitoriamenteparapermitirqueseenfrieelarrancadorencaso
quesesobrecargueelarrancadorel_ctrico.
6. Mientrassecalientaelmotor,girelentamenteel controldelobturadorala
posici6nOFF(apagado).S[elmotorsedetiene,vuelvaaencenderlo,h_galo
funcionarconel cebadorensuposici6nmediaduranteunlapsobrevey
luegogirelentamenteelcebadorhastalaposicl6nOFF(apagado).
Z Unavezqueelmotorest_enfuncionamiento,desconectedelarrancador
el_ctricoelcabledealimentad6n.Paradesconectarlo,desenchufe
siempreelextremoqueest_enchufadoaltomacorrientedeparedantesde
desenchufarelextremoopuestoqueest_conectadoalmotor.
Arrancadorde Retroceso
2. Muevalapalancadelcebadorhastalaposid6nCHOKE[J[ (encendidocon
el motorenfrio).S[elmotoryaest_callente,ublqueel cebadorenla posicl6n
OFF.
3. Presioneelcebadortresveces,asegur_ndosedecubrirelorifido de
ventilad6ncuandoIo haga.Siel motorest_caliente,presioneelcebadoruna
solavez.Cubrasiempreelorlflclodeventilad6ncuandooprimaelbot6ndel
cebador.S[hacefifo puederesultarnecesarlorepetirelcebado.
4. Jalesuavementelamanljadelarrancadorhastaquecomlenceaofrecer
resistenda,luegoj_lelar_pidamenteyconfuerzaparasuperarla
compresl6n.Nosueltelamanljanipermitaquesedesenganche.Vuelvala
cuerdaLENTAMENTEasuposici6noriginal.Desernecesario,repitaestepaso.
5. Mientrassecalientaelmotor,girelentamenteelcontroldelobturadorala
posici6nOFF(apagado).S[elmotorsedetiene,vuelvaaencenderlo,h_galo
funcionarconelcebadorensuposici6nmediaduranteunlapsobrevey
luegogirelentamenteel cebadorhastalaposicl6nOFF(apagado).
Paraevitar queelmotorfuncionesincontrol,nuncaIo dejesinvigilancia
mientrasest_enmarcba.Apagueelmotor luegodeusarloysaquela flare.
Detenci6ndel Motor
Dejeencendidoel motorduranteaigunosm[nutosantesdedetener[oparapermitir
quesesequelahumedadenel mismo.
1. Muevaelcontroldelreguladora laposlcl6nOFF.
2. RetirelaIlave.AIretirarlaIlavesereducelaposibilidaddequeelmotorsea
puestoenmarchasinautorizad6nmientraselequiponoest_enuso.Guarde
la Ilaveenunlugarseguro.Elmotornopuedearrancarsinla Ilave.
3. Ellmlnelahumedaddeloscontrolesdelmotor.
Procedimientopara EngranariaTransmisi6n
I. Conel controldelestranguladorenposid6nr_pida_ (dibujodeun
conejo),muevalapalancadecambiosa unadelasselsposidonesdeavance
(F)odelasdosposicionesdereversa(R).Selecdonelaveloddadadecuada
paraelestadodelanieveexistenteyunaveloddadconlaquesesienta
c6modo.
Aprieteelcontroldelatransmisi6ncontralamanijaderecha,yla m_quina
qultanievesemover_.Su_Iteloysedetendr_el movlmlentodela
transmisi6n.
NOTA:NUNCAcambiela posici6ndelapalancadecambios(cambiodevelocidades
odedirecd6ndedesplazamiento)sinsoltarprimeroelcontroldetransmisi6ny
detenerporcompletolam_quinaquitanieve.Estoproducir_undesgasteprematuro
delsistemadetransmisi6ndelam_quinaquitanieve.
Procedimiento para Engranar ias Barrenas
1. Aprieteelcontroldelabarrenacontralamanijay lasbarrenasrotar_n.
Su_ltelaylasbarrenassedetendr_n.
Notirede la manijadel arrancadormientraselmotor est_enmarcba.
41
Page 42

PROGRAMADEMANTENIMIENTO
Antesderealizarcualquiertipo de[mantenimiento/servicio,suelte
todoslosmandosy pareel motor.Esperehastaquetodaslaspartesde
movimientohayanvenidoauna paradacompleta.Desconecteel alambre
debujiay b_selocontraelmotor paraprevenirel comienzoinvoluntario.
Siemprellevepuestoscristalesinastillablesdurante laoperad6no
realizandocualquierajusteo reparadones.
Sigaelcronogramademantenimientoquesepresentaacontinuaci6n.Estatabla
s61odescribepautasdeservicio.UtilicelacolumnaRegistrodeServicioparahacerel
seguimientodelastareasdemantenimientocompletadas.ParaubicarelCentrode
ServicioSearsm_scercanoo paraprogramarunservicio,simplementecomuniquese
conSearsaltel_fono1-888-331-4569.
CadaUsoy5horas
Ios5
Anualmenteo25horas
Anualmenteo50horas
Anualmenteo100horas
AntesdeAlmacenaje
1. Niveldelaceitedemotor
2. Hardwaresueltoo ausente
3. Unidady motor
1. Elaceitedemotor
1. Bujia
2. Encadenamientosdecontrolypivotes
3. Ruedas
4. Ejedeengranajeyejedela barrena
1. Elaceitedemotor
1. Bujia
1. Sistemadecombustible
MantenimientodeMotor
Antesderealizartareasdelubricaci6n,reparaci6noinspecci6n,
desengranetodos loscontrolesydetengael motor. Esperea quese
detengantodaslaspiezasm6viles.
Control del Aceitedel Motor
flOTA:Verifiqueel niveldeaceiteantesde cadausoparacerciorarsequese
mantieneelniveldeaceiteindicado.
Cuandoleagregueaceitealmotor,consultelasiguientetabladeviscosidad.La
capacidaddeaceitedelmotores600ml (aprox.20onzas).NoIleneexcesivamente.
Useunaceiteparamotordecuatrotiempos,ounaceitedetergentedecalidad
Premiumconcertificadoquecubraoexcedalasexigenciasdelosfabricantesde
autom6vilesamericanosrespectodelaclasificaci6ndeservidoSGy SELosaceites
paramotorconladasificaci6nSG,SFtienenest_designaci6nenelenvase.
1. Retireeltap6ndeIlenadodeaceiteylimpielavarillademedid6ndeaceite.
2. Insertelavarillademedid6nenelcuellodeIlenadodeaceite,peronoIo
atomille.
3. Retireeltap6ndeIlenadodeaceite.Sielnivelest_bajo,agregueaceite
lentamentehastaregistrosdeniveldelaceiteentrealto(H)ybajo(L).Yeala
Figura12.
4. Ajustefirmementelavarillademedici6nantesdearrancarelmotor.
1. Comprobar
2. Aprieteosustltuir
3. Limpio
1. Cambio
1. Comprobar
2. Lubricaci6nconpetr61eoligero
3. Lubricaci6nconautomotoresmultiusos
4. Lubricaci6nconpetr61eoligero
1. Cambio
1. Cambio
1. Elmotordirigidohastaqueestosepareafalta
delcombustible
f
J
Figura12
42
Page 43

CambiodeAceitedel Motor
NOTA:Cambieelaceitedespu_sdelas5primerashorasdeoperaci6ny despu_sde
cada50horasdeoperaci6no unavezportemporada.
1. Vacieel combustibledeltanquehaciendofuncionarel motorhastaqueel
tanquedecombustibleest_vac[o.Cerci6resedequelatapadelcombustible
est_asegurada.
2. Coloqueunrecipienteadecuadopararecolectarelaceitebajoeltap6nde
drenajedeaceite.
3. Retireeltap6ndedrenajedeaceite.VealaFigura13.
4. Inclinelaunidadparadrenarelaceiteenelredpiente.Elaceiteusadose
debedescartarenuncentroderecolecci6nadecuado.
Elaceiteusadoesunresiduopeiigroso.Elimineelaceiteusado
adecuadamente.NoIoarrojejunto conlosresiduosdomidliarios. Consulte
alas autoridadeslocalesoal centrodeservicioSearsparaaveriguard6nde
hayinstalacionespara[aeiiminaci6n/recidajesegura(o)de[aceiteusado.
5,
Vuelvaacolocareltap6ndedrenajedeaceiteyajt_stelobien.
6.
Relleneel motorconelpetr61eorecomendado.VetlacartadeUsodelAceite
Recomendada.Lacapacidaddelaceitedelmotores20onzas.
Tap6ndeDrenajede
Aceite
Figura13
Bujiade encendido
(%-40 o-20o 0o 200 400
(oc) -300 -200 -10° 0°
NOutiliceaceitessindetergenteoparamotordedostiempos. Podria
acortar[avida util del motor.
Z Vuelvaacolocaryajustareltap6ndeIlenado/lavarilladeniveldeaceite.
Control de la Bujia
NOpruebela chispasinoest_la bujiadeencendldo.NOd_arranqueal
motorsi noest_la bujiadeencendido.
Sielmotor haestadofuncionando,elsilenciadorestar_muycaliente.
Tengacuidadodenotocar elsilendador.
NOTA:Controlelabuj[aanualmenteocada25horasdeoperad6n.Cambielabujia
anualmenteocada100horas.Paraasegurarsedequeelmotorfuncionebien,la
buj[adebetenetunaseparaci6ncorrectaynotenetsedimentos.
1. Retirelafundadelabuj[ayutiliceunaIlaveparabuj[asparaextraerla.Vea
laFigura14.
Fundadelabujia
J
Figura14
Inspeccionevisualmentelabujia.Descartela bujiasipresentamucho
desgaste,o sielaislanteest_agrietadooastillado.Limpielabuj[aconun
cepillodealambresilava avolvera utilizar.
NO@:UnabujiaF6RTCdebeserutilizadoparael reemplazo.Paralacompra
deSears,visiteunadeservicoSearsCenteroIlame1-888-331-4569.
Consultarparabuj[a951-10292.
43
Page 44

3. Midalaseparad6ndebujiaconuncalibrador.Cordjadesernecesado
tordendoelelectrodolateral.Veala Figura15.Laseparaci6ndebe
establecerseentre0,020y0,030pulgadas(0,60-0,80mm).
4. VerMquequelaarandeladelabujiaest_enbuenascondlclonesyenr6squela
manualmenteparanoestropearlarosca.
5. Unavezquelabujiaest_colocada,aprl_telaconunallaveparacompdmlrla
arandela.
NOTA:Cuandoinstaleunabujianueva,unavezcoIocadalabujiaaprieteI/2 vuelta
paracomprimirlaarandela.Cuandovuelvaa colocarunabujiausada,unavez
colocadalabujiaaprieteI/8- I/4de vueltaparacomprimirlaarandela.
Labujia debeestarbienajustada.Unabujiafloja puederecalentarsey
dafiarel motor.
f
Electrodo
0,020-0,030pulgadas
(0,60-0,80ram)
Lubricad6n
Ejede Engranaje
Elejedeengranaje(hexagonal)sedebelubdcaralmenosunavezportemporadao
trascada25horasdeoperaci6n.
I. Paraprevenlrel derramamlento,ellmlnetodoelcombustibledeltanque
hadendofuncionarelmotorhastaquesedetenga.
2. Glreconcuidadolam_quinaquitanievehadaardbayhacladelantede
maneraquequedeapoyadasobrelacajadelabarrena.
3. Retirelacubiertadelmarcoinferiorquitandolostornlllosquelaaseguran.
4. Apllquealejehexagonalunacapaligeradeunagrasamultiusosaptapara
condlclonescllm_ticasmultiples.VealaFlgura16.
NOTA:Evltelosderramesdeaceitesobrelaruedadefrlccl6ndecauchoysobrela
placadetransmisi6ndealumlnio.HadendotandMcultar_elslstemadepaseodel
lanzadordenleve.Borrecualqulerexcesoo petr61eoderramado.
Ruedas
Retireambasruedasal menosunavezcadatemporada.Limpley recubralosejes
conunagrasaparaautomotoresmultiusosantesdevolveralnstalarlasruedas.
Control DireccionaldelCanal
Lubdqueelmangultodelpernodeojoy laespiralconaceite3-en-1unavezpor
temporada.
J
Figura15
Ejede la Barrena
AImenosunavezpottemporada,quitelospasadoresdecuchllladelejedela
barrena.Rodelubdcanteal interiordeleje,alrededordelosseparadores.Aslmismo,
lubdqueloscojlnetesbddadosqueseencuentranenambosextremosdeleje.Vea
laFigura17.
Plata de RaspadoyZapatasAntideslizantes
Laplacaderaspadoylaszapatasantideslizantesubicadasenlabasedelam_quina
quitanleveest_nsujetasadesgaste.Ped6dlcamentedeberiacontrolarlospernosy
reemplazarloscuandoseanecesado.
NOT.4:Laszapatasdeestam_qulnatienendosbordesdedesgaste.Cuandounlado
sedesgasta,selaspuederotar 1800parausarel ottoborde.
!
Figura17
44
Page 45

Pararetirarlaszapatasantideslizantes:
1. Quiteloscuatropernosdelcarro,arandelas,ylastuercasdebrida
hexagonalesquelosasegurana lam£quinaquitanieve.
2. Montelasnuevaszapatasantideslizantesconcuatrospernosdecarro(dosen
cadalado),arandelas,y lastuercasdebridahexagonales.Consultela Figura
18.
Pararetirarlaplacaderaspado:
1. Dejequeelmotorfundonehastaquesequedasincombustible.Nointente
vertercombustibledelmotor.
2. Gireconcuidadolaunidadhaciaarribay haciadelantedemaneraquequede
apoyadasobrelacajadelabarrena.
3. Quitelospernosdecarroy lastuercashexagonalesquelasujetana lacajade
lam£quinaquitanieve.
4. Montelaplataderaspadonueva,asegur£ndosedequelascabezasdelos
pernosdecarroseencuentrendelladointeriordelacaja.Ajustebien.
Ajustes
CabledeCambios
SinosepuedeIogrartodalagamadeveloddades(avanceyretro-ceso),consultela
figuradela izquierdayajusteelcabledecambiosdelasiguienteforma:
1. Coloquelapalancadecambiosenlaterceraposid6nm£sr£pidadeavarice.
2. Aflojelatuercahexagonaldelsoportedeposicionamientodel cablede
cambios.YealaFigura19.
3. Gireelsoportehaciaabajopararedudreljuegodelcable.
4. Vuelvaaapretarlatuercahexagonal.
Control de laTransmisi6n
Cuandosesueltaelcontroldelatransmisi6nyest_enposici6ndesenganchada
arriba,elcabledebetenetmuypocojuego.NOdebeestartenso.Tambi#n,sihay
excesivoflojoenelcabledepaseoosilaunidadexperimentael paseointermitente
usando,elcablepuedetenetquesetajustado.
Compruebeelajustedelcontroldelatransmisi6ndelasiguienteforma:
1. Cuandosuelteelcontroldelatransmisi6n,empujesuavementelam£quina
quitanievehadadelante.Launidaddeberfaavanzarlibremente.
2. Engancheel controldelatransmisi6neintenteempujarsuavementela
m£quinaquitanievehadadelante.Lasruedasnodebengirar.Launidadno
debeavanzarlibremente.
3.
Conelcontroldelatransmisi6nsuelto,muevalapalancadecambioshacia
atr£syhadadelanteentrelaposid6nR2ylaposid6nF6variasveces.No
deberfahaberresistenciaenlapalancadecambios.
4.
Sifallacualquieradelaspruebasanteriores,esnecesarioajustarel cablede
latransmisi6n.Procedadelasiguientemanera:
a. Apagueelmotorcomoseindicaenlasecd6ndeOperaci6n.
b. Aflojelatuercahexagonalinferiordelsoportedelcabledela
transmisi6n.YealaFigura20.
c. Ubiquela mdnsulahadaarribaparabrindarm£sjuego(ohaciaabajo
paraaumentarlatensi6ndelcable).
d. Vuelvaaapretarlatuercahexagonalsuperior.
e. Realicelospasos1a3paraconfirmarelajuste.
f
NOTA:Las barrenas no se muestran para mayor claridad.
Figura18
E
Figura20
45
Page 46

SoportedelCanal
Silaespiralsituadaenlaparteinferiordelcontroldirectionaldelcanalnose
enganchacompletamenteconelmontajedelcanal,esposibleajustarelsoportedel
canal.Parahacedo:
1. Aflojelasdostuercasquesujetanelsoportedelcanalycambiesuposid6n
ligeramente.VealaFigura21.
2. Vuelvaaajustarlastuercas.
Control de la Barrena
Consultelasedondemontajeparaajustardichocontrol.
ZapatasAntideslizarites
ConsultelasedondemontajeparaajustarLaszapatasantideslizantes.
Reemplazode ia Correa
f
LaCorreadela Barrena
Pararetiraryreemplazarlacorreadelabarrenadesum_quinaquitanieve,proceda
comoseindicaacontinuaci6n:
1. Paraprevenirel derramamiento,eliminetodoelcombustibledeltanque
hadendofuncionarelmotorhastaquesedetenga.
2. Saquelacubiertapl_sticadelacorreaubicadaenelfrentedelmotor.Para
ellosaquelosdostornillosautorroscantes.VealaFigura22.
3. Aflojeyretirelosdostornillosyarandelasplanasqueaseguranlagu[adela
correa.VealaFigura23.Retirelaguiadelacorrea.
4. Saquelacorreadelabarrenadelapoleadelmotor.VealaFigura24.
5. Gireconcuidadolam_quinaquitanievehaciaarribayhadadelantede
maneraquequedeapoyadasobrelacajadelabarrena.
J
Figura22
Figura23
Figura21
J
46 Figura24
Page 47

Saquelacubiertadelmarcodesdedebajodelam_quinaquitanieve
retirandoloscuatrotornillosautorroscantesquelaaseguran.VealaFigura
25.
Afiojey retireeltornilloconrebordequeactuacomoguardadelacorrea.
VealaFigura26.
8,
Retirelacorreadealrededordelapoleadelabarrenaydeslicela misma
entrelam_nsuladesoporteylapoleadelabarrena.Veala Figura27.
NO@:Mantenerelcontroldelabarrenavaafacilitareldesmontajey
reinstalad6ndelacorrea.
Pararealizarelreensambladodelacorreadelabarrenasigalasinstrucciones
enordeninverso.
NOTA:NOolvidevolvera instalareltornilloconrebordeyvolveraconectarel
resortealmarcotrasinstalarunacorreadelabarrenaderepuesto.
10.
RealicelapruebadeControldeTaladroperfiladaenlasecci6ndeAsamblea
deestemanual.
LaCorreade laTransmisi6n
NOTA:Varioscomponentesdebenserretiradosyserequierenherramientas
espedalesparareemplazarlacorreade[am_quinaquitanieveunidad.P6ngaseen
contactoconlaspiezasm_scercanacentrodeservicoSearsparaquelacorreade
transmisi6nreemplazado.
J
Figura25
soporte
Figura27
J
47
Page 48

Extracci6nde ia Eueda de Fricci6n _
Silam_quinaquitanievenoseaccionacuandoelcontroldelatransmisi6nest_
engranado,ysialrealizarelajustedelcabledecontroldelatransmisi6nque
apareceelproblemanosecorrige,tal vezsedebareemplazarlaruedadefricci6n.
Sigalasinstruccionesqueaparecenacontinuaci6n.Examinelagomadesuruedade
fricci6nenbuscadesignosdedesgasteogrietasyreemplaceruedasiesnecesario.
I. Paraprevenirel derramamiento,eliminetodoelcombustibledeltanque
haciendofuncionarelmotorhastaquesedetenga.
2. Coloquelapalancadecambiosenlaprimeraposici6nde avarice(FI).
3. Gireconcuidadolam_quinaquitanievehaciaarribayhaciadelantede
maneraquequedeapoyadasobrelacajadelabarrena.
4. Saquelacubiertadelmarcodesdedebajodelam_quinaquitanieve
retirandolostornillosautorroscantesquelaaseguran.
5. Retirelaruedaderechaquitandoeltornilloylaarandeladecampanaquela
aseguranaleje.VealaFigura28.
6. Retireconcuidadolatuercahexagonalylaarandelaquesujetaneleje
hexagonalalmarcodelam_quinaquitanieve,ygolpeesuavementeel
extremodelejeparadesplazarel cojinetedebolasdelladoderechodel
marco.Veala Figura29.
flOTA:Tengacuidadodenodaffarlasroscasdeleje.
7. Concuidado,ubiqueelejehexagonalhaciaabajoy hacialaizquierdaantes
dedeslizarconprecauci6nel montajedelaruedadefricci6nfueradeleje.
VealaFigura30.
flOTA:Cuandosedeseareemplazarelconjuntodelaruedadefricci6n
completo,descartelapiezadesgastaday deslicelanuevapiezaeneleje
hexagonal.
8. Parareensamblarloscomponentessigalospasosanterioresenorden
inverso.
9.
Realicela PruebadeControldePaseoperfiladaantesenlasecd6nde
ServidoyMantenimiento.
f
J
Figura29
f
Figura30
/
/
Figura28
48
Page 49

Slest_desmontandolaruedadefricci6nparareemplazartTnicamenteelanillode
goma,procedacomoseindkaacontinuaddn:
170@:Notodaslasruedasdefrkd6n sontltiles.Siesteeselcaso,bastaconsustituir
elconjuntoderuedadefrkd6n.
1. SaqueloscuatrotorniNosdemantienenunidaslasplacaslateralesdela
ruedadefrkddn. VealaFigura31.
2. Retireelanillodegomadeentrelasplacas.
3. Reensamblelasplacaslateralesconunnuevoanillodegoma.
170@:AIreensamblarel conjuntodelaruedadefrkd6n, asegtlresedeque
elanillodegomaestacorrectamentecentradoyasentadoentrelasplacas
laterales.Aprietecadatornillotinkamenteungiroantesdegirarlaruedaen
elsentidodelasagujasdelrelojyprocederconelsiguientetornillo.Repita
esteprocesovariasvecesparaasegurarsedequelasplacasseaprietanconla
mismafuerza(entre6y9 p[es-Nbras).
4. VuelvaadesNzarelconjuntodelaruedadefrkddn sobreelejehexagonal
ys[galospasosanterioresenordeninversoparareensamblarlos
componentes.
5. ReaNcela PruebadeControldePaseoperfiladaantesen lasecd6nde
ServkioyMantenimiento.
Barrenas
Lasbarrenasest_najustadasalejeespiralconcuatropasadoresdecuchillay
pasadoresdechaveta.Silabarrenagolpeaunobjetoextraffoounabarradehielo,la
m_quinaquitanieveest_diseffadademaneraquelospasadoressepuedencortar.Si
lasbarrenasnogiran,verifiquesilospasadoressecortaron.YealaFigura32.
f
Figura31
NIINCAcambielospasadoresdecuchilladelasbarrenasporotra cosaque
lospasadoresdecucNIladerepuestodel fabricantedeSears,Nodepieza
88389Cualquierdaffoquesufraelengranajedela barrenaocualquier
otro componentepordejardehacer[oIoanterior, NOestar_cubiertopor la
garantiadesum_quinaquitanieve.
Siempredebeapagarel motorde lam_quinaquitanievey retirar[aIlave
antesdecambiarlospasadoresdecuchilla.
Figura32
49
Page 50

Sinosevaautilizaelequipodurante30d{asom_s,osieselfinalde[atemporadadenieveyyanoexisteposibi[idaddequenieve,esnecesarioalmacenarelequipode
maneraadecuada.Siga[asinstrucdonesdea[macenamientoqueseindicanacontinuaddnparagarantizare[rendimientom_ximode[am_quinaquitanieveparausofuturo.
Preparad6ndelMotor Preparad6ndeia M quina Quitanieve
Losmotoresquesealmacenandurantem_sde30diasnecesitanserdrenados
decombustibleparaevitarquesedeteriorenyseformegomaenelsistemade
combustibleoen[aspiezasprindpalesde[carburador.S[[agaso[[nadesumotorse
deterioradurantee[almacenamiento,esposib[equedebarepararoreemplazarel
carburadoryotroscomponentesdelsistemadecombustible.
1. E[iminetodoelcombustibledeltanquehadendofundonare[motorhasta
quesedetenga.No[ntentedecombustibleparaelmotor.
2. Cambiee[aceitede[motor.
3. Extraigalabujiadeencendidoyviertaeneldlindroaproximadamente1
onza(30m[)deaceiteparamotor[[mpio.Tirevariasvecesde[arrancadorde
retrocesoparad[str[bu[re[aceiteyreinsta[e[abujia.
4. Limpielosresiduosdea[rededordelmotor,ydebajo,alrededor,ydetr_s
de[silendador.Apliqueunacapade[gadadeaceiteentodas[as_reasque
pueden[[egaraoxidarse.
A[maceneenunsectorlimp[o,secoy bienventilado,[ejosdecualquier
artefactoquefundoneconunallamao luzpilotocomounhomo,ca[entador
deaguaosecadorderopa.Evitecua[quiersectorconunmotore[#ctricoque
produzcachispasodondeseutHicenherramientase[#ctrkas.
Nuncaaimacene[am_quinaquitanieveconcombustibleen eltanqueen
unespadocerradooen_ireasconpocaventilad6n, donde losgasesdel
combustiblepuedanakanzar elfuego, chispasounaluzpiloto comolaque
tienen algunoshornos,calentadoresdeagua,secadoresderopaoalgun
otro disposffivoagas.
Cuandoaimacenelam_quinaquitanieveenungaipbndedepbsitomet_lico
oconpocaventiladbn,tengaespecialcuidadoderealizarleuntratamiento
anti-oxidantealequipo.UseaceiteIigeroosilicbnpararecubrirelequipo,
espedalmentelascadenas,losresortes,loscojinetesyloscables.
Eliminetodoelpolvodelexteriordelmotorydelequipo.
Sigalasrecomendadonesdelubrkad6nenlasecd6ndemantenimientode
estemanual.
Almaceneelequlpoenun_readespejadayseca.
Inflarlosneum_tlcosalapresl6ndelosfabrlcantesdeneum_tlcos
recomendada.Consulteel flancodel neum_tico.
Lanzanievestiendaenposici6nde fundonamientoconlasdosruedasyplata
deraspadoenlasuperfidedelatierraliana.
Siesposible,evitesectoresdealmacenamientoconmuchahumedad.
Mantengaelmotorniveladoenelalmac_n.Lainclinad6ndelmotorpuede
causarp_rdidasdecombustibleoaceite.
50
Page 51

Antesderealizarcualquiertipo delmantenimiento/servicio,sueite
todoslosmandosypareelmotor. Esperehastaquetodaslaspartesde
movimientohayanvenidoaunaparadacompleta.Desconecteel alambre
debujiayb_selocontrael motor paraprevenirelcomienzoinvoluntario.
Siemprellevepuestoscristalesinastillablesdurante laoperaci6no
realizandocualquierajusteo reparaciones.
Estasecd6nseocupadecuestionesdemenor importandadel servido.Paralocalizar el m_scercanoCentrode Servkio Sears,oparaprogramarun
servkio,simplementep6ngase encontactoconSearsal 1-888-331-4569.
Elmotornoarranca
Elmotorfundonademanera
err_tica
Demasiadavibrad6n
P_rdidadepotenda
1. Lapalancadeobturad6nnoest_enlaposici6nON
(encendido)
2. Sehadesconectadoelcabledelabujia
3. Labujianofundonacorrectamente
4. Eltanquedecombustibleest_vadooelcombustible
esviejo
5. Elmotornoest_cebado
6. LaIlavenoseencuentraenelencendidodelmotor
Z Cabledeextensi6nnoconectado(cuandoseusa
elbot6ndearranqueel_ctdco,enlosmodelos
equipados).
I. Launidadest_fundonandoenlaposid6nCHOKE
(obturad6n).
2. Elcombustibleesviejo.
3. Aguaosudedadenelsistemadelcombustible.
4. Necesadoajustarelcarburador.
5. M&sgobernadosmotor.
1. Haypiezasqueest&nflojasolabarrenao[mpulsorest&
daffada.
I. Elcabledelabujiaest_flojo.
2. Elodficiodeventilad6ndeltap6ndellenadodel
combustibleest_obstruido.
1. Pongaelinterruptorenlaposici6nCHOKE(obturad6n).
2. Conecteelcablealabujia.
3. Limpie,ajusteladistandadisruptivaocambie.
4. Lleneeltanquecongasolinalimpiayfresca.
5. Cebeelmotortalycomoseindicaenlasecd6ndeoperad6n.
6. InsertelaIlavetotalmentedentrodelinterruptor.
7. Conecteunextremodelcabledeextensi6nalasalidade
arranqueel_ctdcoyelottoextremoauntriplede120-voltios,
detierra,tomadeCA.
1. Cambielapalancadeobturad6nalaposid6nOFF(apagado).
2. Lleneeltanquecongasolinalimpiayfresca.
3. Drenareltanquedecombustibleenelmotorenmarchahasta
quesedetenga.Vuelvaa llenarloconcombustiblellmpio.
4. ContacteconsucentrodepartesyreparadonesSears.
5. ContacteconsucentrodepartesyreparadonesSears.
I. Detengaelmotordeinmediatoydesconecteelcabledelabuj[a.
Ajustetodoslospemosylastuercas.SIlavlbraci6ncontint_a,
llevelaunidadarepararauncentrodepartesyreparad6n
Sears.
I. Conecteyajusteelcabledelabujia.
2. Retireelhieloylanievedeltap6ndellenadodelcombustible.
Compruebequeelorlfidodeventilad6nnoest_obstruido.
51
Page 52

Launidadnoseautopropulsa 1. Ajusteelcabledelcontroldetransmisi6n.Consultelasecci6nde
1. Elcabledelcontroldetransmisi6nnecesitaunajuste.
ServicioyMantenimiento.
2. Lacorreadetransmisi6nest_flojaodaffada.
3. Ruedadefricci6nIlevadapuesta.
2. Hareemplazadolacorreadetransmisi6n.Contacteconsucentro
departesyreparacionesSears.
3. Hareemplazadolaruedadefricci6ndepiezasenunCentrode
ServicioSears.
1. Elmontajedelcanalest_tapado.Launidadnodescargalanieve
2. Hayunobjetoextraffoenlabarren&
3. Elcabledelcontroldelabarrenanecesitaunajuste.
4. Lacorreadelabarrenaest_flojaodaffada.
Detengaelmotordeinmediatoydesconecteelcabledelabujia.
Limpieelmontajedelcanalyelinteriordelacajadelabarrena
conlaherramientadelimpieza.
2.
Detengaelmotordeinmediatoydesconecteelcablede[abuj[a.
Retireelobjetodelabarrenaconlaherramientadelimpieza.
3.
Ajusteelcabledelcontroldelabarrena.Consultelasecd6nde
montaje.
4.
ReemplacelacorreadelabarrenaConsultelasecci6ndeServido
yMantenimiento.
5. El/lospasador/esdecuchillaest_ncortados.
Chutenogirar180-200grados 1. Chutemontadosincorrectamente. 1. Unassembletolvadecontrolyvolveracomoseindicaenla
1. 1.
Launidadquitalanieveenlugar
desoplarla
Veloddadabsolutabaja/lentaennieveht]meda/semi
derretidade1-3"deprofundidad.
2. Elolospasadoresdecuchillaest,(n)quebrado(s).
5.
Reemplaceconnuevo(s)pasador(es)decuchilla.Consultela
secd6ndeOperad6n.
Asambleasecci6n.
Aumentelaveloddadabsolutay utilicesiempreel motordela
m_quinaquitanievesconlaacelerad6nMAXIMA.
2.
Reemplaceconnuevo(s)pasador(es)decuchilla.Consultela
secci6ndeOperaci6n.
52
Page 53

DECLARACIONFEDERALy/o DECALiFORNiASOBREGARANTiASENELCONTROLDEEMISIONES
SUSDERECNOSY OBLIGACIONESENCUANTOALAGARANTiA
MTD Consumer Group Inc, laAgencia de Protecci6n Medioambiental de los Estados Unidos (EPA), y para aquellos productos certificados
para su venta en el estado de California, el Departamento de los Recursos del Aire de California (CARB) se complacen en explicar la garantia
que cubre al sistema de control (ECS) de emisiones de su equipo y motor (equipos de exteriores) de encendido pot chispa para todo terreno,
pequefio, de exteriores del aho 2014-2015. En California, los nuevos motores de equipos de exteriores deben estar dise_ados, construidos y
equipados para cumplir con las estrictas normas antipoluci6n del Estado (en otros estados, equipos de exteriores deben set estar dise_ados,
construidos y equipados para cumplir con las regulaciones de motores de encendido pot chispa para todo terreno peque_os de la Agencia de
Protecci6n Medioambiental de los Estados Unidos, (EPA). MTD Consumer Group Inc. debe garantizar el sistema de control de emisiones (ECS)
de su motor de equipos de exteriores pot el periodo de tiempo indicado m_s abajo, siempre y cuando no exista uso incorrecto, negligencia o
mantenimiento inadecuado de equipos de exteriores.
Su ECS puede incluir piezas tales como el carburador, el sistema de inyecci6n de combustible, el sistema de encendido, el convertidor catalitico,
los dep6sitos de combustible, las lineas de combustible, los tapones de combustible, las v_lvulas, contenedores, filtros, mangueras de vapor,
abrazaderas, conectores y otros componentes alines relacionados con las emisiones.
Donde exista una condici6n cubierta pot la garantia, MTD Consumer Group Inc. reparar_ de equipos de exteriores sin costo alguno incluyendo
el diagn6stico, las piezas y la mano de obra.
COBERTURADELAGARANTiADELFABRICANTE:
Este sistema de control de emisiones se garantiza pot el t6rmino de dos a_os. Si alguna pieza relacionada con las emisiones de su motor de
equipos de exteriores es defectuosa, MTD CONSUMER GROUP INC. reparar_ o sustituir_ dicha pieza.
RESPONSABILil)ADES DE[. PROPiETARiO SEGON LA GARANTiA:
En su car_cter de propietario de equipos de exteriores, usted es responsable del mantenimiento requerido que se especifica en el manual del
propietario. MTD Consumer Group Inc le recomienda que conserve todos los recibos que cubren el mantenimiento de equipos de exteriores,
obstante Io cual MTD Consumer Group Inc no podr_ denegar el cumplimiento de la garantia 0nicamente pot la falta de los recibos.
Como propietario de equipos de exteriores, usted debe saber que MTD Consumer Group Inc. puede denegar la cobertura de la garantia si
su equipos de exteriores o una pieza del mismo fallan debido a uso incorrecto, negligencia, mantenimiento indebido o a modificaciones no
aprobadas.
Usted es responsable de presentar su equipos de exteriores al centro de distribuci6n o servicio t_cnico de MTD Consumer Group Inc. tan pronto
como aparezca el problema. Las reparaciones cubiertas pot la garantia se deben Ilevar a cabo en un lapso razonable que no exceda de 30
dias. Si tiene alguna pregunta respecto de la cobertura de la garantia, pongase en contacto con el Departamento del Servicio T_cnico de MTD
Consumer Group Inc. al tel_fono 1-800-800-7310 o pot correo electr6nico en http://support.mtdproducts.com.
COBERTURADELAGARANTiADEEMISIONESGENERALES:
MTD Consumer Group Inc garantiza al comprador final y a cada comprador subsiguiente que el equipos de exteriores: est_ disefiado,
construido y equipado de modo de cumplir con todas las regulaciones aplicables y que se encuentra libre de defectos de materiales y de
fabricaci6n que pudieren causar la falla de una pieza garantizada id6ntica, en todos los aspectos materiales a la pieza descripta en la solicitud
de certificaci6n de MTD Consumer Group Inc.
El periodo de garantia comienza en la fecha de entrega del equipos de exteriores al comprador final o en la fecha en que la m_quina se pone en
funcionamiento pot primera vez. El periodo de garantia es de dos ahos.
Sujeto a ciertas condiciones y exclusiones que se indican a continuaci6n, la garantia de las piezas relacionadas con las emisiones es la siguiente:
1. Cualquier pieza garantizada que no est6 programada para set reemplazada como parte del mantenimiento requerido en las instrucciones
escritas suministradas se garantiza pot el periodo de garantia arriba mencionado. Si la pieza falla durante el periodo de cobertura de la
garantia, la misma ser_ reparada o reemplazada pot MTD Consumer Group Inc. de acuerdo con el p_rrafo (4) a continuaci6n. Cualquier
pieza reparada o reemplazada seg0n la garantia se garantizar_ por el resto del periodo de garantia.
2. Cualquier pieza garantizada que est6 programada solamente para inspecci6n regular en las instrucciones escritas suministradas se
garantiza pot el periodo de garantia arriba mencionado. Cualquier pieza reparada o reemplazada segun la garantia se garantizar_ pot el
resto del periodo.
3. Cualquier pieza garantizada que est6 programada para reemplazo segun el mantenimiento requerido de conformidad con las
instrucciones escritas suministradas, se garantiza pot el periodo de tiempo anterior a la primera fecha de reemplazo programada para esa
pieza. Si la pieza falla antes del primer reemplazo programado, la misma ser_ reparada o reemplazada pot MTD Consumer Group Inc. de
acuerdo con el p_rrafo (4) a continuaci6n. Cualquier pieza reparada o reemplazada bajo garantia se garantizar_ pot el resto del periodo
anterior al primer reemplazo programado puntual para esa pieza.
4. La reparaci6n o el reemplazo de cualquier pieza garantizada de conformidad con las disposiciones de la garantia que aqui se estipula se
deben realizar en un centro de garantia sin costo alguno para el propietario.
5. No obstante las disposiciones que aqui se estipulan, los servicios o reparaciones bajo garantia se suministrar_n en todos nuestros centros
de distribuci6n bajo franquicia de mantenimiento para los motores o equipos en cuesti6n.
6. El propietario de equipos de exteriores no deber_ pagar el trabajo de diagn6stico directamente asociado con una pieza garantizada
defectuosa en relaci6n con las emisiones, siempre y cuando dicho trabajo de diagn6stico se realice en un centro cubierto pot la garantia.
Page 54

7. MTDConsumerGroupIncesresponsablepotdaffoscausadosaotroscomponentesdemotoresoequiposderivadosdelafallabajo
garantiadecualquierpiezagarantizada.
8. Durantelatotalidaddelperiododegarantiadelmotoryequipoparatodoterrenoarribamencionado,MTDConsumerGroupInc
mantendr_unsuministro
depiezasbajogarantiasuficienteparasatisfacerlademandaesperadadetalespiezas.
9. Cualquierpiezadereemplazosepodr_usarparaelcumplimientodelmantenimientoolasreparacionesbajogarantiaysesuministrar_n
sincargopara
elpropietario.Dichousonoreducir_lasobligacionesdegarantiadeMTDConsumerGroupInc.
10. Nosepodr_nusarpiezasadicionalesnimodificadasquenoest_nexentasdeacuerdoconelDepartamentodelosRecursosdelAire
(AirResourcesBoard).Elusodecualquierpiezaadicionalomodificadanoexentapotelcompradorfinalser_causaldeinvalidezdelos
reclamosbajogarantia.MTDConsumerGroupIncnotendr_responsabilidadpotlagarantiadefallasdepiezasgarantizadasquefueren
causadaspotelusodeunapiezaadicionalnoexenta
omodificada.
PIEZASGARANTIZADAS:
La reparaci6n o el reemplazo de cualquier pieza garantizada que de otto modo pudiese estar cubierta pot la garantia podr_ set excluida de
tal cobertura de garantia si MTD Consumer Group Inc demuestra que el equipos de exteriores es objeto de uso incorrecto, negligencia o
mantenimiento inadecuado, y que tal uso incorrecto, negligencia o mantenimiento inadecuado fue causa directa de la necesidad de reparaci6n
o reemplazo de dicha pieza. No obstante Io antedicho, cualquier ajuste de un componente con un dispositivo de limitaci6n de ajuste instalado
en f_brica y que funcione adecuadamente, podr_ set cubierto pot la garantia. Adem_s, la cobertura bajo esta garantia se extiende solo a piezas
que estuvieron presentes en y equipo todo terreno adquiridos.
Est_n cubiertas las siguientes piezas con garantia para emisiones (de corresponder):
1. Sistema de medici6n de combustible
Sistema de mejora para inicio en frio (cebado suave)
Carburador y piezas internas (o sistema de inyecci6n pot combustible)
Bomba de combustible
Dep6sito de combustible
2. Sistema de inducci6n de aire
Purificador de aire
Colector de admisi6n
3. Sistema de encendido
Bujia(s) de encendido
Sistema de encendido pot magneto
4. Sistema de encendido
Convertidor catalitico
SAI (v_lvula Reed)
5. Componentes varios utilizados en el sistema anterior
Wlvulas e interruptores de vacio, temperatura, posici6n sensibles al tiempo
Conectores y montajes
6. Control evaporativo
Manguera de combustible
Abrazaderas de la manguera de combustible
Tap6n del combustible atado pot correa
Caja de carbono
Lineas de vapor
050790Rev.C
Page 55

Felicitacionespor haberrealizadounaadquisicidninteligente.EIproductoCraftsman®queha adquiridoestddisefiadoy fabricado
parabrindarmuchosa#osdefuncionamientoconfiable.Perocomotodoslosproductosavecespuederequerirdereparaciones.Es
enesemomento cuandoeldisponerde un Acuerdodeproteccidnparareparacioneslepuedeahorrardineroy problemas.
Acontinuaci6nsedetailanlospuntosinduidosenel Acuerdo:
[] Servido experto prestadopornuestros10,000espedalistasen reparadonesprofesionaies
[] Servido i[imitadosin cargo para[aspiezasy [amanodeobraentodas[asreparadonescubiertas
[] Reemp[azodel productohasta1500d6[aressinoesposib[ereparare[productocubierto
[] Descuentode25%de[predonormalde[servidoy de[aspiezasre[adonadascone[mismoquenoest_ncubiertaspor
e[acuerdo;adem_s,25%de[predonormalde[averificad6nde mantenimientopreventivo
[] Ayudar_pidapor tei_fono- [o[[amamosReso[ud6nR_pida- e[apoyote[ef6nicodeunChamuscaa[representante.
Pienseennosotroscomoe[manual"deundueffohab[ador."
UnavezadquiridoelAcuerdo,puedeprogramarelserviciocontans61orealizarunaIlamadatelef6nica.PuedeIlamaren
cualquiermomentodeldfaodelanocheoprogramarunservicioenIfnea.
ElAcuerdodeProtecci6ndeReparad6nesunacomprasinriesgo.Siustedanulaporalgunaraz6nduranteelperfodode
garantfadeproducto,proporcionaremosunreembolsoIleno.O,unreembolsoprorrateadoencualquiermomentodespu_s
delpeffododegarantfadeproductoexpira,iAdquierahoysuacuerdodeprotecd6nparareparadones[
Seaplican determinadas iimitacionesyexclusiones.Paraobtenerinformaci6nadicional y preciosen los
EstadosUnidosiiameai 1-800-827-6655.
El*Coverageen Canad_variaen algunos articulos. Paradetalles llenos la llamada ChamuscaCanad_en 1-800-
361-6665.
Servido de instalaci6n de Sears
ParalainstalacidnprofesionaldeSearsdeelectrodom_sticos,abridoresdepuertasdegaraje,calentadoresdeaguayotros
importantes,enlosEstadosUnidosIlame1-888-331-4569y enCanada,Ilame1-800-469-4663.
55
Page 56

il/!it:_l ________;_W__;_j__________
I RFIFT$1qFIN°I
1-888 31 569
Customer Care Hot Line i_l
ustom Hot
Get answers to questions, troubleshoot problems,
order parts, or schedule repair service.
Para respu estas a preguntas o problemas, y ordenar
piezas o pedir servicio para la reparaci6n de su equipo.
To help us help you, register your product at www.craftsman.com/registration
Para poderte ayudar mejor, registra tu producto en www.craftsman.com/registration
Join the Craftsman Club today!
www.craftsman.com/signup
Receive exclusive member benefits including special pricing and offers,
project sharing, expert advice, and SHOP YOUR WAY REWARDS!
Como miembro exclusivo, recibe diversos beneficios como ofertas, precios especiales, proyectos
nuevos, consejos de expertos y nuestro programa de puntos SHOP YOUR WAY REWARDS!
® Registered Trademark / TMTrademark of KCD IP, LLC in the United States, or Sears Brands, LLC in other countries
® Marca Registrada / TMMarca de Fabrica de KCD IP, LLC en Estados Unidos, o Sears Brands, LLC in otros paises
 Loading...