

Craftsman 24777614 Owner’s Manual

Operator's Manual
I:RRFTSMRN°
675 Series
LOG SPLITTER
Model No. 247.77614
CAUTION: Before using
this product, read this
manual and follow all
safety rules and operating
instructions.
Sears, Roebuck and Co., Hoffman Estates, IL 60179, U.S.A.
Visit our web site: www, sears,corn/craftsrnan FORMNO.769-03352
• SAFETY
ASSEMBLY
OPERATION
MAINTENANCE
PARTS LIST
Spanish
06/21/2007
WarrantyStatement..................................Page2
RepairProtectionAgreement...................Page3
SafeOperationPractices.........................Pages4-5
Assembly..................................................Pages6-7
Operation..................................................Pages8-11
Service&Adjustments.............................Pages12-13
Limited Warranty on Craftsman Log Splitter
Forone (1)yearfromthe dateof purchase,if thisCraftsmanEquipmentismaintained,lubricated,andtunedupaccordingtothe instructionsto
theoperator'smanual,Searswillrepairor replacefreeofchargeanypartsfoundto be defectiveinmaterialorworkmanship.Warrantyserviceis
availablefreeofchargebyreturningCraftsmanequipmentto yournearestSearsServiceCenter.In-homewarrantyserviceisavailablebuta trip
chargewillapply.ThisWarrantyappliesonlywhilethisproductisinthe UnitedStates.
This warranty does not cover:
• Expendableitemswhichbecomewornduringnormaluse,suchas sparkplugs,aircleaners,belts,andoil filters.
Tirereplacementor repaircausedbypuncturesfromoutsideobjects,suchas nails,thorns,stumps,or glass.
Repairsnecessarybecauseof operatorabuse,includingbutnotlimitedto,damagecausedbyobjects,suchasstonesor metaldebris,
oversizedstock,impactingobjectsthat bendtheframeor crankshaft,orover-speedingtheengine.
Repairsnecessarybecauseof operatornegligence,includingbutnot limitedto,electricalandmechanicaldamagecausedbyimproper
storage,failureto usethe propergradeand amountofengineoil,orfailuretomaintaintheequipmentaccordingtotheinstructionscontained
in theoperator'smanual.
Engine(fuelsystem)cleaningorrepairscausedbyfuel determinetobe contaminatedor oxidized(stale).Ingeneral,fuelshouldbeused
within30 daysof itspurchasedate.
Equipmentusedforcommercialor rentalpurposes.
WARRANTYSERVICEISAVAILABLEBYRETURNINGTHECRAFTSMANSNOWTHROWERTOTHE NEAREST
SEARSPARTS& REPAIRCENTERINTHEUNITEDSTATES.
This warrantyappliesonlywhilethisproductis in use intheUnitedStates.
TOLOCATETHENEARESTSEARSPARTS& REPAIRCENTERORTOSCHEDULESERVICE,
SIMPLYCONTACTSEARSAT1-800-4-MY-HOME®.
Thiswarrantygivesyouspecificlegalrightsandyoumayalso haveotherrightswhichmayvaryfromstatetostate.
SEARS,ROEBUCKANDCO., D/817WA,HOFFMANESTATES,IL 60179
Maintenance.............................................Pages14-16
OffSeasonStorage..................................Page17
TroubleShooting......................................Page18-19
PartsList...................................................Page20-27
Espa_ol.....................................................Page29
ServiceNumbers......................................BackCover
Engine Series: 126L02-0531
Engine Oil: SAE 30
Engine Oil Capacity: 20 Ounces
Fuel Capacity: 1.5 Quarts
Spark Plug 0030" Gap):Champion® RJ19LM
Hydraulic Fluid/Capacity:Dexron ill/3.0 gal.
Model Number .............................................................
Serial Number ..............................................................
Date of Purchase ..........................................................
Record the model number, serial number
and date of purchase above
Congratulationson makingasmartpurchase.YournewCraftsman®
productisdesignedandmanufacturedforyearsof dependableopera-
tion.Butlikeall products,it mayrequirerepairfromtimetotime.That's
whenhavinga RepairProtectionAgreementcansaveyoumoneyand
aggravation.
Here'swhat'sincludedinthe Agreement:
,, Expertservicebyour 12,000professionalrepairspecialists
,, Unlimitedserviceand nochargefor partsandlaboronall covered
repairs
,, Productreplacementifyourcoveredproductcan'tbe fixed
,, Discountof 10%fromregularpriceofserviceandservice-related
partsnotcoveredby theagreement;also,10%off regularpriceof
preventivemaintenancecheck
,, Fasthelpbyphone- phonesupportfroma Searstechnicianon
productsrequiringin-homerepair,plusconvenientrepair
scheduling
Purchasea RepairProtectionAgreementnowandprotectyourself
fromunexpectedhassleandexpense.
Onceyou purchasetheAgreement,a simplephonecallis all thatit
takesfor youtoscheduleservice.Youcan callanytimedayornight,or
schedulea serviceappointmentonline.
Searshasover12,000professionalrepairspecialists,whohave
accesstoover 4.5millionqualitypartsandaccessories.That'sthe
kindof professionalismyoucancounton tohelpprolongthelifeof
yournewpurchaseforyearsto come.PurchaseyourRepairProtection
Agreementtoday!
Somelimitationsandexclusionsapply. Forpricesandadditional
informationcall 1-800-827-6655.
SearsInstallation Service
ForSearsprofessionalinstallationof homeappliances,garagedoor
openers,waterheaters,andothermajorhomeitems,in theU.S.A.call
1-800-4-MY-HOME®
l_lk ARNING: This symbol pointsout importantsafety instructionswhich, ifnot followed, could endanger the
attemptingto operate this machine. Failureto comply with these instructionsmay result inpersonalinjury.
Whenyou see this symbol- heed itswarning.
personalsafety and/or propertyof yourself and others. Read and followall instructionsinthis manual before
__i ARNING: EngineExhaust,some of its constituents, and certain vehiclecomponentscontain oremit
chemicalsknown to State of Californiato cause cancer and birth defects or other reproductiveharm.
DANGER: This machinewas builtto be operatedaccording to the rulesfor safe operationin this manual.
As withany type of powerequipment, carelessnessor error on thepart of the operatorcan result in
seriousinjury.This machine is capableof amputatinghands and feet and throwingobjects. Failureto
observe the followingsafety instructionscould resultin seriousinjury or death.
General Practices
1. Read,understand,andfollowall instructionson themachineand
in themanual(s)beforeattemptingtoassembleandoperate.Keep
thismanualina safeplacefor futureandregularreferenceandfor
orderingreplacementparts.
2. Befamiliarwithall controlsandproperoperation.Knowhowto stop
themachineanddisengagethemquickly.
3. Neverallowchildrenunder16yearstooperatethis machine.
Children,16yearsandover,shouldreadandunderstandinstruc-
tionsandsafetyrulesinthismanualandshouldbetrainedand
supervisedbya parent.
4. Neverallowadultsto operatethismachinewithoutproperinstruc-
tion.
5. Manyaccidentsoccurwhenmorethanonepersonoperatesthe
machine.Ifahelperis assistinginloadinglogs,neveractivatethe
controluntilthe helperisa minimumof 10feetfromthe machine.
6. Keepbystanders,helpers,pets,andchildrenat least20 feetfrom
themachinewhileit isin operation.
7. Neverallowanyonetorideon thismachine.
8. Nevertransportcargoonthis machine.
9. Hydrauliclogsplittersdevelophighfluidpressuresduringopera-
tion.Fluidescapingthroughapin holeopeningcanpenetrateyour
skinandcausebloodpoisoning,gangrene,or death.Giveattention
tothe followinginstructionsatall times:
a. Donotcheckforleakswithyourhand.
b. Donotoperatemachinewithfrayed,kinked,cracked,ordamaged
hoses,fitting,ortubing.
c. Stoptheengineandrelievehydraulicsystempressurebeforechanging
oradjustingfittings,hoses,tubing,orothersystemcomponents.
d. Donotadjustthepressuresettingsofthepumporvalve.
10.Leakscanbedetectedbypassingcardboardor wood,while
wearingprotectiveglovesandsafetyglasses,overthesuspected
area.Lookfordiscolorationofcardboardorwood.
11.Ifinjuredby escapingfluid,seeadoctorimmediately.Serious
infectionorreactioncandevelopif propermedicaltreatmentisnot
administeredimmediately.
12.Keepthe operatorzoneandadjacentareaclearforsafe,secure
footing.
13.If yourmachineisequippedwithaninternalcombustionengine
and itisintendedforuse nearanyunimprovedforest,brush,or
grasscoveredland,theengineexhaustshouldbeequippedwitha
sparkarrester.Makesureyoucomplywithapplicablelocal,state,
andfederalcodes.Takeappropriatefirefightingequipmentwith
you.
14.Thismachineshouldbeusedfor splittingwoodonly,do notuseit
forany otherpurpose.
15.Followthe instructionsinthemanual(s)providedwithany
attachment(s)forthismachine.
Preparation
1. Alwayswearsafetyshoesor heavyboots.
2. Alwayswearsafetyglassesorsafetygogglesduringoperatingthis
machine.
3. Neverwearjewelryor looseclothingthatmightbecomeentangled
in movingor rotatingpartsof themachine.
4. Makesuremachineis onlevelsurfacebeforeoperating.
5. Alwaysblockmachineto preventunintendedmovement,and lock
in eitherhorizontalorverticalposition.
6. Alwaysoperatethismachinefromtheoperatorzone(s)specifiedin
themanual.
7. Logsshouldbe cutwithsquareendspriortosplitting.
8. Uselogsplitterindaylightor undergoodartificiallight.
9. Toavoid personalinjuryor propertydamageuseextremecarein
handlinggasoline.Gasolineisextremelyflammableandthe vapors
areexplosive.Seriouspersonalinjurycanoccurwhengasolineis
spilledon yourselforyourclotheswhichcan ignite.Washyourskin
andchangeimmediately.
a. Useonlyanapprovedgasolinecontainer.
b. Extinguishallcigarettes,cigars,pipes,andothersourcesofignition.
c. Neverfuelmachineindoors.
d. Neverremovegascaporaddfuelwhiletheengineishotorrunning.
e. Allowenginetocoolatleasttwominutesbeforerefueling.
4
f. Neveroverfillthefueltank.Filltankto nomorethan1/2inchbelow
bottomoffillernecktoprovidespaceforfuelexpansion.
g. Replacegasolinecapandtightensecurely.
h. Ifgasolineisspilled,wipeitofftheengineandequipment,move
machinetoanotherarea.Wait5minutesbeforestartingtheengine.
i. Neverstorethemachineorfuelcontainerinsidewherethereisanopen
flame,sparkorpilotlightasonawaterheater,spaceheater,furnace,
clothesdryerorothergasappliances.
j. Allowmachinetocool5minutesbeforestoring.
Operation
1. Beforestartingthis machine,reviewthe"SafetyInstructions".
Failuretofollowtheserulesmayresultinseriousinjurytothe
operatororbystanders.
2. Neverleavethismachineunattendedwiththe enginerunning.
3. Donotoperatemachinewhileundertheinfluenceofalcohol,drugs,
or medication.
4. Neverallowanyonetooperatethis machinewithoutproperinstruc-
tion.
5. Alwaysoperatethismachinewithallsafetyequipmentinplace
andworking.Makesureall controlsareproperlyadjustedfor safe
operation.
6. Donotchangethe enginegovernorsettingsoroverspeedthe
engine.Thegovernorcontrolsthemaximumsafeoperatingspeed
ofthe engine.
7. Whenloadinga log,alwaysplaceyourhandsonthesidesofthe
log,noton theends,andneveruseyourfootto helpstabilizea log.
Failuretodo so,mayresultin crushedoramputatedfingers,toes,
hand,orfoot.
8. Useonlyyour handtooperatethecontrols.
9. Neverattempttosplitmorethanone logata timeunlesstheram
hasfullyextendedanda secondlogis neededtocompletethe
separationofthefirst log.
10.Forlogswhichare notcut square,theleastsquareendandthe
longestportionof thelogshouldbeplacedtowardthebeamand
wedge,andthesquareendplacedtowardtheend plate.
11.Whensplittinginthe verticalposition,stabilizethelogbefore
movingthecontrol.Splitas follows:
a. Placelogontheendplateandturnuntilitleansagainstthebeamand
isstable.
b. Whensplittingextralargeorunevenlogs,thelogmustbestabilized
withwoodenshimsorsplitwoodbetweenthelogandendplateor
ground.
12.Alwayskeepfingersawayfromany cracksthat openinthe log
whilesplitting.Theycan quicklycloseandpinchoramputateyour
fingers.
13.Keepyourworkareaclean.Immediatelyremovesplitwood around
themachinesoyoudonot stumbleoverit.
14.Nevermovethismachinewhiletheengineis running.
15.Thismachineshouldnotbetowedonanystreet,highwayor public
roadwithoutcheckingtheexistingfederal,state,or localvehicle
requirements.Anylicensingormodificationssuchastaillights,etc.,
neededtocomply,is thesoleresponsibilityof thepurchaser.If a
"StatementofOrigin"isrequiredinyourstate,seeyourlocaldealer.
16.Donottowmachinefasterthan45mph.
17.SeeTransportingtheLogSplittersectioninthis manualfor proper
towinginstructionsonceallfederal,local,or staterequirementsare
met.
Maintenance and Storage
1. Stoptheengine,disconnectthespark plugandgrounditagainst
theenginebeforecleaning,or inspectingthemachine.
2. Stoptheengineandrelievehydraulicsystempressurebefore
repairingoradjustingfittings,hoses,tubing,or othersystem
components.
3. Topreventfires,cleandebrisandchafffromthe engineandmuffler
areas.Iftheengineis equippedwitha sparkarrestermuffler,clean
and inspectit regularlyaccordingtomanufacturersinstructions.
Replaceifdamaged.
4. Periodicallycheckthatall nutsandbolts,hoseclamps,and
hydraulicfittingsaretighttobe sureequipmentisin safeworking
condition.
5. Checkall safetyguardsandshieldsto besuretheyareinthe
properposition.Neveroperatewithsafetyguards,shields,orother
protectivefeaturesremoved.
6. Thepressurereliefvalveispresetat thefactory.Donotadjustthe
valve.
7. Neverattempttomovethis machineoverhilly or uneventerrain
withouta towvehicleoradequatehelp.
8. Foryoursafety,replacealldamagedorworn partsimmediately
withoriginalequipmentmanufacturer's(O.E.M.)partsonly."Useof
partswhichdo notmeettheoriginalequipmentspecificationsmay
leadtoimproperperformanceandcompromisesafety!"
9. Donot alterthismachinein anymanner,alterationssuchasattach-
inga ropeor extensiontothe controlhandle,oraddingto thewidth
or heightofthewedgemayresultinpersonalinjury.
Your Responsibility
Restricttheuseof this powermachinetopersonswhoread,under-
standandfollowthewarningsandinstructionsin thismanualandon
themachine.Alwaysfollowdirectionson safetylabelsfoundonyour
equipment.
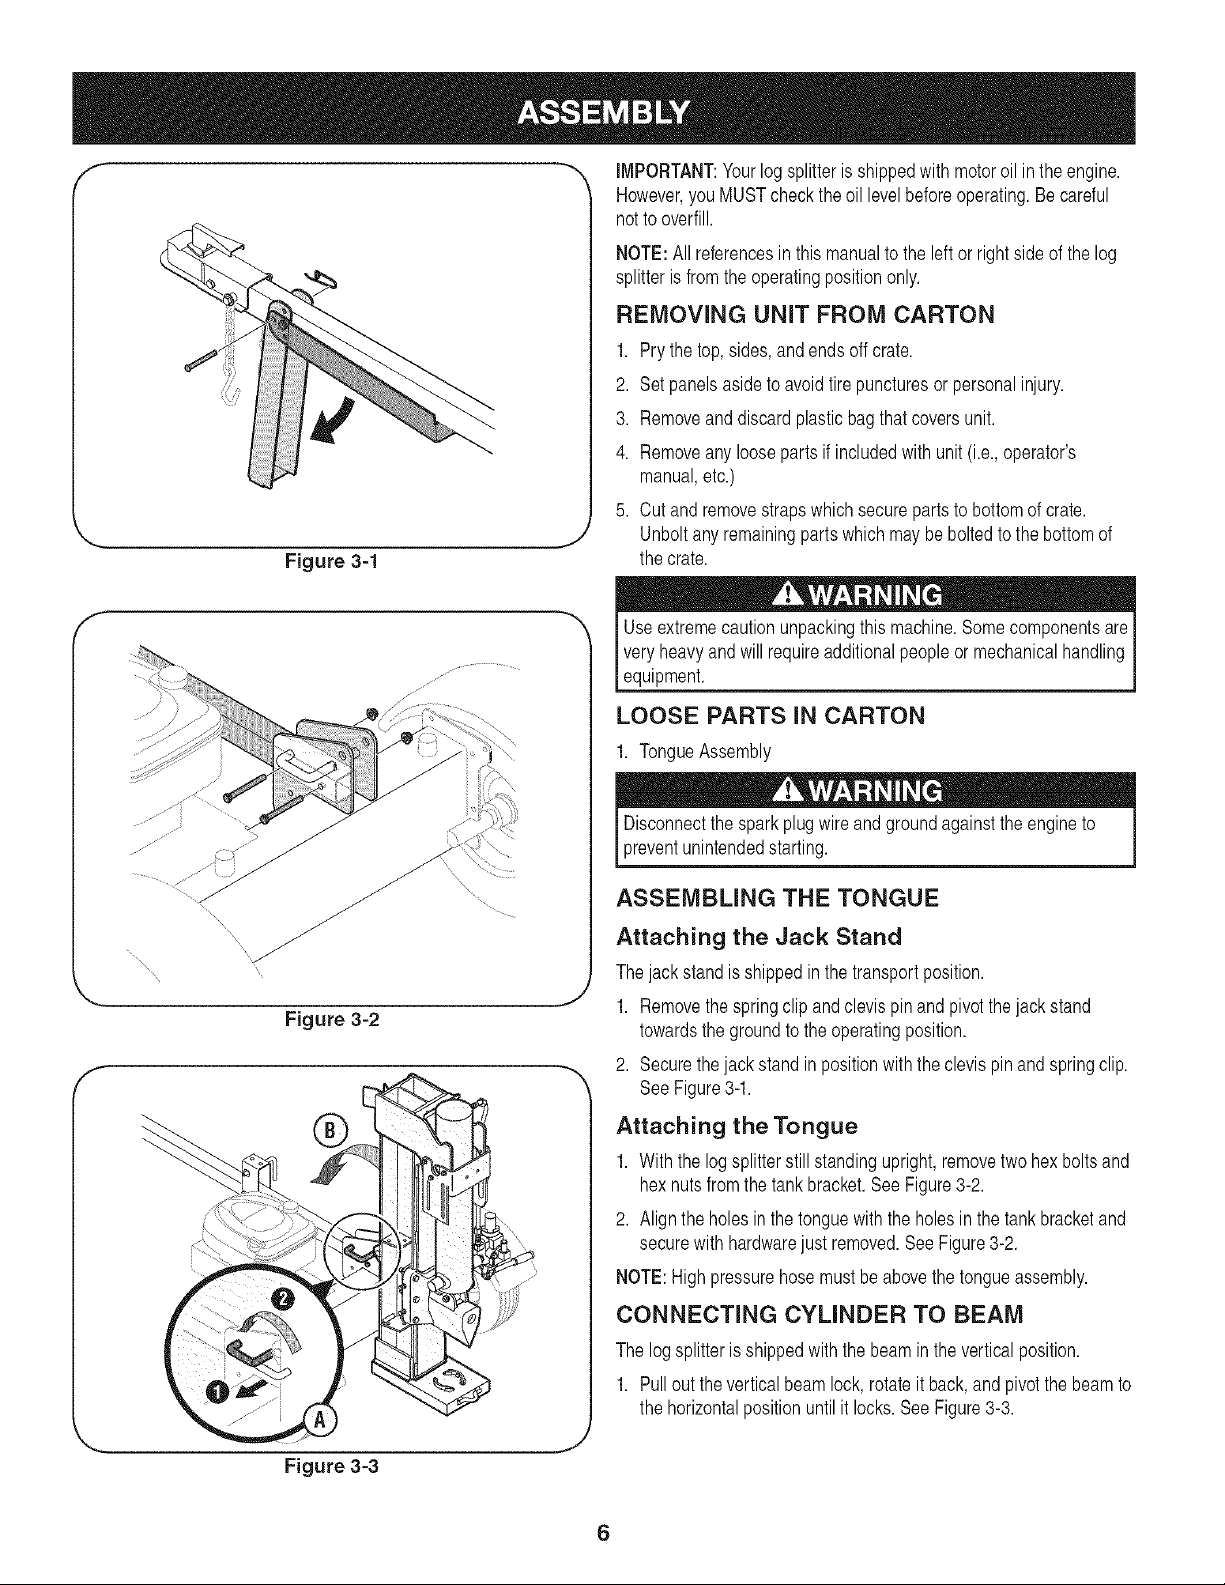
Figure 3-1
IMPORTANT:Yourlogsplitterisshippedwith motoroil in theengine.
However,youMUSTchecktheoil levelbeforeoperating.Becareful
notto overfill.
NOTE:Allreferencesinthismanualto theleftor rightsideofthelog
splitteris fromthe operatingpositiononly.
REMOVING UNIT FROM CARTON
1. Prythe top,sides,andendsoff crate.
2. Setpanelsasideto avoidtirepuncturesorpersonalinjury.
3. Removeanddiscardplasticbagthatcoversunit.
4. Removeanyloosepartsif includedwithunit(i.e.,operator's
manual,etc.)
5. Cutand removestrapswhichsecurepartstobottomofcrate.
Unboltanyremainingpartswhichmaybeboltedto thebottomof
thecrate.
Useextremecautionunpackingthis machine.Somecomponentsare
veryheavyand willrequireadditionalpeopleor mechanicalhandling
equipment.
LOOSE PARTS IN CARTON
1. TongueAssembly
Disconnectthesparkplugwireandgroundagainstthe engineto
preventunintendedstarting. J
\\\
ASSEMBLING THE TONGUE
Attaching the Jack Stand
Thejackstandis shippedinthetransportposition.
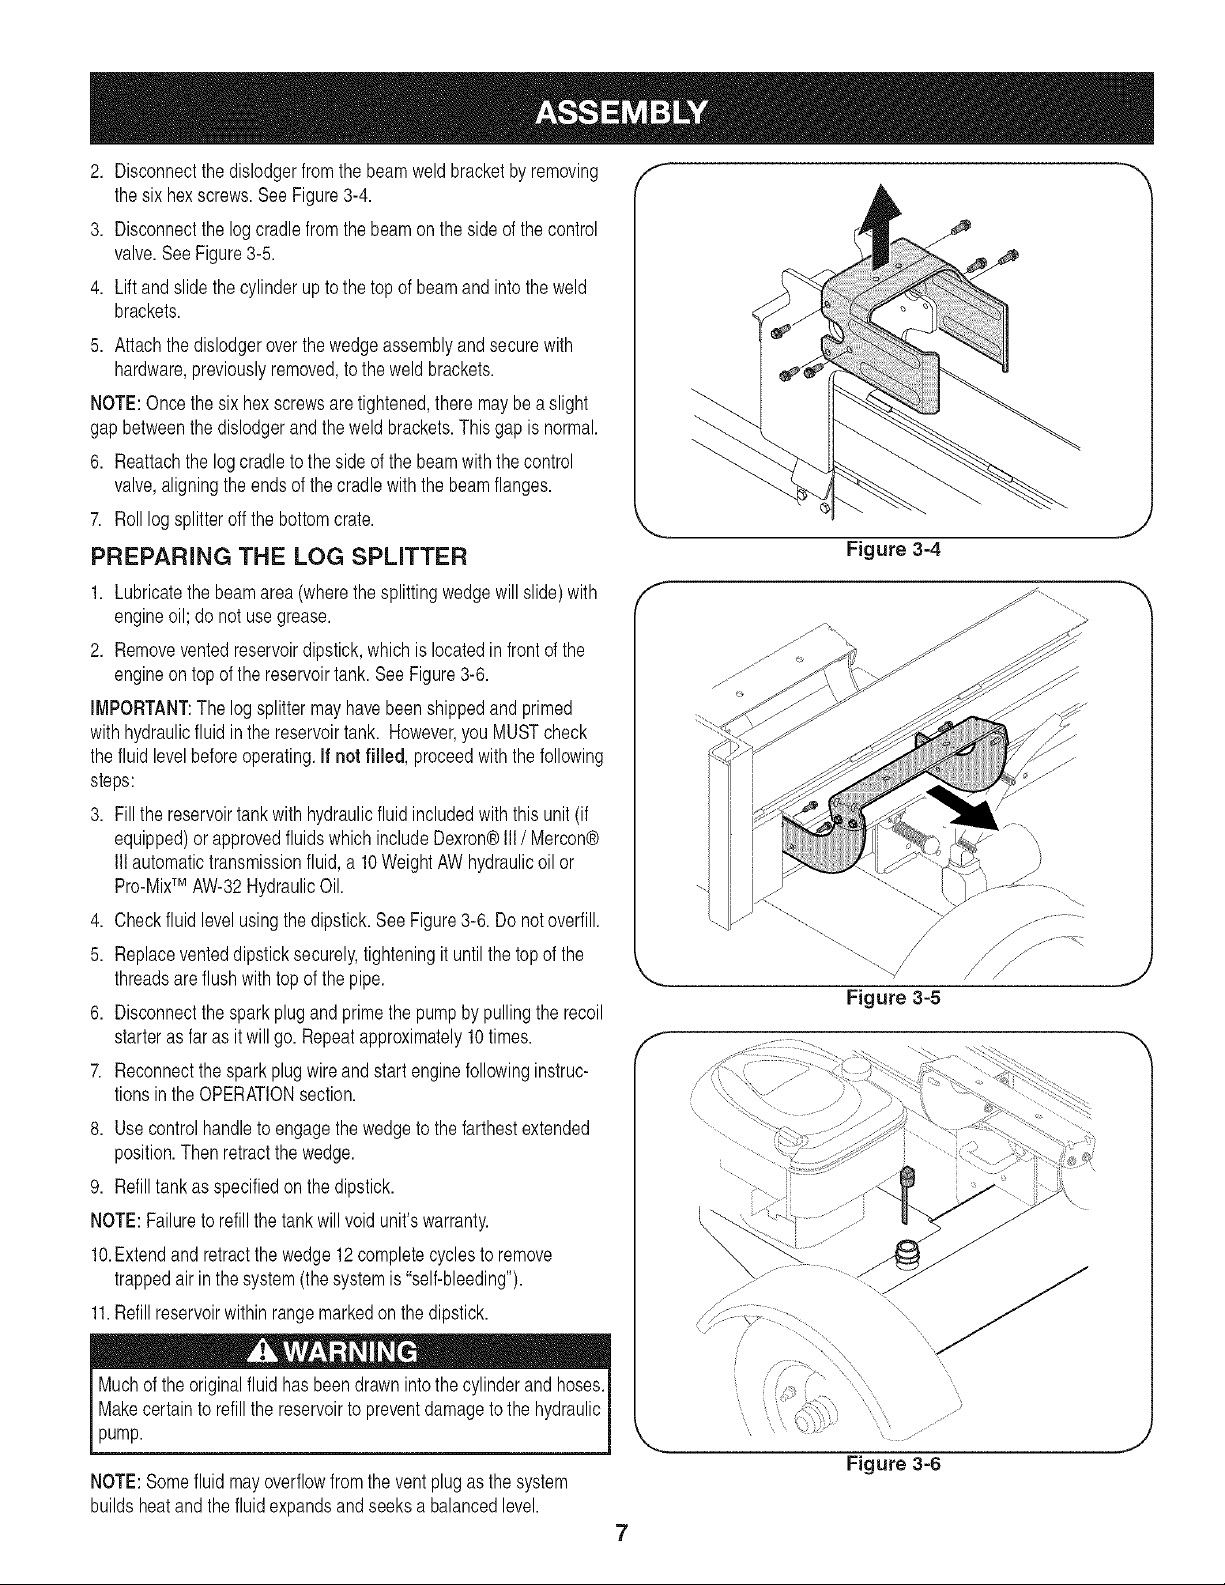
Figure 3=2
f
1. Removethespringclip andclevispinandpivotthejackstand
towardsthegroundtothe operatingposition.
2. Securethejack standinpositionwiththeclevispinandspringclip.
SeeFigure3-1.
Attaching the Tongue
1. Withthelogsplitterstillstandingupright,removetwo hexboltsand
hexnutsfromthe tankbracket.SeeFigure3-2.
2. Aligntheholesin thetonguewiththeholesin thetank bracketand
securewith hardwarejustremoved.SeeFigure3-2.
NOTE:Highpressurehosemustbe abovethetongueassembly.
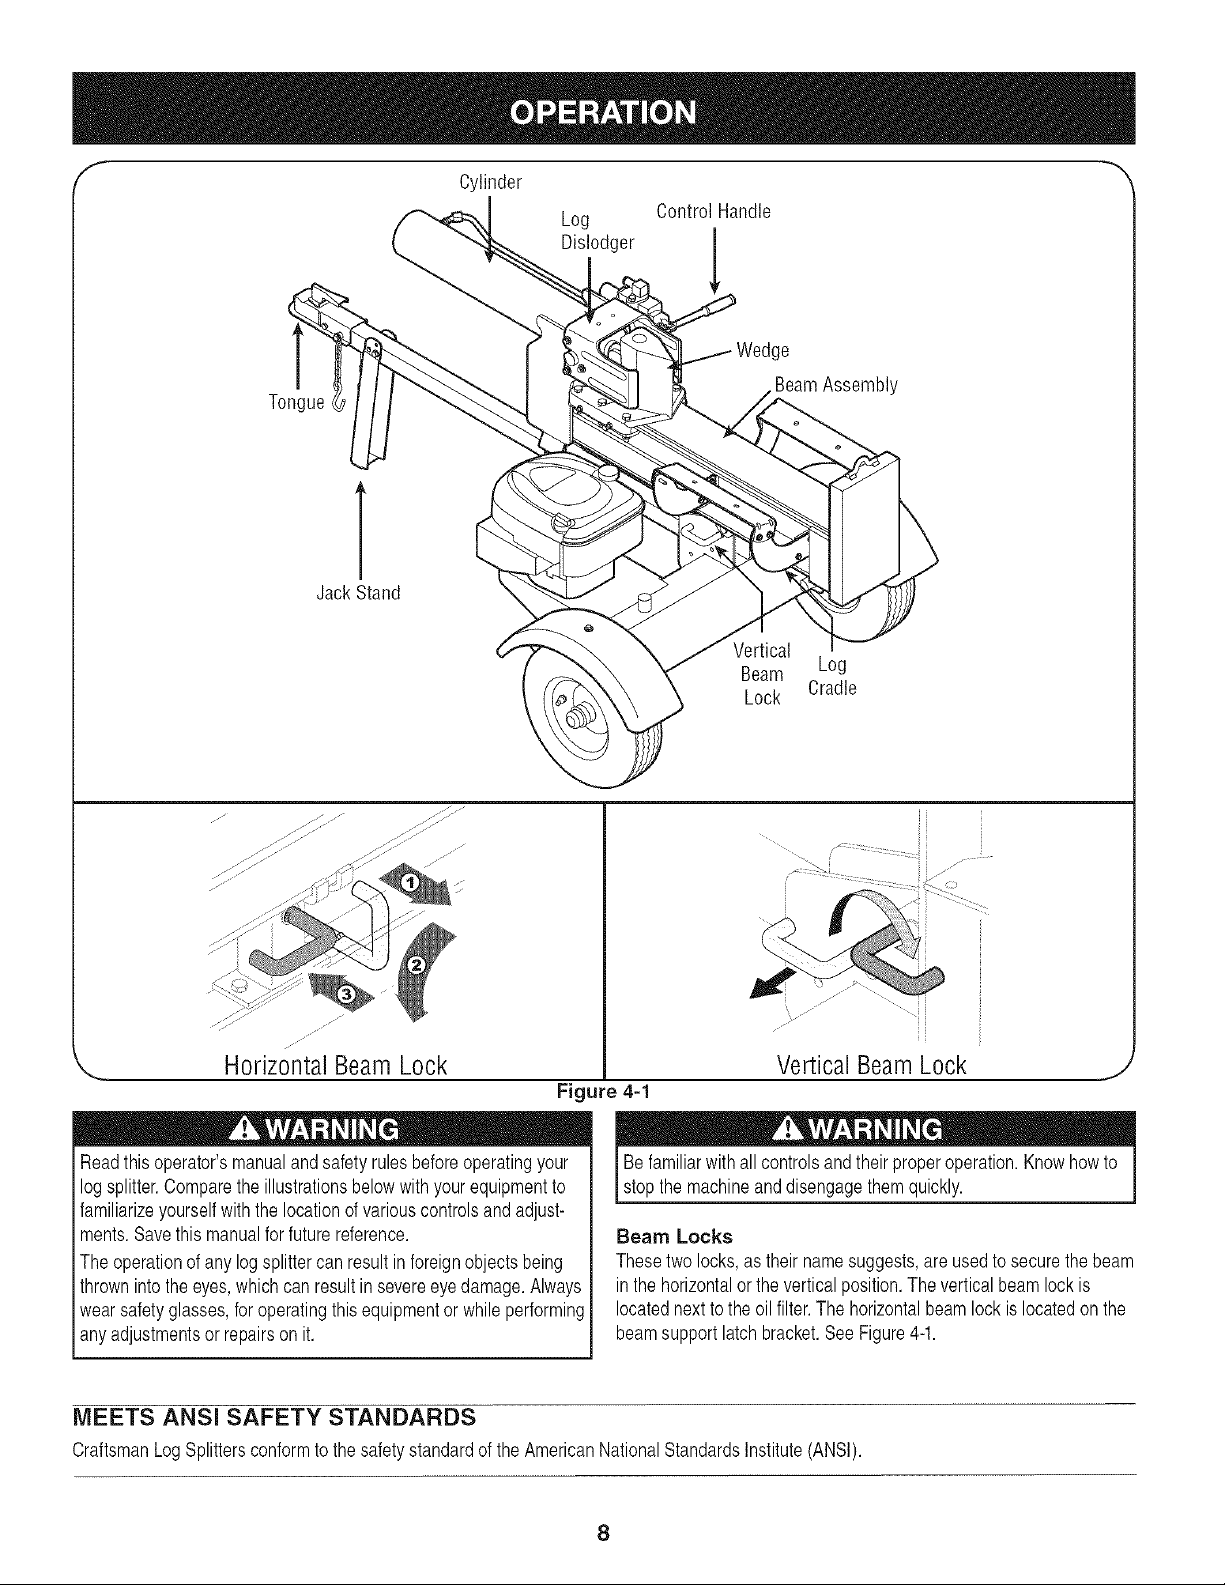
CONNECTING CYLINDER TO BEAM
Thelogsplitterisshippedwiththebeamintheverticalposition.
1. Pulloutthe verticalbeamlock,rotateit back,andpivotthebeamto
thehorizontalpositionuntilitlocks.SeeFigure3-3.
6
2. Disconnectthe dislodgerfromthebeamweldbracketbyremoving
thesixhexscrews.SeeFigure3-4.
3. Disconnectthe logcradlefromthebeamonthesideofthecontrol
valve.SeeFigure3-5.
4. Liftandslidethe cylinderuptothetop ofbeamandintotheweld
brackets.
5. Attachthe dislodgeroverthewedgeassemblyandsecurewith
hardware,previouslyremoved,tothe weldbrackets.
NOTE:Oncethesixhex screwsaretightened,theremaybea slight
gapbetweenthedislodgerandtheweld brackets.Thisgapis normal.
6. Reattachthelogcradletothe sideofthe beamwiththecontrol
valve,aligningtheendsof thecradlewiththe beamflanges.
7. Rolllogsplitteroffthebottomcrate.
PREPARING THE LOG SPLITTER
f --,,
,.. j
Figure 3-4
1. Lubricatethebeamarea(wherethesplittingwedgewillslide)with
engineoil;do notusegrease.
2. Removeventedreservoirdipstick,whichislocatedin frontofthe
engineontopof thereservoirtank.SeeFigure3-6.
IMPORTANT:The logsplittermayhavebeenshippedandprimed
withhydraulicfluidinthe reservoirtank. However,youMUSTcheck
thefluidlevelbeforeoperating.If not filled, proceedwiththefollowing
steps:
3. Fillthe reservoirtankwithhydraulicfluidincludedwiththisunit (if
equipped)or approvedfluidswhichincludeDexron®III/ Mercon®
Ill automatictransmissionfluid,a 10WeightAWhydraulicoil or
Pro-MixTM AW-32HydraulicOil.
4. Checkfluidlevelusingthedipstick.SeeFigure3-6.Donotoverfill.
5. Replaceventeddipsticksecurely,tighteningituntilthetop ofthe
threadsare flushwithtopofthe pipe.
6. Disconnectthe sparkplugand primethepumpbypullingthe recoil
starteras faras it willgo.Repeatapproximately10times.
7. Reconnectthesparkplugwireandstartenginefollowinginstruc-
tionsintheOPERATIONsection.
8. Usecontrolhandletoengagethe wedgeto thefarthestextended
position.Thenretractthe wedge.
9. Refilltankasspecifiedon thedipstick.
NOTE:Failuretorefill thetankwillvoidunit'swarranty.
10.Extendandretractthewedge12completecyclesto remove
trappedairinthe system(thesystemis "self-bleeding").
11.Refillreservoirwithinrangemarkedonthe dipstick.
f
Muchofthe originalfluidhasbeendrawnintothe cylinderandhoses.
Makecertainto refillthe reservoirto preventdamagetothehydraulic
pump.
NOTE:Somefluidmayoverflowfromtheventplugas thesystem
buildsheatandthefluidexpandsandseeksa balancedlevel.
, _ jlJ _
Figure 3=6
7
Cylinder
Log Control Handle
Dislodger
Tongue
BeamAssembly
V
JackStand
Vertical
Beam Log
Lock Cradle
/.jl
if ....
,.. HorizontalBeamLock
Figure 4-1
Readthisoperator'smanualandsafetyrulesbeforeoperatingyour
logsplitter.Comparetheillustrationsbelowwithyourequipmentto
familiarizeyourselfwiththelocationof variouscontrolsandadjust-
ments.Savethismanualforfuturereference.
Theoperationofany logsplittercanresultin foreignobjectsbeing
thrownintothe eyes,whichcanresultinsevereeyedamage.Always
wearsafetyglasses,for operatingthisequipmentorwhileperforming
anyadjustmentsor repairsonit.
MEETS ANSI SAFETY STANDARDS
CraftsmanLogSplittersconformtothesafetystandardof theAmericanNationalStandardsInstitute(ANSI).
Be familiarwithall controlsandtheirproperoperation.Knowhowto
stopthemachneandd sengagethemqucky.
Beam Locke
Thesetwo locks,astheirnamesuggests,areusedto securethe beam
inthehorizontalorthe verticalposition.Theverticalbeamlockis
locatednexttothe oil filter.Thehorizontalbeamlockislocatedon the
beamsupportlatchbracket.SeeFigure4-1.
8
Vertical BeamLock
,J
ENGINE CONTROLS f --,,
Stop Switch
Pushbuttonto ONpriortochokingfor enginestart; pushtoOFFto
shutenginedown.
Choke Control
Thechokecontrolis usedtochokeoffthecarburetorandassistin
startingtheengine.
Starter Handle
Thestarterhandleislocatedonthe engine.Pullthestarterhandleto
startengine.
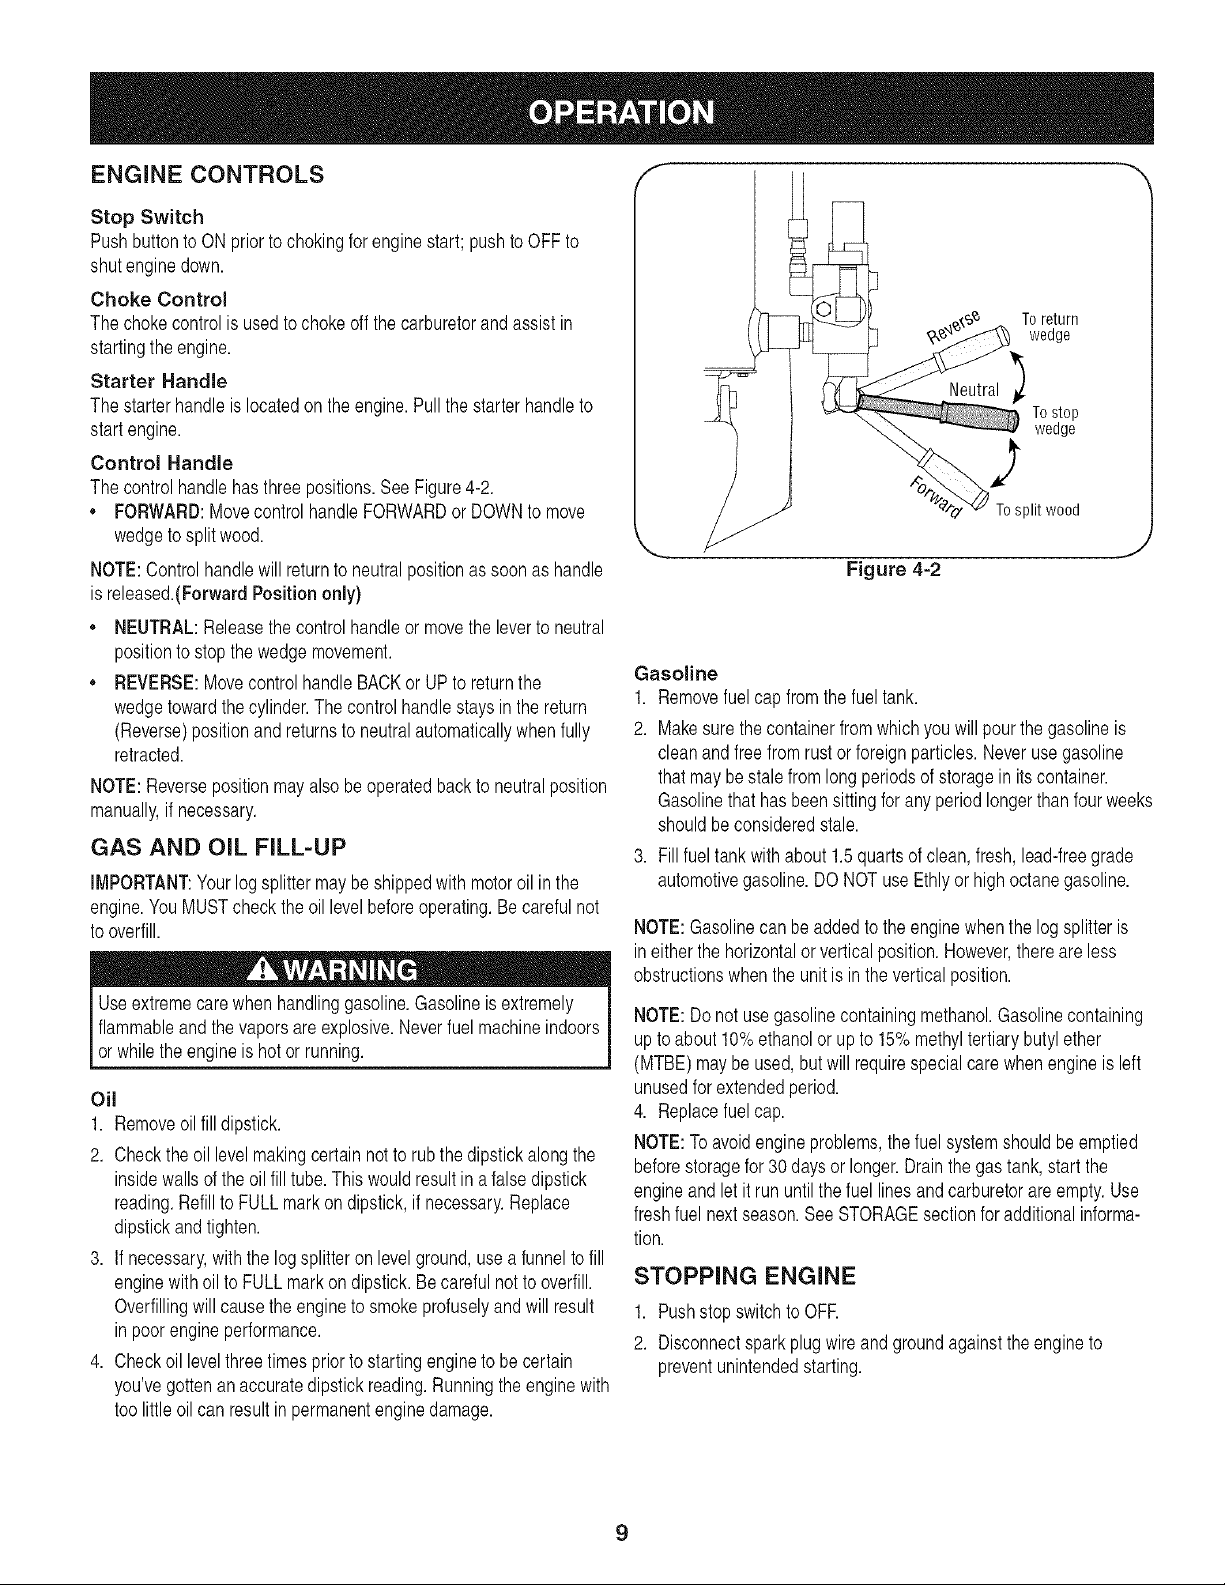
Control Handle
Thecontrolhandlehasthreepositions.SeeFigure4-2.
• FORWARD:MovecontrolhandleFORWARDor DOWNto move
wedgeto splitwood.
NOTE:Controlhandlewill returnto neutralpositionassoonas handle
isreleased.(ForwardPosition only)
• NEUTRAL:Releasethecontrolhandleor movetheleverto neutral
positiontostopthe wedgemovement.
• REVERSE:MovecontrolhandleBACKor UPtoreturnthe
wedgetowardthecylinder.The controlhandlestaysin the return
(Reverse)positionandreturnsto neutralautomaticallywhenfully
retracted.
NOTE:Reversepositionmayalsobeoperatedbackto neutralposition
manually,if necessary.
GAS AND OIL FILL-UP
IMPORTANT:Yourlogsplittermaybeshippedwithmotoroil inthe
engine.YouMUSTcheckthe oil levelbeforeoperating.Becarefulnot
tooverfill.
Useextremecarewhenhandlinggasoline.Gasolineisextremely
flammableandthe vaporsareexplosive.Neverfuelmachineindoors
orwhilethe engineis hotorrunning.
Oil
1. Removeoilfill dipstick.
2. Checktheoil levelmakingcertainnottorubthedipstickalongthe
insidewallsof theoil filltube.This wouldresultin afalsedipstick
reading.Refillto FULLmarkondipstick,ifnecessary.Replace
dipstickandtighten.
3. If necessary,withthelogsplitteronlevelground,usea funneltofill
enginewithoil toFULLmarkondipstick.Becarefulnot tooverfill.
Overfillingwillcausethe enginetosmokeprofuselyandwill result
in poorengineperformance.
4. Checkoillevelthreetimespriortostartingenginetobe certain
you'vegottenanaccuratedipstickreading.Runningtheenginewith
toolittleoilcan resultin permanentenginedamage.
Gasoline
1. Removefuelcapfromthe fueltank.
2. Makesurethe containerfromwhichyouwillpourthe gasolineis
cleanandfree fromrustorforeignparticles.Neverusegasoline
that maybestalefromlongperiodsof storagein itscontainer.
Gasolinethathasbeensittingfor anyperiodlongerthanfourweeks
shouldbeconsideredstale.
3. Fillfuel tankwithabout1.5quartsof clean,fresh,lead-freegrade
automotivegasoline.DONOTuseEthlyor highoctanegasoline.
NOTE:Gasolinecanbeaddedto the enginewhenthe logsplitteris
ineitherthe horizontalorverticalposition.However,thereareless
obstructionswhenthe unitis in the verticalposition.
NOTE:Donotusegasolinecontainingmethanol.Gasolinecontaining
uptoabout10%ethanolorupto 15%methyltertiarybutylether
(MTBE)maybe used,butwillrequirespecialcarewhenengineis left
unusedforextendedperiod.
4. Replacefuelcap.
NOTE:Toavoidengineproblems,thefuelsystemshouldbe emptied
beforestoragefor30 daysorlonger.Drainthegastank,startthe
engineand letitrununtilthefuel linesandcarburetorareempty.Use
freshfuelnextseason.SeeSTORAGEsectionforadditionalinforma-
tion.
STOPPING ENGINE
1. Pushstopswitchto OFR
2. Disconnectsparkplugwireand groundagainsttheengineto
preventunintendedstarting.
_ T_osplit wood
J
Figure 4-2
9
USING THE LOG SPLITTER
1. Placethelogsplitteron level,dryground.
2. Placethebeamineitherthehorizontalor verticalpositionandlock
inplacewiththeappropriatelockingrod.
3. Blockthefrontand backof bothwheels.
4. Placethelogagainsttheendplateandonly splitwoodinthe
directionofthegrain.
5. Tostabilizethelog,placeyourhandonlyon sidesof log.Never
placehandon the endbetweenthe logand the splitting
wedge.
6. Onlyoneadultshouldstabilizethelogandoperatethecontrol
handle,so theoperatorhasfullcontroloverthelogandthesplitting
wedge.
Control Handle
1. MovecontrolhandleFORWARDor DOWNtosplitwood.
2. Releasethecontrolhandleto stopthewedgemovement.
3. MovecontrolhandleBACKorUP toreturnthewedge.
Log Dislodger
Thelogdislodgerisdesignedto removeanypartiallysplitwoodfrom
thewedge.Thismayoccurwhilesplittinglargediameterwoodor
freshlycutwood.
STARTING ENGINE
1. Attachsparkplugwiretosparkplug. Makecertainthemetalcapon
theendof thesparkplugisfastenedsecurelyoverthemetaltip on
thesparkplug.
2. Pushstopswitchto ON.
3. Movechokecontrolto CHOKEposition.
4. Graspstarterhandleandpullropeoutslowlyuntilenginereaches
startof compressioncycle(ropewillpullslightly harderat this
point).
5. Pullropewitha rapid,continuous,fullarmstroke.Keepafirmgrip
onstarterhandle.Letroperewindslowly.
6. Repeat,if necessary,untilenginestarts.Slowlyadjustchoke
towardRUNposition.Waituntilenginerunssmoothlybeforeeach
chokeadjustment.
7. If enginefalters,movecontrollevertoCHOKEposition,thenslowly
backto RUNposition.
8. If weatheris cold,run wedgeup ordownbeam6to 8 timesto
circulatethehydraulicfluid.
Whenstartinga warmengine,themufflerandsurroundingareasare
hotandcan causea burn.Donot touch.
Neverremovepartiallysplitwoodfromthewedgewithyourhands.
Fngersmaybecometrappedbetweensp t wood. J
1. Toremovepartiallysplitwoodfromwedge,movecontrolhandleto
REVERSEpositionuntilwedgeisfullyretractedtoallowsplitwood
portionto contactthe logdislodger.
2. Onceremovedfromwedgewithlogdislodger,splitwoodfrom
oppositeendor inanotherlocation.
Vertical Position
1. Pullthehorizontalbeamlockoutto releasethebeamandpivotthe
beamto theverticalposition.
2. Tolockthe beamintheverticalposition,pulloutonthevertical
beamlockand rotateitto securethebeam.SeeFigure4-1.
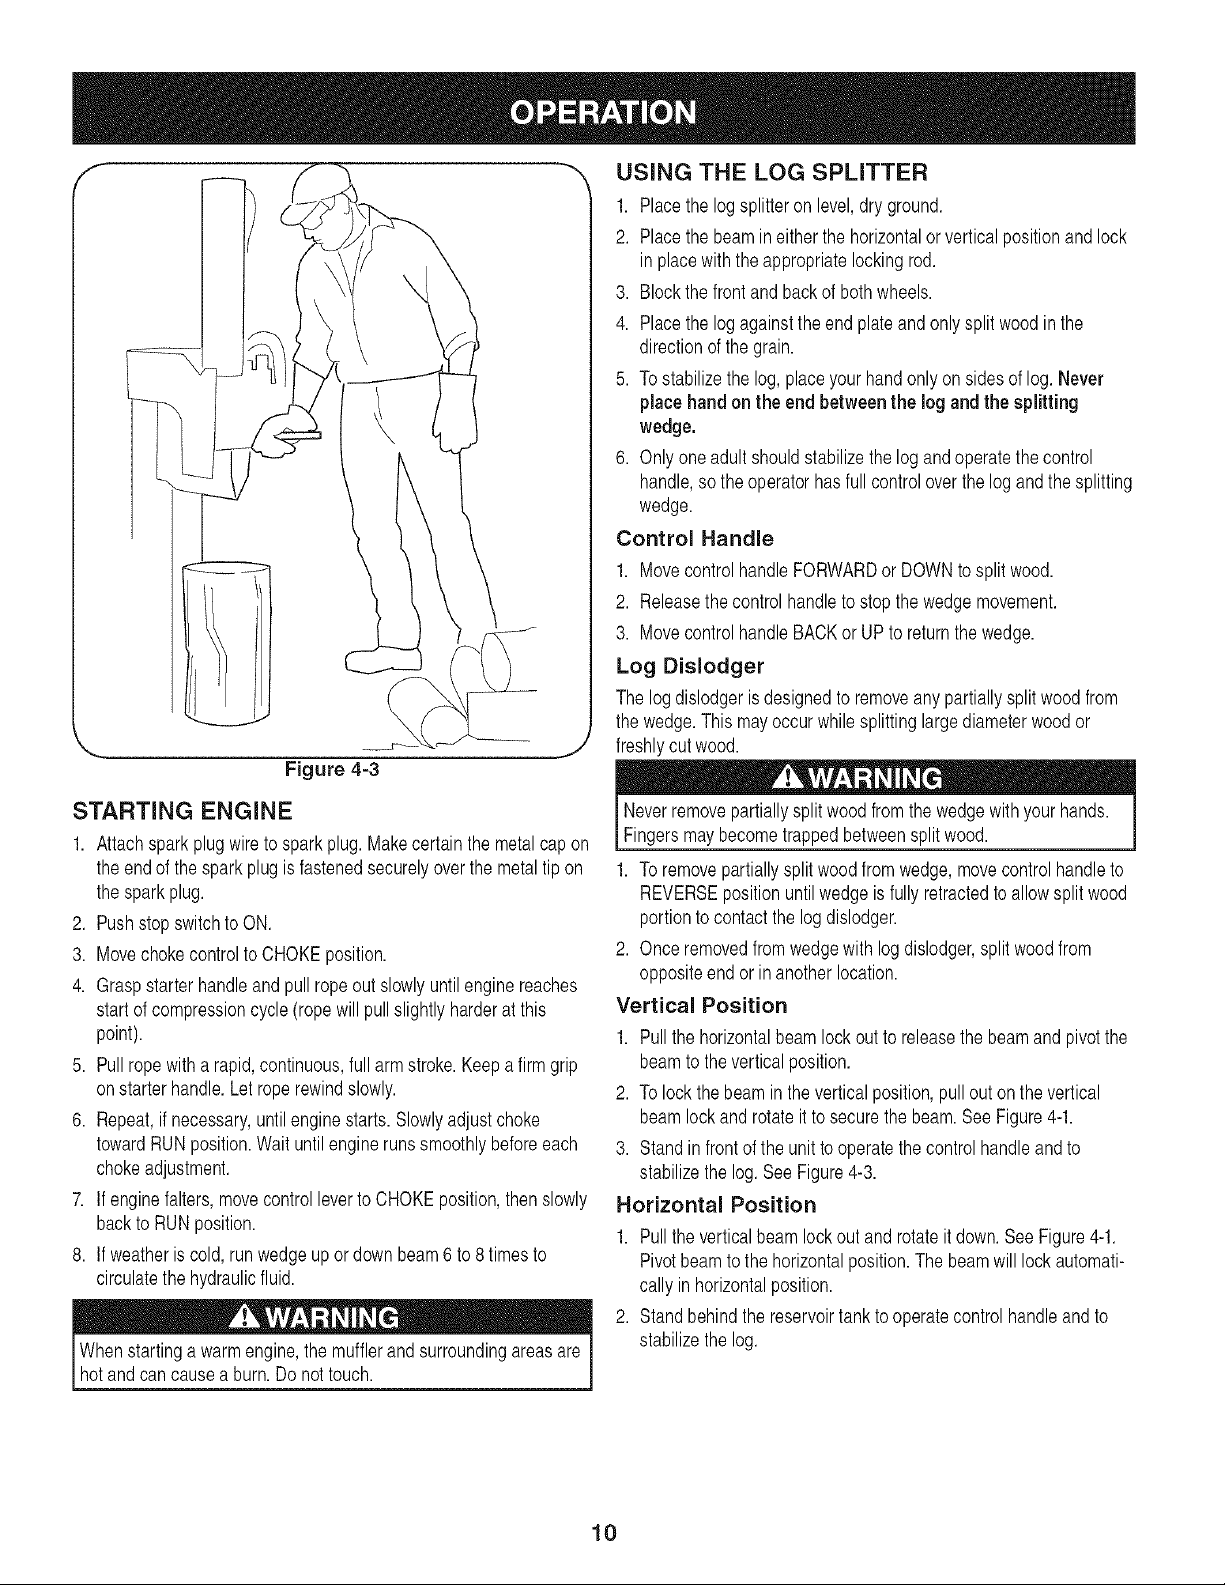
3. Standin frontofthe unittooperatethecontrolhandleandto
stabilizethe log.SeeFigure4-3.
Horizontal Position
1. Pulltheverticalbeamlockoutand rotateitdown.SeeFigure4-1.
Pivotbeamto thehorizontalposition.The beamwilllockautomati-
callyin horizontalposition.
2. Standbehindthe reservoirtankto operatecontrolhandleandto
stabilizethe log.
J
10
Operating Tips
Always:
1. Usecleanfluidandcheckfluid levelregularly.
2. Useanapprovedhydraulicfluid.ApprovedfluidsincludeDexron®
III/Mercon® IIIautomatictransmissionfluid,a 10WeightAW
hydraulicoil orPro-MixTM AW-32HydraulicOil.
3. Useafilter (cleanorreplaceregularly).
4. Useabreathercapon fluidreservoir.
5. Makesurepumpismountedandalignedproperly.
6. Useaflexible"spider"typecouplingbetweenengineandpump
driveshafts.
7. Keephosesclearandunblocked.
8. Bleedair outof hosesbeforeoperating.
9. Flushandcleanhydraulicsystembeforerestartingafterservicing.
10.Use"pipedope"on allhydraulicfittings.
11.Allowtimeforwarm-upbeforesplittingwood.
12.Primethe pumpbeforeinitialstart-upbyturningoverthe engine
withsparkplugdisconnected.
13.Splitwoodalongthe grain(lengthwise)only.
Never:
1. Usewhenfluid isbelow20°F or above150° R
2. Useasolidengine/pumpcoupling.
3. Operatethroughreliefvalvefor long.
4. Attempttoadjustunloadingorreliefvalvesettingswithoutpressure
gauges.
5. Operatewithair inhydraulicsystem.
6. Useteflontapeonhydraulicfittings.
7. Attempttocutwoodacrossthe grain.
8. Attempttoremovepartiallysplitwoodfromthewedgewithyour
hands.Fullyretractwedgetodislodgewoodwith logdislodger.
TRANSPORTING THE LOG SPLITTER
IMPORTANT:AlwaysturnfuelvalvetoOFFpositionbeforetransport-
ingthelogsplitter.
1. Lowerthebeamto its horizontalposition.Makecertainthebeamis
lockedsecurelywiththe horizontalbeamlock.
2. Removespringclipandclevis pinfromjackstand.
f
Figure 4-4
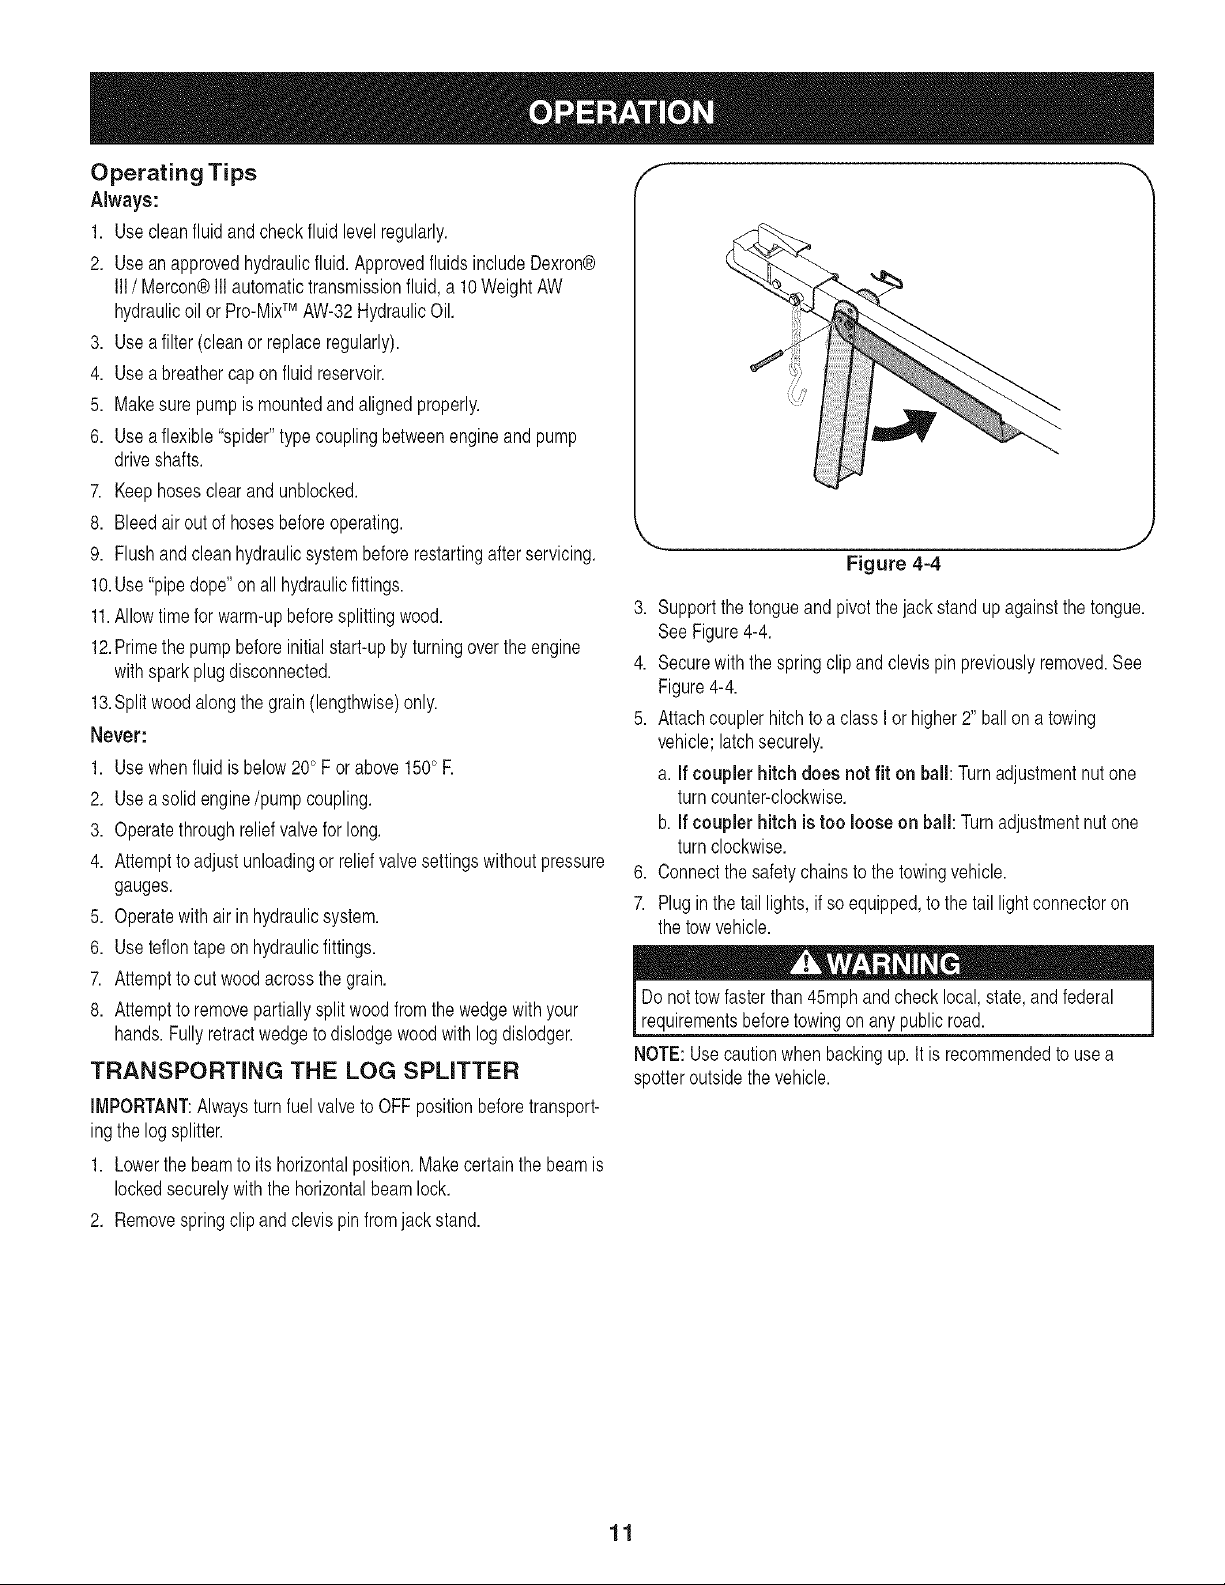
3. Supportthetongueandpivotthejackstandupagainstthetongue.
SeeFigure4-4.
4. Securewiththe springclipandclevispinpreviouslyremoved.See
Figure4-4.
5. Attachcouplerhitchtoa classI or higher2" ballona towing
vehicle;latchsecurely.
a. If couplerhitchdoes not fit on ball: Turnadjustmentnutone
turncounter-clockwise.
b.If coupler hitch is too looseon ball: Turnadjustmentnutone
turnclockwise.
6. Connectthesafetychainstothe towingvehicle.
7. Plugin thetaillights,ifso equipped,to thetail lightconnectoron
thetowvehicle.
nottow
IDo fasterthan andcheck and federal
Irequrementsbeforetowngon anypub croad. J
NOTE:Usecautionwhenbackingup.It isrecommendedtouse a
spotteroutsidethe vehicle.
45mph
local,state,
11
f
Adjustment
Bolt
-Gib
Jam Nut
Lock Nut
Figure 5-1
Donotatany timemakeanyadjustmentswithoutfirststopping
engine,disconnectingsparkplugwire,andgroundingit against
theengine.Alwayswearsafetyglassesduringoperationorwhile
[performng anyadustmentsor repars.
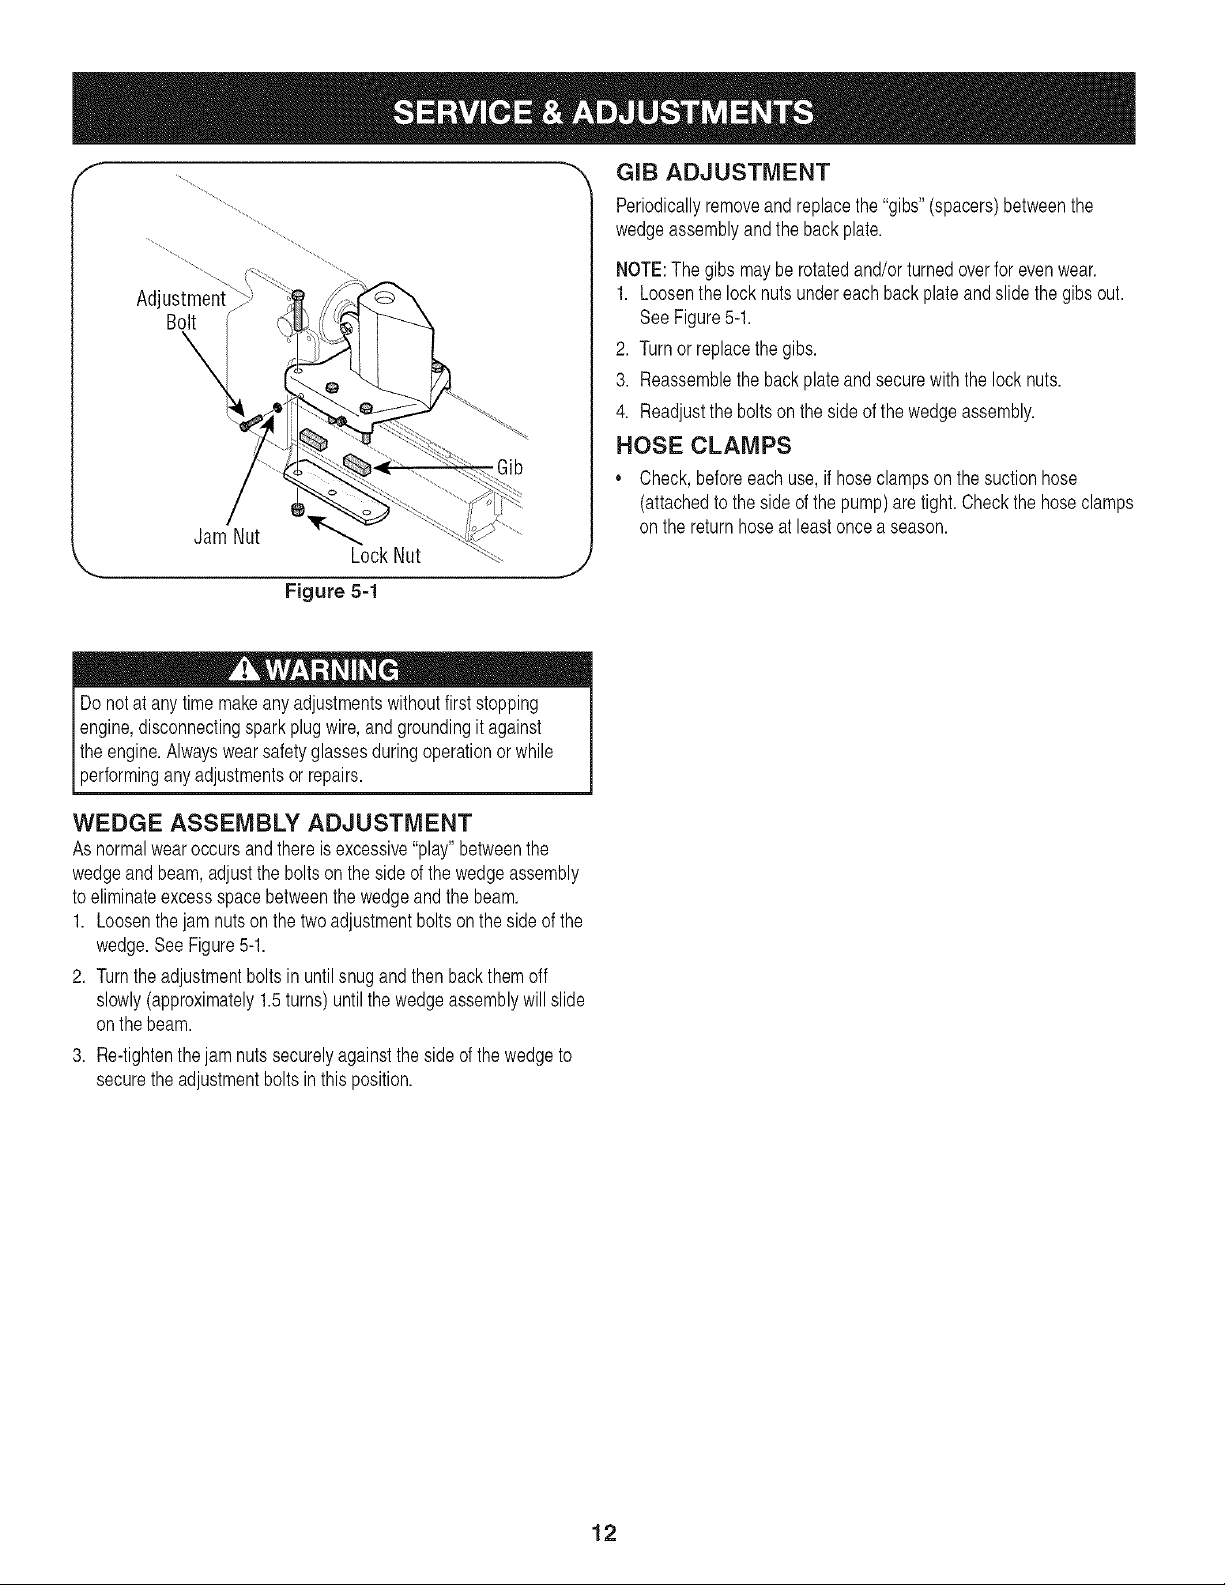
GIB ADJUSTMENT
Periodicallyremoveand replacethe"gibs"(spacers)betweenthe
wedgeassemblyandthe backplate.
NOTE:Thegibsmaybe rotatedand/orturnedoverfor evenwear.
1. Loosenthe locknutsundereachbackplateandslidethegibsout.
SeeFigure5-1.
2. Turnor replacethegibs.
3. Reassemblethebackplateandsecurewiththelock nuts.
4. Readjusttheboltsontheside ofthewedgeassembly.
HOSE CLAMPS
,, Check,beforeeachuse,if hoseclampsonthesuctionhose
(attachedto thesideofthepump)aretight.Checkthehoseclamps
on thereturnhoseatleastonce aseason.
WEDGE ASSEMBLY ADJUSTMENT
Asnormalwearoccursandthereisexcessive"play"betweenthe
wedgeandbeam,adjustthe boltsonthesideofthewedgeassembly
toeliminateexcessspacebetweenthewedgeandthe beam.
1. Loosenthejamnutson thetwoadjustmentboltsonthe sideofthe
wedge.SeeFigure5-1.
2. Turntheadjustmentboltsin untilsnugandthenbackthemoff
slowly(approximately1.5turns)untilthe wedgeassemblywillslide
onthebeam.
3. Re-tightenthe jamnutssecurelyagainstthesideof thewedgeto
securetheadjustmentbolts inthisposition.
12
FLEXIBLE PUMP COUPLER
Theflexiblepumpcoupleris a nylon"spider"insert,locatedbetween
thepumpandtheengineshaft.Overtime,the couplerwillhardenand
deteriorate.
Replacethecouplerifyou detectvibrationornoisecomingfromthe
areabetweentheengineandthe pump.If thecouplerfailscompletely,
youwill experiencea lossof power.
IMPORTANT:Neverhit theengineshaftinany manner,asablowwill
causepermanentdamagetotheengine.
1. Removethreenutsthatsecurethepumpto thecouplingshield.
Twonutsareatthe bottomcornersandoneisinthe topcenter.
SeeFigure5-2.
2. Removethepump.
3. Rotatetheenginebyslowlypullingstarterhandleuntil engine
couplinghalfsetscrewis visible.Loosensetscrewusingallen
wrenchandslidecouplinghalfoff engineshaft.
4. Loosensetscrewon pumpcouplinghalfandremovecouplinghalf.
5. Slidenewenginecouplinghalfontotheengineshaft untiltheend of
theshaftisflushwiththe innerportionofthecouplinghalf.(There
mustbespacebetweentheendofthe enginesupportbracketand
couplinghalf).Tightensetscrew.
6. Installpumpcouplinghalfand keyonpumpshaft.Rotatecoupling
halfuntilsetscrewfacesopeninginshield.Donottightenset
screw.
7. Installnylon"spider"ontoenginecouplinghalf.
8. Alignpumpcouplinghalfwith nylon"spider"byrotatingengine
usingstarterhandle.Slidecouplinghalfintoplacewhileguiding
threemountingboltsthroughholesinpumpsupportbracket.
9. Securewithnutsremovedearlier.
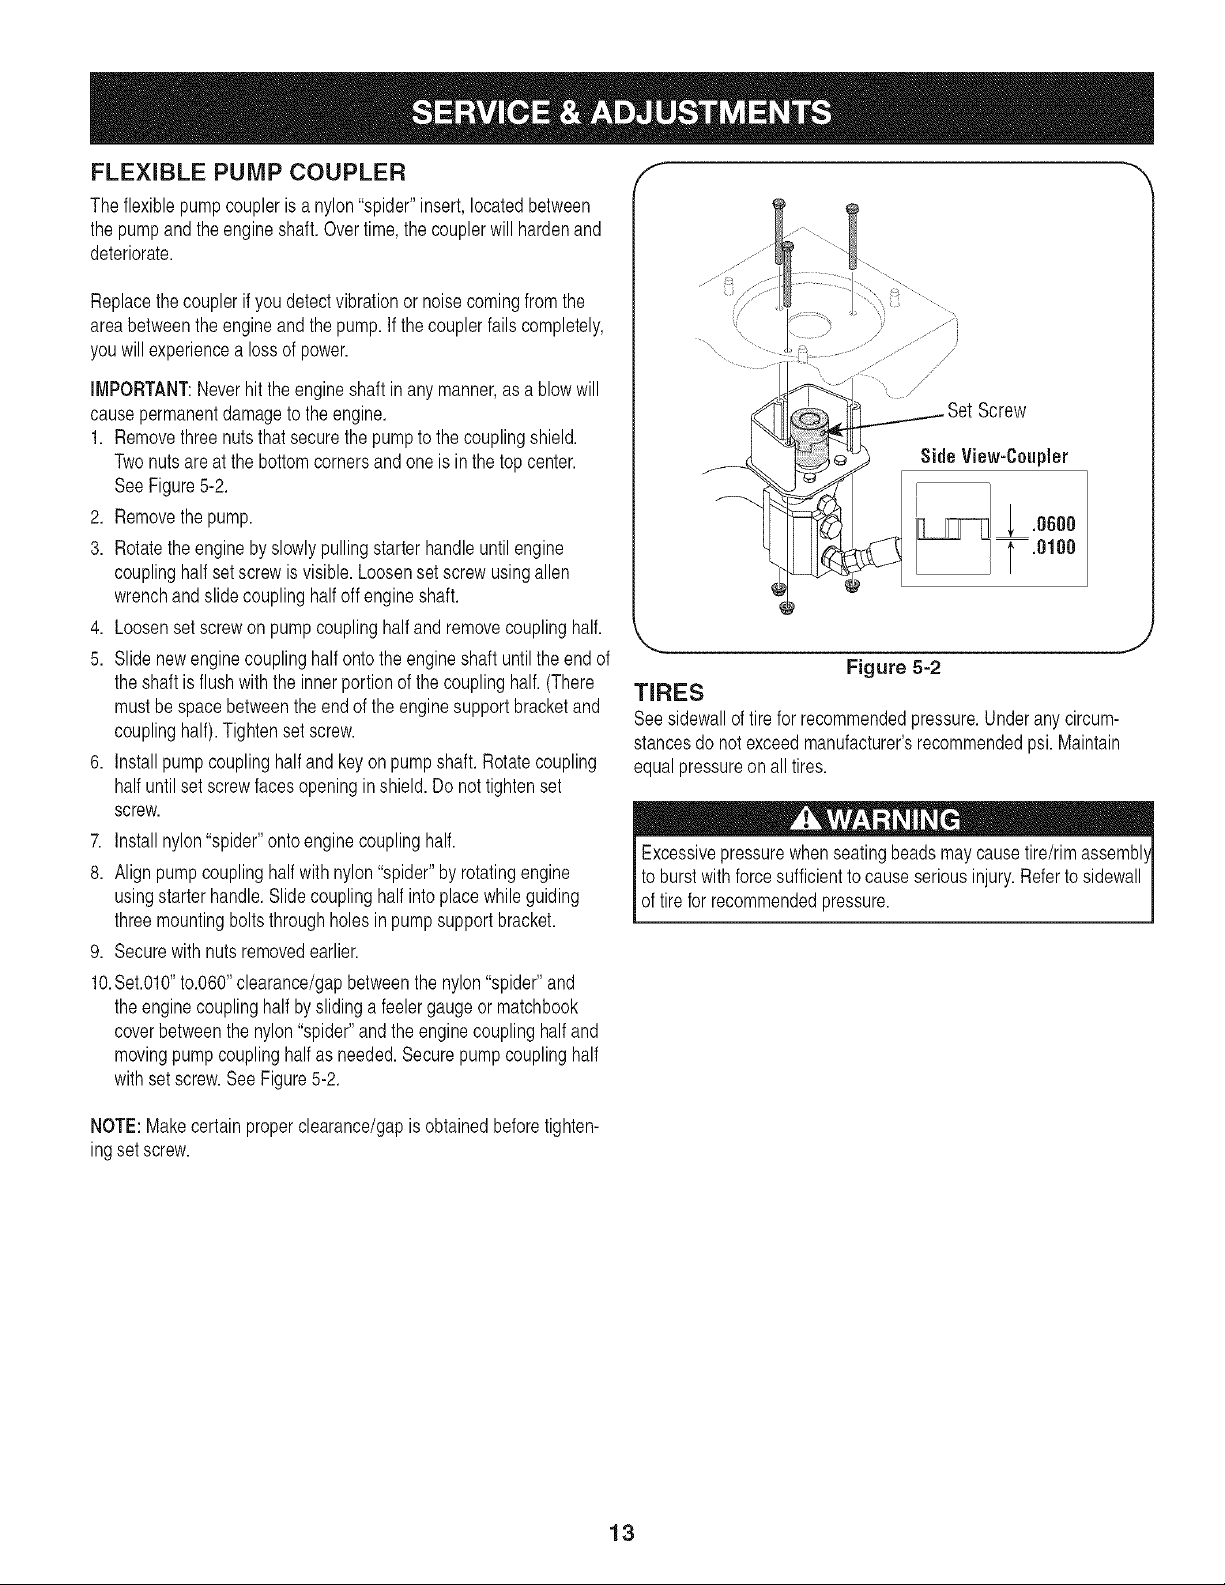
10.Set.010"to.060"clearance/gapbetweenthe nylon"spider"and
theenginecouplinghalfbyslidinga feelergaugeor matchbook
coverbetweenthenylon"spider"andtheenginecouplinghalfand
movingpumpcouplinghalfas needed.Securepumpcouplinghalf
withsetscrew.SeeFigure5-2.
//
/
/
Screw
_,, ,J
Figure 5-2
TIRES
Seesidewalloftire forrecommendedpressure.Underanycircum-
stancesdo notexceedmanufacturer'srecommendedpsi. Maintain
equalpressureon alltires.
Excessivepressurewhenseatingbeadsmaycausetire/rimassembl_,
toburstwithforcesufficienttocauseseriousinjury.Referto sidewall
oftire forrecommendedpressure.
NOTE:Makecertainproperclearance/gapisobtainedbeforetighten-
ingsetscrew.
13
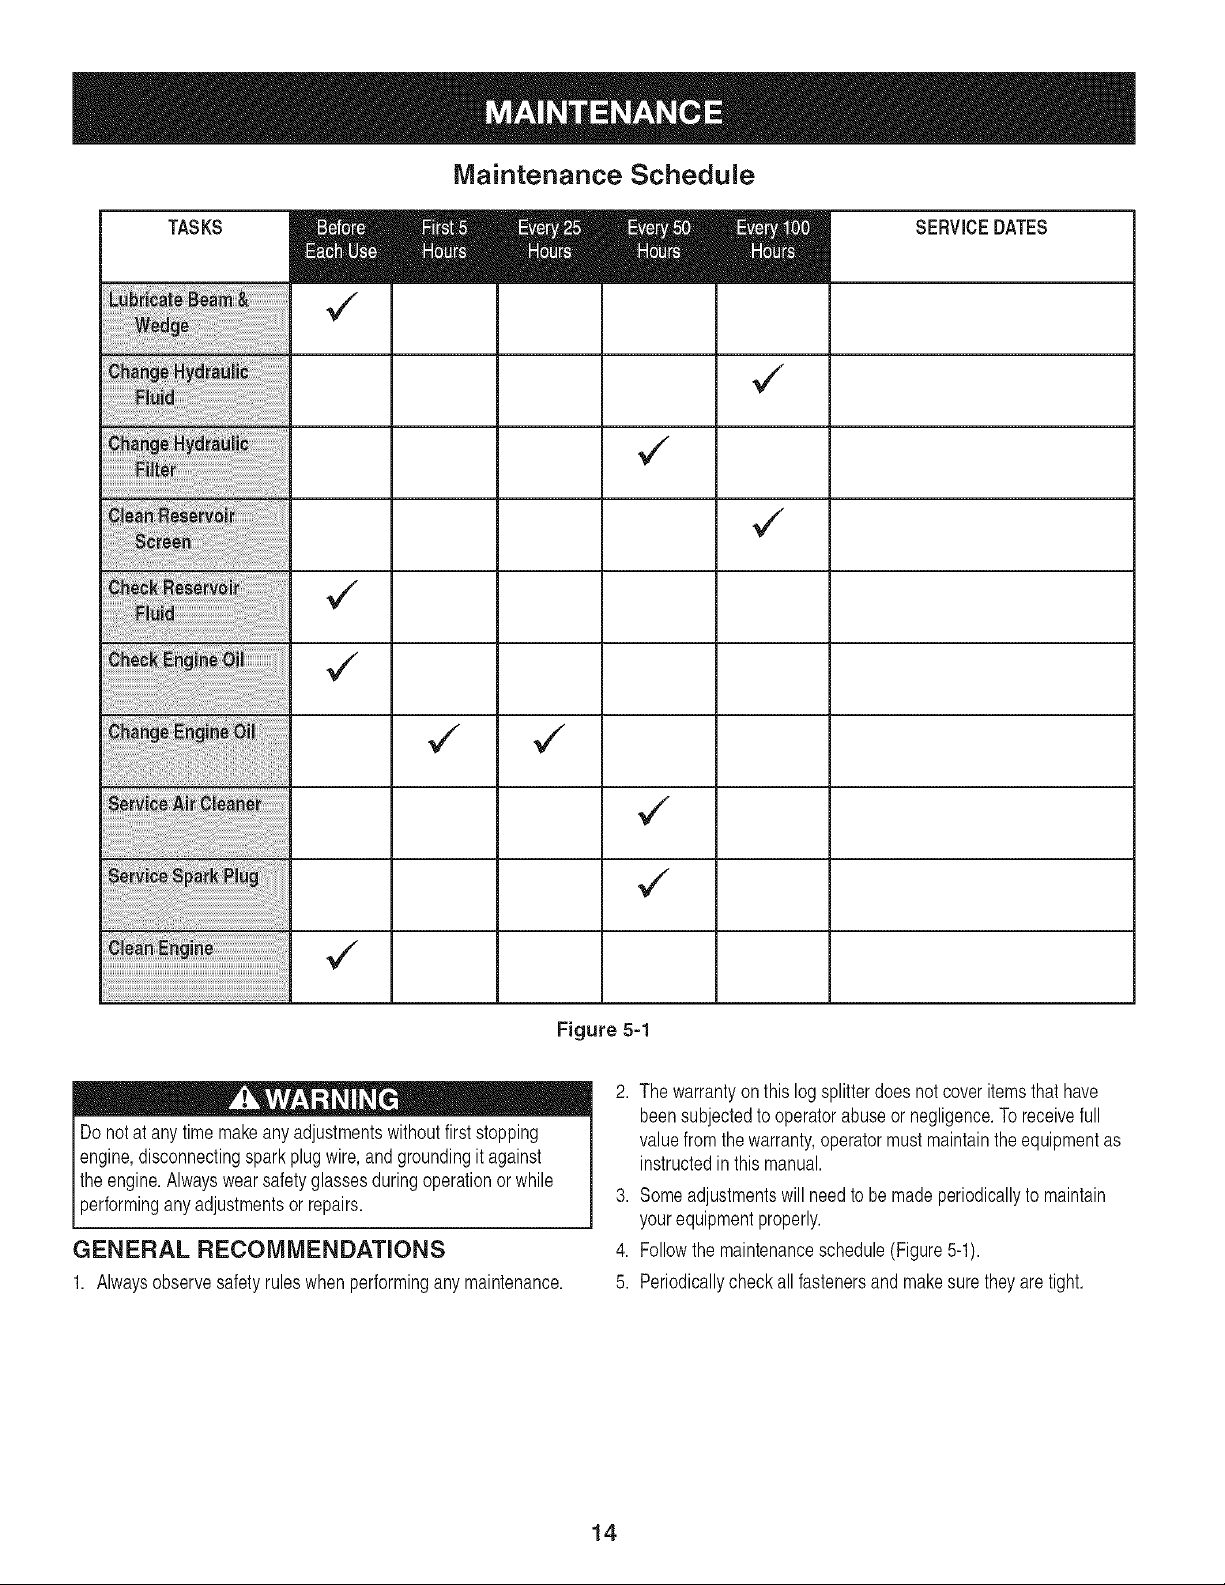
Maintenance Schedule
TASKS
SERVICEDATES
Figure 5-1
Donotatany timemakeanyadjustmentswithoutfirststopping
engine,disconnectingsparkplugwire,andgroundingit against
theengine.Alwayswearsafetyglassesduringoperationorwhile
performinganyadjustmentsor repairs.
GENERAL RECOMMENDATIONS
1. Alwaysobservesafetyruleswhenperformingany maintenance.
2. Thewarrantyonthis logsplitterdoesnotcoveritemsthathave
beensubjectedtooperatorabuseor negligence.Toreceivefull
valuefromthe warranty,operatormustmaintaintheequipmentas
instructedinthis manual.
3. Someadjustmentswillneedto bemadeperiodicallytomaintain
yourequipmentproperly.
4. Followthe maintenanceschedule(Figure5-1).
5. Periodicallycheckall fastenersandmakesuretheyaretight.
14
HYDRAULIC FLUID AND iNLET FILTER
,, Checkthehydraulicfluid levelinthelogsplitterreservoirtank
beforeeachuse.Maintainfluidlevelwithintherangespecifiedon
thedipstickat alltimes.
,, Changethehydraulicfluidinthereservoirevery100hoursof
operation.Followthestepsbelow:
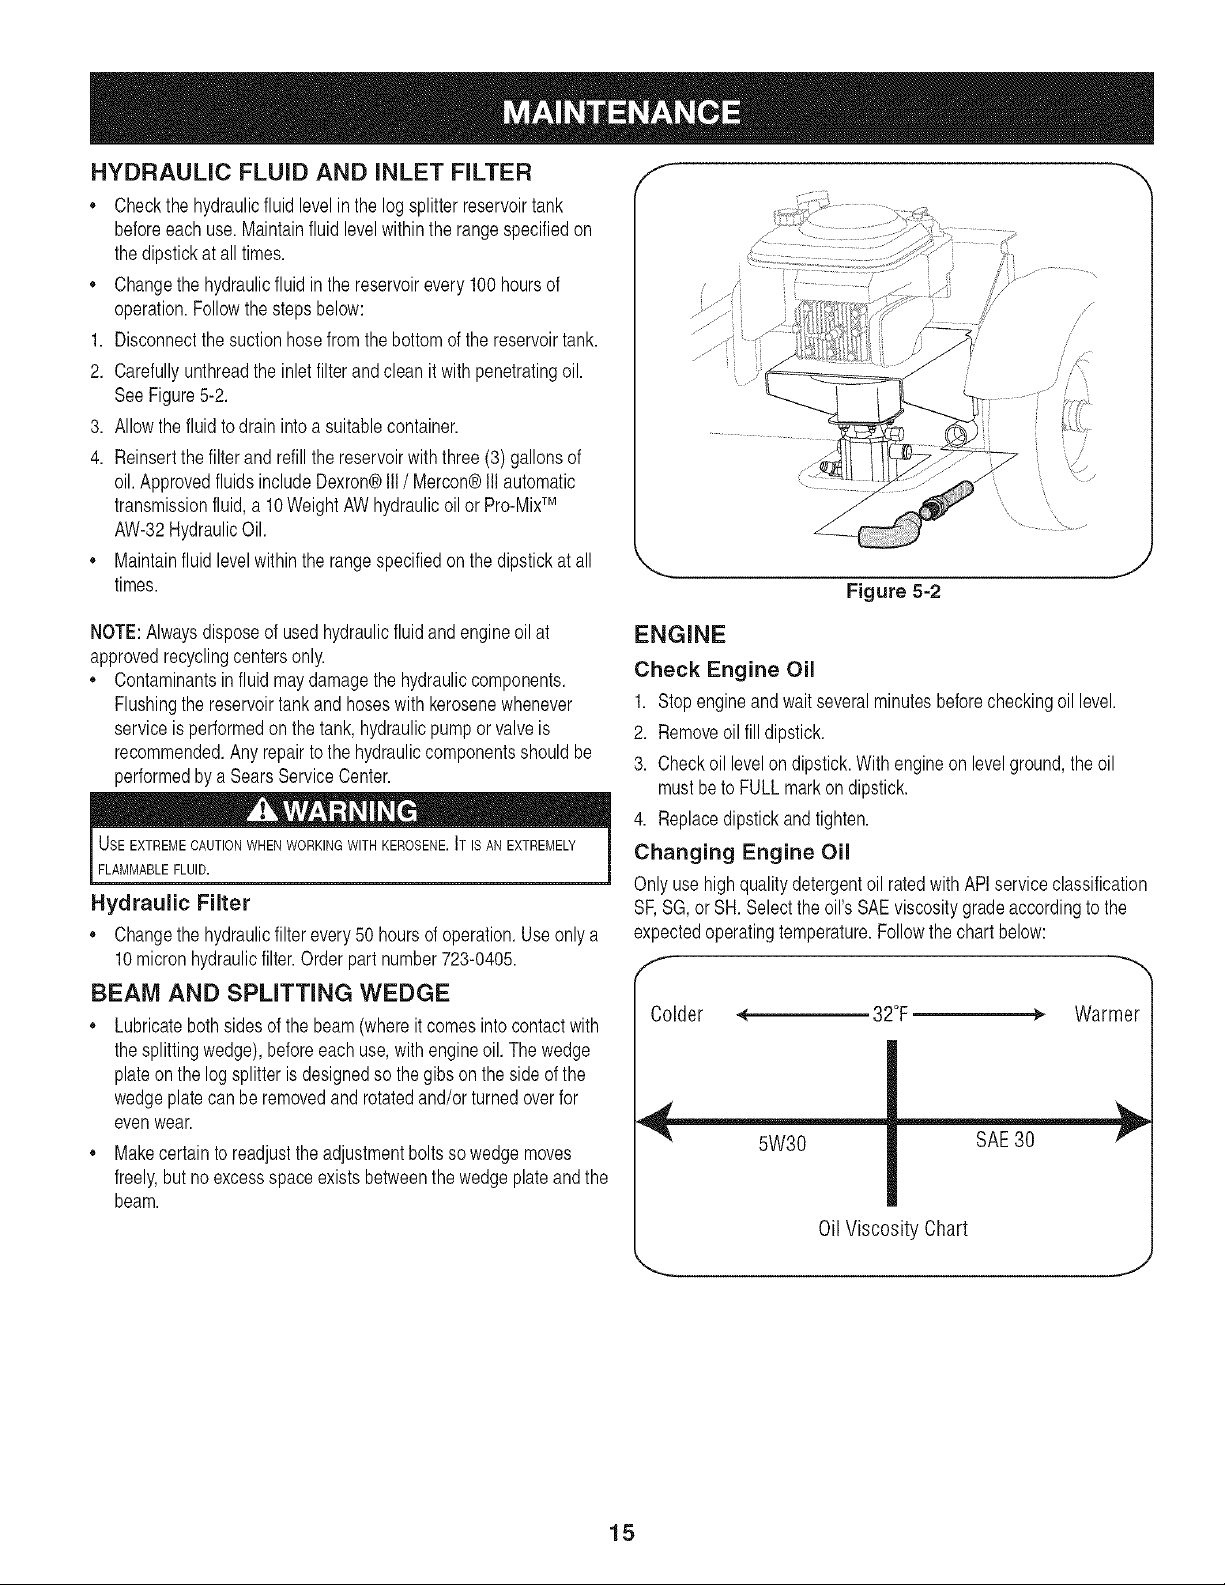
1. Disconnectthe suctionhosefromthebottomofthereservoirtank.
2. Carefullyunthreadtheinlet filterandcleanitwithpenetratingoil.
SeeFigure5-2.
3. Allowthe fluidtodrainintoasuitablecontainer.
4. Reinsertthefilterandrefillthe reservoirwiththree(3) gallonsof
oil.ApprovedfluidsincludeDexron®Ill/ Mercon®Illautomatic
transmissionfluid,a 10WeightAWhydraulicoilor Pro-MixTM
AW-32HydraulicOil.
,, Maintainfluidlevelwithinthe rangespecifiedonthedipstickat all
times.
/ ,......... /
Figure 5-2
/
/ /,,
i \ /
NOTE:Alwaysdisposeofusedhydraulicfluidand engineoilat
approvedrecyclingcentersonly.
,, Contaminantsin fluidmaydamagethehydrauliccomponents.
Flushingthereservoirtankand hoseswithkerosenewhenever
serviceis performedon thetank,hydraulicpumporvalveis
recommended.Anyrepairto thehydrauliccomponentsshouldbe
performedbya SearsServiceCenter.
Hydraulic Filter
,, Changethehydraulicfilterevery50 hoursof operation.Useonlya
10micronhydraulicfilter.Orderpartnumber723-0405.
BEAM AND SPLITTING WEDGE
,, Lubricatebothsidesofthe beam(whereitcomesintocontactwith
thesplittingwedge),beforeeachuse,withengineoil.Thewedge
plateonthe log splitterisdesignedso thegibs onthesideof the
wedgeplatecanbe removedandrotatedand/orturnedoverfor
evenwear.
,, Makecertainto readjusttheadjustmentboltssowedgemoves
freely,butnoexcessspaceexistsbetweenthewedgeplateandthe
beam.
ENGINE
Check Engine Oil
1. Stopengineandwaitseveralminutesbeforecheckingoil level.
2. Removeoil filldipstick.
3. Checkoil levelondipstick.Withengineonlevelground,theoil
mustbeto FULLmarkondipstick.
4. Replacedipstickandtighten.
Changing Engine Oil
j
Onlyusehighqualitydetergentoil ratedwithAPIserviceclassification
SF,SG,or SH.Selecttheoil'sSAEviscositygradeaccordingtothe
expectedoperatingtemperature.Followthe chartbelow:
f- --..
Colder -4 32°F _ Warmer
Oil Viscosity Chart
15
 Loading...