

Page 1
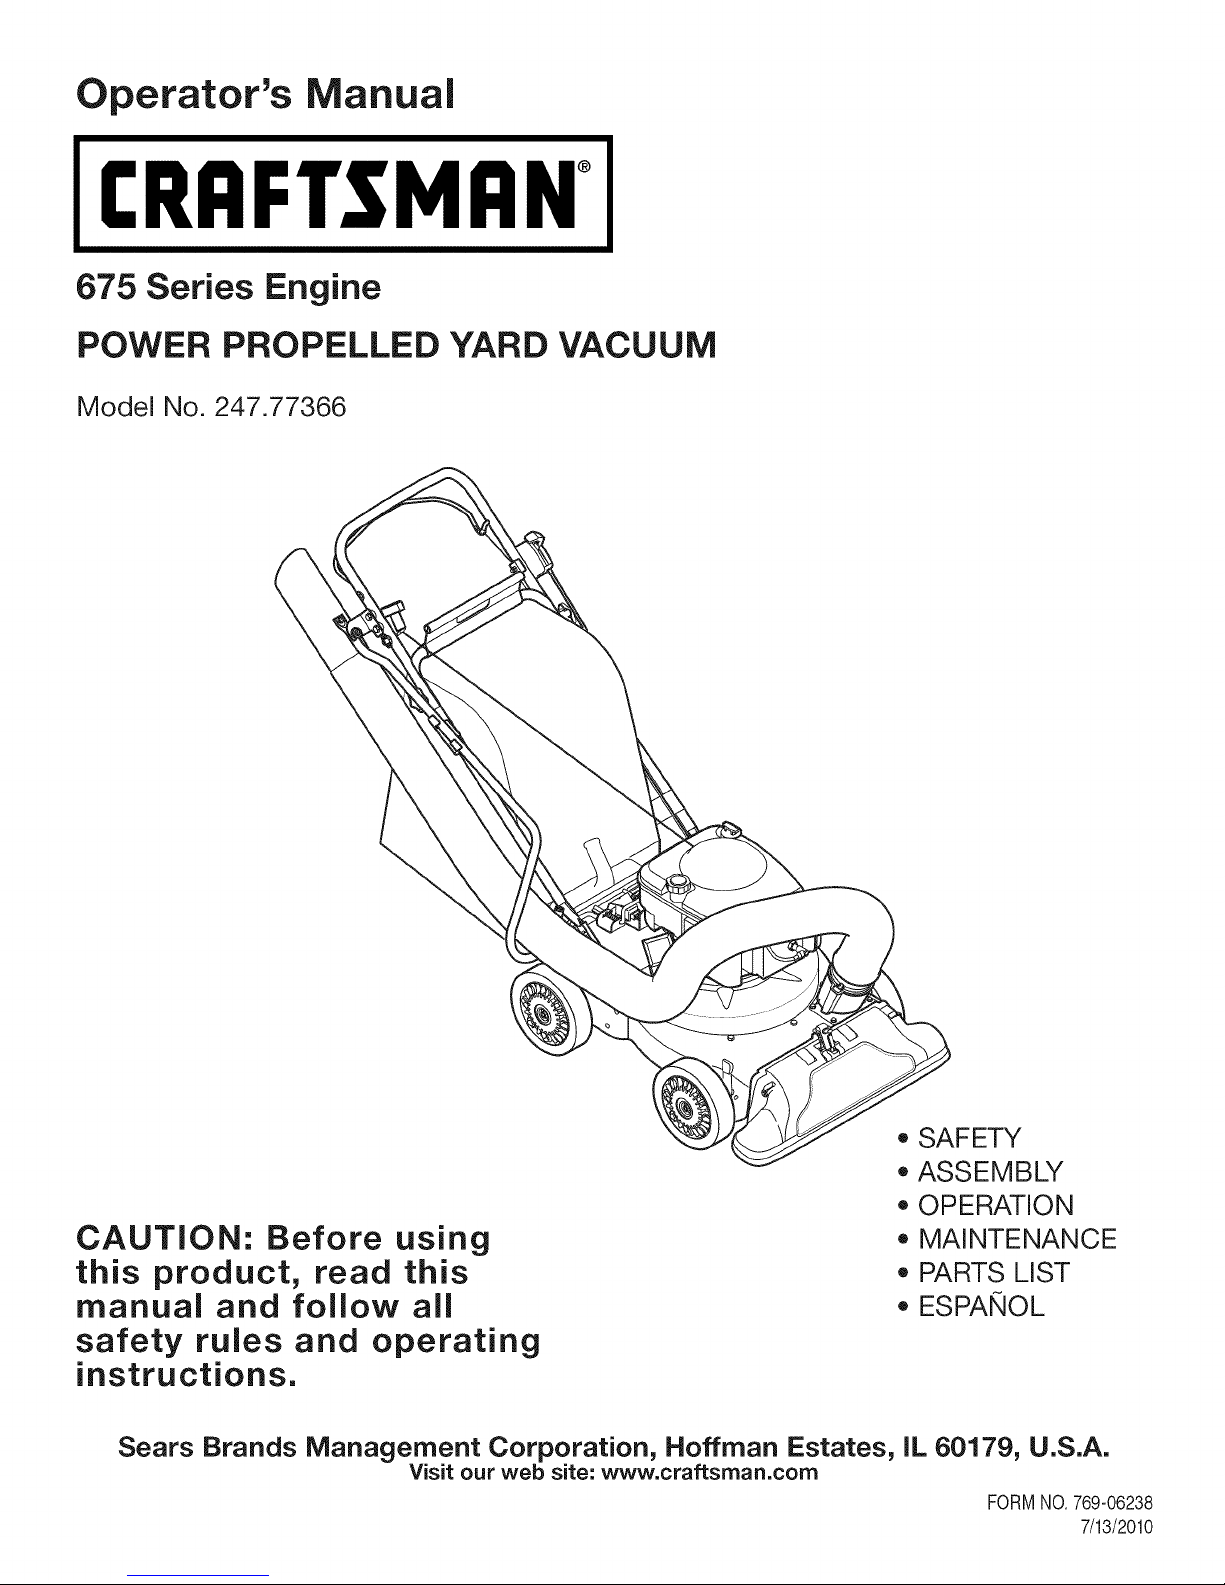
Operator's Manual
CRRF[SM ®
675 Series Engine
POWER PROPELLED YARD VACUUM
Model No. 247.77366
CAUTION: Before using
this product, read this
manual and follow all
safety rules and operating
instructions.
Sears Brands Management Corporation, Hoffman Estates, IL 60179, U.S.A.
Visit our web site: www.craftsman.com
o SAFETY
ASSEMBLY
OPERATION
MAINTENANCE
PARTS LIST
o ESPANOL
FORMNO.769-06238
7/13/2010
Page 2
WarrantyStatement..................................Page2
SafeOperationPractices..........................Pages3-6
SafetyLabels............................................Page7
Assembly..................................................Pages8-11
Operation..................................................Pages12-15
ServiceandMaintenance.........................Pages16-21
Off-SeasonStorage..................................Page22
TroubleShooting.......................................Page23
PartsList...................................................Page24-34
RepairProtectionAgreement...................Page38
Espa_ol.....................................................Page39
ServiceNumbers......................................BackCover
CRAFTSMANTWOYEARFULLWARRANTY
FORTWOYEARSfromthedateofpurchase,thisproductiswarrantedagainstanydefectsinmaterialorworkmanship,Defectiveproductwill
receivefreerepairor freereplacementif repairisunavailable.
Thiswarrantyisvoidifthisproductiseverusedwhileprovidingcommercialservicesor ifrentedtoanotherperson.
Forwarrantycoveragedetails to obtain repairor replacement,visit the website: www.craftsman.com
This warranty covers ONLYdefects in materialandworkmanship. Warrantycoverage does NOTinclude:
• Expendableitemsthatcanwearoutfromnormalusewithinthewarrantyperiod,includingbutnotlimitedto sparkplug,aircleaner,belt,and
oilfilter.
• Standardmaintenanceservicing,oilchanges,or tune-ups.
• Tirereplacementorrepaircausedby puncturesfromoutsideobjects,suchasnails,thorns,stumps,orglass.
• Tireorwheelreplacementor repairresultingfromnormalwear,accident,orimproperoperationormaintenance.
• Repairsnecessarybecauseof operatorabuse,includingbutnotlimitedto,damagecausedbyover-speedingtheengine,orbyimpacting
objectsthatbendtheframe.
• Repairsnecessarybecauseof operatornegligence,includingbutnotlimitedto,electricalandmechanicaldamagecausedbyimproper
storage,failureto usethepropergradeandamountof engineoil,orfailureto maintaintheequipmentaccordingtothe instructionscontained
intheoperator'smanual.
• Engine(fuelsystem)cleaningorrepairscausedbyfueldeterminedto becontaminatedoroxidized(stale).in general,fuelshouldbeused
within30 daysof itspurchasedate.
• Normaldeteriorationandwearofthe exteriorfinishes,or productlabelreplacement.
Thiswarrantygivesyou specificlegalrights,andyoumayalsohaveotherrightswhichvaryfromstatetostate.
Sears Brands Management Corporation, Hoffman Estates, IL 60179
EngineSeries: 675
EngineOilType: SAE30
EngineOilCapacity: 18ounces
FuelCapacity: 1 1/2 Quarts
SparkPlug: Champion®RJ19LM
SparkPlugGap: .020"
©SearsBrands,LLC 2
Model Number.................................................................
Serial Number .................................................................
Dateof Purchase.............................................................
Recordthemodelnumber,serialnumber
anddateof purchaseabove
Page 3
Thissymbolpointsoutimportantsafetyinstructionswhich,if not
followed,couldendangerthepersonalsafetyand/orpropertyof
yourselfandothers. Readandfollowallinstructionsin thismanual
beforeattemptingtooperatethismachine.Failureto complywith
theseinstructionsmayresultinpersonalinjury.Whenyou seethis
symbol,HEEDITSWARNING!
Thismachinewasbuilttobeoperatedaccordingtothesafeopera-
tionpracticesin thismanual.Aswithanytypeofpowerequipment,
carelessnessorerroronthepartoftheoperatorcan resultin
seriousinjury.Thismachineis capableofamputatingfingers,hands,
toesandfeetandthrowingdebris.Failureto observethefollowing
safetyinstructionscouldresultin seriousinjuryordeath.
CALIFORNIA PROPOSITION 65
EngineExhaust,someof itsconstituents,andcertainvehicle
componentscontainoremitchemicalsknowntoStateofCalifornia
tocausecancerandbirthdefectsorother reproductiveharm.
TRAINING
• Read,understand,andfollowallinstructionson themachineand
in themanualbeforeattemptingtoassembleandoperate.Keep
thismanualinasafeplaceforfutureandregularreferenceandfor
orderingreplacementparts.
• ReadtheOperator'sManualand followallwarningsand safety
instructions.Failuretodosocanresultin seriousinjurytothe
operatorand/orbystanders.Forquestionscall, 1-800-4MY-
HOME.
• Befamiliarwithallcontrolsandtheirproperoperation.Knowhow
tostopthemachineanddisengagethemquickly.
• Neverallowchildrenunder16yearsofageto operatethis
machine.Children16andovershouldreadandunderstandthe
instructionsandsafeoperationpracticesinthismanualandon
themachineandbe trainedandsupervisedbyanadult.
• Neverallowadultstooperatethis machinewithoutproper
instruction.
• Keepbystanders,pets,andchildrenat least75feetfromthe
machinewhileit is inoperation.Stopmachineifanyoneenters
thearea.
• Neverrunanengineindoorsor ina poorlyventilatedarea.Engine
exhaustcontainscarbonmonoxide,anodorlessanddeadlygas.
• Donotputhandsandfeetnearrotatingpartsor inthefeeding
chambersanddischargeopening.Contactwiththerotating
impellercanamputatefingers,hands,andfeet.
• Neverattempttounclogeitherthefeed intakeordischarge
opening,removeor emptybag,orinspectandrepairthe machine
whilethe engineis running.Shuttheengineoffandwaituntilall
movingpartshavecometoa completestop.Disconnectthespark
plugwireandgroundit againsttheengine.
Your Responsibility--Restrict theuseofthispowermachineto
personswhoread,understandandfollowthewarningsandinstruc-
tionsinthismanualandonthemachine.
SAVETHESEINSTRUCTIONS!
PREPARATION
• Thoroughlyinspecttheareawheretheequipmentistobeused.
Removeall rocks,bottles,cans,or otherforeignobjectswhich
couldbepickeduporthrownandcausepersonalinjuryor
damageto the machine.
• Alwayswearsafetyglassesorsafetygogglesduringoperation
andwhileperforminganadjustmentorrepair,to protectyour
eyes.Thrownobjectswhichricochetcan causeseriousinjuryto
theeyes.
• Wearsturdy,rough-soledworkshoesandclose-fittingslacksand
shirts.Loosefittingclothesor jewelrycanbecaughtinmovable
parts.Neveroperatethismachineinbarefeetorsandals.Wear
leatherworkgloveswhenfeedingmaterialinthechipperchute.
• Beforestarting,checkallboltsandscrewsforpropertightnessto
besurethemachineisinsafeworkingcondition.Also,visually
inspectmachinefor any damageat frequentintervals.
• Maintainor replacesafetyandinstructionslabels,asnecessary.
3
Page 4
SafeHandlingof Gasoline:
Toavoidpersonalinjuryorpropertydamageuseextremecarein
handlinggasoline.Gasolineisextremelyflammableandthevaporsare
explosive.Seriouspersonalinjurycanoccurwhengasolineisspilled
onyourselfor yourclotheswhichcanignite.Washyour skinand
changeclothesimmediately.
• Useonlyan approvedgasolinecontainer.
• Neverfillcontainersinsideavehicleor onatruckortrailerbed
withaplasticliner.Alwaysplacecontainersonthegroundaway
fromyourvehiclebeforefilling.
• Whenpractical,removegas-poweredequipmentfromthetruck
ortrailerand refuelitontheground.Ifthisisnotpossible,then
refuelsuchequipmentona trailerwithaportablecontainer,rather
thanfroma gasolinedispensernozzle.
• Keepthenozzleincontactwiththerimofthe fuel tankor
containeropeningatalltimesuntilfuelingiscomplete.Do not use
a nozzlelock-opendevice.
• Extinguishallcigarettes,cigars,pipesandothersourcesof
ignition.
• Neverfuelmachineindoors.
• Neverremovegas capor addfuel whiletheengineishotorrun-
ning.Allowenginetocoolatleasttwo minutesbeforerefueling.
• Neveroverfillfueltank.Filltankto nomorethan1/2inchbelow
bottomoffillernecktoallowspaceforfuelexpansion.
• Replacegasolinecapandtightensecurely.
• Ifgasolineisspilled,wipeitoff theengineandequipment.Move
unitto anotherarea.Wait5 minutesbeforestartingthe engine.
• Toreducefirehazards,keepmachinefreeofgrass,leaves,or
otherdebrisbuild-up.Cleanupoil orfuelspillageandremoveany
fuelsoakeddebris.
• Neverstorethemachineorfuelcontainerinsidewherethereisan
openflame,sparkor pilotlightas onawaterheater,spaceheater,
furnace,clothesdryerorothergas appliances.
OPERATION
• Donotputhandsandfeetnearrotatingpartsor in thefeeding
chambersanddischargeopening.Contactwiththe rotating
impellercanamputatefingers,hands,andfeet.
• Beforestartingthemachine,makesurethechipperchute,feed
intake,andcuttingchamberare emptyandfreeofalldebris.
• Thoroughlyinspectall materialto beshreddedandremoveany
metal,rocks,bottles,cans,orotherforeignobjectswhichcould
causepersonalinjuryor damagetothemachine.
• Iftheimpellerstrikesaforeignobjector ifyourmachineshould
startmakinganunusualnoiseorvibration,immediatelyshut
theengineoff.Allowtheimpellerto cometoacompletestop.
Disconnectthe sparkplugwire,grounditagainstthe engineand
performthefollowingsteps:
a. Inspectfordamage.
b. Repairor replaceanydamagedparts.
c. Checkfor anyloosepartsandtightento assurecontinued
safeoperation.
• Donot allowanaccumulationof processedmaterialto buildupin
thedischargearea.Thiscan preventproperdischargeandresult
inkickbackof materialthroughthefeedopening.
• Donot attempttoshredorchipmateriallargerthanspecified
on the machineor inthis manual.Personalinjuryormachine
damagecouldresult.
• Neverattempttounclogeitherthefeedintakeordischarge
openingwhilethe engineis running.Shuttheengineoff,waituntil
all movingpartshavestopped,disconnectthe sparkplugwireand
grounditagainsttheenginebeforeclearingdebris.
• Neveroperatewithoutvacuumbaganddischargechuteproperly
attachedtothe machine.Neveremptyor changevacuumbag
whilethe engineisrunning.Vacuumbagmustbekeptclosedat
all timesduringoperation.
• Neveroperatewithouteithertheinletnozzleor optionalhose
attachment(ifapplicable)properlyattachedtothemachine.
Neverattempttoattachorchangeeitherattachmentwhilethe
engineisrunning.
• Keepallguards,deflectorsand safetydevicesin placeand
operatingproperly.
• Keepyourfaceandbodybackandtothesideof the chipper
chutewhilefeedingmaterialintothemachineto avoidaccidental
kickbackinjuries.
• Neveroperatethismachinewithoutgoodvisibilityorlight.Always
be sureofyourfootingand keepafirmholdonthehandles.
• Donot operatethismachineonapaved,gravelornon-level
surface.
• Donot operatethismachinewhileunderthe influenceofalcohol
or drugs.
• Mufflerandenginebecomehot andcancausea burn.Do not
touch.
• Neverpick uporcarrymachinewhiletheengineisrunning.
• Ifsituationsoccurwhicharenotcoveredinthismanual,use care
andgoodjudgement.ContactCustomerSupportforassistance
andthenameofthe nearestservicedealer.
4
Page 5
MAINTENANCE & STORAGE
• Nevertamperwithsafetydevices.Checktheirproperoperation
regularly.
• Checkboltsandscrewsforpropertightnessat frequentintervals
tokeepthe machinein safeworkingcondition.Also,visually
inspectmachineforanydamageandrepair,ifneeded.
Beforecleaning,repairing,or inspecting,stopthe engineand
makecertaintheimpellerandallmovingpartshavestopped.
Disconnectthe sparkplugwireandgrounditagainsttheengine
topreventunintendedstarting.
Donotchangetheenginegovernorsettingsor overspeedthe
engine.Thegovernorcontrolsthe maximumsafeoperatingspeed
oftheengine.
Maintainor replacesafetyandinstructionlabels,asnecessary.
Followthismanualfor safeloading,unloading,transporting,and
storageof thismachine.
Neverstorethemachineorfuelcontainerinsidewherethereis an
openflame,sparkorpilotlightsuchasa waterheater,furnace,
clothesdryer,etc.
Allowmachinetocoolatleast5minutesbeforestoring.
• Alwaysrefertotheoperator'smanualfor properinstructionson
off-seasonstorage.
• If thefueltankhasto bedrained,dothisoutdoors.
• Observeproperdisposallawsand regulationsforgas,oil,etc.to
protecttheenvironment.
• Accordingto theConsumerProductsSafetyCommission(CPSC)
andtheU.S.EnvironmentalProtectionAgency(EPA),thisproduct
hasan AverageUsefulLifeofseven(7)years,or60hoursof
operation.Atthe endoftheAverageUsefulLifehavethe machine
inspectedannuallybyanauthorizedservicedealertoensurethat
allmechanicalandsafetysystemsareworkingproperlyandnot
wornexcessively.Failuretodo socanresultinaccidents,injuries
ordeath.
DO NOT MODIFY ENGINE
Toavoidseriousinjuryordeath,donot modifyengineinanyway.
Tamperingwiththegovernorsettingcanleadto arunawayengineand
causeittooperateatunsafespeeds.Nevertamperwithfactorysetting
ofenginegovernor.
NOTICE REGARDING EMISSIONS
EngineswhicharecertifiedtocomplywithCaliforniaandfederal
EPAemissionregulationsfor SORE(SmallOff RoadEquipment)are
certifiedto operateon regularunleadedgasoline,andmayinclude
thefollowingemissioncontrolsystems:EngineModification(EM),
OxidizingCatalyst(OC),SecondaryAirInjection(SAI)and ThreeWay
Catalyst(TWO)if so equipped.
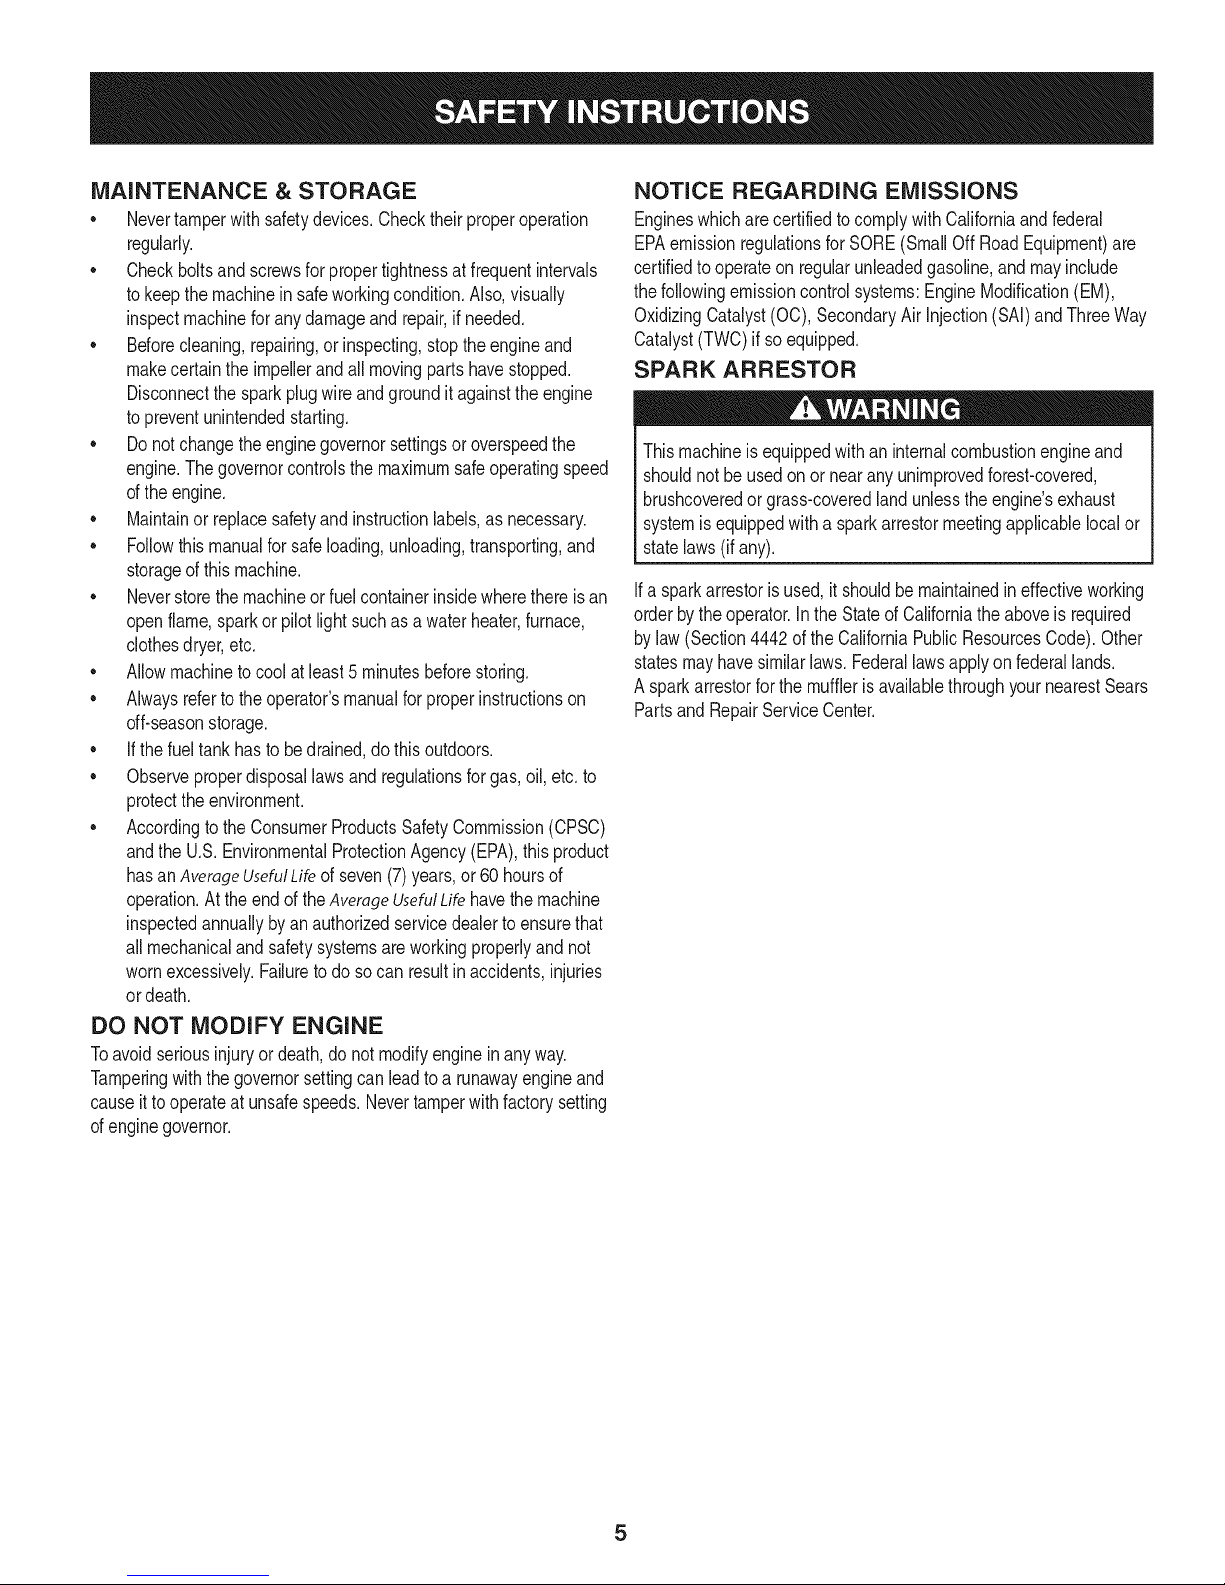
SPARK ARRESTOR
Thismachineis equippedwithan internalcombustionengineand
shouldnotbeusedonor nearanyunimprovedforest-covered,
brushcoveredor grass-coveredlandunlesstheengine'sexhaust
systemisequippedwitha sparkarrestormeetingapplicablelocalor
statelaws(ifany).
Ifasparkarrestorisused,itshouldbemaintainedin effectiveworking
orderbytheoperator.IntheStateof Californiathe aboveis required
bylaw (Section4442ofthe CaliforniaPublicResourcesCode).Other
statesmayhavesimilarlaws. Federallawsapplyonfederallands.
A sparkarrestorfor themufflerisavailablethroughyournearestSears
PartsandRepairServiceCenter.
Page 6
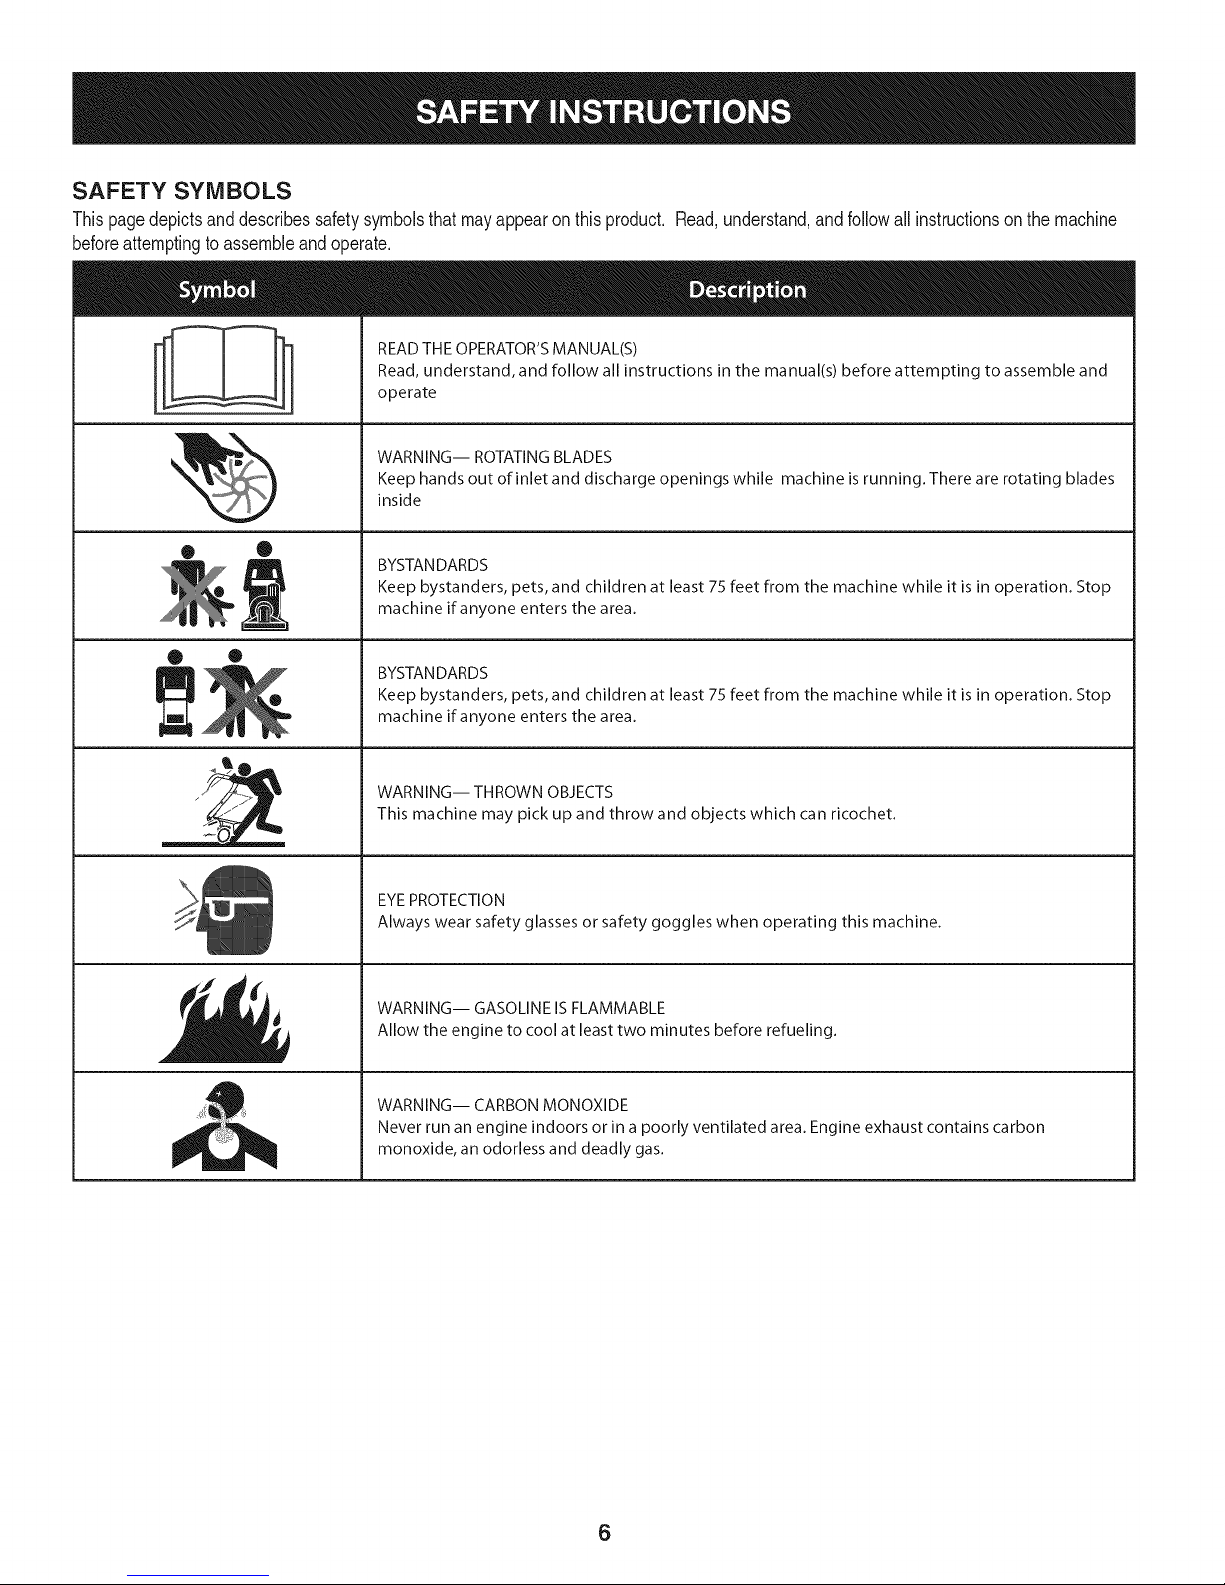
SAFETY SYMBOLS
Thispagedepictsanddescribessafetysymbolsthatmayappearonthisproduct. Read,understand,andfollowall instructionson themachine
beforeattemptingto assembleandoperate.
READ THE OPERATOR'S MANUAL(S)
i
i
Read, understand, and follow all instructions in the manual(s) before attempting to assemble and
operate
WARNING-- ROTATING BLADES
Keep hands out of inlet and discharge openings while machine isrunning. There are rotating blades
inside
• ®
® •
llm
il
BYSTANDARDS
Keep bystanders, pets, and children at least 75 feet from the machine while it is in operation. Stop
machine if anyone enters the area.
BYSTANDARDS
Keep bystanders, pets, and children at least 75 feet from the machine while it is in operation. Stop
machine if anyone enters the area.
WARNING-- THROWN OBJECTS
This machine may pick up and throw and objects which can ricochet.
EYEPROTECTION
Always wear safety glasses or safety goggles when operating this machine.
WARNING-- GASOLINE IS FLAMMABLE
Allow the engine to cool at least two minutes before refueling.
WARNING-- CARBON MONOXIDE
Never run an engine indoors or in a poorly ventilated area. Engine exhaust contains carbon
monoxide, an odorless and deadly gas.
6
Page 7
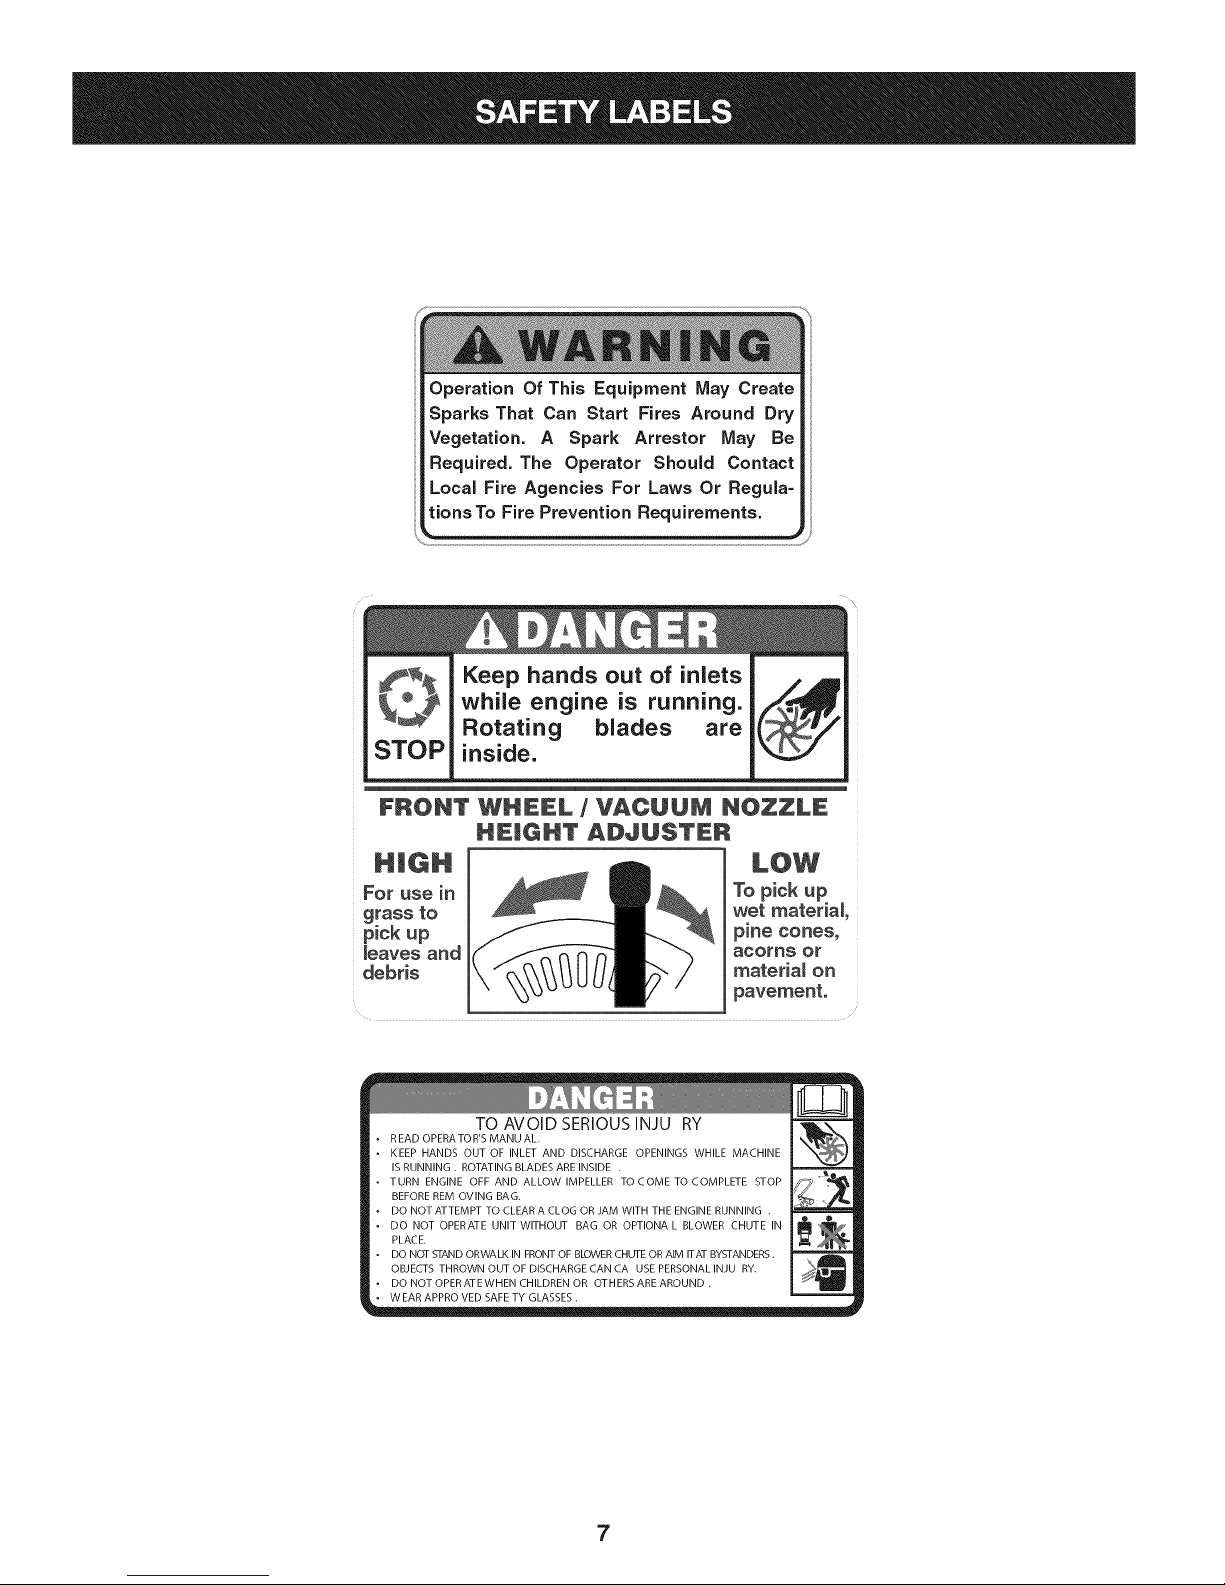
Operation Of This Equipment May Create
Sparks That Can Start Fires Around Dry
Vegetation. A Spark Arrestor May Be
Required. The Operator Should Contact
Local Fire Agencies For Laws Or Regula=
tions To Fire Prevention Requirements.
Keep hands out of inlets
while engine is running.
Rotating blades are
STOP
inside.
FRONT WHEEL / VACUUM NOZZLE
HEmGHT ADJUSTER
For use in
grass to
pickup
_eaves and
debris
R EAD OPERA TO R'S MANU AL.
KEEP HANDS OUT OF INLET AND DISCHARGE OPENINGS WHILE MACHINE
IS RUNNING . ROTATING BLADES ARE INSIDE .
TURN ENGINE OFF AND ALLOW IMPELLER TOCOME TOCOMPLETE STOP
BEFORE REM OVlNG BAG.
DO NOT ATTEMPT TO CLEAR A CLOG OR JAM WITH THE ENGINE RUNNING .
DO NOT OPERATE UNIT WITHOUT BAG OR OPTIONA L BLOWER CHUTE IN
PLACE.
DO NOT STAND ORWALK IN FRONT OF BLOWER CHUTE OR AIM ITAT BYSTANDERS.
OBJECTS THROWN OUT OF DISCHARGE CAN CA USE PERSONAL INJU RY.
DO NOT OPERATEWHEN CHILDREN OR OTHERS ARE AROUND .
WEAR APPRO VED SAFE TY GLASSES.
TO AVOID SERIOUSINJU RY
To pick up
wet material
pine cones_
acorns Or
materia_ on
pavement.
7
Page 8
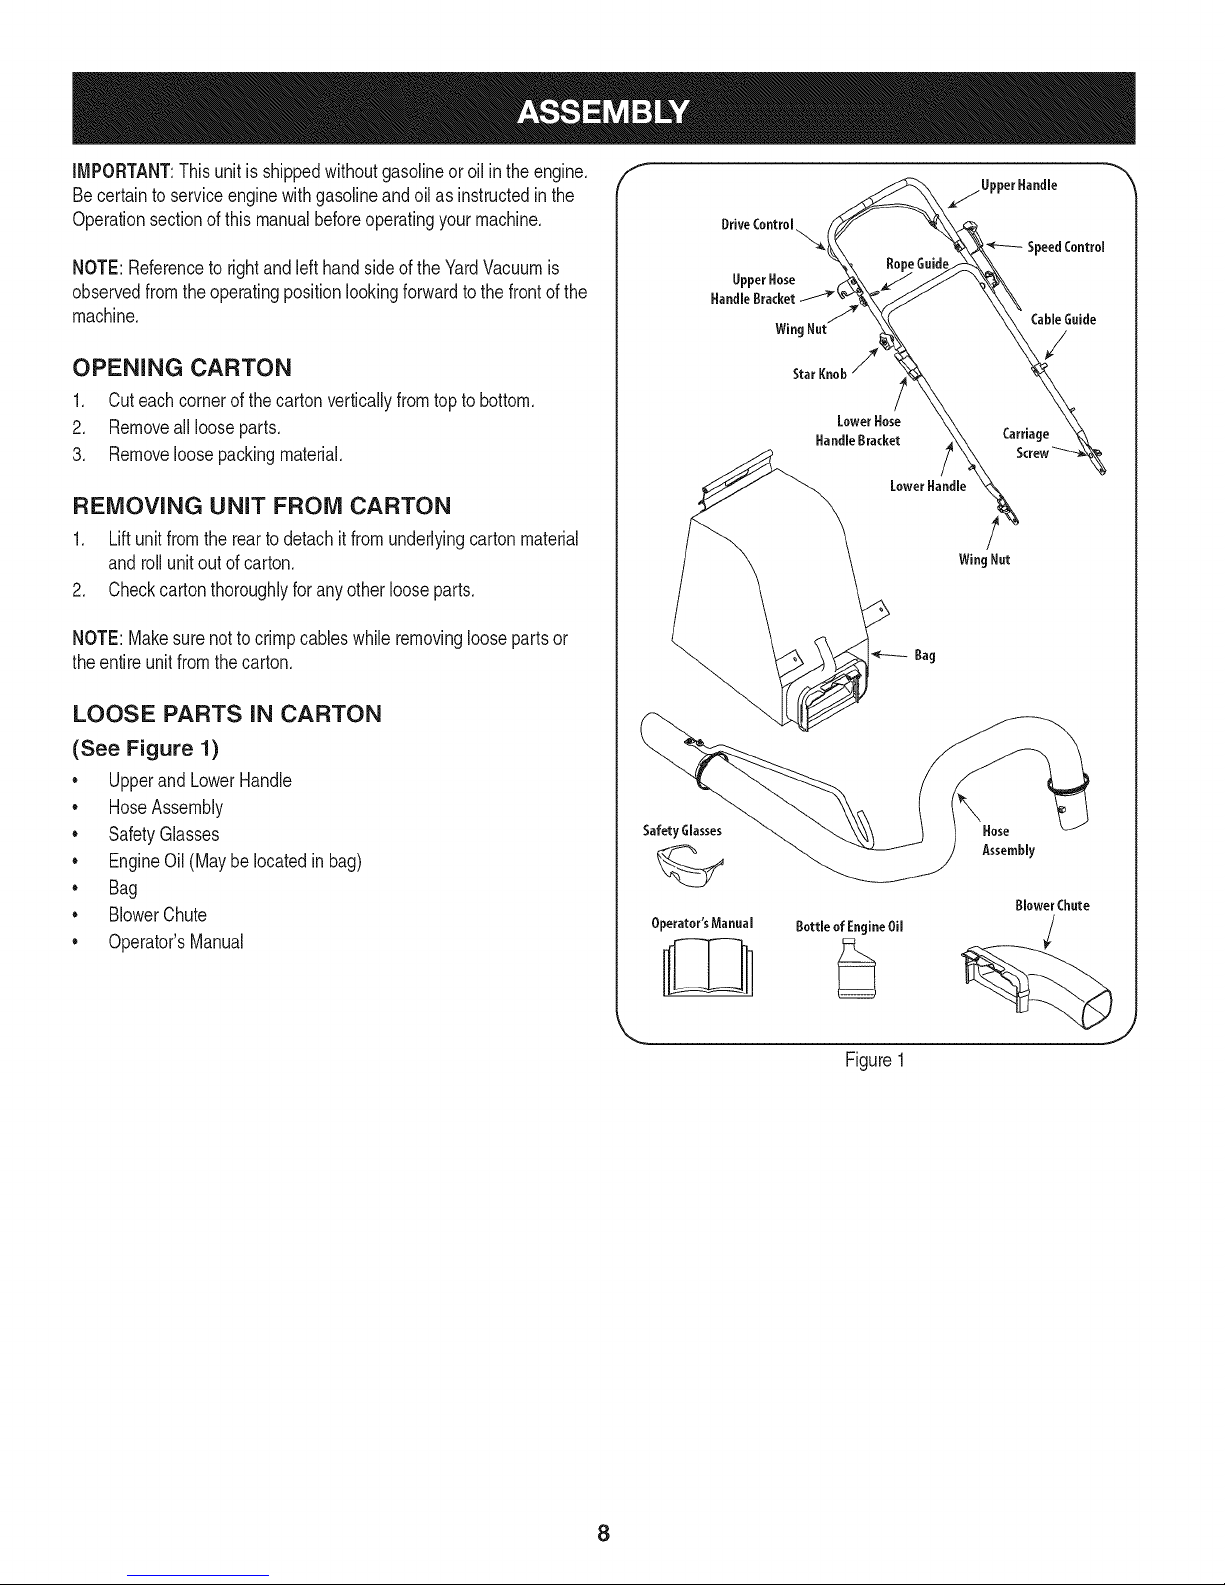
IMPORTANT:Thisunit isshippedwithoutgasolineoroil intheengine.
Becertainto serviceenginewithgasolineandoilasinstructedinthe
Operationsectionofthis manualbeforeoperatingyourmachine.
NOTE:Referenceto rightandlefthandsideofthe YardVacuumis
observedfromtheoperatingpositionlookingforwardto the frontof the
machine.
OPENING CARTON
1. Cuteachcornerofthecartonverticallyfromtop to bottom.
2. Removeall looseparts.
3. Removeloosepackingmaterial.
REMOVING UNIT FROM CARTON
1. Liftunit fromthe reartodetachitfromunderlyingcartonmaterial
androllunit outofcarton.
2. Checkcartonthoroughlyforanyotherlooseparts.
NOTE:Makesurenottocrimpcableswhileremovingloosepartsor
theentire unitfromthecarton.
LOOSE PARTS IN CARTON
f
(See Figure 1)
• UpperandLowerHandle
• HoseAssembly
• SafetyGlasses
• EngineOil(Maybelocatedinbag)
• Bag
• BlowerChute
• Operator'sManual
Safety Glasses
Operator'sManual
\
Hose
Assembly
BlowerChute
Bottle of EngineOil
J
Figure1
8
Page 9
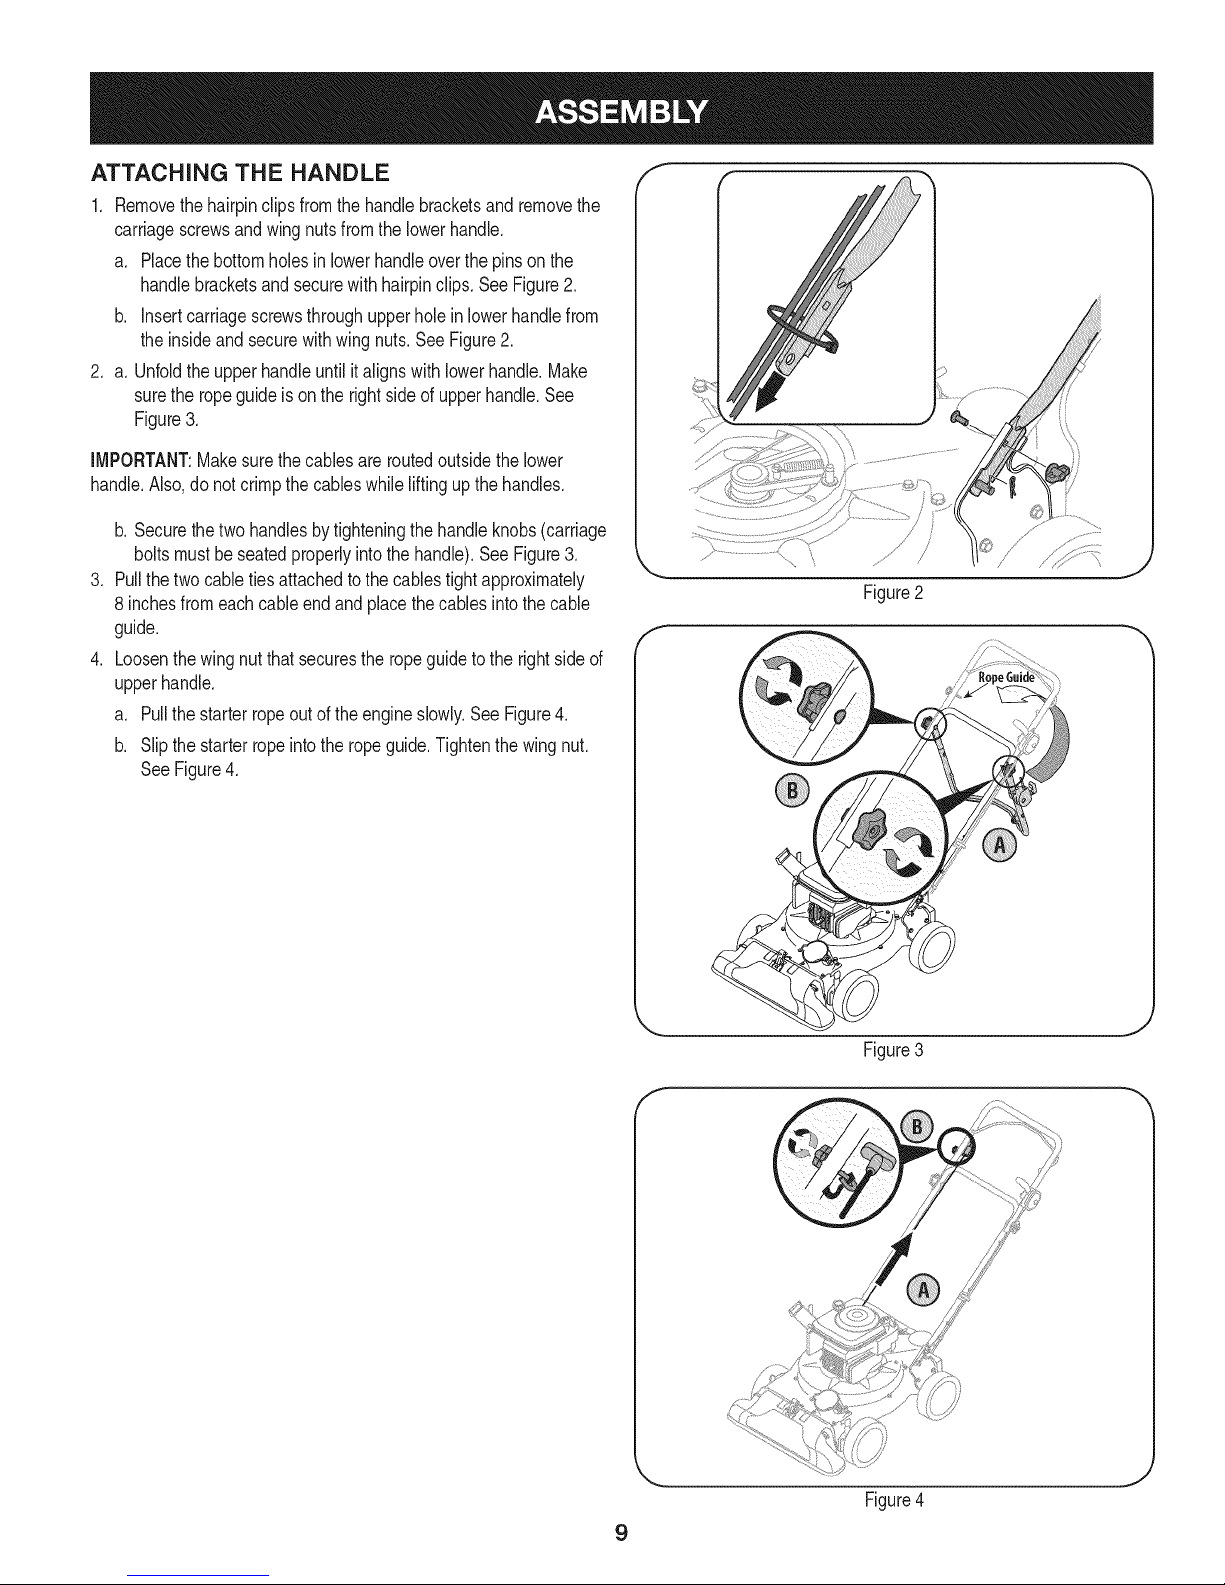
ATTACHING THE HANDLE
1. Removethehairpinclipsfromthehandlebracketsand removethe
carriagescrewsandwingnutsfromthelowerhandle.
a. Placethebottomholesinlowerhandleoverthepinsonthe
handlebracketsand securewith hairpinclips. SeeFigure2.
b. insertcarriagescrewsthroughupperholeinlowerhandlefrom
theinsideandsecurewithwingnuts.SeeFigure2.
2. a. Unfoldtheupperhandleuntilitalignswithlowerhandle.Make
surethe ropeguideis ontherightsideofupperhandle.See
Figure3.
IMPORTANT:Makesurethecablesareroutedoutsidethelower
handle.Also,donotcrimpthecableswhile liftingupthehandles.
b. Securethetwohandlesbytighteningthe handleknobs(carriage
boltsmustbeseatedproperlyintothehandle).See Figure3.
.
Pullthetwo cabletiesattachedto thecablestightapproximately
8 inchesfromeachcableendandplacethecablesintothecable
guide.
.
Loosenthewingnutthatsecurestheropeguideto the rightsideof
upperhandle.
a. Pullthestarterropeoutoftheengineslowly.SeeFigure4.
b. Slipthestarterropeintotheropeguide.Tightenthewingnut.
SeeFigure4.
Figure2
J
Figure3
J
Figure4
9
Page 10
f
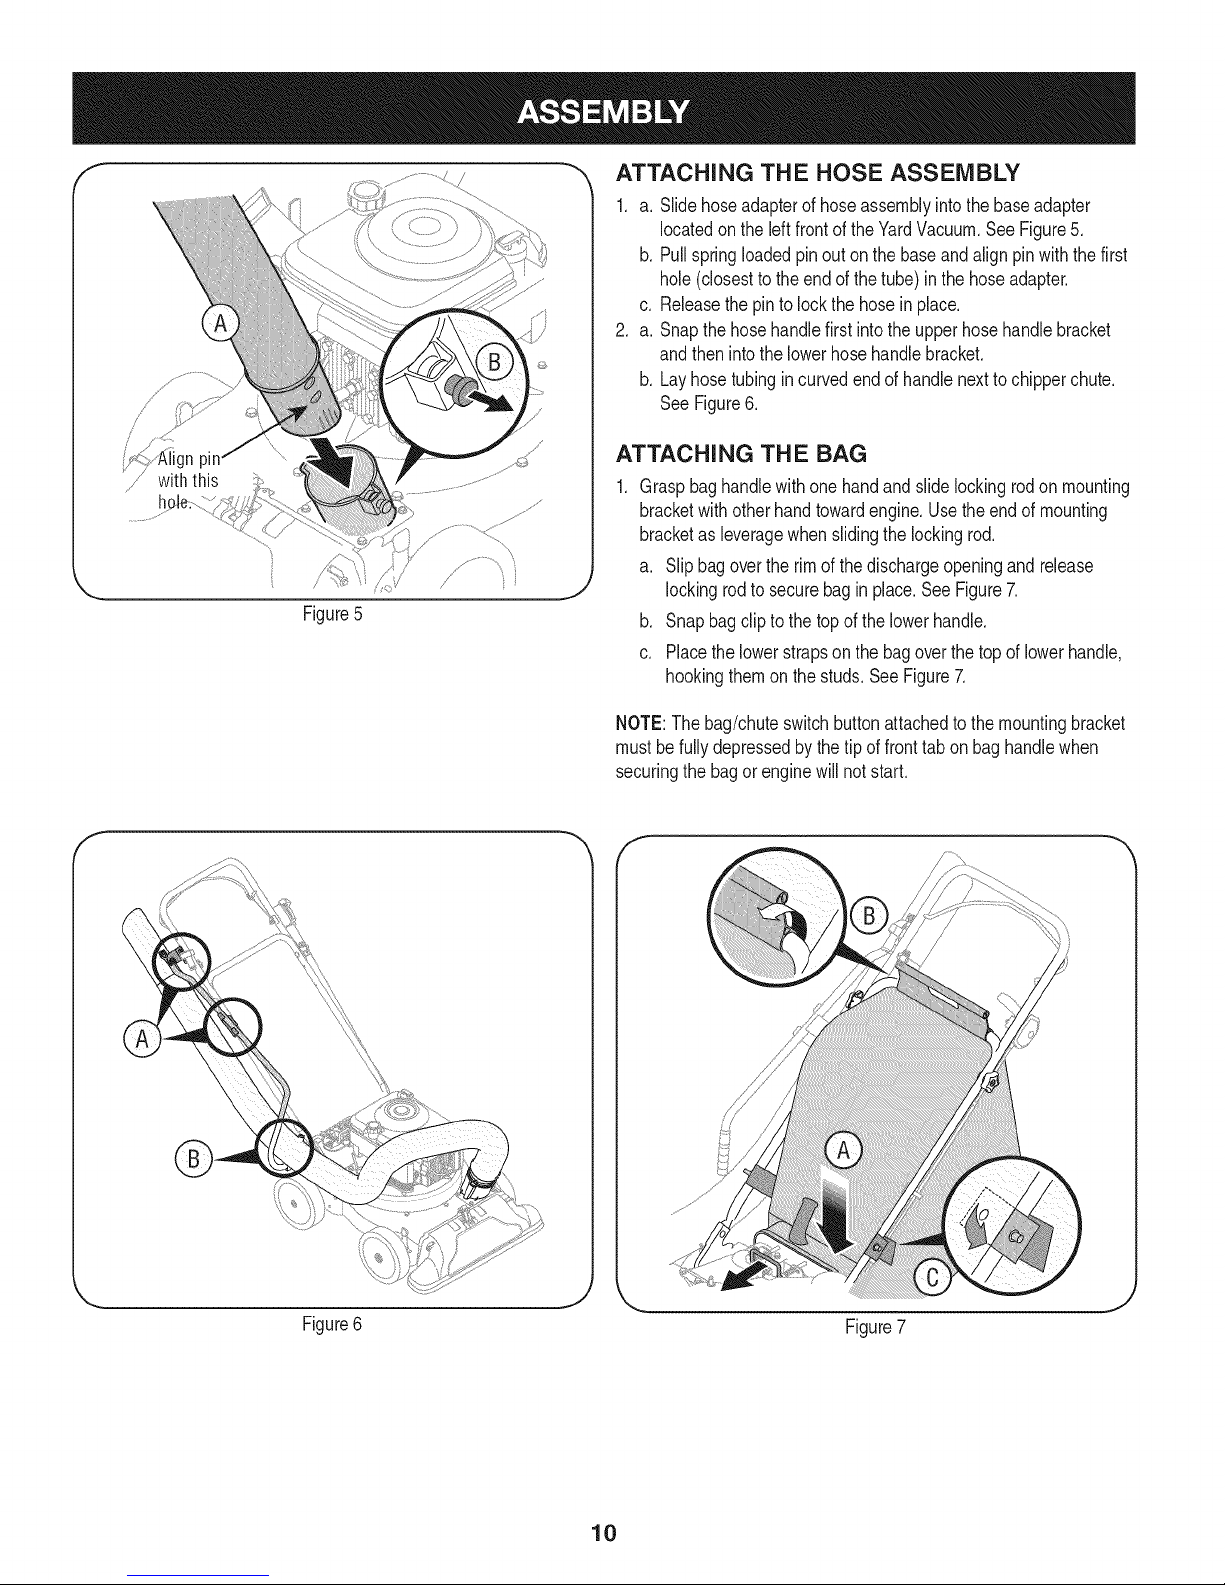
_, ATTACHING THE HOSE ASSEMBLY
1. a. Slidehoseadapterof hoseassemblyintothebaseadapter
locatedon theleftfrontof theYardVacuum.SeeFigure5.
b. Pullspringloadedpinouton thebaseandalignpinwiththe first
hole(closesttotheendofthetube)inthehoseadapter.
c. Releasethepintolockthehosein place.
2. a. Snapthehosehandlefirstintotheupperhose handlebracket
andthenintothelowerhosehandlebracket.
b. Layhosetubingincurvedendof handlenextto chipperchute.
SeeFigure6.
ATTACH ING TH E BAG
Graspbaghandlewithonehandandslidelockingrodonmounting
bracketwithotherhandtowardengine.Usetheendofmounting
bracketas leveragewhenslidingthelockingrod.
a. Slipbagovertherim of thedischargeopeningandrelease
lockingrodto securebagin place.SeeFigure7.
Figure5
b. Snapbagclipto thetopofthelowerhandle.
c. Placethelowerstrapsonthebagoverthe topof lowerhandle,
hookingthemon thestuds.SeeFigure7.
NOTE:The bag/chuteswitchbuttonattachedto themountingbracket
mustbefullydepressedby thetipof fronttabon baghandlewhen
securingthebagorenginewillnotstart.
Figure6
Figure7
10
Page 11
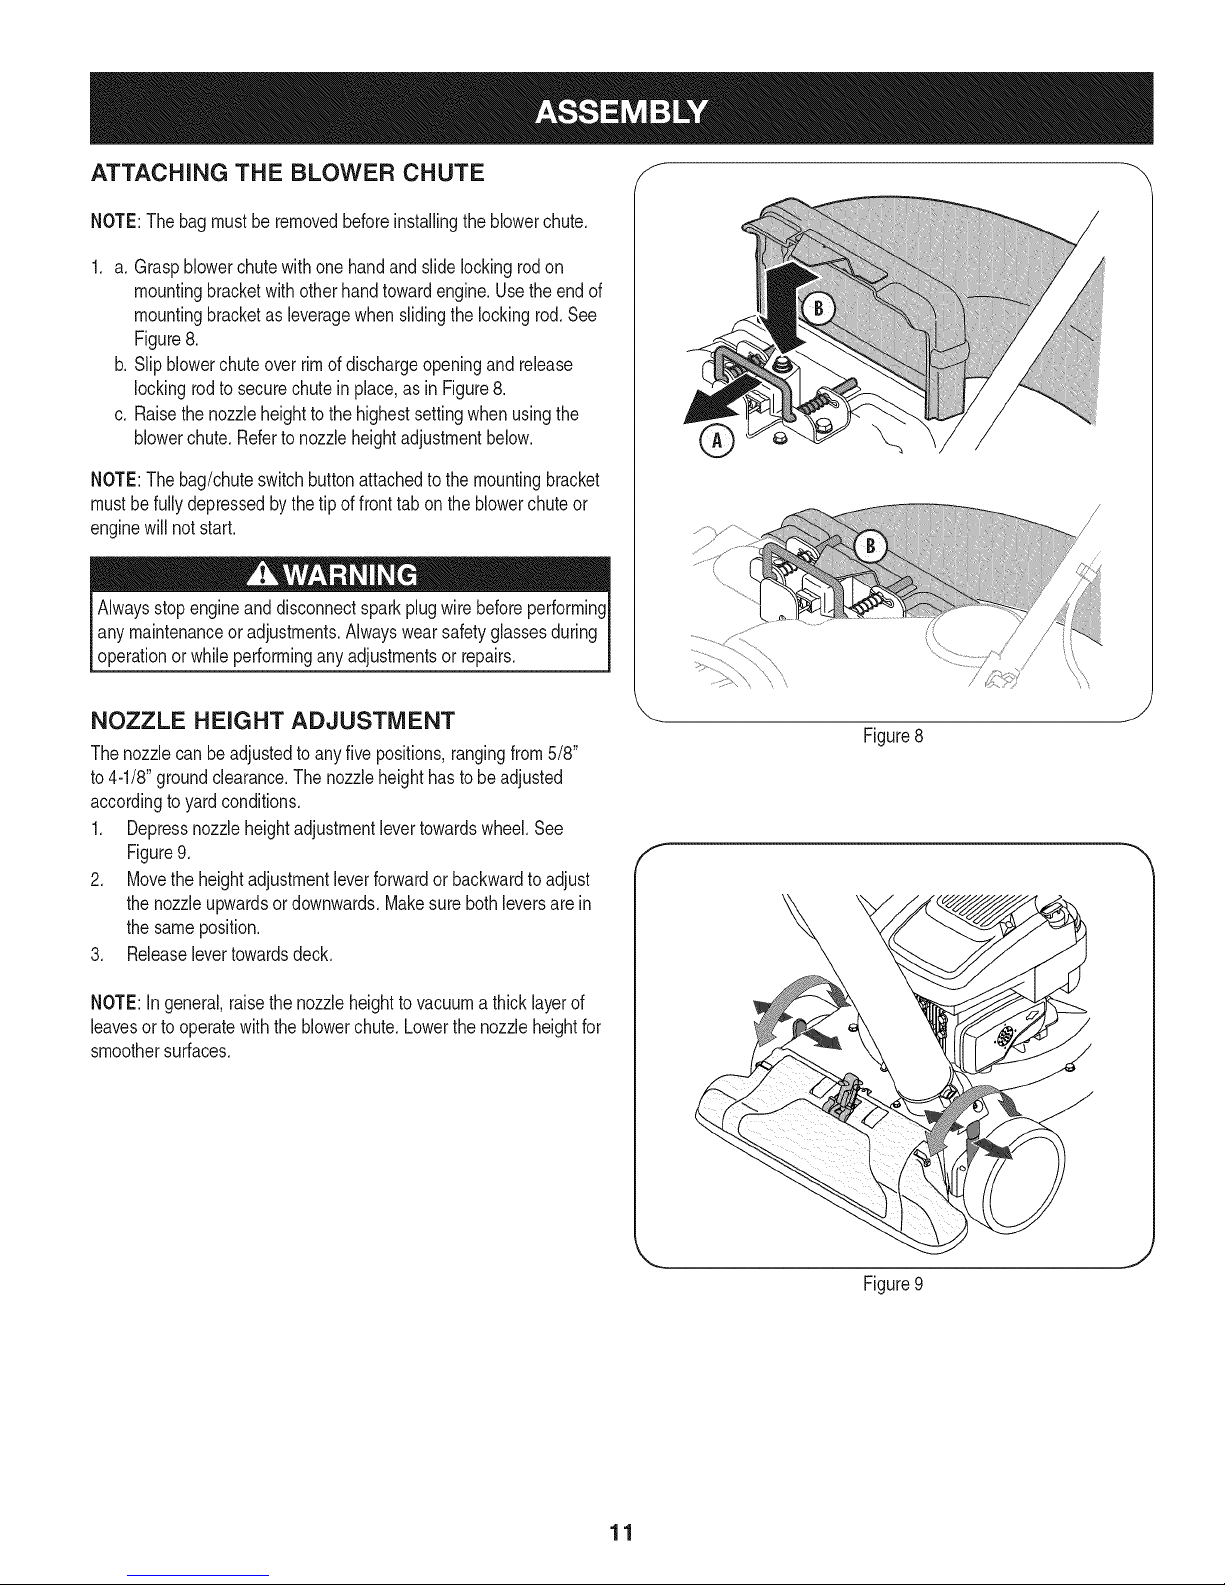
ATTACHING THE BLOWER CHUTE f
NOTE:Thebagmust beremovedbeforeinstallingtheblowerchute.
1. a. Graspblowerchutewithonehandandslidelockingrodon
mountingbracketwithotherhandtowardengine.Usetheendof
mountingbracketas leveragewhenslidingthelockingrod.See
Figure8.
b. Slipblowerchuteoverrimof dischargeopeningandrelease
lockingrodto securechuteinplace,asin Figure8.
c. Raisethe nozzleheighttothehighestsettingwhenusingthe
blowerchute.Refertonozzleheightadjustmentbelow.
NOTE:Thebag/chuteswitchbuttonattachedtothemountingbracket
mustbefullydepressedbythetip of fronttab onthe blowerchuteor
enginewillnotstart.
Alwaysstopengineanddisconnectsparkplugwirebeforeperforming
anymaintenanceoradjustments.Alwayswearsafetyglassesduring
operationorwhileperforminganyadjustmentsor repairs.
NOZZLE HEIGHT ADJUSTMENT
Thenozzlecan beadjustedtoanyfivepositions,rangingfrom5/8"
to4-1/8"groundclearance.Thenozzleheighthastobe adjusted
accordingtoyardconditions.
1. Depressnozzleheightadjustmentlevertowardswheel.See
Figure9.
2. Movetheheightadjustmentleverforwardor backwardto adjust
thenozzleupwardsordownwards.Makesure bothleversarein
thesameposition.
3. Releaselevertowardsdeck.
\\
J
Figure8
f
NOTE:In general,raisethe nozzleheighttovacuumathicklayerof
leavesortooperatewiththeblowerchute.Lowerthenozzleheightfor
smoothersurfaces.
J
Figure9
11
Page 12
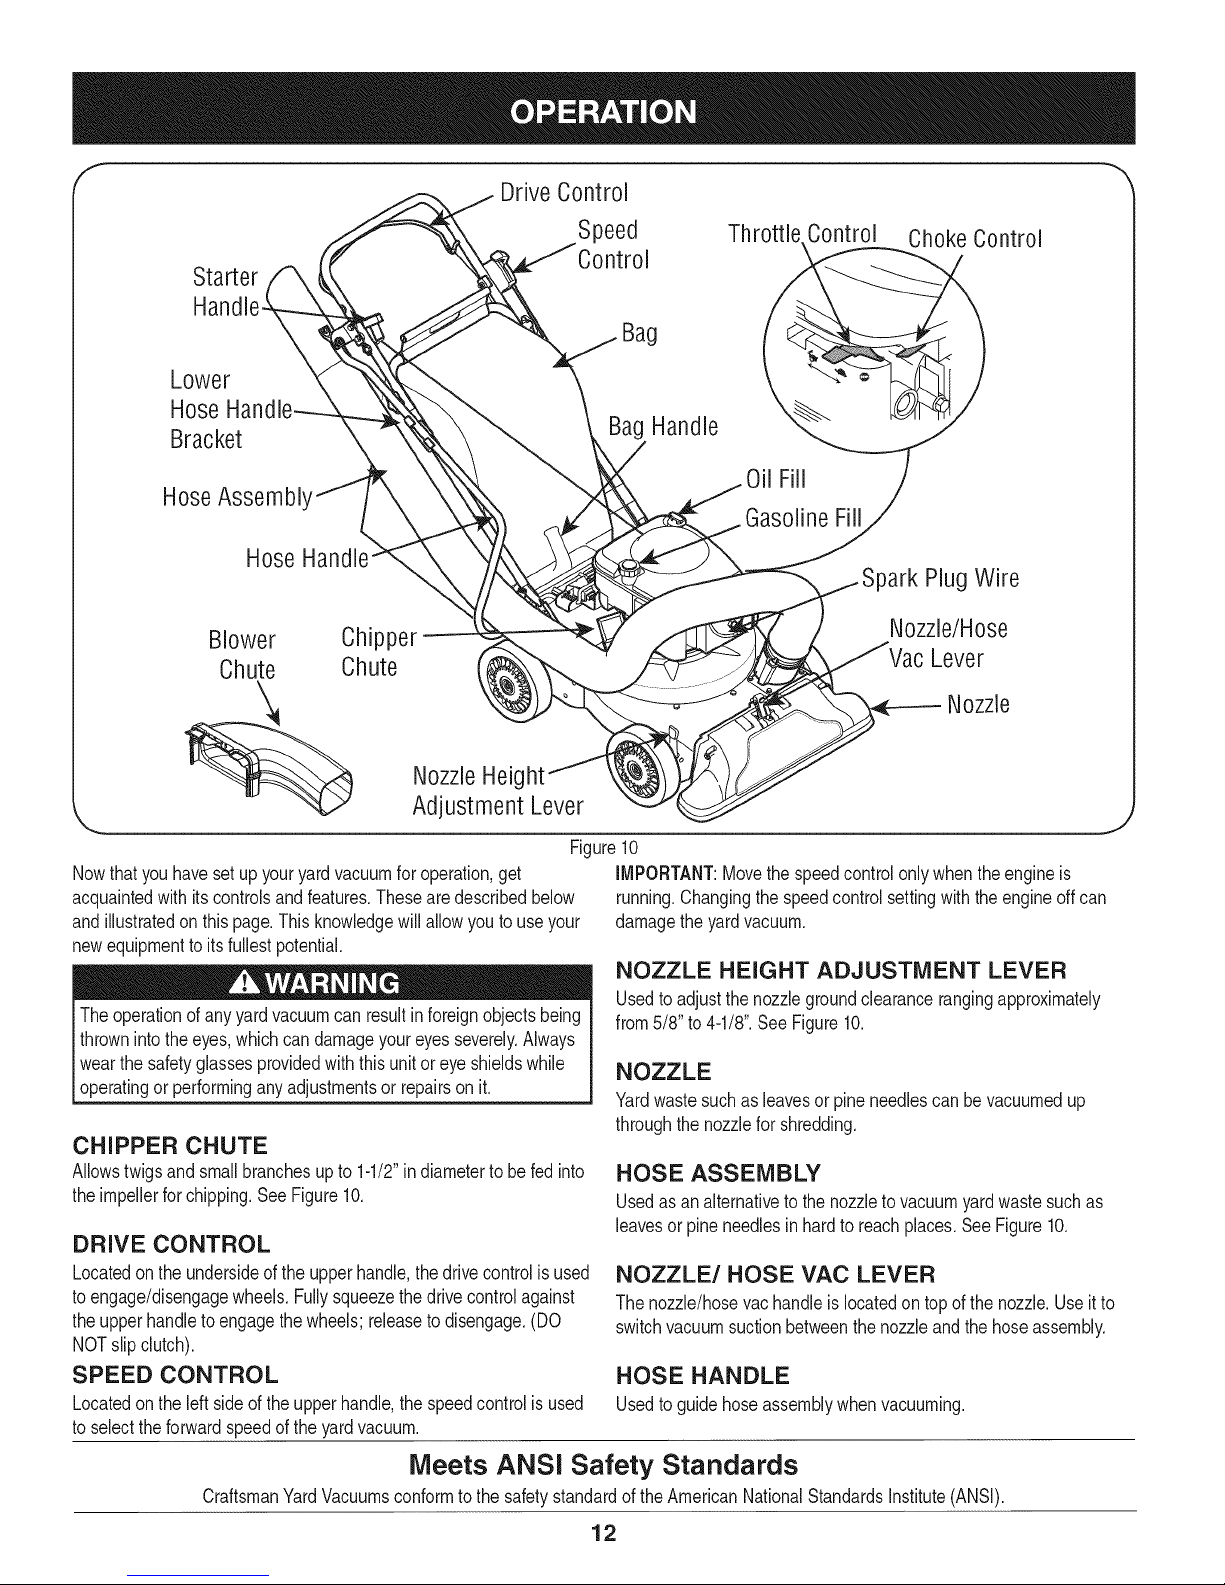
f
Drive Control
Speed Thr( Control Choke Control
Starter
Bag
Lower
Hose
Bracket
Bag Handle
HoseAssembl'
Hose
Blower Chipper
Chute Chute
NozzleHeig
Adjustment Lever
Figure10
Nowthat youhavesetup youryardvacuumforoperation,get
acquaintedwith itscontrolsandfeatures.Thesearedescribedbelow
andillustratedon thispage.Thisknowledgewill allowyoutouseyour
newequipmenttoitsfullestpotential.
Theoperationofanyyard vacuumcan resultinforeignobjectsbeing
thrownintothe eyes,whichcandamageyoureyesseverely.Always
Iwearthe safetyglassesprovidedwiththisunit oreye shieldswhile
[operatingor performinganyadjustmentsor repairsonit.
CHIPPER CHUTE
Allowstwigsandsmallbranchesupto 1-1/2"in diametertobe fedinto
theimpellerforchipping.SeeFigure10.
DRIVE CONTROL
Locatedon theundersideof the upperhandle,thedrivecontrolisused
toengage/disengagewheels.Fullysqueezethedrivecontrolagainst
theupperhandletoengagethewheels;releasetodisengage.(DO
NOTslipclutch).
SPEED CONTROL
Locatedon theleftsideoftheupperhandle,thespeedcontrolis used
toselectthe forwardspeedof the yardvacuum.
Oil Fill
GasolineFill
)ark PlugWire
Nozzle/Hose
Lever
Nozzle
J
iMPORTANT:Movethespeedcontrolonlywhenthe engineis
running.Changingthespeedcontrolsettingwiththeengineoffcan
damagetheyardvacuum.
NOZZLE HEIGHT ADJUSTMENT LEVER
Usedtoadjustthenozzlegroundclearancerangingapproximately
from5/8"to 4-1/8".See Figure10.
NOZZLE
Yardwastesuchasleavesorpineneedlescan bevacuumedup
throughthe nozzlefor shredding.
HOSE ASSEMBLY
Usedasanalternativeto thenozzletovacuumyardwastesuchas
leavesor pineneedlesinhardto reachplaces.SeeFigure10.
NOZZLE/HOSE VAC LEVER
Thenozzle/hosevachandleislocatedon topofthe nozzle.Useit to
switchvacuumsuctionbetweenthenozzleandthehoseassembly.
HOSE HANDLE
Usedtoguidehoseassemblywhenvacuuming.
Meets ANSI Safety Standards
CraftsmanYardVacuumsconformto the safetystandardof theAmericanNationalStandardsinstitute(ANSi).
12
Page 13
BAG HANDLE
Usedtograspbaginorderto assistinattaching,removing,and
emptyingbag.SeeFigure10.
BAG
Collectsshreddedmaterialfed throughthechipperchuteorvacuumed
throughthenozzleorhose.
BLOWER CHUTE
Whenattachedtounit,theblowerchuteisusedtodischargeyard
wastesuchas leaves,pineneedle,or smalltwigsacrossyard.
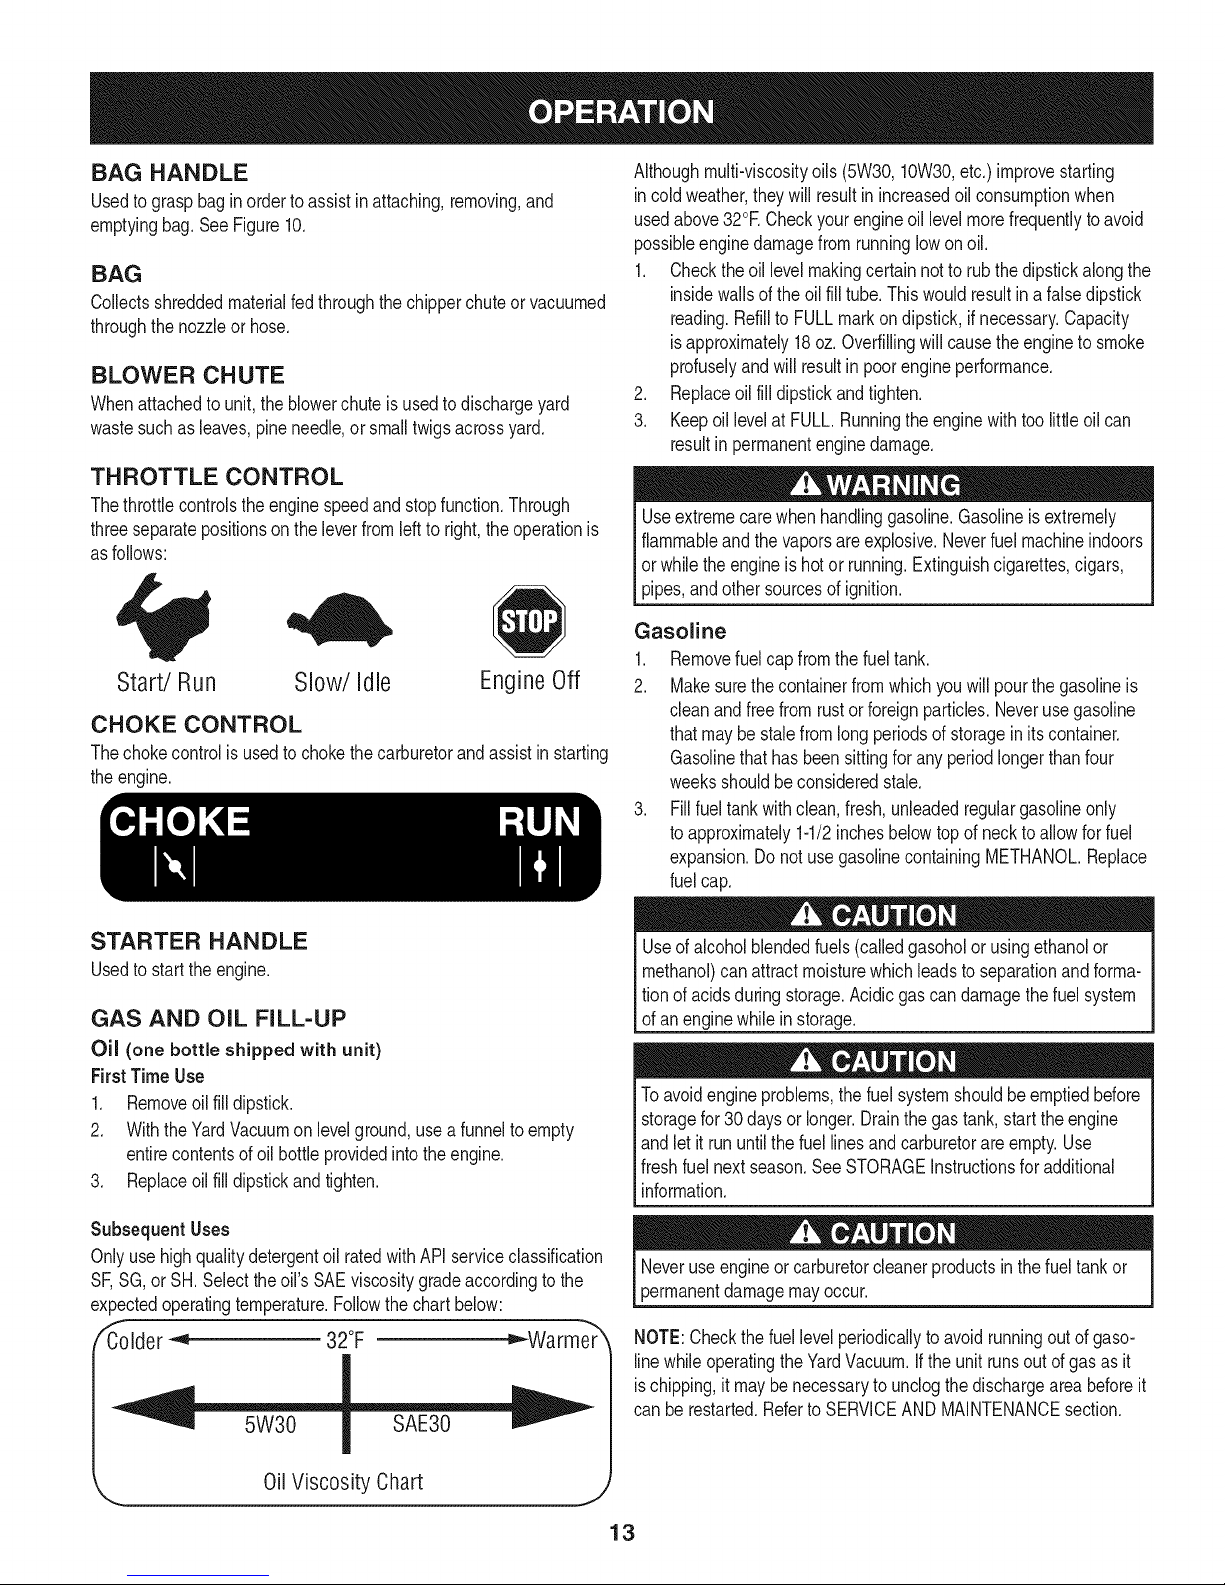
THROTTLE CONTROL
Thethrottlecontrolsthe enginespeedandstopfunction.Through
threeseparatepositionson theleverfromleftto right,theoperationis
asfollows:
Start/Run Slow/Idle EngineOff
CHOKE CONTROL
Thechokecontrolisusedtochokethecarburetorandassistinstarting
theengine.
Althoughmulti-viscosityoils (5W30,10W30,etc.) improvestarting
incoldweather,theywill resultinincreasedoilconsumptionwhen
usedabove32°ECheckyourengineoillevelmorefrequentlyto avoid
possibleenginedamagefromrunninglowonoil.
1. Checktheoillevelmakingcertainnotto rubthedipstickalongthe
insidewallsof the oilfill tube.Thiswouldresultinafalsedipstick
reading.RefilltoFULLmarkondipstick,ifnecessary.Capacity
isapproximately18oz.Overfillingwillcausetheenginetosmoke
profuselyandwillresultin poorengineperformance.
2. Replaceoilfilldipstickandtighten.
3. KeepoillevelatFULL.Runningtheenginewithtoolittleoilcan
resultin permanentenginedamage.
Useextremecarewhenhandlinggasoline.Gasolineisextremely
flammableand thevaporsare explosive.Neverfuel machineindoors
or whiletheengineishotor running.Extinguishcigarettes,cigars,
pipes,andothersourcesof ignition.
Gasoline
1. Removefuelcapfromthefueltank.
2. Makesurethecontainerfromwhichyouwillpourthegasolineis
cleanandfreefromrustorforeignparticles.Neverusegasoline
thatmaybe stalefromlongperiodsof storageinitscontainer.
Gasolinethathasbeensittingforanyperiodlongerthanfour
weeksshouldbeconsideredstale.
3. Fillfueltankwithclean,fresh,unleadedregulargasolineonly
toapproximately1-1/2inchesbelowtopof necktoallowforfuel
expansion.DonotusegasolinecontainingMETHANOL.Replace
fuelcap.
STARTER HANDLE
Usedto startthe engine.
GAS AND OiL FILL-UP
Oil (one bottle shipped with unit)
First TimeUse
1. Removeoilfilldipstick.
2. WiththeYardVacuumon levelground,useafunnelto empty
entirecontentsofoilbottleprovidedintotheengine.
3. Replaceoilfill dipstickandtighten.
Subsequent Uses
Onlyuse highqualitydetergentoil ratedwithAPIserviceclassification
SF,SG,or SH.Selecttheoil'sSAEviscositygradeaccordingto the
expectedoperatingtemperature.Followthe chartbelow:
/_Colder_ 32°F _Warme_
0il Viscosity Chart
J
Useofalcoholblendedfuels(calledgasoholor usingethanolor
methanol)canattractmoisturewhichleadsto separationandforma-
tionofacidsduringstorage.Acidicgascandamagethe fuelsystem
of anenginewhilein storage.
Toavoidengineproblems,thefuelsystemshouldbeemptiedbefore
storagefor30 daysorlonger.Drainthe gastank,starttheengine
andletitrununtilthefuellinesandcarburetorareempty.Use
freshfuelnextseason.SeeSTORAGEInstructionsfor additional
nformaton.
mayoccur.
NOTE:Checkthefuellevel periodicallyto avoidrunningoutofgaso-
linewhileoperatingthe YardVacuum.Iftheunitrunsout of gasasit
ischipping,it maybe necessarytounclogthedischargeareabeforeit
canbe restarted.RefertoSERVICEANDMAINTENANCEsection.
13
Page 14

BagYC_hutei/
SwitchWire /
/
TopView
iiii FrontTab i ..............................
/
Figure11
ChokeControl
Whenmovingthrottlecontrollever,becarefulof heatedsurfacesand
sharpedgesonmufflerguard.
TO START ENGINE
1. Attachsparkplugwire andrubberbootto sparkplug.
2. Thebag/chuteswitchbuttonmustbefullydepressedbythe tip
offronttabon baghandleor blowerchutefor enginetostart.See
Figure11.
3. Makesurebag/chuteswitchwire is connectedto engineand
groundedtomountingbracket.SeeFigure11.
4. Gastankshouldbe filled3/4tofull beforestarting.
5. Movethrottlecontrolto START/RUN(Rabbit) ,_ position.See
Figure12.
6. MovethechokecontrolI'_'1 towardthethrottlecontroltochoke
theengine'scarburetor.(Awarmenginemaynotrequirechoking.)
See Figure12.
7. Standingbehindtheunit,graspstarterhandleandpullropeout
untilyoufeel adrag.
8. Pullthe ropewitha rapid,continuous,fullarmstroke.Keepa firm
griponthestarterhandle.Letthe roperewindslowly.
9. Repeat,ifnecessary,untilenginestarts.Whenenginestarts,
movechokecontrolgraduallyawayfromthe throttlecontrol.
10. if enginefalters,movechokecontrolbacktowardthethrottle
controland repeatsteps7 through9.
11. ALWAYSkeepthethrottlecontrolinthe START/RUN
positionwhenoperatingtheYardVacuum.
TO STOP ENGINE
1. Movethrottlecontrolleverto slow(turtle)_ position.
Wheneverpossible,graduallyreduceenginespeedbefore
stoppingengine.
2. Movethrottlecontrolleverto STOP or OFFposition.
Figure12
f
3. Disconnectsparkplugwireand groundittopreventaccidental
startingwhiletheequipmentisunattended.
TO EMPTY BAG
1. Unhookbagstrapsfromthelowerhandle.
2. Unsnapbagclip fromthetopoflowerhandle.See Figure13.
3. Graspbaghandlewithonehandandpulllock rodonmounting
bracketwithotherhandtowardengineto release.
4. Liftbagoffbackof unit.
5. Twistthetwobuttonsonthebackof thebagto unlockandempty
contents.SeeFigure14.Holdbaghandleandbagclipwhile
emptyingthecontents.
6. Compressbagopeningandfold innerflap overopening.
7. Foldouterflapoverinnerflapand insertbuttonsonthebag
throughmetaloutlets.SeeFigure14.
8. Twistthebuttonsto lockbag.Placebagbackontounitas
instructedintheASSEMBLYsection.
J
Figure13
14
Page 15
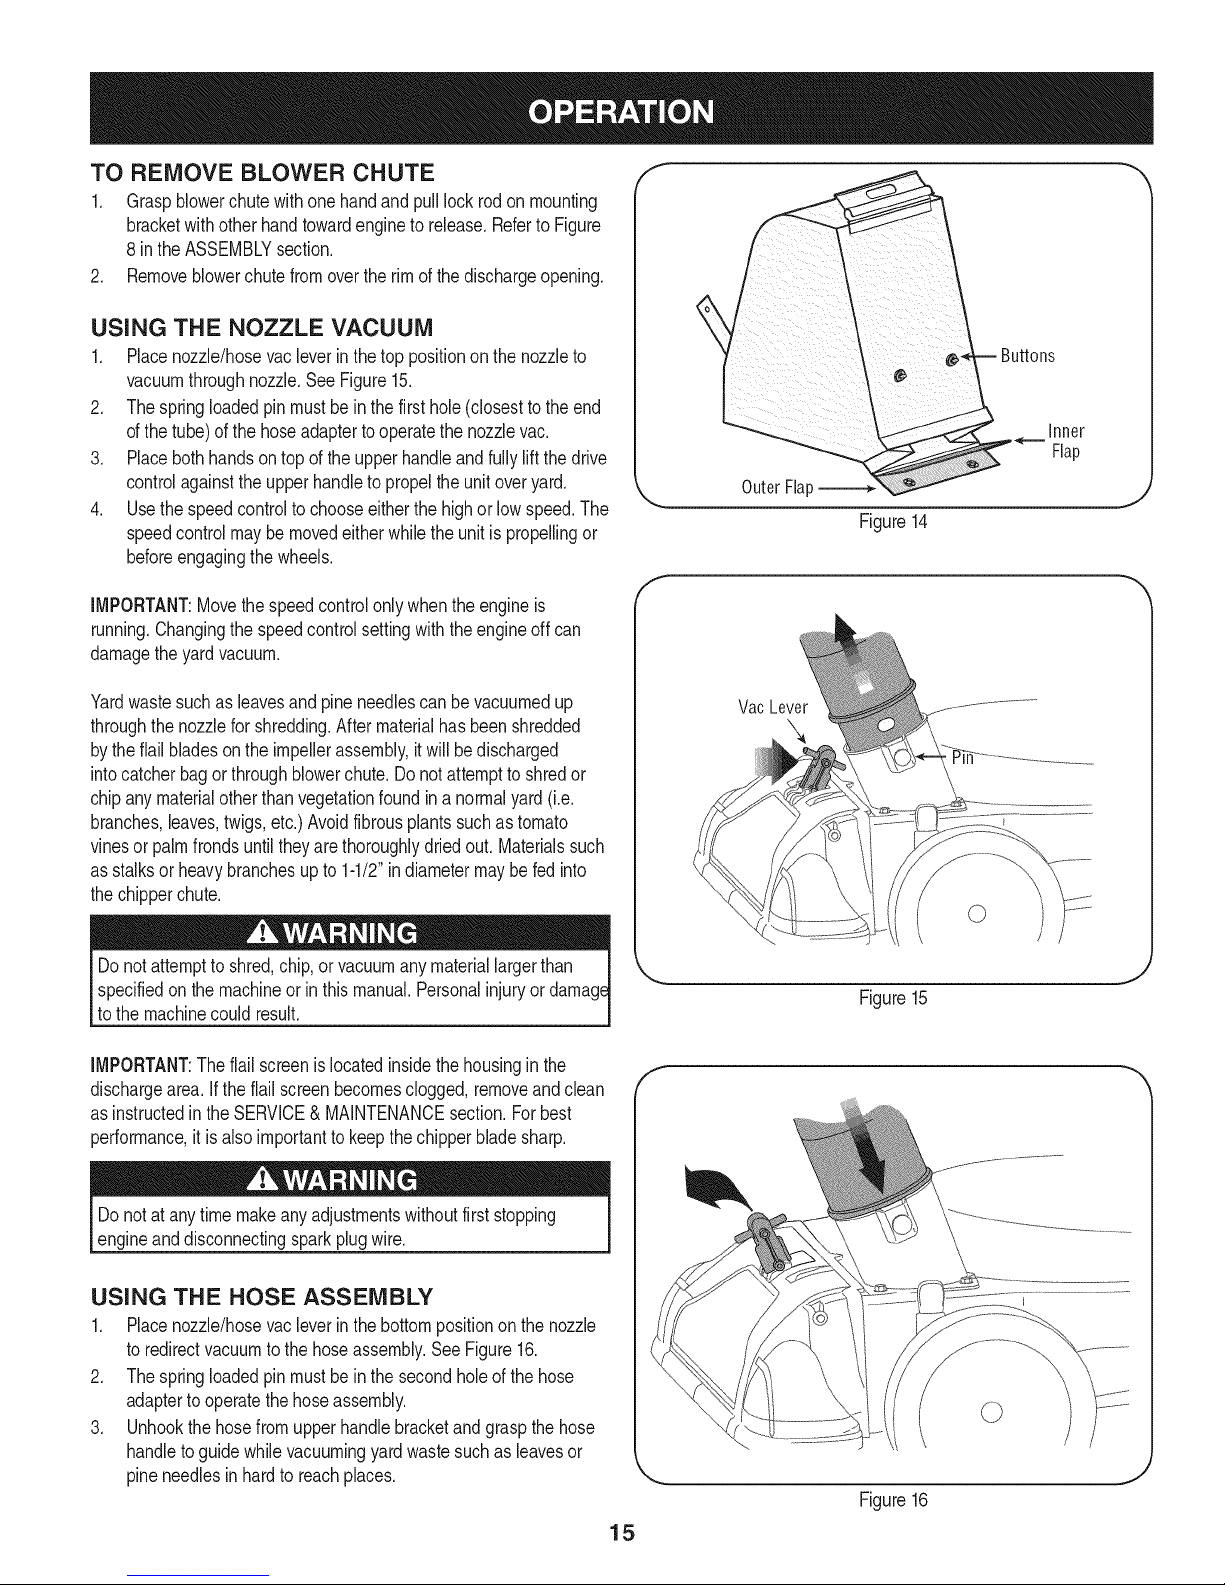
TO REMOVE BLOWER CHUTE
1. Graspblowerchutewithone handandpull lockrodonmounting
bracketwithotherhandtowardengineto release.Referto Figure
8 intheASSEMBLYsection.
2. Removeblowerchutefromovertherimofthe dischargeopening.
USING THE NOZZLE VACUUM
1. Placenozzle/hosevacleverinthe top positionon thenozzleto
vacuumthroughnozzle.SeeFigure15.
2. Thespringloadedpinmustbein the firsthole(closesttotheend
ofthetube)ofthehoseadaptertooperatethenozzlevac.
3. Placebothhandsontop oftheupperhandleandfullyliftthedrive
controlagainsttheupperhandletopropeltheunitoveryard.
4. Usethe speedcontrolto chooseeitherthe highorlow speed.The
speedcontrolmaybemovedeitherwhiletheunitis propellingor
beforeengagingthewheels.
IMPORTANT:Movethe speedcontrolonlywhentheengineis
running.Changingthe speedcontrolsettingwiththeengineoffcan
damagetheyardvacuum.
Inner
Flap
OuterFlal:
Figure14
Yardwastesuchas leavesandpineneedlescanbevacuumedup
throughthenozzleforshredding.Aftermaterialhasbeenshredded
bytheflail bladesontheimpellerassembly,itwill bedischarged
intocatcherbagorthroughblowerchute.Donotattempttoshredor
chipany materialotherthanvegetationfoundin a normalyard(i.e.
branches,leaves,twigs,etc.)Avoidfibrousplantssuchastomato
vinesor palmfrondsuntiltheyare thoroughlydriedout.Materialssuch
asstalksor heavybranchesupto 1-1/2"indiametermaybefedinto
thechipperchute.
specifiedonthe machineorin thismanual.Personalinjuryor
to themachinecould result.
IMPORTANT:Theflailscreenis locatedinsidethe housinginthe
dischargearea.if the flailscreenbecomesclogged,removeandclean
asinstructedin theSERVICE&MAINTENANCEsection.Forbest
performance,itis alsoimportanttokeepthechipperbladesharp.
Donotat anytimemakeanyadjustmentswithoutfirststopping
engineanddisconnectingsparkplugwire.
Vac Lever
Figure15
F
USING THE HOSE ASSEMBLY
1. Placenozzle/hosevacleverinthe bottompositionon thenozzle
toredirectvacuumtothehoseassembly.SeeFigure16.
2. Thespringloadedpinmustbein the secondholeof thehose
adaptertooperatethe hoseassembly.
3. Unhookthehosefromupperhandlebracketandgraspthehose
handletoguidewhilevacuumingyardwastesuchas leavesor
pineneedlesin hardto reachplaces.
Figure16
15
Page 16

MAINTENANCE SCHEDULE
Beforeperforminganytypeofmaintenance/service,disengageall
controlsandstoptheengine.Waituntilallmovingpartshavecometo
acompletestop.Disconnectsparkplugwireandgroundittoprevent
unintendedstarting.Alwayswearsafetyglassesduringoperationorwhile
performinganyadjustmentsorrepairs.
EachUse
1. Engineoil level
2. Looseormissinghardware
3. Unitandengine.
1st5 - 8 hours
25 hours
1. Engineoil
1. Engineoilt
2. Aircleaner
3. Controllinkagesandpivots
50 hours
Annuallyor100hours
1. Engineoil
1. Sparkplug
BeforeStorage 1. Fuelsystem
1. Check
2. Tightenor replace
3. Clean
1. Change
1. Change
2. Cleanor replace
3. Lubewithlight oil
1. Change
1. Cleanandadjustgap,orelse
1. Runengineuntilit stopsfromlackof
Underheavyloador inhightemperatures
Followthemaintenanceschedulegivenbelow.Thischartdescribes
serviceguidelinesonly.UsetheServiceLogcolumntokeeptrackof
completedmaintenancetasks.To locate the nearest SearsService
Centeror to scheduleservice,simplycontactSearsat
1-800-4-MY-HOME®.
= =
replacewithnewplug.
fuelor addagasolineadditiveto the
gasin thetank.
Alwaysstopengineanddisconnectsparkplugwirebeforeperforming
Ianymaintenanceoradjustments.Alwayswearsafetyglassesduring
_operationor whileperforminganyadjustmentsor repairs.
GENERAL RECOMMENDATIONS
• Alwaysobservesafetyruleswhenperforming
anymaintenance.
• Thewarrantyon thisyardvacuumdoesnotcoveritemsthat have
beensubjectedtooperatorabuseor negligence.Toreceivefull
valuefromwarranty,operatormustmaintaintheequipmentas
instructedhere.
• Someadjustmentswillhavetobemadeperiodicallyto maintain
yourunit properly.
• Periodicallycheckallfastenersand makesurethesearetight.
ENGINE MAINTENANCE
Checking the Spark Plug
Cleansparkplugandresettheelectrodegapto0.020"atleastoncea
season;replaceevery100hoursofoperation.
• Cleanareaaroundthesparkplugbase.Donotsandblastspark
plug.Sparkplugshouldbecleanedbyscrapingorwirebrushing
andwashingwitha commercialsolvent.
/f Electrode Porcelain
.020inch(.51ram)gap
J
Figure17
• Removeandinspectthesparkplug.Checkgaptomakesureit is
setat .020".SeeFigure17.
• Replacethesparkplugifelectrodesare pitted,burned,or the
porcelainiscracked.
16
Page 17
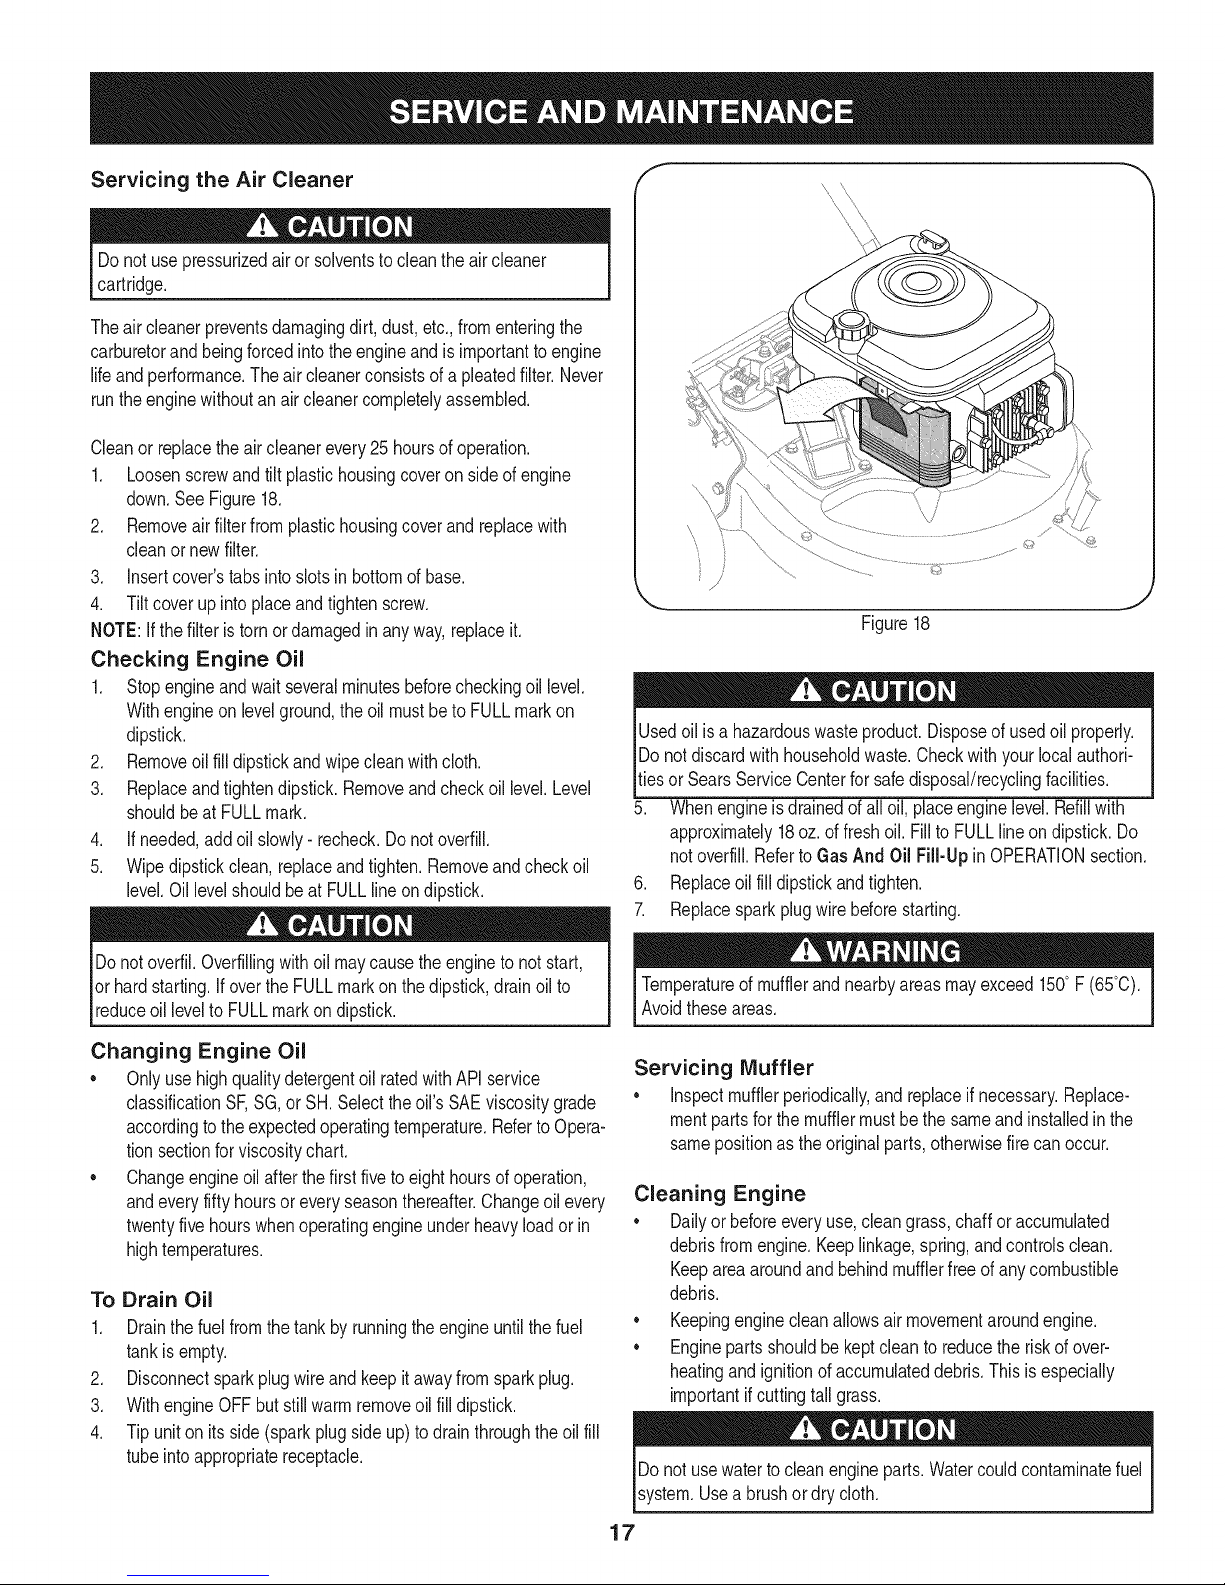
Servicing the Air Cleaner
Donotuse pressurizedairorsolventstocleantheaircleaner
cartridge.
Theair cleanerpreventsdamagingdirt, dust,etc.,fromenteringthe
carburetorand beingforcedintotheengineandis importantto engine
lifeandperformance.Theair cleanerconsistsofa pleatedfilter. Never
runtheenginewithoutan aircleanercompletelyassembled.
Cleanor replacetheair cleanerevery25hoursofoperation.
1. Loosenscrewandtilt plastichousingcoveronsideofengine
down.SeeFigure18.
2. Removeairfilterfromplastichousingcoverandreplacewith
cleanor newfilter.
3. insertcover'stabsintoslotsin bottomofbase.
4. Tiltcoverupintoplaceandtightenscrew.
NOTE:Ifthefilteristornordamagedinanyway,replaceit.
Checking Engine Oil
1. Stopengineandwaitseveralminutesbeforecheckingoil level.
Withengineonlevelground,the oilmustbeto FULLmarkon
dipstick.
2. Removeoilfilldipstickandwipecleanwithcloth.
3. Replaceandtightendipstick.Removeandcheckoillevel.Level
shouldbeatFULLmark.
4. Ifneeded,addoil slowly- recheck.Do notoverfill.
5. Wipedipstickclean,replaceandtighten.Removeandcheckoil
level.Oil levelshouldbe atFULLlineondipstick.
f
x \
\
©
J
Figure18
Usedoil is ahazardouswasteproduct.Disposeofusedoilproperly.
IDo notdiscardwithhouseholdwaste.Checkwithyourlocalauthori-
_tiesorSearsServiceCenterfor safedisposal/recyclingfacilities.
5. Whenengineisdrainedofall oil,placeenginelevel.Refillwith
approximately18oz.offreshoil.Fillto FULLlineondipstick.Do
notoverfill.RefertoGasAnd Oil Fill-Up inOPERATIONsection.
6. Replaceoilfilldipstickandtighten.
7. Replacesparkplugwirebeforestarting.
Donotoverfil.Overfillingwithoil maycausetheenginetonotstart,
or hardstarting.Ifoverthe FULLmarkonthedipstick,drainoilto
reduceoillevelto FULLmarkondipstick.
Changing Engine Oil
• OnlyusehighqualitydetergentoilratedwithAPIservice
classificationSF,SG, orSH.Selecttheoil's SAEviscositygrade
accordingtothe expectedoperatingtemperature.Referto Opera-
tionsectionforviscositychart.
• Changeengineoilafterthefirst fivetoeighthoursofoperation,
andeveryfiftyhoursoreveryseasonthereafter.Changeoilevery
twentyfivehourswhenoperatingengineunderheavyloadorin
hightemperatures.
To Drain Oil
1. Drainthefuelfromthetankbyrunningtheengineuntil thefuel
tankisempty.
2. Disconnectsparkplugwireandkeepit awayfromsparkplug.
3. WithengineOFFbutstillwarmremoveoil filldipstick.
4. Tipuniton itsside(sparkplugside up)to drainthroughtheoilfill
tubeinto appropriatereceptacle.
Temperatureof mufflerandnearbyareasmayexceed150°F (65°C).
Avoidtheseareas.
Servicing Muffler
• inspectmufflerperiodically,andreplaceif necessary.Replace-
mentpartsforthemufflermustbe the sameandinstalledinthe
samepositionastheoriginalparts,otherwisefirecanoccur.
Cleaning Engine
• Dailyor beforeeveryuse,cleangrass,chafforaccumulated
debrisfromengine.Keeplinkage,spring,andcontrolsclean.
Keepareaaroundand behindmufflerfreeofanycombustible
debris.
• Keepingenginecleanallowsairmovementaroundengine.
• Enginepartsshouldbekeptcleanto reducetheriskofover-
heatingandignitionofaccumulateddebris.Thisisespecially
importantifcuttingtallgrass.
Donot usewatertocleanengineparts.Watercouldcontaminatefuel
system.Useabrushordry cloth.
17
Page 18
Carburetor Adjustment f ..../ _,
Thecarburetoronthis engineisnotuseradjustable.ContactSears /
Parts&Repairforadjustment,
Engine Speed
/
Donot,attempttoaltertheenginespeedbytamperingwiththe
enginesgovernorlinkage.Doingsocouldresultinseriouspersonal
Iinjuryanddamagetotheengine.TheengineRPMhasbeensetat
thefactory.
LUBRICATION
• Wheels- Placea fewdropsofSAE30 oiloneachshoulderscrew
oncea season.
• Nozzleheight adjustment levers- Lubricatenozzleheight
adjustmentleverswith lightoil.
• Locking Rod-Lubricatethelock rodandcompressionsprings
Figure19
whichattachto the mountingbracket.
• Nozzle/HoseVacLever: Lubricatethe nozzle/hosevacleveron
topof the nozzleonceaseasonwithlightoil.
CLEANING EQUIPMENT
Cleanundersideof theyardvacuumonceaseasontopreventbuild-up
ofdebris.Followstepsbelowforthisjob.
1. Disconnectandgroundsparkplugwire.Emptythefueltankby
runningengineuntiltankisdry.
2. Tiptheyardvacuumsothatitrestson itsside,keepingthe
mufflersidedown.Holdyardvacuumfirmly.
3. Scrapeandcleanthe undersideofthedeckandnozzlewitha
suitabletool.Donotspraywithwater.
f
IMPORTANT:Donotusea pressurewasherorgardenhosetoclean
yourunit.Thesemaycausedamageto bearings,orthe engine.The
useof waterwillresultin shortenedlifeandreduceserviceability.
4. Puttheyardvacuumbackonitswheelson theground.
CLEANING THE FLAIL SCREEN
Ifthedischargeareabecomesclogged,removetheflailscreenand
cleanareaasfollows:
1. Stoptheengine.Makecertainthe chipper/shreddervacuumhas
cometoa completestop.
2. Beforeuncloggingthedischargechute,disconnect and ground
the spark plugwire.
3. Removethevacuumbagorblowerchutefromthe unitas
instructedin theOPERATIONsectiontoobtainaccesstoflail
screen.
4. Removethethreeselftappingscrewssecuringthebeltcover,and
removebeltcover.SeeFigure19.
5. Removeselftappingscrewon rightsideof unitthatattachesto
theflail screen.SeeFigure20.
/
J
Figure20
18
Page 19
6. Removehexscrewontopofrearhousingnearmountingbracket
andtheflangelocknutthatsecuresflailscreen.SeeFigure20.
7. Removeandcleanthe screenby scrapingorwashingwithwater.
SeeFigure21.
8. Reinstallthescreen.
Beforeperforminganytypeof maintenanceon themachine,waitfor
all partsto stopmovinganddisconnectandgroundthesparkplug
wire. Failuretofollowthisinstructioncould resultinpersonalinjuryor
propertydamage.
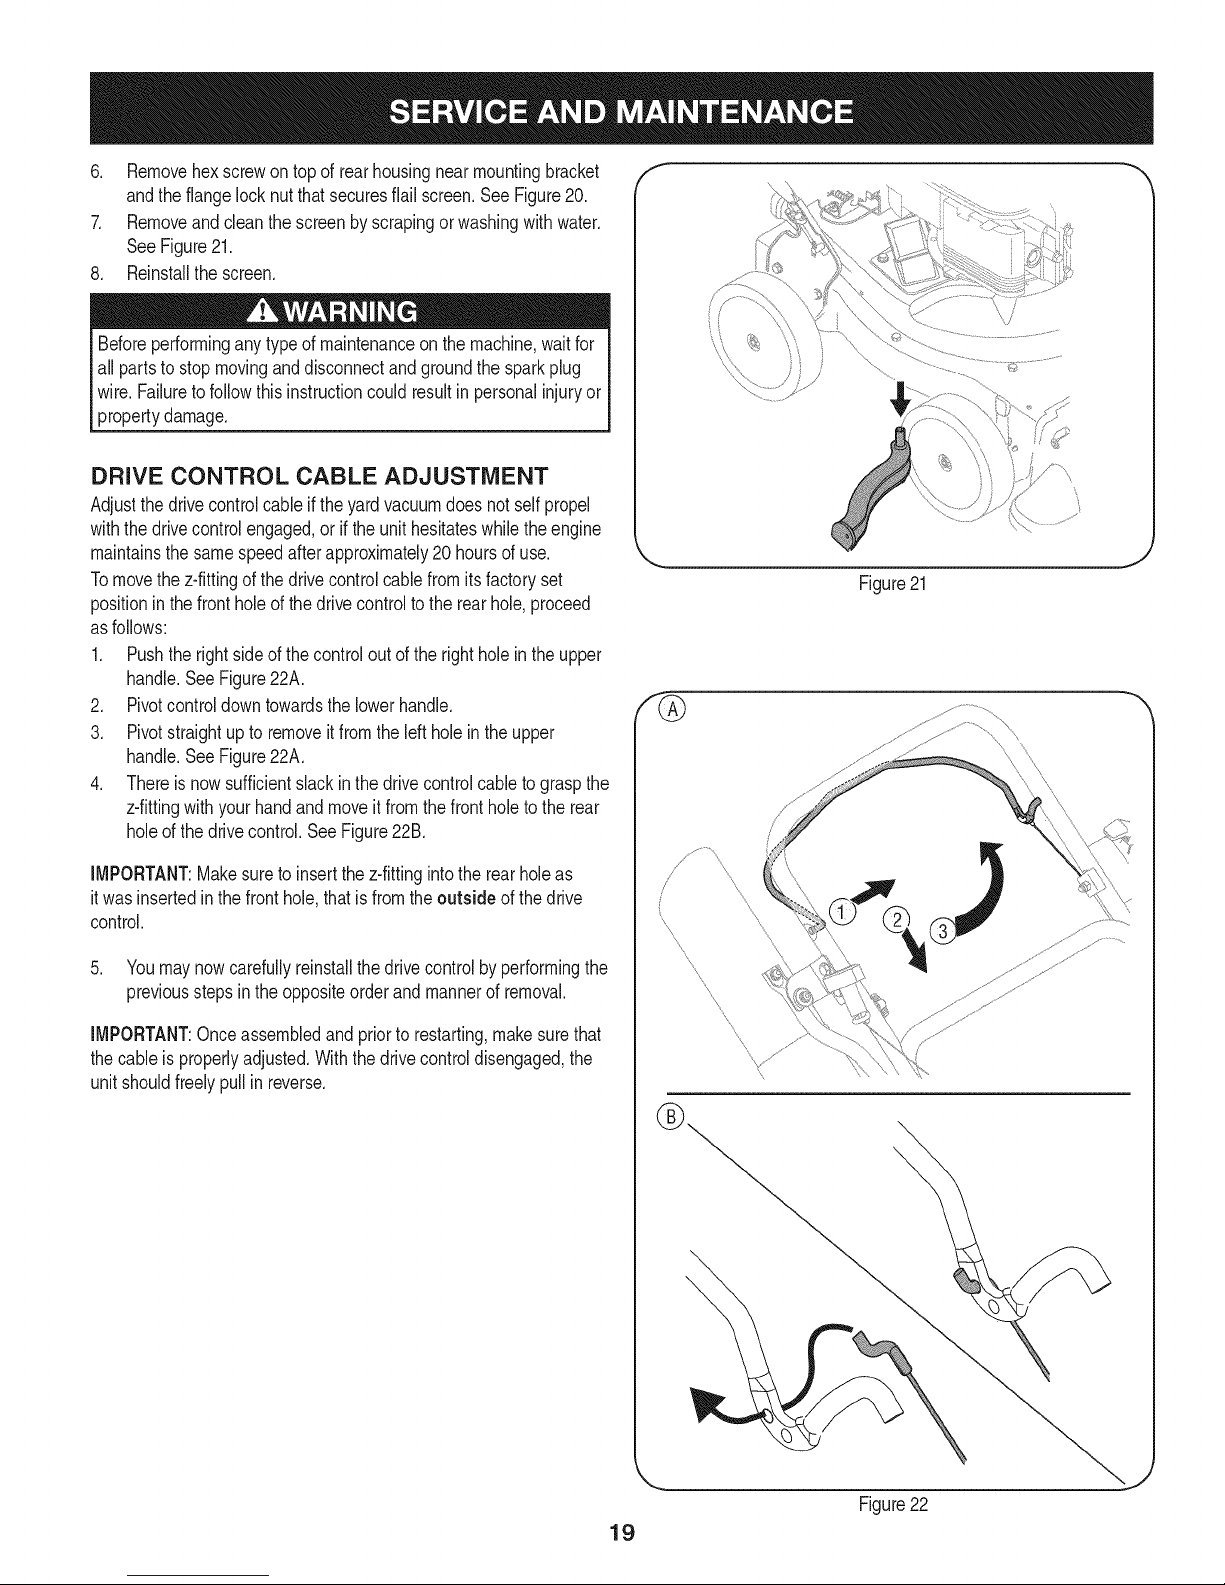
DRIVE CONTROL CABLE ADJUSTMENT
Adjustthedrivecontrolcableif theyardvacuumdoesnot selfpropel
withthedrivecontrolengaged,orif the unithesitateswhiletheengine
maintainsthe samespeedafterapproximately20 hoursofuse.
Tomovethe z-fittingof thedrivecontrolcablefromitsfactoryset
positioninthefrontholeof the drivecontroltotherearhole,proceed
asfollows:
1. Pushtherightsideof thecontroloutofthe rightholeintheupper
handle.SeeFigure22A.
2. Pivotcontroldowntowardsthelowerhandle.
3. Pivotstraightupto removeitfromtheleftholein theupper
handle.SeeFigure22A.
4. Thereisnowsufficientslackinthedrivecontrolcableto graspthe
z-fittingwithyourhandandmoveitfromthe frontholeto the rear
holeofthedrivecontrol.SeeFigure22B.
f
\
J
Figure21
IMPORTANT:Makesureto insertthez-fittingintothe rearholeas
itwasinsertedinthefronthole,thatis fromthe outside ofthedrive
control.
5. Youmaynowcarefullyreinstallthe drivecontrolbyperformingthe
previousstepsintheoppositeorderandmannerof removal.
IMPORTANT:Onceassembledand priorto restarting,makesurethat
thecableis properlyadjusted.Withthedrivecontroldisengaged,the
unitshouldfreelypullin reverse.
\
Figure22
19
Page 20
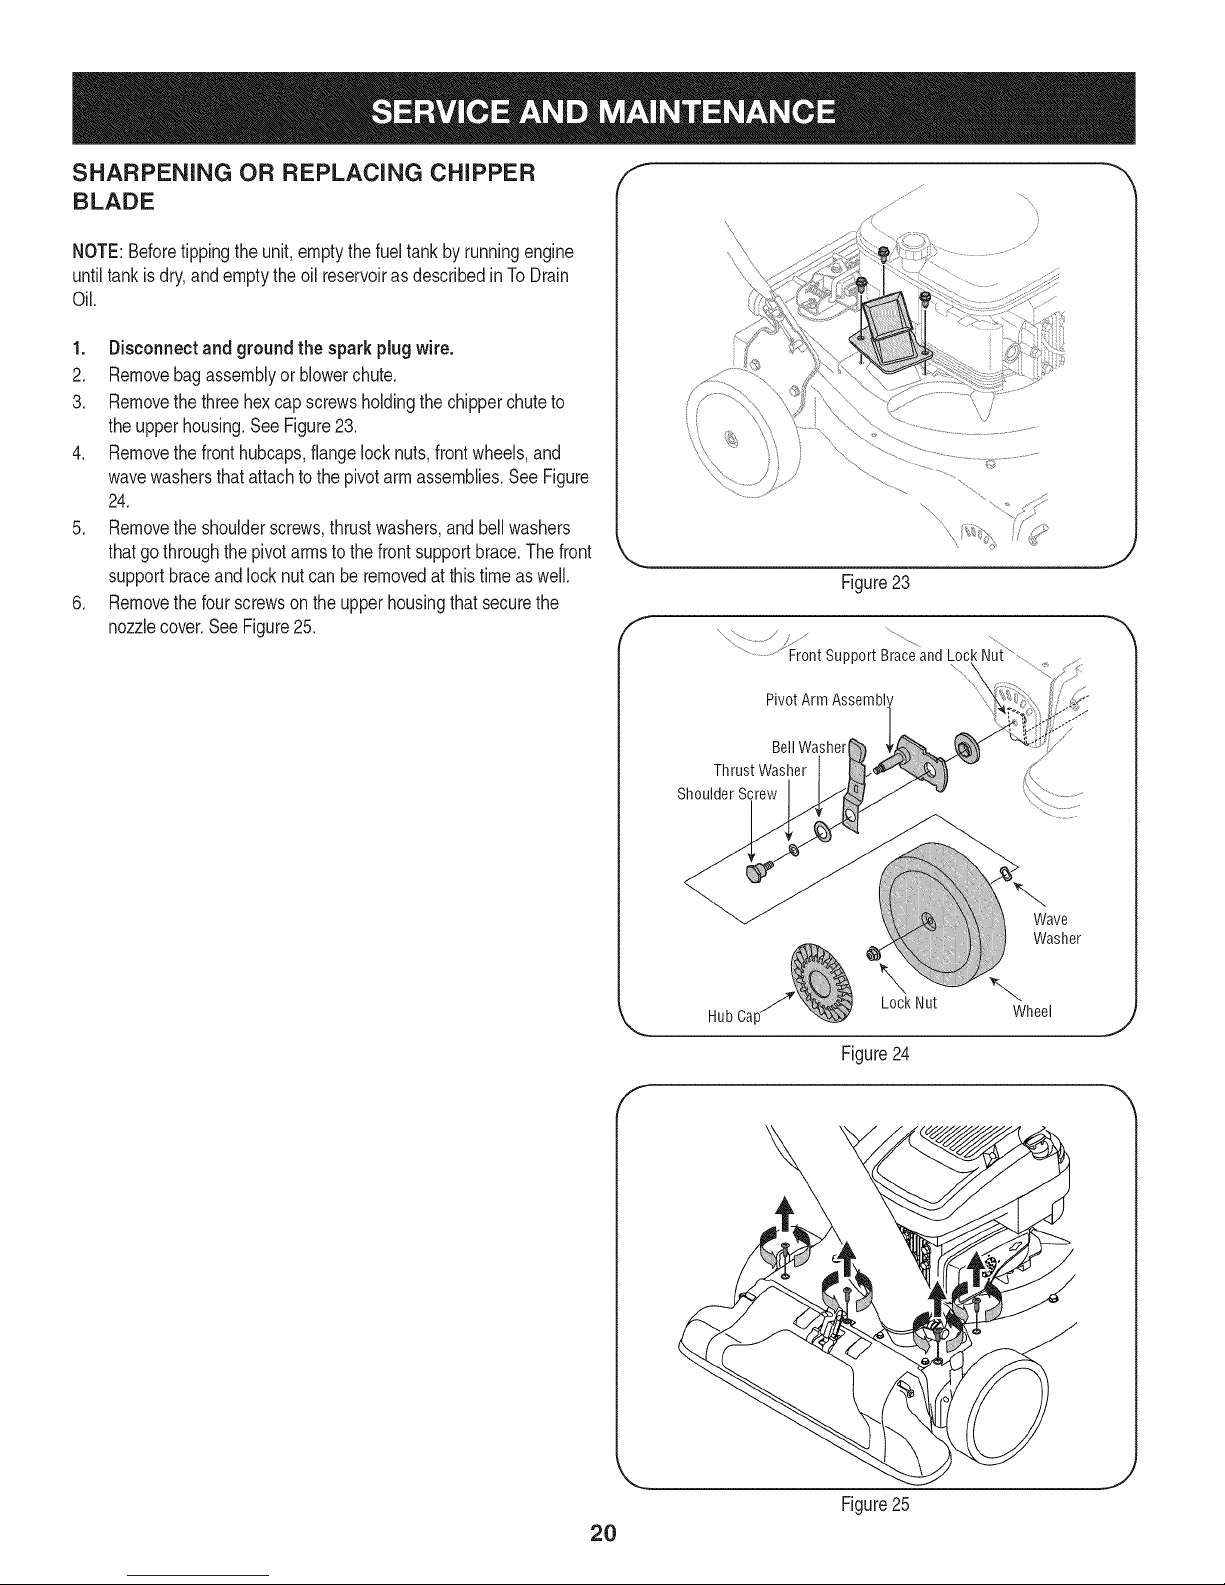
SHARPENING OR REPLACING CHIPPER
BLADE
NOTE:Beforetippingthe unit,emptythefueltankbyrunningengine
untiltankisdry,andemptythe oil reservoiras describedinTo Drain
Oil.
1. Disconnectand groundthesparkplugwire.
2. Removebagassemblyor blowerchute.
3. Removethethreehexcapscrewsholdingthechipperchuteto
theupperhousing.SeeFigure23.
4. Removethefronthubcaps,flangelocknuts,frontwheels,and
wavewashersthatattachtothepivotarmassemblies.SeeFigure
24.
5. Removethe shoulderscrews,thrustwashers,andbellwashers
thatgothroughthepivotarmstothefrontsupportbrace.Thefront
supportbraceandlocknutcanberemovedatthistimeaswell.
6. Removethefourscrewsontheupperhousingthatsecurethe
nozzlecover.SeeFigure25.
f
J
Figure23
x /
..........................Front support Braceand Lock Nui,
PivotArm Assembl'
BellWasher
Thrust Washer
Shoulder Screw
2O
Wave
Washer
Lock Nut
HubCa[ Wheel
J
Figure24
f
J
Figure25
Page 21

7. Carefullytilt andsupportthe unituptoprovideaccessunderneath
tothenozzlemountinghardwareandimpeller.Removethe three
shoulderboltssecuringtheblackplasticlowerflail housingto the
lowerhousing.Referto Figure26.
8. Tilttop ofblackplasticlowerflailhousingtowardtheengineto
remove.
9. Usinga3/16"allenwrench,removetheflat headcapscrewsthat
holdthechipperbladetothe impeller.Thesescrewsareacces-
siblethroughtheopeningcreatedwhenthechipperchutewas
removedearlier.SeeFigure27.
10. Thenutsontheflat headcapscrewscanbereachedfrom
underneathusinga 1/2-inchsocket,universal,andextension.
SeeFigure28.
11. Replaceorsharpenchipperblade.The bladecanbesharpened
withafileoronagrindingwheel.
\
Black
Nozzle
ShoulderScrews
Thechipperbladeis sharp.Whensharpeningblade,wear leather
workglovestoprotectyourhandsandfollowtheoriginalangleof
grind.
12. Reassemblebyperformingthe previousstepsin theopposite
orderand mannerofremoval.
NOTE:Tightenbladescrewsto 210- 250in-lbs.Makecertainchipper
bladeis reassembledwiththesharpedgefacingupward.
Figure26
f
C
Flat HeadCa Screws
Chipper Blade
J
Figure27
Impeller
J
Figure28
21
Page 22

Neverstoreyardvacuumwithfuelintankindoorsorinpoorly
ventilatedareaswherefuelfumesmayreachanopenflame,spark,
or pilotlightasona furnace,waterheater,clothesdryer,orgas
appliance.
PREPARING THE ENGINE
Forenginesstoredover30 days:
1. To preventgumfromforminginfuelsystemor oncarburetor
parts,runengineuntilit stopsfromlackof fueloradda gasoline
additivetothegasinthetank.Ifyouuseagasadditive,runthe
engineforseveralminutestocirculatethe additivethroughthe
carburetor--afterwhichtheengineandfuelcanbestoredupto
six months.
2. Whileengineis stillwarm,changetheoil.
3. Removesparkplugand pourapproximately1oz. (30rnl)of clean
engineoil intothecylinder.Pullthe recoilstarterseveraltimesto
distributetheoil,andreinstallthe sparkplug.
4. Cleanengineofsurfacedebris.
PREPARING THE YARD VACUUM
• Whenstoringtheyardvacuuminan unventilatedor metalstorage
shed,careshouldbetakento rustproofthenon-paintedsurfaces.
Usinga lightoilorsilicone,coatthe equipment,especiallyany
springs,bearings,andcables.
• Removealldirt fromexteriorofengineandequipment.
• Followlubricationrecommendations.
• Storeequipmentin aclean,dry area.Donotstorein anarea
whereequipmentispresentthatmayuseapilotlightorhasa
componentthatcancreateaspark.
22
Page 23

Enginefailstostart
1. Throttlelevernotincorrectstartingposition
2. ChokecontrolnotinCHOKEposition
3. Sparkplugwiredisconnected
4. Faultysparkplug
5. Fueltank emptyorstalefuel
6. Cannotpullrecoilcord
7. Safetyswitchnotdepressed
8. Safetyswitchwireis notconnectedto
engineor notproperlygrounded
Enginerunserratically
1. UnitrunningonCHOKE
2. Sparkplugwireloose
3. Stalefuel
4. Waterordirtin fuelsystem
5. Dirtyair cleaner
6. LowengineRPM
7. Carburetorout ofadjustment
Engineoverheats
1. Engineoil levellow
2. Air flowrestricted
Enginehesitatesathigh RPMs 1. Sparkpluggap settooclose
Engineidlespoorly 1. Fouledsparkplug
2. Dirtyair cleaner
Excessivevibration 1. Loosepartsor damagedimpeller
Unitdoesnotdischarge 1. Dischargeareaclogged
2. Foreignobjectlodgedin impeller
3. LowengineRPM
4. Vacuumbagis full
Rated dischargeslows
considerablyor compositionof
1. LowengineRPM
2. Chipperbladedull
dischargedmaterialchanges
Unitfailsto propelitselfor
1. Drivecontrolcableoutofadjustment
slipswhendrivecontrolis
engaged
2. Drivebeltwornordamaged
1. Movethrottleleverto START/RUNposition.
2. MovechokecontroltoCHOKEposition.
3. Connectwiretosparkplug.
4. Clean,adjustgap,orreplace.
5. Filltankwithclean,freshgasoline.
6. Obstructionlodgedin impeller.Disconnectspark
plugwireandremovelodgedobject.
7. Safetyswitchmustbedepressedby thefronttabon
thebag handlewhen securingthebag.
8. Connectsafetyswitchwireto engineconnectorand
groundto mountingbracket.
1. Movechokecontrolto RUNposition.
2. Connectandtightensparkplugwire.
3. Filltankwithfreshgasoline.
4. Drainfuel. Refillwithfreshfuel.
5. Cleanor replaceaircleanerfilter.
6. Alwaysrunengineat fullthrottle.
7. ContactyourSearsParts& RepairCenter.
1. Fillenginewith properamountandtype ofoil.
2. Cleangrassclippingsanddebrisfromaroundthe
engine'scoolingfinsandblowerhousing.
1. Removesparkplugandadjustgap.
1. Replacesparkplugandadjustgap.
2. Replaceair cleanercartridge.
1. Stopengineimmediatelyanddisconnectsparkplug
wire.ContactyourSearsParts& RepairCenter.
1. Stopengineimmediatelyanddisconnectsparkplug
wire.Cleanflailscreenandinsideof dischargeopen-
ing.
2. Stopengineanddisconnectsparkplugwire.Remove
lodgedobject.
3. Alwaysrunengineat fullthrottle.
4. Emptybag.
1. Alwaysrunengineat fullthrottle.
2. ReplacechipperbladeorcontactyourSearsParts&
RepairCenter.
1. Followadjustmentprocedurein Service&Mainte-
nancesection.
2. ContactyourSearsParts& RepairCenter.
Find this and al! your other product manuals online.
Get answers from our team of home experts.
Get a personalized maintenance plan for your home.
Find information and tools to help with home projects.
23
Page 24

Craftsman 675 Series Yard Vacuum Model 247.77366
2
/
39
14
24
25
28
27
/
./
I0
A
64
\
@
A
/
23
53
32
58
59
57
34
35
37
24
Page 25

Craftsman 675 Series Yard Vacuum Model 247.77366
Ref.No. PartNo. Description
1. 731-07001 HubCap
2. 749-04163-0637 UpperHandle
3. 720-0279 Knob
4. 710-1205 EyeBolt
5. 781-1056-0637 UpperHandleBracket
6. 710-0726 HexCapScrew5/16-12x.750
7. 720-04072A HandleKnob5/16-18
8. 710-1174 CarriageBolt
9. 731-04911 NozzleHandleClip
10. 749-04165-0637 LowerHandle
11. 711-1293 Studs
12. 710-0703 CarriageScrew1/4-20x.75
13. 912-0397 WingNut1/4-20
14. 710-1611B TT Screw,5/16-18x .750
15. 710-0599 Screw,1/4-20x .500
16. 912-0442 CapLockNut,1/4-20
17. 710-0751 HexCapScrew1/4-20x.620
18. 681-0195 HoseBaseAdapterAssembly
(Incl.Ref.#19-21)
19. 916-0104 E Ring.500Dia
20. 932-3035 CompressionSpring
21. 711-1571 ClevisPin
22. 936-3020 FiatWasher.271IDx.630OD
23. 781-04266-4044 UpperFlailHousing
24. 746-04156 DriveControlCable
25. 731-1820 CableGuide
26. 681-04088-4044 ChipperChuteAssembly
27. 746-04155 SpeedControlCable
28. 710-1122 HexScrew,1/4-20x2.50
29. 981-0156A-4044 HandleBracketAss'yRH
981-0155A-4044 HandleBrktAss'yLH (NotShown)
30. 712-04064 FlangeLockNut,1/4-20
31. 748-0457 Spacer
32. 731-2478 HoseNozzle
33. 710-3288 HexCapScrew1/4-20x 2.625
34. 723-0295 AdjustmentClamp
35. 749-1270A NozzleHandle
36. 764-0648A VacuumHose
37. 720-0369 HandlePlug
38. 731-2292 HoseAdapter
39. 747-04305A DriveControl
40. 725-0157 CableTie
Ref.No. PartNo. Description
41. 918-04460 TransmissionAssembly
42. 981-04027 IdlerAssembly(Incl.Ref.#74-80)
43. 710-1650 ShoulderScrew,#12-24x .30x .46
44. 710-1220 Screw,#12-16x .750
45. 911-04245 ImpellerHub
46. 915-0221 DowelPin
47. 781-04082-0637 FrontWheelSupportBrace
48. 781-04081-0637 RearWheelSupportBrace
49. 914-0104 CotterPin
50. 916-0104 E-Ring
51. 936-3004 FiatWasher,.406x .875x.105
52. 936-0232 WaveWasher.531IDx.781OD
53. 738-1015 ShoulderScrew3/8-16
54. 934-2042A RearWheel
55. 716-0865 SnapRing
56. 741-04242 HeightAdjustmentBearing
57. 687-02342 PivotArmAssembly
58. 720-0426 HeightAdjustmentKnob
59. 732-1026 SpringLever
60. 736-0741 BellWasher.760IDx.25OD
61. 738-1172 ShoulderScrew,.750x.500
62. 987-02051 HeightLeverAssembly
(Incl.Ref.#58-59)
63. 734-2004B FrontWheel
64. 710-1652 Screw,1/4-20x .625
65. 712-04065 FlangeLockNut,3/8-16
66. 731-04879 Belt Cover
67. 936-0314 ThrustWasher.375IDx.70OD
68. 731-04643 WheelCover
69. 732-04217 ExtensionSpring,.375x2.95
70. 936-0369 FiatWasher,.5081Dxl.0OODx.020
71. 738-0930 ShoulderScrew,.560x.165
72. 741-04108 DriveAxle Bushing
73. 781-04078-0637 TransmissionMountingBracket
74. 710-0597 Screw,1/4-20x 1.00
75. 717-1762 SpurGear- RH
717-1761 SpurGear- LH (NotShown)
76. 941-0600 BallBearing
77. 750-1050 FlangeSpacer,.260x.659x.517
78. 954-0369 Belt,3/8x 32.5
79. 781-04077-0637 Idler Bracket
80. 782-7598 BeltKeeper
25
Page 26

Craftsman 675 Series Yard Vacuum Model 247.77366
45
48
2
o
15
17
7
16
25
26
Page 27

Craftsman 675 Series Yard Vacuum iVlodel 247.77366
Ref.No. PartNo. Description
1. 664-0094 BagAssembly
2. 681-0154-0637 ScreenAssembly
3. 710-1054 HexScrew5/16-24x 1.0
4. 981-0490 ChipperBlade
5. 781-0735 PinClip
6. 719-0329 Flail
7. 715-0166 SpiralPin
8. 711-1401 ClevisPin
9. 912-0411 LockNut,5/16-24
10. 936-0119 LockWasher,5/16
11. 981-0152 ImpellerAssembly
(Incl.Ref.#3- 10)
12. 781-0721B-4044 LowerFlailHousing
13. 712-04063 FlangeLockNut5/16-18
14. 710-0607 Screw,5/16-18x.500
15. 747-04297 HingePin
16. 981-04031 Nozzle
17. 781-1064 BaseAdapterDoor
18. 732-1156 TorsionSpring
19. 926-0106 CapSpeedNut1/4
20. 711-1551 PivotRod
21. 731-04967 NozzleDoorLever
22. 710-1256 HexScrew,#8-18x 1.25
23. 750-1294 ShoulderSpacer
24. 732-3118 ExtensionSpring
25. 732-1151A NozzleDoorTorsionSpring
26. 731-2294A NozzleDoor
Ref.No. PartNo. Description
27. 664-04039 Bag
28. 631-0083 ChuteAssembly
29. 736-0247 FiatWasher.375IDx 1.25OD
30. 936-0217 LockWasher3/8
31. 710-1273 HexCap Screw,3/8-24 x 2.75
32. 631-04118 EngineSpacerAssembly
33. 710-1008 Screw,3/8-16x 1.875
34. 925-1700 SwitchCover
35. 925-3166 SafetySwitch
36. 931-1613 SafetySwitchCover
37. 910-0224 HexWasherScrew#10-16x.50
38. 629-0920A Wire Harness
39. 914-0104 CotterPin
40. 732-0962 CompressionSpring
41. 781-0778A-0637 MountingBracket
42. 747-1153 LockRod
43. 710-3195 HexCap Screw5/16-18x 4.5
44. 710-3025 HexCap Screw5/16-18x.625
45. 710-1220 Screw,#12-16x.750
46. 710-0351 Screw#10- 16x.500
47. 736-0607 ExternalbWasher5/16
48. 726-0139 SpeedNut
49. 710-0726 HexindexScrew,5/16-12x.750
50. 710-1650 ShoulderScrew,#12-24x .30x .46
51. 0EM-290-012 BlowerChute
-- 723-0400 SafetyGlasses(NotShown)
27
Page 28

Craftsman 675 Series Engine Model No. 126L02
For Yard Vacuum Model 247.77366
[ 48 SHORT BLOCK ] 11058 OPERATOR'S MANUAL I I 1329 REPLACEMENT ENGINE I 11330REPAIRMANUALI
307 }_
718 _i
684 ?
10_)
24
287
525i
524 (q_
12
26
32
20 _%_J
43
15 _-;j
28
Page 29

Craftsman 675 Series Engine iVlodel No. 126L02
For Yard Vacuum iVlodel 247.77366
_JL
108
209 _'fJ" J_
163
276 (<_
_ 276 _- _)
425 _%
190
J
968
202 _ ::"_ _/'yj_
188 <_#_
613 \<_
843\-:_ _,
843A '
443 _
(_ 163i
29
Page 30

Craftsman 675 Series Engine Model No. 126L02
For Yard Vacuum Model 247.77366
I 1036 EMISSIONS LABEL I
65 _
55 592 -_(_,
58
1211
6O
1210
S
689 ....
456
597
121 CARBURETOR OVERHAUL KIT
104 _
127 ',_
358 ENGINE GASKET SET
3_:::_ 20
51 _ "_'_,_
7
163 ¢2
524 _ _,
305 _
304
334
/_ 851 _/\
',\ ?
883 i!p_
1095 VALVE GASKET SET
/
883
30
Page 31

Craftsman 675 Series Engine Model No. 126L02
For Yard Vacuum iVlodel 247.77366
D = " O
697322 CylinderAssembly
2. 399269 Kit-Bushing/Seal
3. 299819s Seal-Oil(MagnetoSide)
4. 493279 Sump-Engine
5. 691160 Head-Cylinder
7. 692249 Gasket-CylinderHead
8. 695250 BreatherAssembly
9. 699472 Gasket-Breather
10. 691125 Screw(BreatherAssembly)
11. 691781 Tube-Breather
11A. 691923 Tube-Breather
12. 692232 Gasket-Crankcase
13. 690912 Screw(CylinderHead)
15. 691680 Plug-OilDrain
16. 694478
20. 399781s
22. 691092
23. 691987
24. 222698s
25. 797302
797303
26. 797304
797305
2Z 691588
28. 298909
29. 797306
32. 691664
32A. 695759
33. 262651s
34. 262652s
Crankshaft
Seal-Oil(PTOSide)
Screw(CrankcaseCover/Sump)
Flywheel
Key-Flywheel
PistonAssembly(Standard)
PistonAssembly(.020"Oversize)
RingSet (Standard)
RingSet (.020"Oversize)
Lock-PistonPin
Pin-Piston
Rod-Connecting
Screw(ConnectingRod)(1/4-28x 1.09)
Screw(ConnectingRod)(1/4-28x 1.52)
Valve-Exhaust
Valve-Intake
D = I! II
691270 Spring-Valve(Intake)
36. 691270 Spring-Valve(Exhaust)
37. 793756 Guard-Flywheel
40. 692194 Retainer-Valve
43. 691997 Slinger-Governor/Oil
45. 690548 Tappet-Valve
46. 691449 Camshaft
48. 790450 ShortBlock
50. 794305 Manifold-Intake
51. 794306 Gasket-Intake
54. 691650 Screw(IntakeManifold)
55. 691421 Housing-RewindStarter
58. 697316 Rope-Starter
60. 281434s Grip-StarterRope
65. 690837 Screw(RewindStarter)
78. 691108 Screw(FlywheelGuard)
81. 691740 Lock-MufflerScrew
97. 696565 Shaft-Throttle
104. 691242 Pin-FloatHinge
108. 691182 Valve-Choke
109. 498593 Shaft-Choke
117. 498981 Jet-Main(Standard)
118. 494870 Jet-Main(HighAltitude)
121. 498260 Kit-CarburetorOverhaul
125. 792253 Carburetor
127. 694468 Plug-Welch
130. 696564 Valve-Throttle
133. 398187 Float-Carburetor
134. 398188 Valve-Needle/Seat
137. 693981 Gasket-FloatBowl
31
Page 32

Craftsman 675 Series Engine Model No. 126L02
For Yard Vacuum iVlodel 247.77366
D = O 0
795629 Gasket-AirCleaner
187. 791766 Line-Fuel(CuttoRequiredLength)
188. 693399 Screw(ControlBracket)
190. 690940 Screw(FuelTank)
202. 691829 Link-MechanicalGovernor
209. 691291 Spring-Governor
222. 692150 Bracket-Control
227. 690783 ControlLever-Governor
276. 271716 SealingWasher
287. 690940 Screw(DipstickTube)
300. 692038 Muffler
304. 493294 Housing-Blower
305. 691108 Screw(BlowerHousing)
306. 690450 Shield-Cylinder
307. 690345 Screw(CylinderShield)
324. 695161 Cup/ScreenAssembly
332. 690662 Nut(Flywheel)
333. 802574 Armature-Magneto
334. 691061 Screw(ArmatureMagneto)
337. 802592s Plug-Spark
347. 691396 Switch-Rocker
356. 692390 Wire-Stop
358. 794307 EngineGasketSet
365. 691688 Screw(Carburetor)
404. 690272 Washer(GovernorCrank)
425. 690670 Screw(AirCleanerCover)
443. 692523 Screw(AirCleanerPrimerBase)
D = B
491588s Filter-AirCleanerCartridge
455. 791960 Cup-Flywheel
456. 692299 Plate-PawlFriction
459. 281505s PawI-Ratchet
505. 691251 Nut(GovernorControlLever)
523. 499621 Dipstick
524. 692296 Seal-DipstickTube
525. 495265 Tube-Dipstick
562. 92613 Bolt(GovernorControlLever)
584. 697734 Cover-BreatherPassage
585. 691879 Gasket-BreatherPassage
592. 690800 Nut(RewindStarter)
597. 691696 Screw(Pawl FrictionPlate)
601. 791850 HoseClamp(Green)
608. 497680 Starter-Rewind
613. 691340 Screw(Muffler)
615. 798326 Retainer-GovernorShaft
616. 698801 Crank-Governor
617. 270344s
621. 692310
633. 691321
633A. 693867
635. 66538s
668. 493823
684. 690345
689. 691855
SeaI-ORing(IntakeManifold)
Switch-Stop
Seal-Choke/ThrottleShaft(ThrottleShaft)
Seal-Choke/ThrottleShaft(ChokeShaft)
Boot-SparkPlug
Spacer
Screw(BreatherPassageCover)
Spring-Friction
718. 690959 Pin-Locating
32
Page 33

Craftsman 675 Series Engine Model No. 126L02
For Yard Vacuum iVlodel 247.77366
m = O O
795755 Gear-Timing
745. 691648 Screw(Brake)
832. 499034 Guard-Muffler
836. 690664 Screw(MufflerGuard)
842. 691031 SeaI-ORing(DipstickTube)
843. 691884 Sleeve-Lever
843A. 691895 Sleeve-Lever
847. 692047 Assembly-Dipstick/Tube
851. 493880s Terminal-SparkPlug
868. 697338 Seal-Valve
869. 691155 Seat-Valve(Intake)
870. 690380 Seat-Valve(Exhaust)
871. 262001 Bushing-ValveGuide(Exhaust)
63709 Bushing-ValveGuide(Intake)
883. 691881 Gasket-Exhaust
957. 796577 Cap-FuelTank
D = O
795259 Base-AirCleanerPrimer
968. 692298 Cover-AirCleaner
972. 796578 Tank-Fuel
975. 796611 Bowl-Float
976. 694395 Primer-Carburetor
1036. Label-Emission(Availablefromauthorized
Briggs& Strattondealer)
1058. 277039TRI Owner'sManual
1059. 692311 Kit-Screw/Washer(FuelTank)
1095. 498528 GasketSet-Valve
1210. 498144 Assembly-Pulley/Spring(Pulley)
1211. 498144 Assembly-Pulley/Spring(Spring)
1329. 126L02- ReplacementEngine
1005-F1
1330. 270962 RepairManual
CarburetorOverhaulKit ReferenceNumber121
EngineGasketSet ReferenceNumber358
ValveGasketSet ReferenceNumber1095
33
Page 34

Craftsman 675 Series Yard Vacuum iVlodel 247.77013.0
777S30270 777S33200
= KEEP HANDS OUT OF D|SCHARGE OPEN|NO=
= DO NOT STAND OR WALK iN FRONT OF
DISCHARGE OPENING OR AiM iT AT
BYSTANDERS= OBJECTS THROWN OUT OF
CHUTE CAN CAUSE PERSONAL iNJURY=
• KEEP CHILDREN AND OTHERS AWAY= $30270
_' jJJJ__l
777S33123
Keep hands out of inlets
while engine is running,
Rotating blades are
inside.
FRONT WHEEL / VACUUM NOZZLE
HEIGHT ADJUSTER
LOW
To pick up
wet material,
pine cones,
acorns or
I materiaJ on
Jpavement,
..................DO ............................
I Operation Of This Equipment May Create
Sparks That Can Start Fires Around Dry
Vegetation, A Spark Arrestor May Be
Required. The Operator Should Contact
Local Fire Agencies For Laws Or Regula=
t_ion Requ'_ements.
777S32432
TO AVOID SERIOUS iNJURY
• READ OPERATOR'S MANUAL,
• KEEP HANDS OUT OF iNLET AND DISCHARGE OPENINGS WHILE MACHINE iS
RUNNING. ROTATING BLADES ARE iNSiDE.
• TURN ENGINE OFF AND ALLOW iMPELLER TO COME TO COMPLETE STOP
BEFORE REMOVING BAG.
• DO NOT ATTEMPT TO CLEAR A CLOG OR JAM WiTH THE ENGINE RUNNING.
" DO NOT OPERATE UNiTWiTHOUT BAG OR OPTIONAL BLOWER CHUTE iN PLACE.
• DO NOT STAND OR WALK IN FRONT OF BLOWER CHUTE OR AiM iT AT BYSTANDERS.
OBJECTS THROWN OUT OF DISCHARGE CAN CAUSE PERSONAL iNJURY.
• DO NOT OPERATE WHEN CHILDREN OR OTHERS ARE AROUND.
• WEAR APPROVED SAFETY GLASSES.
777i22415
777122416
USEE85ORFUEL..............
CONTAiNiNGMORE
THAN10% ETHAHOL
777X43688
$32432 AC
777120916
777Dl1379
777122428
777Dl1373
777Dl1374
34
Page 35

35
Page 36

(Thispageapplicableinthe U.S.A.and Canadaonly.)
Sears Brands Management Corporation (Sears), the California Air Resources Board (CARD)
and the United States Environmental Protection Agency (U.S. EPA)
Emission Control System Warranty Statement (Owner's Defect Warranty Rights and Obligations)
EMISSIONCONTROLWARRANTYCOVERAGEISAPPLICABLETOCERTI-
FIEDENGINESPURCHASEDINCALIFORNIAIN1995ANDTHEREAF-
TER,WHICHAREUSEDINCALIFORNIA,ANDTOCERTIFIEDMODEL
California and United States Emission
TheCaliforniaAirResourcesBoard(CARD),U.S.EPAandSearsare pleased
toexplaintheEmissionControlSystemWarrantyonyour modelyear2000and
latersmalloff-roadengine(SORE).InCalifornia,newsmalloff-roadengines
mustbe designed,builtand equippedto meettheState'sstringentanti-smog
standards.Elsewherein theUnitedStates,newnon-road,spark-ignition
enginescertifiedformodelyear1997andlatermustmeetsimilarstandardsset
forthbythe U.S.EPA.Searsmustwarranttheemissioncontrolsystemonyour
YEAR1997ANDLATERENGINESWHICHARE PURCHASEDANDUSED
ELSEWHEREINTHEUNITEDSTATES(ANDAFTERJANUARY1,2001 IN
CANADA).
Control Defects Warranty Statement
enginefortheperiodsoftimelistedbelow,providedtherehasbeennoabuse,
neglector impropermaintenanceof your smalloff-roadengine.Youremis-
sioncontrolsystemincludespartssuchas thecarburetor,aircleaner,ignition
system,mufflerandcatalyticconverter.Alsoincludedmaybeconnectorsand
otheremissionrelatedassemblies.Wherea warrantableconditionexists,Sears
will repairyoursmalloff-roadengineatnocostto youincludingdiagnosis,parts
andlabor.
Sears Emission Control Defects Warranty Coverage
Smalloff-roadenginesarewarrantedrelativeto emissioncontrolpartsdefects
fora periodof one year,subjecttoprovisionsset forthbelow.Ifanycovered
Owner's Warranty
Asthe smalloff-roadengineowner,youare responsiblefor theperformanceof
therequiredmaintenancelistedin yourOperatingand MaintenanceInstruc-
tions.Searsrecommendsthatyouretainallyourreceiptscoveringmaintenance
onyoursmalloff-roadengine,butSearscannotdenywarrantysolelyforthe
lackofreceiptsorfor yourfailuretoensuretheperformanceof allscheduled
maintenance.Asthe smalloff-roadengineowner,youshouldhoweverbe
awarethat Searsmaydenyyouwarrantycoverageifyour smalloff-roadengine
ora parthasfaileddueto abuse,neglect,impropermaintenanceor unap-
parton yourengineis defective,thepartwillbe repairedorreplacedbySears.
Responsibilities
provedmodifications.Youareresponsibleforpresentingyour smalloff-road
engineto anAuthorizedSearsServiceDealerassoonasaproblemexists.The
undisputedwarrantyrepairsshouldbecompletedinareasonableamountof
time,notto exceed30 days.Ifyouhaveanyquestionsregardingyourwarranty
rightsandresponsibilities,youshouldcontacta SearsServiceRepresentative
at 1-800-469-4663.Theemissionwarrantyisa defectswarranty.Defectsare
judgedonnormalengineperformance.Thewarrantyisnotrelatedtoanin-use
emissiontest.
Sears Emission Control Defects Warranty Provisions
ThefollowingarespecificprovisionsrelativetoyourEmissionControlDefectsWarrantyCoverage.ItisinadditiontotheSearsenginewarrantyfornon-regulated
enginesfoundin theOperatingand MaintenanceInstructions.
1. WarrantedParts
Coverageunderthiswarrantyextendsonly to the partslistedbelow(the
emissioncontrolsystemsparts)tothe extentthesepartswere presenton
the enginepurchased.
a. FuelMeteringSystem
• Coldstartenrichmentsystem
• Carburetorandinternalparts
• FuelPump
b. AirlnductionSystem
• Aircleaner
• Intakemanifold
c. IgnitionSystem
• Sparkplug(s)
• Magnetoignitionsystem
d. CatalystSystem
• Catalyticconverter
• Exhaustmanifold
• Air injectionsystemorpulsevalve
e. MiscellaneousItemsUsedin AboveSystems
• Vacuum,temperature,position,timesensitivevalves
andswitches
• Connectorsandassemblies
2. LengthofCoverage
Searswarrantsto the initialownerandeachsubsequentpurchaserthat
the WarrantedPartsshallbefree fromdefectsin materialsandworkman-
shipwhich causedthefailureofthe WarrantedPartsforaperiodofone
yearfromthe datetheengineis deliveredtoa retailpurchaser.
Inthe USAandCanada,a 24hourhotline, 1-800-469-4663,hasamenuofpre-recordedmessagesofferingyouenginemaintenanceinformation.
3. NoCharge
Repairorreplacementof anyWarrantedPartwill beperformedat no
chargeto the owner,includingdiagnosticlaborwhichleadstothe
determinationthata WarrantedPartisdefective,ifthe diagnosticworkis
performedatanAuthorizedSearsServiceDealer.Foremissionswarranty
servicecontact yournearestAuthorizedSearsServiceDealeras listed in
the "YellowPages"under"Engines,Gasoline,""GasolineEngines,""Lawn
Mowers,"orsimilarcategory.
4. ClaimsandCoverageExclusions
Warrantyclaimsshallbefiledinaccordancewiththe provisionsofthe
SearsEngineWarrantyPolicy.Warrantycoverageshallbeexcludedfor
failuresof WarrantedPartswhichare notoriginalSearspartsor because
ofabuse,neglector impropermaintenanceassetforth intheSears
EngineWarrantyPolicy.Searsisnotliableto coverfailuresof Warranted
Partscausedby theuseof add-on,non-original,or modifiedparts.
5. Maintenance
AnyWarrantedPartwhichis notscheduledfor replacementasrequired
maintenanceor whichis scheduledonlyforregularinspectiontothe effect
of"repairorreplaceasnecessary"shallbe warrantedasto defectsfor the
warrantyperiod.AnyWarrantedPartwhichisscheduledfor replacement
asrequiredmaintenanceshallbe warrantedasto defectsonlyforthe
periodoftimeuptothe first scheduledreplacementfor that part.Any
replacementpartthat is equivalentin performanceanddurabilitymay
beusedin theperformanceofanymaintenanceorrepairs.The owneris
responsiblefortheperformanceof allrequiredmaintenance,as definedin
the SearsOperatingand MaintenanceInstructions.
6. ConsequentialCoverage
Coveragehereundershallextendtothefailureofanyenginecomponents
causedbythe failureofanyWarrantedPartstillunderwarranty.
GD0C-100188Rev.B
36
Page 37

Look For Relevant Emissions Durability Period and
Air index information On Your Engine Emissions Label
Engines that are certified to meet the California Air Resources Board (CARB) Tier 2 Emission Standards must
display information regarding the Emissions Durability Period and the Air Index. Sears Brands Management
Corporation makes this information available to the consumer on our emission labels.
The Emissions Durability Period describes the number of hours of actual running time for which the engine is
certified to be emissions compliant, assuming proper maintenance in accordance with the Operating & Mainte-
nance Instructions. The following categories are used:
Moderate: Engine is certified to be emission compliant for 125 hours of actual engine running time.
Intermediate: Engine is certified to be emission compliant for 250 hours of actual engine running time.
Extended: Engine is certified to be emission compliant for 500 hours of actual engine running time.
For example, a typical walk-behind lawn mower is used 20 to 25 hours per year. Therefore, the Emissions
Durability Period of an engine with an intermediate rating would equate to 10 to 12 years.
The Air index is a calculated number describing the relative level of emissions for a specific engine family. The
lower the Air Index, the cleaner the engine. This information is displayed in graphical form on the emissions label.
After July 1,2000, Look For Emissions Compliance Period
On Engine Emissions Compliance Label
After July 1, 2000 certain Sears Brands Management Corporation engines will be certified to meet the United
States Environmental Protection Agency (USEPA) Phase 2 emission standards. For Phase 2 certified engines, the
Emissions Compliance Period referred to on the Emissions Compliance label indicates the number of operating
hours for which the engine has been shown to meet Federal emission requirements.
For engines less than 225 cc displacement, Category C = 125 hours, B = 250 hours and A = 500 hours.
For engines of 225 cc or more, Category C = 250 hours, B = 500 hours and A = 1000 hours.
This isa generic representation of the emission label typically found on a certified engine.
FAMILYYBSXS.3192VA 274812
GDOC-100182Rev.B
37
Page 38

Congratulationsonmakingasmartpurchase.YournewCraftsman@
productisdesignedandmanufacturedforyearsofdependableopera-
tion.Butlikeallproducts,itmayrequirerepairfromtimetotime.That's
whenhavingaRepairProtectionAgreementcansaveyoumoneyand
aggravation.
Here'swhattheRepairProtectionAgreement*includes:
* Expertservicebyour10,000professionalrepairspecialists
o Unlimitedserviceand no chargeforpartsand laboronall
coveredrepairs
o Product replacementupto$1500if yourcoveredproductcan'tbe
fixed
• Discountof 10%from regularprice ofserviceand relatedinstalled
partsnotcoveredbytheagreement;also,10%off regularpriceof
preventivemaintenancecheck
• Fast help byphone- wecallit RapidResolution- phonesupport
fromaSearsrepresentative.Thinkof usasa"talkingowner's
manual."
Onceyoupurchasethe Agreement,a simplephonecallisall thatit
takesfor youto scheduleservice.Youcancallanytimedayor night,or
schedulea serviceappointmentonline.
TheRepairProtectionAgreementisarisk-freepurchase.Ifyoucancel
foranyreasonduringtheproductwarrantyperiod,wewill provideafull
refund.Or,a proratedrefundanytimeaftertheproductwarrantyperiod
expires.Purchaseyour RepairProtectionAgreementtoday!
Somelimitationsandexclusionsapply. Forpricesandadditional
informationin the U.S.A.call 1-800-827-6655.
*CoverageinCanadavaries on some items.Forfull details call
SearsCanadaat 1-800-361-6665.
SearsInstallation Service
ForSearsprofessionalinstallationof homeappliances,garagedoor
openers,waterheaters,andothermajorhomeitems,in theU.S.A.or
Canadacall1-800-4-MY-HOME®.
38
Page 39

Declaraci6n de garantia ....................... Pagina 39
Practicas operaci6n seguras ............... Paginas 40-43
Montaje ................................................ Paginas 44-47
Operaci6n ............................................ Paginas 48-51
Servicio y Mantenimiento .................... Paginas 52-57
AImacenamiento fuera de temporada .... Pagina 58
GARANTiA COMPLETA CRAFTSMAN POR DOS ANOS
PORDOSANOSapartirdelafechade lacompra,esteproductoest,.garantizadopordefectosen losmaterialesyla manodeobra.
Losproductosdefectuososser_.nreparadossincostooreemplazadossincostosi la reparaci6nnoest,.disponiNe.
La presentegarantiase anulasise utilizaesteproductoalgunavezparaprestarservicioscomercialeso sise Ioalquilaa otrapersona.
Paraobtener informaci6nsobre elalcancedelagarantiay solieitar lareparaci6no elreemplazo,visite elsitio Web:www.craftsman.com
Esta garantia cubre0NICAMENTElosdefectosen los materiales y en la manodeobra. EstagarantiaNOeubre:
• Elementosno renovablesquepuedendesgastarsepor elusonormal,duranteel plazodela garantia,induso,peronolimitadosparabujias
deencendido,purificadoresdeaire,correasy filtrosdeaceite.
• Revisi6ndemantenimientoest_.ndar,cambiosdeaceite,o puestasa punto.
• ReemplazooreparacionesdeIlantascausadasporpinchadurasconobjetosexteriorescomo,porejemplo,clavos,espinas,palosovidrios,etc.
• Neurn_.ticoo reemplazode ruedao reparaci6nqueresultade ropanormal,accidente,u operaci6nimpropiaomantenimiento.
• Reparacionesnecesariasdebidoa abusodeloperador,incluyendo,perosinlimitarseaellos,sobreacelerarel motor,oobjetosque hacen
impactoquepuedendoblarla estructura.
• Reparacionesnecesariasdebidoa negligenciadeloperador,induyendoentre otros,daSosmec_.nicoyel_ctricoocasionadoporun
almacenamientonoapropiado,fallapotel usode aceitedegradoy/o cantidadnoapropiadao fallapornodarmantenimientoal equipode
acuerdoconlasinstruccionescontenidasenelmanualdeloperador.
• Limpiezao reparacionesal motor(sistemadecombustible)provocadasporuncombustiblecontaminadouoxidado(viejo).Engeneral,el
combustibledebeutilizarseen unperiodonomayorde 30diasa partirdesu adquisici6n.
• Elempejoramientonormaly laropade losfinesexteriores,o productoetiquetanel reemplazo.
Soluci6n de problemas ...................... Pagina 59-60
Etiquetas de seguridad ....................... Pagina 7
Lista de piezas .......................................... Pagina 24
Acuerdo de Protecci6n Para
Reparaciones ....................................... Pagina 63
NOmero de servicio ..................... Cubierta posterior
Estagaranfialeotorgaderechoslegalesespecificos,peroustedpodriagozarde otrosderechosen raz6nde sulugarde residencia.
Sears Brands Management Corporation, Hoffman Estates, IL 60179
Serie: 675
Tipodeaceitedelmotor: SAE30
Capacidadde aceitedel motor: 18onzas
Capacidadde combustible: 11/22cuartos
Bujias: Champion®RJ19LM
Separaci6ndelasbujias: .020"
©SearsBrands,LLC 39
N_mero de modelo ..........................................................
N_mero de sede..............................................................
Feehadeeompra.............................................................
RegistrearribaelnOmerodelmodelo,el nOmerodeserieylafecha
de compra
Page 40

Lapresenciade estesirnboloindicaque setratadeinstrucciones
irnportantesde seguridadquesedebenrespetarparaevitar
ponerenpeligrosu seguridadpersonaly/omaterialy lade otras
personas.Leay sigatodaslasinstruccionesdeestemanualantes
de poneren funcionarnientoestarn_.quina.Sino respetaestas
instruccionespodriaprovocarlesionespersonales.Cuandoveaeste
sirnbolo,ipresteatenci6na laadvertencia!
Estarn_.quinarueconstruidaparaseroperadadeacuerdocon
lasreglasdeseguridadcontenidasenestemanual.AIigualque
concualquiertipodeequipornotorizado,undescuidooerrorpor
partedeloperadorpuedeproducirlesionesgraves.Estarn_.quina
escapazde arnputarrnanosy piesy dearrojarobjetoscongran
fuerza.De norespetarlas instruccionesde seguridadsiguientesse
puedenproducirlesionesgraveso la rnuerte.
PROPOSICION 65 DE CALIFORNIA
Elescapedelmotorde esteproducto,algunosdesuscornponentes
y algunoscornponentesdelvehiculocontieneno liberansustancias
quirnicasqueelestadode Californiaconsideraquepuedenproducir
c_.ncer,defectosde nacirnientouotrosproblernasreproductivos.
CAPACITACION
• Lea,entienday curnplatodaslasinstruccionesincluidasen
la rnAquinayen losrnanualesantesde rnontarlayutilizarla.
Guardeestemanualenun lugarseguroparaconsultasfuturasy
regulares,asicornoparasolicitarrepuestos.
• LeaelManualdelOperadory sigatodaslasadvertenciase
instruccionesdeseguridad.El fracasodehacerasi puedecausar
la heridaseriaaloperadory/opersonaspresentes.ParaIlarnada
de preguntas,1-800-659-5917.
• Farniliaricesecontodosloscontrolesysuoperaci6nadecuada.
Sepac6rnodetenerla rn_.quinayc6rnodesengranarloscontroles
r_.pidarnente.
• Noperrnitanuncaquelosniffos rnenoresde 16afrosutilicen
estarn_.quina.Losniffosde 16afrosy rn_.srnayoresdeben
leerycornprenderlasinstruccionesde operaci6nylasreglas
de seguridadcontenidasen estemanual,y tarnbi_ndebenser
capacitadosy estarsupervisadosporunode lospadres.
• Nuncaperrnitaquelosadultosoperenestarn_.quinasinrecibir
antesla instrucci6napropiada.
• Mantengaa lostranseQntes,ayudantes,rnascotasy niffosal
rnenosa75piesde larn_.quinarnientrasest,.operando.Detenga
la rn_.quinasialguienentraenla zona.
• Nuncaenciendaunmotorenespacioscerradosoenunazona
conpocaventilaci6n.Elescapedel motorcontienernon6xidode
carbono,un gasinodoroy letal.
• Nopongalasrnanoso lospiescercadelaspiezasrotatoriaso
en lasc_.rnarasdealirnentaci6nnienlaaberturadedescarga.El
contactoconel motorrotatoriopuedeproducirlaarnputaci6nde
dedos,rnanosopies.
• Nuncatratededestapar[atornade alirnentaci6no la aberturade
descarga,nitratede sacarovaciarla bolsade laaspiradora,ni
de revisary repararlarn_.quinarnientrasel motorest,.enrnarcha.
Su responsabilidad--Restrinja el usode estarn_.quina
rnotorizadaalas personasque lean,cornprendany respetenlas
advertenciase instruccionesqueaparecenenestemanualyen la
rn_.quina.
iGUARI)E ESTASINSTRUCCIONES!
Apagueel motory esperehastaquetodaslaspiezasrn6vilesse
hayandetenidoporcornpleto.Desconecteel cablede labujiay
p6ngalode rnaneraquehagarnasacontraelmotor.
PREPARATIVOS
• Inspeccionerninuciosarnenteel_.readondeutilizar_,elequipo.
Retiretodaslaspiedras,botellas,latasuotrosobjetosextra_os
que puedanserlevantadoso arrojadoscausandolesiones
personaleso da_osa larn_.quina.
• Paraprotegerselosojosutilicesiernpreanteojoso antiparras
de seguridadrnientrasoperalarn_.quinao rnientrasla ajusta
o repara.Losobjetosarrojadosquerebotanpuedenlesionar
gravernentelavista.
• Utilicezapatosde trabajoresistentes,desuelafuerte,asicorno
pantalonesycarnisasajustados.Lasprendassueltasolas
alhajaspuedenquedaratrapadasen laspiezasrn6viles.Nunca
utilicelarn_.quinadescalzooconsandalias.Utiliceguantesde
trabajodecuerocuandoalirnentematerialporelcanaldela
cortadora.
• Antesde encenderla rn_.quinacontrolequetodoslos pernosy
tornillosest_nbienajustadosparacornprobarquela rn_.quinase
encuentraen condicionessegurasdeoperaci6n.Adern_.s,realice
una inspecci6nvisualde la rn_.quinaa intervalosfrecuentespara
controlarsila rnisrnaest,.da_ada.
• Mantengao reernplacelasetiquetasdeseguridade instrucciones
segQnsea necesario.
Manejoseguro de lagasolina
Paraevitarlesionespersonaleso daSosrnaterialesseasurnarnente
cuidadosoal rnanipularlagasolina.Lagasolinaesaltarnenteinfiarn-
abley susvaporespuedencausarexplosiones.Sepuedelesionar
gravernentesiderrarnagasolinasobreustedo sobrela ropayaquese
puedeencender.L_.vesela piely c_.rnbiesede ropade inrnediato.
• Utilices61orecipientesparagasolinaautorizados.
4O
Page 41

• NuncaIleneloscontenedoresen elinteriordeunvehiculo
o carni6nocajadecarnionetacon recubrirnientospl_.sticos.
Coloquesiernprelosrecipientesenel pisoy lejosdelvehiculo
antesde Ilenarlos.
Retireel equipoa gasolinadelcarni6no rernolquey II_neloen
el piso.Si estonoesposible,entoncesIlenedichoequipoenun
rernolqueconunrecipienteport_.til,en vezdedesdeundispen-
sadordegasolina.
Mantengala boquillade llenadoencontactoconelhordedela
entradadeltanquedegasolinaocontenedorentodornornento
hastaqueest_Ileno.Noutiliceundispositivoparaabrir/cerrarla
boquilla.
Apaguetodosloscigarrillos,cigarros,pipasyotrasfuentesde
cornbusti6n.
Nuncacarguecombustibleen la rn_.quinaen unespaciocerrado.
Nuncasaquelatapadelgasni agreguecombustiblernientrasel
motorest,.calienteoenrnarcha.Dejequeel motorseenfriepor
Iornenosdosrninutosantesdevolveracargarcombustible.
Nuncarecargueel tanquede combustible.Lleneel tanqueno
rn_.sde 1/2pulgadapordebajodela basedelcuellodelfiltro
paradejarespacioparala dilataci6ndelcombustible.
• Vuelvaacolocarla tapade lagasolinay ajOstelabien.
• Lirnpielagasolinaderrarnadasobreelmotory elequipo.Traslade
la rn_.quinaa otrazona.Espere5rninutosantesdeencenderel
motor.
• Nuncaalrnacenela rn_.quinao elrecipientede combustibleen
unespaciocerradodondehayafuego,chispaso luzpiloto(por
ejernplo,hornos,calentadoresdeagua,calefactores,secadores
de ropa,etc.)
• Parareducirelriesgodeincendiornantengalarn_.quinalirnpia
depasto,hojasy deacurnulaci6nde otrosdesechos.Lirnpielos
derrarnesdeaceiteocombustibley saquetodoslosdesechos
ernbebidosconcombustible.
OPERACION
• Nopongalasrnanoso lospiescercadelaspiezasrotatoriaso
enlasc_.rnarasdealirnentaci6nni enlaaberturadedescarga.El
contactoconel motorrotatoriopuedeproducirlaarnputaci6nde
dedos,rnanosopies.
• Antesdeencenderlarn_.quinacornpruebequeelcanaldela
cortadora,latornadealirnentaci6ny lac_.rnarade corteest_.n
vadas y sindesechos.
• Inspeccionerninuciosarnentetodoelmaterialquedeseatriturar
ysaquelos objetosrnet_Jicos,piedras,botellas,latasuotros
objetosextra_osquepuedenocasionarlesionesoda_arla
rn_.quina.
Sielmotorgolpeaunobjetoextra_oo sila rn_.quinaernpiezaa pro-
ducirunsonidopococornOnounavibraci6n,apagueelmotorde
inrnediato.Dejequeelmotorsedetengaporcornpleto.Desconecte
el cablede labujia,p6ngalodernaneraquehagarnasacontrael
motorysigaestospasos:
a. Inspeccionela rn_.quinaparaversiest,.da_ada.
b. Repareo reernplacelaspiezasda_adas.
c. Controlesihaypiezasflojasy ajQstelasparaasegurarquela
rn_.quinafuncionedernaneraseguray continua.
• Noperrnitaqueseacurnulematerialprocesadoenlazonade
descarga.Elrnisrnopuedeobstaculizarladescargaadecuada
y provocarel retornodelmateriala travesdelaaberturade
alirnentaci6n.
• Nointentetriturarni picarmaterialdemayortarna_oal espe-
cificadoen larn_.quinao enestemanual.Sepodrianproducir
lesioneso da_os.
• Nuncatratede destaparla tornadealirnentaci6no laabertura
de descargarnientrasel motorest,.enrnarcha.Apagueel motor
y esperehastaquetodaslaspiezasque sernuevensehayan
detenidoporcornpleto,desconecteelcabledelabujfay p6ngalo
de rnaneraquehagarnasacontraelmotorantesde sacarlos
escombros.
• Nuncaoperela rn_.quinasinquelabolsade laaspiradorayel
canalde descargaest_nconectadosa larn_.quinacornocorre-
sponde.Nuncavade ni carnbiela bolsadela aspiradorarnientras
el motorest,.en rnarcha.Elextrernoconcierredelabolsade la
aspiradoradebequedarcerradotodoel tiernpornientrasla opera.
• Nuncaoperela rn_.quinasiel picode ingresoola uni6nopcional
parala rnangueranoest_.nconectadosa la rn_.quinaadecu-
adarnente.Nuncaintenteconectarocarnbiarningunadeestas
unionesrnientrasel motorest,.enrnarcha.
• Mantengatodoslosprotectores,desviadoresy dispositivosde
seguridadensu lugaryen buenascondiciones.
• Mientrasalirnentamaterialdentrodela rn_.quinarnantengasu
rostroysucuerpodetr_.syhaciaun costadodelcanaldela
cortadoraparaevitarlesionesporretrocesosaccidentales.
• Nuncaopereestarn_.quinasin buenavisibilidado ilurninaci6n.
Siernpredebeestarsegurode queest,.bienafirrnadoy sostenga
bienlasrnanijas.
• Noopereestarn_.quinaensuperficiescongrava.
• Noopereestarn_.quinaestandobajolosefectosdelalcoholode
drogas.
• Elsilenciadoryel motorsecalientany puedenproducirquerna-
duras.Nolostoque.
• Nuncalevanteo transportelarn_.quinacuandoel motorest,.
encendido.
Sisepresentansituacionesquenoest_.nprevistaseneste
manualseacuidadosoy useelsentidocornQn.Marquepara
contactareldepartarnentodeatenci6nalclienteyobtenerel
nornbredesudistribuidorrn_.scercano.
41
Page 42

MANTENIMIENTO Y ALMACENAMIENTO
• Nuncarnanipulelos dispositivosde seguridadde rnanera
irnprudente.Controleperi6dicarnentequefuncionende forrna
adecuada.
• Controlefrecuenternentequetodoslospernosytornillosest_n
bienajustadosparacornprobarquela rn_.quinaseencuentraen
condicionessegurasdefuncionarniento.Adern_.s,realiceuna
inspecci6nvisualdelarn_.quinaparacontrolarsi larnisrnaest,.
da_adayrep_.reladesernecesario.
• Antesde lirnpiar,repararoinspeccionarla rn_.quina,detengael
motorycornpruebequeel rnisrnoy quetodaslaspiezasrn6viles
sehallandetenido.Desconecteel cablede labujiay p6ngalo
de rnaneraquehagarnasacontraelmotorparaevitarquese
enciendadernaneraaccidental.
• Nocarnbielaconfiguraci6ndel reguladordel motorni acelere
dernasiadoel rnisrno.El reguladorcontrolalavelocidadrn_.xirna
seguradeoperaci6ndelmotor.
• Mantengao reernplacelasetiquetasde seguridade instrucciones
segQnseanecesario.
• Sigalasinstruccionesde estemanualparacargar,descargar,
transportary alrnacenardernaneraseguraestarn_.quina.
• Nuncaalrnacenela rn_.quinao elrecipientedecombustibleenun
espaciocerradodondehayafuego,chispaso luzpilotocornopor
ejernplo,calentadoresdeagua,hornos,secadoresde ropa,etc.
• Dejequela rn_.quinaseenfriepotIornenos5rninutosantesde
guardarla.
• Consultesiernpreel manualdel operadorparaconocerlas
instruccionesadecuadasparaelalrnacenarnientofuerade
ternporada.
• Seg_nla Cornisi6ndeSeguridadde Productosparael Consu-
rnidorde los EstadosUnidos(CPSC)y laAgenciadeProteccidn
Arnbientalde losEstadosUnidos(EPA),esteproductotieneuna
vidaOtilmediade siete(7)a_os,6 60horasde funcionarniento.
AI finalizarla vidaOtilmedia,adquieraunarn_.quinanuevao
hagainspeccionaranualrnente_staporundistribuidorde servicio
autorizadoparacerciorarsede quetodoslossisternasrnec_.nicos
yde seguridadfuncionancorrectarnenteyno tienenexcesivo
desgaste.Si noIohace,puedenproducirseaccidentes,lesiones
o rnuerte
• Sidebevaciareltanquedecombustible,h_.galoal airelibre.
• Respetelasnorrnasreferentesa ladisposici6ncorrectay las
reglarnentacionessobregas,combustible,etc. paraprotegerel
medicarnbiente.
NO MODIFIQUE EL MOTOR
Paraevitarlesionesgraveso larnuerte,nornodifiqueel motorbajo
ningunacircunstancia.Si carnbialaconfiguracidndel reguladorel
motorpuededescontrolarsey operaravelocidadesinseguras.Nunca
carnbielaconfiguracidndef_.bricadelreguladordelmotor.
AVISO REFERIDO A EMISIONES
Losrnotoresqueest&ncertificadosycurnplenconlasregulaciones
de ernisionesfederalesEPAyde CaliforniaparaSORE(Equipos
peque_ostodoterreno)est_.ncertificadosparaoperarcongasolina
cornOnsin plornoy puedenincluirlossiguientessisternasdecontrol
de ernisiones:Modificacidnde motor(EM)ycatalizadorde tresvias
(TWO)siest_.nequipadosde esarnanera.
GUARDACHISPAS
Estarn&quinaest&equipadaconunmotordecornbusti6ninternay
nodebeser utilizadaen o cercadeunterrenoagrestecubiertopor
bosque,rnalezaso hierbaexceptosi elsisternade escapedelmotor
est,.equipadocon unarnortiguadorde chispasque curnplaconlas
leyeslocaleso estatalescorrespondientes,encasodehabedas.
Si seutilizaunarnortiguadordechispasel operadorIodebernantener
en condicionesde usoadecuadas.Enel Estadode Californialas
rnedidasanteriorrnenternencionadassonexigidasporIcy (Arficulo
4442delC6digodeRecursosPt_blicosde California).Esposible
queexistanleyessirnilaresenotrosestados.Lasleyesfederalesse
aplicanenterritoriosfederales.
Puedeconseguirelarnortiguadordechispasparael silenciadora
travesdesudistribuidorautorizadodernotoreso poni_ndoseen
contactoconel departarnentodeservicios.
42
Page 43

SilVIBOLOSDE SEGURIDAD
Estap&ginarepresentay describelaseguridadlossirnbolosquepuedenpareceren esteproducto.Lea,comprenda,y sigatodasinstrucciones
enlarn_.quinaantesprocurarparareuniry operar.
LEA EL MANUAL(S) DEL OPERADOR
Lea, comprenda, y siga todas instrucciones en el manual (manuales) antes procurar para
reunir y operar
ADVERTENCIA-- GIRANDO HOJAS
Mantenga manos fuera de aperturas de cala y descarga mientras m_fiquina corre. Alli giran
hojas adentro
0 0
I-=l k
iT=m
ESPECTADORES
Mantenga aespectadores, los animales favoritos, y los nihos por Io menos 75 pies de la
m_iquina mientras est,1en la operaci6n. Parem_iquina sicualquiera entra el _irea.eet from
the machine while it isin operation. Stop machine if anyone enters the area.
ADVERTENCIA-- OBJETOS TIRADOS
Esta m_iquina puede recoger y poder tirar y los objetos que pueden rebotar.
PROTECCION DE OJO
Siempre Ileve gafas de seguridad o gafas de seguridad al operar esta m_iquina.
ADVERTENCIA-- GASOLINA ESINFLAMABLE
Allow the engine to cool at least two minutes before refueling.
ADVERTENCIA-- MONOXIDO DE CARBONO
Nunca corra un motor dentro ni en un _fireamal ventilada. El escape del motor contiene
mon6xido de carbono, un gas inodoro y mortal.
43
Page 44

IMPORTANTE:Estaunidadseenviasingasolinaniaceiteenelmo-
tor.Antesdeoperarlam_.quinacargueel motorcongasolinay aceite
comoseindicaen la secci6nde Operaci6nen estemanual.
NOTA:Lasreferenciasa losladosderechoeizquierdodelaaspira-
doraparapatiosse hacenobservandolam_.quinadesdela posici6n
deoperaci6n.
APERTURA DE LA CAJA DE CARTON
1. Cortecadaunade lasesquinasde lacajaverticalmente,dela
partesuperiora la base.
2. Saquetodaslaspiezassueltas.
3. Quiteel materialdeempaquesuelto.
COIVlO SACAR LA UNIDAD DE LA CAJA
1. Elevelaunidaddesdela parteposteriorparasepararladel
materialde lacajaquequededebajo,yhagarodarlaunidad
fuerade lacaja.
2. Verifiquecuidadosamentesi enlacajaquedaalgunapartesuelta.
NOTA:AsegOresedenodoblarloscablesmientrasextraede lacaja
laspartessueltasotodala unidad.
f
Control de la transmisi6n
Soporte parala manijade
la manguera superior
Tuerca
mariposa /7'
Perilla manual
Soportepara lamanija de la
manguerainferiort
j Manijasuperio_r
Guia de I Control de
cuerda velocidad
Guiadel
cable
Tornillo
carro
Manija
Tuercade
mariposa
Bolsa
PIEZAS SUELTAS DENTRO DE LA CAJA
(Yea la figura 1)
• Manijasuperiore inferior
• Montajede la manguera
• Bolsa
• Canaldesoplado
• Anteojosde seguridad
• Aceiteparamotor(puedeestarenel interiordela bolsa)
• Manualdeloperador
\
Montaje de la
manguera
Botellade aceiteparamotor Canalde soplado
Manualdel operador d_ _
__ Anteojos de segurida
Figura 1
44
Page 45

MONTAJE DE LA MANIJA
1. Saquelosbrochesdehorquillade lossoportesde larnanija,y
saquelostornillosdelcarroy lastuercasdernariposadelarnanija
inferior.
a. SitOelosagujerosinferioresde larnanijainferiorsobre
lospernosdelossoportesde larnanija,yasegOreloscon
brochesdehorquilla.Vealafigura2.
b. Insertelostornillosdelcarrodesdeelladodeafueraa trav_s
delagujerosuperiorde larnanijainferiory asegOreloscon
tuercasdernariposa.Vealafigura2.
2. a. Desplieguelarnanijasuperiorhastaquequedealineadacon
la rnanijainferior.AsegQresequelaguiade lacuerdaest_
situadaa laderechadela rnanijasuperior.Veala figura3.
[MPORTANTE:AsegQresedeenrutarlos cablesfuerade larnanija
inferior.Asirnisrno,noprenseloscablesrnientraslevantalas rnanijas.
b. Parasujetar[asdosrnanijasajustelasperiiiasde[arnanija
(lospernosdelcarrodebenestarcolocadosde forrna
adecuadaen[a rnanija).Vea[afigura3.
.
Tirede lasdosunionesdelcableunidasa loscables,ajuste
aproxirnadarnente8 pulgadasdecadaextrernode cable,y ubique
loscablesen suguia.
.
Aflojela tuercade rnariposaquesostienelaguiade lacuerd
contrael ladoderechode la rnanijasuperior.
a. Tirelentarnentede lacuerdade arranqueparasacarladel
motor.Vealafigura4.
b. Deslicela cuerdadearranqueen la guia.Ajustela tuercaa
rnariposa.Vealafigura4.
Guiadela
cuerda
J
Figura 4
45
Page 46

f
/
i' !i ee el \\\
Figura5
INSTALACI6N DEL iVIONTAJE DE LA
iVlANGUERA
1. a. Desliceeladaptadorpararnangueradel rnontajede larnisrna
haciaelinteriordeladaptadorbaseubicadoala izquierday al
frentedela aspiradoraparapatios.Vealafigura5.
b.Tiredelpernocon resortedel ladoexteriordela base,yponga
el pernoen Nneaconel primeragujero(elrn_.scercanoal
extrernodel tubo)deladaptadorpararnanguera.
c. Suelteelpernoparaajustarlarnangueraensulugar.
2. a. Prirnero,unaa presi6nla rnanijade larnangueraconel soporte
parala rnanijadela rnanguerasuperior,ydespu6sconel
soportede larnanguerainferior.
b. SitQeel ca_ode la rnangueraa finalcurvode mangoal canalde
lacortadora.Vealafigura6.
iViONTAJE DE LA BOLSA
Sostengalarnanijadela bolsacon unarnanoy deslicelavariNade
seguridaddelsoportede rnontajehaciaelmotorconlaotra rnano.
Useel extrernodelsoportede rnontajecornopalancacuando
deslicelavarilladeseguridad.
a. Deslicela bolsapotencirnadelbordedelaaberturade
descargaysueltelavariNade seguridadparaajustarla bolsa
en su lugar.Vealafigura7.
b. Unaelbrochedelabolsaa presi6nconlapartesuperiorde la
rnanijainferior.
c. Coloquelastirasinferioresdela bolsaporencirnadelaparte
superiordela rnanijainferior,enganch_.ndolasen lospernos.
Vealafigura 7.
Figura6
NOTA:El bot6ninterruptorde bolsa/ canal,unidoa larn6nsulade
rnontaje,debequedarpresionadototalrnenteporla puntadelaaleta
delanterasituadaenla rnanijadelabolsacuandoajustedichabolsa,
o el motorno arrancar_..
J
Figura7
46
Page 47

INSTALAR EL CANAL DE SOPLADO f
NOTA:hayquerefirarlabolsaantesdeinstalarel canalde soplado.
1. a. Tomeelcanalde sopladoconunarnanoy deslicela varillade
seguridaddel soportede rnontajehaciaelmotorconlaotra
rnano.Useelextrernodelsoportedernontajecornopalanca
cuandodeslicelavarillade seguridad.Vealafigura8.
b. Desliceelcanalde sopladoporencirnadel hordedelaabertura
dedescarga,y sueltelavarillade seguridadparaajustarel
canalen sulugar.
c. Aurnentela alturadel picoalrrn_.xirnocuandoutiliceelcanalde
soplado.Consultelas instruccionesparaajustarlaalturadel
picoen la siguientesecci6n.
NOTA:Elbot6ninterruptorde bolsa/ canalunidoala rn_nsulade
rnontajedebequedarpresionadototalrnenteporlapuntadelaaleta
delanterasituadaen el canaldesoplado,oel motornoarrancar&
Siernpredetengaelmotory desconecteelcable dela bujiaantes
dehacercualquiertipode mantenirnientoo ajustes.Utilicesiernpre
anteojosde seguridaddurantelaoperaci6no rnientrasajustao
reparaesteequip&
/
J
Figura8
AJUSTE DE LA ALTURA DEL PICO
Puedeajustarel picoenseisposicionesquevariandesde5/8"a
4-1/8"dedistanciadelsuelo.Debeajustarla alturadelpicosegOnlas
condicionesdel patio.
1. Oprirnalapalancadeajustede laalturadel picohaciala rueda.
Veala figura9.
2. Muevalapalancadeajustede alturahaciadelanteo haciaatr_.s,
paramoverel pico arribaoabajo.AsegOresedequearnbas
palancasest_.nenlamisrnaposici6n.
3. Liberelapalancahaciala cubierta.
NOTA:engeneral,levantelaalturadelpicoparaaspirarunacapa
gruesadehojaso parausarelcanalde soplado.Bajelaalturadel
picoparasuperficiesrn_.slisas.
f
J
Figure9
47
Page 48

f
de latransmisi6n Controldel Control de
Control develocidad estrangulador obturaci6n
Manija del
arrancador
Bolsa
Soporte parala
manija de la
ijade la bolsa
manguera inferior
Llenadode aceite
Montaje de la
manguera
Llenado de
dela
Manija de
manguera
Canalde Canaldel_
soplado cortadora
la
delpico /
manguera de la
aspiradora
Palancadeajuste
de laaltura del
pico
Figura10
Ahoraqueyahaajustadosuaspiradoraparapatiosparala operaci6n,
familiarfcesecon suscontrolesycaracterfsticas.Estossedescriben
yseilustranenesta pAgina.Esteconocimientolepermitir_utilizarsu
nuevoequipoa sum_ximacapacidad.
Ai operarunacortadoratrituradorapuedeserqueobjetosextra_os
seanarrojadosa losojosIocual puededa_arlosgravemente.Utilice
siemprelosanteojosdeseguridadprovistosconestaunidado
protectoresparaojosmientrasoperaymientrasrealizaajusteso
reparaciones.
CANAL DE LA CORTADORA
Permiteque lasramaspequeSasde hasta1-1/2"de di&metroingresen
al motorparapicarlas.Yealafigura9.
CONTROL DE VELOCIDAD
Situadoenlaparteizquierdade la manijaizquierda,el controlde
velocidadseutilizaparaseleccionarlavelocidaddeavancedela
aspiradoraparapatios.
lJ
CONTROL DE LA TRANSMISION
Ubicadosobrelapartedeabajodelamanijasuperior,elcontroldela
transmisi6nseutilizaparaengranar/ desengranarlasruedas.Apriete
pot completoel controlde latransmisi6ncontralamanijasuperior
paraengranarlasruedas,y su_lteloparadesengranarlas.(NO suelte
el embrague).
IMPORTANTE: Mueva el control de velocidad s61ocuando el motor
est_ en marcha. Si cambia el ajuste dei control de velocidad con el
motor apagado, su aspiradora para patios puede resultar daSada.
PALANCA
Losdesechosqueseacumulanenlospatioscomoporejemplolashojas
o lasagujasdelospinossepuedenaspirarconelpicoparapicarlos.
BOLSA
Juntaelmaterialtrituradoqueingres6atravesdel canaldepicadoo
querueaspiradoa travesdel picoo de la manguera.
MANIJA DE LA BOLSA
Seutilizaparatomarlabolsaparacolocarla,sacarlayvaciarla.Vealafigura
10.
Cumple con los estandares de seguridad de ANSI
LasaspiradorasparapatiosdeCraftsmancumplenconlosest&ndaresdeseguridaddelinstitutoestadounidensedeest&ndaresnacionales(ANSI).
48
Page 49

CANAL DE SOPLADO
CuandoseIounealaunidadelcanaldesopladoseutilizaparasoplaro
esparcirpotlospatioslosdesechosqueseacurnulanenlosrnisrnoscorno
potejernplolashojas,lasagujasdelospinoso lasrarnaspeque_as.
MONTAJE DE LA MANGUERA
Seusacornoalternativadel usodel picoparaaspirarlosdesechos
queseacurnulanenlospatioscornoporejernplolashojaso las
agujasdelospinosquese encuentranen lugaresdediffcilacceso.
Veala figura 10.
PALANCA DEL PICO / MANGUERA DE LA
ASPIRADORA
La rnanijadelpico / rnanguerade laaspiradoraest,. situadaen
la partesuperiordelpico.Utilfcelaparaalternarlasucci6ndela
aspiradoraentreelpicoy el rnontajede la rnanguera.
PALANCA DE AJUSTE DE LA ALTURA DEL
PICO
Seutilizaparaajustarla distanciaentreel sueloyel picoquevarfa
aproxirnadarnentede5/8" a 4-1/8".Vealafigura10.
CONTROL DEL ESTRANGULADOR
Estapalancacontroialavelocidaddelmotory lafunci6ndedetenci6n.
Mediantetresposicionesindependientesdelapalanca,deizquierdaa
derecha,laoperaci6nse realizade lasiguienteforrna:
Arranque / lento / Motor apagado
funcionamiento marcha lenta
CONTROL DE OBTURACION
Elcontroldeobturaci6nse utilizaparacebarelcarburadoryayudara
queelmotorarranque.
MANIJA DEL ARRANCADOR
Seutilizaparaencenderel motor.
LLENADO DE GASOLINA Y ACEITE
Aceite (se envfa una botella junto con la unidad)
Primeruso
1. Saquela varilladelniveldeaceite.
2. Conla aspiradoraparapatiosal niveidel suelo,utiliceunernbudo
paravaciardentrodelmotortodoel contenidode laboteNade
aceitesurninistradacon la unidad.
3. Vuelvaa colocarlavarillade Nenadodeaceitey ajOstela.
Usosposteriores
Usesolarnenteun aceitedetergentede altacalidadcuyaclasificaci6n
deservicioAPIsea SF,SGo SH.Seleccioneel gradodeviscosidad
SAEdel aceitesegOnla ternperaturade operaci6nesperada.Curnpla
la tablaqueaparecea continuaci6n:
_s
frio _ 32° _ M_tscalient(
" W30 S E30--"
,, .y
AunquelosaceitesdeviscosidadrnWtipie(5W30,10W30,etc.)
rnejoranel encendidocuandoelclirnaest,.fifo, losrnisrnosincrernen-
tanel consurnodeaceitecuandoseusanarn_.sde32°ECornpruebe
el niveldeaceitecon mayorfrecuenciaparaevitarda_osdebidoa que
el motortrabajeconunniveldeaceitebajo.
1. Cornpruebeel niveldeaceiteasegur_.ndoseque lavarilladel
niveldeaceitenoroceconlasparedesinterioresdeltubode
Ilenadode aceite.Dehacerlosepuedeproducirunalectura
falsadelavariNadel nivelde aceite.Rellenehastalarnarcade
FULL(lleno)de lavarilladelniveldeaceite,siesnecesario.La
capacidadesde aproxirnadarnente18oz. ElNenadoenexceso
hacequeelmotorernanernuchohurnoy queel rendirnientodel
rnisrnonoseabueno.
2. Vuelvaa colocarlavarilladeIlenadode aceiteyajQstela.
3. Mantengael nivelde aceiteen larnarcaFULL.Si poneel motor
en rnarchaconrnuypocoaceitele puedecausarda_osperrnan-
entes.
Tengaextrernocuidadocuandornanipulegasolina.Lagasolinaes
altarnenteinfiarnabley susvaporespuedencausarexplosiones.
Nuncacarguecombustibleenla rn_.quinaenunespaciocerrado
o cuandoel motorest,.calienteo en rnarcha.ApaguecigarriNos,
cigarros,pipasy otrasfuentesdecornbusti6n.
GASOLINA
1. Saquelatapadelcombustibledel dep6sitodel rnisrno.
2. Verifiquequeelrecipientedelquevaa verterlagasoiinaest_
lirnpioylibrede6xidoodeobjetosextra_os.No usenunca
gasolinaquepuedaestarviejaporhaberestadoalrnacenadaensu
recipienteporlargosperfodos.Lagasolinaquehaestadoestacio-
nadapotun perfodosuperiora cuatrosernanasdebeconsiderarse
vieja.
3. Lleneel tanquedecombustibles61ocongasolinanormalsin
piorno,lirnpiay fresca.No usegasolinaquecontengaMETANOL
Vuelvaacolocarlatapadecombustibleensu lugar.
Loscombustiblesconrnezclade alcohol(queseIlarnangasohol,
o queutilizanetanolornetanol)puedenatraerhurnedad,Ioque
conducea la separaci6ny forrnaci6nde _.cidosduranteelalrnace-
narniento.Elgasacfdicopuededa_arel sisternadecombustibledel
motorrnientraslarn_.cj_uinaest,.alrnacenada.
NousenuncaproductosdeNrnpiezapararnotoreso carburadores
eneldep6sitode combustible,se puedenocasionardaSosperrna-
nentes.
Tabladeviscosidad delaceite
49
Page 50

Cable/d{ ptor
de JaBols_/Canal ..........
i /
f
Control del estrangulador
Figura11
Control de obturaci6n
Paraevitarproblemasconelmotor,sedebevaciarelsistemade
combustibleantesdealmacenaria m_.quinadurante30dfaso m_.s.
Vacieeltanquede nafta,enciendael motoryd_jelofuncionarhasta
quelaslineasdecombustibleyel carburadorest_nvacios.La
siguientetemporadause combustiblefresco.ConsultelasInstruc-
clonesde ALMACENAMIENTOsideseainformaci6nadicional.
NOTA:Verifiqueperi6dicamenteelnivelde combustibleparaevitar
quedarsesingasoiinamientrasest,.operandolaaspiradorapara
patios.Si launidadsequedasincombustiblemientrasest,.triturando,
puederesultarnecesariodestaparel_.readedescargaantesde poder
volvera encenderla.Consultela secci6nSERVlCIOY MANTEN-
IMIENTO.
Cuandomuevalapalancadelcontroldel reguladortengacuidado
J
conlassuperficiescalientesy los hordesafiladosde laprotecci6ndel
silenciador.
PARA ENCENDER EL MOTOR
1. Conecteel cabledela bujiay la mangade gomaa lamisma.
2. Elbot6ndelinterruptordebolsa/canaldebequedarpresionado
totalmenteporlapuntadelaaletadelanterasituadaenlamaniadeia
bolsaoenelcanaldesoplado,yaqueencasocontrarioelmotorno
arrancar_..Vealafigura11.
3. Compruebequeel cabledelinterruptorde labolsa/ canalest6
conectadoalmotoryqueest_conectadoa tierramediantela
m_nsulade montaje.Vealafigura11.
4. EltanquedecombustibledebeIlenarsea3/4deltotalantesde
arrancar.
5. Muevalapalancadecontroldelestranguladora la posici6n
START/RUN(encendido/ funcionamiento,representadoporuna
liebre).Vealafigura12.
6. Muevaelcontroldelobturadorl'e'! haciael controldel regulador
paraobturarel carburadordel motor.(Siel motorest,.tibiola
Figura12
f
"_ delacuerdahastaquesientauntir6n.Vealafigura12.
obturaci6npuedenosernecesaria).
7. Situadodetr_.sde launidad,tomela manijadel arrancadory tire
8. Tirede iacuerdademanerar_.pidaycontinua.Aprietebienla
manijadelarrancador.Dejequelacuerdaseenrosquelentamente.
9. Repitaestepaso,desetnecesario,hastaqueseenciendael mo-
tor.Cuandose enciendeel motormuevaelcontroldeobturaci6n
gradualmentelejosdel controldelestrangulador.
10. Si elmotorfalla,muevael controldelobturadorhaciaatr_.s,en
direcci6nal controldelestrangulador,y repitalos pasos1a 9.
11. MantengaSiEMPREel controldelestrangula,,doren posici6n
START/RUN(encendido/ funcionamiento)_ mientras
operelaaspiradoraparapatios.
PARA DETENER EL MOTOR
1. Elreguladordemovimientocontrolalapalancaparareducir_
la marcha(tortuga)dela posici6n.Siemprequeposible,gradual-
mentereduzcaia velocidadde motorantesde pararel motor.
2. Muevalaspalancasde controldel reguladora laposici6n
,J
Figura13
STOP(detenci6n)uOFF(apagado).
5O
Page 51

3. Desconecteel cabledelabujiade labujiaycol6queloarnasa f
contrael motorparaevitarqueseenciendaaccidentalrnente
rnientrasnoseest,.prestandoatenci6nalequipo.
DESCARGA DE LA BOLSA
1. Desenganchelastirasdelabolsade la rnanijainferior.
2. Suelteel brochede labolsaa presi6nde lapartesuperiorde la
rnanijainferior.Veala figura13.
3. Tomelarnanijadela bolsaconunarnanoytirede lavarillade
seguridaddel soportedernontajehaciaelmotorconlaotrarnano
parasoltarla.
4. Elevela bolsafueradela parteposteriorde la unidad.
5. Girelosdosbotonesdelaparteposteriordela bolsaparaabrida
yvaciarel contenido.Sostengalarnanijay el brochedela bolsa
rnientrasvaciael contenido.
6. Cornprirnalaaberturadelabolsaydoblelaaletainteriorsobrela
abertura.
7. Doblela aletaexteriorsobrelaaletainterioreinsertelos botones
delabolsaatravesdelassalidasrnet_.licas.
8. Girelos botonesparacerrarlabolsa.Ubiquelabolsade nuevo
enlaunidadcornoseindicaenlaSecci6ndeAsarnblea.
EXTRACCION DEL CANAL DE SOPLADO
1. Tomeelcanalde sopladoconunarnanoytiredelavarillade
seguridaddel soportedernontajehaciaelmotorconlaotrarnano
parasoltado.Consultelafigura8 enlaSecci6nde Asarnblea.
2. Saqueelcanaldesopladoporencirnadelhordedelaaberturade
descarga.
Palancade la
aspiradora
Figura14
USO DEL PICO DE LA ASPIRADORA
1. Coloquelapalancadelpico/ rnangueradelaaspiradoraenlaposici6n
superiordelpicoparaaspiraratravesdelrnisrno.Yealafigura14.
2. Elpernoconresortedebeestarenel primerorificio(el rn_.s
cercanoalfinaldeltubo)del adaptadorde larnanguerapara
operarel picodela rnisrna.
3. Conarnbasrnanossituadasenla partesuperiorde larnanija
superior,elevecornpletarnenteel controlde transrnisi6ncontrala
rnanijasuperiorparairnpulsarla unidadporelpatio.
4. Utiliceelcontroldevelocidadparaelegirvelocidadaltaobaja.
Elcontroldevelocidadpuedernoversernientrasla unidadse
irnpulsaoantesdeengranarlasruedas.
IMPORTANTE:Muevaelcontrolde velocidads61ocuandoelmotor
est_enrnarcha.Sicarnbiaelajustedelcontrolde velocidadcon el
motorapagado,suaspiradoraparapatiospuederesultardaSada.
Eldesechoquese acurnulaen lospatioscornoporejernplolashojas
ylasagujasdelos pinospuedenaspirarsea travesdel picopara
triturarlos.Despu_squehatrituradoel materialconlas hojasde
desgranardel rnontajedel motor,elrnisrnoser_.descargadoa labolsa
colectoraoatrav_sdelcanalde soplado.$61outilicela rn_.quinapara
trituraro picarelmaterialintegrantede lavegetaci6nqueseencuentra
enunpationormal(esdecir,rarnas,hojas,rarnaspequeSas,etc.)
Evitelasplantasfibrosascornoporejernplolasde tornateso frondas
depalrnahastaqueest_ntotalrnentesecas.Se puedenintroducir
rnaterialescornoporejernplotroncosorarnaspesadasde hasta1
-1/2"de di_.rnetroenelcanaldelacortadora.
Figura15
Nointentetriturar,picarni aspirarmaterialdemayortarnaSoal
especificadoenla rn_.quinaoenestemanual.Sepodrianproducir
lesioneso daSosa la rn_.quina.
IMPORTANTE:La pantalladedesgranadoest,.ubicadadentrode la
cajaen lazonade descarga.Sisetapalapantalladedesgranado,
s_.quelaylirnpielacornose indicaen la secci6nde rnantenirniento.
Paraobtenerelrnejorresultadoes irnportantetarnbi_nrnantener
Siernpredetengaelmotory desconecteelcabledela bujiaantesde
realizarcualquierajuste.
USO DEL MONTAJE DE LA MANGUERA
1. Coloquela rnanijadel pico/ rnanguerade laaspiradoraenla
posici6nde labasedelpico paravolveradirigirla aspiraci6nal
rnontajede la rnanguera.Vealafigura15.
2. Paraoperarelensarnbladodela rnanguera,el pernoconresorte
debeestarenel segundoagujerodeladaptadordelarnisrna.
3. Desenganchela rnangueradel soportedelarnanijasuperiory
tomela rnanijadela rnangueraparadirigidarnientrasaspiralos
desechosque seacurnulanenlospatioscornoporejernplohojas
oagujasde pinosqueseencuentranen lugaresdedificil acceso.
51
Page 52

LISTA DE iVlANTENIIVllENTO
Antesderealizarcualquiertipodelrnantenirniento/servicio,suelte
todoslosrnandosy pareel motor.Esperehastaquetodaslaspartes
de rnovirnientohayanvenidoaunaparadacornpleta.Desconecteel
alarnbredebujiay b_.selocontrael motorparaprevenirel cornienzo
involuntario.SiernpreIlevepuestoscristalesinastillablesdurantela
Sigalalistade rnantenirnientodadaabajo.Estacartadescribepautas
de servicios61o.Uselacolurnnade Troncode Servicioparaguardar
la pistade tareasdernantenirnientocornpletadas.Localizarel rn_.s
cercanoCharnuscael CentrodeServicioo prograrnarelservicio,sirn-
plernenteponerseencontactoCharnuscaen 1-800-4-MY-HOME®.
operaci6norealizandocualquierajusteoreparaciones.
CadaUso
los 5- 8horas
25 horas
1. Niveldel aceitede motor
2. Hardwaresueltooausente
3. Unidadymotor
1. Elaceitedemotor
1. Elaceitedernotort
2. Filtrodeaire
3. Encadenarnientosde control
1. Cornprobar
2. Aprieteo sustituir
3. Lirnpio
1. Carnbio
1. Carnbio
2. Lirnpioosustituyen
3. Lubricaci6nconpetr61eoligero
y pivotes
50 horas 1. Carnbio
Anualrnenteo 100horas 1. Lirnpiary ajustarladiferencia,o bien
1. Elaceitedemotor
1. Bujia
reernplazarlosconnuevosbujia.
AntesdeAIrnacenaje 1. Sisternadecombustible 1. Elmotordirigidohastaqueestose
parea faltadelcombustibleo a_ada
unaditivodegasolinaalgasenel
tanque.
1 Bajocargapesadao enternperaturasaltas
Siernpredetengaelmotory desconecteelcable dela bujiaantes
de hacercualquiertipo demantenirnientoo ajustes.Utilicesiernpre
pnteojos de seguridaddurantela operaci6no rnientrasajustao
[reparaesteequipo.
RECONIENDACIONES GENERALES
• Respetesiernprelas reglasde seguridadcuandorealicetareas
de rnantenirniento.
• Lagarantiadeestaaspiradoraparapatiosnocubreelernentos
quebanestadosujetosal rnalusoonegligenciadel operador.
Pararecibirel reernbolsototaldelagaranfia,eloperadordeber_.
darrnantenirnientoal equipotal y cornose indicaenestemanual.
• Algunosajustesdebenserrealizadosperi6dicarnenteparael
mantenirnientoadecuadodela unidad.
• Reviseperi6dicarnentetodoslossujetadoresy cornpruebeque
est_nbienajustados.
iVlANTENIlVlIENTO DE MOTOR
Servicio A La Bujia
Lirnpielabujiay ajusteelespacioa 0.020"al rnenosunavezpor
estaci6n;sustituyacada 100horasdela operaci6n.
fi 3
1. Espaciode0,020pulg(0,51mm)
2. Electrodo
3. Porcelana
Figura 16
Area lirnpia alrededor de la base de bujia. No lije labujfa. Se
deben lirnpiar las bujfas rnediante raspado otallado con cepillo
de alarnbre y lavado con un solvente cornercial.
Quite e inspeccione la bujfa. Cornpruebe el hueco para asegu-
rarse que es puesto en .020". Vet la Figura 16.
Sustituya labujia si los electrodos son picados, quernados, o la
porcelana es rajada.
52
Page 53

Servicio Del Filtro De Aire f
Nouse airepresurizadoo solventesparalimpiarelcartuchodefiltro
de aire.
Elfiltrode aireevitaelingresoal carburadorde suciedad,polvo,etc.
perjudicialesy evitaque losmismosseanintroducidosdentrodelmo-
tor.Adem_.s,dichofiltroesimportanteparalavida Qtilyel rendimiento
delmotor.Elfiltrodeaireconstadeun filtroplisado.Noponganunca
enfuncionamientoel motorsinhabermontadototalmenteelfiltrode
aire.
Limpioosustituyenelfiltrode airecada25 horasde laoperaci6n.
1. Aflojeeltornilloeinclinehaciaabajola cubiertadelalojamiento
depl_.sticoenel lateraldelmotor.Vealafigura 17.
2. Retireelfiltroplisadodelacubiertadelalojamientode pl_.sticoy
sustituyaporunfiltrolimpioo nuevo.
3. Insertelasetiquetasde latapaen ranurasen el fondodelabase.
4. Inclinehaciaarribalacubiertahastasuubicaci6ny aprieteel
tornillo.
NOTA:Siel filtroestArotoodafiado,c_.mbielo.
Compruebe El Aceite Del Motor
1. Detengaelmotoryesperevariosminutosantesdeverificarel
niveldeaceite.Conelmotorubicadoensueloparejo,el aceite
debeestarenla marcaFULL(lleno)dela varilladelnivelde
aceite.
2. DesconectelabujiaIoalambrany guardanlejosdelabujia.
3. ConelmotorLEJOSperotodaviasecalientanquitanelpetr61eo
4. Launidadde puntaen sulado(ladodebujia)paradrenarporel
2. Saquelavarilladelniveldeaceiteylimpielimpioconlatel&
3. Sustituyay aprietela varillade aceite.Quitey compruebeelnivel
delaceite.Elniveldeberiaestaren laserialLLENA.
4. Desernecesario,afiadaelpetr61eodespacio-nuevocontrol.No
sobrellenar.
5. Limpielavarilladeaceitelimpia,sustituyayapretar.Quitey
compruebeelniveldel aceite.Elniveldelaceitedeberiaestaren
la lineaLLENAenlavarilladeaceite.
5. Cuandoelmotoresdrenadodetodoelpetr61eo,niveldemotor
Nohagaoverfil.Elsobrellenoconel petr61eopuedehacerqueel
motornocomience,o confuerzacomienzo.Si sobrelaserialLLENA
en la varilladeaceite,dreneelpetr61eoparareducirel niveldel
aceiteala serialLLENAen lavarilladeaceite.
6. Vuelvaa colocarlavarilladeIlenadode aceiteyajQstela.
Cambio Del Aceite Del Motor
• Usesolamenteun aceitedetergentedealtacalidadcuya
clasificaci6nde servicioAPIseaSF,SGoSH.Seleccioneel
gradode viscosidadSAEdelaceitesegQnlatemperaturade
operaci6nesperada.Consultelasecci6ndeoperaci6nparavetla
tablade viscosidad.
• Cambieelpetr61eodemotordespu6sdelascincoaocho
primerashorasdelaoperaci6n,y cadacincuentahoraso
cadatemporadaapartirdeentonces.Cambieel petr61eocada
veinticincohorascuandomotordeoperacionesbajolacarga
encenderpuedeocurrir.
pesadaoentemperaturasaltas.
©
Figura17
C6mo Vaciar El Aceite
1. Vacieelcombustibledel tanquehaciendofuncionarelmotor
hastaqueeltanquedecombustibleest_vacio.
Ilenanlavarilladeaceite.
petr61eoIlenael tuboen elrecept_.culoapropiado.
El petr61eousadoes undesechoarriesgado.Elimineel petr61eo
usadocorrectarnente.Nodesecheconla basuradela casa.
CompruebeconsusautoridadeslocalesoChamuscael Centrode
Servicioparainstalacionesdedisposici6n/reciclajeseguras.
de iugar.Recambioconaproximadamente18onz.de petr61eo
fresco.Llenesea lalineaLLENAen iavarilladeaceite. No
sobrellenar.Refi@asea Gasy Petr61eoLlenaren lasecci6nde
OPERACiON.
7. Sustituyael alambredebujiaantesdelcomienzo.
Latemperaturadel silenciadory las_.reascercanaspuedesuperar
los 1500F(650F). Eviteesaszonas.
Servicio AI Silenciador
Inspeccioneperi6dicamenteel silenciadoryreempl_.celode ser
necesario.Los repuestosparaelsilenciadordebenserel mismoe
instaladoenla mismaposici6nque laspartesoriginales,porotraparte
53
Page 54

Limpieza Del Motor
• Diariarnenteoantesdecada uso,lirnpiehierba,barciao
escornbrosacurnuladosdelmotor.Guardeencadenarniento,
prirnavera,y rnandoslirnpios.Guardeel_.reaalrededorydetr_.s
delsilenciadorsincualesquieraescornbroscombustibles.
• Elcuidadodelmotorlirnpioperrniteelrnovirnientoa_reoaired-
edordelmotor.
• Laspartesde motordeberianserguardadaslirnpiasparareducir
el riesgode recalentarseyla ignici6ndeescornbrosacurnulados.
Estees sobretodoirnportantecortandola altahierba.
Nouseel aguaparalirnpiarpartesdemotor.Elaguapodria
contarninarel sisternadecombustible.Useuncepilloo latelaseca.
Ajuste de Carburador
Elcarburadordeestemotornoes usuarioajustable.Piezasen
contactoconSearsy Reparaci6nparaelajuste.
Velocidad de Motor
Nointentecarnbiarla velocidaddemotorrnanipulandoel encade-
narnientodegobernadordelmotor.Haciendotanpodriacausarla
heridapersonalseriay da_aral motor.LasREVOLUCIONESPOR
[M NUTOde motorbansdopuestasen a f_.brca.
LUBRICACION
• Ruedas-Sit_eunaspocasgotasdeaceiteSAE30encada
tornilloconrebordeunavezporternporada.
• Palancasdeajuste de altura delpico- Lubriquelaspalancas
deajustedealturadelpicoconaceiteligero.
• Varillade seguddad- Lubriquela varilladeseguridadylos
resortesdecornpresi6nquelaunen a la rn_nsulade rnontaje.
• Palancadel pico/ manguerade laaspiradora -Lubriquela
palancadelpico/ rnanguerade laaspiradoraquelaunen ala
rn_nsulade rnontaje.
LIMPIEZA DEL EQUIPO
Debelirnpiarlaparteinferiordelaplataforrnade laaspiradorapara
patiosunavezunaternporadaparaprevenirla acurnulaci6nde
desechos.Sigalospasosqueaparecendebajopararealizaresta
tarea.
1. Desconecteelcabledelabujia.Drenelagasolinade laaspira-
doraparapatios.
2. Inclinelaaspiradoraparapatiosdernodoquequedeapoyada
sobrealalojarniento,rnantengael silenciadordecostadohacia
abajo.Sostengafirrnernentelaaspiradoraparapatios.
3. Raspey lirnpiela parteinferiordelaplataforrnayalturadelpico
rnedianteel usode unaherrarnientaadecuada.Nola rode con
agua.
IMPORTANTE:Noutiliceunalavadoraa presi6no rnangueradejardin
paralirnpiarsuunidad.PuedenproducirdaSosa losrodarnientoso al
motor.Elusodeaguaacortar_,la vida_til de larn_.quinay reducir_,su
capacidadde servicio.
Figure18
Figura19
4. Vuelvaa colocarlaaspiradoraparapatiossobresusruedasen el
suelo.
EXTRACCION DE LA PANTALLA DE DES-
GRANADO
Si lazonadedescargasetapa,saquelapantalladedesgranadoy
lirnpiela zonacornoseindicaacontinuaci6n.
1. Detengael motor.Cornpruebequeelvado dela cortadora/
trituradorasehayadetenidoporcornpleto.
2. Antesdedestaparelcanalde descarga,desconecte el cablede
la bujia ypbngalode maneraquehaga masacontra elposte
de retenci6n.
3. Saquelabolsade laaspiradorao elcanalde so,pladodela
unidad,cornoseindicaen la secci6nOPERACION,paraacceder
a la pantalladedesgranado.
4. Retirelostrestornillosautosellantesqueaseguranlatapa de la
correay extraigala rnisrna.Yealafigura18.
5. Saqueeltornilloautosellantedelladoderechodelaunidadque
seuneala pantalladedesgranado.Veala figura19.
54
Page 55

6. Saqueeltornillodecabezahexagonaldelapartesuperiorde
lacajaposteriorcercadelsoportedernontaje,ylatuercade
seguridaddelabridaqueunelapantalladedesgranado.Veala
figura19.
7. SaquelapantallaylirnpielaconuncepillooI_.velaconagua.Vea
lafigura20.
8. Vuelvaacolocarlapantalla.
Antesderealizarcualquiertipodelrnantenirnientoenlarn_.quina,
esperetodaslaspartesadejardernoverseydesconectarelalarnbre
debujfa.Elfracasodeseguirestainstrucci6npodriacausarlaherida
personaloelda_oalapropiedad.
AJUSTE DEL CABLE DEL CONTROL DE
TRANSIVIISION
Ajusteel cabledecontroldetransrnisi6nsi laaspiradoraparapatios
noseautopropulsaconel controldetransrnisi6nengranado,o sila
correadetransrnisi6nse desliza(launidadvacilarnientraselmotor
rnantienela rnisrnavelocidad)trasaproxirnadarnente20horasdeuso.
Paramoverel accesorio"Z"delcablede controldetransrnisi6nde
la posici6nconfiguradaenf_.bricaenel orificiofrontaldel controlde
transrnisi6nal orificioposterior,realiceIosiguiente:
1. a. Ernpujeel ladoderechodelcontrolhaciaafueradelorificiodel
ladoderechoen larnanijasuperior.Veala figura21A.
b.Gireelcontrolhaciaabajo,hacialarnanijainferior.
c. Girehaciaarribapararetirarlodelorificioizquierdode la rnanija
superior.Vealafigura21A.
2. Ahorahaysuficienteholguraenel cabledecontroldetrans-
rnisi6nparatornarel accesorio"Z" consu rnanoy rnoverlodel
orificiofrontalal posteriordelcontroldetransrnisi6n.Veala
figura21B.
f
\
Figura20
IMPORTANTE:asegOresedeinsertarel accesorio"Z"enel orificio
posteriortaly cornoseinsert6en elorificiodelantero:es decir,desde
el exterior del controldetransrnisi6n.
3.Ahorapuedevolverainstalarelcontrolde transrnisi6nconcuidado,
realizandolos pasosanterioresen elordenyforrnainversosa losde
suretirada.
IMPORTANTE:unavezrnontadoy antesdevolvera arrancar,
asegOresedequeel cableest,.bienajustado.Conel controlde la
transrnisi6ndesengranado,la unidaddebernoverselibrernentehacia
atr_.s.
\
Figure21
55
Page 56

AFILADO O REENIPLAZO DE LAS HOJAS DE
LA CORTADORA
NOTA:Antesdeinclinarla unidad,vaciareldep6sitode combustible
defuncionamientodelmotorhastael dep6sitoest_seco,yvaciarel
dep6sitode aceitecomosedescribeen Paradrenajede aceite.
1. Desconecteelcabledela bujiay p6ngalode maneraque
haga masacontrael motor.
2. Retireelmontajede la bolsao elcanaldesoplado.
3. Ajustelostrestornillosde cabezahexagonalquesostienenel
canalde lacortadoraalacajasuperior.Veala figura22.
4. Saquelastapasdebujedelanteras,las tuercasde seguridadde
brida,las ruedasdelanterasy lasarandelasondulatoriasquevan
unidasa losmontajesdel brazogiratorio.Veala figura23.
5. Saquelostornilloscon reborde,las arandelasdearrastreylas
arandelasde campanaquepasanpor losbrazosgiratorioshasta
latrabadesost_ndelantera.Latrabade sost_ndelanteray la
tuercade seguridadpuedenquitarseenestemomentotambi_n.
6. Saqueloscuatrotornillosdela cajasuperiorqueajustanla
cubiertadelpico.Vealafigura24.
f
Arandelade arrastre
Tornillo con reborde
Figura22
Trabade_ost_ndelanteray
tuercadesegu
Montaje del bra;
Arandela de campana
56
Arandela
ondulatoria
Tuercade
seguridad
Figura 23
Rueda
f
J
Figura24
Page 57

7. Inclinelaunidadconcuidadoyap6yelahaciaarribaparaobtener
accesoporlaparteinferioralmaterialde montajedel picoy al
motor.Retirelostrestorniiloscon rebordequeaseguranelpico
depl_.sticonegroala cajainferior.Consuitelafigura25.
8. Inclinelapartesuperiordel picode pl_.sticonegrohaciaelmotor
pararetirarlo.
9. MedianteunaIlaveAllende3/16",retirelostornillosdecabeza
planaque sujetanlahojadelacortadoraalmotor.Dichostornil-
lossonaccesiblesatravesdela aberturaquese cre6 cuando
retir6elcanalde la cortadoraanteriormente.Veala figura26.
10. Esposiblealcanzarlastuercasdelostornillosde cabezaplana
desdelaparteinferior,medianteunaIlaveuniversalde 1/2pulg.
conextensi6n.Veala figura27.
11. Cambieoafilelashojasdela cortadora.Sepuedeafilarla
cuchillaconunafiladoro conunaruedade esmalte.
Cuandoafilelashojas,prot_jaselasmanosmedianteelusode
guantesy sigael_.ngulooriginalde molido.
12. Pararealizarel reensambladosigalospasosanterioresenorden
ymanerainversosa la extracci6n.
NOTA:Ajustelostornillosdela hojaconun pardetorsi6nde 210-250
in-lbs.Compruebequese reensamblenlashojasde lacortadoracon
el filohaciaarriba.
Pico de
pl_stico
negro
Torni!!os con reborde
Figura25
f
Tornillos de c.
cabezaplana "
57
a de la
"_. cortadora
J
Figura26
Motor
J
Figura27
Page 58

Nuncaalrnaceneel vacfodeyardacon elcombustibleenel tanque
dentrooen Areasrnalventiladasdondelosvaporesde combustible
puedenalcanzaruna Narnaabierta,lachispa,o el pilotocornoen un
homo,calentadorde agua,secadorderopa,o aplicaci6nde gas.
PREPARACI6N DEL MOTOR
Yaquelos rnotoresalrnacenaronrn_.sde 30dfas:
1. Parairnpediralagornaforrnarseenel sisternadecombustible
oenpartesde carburador,dirijasel motorhastaqueestose
parea faltadel combustibleoaSadirunaditivodegasolinaal
gasen el tanque.Siustedusaunaditivode gas,dirigeelmotor
durantevariosrninutosparaponeren circulaci6nel aditivoporel
carburador-- despu_squeel motory elcombustiblepuedenser
alrnacenadoshastaseisrneses.
2. Mientrasel motorestodavfacaliente,carnbioelpetr61eo.
3. Quitela bujfay viertaaproxirnadarnente1onz.(30rnl)del
petr61eodemotorlirnpioen el cilindro.Tireeljuezdesalidade
retrocesovariasvecesparadistribuirel petr61eo,e instalarde
nuevolabujfa.
4. Lirnpieel motorde escornbrossuperficiales.
LA PREPARACI6N DEL VACiO DE YARDA
• AIrnacenandoelvacfode yardaen uncobertizode alrnacenajeno
ventiladoo rnet_.lico,el cuidadodeberfasertornadoainoxidable
lassuperficiesnopintadas.Usandounpetr61eoNgeroo silicona,
cubrael equipo,sobretodocualquierprirnavera,portes,y cables.
• Quitetoda lasuciedaddelexteriordemotory equipo.
• Sigarecornendacionesdelubricaci6n.
• Equipodetiendaen un_.realirnpia,seca.Noalrnaceneen un
_.readondeel equipoest,.presentequepuedeusar unpilotoo
tieneuncornponentequepuedecreeunachispa.
58
Page 59

hayanvenidoa unaparadacornpleta.Desconecteel alarnbrede bujfayb_.selocontrael motorparaprevenirel cornienzoinvolun-
SiernpreIlevepuestoscristabs inastillablesdurantelaoperaci6norealizandocualquierajusteo reparaciones.
Esta secci6nsedirigeacuestionesde serviciornenores.Localizarel rn_scercanoChamuscaelCentrodeServicio o prograrnarel
servicio,simplementeponerseen contactoChamuscaen 1-800-4-MY-HOME®.
Elmotornoarranca
Elmotorfuncionade rnanera
err_.tica
1. Lapalancadel reguladornoest,.en la
posici6nde arranquecorrecta
2. Lapalancade obturaci6nnoest,.en la
posici6nCHOKE(encendido)
3. Seha desconectadoelcablede labujia
4. Labujianofuncionacorrectarnente
5. Eltanquedecornbustibbest,.vadooel
combustibleesviejo
6. Nosepuedetirarde lacuerdade retroceso
7. Elinterruptordeseguridadnoest,.
presionado
8. Elcabledelinterruptorde seguridadnoest,.
conectadoal motoro noest,.conectadoa
tierracornocorresponde
1. Launidadest,.funcionandoenla posici6n
CHOKE(obturaci6n)
2. Elcabledela bujfaest,.fiojo
3. EIcombustibleesviejo
4. Aguaosuciedaden el sisternadel combus-
tible
5. Elfiltrodeaireest,.sucio
6. RPMdelmotorbajas
7. Esnecesarioajustarelcarburador
1. Muevalapalancadel reguladorala posici6nSTART
(inicio)/RUN(dirigido).
2. Pongaelinterruptorenlaposici6nCHOKE(obtura-
ci6n).
3. Conecteelcablea labujfa.
4. Lirnpie.ajusteladistanciadisruptivaocarnbie.
5. Lleneeltanquecongasolinalirnpiay fresca.
6. Hayunaobstrucci6nenel motor.Desconecteel
cablede labujiay retireelobjetoatascado.
7. Elinterruptordeseguridaddebeserpresionadopor
laaletadelanteradela rnanijade labolsacuandose
aseguralabolsa.
8. Conecteelcabledelinterruptordeseguridadal
conectordelmotor,de rnaneraquehagarnasa
contrala rn_nsulade rnontaje.
1. Carnbielapalancadeobturaci6na la posici6nRUN
(apagado).
2. Conecteyajusteel cablede la bujia.
3. Lleneeltanquecongasolinalirnpiay fresca.
4. Vacieel tanquedelcombustible.Vuelvaa Ilenarlo
concornbustibblirnpio.
5. Lirnpieo carnbieelfiltrodeaire.
6. Siernpreaccioneelmotorconel estranguladoral
m_.xirno.
7. Contactecon sucentrodepartesyreparaciones
Sears.
LNECESITA MAS AYUDA?
E:_cor_trar_ la e pue tay mi_ en managemylife.com - isin cargo!
En linea podr_ encontrar este manual y los manuales de todos los otros productos que posea,
Sus preguntas ser_n respondidas pot nuestro equipo de especialistas,
Obtenga un plan de mantenimiento personaLizado para su hogar,
Encuentre information y herramientas que Io ayudar_n con los proyectos de su hogar,
! managemylife
59
Page 60

tuiertipodel rnantenirniento/servicio,sueltetodoslosrnandosy pareel motor.Esperehastaquetodaslaspartesde
yan venidoaunaparadacornpleta.Desconecteel alarnbrede bujfay b_.selocontrael motorparaprevenirel cornienzoinvolun-
SiernpreIlevepuestoscristalesinastillablesdurantelaoperaci6norealizandocualquierajusteo reparaciones.
Esta secci6nsedirigeacuestionesde serviciornenores.Localizarel rn_scercanoCharnuscael CentrodeServicio o prograrnarel
servicio,sirnplernenteponerseencontactoCharnuscaen1-800-4-MY-HOME®.
El motorrecalienta
1. Elniveldeaceitedel motoresbajo
2. Flujodeairerestringido
Saltosocasionales(pausas)a 1. Ladistanciadisruptivade labujiaesrnuy
altavelocidad poca
El motorfuncionaen vado rnal 1. Bujiaensuciada 1.
2. Elfiltrode aireest,.sucio 2.
Dernasiadavibraci6n 1. Haypartesqueest_.nfiojasoel motorest,. 1.
da_ado
La unidadnodescarga 1. El_.readedescargaest,.tapada 1.
2. Hayunobjetoextra_oen elmotor
3. RPMdelmotorbajas
4. Labolsadelaaspiradoraest,.Ibna.
Latasade descargase reduce
1. RPMdelmotorbajas
de rnaneraconsiderableo
carnbialacornposici6ndel
2. Lahojade lacortadoraest,.desafilada
materialdescargado
La unidad no se autopro-
pulsa, o se desliza cuando
el control de transmisi6n
est,. engranado
1. Elcabledelcontroldetransrnisbnest,.rnal
ajustado.
2. Lacorreadetransrnisi6nest,.desgastadao
da_ada.
1. Lleneelc_.rterconlaadecuadaselecci6nde aceite.
2. Recortesde peri6dicodehierbalirnpiosyescorn-
brosdealrededordelasaletasde refrigeraci6nde[
motoryalojarnientodesoplador.
1. Quitela bujiay ajusteelhueco.
Sustituyala bujfay ajusteelhueco.
Lirnpieo carnbiee[ fiitrodeaire.
Detengael motordeinrnediatoydesconecteel
cabledela bujfa.Contacteconsucentrode partesy
reparacionesSears.
Detengael motordeinrnediatoydesconecteel
cabledela bujfa.Lirnpielapantalladedesgranadoy
elinteriorde laaberturade descarga.
.
Detengael motorydesconecteel cablede labujia.
Saqueelobjetoextra_odel motor.
3.
Siernpreaccioneel motorconel estranguiadora[
rn_.xirno.
4.
Vade labolsa.
1. Siernpreaccioneel motorconel estranguladora[
rn_.xirno.
2. Reernplacela hojade lacortadorao contacteasu
centrode reparacionesy partesSears.
1. Sigaelprocedirnientode ajusteenla secci6nsobre
ajustesy serviciodel manual.
2. Contactecon sucentrodepartesy reparaciones
Sears.
LNECESITA MAS AYUDA?
[{r_c >r_trar_ la e pue tay mi_ en managemylife.com - isin cargo!
En Ifnea podr4 encontrar este manual y los manuales de todos los otros productos que posea.
Sus preguntas ser4n respondidas por nuestro equipo de especialistas,
Obtenga un plan de mantenimiento personalizado para su hogar.
Encuentre informaci6n y herramientas que Io ayudar4n con los proyectos de su hogar.
manage, mylife
6O
Page 61

(Esta p_.ginase aplica s61oen EE.UU. y Canada.).
Sears Brands Management Corporation, el Consejo de Recursos Ambientales de California (CARB)
y la Agencia de Protecci6n Ambiental de los Estados Unidos (EPA)
Declaraci6n de garantia del sistema de control de emisiones (derechos y obligaciones de la garanfia de defectos del propi=
LACOBERTURADELAGARANTJADECONTROLDEEMISIONESES Y PARALOSMODELOSCERTIFICADOSDELANO 1997YPOSTERIORES,
APLIOABLEALOSMOTORESCERTIFICADOSCOMPRADOSENCALIFOR- QUESECOMPRENY UTILICENENCUALQUIERPARTEDE LOSESTADOS
NIAEN1995Y POSTERIORMENTE,QUESE UTILIZANENCALIFORNIA, UNIDOS(Y APARTIRDEL1DE ENERODE2001ENCANADA).
Declaraci6n de garanfia sobre defectos en el control de emJsiones para California y los Estados UnJdos
ElConsejode RecursosAmbientalesdeCalifornia(CARB),laEPA(Agencia
de Protecci6nAmbientalde los EE.UU.)y Searstienenel gusto deexplicarla
garantiadelsistemadecontroldeemisionesparamotoresdela_o 2000y para
elfuturoconrelaci6na motorespeque_ostodo terreno(SORE).EnCalifornia,
los nuevosmotorespeque_ostodo terrenodebenestardise_ados,construidos
y equipadosparacumplirconlas rigurosasnormasanti-smogdelestado.En
el restode los EstadosUnidos,losmotoresnuevostodoterrenodeencendido
porchispacertificadosparaela_o1997debencumplirest_ndaressimilares
establecidospot la EPA.Searsdebegarantizarelsistemadecontroldeemi-
Cobertura de la garantJa Sears para defectos en el control de emJsiones
Losmotorestodoterrenopeque6osest_ngarantizadosenIorelativoalcontrol alas disposicionesque seindiquenacontinuaci6n.Siuna partedesumotor
deemisionesparadefectosenpiezasduranteunperiododedosa_os,sujeto cubiertapot lagaranfiaesdefectuosa,Searsreparar_o sustituir_dichaparte.
Responsabilidades del propietario en relacibn con la garantia
Comopropietariodelmotortodoterrenopeque_o,Ud.esresponsabledela
realizaci6ndelmantenimientorequeridoquese incluyeenlasinstrucciones
deoperaci6ny mantenimiento.Searsrecomiendaquese conserventodoslos
recibosrelativosalmantenimientodesu motortodoterrenopeque_o,pero
nopudedenegarla garantiasimplementeporlafaltade losmismos,oporsu
incumplimientodelmantenimientoprogramatic.Comopropietariodelmotor
peque_otodoterrenodebe saberque, sinembargo,Searslepuedenegar
lacoberturade lagarantiasi sumotortodoterrenopeque6oouna piezadel
mismohanfalladodebidoa abuso,negligencia,mantenimientoindebidoo
Disposiciones de la garantJa Sears para defectos en el control de emJsiones
Lassiguientessondisposicionesespecificasrelacionadasconlacoberturadelagarantiaparadefectosenel controldeemisiones.Esuna_adidoa lagarantiade
motorSearsparamotoresnoreguladosqueseencuentraenlasinstruccionesdefuncionamientoy mantenimiento.
1. Piezascongarantia
Lacoberturadeestagarantiase extiendeL]nicamentealas piezas
queaparecenacontinuaci6n(las partesde lossistemasdecontrolde
emisiones),siemprequedichaspiezasestuvieranyaenelmotoren el
momentodesucompra.
a. Sistemademedici6ndecombustible
•Sistemadeenriquecimientoparaarranqueenfrio
•Carburadorypartesinternas
• Bombadecombustible
b. Sistemadeinducci6nde aire
• Filtrodeaire
•Colectordeadmisi6n
c. Sistemadeencendido
• Bujia(s)de encendido
•Sistemadeencendidomagneto
d. Sistemadelcatalizador
•Convertidorcatalitico
•Colectordeescape
•Sistemadeinyecci6nde aireov_lvulade impulsos
e. Elementosvariadosusadosenlossistemasanteriores
•Wlvulas devacio,sensiblesatemperatura,posici6ny tiempo
einterruptores
•Conectoresy montajes
2. AIcancedela cobertura
Searsgarantizaal poseedorinicialy a loscompradoressubsiguientes
quelas piezascongarantianotendr_ndefectosen materialesnimano
deobraqueprovoquenla falladelasmismasduranteun periodode
dosaSosa partirdela fechaen queelmotorseentregaa uncomprador
particular.
3. Sin cargo
Lareparaci6noreemplazodecualquierpartecongarantiase realizar_
EnlosEstadosUnidosyCanad_hayunalinea deatenci6nde24 horas,1-800-469--4GG3,quecuentacon un menL]conmensajespre-grabadosque contienen
etario)
sionesdesu motorparalosperiodosdetiempoenumeradosacontinuaci6n,
siemprequenohayaabuso,negligenciao mantenimientoindebidode su
motortodoterrenopeque_o.Susistemade controldeemisionespuedeincluir
piezastalescomoel carburador,el filtrodeaire, elsistemadeencendido,el
silenciadoryelconversorcatalitico.Tambienpuedeincluirconectoresyotras
unidadesrelacionadasconlasemisiones.Dondeexistaunacondici6ncubierta
porla garantia,Searsreparar_su peque6omotortodoterrenosincostoalguno
incluyendodiagn6stico,piezasy manodeobra
a modificacionesnoaprobadas.Ud.es responsabledepresentarsu motor
todoterrenopeque6oa undistribuidorde serviciosSearsautorizadotan pronto
comoaparezcaunproblema.Lasreparacionesde la garantiasinconfiicto
debencompletarseen un plazodetiemporazonable,nosuperiora 30dias.Si
tienealgunapreguntarespectoa sus derechosy responsabilidadesreferentes
a lagarantia,debecontactarconunrepresentantedeserviciosSearsal 1--
800--469--4663.La garantiadeemisioneses unagarantiapotdefectos.Los
defectossejuzgandeacuerdoconelfuncionamientonormalde un motor.La
garantiano est_relacionadaconunapruebade emisionesenuso.
sin cargoalgunoparael poseedor,incluyendotareasdediagn6sticoque
permitandeterminarsi una partecongarantiaesdefectuosa,siempreque
dichodiagn6sticoserealiceenundistribuidordeserviciosSearsautoriza-
do. Parael serviciodelagarantiadeemisiones,contacteal distribuidorde
serviciosSearsautorizadom_scercanoincluidoen las"P_ginasamarillas"
en lascategorias"Motores,gasolina","Motoresdegasolina","Podadoras
de cesped",osimilares.
4. Reclamacionesyexclusionesala cobertura
Las reclamacionesde lagarantiadebenenviarsedeacuerdocon las
disposicionesdelapoliticadegarantiaparamotoresSears.Lacobertura
de lagarantiaexcluir_defectosen piezascongarantiaquenoseanpartes
originalesSears,o abuso,negligenciao mantenimientoincorrecto,tal y
comoseestableceen lapoliticadegarantiaparamotoresSears.Searsno
es responsablede lasfallasenpiezascongarantiaprovocadaspor el uso
de partesa_adidas,quenoseanoriginalesoquesehayanmodificado.
5. Mantenimiento
Cualquierpartecongarantiaque noesteprogramadaparaset reempla-
zadacomo mantenimientorequerido,o que s61odebainspeccionarse
regularmentealefecto de"inspeccioneo reemplacesegL]nsea necesario",
estar_garantizadacontradefectosduranteel periododela garantia.Todas
las piezasgarantizadasqueestenprogramadasparasureemplazopara
cumplirconlosrequisitosdemantenimientoestar_ngarantizadass61o
porel periodoanterioral primerreemplazoprogramaticparadicha pieza.
Cualquierpiezade recambioqueseaequivalenteenfuncionamientoy
durabilidadpuedeusarsepararealizarmantenimientoo reparaciones.El
propietarioes responsablederealizartodoel mantenimientorequerido,tal
y comosedefineenlasinstruccionesdefuncionamientoy mantenimiento
Sears
6. Coberturaindirecta
Porla presente,lacoberturaseextiendeala falladecualquiercomponente
de motorprovocadapot lafallade unapiezacongarantiaque estetodavia
en periododegarantia.
informaci6nparaelmantenimientode motores.
Page 62

Busque el periodo de duraci6n de emisiones importantes yla informaci6n de clasificaci6n de aire en
la etiqueta de emisiones de su motor
Los motores cuyo cumpiimiento con los estAndares de emisi6n Tier 2 de laComisi6n de Recursos Ambientales de California (CARB)
est6 certificado deben exhibir la informaci6n relacionada con el periodo de duraci6n de ias emisiones y la clasificaci6n de aire. Sears
Brands Management Corporation ponen esta informaci6n a disposici6n del consumidor en nuestras etiquetas de emisiones.
Ei Periodo de Duraci6n de las Emisiones describe el nQmero de horas de tiempo real de funcionamiento para el cuai se certifica que
el motor cumpie con ias reglas de emisi6n, descontando el mantenimiento adecuado del mismo segQn las instrucciones de oper-
aci6n y mantenimiento. Se utilizan las siguientes categonas:
Moderado:Se certifica que el motor cumpie con las reglas de emisi6n durante 125 horas de tiempo real de funcionamiento del motor.
Inmediato:Se certifica que el motor cumpie con las reglas de emisi6n durante 250 horas de tiempo real de funcionamiento del motor.
Extendido:Se certifica que el motor cumpie con las reglas de emisi6n durante 500 horas de tiempo real de funcionamiento del motor.
Por ejemplo, una cortadora de c6sped tJpica que se empuja desde arras se usa entre 20 y 25 horas por aSo. Por Io tanto, el Periodo
de Duraci6n de Emisiones de un motor con una clasificaci6n intermedia sena equivaiente a entre 10 y 12 aSos.
Laciasificaci6n de aire es un nQmero calculado para describir el nivel relativo de emisiones para un grupo de motores en particular.
Cuanto menor sea la clasificaci6n de aire, mayor es la limpieza del motor. La informaci6n se presenta de forma grAfica en la etiqueta
de emisiones.
Despu_s del 1 de julio de 2000, busque el periodo de cumplimiento de las reglas de
emisiones en la etiqueta de cumplimiento de las reglas de emisiones del motor
Despu6s del 1 de julio de 2000 se certificarA que determinados motores Sears Brands Management Corporation cumplen
con los estAndares de emisiones de la fase 2 de la Agencia de Protecci6n Ambientai de los Estados Unidos (USEPA). Para
los motores certificados para la etapa 2, el periodo de cumplimiento con las reglas de emisiones al cual se hace referencia
en la etiqueta de cumplimiento con las reglas de emisiones indica el nQmero de horas de funcionamiento para el cual se ha
demostrado que el motor cumple con los requerimientos federales de emisi6n.
Para los motores con desplazamiento inferior a 225 cc, Categoria C = 125 horas, B = 250 horas y A = 500 horas.
Para los motores con desplazamiento de 225 cc o mAs, Categoria C = 250 horas, B = 500 horas y A = 1000 horas.
El desplazamiento de los motores de la serie modelo 150112 es 249 cc.
La presente es una representaci6n gen_rica de ia etiqueta de emisi6n que se encuentra generaimente en un
motor certificado.
FAMILYYBSXS.3192VA 274812
GDOC-100182Rev.A
62
Page 63

Felicitacionespor haberrealizadounaadquisici6ninteligente.El
productoCraftsman@quehaadquiridoest_dise_adoyfabricado
parabrindarrnuchosa_osdefuncionarnientoconfiable.Perocorno
todoslosproductosavecespuederequerirde reparaciones.Esen
esernornentocuandoeldisponerde unAcuerdodeprotecci6npara
reparacionesle puedeahorrardineroy problernas.
A continuaci6nsedetallanlospuntosincluidosenel Acuerdo:
• Servicio experto prestadopornuestros10,000especialistasen
reparacionesprofesionales
• Servicio ilirnitadosincargoparalaspiezasy larnanodeobraen
todaslas reparacionescubiertas
• Reernplazodel productohasta1500d61aressino esposible
repararel productocubierto
• Descuentode10%del precionormaldelservicioy delaspiezas
relacionadasconel rnisrnoquenoest_ncubiertasporelacuerdo;
adern&s,10%del precionormalde laverificaci6nde rnantenirniento
preventivo
• Ayudar_pidapottel_fono- IoIlarnarnosResoluci6nR_pida- el
apoyotelef6nicode unCharnuscaal representante.Pienseen
nosotroscornoel manual"de undue_ohablador."
Unavezadquiridoel Acuerdo,puedeprograrnarel serviciocon
tans61orealizarunaIlarnadatelef6nica.PuedeIlarnarencualquier
mornentodeldiao delanocheo prograrnarun servicioen linea.
ElAcuerdode Protecci6nde Reparaci6nesunacornprasin riesgo.
Siustedanulaporalgunaraz6nduranteel periododegarantiade
producto,proporcionarernosunreernbolsoIleno.O,unreernbolso
prorrateadoencualquiermornentodespu_sdelperiodode garantia
de productoexpira,iAdquieraboysuacuerdodeprotecci6npara
reparaciones!
Seaplican deterrninadaslirnitaciones y exclusiones.Paraobtener
inforrnaci6nadicional y preciosenlos Estados UnidosIlarne al
1-800-827-6655.
El*CoverageenCanad_variaenalgunosarticulos. Paradetalles
IlenoslaIlarnadaCharnuscaCanad_en 1-800-361-6665.
Servicio de instalaci6ndeSears
Sideseasolicitarlainstalaci6nprofesionaldeSearsde aparatos
dorn_sticos,dispositivosparaabrirportones,calentadoresde agua
y otrosarficulosdorn_sticosirnportantes,en losEstadosUnidoso
Canad_Ilarneal 1-800-4-MY-HOME®.
63
Page 64

Your Home
For troubleshooting, product manuals and expert advice:
managernylife
www.managemylife.com
For repair - in your home - of all major brand appliances,
lawn and garden equipment, or heating and cooling systems,
no matter who made it, no matter who sold it!
For the replacement parts, accessories and
owner's manuals that you need to do-it-yourself.
For Sears professional installation of home appliances
and items like garage door openers and water heaters.
1-800-4-MY-HOME ® (1-800-469-4663)
Call anytime, day or night (U.S.A. and Canada)
www.sears.com www.sears.ca
Our Home
For repair of carry-in items like vacuums, lawn equipment,
and electronics, call anytime for the location of your nearest
Sears Parts & Repair Service Center
1-800-488-1222 (U.S.A.) 1-800-469-4663 (Canada)
www.sears.com www.sears.ca
To purchase a protection agreement on a product serviced by Sears:
1-800-827-6655 (U.S.A.) 1-800-361-6665 (Canada)
Para pedir servicio de reparaci6n
a domicilio, y para ordenar piezas:
1-888-SU-HOGAR ®
(1-888-784-6427)
www.sears.com
® Registered Trademark / TMTrademark of KCD IP, LLC in the United States, or Sears Brands, LLC in other countries
® Marca Registrada ! TMMarca de Fabrica de KCD IP, LLC en Estados Unidos, o Sears Brands, LLC in otros paises
MCMarque de commerce ! MDMarque deposee de Sears Brands, LLC
Au Canada pour service en frangais:
1-800-LE-FOYER Mc
(1-800-533-6937)
www.sears.ca
 Loading...