

Craftsman 14218839 Owner’s Manual

OperationManuaJ
MIN! PALM NAILER
Model 142.18839
CAUTION: Read, understand • Safety
and follow all Safety Rules • Know Your Nailer
and Operating instructions in
this manual before using this • Operation
product. • Maintenance
PRECAUCION:Lea, comprenda y • Troubleshooting
sigatodas las reglas de seguridad y
las instruccionesde operaci6n en este • Espa_ol
manual antes deoperar este producto
Sears Brands Management Corporation, Hoffman Estates, IL 60179 U.S.A.
www.craftsman.com
• Parts List
Warranty......................................2
Safetylnstructions....................2-3
KnowYourNailer.........................4
Operation.................................5-6
Maintenance................................6
Troubleshooting..........................7
Espa_ol..................................8-13
PartsandIllustrationsList..........14
CRAFTSMAN ONE YEAR FULL
WARRANTY
FOR ONE YEAR from the date of
purchase, this product is warranteed
against any defects in material or
workmanship. A defective product will
be replaced free of charge.
For warranty coverage details to
obtain free replacement, visit the
web site: www.craftsman.com
This ONE YEAR warranty is void
if this product is ever used while
providing commercial services or if
rented to another person. For 90 DAY
commercial use terms, see listing
on Craftsman warranty web page.
This warranty gives you specific legal
rights, and you may also have other
rights which vary from state to state.
Sears Brands Management Corp.
Hoffman Estates, IL 60179
Read and follow all safety rules and
operating instructions in this manual
and on warning label of tool before us-
ing this tool. Failure to follow warnings
could result in DEATH or SERIOUS
INJURY.
WARNING: Some dust created by
using power tools contains chemicals
known to the State of California to
cause cancer and birth defects or
other reproductive harm.
WORK AREA
Keep your work area clean
and well lit. Cluttered benches
and dark areas invite accidents.
Do not operate power tools in
explosive atmospheres, such
as in the presence of flam-
mable liquids, gases, or dust.
Power tools create sparks which
may ignite the dust of fumes.
Keep bystanders, children and
visitors away while operating
a power tool. Distractions can
cause you to lose control.
PERSONAL SAFETY
Eye protection which con-
forms to ANSI specifications
and provides protection
against flying particles both
from the FRONT and SIDE
should ALWAYS be worn by
the operator and others in
the work area when loading,
operating and servicing this
tool. Eye protection is required
to guard against flying fasteners
and debris, which could cause
severe eye injury.
Additional safety protection
will be required in some
environments. For examples,
the working area my include ex-
posure to noise level which can
lead to hearing damage. The
employer and user must ensure
that any necessary hearing
protection is provided and used
by the operator and others in the
work area. Some environments
will require the use of head
protection equipment. When
required, the employer and user
must ensure that head protection
conforming to ANSI Z89.1-1997
is used.
Stay alert, watch what you
are doing and use common
sense when operating a power
tool. Do not use tool while tired
or under the influence of drugs,
alcohol or medication. A moment
of inattention while operating
power tools may result in serious
personal injury.
Dress properly. Do not wear
loose clothing or jewelry. Contain
long hair. Keep your hair,
clothing and gloves away from
moving parts. Loose clothes,
jewelry, or long hair can be
caught in moving parts.
Keep fingers away from trig-
ger when not driving fasteners
to avoid accidental firing.
Do not overreach. Keep proper
footing and balance at all times.
Proper footing and balance
enables better control of the tool
in unexpected situations.
Use safety equipment. Always
wear eye protection. Dust mask,
nonskid safety shoes, hard hat,
or hearing protection must be
used for appropriate conditions.
Do not use a ladder or unsta-
ble support. Stable footing on
a solid surface enables better
control of the tool in unexpected
situations.
Store idle tools out of reach of
children and other untrained
persons. Tools are dangerous in
the hands of untrained users.
may result. Do not interfere with
the proper operation of the work-
piece contact mechanism.
Use only the size and type
of fasteners designated in
the Specifications list in this
manual,
Keep the tool and its handle
dry, clean and free from oil
and grease. Always use a
clean cloth when cleaning.
Never use brake fluids, gasoline,
petroleum-based products, or
any strong solvents to clean
your tools. Following this rule
will reduce the risk of loss of
control and deterioration of the
enclosure plastic.
Do not use oxygen, combus-
tible gases or bottled gases
as a power source for this tool
as tool will explode, possible
causing injury or death.
Do not use with an air com-
pressor which can potentially
exceed 200 psi as tool may
burst, possibly causing injury.
Always disconnect air supply:
1.
Before making adjustments
2.
When servicing the tool
3.
When clearing a jam
4.
When tool is not in use
5.
When moving to a different work
area, as accidental actuation
may occur, possibly causing
injury.
OPERATION
Check operations of the
workpiece contact mechanism
frequently. Do not use the tool
if the workpiece contact mecha-
nism is not working correctly as
accidental driving of a fastener
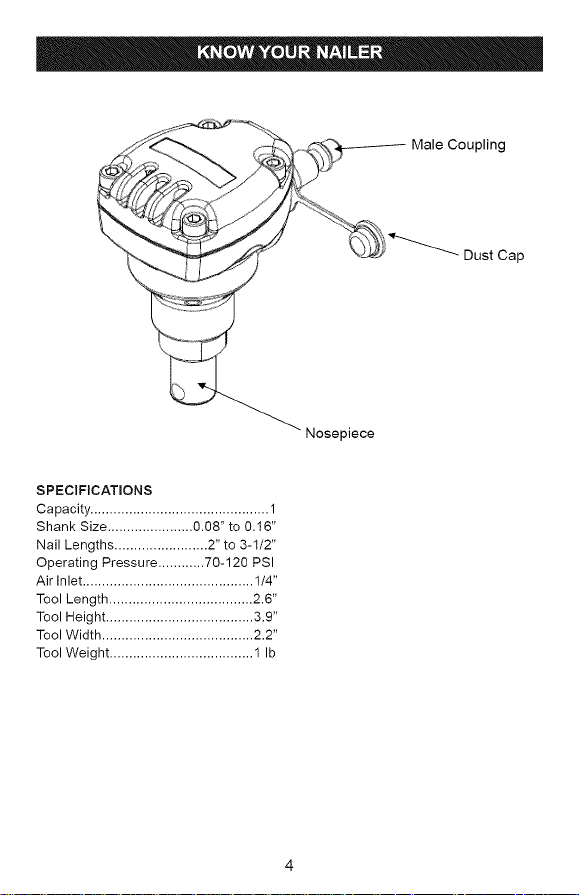
SPECIFICATmONS
Capacity..............................................1
ShankSize......................0.08"to0,t6"
NailLengths........................2"to3-1/2"
OperatingPressure............70-120PSI
AirInlet............................................1/4"
ToolLength.....................................2.6"
ToolHeight......................................3.9"
ToolWidth.......................................2,2"
ToolWeight.....................................1Ib
MaleCoupling
Nosepiece

NOTE:Whenhoseisdisconnected
PREPARINGTHETOOLFORUSE
Undernormalconditions,thetool
shouldbelubricatedbeforeconnecting
thetooltoanairsupply.Addairtool
lubricantintothemalecouplingonthe
tooloncedailywithminimaluse,or
twiceadaywithheavyuse.Onlya
fewdropsofoilatatimeisnecessary.
Toomuchoilwillonlycollectinside
thetoolandwillbenoticeableinthe
exhaustcycle.
Beforeconnectingthetool,checkthe
aircompressorgaugetobesureitis
functioningwithintheproperrangeof
70-120PSI.
CONNECTmNGTHETOOLTOANAIR
SUPPLY
(SeeFigure1)
NOTE:Airpressurethatishigherthan
120PSImaydamagethetool.
WARNING:Thistoolisequipped
withacouplingthatdischargesall
thecompressedairinthetoolatthe
timethefittingorhosecouplingis
disconnected.Neverequipthistoot
withacouplingthatdoesnotdischarge
thecompressedairwhendisconnect-
ed.Animpropercouplingcouldcause
unintendedoperationandserious
personalinjury.
Connectthetooltotheairsupplywith
a1/4"femalequickconnector.(See
Figure1)A3/8"femalequickconnec-
tormaybeusedinsituationswherea
1/4"supptylineisnotavailable.For
maximumtoolperformancea3/8"
supplylineandfittingsarerequired.
CAUTmON:Whenconnectingordis-
connectingairhose,airpressuremay
causethethehosecouplingtokick
backifthehosecouptingisnotfirmly
seatedontoo!coupling.
fromtool,snapthedustcapoverthe
tipofthetoolmalecoupling.
Figure1-ConnectingtheAirSupply
SETTINGTHEAIRPRESSURE
Theamountofairpressurerequired
willdependonthesizeofthenailand
theworkpiecematerial.
DRIVmNGNAmLS
1. Placethenailtiponthework-
2. Holdthenailinpositionwith
3. Placethenosepiecedownonto
WARNING:Topreventinjury,DONOT
pushdownonnaileruntilyouremove
yourfingertipsfromnail.
4. Pushdownonnailertodrivenail
Begintestingthedepthofdrive
bydrivingatestnailintothe
sametypeofworkpiecematerial
usedfortheactualjob.
Driveatestnailwiththeairpres-
suresetat70-75PSI.Raiseor
lowertheairpressuretofindthe
lowestsettingthatwillperform
thejobwithconsistentresults.
pieceatthepositionwhereyou
wanttodriveitin.
yourfingertipsontheshaft.
thetopofthenail.Removethe
fingertipsofyourotherhand
fromnail.(SeeFigure2,Page
5).
intoworkpiece.Keepthenailin
linewiththenosepieceasthe
nailisdriven.
 Loading...