

Craftsman 137216200 Owner’s Manual

Operator's Manual
iCRRFTSMRN'J
SCROLL SAW
Model No.
137.216200
1/9 HP (Max. Developed)
Pin-end or Plain-end Blade
400-1600S.RM.
CAUTION:
Before using this Scroll Saw,
read this manual and follow
all its Safety Rules and
Operating Instructions
Customer Help Line
1-800-843-1682
Sears, Roebuck and Co., Hoffman Estates, IL 60179 USA
Part No, 137216200001
• Safety Instructions
• Installation
• Operation
• Maintenance
• Parts List

SECTION PAGE
Product Specifications ............................................................................................................... 2
Warning .................................................................................................................................... 2
Safety Instructions ..................................................................................................................... 3
Accessories and Attachments ...................................................................................................... 6
Carton Contents ......................................................................................................................... 6
Know Your Scroll Saw .................................................................................................................................. 8
Glossary of Terms ...................................................................................................................... 9
Assembly and Adjustments ......................................................................................................... t0
Bsalc saw Operation..................................................................................................................... 14
Maintenance .............................................................................................................................. 17
Troubleshooting Guide ............................................................................................................... 18
Parts ........................................................................................................................................ 20
FULL ONE YEAR WARRANTY
if this Scroll Saw fails due to a defect in material or workmanship within one year of date of purchase,
Sears will at its option repair or replace it free of charge.
Return this Scroll Saw to a Sears Service Center for repair, or to place of purchase for replacement.
This warranty gives you specific legal rights, and you may also have other rights which may vary from
state to state.
Sears, Roebuck and Co., Dept. 817 WA, Hoffman Estates, IL 60179
Some dustcreatedbypowersanding sawing,grinding,drillingand otherconstructionactivitiescontainschemicals
knownto the state of Californiato cause cancer, birthdefectsor otherreproductveharm Someexamplesof these
chemicalsare:
• Lead from lead-basedpaints
• Crystalline silicafrom bricks, cementandother masonry products
• Arsenic and chromiumfrom chemicallytreatedlumber
Yourriskfrom these exposuresvades, dependingon howoftenyoudothistype of work. To reduceyour exposureto
these chemicals,work in a well ventilatedarea andworkwith approvedsafetyequipmentsuch as dustmasksthatare
speciallydesignedto filter out microscopicparticles.
Motor
Power source ......... 120 V, 60 Hz, 1.4Amp., Ac
Speed ...................... 400 ~ 1600 spm
Speed control .......... Electronic
Blade
Type ..................... Pin-end or Plain-end
Depth of Throat ....... 20-114"
Blade Stroke .......... 3/4"
Depth of 45"Cut .... 1-1/8" Left; 3/4" Right
Depth of 90"Cut .... 2-1/4"
Table
Size ...................... 23-23/32" X 15-11/16"
Tilt ........................ 45"Left; Right
SAWDUST BLOWER ...... Yes
To avoid electrical hazards, fire hazards, or damage to
the tool, use proper circuit protection. Use a separate
electrical circuit for your tools.
Your scrollsaw is wired at the factory for 120V operation.
Connect to a 120V, 15 AMP branch circuit and use a 15
Amp time delay fuse or circuit breaker. To avoid shockor
fire, replace power cord immediately if it is worn, cut or
damaged in any way.

GENERAL SAFETY INSTRUCTIONS
BEFORE USING THE SCROLL SAW
Safety is a combinationofcommon sense, stayingalert
and knowinghowto useyour scrollsaw.
_k_ll_ [_
Toavoidmistakesthatcould cause seriousinjury,donot
plugthe ScrollSaw in untilyou have roadand
understoodthefollowing.
1. READ and become familiar with the entireOperator's
Manual.LEARN the tool'sapplication,limitationsand
possiblehazards.
2. KEEP GUARDS IN PLACE and inworkingorder.
3. REMOVE ADJUSTING KEYS AND WRENCHES.
Fromthe habitof checkingto see that keysand
adjustingwrenches are removed from the toolbefore
turningON.
4. KEEP WORK AREA CLEAN. Clutterodareas and
benchesinviteaccidents.
5. DON'T USE IN DANGEROUS ENVIRONMENT.
Don'tuse power toolsin damp and wet locations,or
exposethemto rain. Keepwork area well lighted.
12.ALWAYSWEAR EYE PROTECTION. Any scrollsaw
can throw foreignobjectsinto theeyes and could
cause permanenteye damage.ALWAYSwear Safety
Goggles(notglasses)thatcomply withANSI Safety
standardZ87.1. Everydayeyeglasseshave only
impact-rosistancelenses.They ARE NOT safety
glasses.Safety Gogglesare availableat Sears.
NOTE: Glasses or gogglesnotin compliance with
ANSI Z87.1 couldcause seriousinjurywhenthey
break.
13.WEAR A FACE MASK OR DUST MASK. Sawing
operationproducesdust.
14.SECURE WORK. Use clamps ora vise toholdwork
when practical.It's saferthan usingyourhand andit
frees bothhandsto operatetool.
15.DISCONNECT TOOLS beforeservicing;when
changingaccessoriessuchas blades, bits,cutters,
and thelike.
16.REDUCE THE RISK OF UNINTENTIONAL
STARTING. Make sureswitchis inOFF position
before pluggingin.
17.USE RECOMMENDED ACCESSORIES. Consultthe
Operator'sManualfor recommendedaccessories.
The useof improperaccessoriesmay cause riskof
injurytopersons.
6. KEEP CHILDREN AWAY.All visitorsshouldbe kepta
safe distancefromwork area.
7. MAKE WORKSHOP CHILD PROOF withpadlocks,
masterswitches,or byremovingstarterkeys.
8. DON'T FORCE THE TOOL. It will do the job better
and safer at the ratefor whichitwas designed.
9. USE THE RIGHT TOOL. Do not force toolor
attachmenttodo a job for which itwas notdesigned.
10.USE PROPER EXTENSION CORD. Make sureyour
extensioncordis in goodcondition.When usingan
extensioncord, be sure to use one heavy enoughto
carrythecurrantyour productwilldraw.An
undersizedcordwillresult ina drop inlinevoltage
and in lossof powerwhichwillcause the toolto
overheat.The table on page 5 showsthe correctsize
to use dependingoncord lengthand nameplate
ampere rating.If in doubt,use the next heaviergauge.
The smallerthe gaugenumber,the heavier thecord
11.WEAR PROPER APPAREL. Do not wear loose
clothing, gloves, neckties, rings, bracelets, or other
jewelry which may get caught in moving parts.
Non-slip footwear is recommended• Wear protective
hair covering to contain long hair.
18.NEVER STAND ON TOOL. Seriousinjurycould
occur ifthe toolis tippedor ifthe cuttingtoolis
unintentionallycontacted.
19.CHECK FOR DAMAGED PARTS. Beforefurther use
ofthe too!,a guardor other partthatis damaged
shouldbe carefully checkedto determinethatit will
operateproperlyandperformits intendedfunction -
checkfor alignmentof movingparts,bindingof
movingparts,breakage of parts,mounting,andany
otherconditionsthat mayaffect itsoperation.A guard
orotherpartthat isdamaged shouldbe properly
repairedor replaced.
20.NEVER LEAVE TOOL RUNNING UNATTENDED.
TURN POWER "OFF". Don't leavetooluntilitcomes
to a completestop.
21.DON'T OVERREACH. Keep properfootingand
balance at all times•
22.MAINTAIN TOOLS WITH CARE. Keep tools sharp
andclean for best and safest performance.Follow
instructionsfor lubricatingandchangingaccassodes.
23.DIRECTION OF FEED. Feed work into a blade or
cutter against the direction of rotation of the blade or
cutter only.
24.DO NOT operatethe toolif youare underthe
influence of any drugs,alcoholor medicationthat
couldaffectyourabilityto usethe toolproberly.
3

25.DUST GENERATED from certainmaterialscan be
hazardoustoyour health.Always operate the saw in
well-ventilatedarea and providefor properdust
removal.Use dustcollectionsystemswhenever
possible.
12.TO PREVENT INJURIES, avoid awkwardhandor
fingerpositions,where a suddenslipcouldcause a
handto move intothe blade whenoperatingthe saw.
13.HOLD WORKPIECE FIRMLY againstthescrollsaw
table top.
SPECIFIC SAFETY INSTRUCTIONS FOR
SCROLL SAWS
1. READ AND UNDERSTAND all safetyinstructions
and operatingproceduresthroughoutthe manual.
2. DO NOT operatethe scrollsaw untilitiscompletely
assembledand installedaccordingtothe instructions.
3. SHOULD any part of scrollsaw be missing,damaged,
or fail in any way,or any electricalcomponent fail to
performproperly,shutoffthe switchand removethe
plugfrom the powersupplyoutlet.Replace missing,
damaged, or failed parts before resumingoperation.
4. IF YOU ARE NOT thoroughlyfamiliar withthe
operationof the scrollsaw,obtainadvice from your
supervisor,instructor,orother qualifiedperson.
5. SERIOUS INJURY couldoccur ifthe tooltipsover or
you accidentallyhitthe cuttingtool.Do notstore
anythingaboveor near the tool.
6. AVOID INJURY from unexpectedsaw movement.
Placethe saw on a firm level surfacewhere thesaw
doesnot rock,and boltor clamp the saw to its
support.
7. YOUR SCROLL SAW MUST BE SECURELY
FASTENED to a standor workbench.Ifthere is any
tendencyfor the standor workbenchtomove during
operation,the standor workbenchMUST befastened
tothe floor.
8. THIS SCROLL SAW is intended for indooruseonly.
14.NEVER CUT MATERIAL that istoo smallto be held
safely.
15.DO NOT USE dullor bent blades.
16.TURN THE SAW OFF AND UNPLUG THE CORD if
the blade bindsin the saw kerf whilebeingbacked
out ofthe workpiece,usuallycaused by sawdust
cloggingthekerf. Ifthishappens, turnoff thescroll
sawand unplugthe powercord. Wedge open thekerf
and backthe bladeoutof theworkpieca.
17.DO NOT feed the materialtoo fast whilecutting.Only
feed the workpieceat therate thesaw willcut.
18.TURN THE POWER OFF, remove theswitchkey and
make surethescrollsaw comes toa completestop
beforeinstallingor removingan accessory,and
beforeleaving the workarea.
19.DO NOT START the saw with workpiecepressing
againstthe blade. Slowly feed theworkpieceinto the
movingblade.
20.WHEN CUTTING a largeworkpiece.MAKE SURE
thematerialissupportedat table height,
21.EXERCISE CAUTION when cuttingworkpiecesthat
are roundor irregularly shaped, workpiecescan pinch
theblade.
22.ALWAYSrelease blade tensionbefore looseningthe
bladeholderscrew.
23.MAKE CERTAIN tabletiltinglock is tightenedbefore
startingthe machine.
9. TENSION BLADE PROPERLY before startingthe
saw.Recheck and adjusttension as needed.
10.BLADE TEETH MUST POINT downwardtowardthe
table.
I1.TABLE MUST BE CLEARED of all debris before
operating saw, Do not perform layout, set up or
assemble work on the table when the saw is in
operation.
24.NEVER REACH underthe scrollsawtable when
motoris running.
25.CHECK FOR DAMAGED PARTS beforeeach use.
Checkfor alignmentofmovingparts, bindingof
movingparts,breakage ofparts, mountingor any
otherconditionsthat may affectoperation.Partsthat
aredamaged shouldbe properly repairedor replaced
before usingthe tool.
26.THINK SAFETY.
4

ELECTRICAL REQUIREMENTS
GROUNDING INSTRUCTIONS
IN THE EVENT OF A MALFUNCTION OR
BREAKDOWN, groundingprovidesa pathof least
resistance for electriccurrentand reducesthe risk of
electricshock.Thistool isequippedwith an electriccord
thathas an equipmentgroundingconductoranda
groundingplug.The plugMUST be pluggedinto a
matching receptaclethat is propertyinstalledand
groundedinaccordancewithALL localcodes and
ordinances.
DO NOT MODIFY THE PLUG PROVIDED. If itwill notfit
thereceptacle,have the properreceptacleinstalledbya
qualifiedelectrician.
IMPROPER CONNECTION of the equipmentgrounding
conductorcan resultin riskof electricshock.The
conductorwithgreen insulation(withor withoutyellow
stripes)is theequipmentgroundingconductor.If repair
or replacement of theelectriccordor plugis necessary,
DO NOT connectthe equipment groundingconductorto
a live terminal.
Thistool is intendedfor use ona circuitthat hasa
receptaclelikethe one illustratedin FIGURE A.
FIGURE A showsa 3-prong electricalplugand
receptaclethat has a groundingconductor.If a proper
groundedreceptacleisnotavailable, an adapter
(FIGURE B) can be used to temporarilyconnectthisplug
toa 2-contactgroundedreceptacle.The temporary
adaptershouldbe used onlyuntila properlygrounded
receptacle can be installedby a qualified technician.The
adapter(FIGURE B) hasa rigid lug extendingfrom it that
MUST be connected to a permanent earthground,such
as a properlygroundedreceptacle box.The Canadian
ElectricalCode prohibitsthe use ofthe adapters.
CAUTION: In all cases, make certain the receptacleis
properlygrounded.If youare not sure, havea qualified
electriciancheckthe receptacle.
Thistoolisfor indooruse only. Do not expose torainor
use indamp locations.
CHECK witha qualified electrician orservice person if
youdo notcompletelyunderstandthe grounding
instructions, or ifyou are not sure thetool isproperly
grounded.
USE ONLY 3-WIRE EXTENSION CORDS THAT HAVE
3-PRONG GROUNDING PLUGS AND 3-POLE
RECEPTACLES THAT ACCEPT THE TOOL'S PLUG.
REPAIR OR REPLACE DAMAGED OR WORN CORD
IMMEDIATELY.
GUIDELINES FOR EXTENSION CORDS
USE PROPER EXTENSION CORD. Makesure your
extensioncord is ingood condition. When using an
extension cord, be sure touse one heavyenoughto
carrythecurrentyour productwilldraw. An undersized
cord will causea drop in linevoltage, resulting inloss of
powerand cause overheating.The table belowshows
the correctsize to use dependingon cordlengthand
nameplateampere rating.If in doubt,use the next
heaviergauge. The smallerthe gauge number,the
heavier the cord.
Be sure your extension cord is properly wired and in
good condition. Always replace a damaged extension
cord or have it repaired by a qualified person before
using it. Protect your extension cords from sharp objects,
excessive heat and damp or wet areas
Use a separate electrical circuit for your tools. This circuit
must not be less than # 12 wire and should be protected
with a 15 Amp time delay fuse. Before connecting the
motor to the power line, make sure the switch is in the
OFF position and the electric current is rated the same
as the current stamped on the motor nameplate, running
at a lower voltage will damage the motor.
Fig, A
3-Prong Plug
J Z
! I Grounding Prong
ProperlyGrounded
_ 3-Prong Receptacle
Fig. B
Grounding Lug
-- Make Sure This
is Connected to a
Known Ground
_- 2-Prong
Receptacle
Thistool must be grounded while in useto protect the
operator from electrical shock.
V_llll hVdIlLVi[l_;111[l1:11;[el :l =t:l 1:1_I_-I[l] _ [_ll] _.|I1[€! F±VIVL_
(When using 120 volts only)
Ampere Rating Total length of cord in feet
Morethan not more than 25' 50' 100' 150'
0 6 18 16 16 14
6 10 18 16 14 12
10 12 16 16 14 12
12 16 14 12 notrecommended
5

AVAILABLE ACCESSORIES UNPACKING AND CHECKING CONTENTS
• Toavoid injury,do notattempt to modify thistoolor
anyaccessoriesnot recommendedfor use withthis
tool.Any suchalterationor modificationismisuse
and couldresultina hazardousconditionleadingto
possibleseriousinjury.
• Use onlyaccessories availablefrom Sears for this
scrollsaw. Followinstructionsthat accompany
accessories.Use of improperaccessoriesmay
cause hazards.
V_sityourSears Hardware Departmentor see theSears
Powerand Handtool catalog for the following
accessodes:
ITEM
Pin-endsaw blades
Plain-endsaw blades
Scrollsaw handbook
Scrollsaw patternkit
Searsmay offer other accessoriesnot listed in this
manual.
See yournearest Sears storeor Power and HandTool
Catalogfor other accessories.
Do not use anyaccessoryunless youhave completely
read theinstructionsor Operator's Manual for that
accessory.
• To avoidinjury,if anypart is missingor damaged, do
not plugthe scrollsaw in untilthe missingor damaged
part isreplaced,and assemblyiscomplete.
• To avoidfire and toxicreaction,neverusegasoline,
naphtha,acetone, lacquer,thinner,orsimilarhighly
volatilesolventsto clean thescrollsaw.
Carefullyunpackthe scrollsaw and all carton contents.
Compare themto the following list and illustrationsto
make surethatthey are all there.
To remove the scrollsaw from the carton, liftthe sawby
the back of the upperframe.
ITEM DESCRIPTION QUANTITY
A. Scrollsaw 1
B. Blades (2 Pin-endand 2 Plain-end) 4
C. Hex wrench 1
D. Knob 1
STAND:
E. Leg withleg flange 1
F. Legs 3
G. Top bracket 2
H. Top bracket 2
I. Bottom bracket (short) 2
J. Bottom bracket (long) 2
K. Foot pads 3
L. Bolt 1
M Nut 1
N. Mounting hex Bolt 4
O. Flatwashers 4
P. Screws 20
Q. Nuts 24
6
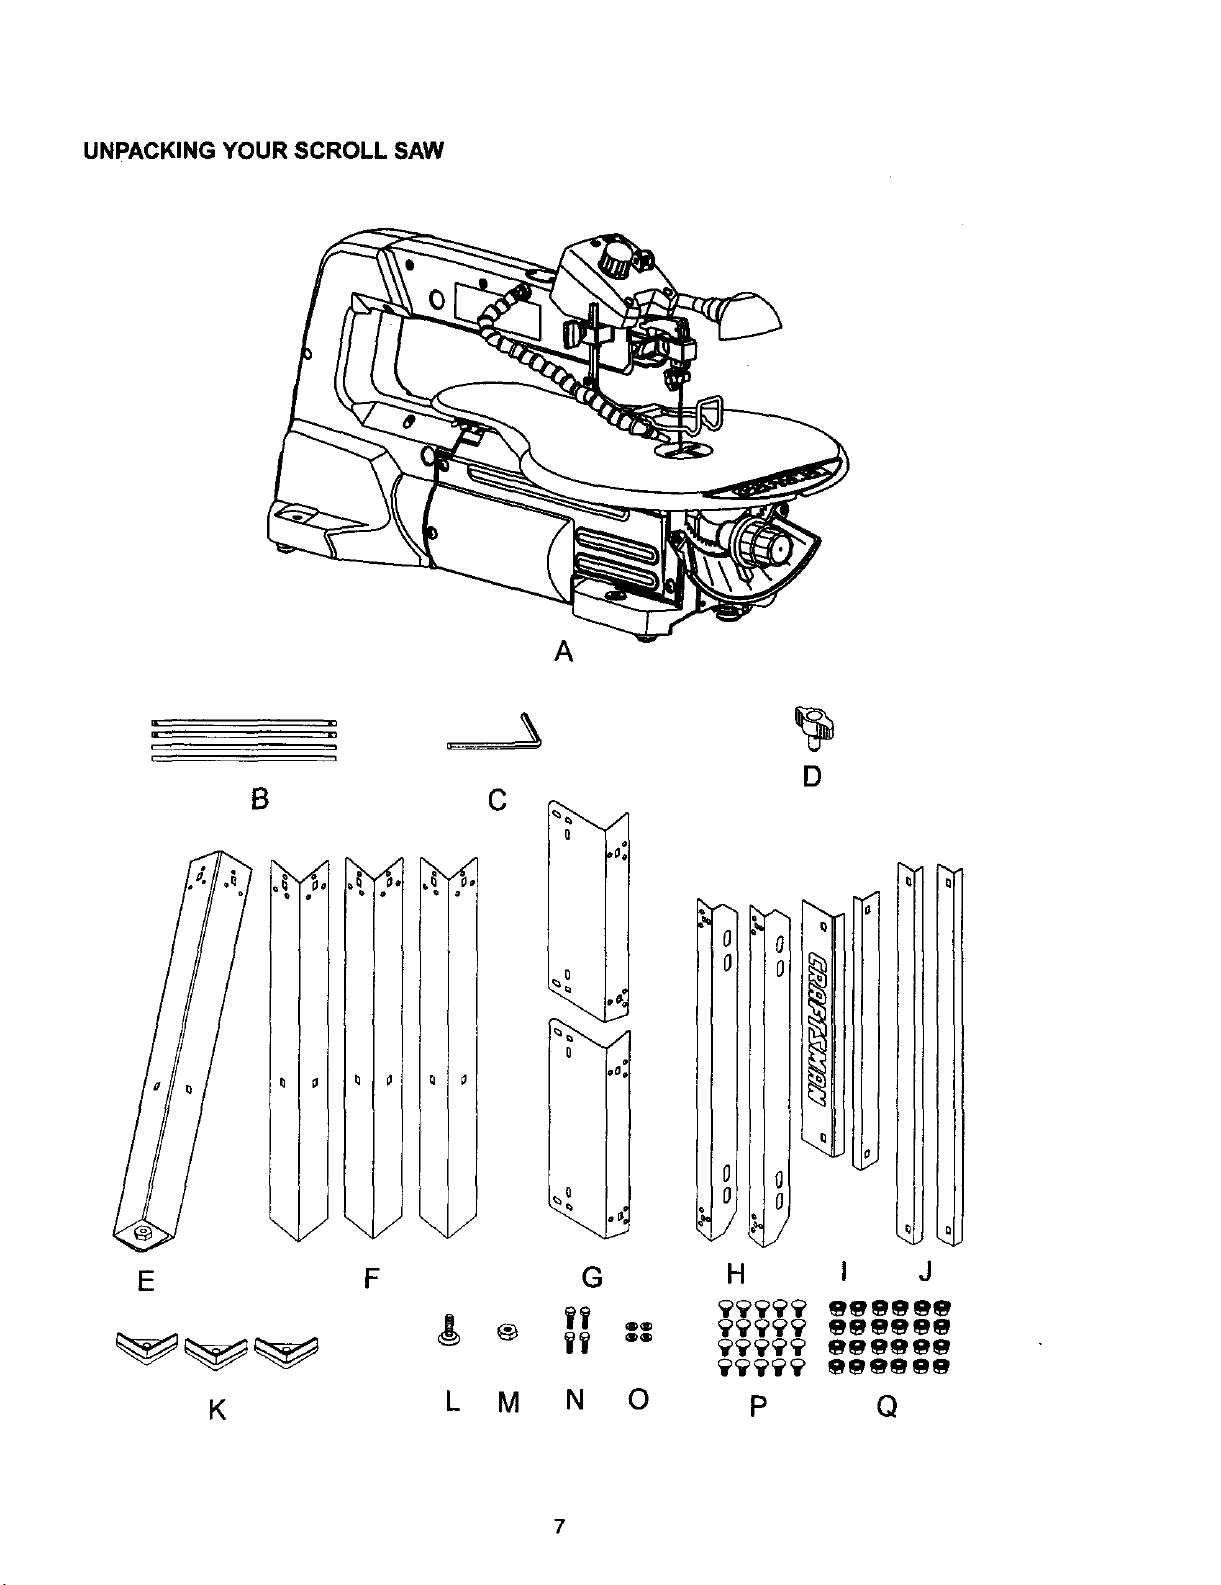
UNPACKINGYOURSCROLLSAW
la • i
,• • p
L
B
J
D
¢
/
o
_lJ o
t I
E
K
J
I
\/
i
o
i
I
J
I
Q
I
/
o
A
0
r_
I
I
\/
F
L M
I
G
V_
N
/
®Q
Q_
0
0
0
J
H
P
I J
Q
7

Bladeguardassembly Variablespeed
lockknob controlknob
tensionlever
-Bladelockknob
adeguard
foot
Mountinghole
UpperArm
Work light
Worktable
Bevel scale
Table lock knob
Sawdust collection
Blade storage
8
 Loading...