

Page 1
SAVE THIS MANUAL
EOn EUTURE REfERENCE
owners
manual
MODEL NO.
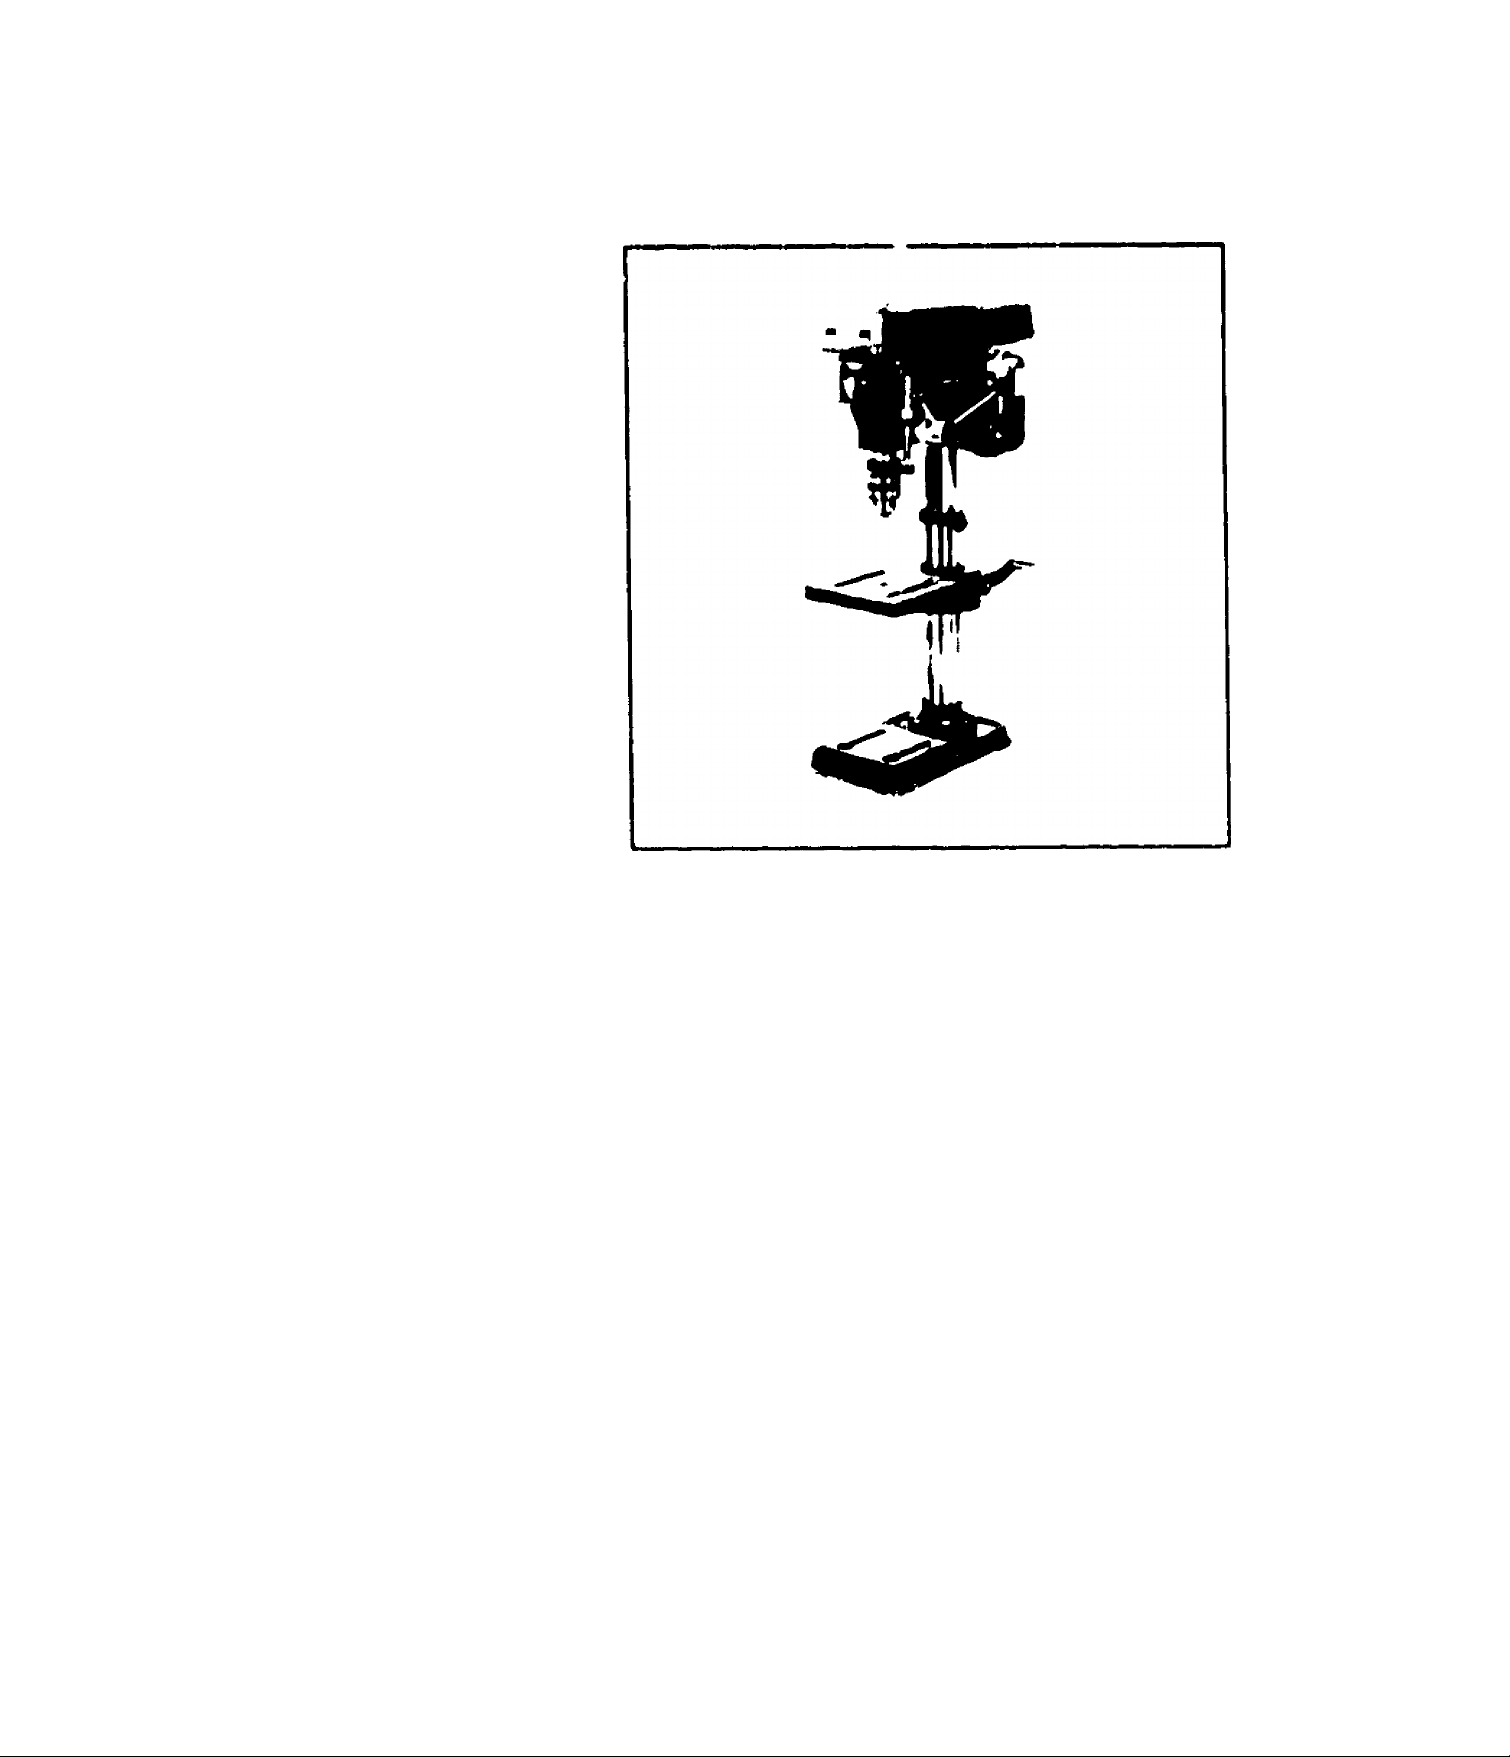
113.213832
DRILL PRESS WITH
1 i HP MOTOR
Sp- h
N ■
V ,')p j’’-; ,p-;)
-.-fl, fw> •' 3’ '*'(• 'f*,!' *
tpp ►'pfl':)
'^'"j S^Ovj i 'pfo"^ N)lt-
'Ti'Xip sp''d 'I'jf^bP' "
a sa'p p acp'o' 'ufu"* usp
CAUTION:
RMd QF.NERa
and ADDITION/ '
SAFETY
INSTRUCTIONS
carafully
li
CRAFTSMAN
MOTORIZED
10 INCH
BENCH MODEL DRILL PRESS
• assembly
• operating
• repair parts
Page 2

FULL ONE YEAR V^ARRANTY ON CRAFTSMAN DRILL PRESS
и w ithm on« v««r tfom the date of pofcn«M IM* Cr«ff«m«n Oritl Fr««i f«*i« du« to • d*f«cl
in m«l«ri*i or worhmannhip S««rt will r«p«ir it. fr«« of churg«
УУАЙЙАНТУ SiPVICE IS AVAILABLE BY RETUnNINO THE CRAFTSMAN DRILL PRESS TO
THE NEAREST SCANS NETAtl CATALOG STORE OR SERVICE CENTER DEPARTMENT IN
THE UNITED STATES
THIS WARRANT V APPL lES ONLY WHIl E THIS PRODUCT IS IN USE IN THE IINITED ST ATEf
Thu wirranly gtvM you «pocific '«g*l nghti «nd you m«y alio Favt oth«f rtghlt which
vary Itom ttal« to atat«
SCARS ROEBUCK AND CO Saart Tow«r BSC 41-3 Chicago IL S0M4
general safety instructions for power toots
1 KNOW YOUR POWER TOOL
г 1 >'
? GROUND AU TOOLS
' ■ ' . , . I ! - -1 , ■ ■ ■ • ’
*1 '<*.■" J j ' ■ . ', i ‘ ‘ ‘ <
i , . / t,; .■ (> i ' I • ■ > . j'. I.-
< , • ■
t ■ /, ’ L » * 4
I KEEP GUARDS IN PLACE
■ * '. r. J . ||. V ■ . ' ' < •I’l-
,J, r- pr-l
4 REMOVE ADJUSTING KEYS AND
WRENCHES
f .'fT- .1 ►lirj'l ■' I «■ « ' I ' '• »0,1. iri(|
' .
.....
J ■' '■
5 KEEP WORK AREA CLEAN
^ flT Merits
( OOF rrujC,! m 1< \\(- y ffi O' iSt
6 AVOID DANGEROUS ENVIRONMENT
nijn f uSP yijwp' iixxs 'P <*' API '0< ■ '
p«pOSP Itipni to Kppp -A'l'h WP ' "
P"jvifip ,i<ipqu,i*p sij"our’'i'nq -vn'k p
7 KEEP CHILDREN AWAY
A'' v'S'lo'S '.hrijid I'P liPrl -I '•fi'p li'vMf’'r fr.,rr^
* O'k ,irpH
S MAKE WORKSHOP KID-PROOF
wth pfiii(xiis m.isfp' switcnpi. ’ tiv 'pf". v-pq
^lartP kPy^
9 DON T FORCE TOOL
II A'" lO *t>p pjt> hPMpr tl inv> -fli,) ' ■
Ahirh it Aas (Jpsiqppri
1C USE RIGHT TOOL
Don t lu'rp ioo‘ O' attaiOmpni u, qo ^ oL t Aris
not dpsignpd *0'
II WEAR PROPER APPAREL
Do not Apai ''osp tioin.nq npr^i.p., yIpwp'fy i'''ngs A'ist war tip'll to gpt ( anqo* n nnyv
■ng pa'^ts Nonsiip lootAPa' 'pr on'mpn<ip<f Wpat
P'oted'vp ha-' tovp"og to rqn(a>n 'otiq t>ai' Ry"
long sleeves abo-.e the eiDow
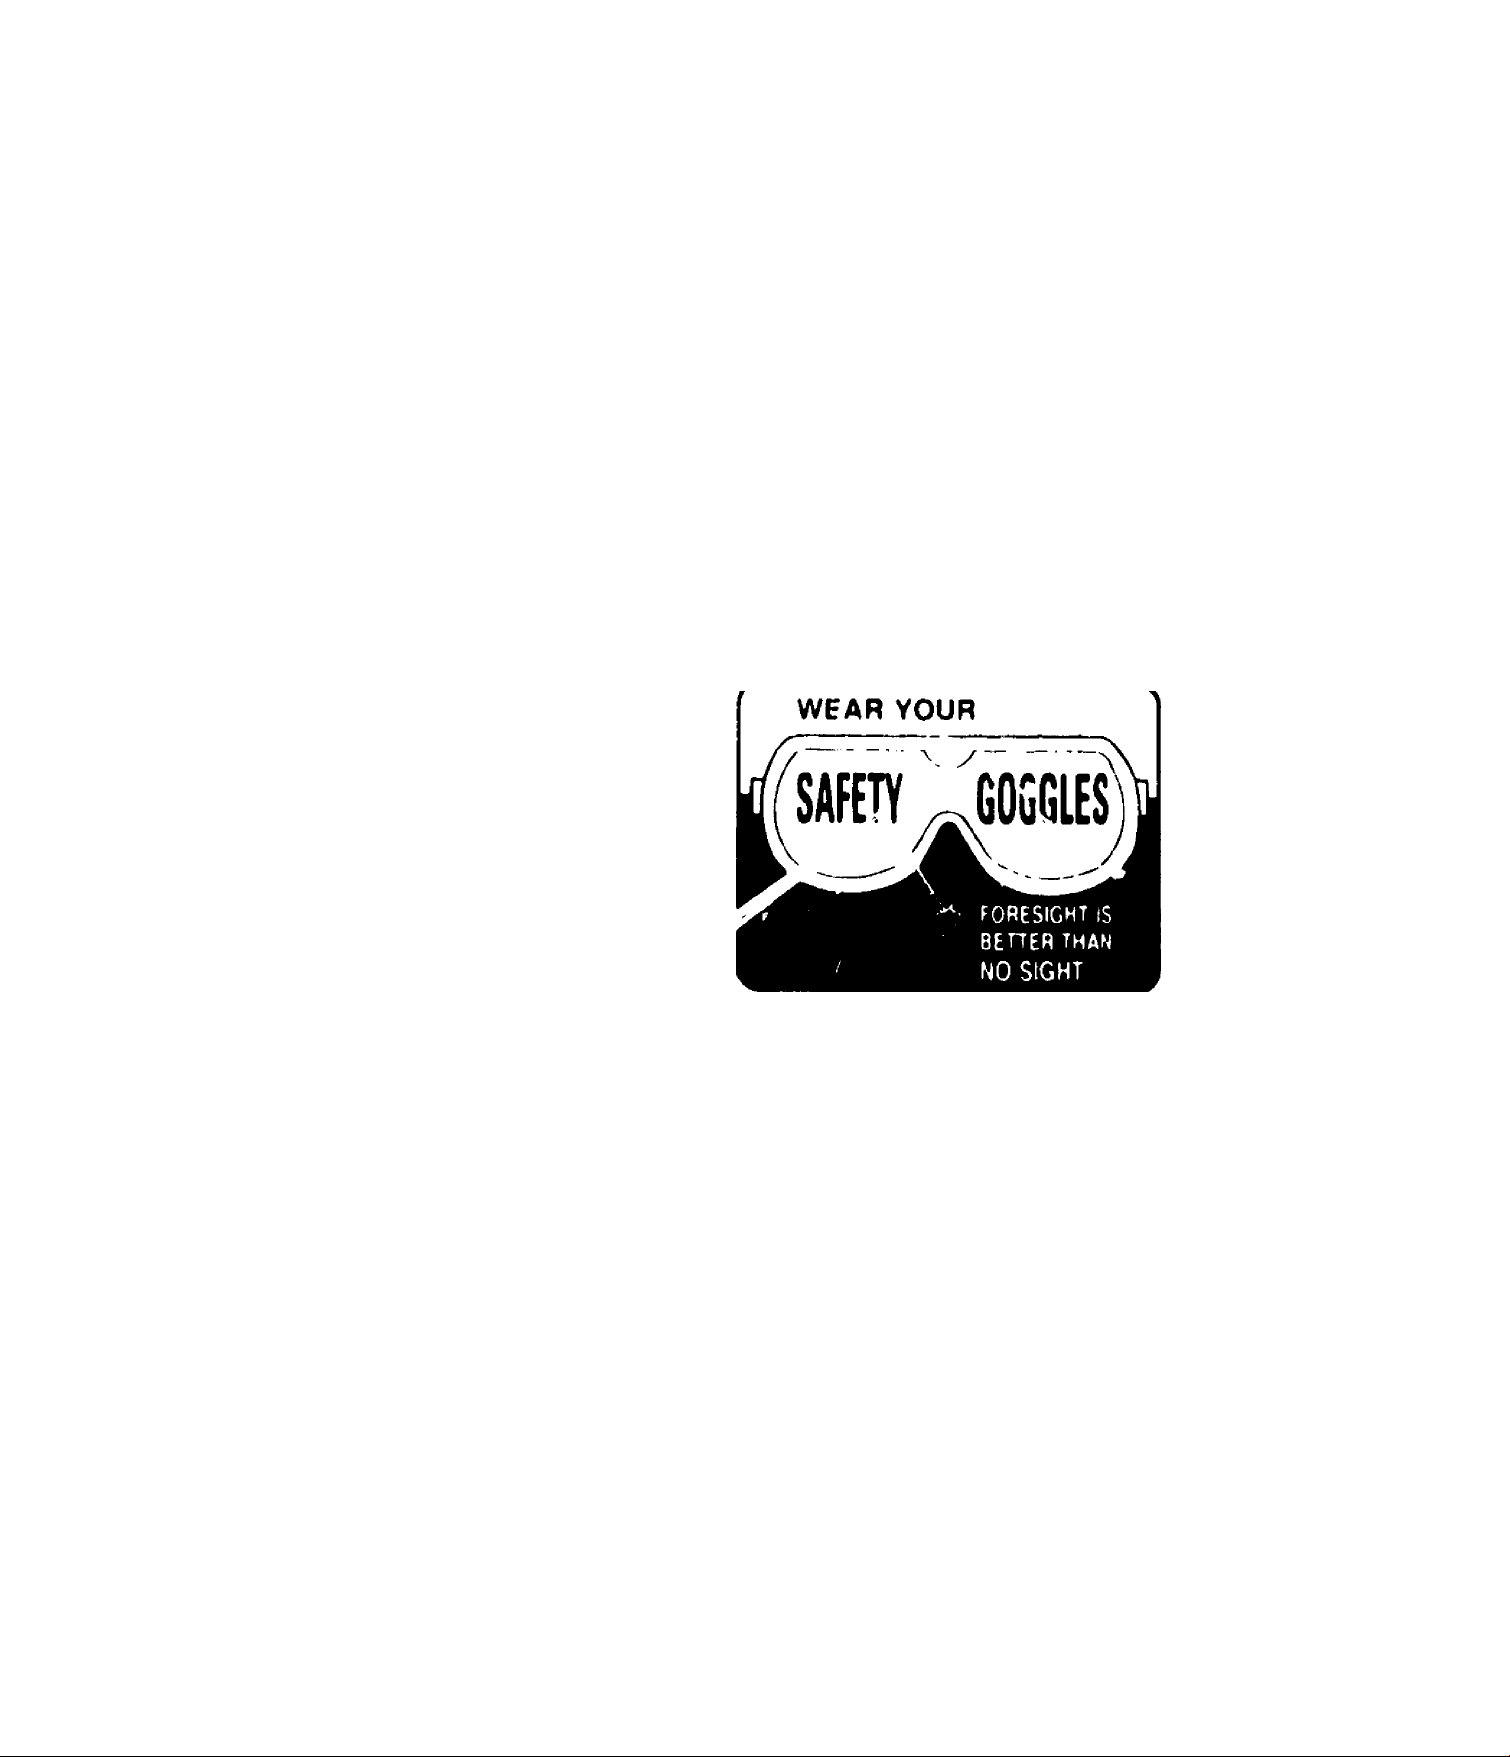
12 USE safety goggles (Head Proteciionl
,*,( 1' . I ■
,'P ■ < ,t , I - n
( J > „
<■ A , ! ■
■ , I - ■ V :
t 1 11 1
13 secure work
Í ' * -l'Til - I .
" a'l • I I'' r '
' ( p-1'.. f
14 DONTOVERREACH
K pp, t ' ■ 't p •'» ' py IP 1 h 1 ,1" r a' 1 'nr,
15 MAINTAIN TOOLS WITH CARE
Koffi I , .'1, ,hi<f .^fvt nan I ■> ppi,! an-1 ' a'f
pp'<, 1 ma''f p f -iinA ns*'"s'n' v)f'' " ii'^q
! hjnq'nq a ' PS'.n-'pi.
1« DISCONNECT TOOLS
ppiyip sp',ic -nq Atipn ■ na’'q'nq n < pssnnps "lu't’
as hiaOps hit'- ;utip's pi
17 AVOID ACCIDENTAL STARTING
M 5Vp Syfp SA'tc t’'S I'’ QF Í p('si|ion OpIq'P p'yg
gi'tq in
18 USE RECOMMENDED ACCESSORIES
i'onsijit thp nwnp's mgrya' *0' '■erofp'rieoopo ac
CPS WPS F iiiQw the inst'of fiQi's ihai accompany
thp ar CPSSO'iPS thP uSP 0< "nprypp, a(cpi;s^>pp^
may rauS“ i^ara'cls
19 NEVER STAND ON TOOL
Sp'ious inuj'y 'nyifj V f u' '* ihp tool'S lipped Of '*
ihp ( ytting loo' -s afC'cJpniai'y (.oniai led
On no' stofp mafp-.ais arwip o' nea' thp tool such
that 'I IS npypijsa'v to stand on the too' to reach
thpm
20 CHECK DAMAGED PARTS
Be'o'e ‘u'thef use o* *hp too' a guard Of other pad
that 'S damaged shoo'd be cafetuMy checked to
pnsu'p that It A'li operate p'opedv and pedorm its
ntpnitPd tynfticn C.heck lor alignment ot rnovog
pads binding 0* moving pads breakage ot pads
rnountiriq and any ottier conditions that may adect
its ope'atK. n A guard o' othe' pad that is damaged
should be properly repaired or replaced
,<’> ^ M, TyD J- 1 .
' 1 ^ " 1 Í
I N' 1 f
1 у .♦ 'Y » F * 1** F
r. ' j у ]
[ .» ' 1*
1 ’ h ‘ fy I'K
, ' 1 'I" * ‘'ПР ■
A Л
■' t ‘--1 rf’
i •
'V ifb ' V « .
Page 3

71 ÙtneCTiON or rtlD
77 Ht VEftLEAVt TOOL RUNNING UNATTENDED
‘ ' A * ' I • t
additional safety instructions for drill presses
WARNING your own ••Nly (To**'*'^Pl'o
opA'Al* your drill pt«t» untihl It romo'ftyly «»Mm
bitrl and imttaMad arrording to IK» lotirucliont
and ur>(ii you hava raad and undarsiand ma
loMowioQ
1 Oonarat Salaty lnttrucl<ona fo' Powar Tool« 7
7 Oattmg to Know Tour OmU Pra*» 17
T Batic Drtti Pra«s Oparai on if
4 Ad|uttmani9 id
5 Mainiananca i*!
6 Stability ot Orili Prat«
il > >.
, i' ■
' I A I
‘ (' ' ,
7 Location
Paqa
VA ■ . I
[ < ' ' ■ I ! . I ' • ‘ '
■ ' I A " Ì 1 ' I K « ' ( « 'I
A> < o ^ *
A KicKbacIi
^ I I
A K fc' I i A '*k I f > I Vi ' ,
•ti. A' ' If‘ it'f’iiTiTf 1
T.nr, ')( f t f P ■'ms < A’( ■ 'j( U ' t ' *i
................................ ;i(if
\ ¡fit K ■ »V ■i't 'T'i't' • 'tt , P , ^ , t t • ,
PS'- ' P'-- ^1^)7 Ip 1 r ' rl J* ' i
9 Protoctton Eyaa Handt Fact Ear* and Body
WARNING To avoid bain^ pullad into tha apinnir>9 toot -
t Do NOT wasr
- glovtt
- nwclill*
- loot* clothing
- (•wai'T^
2 Tia tMck long hair
4 ' ''T "■'1 ' ■
fin Orq ( j ‘
tth#3 rr,^,frjr f T / » pr '■ 'j ' •
a -y rrio ; 0Af>' ■ rv ■ < ^
'Tnp-j.aip, .p* iHf j ¡j4'>
f)"jpo' y 't«ca''P't 'y 'Ptj'rt' I'T
b NPvO' p'a'P yOiC *'"qp'S tt a posl'rP A>-P'p
tnpy <0L) <1 O' M'l inp It' ' .11-pi i jtl.p") *.)'
‘ lOf“ A'l'opiw.a t,n^ j" ir-pipi*i tpii Y ” >'
y 10' s'- oj'o ■ [
' T a^oic •''to't t -r’' "-'•OA'-' ' , "■» s(i'-''q
*0-'<)W '"St'uf t>OnS ‘>*'1 ' y as ) ,P' A'”' s'-' A'
■n a'Tiusl-'^ s{” 'iq la-'S '.r qu'
' • ■ ’ ‘ 1 . ► * I f ’ * i^r *
• 1 f ' ' t*
r A a , T T .( T ^ j *
> ^ ', s * ■ ' ' I • *
• . •i :' . -w t 1 , i i
* t ,t , * F I ^ F r
> '» J . 1'» , ' * J *• I '* fy *R
4 * *
il ( 'O ' -rT'F-nor’'^0 •
t *r < ,l pr ♦ ^ -'htii.O O
"■ t i »- fT'r P** < t<
* T F I * ^ ]*■ riF^ ft ,frt .^t r f ’ -i
t • t ’f U-' * . P , f 7 ■ [ r , . It 1
< I t r • O«,
' 4 • Ik t< “«r P'O S ^ 4 •'* ; i
' f' |p ' { j Tr ♦ < r T Ft Tr ■* .FI ^
, ■» ■■ tr f. \ ^ p ,T
r f rt <r .fTs thr Af'h t K ' I»"' i *
T J i- ' *'* ^ • «;nt ,[,*.< 'a
' *' * f-lt ‘ S")TH»-g
A I 1» r • jr 1 kr>n FT, t ,.y ^ in J# ‘ Or^
t , 7 ' t r( rr i |0- If- O f.-^T -O hP* I'O fT p -^r L
I pa , 1 r
to Uta only accattoriat dattgned 'or thi* drill
prats to avoid tanoua injury from thrown bro
ken pant ot work piece*
A M-PSAAS fo-y NEVER h« 'jtfO'AlP'l 'I'"’ O’ S 't'
o'pss a' i) 1(1#“»'! 'j’f'at#" ma' rpv
I U'A'n sa»’''»"s jSt NEVER t)#’ opyaipd on it-.i
ij>. p'pss J' a stnpq qrpaip' ihan '800 RMM
Page 4
additional safety instructions for drill presses
rv i ^ f V OI < T' t ■* .n
>' I t*i f \ #1 ► r -A f ft m ) |iif
,1 U'r p 1 ^ ► 'P
♦ ['< t .1 i\€' /t ‘f fyt t t /r ' * t i ,t
i# *t. f * * 1 *<^0' * i i * ' 1^- »,
11 Not* *nd Foll(rw th* Safffly Warning* and in
•iruction* that A,>p«ar on th* Pan*l un lh* L«H
Std* ot th* H*ad
OANOen
fOR YOUR OWN SAfE’Y
1 READ AND UNDERSTAND OWNERS MAN
UAL BEFORE 0PERAT1N0 MACHINE
7 WEAR safety 0030LES
1 DO NOT WEAR CLOVES NECKTIE OR
LOOSE CLOTHING TIE BACK LONG HAIR
4 SECURELY Cl AMP WORK TO TABLE IF IT
IS TOO SHORT TO contact THE COl UMN
WHEN IN OPERATING POSITION
i USE RECOMMENDED SPEED FOR DRILL
ACCESSORY AND WORKPIECE MATER
IAL
6 SECURELY LOCK HEAD AND SUPPORT TO
COLUMN ARM TO SUPPORT AND TABLE
TO ARM BEFORE OPERATING DRILL
PRESS
7 USE ONLY RECOMMENDED ACL'FS-
SORIES
12 Th^[l.
Spp
f'irt .
' IS 1 [’<-M ’
.IK UP*,'
i UP*,'
' ' UP','
UP*,*
'* Uf
ilp'f ■ ir> [)|J ipyt.
13 TMnh Saftiy ^ ^ ^ F>rnti r>f
.»rftion %rnc,0 anrf ^ pFi !ho
■ ^'11 |jF( c t ^>prr»q
WARNtNO Do not allow familiarity (gatn*<t from
traquanl ua* of your drill pr**al to bacom* commonptar* Alwaya ramambar that a carata** frac
tion of a aacond la tufticiam lo inflict aavara injury
Thn .1(^1,;^» r- ^ pnyyfif ♦'¡n ' P\ , * f ' 'C J'
Fifijp ' !«s f-irj Ihr-i^m ,nfr^ Ihp Oyn-^ .^r- *p-,,j»
,P , prp p A 'J yjig rt
{ 4 A ANS^ /S'* * *. )r> ^ B-^JC *a
* -ra r»'pi,r .nrj fx ^ t » -1''
l,;i p ri* ir 'p*i. •' j 'p
unpacking and checking contents
COfiTENTS
Salary Iis1'ik'-(’'’s •<>' p *0-
A(j'l'*-ona' Saiaty lns('u( tiorii, ' 'f (J-. ■ p-p^sp
UnpdCNi<‘>q a*'d CnpCt'fX) f 'intpnK
Tab'e of Loose Pans
i,''-)i'-n Spa*''fKai)ons a*vi E *>< f''< a'
Rpqoi'emef’fs
Assp^itJiy
Assemh'y of Base to umi.
Installing tie Table Suppe
Assembly & Ha'(Jv*a*e
.''Stalling irie Head
insia-i’T Feed H,inr)iios
inslai'ing *rH- ^riKLli
Tensioning Eteit
Ad|ijsting the Table Squa to Head
Ad)usting trie Pointe'
Geling to Knovy You* D'>ti P'ess
PAGE
?
3
s
s
fi
**
8
9
9 ib'if at-on
'0
' •
11
COffTENTS
BasH D'lii P'ess Ope aiion
Adjijs'rner :s
M imtenaiiC“
"fyomm^nded Accessories
'juD'e Sboofirig
Repai' Pads
Removma tr*e tiifr
D'lHinij to Depti
Depin Sca'e
Instating D'li’S
Positioning Tab'e and Wo'»p-oce
Tilling Tab*e
r-Toie Loration
Feedirg
Oiji'i RelofM Spnnq
PAGE
4 T
1 :•
10
10
10
19
19
?0
31
'5
IS
'6
'6
f0
'9
Page 5
UNPACKING ANO CHECKING
CONTENTS
f fi jn ] F' I Ji's ' 4 ’ ^2^ ttPV rri; if i'
Si't'f'i**' ■' Pil'S ''Of' Dll' «i”n 4-‘- I hf'h
*‘,li ■ T ripif ]'L ixt'-f P.l'S *■ rn,)»»! p'* . I
1 ^ cl'f 4' ( .'’'*=(1pP'O'P 1 V' 4' j'np .'’.I 1 •
r , T (>*1F
WARNING For your own ufety 11 any par^t are
misiing. Oo not attempt to asaemble the drill preta
plug in the power cord or turn the switch on until
tine missiflq parts are obtained and installed cor
rectly
it# 1 , FF,^r F F ,
) ' 1 ^ < M8 ,h.pijpr! I p f’tP .'■ '(> ' .V
(' I.
• ',l F
TOOLS NEEDED
r -e -» • T • T'» * ♦ r e-f-'
:V
COMBINATION SQUARE
FÍ
a u f V , s'
]
•V
/.
f
WARNING To avoid tire or toxic reaction never
II 'jaao'ine naptha or similar rnghiy volatile sol
vent
r\; , . I F* ‘ , 1 • ' F ' 1 ■ . ■
‘ ' , t ' * i / , ■ • * ' , “
TABLES OF LOOSE PARTS
Item Description Oty
A , mr A',^,p'-F > ,
B ^SSF''F t ,
T f4')P -jurt ■' * i *
L B.rsf
f OVi'P'-^ ijl.V j4
0( * -,l r/ V- p I ^ ^
S'f 4 P.l"^ i 1 ' » " ■ r' -I
( f r yf F -F I FF.f t A I' H
C r-F , •
^ PF»' ' M.4' ! . '
'jutjl f'* L ' "
►’.■H Kp, MV'.'
T-Jfp C'4''" Ass*"''b I
'li' PA Pd" r-l'l "J )c'«' 1
■p. i.ip. 1
"Bo's rHei Hd IS Ip*' ' 2 4
'i otiFAdsnpF 3 8 ■)
‘Hen S('s Set S''pa S 16 '*1»’ ? 2
■Sw'.ri Kp^ ’
'Stf'PA f'a* HO 'n ^ 8 ’
’Knob Ben Gua'C
'Sc PA Pan Hpal 1 •# ?0»i £' 1
MEDIUM
SCREWDRIVER
a INCH ADJUSTABLE
WRENCH
K-
I C»
10 HEX L WRENCH S3? HEX L WRENf-H
\
1
---
I
L_.
* Pails ContfcnpC In L oosp Pa'is Bag P.n'N'j ’’ 56«
Page 6
motor specifications and electricai requirements
MOTOR SPECIFICATIONS
Th v !t I pros', 'S to US,’ .! ' 7;»', RPV m jlnr
on , p no! uSf> rriijt, ' 'f’rit 'U'lS 1^,10 ’7p*)
RPM Ir s Iri’ npf'at'On nn tin 1 ?P vrj'ts f>0 Hz
|"t n J '
WARNING To avoid injury Irom uneipactad atarlup. do not ute blower or waahing machine motora
or a iy motor with an automatic reset overload pro
tector
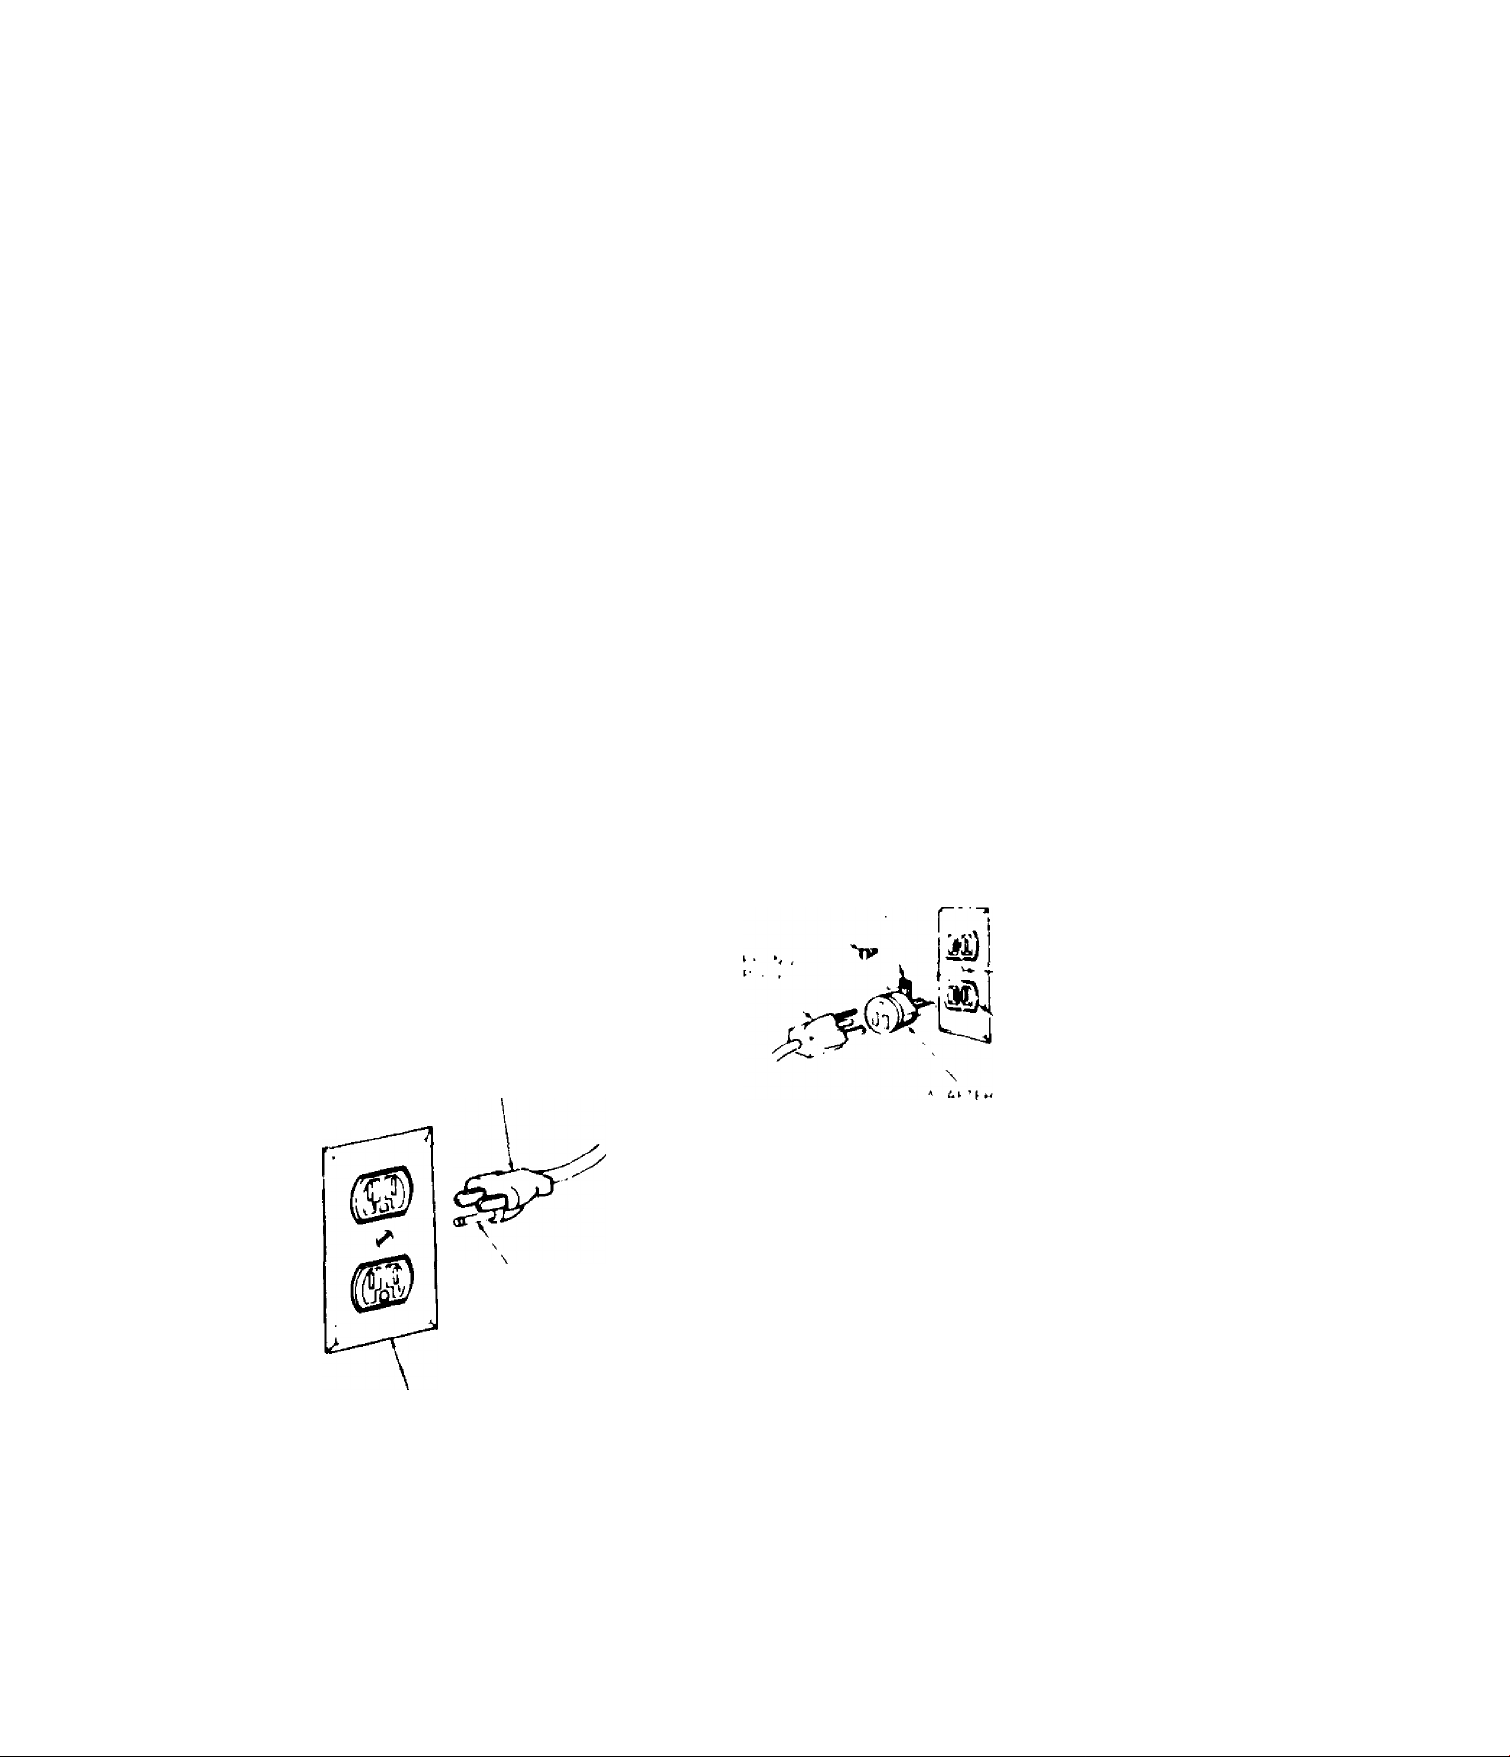
CONNECTtNG TO POWER SOUr.„t OUTLET
Tt. '■ ) >' r , m ,st tl<‘ 1" , ii)l'r1 /,*' r ' 1S< to prof,., t
.j J ( A!" • p"! '"|p 1 ' I j
[ ,jt >■' [ '■ tC t.>(t ■ , .1 '
■'.tv ( ,n I,i1 Sdvf *U'.f '
NOT ALL OUTLETS ARE PROPERLY GROUNDED
IF YOU ARE NOT SURE THAT YOUR OUTLET AS
PICTURED BELOW IS PROPERLY GROUNDED
HAVE IT CHECKED BY A QUALIFIED ELECTRI
CIAN
WARNING Do not permit fingers lo touch the ter
minals of plugs when installing or removing the
” ! *’ ' ( ni ist tl<‘ J" , ii)l'r1
* ■ ft, r r»i If i( , Iror k
. 'J p'p p| , ['
I t> cr'ir ot I ,
' • I 'l iki
plug to or irom the outlet
WARNING If not properly grounded this power
tool can incur the potential haiard of electrical
ahocfc particularly when used in damp locations
m proximity to plumbing If an electrical shocli oc
curs there is the potential of a secondary hazard
such as your hands contacting the cutting tool
It power cord IS worn or cut. or damaged in any
way. have it replaced immediately to avoid shock
or lire hazard
. r it.
t
This powe' iO!.i is pfiuippPd Ai|h a 1 'onduci' ■ ■ i
and qr'jund'ny 'ypp p'uQ which has <i i •<
approved hy Undprvyntp's laljoralonps a' '' " <’ ( a' a
rlian ¿tanda'ds Assoc lation Theg'ound co'a i'i • nas
a g'ppn latKpt and ¡s atidcheo to thp too' n-,............................
one end and to the g'ouno pfong m ttip a't i > men'
p'ug at the c ‘t’p' > 'id
This p'jg fpQuifp', a matinq 1 f ondu t'' O'oun ¡r i '^pp
out Pt as ShuAti
It the out pi you a'e p'ano'nij li) uSP *0' 'i'lS fsjW“’ I'Xi
'S o'till-two p"’ng type DONOTRfMCjyf ORAiTju
THE GROUNDING PHONG 'N ANC MANNER tja>
1" ada[)’p' a .no^n anri a'y<ays' ■ ;n u>r * the ■ i..'ni r
ud t, kpijai’ g'liw^
It 1, -<>i I,mirende-l ttiat yC r ' I t i 'in,I ‘ i- i < r t' j'
|(’(j'.!, I-It'i TWO (j'lii’rj'III A'" i; ■ ifi'r d
THH(E p"ii'i) ontie*
A-'ad tptf'a oei lA " I. ! 1*||''. r 'I- ’ ■
I 'll.,, tn ^ [ ' 'f'd '(.I >iit,tr ( •
warning The green grounding lug extending
from the adapter must be connected lo a permanent
ground such as to a properly grounded outlet box
.
■f
fill r, ,
f I ' A I
,U( !i
I'U-
i! AAyS u' f A
PrXjPf ni Y C.nouNtiF ('
ÜUUf ’
|i V >u' unrt IS *0' uSP on ipss than ' bO vo'ts it nas a
p ui) i''at tix)hs iiHp thp ab<jvp
NOTE The .vtaptpr inust'.’.iPd 'S *o' jsp on'y ii yo'i
f'pady hivn a p'oppny qnt jnded y* p'ong 'pceplac'p
Arapte' 's not .’.I’owpd 'n Ganada Dy thp Canadian t lec
1"! a' G odr
The jsp cf any pytpns'df' (ijrd w" t ausp some oss o*
powp' T.' keep this I j a m.nuTn^tri jng to pfevpni ovp'
heating and moto' hum ,.ut uSp the lab'p ppiow to
dplermme Ihp ni.mmu'T' W"P S'ZP lA W G > p«tpnsiijr
co'd Usp only ' Wire pxtpnsion c. cds whn,h have 3
P'ong grcundm.j type pn.gs and 3 po'p 'pcpptac'ps
whii.ti at (ppt thp i(xrs plug
F xtension Co'd L pngth
Uplo ’00 Ft
too 200Ft
200 400Ft
Wi'P S>/r A W G
IP
14
to
Page 7

assembly
WARNING For your o«rn uftty. ntvar conrioct
plug to power tourc« outlot untti eti aesombly steps
are completed
ASSEMBLY OF BASE COLUMN
’ Positiofi Dase o'' *'oo'
Rprnovp p'otpctive s'peve ''om co'ijrnn lubp a'l'i
disca'cl P'at e i.o'u'Ti'i 3' prnbi^ pn oasp a''claiiQ!ho PS 'fi (i.iuTin Supponi Po'ps n bate
i I ota'p fou' -4' 1 H 16» ’ ' bo tt and »ou' i4i i a
Of »Aasi'P's ■o<''sp pafs baq
4 a '0( »A.is''f” afi'i be' ■" oar fi bo'p th'-rnnh
■ sjpp'-a a-'d t ate a"'i’'qhtpn jvib ari itta
r. «JI H
INSTALLATION OF TABLE SUPPORT
ASSEMBLY AND HARDWARE
,t ’ г*л .j*’ '■ ' p -e A *r ' a H| « L
r j «i'irì ' (>i'a' rjpp *,y ^ *" ff' ( ^I'T
L
W'lri long smooth pod o' rac» p<j'Otiog upAd'd s'ldp
rac» down through large rg jnd opeoing m lab'e sup
pod Engage 'ac>< 'o qea' meshao'sm 'ouod ins'dt
opeo'ng o' table suppod
Whi'e holding rack and table suppod m an engaged
pos'iion slide both down ove' coi'jmn S'rde fack
down cCumn until rack is positioned against lowe'
co'umn Suppod
4 Replace column cona' and position i| over rack
Tighten setsc'ew m coiiat with 1 '8 HE X L wrench
Collar should sit loosely over rack and should noi
be angled on the column Only tighten setscrew
enough to keep ronar m place rack should siiti slide
treeiy in collar
CAUTION : To avoid column tutM or collar dem-
■ве. do not over tighten eetecrew.
Page 8

assembly
I >( tatjf’ t ank assf'rnti V and suppo'' 'ofk
,lfn, fq OOSP pa'K
I'istai' ta^|f‘ ' 'a'l*' a',sr'Tih(y tas 'I’qs'Mtfd nnfo
s*'a*i pitpnd nq out of lab'p suppo't T qhtpn
1 'PA against tiai side o* s'laH uS'og 'ft Hf X L
A'f'H n
1- t.ii Supped 'otti t'nm iptt S'cJp 'Ptc latiip supped
I 'd ‘ ,'ifpn by hand
' ipi- MPk handle jhouid turn fippiy Ahpf »aiS'nq
AP'-nq laD'p d adiuslment nppderl oospn
I” 'ij' 't'pn Aitn a 'PAflnypi i.X)‘Pn tXj't n h indif
,Mi. tticrp ,s osiy Dptwppn lani nut a'l') hand'p
T Jl.1i M qrTi'lul SP' u'i y Ah'n hi jifl.nq hull if 1 ir>() t-
t, " ■ 'cA't' vP'
I '(Cspn Mjptio'l Ю( h a'lrj • Jisc (at)ip Suplkj't (ly tii'n
inq table t мчк ( I,;', кл'' * unti' suppi ■'* is at a Ач'кinq
hpiqht T ghtpn suppo't к
-s^
ry<-
INSTALLING THE HEAD
CAUTION Tht h««<l atMmbly weights about 45
pounds Csrsfully lift head
1 Remove prolettive bag Ifom head assembly and
discard CareHiliy I'h head above coiumn tube arid
slide il uiilo column mahirig sure bead glides dOAn
over column as fa' as possible Aiigri head with table
arid base
2 Locate two I?) 5 16 18*1 ? set screws among uюse
parts bag
3 Install one set screw on each side of head to lock
head mto position and tighten with s 3? HE X l
Arpneh
' \
Page 9

INSTAUING FEED HANDLES
1 locate Iti're t3i 'eeo tiand'es amonq icKj'.e pa'fs
? Sc'Piv the *eeO hanqips 'nto t'^e thipaoea ho'es
thp fiLiO anq lighten
i L'x.ltp ''n(. ,1. iQ 3?*' 4 pan nq s<'PA an J onn
■ ’ ■ pii.i't«' a 'irg loose [a''s haq
4 inijtd s( " A th'.,^,(jh (^x-'nte'and mil tahesoj't' *
T.ghipn S''PA A th St'PAClfivP'
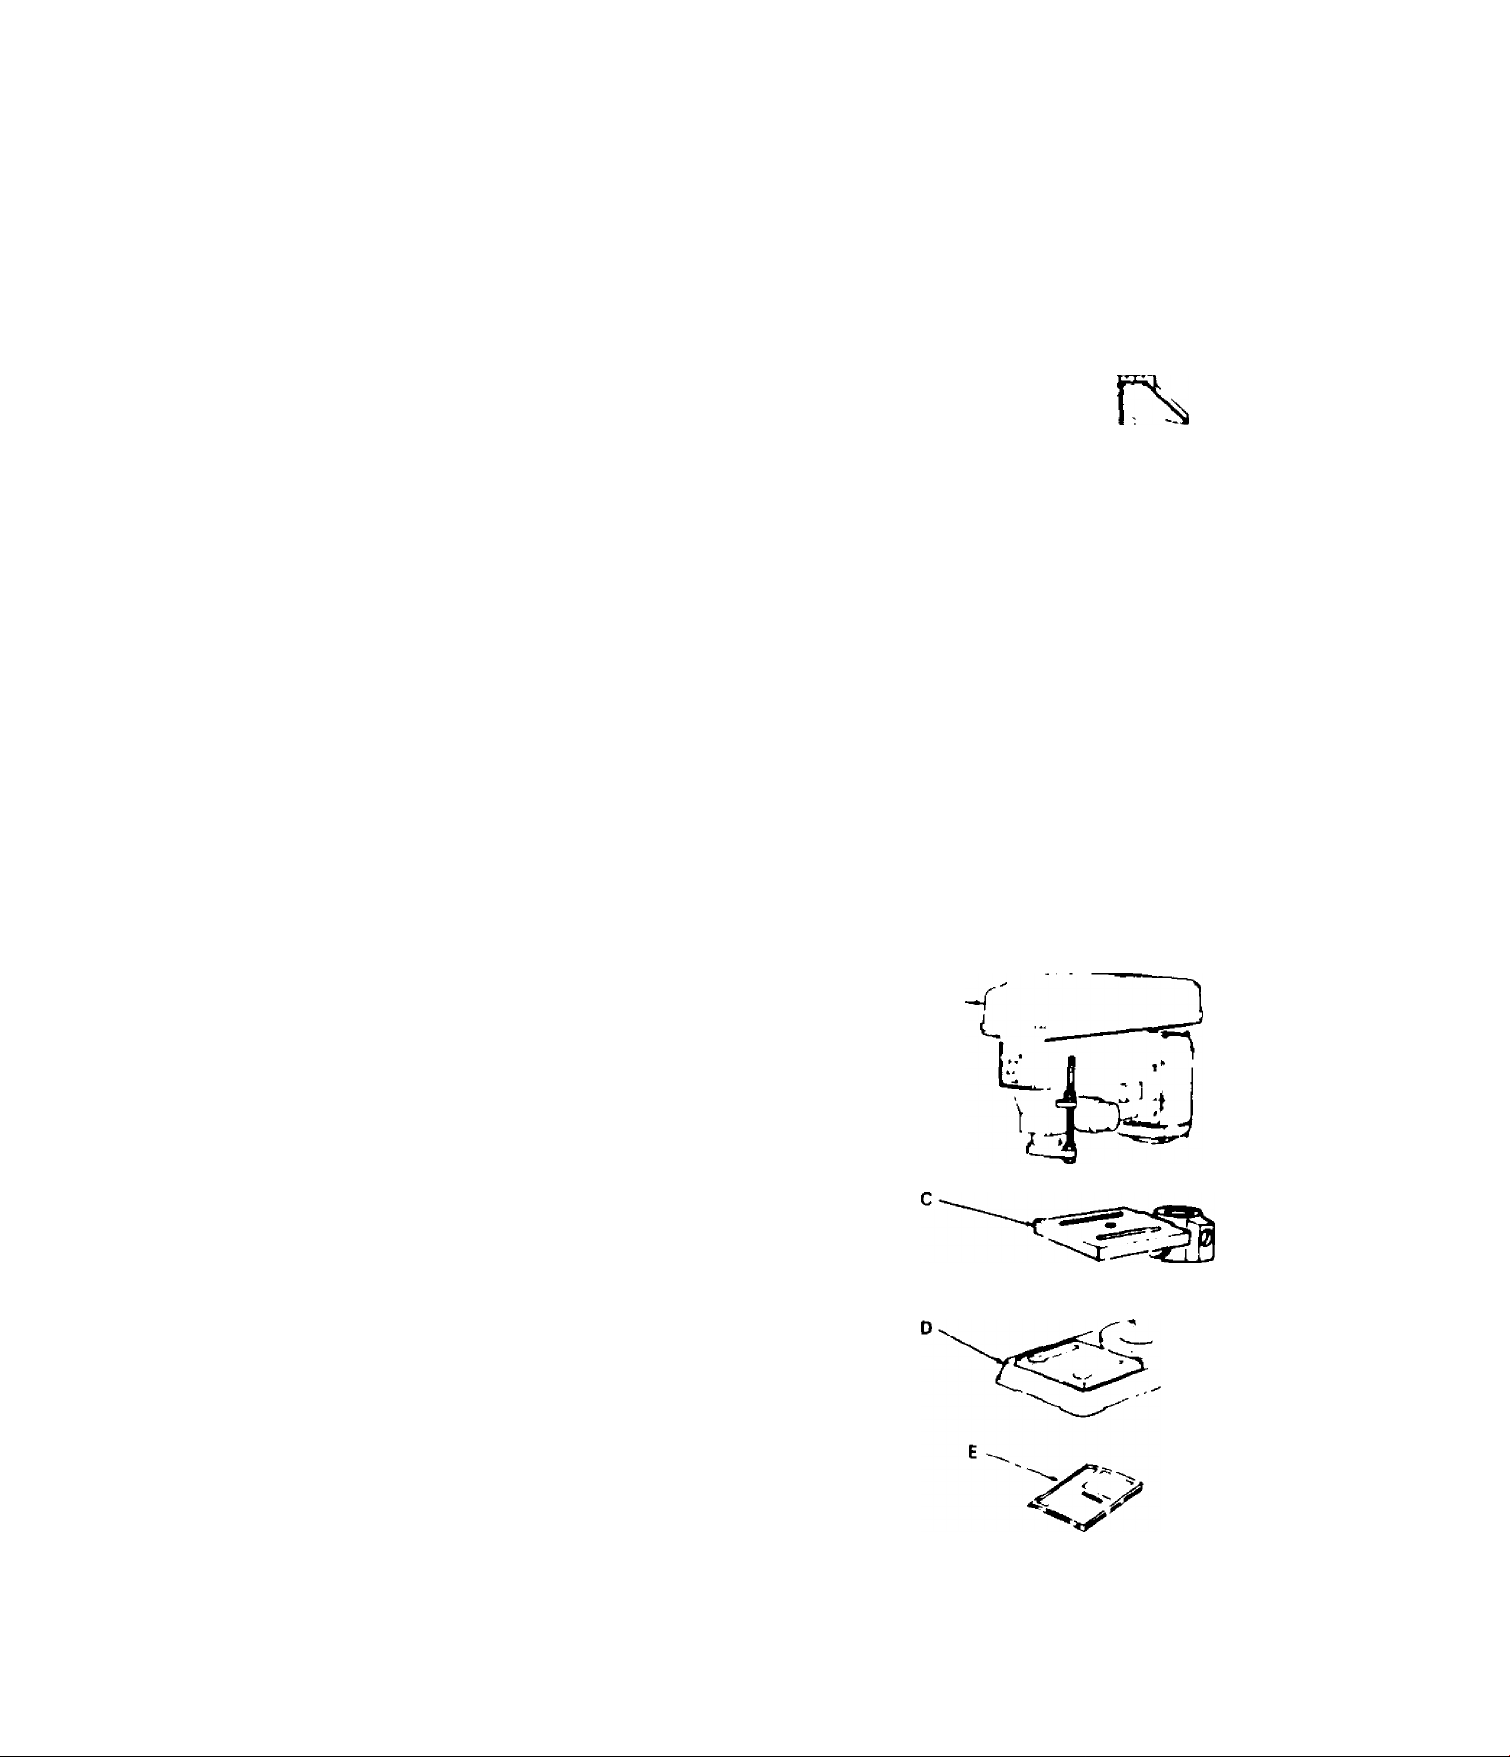
INSTALLING THE CHUCK
1 '„otate ctiif'i'd''0'-np 111 10 32*7 8 t>at hp s<'pa
among loose pads
2 Clean out the TAf-'EMFD HOLE 'm the chuck as
-iiust'ated ciean ihp spmpie riosf A'it*a rieancioth
Mat<e su'e ihe'e a'e no to'eign oartices stx king t'j
the Surfaces The slightest piece of 0<rt on the spmdip
nose or m the chuck wi" prevent the chufk from
seatingprope'iy Thiswucauseiheciriiiiii Aobbie
NOTE It TAPERED hQlE m the rhuck is e*
irgrieiy drty use a '.leaning solvent on me clean
doth
Push the chuck up on the spmrt'e nose as la' as >t
WH 'JO
Lightly tap the nose o* the dock Art*-, a piP'e o*
wood to insure proper seating ' * the chuck on me
spindle
Page 10

assembly
^ Open the jaws o( the chucK as wide as the/ w'l
()0 by tufninq the chuci< sleeve
6 Inseh screw <nside chuck and tighten onto spinqie
nose w'th screwdriver
INSTALLATION OF BELT GUARD KNOB
' Locate knob and 1 4 20x3 8 pan head v mw ni ■ losr
parts bag Insta'i sc rew m hole located n tip * guard
and Knot? ^uiHfnq Ljntpi iiqhf
TENSIONING BELT
NOTE The Drill P-ess is shipped vvith the ben installed
but It Should be properly lens'onpd betorp use
1 I iff belt guard hom nght -ide ar’d -eavP openeo on
hinge
? Release Beit Tension lock Hmdies mc atert on
each Side o' Ds • P ess he. 1
1Д1, nr I ,f (J( /,
e As' I
9'
I'OiiH
3 Choose speed tor drilling operation and rnove belt
to correct position for desired speed
NOTE-Rete' to chart on side of DnH
ended Drilling Speeds
' Press to' Recom
4 Adjust bell leiision t у pustimq againsi miito'
mount moving motor toward'ear isee a us’raii ini
Ъ Tighten Ben Tension юс к har>dies
NOTE Ben SHOULD defied app'oximiipiy ' 2 by
thumb pressure at гтиг* pc-mt ot ben between p.jupys
6 Close ben guard
7 li ben slips while d'lumg readjust ben tension
nf AP
( n, OWN
S.
Ю
Page 11

ADJUSTING THE TABLE SQUARE TO HEAD
NOTE It s i.j.i . ’ h t', .
linp.i ^ M. H ' 1 I ^ «Ml «, » t .
^ '* * 3 ','p -s ir . • .'O «-»O# 1 S ' > f’- •!*•
nr 0 ' ^ ^ h ^ f * I ■
i W ff- M'- n H "-E 1 ' A 'H ' ^ '<t= 1 r ■ X»
j'T r1 J V f < ”lt' -vlj. n 1 » ' I ’ ♦ 1’
- 1i
' vV t , ^*T ♦ ' ^ ^ •» ■ « -.ii' y » n ti . ■ » /,
, ■ . < ' U r ^ H-. 1 4 Hf Jf I \-i r fi .
' t ' *'•¥ ^v■ * * ' k 'I.»i A-*' I :, , M ^
A I ^ ^ ( '>* , ’ J r f 1 i' 4*1 1 n M 4
1
A ■ • » I ! • ■ . ' , ( _ ) j I ' l ' ’ > ■ ( ■ ■ , : r , ' t r ) f . i ’ .
^ r) i • ; f V . • ^ f . i - f i ( < ( ■
t pe t > t ' , n - , ( t , - ( ■ / ,
' ^
' V . t
i-o7
n
i
\
’ AR t
ADJUS l ING POINTER
* VV'*'trp (at *•-.gu j'Pfi to tR( '.fMO ttu’tjD* t>f'vi'
pn ,p' s^'uuti bP abj (Sit'd
i* L (tuSPt'sc’PA >" pO n't" Hiv.t ■ ^(. rPiA yt" dPdTOit
pn n t p r ( e 0 p o s t i ' i n ' j f i S ' a p F i t * j t t p r ' P A
11
Page 12

getting to know your drill
press
16
HI If K
■ K K( T
1?
Page 13

fhis b' " Pfpsi. »'ds 4 sppprt' d«. l■'.tec^ Ор1ол
4ЙС Rf’V
940 RPM
' ГЛ RPW
300 0 RP M
Spp "qh( sidp p' Hpid <o' t,ppr *c р'дсрр'рр' pp ft
1 u Pyi.
>INDLE SPEEDS IN R.P.
4M
17M
1 •»
i. -*
J—"—
ЮОО
il'
BELT GUARD ( i w< ■ [■„ p' ■ r.>. < ],,■ ■
■[ i -y •• ■ p., V.
BELT TENSION LOCK HANDLES t ¡m,. , ,
■ !■ ’ I ^ '’-I
*' t O p 1 ■ ; S t , I ' ’ • p ! i m ' . v •
<• ■■ ' '
Ht-t ¡'I
< ’ 1
■ MEAD LOCK L )( hs th(, tj tl’f 1 о ijr...
4
; \ Л / А > t ’ d v P t О ' к р г * p ' d ' p Л * ' • ' p t " d ' ' r i q
"■( rO
4 COLUMN COLLAR R ds IM> 'di i- f ' •
uTf 0,3.»' n f( ,1» . p(,"F t
•, ) ! > ( ’ S . p p ' ' * F T ' i v ‘ * f ’ i p n t s
- R A C K ( i i r n h ' i p S A 't h g f M T i p i » . p ' l S ' T t i ■ Г "
'C i P Pd ' - . y “ f“ v d ' , ' F ' ' ' t. l t P fi , ‘ S ’ t p p ' ) ' » S' St ) t
'' Л P к
»1 Support LOCK T'yhtpf. rg idt'pvjp
PO ' t t O F n I u ' P ' А ' Л с З у Ч » ^ . S V P 4 K I M F ■ ; , ,
op p ' d l ' D q t h p O ' I P ' p s s
' T A B L E C R A N K T, / n ' т к л t
td h i p S u p i i p F l » O ' * p p i . s i t ' p ' ( • t H S p ' t f p * ' , • St
■nq c 'dPH
Ч
T A B L E S U P P O R T F T . i p s ( ) M ' 1'и П ' П f ( . b u p
table
Ч BASE Supports П' ■ P'pss fiirH-S't.i "s sfd
b' i f y t i Q i e s d ' p p r o y . r t p i i ■ F ' b a s p ' Г / t i i ' * О R ' p s s
t' j b e ' i t t i iS p o Ad f j i t ' F i n d Sr i ' p t y |p s * ' . j F t i - if i t
O'. I P'PSSP'
()»,'1
. .. .. . .. . .. . .. . ..... . .. . .. .
.' 1,1 г
*t)t
COLUMN ) ’f ‘i ; ',st4p a^'' t tsp '
I ■' *■ [) ' ’ F'l ' caSy s .yirfiint ¡n ) lyp
\ BEVEL SCALE
•' ' ' ) ( . y f .. . St .
Л * ty* t * >* * ' t. ff ]
s ,t |). I'l
’3 TABLE BEVEL LOCK
I ».„il.. in ifT I 4»^
'4 TABLi. O'
Л '!■( ip' (
tp Л . ‘ ' l i j ■ - . i '
FEED HANDLE
li V . O" ^ » ' t )' ( l A r i i rt i d y t (. ' p r T n j v p i J it i . p i t ' . F a ' y
A»'c"t ji- i»)p ipVi'ttp.y.i (F IS }f su( b sjousoa' sbapp
»0, ' t . r i t p r F y i ' y . t ^ ' t t l t h ( ' P u F ) ' t p ^
’b CHUCK Hn'ts 't'lii O't O' oibpr Fpf oiTiFnpoqpri
f,
,v ■ i'',sr"y to pp'» i'’n ripsi'pci operations
' FEED STOP ROD Hnigs stop nuts tor qiii .na
' spp' iti( depths
I ft STOP NUTS I .mils thp rtoAnyyaf j mover^pF'i
rjt thp qui.' at aoy des'rpcl poi 4 rtilh'P its travel
arv! preypi'is tt'p pniritp' trpm tTirjvinq upwa'd
' ) DEPTH POINTER todnales d'lHinq depth and
't f a ' p ’ * b p t \ e i - n s t i p F i y t ' .
itp DEPTH SCALE yhij^s lepth o* ho'e hpim)
!' Fs hps ap 1 " ■ iiTietP's
^ Ml* ,* ^
^ tl P
,;)pF.''
F. ' f r T ' C j v i H ' j t t i f i q u , i i . , p y r
COLUMN SUPPORT SMppn'ts''. jff)' g.j.'les
'a( К dorj prrjv.Oa'' '‘.'sijFiting hi,.,", i ,r
»)ase
'3
Pt SPRING CAP P' , dPs FTipans to aidiost tjim
Sp F i i i g l e n s ' < i
Page 14

getting to know your drill press
t'i’ ON-OFF SWITCH Hhs'oc King This
FFATUHE IS INTFNDfD TO PRFVFNT UNAU
THOniZED AND POSSIBLE MA/APOv)US USE
Rv CHli OPEN AND OTHf R$
I' KF Y intn switi
NOTE Kf / ‘S 'I* •'/< pi'''
T .lr,i CJ\
I' 'f jrirl*
,fy,U t-
■VI " .m l [I
Ti) ti,'M O'l" Of f f ii'.'' "
In ,m (imp-qim, y the ijn'' tnt B'NDS Si Al [ S
STiTPs ,ir ty.rv^. ' 1 *f*.v Hie A'l'i»!'. 'e 'ooiie
VLHJ I'in OUK Kl V to the tjn Of F tiy (..ttieg ttip
■ t( h ^i|h the p.iini .it yuij' h,^пrl
Tj ' or ti s w itc h m O FF h O Sit 'O n ho ld S A 'tC h IN w ith
one h ^n d R EM O V E 'ey w it h o IM h ' hc tn ij
WARNING For your own Mtety. always lock th*
twitch 'OFF' when Drill prtaa It not In ute
Remove key and keep it in a sa'e place alto
In the event o1 a power failure (all of your llghtt
go out) or blown fuse or tripping circuit breaker,
turn twitch off Lock it and remove tiie key Thit
will prevent ‘.he Drill Prett from atarting up again
when the power comet back on
14
Page 15

CHUCK KEY H - Sk-* Pl(i t|n.) n.. K «f>y A*' I ^
A' pop Out O' Ihj A*'*-" , ' . ]' t • I-
•,/lot, .^jnprl '0 ' i P" . t''" ’ fr. ' 5 • >1 h
K(i, ‘tiirr ttip r h.,‘ k P' A>" 'i ''('P 0\ 1 ' t
ji,p .jrly ,)tht kPv a 1 ■>’ ''.j't ' If 1 "l A *' '
M'-'acyfa (I- “it
DRILLING SPEED i t- r* i nrjp i [1^ ,p j tpp
' t ' " > -^Tf )■ ' vc% ' 'fp ; , (i,s Sf<
H t , t
.. ;• ) <( ,.> Up 1 ’
, ill «’'’ I’f t'
, M ’ !« 'I',.
BELT TENSION t. L I t J' ' ' » ’ * ^
• Tor V I •" - n J í']^ ^
REMOVING THE CHUCK
' '[ ■*■' i-iAs ■ ' ' . « t A-1f I
J • , » , t ■
♦ ' • A t ‘ * ' '» * H t •
^ ^ i'* * J V ' I' ‘ »
■ 1 " ^ I K ' 1^ f ' 1 ■ , » . I
u ' : ^
j»f’ 'o # i *' '■• J ' • 4
* ' ♦ ‘i ■* J'' "
DRILLING TO DEPTH
T''T '. .i Bi If- i''' ’ i I'a 1 >t 'i A ,i , " " ./■ ’ i
■) vpn (1p{j*h ff A Aa.'.
' '''f* o' fhf i> . r 'hp o.pi ' *'-1 A >•
piPr P
¿> W'th t' f «.Alt' '' Of f hr.f'g t4'C '^'1 111 A' j''* " I
Tip .(s .('»■ p<p' A f 'T' Ma'*i
T Sp"^ tip OAP' n ,t n-jAH t' ■ IjAMi I *' P -Ipp" 4
njg 'I' up Hp3'J
4 M jkp Up PQlNTf R d'' tip Adf duAP
> m »
5 Sp'p (Ip uppp' "ot 'l-'AP d'"'1 tigitPf' dga " ' t'’<-
^J ■ •' tP-
ANOTHER WAY - DEPTH SCALE
1 W tl lip *iAi!(.i’ or T (y'i''g tip d'' i'iA' 1.1' '1*
T IP lu’jc t'ps (Ip Ti,)P o* tip WORK Pi[ t f
^ AOjusl (Ip lult) so lip P'jiiip' IS ■'PI ’ tip 'IPS- p 1
DEPTH TiGhTEN tip uPPf It tyuT aqii' s'n*
Pomlpf 1-0' pKdmp'P ■( y'U) All a t’> I'l a i- <
IJDP "irl dPPp SPl H'p pljintf ( ,v !hp np m 1 rr-^.y
'I (tip S( 3P
Page 16

basic drill press operation
F 0*1/1^ *hi- n{j n ,»r^, r
I f 'rs j
H>/1 p*''SM'vl
WARNING Fo' your owrt safety always observe
the safety precautions here and on pages 2 3 and 4
1 Protection Eyes. Hands. Face. Ears and Body
WARNING To avoid being pulled into the spin
ning tool -
1 Do NOT wear
- gloves
- necktie
- loose clothing
- lewelry
2 Tie bach long hair
I I' l"' V ( i'l • ' '.J' "i [ ’ • ' 'T 'I I J'll
* ' ^ I 1 t ' f '• 1 § i I 1 1 '''hi'- 1J. I
I tin .i ■ • A-t I 'I 4 ’ 4 4- ¡1.4 i .
J'y
I . 1*4 ly |4-, 4- ' II 4 I /.4 ' ■ 1 -|4'
( '• ' |t '"I ” • 1 ' ''4(1-'. r I- [ |4( .
4 - [.4 ■ , -4 [. ) -4- 1 ■ -4.4 ,, .
I' Nl .4.4 [. )4 4 y. 1,4 I 41 ]4 M j pi f,, I , Al'f'f
■1'4’y I 1 4 .iHl.f I 41.4> ]' .14 , *4 4-4 I ijtfir J lijii
' 'H4- A J'lllMf 41 ^4 -.J 4l 1.4 4 ,p|i t4 .1 y ,4l.lt 414
V 'u' 4^i|4l 1 * I. njlf] S P
1 - I. -1 '4:.l', '' "■ [ I't' 'f'4 lA'I I , 'l'4' I
• 1 1-A il^-it' I' 1.1441 , 4')l(t4 t V I- 4J v* 44 - 4 4 1|t yl-.lA'l
" ).l|Lj‘'f 4'vl
4 Ti- tl'li.rint lt^4' A4l44ip-|i4 4' I' 4T- t.4- nij I 1411 t4(j471
yiiljr hitrills lyp.nil.l'ij 4 4* ll'il- t'4.4 ■,4i,ttt4i4 4n(( H14j
tlHl'
V ‘ A ’4|4 SO 4t A'lfl t si 1.1* . .4 (4 'll) 4 '4 4 1114* Il .1 1
S[
' •14) 44‘4.i,.i .41 il .] ,.|.
'44
4ir>.4ig (iT'lAfl d'AH/'' (j'')(44’'y i.ll[4p(14t
A Ally- pn-.t. BACKUf’ MATE RiAi 4usi>
S4ilt* .ji th4* I .
tl'fi A.l'Kp.fii P 4
VVh|4noy|.r poss.[ ,4 [)()Sl|40n tup WORK
Pif C t ti 4 1, ontill I thp Ipfrf S4 1p ot trip < 414L|4Tin
4* 'I 'S too >1^04 1 p4 tnp 4S liitpo t lamp
sp4.., yiothetatjip Usf> tati4p Slots O'('amp
■'ig
Pdgp a'Opn-J thp oiits.rlp priqp 4yi trip
taoi*
a p'pss \/K t 41-4.jst a'A.iys bp 'astpnpo
*■ irip r,th p
f S ^
............
y' • f'
S 1 *, rtt.n.rt /i* t*1l iH4' ■
1,1
]f- ^
f inl irt thp Ipl)
Npvp' p(*'<o4rTi any Qpp'al'04^ F Rt C
HAND ir'an'-t h.t't.nq Aonp.pip rairip*
ft'an suppo't'4^q 'I rn th<4 tatjP' pxcept
Atipn p/)'ibti4nq
S<*4 u'4‘ y or h H' art anft S jppo't to C O' j'nn
faO'p A'ln til Suptxift inii Tabp to Tatiii*»
A'4T1 ripf.}4 41 4)pp'at.n ) *t'. 4 pinss
Npyp' moyp trip Hp.vI ■ ■ ’aop An.'P [h4‘
t. ). .s 4 .4141.41-J
Bp'O'P stai’.i.yj t4i4i op44. iS. ,41 ^ ,q ply. 4T1 i,j4
.1 A't' ri In makp Sum Hip-I'- 'ltti4-4 . ,'t.4i.j
I ’4' 4iij4.s'irji riavp p»4 pss',(>'4j'i4iijt ■ .v'lti
tl'P 4 1J4
4
,1,,SP U'p'atiriP
I' a A )'|4i 4P4 4* 44-'ha4l4J‘- |4'4' ' it 41 , ,4 h
411,11 .f A' t )' 1' I'P .1 ".1! b4'"1 ' ',J4T1[1 1 f'.
tt'p t.tbp 1' ( "4.I'll a'li -a'y si([.ii4 4*
U .4' l.ytu'l'i '.l-ltj- ,a' 'JpP'.l' if's t-
.ti 1* ' 'U ltp4 y tv . 4t fj J.f l4' ,141, t p4j ...4,4 ifl A' '4 14
[-4,., 41
4 J 4* f4l4. 'yt’'|t;DL f SPI I r 4 'p. , .4T14T1414, I4 4
4 ' *tlP S()Pi '4[](4f ,tl44l4' t414t A"'li0'4 ■ 4
4 4 4 ,It. 4 ,1 4 41P4 I4 t4-4- [1.1414 -.41 tti. 4 If ' 14*
it till* 111- lit t( 4 ,14| .4 4J 4ll- |4p.,li,f ,r. 4,14 J
4 t'SSCI'-PS 'Ptpi tl4 tri4> iPstOJi tH,riS pfilV.fl4>0
’ NpvP' I 'imb 4)44 thp ii'. i prpss T lb p 'I ' 414.4 (t
■) Tu'p thp rrptQi Sw'icti OH a'll pi|t ,iAa, i'll*
h To jvOifl in(u'v *'0m frvijAn Ao'li 4." ■'o'r on .U f
2 Use only accessories designed for this drill
press to avoid serious in)ury from thrown broken
parts or work pieces
a Hoipsaws mps' NEVER hp oppiatpd on tri.s ■'I''
h Dnim sandprs mijsi NEVER he opp'atpit on imps
t Do not Tstaii O' use any d'lii that exceeds 7 'n
d Do not use wifp whipp's routei bits shape' < ui
A'th ihp ai t “sso'4ps
tl'p.lh U' poil tnp 4*nt'4p il'l 4 plPsS 'luAn ijn yu' 4
‘'A'ti ti Kny Ahpn ipayini) lh4> iji [444.
4I0 NOT ppilo'm layout .isspmp y - sptu[i A'lrk
■in trip tab'p Ar"'h trip I uft'oq tiif iS iita'.nq
P'pss at a spr'Pd gipalp' trian 400 PRM
d'lii p'pss at a speed q'patpf than 18OO RPM
length 0'extendsb below trip chuck ;aiivs They
can suddenly bend outwa'd of b'eak
tp's ci'i'ie illy I c utte's O' 'Otacy piane'S on thp
d'lii p'ess
INSTALLING DRILLS
Insect di'I 'n|() . h.)f k l.yi p'HiuiJ'i to ¡jl'la"' max'n'iuiTi
.■jRIPPlNtu 4,1 thp CHUCK JAWS tt'P I.IAS am
app")x ' 4n irjnq Whpn us'i'q a sm,ii'.t'.' .jonnt nsP't
't so ta' trial thp taws touch thp f'ufps 'iit'.'a 4j' «'ypi,
4,t the It 'll
Make Su'P Hia' trip 4-)r,.i f [NT( R( 0 ttn ''..'k
ripl'i'p tiqhtP'ipnq thp f hui k A'lt' iht ki-,
T.qt'ipn thp ■),, su'tic pnt'y Sc ''4,it t '1 i|i'. '■ 'I ,, 'P
Ah.ip O'i' .n.j
CHUCK Kfy
S'-
Page 17

basic drill press operation
POSITIONING TABLE AND WORKPIECE
^ .. h ' (f ( *. n r 1 p( sit . ■' '
*[ ' Itii- 1' 1 M # ',#1 A-'-
Д Л ■* ВД( H tjC3 MATt HiAl л ' ^
^ у ,■ * ” ti »• t.l'. f 'Щ » ►•
’ ' Л ^ ' * i’ ' Ч ' ) 1 ^
' *t'* » S ♦* ( Л *’f » 1 M ^ ‘ 'i Ih
^ t *i I h f»‘ jn-' i <• -» J ' ' J
♦ < - I ♦ , * ♦ i t ^ 4 i и Ч * * 1 4 ^ T r
1 . f 1'»' ^
WARNING To prevent the workpiece or the buckup
materia! from being torn from your hand while drill
ing position them agamst the left side o* the col
umn If the worspiece or the backup material are
not long enough to reach the column clamp them
to the table Failure to do this could result in per
sonal in|urv
.-Да ■
».■»Л tr a
* Г" » '
t * f ■
WARNING The vise must be clamped or bolted to
the table to avoid injury from spinning work and
vise or tool breakage
tilting TABLE
" ** i- .
-■f * -jr.lr ' *.U
t
* 4 hf ' fi**.F
T 1
b ,f
■ Ip , H ^ ■ f
Vi* j <
C.
4 '■
X
f ’ J
r ;
Ч t I .
I
.c?
г/
Page 18

basic drill press operation
WARNING To avoid injury from tpinnmg work or
tool breakage, always clamp workpiece and back
up material securely to table before operating Drill
Press with the table tilted
' ' ........... ' ' j ' 1 ! ■
I *1 ■ « * ' ' ir . > I > <
■ ■
................
> t. .. fi,
I -■ I '
' 1 < t’ 1
HOLE LOCATION
I ■ I ' I' " > *. . . I
' > ■ 1 f 1‘j I I M I 'I If, > I
■ . • I •
MAUI ’,Al,
adjustments
WARNING For your own safety turn switch OFF
and remove plug from power source outlet before
making any adjustments To avoid injury from
thrown parts due to spring release follow instruc
tions carefully
QUILL RETURN SPRING
’ y the - r' ,i ,)' ! i( ( n [ I I,
■I'On HHi) (1. k .n () ,)i f> A'l' .S'l-n. >
r!'. ppinq Ali' n Ipnmi n '■ J [ '
<? L ' iwe- Ml i-r' I'll .qrj ) iiQn I Mf.,). jM. «
t I'iirn 'r>M ц„J,. I), ,, p,, ,
dnrj llii() 1 .n pirl p Alitlp I jr'Kitr-nq A«i,j -ptti.
I'^i (outer) nut only
*1 W m PAli'-vP- 'prnq.n.ng .ti ni'l, h ,|fgp
Sl.inflviJ I'nnpri nut ,,,[ Ip j 1 g uni- r.,.t I)
d'Seng.igps ’'(I'Tl tV.S-- u-’ tip,1-1 t>(' NOT Of MOVf
THIb NUT
I tu'” SI.'PW t iiijPlp- i »A' iP li'iU It
-1 p .It t> .. iPA'invI'i l| At" >’I nt |.( II
gAgp np„t ) t, Of ^1Пvt
S( Rf WORiVt R
T'liripn SMnrtilnt 'iijt A'ln A'pr t I ,,r y >*n,.|jnM It ■
en-jagp txiss Du Itnl (ivPil ghJ* n ,)«, (hit. A'" 'PsI'M t
Til ■' rnovpmpnt RptTi typ t,( tpA'I' vP'
M M(,vP stOJi nuts ,|nr) 'fpptli
[ ' s.|iun And [ hpt k tpnt,! '- A*' p ti,tiling I
i*f»S
9 Ihprfl iS n )t IfrTS'Ofl I Jfl
4 fl iif'iy ONf no!' h n tirrt#» ^injJ ; hpj k n(^
^0 ^'OpP'ti n«>ii'r* IS jf ht^v»'(1 'r>!u"'*s joti'y
t'"'' \jp pfJS tiry- 'pl»‘ IS#' 1 *• 'ITT < 4 fht
[11 1
nipt ti «[ippt ii'iist
f A( H 'OppMo”
A. -I ¡■.
' I ■ iu
..
......... Ii." ,A li •> f JN i .nqti.p <, ri( An I(.
tl'( A'"«[ .f. ( .1 A'ln tn*i HOKI in
FEEDING
I * ''’A i‘ ll'( ^ ^ «... A II i-'q prv. ij.jf. ««M,..»
' 1 )' 1 , ,!
' ■ * 'I ■ -1 T'j' I ,i OW; V ■ I I ■ .1 , .. ti ) t.,
I ' ' ' f * <■ I M ih , tt,, ,,, ,,,.
I ' If I ,j . nuf Ah m . .
I 1 Wtlpn Ihprp It, pnguqh tension Hhp- ( tiP( King .p
III 1" ■) TI K) flAI’i(n > M' , f/ jJ *t j ,f. J, ,
P‘df p li'm Put and tighten to standard nui BUT do
r’of ovpdightpn aga-nst standard nijj
Chpi k quill Ahi'p IppOing to have smooth and Ijn
'PSI'ittPd mnvpmpnl (I movement >s tOO t*ght
oos m ,am nui and r.LiCiMTLv loosen standard
n'jt ,jn|i unrpst'iclpd Rpt-ghtpn lam n-jt
IB
Page 19

maintenance
WARNING For youf own tsftty lufft«witch OFF
and removt plug from power lource outlet before
maintaining or lubricating your drill press
‘ '■ 1 If ' , ' I* . l -'-l " 1' " I, t i”-.. !'<■ "
•v * r . »' r
r ‘. I '■ t' H‘, r ’
,, ■ . i I * , . . (■
WARNING To avoid shocA or fire haiard if the
power cord IS worn or cut or damaged m any way
have I* rep'*ced immediately
lubrication
4 ■ •• HA
' ■ 1 1 . ■
V ^ r , ( « • r
. PA >< ■ .
, ’■
Aft \ ,
i’» * ' • ,»
. r ^
1 ' * f Mr 1
* J *' jf ' 1*
i f ‘ i • 1* f
/ V* ' ' ff F [
, .F 1 t* ' '
, \ ^ * f r 1'*
I'- > *
F i .
' .1 F
1 • ^ '
1*
1 ’
A
recommended accessories
WARNING Use only recommended accessories
Follow instructions that accompany accessories
Use of improper accessories msy cause hatards
O' B 'v
H'-n [’ll f,' ,f j j ■If-
[)'. P't'ss V'S* '
O'- P' p- 'S M ')'* I- K
“i P' St'ip f I V '^i '
‘‘ipf r '/1
'I' p I. iM oq
u PQV 1
q \
I/dw q i'4qn
Tflt- 'O' I IT rr.(irvlpf) ^1 I , ' sir I) lif'l
ij.ii ■ ,i(vt Ap'p livi' ati I a* f*'i‘ *''*'*
•I -s Ati'i ' tr T
Bij" ' j > ill*' 4 ')■) "an S'-* < I* 1 1
h'j' sf'' ) W*'pn ’ ‘ * j I.» i'l*
P -vVp' * Hi f'' 'W !"•' W H 1' '“I' I"
n,r! H' S lA q /'•!' ’
T.ifif .-lA
iq
Page 20

trouble shooting
УУАЙ№МО Рог your own lum »wdch OFF and always ramov* plug »rom powvr aourc« outlel
tMlora trouble shooting
NSUl T I Al ’jl AM'> '¡ [f.'IH' Л', - Hi Л M( 'H Л., I NjT И -N
a ( ' и
TROUBLE
Noisy Optrslion
-------
- +
Drill Burns j
Drill leads off
hole not round
— ' ■ — -
Wood splinters on
underside
1 |nn / jffM' t f f ' *4 f • r •'»
1
( )ry '■,1, t .)■<
1 1 ,'■*.( .[ 1 )l* . -fi
1 1 .K>v ■’ t. • 1 Cy
1
i
1
4 ( (.p(j Mi] t, V 1.
1
Ni‘t i|phf 1 1*'" i
1
j
- - . -i
1 llrlffl g'.lin in ujflt'r
ipi'qths n' I u't n(]
iips^no O' H'lqips
not pquai
1 No b.K h up'n llpf'.n
jndpf wo'*'piPi p
PROBABLE CAUSE |
1 t... ,r', t ■ *
'
REMEDY
' Al tins* tt'ris t j'' s<‘‘' S*>' I I in
TL NSlQNiNi'i BEtT
tub'll ill'Spniilp Spp 1 iilj'if .ll'on
l,tir til tf •
i f hpf k iiqrUi’P' S n( rpt.i n 'nj '.| ' in
[HjI py an'l li'jlilp'l t np( )fy
■1 T iqhtpri i,pts' 'PAS '* Ou'IPyS
+
1 < t'liP'Jl'sppPd Spp SP'' .1 f ip't "q
1
T' ) Knfiw > 1 1 jf Orili p((>i,i,
i
OfiH 1 iNOM’f i 0
Mptt,,, t-jf nua'i''[■'’
J Ot>t,h,)t(itin r)riii
4 r pp'i t,i ,t pni I'jqh H-i ■ A i'll'In 11/
Lub'Halp I'l" Spp Basil [.''Hii'P'.-.
Ofw'iilion sp(tn.r’
•—
-------
---------
-----------
1 Hesn ifpe'id'l i ( 'rrp( ;iy
1 Usp bat n up rnatp’iai 5peBa'>it
OriliPrpssOpp'at'i.p section
-----
- - — - —■ - --
Workpiece torn
loose from hand
Drill Binds in
workpiece
Excessive drill
runout or wobble.
Quill Returns
too slow or too
fast
1 Notsuppo'lp'lo'
clflrnped p'opp'iy
1 WoiKpipcpp'ni iii'iq d'lii
O' pucpss've ippfl p'ps'.u'f-
? I'pproppr belt tpnt,inn
1 Bpntd.ili 1 Use a straight dull
2 Wo'n spindle hp.vnqs
d Doll not pfüpe"y
installed t buf t
4 Chucli notp'orp'iy nstaiipd
1 Spnnq n,is ifTipropp'tpnsion
' Support wo'iipipi e O't lamp i| See
Basic Dnii P'ess Opetatioti section
I Support wo'iipiece .tf damp't See
Basic Orili P'PssOpe'at'cn seci'on
? Adjust tension See section
ASSEMBLY TENSIONING BELT
? Bepiacebea'ings
3 Install d"ii properly Ste Bas'C
Dni’Press Operation section
4 InstallrbucKproperly referto
Unpacking and Assembly instructions
INSTALLING THE CHUCK'
1 Adjust spnng lens'on See section
Adjustments Quill Return Spring
го
 Loading...