

Page 1

User Manual
ver. 1.3EN
Page 2

2
COWON D2
COWON D2
3
Table of Contents
Thanks for purchasing COWON.
We always strive for your complete satisfaction of our product.
This manual contains user guide, cautions and other useful information about your COWON player. Please read
this manual thoroughly before using, to take full advantage of features in your COWON player.
Legal Notice
• COWON is a registered trademark of COWON SYSTEMS, INC.
• This product is intended for personal use only and may not be used for any commercial purpose without the writ-
ten consent of COWN SYSTEMS, INC.
• Information in this document is copyrighted by COWON SYSTEMS, INC. and no part of this manual may be
reproduced or distributed without the written permission of COWN SYSTEMS, INC.
• The software described in this document including JetShell and jetAudio are copyrighted by COWON SYSTEMS,
INC.
• JetShell and jetAudio may only be used in accordance with the terms of license agreement and cannot be used
for any other purposes.
• The media conversion feature in JetShell and jetAudio may only be used for personal use only. Use of this feature
for any other purposes may be considered a violation of the international copyright law.
• COWON SYSTEMS, INC. complies with the laws and regulations related to records, videos and games. Complying with all other laws and regulations regarding consumer use of such media is the responsibility of the users.
• Information in this manual including contents of product features and specifications is subject to change without
notice as updates may be made.
• This product has been produced under the license of BBE Sound, Inc. (USP4638258, 5510752 and 5736897).
BBE and the BBE symbol are the registered trademarks of BBE Sound, Inc.
On-line registration and support
• Users are strongly encouraged to complete customer registration at http://www.COWON.com. After filling out our
customer registration form using the CD-Key and serial numbers, you can receive various benefits offered only to
official members.
• 1:1 online support, news updates for new products or special events, and other services are available for our
registered customers.
• Each CD-key is unique and will not be re-issued in case of loss.
• Further information regarding the product can be found on the web: http://www.COWON.com
• Users will be able to find the latest information for other COWON products and download the latest updates for
firmware and software.
• Frequently Asked Questions and Answers can be found on the website.
COWON D2
Precautions and Safety Tips
1)Before Using D2
1. Package Contents
2. Identifying the Parts
3. Charging the D2
4. Installing Windows 98 Driver
5. Connecting to PC and Transferring Files
6. Upgrading Firmware
2)Using D2
1. Button Control
2. Basic Operation
3. Music Mode
4. Video Mode
5. Picture and Text Mode
6. FM Radio Mode
7. Record Mode
8. Settings Mode
3)Additional Information
1. Specification
2. Setting to Factory Default
3. File Conversion Using jetAudio VX
Troubleshooting
JetShell
4
5
11
20
23
25
All rights reserved by COWON SYSTEMS, Inc. 2006
Page 3
4
COWON D2
COWON D2
5
Before Using D2 Safety Tips
• Do not use this product for any purpose other than described in this document
• Use caution opening the contents of the package to avoid injuries
• Refrain from using earphones if it might affect your awareness of your surroundings. For example, it can be
dangerous to use earphones while driving a motorized vehicle, cycling, running, walking, or even during exercises.
• Avoid any exposure to extreme moisture. Damage from moisture constitutes user’s negligence and will not be
covered by manufacturer’s warranty.
• Disassembling or modifying the device will void any warranty.
• Make sure the USB connection is made correctly to avoid any damage to the device or the PC. Avoid extreme
bending or pressuring the connection.
• Avoid any excessive force or impact. If there is an unusual odor such as burning smell or excessive heating during
use, stop using the device immediately and contact us through www.COWON.com
• Do not use the player with wet hands as it may cause damage and malfunctions.
• Do not listen to the player at excessively high volume for long period of time. Avoid using the device at excessively
high volume (>85dB) for any extended period as it may cause damage to your auditory functions.
• Avoid using the player at a location where static electricity is frequent
• Before any repair service, you should back up all data from the player. COWON SYSTEMS, INC. shall not be
liable for any loss of data or files during the repair.
• Only use the AC adapter and USB cable provided by COWON SYSTEMS, INC.
• During lightning or thunderstorms, disconnect the player from the PC or AC adapter to avoid a risk of power surge
or fire hazard.
• Store the player away from direct sunlight, excessive heat, fire and extreme cold environments. Excessive
temperature can damage the exterior, interior circuits or the display.
• When using the player as a portable storage device, important data should be backed up as frequently possible.
COWON SYSTEMS, INC. shall not be responsible for any unexpected data loss.
• Price of the player may fluctuate depending on the market condition, COWON SYSTEMS, INC. shall not compensate for any loss caused by price fluctuation.
• Avoid viewing the display in very dark environment for extended period as it may cause excessive strains on your
eyes. To prevent any vision damages that may be caused by such strains, please use the device in properly lit
locations.
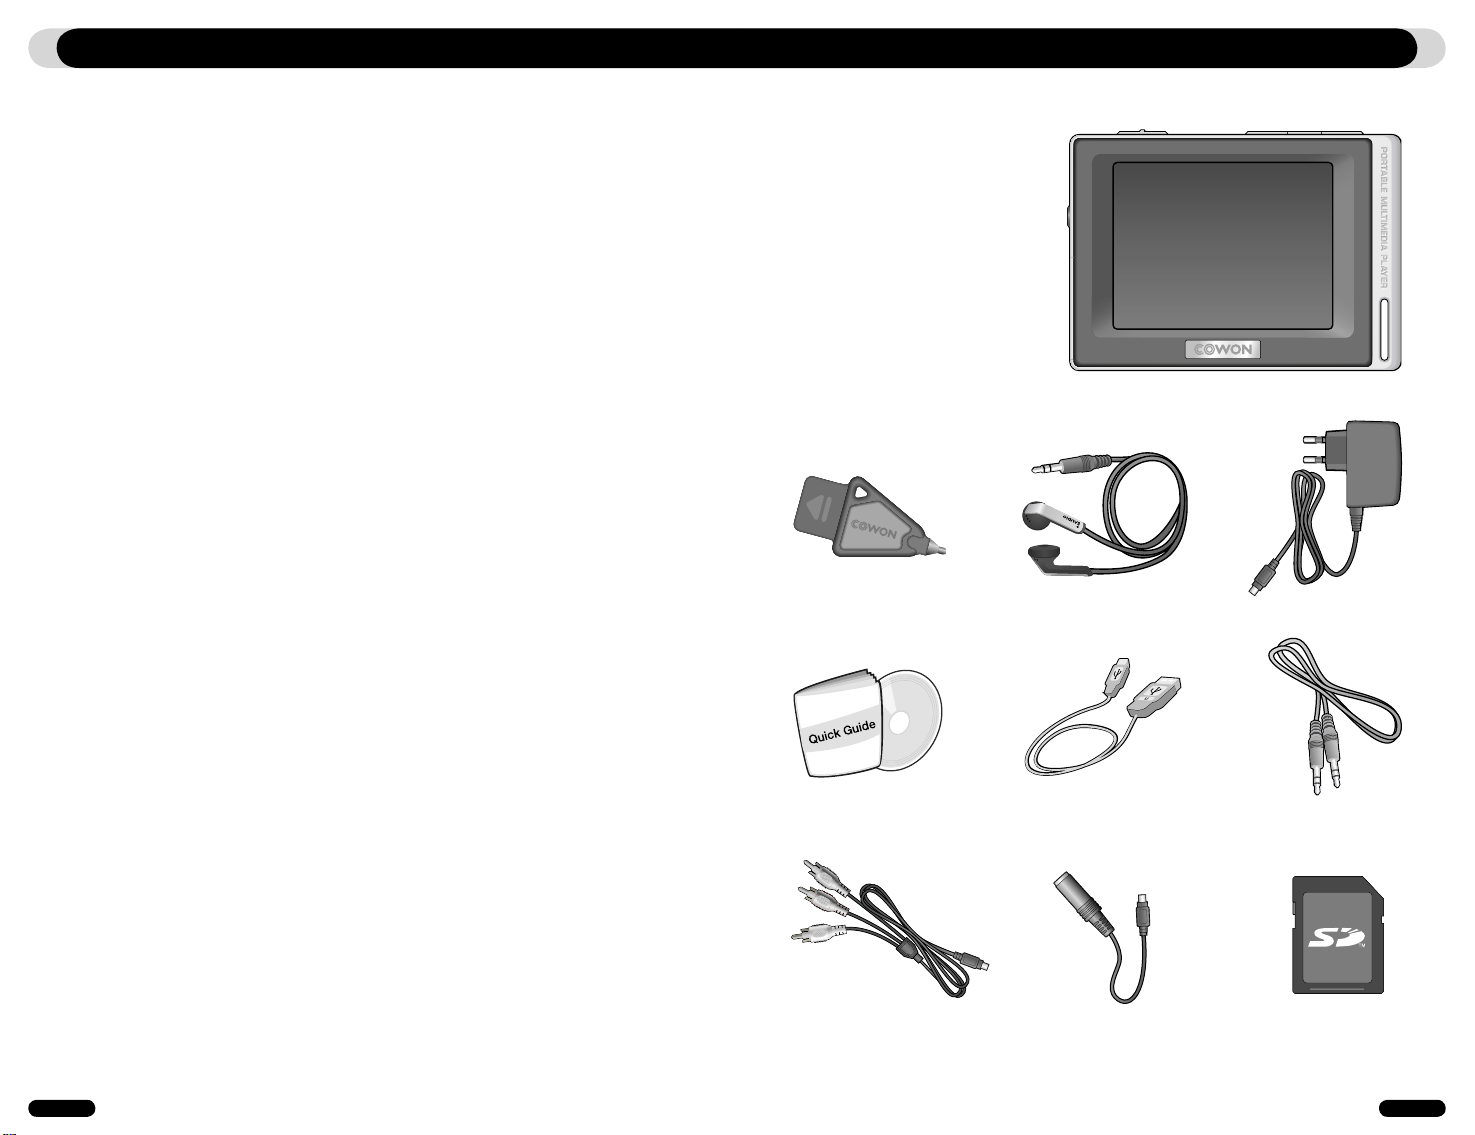
1.Package Contents
Simple stylus pen Earphone AC Adapter
Installation CD(JetShell, JetAudio,
USB Cable Line-in Cable (Optional)
User Guide), Quick Guide
TV out Cable (Optional) Line-in Cable Converter
(Optional)
SD Card (Optional)
Page 4
6
COWON D2
COWON D2
7
Before Using D2Before Using D2
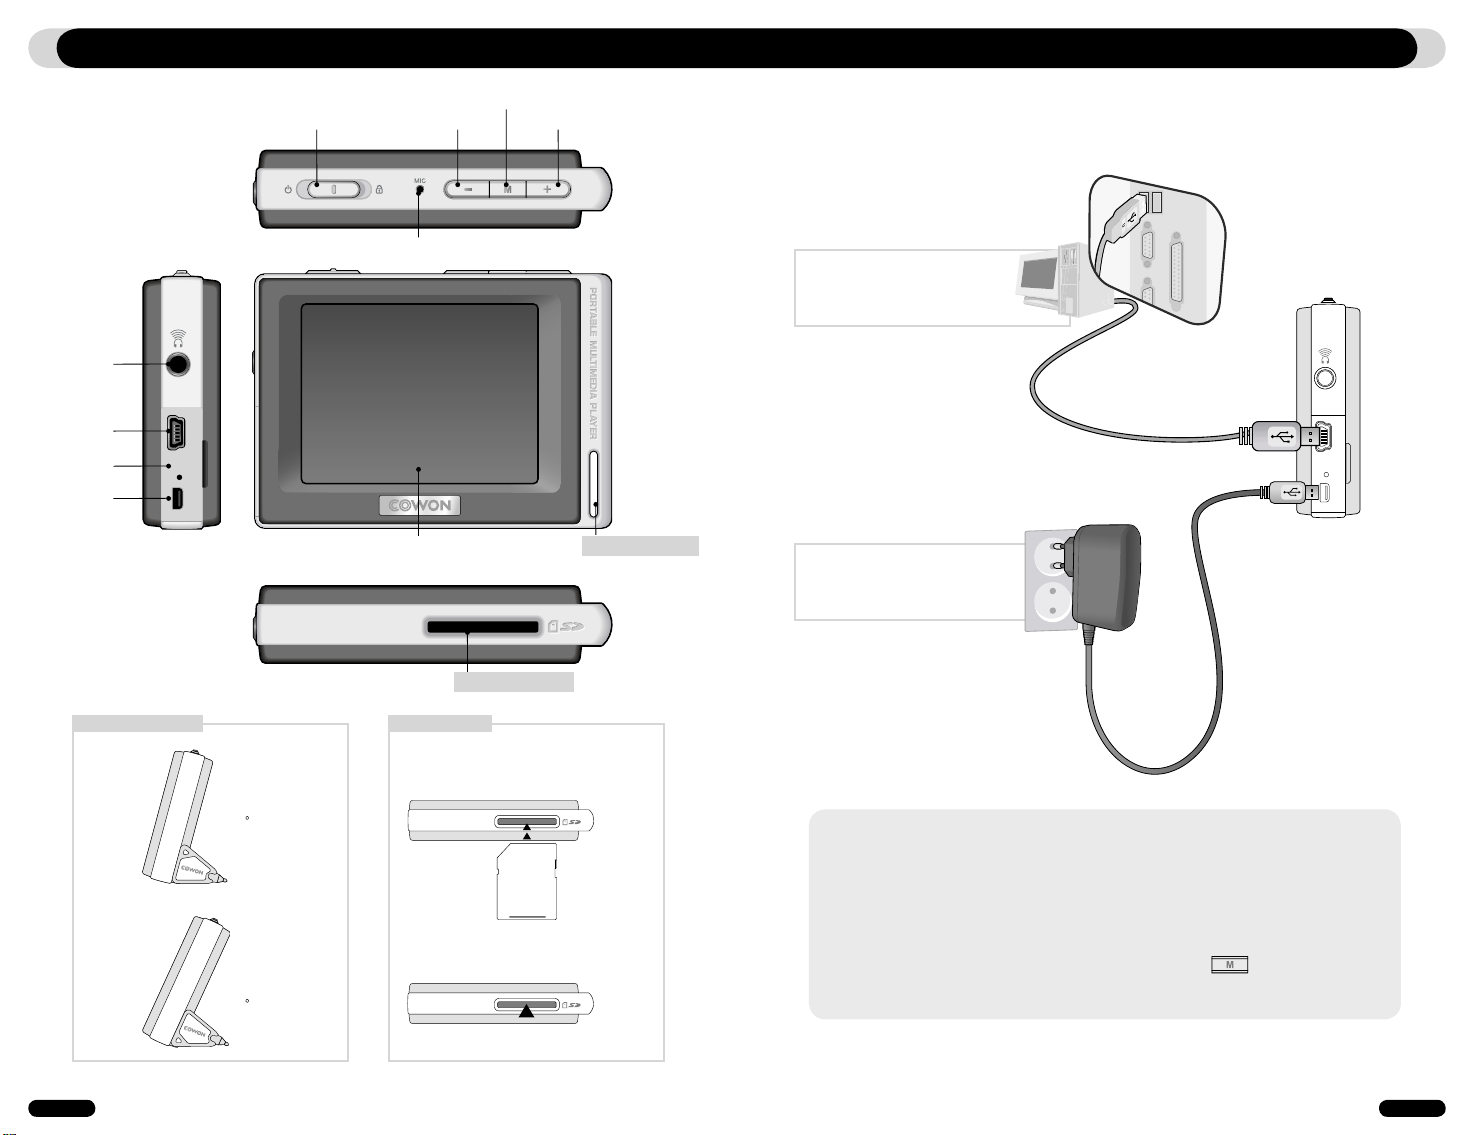
2. Identifying the Parts
Earphone Jack
USB Connection Jack
Reset
EXTport
Power/HOLD
VOL-
MIC
Display
MENU
VOL+
3. Charging the battery
To charge the internal battery of COWON D2, connect D2 to a PC through a USB or connect it to an
AC power outlet using an adapter.
1. Connecting to PC via USB : It
takes about 7 hours for a fullcharge
Simple stylus ring
2. Connecting to power outlet :
It takes about 3.5 hours for a
full-charge
Simple stylus stand angle
75
50
SD/SDHC/MMC Slot
SD/SDHC/MMC Slot
Inserting Memory: Press the SD/SDHC/MMC
memory cards all the way in
Removing Memory: Press the memory card
slightly in and let it come out.
- Battery status can be checked on the LCD display
- Using both USB and power adapter simultaneously may damage D2
- If you are using D2 for the first time or after using it for an extended period time, allow it to charge for sufficient
amount of period.
- It might be slow to power up depending on the battery’s charge status.
- For your safety, please use only the JetAudio AC power adapter.
- JetAudio AC Power adapter can be used for either 100V or 220V.
- During the charge via an AC power adapter, D2 can be used by pressing button
- USB charging does not work if the unit is connected to a USB Hub. It must be connected directly to a USB
port on a computer.
Page 5
8
COWON D2
COWON D2
9
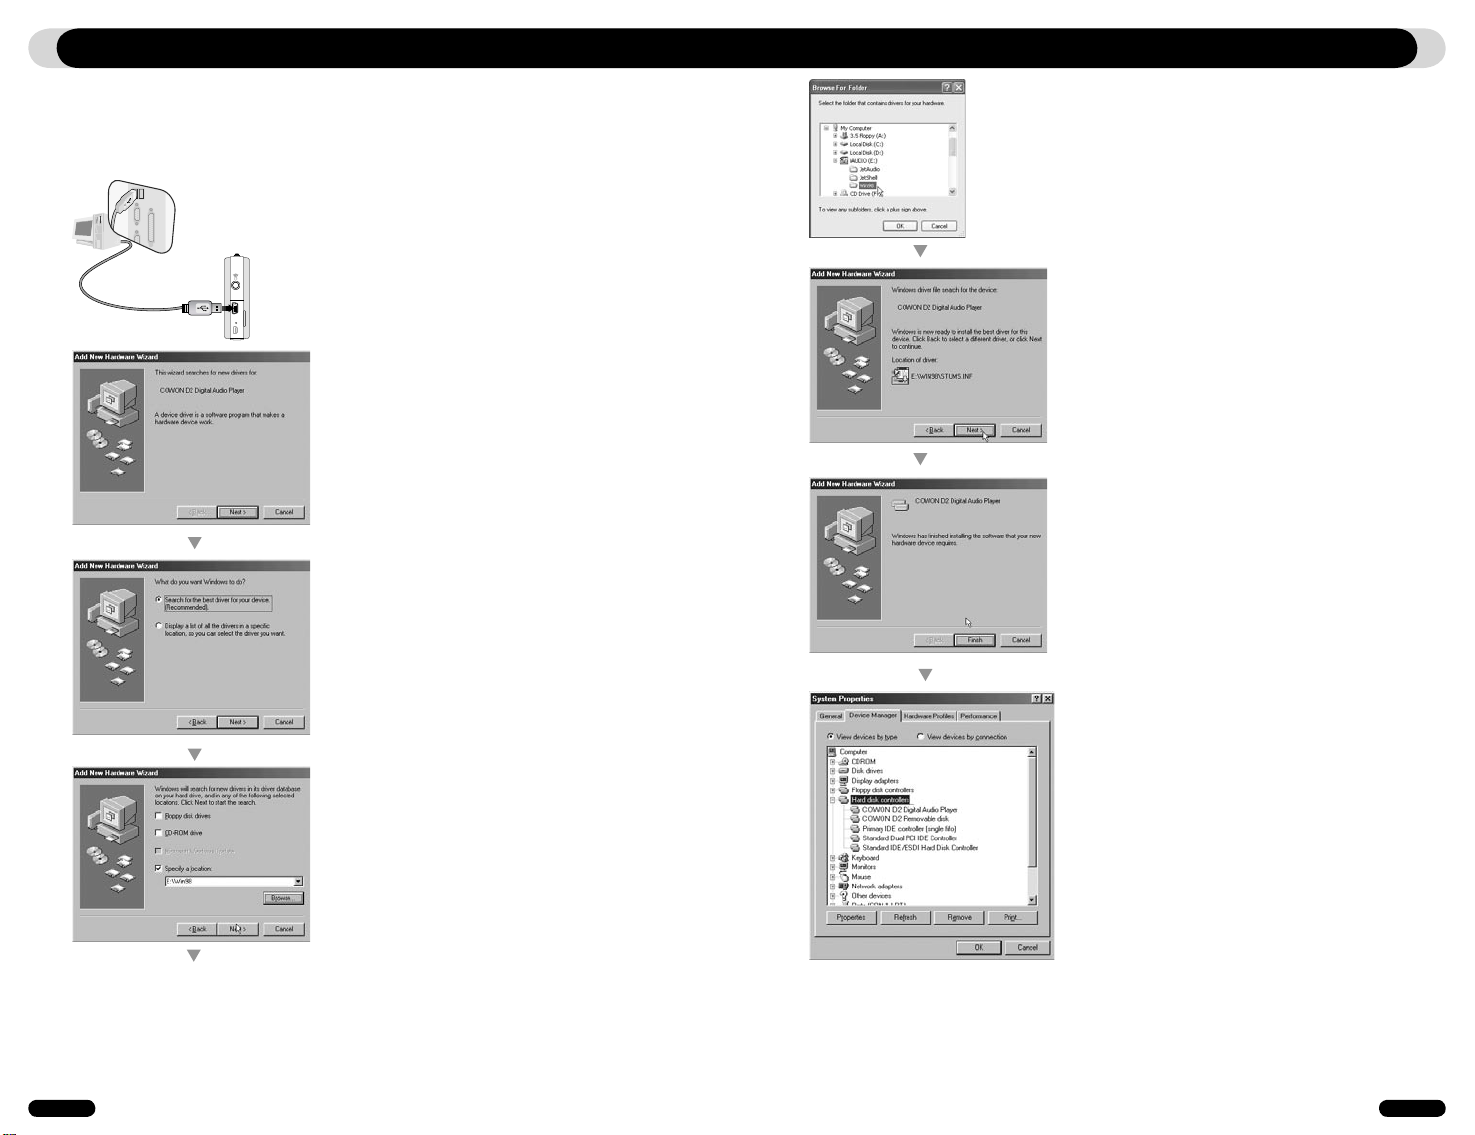
4. Windows 98 Driver Setup
If you are using Windows 98 or 98 SE, you will need to install a separate driver when the player is
connected to the computer. Under windows XP, D2 is automatically recognized.
■
Installing Windows 98 Driver
1. Connect D2 with a computer via USB cable
2. “Add New Hardware Wizard” will appear as
shown. Click “Next”.
3. Click “Search for the best driver for your device
(Recommended)”, and then click “Next”
5. Select “Win98” folder in the installation CD and
then click “Next” button. Drivers are also available
for download from www.COWON.com.
6. Once the drivers are recognized, click “Next”.
7. Continue to click “Next”
Before Using D2Before Using D2
8. Click the “Finish” button to complete the driver
installation. The newly added drive can be seen in
Device Manager or Explorer.
4. Click “Specify a location” and click “Browse”
button.
Page 6
10
COWON D2
COWON D2
11
Basic Operations Before Using D2
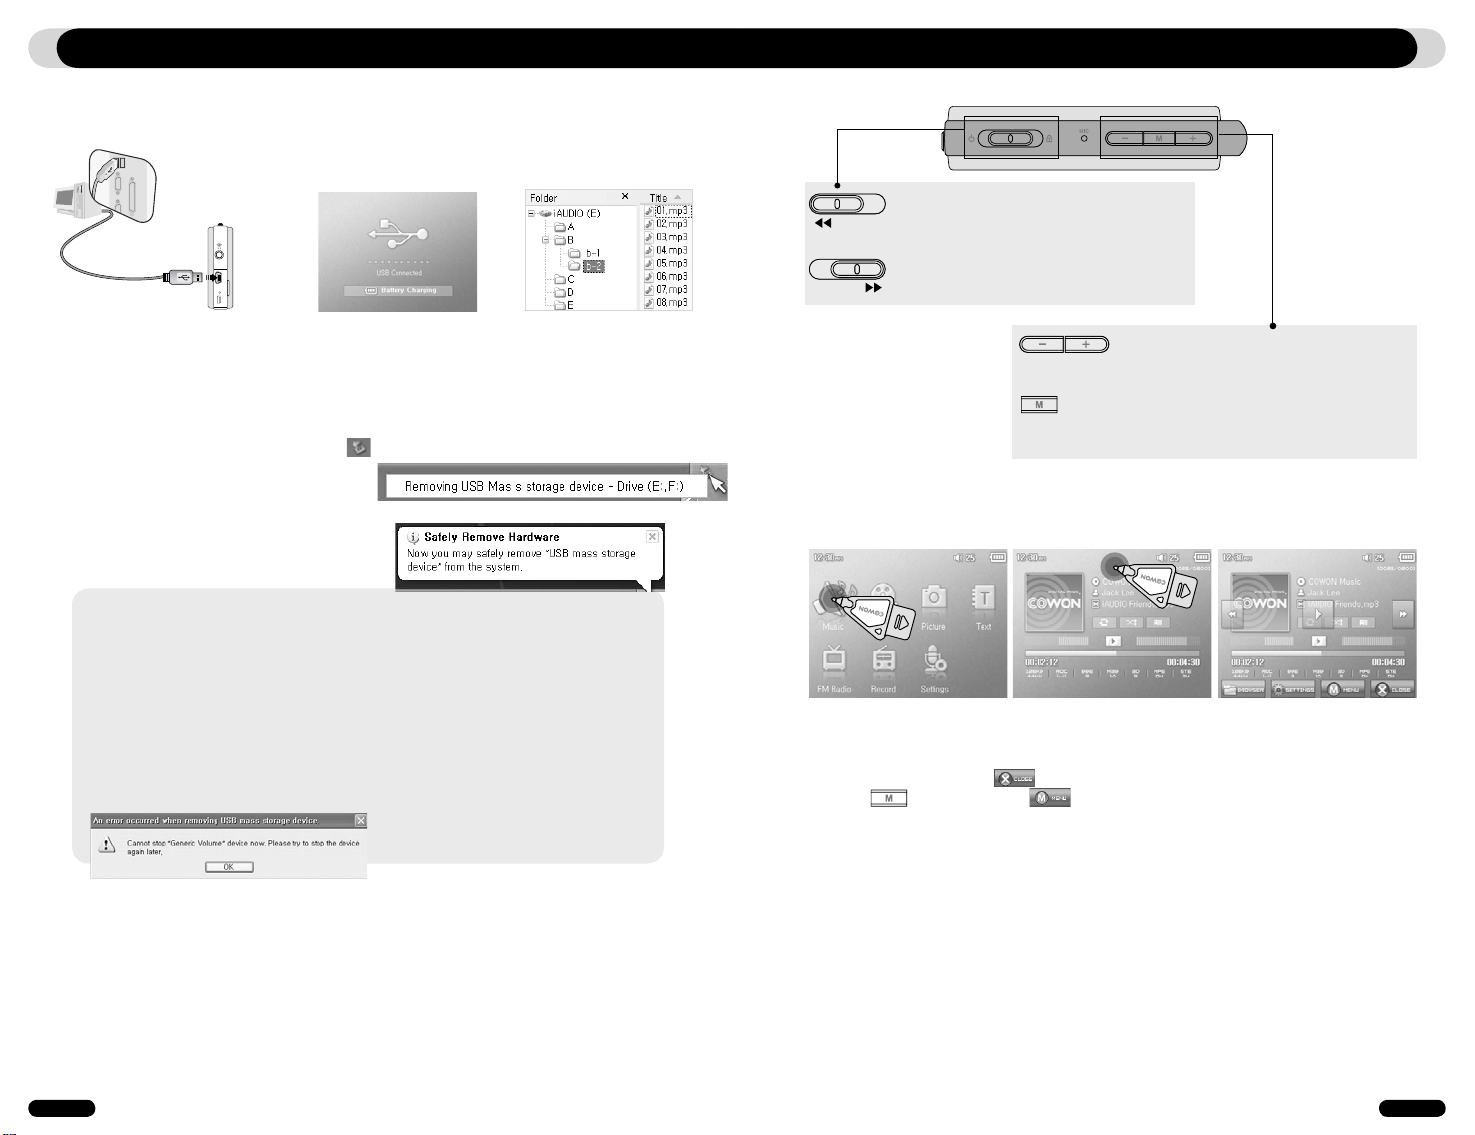
5. Connecting to a computer and Saving Files
If you are using Windows 98 or 98 SE, you will need to install a separate driver when the player is
connected to the computer. Under windows XP, D2 is automatically recognized.
1. Connect the player to a computer
using a USB cable provided.
4. Start Windows Explorer or JetShell Pro.
5. Copy multimedia files (music, picture, encoded video files) from your computer to either ‘COWON” drive or
“SD/SDHC/MMC Card”
6. Once the file transfer is completed, Click on icon listed on Windows tray using left button on your mouse
7. To disconnect D2 from the computer,
click on the following message when it pops up.
8. When the “Safe to Remove Hardware” window appears, disconnect the USB from the computer and D2.
- The D2 can recognize up to 500 folders and about 5,000 files.
- If the COWON drive does not show up under Computer or Windows Explorer, Disconnect and re-connect the
USB cable and repeat the previous procedure again [For windows 98)
- If remove the USB connection within the windows software while the USB cable is connected to a PC, the
player is being charged through the USB.
- USB charging does not work if the unit is connected to a USB Hub. It must be connected directly to a USB
port on a computer.
- If using Windows 98, 98 SE, the “Safe to Remove Hardware” window may no t appear. If this happens, Exit
JetShell (or confirm that the file transfer status window has been closed), and then disconnect the USB cable
from the PC.
- If a following message appears, please ignore the message.
2. Once it is connected correctly,
the following will appear on the
LCD screen.
3. The newly added drive can be
confirmed in Device Manager
or Explorer.
1. Button Control
It turns on and off the power
It turns on and off the LCD
It switches on ‘Hold’
It controls the Volume
It moves the cursor left or right on LCD
It indicates the selected mode on screen
It indicates the selected mode on screen even during
charging the unit with an AC adapter
2. Basic Control
D2 has a touchscreen feature and you can control it directly by touching the screen.
To select a desired operation mode, touch it from the mode selection window.
Under each operation mode, touching the screen lightly will trigger a control screen to appear.
After a pre-set period time or if is touched, the control screen disappears.
Pressing button or touching on screen returns it to the mode-selection screen.
6. Firmware
Firmware is a program embedded in the hardware. By upgrading the firmware, features of the product can
be enhanced and bugs and glitches be fixed.
Performance and menus may change when the firmware is upgraded without notice. Some beta versions
of firmware may have bugs that will be fixed in the next version.
Current firmware version can be verified at Menu - Settings - Information.
When upgrading firmware, always backup data stored in the memory to prevent any unexpected data loss
Actual firmware upgrade method may vary sometimes. For more information, visit our home page (www.
COWON.com).
Page 7

12
COWON D2
COWON D2
13
Basic OperationsBasic Operations
3. Music Mode
4 4
10
1 2 3
1
Selects the previous music track or rewinds the current track.
2
Plays a music file or pauses it.
If a file contains an ID3 tag with an image, it will display the image on the screen.
3
Selects the next music track or fast-forwards the current track.
4
Close the settings screen
5
Inserts bookmarks during the playback.
Once a bookmark is inserted at a specific point during a playback of music, it is possible to start
playback at that particular point.
Maximum of 256 files can be added to bookmark.
6
Adds the currently playing music file to a DPL (Dynamic Play List)
Maximum of 256 files can be added to DPL (Dynamic Play List)
7
Displays Bookmark list
Used to find and play back bookmarked music files
8
Displays Play List
Used to find and play music files in the DPL
9
Displays File Browser Mode
10
Sets the boundaries for playback
All : Plays all music files regardless of folder
1 : Plays the currently selected music track
Folder : Plays music files located within the current folder
Sets the random play mode
11
12
Sets the repeat play mode
13
Selects JetEffect settings
Sets the sectional repeat. It can play back in repeat mode a minimum 1 second-length section of
14
a track.
5
6
11
7
12
8
13
14
9
Move cursor upwards
Expand selected folder
Execute/run selected file
move to upper level folder
Move cursor downwards
4. Video Mode
4
1 2 3
Move cursor upwards
Expand selected folder
Execute/run selected file
move to upper level folder
Move cursor downwards
1
Selects the previous video file or rewinds the current video file.
2
Plays a video file or pauses it.
A video file may not play properly if it has not been converted using jetAudio VX software.
3
Selects the next video file or fast-forwards the current video file.
4
Closes the settings screen
5
Inserts bookmarks during the playback.
Once a bookmark is inserted at a specific point during a playback of music, it is possible to start
playback at that particular point.
Maximum of 256 files can be added to bookmark.
6
Displays Bookmark list
Used to find and play back bookmarked video files
7
Displays File Browser Mode
Sets the boundaries for playback
8
All : Plays all music files regardless of folder
1 : Plays the currently selected music track
Folder : Plays music files located within the current folder
9
Sets the random play mode
Sets the repeat play mode
10
11
Selects JetEffect settings
12
Turns on the TV OUT (* This can be used only for playback purpose)
When TV OUT is selected, volume level is fixed and headphone cannot be used.
TV OUT can be cancelled by pressing
TV-OUT
4
8
5
9
10
6
7
11
12
※ TV OUT cable (Optional)
Page 8

14
COWON D2
COWON D2
15
Basic Operations
Basic Operations
5. Picture and Text Mode
1
2
3
4
1
Open images and text files by touching the screen
Images should be placed in PICTURE folder, text files in TEXT folder
Please refer to the list of supported file types for images and texts.
2
Closes the settings screen
3
Applies the currently selected image as the background on screen
Displays the image files in the selected folder in slideshow
4
5
Moves the cursor up.
6
Opens the currently selected folder or file
7
Moves up in a folder level.
8
Moves the cursor down.
1
5
6
7
8
6. FM Radio Mode
1 2
3 3
1
Checks status of stereo or mono signals
2
Displays the country for radio signals, which can be changed under Settings mode.
3
Press it briefly to change the tuning frequency at 0.1MHz intervals. Press it and hold it to searches and
jumps to the next tuning frequency with good signals.
In preset mode, it changes to either previous preset channel or the next preset channel.
4
Closes the settings screen
5
Selects the Preset mode. In this mode, only the preset channels can be accessed.
Automatically searches the FM frequencies with good signals and enters them into the preset channels
6
7
Sets stereo or mono setting
Displays the preset search mode. You can add the currently tuned frequency to the preset channel or
8
delete a preset channel.
Sets the quality of the recording radio signals. Higher bps provides better sound quality but requires larger file size.
9
10
Records the currently selected channel
- D2 does not have a dedicated antenna. Instead the headphone wire is used to enhance radio signal
strengths like an antenna. Stretching out the headphone wire will improve signal reception quality. During
Radio recording, be sure to use the headphone to optimize sound quality.
4
5
6
7
8
4
9
10
7. Record Mode
1 2
4
5
Line-In record
※ Line-in Cable, Line-in Cable Converter (Optional)
1
Plays back recorded files
2
Starts recording
3
Closes the setting screen
Records voice
4
5
Records through a Line-In connection
6
Selects the sound quality of the recording. Higher bps provides better sound quality but requires
larger file size.
7
Sets the volume level during recording.
8
Sets use of external microphone. Only stereo pin microphone should be used. (This setting can be
selected on in Voice Record mode)
9
Sets the duration for silent intervals before it creates a new file for recording. It automatically detects
the silent intervals in incoming sound and creates a new file when the silent interval exceeds the
specified duration. (*This setting can be selected only in Line-In Record mode)
3
3
6
7
8
9
Rec via external microphone
※ Line-in Cable Converter (Optional)
Page 9

16
COWON D2
COWON D2
17
Basic Operations
Basic Operations
8. Settings Mode
1. JetEffect
1. Equalizer
· settings or manually set 5 Band Equalizers(EQ).
· Preset EQ settings include Normal, Rock, Jazz, Classic, Pop, and Vocal. Each preset EQ can be
edited to match user’s preference.
2. BBE
· BBE is the sound effect that provides clear music.
3. Mach3Bass
· Mach3Bass is the base booster that enhances super low-end bass.
4. 3D Surround
· 3D Surround provides three dimensional sound effects.
5. Stereo Enhance
· Stereo Enhance enhances stereo effect for fuller sound quality
6. MP Enhance
· MP Enhance: Sound effect that compensate for missing sound segments
7. Pan
· Pan adjusts the left and right volume balance.
8. Play Speed
· Controls the speed of music playback.
- Excessive JetEffect settings may strain sound and generate noise.
- For further information regarding JetEffect, refer to BBE MP at our website: www.COWON.com
2. Play Mode
1. Boundary
· This function sets the various ranges of files and folders.
· All: Plays all tracks in all folders
· Single: Plays only one track.
· Folder: Plays files in the current folder
2. Repeat
· Within the range specified in the boundary, repeat playback can be set.
3. Shuffle
· Within the range specified in Boundary, random playback can be set.
· If enabled, files within the range are randomly played.
3. Display
1. Language
· Sets the language in COWON D2
2. Title
· Sets how the player displays file names on the screen.
· Choose ID3 tag to display tag information (artist, title) while playback.
3. Play time
· Sets how it displays time information of current file.
·Play time shows elapsed playback time and Remaining shows the remaining playback time.
4. Scrollspeed
· Sets the scrolling speed for text displayed on the screen.
· Larger the number, faster the scrolling speed.
5. Wallpaper
· Sets the wallpaper for Music mode.
· If None is selected, wallpaper is not displayed.
· If Defaults is selected, default wallpaper will be displayed.
· If Custom is selected, the image set as Wallpaper in Picture mode will appear as the wallpaper.
6. Lyrics
· COWON D2 can display lyrics of music files that contain lyric information.
· When enabled, lyrics of the music file being played is displayed on the screen.
· Music files without lyrics will not display lyrics even if this feature enabled.
· For more information regarding using lyrics, please refer the COWON’s homepage (www.COWON.
com) under FAQ-How to use LDB Manager.
7. LCD Auto off
· Sets how long the screen stays on before it turns off.
· If there is no operation for a specified period of time, the screen will automatically turn off.
8. Brightness
·Sets the screen brightness.
9. Set Font Color
· Sets the default font color for display
10. TV-Out Methods
· Sets the signal out to TV
11. 7.5 IRE
· Sets the brightness of the signals to TV
· The 7.5 IRE is a U.S. analog signal brightness standard and is used in US, Korea, and other countries.
(Most countries use 0 IRE)
· Sets this if the TV is made for use in Korea or in U.S.
Page 10

18
COWON D2
COWON D2
19
Basic Operations
Basic Operations
4. Timer
1. Time Setup
· Sets the current time.
· Sets the correct time setting for alarm and scheduled recording.
2. Wakeup mode
· Automatically turns on the player at the specified wakeup time.
· Music Alarm plays music and for FM Alarm settings, the last station to be listened to will run in Radio mode.
· For FM recording, it records the last radio frequency from the preset time during the specified time.
NOTE: FM Scheduled Recording uses more power than other features. Always make sure that the player is
fully charged before using this feature.
3. Wakeup Time
· Sets the time to automatically turn the player on.
· Once sets the alarm for one time use, Daily sets the alarm for daily use.
· Duration is the period of time during which the alarm will stay on.
4. Sleep
· Automatically turns off the power after a specified time.
· After the preset time has passed, the player will automatically turn off even if a file is being played at the time.
5. Auto Off
· When the player is stopped and no action is taken after a specified time has elapsed, this feature will automatically turn off the player.
· This function does not operate during playback.
5. General
1. Skip length
· Sets the length of playback time skipped when the buttons are pressed shortly.
2. Scan speed
· Sets the speed of Fast Forward/Rewind when the buttons are pressed and held.
· The faster the speed, the quicker scanning is possible.
3. Resume
· Saves the location of the music file played at the last power off.
· If enabled, when the player is turned on, it automatically plays from the last position where it was
turned off.
4. Fade in
· Gradually increases volume when resuming playback after stop or pause.
· Sets how long it takes to increase the volume.
5. Load Default
·Sets all the settings to default values except for the language
6. User defined button
·User can define a desired function for Pressing and holding button
6. Recording
1. LineIn bps
· Sets the audio quality of the file being recorded through Line-In.
· The higher Kbps, the better the recording quality is, but file size also becomes larger.
2. Voice bps
· Sets the audio quality of the file recorded with the built-in microphone.
· Files recording through the microphone are set to Mono by default.
· The higher Kbps, the better the recording quality is, but file size also becomes larger.
3. FM bps
· Sets the quality of the file being recorded during FM Radio listening.
· Also sets the quality of scheduled FM recording file.
· The higher Kbps, the better the recording quality is, but file size also becomes larger.
4. Mic volume
·Adjusts the volume level of audio recorded through the built-in microphone.
5. Line volume
· Adjusts the volume level of audio recorded through the Line-In.
6. Auto Sync
· Recognizes input sound through the Line-In and generates a new file automatically.
· If there is no sound input during a specified time period, a new file is created when recording is
resumed.
7. External MIC
· Sets whether an external microphone is being used.
· External microphone does not need separate power. Line-in Cable Converter (sold separately) can
be used
7. FM Radio
1. Stereo
· Select from Stereo and Mono when listening to FM Radio.
· Radio broadcasts that only support Mono will not support the Stereo feature.
2. Auto scan
· Automatically scans for FM frequency channels and sets to preset channels.
3. Region
· Selects the country in which you are listening to FM radio.
8. Information
· Version : version of the firmware installed
· Total Space : Total capacity of the flash memory
· Free Space : Un-used amount of flash memory
Page 11

20
COWON D2
COWON D2
21
Additional Information
Additional Information
1. Specification
COWON D2 – Specification
Music MP3 : MPEG 1/2/2.5 Layer 3, ~320kbps, ~48kHz, mono/stereo
Video AVI : MPEG4 ~ 2Mbps, 320x240, 30fps, MP3 audio
Supported
File Types
Radio
Display
Internal
Memory
External
Memory
PC Interface
File Transfer
Speed
Battery
Battery Life
Charging Time
Buttons
SNR
Tunable
Frequencies
Sound Output
Dimensions
Weight
Record WMA : 32 ~ 256kbps recording and playback
Picture JPG
Text TXT file Viewer
Max. numbers 500 folders / 5,000 files
FM RADIO : 76Mhz ~ 108Mhz, 87.5Mhz ~ 108Mhz
WMA : 32~256kbps Recording
2.5 inches 1.6M color TFT-LCD – QVGA (320x240)
Touchscreen
2GB, 4GB
1 Memory Slot for SD/SDHC Card or MMC Card
USB 2.0 High Speed
Max. 35Mbps (Upload Max. 40Mbps)
Internal Lithium Polymer battery
Movie : Max. 10 hours of continuous play
Audio: Max. 52 hours of continuous play
Power adapter: ~3.5 hrs, USB: ~7 hrs
3 buttons (MENU, VOL-, VOL+), POWER & HOLD Switch
95dB (A-Weighted)
20Hz~20KHz
16 Ohm Earphone : 37mW + 37mW
78 X 55.4 X 16.6 mm (LxHxD)
91g (Including the battery)
WMA : ~256kbps, ~48kHz, mono/stereo
OGG : ~Q10, ~44.1kHz, mono/stereo
FLAC : Compression Level 0 ~ 8, ~44.1kHz, mono/stereo
WAV : ~48kHz, 16bit, mono/stereo
JetEffects(BBE, Mach3Bass, 3D Surround, Stereo Enhance, MP Enhance)
WMV : WMV9 ~ 768kbps, 320x240, 30fps, WMA audio
TV OUT (TV OUT cable sold separately)
Voice, Line-In, External Mic
No limit on file size
Supports Max. 2MB
2. Setting to Factory Default Values
COWON D2 can be returned to its original factory settings. Resetting will erase all the currently set
values for settings and will return them to the values pre-set at the factory.
1. Turn on the power
2. At the Mode Selection screen, follow the steps shown below.
3. Next time a power is turned on, the language selection screen will appear.
- If the product does not function properly, before setting it to its factory default values, please press “RESET”
button at the bottom of D2. If problem persists, then set it to the factory default values.
- The battery life is as tested under COWON’s standard testing settings and can vary for individual uses.
Page 12

22
COWON D2
COWON D2
23
Troubleshooting Additional Information
3. Converting Video Files Using JetAudio VX
1. Install and then run JetAudio VX.
2. Click “Convert Video” on the top to convert the video file.
3. From the Convert Video window, click “Add File” to select the files to convert.
4. Check the selected video files in the list.
I am still confused even after reading the manual.
Our website www.COWON.com provides support for users of COWON products with FAQ (Frequently Asked Questions) and beginner’s guide for our products. Users are strongly encouraged to
check out our website for further information regarding product usages and software upgrades and
patches. For individual inquiries, please contact us on-line as we will try to help you as best we can.
I cannot turn on the player.
Charge the battery fully in case the battery charge has been drained. If the battery is weak it may
take a few seconds to power on. If the player does not respond at all, first disconnect all USB and
power cables, and then press the RESET button located at the bottom of the player. RESET button
simply powers off the player and does not affect the player in any other way.
Buttons do not respond.
Check if the power switch is set to HOLD
The player is on but there is no sound.
Check if the volume is set to 0
Check if the player has any music file stored in its disk. Damaged music files may not play or play
improperly. Check the connection of the earphones to the D2. Loose or blocked connection can
cause inadequate contact between earphone jack and the D2.
The battery life is shorter when I use external memory
D2 requires more power to read and play back/record files from an external memory card,
So, battery life will be shorter when using external memory compared to using the internal memory.
Album image is not displayed in Music Mode
In order display album image, the image has to be stored in the ID3 tag of the music file. You can
edit the ID3 tags using jetAudio.
Video won’t play.
All video files must be converted using jetAudio VX. Any other video files are not supported by D2.
5. After checking the target folder location to save the converted files and other settings, click on “Start”
to start the video conversion process.
- Movie files that have not been converted by jetAudio VX will not play in COWON D2.
- Make sure that the movie files play properly on the PC.
- Not all video files can be converted. Files already damaged before conversion may not work on COWON D2 even if the conversion process is successful.
- Conversion time may vary depending on PC performance, source file size and codec types.
- “Preview” allows checking the converted video before starting conversion.
- To convert a file with subtitles or to change settings on subtitles, click on “Convert Options”.
- SMI files for subtitles must have the same file name as its video file.
FM Radio does not work.
D2 does not have a separate antenna. Instead it uses earphone wire to receive FM Radio signals.
Stretching the wires may enhance the reception quality. FM radio reception may be poor at locations
where FM radio transmissions are shielded. If FM radio does not work where reception should be
possible, please contact our service center (Note that reception quality of D2 may differ from other
FM radio receivers.)
DMB does not work
This model does not include DMB module. Built-in DMB module is available in COWON D2 DMB
model.
There is too much noise in my recordings.
COWON D2 uses ultra-small embedded microphone, so it may be more susceptible to noise during
recordings.
Page 13

24
COWON D2
COWON D2
25
Troubleshooting
JetShell
Characters on the display are corrupted.
Reset the language using Settings-Display-Language menu and set display format to File name using Settings-Display-Title menu. If the problem continues, reset the player following the procedures
outlined in the manual. Some special fonts may not display perfectly.
Computer cannot recognize the player when connected.
If D2 doesn’t’ power on when connected PC, press RESET button next to the USB jack on the
bottom of the player.
D2 may require additional driver installation for Windows 98 users.
Connection to an external USB Hub may not be stable due to its low power. D2 should be connected directly to a PC’s USB port.
Player is not recognized by JetShell and “No iAUDIO found” message
appears.
Check to see if the player is recognized in Windows Explorer when it is properly connected to PC.
D2 must be recognized in the Windows for it to work with JetShell.
Additional driver installation is required for Windows 98 and 98 SE users.
Within JetShell, set Settings-Device to match your model.
Memory capacity of the player is different or smaller than specified.
The memory capacity indicated by Windows Explorer may be different from that indicated by the
memory manufacturer.
D2 uses some area in the drive for system operation. Therefore, the actual available capacity is
somewhat reduced after excluding system area.
COWON D2 does not play properly when memory is full.
For D2 to function properly, it requires at least 5 MB of space for saving settings and other system
files.
What is JetShell?
JetShell is the COWON D2 manager program providing the following features:
• Downloading/Uploading files from/to COWON D2.
• File management similar to Windows Explorer
• Playing MP3, MP2, WAV, WMA, ASF, Audio CD, and Playlist (m3u)
• Copying (ripping) MP3 files from Audio CD
• Converting between WAV/MP3/WMA
• Changing bitrate of MP3 files
• Convenient file transfer using Download List
• A wide selection of spectrums, equalizers, and sound effects
• Editing ID3 tags
• Downloading COWON D2 logo
• Formatting the flash memory
Running Environment for JetShell
• Pentium 200 Mhz or higher
• 32 MB or more memory
• 20 MB or more hard disk space
• 256 Color or higher display
• Windows 98/ME/2000/XP (NT is not supported)
• USB Port 1.1 or higher
• CD-ROM drive
• Sound Card, Speaker or Headphone
Connecting COWON D2 and Installing JetShell
1. When you insert COWON D2 installation CD in the CD-ROM drive, the installation program starts automatically. It may not start automatically depending on the settings of Windows. In this case, run x:\setup.exe or
x:\JetShell\setup.exe. (where x is the letter of your CD-ROM drive)
2. When the installation finishes, Start -> Program -> COWON -> program group is created.
3. You are now ready to connect COWON D2 to PC (Don’t run JetShell at this time).
Connect the USB ports of COWON D2 to your PC using the provided USB cable.
(We recommend to connect COWON D2 to the PC directly, not using USB hub)
4. As soon as the cabe is connected, the message “Found New Hardware” appears and the USB driver for
COWON D2 is installed automatically. The driver installation message may not appear on the screen depending on the status of Windows. To make sure that the installation was completed normally, check for the device
“iAUDIO” in My Computer as shown below, or “Control Panel -> System -> Hardware -> Device Manager”.
5. Now you can transfer files by using JetShell or Window Explorer.
Page 14

26
COWON D2
COWON D2
27
JetShell JetShell
Introducing JetShell
The Whole View
Play and MP3
Management
Section
File
Management
Section
Flash
Memory
Management
Section
When JetShell is running, it controls the iAUDIO. Make sure to exit JetShell before performing the
following tasks:
• Installing COWON D2's USB driver
• Formatting COWON D2 in Windows Explorer
• Upgrading COWON D2's firmware
Player Section
Double click an MP3, MP2, WAV, WMA, ASF, Audio CD track, or Playlist (m3u) file in the "File Management
Window", or drag and drop files on the "Player Window" shown above. You can also select multiple files and
then press the Play button. On the black screen in the middle, various information of current file is displayed,
and two types of spectrum screens appear.
You can start and stop playing the file with the buttons at the right, and adjust the volume with the + and - buttons. To skip instantly to a specific position of the track being played, click on the position bar.
File Management
Window
Download List
Management
Section
File Management Section
The File Management Section of JetShell looks just like Windows Explorer. The left window shows
folders, disks, and CD-ROM drives in a tree structure, and the right window shows the files in current
folder.
Flash Memory Management Section
The bottom part of JetShell consists of "Flash Memory Management Window" and "Download List
Window". When COWON D2 is working normally, the red lamp is turned on with the message "COWON D2 is working" as shown in the figure. The files in COWON D2 displayed in the middle window.
The "Memory used" bar shown at the bottom right indicates the used memory size of the total flash
memory of COWON D2. If this bar is almost full, it means that there is almost no free space available
in COWON D2.
Button Function Explanation
Up Move to the upper folder.
Properties Display the properties of the selected file.
Refresh Refresh the contents of flash memory.
Delete Delete the selected file or folder.
New folder Create a new folder.
Cut Cut the selected file or folder.
Copy Copy the selected file or folder.
Paste Paste the cut or copied file.
Transfer to Flash
Memory
Transfer to PC Transfer the selected files or folder from COWON D2 to PC.
Transfer the selected files or folder from PC to COWON D2.
Page 15

28
COWON D2
COWON D2
29
JetShell JetShell
JetShell displays visually cool spectrums. When you click on the spectrum display area, the screen
changes as follows.
3. The following window shows the file downloading process.
Never disconnect the USB cable while downloading.
Make sure that the LCD status is READY before disconnecting
USB cable.
4. Another method is to put the files in the "Download List Window" first, and transfer them
You can also enjoy various equalizers and sound effects.
Various Equalizers
later.
This is useful when you wish to download files in different folders.
5. You can also download the files existing outside of JetShell by dragging and dropping them
onto the "Flash Memory Window".
Various Sound Effects
Downloading Music files to COWON D2
If you want to download secure WMA files (WMA files from online music store) to COWON D2, please refer to “Downloading
secure WMA files to COWON D2”. JetShell does not support downloading secure WMA files.
You can use Windows Explorer or other file management programs to download music files to COWON D2.
1. Downloading music files to COWON D2 is very simple. Select files
to download from the "File Management Window" and click down
arrow.
2. Or you can also drag and drop the selected files from the "File
Management Window" to the "Flash Memory Management
Window".
Page 16

30
COWON D2
COWON D2
31
JetShell JetShell
Converting Audio CD Tracks to MP3 Files and
Downloading Them to COWON D2
With JetShell, you can easily convert your Audio CD into MP3 files and download them to COWON D2.
1. Before getting started, you must choose the quality of the MP3 files to create. Click [Setup] –[MP3 Encoder
Option] to set the desired bitrate of the MP3 files. (The files compressed in a high bitrate have a higher sound
quality and a bigger file size.)
2. From the File Management section, select the CD-ROM drive in which the Audio CD is inserted. Select the
audio tracks from the right window and click or [File] –[Convert CD to MP3] from the menu.
Other Features
1. Editing ID3 Tag
You can edit the ID3 tag of a MP3 file by selecting [Tools] – [Edit MP3 ID3 Tag] from the JetShell menu.
2. Downloading Logo File
You can download a logo file to change the logo screen that appears when COWON D2 powers on.
Select [Download Logo File] from the menu. When the "Open" window appears, select the desired logo file and
click Open. Then the logo file is downloaded and applied.
3. Specify the path to save the MP3 files in. Choose a folder in COWON D2 to directly download MP3 files onto
COWON D2.
Page 17

 Loading...