

Page 1

Ver. 200711
Important!
Read the entire instruction manual carefully
and make sure that you fully understand
it before you use the equipment. Keep the
manual for future reference.
Viktig information:
Läs hela bruksanvisningen noggrant och
försäkra dig om att du har förstått den innan
du använder utrustningen och spara den för
framtida bruk.
Viktig informasjon:
Les disse anvisningene nøye og forsikre deg
om at du forstår dem før du bruker enheten
og oppbevar dem for senere bruk.
Tärkeätä tietoa:
Lue nämä ohjeet huolellisesti ja varmista
että olet ymmärtänyt ne, ennen kuin alat
käyttää laitetta. Säilytä ohjeet myöhempää
tarvetta varten.
English 2
Svenska 12
Norsk 22
Suomi 32
Diamond Blade
Tile Saw
Kakelkap med diamantklinga
Vannsag med diamantklinge
Laattaleikkuri ja timanttiterä
Model TC-RM-180E/ TC-RM-180E-UK
Art.No 30-9375/18-3050
Page 2

ENGLISH
ENGLISH
Diamond Blade Tile Saw
Art. n0: 30-9375/18-3050, model: TC-RM-180E/ TC-RM-180E-UK
Please read the entire instruction manual before using and save it for future use.
We apologise for any text or photo errors and any changes of technical data.
If you have any questions concerning technical problems please contact our
Customer Service Department (see address on reverse.)
Table of contents
Safety .........................................3
Contents of packet ......................7
Assembly ....................................8
Use ............................................. 9
Troubleshooting ........................ 11
Teknical data ............................ 11
Page 3

ENGLISH
Safety
General safety instructions
Warning! When using this tool, take precautionary measures in order to reduce the
risk of re, electric chock or injury to persons. Read all the instructions before using
the product and save them for future reference.
1.
Keep the working site in order
Cluttered surfaces and tables invite accidents.
2. Mind the working environmen
Do not expose the tools to rain.
Do not use the tools in damp or wet spaces.
Keep the working site well lit.
Do not use the tools near inammable uids or gases.
3. Avoid electric shock
Avoid physical contact with earthed objects such as water conduits, radiators,
kitchen stoves or refrigerators.
4. Keep other people at a distance
Unless they are taking part in the work, do not let other people, especially not
children, touch the tool or the extension cords. Keep them at a safe distance
from the working site.
5. Store the tools safely
When the tools are not being used, store them in a dry, locked space out of
reach from children.
6. Do not overload the tools
It is better and safer to use the tools at the intended feed rate.
7. Use the right tool
Do not attempt to use small tools to carry out big work that demands powerful
tools. Do not attempt to use a tool or an addition to do something for which it
was not intended; for instance, do not use a circular saw to cut tree branches or
timber.
8. Wear suitable clothes
Do not wear loose-tting clothes or jewellery that may get caught in rotating
parts. Skid resistant shoes are recommended when working outdoors. Wear a
hairnet or similar if you have long hair.
9. Always wear safety equipment
Wear protective goggles. Use a dust lter or protection mask when doing work
that raises dust.
Page 4

ENGLISH
ENGLISH
10. Use the dust extractor
If the tool comes with the option to attach equipment to collect and extract dust,
make sure that the equipment is connected and used correctly.
11. Do not mistreat the power cord
Pull the plug, not the cord, when disconnecting from the wall socket. Make sure
that the cord does not come into contact with heat, oil or sharp edges.
12. Fasten the work piece properly
When possible, use clamps or a vice to secure the workpiece. It is safer than
holding the workpiece with one hand.
13. Do not overreach
Make sure that you are standing securely and keep your balanced at all times.
14. Keep the tools trimmed
Make sure that they are clean and that the edges are sharp for optimal effect
and a safe outcome. Follow the recommendations in the manual about greasing
and changing ttings. Check the cord regularly, if damaged it should be replaced
by a qualied technician. Check all extension cords regularly to make sure that
they are not damaged. Make sure that the handles and controls of the machine/
tool are dry, clean and completely free from oil, grease, and so on.
15. Disconnect the power
Pull the plug and press the emergency stop button before maintenance and
when changing ttings such as cutter, drills, abrasive band or blade.
16. Remove all wrenches and service tools
Make a habit out of checking that all wrenches and service tools are removed
from the machine before you turn on the power.
17. Avoid starting the tool inadvertently
Never carry a tool with a nger on the power switch/trigger if it is plugged in.
Make sure that the power switch is ipped to OFF when you plug it in.
18. Use the right extension cords
If you use extension cords outdoors, make sure that you only use the kind
intended for outdoor use. Use extension cords with sufcient cable area and
uncoil the whole cord.
19. Use common sense and be careful
Before carrying out an operation, think it through to make sure you do it safely.
Do not use the machine/tool when you are tired, on medication, and so on.
20. Before starting the tool, check the following:
- That all safety devices and other parts are intact and serve their purpose.
- That all moving parts can rotate freely and are aimed right.
- That no moving parts can get stuck.
- That no damages have occurred.
- Any other circumstances that may affect the work.
Page 5

ENGLISH
If a safety device or any other part is damaged it should be professionally
repaired or replaced. Damaged power cords and power switches should always
be replaced by a professional. Never use the tool if you are unable to turn it on
or off in a safe way.
21. Use the recommended ttings
Using non-recommended ttings may cause accidents or injury to persons.
22. Repairs may only be carried out by qualied technicians
This tool is in accordance with existing safety requirements. Repairs should
always be carried out by professionals, using original parts, or the tool may
cause accidents or injury to persons.
General
• This product may not be altered or used for operations for which it is not
intended! Check regularly that all nuts and bolts are secured tightly!
• Check that the supply voltage of the engine is the same as that of your power
socket.
• A damaged power cord or power switch should always be replaced by a
professional. Never use the tool if you are unable to turn it on or off in a safe
way.
• This machine is only intended to cut tiles, stone, glazed tiles, clinker slabs and
so on.
Special safety regulations
Before turning on the machine:
• Check that the power switch is in the “0” position before plugging in the
machine. Only connect the machine to an earthed power socket.
• Check that the cutting wheel is centred and undamaged before use.
• Only use cutting wheels that have the right diameter and are approved for the
spindle speed of the machine.
• Do not tighten the spindle nut too much.
• Protect the cutting wheel against dampness and shocks.
• Check that the cutting wheel can rotate freely before starting the machine.
Page 6
ENGLISH
ENGLISH
!
!
When working with the machine:
• Never use the machine unless the safety devices are tted.
• Do not stand right in front of the cutting wheel when starting the machine.
• Pull out the plug if you are leaving the machine unsupervised.
• Stand rmly and use both hands to hold the machine.
• Do not apply a lateral load to the cutting wheel.
• Keep an eye on the power cord when using the machine, so that it does not
come into contact with any moving parts.
• When cutting, do not hold small tiles using only your hands, use a pusher.
Turn off the machine immediately if...
• The machine starts acting strange, for example by emitting sparks, smoke,
vibrations or abnormal sounds.
• The power switch or the power cords are damaged.
Safety symbols on the machine
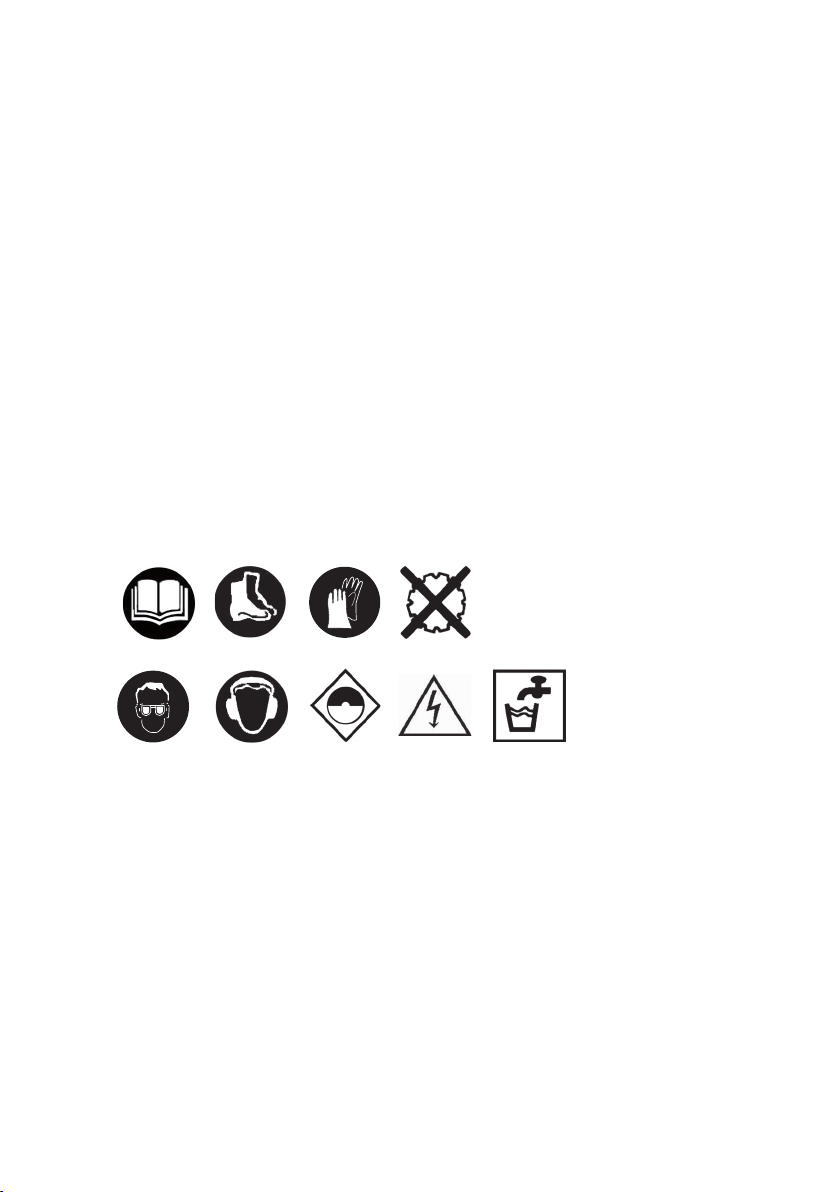
Read the entire manual before using the machine.
Always wear protective shoes.
Always wear protective gloves.
Cutting wheels with slits or teeth may not be used.
Always wear protective goggles/visor
Always use ear protectors.
The xed and movable safety devices on the machine must be installed during use.
Warning! High voltage.
Check the water level.
Page 7
Contents of packet
ENGLISH
9
8
1
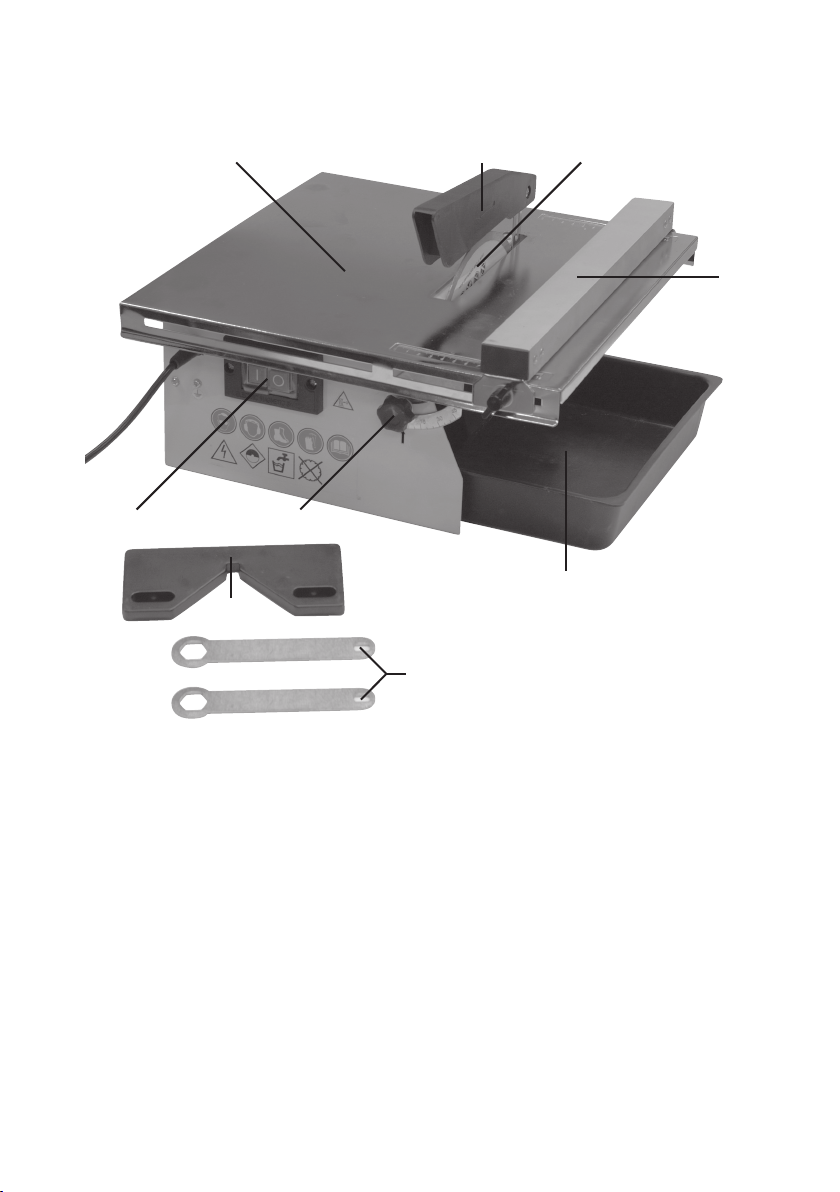
1. Blade cover
2. Parallel guide with xing parts (2 carriage bolts, 2 washers and 2 knobs)
3. Diamond cutting blade
4. 45° cutting support
5. Combination wrenches for the blade bolt and spindle.
6. Water container
7. Power switch (no-volt release switch)
8. Knob for adjusting the table
9. Adjustable table (xing parts, 2 locking knobs and 2 washers)
Page 8
ENGLISH
ENGLISH
Assembly
Important: Pull out the plug before assemblage.
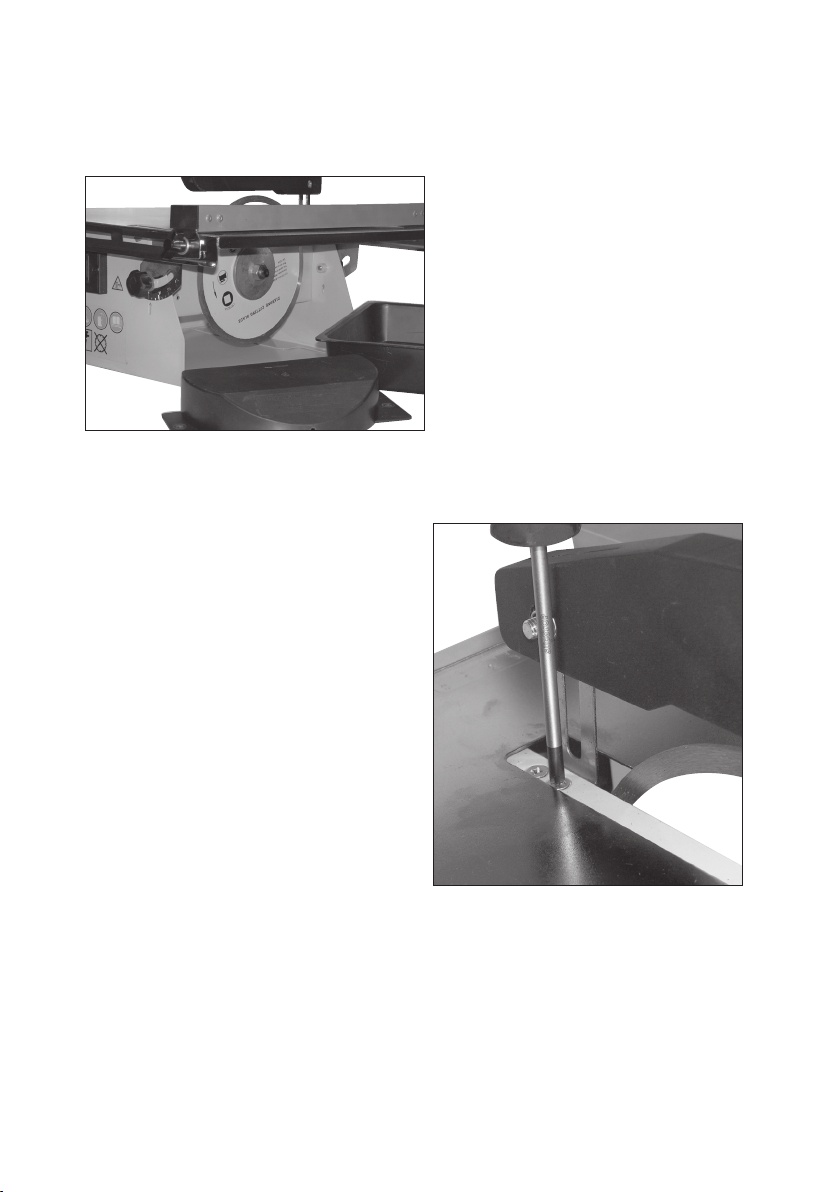
1. Remove the water container and
then unscrew the two screws that
hold the lower blade cover and
remove it.
2. Unscrew the blade bolt and the
outer ange washer from the
spindle, use the combination
wrenches (let the inner ange
washer remain on the spindle).
3. Turn the diamond cutting blade so that it rotates in the direction of the arrow on
the lower cover.
4. First t the diamond cutting blade
on the spindle and then the outer
ange washer and the blade
bolt, tighten with the combination
wrenches (the inner and outer
ange washers are different!).
5. Put back the lower blade cover and
the water container.
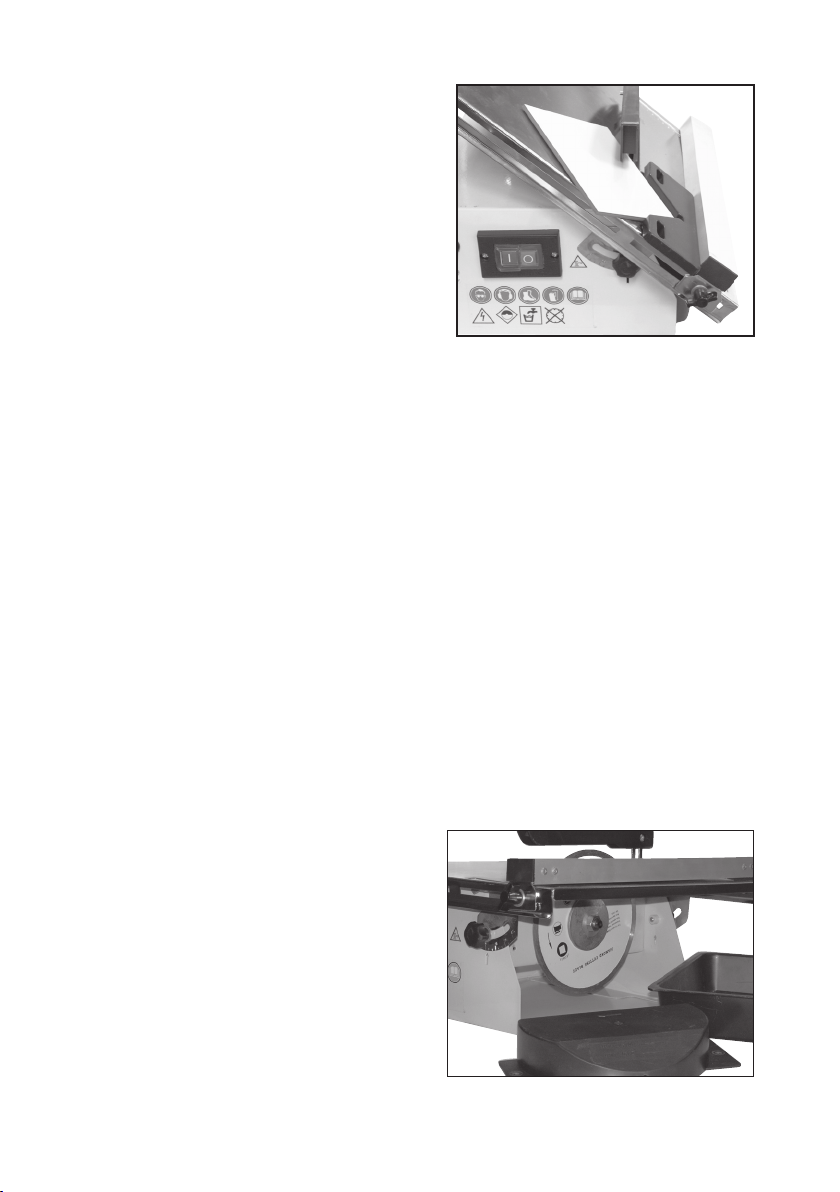
6. Loosen the two star quads on the
table behind the blade, press the
socket of the upper blade cover
between the table and the threaded
lock plate, aim the cover and tighten
the screws.
7. Fit the parallel guide to the table
using 2 carriage bolts, 2 washers
and 2 knobs.
Do a trial run of the tile cutter for one minute, without cutting anything, check that
the diamond cutting wheel rotates in the direction of the arrow on the upper blade
cover and make sure that it is not “wobbling”!
8
Page 9
ENGLISH
Use
1. Fill the water container with water up to the level marking “max level” on the
lower blade cover.
2. Adjust the upper movable blade cover so that the tile ts precisely between the
cover and the table.
3. Think through the work you are about to carry out: Position the parallel guide,
slant the table and so on (the parallel guide can be tted on both sides of the
diamond cutting blade). Use a ruler or a measure tape to measure, the markings
on the table are only intended for rough adjustments!
4. Connect the plug to a power socket, start the engine by pressing “1” on the
power switch.
5. Move the tile towards the diamond cutting wheel in a steady and smooth
manner. Use the parallel guide as support if needed, set the parallel guide to the
same graduation marks on both sides.
6. Turn off the engine by pressing “0” on the power switch after completing the
cutting.
Diagonal cutting
1. Fill the water container with water up to the level marking “max level” on the
lower blade cover.
2. Adjust the upper movable blade cover so that the tile ts precisely between the
cover and the table.
3. Think through the work you are about to carry out: Position the parallel guide,
slant the table and so on (the parallel guide can be tted on both sides of the
diamond cutting blade). Use a ruler or a measure tape to measure, the markings
on the table are only intended for rough adjustments!
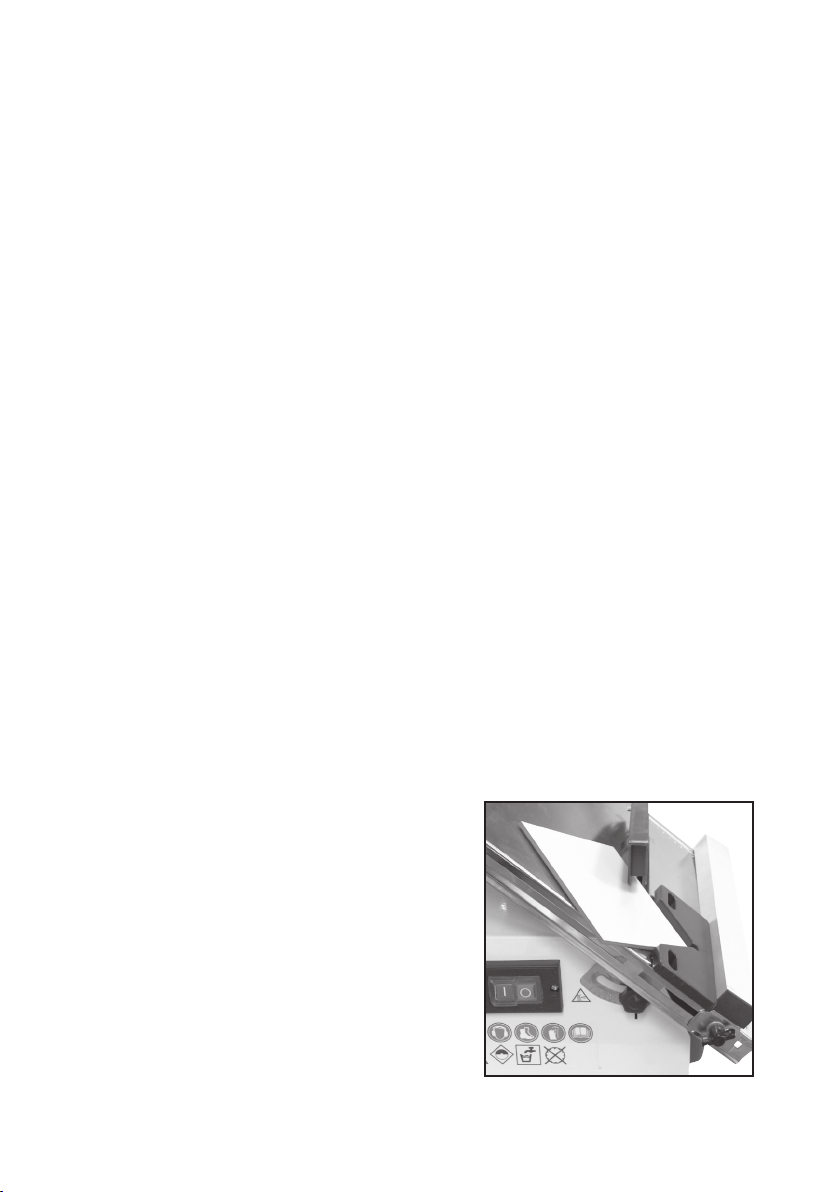
4. Place one corner of the tile in the enclosed
45° cutting support and place the cutting
support against the parallel guide. Use the
parallel guide for support, set the parallel
guide to the same graduation marks on
both sides.
5. Connect the plug to a power socket, start
the engine by pressing “1” on the power
switch.
6. Move the tile towards the diamond cutting
wheel in a steady and smooth manner.
Turn off the engine by pressing “0” on the
power switch after completing the cutting.
9
Page 10
ENGLISH
ENGLISH
Cutting with a slanted table
1. Fill the water container with water up
to the level marking “max level” on the
lower blade cover.
2. Loosen the two locking knobs that hold
the adjustable table in position, set to
the desired slant (0° - 45°) and tighten
the locking knobs.
3. Adjust the upper movable blade cover
so that the tile ts precisely between
the cover and the table.
4. Think through the work you are about to carry out: Position the parallel guide
(the parallel guide can be tted on both sides of the diamond cutting blade).
Use a ruler or a measure tape to measure, the markings on the table are only
intended for rough adjustments!
5. Connect the plug to a power socket, start the engine by pressing “1” on the
power switch.
6. Move the tile towards the diamond cutting wheel in a steady and smooth
manner. Turn off the engine by pressing “0” on the power switch after
completing the cutting.
Replacing the diamond cutting wheel
1. Remove the water container and then unscrew the two screws that hold the
lower blade cover and remove it so that you have access to the blade.
2. Unscrew the blade bolt and the outer ange washer from the spindle, use the
combination wrenches (let the inner ange washer remain on the spindle).
3. Fit a new diamond cutting blade (Ø 180 mm x 2.0 mm, centre hole Ø 22.2 mm,
no slits or teeth).
4. Turn the diamond cutting blade so
that it rotates in the direction of the
arrow on the lower cover.
5. First t the diamond cutting blade on
the spindle and then the outer ange
washer and the blade bolt, tighten
with the combination wrenches (the
inner and outer ange washers are
different!).
6. Put back the lower blade cover and
the water container.
10
Page 11

ENGLISH
Troubleshooting
The engine has a thermal motor protector, which is activated when the engine gets
too hot. If this happens, let the engine cool off for 5 minutes, then restart it.
Disposal
Follow local ordinances when disposing of this product. If you are unsure
about how to dispose of this product contact your municipality.
Technical data
Rated voltage: 230VAC, 50Hz
Rated output: 600W
Intermittent operation: S3/40%
Protection class: IP44
No-load speed: 2990 RPM
Cutting wheel: Ø 180 mm x 2.0 mm, centre hole Ø 22.2 mm
Maximum cutting depth: 34 mm
Cooling the blade: Water
Acoustic pressure: < 70 dBA
Weight: 11 kg
Size: 395 x 385 x 240 mm (lxbxh)
11
Page 12

SVENSKA
SVENSKA
Kakelkap med diamantklinga
Art. nr: 30-9375/18-3050, modell: TC-RM-180E/ TC-RM-180E-UK
Läs igenom hela bruksanvisningen före användning och spara den sedan för
framtida bruk. Vi reserverar oss för ev. text- och bildfel samt ändringar av tekniska
data. Vid tekniska problem eller andra frågor, kontakta vår kundtjänst (se adressuppgifter på baksidan).
Innehållsförteckning
Säkerhet ................................... 13
Förpackingen innehåller ........... 17
Montering ..................................18
Användning ...............................19
Felsökning ................................ 21
Tekniska data ........................... 21
1
Page 13

SVENSKA
Säkerhet
Generella säkerhetsregler för din och andras säkerhet
Varning! Läs alla instruktioner. Om nedanstående instruktioner inte följs kan detta
leda till elektrisk stöt, brand och/eller allvarlig skada. Spara dessa instruktioner.
1. Håll arbetsutrymmet rent!
Belamrade ytor och bord inbjuder till olyckor.
2. Använd inte maskinen i riskfylld miljö!
Elmaskiner skall inte användas på fuktiga, våta ytor eller vid regn. Se till att
belysningen är god i arbetsutrymmet. Sörj för god luftväxling vid dammande
arbeten. Använd aldrig elektriska maskiner/verktyg där de kan förorsaka
brand eller explosion!
3. Undvik elektrisk chock!
Undvik kroppskontakt med jordade föremål som vattenledning, element,
köksspis etc. samtidigt som du använder el-maskiner/verktyg.
4. Håll undan barn och besökare!
Alla barn och besökare bör befinna sig på säkerhetsavstånd från el-maskiner/verktyg eller elkablar i arbetsutrymmet.
5. Förvara maskinerna barnsäkert!
Förvara el-maskiner/verktyg inlåsta eller utom räckhåll för barn när de inte
används!
6. Pressa inte maskinen!
Den gör jobbet bättre och säkrare med avsedd matningshastighet.
7. Använd rätt verktyg!
Pressa inte ett verktyg eller en tillsats att göra ett arbetsmoment som den
inte är gjord för.
8. Bär lä
9. Bä
10. Använd utsug!
mplig klädsel!
Inga löst sittande kläder, vantar, halsband, ringar, armband eller andra
smycken som kan fastna i roterande delar. Halksäkra skor rekommenderas.
Bär hårnät (motsv.) om du har långt hår.
r alltid skyddsglasögon!
Bär alltid skyddsglasögon, vanliga glasögon räcker inte! Använd också
dammfilter eller skyddsmask vid dammande arbeten.
Använd utsugningsutrustning för att ta bort och samla damm och spån, om
maskinen är avsedd för det, se till att utrustningen används på rätt sätt och
töms vid behov.
1
Page 14

SVENSKA
SVENSKA
11. Misshandla inte nätsladden!
Bär aldrig maskinen i nätsladden. Ryck inte i sladden, utan dra i stickproppen när du bryter strömmen. Se till att nätsladden inte kommer i kontakt med
värme, olja eller vassa kanter.
12. Sätt fast ämnet ordentligt!
Använd tvingar eller skruvstycke där det går, då kan du hantera verktyget
med två händer Det är säkrare än att hålla fast ämnet med ena handen.
13. Sträck dig inte fö
Se till att du hela tiden står säkert med god balans.
14. Håll verktygen i trim!
Se till att de är rena och eggarna vassa för optimal effekt och ett säkert resultat. Följ manualens rekommendationer för smörjning och byte av tillbehör.
Kontrollera nätsladden regelbundet, om den är skadad ska den bytas av en
kvalificerad servicetekniker. Syna alla skarvsladdar regelbundet så att de inte
är skadade. Se till att maskinens/verktygets handtag och reglage är torra,
rena och helt fria från olja, fett etc.
15. Slå av strömmen!
Dra ur stickproppen och tryck in nödstopp, före service och vid byte av tillbehör som hyvelstål, borrar, skär, slipband eller blad.
16. Ta bort alla nycklar och serviceverktyg!
Gör det till en vana att kontrollera att alla nycklar och serviceverktyg är borttagna från maskinen innan du slår på strömmen.
17. Undvik oavsiktlig start!
Bär inte ett verktyg med ett finger på strömbrytaren/avtryckaren om sladden
sitter i ett uttag. Se till att strömbrytaren står på OFF när du sätter in stickproppen.
18. Använd rä
Om du använder skarvsladdar utomhus, använd endast de som är avsedda
för utomhusbruk. Använd skarvsladdar med tillräcklig ledararea, rulla ut hela
sladden!
19. Använd sunt förnuft och var försiktig!
Tänk efter innan du utför ett arbetsmoment, så att du kan utföra det på ett
säkert sätt! Använd inte maskinen/verktyget när du är trött, påverkad av
mediciner etc.
20. Kontrollera att alla delar är oskadade!
Kontrollera innan du startar verktyget: att alla skydd och övriga delar är
oskadade och fyller sin funktion, att rörliga delar kan rotera fritt och är rätt
inriktade, att inga rörliga delar kan fastna, att ingen defekt uppstått och andra
omständigheter som kan påverka arbetets utförande. Ett skydd eller någon
annan del som skadats, skall repareras fackmässigt eller bytas ut.
r långt!
tt skarvsladdar!
1
Page 15

SVENSKA
Skadade nätsladdar och strömbrytare ska alltid bytas ut av fackman. Använd
aldrig verktyget om du inte kan stänga av eller starta det på ett betryggande
sätt.
21. Använd rekommenderade tillbehör!
Användning av ej rekommenderade tillbehör kan vålla olyckor eller risk för
personskada.
22. Repareras endast av kvalificerad tekniker!
Verktyget överensstämmer med gällande säkerhetskrav. Reparationer av
verktyget ska alltid utföras av fackman, med originalreservdelar, annars kan
verktyget vålla olyckor eller risk för personskada.
23. El-verktyg bör anslutas till elnätet via en jordfelsbrytare för person
skydd! Produkten får inte ändras eller användas till arbetsmoment som
den inte är avsedd för! Kontrollera regelbundet att alla skruvar och
muttrar är ordentligt åtdragna!
-
Allmänt
• Produkten får inte ändras eller användas till arbetsmoment som den inte är
avsedd för!
Kontrollera regelbundet att alla skruvar och muttrar är ordentligt åtdragna!
•
Kontrollera att motorns angivna drivspänning är lika som eluttagets spänning.
•
Skadad nätsladd och strömbrytare ska alltid bytas ut av fackman. Använd
•
aldrig verktyget om du inte kan stänga av eller starta det på ett betryggande
sätt.
Maskinen är endast avsedd för att kapa tegel, sten, kakel, klinkers etc.
•
Särskilda säkerhetsregler
Innan maskinen startas
• Kontrollera att strömbrytaren står i läge ”0” innan stickkontakten ansluts till ett
el-uttag. Anslut endast maskinen till ett jordat el-uttag.
Kontrollera att kapskivan är väl centrerad och att den inte är skadad
•
innan användning.
• Använd endast kapskivor som har rätt diameter och är godkända för
maskinens spindelvarvtal.
• Dra inte åt spindelmuttern för hårt.
• Skydda kapskivor mot fukt och stötar.
• Kontrollera att slipskivan kan rotera fritt innan du startar maskinen.
1
Page 16

SVENSKA
SVENSKA
!
!
Under arbete med maskinen
• Använd aldrig maskinen utan att skydden är monterade.
• Stå inte rakt framför kapskivan när du startar maskinen.
• Dra ur stickproppen om du lämnar maskinen utan uppsikt.
• Stå stadigt och håll i maskinen med båda händerna.
• Kapskivan får inte belastas i sidled!
• Håll uppsikt på elkabeln under användning av maskinen, så att den inte
kommer i kontakt med några rörliga delar.
• Håll inte i små kakelplattor med bara händerna vid kapning, använd
påskjutare.
Stäng av maskinen omedelbart om...
• Maskinen börjar uppträda konstigt som t.ex. gnistor, rök, vibrationer eller
onormala ljud.
• Maskinens strömbrytare eller elkabel är skadade.
Produktmärkning med säkerhetssymboler
• Läs hela bruksanvisningen innan användning av maskinen.
•
Använd alltid skyddsskor.
Använd alltid skyddshandskar.
•
Kapskivor med slits eller tänder får inte användas.
•
Använd alltid skyddsglasögon/visir.
•
Använd alltid hörselskydd.
•
Maskinens fasta och rörliga skyddsanordningar måste vara monterade vid
•
användning.
Varning! Hög spänning.
•
Kontrollera vattennivån.
•
1
Page 17

Förpackningen innehåller
SVENSKA
9
8
1
1. Klingskydd
2. Parallellanslag med fästdetaljer (2 vagnsbult, 2 brickor och 2 rattar)
3. Diamantkapklinga
4. 45° kapstöd
5. Kombinycklar till klingmuttern och spindeln
6. Vattenbehållare
7. Strömbrytare (Nollspänningsbrytare)
8. Ratt för justering av bord
9. Justerbart bord (fästdetaljer 2 låsrattar och 2 brickor)
1
Page 18

SVENSKA
SVENSKA
Montering
Viktigt: Drag ur stickkontakten innan monteringen.
1. Tag bort vattentanken,
skruva sedan bort dom två
skruvarna som håller det undre
klingskyddet och ta bort det.
2. Skruva av klingmuttern och den
yttre änsbrickan av spindeln,
använd kombinycklarna (låt den
inre änsbrickan sitta kvar på
spindeln).
3. Vänd diamantkapklingan så att den roterar åt samma håll som pilen på det
undre skyddet.
4. Montera först diamantkapklingan
på spindeln och sedan den yttre
änsbrickan och klingmuttern, dra
åt med kombinycklarna (inre och
yttre änsbricka är olika!).
5. Skruva tillbaka det nedre
klingskyddet och montera
vattenbehållaren.
6. Lossa de två stjärnskruvarna
på bordet bakom klingan, tryck
in det övre klingskyddets fäste
mellan bordet och det gängade
låsblecket, rikta in skyddet och dra
åt skruvarna.
7. Montera parallellanslaget på bordet
med 2 vagnsbultar, 2 brickor och 2
rattar.
Testkör kakelkapen i en minut utan att kapa något, kontrollera att diamantkapskivan roterar åt samma håll som pilen på det övre klingskyddet och att den inte
”kastar”!
18
Page 19

SVENSKA
Användning
1. Fyll i vatten i vattenbehållaren upp till nivåmarkeringen ”max level” på det
undre klingskyddet.
2. Justera det övre rörliga klingskyddet så att kakelplattan precis får plats mellan
skyddet och bordet.
3. Tänk över hur arbetet ska utföras: Ställ in parallellanslaget, vinkla bordet etc.
(parallellanslaget kan monteras på båda sidor av diamantkapklingan). Mät med
en linjal eller måttband, bordets märkning är endast för grovinställning!
4. Anslut stickproppen till ett el-uttag, starta motorn genom att trycka in ”1” på
strömbrytaren.
5. För kakelplattan med lugn och jämn rörelse mot diamantkapskivan, Använd
parallellanslaget som stöd vid behov, ställ in parallellanslaget på samma
skalstreck på båda sidor.
6. Stäng av motorn genom att trycka in ”0” på strömbrytaren när kapningen är klar.
Diagonal kapning
1. Fyll i vatten i vattenbehållaren upp till nivåmarkeringen ”max level” på det
undre klingskyddet.
2. Justera det övre rörliga klingskyddet så att kakelplattan precis får plats mellan
skyddet och bordet
3. Tänk över hur arbetet ska utföras: Ställ in parallellanslaget, vinkla bordet etc.
(parallellanslaget kan monteras på båda sidor av diamantkapklingan). Mät med
en linjal eller måttband, bordets märkning är endast för grovinställning!
4. Placera kakelplattans ena hörn i det bifogade 45º kapstödet och kapstödet mot
parallellanslaget. Använd parallellanslaget som stöd, ställ in parallellanslaget
på samma skalstreck på båda sidor.
5. Anslut stickproppen till ett el-uttag,
starta motorn genom att trycka in ”1” på
strömbrytaren.
6. För kakelplattan med lugn och jämn
rörelse mot diamantkapskivan, Stäng
av motorn genom att trycka in ”0” på
strömbrytaren när kapningen är klar.
19
Page 20

SVENSKA
SVENSKA
Kapning med vinklat bord
1. Fyll i vatten i vattenbehållaren upp till
nivåmarkeringen ”max level” på det
undre klingskyddet.
2. Lossa de två låsrattarna som xerar
det justerbara bordet, ställ in önskad
lutning (0º - 45º), dra åt låsrattarna.
3. Justera det övre rörliga klingskyddet så
att kakelplattan precis får plats mellan
skyddet och bordet.
4. Tänk över hur arbetet ska utföras: Ställ in parallellanslaget (parallellanslaget
kan monteras på båda sidor av diamantkapskivan). Mät med en linjal eller
måttband, bordets märkning är endast för grovinställning!
5. Anslut stickproppen till ett el-uttag, starta motorn genom att trycka in ”1” på
strömbrytaren.
6. För kakelplattan med lugn och jämn rörelse mot diamantkapskivan, Stäng av
motorn genom att trycka in ”0” på strömbrytaren när kapningen är klar.
Byte av diamantkapskiva
1. Tag bort vattentanken, skruva sedan bort dom två skruvarna som håller det
undre klingskyddet och ta bort det så att du kommer åt klingan.
2. Skruva av klingmuttern och den yttre änsbrickan av spindeln, använd
kombinycklarna (låt den inre änsbrickan sitta kvar på spindeln).
3. Montera en ny diamantkapklinga (Ø 180 mm x 2,0 mm, centrumhål Ø 22,2
mm, utan tänder eller slitsar)
4. Vänd diamantkapklingan så att den roterar åt samma håll som pilen på det
undre skyddet.
5. Montera först diamantkapklingan
på spindeln och sedan den yttre
änsbrickan och klingmuttern, dra åt
med kombinycklarna (inre och yttre
änsbricka är olika!)
6. Skruva tillbaka det nedre
klingskyddet och montera
vattenbehållaren.
0
Page 21

SVENSKA
Felsökning
Motorn har termiskt motorskydd, som löser ut när motorn blir för varm, om så händer: Låt motorn kallna i 5 minuter, och starta om.
Avfallshantering
När du ska göra dig av med produkten ska detta ske enligt lokala
föreskrifter. Är du osäker på hur du ska gå tillväga, kontakta din kommun.
Tekniska data
Märkspänning: 230 VAC, 50 Hz
Märkeffekt: 600 W
Intermittent drift: S3/40 %
Kapslingsklass: IP44
Varvtal, obelastad: 2990 RPM
Kapskiva: Ø 180 mm x 2,0 mm, centrumhål Ø 22,2 mm
Max skärdjup: 34 mm
Kylning av klinga: Vatten
Ljudtryck: < 70 dBA
Vikt: 11 kg
Storlek: 395 x 385 x 240 mm (lxbxh)
1
Page 22

NORSK
NORSK
Vannsag med diamantklinge
Art. nr: 30-9375/18-3050, modell: TC-RM-180E/ TC-RM-180E-UK
Les nøye igjennom hele bruksanvisningen og ta vare på den til senere bruk.
Vi reserverer oss mot ev. tekst- og bildefeil, samt forandringer av tekniske data.
Ved tekniske problemer eller andre spørsmål, ta kontakt med vårt kundesenter
(se opplysninger på baksiden).
Innholdsfortegnelse
Sikkerhet .................................. 23
Forpakningen inneholder ......... 27
Montering ................................. 28
Bruk ......................................... 29
Feilsøking ................................ 31
Spesikasjoner ........................ 31
Page 23

NORSK
Sikkerhet
Generelle sikkerhetsregler
Advarsel! Les alle instruksjonene grundig. Dersom instruksjonene ikke
følges, kan dette lede til brann, elektrisk støt og/eller alvorlig skade.
TA VARE PÅ DENNE INSTRUKSJONEN.
1. Hold arbeidsstedet ryddig!
Uryddige arbeidsplasser innbyr til ulykker.
2. Bruk ikke maskinen i risikofylt miljø!
Elektromaskiner skal ikke benyttes på fuktige, våte miljøer eller ved regn.
Påse at belysningen er god på arbeidsstedet. Sørg for god luftsirkulasjon ved
støvfylte oppgaver. Bruk aldri elektriske maskiner/verktøy der de kan forårsake
brann eller eksplosjon!
3. Unngå elektrisk sjokk!
Unngå kroppskontakt med jordede formål som vannledning, element, komfyr
etc. samtidig som du bruker elektromaskiner/verktøy.
4. Hold barn og tilskuere på avstand!
Barn og tilskuere bør benne seg på sikkerhetsavstand fra elektromaskiner/
verktøy eller elkabler på arbeidsstedet.
5. Barnesikker oppbevaring!
Oppbevar elektromaskiner/verktøy innelåst eller utenfor rekkevidde for barn
når de ikke er i bruk.
6. Press ikke maskinen!
Maskinen gjør jobben bedre og sikrere med beregnet matehastighet.
7. Bruk riktig verktøy!
Press ikke et verktøy eller lignende til å utføre et arbeidsmoment den ikke er
beregnet for.
8. Bruk egnet kledsel!
Bruk ikke løstsittende klær, vanter, hals-/armbånd, ringer eller andre smykker
som kan sette seg fast i roterende deler. Sklisikre sko anbefales. Bruk hårnett
eller tilsvarende om du har langt hår.
9. Bruk verneutstyr!
Benytt alltid vernebrille, vanlige briller duger ikke! Bruk også støv-/vernemaske
samt hørselvern der dette kreves.
10. Utlufting!
Bruk tilgjengelig utsugingsutrustning for å fjerne og samle opp støv og spon.
Om maskinen er beregnet for det, påse at utrustningen brukes på riktig måte
og tømmes ved behov.
Page 24

NORSK
NORSK
11. Beskadige ikke nettkabelen!
Bær aldri maskinen i nettkabelen. Rykk ikke i kabelen, men trekk i støpselet
når strømmen brytes. Påse at kabelen ikke kommer i kontakt med varme, olje
eller skarpe kanter.
12. Sett fast emnet ordentlig!
Bruk tvinger eller skruestikke der dette er mulig, du kan da håndtere verktøyet
med begge hender. Dette er sikrere enn å holde emnet med en hånd.
13. Strekk deg ikke for langt!
Sørg for at du hele tiden står stødig og med god balanse.
14. Hold verktøyet i god stand!
Se etter at eggen er hvass for optimal effekt og sikkert resultat. Følg
manualens anbefalinger for smøring og bytte av tilbehør. Kontrollér
nettkabelen regelmessig, om den er skadet skal den byttes av en kyndig
person. Dette gjelder også ved bruk av skjøteledninger. Maskinens håndtak,
strømbryter m.m. skal være rene, tørre og fri for olje, fett etc.
15. Slå av strømmen!
Trekk ut støpselet og trykk inn nødstopp innen service utføres eller ved bytte
av tilbehør som høvelstål, bor, slipebånd, blad etc.
16. Ta bort alle nøkler og serviceverktøy!
Gjør det til en vane å kontrollere at alle nøkler og serviceverktøy er fjernet fra
maskinen før du slår på strømmen.
17. Unngå utilsiktet start!
Bær ikke verktøyet med ngeren på strømbryteren/avtrekkeren om nettkabelen
sitter i et uttak. Påse at bryteren står i OFF når støpselet settes i.
18. Bruk egnet skjøteledning!
Om du benytter skjøteledning utendørs, bruk kun ledning som er beregnet for
dette formål samt påse at de har riktig trådareal. Rull ut hele ledningen!
19. Bruk sunn fornuft og vær varsom!
Tenk etter, innen du utfører et arbeidsmoment, at dette kan utføres på en
sikker måte! Bruk ikke maskinen/verktøyet når du er trett, påvirket av medisin
etc.
20. Kontroller at alle deler er uskadet!
Før du starter verktøyet, kontroller at all beskyttelse og øvrige deler er uskadet
og oppfyller sin funksjon, at alle deler kan rotere fritt og er riktig justert, at ingen
bevegelige deler kan sette seg fast, at ingen defekt har oppstått og øvrige omstendigheter som kan påvirke arbeidets utførelse.
Et vern eller annen del som er skadet skal fagmessig repareres eller skiftes ut.
Skadde kabler og strømbrytere skal alltid byttes av en fagmann.
Bruk aldri verktøyet dersom du ikke kan stenge av eller starte det på en
betryggende måte.
Page 25

NORSK
!
!
21.Bruk anbefalt tilbehør!
Bruk av ikke anbefalt tilbehør kan volde ulykke eller risiko for personskade.
22.Repareres kun av kyndig tekniker!
Verktøyet overensstemmer med gjeldende sikkerhetskrav. Reparasjoner skal
alltid utføres av fagmann, med originale reservedeler, ellers kan verktøyet
volde skade eller risiko for personskade.
23. Elektroverktøy bør tilsluttes strømnettet via jordfeilbryter! Produktet
må ikke endres eller benyttes til arbeidsmoment det ikke er beregnet
for! Kontroller regelmessig at alle skruer, muttere etc. er tilstrekkelig
tilskrudd!
Produktmerking med sikkerhetssymboler på maskinen
• Les hele bruksanvisningen før du begynner å bruke maskinen.
Bruk alltid vernesko.
•
Bruk alltid arbeidshansker.
•
Kappeskiver med slits eller tenner må ikke brukes.
•
Bruk alltid vernebriller/visir.
•
•
•
•
•
Bruk alltid hørselsvern.
Maskinens faste og bevegelige beskyttelsesutstyr må være montert ved bruk.
Advarsel! Høy spenning.
Kontroller vannivået.
Page 26

NORSK
NORSK
Allment
• Les hele bruksanvisningen grundig og ta vare på den til senere bruk.
• Produktet må ikke endres eller brukes til arbeidsoppgaver den ikke er
beregnet for!
• Kontroller regelmessig at alle skruer og muttere er ordentlig skrudd til.
• Kontroller at motorens angitte driftsspenning er lik vegguttakets spenning.
• Skadet strømledning og strømbryter skal alltid byttes av fagmann. Bruk aldri
verktøyet hvis du ikke kan skru av eller starte det på en betryggende måte.
• Maskinen er kun beregnet for å kappe mur, stein, is, heller etc.
Spesielle sikkerhetsregler
Før maskinen startes
• Kontroller at strømbryteren står på ”0”, før kontakten kobles til et strømuttak.
Maskinen må kun kobles til et jordet uttak.
• Kontroller at kappeskiven er sentrert og at den ikke er skadet før bruk.
• Bruk bare kappeskiver, som har riktig diameter og er godkjent for maskinens
spindelturtall.
• Trekk ikke til spindelmutteren for hardt.
• Beskytt kappeskiver mot fukt og støt.
• Kontroller at slipeskiven kan rotere fritt, før du starter maskinen.
• Trekk alltid ut støpselet fra uttaket, før service og justering av maskinen.
Under arbeid med maskinen
• Bruk aldri maskinen uten at beskyttelsene er montert.
• Stå ikke rett foran kappeskiven når du starter maskinen.
• Trekk ut støpselet, når du forlater maskinen uten tilsyn.
• Stå stødig og hold i maskinen med begge hendene.
• Kappeskiven må ikke belastes sidelengs.
• Hold oppsikt med strømledningen når du bruker maskinen, så den ikke
kommer i kontakt med bevegelige deler.
• Hold ikke små iser med bare hendene ved kapping, bruk påskyver.
Skru av maskinen umiddelbart når…
• Maskinen begynner å opptre merkelig som f.eks. gnister, røyk, vibrasjoner eller
unormal lyd.
• Maskinens strømbryter eller strømkabel er skadet.
Page 27

Forpakningen inneholder
NORSK
9
8
1
1. Klingebeskyttelse
2. Parallellanslag med festedetaljer (2 vognbolter, 2 brikker og 2 ratt)
3. Diamantkappeklinge
4. 45˚ kappestøtte
5. Kombinøkler til klingemutteren og spindelen
6. Vannbeholder
7. Strømbryter (Nullspenningsbryter)
8. Ratt for justering av bord
9. Justerbart bord (festedetaljer 2 låseratt og 2 brikker)
Page 28

NORSK
NORSK
Montering
Viktig: Trekk ut støpselet før monteringen.
1. Fjern vanntanken, skru deretter
bort de to skruene, som holder
den nedre klingebeskyttelsen og
fjern det.
2. Skru av klingemutteren og den
ytre ensbrikken fra spindelen,
bruk kombinøklene (la den
indre ensbrikken sitte igjen på
spindelen).
3. Snu diamantkappeklingen så den roterer i samme retning som pilen på den
nedre beskyttelsen.
4. Monter først diamantkappeklingen
på spindelen, og deretter den tre
ensbrikken og klingemutteren. Dra
til med kombinøklene (indre og ytre
ensbrikke er forskjellige!).
5. Skru tilbake den nedre
klingebeskyttelsen og monter
vannbeholderen.
6. Løsne de to stjerneskruene på
bordet bak klingen. Trykk inn den
øvre klingebeskyttelsens feste
mellom bordet og det gjengede
låsblekket. Rett inn beskyttelsen og
dra til skruene.
7. Monter parallellanslaget på bordet
med 2 vognbolter, 2 brikker og 2
ratt.
Testkjør vannsagen i ett minutt uten å kappe noe. Kontroller at diamantslipeskiven
roterer i samme retning som pilen på den øvre klingebeskyttelsen og at den ikke
”kaster”!
8
Page 29

NORSK
Bruk
1. Fyll i vann i vannbeholderen opp til nivåmerkingen ”max level” på den underste
klingebeskyttelsen.
2. Juster den øvre bevegelige klingebeskyttelsen, så isene akkurat får plass
mellom beskyttelsen og bordet.
3. Tenk over hvordan arbeidet skal utføres: Still inn parallellanslaget, vinkle bordet
etc. (parallellanslaget kan monteres på begge sider av diamantkappeklingen.)
Mål med en linjal eller målebånd. Bordets merking er bare for grovinnstilling!
4. Tilslutt støpselet til et strømuttak. Start motoren ved å trykke inn ”1” på
strømbryteren.
5. Før isene med en forsiktig og jevn bevegelse mot diamantslipeskiven. Bruk
parallellanslaget som støtte ved behov. Still inn parallellanslaget på samme
strek på skalaen på begge sider.
6. Steng av motoren ved å trykke inn ”0” på strømbryteren når kappingen er ferdig.
Diagonal kapping
1. Fyll i vann i vannbeholderen opp til nivåmerkingen ”max level” på den underste
klingebeskyttelsen.
2. Juster den øvre bevegelige klingebeskyttelsen, så isene akkurat får plass
mellom beskyttelsen og bordet.
3. Tenk over hvordan arbeidet skal utføres: Still inn parallellanslaget, vinkle bordet
etc. (parallellanslaget kan monteres på begge sider av diamantkappeklingen.)
Mål med en linjal eller målebånd. Bordets merking er bare for grovinnstilling!
4. Plasser isenes ene hjørne i den vedlagte 45˚ kappestøtten og kappestøtten
mot parallellanslaget. Bruk parallellanslaget som støtte. Still inn parallellanslaget
på samme strek på skalaen på begge sider.
5. Tilslutt støpselet til et strømuttak.
Start motoren ved å trykke inn
”1” på strømbryteren.
6. Før isene med en forsiktig og
jevn bevegelse mot diamantslipeskiven. Steng av motoren
ved å trykke inn ”0” på strømbryteren, når kappingen er ferdig.
9
Page 30

NORSK
NORSK
Kapping med vinklet bord
1. Fyll i vann i vannbeholderen opp til
nivåmerkingen ”max level” på den
underste klingebeskyttelsen.
2. Løsne de to låserattene som fester
det justerbare bordet. Still inn ønsket
helling (0˚-45˚). Dra til låserattene.
3. Juster den øvre bevegelige
klingebeskyttelsen, så isene akkurat
får plass mellom beskyttelsen og
bordet.
4. Tenk over hvordan arbeidet skal utføres: Still inn parallellanslaget,
vinkle bordet etc. (parallellanslaget kan monteres på begge sider av
diamantkappeklingen.) Mål med en linjal eller målebånd. Bordets merking er
bare for grovinnstilling!
5. Tilslutt støpselet til et strømuttak. Start motoren ved å trykke inn ”1” på
strømbryteren.
6. Før isene med en forsiktig og jevn bevegelse mot diamantslipeskiven. Steng
av motoren ved å trykke inn ”0” på strømbryteren, når kappingen er ferdig.
Bytte av diamantkappeskive
1. Fjern vantanken. Skru deretter bort de to skruene som holder den nedre
klingebeskyttelsen og fjern det så du kommer til klingen.
2. Skru klingemutteren og den ytre ensbrikken av fra spindelen. Bruk
kombinøklene (La den indre ensbrikken en sitte igjen på spindelen).
3. Monter en ny diamantkappeklinge (Ø 180 mm x 2,0 mm, senterhull Ø22,2 mm,
uten tenner eller slits).
4. Snu diamantkappeklingen så den roterer i samme retning som pilen på den
nedre beskyttelsen.
5. Monter først diamantkappeklingen
på spindelen og deretter den tre
ensbrikken og klingemutteren.
Dra til med kombinøklene(indre
og ytre ensbrikke er forskjellige!).
6. Skru tilbake den nedre
klingebeskyttelsen og monter
vannbeholderen.
0
Page 31

NORSK
Feilsøking
Motoren har termisk motorvern som løser ut når motoren blir for varm. Skjer dette:
La motoren avkjøles i 5 minutter og start på ny.
Avfallshåndtering
Når du skal kvitte deg med produktet, skal dette skje i henhold til
lokale forskrifter. Er du usikker på hvordan du går fram, ta kontakt
med lokale myndigheter.
Tekniske data
Spenning: 230 VAC, 50 Hz
Effekt: 600W
Intermittent drift: S3, 40 %
Kapslingsklasse: IP44
Turtall, ubelastet: 2990 o/min
Kappeskive: Ø 180 mm x 2,0 mm, senterhull Ø 22,2 mm
Maks. skjæredybde: 34 mm
Kjøling av klinge: Vann
Lydtrykk: < 70 dBA
Vekt: 11 kg
Størrelse: 395 x 385 x 240 mm (l x b x h)
1
Page 32

SUOMI
SUOMI
Laattaleikkuri ja timanttiterä
Tuotenumer0: 30-9375/18-3050, malli: TC-RM-180E/ TC-RM-180E-UK
Lue käyttöohjeet ennen tuotteen käyttöönottoa. Säilytä käyttöohjeet tulevaa tarvetta varten. Pidätämme oikeuden teknisten tietojen muutoksiin. Emme vastaa
mahdollisista teksti- tai kuvavirheistä. Jos laitteeseen tulee teknisiä ongelmia, ota
yhteys myymälään tai asiakaspalveluun (yhteystiedot käyttöohjeen lopussa).
Sisällysluettelo
Turvallisuusohjeita .............................. 33
Pakkauksen sisältö ............................. 37
Asennus ..............................................38
Käyttö .................................................39
Vianetsintä .......................................... 41
Tekniset tiedot .................................... 41
Page 33

SUOMI
Turvallisuusohjeita
Yleisiä turvallisuusohjeita
Varoitus! Lue kaikki ohjeet. Seuraavien ohjeiden noudattamatta jättäminen
saattaa johtaa sähköiskuun, tulipaloon ja/tai vakavaan onnettomuuteen.
1. Pidä työtilat siisteinä.
Täynnä tavaraa olevat työtasot ovat avoin kutsu onnettomuudelle.
2. Älä käytä konetta vaarallisessa ympäristössä.
Sähkökäyttöisiä koneita ei saa käyttää kosteissa ja märissä tiloissa eikä
sateella. Huolehdi työpisteen riittävästä valaistuksesta. Huolehdi myös pölynpoistosta. Älä käytä sähkökäyttöisiä työkaluja paikoissa, joissa on tulipalon
tai räjähdyksen vaara!
3. Vältä sähköiskuja!
Vältä kontaktia maadoitettuihin esineisiin, kuten vesijohtoihin, lämpöpattereihin, lieteen ym. työskennellessäsi sähkötyökalulla.
4. Pidä lapset ja vierailijat loitolla.
Heidän tulee olla riittävän kaukana työpisteestä.
5. Säilytä laite poissa lasten ulottuvilta!
6. Älä pakota konetta.
Anna koneen työskennellä puolestasi oikealla nopeudella.
7. Käytä oikeita työkaluja.
Älä pakota konetta tai lisälaitetta työtehtävään, johon laite ei sovellu.
ytä sopivia vaatteita.
8. Kä
Älä käytä löysiä vaatteita, käsineitä, kaulaketjuja, sormuksia, rannerengasta
tai muita koruja, jotka voivat tarttua liikkuviin osiin. Liukuestekengät lisäävät
turvallisuutta. Pitkät hiukset tulee suojata hiusverkolla tai vastaavalla.
9. Käytä aina suojalaseja.
Käytä aina suojalaseja, tavalliset silmälasit eivät anna riittävää suojaa! Käytä
myös hengityssuojainta ja suojanaamaria, jos pölyä on paljon.
10. Käytä pölynpoistoa.
Käytä pölynpoistoa pölyn ja lastujen imemiseen, mikäli laitteessa on tämä
toiminto. Käytä välineitä oikealla tavalla ja tyhjennä ne säännöllisesti.
11. Käsittele sähköjohtoa varoen!
Älä kanna konetta johdosta. Kun irrotat pistokkeen, vedä pistokkeesta, älä
johdosta. Johtoa ei saa altistaa kuumuudelle, öljylle tai teräville esineille.
Page 34

SUOMI
SUOMI
12. Kiinnitä materiaali kunnolla.
Käytä esim. ruuvipuristinta, mikäli mahdollista. Näin kätesi jäävät vapaaksi,
ja voit työskennellä molemmin käsin. Tämä on turvallisempaa kuin työkappaleesta kiinni pitäminen.
13. Älä
14. Pidä työvälineet kunnossa.
15. Katkaise virta.
16. Poista kaikki avaimet ja työkalut.
17. Vältä tahatonta käynnistystä.
18. Käytä oikeita jatkojohtoja.
kurota liian kauas.
Varmista, että työasentosi on tasapainoinen työn jokaisessa vaiheessa.
Varmista työvälineiden puhtaus ja terien terävyys. Näin työskentely on turvallisempaa ja tehokkaampaa ja lopputulos parempi. Noudata voiteluohjeita
ja varusteiden vaihtamisesta annettuja ohjeita. Tarkista virtajohto säännöllisesti. Anna sähkömiehen vaihtaa vioittunut virtajohto. Tarkista johdot säännöllisesti ja varmista että ne ovat kunnossa. Varmista, että työkalun kahvat,
säätimet ym. ovat puhtaita, ja että niissä ei ole öljyä ym.
Irrota pistoke ja paina hätäkatkaisinta ennen huoltoa ja laitteiden vaihtoa,
esim. höylän terät, poranterät, hiomanauhat ja terät.
Ota tavaksesi poistaa ne koneesta ennen virran kytkemistä.
Konetta kannettaessa sormi ei saa olla virtakytkimellä/liipaisimella johdon
ollessa seinässä. Kun pistoke liitetään pistorasiaan, tulee virtakytkimen olla
OFF-asennossa.
Käytä ulkona ainoastaan ulkokäyttöön tarkoitettuja jatkojohtoja. Jatkojohdon
johtimen pinta-alan tulee olla riittävä. Kierrä koko johto auki.
19. Käytä tervettä järkeä ja ole varovainen.
Suunnittele työvaiheet etukäteen, niin työ sujuu turvallisemmin! Älä käytä
laitetta väsyneenä, lääkkeiden vaikutuksen alaisena jne.
20. Varmista, että osat ovat kunnossa!
Varmista ennen koneen käynnistämistä, että kaikki suojat ja muut osat ovat
kunnossa ja toimivat moitteettomasti. Huolehdi siitä, että liikkuvat osat
liikkuvat vapaasti ja että ne on suunnattu oikein, eivätkä jää kiinni. Tarkista
myös, ettei koneessa ole muita vikoja tai työskentelyyn vaikuttavia seikkoja.
Ainoastaan ammattilainen saa vaihtaa tai korjata vioittuneet suojat ja muut
osat. johdot ja virtakytkimet. Älä käytä työkalua, mikäli et voi käynnistää ja
sammuttaa sitä turvallisesti.
Page 35

SUOMI
!
!
21. Käytä suositeltuja lisälaitteita.
Muiden kuin suositeltujen lisälaitteiden käyttö saattaa johtaa onnettomuuksiin tai henkilövahinkoihin.
22. Korjauksen saa suorittaa ainoastaan ammattihenkilö.
Laite on voimassa olevien turvallisuusvaatimusten mukainen. Laitteen saa
korjata vain ammattilainen. Korjauksessa tulee turvallisuussyistä käyttää
ainoastaan alkuperäisosia.
23. Sähkötyökalut tulee turvallisuussyistä liittää vikavirtasuojakytkimen
kautta. Tuotteeseen ei saa tehdä muutoksia, eikä sitä saa käyttää muihin, kuin sille tarkoitettuihin työtehtäviin. Varmista säännöllisesti, että
ruuvit ja mutterit ovat kireällä.
Tuotteen merkinnät ja turvallisuussymbolit
• Lue koko käyttöohje huolellisesti ennen laitteen käyttöä.
Käytä aina turvakenkiä.
•
•
•
•
•
•
•
•
Käytä aina suojakäsineitä.
Katkaisulaikkoja, joissa on lovet tai hampaat ei saa käyttää.
Käytä aina visiiriä tai suojalaseja.
Käytä aina kuulosuojaimia.
Koneen kiinteät ja liikkuvat suojalaitteet tulee olla asennettuina käytön aikana.
Varoitus! Korkea jännite.
Tarkasta veden taso.
Page 36

SUOMI
SUOMI
Yleistä
• Lue käyttöohjeet ennen tuotteen käyttöönottoa ja säilytä ohjeet tulevaa tarvetta
varten.
• Tuotteeseen ei saa tehdä muutoksia, eikä sitä saa käyttää muihin, kuin sille
tarkoitettuihin työtehtäviin.
• Varmista säännöllisesti, että ruuvit ja mutterit ovat kireällä.
• Varmista, että moottorin jännite vastaa pistorasian jännitettä.
• Vain ammattilainen saa vaihtaa vioittuneet johdot ja virtakytkimet. Älä käytä
työkalua, mikäli et voi käynnistää ja sammuttaa sitä turvallisesti.
• Laite soveltuu ainoastaan tiilen, kiven, kaakelin, klinkkerin tms. leikkaamiseen.
Laattaleikkuria koskevia turvallisuusohjeita
Ennen koneen käynnistämistä
• Varmista, että virtakytkin on asennossa ”0”, ennen kuin liität pistokkeen
pistorasiaan. Laite tulee liittää maadoitettuun pistorasiaan.
• Varmista, ennen käyttöä että katkaisulaikka on oikein keskitetty ja
vahingoittumaton.
• Käytä ainoastaan katkaisulaikkoja joiden halkaisija on oikea ja jotka ovat
hyväksytty laitteen kierrosluvuille.
• Älä kiristä karan mutteria liikaa.
• Älä altista katkaisulaikkoja kosteudelle tai iskuille.
• Varmista ennen käynnistämistä, että hiomalaikka pääsee pyörimään vapaasti.
• Poista pistoke pistorasiasta ennen koneen huoltoa ja säätöä.
Työskentely koneen kanssa
• Älä käytä laitetta mikäli suojia ei ole asennettu.
• Älä seiso suoraan katkaisulaikan edessä kun käynnistät laitteen.
• Irrota pistoke mikäli jätät laitteen ilman valvontaa.
• Seiso tukevasti ja pidä kiinni laitteesta molemmin käsin.
• Katkaisulaikkaa ei saa kuormittaa sivusuunnassa!
• Huolehdi käytön aikana, että laitteen virtajohto ei joudu kosketuksiin liikkuvien
osien kanssa.
• Älä pidä kiinni pienistä kaakeleista paljain käsin leikkauksen aikana, käytä
syöttökapulaa.
Sammuta kone välittömästi, mikäli
• Laite käyttäytyy omituisesti, esim. kipinöi, savuaa, tärisee tai kuulostaa
epätavalliselta.
• laitteen virtakytkin tai virtajohto on vioittunut.
Page 37

Pakkauksen sisältö
SUOMI
9
8
1
1. Teräsuoja
2. Halkaisuohjain ja kiinnitysosat (2 lukkopulttia, 2 aluslaattaa ja 2 nuppia)
3. Timanttikatkaisulaikka
4. 45°:n katkaisutuki
5. Terämutterin ja karan yhdistelmäavaimet
6. Vesisäiliö
7. Virtakytkin (nollakatkaisin)
8. Pöydän säätönuppi
9. Säädettävä pöytä (kiinnitysosa 2 lukkonuppia ja 2 aluslaattaa)
Page 38

SUOMI
SUOMI
Asennus
Tärkeää: Irrota pistoke ennen asentamista.
1. Irrota vesisäiliö, avaa alempaa
teräsuojaa kiinni pitävät 2 ruuvia
ja irrota suoja.
2. Ruuvaa auki terämutteri ja
karan ulompi laippa-aluslevy
yhdistelmäavaimilla. Jätä sisempi
laippa-aluslevy karaan.
3. Käännä timanttikatkaisulaikka siten, että se pyörii samaan suuntaan kuin
alemmassa suojassa oleva nuoli.
4. Asenna ensin timanttikatkai
sulaikka karaan ja sen jälkeen
ulompi laippa-aluslevy ja terämutteri. Kiristä yhdistelmäavaimella
(sisempi ja ulompi laippa-aluslevy
ovat erilaisia!).
5. Ruuvaa alempi teräsuoja takai
sin paikoilleen ja asenna vesisäiliö.
6. Irrota terän takana pöydässä
olevat kaksi ristipääruuvia, paina ylemmän teräsuojan kiinnike
pöydän ja kierteisen lukkolevyn
väliin. Suuntaa suoja ja kiristä
ruuvit.
7. Asenna halkaisuohjain pöytään
2 lukkopultilla, 2 aluslaatalla ja 2
nupilla.
-
-
Kokeile laattaleikkuria minuutin ajan leikkaamatta mitään. Varmista, että timanttikatkaisulaikka pyörii samaan suuntaan kuin ylemmässä teräsuojassa oleva nuoli
ja että se ei ”potki”!
8
Page 39

SUOMI
Käyttö
1. Täytä vettä säiliön ”max level”-merkintään asti (alemmassa teräsuojassa).
2. Säädä ylempi liikkuva teräsuoja siten, että kaakeli sopii täsmälleen suoja ja
pöydän väliin.
3. Mieti kuinka aiot suorittaa työn: Säädä
(Halkaisuohjain voidaan asentaa timanttikatkaisulaikan kummallekin puolelle).
Mittaa viivaimella tai mittanauhalla; pöydän merkinnät ovat vain suuntaaantavia!
4. Liitä pistoke pistorasiaan, käynnistä moottori painamalla virtakytkintä ”1”.
5. Liikuta kaakelia tasaisesti ja rauhallisesti kohti timanttikatkaisulaikkaa. Käytä
tarvittaessa halkaisuohjainta tukena. Säädä halkaisuohjain samaan asteikon
kohtaan kummallakin puolella.
6. Sammuta moottori painamalla virtakytkimestä ”0”, kun katkaisu on valmis.
Viistoleikkaus
1. Täytä vettä säiliön ”max level”-merkintään asti (alemmassa teräsuojassa).
2. Säädä ylempi liikkuva teräsuoja siten, että kaakeli sopii täsmälleen suoja ja
pöydän väliin.
3. Mieti kuinka aiot suorittaa työn: Säädä
(Halkaisuohjain voidaan asentaa timanttikatkaisulaikan kummallekin puolelle).
Mittaa viivaimella tai mittanauhalla; pöydän merkinnät ovat vain suuntaaantavia!
4. Aseta kaakelin yksi kulma pakkauksessa olevaan 45°:n leikkaustukeen ja
leikkaustuki kohti halkaisuohjainta. Käytä halkaisuohjainta tukena. Säädä
halkaisuohjain samaan asteikon kohtaan kummallakin puolella.
5. Liitä pistoke pistorasiaan,
käynnistä moottori painamalla
virtakytkintä ”1”.
6. Liikuta kaakelia tasaisesti
ja rauhallisesti kohti
timanttikatkaisulaikkaa.
Sammuta moottori painamalla
virtakytkimestä ”0”, kun
katkaisu on valmis.
halkaisuohjain, käännä pöytää jne.
halkaisuohjain, käännä pöytää jne.
9
Page 40

SUOMI
SUOMI
Katkaisu pöydän ollessa kulmassa
1. Täytä vettä säiliön ”max level”merkintään asti (alemmassa
teräsuojassa).
2. Irrota 2 lukitusnuppia, jotka lukitsevat
säädettävän pöydän, säädä sopiva
kallistus (0° - 45°), kiristä lukitusnupit.
3. Säädä ylempi liikkuva teräsuoja siten,
että kaakeli sopii täsmälleen suoja ja
pöydän väliin.
4. Mieti kuinka aiot suorittaa työn: Säädä
asentaa timanttikatkaisulaikan kummallekin puolelle). Mittaa viivaimella tai
mittanauhalla; pöydän merkinnät ovat vain suuntaa-antavia!
5. Liitä pistoke pistorasiaan, käynnistä moottori painamalla virtakytkintä ”1”.
6. Liikuta kaakelia tasaisesti ja rauhallisesti kohti timanttikatkaisulaikkaa.
Sammuta moottori painamalla virtakytkimestä ”0”, kun katkaisu on valmis.
halkaisuohjain (halkaisuohjain voidaan
Timanttikatkaisulaikan vaihto
1. Irrota vesisäiliö, avaa alempaa teräsuojaa kiinni pitävät 2 ruuvia ja irrota suoja,
niin pääset käsiksi laikkaan.
2. Ruuvaa auki terämutteri ja karan ulompi laippa-aluslevy yhdistelmäavaimilla.
Jätä sisempi laippa-aluslevy karaan.
3. Asenna uusi timanttikatkaisulaikka (Ø 180 mm x 2,0 mm, keskireikä Ø 22,2
mm. Laikassa ei saa olla lovia eikä hampaita.)
4. Käännä timanttikatkaisulaikka siten, että se pyörii samaan suuntaan kuin
alemmassa suojassa oleva nuoli.
5. Asenna ensin timanttikatkaisulaikka
karaan ja sen jälkeen ulompi laippaaluslevy ja terämutteri. Kiristä
yhdistelmäavaimella (sisempi ja
ulompi laippa-aluslevy ovat erilaisia!).
6. Ruuvaa alempi teräsuoja takaisin
paikoilleen ja asenna vesisäiliö.
0
Page 41

SUOMI
Vianetsintä
Moottorissa on terminen moottorisuoja, joka laukeaa moottorin ylikuumentuessa.
Mikäli näin tapahtuu: Anna moottorin jäähtyä 5 minuutin ajan ja käynnistä se uudelleen.
Kierrätys
Kierrätä tuote asianmukaisesti, kun poistat sen käytöstä.
Ota yhteys kuntasi jäteneuvontaan, mikäli olet epävarma.
Tekniset tiedot
Nimellisjännite: 230 VAC, 50 Hz
Teho: 600 W
Ajoittainen käyttö: S3/40 %
Kotelointiluokka: IP 44
Kuormittamaton kierrosluku: 2990 k/min
Katkaisulaikka: Ø 180 mm x 2,0 mm, keskireikä Ø 22,2 mm
Suurin leikkaussyvyys: 34 mm
Terän jäähdytys: Vesi
Äänenpaine: < 70 dBA
Paino: 11 kg
Mitat: 395 x 385 x 240 mm (PxLxK)
1
Page 42

Declaration of Conformity
Hereby, Clas Ohlson AB, declares that the machinery:
Tile Cutter
CO/TECH 30-9375/18-3050
TC-RM-180E/ TC-RM-180E-UK
Complies with the provisions of the following Directives:
98/37/EC Machinery
2006/95/EC Low Voltage Equipment
89/336/EC EMC
Insjön, Sweden, November 2007
Klas Balkow
President
Clas Ohlson, 793 85 Insjön, Sweden
Page 43

Page 44

SVERIGE
KUNDTJÄNST
Tel: 0247/445 00
Fax: 0247/445 09
E-post: kundtjanst@clasohlson.se
ÖVRIGT
Tel vxl: 0247/444 00
Fax kontor: 0247/444 25
INTERNET
www.clasohlson.se
BREV
Clas Ohlson AB, 793 85 INSJÖN
NORGE
KUNDESENTER Tlf.: 23 21 40 00
Faks: 23 21 40 80
E-post: kundesenter@clasohlson.no
INTERNETT www.clasohlson.no
POST Clas Ohlson AS
Postboks 485 Sentrum, 0105 OSLO
SUOMI
ASIAKASPALVELU Puh: 020 111 2222
Faksi: 020 111 2221
Sähköposti: info@clasohlson.
INTERNET www.clasohlson.
OSOITE Clas Ohlson Oy, Yrjönkatu 23 A, 00100 HELSINKI
GREAT BRITAIN
For consumer contact, please visit
www.clasohlson.co.uk and click on
customer service.
INTERNET www.clasohlson.co.uk
 Loading...