

Page 1

Electric Mower
Elgräsklippare
Gressklipper
Sähköruohonleikkuri
Important!
Read the entire instruction manual carefully
and make sure that you fully understand
it before you use the equipment. Keep the
manual for future reference.
Viktig information:
Läs hela bruksanvisningen noggrant och
försäkra dig om att du har förstått den innan
du använder utrustningen. Spara manualen
för framtida bruk.
Viktig informasjon:
Les disse anvisningene nøye og forsikre deg
om at du forstår dem før du bruker enheten
og oppbevar dem for senere bruk.
Tärkeätä tietoa:
Lue nämä ohjeet huolellisesti ja varmista
että olet ymmärtänyt ne, ennen kuin alat
käyttää laitetta. Säilytä ohjeet myöhempää
tarvetta varten.
ENGLISH
SVENSK A
NORSKSUOMI
Art.no. Model
18-3117 LM-38E-UK
30-9945 LM-38E
Ver. 200802
Page 2

Page 3

Cotech 1300 W Electric Lawnmower
Art.no.: 18-3117 Model: LM-38E-UK
30-9945 LM-38E
Please read the entire instruction manual before using the product and save it for future reference. We reserve
the right for any errors in text or images and any necessary changes made to technical data. If you have any
questions regarding technical problems please contact our Customer Services (see address on reverse).
1. Safety
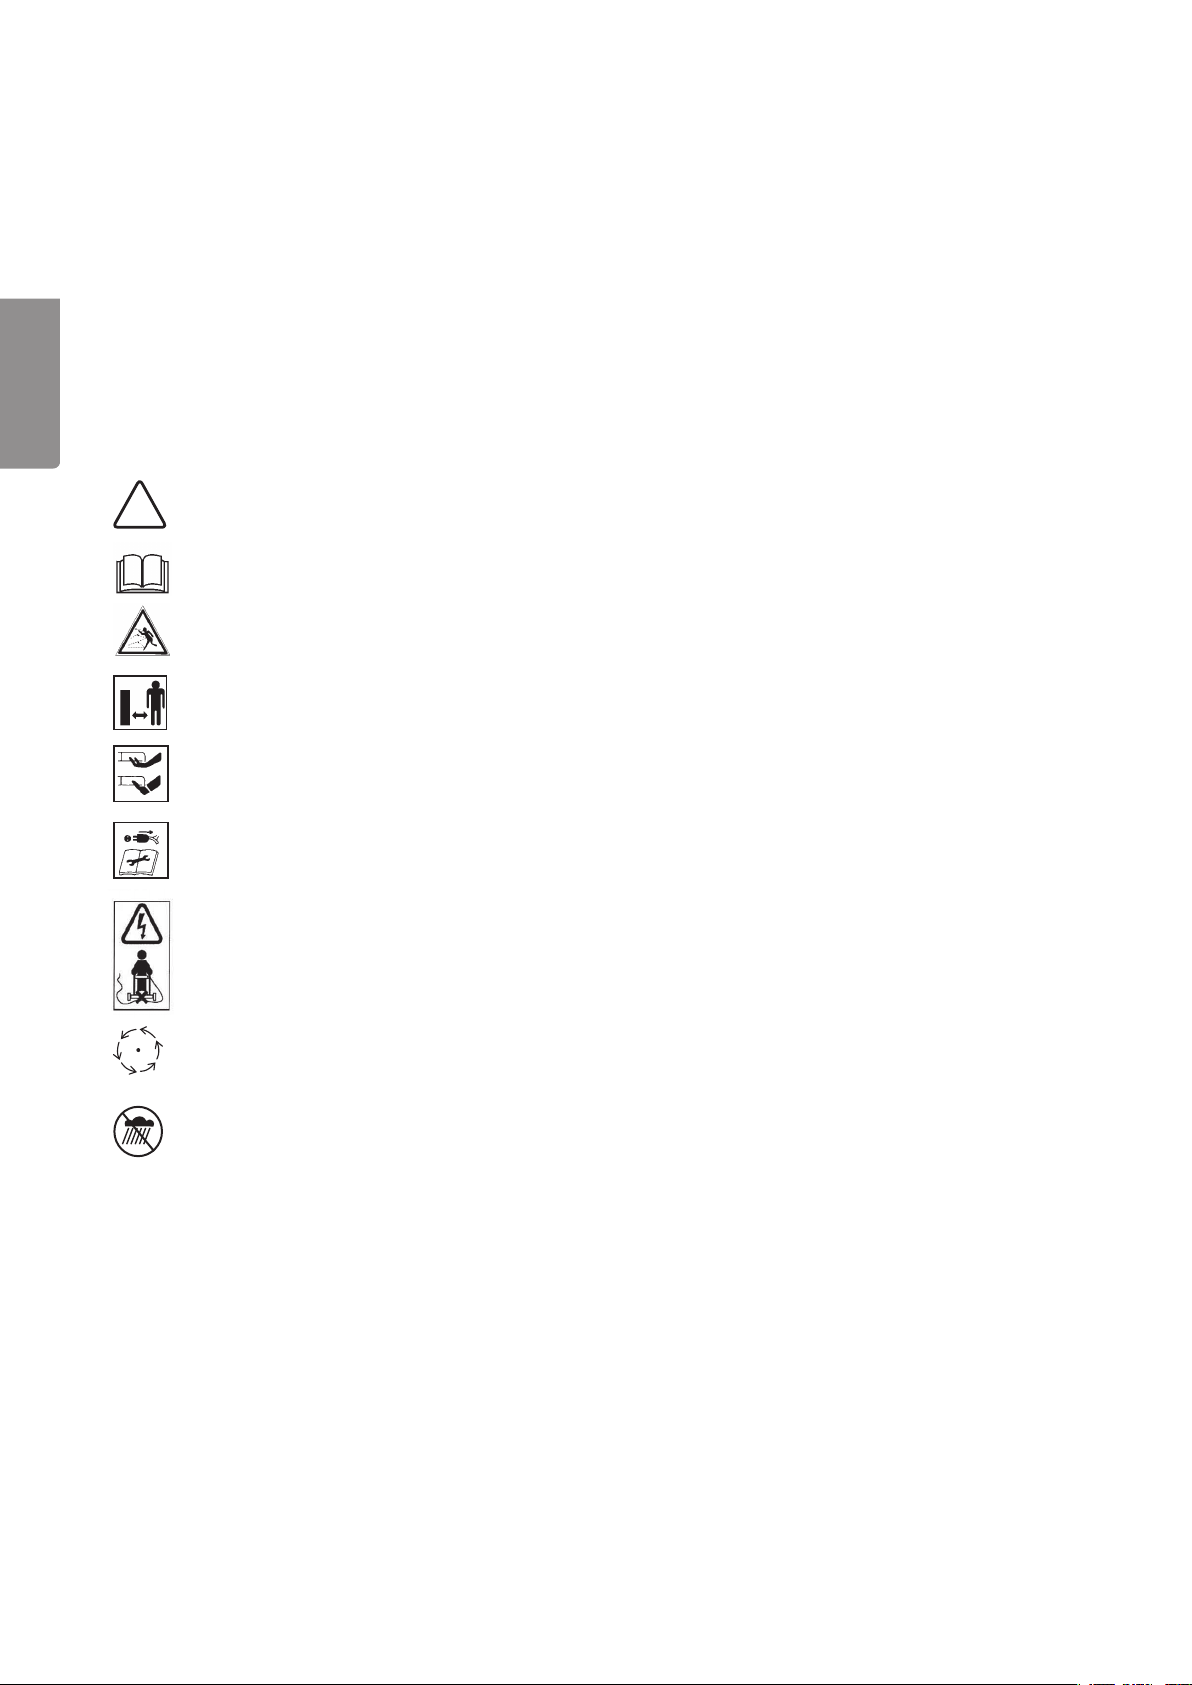
1.1 Product safety symbols
General warning.
!
Important safety instructions. Read the entire operating instructions before using product.
Watch out for ying objects that can cause personal injury to those in the vicinity.
Make sure that bystanders and animals are kept at a safe distance from the machine.
ENGLISH
Make sure to keep hands and feet away from the rotating blades. Risk for serious injury.
Turn off and disconnect the machine from the wall socket before adjusting, cleaning, xing the
electrical lead, or leaving the machine unattended if even for a moment. Keep the electrical
lead away from the rotating blades.
Keep the electrical lead away from the rotating blades. Make sure that the electrical lead is not
damaged before using. Only undamaged cables may be used.
Make sure that the rotating parts come to a complete stop before inspecting them. The rotating
STOP
Do not use the machine in rain or let it stay out in the rain.
blades continue to rotate for a while after the machine is turned off and can personal injury.
1.2 General safety instructions
• This mower is constructed to be used for domestic use on lawns. Because of the risk of physical injury
to the user or bystanders, the machine may not be used for other purposes than that it was designed for.
Read carefully through the instructions and inform yourself about all controls and functions and how to
•
correctly use the product.
• Never let children or others who do not have the adequate knowledge of these instructions use the
product. Local ordinances can have restrictions regarding the user’s age.
• Never use the machine in the vicinity of others, especially children and animals.
• Remember that it is the user who is always responsible for accidents occurring to others and
to property.
• Never use the product if you are under the inuence of alcohol or medicine. Do not use the product
if you are tired or sick.
3
Page 4

1.3 Before use
• Make sure that the area being cut is free from loose and foreign objects.
• Never use the mower without the proper clothing. Do not wear loose clothing which can get caught in
ENGLISH
the mower’s rotating parts. Use appropriate footwear.
• Make sure that the mower’s electrical lead is free from damage or cracks. Only use the mower if the
electrical lead is free from defects.
The mower’s electrical lead may only be changed by qualied service technicians.
•
• Make sure that the blade and blade nut are not worn or damaged.
• Make sure to regularly check the collector for damage or deformations.
• Make sure that the extension lead is not damaged or cracked. Use only leads that are undamaged.
• Only use extension leads approved for outdoor use with at least a 3 x1.5 mm² core area.
Do not exceed a maximum length of 25 m.
• Adjust the cutting height so that the motor struggles or is overloaded.
• Make sure the mains voltage is consistent with the product’s rated voltage.
• Under no circumstances may maintenance and service be performed when the motor is on
( if not otherwise instructed by the instruction manual).
1.4 Operation
• Make sure to keep hands and feet away from rotating parts. Avoid the discharge opening.
• Stop the motor immediately if you have struck a foreign object. Inspect the product carefully for any
possible damage. Do not use the product until any possible damage has been repaired.
• If the mower begins vibrating abnormally, turn off the motor immediately, disconnect the power lead and
investigate the cause. Vibrations are normally a sign of problems.
• The mower should only be connected to an outlet protected by a RCD which trips at max 30 mA.
• The mower should only be used with a power lead designed for outdoor use.
• Never run over the power lead with the mower.
• The power lead and its connections must be approved for outdoor use and free of defects. Check the
power cable regularly and change if necessary.
• Be careful not to trip over the power cable. Always be aware of the cable so that it does not get in the
way of your feet or anything else in the vicinity.
• Repairs done to the mower’s electrical parts may only be performed by a qualied service technician.
• The following instructions should be followed if the mower’s ex is damaged during use:
1. Turn off the mower.
2. Pull out the extension lead’s plug from the wall socket. Do not touch the extension lead before
the plug has been removed.
• Stop the motor and disconnect power if:
- Leaving the mower unattended.
- The rotating blades are blocked.
- Discharge port is blocked and must be cleared.
- Some foreign object has been mowed over.
- The mower begins to vibrate abnormally.
- Repairs or adjustments must be made.
- The mower needs to be carried between two areas.
4
Page 5
• Make sure that rotating parts have stopped completely before cleaning, repairs or inspection.
• Existing safety features may not be disconnected or made inoperative.
• Do not overload the mower by pushing it too fast in high or thick grass.
• Do not tilt the mower when starting, unless absolutely necessary. In such cases do not tilt the mower
more than necessary to start the motor and only tilt the section facing away from the user.
• Avoid cutting wet grass.
• Avoid cutting on steep hillocks.
• Make sure to have good footing on slopes.
• Walk, never run.
• Cut along the edge of slopes, never over them.
• Be extra careful when turning and changing directions on slopes.
1.5 Storage and maintenance
• Tighten all nuts and screws to ensure that the mower is in good working order.
• Never use water to wash off the mower. The electrical components can be damaged and present
a risk for electric shock.
• Before using make sure to check all your electrical equipment. If there is damage to insulation,
ttings or anything else the mower must not be used.
• Always use original parts. Non-original parts can present a risk for injury even if they t the mower.
• For extended storage, refer to the instruction manual for recommendations.
• Change damaged warning and instruction decals.
ENGLISH
2. Assembly
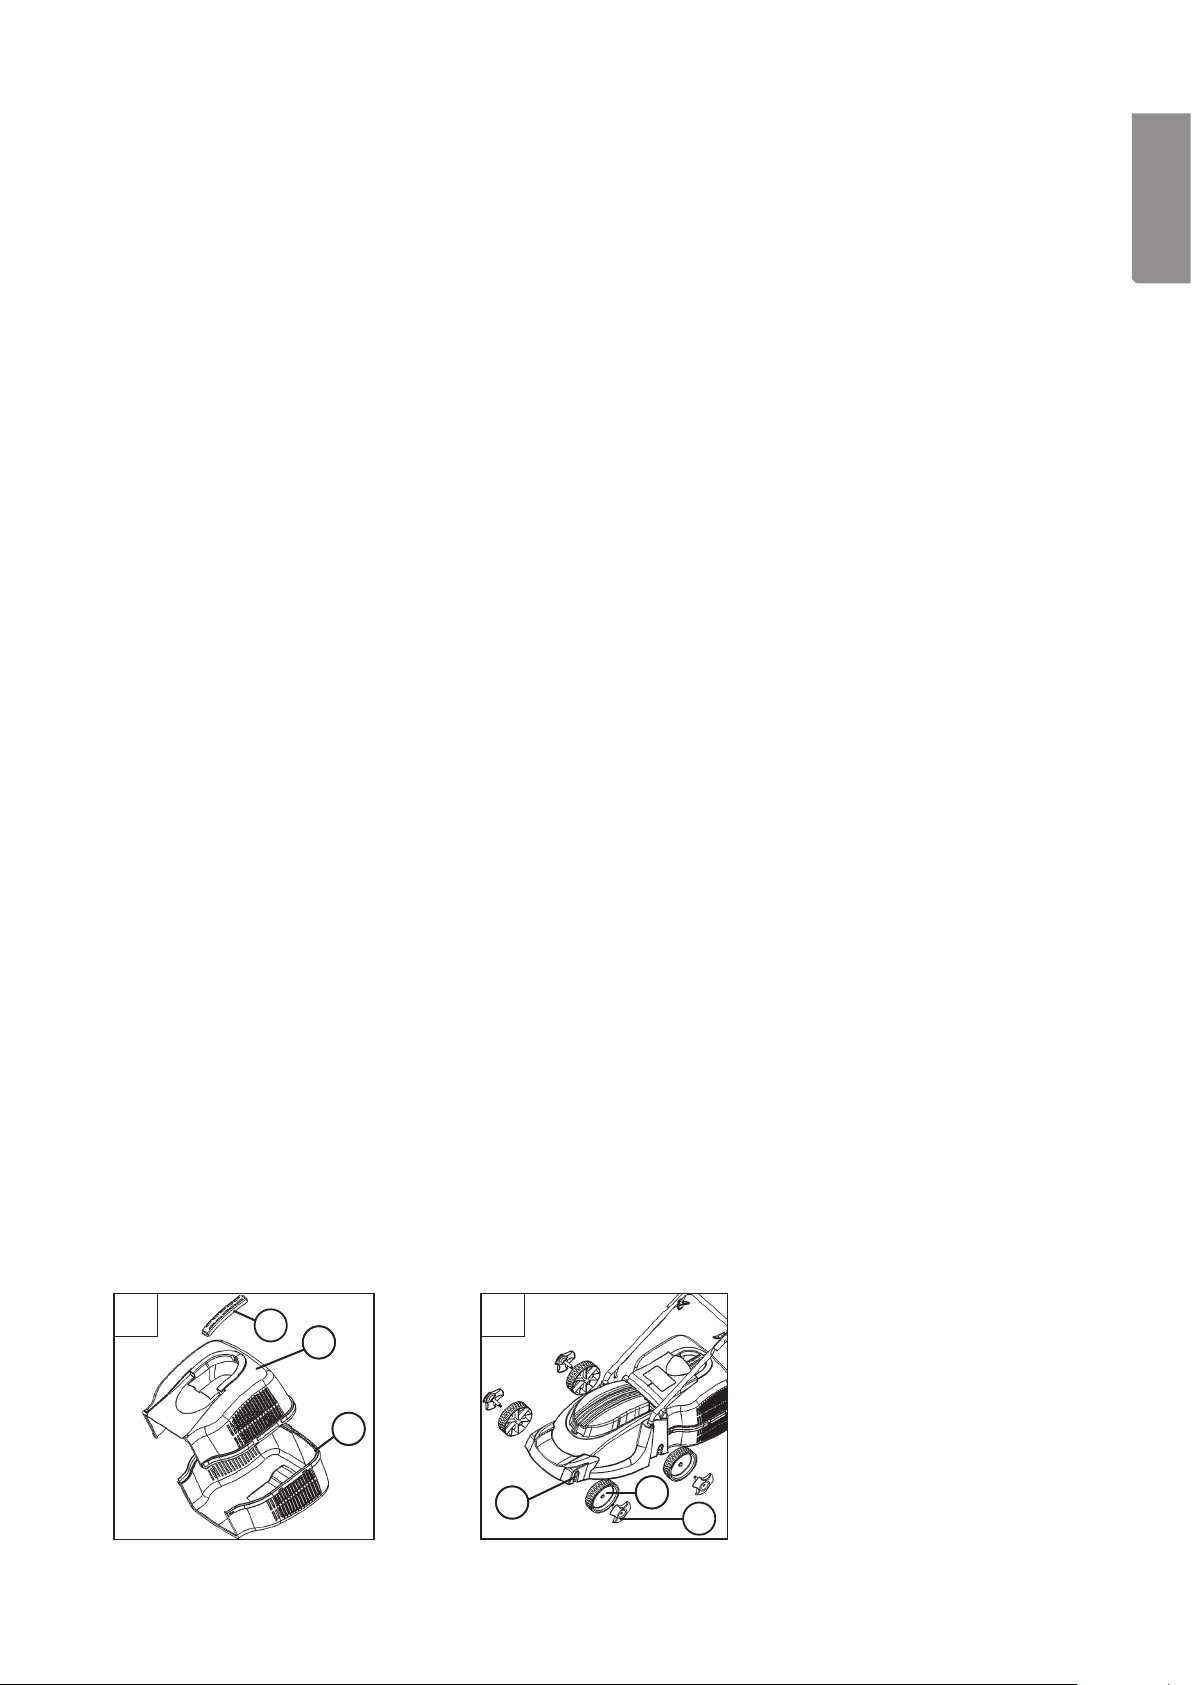
2.1 Assembling the collector (fig. A1)
1. Press the handle (1) securely into the slot on the collector’s upper section (2).
2. Place the upper section over the bottom section (3) in the direction of the arrow. Make sure that the
locking tabs are lined up to the holes.
3. Press the upper section against the bottom section until the locking tabs are in securely.
4. Make sure that all the collector’s parts are correctly assembled.
2.2 Mounting the wheels (fig. A2)
Mount the wheel (2) with the help of the threaded hub screw (1) to the wheel socket (3). Tighten the
hub screw by hand.
For adjusting the cutting height, refer to the “Adjusting the cutting height” section.
A1
1
102
103
A2
103
5
102
1
Page 6
A3 A5
A
ENGLISH
C
A4
1
102
103
B
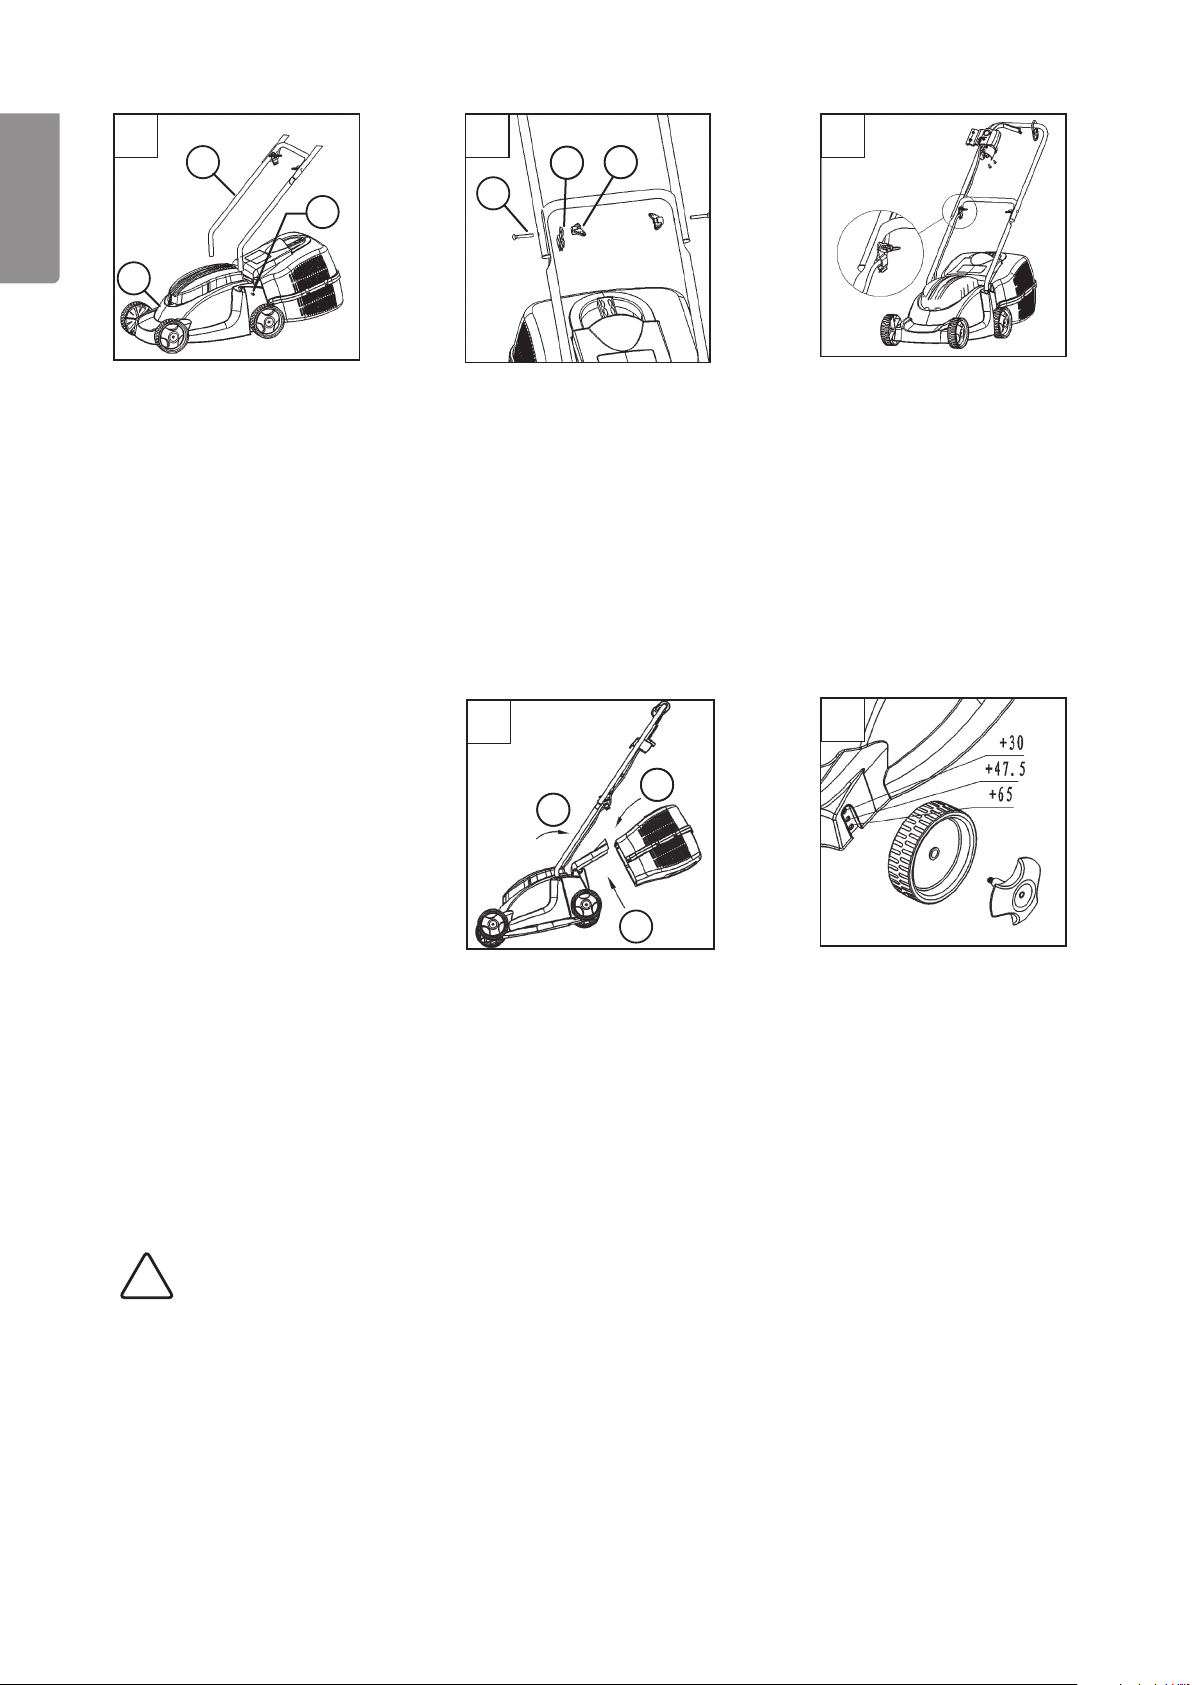
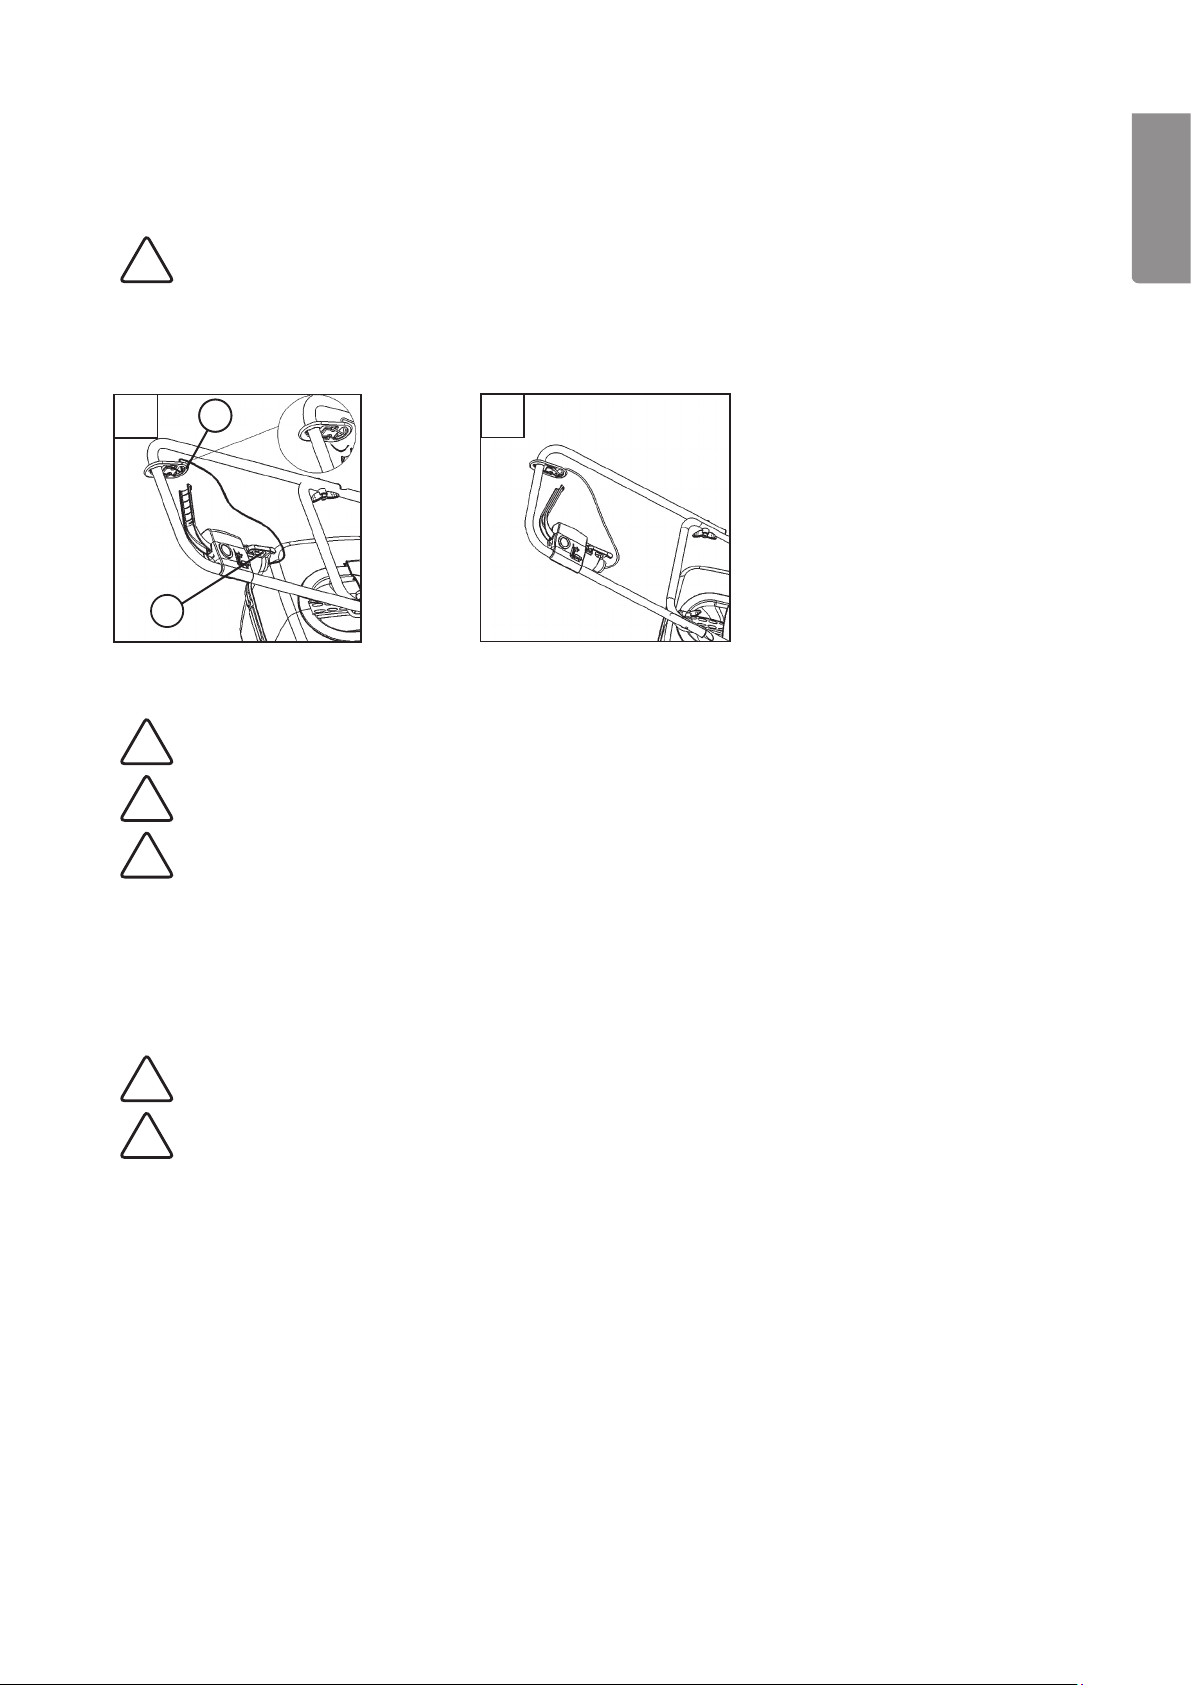
2.3 Mounting the handle and control
1. Insert the handle’s lower section (A) into the mower’s handle sockets according the gure. Secure the
handle with the two screws (C). See g. A3.
2. Fasten the handle`s upper section to the lower section with the bolts (1), cable holder (2) and wing nuts
(3). See g. A4.
3. Thread the cable through the cable holder. See g. A5.
4. Pry open the throttle’s bracket with a screwdriver or similar. Line up the two tabs to the two holes in the
handle (2) according to the gure. Pull back the bracket`s lower section and secure it with the screws (3).
5. Fasten the cable to the handle with the two clamps.
A6
A7
102
103
1
3. Setup
3.1 Using the collector (fig. A6)
• Attach the collector by rst opening and holding up the discharge cover (1). Mount the collector (2) to its
holder on the mower according to the gure.
• Remove the collector by lifting up the discharge cover and then lifting up the collector.
• The mower can even be used without the collector if the discharge cover is completely folded down.
3.2 Adjusting the cutting height (fig. A7)
Always turn off the mower and let the rotating blades stop completely before adjusting
!
the cutting height.
The cutting height can be adjusted to 3 levels:
I = 30 mm (short grass) II = 47.5 mm III = 65 mm (long grass)
• Adjust the cutting height by loosening the threaded hub screw (1). Re-mount the wheel in the wheel
socket appropriate for the cutting height.
N.B. All four wheels must be set for the same cutting height.
•
When cutting grass at the beginning of the season the mower should be set to the highest cutting height.
Afterwards the cutting height can be adjusted according to desire.
6
Page 7
4 Operation
4.1 General information
Never start the motor without rst reading all the steps in the “Assembly” section.
Never use the mower without reading and understanding the accompanying instruction
!
manual and all warning and instruction decals on the mower.
ENGLISH
A8
102
1
A9
4.2 Before using (fig. A8)
The power lead and its connections must be approved for outdoor use and free of defects. Check
!
the power cable regularly and change if necessary.
The mower should only be connected to an outlet protected by a RCD which trips at max 30 mA.
!
The power cable should always be hung on the cable holder. Otherwise undue strain can be
!
exerted on the mower`s socket which might damage it and make it dangerous.
1. Connect the mower to a 230 V outlet.
2. Hang the cable up on the cable holder (2) and connect it to the mower plug (1). See g. A8.
4.3 Starting and stopping the mower (fig. A9)
Start the mower only when your hands and feet are a safe distance from the rotating blades.
!
The blades continue to rotate a short while after turning off the motor. Always let the motor/
!
blades come to a complete stop before starting the motor again.
Start
Press and hold the safety lock (1) and then pull the throttle lever (2).
Stop
Release the
come to a complete stop before starting the motor again.
throttle lever (2) completely to stop the motor and blades. Always let the motor/blades
7
Page 8
4.4 Cutting the lawn
1. Adjust the cutting height according to the grass height. Start with a high cutting height and adjust
accordingly for the best results.
ENGLISH
2. Position the mower close to the power point being used and work away from the socket. Let the power
cable trail on the already cut areas.
3. Release the
!
throttle lever and disconnect the power cable once nished.
Never expose the motor to overload for lengthy periods. When the mower is heavily overloaded
(high grass, etc.) the motor becomes sluggish and will make a different noise. Immediately release the throttle lever, disconnect the power cable and adjust the cutting height to avoid damaging
the mower.
Lengthy heavy overloads can trip the overload protection. In such cases release the throttle lever
and disconnect the power cable. The overload protection is reset only when the throttle lever is
released. Clean the mower from possible obstructions and wait a few minutes before you connect the power cable and use the mower again. If the overload protection trips again, try raising
the cutting height to prevent the motor from being overloaded.
5. Maintenance
Always disconnect the power cable from the mower before starting maintenance or servicing.
!
• Clean the mower with a brush or cloth after each use.
• Never use water to wash off the mower. The electrical components can be damaged and present a risk
for electric shock.
• Tighten all nuts and screws to ensure that the mower is in good working order.
• Before using make sure to check all your electrical equipment. If there is damage to insulation, ttings or
anything else the mower must not be used.
• Always use original parts. Non-original parts can present a risk for injury even if the t the mower.
A10
1
2
4
3
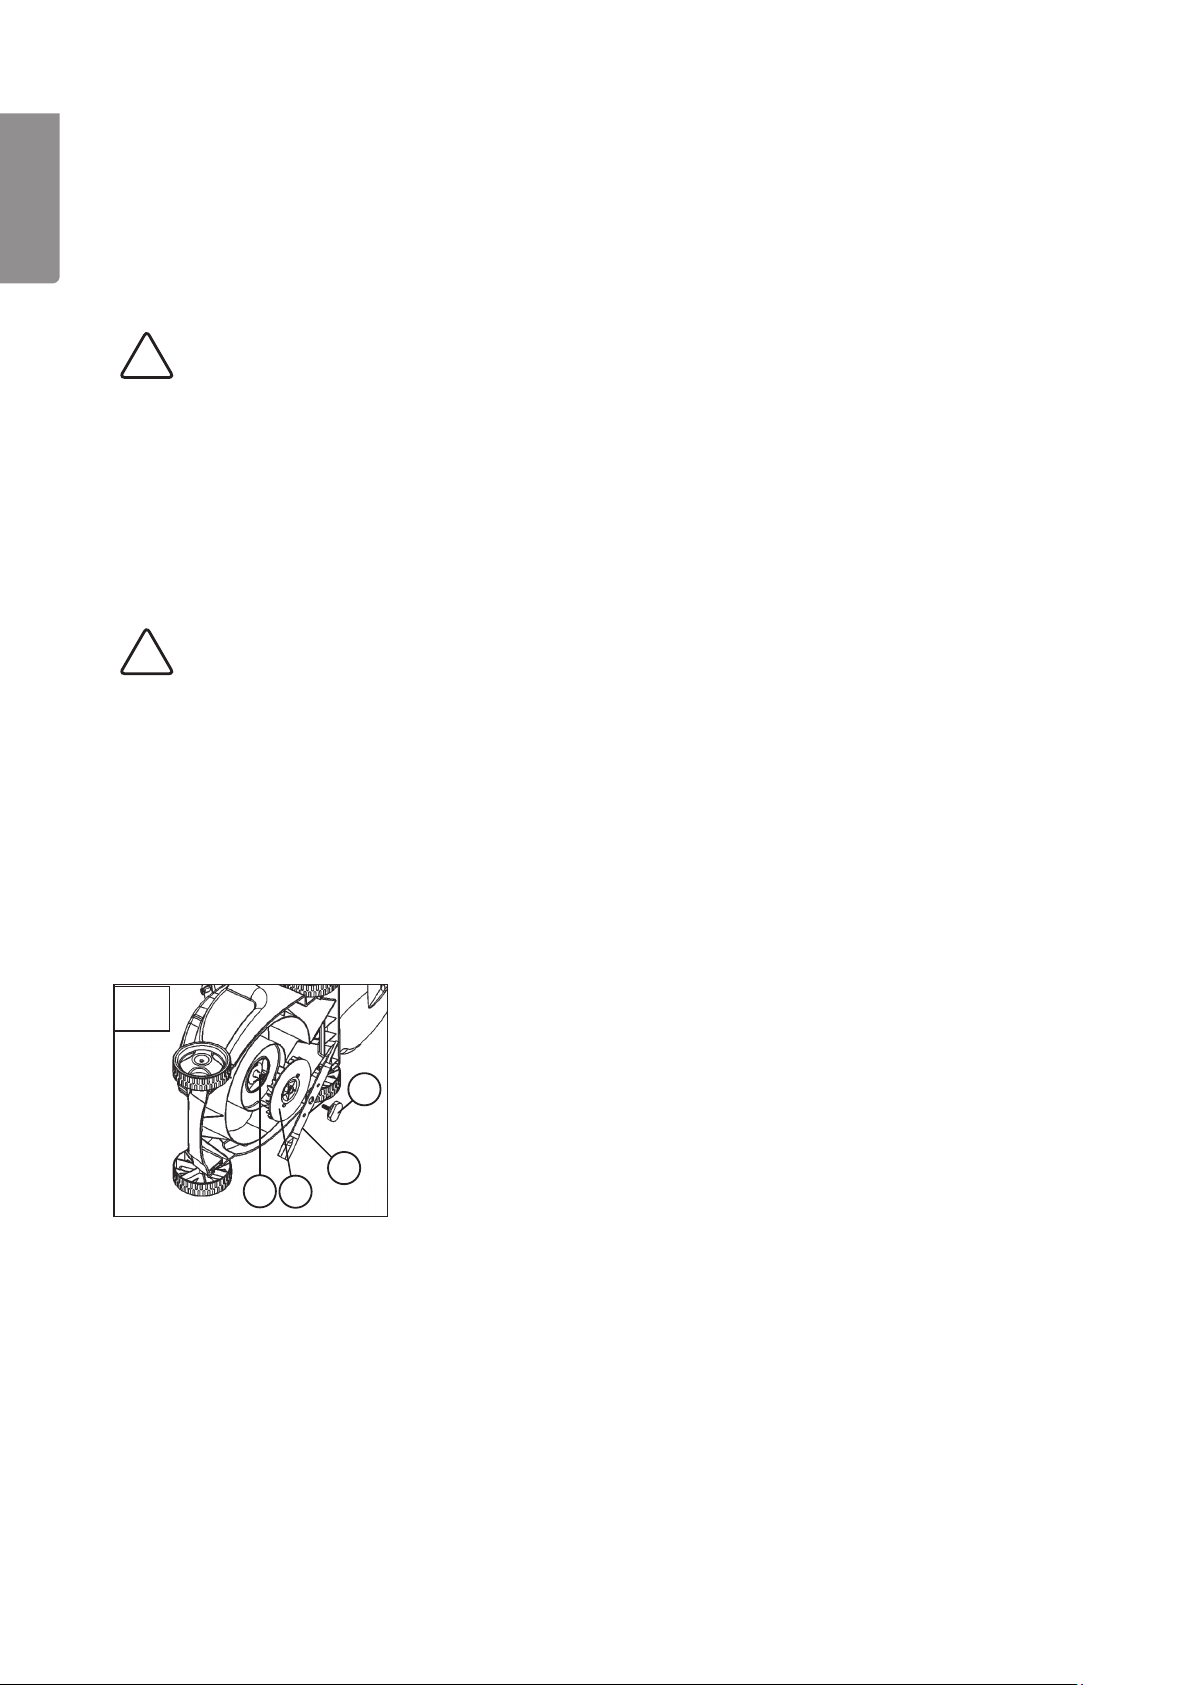
5.1 Changing the blades (fig. A10)
1. Turn the mower on its side and inspect the blades. If the blades are blunt or damaged they should
be replaced.
2. Hold the blade (2) and loosen the bolt (1) with an adjustable spanner. Use work gloves when holding
the blades since they can be sharp.
3. Remove the blade (2) and fan assembly (3). Clean if necessary.
4. Replace the fan, new blades and
blades are facing the right direction and that the bolt is securely tightened.
bolt in reverse order according to the above. Make sure that the
8
Page 9

5.2 Troubleshooting
The problems described below can often be repaired by the user. If there is any doubt, contact
Customer Services.
Motor does not start:
• Thepowercableisdefectiveornotconnected.Checkandchangeifnecessary.
• Thefuse(RCD)hastripped.Ifastrongerfuse(RCD)mustbeinstalled,consultanelectrician.
Motor stops suddenly:
• Looseconnections.Check.
• Thefusehastripped.Ifastrongerfuse(RCD)mustbeinstalled,consultaqualiedelectrician.
Mower vibrates during use:
• Looseparts.Check.
• Thebladesaredamaged.Changeblades.
• Themotorisloose.Check.
Unsatisfactory cutting results:
• Thebladesaredamagedordull.Changeblades.
• Collectorisfull.Emptycollector.
• Thecollectorisblocked.Check.
• Thewrongcuttingheighthasbeenset.Adjust.
6. Storage
If the mower is to be stored for an extended period, during winter for example, the following steps should
be followed:
ENGLISH
1. Clean the mower thoroughly.
2. Inspect the mower for possible damage.
3. Store the mower in a clean and dry environment.
7. Disposal
Dispose of your waste responsibly, sort and recycle where possible. All machines, hoses and
packing material should be sorted and handled according to local environmental regulations.
8. Technical data
Type LM-38E
Length (A) 114 cm
Height (B) 95 cm
Breadth (C) 46 cm
Sound level (EN836) LPA 75 dB (A)
Vibration level (EN1033, 836) 2.34 m/s²
Power 1300 W
Current 6 A
Capacitor 20 μF
Voltage 230 V AC, 50 Hz
Cutting width 38 cm
Cutting height 30 – 65 mm
Weight 15. 5 kg
A
B
C
9
Page 10
Elgräsklippare Cotech 1300 W
Art.no.: 18-3117 Model: LM-38E-UK
30-9945 LM-38E
Läs igenom hela bruksanvisningen före användning och spara den sedan för framtida bruk. Vi reserverar
oss för ev. text- och bildfel samt ändringar av tekniska data. Vid tekniska problem eller andra frågor,
kontakta vår kundtjänst (se adressuppgifter på baksidan).
1. Säkerhet
SVENSK A
1.1 Produktmärkning med säkerhetssymboler på maskinen
Allmänna varningar för riskmoment.
!
Läs hela bruksanvisningen innan användning av produkten.
Se upp för kringygande föremål som kan skada personer i närheten.
Se till att personer och djur hålls på ett säkert avstånd från maskinen.
Håll händer och fötter borta från roterande vassa knivarna. Risk för allvarliga skador.
Stäng av och koppla bort maskinen från eluttaget före all justering, rengöring eller
om elsladden trasslat in sig och när maskinen lämnas utan uppsikt även om det så är
för en kort stund. Håll elsladden borta från dom roterande knivarna.
Håll elsladden borta från dom roterande knivarna. Kontrollera före användning att elsladden
inte är skadad. Endast felfria kablar får användas.
Låt alla roterande delar stanna helt innan de vidrörs. Den roterande kniven fortsätter rotera
en stund efter det att maskinen stängts av och kan då orsaka personskada.
STOP
Använd ej maskinen i regnväder och låt den ej stå ute när det regnar.
1.2 Allmänna säkerhetsföreskrifter
• Denna gräsklippare är konstruerad för att användas i villa trädgårdar på gräsmattor. På grund av risk för
fysisk skada hos användaren eller andra personer får ej gräsklipparen användas till andra ändamål än
vad den är avsedd för.
• Läs noga igenom instruktionerna och lär dig alla reglage samt korrekt användning produkten.
• Låt aldrig barn eller personer som inte har tillräcklig kännedom om dessa instruktioner använda
produkten. Lokala föreskrifter kan ha restriktioner gällande användarens ålder.
• Använd aldrig maskinen i närheten av andra, särskilt barn och djur.
Kom ihåg att användaren/föraren alltid är ansvarig för olyckor som händer andra människor eller egendom.
•
• Använd aldrig produkten påverkad av alkohol eller mediciner. Använd den inte heller om du är trött
eller sjuk.
10
Page 11

1.3 Förberedelser
• Kontrollera att det område som ska klippas är fritt från lösa och främmande föremål.
• Använd aldrig gräsklipparen utan att vara rätt klädd. Använd inga lösa kläder som riskerar att fastna i
klipparens roterande delar. Använd lämpliga skor
• Kontrollera elsladden som sitter på gräsklipparen så att inga skador eller sprickor nns, använd endast
gräsklipparen om elsladden är helt felfri.
• Elsladden på gräsklipparen får endast bytas av en kvalicerad servicetekniker.
• Kontrollera att kniv och knivbult inte är slitna eller skadade.
• Kontrollera uppsamlaren regelbundet för skador eller deformationer.
• Kontrollera att skarvsladden inte har några skador eller sprickor, använd endast en skarvsladd som är
helt felfri.
• Använd endast skarvsladdar godkända för utomhusbruk med minst 3x1,5mm², överskrid ej maximal
längd 25 m.
Justera klipphöjden så att motorn inte går tungt och överbelastas.
•
• Kontrollera att nätspänningen överensstämmer med produktens märkspänning.
• Under inga omständigheter får underhåll och service göras när motorn är igång (om inte
bruksanvisningen anger annat).
1.4 Användning
SVENSK A
• Håll händer och fötter borta från roterande delar. Undvik alltid utkastets öppning.
• Stanna motorn omedelbart om gräsklipparen träffar ett främmande föremål. Inspektera därefter
produkten noggrant efter eventuella skador. Använd inte produkten förrän eventuella skador reparerats.
• Om gräsklipparen börjar vibrera onormalt, stanna genast motorn, koppla från spänningskabeln och
kontrollera orsaken. Vibrationer är normalt ett tecken på problem.
• Gräsklipparen får endast anslutas till ett jordat vägguttag skyddat med en jordfelsbrytare med en
utlösningsström på max 30 mA.
• Gräsklipparen får endast anslutas med en spänningskabel avsedd för utomhusbruk.
• Spänningskabeln får aldrig köras över av gräsklipparen.
• Spänningskabeln och dess kontakter ska vara godkända för utomhusbruk och får aldrig vara skadade.
Kontrollera spänningskabeln med jämna mellanrum och byt ut den om nödvändigt.
• Var försiktig så att du inte snubblar på spänningskabeln. Håll alltid uppsikt över kabeln så att den inte
kommer i vägen för dina fötter eller annat som rör sig i området.
• Reparationer av gräsklipparens elektriska delar får endast utföras av en kvalicerad servicetekniker.
• Om gräsklipparens spänningskabel skadas under användning ska följande instruktioner följas:
1. Stanna gräsklipparen.
2. Drag ur skarvsladdens stickpropp ur vägguttaget, rör ej skarvsladden innan dess stickkontakt
tagits ur eluttaget.
• Stanna motorn och koppla från spänningen om:
- Användaren lämnar gräsklipparen.
- Den roterande kniven är blockerad.
- Utkastet satt igen sig och måste rengöras.
- Något främmande föremål körts på.
- Gräsklipparen börjar vibrera onormalt.
- Reparationer eller justeringar ska utföras.
- Gräsklipparen skall lyftas mellan två klippställen.
11
Page 12

• Se till att roterande delar har stannat före rengöring, reparation eller inspektion.
• Bentliga säkerhetsanordningar får inte kopplas bort eller sättas ur funktion.
• Överbelasta inte gräsklipparen genom att köra den för fort i högt eller tjockt gräs.
• Luta ej gräsklipparen när den skall startas, utom när det absolut är nödvändigt för att kunna starta,
i detta fall skall den inte lutas mer än nödvändigt för att kunna starta och lyft den delen som är bort
från användaren.
• Undvik att klippa i vått gräs.
• Undvik att klippa i branta sluttningar.
• Se till att ha bra fotfäste i sluttningar.
SVENSK A
• Gå, spring aldrig.
• Klipp längs med sluttningen, aldrig upp och ner.
• Var extra försiktig när du vänder och ändrar riktning i en sluttning.
1.5 Underhåll och förvaring
• Drag åt alla muttrar och skruvar så att gräsklipparen är i ett säkert arbetsskick.
• Spola aldrig av gräsklipparen med vatten. Den elektriska utrustningen kan ta skada samt utgöra fara
för elektriska stötar.
• Innan gräsklipparen används ska all elektrisk utrustning kontrolleras. Om skador nns på isolering,
infästning eller i annat avseende får gräsklipparen inte användas.
• Använd alltid originalreservdelar. Icke originalreservdelar kan medföra risk för skador även om
de passar gräsklipparen.
• Före långtidsförvaring, se bruksanvisningen för rekommendationer.
• Byt ut skadade varnings- och anvisningsdekaler.
2. Montering
2.1 Montering av uppsamlaren (fig. A1)
1. Tryck fast handtaget (1) i fästet på uppsamlarens överdel (2).
2. Placera överdelen på bottendelen (3) i pilens riktning. Se till att låsklackarna hamnar
i rätt position mot fästhålen.
3. Tryck till överdelen mot bottendelen tills låsklackarna låst fast ordentligt.
4. Kontrollera att uppsamlarens alla delar är korrekt monterade.
2.2 Montering av hjulen (fig. A2)
Montera hjulet (2) med hjälp av den gängade hjulkåpan (1) till fästet (3). Drag åt hjulkåpan för hand.
För justering av klipphöjd, se avsnittet ”Ändra klipphöjden”.
A1
1
102
A2
103
103
12
102
1
Page 13

A3 A5
A
C
A4
1
102
103
B
2.3 Montering av styre och reglage
1. Placera styrets underdel (A) i gräsklipparens fästen enligt bilden. Lås styret med hjälp av de två
skruvarna (C). Se g. A3.
2. Fäst styrets överdel på underdelen med bultarna (1), kabelhållaren (2) och vingmuttrarna (3).
Se g. A4.
3. Placera kabeln i kabelhållaren. Se g. A5.
4. Öppna reglagets fäste med t.ex. en skruvmejsel. Passa sedan in de två klackarna i de två hålen
på styret (2) och enligt bilden. Fäll tillbaka fästets underdel och lås med skruvarna (3).
5. Fixera kabeln mot styret med hjälp av de två klamrarna.
A6
A7
102
103
1
SVENSK A
3. Förberedelser
3.1 Använda uppsamlaren (fig. A6)
• Sätt dit uppsamlaren genom att öppna och hålla upp skyddslocket (1). Placera sedan
uppsamlaren (2) i dess fäste på gräsklipparen enligt bilden.
Tag bort uppsamlaren genom att lyfta upp skyddslocket och sedan lyfta upp och avlägsna uppsamlaren.
•
• Gräsklipparen kan även användas utan uppsamlaren om skyddslocket är helt nedfällt.
3.2 Ändra klipphöjden (fig. A7)
Stäng alltid av gräsklipparen och låt den roterande
!
kniven stanna helt innan du ändrar klipphöjden.
Klipphöjden kan justeras i 3 lägen:
I = 30 mm (kort gräshöjd) II = 47,5 mm III = 65 mm
• Justera klipphöjden genom att lossa den gängade hjulkåpan (1). Montera tillbaka hjulet i ett av hålen
beroende på klipphöjd.
• Obs! Alla fyra hjul måste ställas in för samma klipphöjd!
Vid säsongens första klippning bör gräsklipparen justeras för högsta klipphöjd. Därefter kan klipphöjden
justeras efter behov.
(högre gräshöjd)
13
Page 14

4. Användning
4.1 Allmänt
Starta aldrig motorn utan att först ha utfört alla åtgärder i avsnittet ”Montering”.
Använd aldrig gräsklipparen utan att ha läst och förstått den medföljande bruksanvisningen
!
samt alla varnings- och anvisningsdekaler på gräsklipparen och i denna bruksanvisning.
SVENSK A
A8
102
1
A9
4.2 Före start (fig. A8)
Spänningskabeln och dess kontakter ska vara godkända för utomhusbruk och får aldrig vara
!
skadade. Kontrollera spänningskabeln med jämna mellanrum och byt ut den om nödvändigt.
Gräsklipparen får endast anslutas till ett jordat vägguttag skyddat med en jordfelsbrytare
!
med en utlösningsström på max 30 mA.
Spänningskabeln ska alltid hängas upp i kabelavlastningen. Annars finns risk för skador invid
!
kontakten vilket medför livsfara.
1. Anslut gräsklipparen med spänningskabeln till ett 230 V eluttag.
2. Häng upp kabeln i kabelavlastningen (2) och anslut i anslutningsdonet (1). Se g. A8.
4.3 Start och stopp av gräsklipparen (fig. A9)
Startfårendastskenärhänderochfötterärpåettsäkertavståndfrångräsklipparens
!
roterandekniv.
Denroterandeknivenfortsätterroteraenstundävenefterdetattmotornharstannats.
!
Låtalltidmotorn/knivenstannaheltinnanmotornstartasigen.
Start
Tryck och håll in startspärren (1) och dra sedan in startreglaget (2).
Stopp
Släpp startreglaget (2) helt för att stanna motorn och den roterande kniven. Låt alltid motorn/kniven
stanna helt innan motorn startas igen.
14
Page 15

4.4 Klippning av gräs
1. Justera klipphöjden efter höjden på gräset. Börja med hög klipphöjd och prova dig fram till
bästa resultat.
2. Placera klipparen i närheten av det eluttaget spänningskabeln är ansluten till och jobba dig bort från
eluttaget. Låt spänningskabeln löpa på den redan klippta delen av gräsmattan.
3. Släpp startreglaget och koppla från spänningskabeln vid avslutad klippning.
Låt aldrig motorn utsättas för tung belastning under längre perioder. När gräsklipparen
belastas tungt (högt gräs etc.) går motorn tyngre och motorljudet förändras. Släpp omedel-
!
bart startreglaget, koppla bort spänningskabeln och höj klipphöjden för att undvika skador
på klipparen.
Vidlångvarigtungbelastningkanmotorskyddetlösaut,släppdåstartreglagetochkopplafrån
spänningskabeln.Motorskyddetåterställsendastomstartreglagetärfriställt.Rengörklipparen
fråneventuellahinderochväntanågraminuterinnanduansluterspänningskabelnochanvänderklipparenigen.Ommotorskyddetlöserutigen,provadåatthöjaklipphöjdenförattförhindraattmotornöverbelastas.
5. Underhåll
Koppla alltid från spänningskabeln från gräsklipparen innan du påbörjar underhåll
!
eller service.
• Rengör gräsklipparen med en borste eller trasa efter varje användning
SVENSK A
• Spola aldrig av gräsklipparen med vatten. Den elektriska utrustningen kan ta skada samt utgöra fara för
elektriska stötar.
• Drag åt alla muttrar och skruvar så att gräsklipparen är i ett säkert arbetsskick.
• Innan gräsklipparen används ska all elektrisk utrustning kontrolleras. Om skador nns på isolering,
infästning eller i annat avseende får gräsklipparen inte användas.
• Använd alltid originalreservdelar. Icke originalreservdelar kan medföra risk för skador även om de passar
gräsklipparen.
A10
1
2
4
3
5.1 Byte av kniv (fig. A10)
1. Vänd gräsklipparen på sidan och inspektera kniven. Är kniven slö eller skadad ska den bytas.
2. Håll emot kniven (2) och lossa bulten (1) med hjälp av en skiftnyckel. Använd arbetshandskar när
du håller i kniven då denna kan vara vass.
3. Tag loss kniven (2) och äkten (3). Gör rent om nödvändigt.
4. Sätt tillbaka äkten, den nya kniven och bulten i omvänd ordning enligt ovan. Se till att kniven är
rättvänd och drag åt bulten ordentligt.
15
Page 16

5.2 Felsökning
Felen som beskrivs nedan kan vanligtvis åtgärdas direkt av användaren. Om tveksamheter uppstår,
kontakta kundtjänst.
Motorn startar inte:
• Spänningskabeln är defekt eller inte ansluten. Kontrollera och byt ut om nödvändigt.
• Säkringen har löst ut. Om en starkare säkring måste installeras, anlita behörig elektriker.
Motorn stannar plötsligt:
• Lösa kontakter. Kontrollera.
• Elpropp har löst ut. Om en starkare elpropp måste installeras, anlita behörig elektriker.
SVENSK A
Gräsklipparen vibrerar vid användning:
• Lösa delar. Kontrollera.
• Kniven har skadats. Byt kniven.
• Motorn sitter löst. Kontrollera.
Gräsklipparen klipper dåligt:
• Kniven är skadad eller slö. Byt kniven.
• Uppsamlaren är full. Töm uppsamlaren.
• Uppsamlaren är blockerad. Kontrollera.
• Fel klipphöjd är inställd. Justera.
6. Förvaring
Då gräsklipparen ska förvaras en längre period, till exempel över vintern, ska följande åtgärder först utföras:
1. Rengör hela gräsklipparen ordentligt.
2. Inspektera hela gräsklipparen efter eventuella skador.
3. Förvara gräsklipparen i ett rent och torrt utrymme.
7. Avfallshantering
Sortera ditt avfall och låt det gå till återvinning istället för att kasta det. Alla maskiner, slangar och
förpackningsmaterial ska sorteras och hanteras enligt lokala miljöförordningar.
8. Tekniska data
Typ LM-38E
Längd (A) 114 cm
Höjd (B) 95 cm
Bredd (C) 46 cm
Ljudnivå (enligt EN836) LPA 75 dB (A)
Vibrationer (enligt EN1033, 836) 2,34 m/s²
Effekt 1300 W
Strömstyrka 6 A
Kondensator 20 uF
Spänning 230 V AC, 50 Hz
Klippbredd 38 cm
Klipphöjd 30 – 65 mm
Vikt 15, 5 kg
A
B
C
16
Page 17

Gressklipper Cotech 1300 W
Art.no.: 18-3117 Model: LM-38E-UK
30-9945 LM-38E
Vi reserverer oss mot ev. tekst- og bildefeil, samt forandringer av tekniske data.
Ved tekniske problemer eller andre spørsmål, ta kontakt med vårt kundesenter.
(se opplysninger om kundesenteret her i denne bruksanvisningen).
1. Sikkerhet
Produktmerking med sikkerhetssymboler på maskinen:
!
Generelle advarsler for fare.
Les hele bruksanvisningen før bruk av produktet.
Se opp for ygende gjenstander som kan skade personer i nærheten.
Påse at personer og dyr holdes på en sikker avstand fra maskinen.
Hold hender og føtter borte fra roterende deler. Det er risiko for alvorlige skader.
Skru av og koble strømmen fra maskinen før all justering, rengjøring eller hvis
strømledningen har krøllet seg, og når maskinen forlates uten oppsikt selv om det bare
er for en kort periode.
Hold strømledningen borte fra de roterende knivene. Kontroller før bruk at strømledningen
er feilfri. Bruk kun feilfrie ledninger.
La alle roterende deler stoppe helt før de berøres. Den roterende kniven fortsetter å rotere
en stund etter at maskinen slås av, og da kan man forårsake personskade.
STOP
Bruk ikke maskinen i regnvær, og la den ikke stå ute når det regner.
NORSK
1.2 Generelle sikkerhetsforskrifter
• Denne gressklipperen er konstruert for bruk på gressplener/gressmatter i hager. På grunn av risiko for
fysisk skade hos brukeren og andre personer, må ikke gressklipperen brukes til andre formål enn den er
beregnet til.
• Les nøye gjennom instruksjonene og lær deg alle innstillinger og riktig bruk av produktet.
• La aldri barn eller personer, som ikke har nok kunnskap om produktet, bruke produktet. Det kan være
lokale forskrifter vedr. aldersgrense for bruk av produktet, som skal følges.
• Bruk aldri maskinen i nærheten av andre, særlig ikke barn eller dyr.
• Husk at det er alltid brukeren/føreren som er ansvarlig for ulykker som forårsakes på andre mennesker
eller andres eiendom.
• Bruk aldri produktet hvis du er påvirket av alkohol eller medisiner. Bruk den heller ikke dersom du er trett
eller syk.
17
Page 18

1.3 Forberedelser
• Kontroller at det området som skal klippes er fritt for løse og fremmede gjenstander.
• Sørg for å være riktig kledd når du klipper gresset. Bruk ingen løstsittende klær som risikerer å feste
seg i klipperens roterende deler. Bruk egnede sko.
• Kontroller strømledningen som sitter på gressklipperen så ingen skader eller sprekker nnes. Bruk kun
gressklipperen dersom strømledningen er feilfri.
• Strømledningen på gressklipperen må kun byttes av en kvalisert servicetekniker.
• Kontroller at kniv og knivbolt ikke er slitt eller skadet.
• Kontroller oppsamleren regelmessig for skader eller deformasjoner.
• Kontroller at skjøteledningen ikke har noen skader eller sprekker. Påse at skjøteledningen er feilfri.
• Bruk kun skjøteledninger som er godkjent for utendørs bruk med minst 3 x 1,5mm², overskrid ikke
maksimal lengde 25 m.
• Juster klipphøyden så motoren ikke går tungt og overbelastes.
• Kontroller at nettspenningen stemmer overens med produktets spenning.
NORSK
• Service og vedlikehold må kun forekomme med motoren skrudd av (dersom ikke bruksanvisningen
sier noe annet).
1.4 Bruk
• Hold hender og føtter borte fra roterende deler. Pass opp for utkaståpningen.
• Stopp motoren umiddelbart hvis gressklipperen treffer en gjenstand. Inspiser deretter produktet grundig
for ev. skader. Bruk ikke produktet før ev. skader er rettet opp.
• Hvis gressklipperen begynner å vibrere unormalt, stopp straks motoren og undersøk årsaken.
Vibrasjoner er normalt et tegn på problemer.
• Gressklipperen må kun kobles til jordet vegguttak som er utstyrt med jordfeilbryter med en
utløsningsstrøm på maks. 30 mA.
• Gressklipperen må kun kobles til ledninger/skjøteledninger som er beregnet for utendørs bruk.
• Ledningen må ikke kjøres over med gressklipperen.
• Strømledningen og dens kontakter skal være godkjente for utendørs bruk og må være feilfrie.
ledningen med jevne mellomrom og skift den ut om nødvendig.
• Vær forsiktig slik at du ikke snubler i ledningen. Hold alltid ledningen under oppsikt slik at den ikke
kommer i veien for føttene dine eller annet som rører seg i området.
• Reparasjoner av gressklipperens elektriske deler skal utføres av kvalisert servicetekniker.
• Hvis gressklipperens ledning skades ved bruk skal følgende instruksjoner følges:
1. Stopp gressklipperen.
2. Trekk ut skjøteledningens støpsel fra vegguttaket. Berør ikke skjøteledningen før støpselet er fjernet
fra strømuttaket.
• Stopp motoren og koble fra strømmen hvis:
- Brukeren forlater gressklipperen.
- Den roterende kniven er blokkert.
- Utkastet er tett, og det må rengjøres.
- Du har kjørt på en fremmed gjenstand.
- Gressklipperen begynner å vibrere unormalt.
- Reparasjoner eller justeringer skal utføres.
- Gressklipperen skal løftes mellom to klippesteder.
Kontroller
18
Page 19

• Påse at roterende deler har stoppet helt opp før rengjøring, reparasjon eller inspeksjon.
• Sikkerhetsanordninger som er på snøfreseren må ikke kobles bort eller settes ut av funksjon.
• Overbelast ikke gressklipperen ved å kjøre den for fort i høyt eller tykt gress.
• La gressklipperen stå rett når den skal startes, bortsett fra når det er absolutt nødvendig å lute den for å
få startet den. I så fall skal den ikke lutes mer enn nødvendig. Løft den siden som er bort fra brukeren.
• Unngå å klippe i vått gress.
• Unngå å klippe i bratte skråninger.
Påse at du har godt fotfeste i skråninger.
•
• Gå når du klipper. Løp aldri med gressklipperen.
• Klipp langs med skråningen, aldri opp og ned.
• Vær ekstra forsiktig når du snur og skifter retning i en skråning.
1.5 Vedlikehold og oppbevaring
• Dra godt til alle mutre og skruer.
• Skyll aldri gressklipperen med vann. Det elektriske utstyret kan ta skade og utgjøre fare for elektrisk støt.
• Innen gressklipperen brukes skal alt elektrisk utstyr kontrolleres. Hvis det er skader på isolering,
innfestninger etc. må man ikke bruke gressklipperen.
• Benytt alltid originale reservedeler. Bruk av piratdeler medfører fare for skader selv om de passer til
gressklipperen.
NORSK
• Før langtidslagring, se bruksanvisningen.
• Skift skadede varsels- og anvisningsdekaler.
2. Montering
2.1 Montering av oppsamleren (fig. A1)
1. Trykk fast håndtaket (1) i festet på oppsamlerens overdel (2).
2. Plasser overdelen på bunndelen (3) i pilens retning. Påse at låsepinnene havner i riktig posisjon
mot festehullene.
3. Trykk overdelen mot bunndelen til låsepinnene er låst ordentlig fast.
4. Kontroller at alle oppsamlerens deler er riktig montert.
2.2 Montering av hjulene (fig. A2)
Monter hjulet (2) med hjelp av det gjengede hjuldekselet (1) til festet (3). Trekk til hjuldekselet for hånd.
For justering av klippehøyde, se avsnittet ”Endre klipphøyden”.
A1
1
102
A2
103
103
19
102
1
Page 20

A3 A5
A
C
A4
1
102
103
B
2.3 Montering av styre og regulering
1. Plasser styrets underdel (A) i gressklipperens fester som vist på bildet. Lås styret ved hjelp av de to
låseskruene (C). Se g. A3.
2. Fest styrets overdel på underdelen med boltene (1), kabelholderen (2) og vingemuttrene (3). Se g. A4.
3. Plasser kabelen i kabelholderen. Se g. A5.
NORSK
4. Åpne reguleringens feste med f.eks. en skrutrekker. Pass deretter inn de to pinnene i de to hullene på
styret (2) og som vist på bildet. Fell festets underdel tilbake og lås med skruene (3).
5. Fest kabelen til styret ved hjelp av de to klamrene.
A6
A7
102
103
1
3. Forberedelser
3.1 Bruk oppsamleren (fig. A6)
• Sett oppsamleren på plass ved å åpne og holde oppe beskyttelseslokket (1). Plasser deretter
oppsamleren (2) i festet på gressklipperen som vist på bildet.
• Ta av oppsamleren ved å løfte opp beskyttelseslokket. Deretter løftes oppsamleren opp og fjernes.
• Gressklipperen kan også brukes uten oppsamleren om beskyttelseslokket er helt nedfelt.
3.2 Endre klipphøyden (fig. A7)
Skru alltid av gressklipperen og la den roterende kniven stoppe helt før du
!
endrer klipphøyden.
Klipphøyden kan justeres i 3 nivåer:
I = 30 mm (liten gresshøyde) II = 47,5 mm III = 65 mm (høyere gresshøyde)
• Juster klipphøyden ved å løsne det gjengede hjuldekselet (1). Monter hjulet tilbake i et av hullene
avhengig av klipphøyde.
• Obs! Alle re hjul må stilles inn på samme klippehøyde!
Ved sesongens første klipping bør gressklipperen justeres for høyeste klipphøyde. Deretter kan klipphøyden
justeres etter behov.
20
Page 21

4. Bruk
4.1 Generelt
Start ikke motoren uten først å ha gjennomført alle punktene i avsnittet ”Montering”.
Bruk ikke gressklipperen uten først å ha lest og forstått denne bruksanvisningen samt alle
!
varsel- og anvisningsdekaler på gressklipperen og den medfølgende bruksanvisningen.
A8
102
1
A9
4.2 Før start (fig. A8)
Strømledningen og dens kontakter skal være godkjente for utendørs bruk og må være feilfrie.
!
Kontroller ledningen med jevne mellomrom og skift den ut om nødvendig.
Gressklipperen må kun kobles til jordet vegguttak som er utstyrt med jordfeilbryter met en
!
utløsningsstrøm på maks. 30 mA.
Strømledningen skal alltid festes i kabelavlastningen. Ellers er det fare for skader inne ved
!
støpselet, noe som medfører livsfare.
1. Koble gressklipperen med strømledningen til et 230 V strømuttak.
2. Heng ledningen i kabelavlastningen (2) og koble til tilkoblingsstykket (1). Se g. A8.
NORSK
4.3 Start og stopp av gressklipperen (fig. A9)
Start må bare skje når hender og føtter er på sikker avstand fra gressklipperens roterende kniv.
!
Den roterende kniven fortsetter å rotere en stund etter at motoren skrus av. La alltid motoren/
!
kniven stoppe helt før motoren startes igjen.
Start
Trykk inn og hold startsperren (1) og dra deretter inn starthåndtaket (2).
Stopp
Slipp starthåndtaket (2) helt for å stoppe motoren og den roterende kniven. La alltid motoren/kniven
stoppe helt før motoren startes igjen.
21
Page 22

4.4 Klipping av gress
1. Juster klipphøyden etter høyden på gresset. Begynn med høy klippehøyde og prøv deg fram til best
mulig resultat.
2. Plasser klipperen i nærheten av det strømuttaket strømledningen er tilsluttet til, og jobb deg bort fra
strømuttaket. La strømkabelen løpe på den allerede klipte delen av gressmatten.
3. Slipp starthåndtaket og koble fra strømledningen ved avsluttet klipping.
La aldri motoren utsettes for tung belastning over lengre perioder. Når gressklipperen
belastes tungt (høyt gress etc.) går motoren tyngre og motorlyden forandres. Slipp umid-
!
delbart starthåndtaket, koble bort strømledningen og øk klipphøyden for å unngå skader
på klipperen.
Vedlangvarigtungbelastningkanmotorvernetløseut,slippdastarthåndtaketogkoblefra
strømledningen.Motorvernettilbakestilleskunhvisstarthåndtaketerfristilt.Rengjørklipperen
fraeventuellehinderogladenventenoenminutterførdukoblertilspenningskabelenog
brukerklipperenigjen.Dersommotorvernetløserutigjen,prøvdaåøkeklipphøydenforå
forhindreatmotorenoverbelastes.
NORSK
5. Vedlikehold
Koble alltid fra strømmen gressklipperen før du starter vedlikeholdsarbeider eller service.
!
• Rengjør gressklipperen med en børste eller klut etter hver gangs bruk.
• Skyll aldri gressklipperen med vann. Det elektriske utstyret kan ta skade og utgjøre fare for elektrisk støt.
• Dra godt til alle mutre og skruer slik at gressklipperen er i sikker stand.
• Innen gressklipperen brukes skal alt elektrisk utstyr kontrolleres. Hvis det er skader på isolering,
innfestninger etc. må man ikke bruke gressklipperen.
• Benytt alltid originale reservedeler. Bruk av piratdeler medfører fare for skader selv om de passer til
gressklipperen.
A10
1
2
4
3
5.1 Bytte av kniv (fig. A10)
1. Snu gressklipperen på siden og inspiser kniven. Er kniven sløv eller skadet, skal den byttes.
2. Hold imot kniven (2) og løsne bolten (1) ved hjelp av en skiftnøkkel. Bruk arbeidshansker når du holder
i kniven da denne kan være skarp.
3. Ta løs kniven (2) og viften (3). Gjør rent, hvis nødvendig.
4. Sett viften tilbake, den nye kniven og bolten i omvendt rekkefølge som vist ovenfor. Påse at kniven er
rettvendt, og dra bolten ordentlig til.
22
Page 23

5.2 Feilsøking
Feilene som beskrives nedenfor kan vanligvis rettes opp av brukeren selv. Hvis du er usikker, ta kontakt
med kundeservicen eller forhandleren.
Motoren starter ikke:
• Strømledningen er defekt eller ikke tilkoblet. Kontroller og bytt ut hvis nødvendig.
• Sikringen er utløst. Hvis en sikring med større kapasitet skal installeres må dette utføres av elektriker.
Motoren stopper plutselig:
• Løse kontakter. Kontroller.
• Sikringen er utløst. Hvis en sikring med større kapasitet skal installeres må dette utføres av elektriker.
Gressklipperen vibrerer ved bruk:
• Løse deler. Kontroller.
• Kniven er skadet. Bytt kniven.
• Motoren sitter løst. Kontroller.
Gressklipperen klipper dårlig:
• Kniven er skadet eller sløv. Bytt kniven.
• Oppsamleren er full. Tøm oppsamleren.
• Oppsamleren er blokkert. Kontroller.
• Feil klippehøyde er innstilt. Juster.
NORSK
6. Oppbevaring
Når gressklipperen skal oppbevares over en lengre periode, for eksempel over vinteren, skal følgende tiltak
først utføres:
1. Rengjør hele gressklipperen ordentlig.
2. Inspiser deretter gressklipperen grundig for ev. skader.
3. Oppbevar gressklipperen på en ren og tørr plass.
7. Avfallshåndtering
Sorter avfallet og la det gå til gjenvinning istedenfor å kaste det. Alle maskiner, slanger og all
emballasje skal sorteres og håndteres i henhold til lokale miljøforskrifter.
8. Tekniske data
Type LM-38E
Lengde (A) 114 cm
Høyde (B) 95 cm
Bredde (C) 46 cm
Lydnivå (ifølge EN836) LPA 75 dB (A)
Vibrasjoner (i følge EN1033, 836) 2,34 m/s²
Effekt 1300 W
Strømstyrke 6 A
Kondensator 20 uF
Spenning 230 V AC, 50 Hz
Klippebredde 38 cm
Klippehøyde 30 – 65 mm
Vekt 15, 5 kg
A
B
C
23
Page 24

Sähköruohonleikkuri Cotech 1300 W
Tuotenro.: 18-3117 Malli: LM-38E-UK
30-9945 LM-38E
Lue käyttöohjeet ennen tuotteen käyttöönottoa. Säilytä käyttöohjeet tulevaa tarvetta varten.
Pidätämme oikeuden teknisten tietojen muutoksiin. Emme vastaa mahdollisista teksti- tai kuvavirheistä.
Jos laitteeseen tulee teknisiä ongelmia, ota yhteys myymälään tai asiakaspalveluun (yhteystiedot käyttöohjeen lopussa).
1. Turvallisuus
1.1 Tuotteen merkinnät ja turvallisuussymbolit
Yleisiä varoituksia riskitekijöistä.
!
Lue koko käyttöohje huolellisesti ennen laitteen käyttöä.
Varo ympärisinkoilevia esineitä, jotka voivat loukata lähellä olevia.
Huolehdi siitä, että asiattomat eivät pääse laitteen läheisyyteen.
SUOMI
Älä laita käsiä ja jalkoja liikkuvien osien lähelle. Riski vakavaan loukkaantumiseen.
Sulje kone ja irrota se sähköverkosta aina ennen huoltoa, säätöjä tai puhdistusta tai jos jätät
sen hetkesikin valvomatta. Pidä sähköjohto poissa terän ulottuvilta.
Pidä sähköjohto poissa terän ulottuvilta. Varmista ennen laitteen käyttöä, ettei virtajohto ole
viallinen. Käytä ainoastaan ehjiä johtoja.
Anna kaikkien pyörivien osien pysähtyä kokonaan ennekuin niihin kosketaan. Pyörivät
terät voivat jatkaa pyörimistä vielä hetken moottorin sammuttamisen jälkeen ja aiheuttaa
vahinkoja.
STOP
Älä käytä konetta sateella, äläkä jätä sitä sateeseen.
1.2 Yleiset turvallisuusohjeet
• Tämä ruohonleikkuri on tehty omakotitalojen nurmikoiden leikkaamiseen. Henkilövahinkojen
välttämiseksi sitä ei saa käyttää muuhun tarkoitukseen.
• Lue käyttöohjeet huolellisesti läpi. Opettele kaikkien säädinten toiminta ja laitteen oikeaoppinen käyttö.
• Älä koskaan anna lasten tai sellaisten aikuisten, jotka eivät ole perehtyneet tarpeeksi näihin käyttöohjeisiin, käyttää laitetta. Paikalliset määräykset saattavat sisältää käyttäjän ikää koskevia rajoituksia.
• Älä koskaan käytä konetta muiden, etenkään lasten tai eläinten, lähettyvillä.
• Muista, että koneen käyttäjä on aina vastuussa koneen aiheuttamista omaisuusvahingoista tai
onnettomuuksista muille ihmisille.
• Älä koskaan käytä laitetta alkoholin tai lääkkeiden vaikutuksen alaisena. Älä myöskään käytä laitetta, jos
olet väsynyt tai sairas.
24
Page 25

1.3 Esivalmistelut
• Varmista, että leikattavalla alueella ei ole irtonaisia ja vieraita esineitä.
• Älä koskaan käytä konetta ilman asianmukaista vaatetusta. Älä käytä löysiä vaatteita, jotka voivat
tarttua pyöriviin teriin. Käytä työhön soveltuvia kenkiä.
• Tarkista, ettei sähköjohdossa ole murtumia vaan että se on vahingoittumaton.
• Sähköjohdon saa vaihtaa vain valtuutettu huoltaja.
• Tarkista etteivät leikkausterä tai sen kiinnitysruuvi ole vahingoittuneet.
• Tarkista kerääjä säännöllisesti, ettei se ole vahingoittunut.
• Tarkista jatkojohdon eheys. Siinä ei saa olla murtumia tai kulumia.
• Käytä vain ulkokäyttöön hyväksyttyjä jatkojohtoja, joissa on vähintään 3x1,5mm² johtimet, älä ylitä
maksimi pituutta 25m.
• Säädä leikkuukorkeus siten, ettei moottori ylikuormitu.
• Tarkista, että verkkojännite vastaa jännitettä laitteen kilvessä.
• Älä koskaan huolla tai hoida laitetta moottorin ollessa päällä (ellei käyttöohje näin
nimenomaisesti neuvo).
1.4 Käyttö
• Älä laita käsiä ja jalkoja liikkuvien osien lähelle. Varo aina poistoaukkoa.
• Pysäytä moottori välittömästi jos leikkuri osuu vieraaseen esineeseen. Tutki laite tämän jälkeen tarkasti
mahdollisten vaurioiden varalta. Älä käytä laitetta ennen kuin mahdolliset vauriot on korjattu.
• Jos laite alkaa täristä oudosti, pysäytä moottori välittömästi ja selvitä tärinän syy. Tärinä on tavallisesti
merkki siitä, että jotain on vialla.
• Laitteen saa liittää ainoastaan maadoitettuun, vikavirtasuojakytkimellä (laukeamisvirta maks. 30 mA)
suojattuun seinäpistorasiaan.
• Laitteen saa liittää ainoastaan ulkokäyttöön tarkoitetulla virtajohdolla.
• Älä koskaan aja leikkurilla virtajohdon yli.
• Virtajohdon ja sen pistokkeiden tulee olla ulkokäyttöön hyväksyttyjä ja aina ehjiä. Tarkista virtajohdon
kunto säännöllisesti ja vaihda se tarvittaessa uuteen.
• Varo kompastumasta virtajohtoon. Pidä virtajohtoa silmällä, ettei se sotkeudu jalkoihisi tai muihin
alueella liikkuviin.
• Laitteen sähköiset osat saa korjata ainoastaan valtuutettu sähköasentaja.
• Jos virtajohto vahingoittuu käytön aikana, noudata seuraavia ohjeita:
SUOMI
1. Pysäytä leikkuri.
2. Vedä virtapistoke irti pistorasiasta. Älä koske jatkojohtoon ennenkuin pistoke on
irroitettu sähkövirrasta.
• Sammuta moottori ja katkaise laitteesta virta, jos:
- Käyttäjä jättää leikkurin.
- Pyörivä leikkuri on tukossa.
- Ulosheittoaukko on tukossa ja pitää puhdistaa.
- Jokin vieras esine joutuu terään.
- Leikkuri alkaa täristä oudosti.
- Leikkuria korjataan tai säädetään.
- Leikkuria siirretään kahden paikan välillä.
25
Page 26

• Varmista, että liikkuvat osat ovat pysähtyneet ennen puhdistusta, korjausta tai tarkastusta.
• Älä kytke laitteen turvalaitteita irti tai pois toiminnasta.
• Älä ylikuormita leikkuria ajamalla sitä liian korkeaan tai paksuun nurmikkoon.
• Älä kallista leikkuria kun sitä käynnistetään. Jos leikkuri on kallistettu, se täytyy suunnata
poispäin käyttäjästä.
• Vältä käyttämästä leikkuria märässä ruohossa.
• Vältä käyttämästä leikkuria jyrkissä rinteissä.
• Katso, että seisot riittävän tukevasti rinteissä.
• Kävele, älä koskaan juokse.
• Leikkaa rinteen suuntaisesti, älä koskaan ylös ja alas.
• Ole erityisen varovainen kun muutat leikkuusuuntaa rinteessä.
1.5 Huolto ja säilytys
• Kiristä kaikki ruuvit ja mutterit, jotta laitteen kanssa olisi turvallista työskennellä.
• Älä koskaan huuhtele leikkuria vedellä. Tämä voi vahingoittaa sähköistä laitteistoa ja aiheuttaa
sähköiskuvaaran.
• Tarkista sähköisen laitteiston kunto ennen leikkurin käyttöä. Jos löydät vaurioita eristyksestä,
kiinnityksestä tai jostain muualta, ei leikkuria saa käyttää.
• Käytä aina alkuperäisvaraosia. Muut kuin alkuperäisvaraosat voivat vioittaa laitetta vaikka ne
sopisivatkin leikkuriin.
SUOMI
• Lue käyttöohjeesta neuvoja ja suosituksia, jos leikkuri on käyttämättä pitkän aikaa.
• Vaihda vioittuneet varoitus- ja ohjetarrat.
2. Asennus
2.1 Kerääjän kiinnitys (kuva A1)
1. Paina kädensija (1) kiinni pidikkeeseen kerääjän yläosaan (2).
2. Aseta yläosa pohjaosaan (3) nuolen suuntaan. Katso että lukkokielekkeet tulevat
oikeaan asentoon kiinnikereikiin.
3. Paina yläosaa pohjaosaa vasten, kunnes lukkokielekkeet kiinnittyvät kunnolla.
4. Tarkista, että kerääjän kaikki osat ovat kunnolla kiinnitetty.
2.2 Renkaiden kiinnitys (kuva A2)
Asenna rengas (2) kierteytetyn rengaskotelon (1) avulla kiinnikkeeseen (3). Kiristä rengaskotelo käsin.
Leikkuukorkeuden säätö esitetään kohdassa ”Muuta leikkuukorkeutta”.
A1
1
102
103
A2
103
102
1
26
Page 27

A3 A5
A
C
A4
1
102
103
B
2.3 Ohjaimen ja säädinten asennus
1. Aseta ohjaimen alaosa (A) ruohonleikkurin kiinnikkeeseen kuvan mukaisesti. Lukitse ohjain kahden
ruuvin (C) avulla. Katso kuva A3
2. Kiinnitä ohjaimen yläosa alaosaan ruuveilla (1), johtopidikkeellä (2) ja siipimuttereilla (3). Katso kuva A4.
3. Aseta johto johtopidikkeeseen. Katso kuva A5
4. Avaa säätimen kiinnike esim. ruuvimeisselillä. Sovita sitten kaksi uloketta ohjaimen (2) kahteen reikään
kuvan mukaisesti. Taita kiinnikkeen alaosa takaisin ja lukitse se ruuveilla (3).
5. Kiinnitä johto ohjaimeen kahdella kiinnikkeellä.
A6
A7
102
103
1
3. Esivalmistelut
3.1 Kerääjän käyttö (kuva A6)
• Aseta kerääjä avaamalla ja pitämällä suojakantta (1) auki. Aseta sitten kerääjä (2) leikkurin kiinnikkeeseen
kuvan mukaisesti.
• Poista kerääjä nostamalla suojakantta ja sen jälkeen kerääjää.
• Ruohonleikkuria voi käyttää myös ilman kerääjää jos suojakansi on kokonaan alastaitettu.
3.2 Leikkuukorkeuden muuttaminen (kuva A7)
Sammuta ruohonleikkuri aina ja anna pyörivän terän pysähtyä kokonaan ennen kuin muutat
!
leikkuukorkeutta.
SUOMI
Leikkuukorkeuden voi säätää kolmeen asentoon:
I = 30 mm (lyhyin ruohonpituus) II = 47,5 mm III = 65 mm (korkein ruohonpituus)
• Säädä leikkuukorkeutta löystämällä kierteytettyä rengaskoteloa (1). Asenna rengas takaisin halutun
leikkuukorkeuden mukaiseen reikään.
• Huom.! Kaikki neljä pyörää tulee asettaa samaan leikuukorkeuteen!
Kauden ensimmäisellä leikkuukerralla leikkuukorkeuden tulee olla korkeimmassa leikkuuasennossa.
Tämän jälkeen leikkuukorkeutta voi säätää tarpeen mukaan.
27
Page 28

4 Käyttö
4.1 Yleistä
Älä koskaan käynnistä moottoria ennen kuin olet suorittanut kaikki kohdassa ”Asennus” mainitut
toimenpiteet.
Äläkäytälaitetta,josetolelukenutjaymmärtänyttätäkäyttöohjettasekäkäyttöohjeenja
!
laitteenkaikkiavaroitus-jaohjetarroja.
A8
102
A9
1
4.2 Ennen käynnistämistä (kuva A8)
Virtajohdon ja sen pistokkeiden tulee olla ulkokäyttöön hyväksyttyjä ja aina ehjiä.
!
SUOMI
1. Liitä ruohonleikkuri virtajohdolla pistorasiaan, jonka jännite on 230 V.
2. Ripusta johto johdonripustimeen (2) ja liitä se liitäntärasiaan. Katso kuva A8.
Tarkista virtajohdon kunto säännöllisesti ja vaihda se tarvittaessa uuteen.
Laitteen saa liittää ainoastaan maadoitettuun, vikavirtasuojakytkimellä (laukeamisvirta
!
maks. 30 mA) suojattuun seinäpistorasiaan.
Virtajohto tulee sijoittaa johdon ripustimeen. Muuten johto voi vioittua ja aiheuttaa
!
hengenvaaran.
4.3 Ruohonleikkurin käynnistys ja sammutus (kuva A9)
Käynnistys ja sammutus saa tapahtua ainoastaan kun jalat ja kädet ovat riittävän
!
etäisyyden päässä leikkaavasta terästä.
Pyörivä terä jatkaa pyörimistä vielä hetken vaikka moottori olisikin jo sammutettu. Anna
!
aina moottorin /terän pysähtyä kokonaan ennen kuin moottori käynnistetään uudelleen.
Käynnistys
Pidä turvalukitusta (1) pohjassa ja vedä sitten käynnistyskahvasta (2).
Pysäytys
Päästä käynnistyskahva (2) kokonaan ja anna moottorin sekä pyörivän terän pysähtyä. Anna aina
moottorin /terän pysähtyä kokonaan ennen kuin moottori käynnistetään uudelleen.
28
Page 29

4.4 Ruohon leikkaus
1. Säädä leikkuukorkeus ruohon pituuden mukaan. Aloita korkeimmalla leikkuukorkeudella ja kokeile jotta
saavutat parhaan leikkuutuloksen.
2. Aseta leikkuri sähköpistokkeen läheisyyteen ja liitä se pistorasiaan. Etene työskentelyssäsi pistorasiasta
poispäin. Anna virtajohdon sijaita jo leikatulla nurmenosalla.
3. Päästä käynnistyskahva ja irroita virtajohto työn loputtua.
Älä altista moottoria kovalle kuormitukselle pitkäkestoisesti. Kun leikkuri joutuu kovalle
kuormitukselle (korkea tiivis ruoho), moottori käy hitaammin ja moottorin ääni muuttuu. Päästä
!
välittömästi käynnistyskahvasta, irrota virtajohto ja nosta leikkuukorkeutta jotta leikkuri ei
vahingoittuisi. Kova kuormitus hitailla kierroksilla saattaa laukaista moottorisuojan. Päästä
käynnistyskahva ja irrota virtajohto. Moottorisuoja voidaan palauttaa vain kun käynnistyskahva on päästetty vapaaksi. Puhdista leikkuri mahdollisista esteistä ja odota muutamia minuutteja ennen kuin liität virtajohdon ja käytät leikkuria uudelleen. Jos moottorisuoja laukeaa
uudelleen, kokeile nostaa leikkuukorkeutta, jotta estät ylikuormituksen.
5. Huolto
Irrotalaitteenvirtajohtoverkkovirrastaennenpuhdistustajahuoltoa.
!
• Puhdista leikkuri jokaisen käyttökerran jälkeen harjalla tai rievulla.
• Älä koskaan huuhtele leikkuria vedellä. Tämä voi vahingoittaa sähköistä laitteistoa ja aiheuttaa
sähköiskuvaaran.
• Kiristä kaikki ruuvit ja mutterit, jotta laitteen kanssa olisi turvallista työskennellä.
• Tarkista sähköisen laitteiston kunto ennen leikkurin käyttöä. Jos löydät vaurioita eristyksestä,
kiinnityksestä tai jostain muualta, ei leikkuria saa käyttää.
• Käytä aina alkuperäisvaraosia. Muut kuin alkuperäisvaraosat voivat vioittaa laitetta vaikka ne
sopisivatkin leikkuriin.
A10
1
2
4
3
5.1 Terän vaihto (kuva A10)
SUOMI
1. Käännä ruohonleikkuri kyljelleen ja tarkista terä. Jos terä on tylsä tai vioittunut, se tulee vaihtaa.
2. Pidä terää (2) ja irrota pultti (1) jakoavaimella. Käytä työkäsineitä, koska terä saattaa olla terävä.
3. Poista terä (2) ja puhallin (3). Tee tarvittaessa puhdistus.
4. Aseta puhallin sekä uusi pultti ja terä takaisin päinvastaisessa järjestyksessä. Katso, että terä tulee
oikeinpäin ja kiristä pultti huolellisesti.
29
Page 30

5.2 Vianhaku
Käyttäjä voi tavallisesti korjata alla kuvaillut viat. Mikäli olet epävarma, ota yhteys myymälään tai
asiakaspalveluun.
Moottori ei käynnisty:
• Virtajohto on viallinen tai sitä ei ole liitetty. Tarkista ja vaihda se tarvittaessa.
• Sulake on lauennut. Jos laitteeseen täytyy asentaa voimakkaampi sulake, pyydä sähköasentaja avuksi.
Moottori sammuu yllättäen:
• Liitännät ovat irti. Tarkista.
• Sulake on lauennut. Jos laitteeseen täytyy asentaa voimakkaampi sulake, pyydä sähköasentaja avuksi.
Ruohonleikkuri tärisee käytettäessä:
• Irtonaisia osia. Tarkista.
• Terä on vaurioitunut. Vaihda terä.
• Moottori on löysästi kiinni. Tarkista.
Ruohonleikkuri leikkaa huonosti:
• Terä on vahingoittunut tai tylsä. Vaihda terä.
• Kerääjä on täynnä. Tyhjennä kerääjä.
• Kerääjä on tukossa. Tarkista.
• Väärä leikkuukorkeus leikkurissa. Säädä.
6. Säilytys
SUOMI
Jos leikkuria on tarkoitus pitää säilytyksessä pidemmän aikaa, esim. talven ajan, tee ensin seuraavat toimenpiteet:
1. Puhdista koko leikkuri perusteellisesti.
2. Tutki koko leikkuri mahdollisten vaurioiden varalta.
3. Sijoita leikkuri kuivaan ja viileään tilaan.
7. Kierrätys
Lajittele ja kierrätä jätteet. Älä heitä niitä sekajätteisiin. Kaikki koneet, letkut ja
pakkausmateriaali on lajiteltava paikallisten ympäristösääntöjen mukaisesti.
8. Tekniset tiedot
Tyyppi LM-38E
Pituus (A) 114 cm
Korkeus (B) 95 cm
Leveys (C) 46 cm
Melutaso (EN836 mukaan) LPA 75 dB (A)
Tärinä (EN1033, 836 mukaan) 2,34 m/s²
Teho 1300 W
Virranvoimakkuus 6 A
Kondensaattori 20 uF
Jännite 230 V AC, 50 Hz
Leikkausleveys 38 cm
Leikkauskorkeus 30 – 65 mm
Paino 15, 5 kg
A
B
C
30
Page 31

Declaration of Conformity
Hereby,ClasOhlsonABdeclaresthatthemachinery:
Lawn Mower Cotech
Art. no: 18-3117 Model: LM-38E-UK
30-9945 LM-38E
Complieswiththeprovisionsofthefollowingdirectives:
98/37/EC Machinery
2006/95/EC LowVoltageEquipment
2004/108/EC EMC
Complieswiththeprovisionsofthefollowinghamonizedstandards:
EN60335-1:2002+A1+a2+a11+a12
EN60335-2-77:2006
EN55014-1:2006
EN55014-2:1997+a1
EN61000-3-2:2006
EN61000-3-3:1995+A1+A2
Insjön,Sweden,November2008
K.Balkow
President.
Clas Ohlson, 793 85 Insjön, Sweden
Page 32

SVERIGE
KUNDTJÄNST Tel: 0247/445 00
Fax: 0247/445 09
E-post: kundtjanst@clasohlson.se
INTERNET www.clasohlson.se
BREV Clas Ohlson AB, 793 85
INSJÖN
NORGE
KUNDESENTER Tlf.: 23 21 40 00
Faks: 23 21 40 80
E-post: kundesenter@clasohlson.no
INTERNETT www.clasohlson.no
POST Clas Ohlson AS, Postboks 485 Sentrum, 0105 OSLO
SUOMI
ASIAKASPALVELU Puh: 020 111 2222
Faksi: 020 111 2221
Sähköposti: info@clasohlson.fi
INTERNET www.clasohlson.fi
OSOITE Clas Ohlson Oy, Yrjönkatu
23 A, 00100 HELSINKI
UNITED KINGDOM
For consumer contact, please visit
www.clasohlson.co.uk and click on
customer service.
INTERNET www.clasohlson.co.uk
 Loading...