

Page 1
!
Grass Trimmer
Grästrimmer
Gresstrimmer
Ruohotrimmeri
Ver. 200801
Important Information:
Read the instruction manual carefully and
make sure that you understand everything
before you use the product, keep it for
future reference.
Viktig information:
Läs hela bruksanvisningen noggrant och
försäkra dig om att du har förstått den innan
du använder utrustningen och spara den för
framtida bruk.
Viktig informasjon:
Les disse anvisningene nøye og forsikre deg
om at du forstår dem før du bruker enheten
og oppbevar dem for senere bruk.
Tärkeää tietoa:
Lue nämä ohjeet huolellisesti ja varmista
että olet ymmärtänyt ne, ennen kuin alat
käyttää laitetta. Säilytä ohjeet myöhempää
tarvetta varten.
English 2
Svenska 14
Norsk 26
Suomi 38
Article number: 30-9940
Model: HY33PD-1
Page 2

ENGLISH
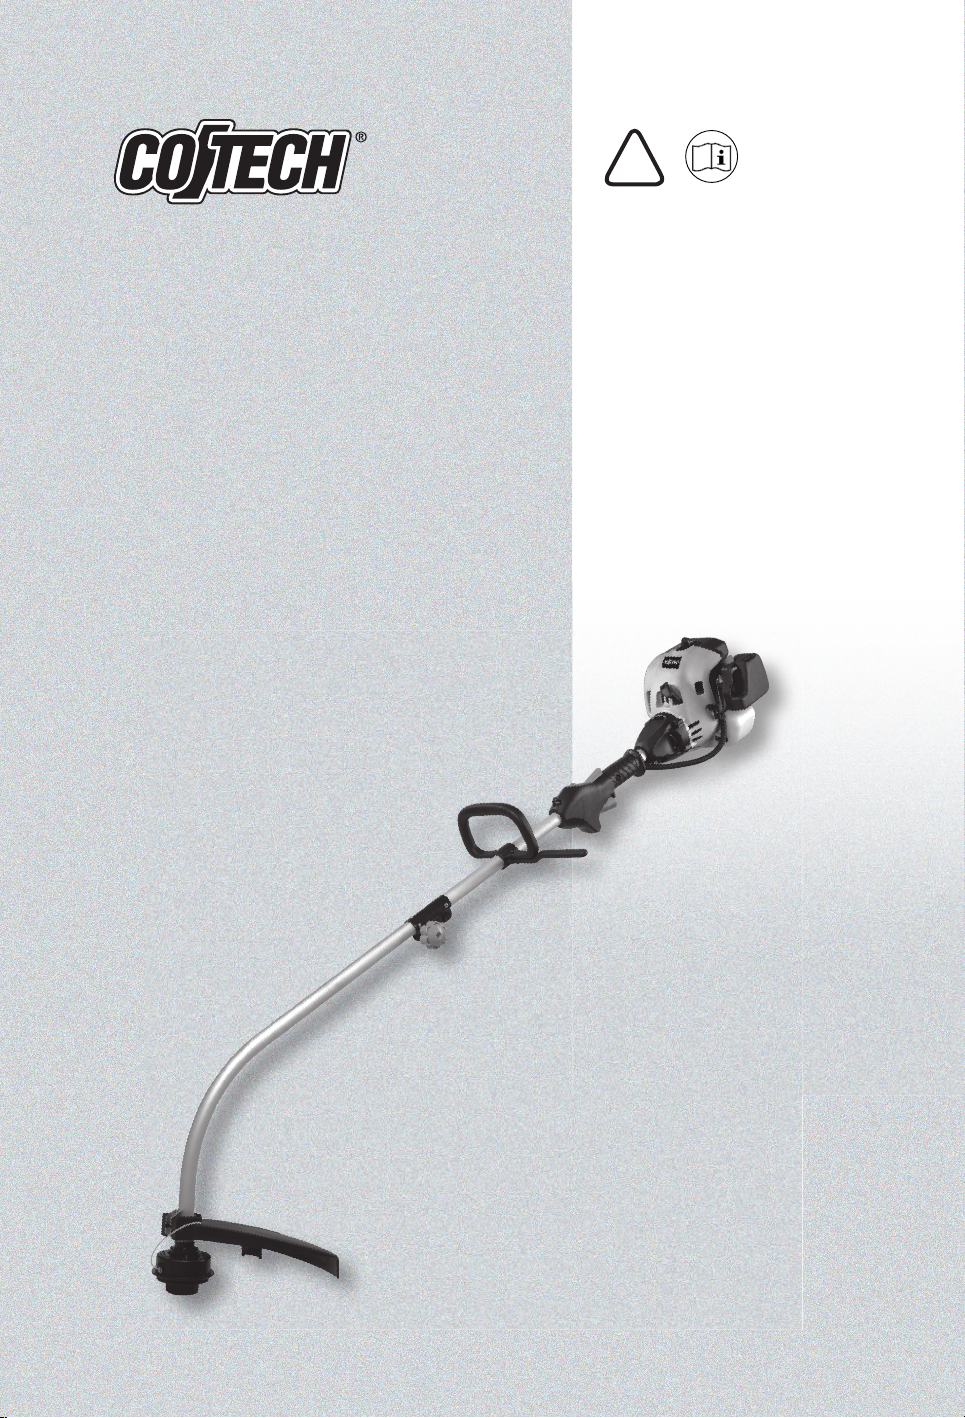
Grass Trimmer Co/TECH
Article number: 30-9940, model: HY33PD-1
Please read the entire instruction manual before using and save it for future use.
We apologise for any text or photo errors and any changes of technical data.
If you have any questions concerning technical problems please contact our Customer Service
Department (see address on reverse.)
Danger: This product is only meant to be used with trimmer line, never use a
saw blade or other cutters as this will only increase the risk of accidents.
Warning! Children, animals and onlookers should keep at least 15 metres away from the
grass trimmer when it is being used, turn it off immediately if anyone comes closer.
1.Explanation of product safety symbols
Please read the entire instruction manual before using
and save it for future use.
Wear hard hat, safety goggles/visor and ear protectors.
Wear safety shoes.
Wear protective gloves.
The product should only be used with trimmer line. Never use a saw blade or
other accessories.
Warning! Keep feet clear of the trimmer line.
Beware of stones or other objects that can be thrown up by the trimmer line.
Other than the user, do not allow anyone to be near the trimmer when it is in
use. Children, animals and onlookers should keep to a distance of at least
15 meters from the grass trimmer when it is in use.
Warning! Hot surface!
Warning! Sharp blade under guard front, do not touch the blade!
Page 3

2.Safe use of the trimmer
Note! Switch off the engine before all servicing, adjusting and cleaning of the grass
trimmer.
ENGLISH
1. Wear protective footwear, tight-tting clothes
and safety glasses/visor, ear defenders and a
helmet.
. Never use the grass trimmer if you are tired,
sick, upset or under the inuence of medication which causes drowsiness, alcohol or
drugs.
. Always be careful when handling fuel. Open
the fuel tank carefully and release any pressure which might have built up in the tank. Wipe
off any spilt fuel and move the grass trimmer
at least metres away from the refuelling
place before starting it. Remove any sources
of ignition, sparks, open ames, smoking, etc.
from places where the fuel is mixed, used or
stored. Do not smoke while fuelling or using
the grass trimmer.
4. Do not permit anyone other than the operator
to come close to the grass trimmer when it
is being started or used. Children, pets and
onlookers should keep at a distance of at least
15 metres from the grass trimmer when it is
being used.
5. Always hold both handles of the grass trim
mer rmly with your ngers on one side of the
handle and thumb on the other side, once the
engine is running.
6. Keep all of you body parts away from the trim
mer line when the engine is running.
7. Make sure that the trimmer line is not in con
tact with anything before starting.
8. Only transport the grass trimmer with the
engine switched off.
9. Always inspect the grass trimmer before star
ting, do not start it if there are worn, damaged
or missing parts. Never use a grass trimmer
which is damaged, incorrectly adjusted or not
assembled correctly.
10. All service other than that mentioned in this
instruction manual should be carried out by
qualied personnel.
11. Switch off the grass trimmer before laying it on
the ground.
1. Be extra vigilant when cutting small bushes
or thick grass, it can get stuck in the trimmer
head.
1. Keep the handles clean, dry and free from oil
or fuel.
-
-
-
14. Only use the grass trimmer outdoors or in
well ventilated locations. Never start it in a
closed room or building. Exhaust fumes are
dangerous to inhale, they contain carbon
monoxide.
15. Avoid moving the trimmer head close to small
objects which can be thrown about, check
the area to be trimmed for small stones etc,
before starting work.
16. Always stand below the trimmer if you are
using it on a slope. NEVER use the trimmer
on a slope if there is the slightest risk of you
losing your footing, falling or sliding. Keep
hold of both handles.
17. Keep the grass trimmer free from grass cut
tings and other deposits, particularly the
guard, trimmer head and engine.
18. The grass trimmer must only be used by
adults who have read the instruction manual.
19. Only use two-stroke engine fuel with a mix
ture of .5% good quality two-stroke oil (40:1)
intended for air-cooled two-stroke engines.
Using petrol without oil mixed in will cause
engine damage that is not covered by the
guarantee.
0. Do not use the grass trimmer without the
-
silencer or silencer cover.
1. Hold both handles of the grass trimmer rmly,
with your ngers on one side of the handle
and thumb on the other.
. The silencer can become very hot, do not
touch it with your hands or other parts of your
body.
. The trimmer head must not be raised during
use, the trimmer line can injure the operator,
work as close to the ground as possible.
4. The grass trimmer must not be used for any
other purpose than for the trimming of lawns
and gardens.
5. The grass trimmer must not be used if the
guard is damaged or missing.
6. This product must not be altered or used for
other tasks, the risk of accidents will increase
and the guarantee will not be valid.
7. Do not use the grass trimmer close to
ammable gases and liquids; this could
cause a re or an explosion.
-
-
Page 4
4
ENGLISH
13
9
11
4
18
3
2
5
a
5
b
8
15
16
1
19
17
7
6
10
20
10
12
14
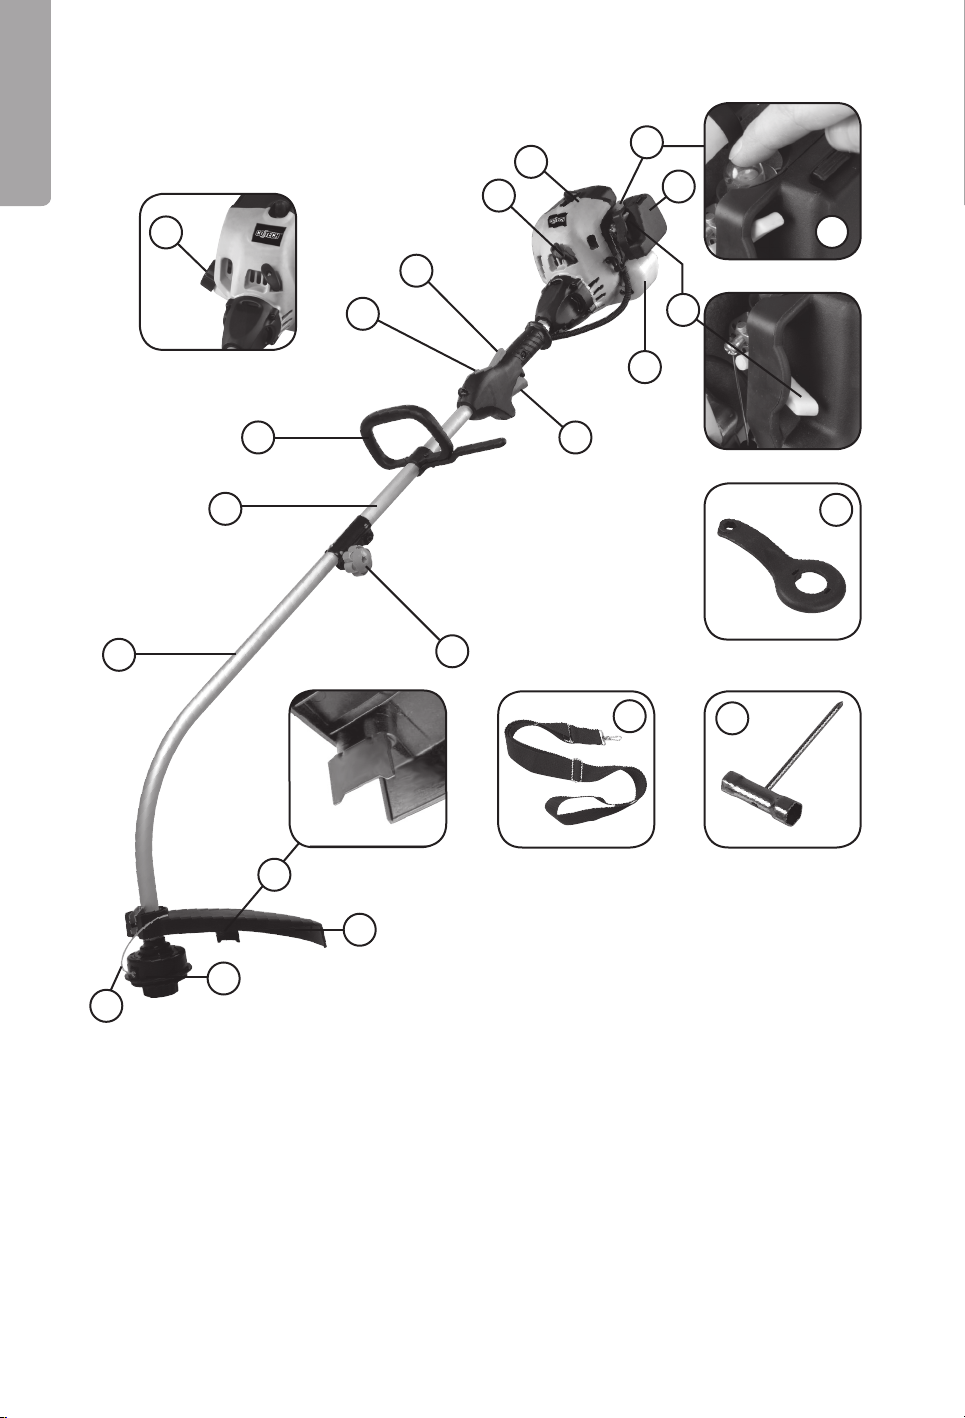
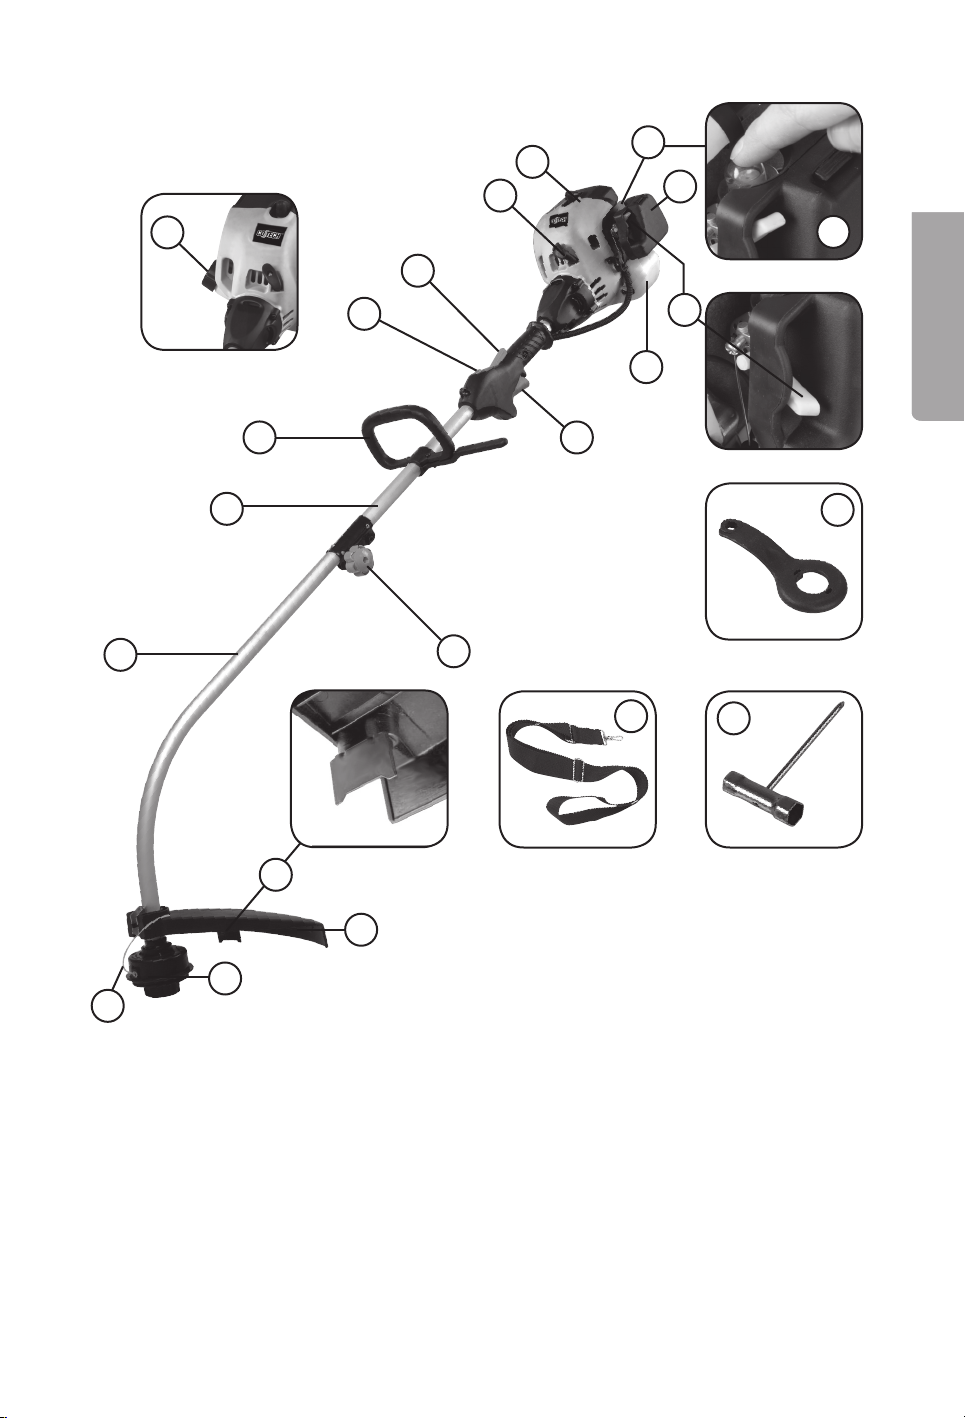
3. Presentation
1. Trimmer head
. Trimmer blade
. Trimmer safety guard
4. Loop handle (with
extra side handle)
5.a Shaft handle upper
5.b Shaft handle lower
6. Ignition switch
7. Fuel tank
8. Throttle lever
9. Start handle
10. Primer bulb
11. Spark plug
1. Air lter cover
1. Safety lever
14. Choke lever (push down
to activate choke)
15. Spool removal spanner
16. Spark plug wrench
17. Shoulder strap
18. Locking knob, trimmer
head
19 Locking knob, shaft
Page 5

4. Specifications
Model: HYPD-1
Net weight (dry): 5. kilograms
Motor: Air-cooled two-stroke motor
Cylinder volume: 5 cm³
Cutting radius: 8 cm
Fuel: Mixture of petrol & oil ratio 40:1 (.5%)
Ignition: Electronic
Maximum motor effect: 0.74 KW at 7,500 RPM
Rotational frequency: 7,000-8,500 RPM
Maximum rotational frequency: 8,500 RPM
Idle running rotational frequency: ,500 RPM
Spark plug: TORCH L8RTC, Champion CJ7Y, NGK BPMR7A
Fuel tank capacity: 0.6 litres
Cutting line: Nylon line Ø mm
Noise LwA: 110 dB (A)
LpA: 88 dB (A)
Vibration
Idle: 10.5 m/s²
Full throttle: 10 m/s²
ENGLISH
5
Page 6
6
ENGLISH
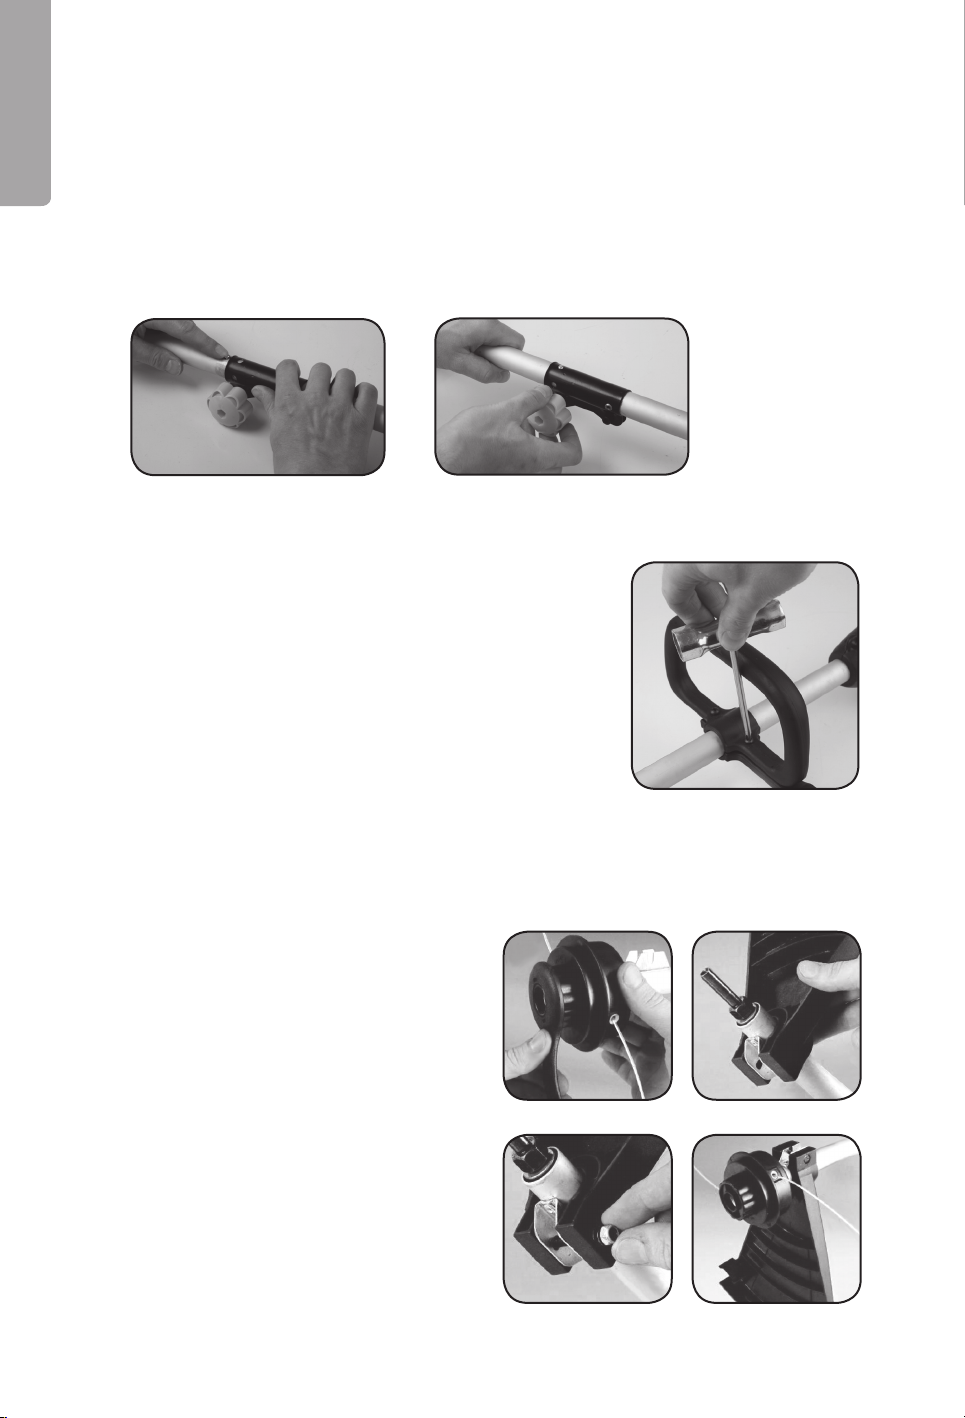
5. Assembly
The shafts (5a), (5b), the loop handle (4) and the trimmer safety guard must be assembled
before use.
Joining the shafts (5a) and (5b)
1. Insert the lower shaft (5b) into the upper shaft (5a) until the ball-lock secures it in place.
. Tighten the shaft locking knob.
Figure 1
Figure 2
Assembly of secondary handle (4)
1. Loosen the screws and washers on the secondary handle.
. Take hold of the secondary handle (4), (together with
the enclosed side handle) on the upper shaft (5a) and
attach with washers and screws. The side handle can
be assembled either on the left or right side to adapt the
trimmer to right or left-handed users.
. Adjust the position of the secondary handle (160 – 00 mm
in front of the throttle lever) and screw together.
Figure 3
Assembly of the trimmer guard (3)
Warning! The trimmer guard must be assembled correctly to protect the operator and to
limit the length of the trimmer line. There is a cutter on the guard that cuts the line to the
right length.
1. The trimmer head should be disassembled
before assembling the trimmer guard ().
. Hold the trimmer head and use your hand
or the enclosed key to loosen the trimmer
head nut. See gure 4.
. Remove the trimmer head from the spindle.
4. Slide the trimmer guard over the shaft and
align the holes in the guard with holes in
the bracket. See gure 5.
5. Pass the bolt through the trimmer
guard from the side with the hexagonal
countersink and assemble the washer and
nut. See gure 6.
Reassemble the trimmer head on the
6.
spindle. See gure 7.
Figure 4
Figure 6 Figure 7
Figure 5
Page 7

6. Fuel and lubrication
Warning! Petrol is highly ammable. Avoid smoking close to where fuel is handled, do not
cause any sparks embers or naked ames either. Switch off the grass trimmer and let it
cool before refuelling it. Refuel outdoors and always move at least 3 metres away from the
refuelling site before starting the trimmer.
Mix petrol (unleaded 95 octane without added ethanol) with a good quality -stroke oil intended
for air-cooled -stroke engines. Recommended mixture: Petrol/oil 40:1 (.5 %).
• The engine is designed to be used with unleaded fuel.
• Use at least 87 octane fuel.
• Use unleaded fuel to protect the environment and your health.
• Bad quality fuel or oil can damage seals, fuel lines or the fuel tank.
6.1 Mixing the fuel
Note! Be precise with the mixture.
1. Measure out the petrol and oil precisely before mixing.
. Pour a small amount of the petrol into a clean fuel can.
. Pour in all of the oil and shake the fuel can.
4. Pour in the rest of the petrol and shake the fuel can for at least a minute. Certain oils do not
mix well; therefore it is important that the fuel can be agitated to mix the oil and petrol. The
engine will last longer if the fuel is well mixed, if the fuel is not mixed properly the mixture
will be too lean and the engine may be damaged.
5. Label the fuel can clearly, to avoid the risk of misidentication.
6. Fuel containing oil is only intended for -stroke engines, pure petrol is for 4-stroke engines,
it is therefore very important to label the fuel cans clearly.
Note! Do not mix too much fuel; it should be used within 90 days.
Warning!
Only use fuel containing oil for 2-stroke engines, using pure petrol without the addition
of oil will soon cause engine damage which is not covered by the guarantee.
ENGLISH
6.2 Refuelling the grass trimmer
1. Unscrew and remove the fuel cap.
. Fill with fuel until the tank is roughly 80% full.
. Replace and tighten the fuel cap then wipe up any spilt fuel on or around the grass trimmer.
Warning!
1. Refuel outdoors and on the ground.
. Always move at least metres away from the refuelling site before starting the trimmer.
. Switch off the grass trimmer and let it cool before refuelling it. Only refuel when you are
sure that the fuel can contains -stroke fuel!
7
Page 8
8
ENGLISH
7. Starting the engine
Note! Pull the starter handle straight out, if you pull at an angle the starter cord will rub on the
sleeve and soon wear out. Keep hold of the starting handle after pulling it and allow it to return
slowly. Never let go of the starting handle straight after pulling it, it could get tangled or break
something on the trimmer.
Note! See section “Troubleshooting” if the trimmer doesn’t start after several attempts.
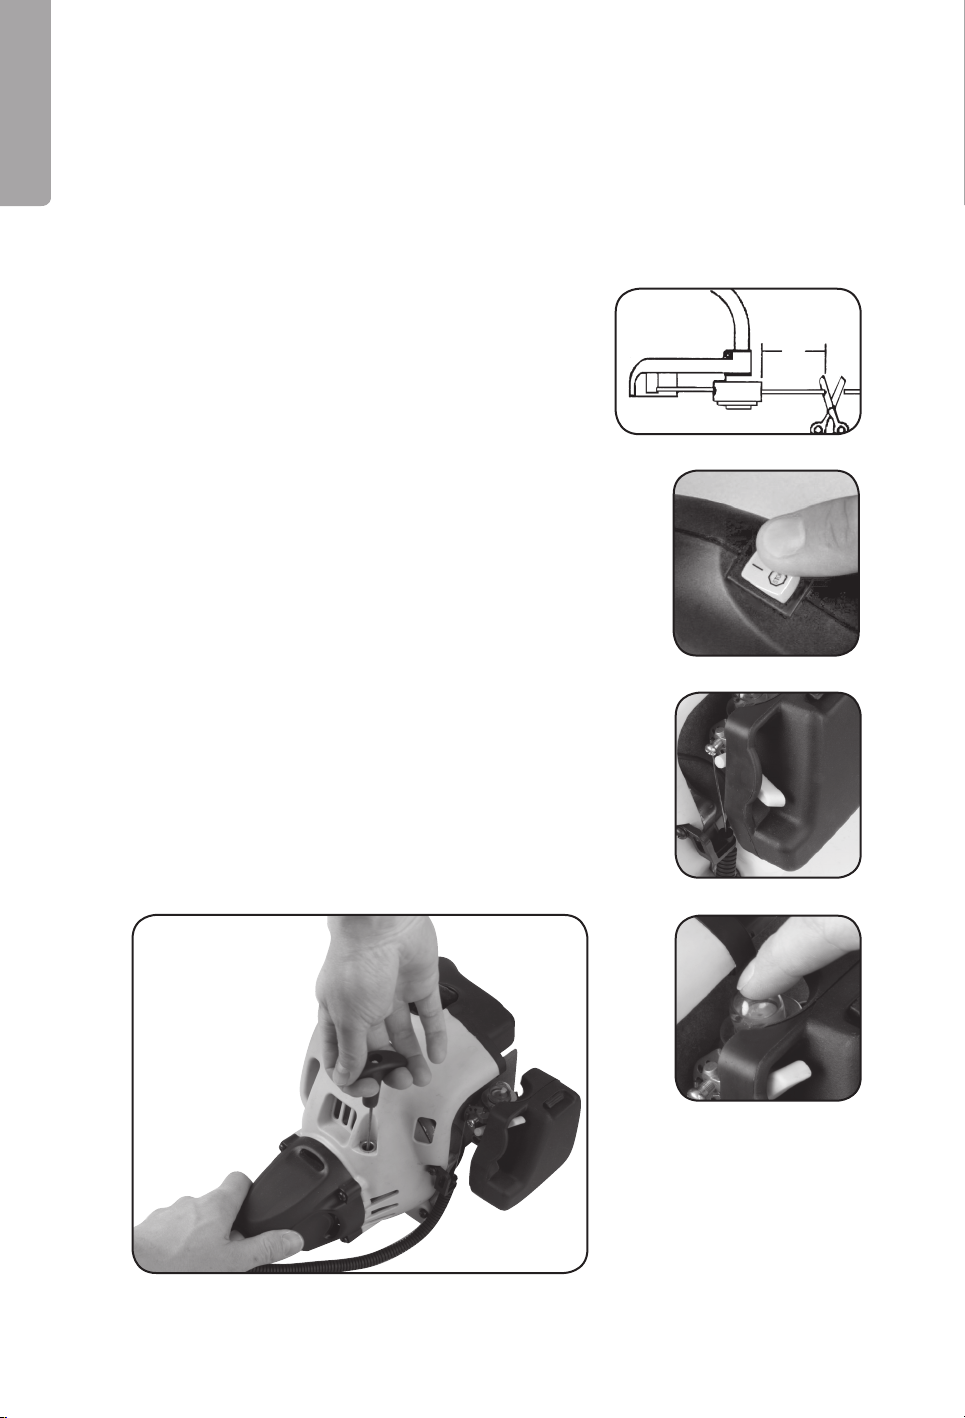
7.1 Starting the engine from cold
Cut the trimmer line to a length of 1 cm before starting to
reduce the load while the trimmer warms up.
1. Place the grass trimmer on a level surface.
. The spring switch (6) is always in the position ‘1’ and
does not need to be touched during ignition. See gure
9.
. Turn the choke (9) down to the “COLD START” position.
See gure 10.
4. Push in the primer bulb (10) 6 times. (the primer bulb is
on the upper side of the carburettor.) See gure 11.
5. Take a steady grip of the back handle.
6. Pull on the start line until a resistance is felt (circa 100
mm). See gure 1, then jerk the start line quickly until
the motor starts. This process can be repeated up to six
times in quick succession.
7. When the motor has started, let it run idle for circa 10
seconds and then push the safety catch (1) and the
throttle lever (8) so that the choke lever automatically
returns to the ‘Drive’ position.
8. Before loading, let the motor run on ‘no-load’ for a while
until it responds to throttle increase.
Figure. 8
Figure 9
13 cm
Figure 12
Figure 10
Figure 11
Page 9

7.2 Starting a warm motor
1. Place the grass trimmer on a at surface.
. The spring switch (6) is always in the position ‘1’ and
does not need to be touched during ignition.
See gure 9.
. Turn the choke lever (9) down to the ‘COLD START’
position and then turn up the choke lever to its original
position. See gure 1.
4. Take a steady grip of the back handle.
5. Pull on the start line until a resistance is felt (circa 100
mm). See gure 11, then jerk the start line quickly until
the motor starts. This process can be repeated up to six
times in quick succession.
6. If the motor does not start repeat all of the steps in ‘Start
of cold motor’.
7.3 Switching the engine off
Release the throttle and let the engine idle, turn the ignition
switch (7) to “STOP”. See gure 14.
ENGLISH
Figure 13
Figure 14
Helpful suggestions
Warning! Remove all objects such as cans, bottles and stones from the ground before
starting to use the grass trimmer, otherwise they can be thrown about by the trimmer
line and cause injury or damage the trimmer.
Switch off the grass trimmer at once and check it for damage if you notice that something is
ejected or if the grass trimmer starts vibrating. Do not operate the grass trimmer if it has been
damaged.
Note! Allow the engine to reach full speed before starting to cut the grass, never try to cut
grass at low speed.
Warning! Never raise the trimmer head above knee-height when it is spinning.
Warning! Never use metal or plastic coated metal trimmer line, this could cause serious
accidents.
9
Page 10
10
ENGLISH
8. Use
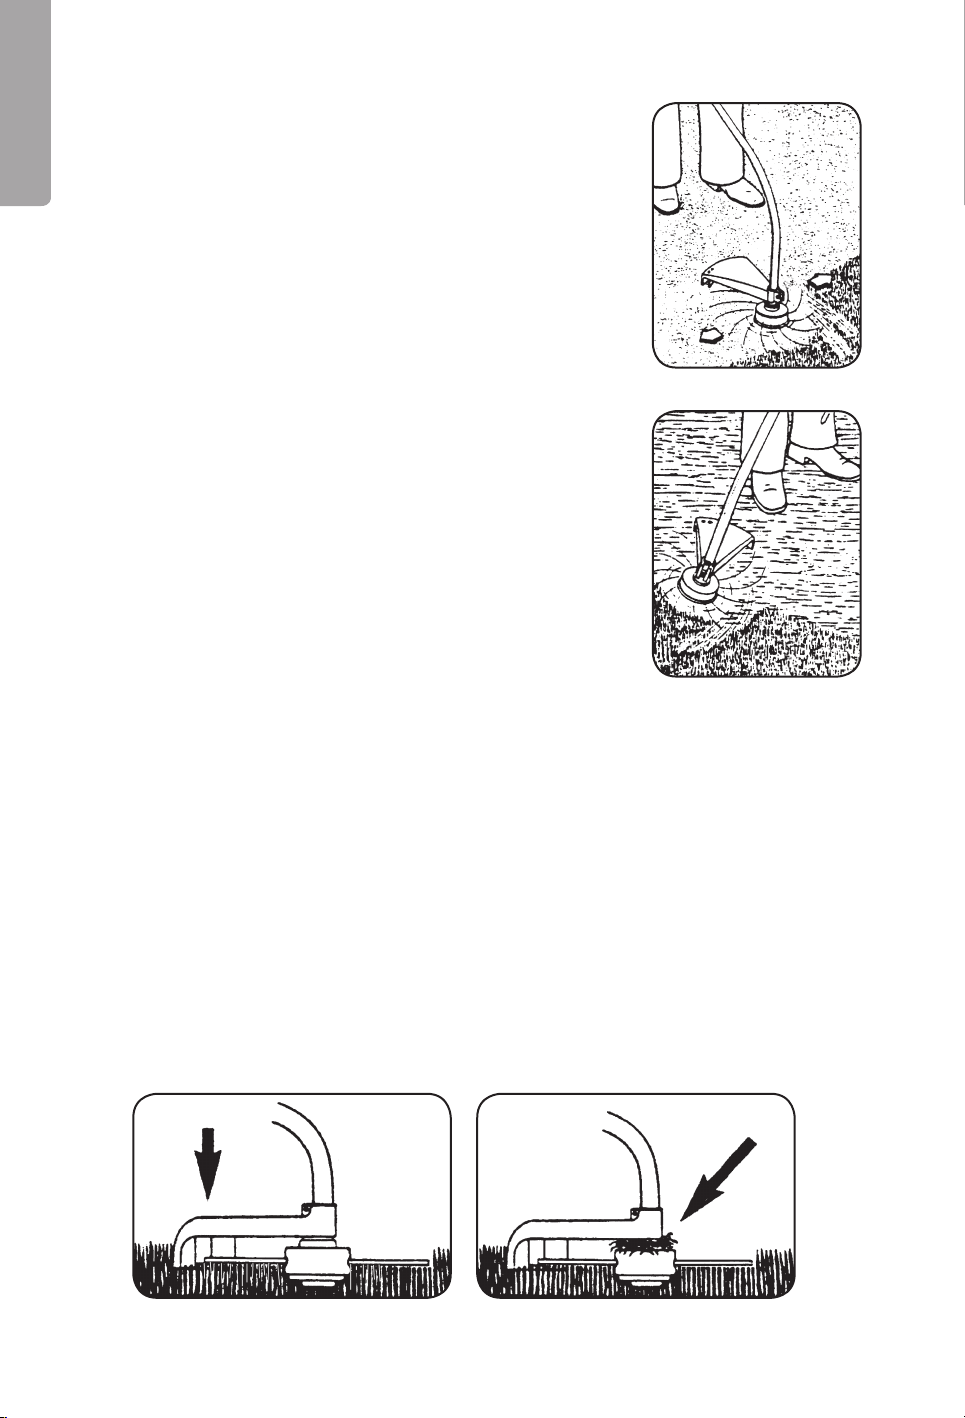
• Hold the grass trimmer in both hands.
• Depress the throttle and let the engine speed up.
• Hold the trimmer head parallel to the ground and swing
the grass trimmer from side to side whilst walking slowly
forwards, do not move forward so much if the going gets
heavy. See g. 15.
• Do not move the trimmer head towards you, always work
away from yourself.
8.1 Trimming round trees and bushes
Lean the trimmer head forward slightly and start trimming from
left to right whilst slowly walking around the tree. Be careful, so
the trimmer line doesn’t cut the bark of the tree or the plants
you want to keep! If you trim grass close to fences, foundations,
rocks etc, the trimmer line will soon wear out.
Fig. 15
8.2 Preparing the ground (removing all
vegetation)
• Angle the trimmer head approx. 0 degrees to the left (it is
easier if you loosen the loop handle and adjust it).
See g. 16.
• Do not do this if there is the slightest risk of something being
ung up and injuring people or animals standing within a
radius of 0 metres.
Fig. 16
8.3 Adjusting the trimmer line
Adjust the trimmer line like this:
1. Run the engine at full speed whilst carrying out points -4.
. Tap the trimmer head on the ground and lift it up again. See g. 17.
. The line will be fed out automatically.
4. The line will be cut to the correct length by the cutter under the trimmer guard.
5. Switch off the engine and using something like a screwdriver, clean off any grass and
debris from around the guard and trimmer head, otherwise it could impair the cooling of the
drive shaft. See g. 18.
Fig. 17
Tap the
trimmer
head
Fig. 18
Page 11
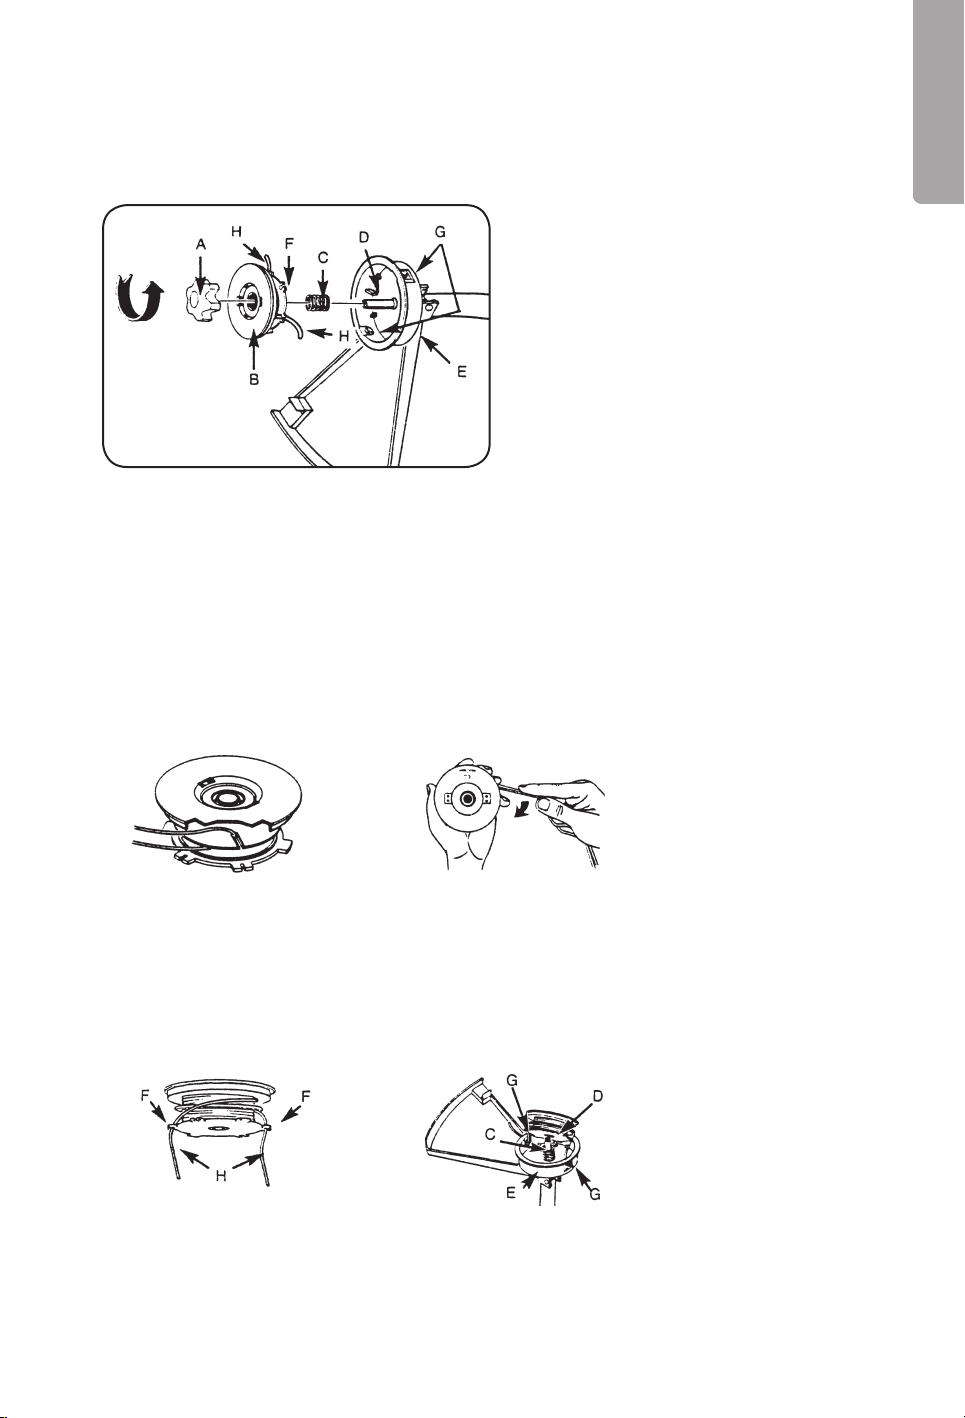
9. Maintenance
Warning! Disconnect the sparkplug lead before carrying out any maintenance.
A. Locking cap
B. Spool
C. Spring
D. Spindle
E. Housing
F. Line slot
G. Line hole
Fig. 18
9.1 Changing the trimmer line
1. Turn the locking cap (A) anticlockwise and remove it (either by hand or using the spanner
supplied).
. Remove the spool (B) and the spring (C) from the spindle (D).
. Remove the existing trimmer line (H).
4. First measure, then cut a 8.6 metre length of trimmer line (Ø mm). Fold it in the middle
so that you have two ends measuring 4. metres. Place the middle of the fold in one of the
slots in the disc dividing the spool See g.0.
H. Trimmer line
ENGLISH
Fig. 20 Fig. 21
5. Wind both ends of the line onto the spool, clockwise as shown in g. 1. Hold the line in
your ngers so that it is taught as it is wound on, stop when roughly 15 cm of the line ends
remain.
6. Press the ends of the line into the slots on opposite sides of the spool as g. shows.
Fig. 22 Fig. 23
7. Push in the spring (C) on the bottom of the spool (if it is not already secure). Pull the ends
of the line through the holes (G) in the side of the housing (E). See g. .
11
Page 12

1
ENGLISH
8. Push the spool (B) into the housing whilst feeding the ends of the line through the holes (G).
9. Press down the spool (B), depressing the spring, tug the ends of the line, freeing them from
the slots (F) in the spool.
10. Push the assembled trimmer head onto the spindle, screw on the locking cap (A) clockwise
(only nger tight). (See g. 5)
11. Cut the ends of the line so they are no longer than 1 cm.
Fig. 24 Fig. 25
9.2 Air filter, inspection/cleaning
Never use the grass trimmer without an air lter, clean or replace the lter if it is damaged or dirty.
Clean the air lter like this:
1. Remove lter cover by pressing in the sides and lifting it
off.
. Remove the sponge dust cover lter.
. Wash the lter with soap and water. Do not use petrol!
4. Squeeze out water from the sponge and allow to dry.
5. Replace the lter and remount the cover.
6. Make sure the cover is securely in place so that it cannot
be shaken loose.
Fig. 26
9.3 Adjusting the carburettor
The carburettor has been factory adjusted for optimum power.
9.4 Spark plug
Type of spark plug: TORCH L8RTC, Champion CJ7Y, NGK BPMR7A
Recommended spark plug gap: 0.65 mm. Se g. 7.
Tightening moment: 1 – 15 Nm.
Fig. 27
0,635 mm
Page 13

9.5 Sharpening the trimmer line cutter (on the trimmer guard)
1. Remove the cutter (E) from the trimmer guard (F). See g.
8.
. Hold the cutter in a vice, sharpen the blade with a at
le, sharpening in one direction only and making sure to
maintain the original grinding angle.
Fig. 28
10. Storage
1. Clean the exterior of the grass trimmer, guard, trimmer head, spindle, the external parts of
the engine, etc.
. Transfer any fuel remaining in the fuel tank to a petrol can.
. Start the engine when the fuel tank has been emptied.
4. Allow the engine to idle until it cuts out, to empty the carburettor of fuel.
5. Allow the engine to cool for 5 minutes.
6. Use a spark plug socket to remove the spark plug.
7. Pour one teaspoon of pure -stroke oil into the cylinder via the spark plug hole, pull the
starter handle slowly a few times to distribute the oil evenly over the inside of the engine,
replace the spark plug.
8. Store the grass trimmer in a dry and well ventilated place.
ENGLISH
10.1 Using the trimmer after it has been stored
1. Use a spark plug socket to remove the spark plug.
. Pull the starter handle quickly and smoothly a few times to get the surplus oil out of the
cylinder.
. Clean the spark plug electrodes or replace the spark plug with one having the correct plug
gap.
4. Tighten the spark plug using a spark plug socket.
5. Fill the fuel tank.
6. Follow the instructions in section 6.1 “Starting the engine from cold”
1
Page 14

ENGLISH
10. Troubleshooting
Problem Cause Correction
The engine won’t start or
only runs at low speed.
The engine starts but with
loss of power.
The engine doesn’t respond
to the throttle.
Loss of power under load. Incorrect spark plug gap. Clean and check the gap or
The engine runs irregularly. Dirt in the carburettor. Allow a qualied technician
Incorrect starting procedure. Read the instruction ma-
nual.
Dirt in the carburettor. Allow a qualied technician
to clean the carburettor.
Faulty spark plug. Clean or change the spark
plug.
Clogged fuel lter. Change the fuel lter (inside
the fuel tank).
Wrong choke setting. Set the choke to “OPEN”.
Dirty air lter. Clean or change the air
lter.
Dirt in the carburettor. Allow a qualied technician
to clean the carburettor.
The engine is not warm
enough.
Allow the engine to idle for
a minute.
change the spark plug.
to clean the carburettor.
The engine smokes a lot. Incorrect fuel mixture. Use petrol and -stroke oil
in the ratio 40:1 (.5%).
Note!
The grass trimmer conforms to current safety requirements. Repairs to the grass trimmer
should always be carried out using original spare parts and by a qualied technician, failure to
do so may result in injury.
12. Disposal
Follow local ordinances when disposing of this product. If you are unsure about how to dispose
of this product contact your municipality.
14
Page 15

Grästrimmer
Artikelnummer: 30-9940, modell: HY33PD-1
Läs igenom hela bruksanvisningen före användning och spara den sedan för framtida bruk.
Vi reserverar oss för ev. text- och bildfel samt ändringar av tekniska data. Vid tekniska problem eller andra frågor, kontakta vår kundtjänst (se adressuppgifter på baksidan).
Fara: Produkten är endast avsedd för att användas med trimmerlina, använd
aldrig sågklinga eller andra tillbehör, det ökar faran för olycksfall.
Varning: Barn, husdjur och åskådare skall vara på ett avstånd av minst 15 meter från
grästrimmern när den används, stäng av omedelbart om någon kommer närmare.
1. Produktmärkning med säkerhetssymboler på maskinen
Läs hela bruksanvisningen.
Använd skyddshjälm, skyddsglasögon/visir och hörselskydd.
SVENSKA
Använd skyddsskor.
Använd skyddshandskar.
Produkten är endast avsedd för att användas med trimmerlina, använd
ALDRIG sågklinga eller andra tillbehör.
Varning! Håll undan fötterna från trimmerlinan.
Stenar och andra föremål kan kastas iväg av grästrimmern.
Tillåt ingen annan än användaren vara nära grästrimmern när den används. Barn, husdjur och åskådare skall benna sig på ett avstånd av
minst 15 meter från grästrimmern när den används.
Varning! Het yta.
Varning! Vass kniv på undersidan av skyddet, vidrör inte kniven.
grästrimmern när den används. Barn, husdjur och åskådare skall benna
sig på ett avstånd av minst 15 meter från grästrimmern när den används.
15
Page 16

16
SVENSKA
2. Säker användning
Obs! Stäng av motorn innan all service, justering och rengöring av grästrimmern.
1. Använd skyddsskor, åtsittande kläder och
skyddsglasögon/visir, hörselskydd och
hjälm.
. Använd aldrig grästrimmern om du är trött,
sjuk, upprörd eller under påverkan av mediciner som gör dig trött, eller påverkad av
alkohol eller droger.
. Var alltid aktsam vid hantering av bränsle.
Öppna tanklocket försiktigt och släpp ut
trycket som kan ha uppkommit i tanken.
Torka upp allt spill och ytta sedan grästrimmern minst meter från tankningsplatsen
innan den startas.
a Avlägsna alla antändningskällor, gnistor,
öppen låga, tobaksrökning etc. från platser
där bränsle blandas, hanteras eller förvaras.
b Rök inte under tankning eller under arbete
med grästrimmern.
4. Tillåt ingen annan än användaren vara nära
grästrimmern vid start eller arbete med den.
Barn, husdjur och åskådare skall vara på
ett avstånd av minst 15 meter från grästrimmern när den används.
5. Håll alltid grästrimmern stadigt i båda handtagen med ngrarna på en sida av handtaget och tummen på andra sidan när motorn
är startad
6. Håll undan alla kroppsdelar från trimmerlinan när motorn går.
7. Kontrollera före start att trimmerlinan inte
har kontakt med något föremål.
8. Transportera endast grästrimmern med
motorn avstängd.
9. Inspektera alltid grästrimmern innan start,
starta den inte om det nns utslitna, saknade eller skadade delar. Använd aldrig en
grästrimmer som är skadad, feljusterad eller
som inte är monterad på rätt sätt.
10. All annan service på grästrimmern än de
som nämns i bruksanvisningen ska utföras
av kvali cerad personal.
11. Stäng av grästrimmern innan den läggs ner
på marken.
1. Var extra uppmärksam när du kapar små
buskar eller tjockt gräs kan fastna i trimmerhuvudet.
1. Håll handtagen rena, torra och fria från olja
eller bränsle.
14. Använd grästrimmern endast utomhus eller
i väl ventilerade lokaler. starta den aldrig i
ett stängt rum eller byggnad. Avgaserna är
farliga att andas in, de innehåller koloxid.
15. Undvik att föra trimmerhuvudet nära små
föremål som kan kastas iväg, kontrollera
ytan som ska trimmas har småstenar etc.
innan arbetet påbörjas.
16. Stå alltid nedanför trimmern om du använder den på lutande mark. Använd ALDRIG
trimmern på lutande mark om det nns den
minsta risk att du tappar fotfästet, ramlar
eller glider ner, håll i båda handtagen.
17. Håll grästrimmern ren från gräsrester och
andra beläggningar, speciellt skyddet, trimmerhuvud och motor.
18. Grästrimmern får endast användas av vuxna personer som har läst bruksanvisningen.
19. Använd endast tvåtaktsbränsle med inblandning av ,5 % tvåtaktsolja (40:1)
avsedd för luftkylda tvåtaktsmotorer av god
kvalitet, användning av bensin utan oljeinblandning leder snabbt till motorskador som
inte omfattas av garantin.
0. Använd inte grästrimmern utan ljuddämpare
eller ljuddämparkåpa.
1. Håll i grästrimmerns båda handtag på ett
säkert sätt med ngrarna på en sida av
handtaget och tummen på andra sidan.
. Ljuddämparen blir mycket het, håll undan
händer och andra kroppsdelar.
. Trimmerhuvudet får inte lyftas upp under ar-
betet, trimmerlinan kan skada användaren,
arbeta så nära marken som möjligt.
4. Grästrimmern får inte användas till något
annat ändamål än trimmning av gräsmattor
och trädgårdar.
5. Grästrimmern får inta användas om skyddet
saknas eller är skadat.
6. Produkten får inte ändras och/eller använ-
das för andra arbetsmoment, risken för
olycksfall ökar och garantin gäller inte.
7. Använd inte grästrimmern i närheten av
brännbara gaser och vätskor annars kan det
leda till brand eller explosion.
Page 17
17
SVENSKA
3. Presentation
13
9
11
4
18
3
2
5
a
5
b
8
15
16
1
19
17
7
6
10
20
10
12
14
1. Trimmerhuvud
. Trimmerkniv
. Trimmerskydd
4. Bygelhandtag (med ett extra
sidohandtag)
5.a Riggrör, övre
5.b Riggrör, nedre
6. Strömbrytare (1 – STOP,
återfjädrande)
7. Bränsletank
8. Gasreglage
9. Starthandtag
10. Primerpump
11. Tändstift
1. Luft lterkåpa
1. Säkerhetsspärr
14. Chokereglage (Tryck ner
för att aktivera choke)
15. Trimmernyckel
16. Tändstiftsnyckel
17. Axelband
18. Låsratt, trimmerhuvud
19. Låsratt, riggrör
0. Tanklock
Page 18

18
SVENSKA
4. Specifikationer
Modell: HYPD-1
Torrvikt: 5, kg
Motor: Luftkyld -taktsmotor
Cylindervolym: 5 cm³
Klippbredd: 8 cm
Bränsle: Blandning bensin & olja 40:1 (.5%)
Tändning: Elektronisk
Max motoreffekt: 0,74 kW vid 7500 rpm
Arbetsvarvtal: 7000-8500 rpm
Max motorvarvtal: 8500 rpm
Tomgångsvarvtal: 500 rpm
Tändstift: TORCH L8RTC, Champion CJ7Y, NGK BPMR7A
Tankvolym: 0,6 liter
Skärutrustning: Nylontråd Ø mm
Ljud LwA: 110 dB (A)
LpA: 88 dB (A)
Vibration, tomgång: 10,5 m/s²
fullgas: 10 m/s²
Page 19

5. Montering
Riggrören (5a), (5b), bygelhandtaget (4) och trimmerskyddet () måste monteras innan användning.
Sammanfoga riggrören (5a) och (5b)
1. Tryck in det nedre riggröret (5b) i det övre riggröret (5a), vrid det nedre riggröret tills
kulspärren låser i det övre hålet
. Dra åt låsratten.
SVENSKA
Bild 1
Bild 2
Montera bygelhandtaget (4)
1. Lossa skruvar och muttrar på bygelhandtaget.
. Håll fast bygelhandtaget (4) (tillsammans med det bifogade
sidohandtaget) på det övre riggröret (5a) och fäst det med
skruv och mutter. Sidohandtaget kan monteras åt endera
vänster eller höger sida, för att anpassa trimmern till högereller vänsterhänta.
. Justera placeringen av bygelhandtaget (160 – 00 mm
framför gasreglaget) xera det med skruvarna.
Bild 3
Montera trimmerskyddet (3)
Varning: Trimmerskyddet måste monteras korrekt för att skydda användaren
och för att begränsa trimmerlinans längd, det sitter en kniv i skyddet som skär
!
av linan till rätt längd.
. För att montera trimmerskyddet () skall
trimmerhuvudet först demonteras.
4. Håll emot på trimmerhuvudet och använd
handen eller den medföljande nyckeln för
att lossa på muttern/låsratten för trimmerhuvudet. Se bild 4.
5. Ta bort hela trimmerhuvudet från spindeln.
6. Skjut på trimmerskyddet på riggröret och
passa in hålen i trimmerskyddet med hålen
i fästet. Se bild 5.
7. Skjut i bulten i trimmerskyddet från den si
dan som har en sexkantig fördjupning och
montera brickan och muttern. Se bild 6.
8. Montera trimmerhuvudet på spindeln igen.
Se bild 7.
Bild 4
-
Bild 6 Bild 7
Bild 5
19
Page 20

20
SVENSKA
6. Bränsle och smörjning
Varning! Bensin är mycket eldfarligt. Undvik att röka i närheten där bränsle hanteras,
medför inte heller någon öppen låga, glöd eller gnistor. Stäng av grästrimmern och låt
den kallna innan den tankas. Var utomhus vid tankning och ytta alltid minst 3 meter från
tankningsplatsen innan grästrimmern startas.
Blanda bensin (oblyad 95 oktan utan etanoltillsats) med en -taktsolja av god kvalitet som är
avsedd för luftkylda tvåtaktsmotorer. Rekommenderat blandningsförhållande: bensin/olja 40:1
(,5 %)
• Motorn är konstruerad för att användas med oblyat bränsle.
• Använd bränsle med minst 87 oktan.
• Använd oblyat bränsle för att skydda miljön och din hälsa.
• Bränsle eller olja av dålig kvalitet kan skada tätningar, bränsleledningar eller bränsletank.
6.1 Blanda bränsle
Obs! Var noga med blandningen.
1. Mät noga upp bensin och olja innan blandning.
. Häll i lite bensin i en ren dunk som är godkänd för bränsle.
. Häll i all oljan och skaka dunken.
4. Häll i resten av bensinen och skaka dunken i minst en minut. Vissa oljor är svåra att
blanda, därför är det viktigt att skaka dunken så att olja och bensin blandas, motorn håller
längre om bränslet är välblandat, om bränslet inte är rätt blandat kan motorn gå på för
mager blandning med större risk för motorskador.
5. Märk dunken så att inga missförstånd om innehållet kan uppkomma.
6. Oljeblandat bränsle är endast avsett för tvåtaktsmotorer, och ren bensin för
fyrtaktsmotorer, därför är det mycket viktigt att märka upp bränsledunkarna.
Obs! Blanda inte för mycket bränsle, det bör användas inom 90 dagar.
Varning! Använd endast oljeblandat bränslet för tvåtaktsmotorer, användning av ren ben-
sin utan inblandad olja leder mycket snabbt till motorskador som inte täcks av garantin.
6.2 Tanka grästrimmern
1. Skruva upp, och ta bort påfyllningslocket.
. Fyll på bränsle till ca 80 % av tankens rymd.
. Skruva fast tanklocket så att det sitter säkert och torka upp ev. bränslespill på och omkring
grästrimmern.
Varning!
1. Var utomhus på marken vid tankning.
. Flytta alltid minst meter från tankningsplatsen innan grästrimmern startas.
. Stäng av grästrimmern och låt den kallna innan den tankas. Tanka endast om du är helt
säker på att dunken innehåller tvåtaktsbränsle!
Page 21

7. Start av motor
Obs! Dra starthandtaget rakt utåt, om draget är snett gör friktionen mot kanten av bussningen
att startsnöret slits och går av i förtid. Håll kvar starthandtaget efter startförsöket och släpp tillbaka det sakta, släpp aldrig starthandtaget efter rycket då kan det trassla sig eller slå sönder
något på grästrimmern.
Obs! Se avsnittet ”Felsökning” om grästrimmern inte startar efter upprepade försök.
7.1 Start av kall motor
Klipp av trimmerlinorna till en längd av ca 1 cm innan start
för att minska belastningen under varmkörningen. Se bild 8.
1. Placera grästrimmern på en plan yta.
. Den återfjädrande strömbrytaren (6) står alltid i läge ”1”,
och behöver alltså inte röras vid start. Se bild. 9
. Vik chokereglaget (9) neråt till kallstartsläge ”COLD
START”. Se bild 10.
4. Tryck in primerpumpen (10) 6 gånger (primerpumpen
nns på översidan av förgasaren). Se bild 11.
5. Håll stadigt i det bakre handtaget.
6. Dra ut starthandtaget tills ett motstånd känns (ca 100
mm) Se bild. 1, ryck i starthandtaget snabbt och mjukt,
tills motorn startar eller upp till 6 gånger i snabb takt.
7. Låt motorn gå på tomgång i ca 10 sekunder när den har
startat, tryck sedan in säkerhetsspärren (1) och gasreg
laget (8) då återgår chokereglaget automatiskt till ”Kör”läge.
8. Låt motorn gå obelastad en stund tills den svarar bra på
gaspådrag innan du börjar belasta den.
Bild. 8
Bild 9
-
13 cm
SVENSKA
Bild 12
Bild 10
Bild 11
21
Page 22

22
SVENSKA
7.2 Start av varm motor
1. Placera grästrimmern på en plan yta.
. Den återfjädrande strömbrytaren (6) står alltid i läge ”1”,
och behöver alltså inte röras vid start. Se bild 1.
. Vik chokereglaget (9) neråt till kallstartsläge ”COLD
START” och vik upp chokereglaget igen.
4. Håll stadigt i det bakre handtaget.
5. Dra ut starthandtaget tills ett motstånd känns (ca 100 mm)
ryck i starthandtaget snabbt och mjukt tills motorn startar
eller upp till 6 gånger i snabb takt. Se bild 1.
6. Om inte motorn startar: Repetera alla stegen i ”Start av
kall motor”.
Bild 13
7.3 Stäng av motorn
Släpp gasreglaget och låt motorn gå ner på tomgång, tryck
strömbrytaren (6) bakåt mot ”STOP”, håll in knappen och
släpp den när motorn har stannat Se bild 14.
Bild 14
Tänk på detta
Varning! Plocka bort alla föremål från marken som burkar, askor, stenar etc. innan du
börjar använda grästrimmern, de kan annars kastas iväg av trimmerlinaen och leda till
olycksfall eller skada grästrimmern.
Stäng av grästrimmern direkt och undersök om den har blivit skadad om du märker att något
kastas iväg eller om grästrimmern börjar vibrera. Använd inte grästrimmern om den har skadats.
Obs! Låt motorn gå upp i fullt varv innan du börjar trimma gräset, försök aldrig trimma gräs
med lågt motorvarv.
Varning! Lyft aldrig trimmerhuvudet över knähöjd när det snurrar.
Varning! Använd aldrig trimmerlina av metall eller plastad metall, det kan leda till svåra
olycksfall.
Page 23

8. Användning
• Håll i grästrimmern med båda händerna.
• Tryck in gasreglaget och låt motorn gå upp i varv.
• Håll trimmerhuvudet parallellt med marken och sväng
grästrimmern fram och tillbaka, ytta fram och sväng etc.,
ytta inte fram så långt om det börjar gå tungt. Se bild 15.
• Rör inte trimmerhuvudet mot dig, arbeta alltid ifrån dig.
8.1 Trimmning runt träd och buskar
Luta trimmerhuvudet något framåt och börja trimma från vänster
mot höger under tiden som du yttar dig sakta och försiktigt runt
trädet. Var försiktig, så att inte skärtråden skadar trädens bark
eller växter som ska vara kvar! Om du trimmar bort gräs nära
staket, husgrunder, stenar etc. slits tråden mycket.
8.2 Markberedning (ta bort all vegetation)
• Luta trimmerhuvudet ca 0 grader åt vänster (det underlättar om du lossar bygelhandtaget och vrider det).
Se bild 16.
• Gör inte detta om det nns minsta risk att något kan kastas
iväg och skada människor eller djur som står närmare än 0
meter.
SVENSKA
Bild. 15
Bild. 16
8.3 Mata ut tråd
Mata ut trimmerlina så här:
1. Låt motorn gå på toppvarv under nedanstående punkter -4.
. Stöt ner trimmerhuvudet mot marken och släpp upp det igen. Se bild 17.
. Tråden kommer att matas ut automatiskt.
4. Tråden kommer att kapas till rätt längd av kniven under skyddet.
5. Stäng av motorn och använd t.ex. en skruvmejsel för att ta bort gräs och annat som
har fastnat mellan skyddet och trimmerhuvudet, annars kan det försämra kylningen av
drivaxeln. Se bild 18.
Bild. 17
Stöt ner
trimmerhuvudet
mot
marken
Bild. 18
23
Page 24

24
SVENSKA
9. Underhåll
Varning: Koppla loss tändstiftets kabel innan du genomför underhåll.
A. Ratt
B. Spole
C. Fjäder
D. Spindel
E. Kåpa
Bild 19
9.1 Byte av tråd
1. Vrid muttern/låsratten (A) moturs och ta bort den (använd handen eller den
medföljandenyckeln).
. Ta bort spole (B) och fjäder (C) från spindeln (D).
. Ta bort kvarvarande trimmerlina (H).
4. Mät upp och kapa en trimmerlina (Ø mm) till en längd av 8,6 meter, vik den på mitten
så att du får två ändar som är 4. meter långa, placera mitten med vecket i ett av spåren i
skivan som avdelar spolen Se bild 0.
F. Trådhållare
G. Hål för tråd
H. Trimmerlina
Bild 20
5. Linda trådens båda ändar på spolen medurs som visas i bild 1 Håll i tråden med
ngrarna under tiden så att den är sträckt när den lindas på, sluta när ca 15 cm av
trådändarna återstår.
6. Tryck fast trådarna i trådhållarna (F) mitt emot varandra som bilden bild visar.
Bild 22 Bild 23
7. Tryck fast fjädern (C) på spolens nedre sida (om den inte redan sitter fast), dra ut
trådändarna genom hålen (G) i sidan av kåpan (E). Se bild .
Bild 21
Page 25

8. Tryck in spolen (B) i kåpan och mata samtidigt ut trådarna genom hålen (G). (Se bild 4).
9. Tryck spolen (B) inåt så att fjädern trycks ihop, ryck till i trådarna så att de lossnar från
trådhållarna (F) i spolen.
10. Tryck fast det kompletta trimmerhuvudet på spindeln och håll fast, dra åt ratten (A) medurs
(dra endast åt med handkraft) (Se bild 5).
11. Klipp av trådarna så att de inte är längre än ca 1 cm.
Fig. 24 Fig. 25
9.2 Luftfilter, inspektion/rengöring
Använd aldrig grästrimmern utan luftlter, rengör ltret eller byt ut det om det är skadat
eller smutsigt.
Rengör luftltret så här:
1. Tryck in låsiken på luftrenarkåpan och ta bort kåpan.
. Ta loss skumplastltret.
. Tvätta ltret i tvål och vatten. Använd inte bensin!
4. Krama ur ltret och låt det sedan lufttorka.
5. Sätt tillbaka ltret och montera kåpan.
6. Se till att kåpan sitter fast så att den inte skakar loss.
SVENSKA
9.3 Förgasarinställning
Förgasaren är fabriksinställd för optimal effekt.
9.4 Tändstift
Tändstift typ: TORCH L8RTC, Champion CJ7Y, NGK BPMR7A
Rekommenderat elektrodavstånd för tändstiftet: 0,65 mm.
Se bild 7.
Åtdragningsmoment: 1 – 15 Nm.
25
Fig. 26
0,635 mm
Fig. 27
Page 26

26
SVENSKA
9.6 Skärpning av trådkniven (på trimmerskyddet)
1. Ta bort trådkniven (E) från trimmerskyddet (F).
Se bild 8.
. Sätt trådkniven i ett skruvstycke, skärp trådkniven
med en at l, la bara åt ett håll och var noga att
behålla den tidigare slipvinkeln.
Bild 28
10. Förvaring
1. Rengör grästrimmern utvändigt, skydd, trimmerhuvud, spindel, motorns yttre delar etc.
. Häll över kvarvarande bränsle i tanken till en bensindunk.
. Starta motorn när bränsletanken är tömd.
4. Låt motorn gå på tomgång tills den stannar för att tömma förgasaren på bränsle.
5. Låt motorn kallna i ca 5 minuter.
6. Använd en tändstiftshylsa för att ta ur tändstiftet.
7. Häll i en tesked ren -takts olja in i cylindern genom tändstiftshålet, dra sakta i
starthandtaget några gånger för att fördela oljan över motorns insida, sätt tillbaka tändstiftet.
8. Förvara grästrimmern på en torr och ventilerad plats.
10.1 Börja användning efter förvaring
1. Använd en tändstiftshylsa för att ta ur tändstiftet.
. Ryck i starthandtaget snabbt och mjukt era gånger för att få ur överskottsoljan ur cylindern.
. Rengör tändstiftets elektroder eller använd ett nytt tändstift med rätt elektrodavstånd.
4. Dra fast tändstiftet med en tändstiftshylsa.
5. Fyll på bränsle i tanken.
6. Följ instruktionerna i avsnitt 6.1 ”Start av kall motor”.
Page 27

11. Felsökning
Problem Orsak Åtgärd
Motorn startar inte eller
går bara på lågt varv.
Motorn startar men har
dålig kraft.
Motorn svarar inte på
gasen.
Motorn är svag vid belastning.
Motorn går ojämnt. Förorening i förgasaren. Låt en kvalicerad verkstad
Motorn röker mycket. Felaktig bränsleblandning. Använd bensin och tvåtaktsolja
Felaktig startprocedur. Läs bruksanvisningen.
Förorening i förgasaren. Låt en kvalicerad verkstad
rengöra förgasaren.
Felaktigt tändstift. Rengör eller byt ut tändstiftet.
Bränslelter igensatt. Byt ut bränslelter (inne i tan-
ken).
Chokereglaget står fel. Öppna chokereglaget ”OPEN”.
Lortigt luftlter. Rengör eller byt ut lter.
Förorening i förgasaren. Låt en kvalicerad verkstad
rengöra förgasaren.
Motorn ej varmkörd tillräckligt.
Tändstiftets elektrodavstånd felaktigt.
Låt motorn gå på lågvarv en
minut.
Rengör och kontrollera avstånd
eller byt ut tändstiftet.
rengöra förgasaren.
i blandningsförhållande 40:1
(,5 %).
SVENSKA
Obs!
Grästrimmern överensstämmer med gällande säkerhetskrav. Reparationer av grästrimmer
ska alltid utföras med originalreservdelar av fackman, annars nns risk för personskada.
Avfallshantering
När du ska göra dig av med produkten ska detta ske enligt lokala föreskrifter. Är du osäker på
hur du ska gå tillväga, kontakta din kommun.
27
Page 28

NOR SK
28
Gresstrimmer
Artikkelnummer: 30-9940, modell: HY33PD-1
Les nøye igjennom hele bruksanvisningen og ta vare på den til senere bruk. Vi reserverer oss
mot ev. tekst- og bildefeil, samt forandringer av tekniske data. Ved tekniske problemer eller
andre spørsmål, ta kontakt med vårt kundesenter (se opplysninger på baksiden).
Fare: Produktet er kun beregnet for å brukes med trimmertråd, bruk aldri sagklinge eller annet tilbehør. Det øker faren for ulykker.
Advarsel: Barn, dyr og tilskuere skal være på minst 15 meters avstand når gresstrimmeren er i bruk. Stopp umiddelbart hvis noen kommer nærmere.
1. Produktmerking med sikkerhetssymboler på maskinen
Les bruksanvisningen nøye.
Bruk vernehjelm, vernebriller/visir og hørselsvern.
Bruk vernesko.
Bruk vernehansker.
Produktet er kun beregnet for bruk med trimmertråd. Bruk aldri sagklinge
eller annet tilbehør. Det øker faren for ulykker.
Advarsel! Hold føttene borte fra tråden.
Steiner og andre gjenstander kan slynges ut fra trimmeren.
Tillat ingen andre enn operatøren å være nær gresstrimmeren når den er
i bruk. Barn, husdyr og tilskuere skal benne seg på en avstand av minst
15 meter fra gresstrimmeren når den er i bruk.
Advarsel! Varm overate.
Advarsel! Skarp kniv på undersiden av dekselet. Berør ikke kniven.
Page 29

2. Sikker bruk
Obs! Stopp motoren før all service, justering og rengjøring av gresstrimmeren.
1. Bruk vernesko, tettsittende klær og vernebriller/visir, hørselsvern og hjelm.
. Bruk aldri gresstrimmeren om du er trøtt,
syk, irritert eller under påvirkning av medisiner som gjør deg trøtt, eller om du er påvirket av alkohol eller narkotika.
. Vær alltid forsiktig ved håndtering av driv
stoff. Åpne tanklokket forsiktig og slipp ut
trykket som kan ha etablert seg i tanken.
Tørk opp alt søl og ytt deretter gresstrimmeren minst meter fra fyllingsplassen før
den startes.
a) Fjern alle antenningskilder, gnister, åpen
amme, tobakksrøyking etc. fra steder der
drivstoff blandes, håndteres eller oppbevares.
b) Røyk ikke ved tanking eller under arbeide
med gresstrimmeren.
4. Tillat ingen andre enn brukeren å være nær
gresstrimmeren ved start eller arbeide med
den. Barn, dyr og tilskuere skal være på en
avstand på minst 15 meter fra gresstrimmeren når den brukes.
5. Hold alltid gresstrimmeren stødig med be
gge hendene, med ngrene på en side av
håndtaket og tommelen på den andre siden
når motoren er i gang.
6. Hold alle kroppsdeler borte fra trimmetrå-
den når motoren går.
7. Kontroller før start at trimmetråden ikke har
kontakt med noen gjenstand.
8. Transporter gresstrimmeren kun med av
slått motor.
9. Inspiser alltid gresstrimmeren før du starter,
start den ikke om den har utslitte, manglende eller skadde deler. Bruk aldri en
gresstrimmer som er skadd, feiljustert eller
som ikke er montert på riktig måte.
10. All annen service enn det som er nevnt
bruksanvisningen skal utføres av kyndig
personell.
11. Skru av gresstrimmeren før den legges ned
på bakken.
1. Vær ekstra oppmerksom når du kapper små
busker eller tykt gress. Dette kan sette seg
fast i trimmerhodet.
1. Hold håndtakene rene, tørre og fri for olje
eller drivstoff.
14. Bruk gresstrimmeren kun utendørs eller i
godt ventilerte lokaler. Start den aldri i et
stengt rom eller bygning. Avgassene er
farlige å puste inn, de inneholder kulloksid.
-
15. Unngå å fore trimmerhodet nær små gjen
stander som kan kastes bort, kontroller om
aten som skal trimmes har småstein etc.
før du begynner arbeidet.
16. Stå alltid nedenfor trimmeren om du bruker
den i en helning. Bruk aldri trimmeren i en
helning om det er en minste risiko for at du
mister fotfeste, faller eller glir ned. Hold i
begge håndtakene.
17. Hold gresstrimmeren ren for gress og annet
belegg, spesielt dekslet, trimmerhodet og
motoren.
18. Gresstrimmeren må kun brukes av voksne
personer som har lest bruksanvisningen.
19. Bruk kun totaktsdrivstoff med innblanding
av ,5% totaktsolje (40:1) beregnet for luft
-
-
i
avkjølte totaktsmotorer av god kvalitet. Bruk
av bensin uten oljeinnblanding fører raskt til
motorskader som ikke omfattes av garanti.
0. Bruk ikke gresstrimmeren uten lyddemper
og lyddemperdeksel.
1. Hold i begge gresstrimmerens på en sikker
måte, med ngrene på en side av håndtaket
og tommelen på den andre siden.
. Lyddemperen blir veldig varm, hold hender
og andre kroppsdeler borte fra den.
. Trimmerhodet må ikke løftes opp mens
arbeidet pågår. Trimmetråden kan skade
brukeren, arbeid så nær bakken som mulig.
4. Gresstrimmeren må ikke brukes til noe an
net enn trimming av gressmatter og hager.
5. Gresstrimmeren må ikke brukes hvis be
skyttelsen mangler eller er skadet.
6. Produktet må ikke forandres og/eller brukes
til andre arbeidsoppgaver. Risiko for skader
øker og garantien gjelder ikke.
7. Bruk ikke gresstrimmeren i nærheten av
brennbare gasser eller væsker. Dette kan
føre til brann eller eksplosjon.
-
NOR SK
-
-
-
29
Page 30

NOR SK
30
13
9
11
4
18
3
2
5
a
5
b
8
15
16
1
19
17
7
6
10
20
10
12
14
3. Presentasjon
1. Trimmerhode
. Kniv
. Deksel
4. Bøylehåndtak (med et
ekstra sidehåndtak)
5.a Riggrør, øvre
5.b Riggrør, nedre
6. Strømbryter (1-STOP,
fjærende)
7. Drivstofftank
8. Gassregulering
9. Starthåndtak
10. Primærpumpe
11. Tennplugg
1. Luft lterdeksel
1. Sikkerhetssperre
14. Chokejustering (Trykk
ned for å aktivere choke)
15. Justernøkkel
16. Tennpluggnøkkel
17. Skulderreim
18. Låseratt, trimmerhode
19. Låseratt, riggrør
0. Tanklokk
Page 31

4. Spesifikasjoner
Modell: HYPD-1
Netto vekt: 5, kg
Motor: Luftavkjølt -taktsmotor
Sylindervolum: 5 cm³
Klippebredde: 8 cm
Drivstoff: Blanding bensin og olje 40:1 (,5 %)
Tenning: Elektronisk
Maks. motoreffekt: 0,74 kW ved 7500 rpm
Arbeidsturtall: 7000-8500 rpm
Maks. omdreiningstall for motor: 8500 rpm
Tomgangsturtall: 500 rpm
Tennplugg: TORCH L8RTC, Champion CJ7Y, NGK BPMR7A
Volum på tank: 0,6 liter
Skjæreutstyr: Nylontråd Ø mm
Lyd: LwA: 110 dB (A)
LpA: 88 dB (A)
Vibrasjon: Tomgang: 10,5 m/s
Full gass: 10 m/s
NOR SK
31
Page 32

NOR SK
32
5. Montering
Riggrørene (5a), (5b), bøylehåndtaket (4) og dekselet () må monteres før bruk.
Riggrørene 5a og 5b sammenføyes.
1. Press det nedre røret (5b) inn i det øvre (5a), vri det nedre til kulesperren låser i det øvre
hullet.
. Dra til låserattet.
Bilde 1
Montere håndtaket (4)
1. Løsne på skruer og mutre på håndtaket.
. Plasser bøylehåndtaket med sidehåndtak på det øvre
riggrøret og fest med skrue og mutter. Sidehåndtaket kan
monteres enten på venstre eller høyre side for å tilpasse
trimmeren til høyre- eller venstrehendte.
. Justere plasseringen av bøylehåndtaket (160 – 00 mm
foran gassreguleringen) og fest det med skruene.
Bilde 2
Bilde 3
Montere dekselet (3)
Advarsel: Dekselet må monteres riktig for å beskytte operatøren og for å be-
grense trimmertrådens lengde. Det sitter en kniv på dekselet som kapper trå-
!
den i riktig lengde.
1. For å montere dekselet () må man først
demontere trimmerhodet.
. Hold imot på trimmerhodet og bruk hånden,
eller den medfølgende nøkkelen for å løsne
mutteren/låserattet på trimmerhodet. Se
bilde 4.
. Fjern hele trimmerhodet fra spindelen.
4. Skyv på dekselet på riggrøret og påse at
hullene på dekselet passer til hullene på
festet. Se bilde 5.
5. Skyv bolten i dekselet fra den siden som har
en sekskantet fordypning og monter brikken
og mutteren. Se bilde 6.
6. Monter trimmerhodet på spindelen igjen. Se
bilde 7.
Bilde 4
Bilde 6 Bilde 7
Bilde 5
Page 33

6. Drivstoff og smøring
Advarsel! Bensin er veldig brannfarlig. Unngå å røyke i nærheten av der drivstoff håndteres, unngå også åpen ild, glød eller gnister. Steng av gresstrimmeren og la den avkjøles
før du fyller. Vær utendørs ved tanking og ytt deg minst 3 meter fra tankingsplassen før
gresstrimmeren startes.
Bland bensin (Blyfri 95 oktan uten etanoltilsetning) med en -takts-olje av god kvalitet som er
beregnet for luftkjølte -taktsmotorer. Anbefalt blandingsforhold: bensin/olje 40:1 (,5%)
• Motoren er konstruert for blyfri bensin.
• Bruk drivstoff med minst 87 oktan.
• Bruk blyfritt drivstoff for å beskytte miljøet og for din egen helse.
• Drivstoff eller olje av dårlig kvalitet kan skade pakninger, drivstofedninger og/eller
drivstofftank.
6.1 Blanding av drivstoff
Obs! Vær nøye med blandingen.
1. Mål nøye opp bensin og olje før du blander.
. Hell i en liten del av bensinen i en ren dunk som er godkjent for drivstoff.
. Hell i all oljen og rist dunken.
4. Hell i resten av bensinen og rist dunken i minst ett minutt. Visse oljer er vanskelige å
blande, derfor er det viktig å riste dunken så olje og bensin blandes. Motoren holder lengre
drivstoffet er godt utblandet, hvis drivstoffet ikke er riktig blandet kan motoren gå på en for
mager blanding med større risiko for motorskader.
5. Merk dunken så det ikke kan misforstås hva den inneholder.
6. Oljeblandet drivstoff er kun beregnet for -taktsmotorer, og ren bensin for 4-taktsmotorer.
Derfor er det viktig å merke drivstoffsdunkene.
Obs! Bland ikke for mye drivstoff, det bør brukes innen 90 dager.
Advarsel! Bruk kkun oljeblandet drivstoff for 2-taktsmotorer, bruk av ren bensin uten
innblandet olje fører veldig fort til motorskader som ikke dekkes av garantien.
NOR SK
6.2 Tanking
1. Skru opp og ta bort tanklokket.
. Fyll på drivstoff til ca. 80 % av det som tanken rommer.
. Skru fast tanklokket så det sitter godt. Tørk opp eventuelt drivstoffsøl på og rundt
gresstrimmeren.
Advarsel
1. Vær utendørs på bakken ved fylling.
. Flytt alltid minst meter fra tankingsplassen før gresstrimmeren startes.
. Skru av gresstrimmeren og la den avkjøles før det tankes. Fyll kun hvis du er helt sikker
på at tanken inneholder -taksdrivstoff!
33
Page 34

NOR SK
34
7. Start av motor
Obs! Dra starthåndtaket rett opp. Hvis du ikke drar rett opp, vil friksjonen mot kanten av bussingen slite på startsnøret. Dette vil forkorte snørets levetid betraktelig. Hold igjen starthåndtaket etter startforsøket og slipp det sakte. Slipp aldri starthåndtaket helt etter rykket, da det kan
henge seg opp eller slå i stykker noe på gresstrimmeren.
Obs! Se avsnittet ”feilsøking” om gresstrimmeren ikke starter etter gjentatte forsøk.
7.1 Start av kald motor
Klipp av trimmertråden til en lengde på ca 1 cm. før start
for å redusere belastningen under varmekjøringen.
Se bilde 8.
1. Plasser gresstrimmeren på en plan ate.
. Den fjærende strømbryteren (6) står alltid i posisjon ”1”,
og trenger altså ikke å stilles på før start. Se bilde 9.
. Vri chokereguleringen (9) ned til nivå ”COLD START”.
Se bilde 10.
4. Trykk inn primerpumpen (10) 6 ganger (primerpumpen
er plassert på undersiden av forgasseren ). Se bilde 11.
5. Hold stødig i det bakerste håndtaket.
6. Dra ut starthåndtaket til du kjenner en motstand (ca. 100
mm). Se bilde 1. Dra raskt og mykt i starthåndtaket til
motoren starter eller inntil 6 ganger i hurtig takt.
7. La motoren gå på tomgang i ca. 10 sekunder når du
har fått startet den. Trykk deretter inn sikkerhetssperren
(1) og gassreguleringen (8). Da vil chokreguleringen
automatisk gå tilbake til Kjør-posisjonen.
8. La motoren gå ubelastet en stund før du belaster den.
Bilde 8
Bilde 9
13 cm
Bilde 12
Bilde 10
Bilde 11
Page 35

7.2 Start av varm motor
1. Plasser gresstrimmeren på en plan ate.
. Den fjærende strømbryteren (6) står alltid i posisjon ”1”,
og trenger altså ikke å stilles på før start. Se bilde 9.
. Vri chokereguleringen (9) ned til nivå ”COLD START”
så å vri den opp igjen. Se bilde 1.
4. Hold stødig i det bakerste håndtaket.
5. Dra ut starthåndtaket til du kjenner en motstand (ca.
100 mm). Dra raskt og mykt i starthåndtaket til motoren
starter eller inntil 6 ganger i hurtig takt. Se bilde 1.
6. Hvis motoren ikke starter: Repeter alle trinnene.
for
Bild 13
7.3 Stopp motoren
Slipp gassen og la motoren gå ned på tomgang. Trykk
strømbryteren (6) bakover mot ”STOP”. Hold knappen inne
og slipp den når motoren har stoppet. Se bilde 14.
Bild 14
Tenk på følgende
Advarsel! Fjern alle gjenstander som bokser, asker, steiner etc. fra bakken før du begynner å bruke gresstrimmeren. De kan ellers kastes bort av trimmertråden og føre til
ulykker eller skade på gresstrimmeren.
Stopp gresstrimmeren umiddelbart og undersøk om den har blitt skadet, dersom du merker at
noe kastes i vei eller om gresstrimmeren begynner å vibrere. Bruk ikke gresstrimmeren hvis
den har blitt skadet.
Obs! La motoren gå opp i full hastighet før du begynner å klippe gresset. Prøv aldri å klippe
gresset med lavt turtall.
Advarsel! Løft aldri trimmerhodet over knehøyde mens det snurrer rundt.
Advarsel! Bruk aldri trimmertråd av metall eller metall innpakket i plast. Det kan føre til
alvorlige ulykker.
NOR SK
35
Page 36

NOR SK
36
8. Bruk
• Hold i gresstrimmeren med begge hender.
• Trykk inn gassen og la motoren gå opp i turtall.
Hold trimmerhodet parallelt med bakken og sving
•
gresstrimmeren fram og tilbake. Flytt deg framover og sving
etc. Ikke ytt fram så langt at klippingen begynner å gå
tungt. Se bilde 15.
• Beveg ikke trimmerhodet mot deg, jobb alltid fra deg.
8.1 Trimming rundt trær og busker
Bøy trimmerhodet litt framover og begynn å trimme fra venstre
mot høyre samtidig som du ytter deg sakte og forsiktig rundt
treet. Vær forsiktig så tråden ikke skjærer i treets bark eller
andre vekster som skal stå igjen. Dersom du klipper bort gress
nær gjerder, hus, steiner etc. vil tråden slites mye.
8.2 Fjerning av vegetasjon
• Bøy trimmerhodet ca 0˚ til venstre (det gjør det enklere
hvis du løsner bøylehåndtaket og vrir det.) Se bilde 16.
• Gjør ikke dette hvis det nnes minste risiko at noe kan kas
tes i vei og skade mennesker eller dyr som står nærmere
enn 0 meter.
-
Bilde 15
Bilde 16
8.3 Mate ut tråd
Mat ut trimmertråd på denne måten.
Mat ut trimmertråd på følgende måte:
1. La motoren gå med maks. hastighet under punktene -4 nedenfor.
. Trykk trimmerhodet lett ned mot bakken og slipp det raskt opp igjen. Se bilde 17.
. Tråden vil da mates ut automatisk.
4. Tråden vil også kappes i riktig lengde av kniven under dekselet.
5. Stopp motoren og bruk for eksempel en skrutrekker til å fjerne gress og annet som har
festet seg mellom dekselet og trimmerhodet. Hvis rusket ikke fjernes, kan det ødelegge
for kjølingen av drivakselen. Se bilde 18.
Bilde 17
Press
trimmerhodet lett
ned.
Bilde 18
Page 37

9. Vedlikehold
Advarsel: Løsne på tennpluggens kabel før du utfører vedlikehold.
A. Mutteren/Låserattet
B. Spole
C. Fjær
D. Spindel
E. Deksel
F. Trådholder
G. Hull for tråd
Bilde 19
9.1 Fylle på ny tråd
1. Vri mutteren/låserattet (A) moturs og fjern det (bruk hånden eller nøkkelen som følger
med).
. Fjern spole (B) og fjær (C) fra spindelen (D).
. Fjern også rester av gammel tråd (H).
4. Mål opp og kapp ny trimmertråd (Ø mm) til en lengde av 8,6 meter. Brett den på midten,
så du har to ender som hver måler 4, meter. Plasser midten med bøyen i et av sporene i
skiven som deler spolen. Se bilde 0.
H. Trimmerline
NOR SK
Bilde 20 Bilde 21
5. Vikle opp begge endene på tråden medurs på spolen som vist på bilde 1. Hold i tråden
med ngrene slik at den er stram når den vikles opp. Stopp når det er ca. 15 cm igjen av
trådendene.
6. Fest trådene i trådholderne (F) tvers ovenfor hverandre som vist på bilde .
Bilde 22 Bilde 23
7. Fest fjæren (C) på spolens underside (hvis den ikke allerede sitter fast.), trekk ut
trådendene gjennom hullene (G) på siden av dekselet (E). Se bilde .
37
Page 38

NOR SK
38
8. Trykk spolen (B) inn i dekselet, og mat samtidig trådene ut gjennom hullene (G).
9. Trykk spolen innover så fjæren trykkes sammen. Rykk til i trådene, slik at de løsner fra
trådholderne (F) i spolen.
10. Fest det komplette trimmerhodet på spindelen og hold fast. Dra til mutteren/låserattet (A)
medurs (dra til kun med håndkraft.) Se bilde 5.
11. Klipp av trådene så de ikke er lengre enn ca. 1 cm.
Bilde 24 Bilde 25
9.2 Luftfilter, inspeksjon/Rengjøring
Bruk aldri gresstrimmeren uten luftlter. Rengjør lteret når det er skittent eller skift
det ut dersom det er skadd.
Rengjør luftlteret på følgende måte:
1. Trykk inn sidene på luftlterdekselet og fjern den.
. Ta ut skumplastlteret.
. Vask lteret i såpe og vann. Bruk ikke bensin!
4. Klem på lteret og la det deretter lufttørkes.
5. Sett lteret tilbake på plass og monter dekselet.
6. Påse at dekselet blir festet skikkelig, slik at det ikke ristes
løst.
Bilde 25
9.4 Forgasserinnstilling
Forgasseren er fabrikkinnstilt for optimal effekt.
9.5 Tennplugg
Tennstifttype: TORCH L8RTC, Champion Cj7Y, NGK BPMR7A
Anbefalt elektrodeavstand for tennstiften: 0,65 mm.
Se bilde 7.
Tiltrekkingsmoment: 1-15 Nm.
0,635 mm
Bilde 24.
Bilde 27
Page 39

9.6 Sliping av kniv for trimmertråden (på dekselet)
1. Ta bort kniven (E) fra trimmerbeskyttelsen (F).
Se bilde 8.
. Sett trådkutter i en skrustikke, kvess trådkniven med
en at l, l bare til ett hull og vær nøye med å beholde
den tidligere slipevinkelen.
Bilde 28
10. Oppbevaring
1. Rengjør gresstrimmeren utvendig, deksel, trimmerhode, spindel, motorens ytre deler etc.
. Hell overskuddet av drivstoff i en godkjent dunk.
. Start motoren når drivstofftanken er tømt.
4. La motoren gå på tomgang til den stopper for å få tømt forgasseren for drivstoff.
5. La motoren avkjøles i ca. 5 minutter.
6. Bruk en tennpluggnøkkel for å ta ut tennpluggen.
7. Hell en teskje ren -taktsolje inn i sylinderen gjennom tennplugghullet. Dra sakte i
starthåndtaket noen ganger for å fordele oljen inni motoren. Sett tennplugg tilbake igjen.
8. Oppbevar gresstrimmeren på et tørt og godt ventilert sted.
10.1 Ved start etter oppbevaring
1. Bruk en tennpluggnøkkel for å ta ut tennpluggen.
. Rykk raskt og mykt i starthåndtaket ere ganger for å få ut overskuddsoljen fra sylinderen.
. Rengjør tennpluggens elektroder eller bruk en ny tennplugg med riktig elektrodeavstand.
4. Skru fast tennpluggen med en tennpluggnøkkel.
5. Fyll drivstoff på tanken.
6. Følg instruksjonene i avsnitt 6.1 ”Start av kald motor”.
NOR SK
39
Page 40

11. Feilsøking
Problem Årsak Tiltak
Motoren starter ikke
eller går bare på lavt
turtall.
Motoren starter men
har dårlig kraft.
NOR SK
Motoren svarer ikke på
gassen.
Motoren er svak ved
belastning
Motoren går ujevnt. Forurensing i forgasseren. La et kvalisert verksted rengjøre
Motoren ryker mye. Feil bensinblanding. Bruk bensin og totaktsolje i bland-
Feil i startprosedyre. Les bruksanvisningen.
Forurensing i forgasseren. La et kvalisert verksted rengjøre
forgasseren.
Feil type tennstift. Rengjør eller bytt ut tennstiften.
Tett bensinlter. Bytt ut bensinlter (inne i tanken).
Chokehåndtaket står feil. Sett chokehåndtaket på ”OPEN”.
Skittent luftlter. Rengjør eller bytt ut lter.
Forurensing i forgasseren. La et kvalisert verksted rengjøre
forgasseren.
Motoren er ikke varmkjørt
tilstrrekklig.
Tennpluggens elektrodeavstand feil.
La motoren gå med lavt turtall i ett
minutt.
Rengjør og kontroller avstand eller
bytt ut tennstiften.
forgasseren.
ningsforhold 40:1 (,5 %).
Obs!
Gresstrimmeren er utformet i henhold til gjeldende sikkerhetskrav. Reparasjoner av gresstrimmer skal alltid utføres med originale reservedeler av fagmann, ellers er det risiko for personskade.
Avfallshåndtering
Når du skal kvitte deg med produktet, skal dette skje i henhold til lokale forskrifter.
Er du usikker på hvordan du går fram, ta kontakt med lokale myndigheter.
40
Page 41

Ruohotrimmeri CO/TECH
Tuotenumero: 30-9940, malli: HY33PD-1
Lue käyttöohjeet ennen tuotteen käyttöönottoa. Säilytä käyttöohjeet tulevaa tarvetta varten.
Pidätämme oikeuden teknisten tietojen muutoksiin. Emme vastaa mahdollisista teksti- tai
kuvavirheistä. Jos laitteeseen tulee teknisiä ongelmia, ota yhteys myymälään tai asiakaspalveluun (yhteystiedot käyttöohjeen lopussa).
Vaara: Laitetta saa käyttää ainoastaan trimmeriin sopivan siiman kanssa.
!
Laitteessa ei saa käyttää sahanterää tai muita sopimattomia varusteita.
Varoitus! Lasten, eläinten ja vierailijoiden tulee olla vähintään 15 metrin etäisyydellä
kun käynnistät trimmerin tai työskentelet sen kanssa. Sammuta trimmeri välittömästi,
mikäli joku tulee alle 15 metrin päähän trimmeristä.
1. Tuotteen merkinnät ja turvallisuussymbolit
Lue käyttöohje.
Käytä aina turvakypärää, suojalaseja/visiiriä ja kuulosuojaimia!
Käytä turvakenkiä.
Käytä suojakäsineitä.
Laitetta saa käyttää ainoastaan trimmeriin sopivan siiman kanssa. Laitteessa EI SAA käyttää sahanterää tai muita sopimattomia varusteita.
Varoitus! Pidä jalkasi loitolla siimasta.
Kivet ja muut esineet saattavat lennähtää ruohotrimmeristä.
Ainoastaan trimmerin käyttäjä saa olla laitteen läheisyydessä sen käytön
aikana. Lasten, eläinten ja vierailijoiden tulee olla vähintään 15 metrin
etäisyydellä, kun käynnistät trimmerin tai työskentelet sillä.
Varoitus! Kuuma pinta.
Varoitus! Suojan alapuolella on terävä terä, älä koske terään.
S U O M I
41
Page 42

S U O M I
42
2. Turvallinen käyttö
Huom! Sammuta moottori ennen ruohotrimmerin huoltoa, säätöä ja puhdistusta.
1. Käytä turvakenkiä, tiukasti istuvia vaatteita,
suojalaseja/visiiriä, kuulosuojaimia ja kypärää.
. Älä käytä ruohotrimmeriä, jos olet väsynyt, sai-
ras, poissa tolaltasi tai väsyttävien lääkkeiden,
alkoholin tai huumeiden vaikutuksen alainen.
. Noudata aina turvallisuutta käsitellessäsi polt-
toaineita. Avaan polttoainesäiliön kansi varoen
ja päästä säiliöön syntynyt paine varoen. Pyyhi
roiskunut bensiini ja siirrä ruohotrimmeri vähintään kolmen metrin päähän tankkauspaikasta
ennen kuin käynnistät sen.
a Poista kaikki tulenarat kohteet, kuten kipinät,
avotuli, savukkeet tms. paikasta, jossa käsitellään bensiiniä.
b Älä polta tupakkaa tankatessa tai kun työsken-
telet ruohotrimmerin kanssa.
4. Älä anna muiden henkilöiden oleskella ruohotrimmerin läheisyydessä kun käynnistät
trimmeriä tai työskentelet sen kanssa. Lasten,
eläinten ja vierailijoiden tulee olla vähintään 15
metrin etäisyydellä kun käynnistät trimmerin tai
työskentelet sen kanssa.
5. Pidä käynnissä olevasta ruohotrimmeristä
vakaasti kiinni kaksin käsin siten, että peukalo
on toisella puolella kuin muut sormet.
6. Huolehdi siitä, ettei mikään ruumiinosasi ole
siiman lähellä sahan ollessa käynnissä.
7. Varmista ennen käynnistystä, ettei siima ole
kosketuksissa vieraisiin esineisiin.
8. Moottorin tulee olla sammutettu, kun trimmeriä
kuljetetaan.
9. Tarkasta trimmeri aina ennen käynnistämistä.
Älä käynnistä trimmeriä, jos siinä on kuluneita
tai viallisia osia tai jos siitä puuttuu osia. Älä
käytä trimmeriä, jos se on vioittunut, väärin
säädetty tai väärin asennettu.
10. Saat suorittaa ainoastaan tässä käyttöohjeessa mainittuja huoltotoimenpiteitä, muu korjaus
ja huolto tulee jättää ammattihenkilölle.
11. Sammuta ruohotrimmeri ennen kuin lasket sen
maahan.
1. Ole huolellinen leikatessasi pieniä pensaita tai
paksua ruohoa, sillä ne saattavat juuttua trimmerin leikkuuosaan.
1. Kahvojen tulee olla puhtaat ja kuivat, eikä
niissä saa olla öljyä tai polttoainetta.
14. Käytä ruohotrimmeriä ainoastaan ulkona
tai hyvin tuuletetuissa tiloissa. Älä koskaan
käynnistä trimmeriä suljetussa tilassa tai rakennuksessa. Pakokaasujen hengittäminen on
vaarallista, sillä ne sisältävät häkää.
15. Älä vie trimmerin leikkuupäätä pienten esineiden lähelle, sillä ne saattavat lennähtää
voimalla. Tarkasta leikattava alue ennen
leikkauksen aloittamista ja poista mahdolliset
pikkukivet tms.
16. Jos työskentelet viettävällä maalla, älä seiso
trimmerin alapuolella. ÄLÄ käytä trimmeriä
viettävällä maalla, jos on olemassa mahdollisuus, että menetät tasapainon, kaadut tai liu’ut
alas. Pidä kiinni molemmista kahvoista.
17. Poista trimmeristä ruohonjäänteet ja muut
kertymät, puhdista erityisen tarkasti suojat leikkuupää ja moottori.
18. Ainoastaan aikuiset, jotka ovat lukeneet käyttöohjeen saavat käyttää laitetta.
19. Käytä ainoastaan -tahtibensiiniä, johon on
sekoitettu laadukasta, ilmajäähdytteisille tahtimoottoreille soveltuvaa ,5 % -tahtiöljyä
(sekoitussuhde 40:1). Moottori vaurioituu nopeasti, mikäli siinä käytetään bensiiniä, johon
ei ole sekoitettu öljyä, eikä takuu kata tällaisia
vaurioita.
0. Älä käytä ruohotrimmeriä ilman äänenvaimen-
ninta tai äänenvaimentimen kupua.
1. Pidä kiinni ruohotrimmerin molemmista kah-
voista siten, että peukalo on kahvan toisella
puolella ja loput sormet toisella puolella.
. Äänenvaimennin kuumenee hyvin paljon;
varo käsiä ja muita ruumiinosia.
. Trimmerin päätä ei saa nostaa ylös työsken-
telyn aikana, sillä siima on vaarallinen käyttäjälle. Pidä trimmerin päätä mahdollisimman
lähellä maan pintaa työskentelyn aikana.
4. Ruohotrimmeriä saa käyttää ainoastaan nur-
mikoiden ja puutarhan kasvillisuuden leikkaamiseen.
5. Ruohotrimmeriä ei saa käyttää, mikäli suoja
puuttuu tai on viallinen.
6. Tuotetta ei saa purkaa/muuttaa eikä sitä saa
käyttää muihin työtehtäviin. Muuten onnettomuusvaara lisääntyy, eikä takuu kata tällaisia
vaurioita.
7. Älä käytä trimmeriä helposti syttyvien kaasujen
tai nesteiden läheisyydessä, sillä se saattaa
aiheuttaa tulipalon tai räjähdyksen.
Page 43

S U O M I
43
3. Kuvaus
13
9
11
4
18
3
2
5
a
5
b
8
15
16
1
19
17
7
6
10
20
10
12
14
1. Trimmerin leikkuupää
. Trimmerin terä
. Trimmerin suoja
4. Kaarikahva (ja ylimääräinen sivukahva)
5.a Rikiputki, ylempi
5.b Rikiputki, alempi
6. Virtakytkin (1 – STOP,
palauttava)
7. Polttoainesäiliö
8. Kaasunsäädin
9. Käynnistyskahva
10. Primer-pumppu
11. Sytytystulppa
1. Ilmansuodattimen
kansi
1. Varmistin
14. Rikastinvipu (aktivoi rikastin
painamalla vipu alas)
15. Trimmerin avain
16. Sytytystulpan avain
17. Olkahihna
18. Lukitusnuppi, trimmerin
leikkuupää
19. Lukitusnuppi, rikiputki
0. Säiliön kansi
Page 44

S U O M I
44
4. Tekniset tiedot
Malli: HYPD-1
Paino: 5, kg
Moottori: Ilmajäähdytteinen -tahtimoottori
Sylinteritilavuus: 5cm³
Leikkuuleveys: 8 cm
Polttoaine: bensiinin ja öljyn sekoitus 40:1 (,5 %)
Sytytys: Elektroninen
Moottorin teho enintään: 0,74 kW/ 7500 k/min
Kierrosluku työskennellessä: 7000–8500 k/min
Moottorin kierrosluku enintään: 8500 k/min
Tyhjäkäynnin kierrosnopeus: 500 k/min
Sytytystulppa: TORCH L8RTC, Champion CJ7Y, NGK BPMR7A
Säiliön tilavuus: 0,6 litraa
Leikkuuvarustus: Nailonsiima Ø mm
Melutaso LwA: 110 dB (A)
LpA: 88 dB (A)
Tärinä Tyhjäkäynti: 10,5 m/s²
Täydellä kaasulla: 10 m/s²
Page 45

5. Asennus
Asenna rikiputket (5a ja 5b), kaarikahva (4) ja trimmerin suoja ennen laitteen käyttöönottoa.
Liitä rikiputket (5a) ja (5b) yhteen
1. Paina alempi rikiputki (5b) ylempään rikiputkeen (5a), kierrä alempaa putkea kunnes kuulalukitus lukitsee sen kiinni ylempään reikään.
. Kiristä lukitusnuppi.
Kuva 1
Kuva 2
Asenna kaarikahva (4)
1. Irrota kaarikahvan ruuvit ja mutterit.
. Aseta kaarikahva kiinni (4) (yhdessä sivukahvan
kanssa) ylempään rikiputkeen (5a) ja kiinnitä se
ruuvilla ja mutterilla. Sivukahvan voi asentaa joko
vasemmalle tai oikealle puolelle riippuen siitä, onko
trimmerin käyttäjä oikea- vai vasenkätinen.
. Säädä kaarikahvan sijoitus (160–00 mm kaasun
säätimen edessä) ja kiinnitä se paikoilleen ruuveilla.
-
Kuva 3
Asenna trimmerin suoja (3)
Varoitus! Trimmerisuoja tulee asentaa oikein, jotta se suojaisi käyttäjää ja ra-
!
joittaisi siiman pituutta suojassa olevan terän avulla.
1. Irrota trimmerin leikkuupää, jotta saat
asennettua trimmerin suojan ().
. Paina trimmerin leikkuupäätä ja irrota sen
mutteri/lukitusnuppi kädellä tai pakkauksessa olevalla avaimella. Katso kuva 4.
. Irrota trimmerin leikkuupää karasta.
4. Työnnä trimmerisuoja rikiputkeen ja sovita suojan reiät kiinnikkeen reikiin. Katso
kuva 5.
5. Työnnä pultti trimmerinsuojaan siltä puolelta, jossa on kuusikulmainen syvennys,
ja kiinnitä lopuksi aluslaatta ja mutteri.
Katso kuva 6.
6. Asenna trimmerin leikkuupää takaisin
karaan. Katso kuva 7.
Kuva 4
Kuva 6 Kuva 7
Kuva 5
S U O M I
45
Page 46

S U O M I
46
6. Polttoaine ja voitelu
Varoitus! Bensiini on erittäin helposti syttyvää. Älä tupakoi polttoaineen käsittelypaikan
lähellä. Älä aiheuta myöskään kipinöintiä, avotulta tms. Sammuta trimmeri ja anna sen
jäähtyä ennen polttoaineen lisäämistä. Tankkaa trimmeri aina ulkotiloissa ja siirrä trimmeri
aina vähintään kolmen metrin päähän tankkauspaikasta ennen käynnistämistä.
Sekoita bensiiniä (lyijytön 95-oktaaninen, ilman etanolia) ja laadukasta -tahtiöljyä, joka sovel
tuu ilmajäähdytteisiin -tahtimoottoreihin. Suositeltu sekoitussuhde: bensiiniä/öljyä 40:1 (,5 %)
• Moottorissa tulee käyttää lyijytöntä bensiiniä.
• Käytä bensiiniä, jossa on vähintään 87 oktaania.
• Käyttämällä lyijytöntä bensiiniä suojelet ympäristöäsi ja itseäsi.
• Huonolaatuinen bensiini tai öljy saattaa vahingoittaa tiivisteitä, polttoaineletkuja tai polttoai
nesäiliötä.
6.1 Polttoaineen sekoittaminen
Huom! Ole tarkkana sekoitussuhteen kanssa.
1. Mittaa tarkasti öljy- ja bensiinimäärät ennen kuin sekoitat ne keskenään.
. Kaada hieman bensiiniä säiliöön, joka on hyväksytty bensiinille.
. Kaada kaikki öljy säiliöön ja ravista säiliötä.
4. Kaada sekaan loppu bensiini ja ravista säiliötä vähintään minuutin ajan. Tietyt öljyt sekoit
tuvat heikosti, joten niitä tulee sekoittaa hyvin, jotta bensiini ja öljy sekoittuvat keskenään.
Moottori kestää pidempään, kun öljy on sekoittunut hyvin. Mikäli öljy ei ole sekoittunut kunnolla, seos on laihaa, mikä taas lisää moottorin vahingoittumisriskiä.
5. Merkitse polttoainesäiliö kunnolla, jotta säiliön sisällöstä ei tule epäselvyyksiä.
6. Öljyyn sekoitettu bensiini soveltuu ainoastaan -tahtimoottoreihin ja puhdas bensiini sovel
tuu ainoastaan 4-tahtimoottoreihin. Tämän vuoksi polttoainesäiliöiden merkitseminen on
hyvin tärkeää.
Huom! Älä sekoita liikaa bensiiniä kerralla, sekoitettu bensiini tulee käyttää 90 päivän kuluessa.
Varoitus! Käytä 2-tahtimoottoreissa ainoastaan bensiiniä, johon on sekoitettu öljyä. Moot-
tori vaurioituu nopeasti, mikäli siinä käytetään bensiiniä, johon ei ole sekoitettu öljyä, eikä
takuu kata tällaisia vaurioita.
-
-
-
-
6.2 Ruohotrimmerin tankkaaminen
1. Avaa polttoainesäiliön korkki.
. Täytä bensiiniä noin 80 % säiliön tilavuudesta.
. Sulje korkki ja pyyhi pois mahdollinen yliroiskunut bensiini ruohotrimmeristä ja sen ympäril
tä.
Varoitus!
1. Tankkaa ainoastaan ulkona ja maan päällä.
. Siirrä trimmeri vähintään metrin päähän tankkauspaikasta ennen käynnistämistä.
. Sammuta trimmeri ja anna sen jäähtyä ennen polttoaineen lisäämistä. Tankkaa ainoastaan,
mikäli olet varma, että säiliössä on -tahtibensiiniä!
-
Page 47

7. Moottorin käynnistäminen
Huom! Vedä käynnistyskahva suoraan ulos. Jos vedät vinoon, holkin reunan aiheuttama kitka
vahingoittaa narua, ja se kuluu nopeammin. Pidä käynnistyskahva ulosvedettynä ja päästä se
takaisin hitaasti. Älä päästä käynnistyskahvaa kerralla heti vetämisen jälkeen, sillä se saattaa
sotkeutua tai vahingoittaa ruohotrimmeriä.
Huom! Jos ruohotrimmeri ei käynnisty lukuisista yrityksistä huolimatta, katso kohta ”Vianhaku”.
7.1 Kylmän moottorin käynnistäminen
Lyhennä siimoja noin 1 cm:n pituisiksi ennen käynnistystä,
jotta kuormitus pienenee lämpimänä käytön aikana. Katso
kuva 6.
1. Aseta ruohotrimmeri tasaiselle ja tukevalle alustalle.
. Palauttava virtakytkin (6) on aina asennossa ”1” ja siihen
ei tavitse koskea käynnistettäessä. Katso kuva 9.
. Käännä rikastinta (9) alaspäin kylmäkäynnistysasentoon
”COLD START”. Katso kuva 10.
4. Paina primer-pumppua (10) 6 kertaa (primer-pumppu on
kaasuttimen yläpuolella). Katso kuva 11.
5. Pidä taaemmasta kahvasta tukevasti kiinni.
6. Vedä käynnistyskahvasta, kunnes tunnet vastuksen (n.
100 mm). Katso kuva 1. Vetäise käynnistyskahvasta
nopeasti ja pehmeästi kunnes moottori käynnistyy
(kuitenkin korkeintaan 6 kertaa).
7. Anna moottorin käydä tyhjäkäynnillä n. 10 sekuntia sen
käynnistyttyä. Paina sitten varmistin (1) ja kaasunsäädin
(8) alas, jolloin rikastin palaa automaattisesti käyttöasentoon.
8. Anna moottorin käydä hetken ajan ilman kuormitusta,
kunnes se reagoi hyvin kaasuun. Kuormita moottoria
vasta tämän jälkeen.
Bild. 8
Bild 9
Bild 10
13 cm
S U O M I
Bild 12
Bild 11
47
Page 48

S U O M I
48
7.2 Lämpimän moottorin käynnistäminen
1. Aseta ruohotrimmeri tasaiselle ja tukevalle alustalle.
. Palauttava virtakytkin (6) on aina asennossa ”1” ja siihen ei
tavitse koskea käynnistettäessä. Katso kuva 9.
. Käännä rikastinta (9) alaspäin kylmäkäynnistysasentoon
”COLD START” ja käännä rikastin takaisin ylös.
Katso kuva 1.
4. Pidä taaemmasta kahvasta tukevasti kiinni.
5. Vedä käynnistyskahvasta, kunnes tunnet vastuksen (n. 100
mm). Katso kuva 1. Vetäise käynnistyskahvasta nopeasti
ja pehmeästi kunnes moottori käynnistyy (kuitenkin
korkeintaan 6 kertaa).
6. Jos moottori ei käynnisty: Toista kappaleen ”Kylmän
moottorin käynnistäminen” kohdat.
7.3 Moottorin sammuttaminen
Päästä kaasunsäädin ja anna moottorin käydä tyhjäkäynnillä.
Paina virtakytkin (6) taaksepäin kohtaan ”STOP”, pidä painiketta pohjassa ja päästä siitä irti, kun moottori on pysähtynyt.
Katso kuva 14.
Kuva 13
Kuva 14
Ota huomioon
Varoitus! Siivoa maastosta pois kaikki esineet, kuten purkit, pullot, kivet tms. ennen kuin
aloitat trimmerin käytön. Trimmeri saattaa lennättää esineitä, mikä saattaa johtaa onnettomuuteen tai trimmerin vioittumiseen.
Sammuta trimmeri välittömästi ja tarkasta onko se vioittunut, mikäli trimmeristä lentää esineitä
tai mikäli trimmeri alkaa täristä. Älä käytä ruohotrimmeriä mikäli se on vioittunut.
Huom.! Anna trimmerin kiihtyä täysille kierroksille ennen kuin aloitat ruohon leikkaamisen. Älä
yritä leikata ruohoa alhaisilla kierroksilla.
Varoitus! Älä nosta trimmerin päätä yli polven korkeuden trimmerin käydessä.
Varoitus! Älä käytä metallista tai muovitetusta metallista valmistettua siimaa; tällaisen
siiman käyttäminen saattaa johtaa vakavaan onnettomuuteen.
Page 49

8. Käyttö
• Pidä koneesta kiinni tukevasti molemmin käsin.
• Paina kaasukahvaa ja anna moottorin kiihtyä täysille
kierroksille.
• Pidä trimmerin päätä maan pinnan mukaisesti ja liikuta trim
merin päätä puolelta toiselle; älä työnnä liian pitkälle jos trimmeri alkaa käydä raskaasti. Katso kuva 15.
• Älä liikuta trimmerin päätä itseäsi kohti, työskentele aina pois
päin itsestäsi.
-
-
8.1 Trimmerin käyttö puiden ja pensaiden ympärillä
Kallista trimmerin päätä hieman eteenpäin ja aloita trimmaaminen vasemmalta oikealle ja liiku samalla hitaasti ja varoen puun
ympäri. Leikkaa varoen, jottei siima vahingoita puiden runkoja
tai istutettuja kasveja. Siima kuluu nopeasti, jos käytät trimmeriä
aidan, sokkelin, kivien tms. Läheisyydessä.
Bilde 15
8.2 Maaperän muokkaus (kaiken kasvillisuuden
poistaminen)
• Kallista trimmerin päätä noin 0 astetta vasemmalle (tämä
toimenpide helpottuu, jos irrotat ja käännät kaarikahvaa).
Katso kuva 16.
Älä tee tätä toimenpidettä, mikäli on mahdollisuus, että maas-
•
ta lentää esineitä, jotka voivat vahingoittaa alle 0 metrin
etäisyydellä olevia ihmisiä tai eläimiä.
Bilde 16
8.3 Siiman pidentäminen
Syötä trimmerin siimaa seuraavalla tavalla:
1. Anna moottorin kiihtyä täysille kierroksille kohtien -4 mukaisesti.
. Paina trimmerin päätä kohti maata ja nosta se ylös. Katso kuva 17.
. Siima pitenee automaattisesti.
4. Suojan alla oleva terä leikkaa siiman oikean pituiseksi.
5. Sammuta moottori ja poista suojan ja trimmerin pään väliin juuttunut ruoho ja muut roskat
esim. ruuvimeisselillä. Roskat saattavat haitata voimansiirtoakselin jäähdytystä. Katso kuva 18.
S U O M I
Bilde 17
Paina
trimmerin
päätä
kohti
maata
Bilde 18
49
Page 50

S U O M I
50
9. Huolto
Varoitus! Irrota sytytystulpan hattu ennen huoltotöitä.
uppi
A. N
B. Kela
C. Jousi
D. Kara
E. Kupu
F. Siimanpidike
Kuva 19
9.1 Siiman vaihtaminen
1. Irrota mutteri/lukitusnuppi (A) vastapäivään kääntämällä (käsin tai pakkauksessa olevalla
avaimella).
. Irrota kela (B) ja jousi (C) karasta (D).
. Poista jäljelle jäänyt siima (H).
4. Mittaa ja leikkaa siima (Ø mm), jonka pituus on noin 8,6 metriä. Taita se keskeltä, jolloin
kummankin puolen pituus on 4, metriä, aseta taitoksen keskikohta yhteen kelan jakavista
urista. Katso kuva 0.
G. Siiman reikä
H. Trimmerin siima
Kuva 20 Kuva 21
5. Kieritä siiman kummatkin päät kelalle myötäpäivään kuvan 1 mukaisesti. Pidä siimasta
kiertämisen aikana kiinni sormilla, lopeta kiertäminen, kun jäljellä on noin 15 cm:n pituiset
siimat.
6. Paina siimat siimanpidikkeisiin (F) vastakkain kuvan osoittamalla tavalla.
Kuva 22 Kuva 23
7. Paina jousi (C) kelan alapuolelle (mikäli se ei jo ole kiinni), vedä siimojen päät kuvun (E)
sivuilla olevien reikien (G) läpi. Katso kuva .
Page 51

8. Paina kela (B) kupuun ja syötä siimaa samanaikaisesti rei’istä (G).
9. Paina kelaa (B) sisäänpäin siten, että jousi painuu kasaan, vetäise siimoja siten, että ne
irtoavat kelan siimanpitimistä (F).
10. Paina koko trimmerin pää karaan ja pidä kiinni. Kiristä nuppia (A) myötäpäivään (vedä käsin
maltillisella voimalla). (Katso kuva 5)
11. Leikkaa siimat alle 1 cm:n pituisiksi.
Kuva 24 Kuva 25
9.2 Ilmansuodattimen tarkistaminen ja puhdistaminen
Älä käytä ruohotrimmeriä ilman ilmansuodatinta. Puhdista tai vaihda vioittunut tai
likainen suodatin.
Ilmansuodattimen puhdistaminen:
1. Paina ilmansuodatinkuvun lukituskielekettä ja irrota
kupu.
. Irrota vaahtomuovisuodatin.
. Pese suodatin saippuavedellä. Älä käytä bensiiniä!
4. Purista vedet pois suodattimesta ja ripusta se
kuivumaan.
5. Aseta suodatin takaisin ja asenna kupu.
6. Varmista, että ilmasuodattimen kupu on kunnolla
kiinni, jotta se ei irtoa tärinän johdosta.
Kuva 26
S U O M I
9.4 Kaasuttimen asetukset
Kaasutin on säädetty tehtaalla parhaan tehon saavuttamiseksi.
9.5 Sytytystulppa
Sytytystulpan tyyppi: TORCH L8RTC, Champion CJ7Y,
NGK BPMR7A.
Sytytystulpan suositeltu kärkiväli: 0,65 mm. Katso kuva 7.
Kiristysmomentti: 1 – 15 Nm.
51
0,635 mm
Bilde 24.
Kuva 27
Page 52

S U O M I
52
9.6 Siimaterän teroittaminen (trimmerinsuojassa)
1. Irrota siimaterä (E) trimmerin päästä (F). Katso
kuva 8.
. Laita siimaterä ruuvipenkkiin, teroita siimaterä
litteällä viilalla. Viilaa ainoastaan yhteen suuntaan ja säilytä alkuperäinen teräkulma.
Kuva 28
10. Säilytys
1. Puhdista ruohotrimmeri ulkopuolelta: suojat, trimmerin pää, kara, moottorin ulko-osat ym.
. Kaada polttoainesäiliöön jäljelle jäänyt bensiini bensakanisteriin.
. Käynnistä moottori, kun polttoainesäiliö on tyhjennetty.
4. Anna moottorin käydä tyhjäkäynnillä, jotta kaasuttimessa oleva polttoaine loppuu.
5. Anna moottorin jäähtyä noin 5 minuutin ajan.
6. Irrota sytytystulppa sytytystulppa-avaimella.
7. Kaada sylinteriin teelusikallinen puhdasta -tahtiöljyä sytytystulpan aukon kautta, vedä
hitaasti käynnistyskahvasta muutamia kertoja, jotta öljy leviää tasaisesti moottoriin. Laita
sytytystulppa takaisin paikoilleen.
8. Säilytä ruohotrimmeriä kuivassa ja hyvin tuuletetussa paikassa.
9.1 Käytön aloittaminen säilytyksen jälkeen
1. Irrota sytytystulppa sytytystulppa-avaimella.
. Vetäise käynnistyskahvasta useita kertoja nopeasti ja pehmeästi saadaksesi ylimääräisen
öljyn pois sylinteristä.
. Puhdista sytytystulpan kärjet tai laita tilalle uusi sytytystulppa, jossa on oikea kärkiväli.
4. Kiristä sytytystulppa sytytystulppa-avaimella.
5. Laita polttoainetta polttoainesäiliöön.
6. Noudata kappaleen 6.1 ”Kylmän moottorin käynnistäminen” ohjeita.
Page 53

11. Vianetsintä
Ongelma Syy Toimenpiteet
Moottori ei käynnisty
tai käy hyvin alhaisilla
kierroksilla.
Moottori käynnistyy,
mutta teho on heikko.
Moottori ei reagoi kaasuun.
Moottori käy heikosti
kuormitettaessa.
Moottori käy epätasaisesti.
Moottori savuaa paljon. Väärä polttoaineseos. Käytä bensiiniä ja -tahtiöljyä,
Väärä käynnistystapa. Lue käyttöohje!
Likainen kaasutin. Jätä kaasuttimen puhdistaminen
huoltoliikkeelle.
Väärä sytytystulppa. Puhdista tai vaihda.
Polttoainesuodatin tukossa. Vaihda polttoainesuodatin (säili-
ön sisällä).
Rikastin väärässä asennossa Avaa rikastin asentoon ”OPEN”
Likainen ilmansuodatin. Puhdista tai vaihda.
Likainen kaasutin. Jätä kaasuttimen puhdistaminen
huoltoliikkeelle.
Moottoria ei ole käytetty riittävästi tyhjäkäynnillä.
Sytytystulpan sytytysväli
väärä.
Likainen kaasutin. Jätä kaasuttimen puhdistaminen
Anna moottorin käydä hiljaisilla
kierroksilla minuutin ajan.
Puhdista ja tarkasta sytytysväli
tai vaihda sytytystulppa.
huoltoliikkeelle.
sekoitussuhde 40:1 (,5 %).
S U O M I
Huom!
Ruohotrimmeri on voimassa olevien turvallisuusvaatimusten mukainen. Ruohotrimmerin korjaaminen tulee jättää huoltoliikkeelle, ja korjauksessa tulee käyttää alkuperäisosia, muussa tapauksessa henkilövahinkojen vaara kasvaa.
53
Page 54

Declaration of Conformity
Clas Ohlson AB declares that the machines:
CO/TECH 0-990/HY15A
Grass Trimmer
Complies with the following Directive:
89/6/EEC amended by 9/68/EEC
98/7/EC
TÜV Rheinland Product Safety GmbH
Am Grauen Stein - D - 51105 Köln
has carried out EC type approval.
The certicate no. 14700768001
Insjön, Sweden, May 007
G.Karnberger
President
Clas Ohlson, 79 85 Insjön, Sweden
54
Page 55

55
Page 56

SVERIGE
KUNDTJÄNST Tel: 047/445 00
Fax: 047/445 09
E-post: kundtjanst@clasohlson.se
INTERNET www.clasohlson.se
BREV Clas Ohlson AB, 79 85 INSJÖN
NORGE
KUNDESENTER Tlf.: 1 40 00
Faks: 1 40 80
E-post: kundesenter@clasohlson.no
INTERNETT www.clasohlson.no
POST Clas Ohlson AS, Postboks 485 Sentrum, 0105 OSLO
SUOMI
ASIAKASPALVELU Puh: 00 111
Faksi: 00 111 1
Sähköposti: info@clasohlson.fi
INTERNET www.clasohlson.fi
OSOITE Clas Ohlson Oy, Yrjönkatu A, 00100 HELSINKI
GREAT BRITAIN
For consumer contact, please visit
www.clasohlson.co.uk and click on
customer service.
INTERNET www.clasohlson.co.uk
 Loading...