

Page 1
XG7 RGB
corsair.com/downloads
WEB: corsair.com
PHONE: (888) 222-4346
SUPPORT: support.corsair.com
© 2018-2 019 CORSAIR MEM ORY, Inc. All rights res erved. CORSAIR and the
sails logo are regis tered trademar ks in the United States and /or other countries .
All other t rademarks are th e proper ty of their re spective owner s. Product m ay vary
slightly from those pictured. 49-001779 AD
BLOG: corsair.com/blog
FORUM: forum.corsair.com
YOUTUBE: youtube.com/corsairhowto
XG7 RGB
RGB GPU WATER BLOCK
Page 2

IMPORTANT NOTICE
AVIS IMPORTANT • WICHTIGER HINWEIS • AVVISO IMPORTANTE • AVISO IMPORTANTE • ВАЖНАЯ ИНФОРМАЦИЯ
This Quick Start G uide is a gene ral installation guide and does not
cover spe cifics of various gr aphics cards fac tory cooling so lution’s
disass embly and/or different XG7 RGB Wate r Block variants.
Disassembly of the o riginal heat-sink fan from any g raphics card may
result in voiding the warranty. Installation o f the aftermarket product,
such as the XG7 RGB Water Block , is genera lly consid ered a warranty
void situation.
CORSAIR recommends you thoroughly leak-test your custom cooling
system for a t least 24 hours to ensure that the system is securely seale d
and oper ating reliably. CORSAIR warranty does not cover any hard ware
damage resulting from poorly executed, imp roper and other wise hasty
assemb ly of your custom water-cooling sys tem.
Disassembly of CORSAIR HYDRO products is highly discouraged
due to comp lex design of c omponents. Suc h action may result i n
irrepa rable mechanical, electrical or chemic al damage that may void
the warr anty.
For an exact a nd up-to-date pr oduct compatibilit y list, please refe r to
CORSAIR website.
Ce Guide rapide de démarrage est un guide général d’installation
et ne couvre pas les dét ails du démontage des solutions d’usine de
refroid issement des diverses car tes graphique s et/ou des différ entes
variante s de Bloc à eau XG7 RGB.
Le démontage du ventilateur du dissipateur thermique originel de toute
carte graphique peut entraîner l’annulation de la garantie. L’installation
d’un produi t de remplacemen t tel que le Bloc à eau XG7 RGB es t
généralement considérée comme une action annulant la garantie.
CORSAIR vous recommande de tester minutieusement l’étanchéité
de votre cir cuit de refroidissem ent personnal isé pendant au moins 24
heures p our vous ass urer que le circuit e st absolument he rmétique et
fonctio nne de façon fiable. L a garantie CORSA IR ne couvre pas tout
dommage matériel résultant d’un montage mal exécuté, inadéquat ou
trop rapide de votre circuit de refroidissement à eau personnalisé.
Le démontage des pro duits CORSAIR HYD RO est vigoureus ement
décons eillé à cause de la conception complexe des composant s.
Cette action peut en traîner des domm ages mécanique s, électrique s ou
chimiques irréparables, qui peuvent annuler la garantie.
Pour une lis te exacte et actualisée de compa tibilité des produ its,
veuillez consulter le site web CORSAIR.
Diese Kurzanleitung ist eine allgemeine Installationsanleitung und
behandelt nicht die Besonderheiten der Demontage verschiedener
Grafikkarten-Kühllösungen und/ode r verschiedene r XG7 RGB
Wasserblock-Varianten.
Die Demo ntage des urspr üngliche n Kühlkörperlüfter s von einer
Grafikkarte kann zu m Erlöschen der Garantie fü hren. Die Installation
des Afte rmarket-Produk ts, wie z. B. des XG7 RGB Wass erblocks , wird
im Allgemeinen als Garantieverlust betrachtet.
CORSAIR empfiehlt Ihnen, Ihr kundenspezifisches Kühlsystem
mindestens 24 Stunden lang auf Dic htheit zu prüfen, um sicv
herzus tellen, dass das System siche r abgedichtet ist und zuverlä ssig
funktioniert. Die CORSAIR-Garantie deckt keine Hardwareschäden ab,
die auf eine schlecht durchgeführte, unsachgemäße und anderweitig
hastige Montage Ihres kundenspezifischen Wasserkühlungssystems
zurückzuführen sind.
Von der Demontage von CORSAIR HYDRO-Produkten wird aufgrund
der komplexen Konstruktion der Komponenten dringend abgeraten.
Dies kann zu irreparablen mechanischen, elektrischen oder
chemischen Schäden führen, die die Garantie ungültig machen können.
Eine genaue und aktuelle Produktkompatibilitätsliste finden Sie auf der
CORSAIR Website.
1 2
Questa G uida rapida è una guida di insta llazione g enerale e non copre
le specifiche dello smontaggio delle soluzioni di raffreddamento di
fabbrica delle varie schede gr afiche e/o diverse varianti di XG7 RGB
blocco ad acqua.
Lo smontaggio della ventola del dissipatore di calore originale da
qualsiasi scheda grafica può invalidare garanzia. L’installazione del
prodot to aftermarket, q uale ad es. l’XG7 RGB bloc co ad acqua,
generalmente invalida la garanzia.
CORSAIR c onsiglia di sotto porre a prova di tenut a il sistema di
raffreddamento persona lizzato per alme no 24 ore per gar antire che
il sistem a sia saldamente sigill ato e funzioni in modo affidabile. La
garanzia CORSAIR no n copre alcun dann o hardware deriva nte da
assemblaggio mal eseguito, improprio o comunque affrettato del
sistema d i raffreddamento ad a cqua personalizzato.
Lo smontaggio dei pr odotti COR SAIR HYDRO è altam ente sconsigliato
a causa della progettazione complessa dei componenti. Tale azione
può provoc are danni meccanici, elet trici o chimici irreparabi li che
possono invalidare la garanzia.
Per un elenco di compatibilità es atto e aggiornato d el prodotto, si
prega di c onsultar e il sito web di CORSAIR .
Page 3
IMPORTANT NOTICE (CONTINUE D)
AVIS IMPORTANT • WICHTIGER HINWEIS • AVVISO IMPORTANTE • AVISO IMPORTANTE • ВАЖНАЯ ИНФОРМАЦИЯ
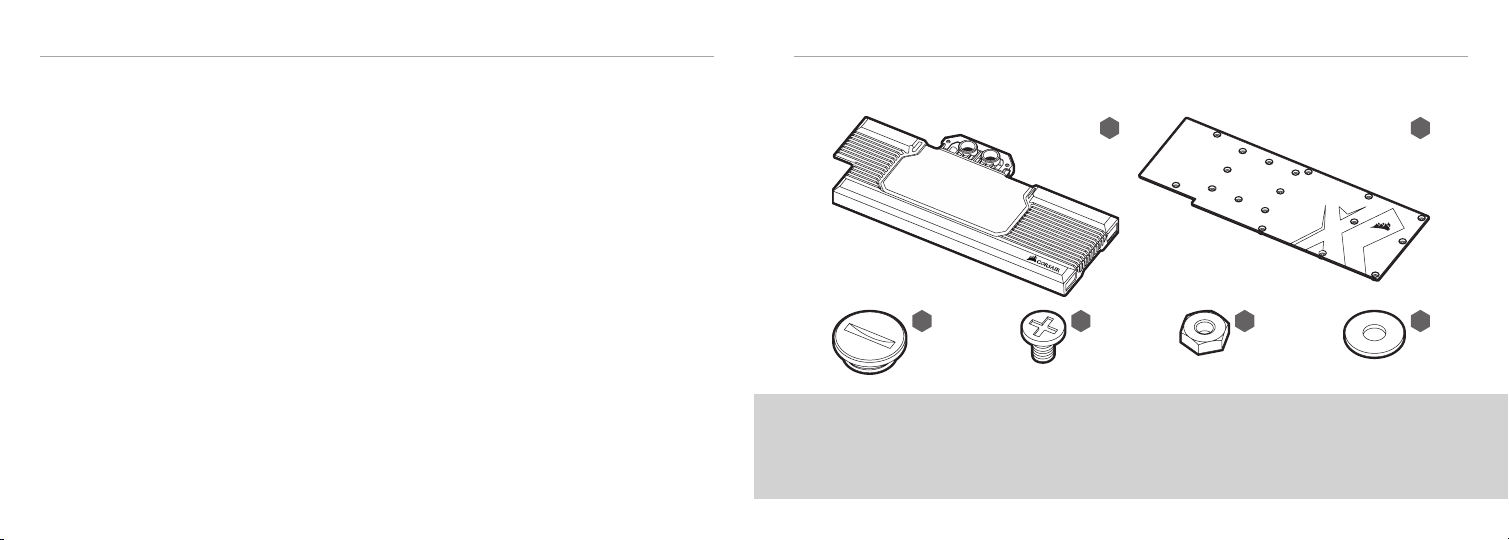
PACKAGE C ONTENTS
CONTEN U DE L’EMBALLAGE • PACKUNGSINHALT • CONTEN UTO DELLA CONFE ZIONE •
CONTEN IDO DEL PAQUETE • КОМПЛЕКТАЦИЯ
Esta guía r ápida para empezar es una guí a de instalación general
y no cubre los detalles específicos del desmontaje de la solución
de enfriamiento de fá brica de varias ta rjetas gráficas y/o diferentes
variante s del bloque de agua XG7 RG B.
El desmontaje del ventilador original del disipador térmico de cualquier
tarjet a gráfica puede anu lar la garantía. L a instalación de l producto
del merc ado de posventa, co mo el bloque de agua XG7 RGB,
generalmente se considera una situación de invalidación de garantía.
CORSAIR l e recomienda que r ealice una prueb a de estanqueidad de su
sistema de refrigeración personalizado durante al menos 24 horas para
asegur arse de que el siste ma está sellado de f orma segu ra y funcion a
de forma fiable. La gar antía de CORSAIR no c ubre ningún daño de
hardware que resulte de un ensamblaje mal ejecutado, inapropiado o
precipitado de su sistema de enfriamiento de agua personalizado.
El desmontaje de los productos CO RSAIR HYDRO es alt amente
desaconsejado debido al complejo diseño de los componentes.
Tal acción pue de resultar en da ños mecánicos, eléc tricos o químico s
irrepa rables que pueden anu lar la garantía.
Para obtener una lista exacta y actualizada de la compatibilidad de los
produc tos, consul te la página web de CORS AIR.
Данное краткое руководство является общим руководством по
установк е и не распростра няется на специ фику различны х вариантов
разборки з аводского охла ждения видео карт и/или блока ж идкостного
охлаждения XG7 RG B.
Снятие оригинального тепловентилятора с какой-либо видеокарты
может аннул ировать гарант ию. При установке пр одукции вторич ного
рынка, в час тности, тако го продукта, ка к блок жидкост ного охлажде ния
XG7 RGB, гарантия, как правило, считается недействительной.
Компания CORSAIR рекомендуе т Вам тщательно п ротестиров ать Вашу
систему ох лаждения в т ечение не менее 24 ч асов для обеспеч ения
надежно й герметизации и р аботы системы . Гарантия CORSAIR не
распространяется на аппаратные повреждения, вызванные плохой,
неправильной и иной поспешной сборкой Вашей системы жидкостного
охлаждения.
Разборка продуктов серии CORSAIR HYDRO весьма нежелательна
ввиду сложной конструкции ее компонентов. Такое действие может
привести к непоправимому механическому, электрическому или
химическому повреждению, которое может аннулировать гарантию.
Для получения точного и актуального списка совместимости продуктов
обратитесь на сайт CORSAIR.
C D E F
A — G7 RGB WATER BLOCK WITH PR E-
INSTALLED THERMAL MATERIAL
B — XG7 RGB WATER BLOCK BACKPLATE
C — x2 CORSAIR G1/4˝ PLUGS
A B
3 4
D — M2.5x5mm SCREWS
E — M2.5 HEX NUT
F — M2.5 WA SHER
Page 4
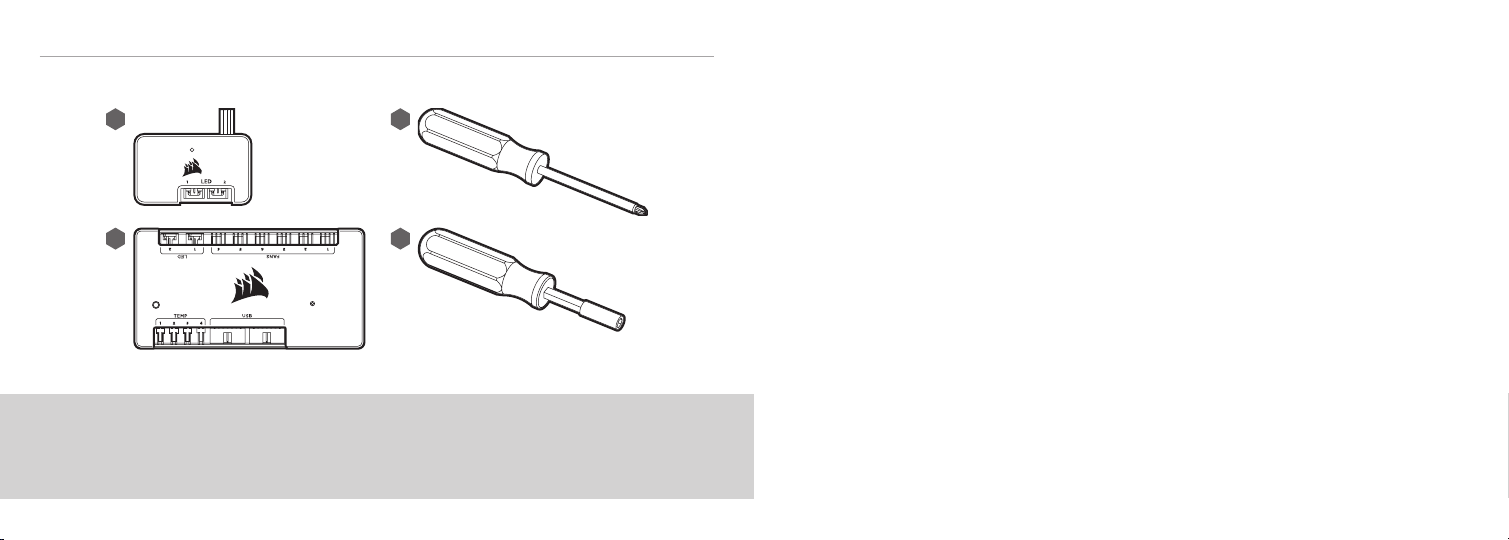
PREREQUISITES (NOT INCLUDED)
MATÉRIEL NÉCESSAIR E (NON INCLUS) • VOR AUSSETZUNGE N (NICHT ENTHALTEN) • PREREQU ISITI (NON INCLU SO) •
PRERREQUISITOS (NO INCLUID OS) • ПРЕДВАРИТЕЛЬНО НЕОБХОДИМЫЕ РЕКВИЗИТЫ (НЕ ВХОДЯ Т В КОМПЛЕКТ П ОСТАВКИ)
G
H
G — CORSAIR LIGHTING NODE PRO
H — CORSAIR COMMANDER PRO
I
J
Note: CORSAIR Commander PRO or CORSAIR Lighting Node PRO are required for driving and controlling the RGB LED illumination. Only certain NVIDIA®
GEFORCE® graphics cards require 4mm hex socket screwdriver in order to remove the factory installed heat sink.
Note: Le CORSAIR Commander PRO ou le CORSAIR Lighting Node PRO sont nécessaires pour activer et contrôler l’éclairage LED RGB. Seules certaines cartes
graphiques NVIDIA® GEFORCE® nécessitent un tournevis pour fiche hexagonale de 4mm afin de retirer le dissipateur thermique installé en usine.
Hinweis: CORSAIR Commander PRO oder CORSAIR Lighting Node PRO werden zum Ansteuern und Steuern der RGB-LED-Beleuchtung benötigt. Nur bestimmte
NVIDIA® GEFORCE® Grafikkarten benötigen einen 4-mm-Innensechskant-Schraubendreher, um den werkseitig installierten Kühlkörper zu entfernen.
I — VARIOUS SIZE PHILLIPS-H EAD
SCREWDRIVER (S) FOR ELECTRONICS
J — 4mm HEX SOCKET (D EPENDS ON THE
GRAPHI CS CARD MAKE A ND MODEL)
Nota: CORSAIR Commander PRO o CORSAIR Lighting Node PRO sono necessari per gestire e controllare l’illuminazione a LED RGB. Solo alcune schede grafiche
NVIDIA® GEFORCE® richiedono un cacciavite a bussola da 4mm per rimuovere il dissipatore di calore installato in fabbrica.
Nota: CORSAIR Commander PRO o CORSAIR Lighting Node PRO son necesarios para accionar y controlar la iluminación LED RGB. Sólo algunas tarjetas gráficas
NVIDIA® GEFORCE® requieren un destornillador hexagonal de 4mm para extraer el disipador de calor instalado de fábrica.
Примечание: Контроллеры CORSAIR Commander PRO или CORSAIR Lighting Node PRO необходимы для управления и контроля LED RGB-подсветкой.
Только для некоторых графических карт NVIDIA® GEFORCE® требуется 4mm шестигранная отвертка для снятия установленного на заводе радиатора.
5 6
Page 5
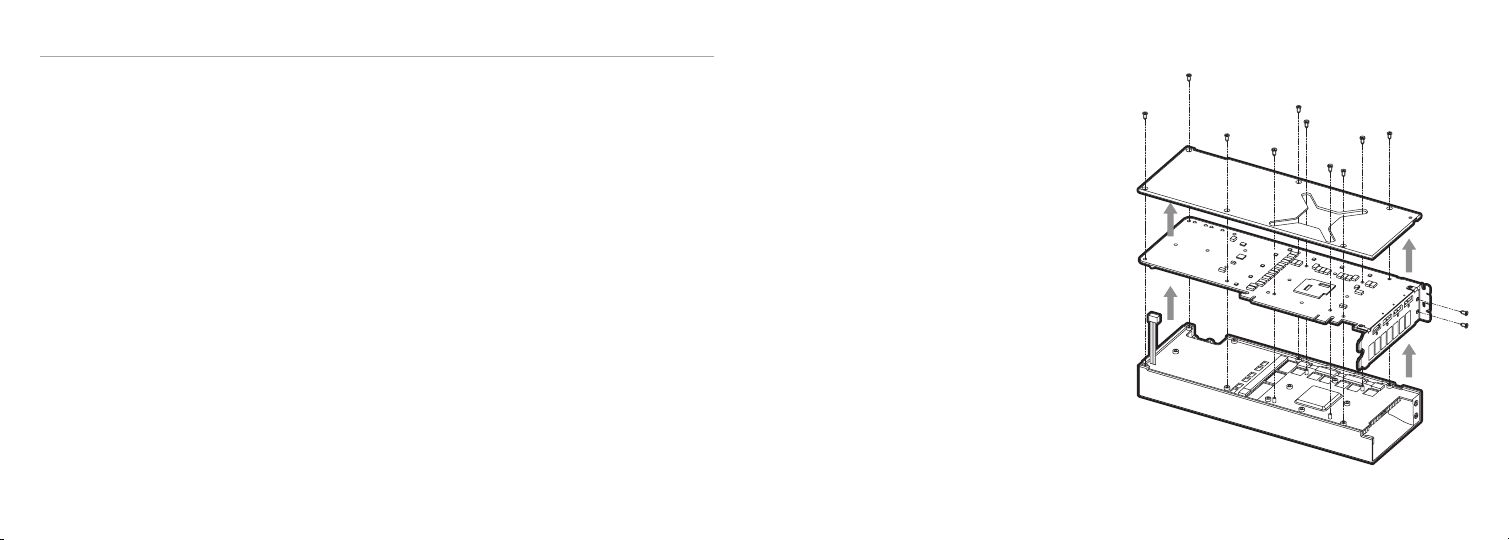
REMOVAL OF ORIGINAL HEAT-SINK FAN ASSEMBLY
RETRAIT DU BLOC VE NTILATEUR DISSIPATEUR THERMIQ UE ORIGINEL • ENTFERNEN DE R URSPRÜNGLIC HEN
KÜHLKÖRPERLÜFTERBAUGRUPPE • RIMOZIONE DEL GRUPP O VENTOLA DEL DI SSIPATORE DI CALORE ORIGIN ALE •
EXTR ACCIÓN DEL CONJ UNTO ORIGI NAL DEL VENTIL ADOR DEL DISIPAD OR TÉRMICO • СНЯТИЕ ОРИГИНАЛЬНОГО ТЕПЛОВЕНТИЛЯТОРА
> Unscrew all f asteners atta ching original he at sink fan assembly to
the graphics card circuit board. Traditionally this includes:
– Hea t-sink with fan
– Backplate and/or front plate
– I/O br acket reinforcement
> Disconne ct all cables con nected fro m heat sink fan asse mbly to
graphics card circuit board
(heat sink assembly fan(s) and (R GB) LED illuminatio n)
> Wipe off any r emains of the original thermal compound and p ads
until there are no lef tovers on the graphics ca rd circuit board a nd
GPU. Use isopropyl alcohol if necessary.
> Dévissez toutes les attaches fixant le bloc ventilateur dissipateur
thermique originel au circuit imprimé de la carte gra phique.
Habituellement ceci comprend :
– Dissipateur thermique avec ventilateur
– Plaque arrière et/ou plaque avant
– Ren fort de sup port I/O
> Débranchez tous les câbles reliant l’ensemble ventilateur dissipateur
thermique au circui t imprimé de la car te graphique (vent ilateur(s) du
bloc dissipateur thermique et éclairage LED (RGB).
> Eliminez tou t reste du composé th ermique et des cou ssinets
origine ls jusqu’à ce qu’il ne reste p lus rien sur le circuit imprimé de
la carte g raphique et le pro cesseur graph ique. Utilisez de l’alcool
isopropylique si nécessaire.
> Lösen Sie alle Befestigungselemente, mit denen die Original-
Kühlkörperlüfterbaugruppe an der Grafikkartenplatine befestigt ist.
Traditionell umfasst dies:
– Kühlkörper mit Lüfter
– Backplate und/oder Frontplate
– E/A-Halterungsverstärkung
> Trennen Sie alle Kabel, die vo n der Kühlkörperlüter-baugruppe mit
der Grafikkartenplatine verbunden sind
(Kühlkörperlüfter und RGB-LED-Beleuchtung).
> Wischen Si e alle Reste der urs prünglichen Wär meleitpaste und d er
Pads ab, bis ke ine Reste auf der Grafikkartenplatine u nd der GPU
mehr vorhanden sind. Verwenden Sie bei Bedarf Isopropylalkohol.
> Svitare tutti i dispo sitivi di fissagg io collegando il gruppo vento le
originale del dissipatore di calore al circuito stampato della scheda
grafica. Questa operazione include tradizionalmente:
– Dissipatore con ventola
– Piastra posteriore e/o piastra anteriore
– Rinforzo staf fa I/O
> Scollega re tutti i cavi connessi dal gruppo ventola del dissipatore di
calore alla scheda g rafica (ventola/e del gruppo di ssipatore di calo re
e illumina zione a LED (RGB)).
> Rimuovere i re sidui della past a termoconduttiva originale e dei
cuscinetti fino a rac cogliere tutti i r esidui sul c ircuito della scheda
grafica e sulla GPU. Utilizzare alc ool isopropilic o se necessario.
7 8
> Desatorn ille todas las suje ciones que fi jan el conjunto de ventilador
del disip ador de calor orig inal a la tarjeta gr áfica. General mente
esto incl uye:
– Disipador de calor con ventilador
– Plac a trasera y/o placa frontal
– Refuerzo del soporte I/O
> Descone cte todos los c ables conecta dos desde el conjunto de l
ventilador del disipador de calor hasta la placa de circuito dela
tarjet a gráfica (ventilad or(es) del conjunto d el disipador de ca lor e
iluminación LED (RGB).
> Limpie cualquier res to del compuesto térmico y las almohadillas
origina les hasta que no que den restos en el circuito impreso de la
tarjet a gráfica y la GPU. Use alc ohol isopropíl ico si es nec esario.
> Откру тите все крепежные детали, соединяющие оригинальный
тепловен тилятор с платой в идеокарты. Об ычно это включае т в себя:
– Радиатор с вентилятором
– Заднюю панель и / или переднюю пластину
– Усиление кронштейна ввода-вывода
> От соедините все каб ели, подключе нные от узла теп ловентилятор а
к плате видеокарты (тепловентилятор(ы) и светодиодная (RGB)
подсветка)
> Вытрите остатк и оригинального термопасты и термолистов, пока на
плате видеокарты и графическом процессоре ничего не останется.
При необходимости используйте изопропиловый спирт.
Page 6
XG7 RGB WATER B LOCK IN STALLATION
INSTALLATION DU BLOC À EAU XG7 R GB • XG7 RGB WASSERBLOCKINSTALLATION •
INSTALLAZIONE DELL’XG7 RGB BLOCCO AD ACQUA • INSTALACIÓN DEL BLOQU E DE AGUA XG7 RGB •
УСТАНОВКА БЛОКА ЖИДКОСТНОГО ОХЛАЖДЕНИЯ XG7 RGB
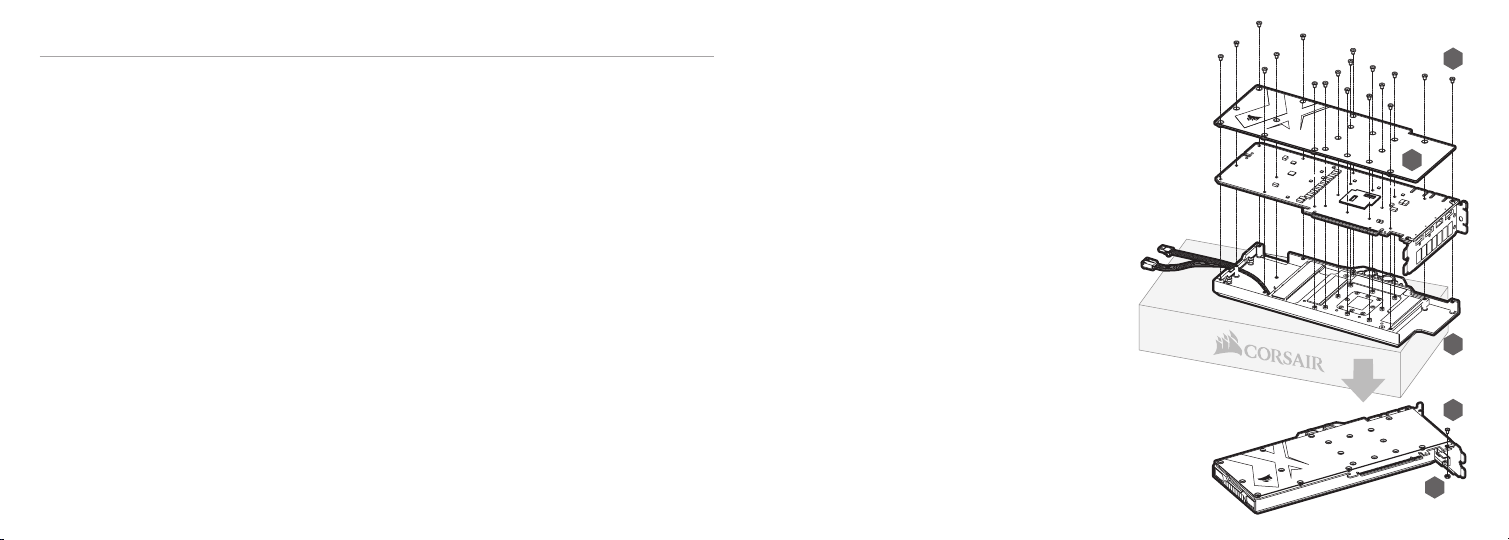
1. Remove the TIM protective cover an d place the XG7 RGB Water
Block on a suitable sm ooth surface, e.g. packaging box, wit h
aesthetic cover and acrylic glass facing d own. Place it so that the
front of the water block s lightly over hangs the box as shown in
the image. This is to preve nt graphics card ’s protruding I/O ports
interfering with installation.
2. Alig n the holes an d carefully place the bare graphics card o nto the
XG7 RGB Water Block with pre- installed ther mal material. Make s ure
to route the XG7 RGB wiring thro ugh the rear of the wate r block as
shown in the i mage.
3. Align the holes and carefully place the enclosed XG7 RGB backplate
onto the graphics car d – water block assembly.
4. Secu re the XG7 RGB Water Block as sembly by fastening the
enclosed M2.5x5mm screws using Phillips-head screwdriver.
5. Some g raphics card, notably NVID IA® GEFORCE® models, also
require you to fasten the I /O bracket to the circu it board after the
install ation of afterma rket cooler. Secure t his bracket by u sing the
enclosed M2.5x5mm scr ew and a M2.5 nut.
1. Retir ez le cache de protec tion TIM et placez le waterblock R GB XG7
sur une surface lis se adaptée, avec le capot esthétique et le verr e en
acrylique vers le bas. Placez-l e de façon à ce que le devant du bloc à
eau dépa sse légèr ement de la boîte co mme montré sur l’imag e. Ceci
est dest iné à empêcher les por ts I/O saillants de la carte graphique
de gêner l’installation.
2. Alig nez les trou s et placez soigneusement la c arte graphiqu e nue
sur le Bloc à eau XG7 RGB avec le matériau ther mique pré-installé.
Assure z-vous que vous faites pass er les fils du XG7 RGB p ar l’arrière
du bloc à eau comme montré sur l’image.
3. Alignez les trous et placez soigneusement la plaque arrière fournie
du XG7 RGB sur l’ense mble carte grap hique – bloc à eau.
4. Fixez l’ens emble Bloc à eau XG7 RGB en s errant les vis M2.5x5mm
fournie s en utilisant un tou rnevis crucifor me Philips.
5. Cer taines carte s graphiqu es, notamment le s modèles NVIDIA®
GEFORCE®, nécessitent également que vo us fixiez le suppor t
I/O au circuit imprimé après l’inst allation d’un refroidisseur d e
remplac ement. Fixez ce sup port en utilisant la vi s M2.5x5mm fournie
et un écrou M2.5.
9 10
1. Entfernen Sie die TIM-Sch utzabde ckung, und legen S ie den XG7
RGB-Wasserblock auf eine geeignete glatte Oberfläche, z.B. eine
Verpackungsschachtel, mit einer ästhetischen Abdeckung und
Acrylglas nach unten. Platzieren Sie es so, dass die Vorde rseite
des Wasse rblocks wie in der A bbildung gezeig t leicht über die Box
hinausragt. Dies verhindert, dass die überstehenden I/O-Ports der
Grafikkarte die Installation beeinträchtigen.
2. Richten Sie die Löc her aus und legen S ie die Grafik karte vorsicht ig
auf den XG7 RGB Wasserblock mit vorins talliertem Th ermomate rial.
Achten Sie darauf, die XG7 RGB -Verkabelung durch die Rückseite
des Wasse rblocks zu führen, wie in der Ab bildung gezeigt.
3. Richten Sie die Löc her aus und legen S ie die beige fügte XG7-RGBBackplate vorsichtig auf die Grafikkarten-Wasserblockbaugruppe.
4. Sich ern Sie die XG7 RGB Wasser blockbaugruppe, indem
Sie die beiliegenden M2,5 x 5-Sc hrauben mi t einem
Kreuzschlitzschraubendreher befestigen.
5. Bei ei nigen Grafikkar ten, insbesondere NVIDI A® GEFORCE®Modellen, müssen Sie die I/O-Halterung nach der Installation des
Zubehörkühlers an der Platine befestigen. Befestigen Sie diese
Halteru ng mit der beilieg enden M2,5 x 5 Schrau be und einer
M2, 5 Mutter.
D
B
A
D
E
Page 7

XG7 RGB WATER B LOCK IN STALLATION ( CONTI NUED)
INSTALLATION DU BLOC À EAU XG7 R GB • XG7 RGB WASSERBLOCKINSTALLATION •
INSTALLAZIONE DELL’XG7 RGB BLOCCO AD ACQUA • INSTALACIÓN DEL BLOQU E DE AGUA XG7 RGB •
УСТАНОВКА БЛОКА ЖИДКОСТНОГО ОХЛАЖДЕНИЯ XG7 RGB
1. Rimuovere la cope rtura protetti va TIM e posizionare i l waterblock
XG7 RGB su una sup erficie liscia i donea, con cope rtura estetica e
vetro acrilico rivolti verso il basso. Posizio narlo in modo che la p arte
anterio re del blocco ad acq ua sporga leggermente oltr e la scatola
come mos trato nell’im magine. Questo per evit are che le porte I/O
sporgenti della scheda grafica interferiscano con l’installazione.
2. Allineare i fori e p osizionare con at tenzione la sche da grafica nuda
sull’XG7 RGB bl occo ad acqua con ma teriale termico p reinstallato.
Assicu rarsi di instrad are il cablaggio XG7 RGB attraverso il retro del
blocco ad acqua, come mostrato nell’immagine.
3. Allineare i fori e p osizionare con cautela la pia stra posteriore XG7
RGB in dota zione sulla sche da grafica - gruppo b locco ad acqua.
4. Fiss are il gruppo XG7 RGB blocco ad acqua fi ssando le viti
M2.5x5mm in dotazione utilizzando un cacciavite a croce.
5. Alcu ne schede grafich e, in particolare i modelli NVIDIA® GEFORCE®,
richiedono il fissaggio della staffa I/O al circuito stampato dopo
l’install azione del dispositivo di raf freddamento aftermar ket.
Fissare questa staffa utilizzando la vite M2.5x5mm in dot azione e
un dado M2.5.
1. Retir e la cubierta protectora TIM y c oloque el bloque d e agua
XG7 RGB en una sup erficie lisa adecuada, por ejemplo, una caja
de embalaje, con la tapa estética y el cristal acrílico hacia abajo.
Colóquelo de forma que la parte frontal del b loque de agua
sobres alga ligeramen te de la caja como se mue stra en la imagen.
Esto es par a evitar que los pue rtos prom inentes I/O de la tarjeta
gráfica interfier an con la inst alación.
2. Alin ee los orificios y coloque con cuida do la tarjet a gráfica
descubierta sobre el bloqu e de agua XG7 RGB con materi al térmico
preinstalado. Ase gúrese de pasar e l cableado del XG7 RGB a tr avés
de la par te posterio r del bloque de agua c omo se muestra en
la imagen.
3. Alin ee los orificios y coloque con cuida do la placa po sterior XG7
RGB adjunta en el conju nto tarjeta gráfica - bloque de a gua.
4. Asegure el conjunto bloque d e agua XG7 RGB ajustando los tornillos
M2.5x5mm adjuntos con un destornillador Phillips.
5. Algu nas tarjetas gráficas, esp ecialmente los modelos NVI DIA®
GEFORCE® tambié n requiere n que fije el soporte I/O a la placa
de circuito después de lainstalación del refrigerador de mercado
postve nta. Aseg ure este soporte u tilizando el tornillo M2.5x5mm
adjunto y una tuerca M2.5.
11 12
1. Удалите защитн ое покрытие с теп лопроводяще го материала и
помест ите блок водяно го охлаждени я XG7 RGB на подхо дящую
гладкую поверхность, например, упаковочную коробку, красивой
стороно й с акриловым ст еклом вниз. Пос тавьте его так, что бы
передня я часть блока сл егка высту пала за коробк у, как показано на
рисунке. Это необходимо для предотвращения выступания по+ртов
ввода-вывода видеокарты, препятствующих установке.
2. Совместит е отверстия и ак куратно поме стите видеок арту на блок
жидкостного охлаждения XG7 RGB с предварительно установленным
термоматериалом. Обязательно проложите проводку блока XG7 RGB
через зад нюю часть блока ж идкостного ох лаждения, к ак показано на
рисунке.
3. Совмест ите отверстия и а ккуратно пом естите прил агаемую заднюю
панель XG7 RGB на видеокарту – блочный комплект жидкостного
охлаждения.
4. Закрепите блочный комплект жидкостного охлаждения XG7 RGB,
закрепив прилагаемые винты M2,5x5mm с помощью крестообразной
отвертки.
5. Некоторые видеокарты, в частности модели NVIDIA® GEFORCE®,
также тр ебуют закрепл ения кронштейн а ввода-вывод а к плате после
установки кулера, купленного позже. Закрепите этот кронштейн,
используя прилагаемый винт M2,5x5mm и га йку M2.5.
D
B
A
D
E
Page 8

FITTI NG AND T UBIN G INSTALL ATION
INSTALLATION DES RACCORDS ET DU TUBAGE • INSTALL ATION DER V ERSCHRAUBUNGEN UND VE RROHRUN G •
INSTALLAZIONE DI RACCORD I E TUBI • INSTALACIÓ N DE CONECTORES Y TUBOS •
УСТАНОВКА ТРУБОК И СОЕДИНИТЕЛЬНЫХ ДЕТАЛЕЙ
1. Inst all the two (2) ap propriate CORSA IR XF G1/4˝ BSPP thr eadedtype fit tings (not include d) into the water bloc k ports an d tighten
them by han d. Do not use any tools to tighte n (i.e. pliers). Use one
port as i nlet and the other as t he outlet. Do not use o ne side for both
inlet and o utlet – this will result in fluid bypassing the wa ter block.
2. Close the remaining two (2) open (unused) ports with the included
CORSAIR G1/4˝ pl ugs and tigh ten them using a coin. Refr ain from
using a screwdriver as it may result i n damage to the surf ace of the
plugs.
3. Inst all approp riate tubing for your CORSAIR XF c ompression-fitti ng
type and secure it us ing the locking rin g to finalize the adding of the
water block to the water-cooling loop. Use the appropriate securing
method wh en using fittings other than compressi on fittings. Do not
forget to le ak test the system before fully powering on your PC.
1. Inst allez les de ux (2) raccords filetés CORSAIR X F G1/4˝ BSPP
appropriés (non inc lus) dans les por ts du bloc à eau e t serrez-les à la
main. N’utilisez aucun outil pour se rrer (tel que des pi nces). Utilisez
un port c omme entrée et l’autre comme sor tie. N’utilisez pas un seul
côté pour l’entrée et la sor tie : ceci entraînerait le contournem ent du
bloc à eau par le liquide .
2. Ferm ez les deux (2) p orts ouverts restants (non utilisés) avec les
bouchons CORSAIR G1/4˝ inc lus et serrez-les e n utilisant une pièce
de monnaie. Evitez d’utiliser un tournevis car ce la pourrait entr aîner
l’endommagement de la surface des bouchons.
3. Inst allez le tuba ge approprié pou r votre CORSAIR XF de t ype
raccord à compression et fixez-le en utilisant l’anneau de verrouillage
pour finaliser l’ajout du bloc à eau à la bo ucle de refr oidissement à
eau. Utilisez la méthode de fixation appropriée lorsque de l’utilisation
de racco rds autres q ue les raccords à compr ession. N’oubliez pa s
de tester l’étanchéité du c ircuit avant d’alimen ter complètement
votre PC.
13 14
C
CORSAIR G1/4˝ PLUGS
Page 9

FITTING AND TUBIN G INSTALLATION (CONTINUED)
INSTALLATION DES RACCORDS ET DU TUBAGE • INSTALL ATION DER V ERSCHRAUBUNGEN UND VE RROHRUN G •
INSTALLAZIONE DI RACCORD I E TUBI • INSTALACIÓ N DE CONECTORES Y TUBOS •
УСТАНОВКА ТРУБОК И СОЕДИНИТЕЛЬНЫХ ДЕТАЛЕЙ
1. Inst allieren S ie Die beiden (2) pas senden CORSAIR X F G1/4˝ BSPPGewindeverschra ubungen (ni cht im Lieferumfang enthalten) in die
Wasserb lockports und Ziehen Sie s ie von Hand fest. Verwenden
Sie keine Werkzeuge zum Festziehen (z. B. Zangen). Verwenden Sie
einen Por t als den Inlet und d en andere n als den Outl et. Verwenden
Sie nicht e ine Seite für den Inl et und Outlet gleichzeitig – dies führt
dazu, dass Flüssigkeit den Wasserblock umgeht.
2. Schließen Sie die verbleib enden zwei (2) offenen (u nbenutzten) Por ts
mit den mitgeliefer ten CORSAIR G1/4˝ Steckern und ziehe n Sie sie
mit einer Münze fest. Ver wenden Sie keine n Schraubendre her, da
dies die Oberfläche der Stecker beschädigen kann.
3. Inst allieren S ie die passende Ver rohrung für Ihren CORSAIR
XF-Versch raubungstyp un d sichern Sie ihn mi t dem
Sicher ungsring, um die Zu gabe des Wasserb locks in den
Wasserkühlkreislauf abzuschließen. Verwenden Sie die geeignete
Befestigungsmethode, wenn Sie andere Verschraubengen anstatt
der Klem mverschraubun gen verwenden. Vergessen S ie nicht, das
System zu te sten, bevor Sie den PC vo llständig eins chalten.
1. Inst allare i due (2) r accordi filett ati CORSAIR X F G1/4˝ BSPP
appropriati (non inclusi) nel le porte de l blocco ad acqua e stringerli
a mano. Non u tilizzar e alcun attrezzo (a d esempio pinze). Utilizzare
una por ta come ingresso e l’altra come us cita. Non utilizzare un lato
sia per l’ingresso che per l’uscita : ciò comporter à il bypass de l fluido
del blocco ad acqua.
2. Chiudere le rima nenti due (2) porte a perte (non u tilizzate) con le sp ine
CORSAIR G1/4˝ in d otazione e s tringerle con un a moneta.
Non utilizzare il cacciavite in qu anto può danneggi are la superficie
delle spine.
3. Inst allare il tub o appropriato pe r il tipo di raccordo a c ompressione
CORSAIR X F e fissarlo con l’anel lo di bloccaggio per finalizz are
l’aggiunta d el blocco ad acqua a l circuito di raffreddamento ad
acqua. Utilizzare il metodo di fissaggio appropriato quando si
utilizz ano raccordi dive rsi dai raccord i a compressione .
Non dimen ticare di control lare la tenuta del si stema prima di
alimentare completamente il PC.
15 16
C
CORSAIR G1/4˝ PLUGS
Page 10

FITTING AND TUBIN G INSTALLATION (CONTINUED)
INSTALLATION DES RACCORDS ET DU TUBAGE • INSTALL ATION DER V ERSCHRAUBUNGEN UND VE RROHRUN G •
INSTALLAZIONE DI RACCORD I E TUBI • INSTALACIÓ N DE CONECTORES Y TUBOS •
УСТАНОВКА ТРУБОК И СОЕДИНИТЕЛЬНЫХ ДЕТАЛЕЙ
1 In stale los dos (2) acc esorios de tipo roscado CORS AIR XF G1/4˝
BSPP apropiados (no incluidos) en los puertos del bloque de agua y
apriéte los a mano. No utilice ninguna herramient a para ajustar (p or
ejemplo, alicates). Ut ilice un puerto co mo entrada y el otro c omo
salida . No utilice un l ado para la entrad a y la salida, ya que esto
provocará que el fluido no pase por el b loque de agua.
2 Cerrar los dos (2) puertos restante s abiertos (no uti lizados) con los
tapone s CORSAIR G1/4˝ incluidos y ajustarl os con una moneda.
Absténgase de utili zar un destornill ador, ya que podría dañar la
superficie de los tapones.
3 In stale el tubo apro piado para su tipo de accesorio CORSAIR XF y
asegúrelo utilizando el anillo de bloqueo para finalizar la instalación
del bloque de agua en el bucle de refrigeración por agua. Utilice el
método de fijación y los tubos adecuados cuando utilice accesorios
que no sean de compres ión. No olvide real izar una prueba de f ugas
del siste ma antes de encend erlo por completo en su PC.
1 Установите две (2) резьбовые соединительные детали CORSAIR
XF G1/4˝ BSPP (не входя т в комплект по ставки) в отверс тия блока
жидкост ного охлажд ения и затяните и х вручную. Не исполь зуйте
никакие инструменты (например, плоскогубцы). Используйте один
порт как вход , а другой – как выход . Не используйте од ну сторону и
для входа и д ля выхода – это прив едет к тому, что жидко сть будет идти
мимо жидкостного блока.
2 Закройте оставшиеся два (2) открытых (неиспользуемых) порта с
включенными вилками CORSAIR G1/4˝ и затяните их с помо щью
монеты. Воздержитесь от использования отвертки, так как это может
привести к повреждению поверхности вилок.
3 Установите соответствующую трубку для Вашего компрессионно-
соединительный типа CORSAIR XF и закрепите ее с п омощью
стопорного кольца для завершения присоединения блока
жидкост ного охлажд ения к контуру во дяного охлаж дения.
При использовании соединительных деталей, отличных от
компрессионных, используйте соответствующий метод крепления. Не
забудьте проте стировать сис тему, прежде че м полностью вк лючить
питание вашего ПК.
17 18
C
CORSAIR G1/4˝ PLUGS
Page 11

CONN ECTIN G AND US ING TH E INTEGR ATED DIG ITAL RGB I LLUMI NATION
RACCOR DEMENT ET UTILI SATION DE L’ÉCLAIRAGE DIG ITAL RGB INTÉGR É • ANSCHLIESSE N UND VERWENDEN D ER INTEGRIERTEN
DIGITALEN R GB-BELEUCH TUNG • COLLEGAMENTO E U TILIZZO DELL’ILLUMINA ZIONE DIGITALE RG B INTEGRATA • CONE XIÓN Y USO
DE LA ILU MINACIÓN D IGITAL RGB INTEGR ADA • ПОДКЛЮЧЕНИЕ И ИСПОЛЬЗОВАНИЕ ВСТРОЕННОЙ ЦИФРОВОЙ ПОДСВЕТКИ RGB
A CORSAIR C ommander PRO or Lighting Node PRO (either) is required
in order to u se the integrated RG B illumination on th e XG7 RGB Water
Block. CORSAIR iCUE s oftware is used to program an d control the
visual effects.
The XG7 RGB Water Block can be connected to the appropriate
CORSAIR controller either directly or “daisy”-chained with other
CORSAIR H YDRO X Series pro duct(s) with addressable RGB light ning.
> Identify the correct RGB connector on the water block (Figure 1).
> Insert th e RGB connector in a CO RSAIR Commande r PRO port or
Lightin g Node PRO por t. (Figure 2).
> Download an d install CORSAIR iCUE soft ware suite from the
following website: https://www.corsair.com/icue
Configu re visual and li ghting effec ts by following the m anual for
iCUE software.
Un CORSAI R Commander PRO ou un L ighting Node PRO (l’un ou
l’autre) est nécessai re afin d’utiliser l‘écl airage RGB intégr é sur le Bloc
à eau XG7 RGB. Le lo giciel CORSAIR iC UE est utilisé pour p rogrammer
et contrôler les effets visuels.
Le Bloc ref roidissement à e au XG7 RGB peut être racc ordé au
contrôleur CORSAIR approprié, soit directement, soit en chaîne dite
“guirlande” avec d’autre s produits de la sér ie CORSAIR HYDRO X avec
éclairage RGB adressable.
> Identifiez le connecteur RGB approprié sur le bloc à eau (Figure 1).
> Insérez la c onnexion RG B dans le port d’un COR SAIR Commander
PRO ou d’un Lighting Node PRO ( Figure 2).
> Téléchargez e t installez la suite l ogicielle CORSAIR iCUE depuis le
site web sui vant : https://www.co rsair.com/icue
Configu rez les effets v isuels et d’éclai rage en suivant le manuel d u
logiciel iCUE.
19 20
Um die integ rierte RGB-Beleuchtung des XG7 RGB Water Bl ock zu
nutzen, i st ein CORSAIR Commander PRO oder Lighting Node PRO
(einer von b eiden) erforderlich. Die Softwar e CORSAIR iCUE dient zur
Programmierung und Steuerung der visuellen Effekte.
Der XG7 RGB Wass erblock kann entweder dir ekt oder mit anderen
Produk ten der CORSAIR HYD RO X -Serie mit adre ssierbarer
RGB-Beleuchtung an den entsprechenden CORSAIR Controller
angeschlossen werden.
> Identifizieren Sie den richtigen RGB-Anschluss am Wasserblock
(Abbildung 1).
> Stecken Sie den RGB-Ste cker in einen CORSA IR Commander PRO -
Port ode r Lighting Node PRO -Port (Abbildung 2).
> Laden Sie herunter un d installieren Sie die C ORSAIR iCUE Soft ware
Suite von der folgenden Website: https://www.corsair.com/icue
Konfigurieren Sie visuelle und Lichteffekte, indem Sie das Handbuch
für die iC UE-Software befolgen.
Figure 1
Figure 2
Daisy Chain (to NEXT)
Direct Attach (IN)
Page 12

CONNECTING AND USING THE INTEGRATED DIGITAL RGB ILLUMINATION (CONTINUED)
RACCOR DEMENT ET UTILI SATION DE L’ÉCLAIRAGE DIG ITAL RGB INTÉGR É • ANSCHLIESSE N UND VERWENDEN D ER INTEGRIERTEN
DIGITALEN R GB-BELEUCH TUNG • COLLEGAMENTO E U TILIZZO DELL’ILLUMINA ZIONE DIGITALE RG B INTEGRATA • CONE XIÓN Y USO
DE LA ILU MINACIÓN D IGITAL RGB INTEGR ADA • ПОДКЛЮЧЕНИЕ И ИСПОЛЬЗОВАНИЕ ВСТРОЕННОЙ ЦИФРОВОЙ ПОДСВЕТКИ RGB
È necessario un COR SAIR Commander PRO o un Lightin g Node PRO
(uno dei due) al fine di utilizzare l’illu minazione RGB integrata sul l’XG7
RGB blocco ad acqua. I l softwar e CORSAIR iCUE vien e utilizzato per
progra mmare e cont rollare gli effetti visivi.
L’XG7 RGB blocco ad acqu a può esser e collegato al controll er
CORSAIR a ppropriato dire ttamente o colle gato in daisy chain (a
marghe rita) ad un al tro prodotto (altr i prodotti) CORS AIR HYDRO X
Series con illuminazione RGB indirizzabile.
> Identificare il connettore RGB co rretto sul blocc o ad acqua
(Figura 1).
> Inserire il connetto re RGB in una porta CORSAIR Com mander PRO o
nella porta Lighting Node PRO (Figura 2).
> Scarica re e install are la suite so ftware CO RSAIR iCUE dal seguente
sito web: https://www.corsair.com/icue
Configu rare gli effetti visivi e di luce seguendo il m anuale per il
software iCUE.
Para utili zar la iluminació n RGB integrada en el Bloque de agu a XG7
RGB se necesita un COR SAIR Commander PRO o un Lightin g Node
PRO (cualquiera de los d os). El softw are CORSAI R iCUE se utiliza para
programar y controlar los efectos visuales.
El XG7 RGB Water Blo ck puede conect arse al controla dor CORSAIR
apropiado directamente o en cadena con otros productos de la serie
CORSAIR HYDRO X con controlador de iluminación RGB.
> Identifiqu e el conector RGB co rrecto en el bloque de agua (Fig ura 1).
> Inserte e l conector R GB en un puerto CORSAIR Comma nder PRO o
en un puer to de Lighting Node PRO (Figura 2).
> Descargue e instale e l paquete de software CORSAIR iCUE desde e l
siguiente sitio web: https://www.corsair.com/icue
Configure los efectos visuales y luminosos siguiendo el manual del
software iCUE.
21 22
Для использования встроенной подсветки RGB на блоке жид костного
охлаждения XG7 RGB требуется контроллер CORSAIR Commander
PRO или Lighting Node PRO (один и з них). Программное обеспечение
CORSAIR iCUE используется для программирования и контроля
визуальными эффектами.
Блок жидкостного охлаждения XG7 RGB можно п одключить к
соответствующему контроллеру CORSAIR либо напрямую, либо
последовательно подключить к другим продуктам серии CORSAIR
HYDRO X с адресным управление м RGB-освещения.
> Определите правильный разъе м RGB на блоке жидкос тного
охлаждения (Рис. 1) .
> Вставьте разъем RGB в отверстие контроллера CORSAIR
Comman der PRO или Lighting Node PRO (Рис. 2).
> Загрузите и установите программный пакет CORSAIR iCUE с сайта:
https://ww w.corsair.com /icue
Настро йте визуальны е и световые эфф екты, сле дуя руководс тву для
программного обеспечения iCUE.
Figure 1
Figure 2
Daisy Chain (to NEXT)
Direct Attach (IN)
Page 13

FREQ UENTLY ASK ED QUE STIONS
FOIRE AUX QUESTIONS • HÄUFIG GESTELLTE FRAGEN • DOMANDE FREQUENTI •
PREGUNTAS MÁS FRECUENTES • ЧАСТО ЗАДАВАЕМЫЕ ВОПРОСЫ
1 I s the XG7 RGB Wat er Block comp atible with my graph ics card?
The support varie s from model to mode l. Please consult c orsair.com
for an up-to-date lis t of unsupported m odels prior to ins tallation!
2 Can I use XG7 RGB Wa ter Block as a st andalone pa rt?
No, this is a water block for yo ur graphics card which requires a
complete custom water-cooling system, including standalone pump
and radiator. For more information, please visit corsair.com.
3 Can I use the XG7 RGB Water B lock wit h aluminium w ater-
cooling equipment?
No, you cannot. The cold plate is made from nickel-plated copper
and should not be mixed with aluminium in a custom co oling system.
4 I s the flow or ientation important?
No, it is not. T he XG7 RGB works great with flow in either d irection.
5 Can I reuse t he pre-app lied thermal paste o n XG7 RGB Water
Block for re-installation?
Re-ins tallation of the XG7 RGB Water Block will r equire you clean
off the pr e-applied thermal paste and apply a new layer of thermal
paste. However, the thermal pads can be re used.
6 Can I conne ct the RGB head er directl y to my motherboard?
No, you cann ot. The RGB functio n is only compatibl e with the
CORSAIR Commander PRO and the CORSAIR Lighting node PRO
controllers.
7 How many RGB d evices can I da isy-chain to a sin gle channel o n
a CORSAIR controller?
CORSAIR r ecommends you co nnect no more than three (3)
Hydro X Ser ies RGB devices of any type conn ected in a series on
a single channel.
Howe ver, you can connect one (1) XC7/XC9 water bl ock, two (2) XG7
RGB water bl ocks and one (1) XD5 RGB pump unit for a total of four
(4) devices .
Do n ot mix CORSAIR fans or RGB LED strips and C ORSAIR HYDRO
X produc ts on the same c hannel on the controller. Use a dedicated
channel for other components.
1 E st-ce qu e le Bloc à ea u XG7 RGB est c ompatibl e avec ma
carte graphique ?
La compa tibilité varie d’un modèle à l’autre. Veuillez consu lter
corsair.com pour une li ste actualisée de s produits compatibles avant
de commencer l’installation !
2 Puis-je ut iliser le Bl oc à eau XG7 RGB comme u n
élément autonome ?
Non, ceci est un bloc de r efroidisseme nt à eau pour votre car te
graphique qui nécessite un circuit de refroidissement à eau
personnalisé complet, y compris une pom pe distincte et un
radiateur. Pour plus d’informations, veuillez visiter corsair.com.
3 Puis-je ut iliser le Bl oc à eau XG7 RGB avec un équipem ent de
refroidissement à eau en aluminium ?
Non, vous ne pouve z pas. La plaque de re froidiss ement est faite en
cuivre pl aqué nickel et ne doit p as être associée à l’aluminium da ns
un circuit de refroidissement personnalisé.
4 L’orie ntation du flux es t-elle important e ?
Non, elle n e l’est pas. Le XG7 RGB fonctionne très bien que l que soit
la direction du flux.
5 Puis-je réutili ser la pâte thermiqu e pré-appl iquée sur le Bloc à
eau XG7 RGB pour réinstallation ?
La réins tallation du Bloc à e au XG7 RGB nécessiter a que vous
éliminiez la pâte ther mique pré-appliquée et que vous appliquiez
une nouvelle couche de pâte thermique. Cependant, les coussinets
thermiques peuvent être réutilisés.
23 24
6 Puis-je r accorder l’en -tête RGB dir ectement à ma c arte mère ?
Non, vous ne p ouvez pas. La fonc tion RGB est uniqu ement compati ble
avec les contrôleurs du CORSAIR Commander PRO et du CORSAIR
Lighting Node PRO.
7. Combien d’appareils RGB puis-je mettre en chaîne
sur un c anal uniqu e de contrôle ur CORSAIR?
CO RSAIR vous recom mande de ne pas rac corder plus de tro is (3)
appare ils RGB Hydro X Serie s de tout type pour u ne connexion en
série su r un seul canal.
C ependant, vous p ouvez raccorde r un (1) bloc à eau XC7/XC9, deux
(2) blocs à e au XG7 RGB et une (1) pompe XD5 RGB p our un total de
quatre (4) ap pareils.
N e mélangez pas de s ventilateurs CO RSAIR ou des barre ttes RGB LED
et des pro duits CORSAIR HY DRO X sur le même cana l de contrôleur.
Utilise z un canal dédié pou r les autres comp osants.
Page 14

FREQ UENTLY ASK ED QUE STIONS (CONTINUED)
FOIRE AUX QUESTIONS • HÄUFIG GESTELLTE FRAGEN • DOMANDE FREQUENTI •
PREGUNTAS MÁS FRECUENTES • ЧАСТО ЗАДАВАЕМЫЕ ВОПРОСЫ
1 I st der XG7 RGB Wa sserblock m it meiner Gr afikkarte
kompatibel?
Die Unter stützung variie rt von Modell zu Modell. Bitte ko nsultieren
Sie cors air.com für eine aktuelle Liste vo n unterstützte n Modellen,
bevor Sie Installationsschritte durchführen!
2 Kann ich de n XG7 RGB Wasserblock als eigenst ändiges
Teil verwenden?
Nein, die s ist ein Wasserbl ock für Ihre Grafikkarte, der e in komplettes
kundenspezifisches Wasserkühlungssystem erfordert, einschließlich
einer Ein zelpumpe und eine s Kühlers. Für weite re Informationen
besuchen Sie bitte corsair.com.
3 Kann ich de n XG7 RGB Wasserblock mit A lumini um-
Wasserkühlgeräten verwenden?
Nein, könn en Sie nicht. Die Küh lplatte be steht aus vernicke ltem
Kupfer und s ollte in einem kund enspezifische n Kühlsystem nicht mi t
Aluminium gemischt werden.
4 Ist die Strömungsrichtung wichtig?
Nein, ist s ie nicht. Der XG7 RGB arb eitet hervorragend in bei den
Strömungsrichtungen.
5 Kann ich di e vorher aufg ebrachte Wär meleitpaste für de n XG7
RGB Wasserblock zur erneuten Installation wiederverwenden?
Bei der Ne uinstallation d es XG7 RGB Wasserblocks müssen Si e die
zuvor aufg ebrachte Wärmeleitpaste en tfernen und ein e neue Schic ht
Wärmeleitpaste auftragen. Die Wärmeleitpads können jedoch
wiederverwendet werden.
6 Kann ich de n RGB-Header direk t an mein
Mainboard anschließen?
Nein, könn en Sie nicht. Die RGB-Funktion ist nur mit dem CORSAIR
Comman der PRO und den CORSAIR Lighting Node PRO Controll ern
kompatibel.
7 W ie viele RGB- Geräte kann ich auf ei nem CORSAIR- Controller
mit einem einzelnen Kanal verketten?
CORSAIR empfiehlt, nicht mehr als drei (3) RGB-Geräte der Hydro
X-Serieanzuschli eßen, die in einer Reihe auf einem einzige n Kanal
angeschlossen sind.
Sie können jedo ch einen (1) XC7 / XC9 Wasserbl ock, zwei (2) XG7
RGB Wasse rblöcke und eine (1) XD5 RG B Pumpenei nheit für
insges amt vier (4) Geräte anschließe n.
Mischen Sie CORSAIR-Lüfter oder RGB-LED-Streifen und CORSAIR
HYDRO X-Produkte nic ht auf demse lben Kanal des Controller s.
Verwenden Sie einen dedizierten Kanal für andere Komponenten.
1 L’XG7 RGB blocco ad ac qua è compat ibile con la mi a
scheda grafica?
Il suppor to varia da modell o a modello. Si prega d i consultare
corsair.com per l’elenc o di suppor to aggiornato pri ma di
intraprendere qualsiasi procedura di installazione!
2 Po sso utilizzare l’XG7 RG B blocco ad acq ua come
parte autonoma?
No, questo è u n blocco ad acqua pe r la scheda grafica che richie de
un sistem a di raffreddam ento ad acqua persona lizzato co mpleto, tra
cui una pom pa autonoma e un radi atore. Per ulteriori informazio ni, si
prega di visitare co rsair.com.
3 Po sso utilizzare l’XG7 RG B blocco ad acq ua con dispos itivi di
raffreddamento ad acqua in alluminio?
No, non puoi. La piastr a di raffreddam ento è realiz zata in rame
nichelato e non deve ess ere mescolata con allumini o in un vdi
raffreddamento personalizzato.
4 È i mport ante l’orient amento del fl usso?
No, non lo è. XG7 RGB f unziona in mo do ottimale con il fl usso in
entrambe le direzioni.
5 Po sso riutili zzare la pas ta termocon duttiva pr eapplicat a
sull’XG7 RGB blocc o ad acqua per la reinst allazione?
La reinstallazione dell’XG7 RGB blocco ad acqua richiede la pulizia
della pasta termoc onduttiva preapplicata e l’ap plicazione di un
nuovo stra to di pasta ter moconduttiva . Tuttavia, i pad termici
possono essere riutilizzati.
25 26
6 Po sso collega re l’intesta zione RGB dir ettament e alla mia
scheda madre?
No, non puoi. La funzion e RGB è compatibile s oltanto con CORSA IR
Comman der PRO e con i controller CORSAIR Lighting Node PRO.
7 Q uanti dispositiv i RGB posso coll egare in dai sy chain ad un
singo lo canale su un c ontroller CORSAIR ?
CORSAIR c onsiglia di colle gare non più di tre (3) di spositivi Hydro X
Series R GB di qualsiasi tip o collegati in ser ie su un singolo canale.
Tuttavia, è possibile colle gare un (1) XC7/XC9 blocco ad acqu a, due
(2) XG7 RGB blocc hi ad acqua e una (1) unità pompa XD5 RGB pe r
un totale di quattro (4) dispositivi.
Non mescolare le ventole CO RSAIR o le strisce LED RGB e i prodot ti
CORSAIR H YDRO X sullo stesso c anale sul contro ller. Utilizz are un
canale dedicato per gli altri componenti.
Page 15

FREQ UENTLY ASK ED QUE STIONS (CONTINUED)
FOIRE AUX QUESTIONS • HÄUFIG GESTELLTE FRAGEN • DOMANDE FREQUENTI •
PREGUNTAS MÁS FRECUENTES • ЧАСТО ЗАДАВАЕМЫЕ ВОПРОСЫ
1 ¿Es el Bloq ue de agua XG7 RGB c ompatibl e con mi tarjet a gráfica?
El sopor te varía de un modelo a o tro. Por favor, consulte co rsair.com
para obtener una lista actualizada de los modelos sin soporte antes
de tomar cualquier medida de instalación.
2 ¿P uedo utiliz ar el Bloque d e agua XG7 RGB como pi eza
independiente?
No, este es un b loque de agua para s u tarjeta gráfica q ue requiere
un sistema completo de enfriamiento por agua personalizado,
incluyendo bomba independiente y radiador. Para más información,
visite corsair.com.
3 ¿P uedo utiliz ar el Bloque d e agua XG7 RGB con un equipo de
refrigeración por agua de aluminio?
No, no es pos ible. La pla ca fría está hecha de cobre niquelado y
no debe mezclarse co n aluminio en un sistema de refri geración
personalizado.
4 ¿E s importan te la direcci ón del flujo?
No, no lo es. El XG7 RG B funciona muy bie n con el flujo en c ualquier
dirección.
5 ¿P uedo reutilizar la p asta térmic a pre-aplicada en el B loque de
agua XG7 RG B para volver a in stalarlo?
La reins talación del Blo que de agua XG7 RGB requerirá que
limpie la p asta térmi ca pre-aplicada y aplique una nueva capa de
pasta tér mica. Sin embargo, las almoh adillas térmica s pueden ser
reutilizadas.
6 ¿Puedo con ectar la bor nera RGB dir ectament e a mi placa madr e?
No, no es pos ible. La fun ción RGB sólo es com patible con los
controladores CORSAIR Commander PRO y CORSAIR Lighting
node PRO.
7 ¿Cu ántos dispositivos RGB pued o conect ar en cadena a u n solo
canal en un controlador CORSAIR?
CORSAIR r ecomienda que no c onecte más de tres (3) dispositivos
RGB de la serie Hydro X de cu alquier tipo cone ctados en serie e n
un solo canal.
Sin embargo, pu ede conectar un (1) blo que de agua XC7/XC9, dos
(2) bloque s de agua XG7 RGB y una (1) unidad de bomba XD5 RGB
para un tot al de cuatro (4) di spositivos.
No mezcle ventil adores CORSAIR o ti ras de LED RGB y produc tos
CORSAIR H YDRO X en el mismo canal del cont rolador. Utili ce un
canal dedicado para otros componentes.
1 Совме стим ли бло к жидкостн ого охлаж дения XG7 RGB с м оей
видеокартой?
Поддержк а зависит от моде ли. Зайдите, пожа луйста, на сай т cor sai r.
com для получения актуального списка поддерживаемых моделей
перед выполнением каких-либо шагов по установке!
2 Могу ли я использовать блок жидкостного охлаждения XG7 RGB
как отдельную часть?
Нет, это водян ой охлаждаю щий блок для Ваш ей видеокарты, к оторый
необходим для полной пользовательской системы жидкостного
охлаждения, включая автономный насос и радиатор. Для получения
дополнительной информации посетите сайт corsair.com.
3 Могу ли я использовать блок жидкостного охлаждения XG7 RGB
с алюминиевым оборудованием водяного охлаждения?
Нет. Охлаждающая пластина изготовлена из никелированной меди
и не может соче таться с алюми нием в пользовате льской систем е
охлаждения.
4 Является ли важной ориентация потока?
Нет. Блок XG7 RGB отлично работает при любом направлении потока.
5 Можно ли повторно использовать предварительно нанесенную
термопасту на блок XG7 RGB при повторной установке?
При повторной установке блока XG7 RGB потребуется очистка
от предварительно нанесенной термопасты и нанесения нового
слоя термопасты. Тем не менее, термолисты можно использовать
повторно.
27 28
6 Могу л и я подключ ить кабель RGB Header непосредственно к
своей материнской плате?
Нет. Функция RGB совместима только с контроллерами CORSAIR
Comman der PRO и CORSAIR Lighting Node PRO.
7 Сколько RGB устройств можно подключить к одному каналу на
контроллере CORSAIR?
CORSAIR рекомендуе т подключать н е более трех (3) RG B устройств
серии Hydro X Seri es любого типа, последовательно подключенных к
одному каналу.
Тем не менее, В ы можете подкл ючить один (1) блок жидкостного
охлаждения XC7 / XC9, два (2) блока жидкостного охлаждения XG7
RGB и один (1) насосный агрегат XD 5 RGB, в общей сложности четыре
(4) устройства.
Не совмещайте вентиляторы CORSAIR или светодиодные RGB
ленты и прод укты CORSAIR HYDRO X на одном и том же ка нале на
контроллере. Используйте выделенный канал для других компонентов.
Page 16

CAUTION!
The manu facturer is not resp onsible for any rad io or TV interfer ence cau sed by
unauthorized modifications to this equipment. Such modifications could void the
user auth ority to operate the e quipment.
This equi pment has been tes ted and found to compl y with the limits for a Class
B digital d evice, pursuant to p art 15 of the FCC Rules. Th ese limits are des igned
to provide re asonable protect ion against harm ful interferen ce in a resi dential
install ation. This equipm ent generates, us es and can radiate ra dio frequency
energy a nd, if not installed a nd used in accorda nce with the instru ctions,
may cause h armful interfe rence to radio comm unications. Howeve r, there is
no guaran tee that interfere nce will not occur i n a particular in stallation. If this
equipment does cause harmful interference to radio or television reception, which
can be dete rmined by turning t he equipment of f and on, the user is enc ouraged to
try to corr ect the interfere nce by one or more of the fo llowing measur es:
• Reorie nt or relocate the rec eiving antenna.
• I ncrease the sepa ration between th e equipment and re ceiver.
• C onnect the equip ment into an outlet on a c ircuit differe nt from that to which
the receiver is connected.
• Consult the dealer or an experienced radio/TV technician for help.
This devi ce must not be co-lo cated or operating i n conjunction wi th any other
antenna or t ransmitter.
Operati on is subject to the fol lowing two condit ions:
(1) this device may n ot cause harmful i nterference, an d
(2) this devic e must accept any inte rference rec eived, includin g interference th at
may cause undesired operation.
CORSAIR MEMORY, Inc. declares that this equipment is compliance with Directive
2014/30/EU and Directive 2011/65/EU. A copy of the original declaration of conformity
can be obtained at regulatory@corsair.com.
CORSAIR MEMORY, Inc. déclare que son équipement est conforme à la directive
2014/30/EU et 2011/65/EU. Une copie de la déclaration de conformité originale peut être
obtenue en envoyant un courrier électronique à l’adresse regulatory@corsair.com.
CORSAIR MEMORY, Inc. erklärt, dass dieses Gerät den Richtlinien 2014/30/EU und
2011/65/EU entspricht. Eine Kopie der ursprünglichen Konformitätserklärung kann unter
regulatory@corsair.com angefordert werden.
CORSAIR MEMORY, Inc. dichiara che questa apparecchiatura è conforme alla Direttiva
2014/30/EU e alla Direttiva 2011/65/EU. Una copia della dichiarazione originale di
conformità è disponibile scrivendo un’email all’indirizzo “regulatory@corsair.com”.
CORSAIR MEMORY, Inc. declara que este equipo cumple con la directiva 2014/30/EU
y 2011/65/EU. Puede obtener una copia de la declaración de conformidad original en
“regulatory@corsair.com”.
THE AUTHO RIZED REPRESENTATIVE IN EUROP E
CORSAIR MEMORY, BV
Wormer weg 8, 1311 XB, Almere, Ne therlands
LE REPRÉSENTANT AGRÉÉ EN EUROPE
CORSAIR MEMORY, BV
Wormer weg 8, 1311 XB, Almere, Ne therlands
DIE AUTORISI ERTEN VERTRETER I N EUROPA
CORSAIR MEMORY, BV
Wormer weg 8, 1311 XB, Almere, Ne therlands
IL RAPPRES ENTANTE AUTORIZZATO PER L’EUROPA
CORSAIR MEMORY, BV
Wormer weg 8, 1311 XB, Almere, Ne therlands
EL REPRESEN TANTE AUTORIZ ADO EN EUROPA
CORSAIR MEMORY, BV
Wormer weg 8, 1311 XB, Almere, Ne therlands
Note on environmental protection
After the implementation of the European Directive 2012/19/EU in the national legal
system, the following applies:
— El ectrical and ele ctronic device s may not be disposed of w ith domestic waste.
— Co nsumers are obli gated by law to return ele ctrical and ele ctronic devices a t
the end of the ir service liv es to the public colle cting points set up fo r this purpose
of point of sa le. Details to this are define d by the national law of th e respective
country. This symbol on the product, the instruction manual or the package
indicate s that a product is sub ject to these regul ations. By recyclin g, reusing the
material s or other forms of util izing old device s, you are making an im portant
contrib ution to protecting ou r environment.
Remarques concernant la protection de l'environnement
Conform ément à la directiv e européenne 2012/19/EU, et afin d'at teindre un
certain nombre d'objectifs en matière de protection de l'environnement, les règles
suivantes doivent être appliquées:
— Elles concernent les déchets d'équipement électriques et électroniques.
Le pictogr amme "picto" présent s ur le produit, son ma nuel d'utilisatio n ou son
emballage indique que le produit est soumis à cette réglementation.
— Le consommateur doit retourner le produit usager aux points de collecte
prévus à cet e ffet. Il peut auss i le remettre à un reve ndeur. En permettan t enfin
le recyclage des produits, le consommateur contribuera à la protection de notre
environnement. C'est un acte écologique.
Informazioni per protezione ambientale
Dopo l'implementazione della Direttiva Europea 2012/19/EU nel sistema legale
nazionale, ci sono le seguenti applicazioni:
— I dispositivi elettrici ed elettronici non devono essere considerati rifiuti
domestici.
— I consumatori sono obbligati dalla legge a restituire I dispositivi elettrici ed
elettronici alla fine della loro vita utile ai punti di raccolta pubblici preposti per
questo sco po o nei punti vendi ta. Dettagli di qua nto riportato son o definiti dalle
leggi nazionali di ogni stato. Questo simbolo sul prodotto, sul manuale d'istruzioni
o sull'imba llo indicano che q uesto prodotto è sog getto a queste regol e.
29 30
Hinweis zum Umweltschutz
Ab dem Zeit punkt der Umset zung der europäi schen Richtlin ie 2012/19/EU in
nationales Recht gilt folgendes:
— El ektrische und e lektronische G eräte dürfen ni cht mit dem Hausmü ll
entsorgt werden.
— De r Verbraucher ist g esetzlich verp flichtet, elekt rische und elek tronische
Geräte am Ende ihrer Lebensdauer an den dafür eingerichteten, öffentlichen
Sammelstellen oder an die Verkaufstelle zurückzugeben. Einzelheiten
dazu reg elt das jeweilige L andesrecht. Da s Symbol auf dem Pro dukt, der
Gebrauc hsanleitung o der der Verpackun g weist auf diese Be stimmungen hin.
Mit der Wiederverwertung, der stofflichen Verwertung oder anderer Formen
der Verwe rtung von Altger äten leisten Sie ein en wichtigen Be itrag zum Schutz
unserer U mwelt. In Deutschl and gelten oben g enannte Entsorgu ngsregeln, laut
Batterieverordnung, für Batterien und Akkus entsprechend.
Nota sobre la protección medioambiental
Despué s de la puesta en marc ha de la directiva Eu ropea 2012/19/EU en el sistema
legislativo nacional, Se aplicara lo siguiente:
— Los a paratos eléctri cos y electrónic os, así como las pila s y las pilas
recarga bles, no se deben ev acuar en la basura d oméstica.
— El u suario está lega lmente obligado a l levar los aparatos e léctricos y
electró nicos, así como pil as y pilas recarga bles, al final de s u vida útil a los puntos
de recogi da comunales o a dev olverlos al luga r donde los adquir ió. Los detalles
quedara n definidos por l a ley de cada país. El sím bolo en el producto, e n las
instrucciones de uso o en el embalaje hace referencia a ello. Gracias al reciclaje, al
reciclaje del material o a otras formas de reciclaje de aparatos usados, contribuye
Usted de forma importante a la protección de nuestro medio ambiente.
Nota em protecção ambiental
Após a implementação da directiva comunitária 2012/19/EU no sistema legal
nacional, o seguinte aplica-se:
— Todos os aparelhos eléctricos e electrónicos não podem ser despejados
juntamente com o lixo doméstico.
— Co nsumidores est ão obrigados por l ei a colocar os apar elhos eléctric os e
electró nicos sem uso em loc ais públicos es pecíficos para es te efeito ou no ponto
de venda. O s detalhes para es te processo são defi nidos por lei pelo s respectivos
países. Es te símbolo no produ to, o manual de instruç ões ou a embalage m indicam
que o produ to está sujeito a estes r egulamentos. Re ciclando, reutil izando os
materiai s dos seus velhos ap arelhos, esta a fa zer uma enorme con tribuição para a
protecção do ambiente.
Page 17

Ympäristönsuojelua koskeva ohje
Siitä lähtien, kun Euroopan unionin direktiivi 2012/19/EU otetaan käyttöön
kansallisessa lainsäädännössä, pätevät seuraavat määräykset:
— Sähkö- ja elektroniikkalaitteita ei saa hävittää talousjätteen mukana.
— Kuluttajalla on lain mukaan velvollisuus toimittaa sähkö- ja elektroniikkalaitteet
niiden käyttöiän päätyttyä niille varattuihin julkisiin keräyspisteisiin tai palauttaa ne
myyntipaikkaan. Tähän liittyvistä yksityiskohdista säädetään kulloisenkin osavaltion
laissa. Näistä määräyksistä mainitaan myös tuotteen symbolissa, käyttöohjeessa
tai pakkauksessa. Uudelleenkäytöllä, materiaalien uudelleenkäytöllä tai
muilla vanhojen laitteiden uudelleenkäyttötavoilla on tärkeä vaikutus yhteisen
ympäristömme suojelussa.
Notit ie aangaand e de bescher ming van het mil ieu
Ten gevolge van d e invoering van de Eur opese Richtlijn 2 012/19/EU in het natio naal
juridis ch system, is het volge nde van toepassin g:
— Electrische en electronische toestellen mogen niet weggegooid worden
tesamen m et het huishoude lijk afval.
— Co nsumenten zijn wet telijk verplic ht om electrisch e en elctronische a pparaten
op het eind e van gebruik in te die nen bij openbar e verzamelpla atsen speciaal
opgezet vo or dit doeleinde o f bij een verkooppu nt. Verdere specif icaties
aangaa nde dit onderwe rp zijn omschreve n door de national e wet van het
betreff ende land. Dit symb ool op het product, d e gebruiksaanw ijzing of de
verpakk ing duidt erop dat h et product onder worpen is aan dez e richtlijnen. Do or
te recycleren, hergebruiken van materialen of andere vormen van hergebruiken van
oude toeste llen, levert u ee n grote bijdrage aan d e bescherming v an het mileu.
Not om mil jöskydd
Efter imp lementeringe n av EU direktiv 2012/19/EU i den nat ionella lagstif tningen,
gäller följande:
— El ekriska och ele ktroniska appa rater får inte avy ttras med hushål lsavfall.
— Konsumenter är skyldiga att återlämna elektriska och elektroniska apparater
vid slutet av d ess livslängd t ill, för detta ända mål, offentliga u ppsamlingspl atser.
Detalje r för detta defini eras via den natio nella lagstif tningen i respek tive land.
Denna symbol på produkten, instruktionsmanualen eller på förpackningen
indikera r att produkten in nefattas av denn a bestämmelse. G enom återvinn ing och
återanvän dning av material b idrar du till att sk ydda miljön och di n omgivning.
Wskazówki dotyczące ochrony środowiska
Od czasu wp rowadzenia europ ejskiej dyrek tywy 2012/19/EU do prawa
narodowego obowiązują następujące ustalenia:
— Ur zadzeń elektr ycznych i elekt ronicznych nie nal eży wyrzucać w raz z innymi
odpadami domowymi.
— Użytkownik zobowiązany jest, niepotrzebne lub zniszczone urządzenia
elektryczne odnieść do punktu zbiórki lub do sprzedawcy. Szczegółowe kwestie
regulują przepisy prawne danego kraju. Informuje o tym symbol przekreślonego
kosza umieszczony na opakowaniu. Segregując śmieci pomagasz chronić
środowisko naturalne.
Ochrana životního prostředí
Evropská s měrnice 2012/19/EU stanovu je:
— El ektrické a elek tronické přístro je se nesmí vhazova t do domácího odp adu.
— El ektrické a elek tronické přístro je musí být zlikv idovány podle záko na na
místech k tom u určených. Recyk lací nebo jiným způ sobem zpracován í výrazně
přispíváte k ochraně našeho životního prostředí!
Környezetvédelmi tudnivalók
Az európ ai irányelvek 2012/19/EU aján lása szerint, a meg jelölt időpont tól kezdve,
minden EU -s tagállamban é rvényesek a következ ők:
— A leselejtezett elektromos és elektronikus készülékeket nem szabad a
háztartási szemétbe dobni.
— Az elhasznált és működésképtelen elektromos és elektronikus készülékek
gyűjtés ére törvényi elő írás kötelez minden kit, ezért azoka t el kell szállíta ni egy
kijelölt gyűjtő helyre vagy visszavinni a vásárlás helyére. A termék csomagolásán
feltüntete tt szimbólum eg yértelmű jelzé st ad erre vonatkozóan a fe lhasználóna k.
A régi készü lékek begyűjté se, visszaváltá sa vagy bármilyen f ormában történ ő újra
hasznosítása közös hozzájárulás környezetünk védelméhez.
Ochrana životného prostredia
Európska smernica 2012/19/EU stanovuje:
— El ektrické a elek tronické zariad enia sa nesmú vy hadzovať do
domáceho odpadu.
— Sp otrebiteľ je zo zákon a povinný zlikvi dovať elektric ké a elektronické z ariadenia
na miesta k to mu určené. Symbo lizuje to obrázok v náv ode na použitie, al ebo
na balení v ýrobku. Recyk láciou, alebo iný mi formami vyu žitia starých pr ístrojov
prispie vate v značnej miere k o chrane vášho živo tného prostredia .
Çevre koruma uyarısı
Avrupa Bir liği Direktif i 2012/19/EU ulusa l yasal uygulamal ar için de geçerl i olduğu
tarihten i tibaren:
— Elektrikli ve elektronik cihazlar normal evsel çöpe atılmamalıdır.
— Tüketiciler için, artık çalışmayan elektrikli ve elektronik cihazları, kamuya
ait toplama yerlerine götürme veya satın alındıkları yerlere geri verme yasal bir
zorunluluktur. Bu konu ile ilgili ayrıntılar ulusal yasalarla düzenlenmektedir. Ürün
üzerinde, kullanma kılavuzunda veya ambalajda bulunan bu sembol tüketiciyi
bu konuda uyarır. Eski cihazların geri kazanımı, yapıldıkları malzemelerin
değerlendirilmesi veya diğer değerlendirme şekilleri ile, çevre korumasına önemli
bir katkıda bulunursunuz. Yukarıda adı geçen atık toplama kuralları Almanya'da
piller ve a küler için de geç erlidir.
Anvisninger til beskyttelse af miljøet
Efter imp lementeringe n af det europæiske di rektiv 2012/19/EU i det nation ale
lovgivningssystem gælder følgende:
— El ektriske og elek troniske appar ater må ikke bortsk affes med
husholdningsaffaldet.
— Forbrugeren er ved afslutningen af elektriske og elektroniske apparaters
levetid lov mæssigt forpli gtet til at aflevere dis se på de dertil ind rettede offentl ige
indsamlingssteder eller hos sælgeren. Enkeltheder vedrørende dette fastlægges
af de respe ktive landes na tionale lovgivni ng. Dette symbol på p roduktet,
betjeningsvejledningen eller emballagen viser, at produktet er underlagt disse
bestemmelser. Med genanvendelse, genanvendelse af materialer eller andre
former fo r genbrug af gamle a pparater yder du et v igtigt bidrag til b eskyttelse a f
vores miljø.
Informasjon om beskyttelse av miljøet
Etter impl ementering av EU- direktiv 2012/19/EU i det nasj onale lovverk, e r
følgende gjort gjeldende:
— El ektrisk og ele ktronisk utst yr skal ikke kaste s sammen med hush oldningsavf all.
— For brukere er pålag t ved lov å returnere el ektrisk og ele ktronisk utst yr ved
enden av le vetiden til offen tlige oppsamlin gspunkter, oppsat t for dette formål e ller
til utsal gssteder for slik t utstyr. Detaljer r undt dette er defi nert i lovverke t i det
respek tive land. Dette sym bolet på produk tet, bruksanvisni ngen eller forp akningen
fortell er at et produkt fal ler inn under dis se betingelsen e. Ved resirkuleri ng,
gjenbr uk av materialet ell er på andre måter å ny ttiggjøre gamm elt utstyr bidr ar du
på en vikt ig måte til å besky tte vårt felles m iljø!
31 32
Υπόδειξ η σχετικά με τ ην προστασ ία περιβάλ λοντος
Από τη στι γμή που η Ευρωπαϊκή Οδηγ ία 2012/19/EU ενσωμ ατώνεται σ το εθνικό
δίκαιο ισχύ ουν τα εξής:
— Οι ηλ εκτρικές και ηλεκ τρονικές συσκε υές δεν επιτρέπ εται να πετιού νται στα
σκουπίδια.
— Ο κατ αναλωτής υποχρ εούται δια νόμου να ε πιστρέφει τις ηλ εκτρικές και
ηλεκτρονι κές συσκευές στ ο τέλος της ζωής του ς πίσω στα ειδικά προβ λεπόμενα
σημεία συγ κέντρωσης ή σ τα καταστήμα τα αγοράς. Οι λε πτομέρειες ρυ θμίζονται
στη σχε τική νομοθεσί α. Το σύμβολο πάνω στο πρ οϊόν, στο εγχειρίδ ιο χρήσης ή στη
συσκευασ ία παραπέμπει σε αυτ ές τις διατάξεις. Μ ε την επαναχρησι μοποίηση, την
ανακύκ λωση των υλικών ή με άλ λους τρόπους αξιοπ οίησης των παλαιώ ν συσκευών
συμμετέ χετε ενεργά σ την προστασία τ ου περιβάλλον τός μας. Στη Γερμανία ισχ ύουν
αντίσ τοιχα οι παραπάνω κα νόνες απόρριψης σύμφ ωνα με τον κανονισμό γι α
μπαταρίες και συσσωρευτές.
Охрана окружающей среды
С момента перехода национального законодательства на европейские
нормативы 2012/19/EU действительно следующее:
— Эле ктрические и эл ектронные пр иборы запрещае тся утилизи ровать вмес те с
обычным мусором.
— Потребитель, согласно закону, обязан утилизировать электрические и
электронные приборы в специально предназначенных для этого пунктах
сбора, либо пунктах продажи. Детальная регламентация этих требований
осуществляется соответствующим местным законодательством. Необходимость
соблюдения данных предписаний обозначается особым значком на изделии,
инструкции по эксплуатации или упаковке. При переработке, повторном
использовании материалов или при другой форме утилизации бывших в
употреблении приборов особое внимание уделяйте охране окружающей
среды. В соот ветствии с пред писаниями по об ращению с батарея ми, в Германии
вышеназванные нормативы действуют для утилизации батарей и аккумуляторов.
Page 18

CHINA RoHS
部件名称
印刷电路板及电子组件
铅
Pb
X
外壳 ○ ○ ○ ○ ○ ○
连接线/配件 ○ ○ ○ ○ ○ ○
本表格依据 SJ/ T11364 的规定编制。
○:表示该有毒有害物质在该部件所有均质材料中的含量均在 GB/T 26572 规定的限量要求以下。
X: 表示该有毒有害物质至少在该部件的某一均质材料中的含量超出 GB/T 26572 规定的限量要求。
表中标有“X”的所有部件都符合欧盟 RoHS 法规“欧洲议会和欧盟理事会 2011 年 6 月 8 日
关于电子电器设备中限制使用某些有害物质的 2011/65/EU 号指令”。
注:环保使用期限的参考标识取决于产品正常工作的温度和湿度等条件。
产品中有毒有害物质或元素的名称及含量
汞
Hg
镉
Cd
六价铬
+6
Cr
○ ○ ○ ○ ○
33 34
多溴联苯
PBB
多溴二苯醚
PBDE
 Loading...