

Page 1
INSTALLATION MANUAL
ESSENCE JUICE DISPENSER
Dimensions
Depth ................................... 22
Width ...................................12.2
Height ..................................30.31
Essence Juice Dispenser Installation Manual
Installation Instructions
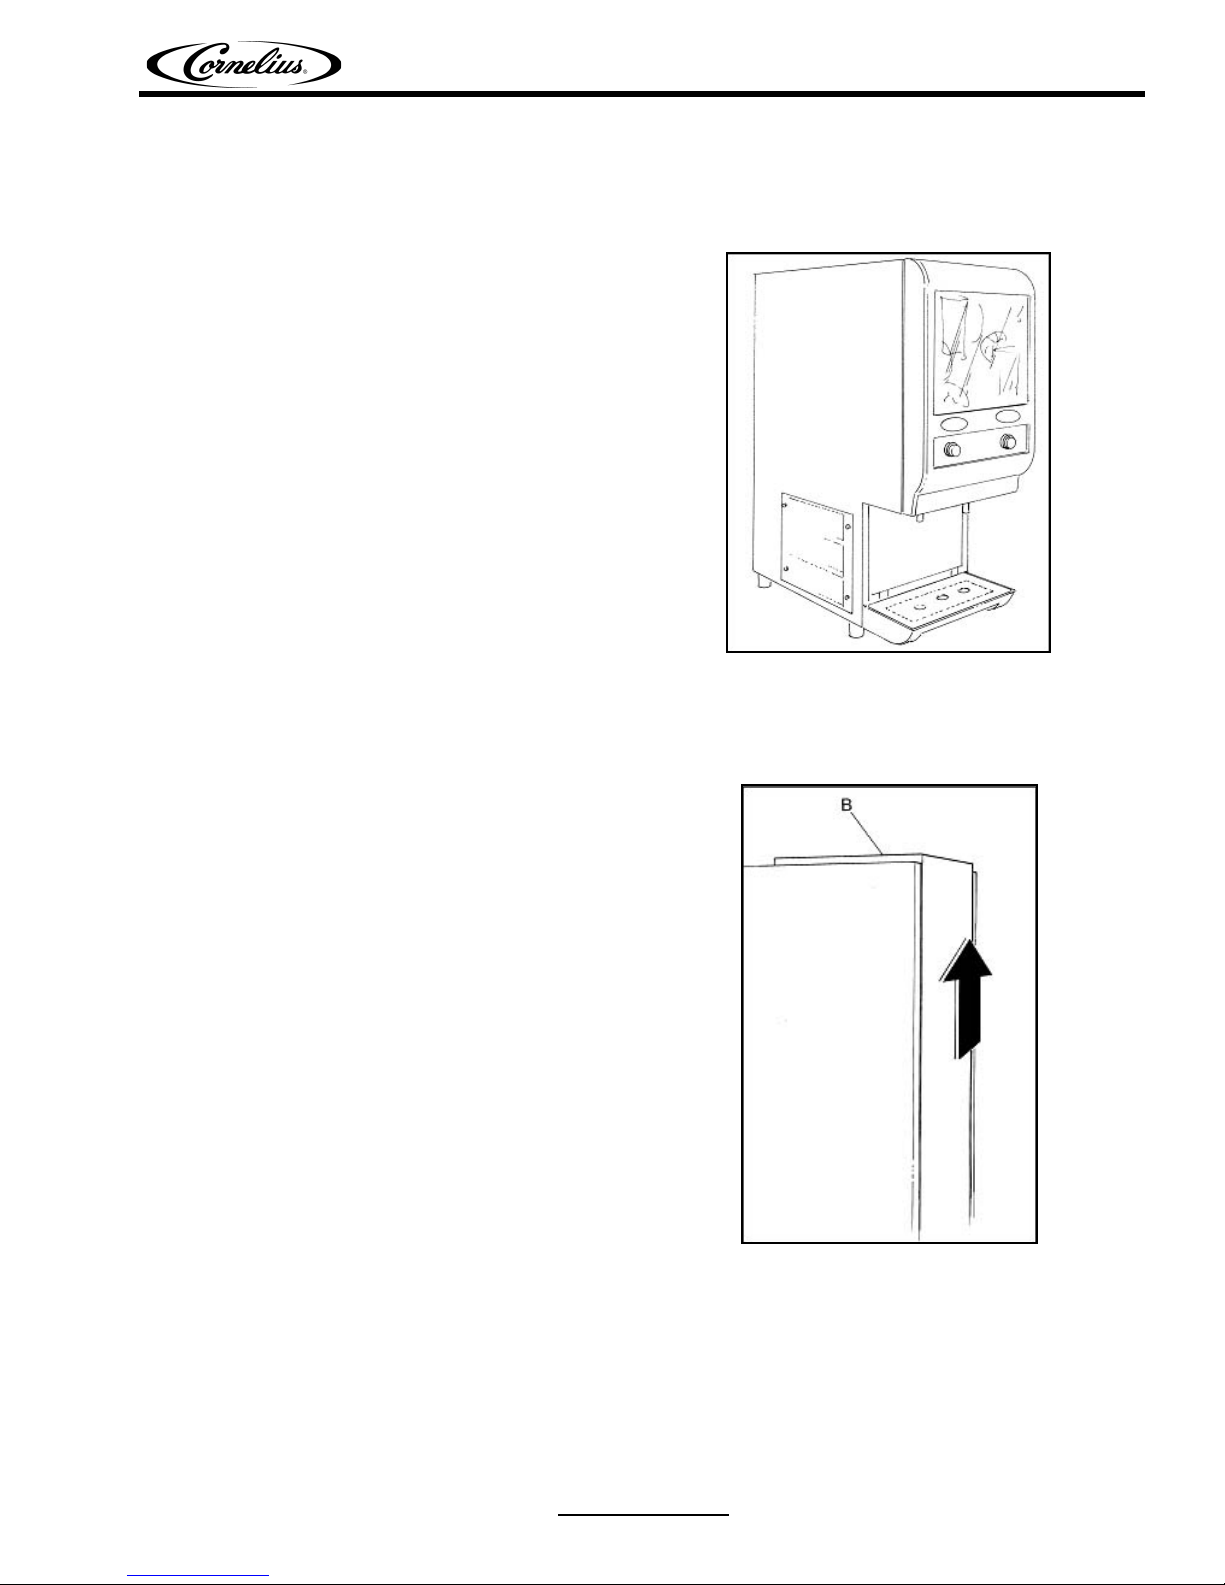
1. Remove back panel (B) by loosening the
screws and lift the panel up, see FIGURE
2.
FIGURE 1
Release Date: October 17, 2006 www.cornelius.com Revision: B
© 2006-2014, Cornelius Inc. - 1 - Publication Number: 621058301INS
FIGURE 2
Page 2
Essence Juice Dispenser Installation Manual
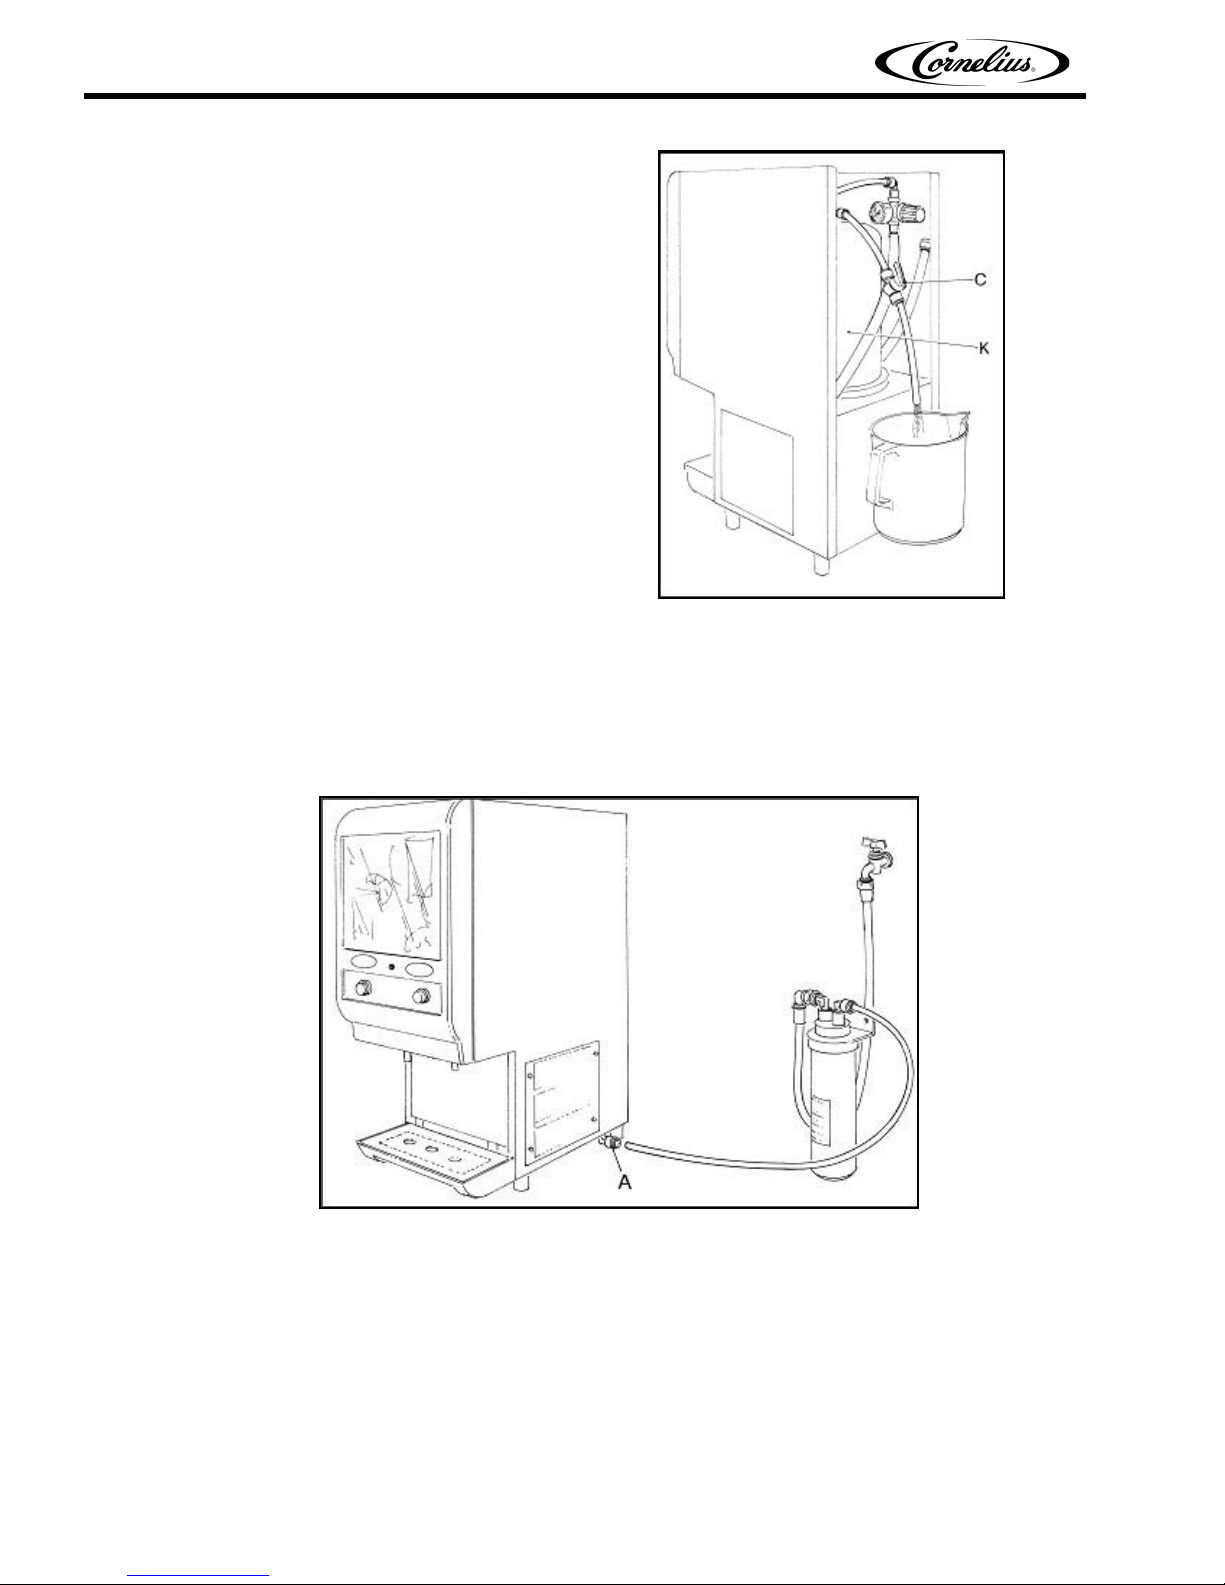
2. Put a container at the end of the tube in
which the tap (C) is mounted, see FIGURE
3.
3. Open tap (C), see FIGURE 3.
4. Attach fitting (A) to the incoming water connection, see FIGURE 4.
5. Check that tap (C) is open, see FIGURE 3.
6. Fill the reservoir tank (K), see FIGURE 3.
7. Close tap (C) when the water begins to flow from the tube in which tap (C) is mounted, see FIGURE
3.
FIGURE 3
Publication Number: 621058301INS - 2 - © 2006-2014, Cornelius Inc.
FIGURE 4
Page 3
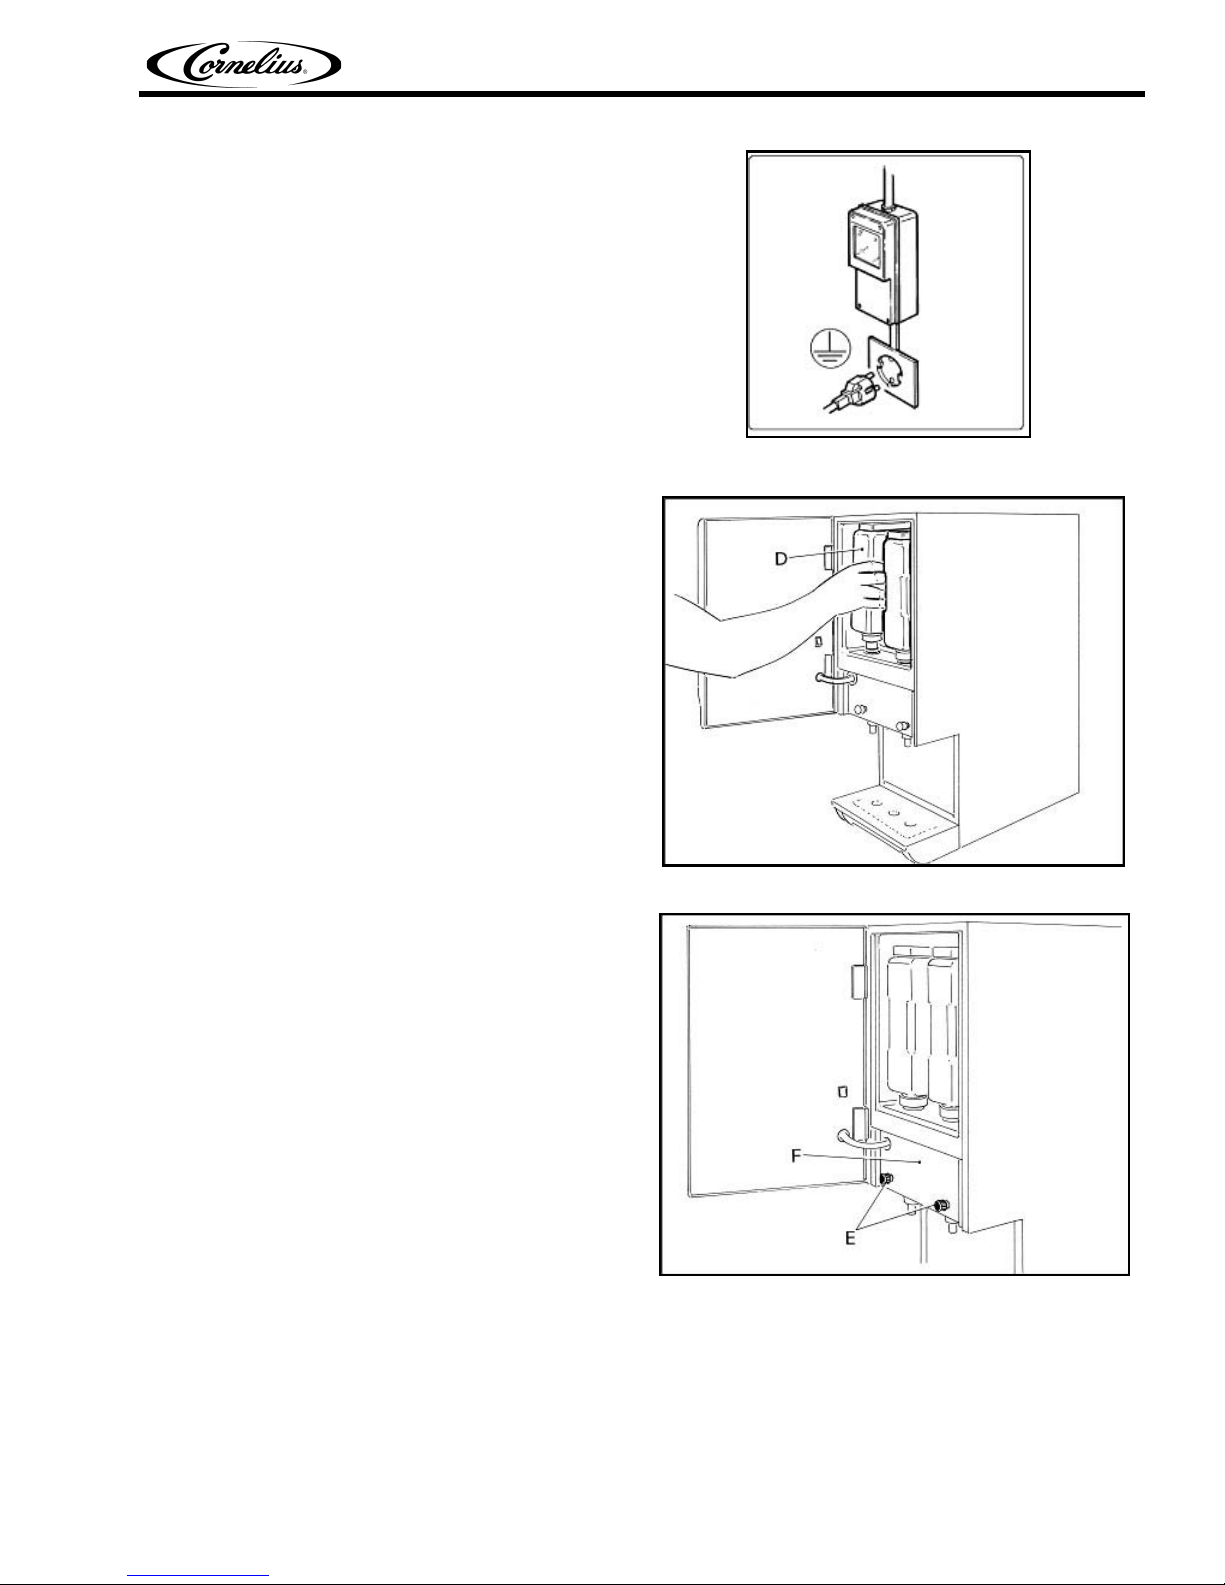
8. Plug the units power cord into a dedicated
power line with a 15amp rating, see
FIGURE 5.
IMPORTANT: The electrical safety of the unit
can only be achieved if the machine is
properly connected to an efficient grounded
system, in compliance with current national
safety standards. The entire length of the
power supply cord must not, in any way, be
compressed (bent or bunched together), nor
may any extension cords be used.
9. Load the concentrate container (D) in
place and press down firmly to seat into
the ball-check adapter, see FIGURE 6.
Essence Juice Dispenser Installation Manual
FIGURE 5
10. Loosen the knobs (E) and remove cover
(F), see FIGURE 7.
FIGURE 6
FIGURE 7
© 2006-2014, Cornelius Inc. - 3 - Publication Number: 621058301INS
Page 4

Essence Juice Dispenser Installation Manual
11. Rotate screw (G) with a flathead
screwdriver in order to regulate the
quantity of water until the proper Brix is
achieved, see FIGURE 8.
• Turning clockwise will increase the
volume of water.
• Turning counter clockwise will decrease
the volume of water.
12. Remount cover (F) by fastening knobs (E),
see FIGURE 7.
13. Press and hold dispense buttons (H) until
the product is dispensed, see FIGURE 9.
The dispenser is now ready to operate.
FIGURE 8
Publication Number: 621058301INS - 4 - © 2006-2014, Cornelius Inc.
FIGURE 9
Page 5

Sanitizing Procedure
1. Fill a clean concentrate container (D) with
2 quarts of fresh sanitizing solution (ie:
Stera-Sheen Green Label sanitizer) in
accordance with the manufacturer’s
directions and load in dispenser, see
FIGURE 10.
2. Press and hold the dispense button (H) for
90 seconds and stop, see FIGURE 11.
Allow the sanitizing solution to remain in
the dispenser for 5 minutes. After 5
minutes, dispense the remaining solution.
3. Repeat the operation for the other
dispense side.
Essence Juice Dispenser Installation Manual
FIGURE 10
© 2006-2014, Cornelius Inc. - 5 - Publication Number: 621058301INS
FIGURE 11
Page 6

Essence Juice Dispenser Installation Manual
4. Loosen the knobs (E) and remove cover
(F), see FIGURE 12.
5. Remove the nozzle (I) by rotating ½ turn
clockwise and pulling it straight downward,
see FIGURE 13.
FIGURE 12
6. Remove the mixing chamber (M) by
pulling it forward, see FIGURE 14.
7. Clean the nozzles, mixers, and mixing
chamber with warm water and a mild
detergent.
8. After cleaning, remount the nozzles and
mixing chambers by repeating the
operations in reverse order.
Publication Number: 621058301INS - 6 - © 2006-2014, Cornelius Inc.
FIGURE 13
FIGURE 14
Page 7

Rinsing Operation and Cleaning Reservoir Tank
Tank Rinsing
This rinsing procedure should be performed daily.
1. Turn the switch (N) to the “Off” position,
see FIGURE 15.
2. Press and hold button (H) for 30 seconds,
see FIGURE 16.
3. Repeat the same operation for each
mixing chamber.
4. Turn the switch (N) to the “On” position,
see FIGURE 15.
Essence Juice Dispenser Installation Manual
FIGURE 15
© 2006-2014, Cornelius Inc. - 7 - Publication Number: 621058301INS
FIGURE 16
Page 8

Essence Juice Dispenser Installation Manual
Tank Rinsing and Sanitizing
This tank rinsing and sanitizing procedure should be performed monthly.
1. Drain the reservoir tank (K), see FIGURE
17:
A. Shut the water connection off.
B. Remove coupling (P) by pressing on
clamp (O).
C. Place an empty container (with at least
2 gallon capacity) at the end of the tube
in which tap (C) is mounted.
D. Open tap (C).
E. Allow the water to completely drain out
of the reservoir tank (K).
2. Sanitize the system, see FIGURE 18.
A. Prepare a tank (S) filled with sanitizing
solution (ie: Stera-Sheen Green Label
sanitizer) in accordance with the
manufacturer’s directions.
B. Connect the quick coupling (P) and
place an empty container at the end of
the tube.
NOTE: Solution can also be manually filled
in tank by removing tube (C) and pouring
directly into tank.
C. Connect a pump (T) to the machine
through the connection tube (R).
D. Switch the pump (T) on.
E. Allow the sanitizing solution to flow out
from the tube in which coupling (C) is
mounted.
F. Switch the pump off (T) and close tap
(C).
FIGURE 17
FIGURE 18
Publication Number: 621058301INS - 8 - © 2006-2014, Cornelius Inc.
Page 9

G. Manually fill a clean empty tank (D)
with sanitizing solution, see FIGURE
19.
H. Check that switch (N) is “On”, see
FIGURE 20.
I. Position an empty container under the
spouts.
J. Turn the unit on.
K. Dispense by pressing and holding the
dispense button (H) for 90 seconds
until the solution comes out clear, see
FIGURE 20.
Essence Juice Dispenser Installation Manual
FIGURE 19
FIGURE 20
L. Remove the product containers (D) and wash them, see FIGURE 19.
M. Fill the product containers with 1 liter of warm water and put them back in place.
N. Empty the reservoirs by pressing and holding the dispense button (H), see FIGURE 20.
O. Reconnect the machine to the water line connection.
P. Turn tap (C) to the open position, see
FIGURE 21.
Q. Allow the reservoir (K) to fill, see
FIGURE 21.
R. Turn tap (C) off when water begins
flowing from the tube in which tap (C) is
mounted.
S. Pushing and hold the dispense buttons
(H) until clear water comes out, see
FIGURE 20.
T. Replace the product containers used
for sanitizing (D) with concentrate
product containers, see FIGURE 19.
U. Press and hold the dispense buttons
(H) until product flows from the
dispense heads, see FIGURE 20.
The unit is ready to dispense.
© 2006-2014, Cornelius Inc. - 9 - Publication Number: 621058301INS
FIGURE 21
 Loading...