


USER MANUAL
ENGLISH

TABLE OF CONTENTS
QUICK START GUIDE |
2 |
CAMERA OVERVIEW |
2 |
SETTING UP |
3 |
CAUTIONS AND WARRANTY |
4 |
CONTACT |
6 |
QUICK START
1Slide the Door Lock to the left so the red icon isn’t showing.
2Slide the camera door up to open.
3Insert the microSD Card.
4Close the camera door.
5Slide the Door Lock to the right to lock it closed.
4Slide the Record Slider forward to record. Slide it back to stop recording.
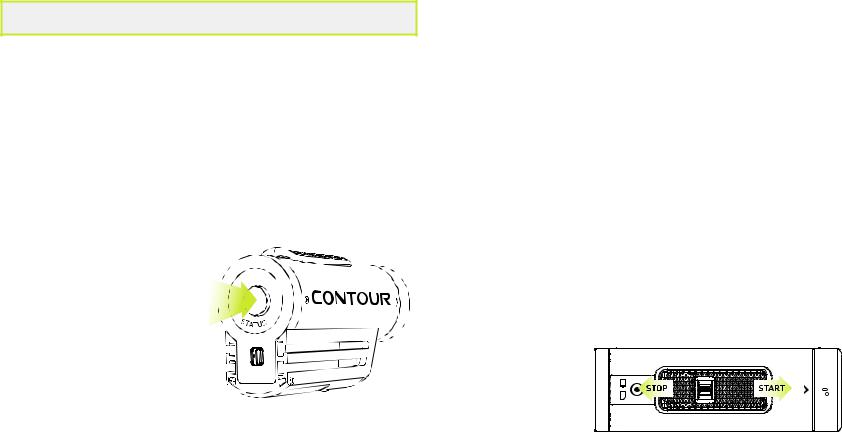
CAMERA DIAGRAM KEY
ARecord Status
BRecord Slider
CRecord Slider Lock
DRotating Lens
ELaser Line
FMicrophone
GStatus Button
HReset Button
IUSB
JmicroSD Card Slot
KCard Format Button
LDoor Lock
MMemory Status
NBattery Status
N
C
 D M
D M 
A
|
H |
I |
F |
|
D
G
L |
F |
|
|
|
J |
|
A |
|
K |
2 |
USER MANUAL |
SETTING UP
Download Contour Storyteller to your PC/Mac from the Contour website. The link below will help you set up your camera to make sure it is registered, update the time on your camera, and get the settings dialed to your custom configuration.
http://www.contour.com/startROAM2
CHARGING THE BATTERY
+Slide the door up to open.
+Connect your camera to a PC/Mac using the supplied USB Cable.
+The Battery Status LED indicates the charge level of the battery. It will change colors from red to green as the battery charges.
+Charge is fully complete when the Battery Status LED turns green. This can take up to three hours.
FORMATTING THE microSD CARD
Format the microSD Card prior to recording so your camera is able to properly read and write to it.
Caution: formatting the card will erase everything on it
Check that the Record Slider is in the off position. Open the back of your camera then press and hold the Format Button until the camera beeps (three to five seconds), then release the Format Button. The microSD Card LED will flash while the card is formatting and then turn solid green when the format is complete.
The ContourROAM2 is compatible with:
+SDSC (standard capacity) class 2 microSD Cards up to a capacity of 2GB.
+SDHC (high capacity) class 4, 6, or 10 microSD Cards up to a maximum capacity of 32GB.
Camera Status
Pressing the Status Button will:
+Activate the Laser Line for 15 seconds.
+ Display the current battery and memory status.
MEMORY STATUS LED |
BATTERY STATUS LED |
Green: 50% or more |
Green: 50% or more |
Yellow: 20 to 50% |
Yellow: 20 to 50% |
Red: 20% or less |
Red: 20% or less |
ERROR CONDITIONS
+Battery LED flashes red: the battery is almost empty.
+Memory LED flashes and there are continuous beeps: the microSD Card cannot be accessed because the card is full, missing, or not
properly formatted.
CAMERA SETTINGS
To adjust the settings on your camera, download and install the Contour Storyteller app to your PC/Mac.
http://contour.com/software/storyteller
With the camera connected to your computer, go to the Tools >> Configure Camera menu in Contour Storyteller.
Here you can adjust: |
|
Video Mode: |
Photo Mode: |
- 1080p video at 30 frames per second |
- 5MP photos every 1, 3, 5, |
- 960p video at 30 frames per second |
10, 30,60 seconds |
- 720p video at 30 frames per second |
|
- 720p video at 60 frames per |
Microphone Sensitivity: |
second (Default) |
- Audio level |
RECORDING
+Start Recording: Move the Record Slider Lock so that the red square is not showing and then slide the Record Slider forward. Your camera will power on, beep once, and the Record Status LED will turn red, indicating that the camera is now recording a video.
+Stop Recording: Slide the Record Slider back. Your camera will beep twice, and the Record Status LED will switch off, indicating that your camera has stopped recording and is powered off.
+Record Slider Lock: The small switch on top of the Record Slider is used to keep the Record Slider from turning on or off. To move the Record Slider forward or back, have the Record Slider Lock moved so that the red square is not showing. To prevent the Record Slider from moving in either the record or off positions, move the Record Slider Lock so that the red square is visible.
3

MOUNTING
Getting the best shot depends only on your creativity. Contour offers a wide range of mounts that let you put the camera just about anywhere, so be creative.
Remember that your ContourROAM2 has a wide-angle lens and objects that are far away will seem smaller than you expect in your videos.
Alignment
Your ContourROAM2 has a Laser Line that helps ensure you have the horizon properly aligned in your videos. To use, activate the Laser Line by pressing the Status Button; place your hand in front of the Laser Line or aim it on to a flat surface a few feet in front of you and rotate the lens (up to 270°) until the Laser Line is horizontal.
When mounting the camera on your helmet or goggles, you may discover that you look down more than you thought. It may take a few practice videos to find the right alignment.
Adhesive Mounts
Clean and dry the mounting surface before applying an adhesive mount. We suggest cleaning the surface with a small amount of alcohol and applying the mount at room temperature. Let the adhesive cure for 24 hours before use.
WATERPROOF
Your ContourROAM2 is waterproof to a depth of 1 meter (3 feet) without the use of a waterproof case. To go deeper, you will need to use the Waterproof Case. The case is good to a depth of 60 meters (180 feet).
CAUTIONS AND WARRANTY
Cautions and Warranty
This Important Product Information Guide contains regulatory, safety, handling, disposal and recycling information, as well as the 1 year limited warranty for your ContourROAM2 camera.
Read all safety information below and operating instructions before using ContourROAM2 camera to avoid injury.
Read all safety information below and operating instructions before using
ContourROAM2 camera to avoid injury.
Warning: Failure to follow these safety instructions could result in fire, electric shock, or other injury or damage.
Battery and Handling
ContourROAM2 uses a non-removable, non-changeable, rechargeable lithi- um-ion, 3.7V, 1350mAh battery. The battery may present a hazard if mistreated. Do not disassemble or crush the camera. To charge, only use the Contour USB Cable with a high power USB port on a computer or other device that is compliant with the USB 2.0 or 1.1 standards, or a Contour wall, car, or battery charger.
Disposal information
Do not dispose of the ContourROAM2 camera in a fire. Dispose of the camera and its internal battery in accordance with local laws and regulations.
Leash Use: DO NOT ATTACH THE LEASH TO THE CAMERA WHEN THE CAMERA IS MOUNTED ON HELMET OR GOGGLES, WHEN THE CAMERA WILL BE USED IN HIGH WINDS OR AT HIGH VELOCITIES, OR IN ANY OTHER CIRCUMSTANCES WHEREBY THE CAMERA COULD CAUSE INJURY OR HARM IN THE EVENT THAT IT COMES LOOSE FROM THE MOUNT AND REMAINS TETHERED BY THE LEASH. BY ATTACHING THE LEASH TO THE CAMERA, YOU AGREE TO WAIVE ANY CLAIMS AGAINST CONTOUR, INC. AND ANY OF ITS AFFILIATES, AGENTS, EMPLOYEES, OFFICERS OR DIRECTORS ARISING FROM THE USE OF THE LEASH.
FCC information
ContourROAM2 Camera
Model: 1800
This device complies with Part 15 of the FCC Rules.
Operation is subject to the following two conditions:
+This device may not cause harmful interference, and
+This device must accept any interference received, including interference that may cause undesired operation.
Warning: Changes or modification to this unit not expressly approved by party responsible for compliance could void the user’s authority to operate the equipment. Note: This equipment has been tested and found to comply with the limits for a Class B digital device, pursuant to Part 15 of the FCC Rules. These limits are designed to provide reasonable protection against harmful interference in a residential installation.
4
 Loading...