Contour Contour +2 User Manual

TABLE OF CONTENTS
QUICK START GUIDE |
2 |
CAMERA OVERVIEW |
4 |
SETTING UP |
6 |
HOW TO USE |
14 |
CAUTIONS AND WARRANTY |
21 |
CONTACT |
26 |
USER MANUAL

QUICK START
Quick Start
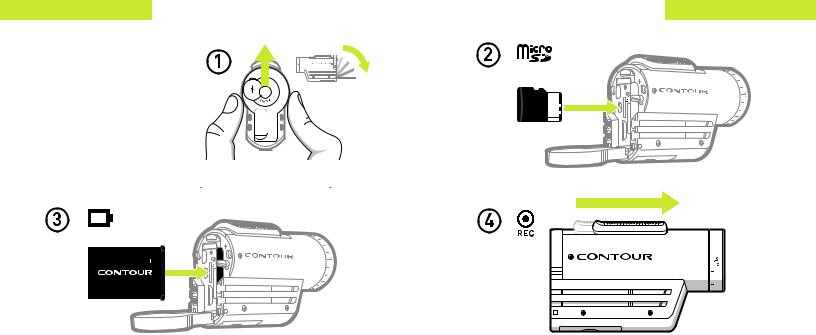
1 Slide the door up to open.
2 Insert the microSD card. 3 Insert the battery.
4 Slide the Record Slider forward to record. Slide it back
to stop recording.
QUICK START
2 |
Contour+2 User Manual |
3 |

CAMERA OVERVIEW
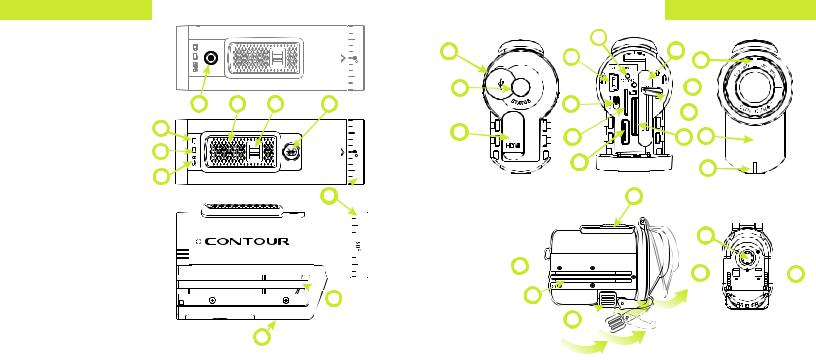
CAMERA DIAGRAM KEY
ABattery Status
BMemory Status
CGPS Status
DRecord Status
ERecord Slider
FRecord Slider Lock
GBluetooth Button and Status
HRotating Lens
IMicrophone Jack
JBattery Slot
KBattery Latch
LCard Format Button
MUSB Port
N1-2 Switch
OConnect View Slot
PmicroSD Card Slot
QHDMI Port
RMicrophone
SLaser Line
4
D E F G
A
B
C
 H
H
 U
U
I
L
M |
|
M |
|
|
|
|
T |
|
|
|
N |
|
Q |
P |
|
|
|
|
|
Q |
E
WATERPROOF CASE DIAGRAM KEY T Status Button
UTRails Lock
VTRails
W Cover Latch T 
V
W 
Contour+2 User Manual
CAMERA OVERVIEW
J
S
H 

 K
K
OR D
T
U 
 U
U
5

SETTING UP
SETTING UP
Download Contour Connect mobile app for your Android or iOS device (available on Google Play and the iTunes App Store) or Contour Storyteller on your PC/Mac. The link below will help you set up your camera to make sure it is registered, ensure your camera has the latest GPS Assist Þle, update the time on your camera, and get the settings dialed to your custom conÞguration.
Go to http://contour.com/startPLUS
SETTING UP
Charging The Battery
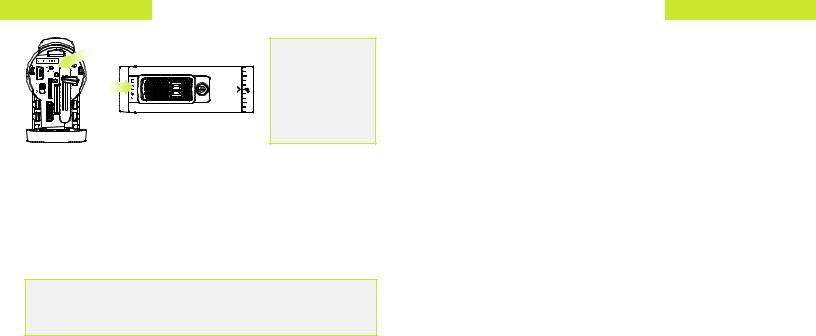
+Slide the door up to open and insert the battery. (As indicated on pg. 2).
+Connect your camera to a PC/Mac using the supplied USB Cable. (As indicated above).
+The Battery Status LED indicates the charge level of the battery. It will change colors from red, to yellow,
to green as the battery charges.
+Charge is fully complete when the Battery Status LED turns green.
This can take up to three hours.
6 |
Contour+2 User Manual |
7 |

SETTING UP
Do not attempt to format the microSD Card if the battery is not charged. Also do not remove the battery when formatting the microSD Card.
Formatting The microSD Card
Format the microSD Card prior to recording so your camera is able to
properly read and write to it. Caution: formatting the card will erase everything on it.
Check that the Record Slider is in the off position. Open the back of your camera then press and hold the Format Button until the camera beeps (three to Þve seconds). The microSD Card LED will ßash while the card is formatting and then turn solid green when the format is complete.
The Contour+2 is compatible with:
+SDSC (standard capacity) microSD Cards up to a capacity of 2GB.
+SDHC (high capacity) class 4, 6, or 10 microSD Cards up to a maximum capacity of 32GB.
SETTING UP
Camera Status
Press and release the Status Button on the back of your camera to activate the Laser Line, and display status of Battery, Memory, and GPS. The camera will power off after 15 seconds or if you press the
Status Button again.
Battery Status LED |
Memory Status LED |
GPS Status LED |
Green: 50% or more. |
Green: 50% or more. |
Green Flashing: |
Yellow: 20 to 50%. |
Yellow: 20 to 50%. |
Searching for satellites. |
Red: 20% or less. |
Red: 20% or less. |
Green Solid: GPS Position |
Red Flashing: The |
Red Flashing and |
Fix obtained, and data can |
battery is almost fully |
continuous beeps: The |
be recorded to video. |
discharged. |
microSD Card cannot |
No LED: The GPS system |
No LED: The battery is |
be read by the camera |
is deactivated. |
fully drained and must |
because the card is full, |
|
be charged. |
missing, or not |
|
|
properly formatted. |
|
|
|
|
8 |
Contour+2 User Manual |
9 |
 Loading...