

Page 1
Page 2
Using the ULTIMAX child car seat
0236-02
To safeguard your child you have
opted for our CONCORD
ULTIMAX seat. This product is
manufactured under strict quality
controls. Its excellent safety
features work best when the seat
is used in accordance with legal
requirements. Be sure, therefore,
to comply fully with the
instructions for its installation and
use.
The ULTIMAX is suitable for
infants from birth up to 18 kg or
for children up to the age of
approx. 4 years. The seat may
be used on all seats in your car
fitted with a three-point seat belt.
On the basis of accident
statistics, we recommend using
the seat behind the passenger
seat.
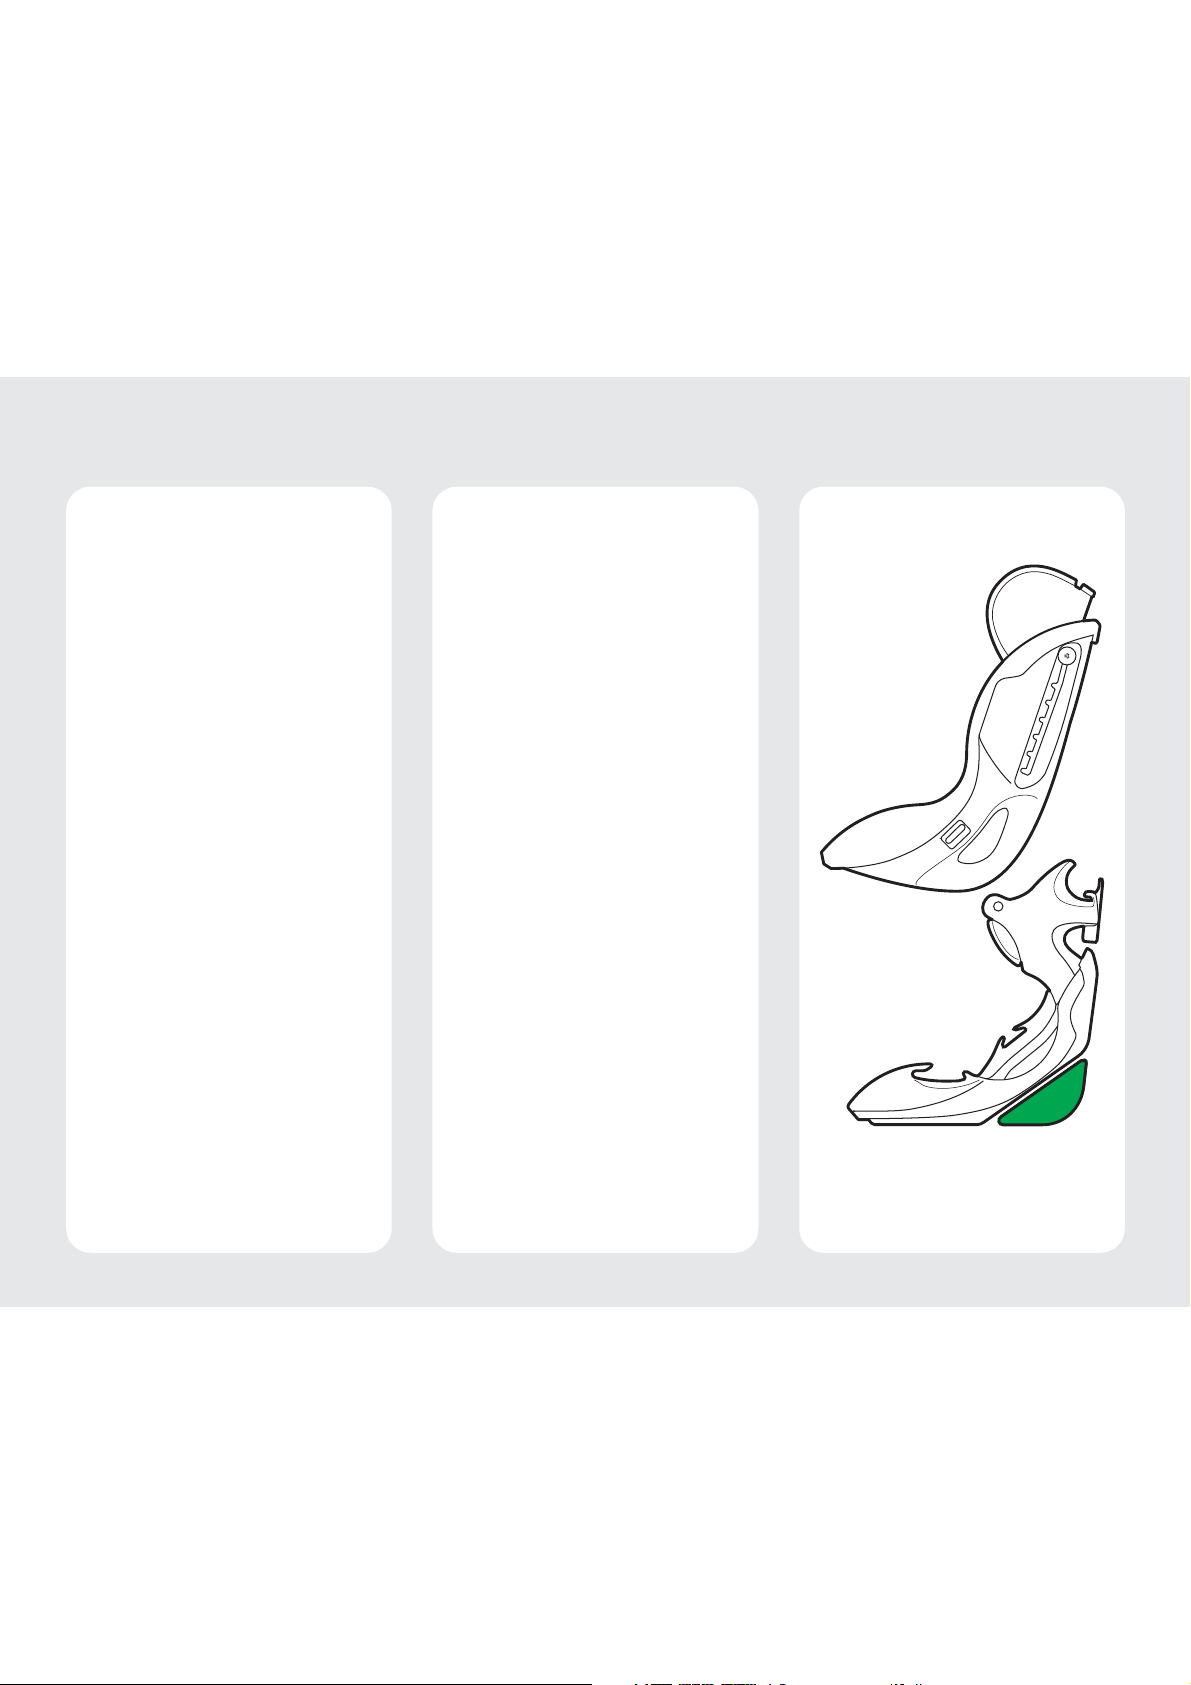
The child car seat comprises
three parts: seat shell (A), base
unit (B) and
reboard wedge (C).
The seat can also be engaged
in four different seat positions
when facing forwards and in one
position when rear-facing.
The seat shell must not be
removed while the child is still
seated in it.
Summary of contents:
1. Rear-facing installation (from
birth to 13 kg).
2. Front-facing installation (from
9 to 18 kg).
3. Securing the child.
4. Adjusting the head support /
adjusting the seat to the
child’s size.
5. Releasing and removing the
seat.
6. Removing the cover /
removing the pelvic insert.
7. Care instructions
8. Important information
9. Warranty terms
10. General information
0106-02
A
B C
Page 3

2
1
1. Rear-facing installation (from birth to 13 kg)
0237-02
A
Do not use on seats
Important!
B
A
R
G
I
with airbags.
Extreme danger!
Turn the rotary handle at the front
of the seat shell upwards (1) and
at the same time push the seat
shell into the upright position (2).
0014-07 0017-06 0013-04
1.2 1.31.1
Hold the seat shell with your
thumbs on the left and right side
and use your fingers to pull the
grey levers as far as they will go
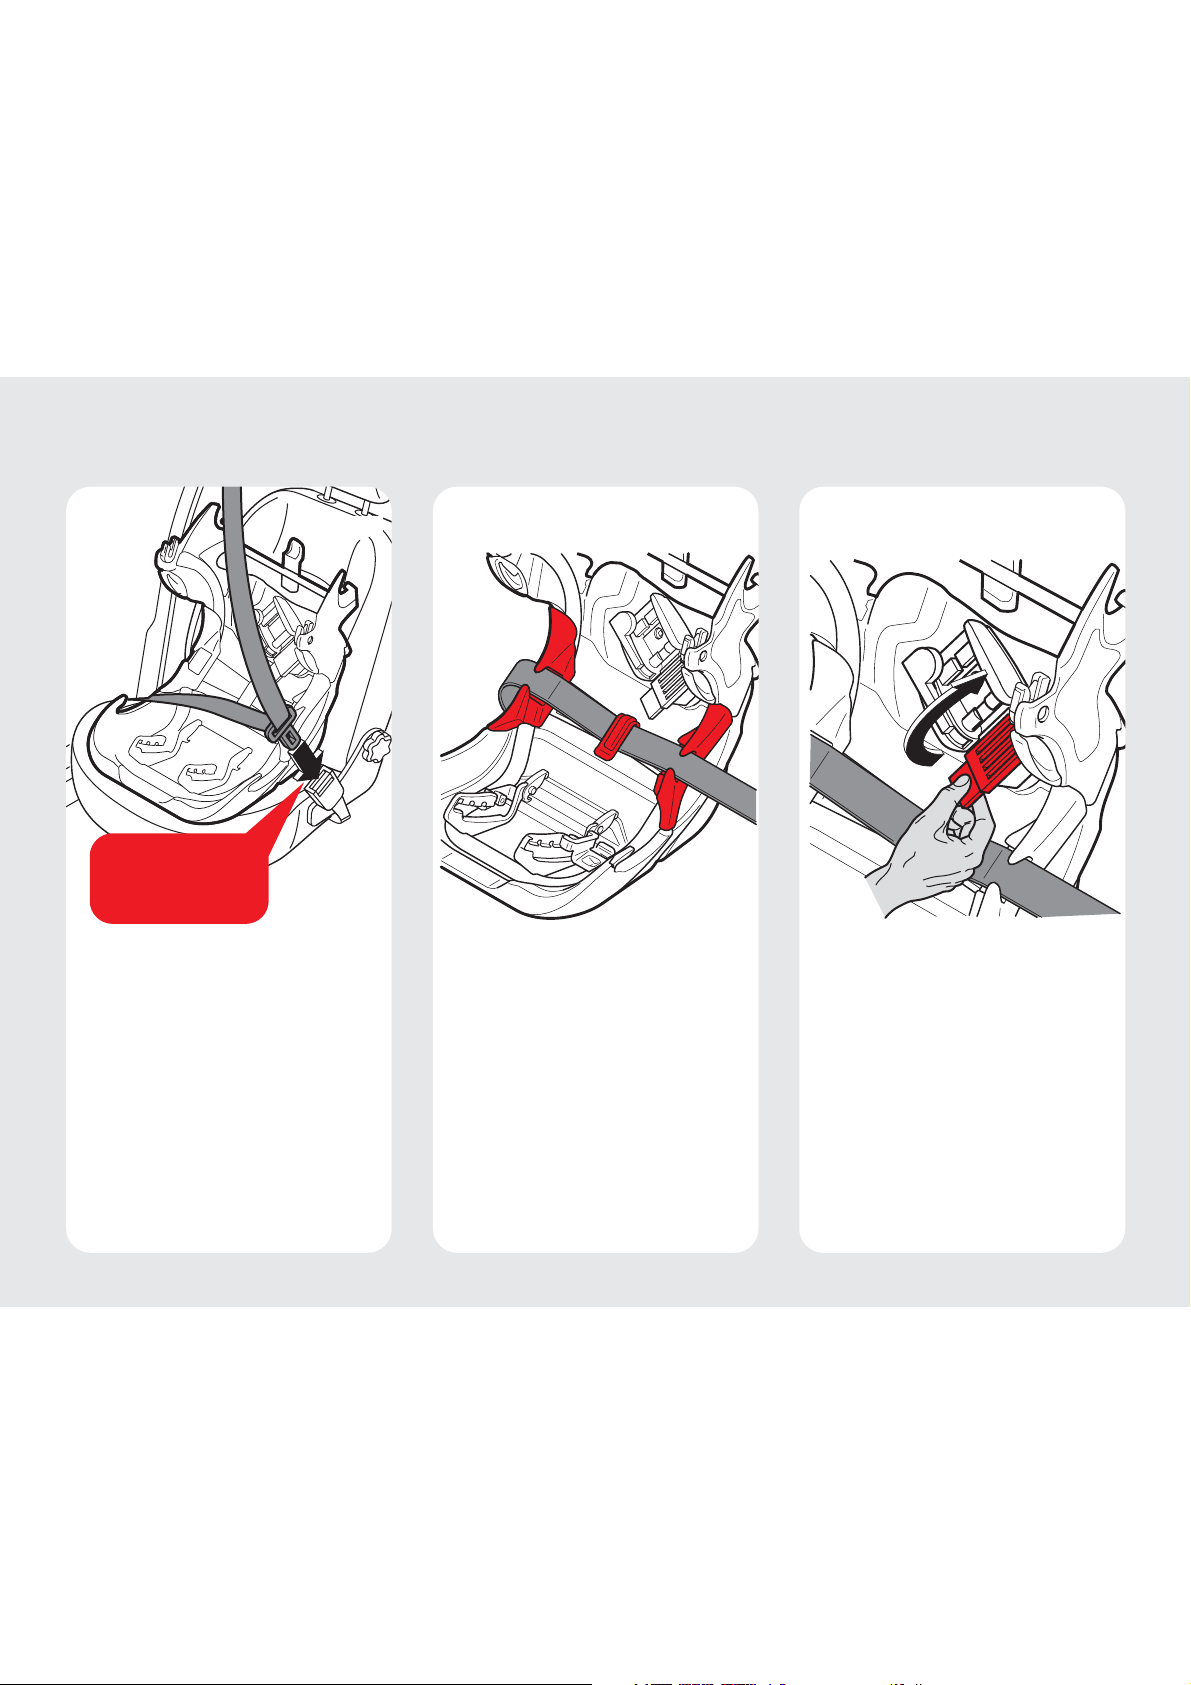
Insert the base unit into the car
seat as illustrated.
Position the reboard wedge
(green) as shown.
in the direction of the arrow. Keep
the levers extended and lift the
seat shell upwards and out until
the green component is visible
above the snap mechanism.
Then release the levers and
remove the seat shell.
Page 4

click
1. Rear-facing installation (from birth to 13 kg)
0238-01
0101-03 0028-05
Pass the car seat belt over the
top of the base unit and secure
the belt in the buckle.
1.51.4
Position the lower belt section
(1) (lap belt) under the blue lap
belt guides (see illustration). Pass
the upper belt section (2)
(diagonal belt) around the outside
of the base unit and insert it into
the blue belt clip. Tension the
belt as shown in the illustration,
and close the blue belt clip.
1
2
Page 5
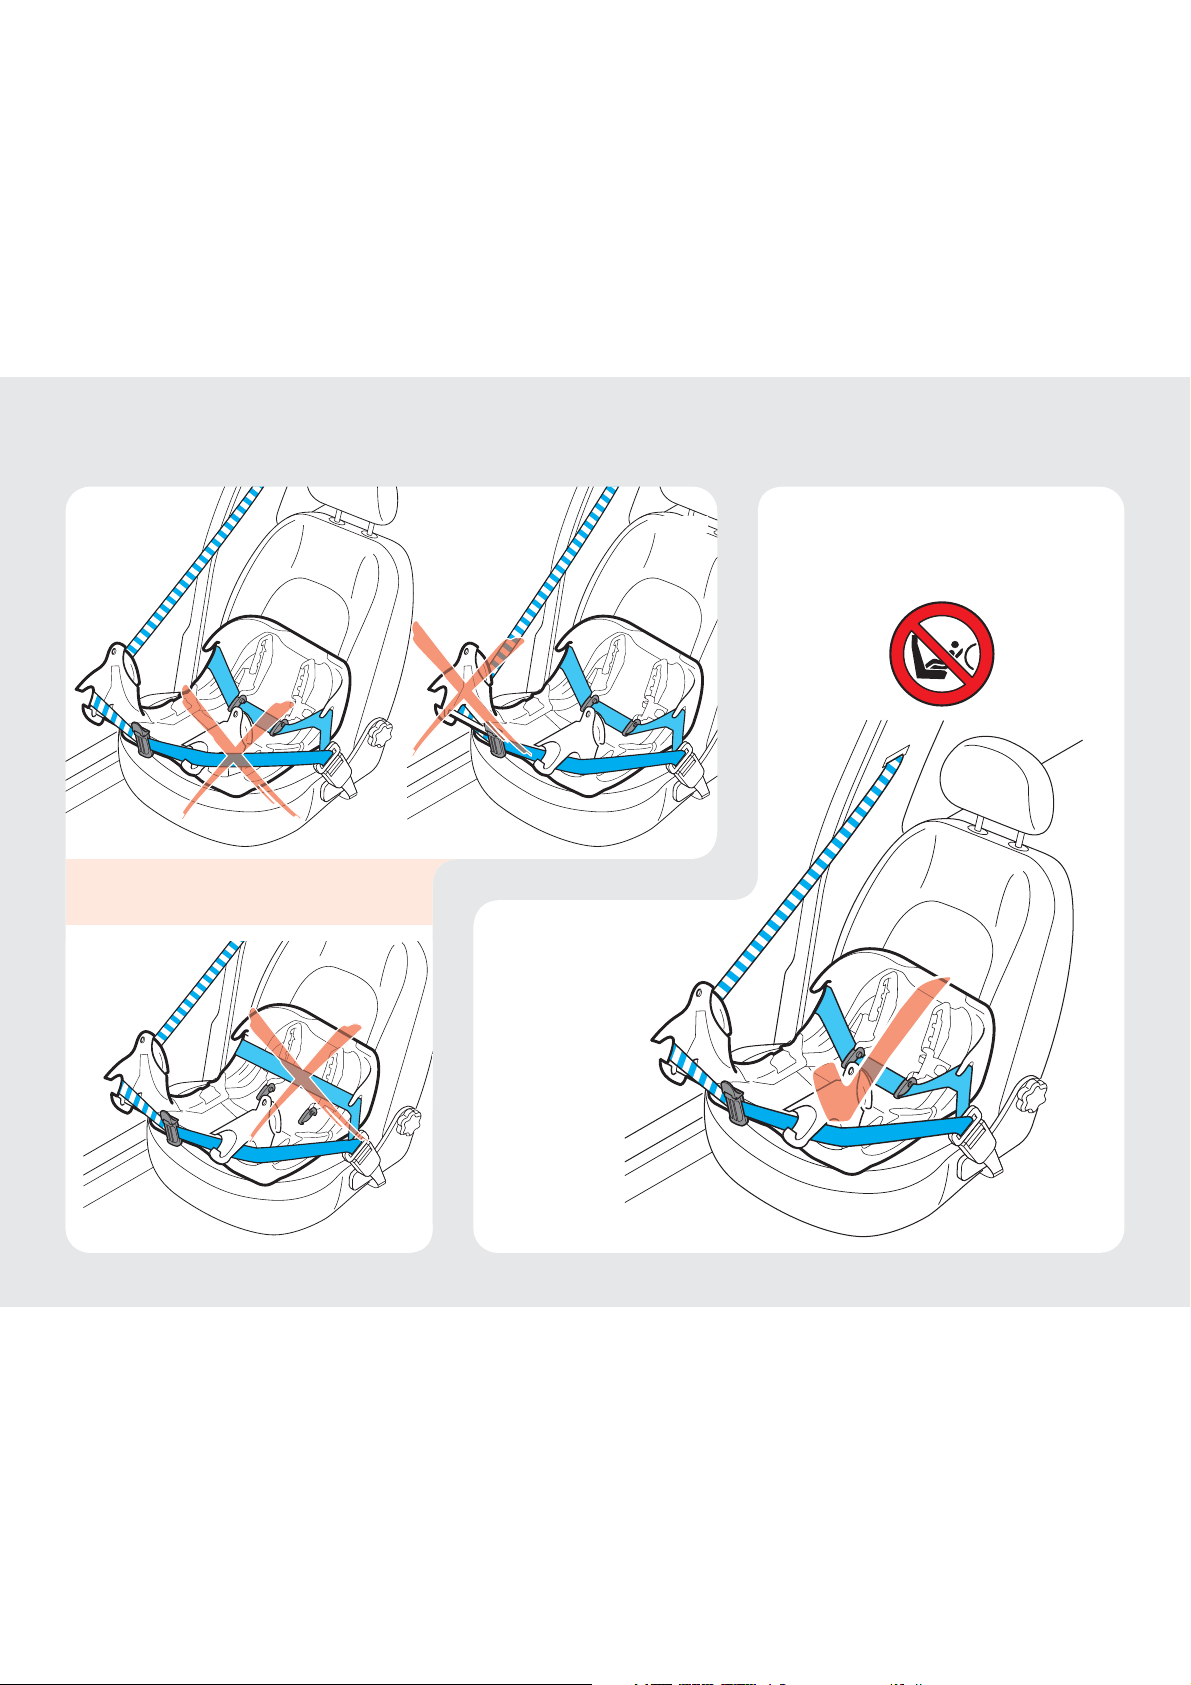
1. Rear-facing installation (from birth to 13 kg)
0239-01
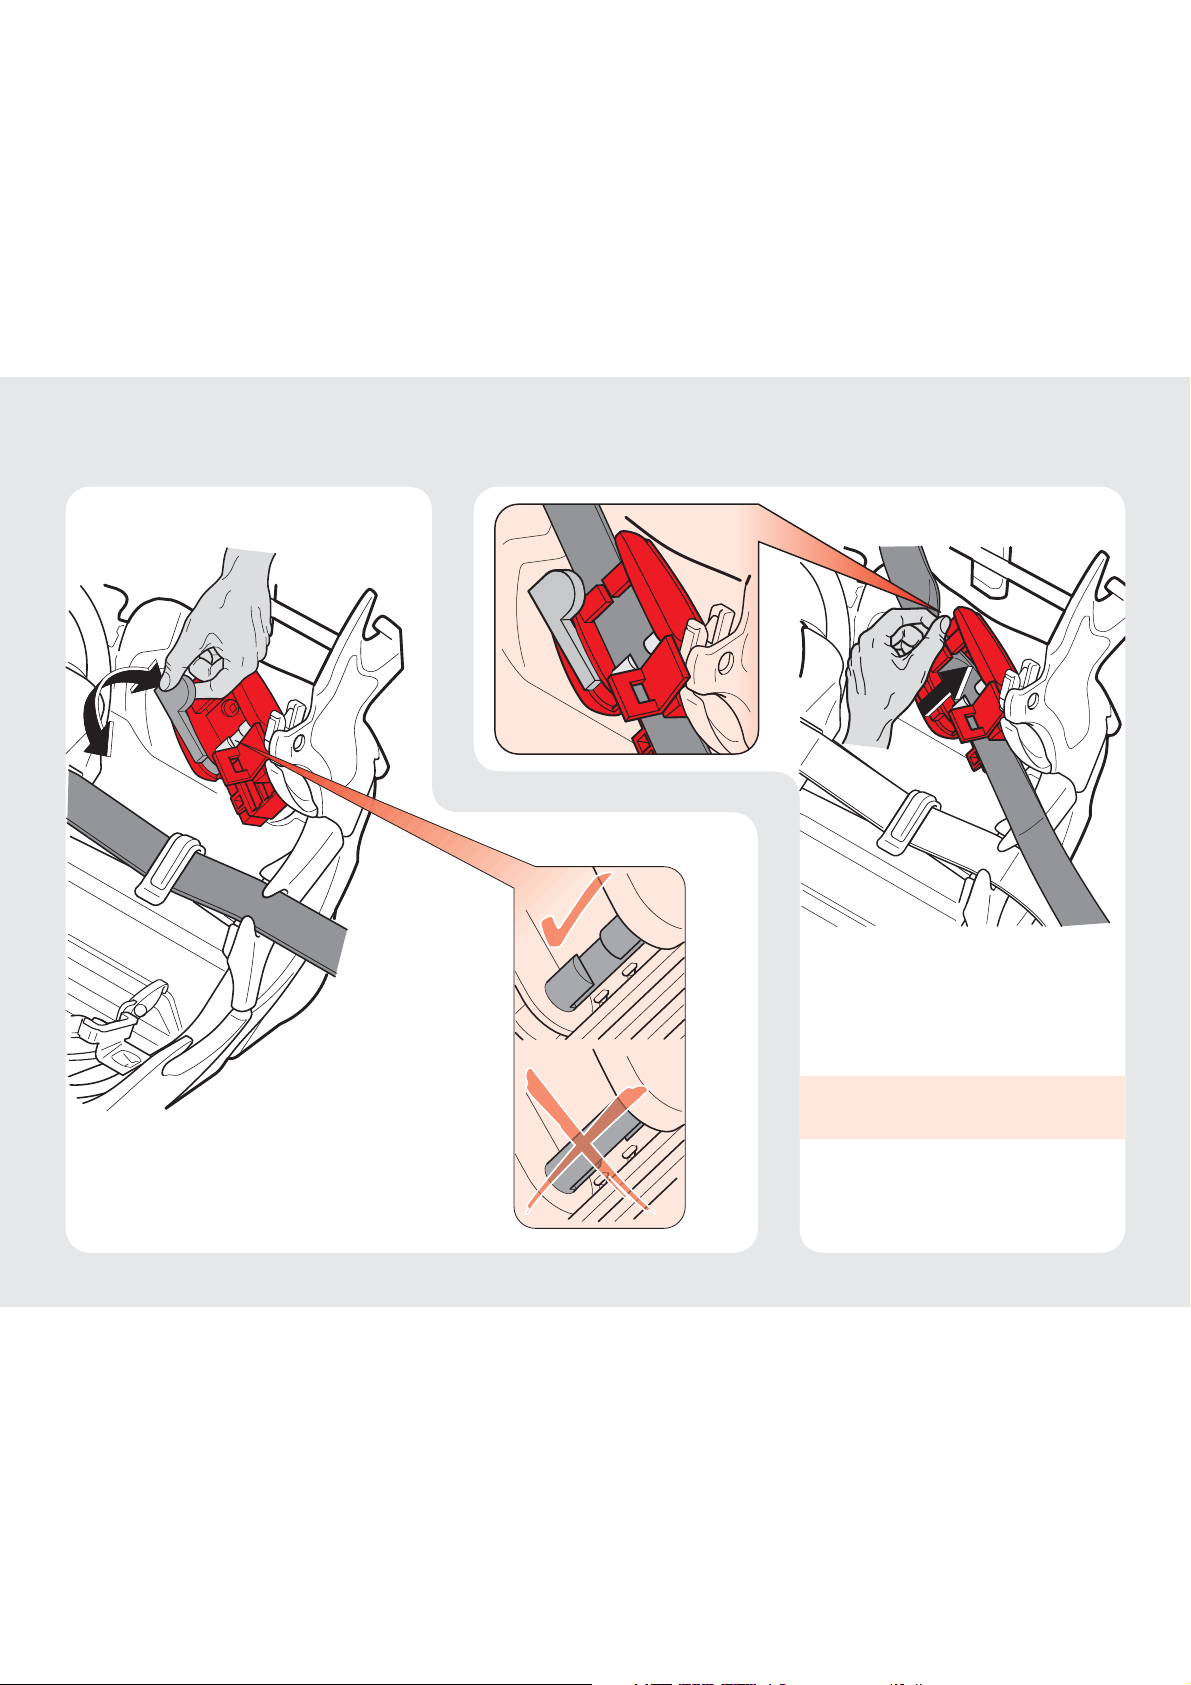
1.6
Wrong belt positioning!
0119-06
1.7
Belt positioning when the base unit
is installed correctly.
0118-04
Page 6
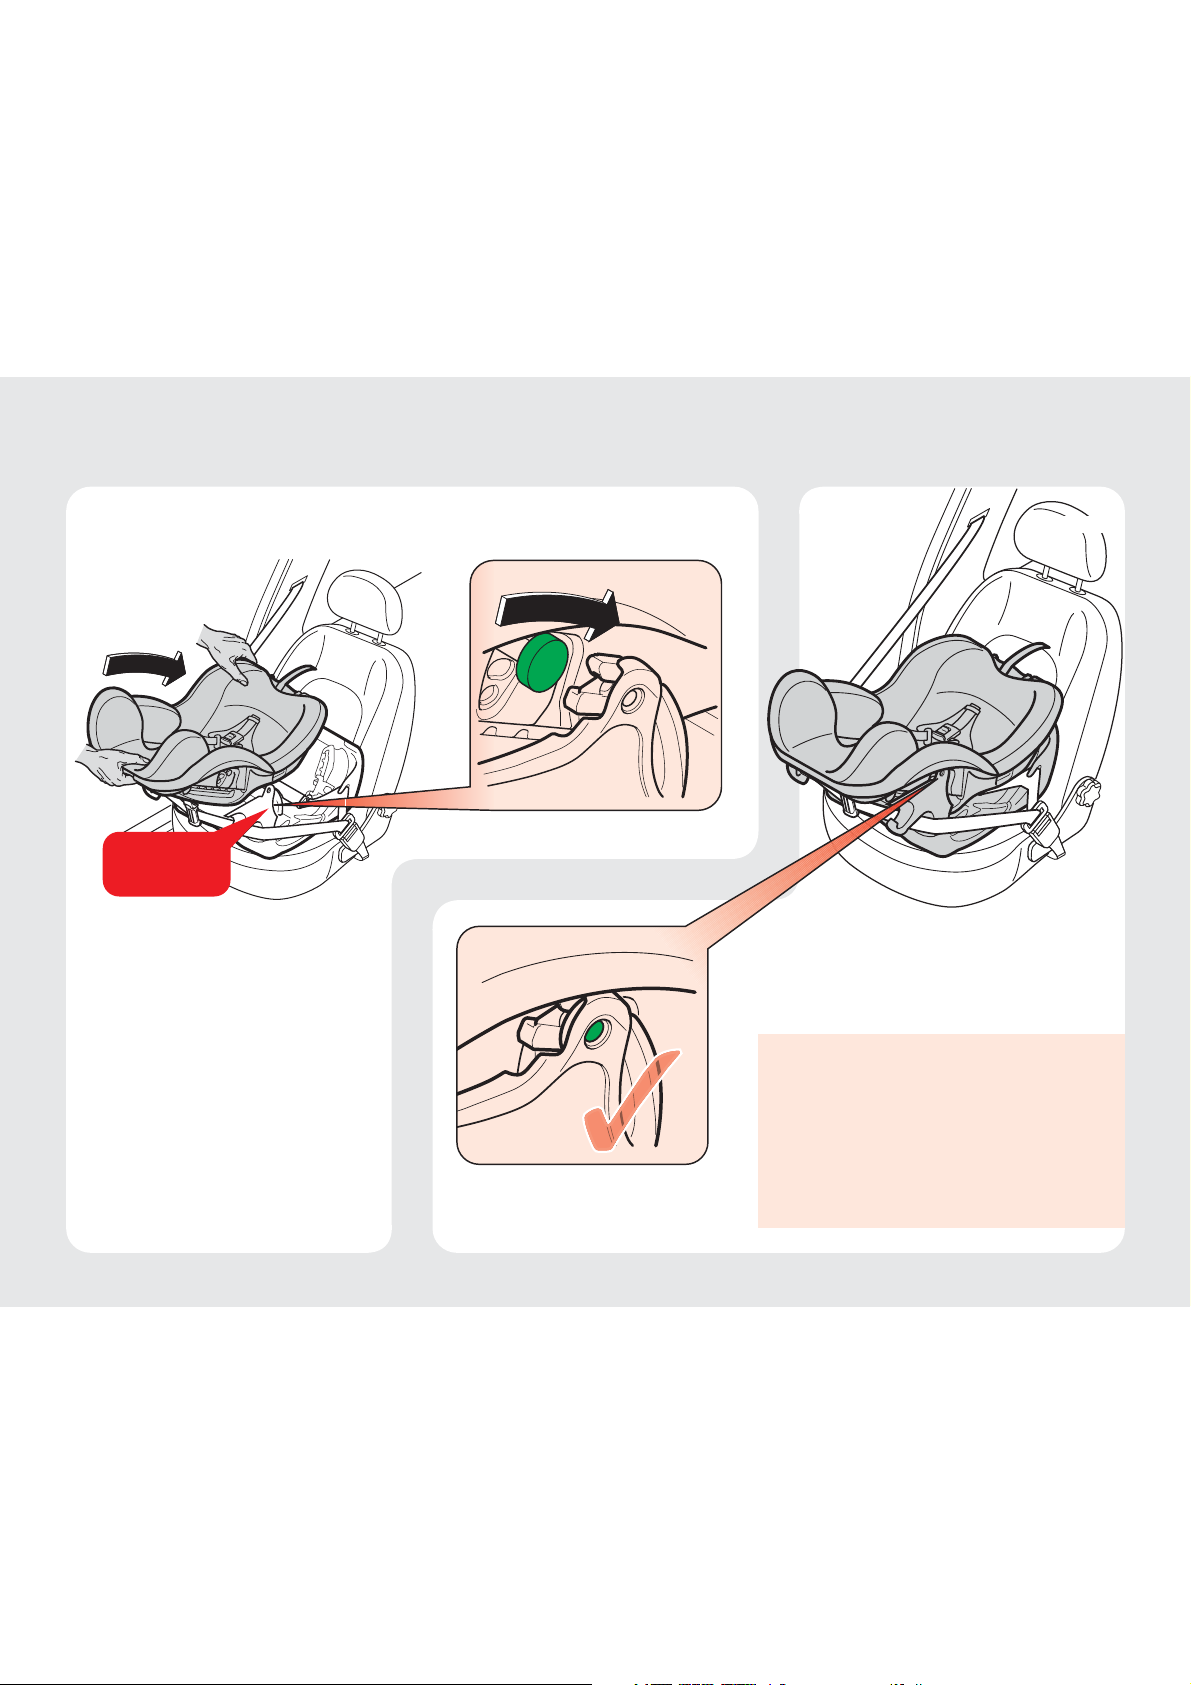
1. Rear-facing installation (from birth to 13 kg)
0240-02
0088-08
click
Hold the seat shell as illustrated
and position it on the base unit.
Press the seat shell downwards
until it clicks audibly into position.
1.91.8
Always check that when the seat
shell is inserted a green dot is visible
on both sides through the opening
on the sidepieces. This indicates
that the seat is installed correctly.
When rear-facing the seat may
only be used in the upright
position! If the child’s body weight
exceeds 8 kg, the factory-fitted
pelvic insert should be removed,
see section 6.5.
Disassembly is done in the
reverse order.
0090-06
Page 7

2
1
2. Front-facing installation (from 9 to 18 kg)
0241-01
Important!
Front-facing installation is only
suitable from a body weight of
9 kg and without the pelvic
insert, see section 6.5!
Turn the rotary handle at the front
of the seat shell upwards (1) and
push the seat shell into the
upright position (2).
0014-07 0017-06 0010-04
2.2 2.32.1
Hold the seat shell with your
thumbs on the left and right side
and use your fingers to pull the
grey levers as far as they will go
in the direction of the arrow. Keep
the levers extended and lift the
seat shell upwards and out until
the green component is visible
above the snap mechanism.
Then release the levers and
remove the seat shell.
Insert the base unit into the car
seat as illustrated. Position the
reboard wedge (green) as
shown.
Page 8
click
2. Front-facing installation (from 9 to 18 kg)
0242-01
0030-04 0031-05 0032-05
Pass the car seat belt over the
top of the base unit and secure
the belt in the buckle.
2.5 2.62.4
Insert the lower belt section (lap
belt) into the lap belt guides (red)
as illustrated.
Open the red belt clip on the belt
tensioner.
Page 9
2. Front-facing installation (from 9 to 18 kg)
0243-02
0029-08 0037-09
2.82.7
Position the upper belt (diagonal
belt) in the opening of the ratchet
shaft and into the guide
mechanism behind it.
Turn the open side of the ratchet
shaft upwards.
The belts must not be twisted!
Page 10

1
2
2. Front-facing installation (from 9 to 18 kg)
0244-01
0039-07 0041-07 0069-08
Tighten the upper belt (1) slightly
and close the red belt clip (2).
Then tighten the belt once again.
2.10 2.112.9
Use the ratchet to wind the belt
up until the base unit is firmly
secured in the car seat.
The belt must be taut.
The car safety belt must be
threaded through all three belt
guides.
The base unit must be
positioned straight on the car
seat, parallel to the direction
of travel. Move the base unit
to adjust if necessary and then
tighten the belt again.
Page 11

2. Front-facing installation (from 9 to 18 kg)
0245-01
2.12 2.13
Belt positioning when the base
unit is installed correctly.
The buckle for the vehicle safety
belt must not come above the
edge of the lap belt guide.
If in doubt or if you are still
uncertain, please contact
CONCORD.
0121-030073-05
Page 12

2. Front-facing installation (from 9 to 18 kg)
0246-00
0048-09
click
Hold the seat shell as illustrated
and position it on the base unit.
Press the seat shell downwards
until it clicks audibly into position.
2.152.14
Always check that when the seat
shell is inserted a green dot is
visible on both sides through
the opening on the side pieces.
This indicates that the seat is
installed correctly.
0050-07
Disassembly is done in the
reverse order (see 1.1 and 1.2).
To release the belt tensioner see
Chapter 5.
Page 13

3. Securing the child
0247-00
3.1 3.2
The central adjuster is located at
the front of the seat, beneath the
cover. This secures the central
belt.
Release the central adjuster by
pushing the small flap up (see
illustration), and then pull the belt
forwards (do not pull on the belt
padding!).
Open the belt buckle and open
the child seat belts outwards to
lie on the armrests. Then put the
child into the seat shell so that
its back rests against the
backrest.
0056-060036-06
Page 14

3. Securing the child
0248-02
3.3 3.4
Tension the belt system by pulling
the belt of the central adjuster
until your child is securely
strapped in. Please check that
both the shoulder and lap belts
are tensioned equally. To take
Fit both belt parts together (see
illustration) and push them into
the belt buckle so that they
engage with an audible “click”.
click
the child out, press the red
“Press” button on the belt buckle
of the harness system.
0059-050058-06
Page 15

4. Adjusting the seat to the child’s size / adjusting the head support and harness
0249-03
4.1 4.2 4.3
0033-05 0105-04 0034-02
A
Grasp the head support at the
top and pull it forwards. You can
then set it to the height that is
right for your child. There are six
possible different positions.
Attention! Always make sure
the belt is positioned correctly,
as shown in 4.2, illustration
(A).
When the child is strapped in,
the shoulder belt should feed
horizontally to the back or incline
slightly upwards, see illustration
(A). If the shoulder belt feeds
downwards as shown in the
illustration (B), then the belt must
be repositioned and inserted
through the next slot up.
To do this proceed as follows:
B
To adjust the shoulder belt
positions, the seat shell must
be removed from the base unit
(see 1.1 and 1.2)!
Pull away the back trim located
on the back of the seat shell.
Page 16

4. Adjusting the seat to the child’s size / adjusting the head support and harness
0250-02
0036-06
The central adjuster is located at
the front of the seat, beneath the
cover. This secures the central
belt.
Release the central adjuster by
pushing the small flap up (see
illustration), and then pull the
belts through to the front (do not
pull on the belt padding!).
4.54.4
0040-04
On the rear of the seat shell,
separate the two belts from the
connecting piece.
Page 17

4. Adjusting the seat to the child’s size / adjusting the head support and harness
0251-01
Pull the two metal clasps on the
back of the seat out of their
recesses and fit them through
the belt openings in the seat shell.
4.74.6
Then pull the two belts out to the
front through the backrest and
the seat cover.
Now thread both belts from the
front through the cover and into
the required slot.
On the back you must thread
both belts back into the
connecting piece, then tighten
the belt at the front by the central
belt.
0042-070123-04
Please check that the left and
right harness belts are both
adjusted in the same way.
Page 18

4. Adjusting the seat to the child’s size / adjusting the harness / shortening the belts
0252-02
4.8
0124-03
click
On the back of the seat, clip the
metal clasps back into position.
They must engage with an
audible “click”.
Thread the belts back into the
connecting piece, as shown in
the illustration.
Finally, clip in the back trim.
4.9
0143-04
When does the belt system
need to be shortened?
If you cannot tighten the child
seat belt sufficiently by pulling on
the central adjuster at the front
of the seat, then it will be
necessary to shorten the belt
system.
To do this proceed as follows:
Page 19

4. Adjusting the seat to the child’s size / shortening the belts
0253-01
4.10 4.11
Remove the seat shell from the
base unit and lay the shell upside
down on a clean surface.
Release the elastic tapes on the
cover and pull the cover back a
little. Lever out the metal clasps
secured on the bottom of the
shell, and thread them through
the large side opening and the
small slot (see illustration).
0045-05 0051-06
Now press the metal clasps from
the outside into the recess.
Both sides must be adjusted
equally!
Page 20

click
4. Adjusting the head support / adjusting the seat to the child’s size
0254-01
4.12 4.13 4.14
When does the shortened belt
system need to be returned to
its lengthened setting?
If, after releasing the child seat
belt by means of the central
adjuster, it does not pull forwards
sufficiently to allow the belt
system to be closed, then the
belt system needs to be
lengthened.
0104-04 0053-06 0054-06
Remove the seat shell from the
base unit and lay the shell upside
down on a clean surface.
Release the elastic tapes on the
cover and pull the cover back a
little. Lever out the metal clasps
secured on the side of the shell
and push them back through their
slots.
Now press the metal clasps from
the outside into the recess. The
clip must engage with an audible
“click”.
Both sides must be adjusted
equally!
To do this proceed as follows:
Page 21

1
5. Releasing the belt tensioner to remove the seat
0255-01
First open the red belt clip.
5.25.1
Releasing the belt tensioner on the
base unit when installed facing the
front:
Pull the grey lever on the belt
tensioner upwards with the thumb of
your left hand until you can push the
small grey button upwards (1) until
there is no tension on the belt.
Keep the grey button in this position
(2), and at the same time press the
lever down (3).
0043-080046-06
3
2
Page 22

0256-01
6. Removing the cover / removing the pelvic insert
Keep pressing the grey lever on
the belt tensioner down and pull
the car seat belt in the direction
of the arrow to unwind it from the
ratchet shaft.
6.15.3
To remove the cover, the seat
shell must be removed from
the base unit.
Undo the seat belt buckle.
Release the elastic tapes located
on the back of the cover at the
points marked in red in the
illustration.
0071-060086-06
Continue removing the seat in
the reverse order to its
installation.
Page 23

6. Removing the cover / removing the pelvic insert
0257-01
6.2 6.3
Lay the seat shell upside down
on a clean surface. Lever out the
metal clasps secured on the
side or bottom of the shell and
push them back through their
slots as illustrated.
0096-06 0095-03
Pull the buckle padding away
from the belt buckle and thread
the belt buckle down and out
through the cover.
Page 24

6. Removing the cover / removing the pelvic insert
0258-00
Remove the cover carefully from
the seat shell.
To fit the cover, proceed in the
reverse order.
6.56.4
If the child’s body weight exceeds
8 kg, the factory-fitted pelvic
insert should be removed. This
is located on the surface of the
seat beneath the seat cover.
0117-020074-04
Page 25

7. Care instructions
8. Important information
0259-00
Removing the seat covers to
wash:
The cover is composed of two
parts which are secured to the
seat by means of Velcro tape,
buttonholes and tapes. Once
these ties have been released
the two parts of the cover may
easily be removed. To fit the
covers, proceed in the reverse
order (seat shell and head
section).
When they come into contact
with moisture, especially during
washing, the cover fabrics can
easily fade. Do not use solvents!
30°
Please note the instructions in
the car’s operating manual for
transporting children in a car.
Information on the use of child
seats together with an airbag
should be observed with
particular care.
Children sometimes have items
in their jacket or trouser pockets
(e.g. toy) or wear hard items that
are attached to their clothes (e.g.
belt buckle). Check that these
items do not come between the
child and the safety belt – they
could cause unnecessary injuries
in the event of an accident. These
hazards also apply to adults!
Naturally children can often be
very lively. You should therefore
explain to children how important
it is to always be safely fastened
in. Children must understand that
they should never change the
way the belts are positioned, and
never open the buckle.
All straps in the child restraint
system and all belts required for
securing the seat in the car must
be fitted tautly and without twists,
and must be protected against
damage.
Protect those parts of the restraint
system that are not covered in
fabric from direct sunlight to avoid
your child being burned.
The child restraint system must
not be damaged or trapped by
moving parts in the car interior
or by doors.
Never modify the restraint system
in any way – this will endanger
your child’s safety.
After an accident the whole child
restraint system must be
replaced or returned to the
manufacturer for testing along
with a report of the accident.
Only if safety equipment is
correctly installed and used can
your child enjoy maximum safety.
Page 26

8. Important information
0260-01
You should also tell your
passenger how to remove the
child in the event of an accident
or danger.
The belts may only be routed via
the points of contact for the belt
on the seat and the positions
stated in the user instructions.
Belts must not be routed in any
other way.
The lap belts on the harness
system must be fitted as low
down as possible so that the
child’s hips are held correctly.
The child seat may not be used
in conjunction with active front
airbags (risk of death)!
Do not leave your child in the
child car seat unsupervised
whether strapped in or not.
Secure luggage and other items
to reduce the risk of injury in the
event of an accident.
The user instructions must
always accompany the child car
seat.
The use of accessories and
replacement parts is not
permissible and shall lead in the
event of contravention to the
expiry of all claims under the
warranty and of all liability claims.
Only special CONCORD original
accessories are excluded.
The child car seat must always
be used with its original covers.
Suitable for cars with three-point
(lap and diagonal) seat belts
tested in accordance with ECE
Regulation 16 or a comparable
standard.
As the period of use for this
restraint system (ULTIMAX) is
very long, it is natural that seat
covers and other used parts will
each receive different degrees
of wear and tear depending on
the individual duration and
intensity of use and will need to
be replaced. For this reason it is
not possible to give a blanket
warranty of durability extending
beyond a six-month warranty
period.
For additional purchases, please
contact your local specialist child
and baby shop, specialist
departments in department
stores, car accessories centre or
mail order companies. There you
will also be able to buy the full
range of accessories for
CONCORD child’s car seats.
The ULTIMAX child car seat has
been tested in a simulated head-
on crash at an impact speed of
50 kph against a solid obstacle.
This complies with the
international test standard ECE
R 44 04 which forms the basis
for all tested restraint systems.
If used according to legal
requirements, and given
adherence to the instructions for
installation and use, this device
should prevent or reduce injury
to children up to three years of
age or with a body weight of up
to 18 kg in the event of an
accident, depending on the type
and severity of accident.
As is the case with the use of
safety belts for adults, a child
safety device does not replace
the need for responsible and
prudent driving behaviour.
Page 27

9. Warranty terms 10. General information
0261-01
The warranty shall commence
from the time at which the seat
is purchased. The warranty
period shall correspond to the
legal warranty period for the sale
of child seats applicable in the
end user’s country. The contents
of the warranty shall comprise
the remedy of a defect, the supply
of a replacement, or a price
reduction, at the manufacturer’s
discretion.
The warranty shall pertain only
to the first user.
In the event of a defect, rights
under the warranty shall only be
considered if the specialist dealer
is notified of the defect
immediately after its first
occurrence.
If the specialist dealer is unable
to resolve the problem, then the
dealer shall return the product to
the manufacturer along with a
precise description of the
complaint and an official receipt
showing the date of purchase.
The manufacturer accepts no
responsibility for products he has
not supplied.
The right to make a claim under
the warranty shall not apply if:
– the product has been altered;
– the product has not been
returned to the dealer together
with the receipt within 14 days
after the occurrence of the
defect;
– the defect has arisen as a
result of incorrect handling or
maintenance, or as the result
of any other fault on the part
of the user, in particular if the
instructions for use have not
been observed;
– repairs have been made to the
product by a third party;
– the defect has been caused
by an accident;
– the serial number has been
damaged or removed.
Alterations to or deterioration in
the product brought about by use
in accordance with the contract
(wear and tear) do not constitute
a warranty claim.
The warranty period shall not be
extended as a result of services
rendered by the manufacturer in
the event of a warranty claim.
1. This is a “universal” child
restraint system. It is approved
for general use in vehicles in
accordance with UN-ECE
Regulation 44, Amendment 04
and fits most, but not all,
passenger vehicle seats.
2. It can be assumed that the
system will fit correctly if the
vehicle manufacturer states in
the vehicle manual that the
vehicle is suitable for the
installation of a “universal”
child restraint system for the
relevant age group.
3. This child restraint system has
been classified as being of the
“universal” class, satisfying
stricter conditions than
previous models which do not
bear this label.
4. If in doubt, please consult the
manufacturer of the child
restraint system or the retailer.
5. Only suitable for vehicles with
three-point (lap and diagonal)
seat belts tested and approved
in accordance with UN-ECE
Regulation 16 or a comparable
standard.
Page 28

Um die Funktionsfähigkeit und Sicherheit Ihres Kinderautositzes auch nach einem Austausch von Ersatz- und Zubehörteilen zu gewährleisten, bitten wir Sie bei Bestellungen
Ihrem Fachhändler nachstehende Angaben mitzuteilen:
0145-06
CONCORD
Industriestrasse 25
95346 Stadtsteinach
To ensure the maximum efficiency of your child car safety
seat after the exchange of the covers or spare parts ask
your retailer about following information:
Pour assurer une efficacité optimale de votre siège auto
après l‘échange de housses ou de pièces détachées,
demandez à votre détaillant l‘information suivante:
Per garantire la funzionalità e la sicurezza del vostro
seggiolino da auto per bambini anche dopo una
sostituzione di parti di ricambio o accessori, vi preghiamo
di comunicare al vostro negozio di fiducia specializzato
i seguenti dati al momento di emettere l‘ordine:
Para seguir garantizando el correcto funcionamiento y
la seguridad de su silla infantil para automóvil después
de un cambio de piezas o accesorios, le rogamos que
indique los siguientes datos al realizar pedidos a su
comercio especializado:
Para garantir a funcionalidade e a segurança da sua
cadeira de criança para automóvel após a substituição
de peças e acessórios, agradecemos que comunique
os seguintes dados ao seu distribuidor:
Om de functionaliteit en de veiligheid van het door u
gekochte autokinderzitje ook na vervanging van onderdelen en accessoires te waarborgen, is het belanggrijk
dat u bij de bestelling in uw speciaalzaak onderstaande
gegevens vermeldt:
universal
- 18 kg
E
1
1
04..........
0000000
2
CONCORD
ULTIMAX
...........................................................................................
1
ECE-Nr. / ECE-no. / N˚ de série / N˚ ECE / Número ECE
..........................................................................................
2
Serien-Nr. / serial-no. / N˚ di serie / Número de serie
............................................................................................
Ersatzteil / Seat type / Type de siège / Parte di ricambio / Pieza de repuesto
/Peça / Type kinderzitje
............................................................................................
Fachhändler / Dealer / Commerçant spécialisé / Negozio specializzato /
Comercio especializado / Distribuidor / Speciaalzaak
..........................................................................................
.............................................................................................
...........................................................................................
Meine Anschrift / my address / Mon adresse / Il proprio indirizzo / Mi
dirección / Meu endereço / Mijn adres
 Loading...