

Page 1

Page 2

1
Table of Contents
Important Precautions......................................................................................2
General Precautions ........................................................................................3
THE CAMERA ....................................................................................................4
SOFTWARE INSTALLATION................................................................................6
CAMERA OPERATION ........................................................................................7
Important battery information ....................................................................7
BATTERY INSTALLATION GUIDE ........................................................................8
Power up the camera ..................................................................................8
OPERATING MODES..........................................................................................9
Image Resolution Settings ........................................................................9
Image Quality Settings ..............................................................................9
Flash settings..............................................................................................9
Anti-flickering settings ..............................................................................10
Capture Modes ..........................................................................................10
Erase Modes ..............................................................................................11
ERROR CONDITIONS ......................................................................................12
Incorrect Exposure ....................................................................................12
Battery Low................................................................................................12
Image memory full ....................................................................................12
TRANSFERRING PICTURES ..............................................................................13
Connecting the camera to your PC ..........................................................13
How to start the TWAIN driver..................................................................14
VIDEO CLIPS ..................................................................................................16
Creating Video Clips ..................................................................................16
WEB CAMERA..................................................................................................17
Web Camera Operation ............................................................................17
GETTING HELP ................................................................................................18
CAMERA SPECIFICATIONS ..............................................................................19
WARRANTY INFORMATION..............................................................................21
Page 3

2
Important Precautions
Before using the camera and the software please take note of the following
precautions.
1) Make sure to install the software before connecting the camera for the
first time to your computer. Failing to do so will cause image transfer
problems. Please make sure you follow the software installation steps
in this manual.
2) Do not remove the batteries otherwise pictures in the camera will be
lost.
3) Always switch off the camera before removing batteries.
4) The camera will retain images for around a minute after the batteries
are removed. If you need to replace the batteries please do so within
this period of time, otherwise; images will be lost.
5) If your computer hangs during image transfer, please follow these
steps:
a. Disconnect camera from the computer.
b. Wait for the camera to switch off. This may take up to 45 seconds.
c. Reboot your computer and wait for it to completely reboot.
d. Connect the camera to the computer and transfer again.
6) You should transfer the images from the camera to your computer as
soon as possible when the batteries are low in order to avoid losing
images.
7) The camera consumes battery power even when switched off. It is
therefore recommended that you remove the batteries after you have
transferred the images and when the camera is not in use.
Page 4

3
General Precautions
1) Never try to take pictures when operating a motor vehicle or while
walking.
2) Never try to open the case of the camera or attempt your own repairs.
Always leave service to authorized repair facilities.
3) Keep the camera away from water and other liquids and never let it
get wet. Never use when it is raining or snowing.
4) Should foreign matter or water get into the unit, immediately turn the
power off and contact your local authorized service center.
5) Physical damage and malfunction of this unit can cause the image data
stored in its memory to be deleted. Be sure to always keep backup
copies of data by transferring them to your computer.
6) Do not leave the camera in places subject to extremely high
temperatures such as a sealed vehicle or in direct sunlight.
7) Remove the batteries when the camera is not used for long periods of
time. Before doing so please make sure all images in the camera are
transferred to your computer.
8) Do not place the camera in unstable locations such as a sloping
surface or unstable table where the camera may fall.
9) Do not touch or press on the display or lens.
10) Do not drop the camera or subject the camera to strong vibrations.
Page 5
4
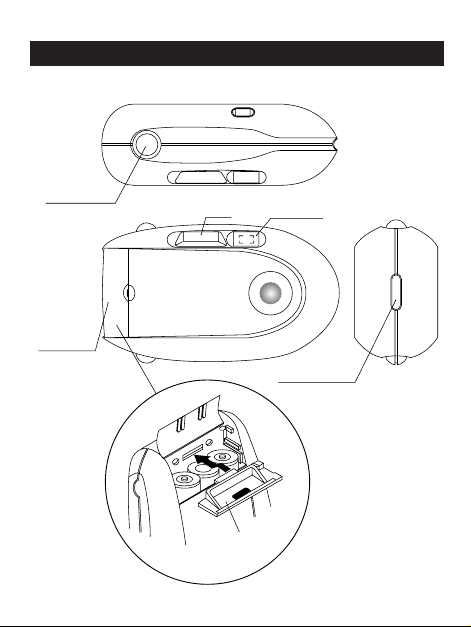
THE CAMERA
Release Button
Battery Door
Flash
Battery Retainer Plate
View Finder
Strap Connector
Page 6
5
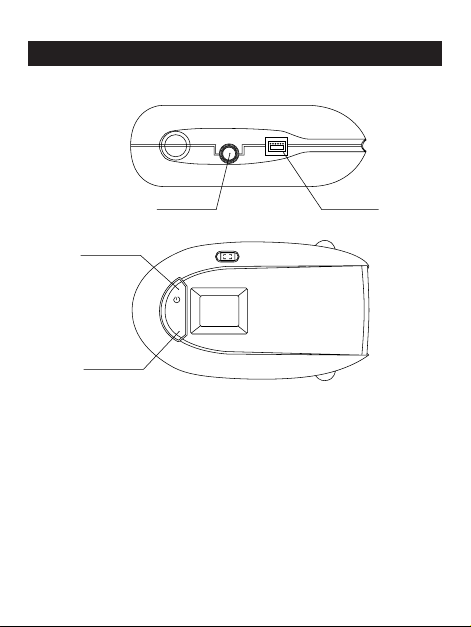
THE CAMERA
Power Button
Mode Button
Tripod Socket
M
USB Socket
Page 7

6
SOFTWARE INSTALLATION
This section shows you how to install the application software and the
drivers required. Please follow the step-by-step instructions.
Do not connect
the camera to the PC until told otherwise during the installation process.
1) Insert the CD into the CD-ROM drive of your computer.
2) If you have the Auto Run feature enabled for your CD-ROM, the setup
application will start automatically.
3) If you don’t have the Auto Run feature enabled, click on Start and
select Run… from the Windows taskbar. Type d:/launch to launch the
software installer (d: refers to your CD-ROM drive. If your CD-ROM drive
is not drive d:, use the drive letter of your CD-ROM drive instead).
4) There are three options in the installer:
a) Install Arcsoft (imaging applications)
b) Install Driver (plug and play drivers)
c) Install Twain Driver
5) You can install all the different options one by one by clicking on the
required option. The plug and play drivers and the twain driver MUST
be installed in order to transfer images.
6) Make sure that you have installed the driver in "4b" above and plug
the camera into the USB port of your PC. A USB cable is provided for
this connection.
7) Once the camera is plugged into the PC, a dialog box titled New
Hardware Found will be displayed. DynaVision DC3500 DSC and
DynaVision DC3500 PC CAM will be identified and installed
automatically.
Page 8

7
CAMERA OPERATION
Important battery information
The Eye-Q fun.cam camera uses a type of memory that continually draws
power to retain the pictures in the camera’s internal memory even if the
camera is powered off. If the battery power is depleted and you have not
transferred your images to the computer, you will lose them. It is strongly
recommended that you transfer your images to the computer promptly and
then remove the batteries to extend their life.
If you have not transferred your pictures to your computer and you receive
a battery low warning, change the batteries immediately and swiftly. The
camera will retain images for around one minute after the batteries are
removed. Failure to replace the batteries will result in the loss of your
images.
Always use fresh batteries to optimize the performance of your camera.
Page 9

8
BATTERY INSTALLATION GUIDE
Power up the camera
Insert three AA-size batteries into the battery compartment. Please make
sure they are inserted into the camera following the polarity marked in the
battery compartment and that they are inserted in the sequence shown in
the diagram. We recommend alkaline batteries for better performance.
Press and hold the power button for around one second
and the camera should turn on with a double-beep
sound. The LCD panel will display the default screen.
Press and hold the power button again to turn off the
camera.
The power-up default settings are single capture, VGA
(640x480) image resolution, high image quality and flash
off. The 3-digit counter on the LCD indicates the number
of pictures stored in the camera. Simply click the shutter
button to take a picture. The camera will emit a high
tone double-beep and the counter will increase when a
picture is taken successfully.
The camera will switch itself off if it is idle for more than 45
seconds in order to save power. The camera will emit a
double-beep sound before switching itself off.
Warning:
• Do not remove the batteries otherwise pictures in the
camera will be lost.
• Always turn the camera off before removing the
batteries.
• The camera will retain images for around one minute
after the batteries are removed. Failure to replace the
batteries within this time frame will result in the loss
of your images.
1
AA
2
AA
AA
3
Page 10

9
OPERATING MODES
You can select the operating mode by pressing the mode button repeatedly
until the desired mode is reached and then press the shutter button to
confirm. The LCD will cycle through the following modes one by one each
time the mode button is pressed. The camera will abort selection if no
button is pressed within 10 seconds.
Image Resolution Settings
1. VGA (640x480) image resolution. Images at this
resolution are perfect for viewing on an 800x600 monitor
resolution setting.
2. QVGA (320x240) image resolution. Images taken in this
resolution use less memory (more pictures can therefore
be taken). However, the pictures may look grainy and
pixelated. This setting is ideal for passport type photos.
Image Quality Settings
3. High image quality setting. In this setting, the picture
quality is the highest and you can take up to 22 pictures
in VGA resolution (or up to 72 in QVGA resolution).
4. Normal image quality setting. In this setting, the picture
quality is still very good and you can take up to 49
pictures in VGA resolution (or up to 144 in QVGA
resolution).
5. Low Image quality setting. In this setting the picture quality
is not as high as the other two settings. However, you can
take up to 74 pictures in VGA resolution (or up to 180 in
QVGA resolution).
Page 11

10
OPERATING MODES
Flash settings
6a. You can press the shutter button to enter automatic flash
mode when you see this display. The flash icon will blink
until the flash is fully charged. In this mode, the flash
will fire automatically when you take a picture under low
light conditions.
6b. To disable the automatic flash, press the Shutter button
when you see the screen in the LCD. The flash icon will
be switched off if you select this mode.
Anti-flickering settings
7. In this mode, the camera will minimize the picture
bandings caused by 60Hz fluorescent lighting (in
countries such as USA and Japan).
8. In this mode, the camera will minimize the picture
bandings caused by 50Hz fluorescent lighting (in
countries such as UK and Australia).
Capture Modes
9. Single capture mode. In this mode, the camera will take
one picture per shutter click.
10. Continuous capture mode. In this mode, the camera will
take pictures continuously once the shutter button is
pressed. Press the shutter button again to stop taking
pictures. The flash will be disabled in this mode.
11. Self-timer mode. In this mode, the camera will take a
picture 10 seconds after the shutter button is pressed.
While the timer is running, the camera will emit 8
seconds of slow beeps followed by 2 seconds of fast
beeps.
Page 12

11
OPERATING MODES
12. Self-timer continuous capture mode. In this mode, the
camera will take pictures continuously 10 seconds after the
shutter button is pressed. Press the shutter button again to
stop taking pictures. While the timer is running, the camera
will emit 8 seconds of slow beeps followed by 2 seconds
of fast beeps. The flash will be disabled in this mode.
Erase Modes
13. You can press the shutter button to erase the last taken
picture when you see this display.
14. You can press the shutter button to erase all the pictures
in the camera when you see this display.
Page 13

12
ERROR CONDITIONS
Incorrect Exposure
If exposure is under or over, the camera will emit a low tone error sound
when the shutter is pressed. The camera will not take pictures under these
conditions. Please note that this also applies in the self-timer mode. The
camera will not start continuous capture or self-timer continuous capture if
the exposure is wrong. However, once the continuous capture is started,
the camera will take pictures regardless of the lighting conditions. Pay
special attention to the light conditions while in this mode to optimize
image quality.
Battery Low
When the battery is running low, the camera will emit a long
high tone beep. It will also switch on the battery low icon as
shown on the right. Under this condition the camera will not
allow any operation apart from power down. Pressing the mode
or the shutter button under this condition will give a low tone
error sound.
You should transfer images from the camera to your computer
immediately in order to avoid image loss.
Image memory full
If the image memory is full, the camera will emit a low tone
error sound when the shutter is pressed. The camera will not
take pictures under this condition and the counter on the LCD
will display "Full" as shown on the left.
Page 14

13
TRANSFERRING PICTURES
Connecting the camera to your PC
The camera provides a USB interface for connection to a PC.
Please turn on your PC and connect the camera to your PC
using the USB cable provided. The counter should display
"PC_" as shown on the left when the camera is connected.
You can now transfer images from the camera to your PC or
you can use the camera as a PC Web Camera. Please refer to the PC
camera section for details. The camera will switch itself off automatically
once it is disconnected from the computer.
You should not connect the camera until the drivers have been installed.
Page 15

14
TRANSFERRING PICTURES
How to start the TWAIN driver
ATWAIN driver is provided for transferring pictures in the camera to your
PC. The TWAIN driver can be activated in one of the following ways
depending on which Arcsoft application you are using. If you are using
other imaging applications, please refer to their manuals on how to start
the TWAIN driver.
In Fun House
1) Click the Get Template icon and select the background template
2) Click the Get Photo icon
3) Click the Acquire (camera) icon
3) Select source Eye-Q fun.cam
In PhotoPrinter
1) Click the Get Photo icon
2) Click the Acquire Photo (camera) icon
3) Select source Eye-Q fun.cam
In PhotoBase
1) Click the Acquire (camera/scanner) icon
2) Select source Eye-Q fun.cam
How to use the TWAIN driver
1
2
3
4
5
6
7
Page 16

15
TRANSFERRING PICTURES
Please follow the steps below to transfer pictures from the camera to your
PC imaging application:
1) The camera will transfer pictures into the thumbnails once the TWAIN
driver is started. The camera icon will blink whenever there is
interaction between the camera and your PC.
2) You can preview the pictures in thumbnails. If more than 20 pictures
are transferred, click the Page Up or Page Down button to go to the
thumbnail page that you need.
3) You can select pictures to transfer from the thumbnails as follows:
a. To select a picture to transfer, simply click on its thumbnail. The
thumbnail of the selected picture will be highlighted.
b. To select all pictures, simply click the Select All button.
c. To select multiple pictures, press and hold the Ctrl key and click at
the same time on the thumbnail of the required picture. Repeat this
until you select all the pictures that you need.
d. To select a range of pictures, click on the thumbnail of the first
picture that you need, then press and hold the Shift key and click at
the same time on the thumbnail of the last picture that you need.
4) After selecting the pictures, click the Capture button to start
transferring pictures to your PC imaging application.
5) To make a video clip in AVI format, click the AVI button. The following
section will provide more details.
6) If you need help on the usage of the TWAIN driver, click on the Help
button.
7) If you want to exit the TWAIN driver, click the Exit Button.
Page 17

VIDEO CLIPS
Creating video clips
Click the AVI button in the TWAIN driver, you will see the following window.
Follow the steps below to create a video clip.
1) Set the Frame Rate in frames per second using this slide bar. This will
determine the play speed of the video clip.
2) Check the Compression box if you need a small file size for your video
clip. Please note that the quality of the compressed video will be lower
as compared to that of the non-compressed video.
3) Click the Create button, then select directory, enter filename and click
on the save button in the dialog box. An AVI video clip will then be
generated automatically.
4) When the video clip screen appears click on open in the AVI creator
dialog box and simply use the Play, Stop, Forward and Rewind buttons
to play the video clip.
5) You can also open an existing AVI format video clip for review. Click on
the Open button and select the AVI file you want to open and click on
the Open button in the Open dialog box.
6) Close the current AVI file once you finish reviewing it.
7) Click on the Quit button to exit from the video clip window.
16
1
3
2
5
4 (play)
4 (Stop)
6
4 (Forward)
4 (Rewind)
7
Page 18

17
WEB CAMERA
Web Camera Operation
The camera can be used as a web camera for video capture via the USB
port. You can use software such as Microsoft AMCAP (not included) for this
purpose. The camera can also be used with software such as Microsoft
NetMeeting for video conferencing purpose. NetMeeting is software that
comes standard with Windows 98. Please refer to the software manuals for
detail of how to use this software.
Page 19

18
If you need help with your camera, refer to the Troubleshooting section of
this manual. If you still cannot find the solution, visit our Web site at
www.support.concordcam.com. Most support issues are answered
in the Frequently Asked Questions (FAQ) section.
Toll Free in the US and Canada:
• (866) 522-6372
Toll Free in Europe:
• UK: 0800-1696482 • Spain: 900-973195
•Germany: 0800-1800563 • Italy: 800-781883
•France: 0800-917599
Toll:
• 31-53-4829779
For Software Technical Support, please contact:
I
n the USA and Canada:
ArcSoft, Inc.
46601 Fremont Blvd.
Fremont, CA 94538
Monday – Friday
8:30AM - 5:30PM (PST)
Tel: (510) 440-9901 Fax: (510) 440-1270
E-mail: support@arcsoft.com
Web: www.arcsoft.com
I
n Europe:
Arcsoft, Inc.
Unit, Shannon Industrial
Estate
Shannon, Co. Clare, Ireland
Tel: +353 (0) 61 702087 Fax: +353 (0) 61 702001
E-mail: europe@arcsoft.com
GETTING HELP
Page 20

19
CAMERA SPECIFICATION
Lens
Focusing
Image sensor
Image quality &
typical number of images
Image resolution
Sensitivity
Exposure
Storage
Output file format
Shutter
Viewfinder
Shooting modes
Status LCD
Frame counter
Flash unit
Power source
Battery life
4-element aspheric hybrid lens with IR filter
Focus free 0.6m to infinity
VGA (640 x 480 pixel) CMOS sensor
High Quality - 640 x 480, (22) or 320 x 240
(72)
Normal Quality - 640 x 480 (49) or 320 x 240
(144)
Low Quality - 640x480 (74) or 320 x 240
(180)
640 x 480, 24-bit color depth
324 x 240, 24-bit color depth
Equivalent to ~ ISO100 Silver Halide Film
Auto exposure, Auto white balance
8 MB Internal memory (SDRAM)
JPEG
Electronic variable speed
Optical viewfinder
Single image capture, Continuous capture (2FPS),
Fluorescent lighting system setting (50Hz/60Hz),
10 second self-timer, PC camera
Yes
LCD counter
Auto flash and flash-off mode
3xAA Batteries
Up to 200 pictures (50% with flash)
Page 21

20
Power management
Size
Weight
PC camera video
Connectivity
Min. system requirements
PC software
Accessories
Auto-power-off after 45 seconds without
activity
110mm W x 61mm H x 37mm D
(4.33 x 2.40 x 1.46 inches)
95 Grams (3.4 Oz) - without batteries
2 FPS in VGA resolution
10 FPS in CIF resolution
USB connector direct to PC
Windows 98/ME/2000/XP, Pentium PC with
USB port
Arcsoft imaging software and TWAIN driver
with AVI video clip generator
CD ROM including Image editing software
and drivers
USB cable
Hand strap
3xAA alkaline battery
Warranty card
User guide
CAMERA SPECIFICATION
Page 22

21
WARRANTY INFORMATION
This device complies with Part 15 of the FCC Rules. Operation is subject to
the following two conditions: (1) This device may not cause harmful
interference, and (2) This device must accept any interference received,
including interference that may cause undesired operation.
Warning: Changes or modifications to this unit not expressly approved
by the party responsible for compliance could void the user’s authority
to operate the equipment.
Note: This equipment has been tested and found to comply with the
limits for a Class B digital device, pursuant to Part 15 of the FCC Rules.
These limits are designed to provide reasonable protection against
harmful interference in a residential installation. This equipment
generates, uses and can radiate radio frequency energy and, if not
installed and used in accordance with the instruction, may cause
harmful interference to radio communications.
There is no guarantee that interference will not occur in a particular
installation. If this equipment does cause harmful interference to radio or
television reception, which can be determined by turning the equipment off
and on, the user is encouraged to try to correct the interference by one or
more of the following measures:
•Reorient or relocate the receiving antenna.
•Increase the separation between the equipment and receiver.
• Connect the equipment into an outlet on a circuit different from that to
which the receiver is needed.
• Consult the dealer or an experienced radio/TV technician for help.
Page 23

Technical Suppor t Hot Line:
Toll Free In the USA & Canada
1-866-522-6372
Toll Free In Europe
UK: 0800-169-6482
BELGIUM: 0800-787-57
FRANCE: 0800-917-599
GERMANY: 0800-1800-563
SPAIN: 900-973-195
ITALY: 800-781-883
All Other Countries - Toll
31-53-482-9779
Page 24

22
WARRANTY INFORMATION
LIMITED WARRANTY
The manufacturer warrants your Concord Eye-Q fun.cam camera for a period of
1 year from the date of purchase to be free from defects in material and
workmanship. The warranty period shall be extended accordingly if applicable
mandatory legislation in effect on the date of purchase requires a longer
warranty period. The manufacturer, at its option, will repair or replace or have
repaired or replaced, at a location selected by the manufacturer, each product
which is proven to the satisfaction of the manufacturer to be defective in
material or workmanship. This warranty shall be limited to the camera for
defects which were not caused by misuse, abuse, improper handling,
tampering or attempts to repair by the owner or any unauthorized repair
service or repair man. This warranty is limited solely to the above and applies
only for the period set forth. We will not be liable for any loss or damage,
incidental or consequential of any kind, whether based on warranty, contract
or negligence arising in connection with the sale, use or repair of the product.
Our maximum liability shall not in any case exceed the sale price. This
warranty is for the benefit of the original purchaser only. This warranty gives
you specific legal rights and may vary from jurisdiction to jurisdiction. The
manufacturer makes no representation or warranties with regard to the
contents of the User's Guide and Quick Start Guide. Non-Concord brand
equipment and software and the Concord fun.cam Too TWAIN driver
distributed with your Concord Eye-Q fun.cam camera are sold "as is" and
without warranty of any kind from Concord, including any implied warranty
regarding merchantability, fitness for a particular purpose, and noninfringement of third party rights, and all such warranties are disclaimed. The
sole warranty, if any, for non-Concord branded items, if any, is given by the
manufacturer or producer thereof.
Concord, Concord Eye-Q and the Concord Eye-Q logo are registered trademarks or trademarks
of Concord Camera Corp., in the United States and/or other countries. Microsoft and Windows
are either registered trademarks or trademarks of Microsoft Corporation in the United States
and/or other countries. Mac and Macintosh are registered trademarks or trademarks of Apple
Computer, Inc. in the U.S. and other countries. All other brands and product names are either
registered trademarks or trademarks of their respective owners.
Copyright 2002 Concord Camera Corp.
5S0844-00
 Loading...