

Page 1
Page 2
Thank you for purchasing the Concord Eye-Q 5330Z.
Please take the time to read through this Quick Start Guide so you can enjoy all its
features.
This mark on your camera certifies that this camera meets the requirements of the
EU (European Union) concerning interference causing equipment regulations.
CE stands for Conformité Européenne (European Conformity).
Digital Camera
Concord Eye-Q 5330Z
Tested To Comply
With FCC
Standards
FOR HOME OR OFFICE USE
This Class B digital apparatus complies with Canadian ICES-003.
Do not remove the ferrite cores from the cables.
This device complies with Part 15 of the FCC Rules. Operation is subject to the following two conditions: (1) This device may not cause harmful interference, and (2)
this device must accept any interference recieved, including interference that may
cause undesired operation.
2
Page 3

BEFORE YOU BEGIN
Check the packing list before you begin. If some parts are missing, please contact your
camera dealer.
• Concord Eye-Q 5330z (x 1)
• AA-size Alkaline Batteries (x 4)
• Video Cable (x 1)
• Hand Strap (x 1)
• Camera Case (x 1)
• Mini-USB Cable (x 1)
• 32 MB CompactFlash Card (x 1)
• Software and Documentation on CD-ROM:
USB Driver Software for Windows ® 98/ 98 SE /Windows ® ME/ Windows ® 2000 / Windows ® XP
and Mac OS 9.0~10.1.3
Instruction Manual (PDF) Windows ® /Macintosh
Photo Impression, Video Impression
• Documentation (Printed)
Warranty Card (x 1)
3
Page 4
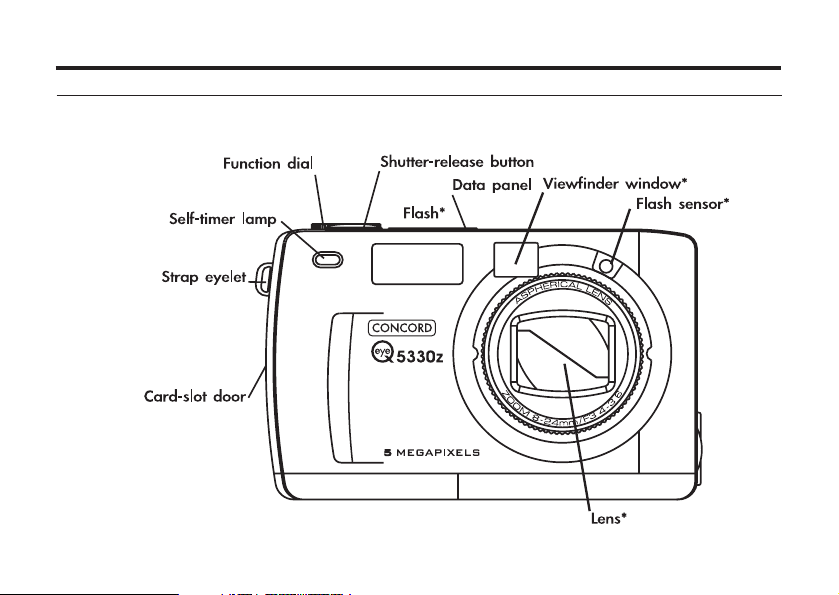
NAMES OF PARTS
CAMERA BODY _FRONT VIEW
* Do not touch.
4
Page 5
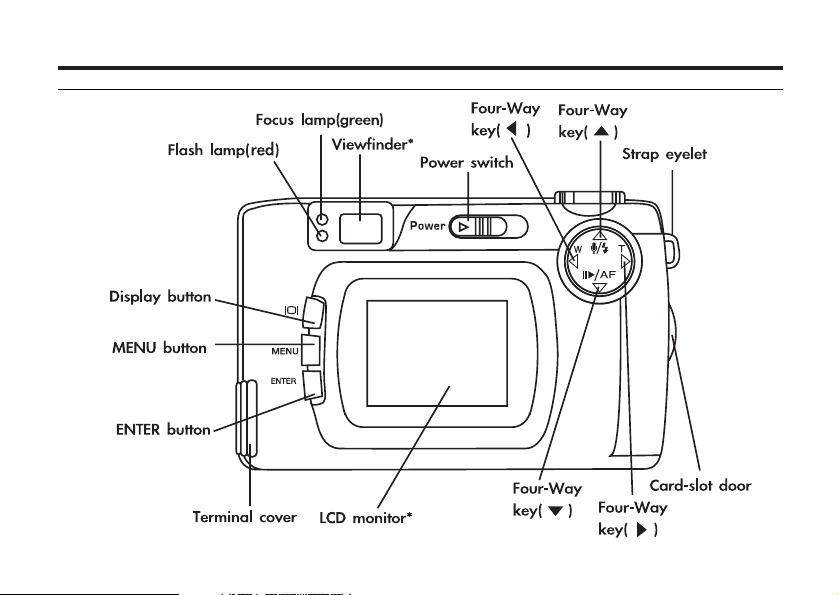
CAMERA BODY _REAR VIEW
5
Page 6

INSIDE THE TERMIN
AL COVER
USB connector
Video-out terminal
BOTTOM OF BODY
Battery-chamber door
Tripod socket
6
DC terminal
Page 7

DATA PANEL
The following diagram shows all items displayed to aid the explanation.
Image-size indicator
Battery-condition indicator
Self-timer indicator
Number display of recordable remaining frame/
No-card indicator
* Refer to the number of recordable remaining frame as a guide.
The number changes depending on the scene or subject you record.
Flash-mode indicator
7
Page 8

BASIC FUNCTIONS
/
/
In general controlling (MENU), press key to select and press key to confirm the settings.
8
Rotate the function dial to STILL IMAGE mode.
FLASH
/
Digital zoom :WIDE / TELE
Focusing distance Auto focus (No icon)
Press ENTER to change DRIVE mode:
/
AUTO FLASH
FILL-FLASH
FLASH CANCEL
AUTOFLASH WITH RED-EYE
REDUCTION
NIGHT MODE
Close up
Specified (0.5m,1.0m,2.5m)
Landscape
Single shot
Continuous shot
Continuous with AF
Self-timer
Page 9

GET READY
ATTACHING THE HAND STRAP
11
Insert the smaller loop of the hand strap through the strap
eyelet.
22
Insert the other end of the hand strap through the small
loop.
GETTING STARTED
11
Insert the batteries .
Be sure that positive and negative battery terminals are oriented as illustrated
on bottom of the back cover.
22
Insert the CF card .
• Be sure to fold the card-release lever down before closing the card slot door.
• Check the direction if the card is stopped halfway.
Note: We advised to use SanDisk ® or HITACHI ® CF card.
9
Page 10

HOW TO TAKE A PICTURE
AKING PICTURES
T
11
Rotate the function dial to STILL IMAGE mode.
22
Slide the power switch to turn on the camera.
33
Press button to turn on the LCD monitor,and determine
the image composition while looking into the LCD monitor
or viewfinder.
44
Adjust the image range and size with the four-way key
( / ).
• When the T key is pressed, the image size becomes larger.
• When the W key is pressed, the image range becomes wider.
10
Page 11

55
Press the shutter-release button halfway down.
• When the image is focused, the focus lamp (green) lights up.
66
Press the shutter-release button fully down to take the picture.
• The captured image is displayed on the LCD monitor.
• While the captured image is being recorded in the CF card, the focus lamp
(green) blinks slowly (about 2 times in a second).
11
Page 12

HOW TO REVIEW A PICTURE
MONITORING THE CAPTURED IMAGES
11
Rotate the function dial to .
22
Slide the power switch to turn on the camera.
• The latest image (which was recorded last) is displayed on the LCD monitor.
33
When the or key is pressed, the image changes to the
next or previous one respectively.
12
Page 13

SOUND RECORDING
RECORD THE SOUND
11
Rotate the function dial to , and press or key to
select the desired image to record sound.
22
Press key to start recording and press key again to stop
recording.
• The icon with recording time(It will record for 10s) is displayed.
SOUND PLAYBACK
Press or
key for PLAY&PAUSE.
• The icon is displayed on the LCD monitor.
key to select the image with sound icon and press
13
Page 14

HOW TO TAKE A MOVIE CLIP
When rotating the function dial to MOVIE CLIP mode,you can directly take a short movie clip.
1 Press the shutter release button fully down to start.
2
Press the shutter release button fully again to stop recording.
• The max recording time is 30 sec.
MO
VIE CLIP PLAYBACK
1 Rotate the function dial to .
2 Press / key to select movie clip files.
• The movie clip shows the icon on top of the LCD monitor.
3 Press key to show the movie clip.(PLAY & PAUSE)
14
Page 15

HOW TO DELETE A PICTURE
11
Rotate the function dial to and press the MENU button.
• The playback mode menu is displayed on the LCD monitor.
22
Press key continuously (selected image) to select the
image to delete.
• Choose "All Images allows user to delete all images of the folder."
33
Press button (trash can icon will be displayed) and press
ENTER button.
44
Select [YES] and press key to delete or press MENU but-
ton to cancel.
55
Press the MENU button.
• The LCD monitor display returns to the playback menu mode.
15
Page 16

Technical Suppor t Hot Line:
Toll Free In the USA & Canada
1-866-522-6372
Toll Free In Europe
UK: 0800-169-6482
BELGIUM: 0800-787-57
FRANCE: 0800-917-599
GERMANY: 0800-1800-563
SPAIN: 900-973-195
ITALY: 800-781-883
All Other Countries - Toll
31-53-482-9779
 Loading...