

Page 1
DVx
Page 2
CONCORD
Quick Start Guide
ENGLISH
FRANÇAIS
DEUTSCH
ESPAÑOL
ITALIANO
NEDERLANDS
LANGUAGES
PORTUGUÊS
DZ QSG(515815-00)-E 1 11/15/04, 1:35:04 PM
Page 3

QUICK START GUIDE
ENU
This Quick Start Guide provides a quick reference for operating your
new Camera. Refer to the User’s Guide, which can be found on the
CD-ROM, for detailed instructions on how to use all of your camera’s
features. Before using the camera, make sure to read all safety
instructions and precautions outlined in the User’s Guide.
1
1
DZ QSG(515815-00)-E 1 11/15/04, 1:35:04 PM
Page 4
1
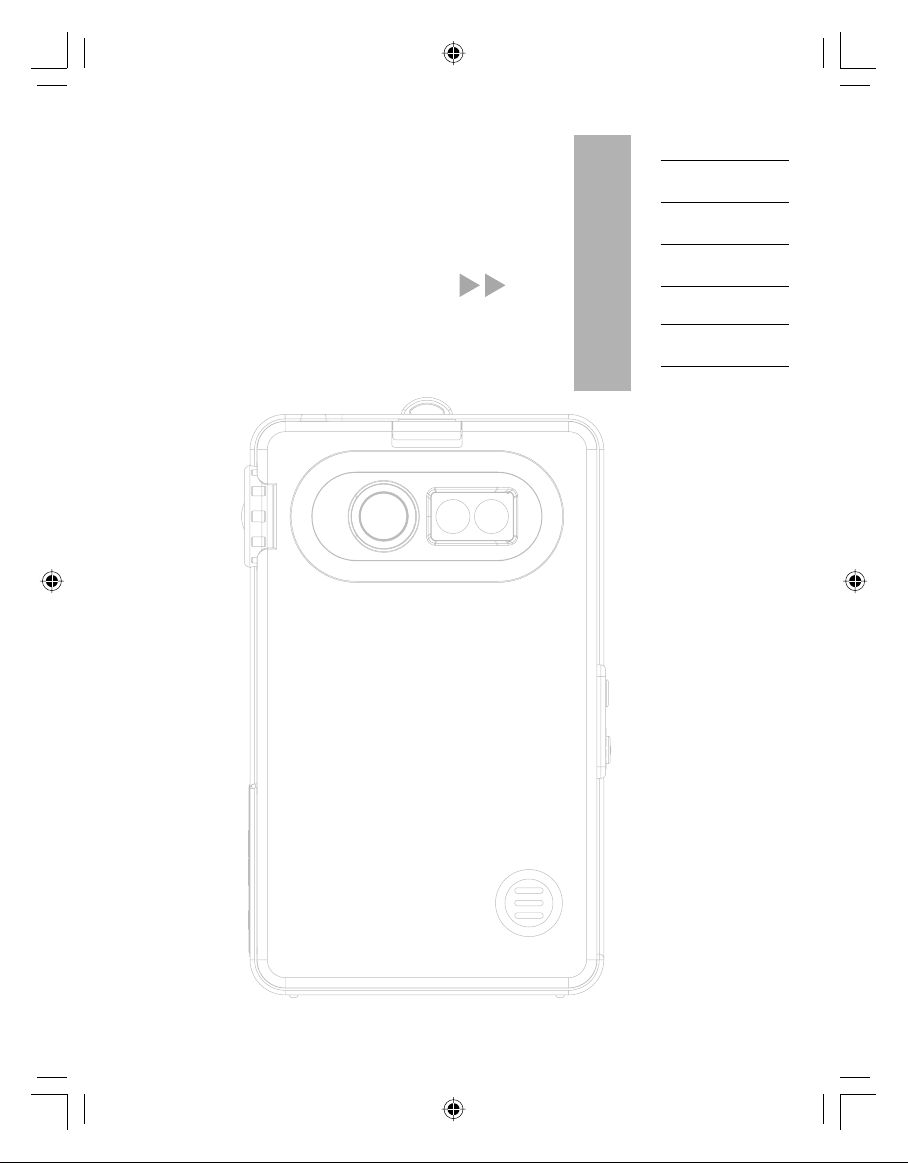
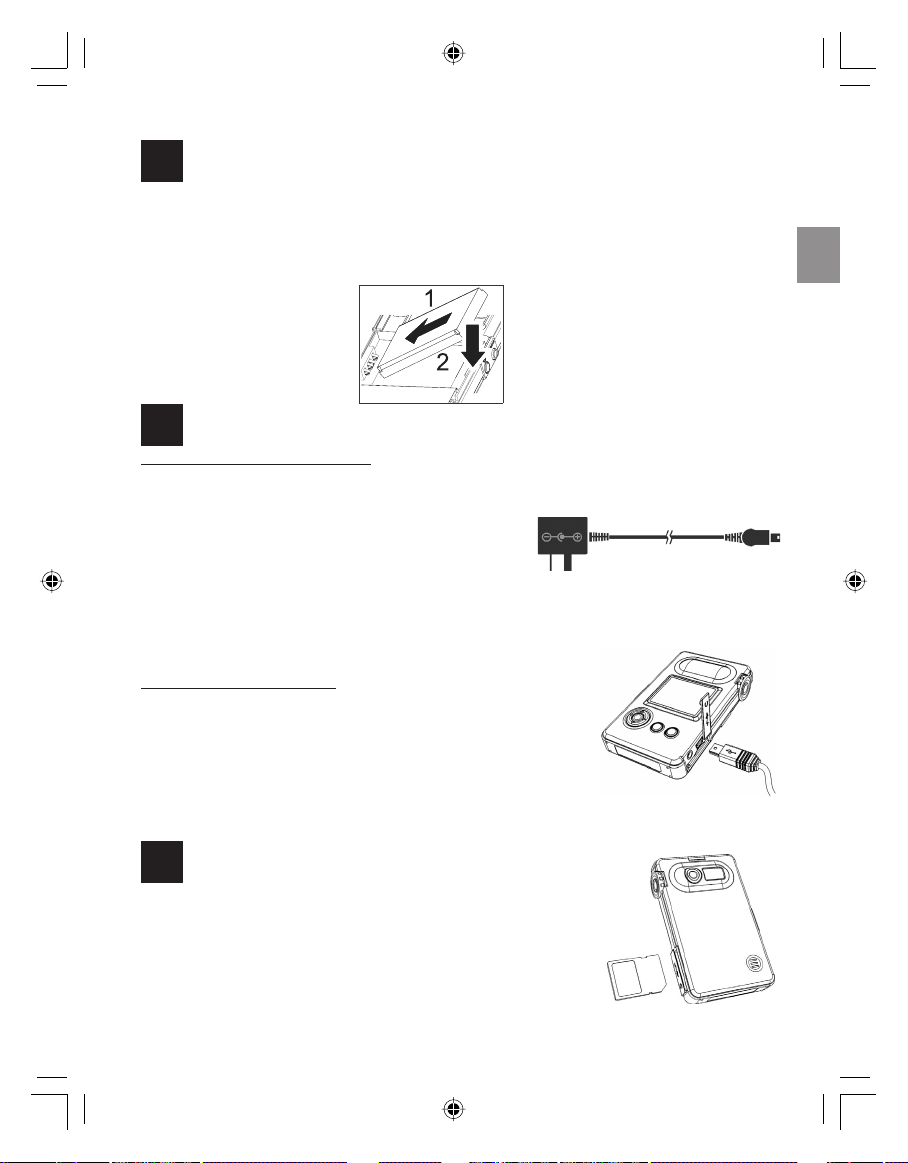
LOADING THE BATTERY
The camera uses a 3.7 volts rechargeable Li-ion Battery.
1. Press the Battery Door Latch that is located at the upper side of the unit to open the back cover.
2. Slide the battery into the battery compartment and align with the metal contact.
3. Replace the back cover.
CHARGING THE BATTERY
2
Charging by AC-Adapter
1. Plug the AC end of the adaptor into a standard AC socket.
2. Plug the USB end of the adaptor into the USB port of the
camera. The red backlight will be turned on.
• Charging the battery for the first time will takes about 6
hours. When the battery is fully charged, the red
backlight will go off.
• Charging the battery fully for the second time or later will
take at least 2 hours.
• When charging the battery for the first time, it is
recommended to use AC adaptor instead of USB cable.
Charging by PC / Notebook
You can also use the USB cable to charge the battery.
1. Connect the bigger end of the USB cable to the USB port of your PC
or Notebook.
2. Plug the smaller end of the USB cable to the USB port of the camera.
• The red backlight will turn on when the battery is being charged
and it will turn off when the unit is fully charged. The time for fully
charging is about 4-6 hours.
AC end USB end
ENU
3
INSTALLING THE MEMORY CARD
The camera uses SD or MMC card as storage. Insert an SD or MMC
card according to the illustrations below before proceeding to take video
clips or pictures.
To remove the memory card, gently push the edge of the memory card
with your fingertip to eject it first, and then pull the card out.
2
DZ QSG(515815-00)-E 2 11/15/04, 1:35:05 PM
Page 5
POWER ON /OFF
4
ENU
Power On
Press the Power button for more than 1 second to turn on the
Camera. The LCD will be turned on.
Power Off
Press the Power button for more than 1 second.
Caution:
1. If the Power button is pressed for more than 1 second while
data is being written to the memory card, the Camera will shut
down, but the memory writing will continue until it is finished.
2. If the Power button is pressed for more than 1 second while the
camera can’t be turned on, that may because the battery is over.
Charge the battery and then try again.
SETTING THE CAMERA’S OPERATIONAL MODES
5
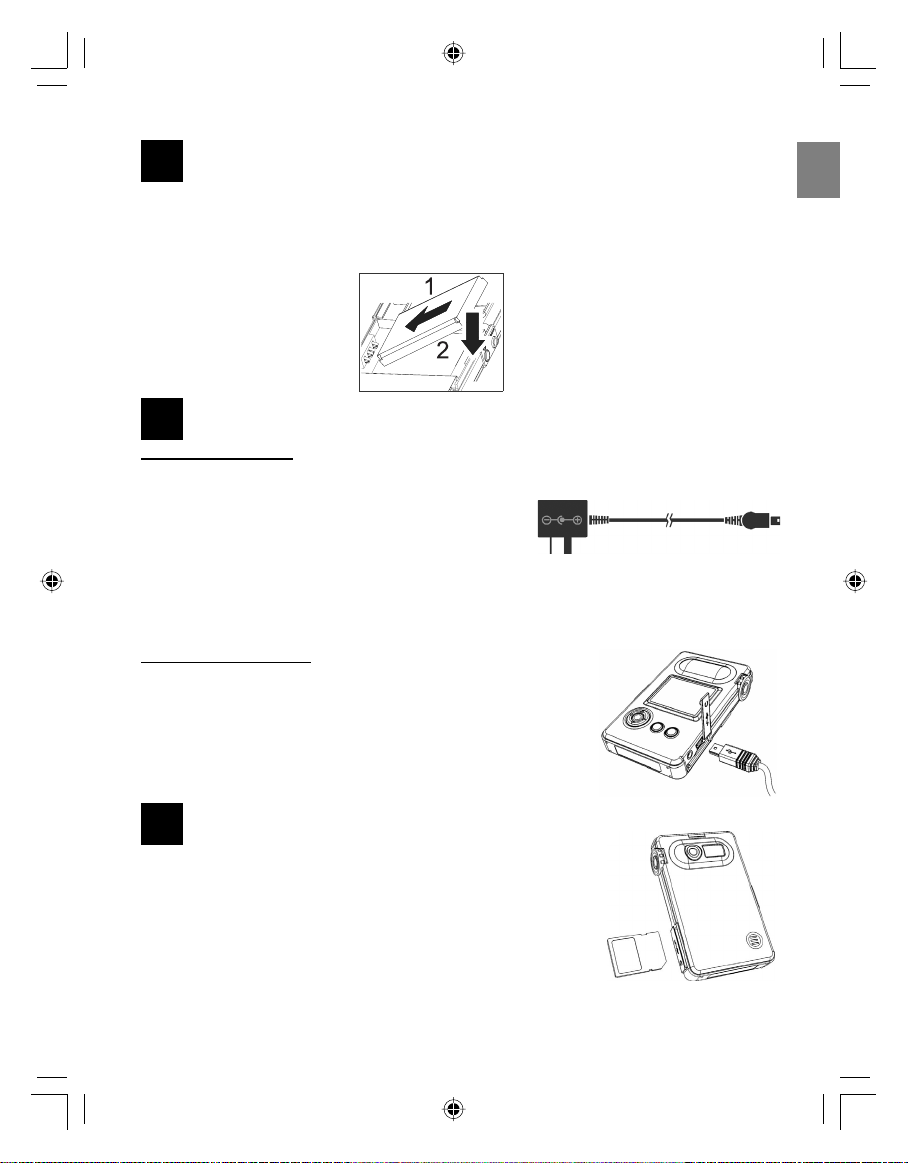
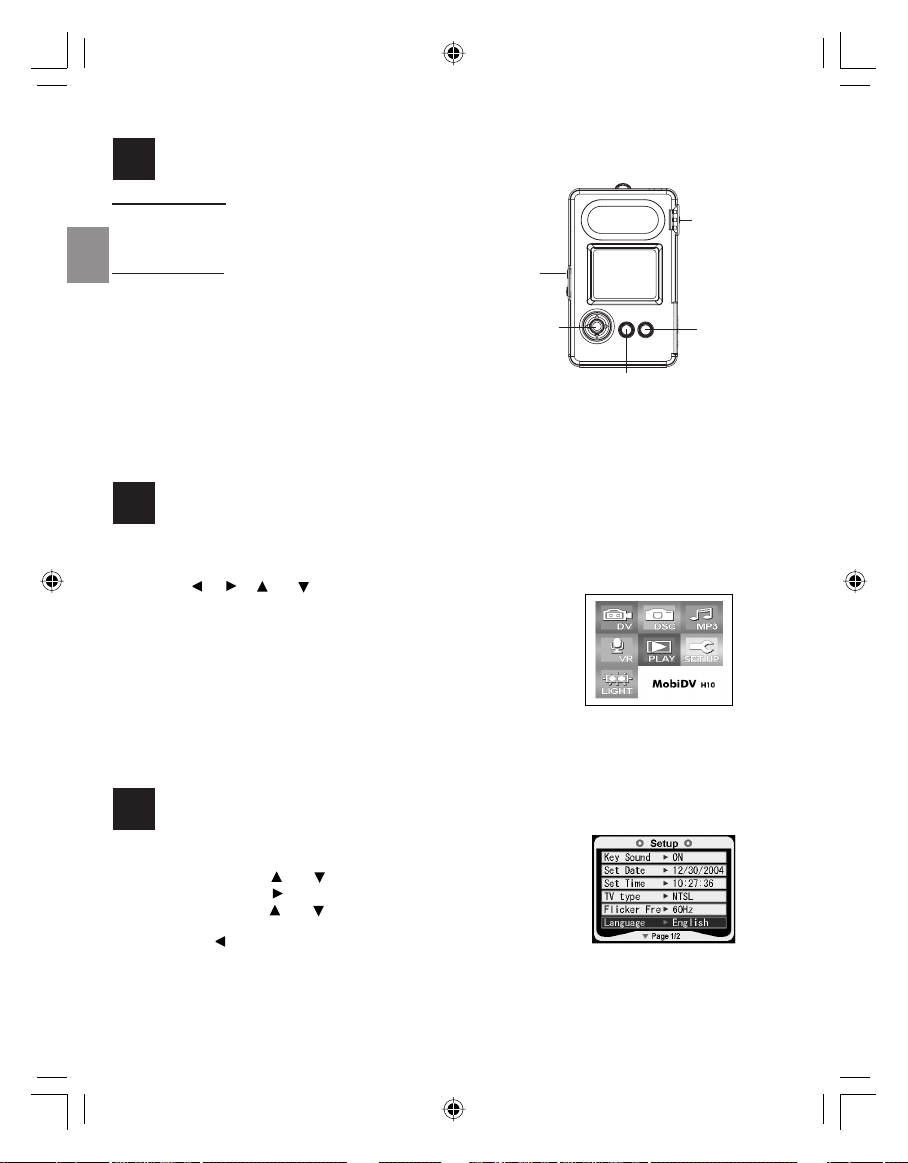
1. Press the MODE button repeatedly to switch among the 7 modes. The mode selected will be highlighted on
the screen.
• You can also press the MODE button first, then press the , , or button to select the desired mode.
DV: Use this mode to record video clip.
DSC: Use this mode to take still picture.
MP3: Use this mode to play MP3 music.
VR: Use this mode to record audio clip.
PLAY: Use this mode to view the recorded video clips, pictures or audio clips.
SET UP: Use this mode to adjust the camera settings.
LIGHT: Use this mode to take the camera as a flashlight.
2. Press the SET button to enter the selected mode.
SETTING LANGUAGE
6
1. Power on the camera and switch to SETUP mode.
2. Press the or button to highlight the Language.
3. Press the button or SET button to enter its submenu.
4. Press the or button to select the desired language.
5. Press the SET to save the setting. Or press the button to exit the
submenu. If so, the language setting will not be changed.
Power
Button
SET
button
MENU button
Shutter
button
DISPLAY
button
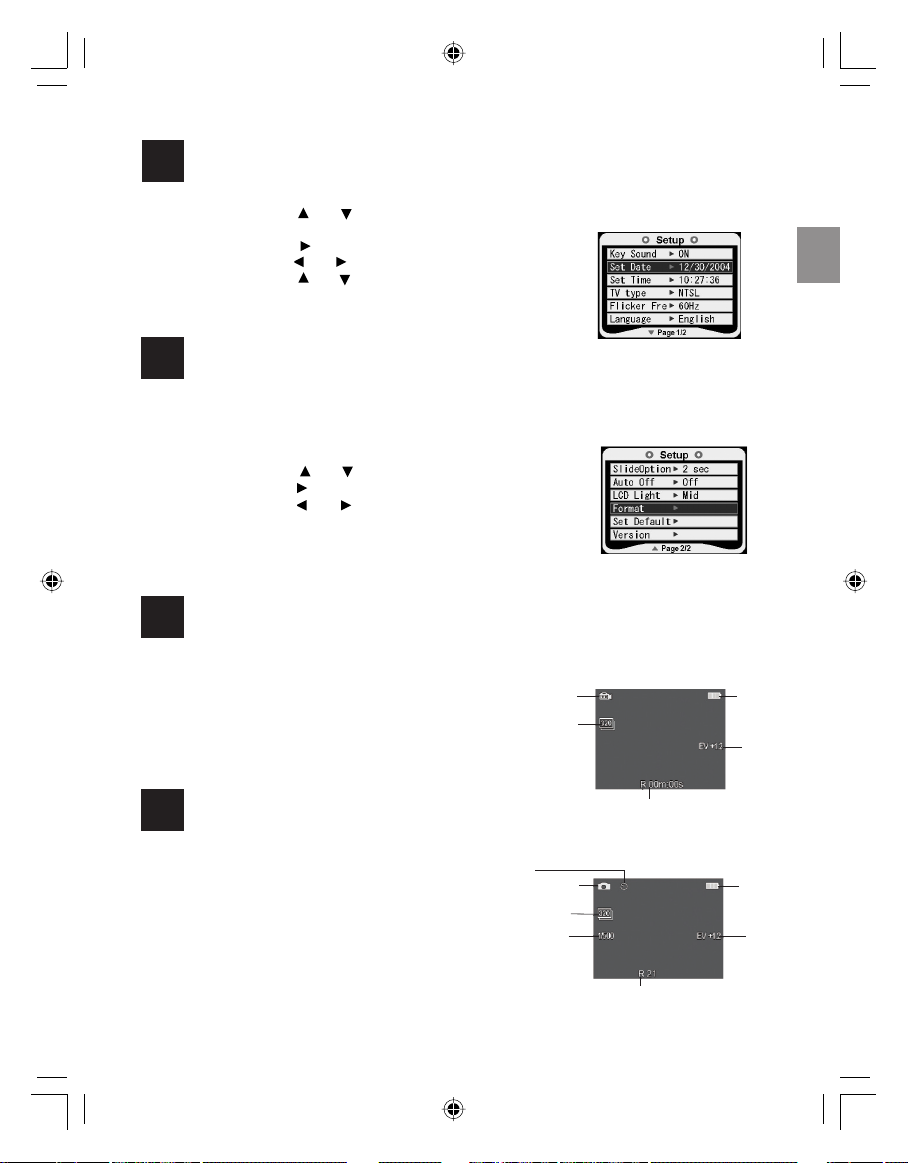
SETTING DATE AND TIME
7
1. Power on the camera and switching to SETUP mode.
2. Press the or button to highlight the Set Date or Set Time.
3. Press the button or SET button to enter its submenu.
4. Press the or button the highlight the field to be changed.
5. Press the or button to change the value of the selected field.
6. Press the SET to save the setting.
3
DZ QSG(515815-00)-E 3 11/15/04, 1:35:06 PM
Page 6
8
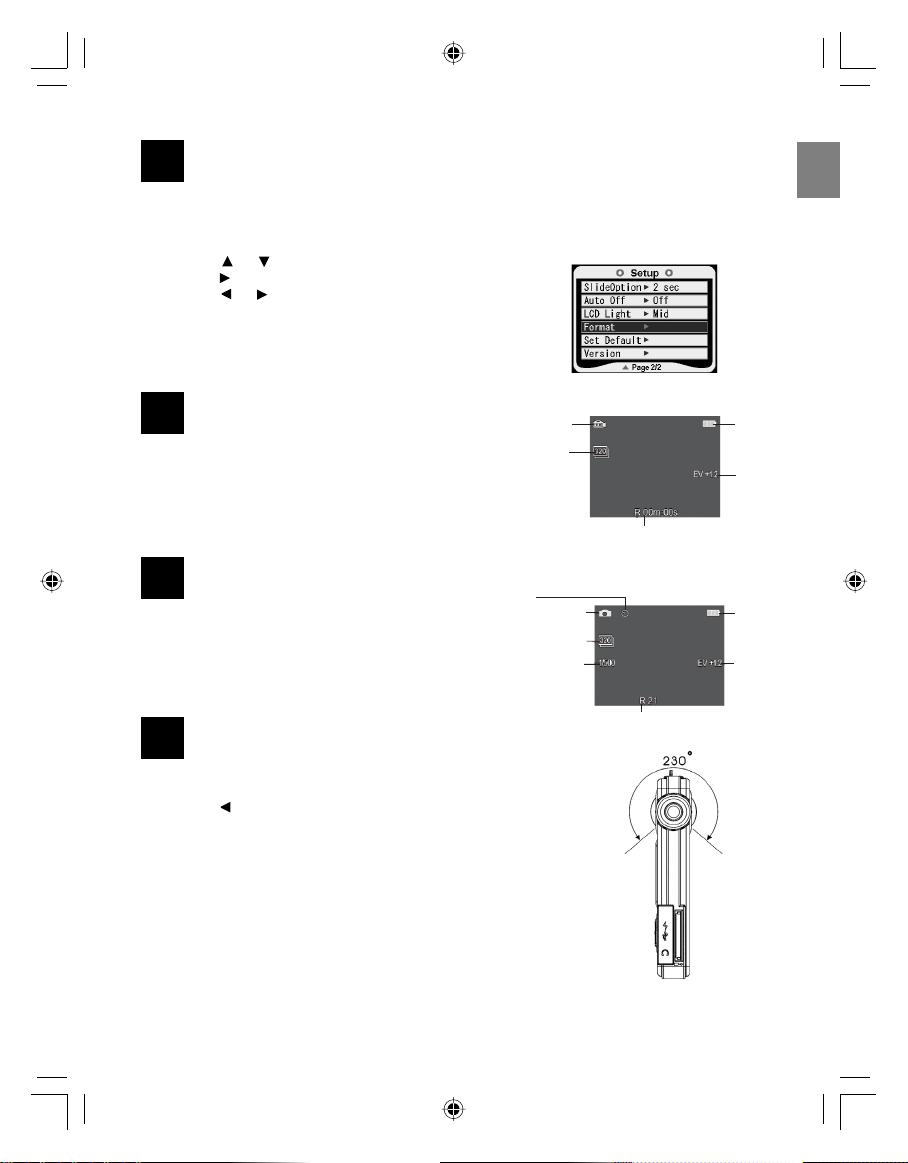
FORMATTING MEMORY CARD
To ensure your memory card functions properly, it is recommended to format the memory card for the first time
you use it.
Caution: Formatting will delete all files including the protected files from the memory.
1. Power on the camera and switch to SETUP mode.
2. Press the or button to highlight the Format.
3. Press the button or SET button to enter its submenu.
4. Press the or button to select Ye s or No.
5. Press the SET to confirm.
• If Ye s is selected, all the files in the memory will be deleted.
• If No is selected, no change will be made.
ENU
9
RECORDING A VIDEO CLIP
1. Power on the Camera and enter DV mode.
2. Rotate the Lens to frame the subject.
3. Press the Shutter button to start recording. The recording
time are indicated on the screen.
4. Press the Shutter button again to end the video recording.
10
TAKING STILL PICTURES
1. Power on the Camera and enter DSC mode.
2. Rotate the Lens to frame the subject.
• For best results, stand at least 0.8 m (2.62 ft.) away from
the subject.
3. Press the Shutter button to take your picture.
11
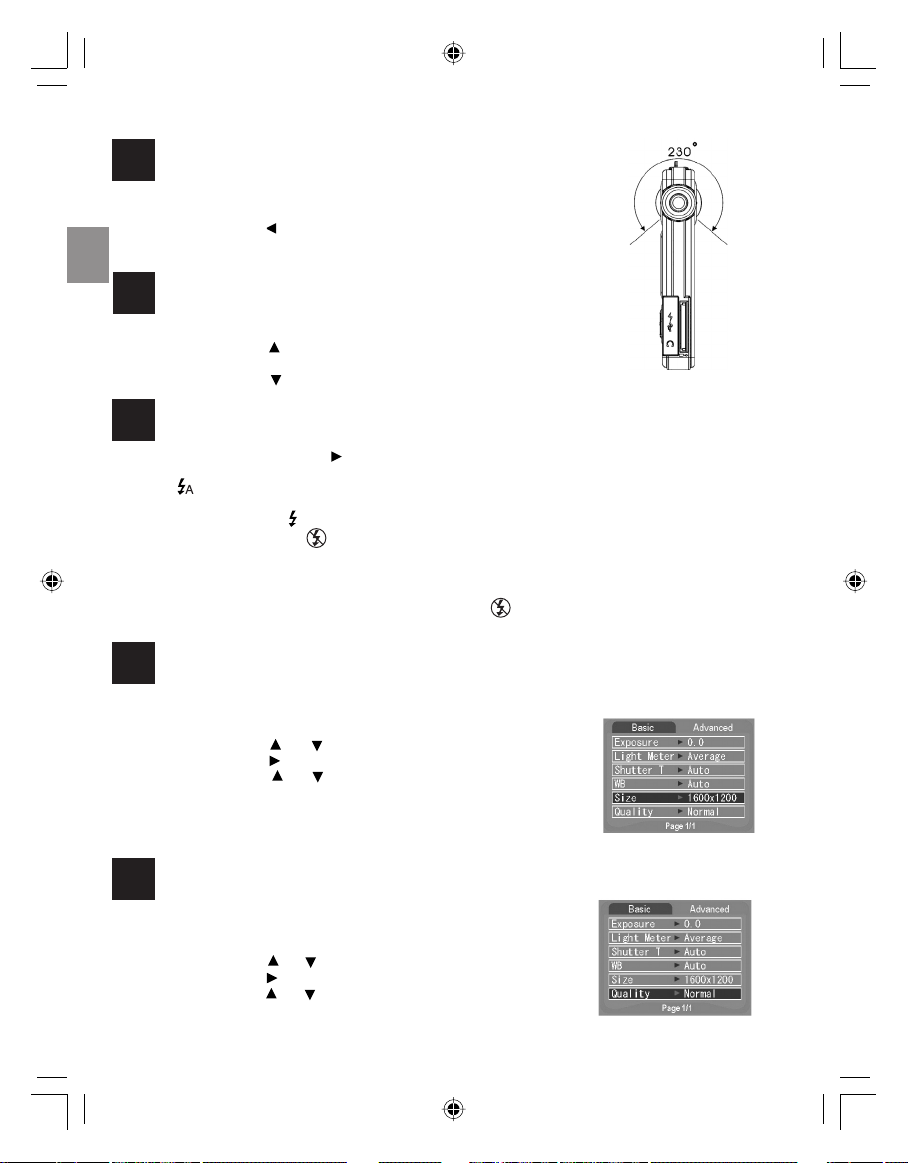
SELF-PHOTOGRAPHY
1. Power on the camera and switch to DV/DSC mode.
2. Turn the lens to face yourself.
3. Press the button to reverse the image on the LCD.
4. Press the Shutter button to take the pictures or video clips of yourself.
DV Mode
Video
Size
Self-Photography
DSC Mode
Picture Size
shutter
Speed
Remaining time
Remaining Pictures
Battery
Exposure
Value
Battery
Exposure
Value
4
DZ QSG(515815-00)-E 4 11/15/04, 1:35:09 PM
Page 7

12
USING THE DIGITAL ZOOM
ENU
The camera provides up to 4x digital zoom.
1. Press the button to zoom in the subject. The zoom scales will be shown on the LCD.
2. Press the button to zoom out.
13
SETTING THE FLASH FOR PICTURE TAKING
Press the button repeatedly until the desired flash icon appears on the LCD to set the flash mode.
Auto ( ): The camera judges automatically if a Flash is required. If the environment is dark, the flash will
fire. The camera uses auto flash by default.
Flash On ( ): The flash will fire in any lighting condition.
Flash Off ( ): The Flash will not fire in this mode.
Note:
1. The flash provides assisting light only. If environment is too dark, the flash cannot ensure enough exposure
for taking clear pictures.
2. When the battery is about to run out, the Flash Off icon ( ) will be shown on the screen and the flash will
not be available in this case.
14
SETTING PICTURE/VIDEO RESOLUTION
Resolution determines the size of a captured file. Higher resolution images contain more details and have larger
file sizes.
1. Press the MENU button to enter Menu screen.
2. Press the or button to highlight the Size.
3. Press the button or SET button to enter its submenu.
4. Press the or button to select the desired resolution setting.
5. Press the SET to save the setting.
6. Press the MENU to exit Menu screen.
15
SETTING PICTURE/VIDEO QUALITY
The quality setting determines the amount of compression used to reduce the
size of the stored files in order to economize space in the memory.
1. Press the MENU button to enter Menu screen.
2. Press the or button to highlight the Quality.
3. Press the button or SET button to enter its submenu.
4. Press the or button to select the desired quality setting.
5. Press the SET to save the setting.
6. Press the MENU to exit Menu screen.
5
DZ QSG(515815-00)-E 5 11/15/04, 1:35:11 PM
Page 8
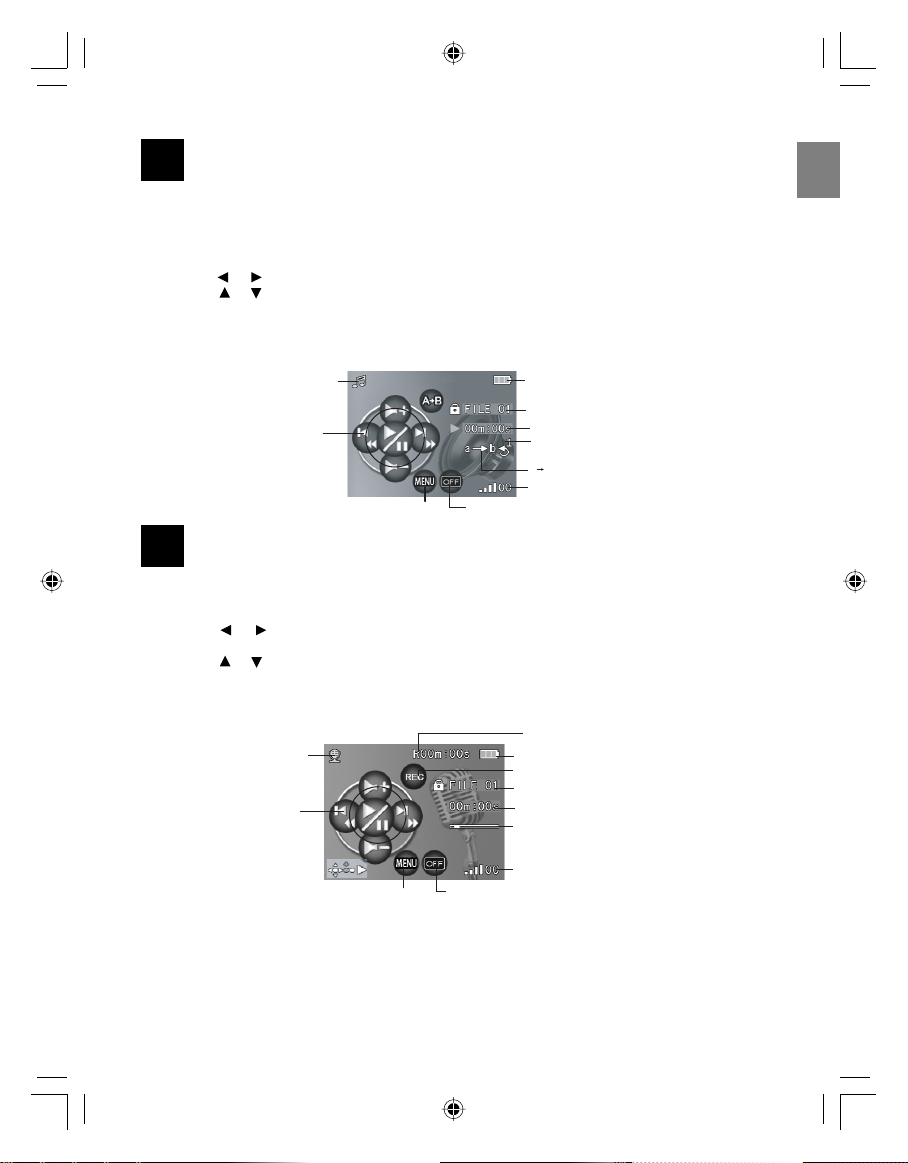
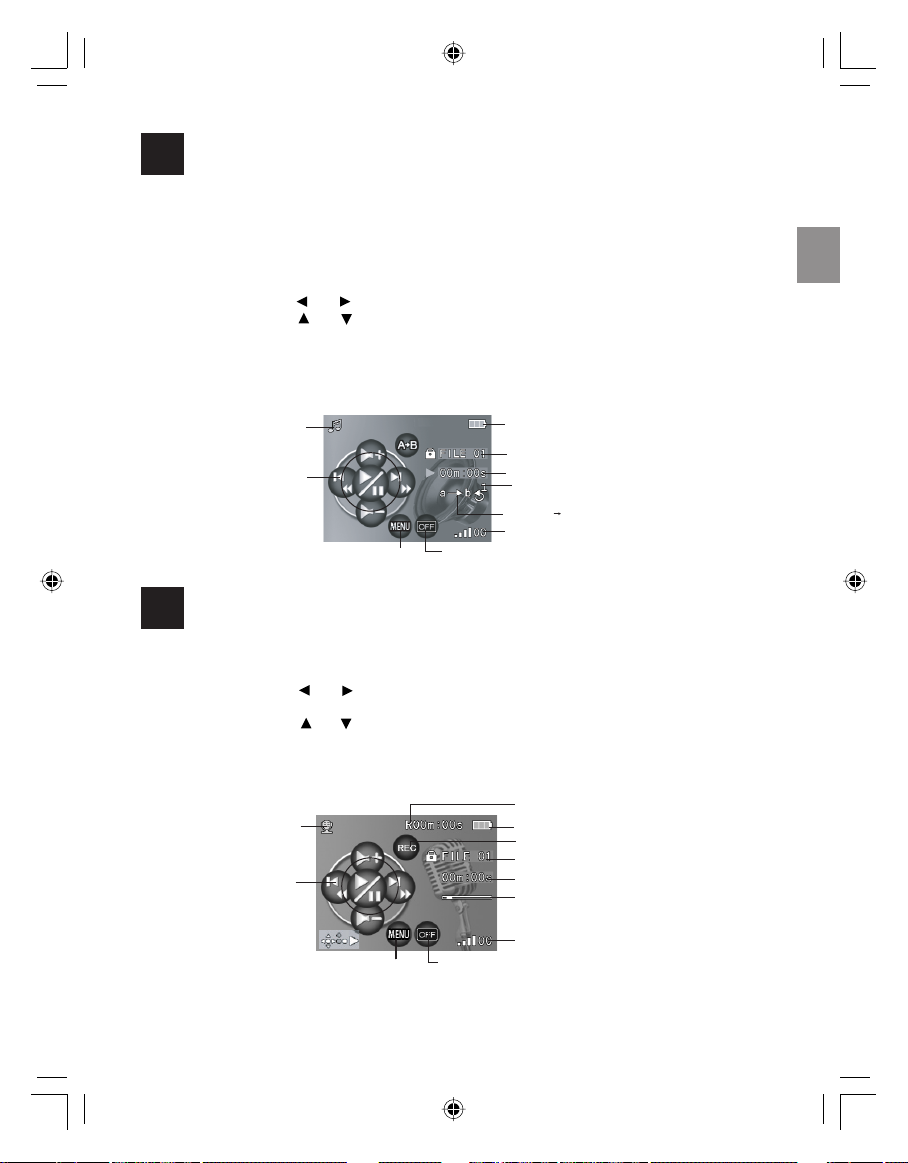
PLAYING MP3
e
16
1. Connect the camera to your computer by using the supplied USB cable and drag the desired MP3 files from your
computer into the \\Removable Disk\DCIM\100-DVx folder. Then disconnect the camera with the computer.
Note: You may also use card reader to save MP3 files onto memory card. But as the camera recognizes only
MP3 files saved in \\DCIM\100-DVx \ folder, you must format the memory card by using the camera first.
2. Power on the camera and switching to MP3 mode.
3. Press the or button to select songs.
4. Press the or button to adjust volume.
• The volume is divided into 21 levels (from 00 to 20).
5. Press the SET button to play the selected song.
6. Press the SET button to pause. Press the SET button again to resume playing.
ENU
MP3 Mode
5 Way
Function Key
Menu
LCD on/off
RECORDING AND PLAYING VOICE FILES
17
1. Power on the camera and switch to VR mode.
2. Press the Shutter button to start recording.
3. Press the Shutter button again to end recording.
4. Press the or button to select a voice file.
5. Press the SET button to start playing the voice file.
6. Press the or button to adjust volume.
7. Press the SET button to pause. Press the SET button again to resume playing.
VR Mode
5 Way
Function Key
LCD on/off
Menu
Battery
File Number
Time
Repeat the
selected song
A B Repeat
Volume
Remaining tim
to record
Battery
Recording
File Number
Time
Displaying Bar
Volume
6
DZ QSG(515815-00)-E 6 11/15/04, 1:35:12 PM
Page 9
18
y
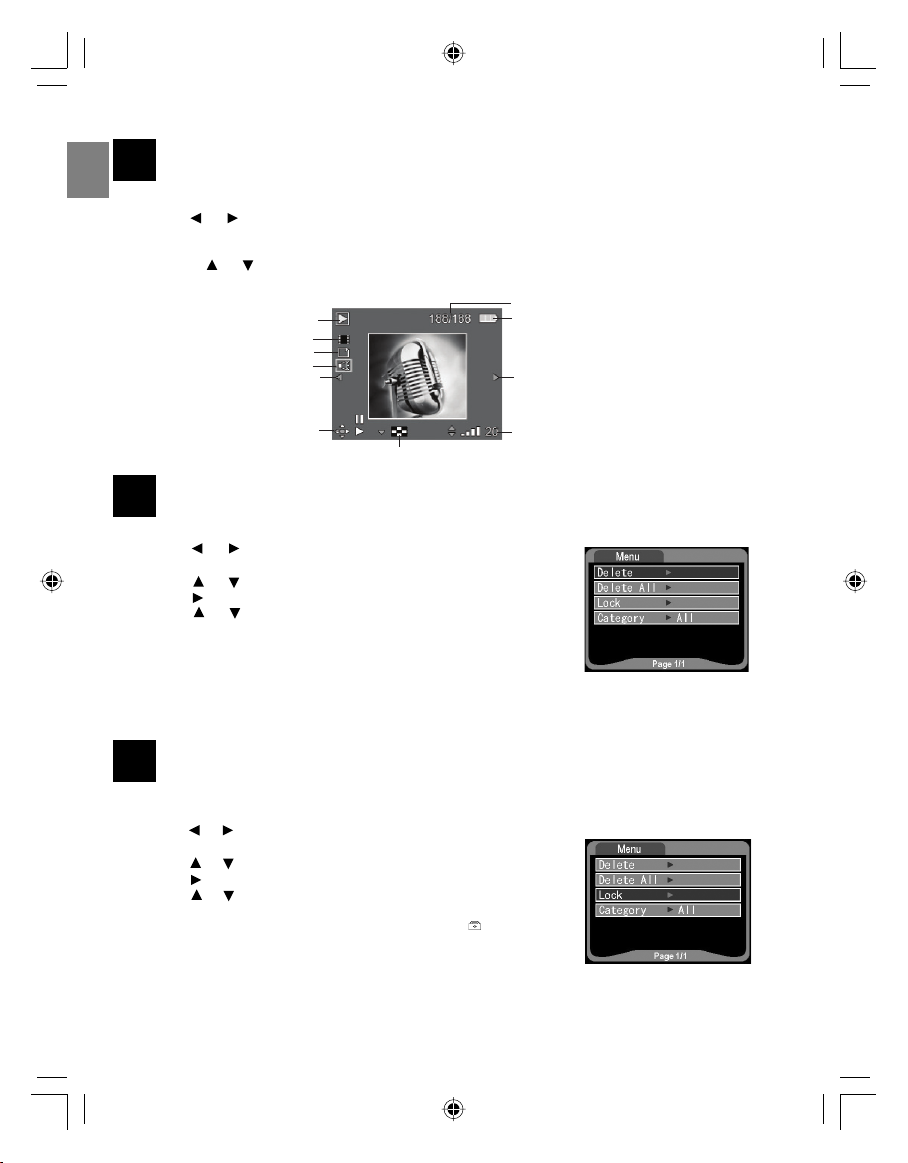
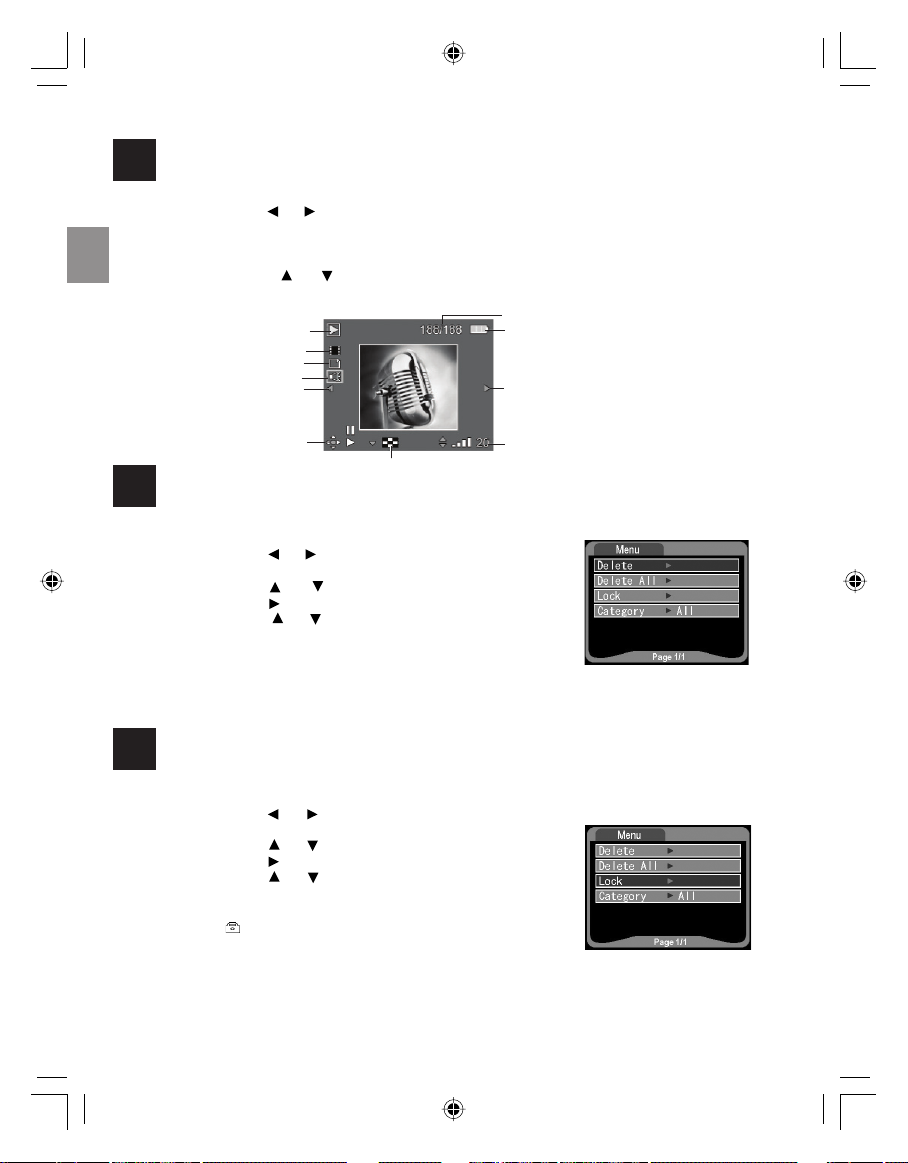
REVIEW THE STORED VIDEO CLIPS, PICTURES OR VOICE FILES
ENU
1. Power on the camera and switching to PLAY mode.
2. Press the or button to skip to the previous or next files.
3. If it is video clips or voice files,
• Press the SET button to start play. Press SET button again to pause or to resume playing.
• Press the or button to adjust volume.
Number of File/All Files
Play Mode
Video
Picture
Voice
Previous
Files
Battery
Next File
Play/Pause
9-files displa
19
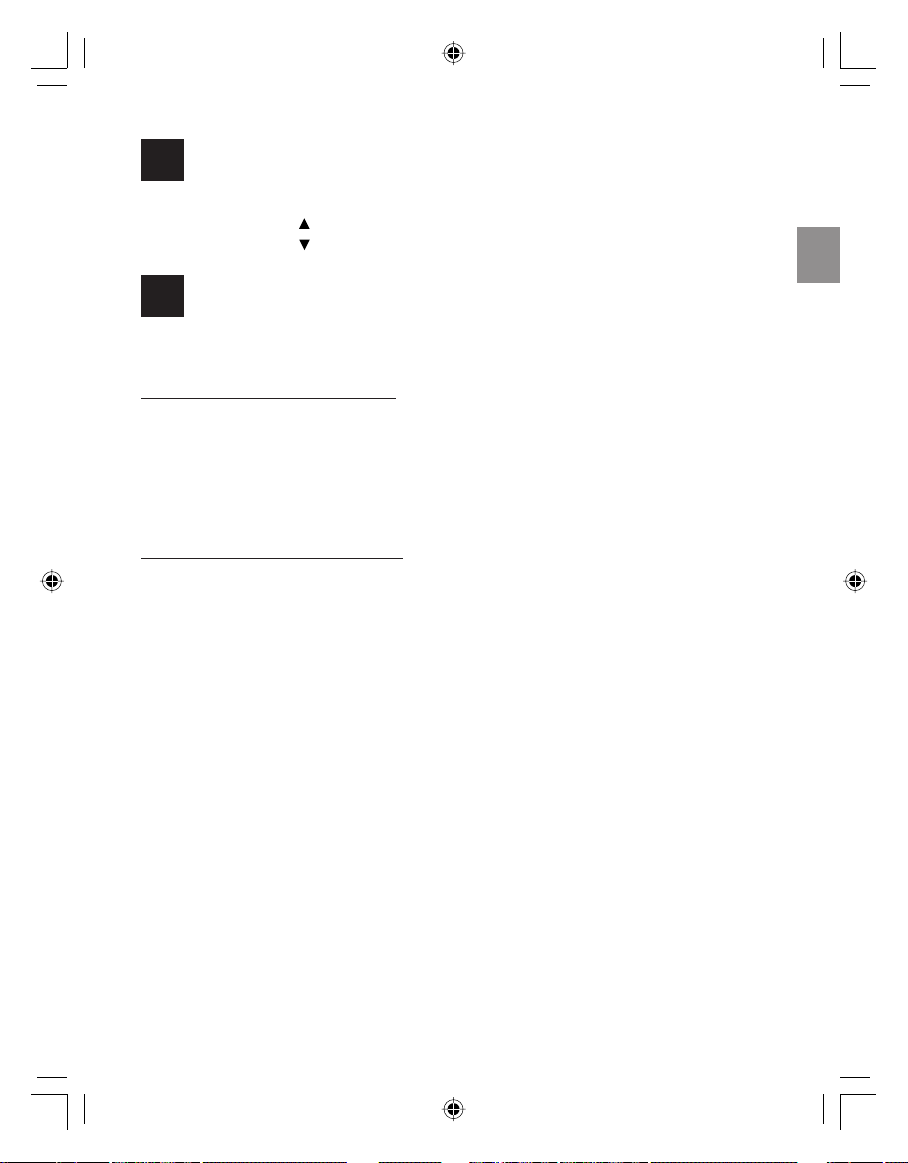
DELETING FILES
1. Power on the camera and switch to PLAY mode.
2. Press the or button to find out the unwanted file.
3. Press the MENU button to enter Menu screen.
4. Press the or button to highlight Delete.
5. Press the button or SET button to enter its submenu.
6. Press the or button to select Yes or No.
7. Press the SET to confirm.
• If Ye s is selected, the file will be deleted.
• If No is selected, no change will be made. Press the MENU to exit
Menu screen.
Note: Once the file is deleted, it cannot be recovered.
20
LOCKING THE FILES
To prevent accidental deletion of the files you like, you can lock the files by following steps below:
1. Power on the camera and switch to PLAY mode.
2. Press the or button to find out the file to be protected.
3. Press the MENU button to enter Menu screen.
4. Press the or button to highlight Lock.
5. Press the button or SET button to enter its submenu.
6. Press the or button to select Ye s or No.
7. Press the SET to confirm.
• If Yes is selected, the file will be locked. The lock icon (
appear on the right side of the LCD.
• If No is selected, no change will be made. Press the MENU to exit
Menu screen.
ed format
Volume
) will
7
DZ QSG(515815-00)-E 7 11/15/04, 1:35:13 PM
Page 10

USING THE FLASHLIGHT
21
1. Power on the camera and switch to LIGHT mode.
2. Press the SET button to turn the flashlight on or off.
3. Press the button to increase the brightness. There are three levels of intensity.
4. Press the button to reduce the brightness.
22
DOWNLOADING FILES ONTO YOUR COMPUTER
Note for Windows 98 SE users: The camera driver must be installed first.
Note for all Windows users: The Windows Media Player 9 must be preinstalled before proceeding to view the
video clips on your computer.
For Windows Users
1. Connect the camera to the computer.
2. Double click “My Computer”.
3. Double click “Removable Disk”.
4. Double click “DICM”.
5. Double Click “100-DVx”.
• The pictures (JPEG), video clips (ASF), voice file (WAV) and MP3 files stored in the memory card will be
displayed.
6. Drag and drop the image you want to save in the computer.
• To select all files, click Edit > Select all.
For Macintosh Users
1. Connect the camera to the computer.
• After a few moments, the external hard drive will appear on the desktop.
2. Double-click the “Concord” removable drive that is on your desktop.
3. Double-click DCIM.
4. Double Click “100-DVx”.
• The pictures (JPEG), video clips (ASF), voice file (WAV) and MP3 files stored in the memory card will be
displayed.
5. Drag and drop the image you want to save in the computer.
• To select all files, click Edit > Select all.
Note: You may also transfer the stored pictures and video clips on your memory card onto your computer by
using a memory card reader (sold separately).
ENU
Concord and the Concord logo are registered trademarks or trademarks of Concord Camera Corp., in the United
States and/or other countries. Microsoft,
or trademarks of Microsoft Corporation in the United States and/or other countries. Mac and Macintosh are
registered trademarks or trademarks of Apple Computer, Inc. in the U.S. and other countries. All other brands
and product names are either registered trademarks or trademarks of their respective owners.
Windows Media Player and Windows are either registered trademarks
8
DZ QSG(515815-00)-E 8 11/15/04, 1:35:15 PM
Page 11

GUIDE DE RÉFÉRENCE RAPIDE
Le présent Guide de référence rapide vous explique rapidement le
fonctionnement de votre nouvel appareil photo. Reportez-vous au
Manuel de l’utilisateur que vous trouverez sur le CD-ROM fourni, pour
FRA
obtenir des instructions détaillées relatives à l’utilisation des fonctions
de votre appareil. Avant d’utiliser votre appareil photo, veuillez lire
attentivement l’ensemble des instructions et consignes de sécurité
énoncées dans le Manuel de l’utilisateur.
1
1
DZ QSG(515815-00)-F 1 11/15/04, 1:50:52 PM
Page 12
1
INSERTION DE LA BATTERIE
L’appareil photo utilise une batterie Li-ion rechargeable de 3,7 Volts.
1. Appuyez sur le loquet du couvercle de la batterie situé sur le côté supérieur de l’appareil pour ouvrir le
couvercle arrière.
2. Insérez la batterie dans le compartiment en l’alignant avec les contacts métal.
3. Fermez le couvercle arrière.
CHARGEMENT DE LA BATTERIE
2
Chargement avec adaptateur secteur
1. Raccordez l’extrémité secteur de l’adaptateur à une prise
secteur standard.
2. Raccordez l’extrémité USB de l’adaptateur au port USB
de l’appareil photo. Une lumière rouge s’allume.
• Le chargement de la batterie prend environ 6 heures
la première fois. Lorsque la batterie est complètement
chargée, la lumière rouge s’éteint.
• Pour charger à nouveau complètement la batterie les
fois suivantes, comptez au minimum 2 heures.
• Lorsque vous chargez la batterie pour la première fois, il
est recommandé d’utiliser un adaptateur secteur plutôt
qu’un câble USB.
Chargement avec PC/Notebook
Vous pouvez aussi utiliser le câble USB pour charger la batterie.
1. Connectez l’extrémité la plus grosse du câble USB au port USB de
votre PC ou Notebook.
2. Raccordez l’extrémité la plus petite du câble USB au port USB de
l’appareil photo.
• La lumière rouge s’allume tant que la batterie se charge, puis elle
s’éteint une fois la batterie complètement chargée. Comptez
environ 4 à 6 heures pour charger complètement la batterie.
Extrémité secteur extrémité USB
FRA
3
INSTALLATION DE LA CARTE MEMOIRE
L’appareil photo utilise une carte SD ou MMC comme support de
stockage. Insérez une carte SD ou MMC comme indiqué sur les figures
suivantes avant de filmer ou de prendre des photos.
Pour retirer la carte mémoire, appuyez doucement sur le bord de la carte
pour l’éjecter, puis sortez-la.
2
DZ QSG(515815-00)-F 2 11/15/04, 1:50:53 PM
Page 13
MISE SOUS TENSION/HORS TENSION
4
Mise sous tension
Appuyez sur le bouton Alimentation pendant plus d’1 seconde
pour mettre l’appareil photo sous tension. L’écran LCD
s’allume.
Mise hors tension
FRA
Appuyez sur le bouton Alimentation pendant plus d’1 seconde.
Attention :
1. si vous appuyez sur le bouton Alimentation pendant
plus d’1 seconde alors que des données sont en
cours d’inscription dans la carte mémoire, l’appareil
photo va s’éteindre, mais l’inscription des données
continuera.
2. Si vous appuyez sur le bouton Alimentation pendant
plus d’1 seconde et que l’appareil photo ne s’allume pas,il se peut que la batterie soit déchargée. Rechargez
la batterie et réessayez.
RÉGLAGE DES MODES DE FONCTIONNEMENT DE L’APPAREIL PHOTO
5
1. Appuyez sur le bouton MODE pour passer de l’un des 7 modes à l’autre. Le mode sélectionné apparaît en
surbrillance à l’écran.
• Vous pouvez aussi appuyer d’abord sur le bouton MODE, puis sur le
bouton , , ou pour sélectionner le mode souhaité.
DV : utilisez ce mode pour enregistrer des clips vidéo.
DSC : utilisez ce mode pour prendre des photos.
MP3 : utilisez ce mode pour écouter de la musique MP3.
VR : utilisez ce mode pour enregistrer des clips audio.
PLAY : utilisez ce mode pour visualiser des clips vidéo enregistrés, des
photos ou écouter des clips audio.
SET UP (installation) : utilisez ce mode pour régler les paramètres de
l’appareil photo.
LIGHT : utilisez ce mode pour utiliser l’appareil photo comme lumière.
2. Appuyez sur le bouton SET (Configuration) pour passer dans le mode sélectionné.
Bouton
Alimentation
Bouton SET
(Configuration)
Bouton Menu
Déclencheur
Bouton de
l'écran (Display)
6
RÉGLAGE DE LA LANGUE
1. Mise sous tension de l’appareil photo et passage en mode SETUP
(Configuration).
2. Appuyez sur le bouton ou pour sélectionner Langue.
3. Appuyez sur le bouton ou SET pour entrer dans le sous-menu.
4. Appuyez sur le bouton ou pour sélectionner la langue souhaitée.
5. Appuyez sur le bouton SET pour enregistrer les paramètres. Ou appuyez
sur le bouton pour quitter le sous-menu. Dans ce cas, les paramètres
de la langue resteront inchangés.
3
DZ QSG(515815-00)-F 3 11/15/04, 1:50:54 PM
Page 14
7
RÉGLAGE DE LA DATE ET DE L’HEURE
1. Mise sous tension de l’appareil photo et passage en mode SETUP (Configuration).
2. Appuyez sur le bouton ou pour sélectionner Régler date ou
Régl.heure.
3. Appuyez sur le bouton ou SET pour entrer dans le sous-menu.
4. Appuyez sur le bouton ou pour sélectionner le champ à modifier.
5. Appuyez sur le bouton ou pour modifier la valeur du champ
sélectionné.
6. Appuyez sur le bouton SET pour enregistrer les paramètres.
FORMATAGE DE LA CARTE MÉMOIRE
8
Pour un bon fonctionnement de votre carte mémoire, il est recommandé de la formater la première fois que vous
l’utilisez.
Attention : le formatage supprime tous les fichiers, y compris les fichiers protégés de la mémoire.
1. Mise sous tension de l’appareil photo et passage en mode SETUP
(Configuration).
2. Appuyez sur le bouton ou pour sélectionner Format.
3. Appuyez sur le bouton ou SET pour entrer dans le sous-menu.
4. Appuyez sur le bouton ou pour sélectionner Oui ou Non.
5. Appuyez sur le bouton SET pour confirmer.
• Si vous avez sélectionné Oui, tous les fichiers de la mémoire seront
supprimés.
• Si vous sélectionnez Non, aucun changement ne sera effectué.
9
ENREGISTREMENT D’UN CLIP VIDÉO
1. Mise sous tension de l’appareil photo et passage en mode DV.
2. Faites tourner l’objectif pour cadrer le sujet.
3. Appuyez sur le déclencheur pour commencer
l’enregistrement. Le temps d’enregistrement est indiqué à
l’écran.
4. Appuyez sur le déclencheur à nouveau pour terminer
l’enregistrement vidéo.
Mode DV
Taille de
la vidéo
Batterie
Valeur
d’exposition
FRA
PRISE DE PHOTOS
10
1. Mise sous tension de l’appareil photo et passage en
mode DSC.
2. Faites tourner l’objectif pour cadrer le sujet.
• Pour un meilleur résultat, tenez-vous à une distance
minimale de 0,8 m du sujet.
3. Appuyez sur le déclencheur pour prendre la photo.
Auto-photographie
Mode DSC
Taille de
la photo
Vitesse
d’obturation
Temps restant
Photos restantes
Batterie
Valeur
d’exposition
4
DZ QSG(515815-00)-F 4 11/15/04, 1:50:55 PM
Page 15
11
AUTO-PHOTOGRAPHIE
1. Mise sous tension de l’appareil photo et passage en mode DV/DSC.
2. Tournez l’ojectif vers vous.
3. Appuyez sur le bouton pour inverser l’image à l’écran.
4. Appuyez sur le déclencheur pour vous prendre en photo ou vous filmer.
FRA
12
UTILISATION DU ZOOM NUMÉRIQUE
Cet appareil dispose d’un zoom numérique 4x.
1. Appuyez sur le bouton pour effectuer un zoom avant. L’échelle de zoom
s’affiche à l’écran.
2. Appuyez sur le bouton pour effectuer un zoom arrière.
RÉGLAGE DU FLASH POUR LA PRISE DE PHOTOS
13
Appuyez plusieurs fois sur le bouton jusqu’à ce que l’icône du flash souhaitée apparaisse à l’écran pour
définir le mode de flash.
Auto ( ) : L’appareil détermine automatiquement si le flash est nécessaire. Si l’environnement est trop
sombre, le flash se déclenche. Le flash automatique est utilisé par défaut.
Flash On (flash activé) ( ) : Le flash se déclenche dans n’importe quelle condition d’éclairage.
Flash Off (flash désactivé) ( ) : Le flash ne s’enclenche pas si vous sélectionnez ce mode.
Remarque :
1. le flash ne fournit qu’une lumière complémentaire. Si l’environnement est trop sombre, le flash ne permettra
pas de prendre des photos assez claires.
2. Lorsque la batterie est presque déchargée, l’icône Flash Off ( ) s’affiche à l’écran ; vous ne pourrez donc
pas utiliser de flash.
14
RÉGLAGE DE LA RÉSOLUTION VIDÉO/PHOTO
La résolution détermine la taille du fichier capturé. Les photos avec une plus haute résolution contiennent
davantage de détails et leur taille de fichier est plus grande.
1. Appuyez sur le bouton MENU pour entrer dans l’écran Menu.
2. Appuyez sur le bouton ou pour sélectionner Taille.
3. Appuyez sur le bouton ou SET pour entrer dans le sous-menu.
4. Appuyez sur le bouton ou pour sélectionner le réglage de la
résolution souhaité.
5. Appuyez sur le bouton SET pour enregistrer les paramètres.
6. Appuyez sur le bouton MENU pour quitter l’écran Menu.
RÉGLAGE DE LA QUALITÉ VIDÉO/PHOTO
15
Le réglage de la qualité détermine le niveau de compression utilisé pour réduire
la taille des fichiers stockés afin d’économiser de l’espace dans la mémoire.
1. Appuyez sur le bouton MENU pour entrer dans l’écran Menu.
2. Appuyez sur le bouton ou pour sélectionner Qualité.
3. Appuyez sur le bouton ou SET pour entrer dans le sous-menu.
4. Appuyez sur le bouton ou pour sélectionner la qualité souhaitée.
5. Appuyez sur le bouton SET pour enregistrer les paramètres.
6. Appuyez sur le bouton MENU pour quitter l’écran Menu.
5
DZ QSG(515815-00)-F 5 11/15/04, 1:50:56 PM
Page 16
t
16
LECTURE MP3
1. Connectez l’appareil photo à votre ordinateur avec le câble USB fourni et faites glisser les fichiers MP3
de votre choix depuis votre ordinateur dans le dossier \Removable Disk\DCIM\100-DVx. Déconnectez
ensuite l’appareil photo de votre ordinateur.
Remarque : vous pouvez aussi utiliser un lecteur de cartes pour enregistrer les fichiers MP3 sur la carte
mémoire. Mais étant donné que l’appareil photo ne reconnaît que les fichiers MP3 enregistrés dans le
dossier \DCIM\100-DVx \, vous devez d’abord formater la carte mémoire en utilisant l’appareil.
2. Mise sous tension de l’appareil photo et passage en mode MP3.
3. Appuyez sur le bouton ou pour sélectionner les chansons.
4. Appuyez sur le bouton ou pour régler le volume.
• Le volume comprend 21 niveaux (de 00 à 20).
5. Appuyez sur le bouton SET pour écouter la chanson sélectionnée.
6. Appuyez sur le bouton SET pour suspendre l’écoute. Appuyez à nouveau sur le bouton SET pour reprendre
l’écoute.
FRA
Mode MP3
Touche à
5 directions
Marche/Arrêt écran
Menu
17
ENREGISTREMENT ET LECTURE DE FICHIERS VOCAUX
1. Mise sous tension de l’appareil photo et passage en mode VR.
2. Appuyez sur le déclencheur pour commencer l’enregistrement.
3. Appuyez à nouveau sur le déclencheur pour arrêter l’enregistrement.
4. Appuyez sur le bouton ou pour sélectionner un fichier vocal.
5. Appuyez sur le bouton SET pour écouter le fichier vocal sélectionné.
6. Appuyez sur le bouton ou pour régler le volume.
7. Appuyez sur le bouton SET pour suspendre l’écoute. Appuyez à nouveau sur le bouton SET pour reprendre
l’écoute.
Mode VR
Touche à
5 directions
Marche/Arrêt écran
Menu
Batterie
Numéro de fichier
Durée
Répéter la
chanson sélectionnée
RépéterA B
Volume
Temps
d’enregistrement restan
Batterie
Enregistrement
Numéro de fichier
Durée
Barre d’affichage
Volume
6
DZ QSG(515815-00)-F 6 11/15/04, 1:50:58 PM
Page 17
LECTURE/VISIONNAGE DES CLIPS VIDÉO, FICHIERS VOCAUX OU PHOTOS
g
r
18
STOCKÉS
1. Mise sous tension de l’appareil photo et passage en mode PLAY (Lecture).
2. Appuyez sur le bouton ou pour passer au fichier précédent ou suivant.
3. S’il s’agit de clips vidéo ou de fichiers vocaux,
• appuyez sur le bouton SET pour commencer la lecture. Appuyez à nouveau sur le bouton SET pour
suspendre et pour reprendre la lecture.
FRA
• Appuyez sur le bouton ou pour régler le volume.
Numéro de fichie
Mode Play
(Lecture)
Vidéo
Image
Voix
Fichier
précédent
/Tous les fichiers
Batterie
Fichier suivant
Lecture
/Pause
Format d’afficha
SUPPRESSION DE FICHIERS
19
1. Mise sous tension de l’appareil photo et passage en mode PLAY
(Lecture).
2. Appuyez sur le bouton ou pour rechercher le fichier à effacer.
3. Appuyez sur le bouton MENU pour entrer dans l’écran Menu.
4. Appuyez sur le bouton ou pour sélectionner Supprimer.
5. Appuyez sur le bouton ou SET pour entrer dans le sous-menu.
6. Appuyez sur le bouton ou pour sélectionner Oui ou Non.
7. Appuyez sur le bouton SET pour confirmer.
• Si vous sélectionnez Oui, le fichier sera supprimé.
• Si vous sélectionnez Non, aucun changement ne sera effectué.
Appuyez sur le bouton MENU pour quitter l’écran Menu.
Remarque : la suppression d’un fichier est définitive : vous ne pourrez plus le récupérer.
VERROUILLAGE DE FICHIERS
20
Pour éviter que des fichiers ne soient effacés par accident, vous pouvez les verrouiller en suivant les étapes ci-après :
1. Mise sous tension de l’appareil photo et passage en mode PLAY (Lecture).
2. Appuyez sur le bouton ou pour rechercher le fichier à protéger.
3. Appuyez sur le bouton MENU pour entrer dans l’écran Menu.
4. Appuyez sur le bouton ou pour sélectionner Verrouiller.
5. Appuyez sur le bouton ou SET pour entrer dans le sous-menu.
6. Appuyez sur le bouton ou pour sélectionner Oui ou Non.
7. Appuyez sur le bouton SET pour confirmer.
• Si vous sélectionnez Oui, le fichier sera verrouillé. L’icône de
verrouillage (
• Si vous sélectionnez Non, aucun changement ne sera effectué.
Appuyez sur le bouton MENU pour quitter l’écran Menu.
) va alors apparaître à droite de l’écran.
e à 9 fichiers
Volume
7
DZ QSG(515815-00)-F 7 11/15/04, 1:50:58 PM
Page 18
UTILISATION DE LA LUMIÈRE DU FLASH
21
1. Mise sous tension de l’appareil photo et passage en mode LIGHT.
2. Appuyez sur le bouton SET pour allumer et éteindre la lumière du flash.
3. Appuyez sur le bouton pour augmenter la luminosité. Trois niveaux d’intensité sont disponibles.
4. Appuyez sur le bouton pour diminuer la luminosité.
TÉLÉCHARGEMENT DE FICHIERS SUR VOTRE ORDINATEUR
22
Remarque à l’attention des utilisateurs de Windows 98 : le pilote de l’appareil photo doit être tout d’abord
installé.
Remarque à l’attention de tous les utilisateurs de Windows : Windows Media Player 9 doit être préinstallé
avant de visionner les clips vidéo sur votre ordinateur.
A l’attention des utilisateurs de Windows
1. Connectez l’appareil photo à votre ordinateur.
2. Double-cliquez sur “ Poste de travail “.
3. Double-cliquez sur “ Disque amovible “.
4. Double-cliquez sur “ DCIM “.
5. Double-cliquez sur “ 100-DVx “.
• Les photos (JPEG), clips vidéo (ASF), fichiers vocaux (WAV) et fichiers MP3 stockés dans la carte
mémoire s’affichent.
6. Faites glisser et déposez l’image que vous voulez sauvegarder sur l’ordinateur.
• Pour sélectionner tous les fichiers, cliquez sur Edition > Sélectionner tout.
A l’attention des utilisateurs de Macintosh
1. Connectez l’appareil photo à votre ordinateur.
• Après quelques instants, le disque dur externe apparaît sur le bureau.
2. Double-cliquez sur le disque amovible “ Concord “ situé sur le bureau.
3. Double-cliquez sur DCIM.
4. Double cliquez sur “ 100-DVx “.
• Les photos (JPEG), clips vidéo (ASF), fichiers vocaux (WAV) et fichiers MP3 stockés dans la carte
mémoire s’affichent.
5. Faites glisser et déposez l’image que vous voulez sauvegarder sur l’ordinateur.
• Pour sélectionner tous les fichiers, cliquez sur Edition > Sélectionner tout.
Remarque : vous pouvez aussi transférer les photos et clips vidéo stockés sur votre carte mémoire sur votre
ordinateur à l’aide d’un lecteur de cartes mémoire (vendu séparément).
FRA
Concord et le logo Concord sont des marques déposées ou des marques commerciales de Concord Camera
Corp. aux Etats-Unis et/ou dans d’autres pays. Microsoft,
déposées ou des marques commerciales de Microsoft Corporation aux Etats-Unis et
Macintosh sont des marques déposées ou des marques commerciales d’Apple Computer, Inc. aux Etats-Unis
et dans d’autres pays. Toutes les autres marques et noms de produits sont des marques déposées ou des
marques commerciales de leurs propriétaires respectifs.
Windows Media Player et Windows sont des marques
/ou dans d’autres pays. Mac et
8
DZ QSG(515815-00)-F 8 11/15/04, 1:50:59 PM
Page 19

KURZANLEITUNG
Diese Kurzanleitung gibt Ihnen die wichtigsten Hinweise zur
Verwendung Ihrer neuen Kamera. Detaillierte Anweisungen für die
Verwendung aller Kamerafunktionen finden Sie im Benutzerhandbuch,
das Ihnen auf CD-ROM bereitgestellt wird. Lesen Sie vor
verwendung der Kamera alle im Benutzerhandbuch enthaltenen
Sicherheitsanweisungen und -hinweise sorgfältig durch.
DEU
1
1
DZ QSG(515815-00)-German 1 11/15/04, 1:40:25 PM
Page 20

1
LADEN DER BATTERIE
Die Kamera verwendet eine wiederaufladbare 3,7 Volt-Li-Ionen-Batterie.
1. Drücken Sie auf den Batteriefachverschluss oben auf der Kamera und öffnen Sie die Kamerarückwand.
2. Legen Sie die Batterie in das Batteriefach ein und richten Sie sie am Metallkontakt aus.
3. Schließen Sie die Kamerarückwand.
LADEN DER BATTERIE
2
Laden über AC-Adapter
1. Schließen Sie den AC-Stecker des Adapters an eine
Standard-Wechselstromsteckdose an.
2. Stecken Sie den USB-Stecker des Adapters in den USB-
Anschluss der Kamera. Die rote Kontrollleuchte leuchtet auf.
• Das erstmalige Aufladen der Batterie dauert ca. 6
Stunden. Sobald die Batterie vollständig geladen
ist, erlischt die rote Kontrollleuchte.
• Beim zweiten und allen folgenden Ladevorgängen dauert
das vollständige Laden der Batterie mindestens zwei
Stunden.
• Beim erstmaligen Laden der Batterie wird empfohlen,
anstelle des USB-Kabels den AC-Adapter zu verwenden.
Laden über PC / Notebook
Sie können die Batterie auch über das USB-Kabel laden.
1. Schließen Sie den größeren Stecker des USB-Kabels am USB Anschluss Ihres PCs bzw. Notebook an.
2. Stecken Sie den kleineren Stecker des USB-Kabels in den USB Anschluss der Kamera.
• Die rote Kontrollleuchte leuchtet auf, während die Batterie geladen
wird, und erlischt, sobald der Ladevorgang abgeschlossen ist. Das
vollständige Laden dauert ca. 4-6 Stunden.
AC - Stecker USB - Stecker
DEU
INSTALLIEREN DER SPEICHERKARTE
3
Die Kamera verwendet eine SD- oder MMC-Karte als Speicher. Legen
Sie entsprechend den folgenden Abbildungen eine SD- bzw. MMC-Karte
ein, bevor Sie Videoclips oder Bilder aufnehmen.
Zum Entfernen der Speicherkarte drücken Sie diese zunächst vorsichtig
mit den Fingerspitzen an, damit sie ausgeworfen wird, und ziehen Sie
dann die Karte heraus.
2
DZ QSG(515815-00)-German 2 11/15/04, 1:40:26 PM
Page 21

EIN-/AUSSCHALTEN DER KAMERA
4
Einschalten
Drücken Sie die POWER-Taste und halten Sie sie länger als
1 Sekunde gedrückt, um die Kamera einzuschalten. Die LCDAnzeige wird eingeschaltet.
Ausschalten
Drücken Sie die POWER-Taste länger als 1 Sekunde.
Vorsicht:
1. Wenn die POWER-Taste länger als 1 Sekunde gedrückt
wird, während Daten auf die Speicherkarte geschrieben
DEU
werden, wird die Kamera ausgeschaltet. Der Speichervorgang
läuft aber dennoch bis zu seinem Abschluss weiter.
2. Wenn die POWER-Taste länger als 1 Sekunde gedrückt
wird, sich die Kamera aber nicht einschalten lässt, dann ist
möglicherweise die Batterie leer. Laden Sie die Batterie auf und versuchen Sie es erneut.
EINSTELLEN DER BETRIEBSMODI DER KAMERA
5
1. Drücken Sie die MODUS-Taste mehrmals, um zwischen den 7 Modi
umzuschalten. Der ausgewählte Modus wird auf dem Bildschirm markiert.
• Sie können auch zuerst die MODUS-Taste drücken und dann
auf , , oder drücken, um den gewünschten Modus
auszuwählen.
DV: Digitaler Video-Camcorder. Verwenden Sie diesen Modus zum
Aufnehmen von Videoclips.
DSC: Digitale Standbildkamera. Verwenden Sie diesen Modus zum
Aufnehmen von stehenden Bildern.
MP3: Verwenden Sie diesen Modus zum Abspielen von MP3-Musik.
VR: Voice Recording (Sprachaufnahmen). Verwenden Sie diesen Modus
zum Aufnehmen von Audioclips.
PLAY: Abspielmodus. Verwenden Sie diesen Modus zum Abspielen der aufgenommenen Videoclips, Bilder
oder Audioclips.
SET UP: Einrichtungsmodus. Verwenden Sie diesen Modus zum Anpassen der Kameraeinstellungen.
LIGHT: Blitzlichtmodus. Verwenden Sie diesen Modus, um die Kamera als Lichtquelle einzusetzen.
2. Drücken Sie die SET-Taste, um den ausgewählten Modus aufzurufen.
POWER
-Taste
SET-Taste
MENÜ-Taste
Auslöser
ANZEIGE-Taste
6
EINSTELLEN DER SPRACHE
1. Schalten Sie die Kamera ein und wechseln Sie in den Einrichtungsmodus.
2. Drücken Sie auf oder , um Sprache zu markieren.
3. Drücken Sie auf oder die SET-Taste, um das Untermenü aufzurufen.
4. Drücken Sie auf oder , um die gewünschte Sprache auszuwählen.
5. Drücken Sie die SET-Taste, um die Einstellung zu speichern. Oder drücken
Sie auf , um das Untermenü zu schließen. In diesem Fall bleibt die
Spracheinstellung unverändert.
3
DZ QSG(515815-00)-German 3 11/15/04, 1:40:27 PM
Page 22

EINSTELLEN VON DATUM UND UHRZEIT
t
7
1. Schalten Sie die Kamera ein und wechseln Sie in den Einrichtungsmodus.
2. Drücken Sie auf oder , um Datum oder Uhrzeit zu markieren.
3. Drücken Sie auf oder die SET-Taste, um das Untermenü aufzurufen.
4. Drücken Sie auf oder , um das zu ändernde Feld zu markieren.
5. Drücken Sie auf oder , um den Wert des ausgewählten Feldes
zu ändern.
6. Drücken Sie die SET-Taste, um die Einstellung zu speichern.
FORMATIEREN DER SPEICHERKARTE
8
Um ein korrektes Funktionieren der Speicherkarte sicherzustellen, wird empfohlen, diese vor der ersten
Verwendung zu formatieren.
Vorsicht: Beim Formatieren werden alle Dateien, einschließlich der geschützten Dateien, aus dem Speicher
gelöscht.
1. Schalten Sie die Kamera ein und wechseln Sie in den Einrichtungsmodus.
2. Drücken Sie auf oder , um Formatieren zu markieren.
3. Drücken Sie auf oder die SET-Taste, um das Untermenü aufzurufen.
4. Drücken Sie auf oder , um Ja oder Nein auszuwählen.
5. Drücken Sie zum Bestätigen die SET-Taste.
• Wenn Sie Ja auswählen, werden alle Dateien aus dem Speicher
gelöscht.
• Wenn Sie Nein auswählen, ändert sich nichts.
AUFNEHMEN EINES VIDEOCLIPS
9
1. Schalten Sie die Kamera ein und wechseln Sie in den
DV-Modus.
2. Drehen Sie das Objektiv so lange, bis das Motiv richtig
erfasst wird.
3. Drücken Sie den Auslöser, um mit
der Aufnahme zu beginnen. Die Aufnahmezeit wird
auf demBildschirm angezeigt.
4. Drücken Sie den Auslöser erneut, um die
Videoaufnahme zu beenden.
DV-Modus
Videogröße
Batterie
Belichtungswert
Verbleibende Zeit
DEU
AUFNAHME VON STEHENDEN BILDERN
10
1. Schalten Sie die Kamera ein und wechseln Sie in
den DSC-Modus.
2. Drehen Sie das Objektiv so lange, bis das Motiv
richtig erfasst wird.
• Beste Ergebnisse erzielen Sie, wenn Sie
mindestens 0,8 m vom Motiv entfernt stehen.
3. Drücken Sie den Auslöser, um das Bild
aufzunehmen.
DZ QSG(515815-00)-German 4 11/15/04, 1:40:28 PM
DSC-Modus
Verschlussgeschwindigkeit
4
Selbstportrait
Batterie
Bildgröße
Belichtungswer
Verbleibende Bilder
Page 23

SELBSTPORTRAIT
11
1. Schalten Sie die Kamera ein und wechseln Sie in den DV/DSC-Modus.
2. Richten Sie das Objektiv auf sich selbst.
3. Drücken Sie auf , um das Bild auf der LCD-Anzeige umzukehren.
4. Drücken Sie den Auslöser, um Bilder oder Videoclips von sich selbst aufzunehmen.
VERWENDEN DES DIGITALEN ZOOMS
12
Die Kamera verfügt über bis zu 4fachen digitalen Zoom.
1. Drücken Sie auf , um das Motiv heranzuholen. Das Zoomverhältnis wird auf
DEU
der LCD-Anzeige angezeigt.
2. Drücken Sie auf , um das Motiv zu entfernen.
13
EINSTELLEN DES BLITZES ZUM FOTOGRAFIEREN
Drücken Sie zum Einstellen des Blitzmodus mehrmals auf , bis das gewünschte Blitzsymbol auf der LCDAnzeige angezeigt wird.
Auto ( ): Die Kamera entscheidet automatisch, ob der Blitz erforderlich ist. Bei unzureichenden
Lichtverhältnissen wird der Blitz ausgelöst. Standardmäßig verwendet die Kamera die
automatische Blitzfunktion.
Blitz Ein ( ): Der Blitz wird bei allen Lichtverhältnissen ausgelöst.
Blitz Aus ( ): Der Blitz bleibt in diesem Modus ausgeschaltet.
Hinweis:
1. Der Blitz kann die Lichtverhältnisse nur unterstützen. Bei zu dunkler Umgebung kann auch der Blitz keine
ausreichende Belichtung für scharfe Bilder sicherstellen.
2. Wenn die Batterie zur Neige geht, wird auf dem Bildschirm das Blitz-Aus-Symbol ( ) angezeigt, und der
Blitz wird nicht mehr ausgelöst.
EINSTELLEN DER BILD-/VIDEOAUFLÖSUNG
14
Die Auflösung entscheidet über die Größe einer aufgezeichneten Datei. Bilder
mit höherer Auflösung enthalten mehr Details und bilden daher größere Dateien.
1. Drücken Sie die MENÜ-Taste, um den Menübildschirm aufzurufen.
2. Drücken Sie auf oder , um Größe zu markieren.
3. Drücken Sie auf oder die SET-Taste, um das Untermenü aufzurufen.
4. Drücken Sie auf oder , um die gewünschte Auflösungseinstellung
auszuwählen.
5. Drücken Sie die SET-Taste, um die Einstellung zu speichern.
6. Drücken Sie die MENÜ-Taste, um den Menübildschirm zu schließen.
EINSTELLEN DER BILD-/VIDEOQUALITÄT
15
Die Einstellung der Bildqualität entscheidet darüber, wie stark gespeicherte Dateien komprimiert werden dürfen,
um Speicherplatz zu sparen.
1. Drücken Sie die MENÜ-Taste, um den Menübildschirm aufzurufen.
2. Drücken Sie auf oder , um Qualität zu markieren.
5
DZ QSG(515815-00)-German 5 11/15/04, 1:40:29 PM
Page 24

3. Drücken Sie auf oder die SET-Taste, um das Untermenü aufzurufen.
4. Drücken Sie auf oder , um die gewünschte Qualitätseinstellung
auszuwählen.
5. Drücken Sie die SET-Taste, um die Einstellung zu speichern.
6. Drücken Sie die MENÜ-Taste, um den Menübildschirm zu schließen.
ABSPIELEN VON MP3
16
1. Schließen Sie die Kamera über das mitgelieferte USB-Kabel an den Computer an und ziehen Sie die
gewünschten MP3-Dateien von Ihrem Computer in den Ordner \Removable Disk\DCIM\100-DVx. Ziehen Sie
dann das Kamerakabel vom Computer ab.
Hinweis: Sie können auch ein Kartenlesegerät zum Speichern von MP3-Dateien auf der Speicherkarte
verwenden. Da die Kamera jedoch nur MP3-Dateien erkennt, die im Ordner \DCIM\100-DVx \ gespeichert sind,
müssen Sie die Speicherkarte zunächst mithilfe der Kamera formatieren.
2. Schalten Sie die Kamera ein und wechseln Sie in den MP3-Modus.
3. Drücken Sie auf oder , um Lieder auszuwählen.
4. Drücken Sie auf oder auf , um die Lautstärke einzustellen.
• Für die Lautstärke können 21 Stufen ausgewählt werden (von 00 bis 20).
5. Drücken Sie die SET-Taste, um das ausgewählte Lied abzuspielen.
6. Drücken Sie die SET-Taste, um die Wiedergabe anzuhalten. Drücken Sie erneut die SET-Taste, um die
Wiedergabe wieder aufzunehmen.
DEU
MP3-Modus
5-WegeFunktionstaste
Menü
LCD Ein/Aus
AUFNEHMEN UND ABSPIELEN VON SPRACHDATEIEN
17
1. Schalten Sie die Kamera ein und wechseln Sie in den VR-Modus.
2. Drücken Sie den Auslöser, um mit der Aufnahme zu beginnen.
3. Drücken Sie den Auslöser erneut, um die Aufnahme zu beenden.
4. Drücken Sie auf oder , um eine Sprachdatei auszuwählen.
5. Drücken Sie die SET-Taste, um die ausgewählte Sprachdatei abzuspielen.
6. Drücken Sie auf oder , um die Lautstärke einzustellen.
7. Drücken Sie die SET-Taste, um die Wiedergabe anzuhalten. Drücken Sie erneut die SET-Taste, um die
Wiedergabe wieder aufzunehmen.
VR-Modus
5-WegeFunktionstaste
LCD Ein/Aus
Menü
Batterie
Dateinummer
Zeit
Ausgewähltes
Lied wiederholen
A B Wiederholen
Lautstärke
Verbleibende
Aufnahmezeit
Batterie
Aufnahme
Dateinummer
Zeit
Anzeigeleiste
Lautstärke
6
DZ QSG(515815-00)-German 6 11/15/04, 1:40:30 PM
Page 25

18
g
WIEDERGABE DER GESPEICHERTEN VIDEOCLIPS, BILDER UND SPRACHDATEIEN
1. Schalten Sie die Kamera ein und wechseln Sie in den Abspielmodus.
2. Drücken Sie auf oder , um zur vorherigen oder nächsten Datei zu springen.
3. Für Videoclips und Sprachdateien:
• Drücken Sie die SET-Taste, um das Abspielen zu beginnen. Drücken Sie erneut die SET-Taste, um das
Abspielen anzuhalten oder wieder aufzunehmen.
• Drücken Sie auf oder , um die Lautstärke einzustellen.
Dateinummer
/ Alle Dateien
Batterie
Nächste Datei
DEU
Abspielmodus
Video
Bild
Sprache
Vorherige
Datei
Abspielen
/ Pause
9 Dateien Anzei
19
LÖSCHEN VON DATEIEN
1. Schalten Sie die Kamera ein und wechseln Sie in den Abspielmodus.
2. Drücken Sie auf oder , um die nicht mehr benötigte Datei zu suchen.
3. Drücken Sie die MENÜ-Taste, um den Menübildschirm aufzurufen.
4. Drücken Sie auf oder , um Löschen zu markieren.
5. Drücken Sie auf oder die SET-Taste, um das Untermenü aufzurufen.
6. Drücken Sie auf oder , um Ja oder Nein auszuwählen.
7. Drücken Sie zum Bestätigen die SET-Taste.
• Wenn Sie “Ja” auswählen, wird die Datei gelöscht.
• Wenn Sie “Nein” auswählen, ändert sich nichts. Drücken Sie die
MENÜ-Taste, um den Menübildschirm zu schließen.
Hinweis: Eine gelöschte Datei kann nicht wiederhergestellt werden.
20
SPERREN VON DATEIEN
Um ein versehentliches Löschen Ihrer Dateien zu verhindern, können Sie die Dateien folgendermaßen sperren:
1. Schalten Sie die Kamera ein und wechseln Sie in den Abspielmodus.
2. Drücken Sie auf oder , um die zu schützende Datei zu suchen.
3. Drücken Sie die MENÜ-Taste, um den Menübildschirm aufzurufen.
4. Drücken Sie auf oder , um Sperren zu markieren.
5. Drücken Sie auf oder die SET-Taste, um das Untermenü aufzurufen.
6. Drücken Sie auf oder , um Ja oder Nein auszuwählen.
7. Drücken Sie zum Bestätigen die SET-Taste.
• Wenn Sie Ja auswählen, wird die Datei gesperrt. Das Sperrsymbol
) wird auf der rechten Seite der LCD-Anzeige angezeigt.
(
• Wenn Sie Nein auswählen, ändert sich nichts. Drücken Sie die MENÜ Taste, um den Menübildschirm zu schließen.
eformat
Lautstärke
7
DZ QSG(515815-00)-German 7 11/15/04, 1:40:31 PM
Page 26

VERWENDEN DES BLITZLICHTS
21
1. Schalten Sie die Kamera ein und wechseln Sie in den LIGHT-Modus.
2. Drücken Sie die SET-Taste, um das Blitzlicht ein- bzw. auszuschalten.
3. Drücken Sie auf , um die Helligkeit zu erhöhen. Drei Helligkeitsgrade sind verfügbar.
4. Drücken Sie auf , um die Helligkeit zu senken.
HERUNTERLADEN VON DATEIEN AUF DEN COMPUTER
22
Hinweis für Benutzer von Windows 98 SE: Der Kameratreiber muss zuvor installiert werden.
Hinweis für alle Windows-Benutzer: Windows Media Player 9 muss installiert sein, damit Sie Videoclips auf
Ihrem Computer anschauen können.
Für Windows-Benutzer:
1. Schließen Sie die Kamera an den Computer an.
2. Doppelklicken Sie auf “Arbeitsplatz”.
3. Doppelklicken Sie auf “Austauschbarer Datenträger”.
4. Doppelklicken Sie auf “DCIM”.
5. Doppelklicken Sie auf “100-DVx”.
• Die auf der Speicherkarte gespeicherten Bilddateien (JPEG), Videoclips (ASF), Sprachdateien (WAV) und
MP3-Dateien werden angezeigt.
6. Ziehen Sie das Bild, das auf dem Computer gespeichert werden soll, und legen Sie es in dem gewünschten
Ordner ab.
• Zum Auswählen aller Dateien klicken Sie auf “Bearbeiten” > “Alle auswählen”.
Für Macintosh-Benutzer
1. Schließen Sie die Kamera an den Computer an.
• Nach kurzer Zeit wird auf dem Schreibtisch die externe Festplatte angezeigt.
2. Doppelklicken Sie auf das austauschbare Laufwerk “Concord”, das auf dem Schreibtisch angezeigt wird.
3. Doppelklicken Sie auf DCIM.
4. Doppelklicken Sie auf “100-DVx”.
• Die auf der Speicherkarte gespeicherten Bilddateien (JPEG), Videoclips (ASF), Sprachdateien (WAV) und
MP3-Dateien werden angezeigt.
5. Ziehen Sie das Bild, das auf dem Computer gespeichert werden soll, und legen Sie es in dem gewünschten
Ordner ab.
• Zum Auswählen aller Dateien klicken Sie auf “Bearbeiten” > “Alle auswählen”.
Hinweis: Sie können die auf der Speicherkarte gespeicherten Bilder und Videoclips auch mithilfe eines
Speicherkarten-Lesegeräts (getrennt erhältlich) auf den Computer übertragen.
DEU
Concord und das Concord-Logo sind eingetragene Marken bzw. Marken von Concord Camera Corp. in den
Vereinigten Staaten und/oder anderen Ländern. Microsoft
Marken bzw. Marken von Microsoft Corporation in den Vereinigten Staaten und/oder anderen Ländern. Mac
und Macintosh sind eingetragene Marken bzw. Marken von Apple Computer, Inc. in den Vereinigten Staaten
und anderen Ländern. Alle anderen Marken- und Produktnamen sind eingetragene Marken bzw. Marken der
jeweiligen Eigentümer.
, Windows Media Playerund Windows sind eingetragene
8
DZ QSG(515815-00)-German 8 11/15/04, 1:40:32 PM
Page 27

GUÍA DE INICIO RÁPIDO
Esta Guía de inicio rápido ofrece una referencia rápida para utilizar su
nueva cámara. Consulte la Guía del usuario, que puede encontrar en
el CD-ROM, para obtener instrucciones detalladas sobre cómo utilizar
todas las funciones de la cámara. Antes de usar la cámara, asegúrese
de leer todas las instrucciones y precauciones de seguridad que se
describen en la Guía del usuario.
ESP
1
1
DZ QSG(515815-00)-S 1 11/15/04, 1:42:44 PM
Page 28

1
CÓMO COLOCAR LA PILA
La cámara utiliza una pila de Li-ion recargable de 3.7 voltios.
1. Presione la traba de la puerta de la pila que se encuentra en la parte superior de la unidad para abrir la
cubierta trasera.
2. Deslice la pila dentro del compartimiento de la pila y alinéela con el contacto de metal.
3. Vuelva a colocar la cubierta trasera.
2
CÓMO CARGAR LA PILA
Carga con Adaptador de CA
1. Conecte el extremo de CA del adaptador en un toma de CA
estándar.
2. Conecte el extremo USB del adaptador en el puerto USB de
la cámara. Se encenderá la luz de fondo roja.
• La carga inicial de la pila tarda aproximadamente 6
horas. Cuando se carga completamente la pila, la luz de
fondo roja se apaga.
• La carga completa de la pila tarda al menos 2 horas
cuando la realiza por segunda vez o con posterioridad.
• Para la carga inicial de la pila, se recomienda utilizar el adaptador de CA en lugar de utilizar el cable
USB.
Carga mediante PC/computadora portátil
También puede utilizar el cable USB para cargar la pila.
1. Conecte el extremo más grande del cable USB en el puerto USB de
su PC o computadora portátil.
2. Conecte el extremo más pequeño del cable USB en el puerto USB de
la cámara.
• La luz de fondo roja estará encendida cuando se esté
cargando la pila y se apagará cuando la unidad se haya
cargado completamente. El tiempo para la carga completa es de
aproximadamente 4 a 6 horas.
Extremo CA Extremo USB
ESP
CÓMO INSTALAR LA TARJETA DE MEMORIA
3
TLa cámara utiliza una tarjeta SD o MMC para el almacenamiento.
Inserte una tarjeta SD o MMC como lo indica la ilustración que aparece a
continuación antes de tomar fotografías o clips de video.
Para extraer la tarjeta de memoria, presione suavemente el borde de
la tarjeta de memoria con la punta del dedo para expulsarla primero y
luego extraiga la tarjeta.
2
DZ QSG(515815-00)-S 2 11/15/04, 1:42:44 PM
Page 29

ENCENDIDO/APAGADO
4
Encendido
Presione el botón de encendido durante más de 1 segundo para
encender la Cámara. Se encenderá la pantalla LCD.
Apagado
Presione el botón de encendido durante más de 1 segundo.
Precaución:
1. Si presiona el botón de encendido durante más de 1 segundo
mientras se escriben datos en la tarjeta de memoria, la Cámara
se apagará, pero la escritura en la memoria continuará hasta
que haya finalizado.
2. Si presiona el botón de encendido durante más de 1 segundo
y no se enciende la cámara, es posible que se haya terminado
la carga de la pila. Cargue la pila y vuelva a intentarlo.
Botón de
encendido
Botón
AJUSTAR
Botón Menú
Botón del
obturador
Botón
Pantalla
ESP
5
CÓMO CONFIGURAR LOS MODOS DE FUNCIONAMIENTO DE LA CÁMARA
1. Presione el botón MODO repetidas veces para seleccionar los 7 modos diferentes. El modo seleccionado
aparecerá resaltado en la pantalla.
• También puede presionar el botón MODO primero, luego el
botón , , o para seleccionar el modo deseado.
DV: Utilice este modo para grabar clips de video.
DSC: Utilice este modo para tomar fotografías fijas.
MP3: Utilice este modo para reproducir música con formato MP3.
VR: Utilice este modo para grabar clips de audio.
REPROD.:Utilice este modo para visualizar los clips de video, las
fotografías y los clips de audio que hagrabado.
AJUSTES: Utilice este modo para ajustar las configuraciones de la cámara.
LUZ:Con este modo puede utilizar la cámara como una fuente de luz.
2. Presione el botón AJUSTAR para ingresar en el modo seleccionado.
6
CÓMO CONFIGURAR EL IDIOMA
1. Encienda la cámara e ingrese en el modo AJUSTES.
2. Presione el botón o para seleccionar el Idioma.
3. Presione el botón o el botón AJUSTAR para ingresar en su submenú.
4. Presione el botón o para seleccionar el idioma deseado.
5. Presione el botón AJUSTAR para guardar la configuración. O presione
el botón para salir del submenú. Si lo hace, no se modificará la
configuración del idioma.
CÓMO CONFIGURAR LA FECHA Y LA HORA
7
1. Encienda la cámara e ingrese en el modo AJUSTES.
2. Presione el botón o para seleccionar Fecha u Hora.
3. Presione el botón o el botón AJUSTAR para ingresar en su submenú.
4. Presione el botón o para seleccionar el campo que desea modificar.
5. Presione el botón o para modificar el valor del campo seleccionado.
6. Presione el botón AJUSTAR para guardar la configuración.
3
DZ QSG(515815-00)-S 3 11/15/04, 1:42:46 PM
Page 30

8
CÓMO FORMATEAR LA TARJETA DE MEMORIA
Para asegurase que su tarjeta de memoria funciona correctamente, se recomienda formatearla la primera vez
que la utiliza.
Precaución: El formateado borrará todos los archivos, incluso los archivos protegidos, de la memoria.
1. Encienda la cámara e ingrese en el modo AJUSTES.
2. Presione el botón o para seleccionar Formato.
3. Presione el botón o el botón AJUSTAR para ingresar en su
submenú.
4. Presione el botón o para seleccionar Sí o No.
5. Presione el botón AJUSTAR para confirmar.
• Si selecciona Sí, se borrarán todos los archivos de la memoria.
• Si selecciona No, no se realizará ningún cambio.
9
CÓMO GRABAR UN CLIP DE VIDEO
1. Encienda la cámara e ingrese en el modo DV.
2 Gire la lente para encuadrar el objeto.
3 Presione el botón del obturador para iniciar la grabación.
El tiempo de grabación se indica en la pantalla.
4 Presione nuevamente el botón del obturador para
detener la grabación del clip de video.
CÓMO TOMAR FOTOGRAFÍAS FIJAS
10
1. Encienda la cámara e ingrese en el modo DSC.
2 Gire la lente para encuadrar el objeto.
• Para obtener mejores resultados, colóquese a una
distancia de al menos 0,8m (2,62pies) del objeto.
3 Presione el botón del obturador para tomar la fotografía.
Modo DV
Tamaño
de video
Autofotografía
Modo DSC
Tamaño
de fotografía
Velocidad
del obturador
Tiempo restante
Pila
Valor de
exposición
Pila
Valor de
exposición
ESP
AUTO FOTOGRAFÍA
11
1. Encienda la cámara e ingrese en el modo DV/DSC.
2. Coloque la cámara para que lo enfoque.
3. Presione el botón para invertir la imagen en la pantalla LCD.
4. Presione el botón de obturador para tomar fotografías o clips de
video de usted mismo.
4
DZ QSG(515815-00)-S 4 11/15/04, 1:42:47 PM
Fotografías restantes
Page 31

12
CÓMO UTILIZAR EL ZOOM DIGITAL
La cámara ofrece un zoom digital de hasta 4x.
1. Presione el botón para acercarse al objeto. Los indicadores de ampliación aparecerán en la pantalla LCD.
2. Presione el botón para alejarse.
13
CÓMO CONFIGURAR EL FLASH PARA TOMAR FOTOGRAFÍAS
Presione el botón repetidas veces hasta que aparezca el icono de flash deseado en la pantalla LCD para
ajustar el modo de flash.
Auto ( ): La cámara decide automáticamente si es necesario el uso del flash. Si el entorno es oscuro, se
dispara. Por defecto, la cámara utiliza el flash automático.
Flash encendido ( ): El flash se disparará independientemente de la condición de iluminación.
Sin Flash ( ): En este modo, el flash no se disparará.
Nota:
1. El flash sólo ofrece luz auxiliar. Si el entorno es demasiado oscuro, el flash no puede asegurar suficiente
ESP
exposición para tomar fotografías nítidas.
2. Cuando la carga de la pila está por agotarse, el icono de Sin flash ( ) aparece en la pantalla, y en ese
caso, el flash no se activa.
CÓMO CONFIGURAR LA RESOLUCIÓN DE FOTOGRAFÍA/VIDEO
14
La resolución determina el tamaño del archivo capturado. Las imágenes con mayor resolución contienen más
detalles, y el tamaño de los archivos es más grande.
1. Presione el botón MENÚ para ingresar en la pantalla Menú.
2. Presione el botón o para seleccionar Tamaño.
3. Presione el botón o el botón AJUSTAR para ingresar en su submenú.
4. Presione el botón o para seleccionar la configuración de resolución
deseada.
5. Presione el botón AJUSTAR para guardar la configuración.
6. Presione el botón MENÚ para salir de la pantalla Menú.
15
CÓMO CONFIGURAR LA CALIDAD DE FOTOGRAFÍA/VIDEO
La configuración de calidad determina la relación de compresión que se utiliza
para reducir el tamaño de los archivos almacenados a fin de ahorrar espacio en
la memoria.
1. Presione el botón MENÚ para ingresar en la pantalla Menú.
2. Presione el botón o para seleccionar Calidad.
3. Presione el botón o el botón AJUSTAR para ingresar en su submenú.
4. Presione el botón o para seleccionar la configuración de calidad
deseada.
5. Presione el botón AJUSTAR para guardar la configuración.
6. Presione el botón MENÚ para salir de la pantalla Menú.
5
DZ QSG(515815-00)-S 5 11/15/04, 1:42:48 PM
Page 32

CÓMO REPRODUCIR MP3
16
1. Conecte la cámara a su computadora utilizando el cable USB suministrado y arrastre los archivos MP3
deseados de la computadora a la carpeta \Disco extraíble\DCIM\100-DVx Luego, desconecte la cámara de la
computadora.
Nota: También puede utilizar un lector de tarjetas para guardar archivos MP3 en la tarjeta de memoria. Sin
embargo, debido a que la cámara reconoce solamente los archivos MP3 que se guardaron en la carpeta
\DCIM\100-DVx \, debe formatear la tarjeta de memoria utilizando primero la cámara.
2. Encienda la cámara e ingrese en el modo MP3.
3. Presione el botón o para seleccionar las canciones.
4. Presione el botón o para ajustar el volumen.
• El volumen está dividido en 21 niveles (de 00 a 20).
5. Presione el botón AJUSTAR para reproducir la canción seleccionada.
6. Presione el botón AJUSTAR para pausar la reproducción. Presione el botón AJUSTAR nuevamente para
reanudar la reproducción.
Modo MP3
Tecla de función
de cinco direcciones
Menú
LCD encendida/apagada
17
CÓMO GRABAR Y REPRODUCIR ARCHIVOS DE VOZ
1. Encienda la cámara e ingrese en el modo VR.
2. Presione el botón del obturador para iniciar la grabación.
3. Presione nuevamente el botón del obturador para detener la grabación.
4. Presione el botón o para seleccionar un archivo de voz.
5. Presione el botón AJUSTAR para iniciar la reproducción del archivo de voz.
6. Presione el botón o para ajustar el volumen.
7. Presione el botón AJUSTAR para pausar la reproducción. Presione el botón AJUSTAR nuevamente para
reanudar la reproducción.
Modo VR
Tecla de función
de cinco direcciones
Menú
Pila
Número de archivo
Hora
Repetir canción
seleccionada
A B Repetir
Volumen
Tiempo restante
para grabar
Pila
Grabación
Número de archivo
Hora
Barra de visualización
Volumen
LCD encendida/apagada
ESP
6
DZ QSG(515815-00)-S 6 11/15/04, 1:42:49 PM
Page 33

CÓMO REVISAR LOS CLIPS DE VIDEO, LAS FOTOGRAFÍAS O LOS ARCHIVOS DE
18
VOZ ALMACENADOS
1. Encienda la cámara e ingrese en el modo REPRODUCCIÓN.
2. Presione el botón o para saltar al archivo anterior o al siguiente.
3. Si son archivos de video clip o de voz:
• Presione el botón AJUSTAR para iniciar la reproducción. Presione el botón AJUSTAR nuevamente para
pausar o reanudar la reproducción.
• Presione el botón o para ajustar el volumen.
Modo
Reproducción
Video
Fotografía
Voz
Archivo
anterior
Número de archivos
/todos los archivos
Pila
Archivo siguiente
ESP
CÓMO BORRAR ARCHIVOS
19
1. Encienda la cámara e ingrese en el modo REPRODUCCIÓN.
2. Presione el botón o para seleccionar el archivo que desea eliminar.
3. Presione el botón MENÚ para ingresar en la pantalla Menú.
4. Presione el botón o para seleccionar Borrar.
5. Presione el botón o el botón AJUSTAR para ingresar en su submenú.
6. Presione el botón o para seleccionar Sí o No.
7. Presione el botón AJUSTAR para confirmar.
• Si selecciona Sí, se borrará el archivo.
• Si selecciona No, no se realizará ningún cambio. Presione el botón
MENÚ para salir de la pantalla Menú.
Nota: Una vez que borra el archivo, no se puede recuperar.
CÓMO PROTEGER LOS ARCHIVOS
20
Para evitar borrar los archivos que le gustan en forma accidental, puede protegerlos realizando los siguientes
pasos:
1. Encienda la cámara e ingrese en el modo REPRODUCCIÓN.
2. Presione el botón o para seleccionar el archivo que desea proteger.
3. Presione el botón MENÚ para ingresar en la pantalla Menú.
4. Presione el botón o para seleccionar Proteger.
5. Presione el botón o el botón AJUSTAR para ingresar en su submenú.
6. Presione el botón o para seleccionar Sí o No.
7. Presione el botón AJUSTAR para confirmar.
• Si selecciona Sí, el archivo quedará protegido. Aparecerá el icono
Proteger (
• Si selecciona No, no se realizará ningún cambio. Presione el botón
MENÚ para salir de la pantalla Menú.
Reproducción
/Pausa
) a la derecha de la pantalla LCD.
Formato de visualización
de nueve archivos
Volumen
7
DZ QSG(515815-00)-S 7 11/15/04, 1:42:50 PM
Page 34

CÓMO UTILIZAR LA LUZ DEL FLASH
21
1. Encienda la cámara e ingrese en el modo LIGHT.
2. Presione el botón AJUSTAR para encender o apagar la luz.
3. Presione el botón para aumentar el brillo. Hay tres niveles de intensidad.
4. Presione el botón para reducir el brillo.
22
CÓMO DESCARGAR ARCHIVOS A LA COMPUTADORA
Nota para usuarios de Windows 98SE: Debe instalar primero el controlador de la cámara.
Nota para todos los usuarios de Windows: Debe tener instalado el Reproductor de Windows Media 9 antes
de ver los clips de video en su computadora.
Para usuarios de Windows
1. Conecte la cámara a la computadora.
2. Haga doble clic en “Mi PC”.
3. Haga doble clic en “Disco extraíble”.
4. Haga doble clic en “DCIM”.
5. Haga doble clic en “100-DVx”.
• Se mostrarán las fotografías (JPEG), los clips de video (ASF), los archivos de voz (WAV) y los archivos
MP3 almacenados en la tarjeta de memoria.
6. Arrastre y suelte la imagen que desea guardar en la computadora.
• Para seleccionar todos los archivos, haga clic en Edición > Seleccionar todo.
Para usuarios de Macintosh
1. Conecte la cámara a la computadora.
• Después de unos momentos, el disco duro externo aparecerá en el escritorio.
2. Haga doble clic en la unidad extraíble “Concord” de su escritorio.
3. Haga doble clic en DCIM.
4. Haga doble clic en “100-DVx”.
• Se mostrarán las fotografías (JPEG), los clips de video (ASF), los archivos de voz (WAV) y los archivos
MP3 almacenados en la tarjeta de memoria.
5. Arrastre y suelte la imagen que desea guardar en la computadora.
• Para seleccionar todos los archivos, haga clic en Edición > Seleccionar todo.
Nota: También puede transferir las fotografías y los clips de video almacenados de la tarjeta de memoria a la
computadora, mediante un lector de tarjetas de memoria (se vende por separado).
ESP
Concord y el logotipo de Concord son marcas registradas o marcas de Concord Camera Corp. en los Estados
Unidos y/o en otros países. Microsoft, Windows Media Player y Windows son marcas registradas o marcas de
Microsoft Corporation en los Estados Unidos y/o en otros países. Mac y Macintosh son marcas registradas o
marcas de Apple Computer, Inc. en los Estados Unidos y en otros países. Todas las marcas y los nombres de
los productos son marcas registradas o marcas de sus respectivos dueños.
8
DZ QSG(515815-00)-S 8 11/15/04, 1:42:51 PM
Page 35

GUIDA RAPIDA
La presente Guida rapida fornisce un riassunto delle informazioni
necessarie per l’uso della fotocamera. Per informazioni dettagliate
sull’uso di tutte le funzioni della fotocamera, si consiglia di consultare
il manuale dell’utente, incluso nella confezione della vostra Concord
Camera, in versione CD-ROM. Prima di utilizzare la fotocamera, leggete
attentamente le istruzioni per la sicurezza che troverete nel manuale
dell’utente.
ITA
1
1
DZ QSG(515815-00)-I 1 11/15/04, 1:44:21 PM
Page 36

1
INSERIMENTO DELLA BATTERIA
La fotocamera è alimentata con una batteria ricaricabile Li-ione a 3.7 volt.
1. Per aprire lo sportello posteriore, premere il fermo dello sportello batteria situato sulla parte superiore
della fotocamera.
2. Introdurre la batteria nell’alloggiamento corrispondente, allineandola con il contatto metallico.
3. Chiudere lo sportello posteriore.
CARICAMENTO DELLE BATTERIE
2
Caricamento con adattatore CA
1. Inserire la spina CA dell’adattatore in una presa CA
standard.
2. Inserire lo spinotto USB dell’adattatore nella porta USB della
fotocamera. Si accenderà la spia rossa posteriore.
• Il primo caricamento della batteria dura circa 6 ore.
Quando la batteria sarà completamente caricata, la spia
rossa posteriore si spegnerà.
• A partire dal secondo caricamento, la durata del processo
sarà di un minimo di 2 ore.
• Per il primo caricamento si consiglia di usare l’adattatore CA
piuttosto che il cavo USB.
Caricamento con PC / Notebook
Per caricare la batteria è anche possibile usare il cavo USB.
1. Collegare l’estremità più grossa del cavo USB alla porta USB del PC
o Notebook.
2. Inserire l’estremità più piccola del cavo USB nella porta USB della
fotocamera.
• La spia rossa posteriore rimarrà accesa durante il processo di
caricamento e si spegnerà una volta che questo sarà completato.
La durata del caricamento completo è di circa 4-6 ore.
Spina CA Spinotto USBend
ITA
3
INSTALLAZIONE DELLA SCHEDA DI MEMORIA
La fotocamera ammette schede SD o MMC come supporto di
memorizzazione. Prima di procedere alla ripresa di video clip o foto,
inserire una scheda SD o MMC come da illustrazione sottostante.
Per rimuovere la scheda memoria, esercitare una leggera pressione sul
bordo della stessa, in modo da farla uscire dall’alloggiamento e quindi
estrarla.
2
DZ QSG(515815-00)-I 2 11/15/04, 1:44:21 PM
Page 37

4
ACCENSIONE E SPEGNIMENTO
Accensione
Per accendere la fotocamera, tenere premuto il pulsante
di accensione per più di 1 secondo. Il monitor LCD si
accenderà.
Spegnimento
Premere il pulsante di accensione per più di un secondo.
Attenzione:
1. Se il pulsante di accensione viene premuto per più di 1
secondo durante la registrazione di dati sulla scheda
memoria, la fotocamera si spegnerà, ma la registrazione
in memoria proseguirà fino a completamento.
2. Se il pulsante di accensione viene premuto per più di 1 secondo
e la fotocamera non si accende, è probabile che la batteria sia scarica. Caricare la batteria e ritentare.
IMPOSTAZIONE DELLE MODALITÀ OPERATIVE DELLA FOTOCAMERA
5
1. Per spostarsi tra le 7 modalità, premere ripetutamente il pulsante
MODALITÀ. La modalità selezionata verrà evidenziata sullo schermo.
ITA
• In alternativa è possibile premere il pulsante MODALITÀ e
quindi il ulsante , , o per selezionare la modalità desiderata.
DV: Utilizzare questa modalità per registrare video clip.
DSC: Utilizzare questa modalità per riprendere immagini fisse.
MP3: Utilizzare questa modalità per riprodurre musica in MP3.
VR: Utilizzare questa modalità per registrare audio clip.
PLAY: Utilizzare questa modalità per visionare video clip, foto o audio clip egistrati.
IMPOSTAZ.: Utilizzare questa modalità per regolare le impostazioni della fotocamera.
LIGHT: Utilizzare questa modalità per impiegare la fotocamera come flash.
2. Premere il pulsante SET per confermare la selezione di modalità.
6
IMPOSTAZIONE LINGUA
1. Accendere la fotocamera e selezionare la modalità IMPOSTAZ.
2. Premere il pulsante o per selezionare Lingua.
3. Quindi premere il pulsante o SET per accedere al relativo sottomenu.
4. Premere il pulsante o per selezionare la lingua desiderata.
5. Premere SET per salvare l’impostazione. Oppure premere il pulsante
per abbandonare il sottomenu. In tal caso, l’impostazione della lingua
resterà invariata.
Pulsante
di accensione
(Power)
Pulsante di
impostazione (Set)
Pulsante Menu
Pulsante
di scatto
Pulsante
Schermo LCD
(Display)
IMPOSTAZIONE DI DATA E ORA
7
1. Accendere la fotocamera e selezionare la modalità IMPOSTAZ.
2. Premere il pulsante o per selezionare Imp. Data o Imposta Ora.
3. Quindi premere il pulsante o SET per accedere al relativo sottomenu.
4. Premere il pulsante o per evidenziare il campo che si desidera cambiare.
5. Premere il pulsante or per cambiare il valore del campo elezionato.
6. Premere SET per salvare l’impostazione.
3
DZ QSG(515815-00)-I 3 11/15/04, 1:44:22 PM
Page 38

8
FORMATTAZIONE DELLA SCHEDA DI MEMORIA
Per garantire un corretto funzionamento della scheda di memoria, si consiglia di formattarla prima di metterla in
uso per la prima volta.
Attenzione: La formattazione eliminerà dalla memoria tutti i file, compresi quelli protetti.
1. Accendere la fotocamera e selezionare la modalità IMPOSTAZ.
2. Premere il pulsante o per selezionare Formatta.
3. Quindi premere il pulsante o SET per accedere al relativo
sottomenu.
4. Premere il pulsante o per selezionare Sì o No.
5. Premere il pulsante SET per confermare.
• Selezionando Sì, tutti i file verranno eliminati.
• Selezionando No non verrà effettuata alcuna modifica.
9
REGISTRAZIONE DI VIDEO CLIP
1. Accendere la fotocamera e impostare la modalità DV.
2. Ruotare l’obiettivo per inquadrare il soggetto.
3. Premere il pulsante di scatto per iniziare
la registrazione. Il tempo di registrazione è indicato sullo
schermo.
4. Premere nuovamente il pulsante di scatto per terminare
la registrazione video.
Modalità
DV
Dimensione
video
Tempo restante
Batteria
Valore di
esposizione
ITA
RIPRESA DI IMMAGINI FISSE
10
1. Accendere la fotocamera e impostare la modalità DSC.
2 Ruotare l’obiettivo per inquadrare il soggetto.
• Per ottimizzare il risultato, collocarsi ad almeno 0,8 m dal
soggetto.
3 Premere il pulsante di scatto per acquisire l’immagine.
11
AUTORIPRESA
1. PAccendere la fotocamera e impostare la modalità DV/DSC.
2. Girate l’obiettivo verso di voi.
3. Premere il pulsante per capovolgere l’immagine sullo schermo LCD.
4. Premere il pulsante di scatto per riprendere immagini o video clip di voi
stessi.
Autoripresa
Modalità
DSC
Dimensione
immagine
Valore di
esposizione
Immagini restanti
Batteria
Velocità
Otturatore
4
DZ QSG(515815-00)-I 4 11/15/04, 1:44:23 PM
Page 39

12
UTILIZZO DELLO ZOOM DIGITALE
La fotocamera permette riprese con zoom digitale fino a 4x.
1. Premere il pulsante per ingrandire il soggetto. La scala di zoom è visualizzata sullo schermo LCD.
2. Premere il pulsante per ridurre il soggetto.
13
IMPOSTAZIONE DEL FLASH PER RIPRESA DI IMMAGINI
Per impostare la modalità flash, premere ripetutamente il pulsante fino all’apparizione dell’icona flash.
Auto ( ): La fotocamera determina automaticamente se l’utilizzo del flash è necessario. Se l’ambiente è
buio, il flash scatta. Per impostazione predefinita, la fotocamera utilizza l’auto flash.
Flash On (Flash acceso) ( ): Il flash scatta in qualsiasi condizione di luce.
Flash Off (Flash spento)( ): In questa modalità il flash non si attiva.
Nota:
1. Il flash fornisce solo un’illuminazione aggiuntiva. In caso di ambiente troppo buio, il flash non può garantire
l’esposizione necessaria a riprendere immagini nitide.
2. Quando la carica della batteria è insufficiente, l’icona di Flash spento ( ) verrà visualizzata sullo schermo
e la funzione flash non sarà disponibile.
ITA
IMPOSTAZIONE DELLA RISOLUZIONE IMMAGINE/VIDEO
14
La risoluzione determina le dimensioni delle immagini acquisite. Le immagini con una risoluzione più alta
contengono un maggior numero di dettagli e il file relativo ha dimensioni maggiori.
1. Premere il pulsante MENU per accedere alla schermata Menu.
2. Premere il pulsante o per evidenziare Dimensione.
3. Quindi premere il pulsante o SET per accedere al relativo sottomenu.
4. Premere il pulsante o per selezionare la risoluzione desiderata.
5. Premere SET per salvare l’impostazione.
6. Premere MENU per abbandonare la schermata Menu.
15
IMPOSTAZIONE DELLA QUALITÀ IMMAGINE/VIDEO
Le impostazioni di qualità determinano la compressione da utilizzare per ridurre
le dimensioni dei file memorizzati, risparmiando così spazio di memoria.
1. Premere il pulsante MENU per accedere alla schermata Menu.
2. Premere il pulsante o per selezionare Qualità.
3. Quindi premere il pulsante o SET per accedere al relativo sottomenu.
4. Premere il pulsante o per selezionare la qualità desiderata.
5. Premere SET per salvare l’impostazione.
6. Premere MENU per abbandonare la schermata Menu.
5
DZ QSG(515815-00)-I 5 11/15/04, 1:44:24 PM
Page 40

RIPRODUZIONE IN MP3
16
1. Collegare la fotocamera al computer mediante il cavo USB in dotazione, quindi spostare i file MP3 prescelti dal
computer alla cartella \Removable Disk\DCIM\100-DVx. A questo punto, scollegare la fotocamera dal computer.
Nota: In alternativa è possibile salvare i file MP3 sulla scheda memoria mediante un lettore di scheda.
Siccome la fotocamera riconosce unicamente i file MP3 salvati nella cartella \DCIM\100-DVx \, è necessario
formattare previamente la scheda memoria con la fotocamera.
2. Accendere la fotocamera e selezionare la modalità MP3.
3. Premere il pulsante o per selezionare i brani musicali.
4. Premere il pulsante o per regolare il volume.
• Il volume è diviso in 21 livelli (da 00 a 20).
5. Premere il pulsante SET per riprodurre il brano musicale prescelto.
6. Premere il pulsante SET per interrompere. Premere il pulsante SET per riprendere la riproduzione.
Modalità MP3
Selettore funzione
pentadirezionale
Menu
LCD acceso/spento
17
REGISTRAZIONE E RIPRODUZIONE DI FILE VOCALI
1. Accendere la fotocamera e selezionare la modalità VR.
2. Premere il pulsante di scatto per iniziare la registrazione.
3. Premere nuovamente il pulsante di scatto per terminare la registrazione.
4. Premere il pulsante o per selezionare un file vocale.
5. Premere il pulsante SET per riprodurre il file vocale prescelto.
6. Premere il pulsante o per regolare il volume.
7. Premere il pulsante SET per interrompere. Premere il pulsante SET per riprendere la riproduzione.
Modalità VR
Selettore funzione
pentadirezionale
Menu
Batteria
Numero file
Durata
Ripetere
canzone selezionata
Ripetere A B
Volume
Tempo di
registrazione restante
Batteria
Registrazione
Numero file
Durata
Barra di
visualizzazione
Volume
LCD acceso/spento
ITA
6
DZ QSG(515815-00)-I 6 11/15/04, 1:44:25 PM
Page 41

18
RIPRODUZIONE DI VIDEO CLIP, IMMAGINI O FILE VOCALI MEMORIZZATI
1. Accendere la fotocamera e selezionare la modalità PLAY.
2. Premere il pulsante o per spostarsi al file precedente o seguente.
3. In caso di video clip o file vocali,
• Premere il pulsante SET per avviare la riproduzione. Premere nuovamente il pulsante SET per
interrompere o riprendere la riproduzione.
• Premere il pulsante o per regolare il volume.
Numero di file
Modalità Play
Video
immagine
Voce
File
precedente
/ Tutti i file
Batteria
Seguente file
Play / Pausa
Formato visualizzazione 9 file
CANCELLAZIONE FILE
19
ITA
1. Accendere la fotocamera e selezionare la modalità PLAY.
2. Premere il pulsante o per individuare il file da eliminare.
3. Premere il pulsante MENU per accedere alla schermata Menu.
4. Premere il pulsante o per selezionare Cancella.
5. Quindi premere il pulsante o SET per accedere al relativo sottomenu.
6. Premere il pulsante o per selezionare Sì o No.
7. Premere il pulsante SET per confermare.
• Selezionando Sì, il file verrà eliminato.
• Selezionando No, non verrà effettuata alcuna modifica. Premere MENU
per abbandonare la schermata Menu.
Nota: I file eliminati non possono più essere recuperati.
BLOCCARE FILE
20
Per evitare la cancellazione accidentale di file importanti, è possibile bloccarli seguendo i passaggi sottoindicati:
1. Accendere la fotocamera e selezionare la modalità PLAY.
2. Premere il pulsante o per individuare il file da bloccare.
3. Premere il pulsante MENU per accedere alla schermata Menu.
4. Premere il pulsante o per selezionare Blocca.
5. Quindi premere il pulsante o SET per accedere al relativo sottomenu.
6. Premere il pulsante o per selezionare Sì o No.
7. Premere il pulsante SET per confermare.
• Selezionando Sì , il file verrà bloccato. La corrispondente icona(
verrà visualizzata nel lato destro dello schermo LCD.
• Selezionando No non verrà effettuata alcuna modifica. Premere
MENU per abbandonare la schermata Menu.
Volume
)
7
DZ QSG(515815-00)-I 7 11/15/04, 1:44:26 PM
Page 42

UTILIZZO DEL FLASH
21
1. Accendere la fotocamera e impostare la modalità LIGHT.
2. Premere il pulsante SET per accendere O spegnere il flash.
3. Premere il pulsante per aumentare la luminosità. Sono disponibili tre livelli di intensità.
4. Premere il pulsante per ridurre la luminosità.
22
DOWNLOAD DI IMMAGINI NEL COMPUTER
Nota per gli utenti Windows 98 SE: È necessaria l’installazione previa del driver della fotocamera.
Nota per tutti gli utenti Windows: Prima di visionare i video clip sul computer, è necessario installarvi
Windows Media Player 9.
Per utenti Windows
1. Collegare la fotocamera al computer.
2. Fare doppio clic su “Risorse del computer”.
3. Fare doppio clic su “Disco removibile”.
4. Fare doppio clic su “DCIM”.
5. Fare doppio clic su “100-DVx”.
• Verranno visualizzati immagini (JPEG), video clip (ASF), file vocali (WAV) e file MP3 memorizzati nella
scheda memoria.
6. Trascinare l’immagine da salvare nel computer.
• Per selezionare tutti i file, fare clic su Modifica > Seleziona tutto.
Per utenti Macintosh
1. Collegare la fotocamera al computer.
• Dopo alcuni istanti l’unità disco esterna verrà visualizzata sulla scrivania.
2. Fare doppio clic sul driver removibile “Concord” visualizzata sulla scrivania.
3. Fare doppio clic su DCIM.
4. Fare doppio clic su “100-DVx”.
• Verranno visualizzati immagini (JPEG), video clip (ASF), file vocali (WAV) e file MP3 memorizzati nella
scheda memoria.
5. Trascinare l’immagine da salvare nel computer.
• Per selezionare tutti i file, fare clic su Modifica > Seleziona tutto.
Nota: È anche possibile trasferire nel computer le immagini e i videoclip salvati sulla scheda di memoria
utilizzando un lettore di schede di memoria (venduto separatamente).
ITA
Concord e il logo Concord sono marchi registrati o marchi di Concord Camera Corp., negli Stati Uniti e/o negli
altri paesi. Microsoft
Stati Uniti e/o in altri paesi. Mac e Macintosh sono marchi registrati o marchi di Apple Computer, Inc. negli Stati Uniti e in
altri paesi. Tutti gli altri nomi di prodotti citati nel presente manuale sono marchi registrati o marchi dei rispettivi proprietari.
, Windows Media Player e Windows sono marchi registrati o marchi di Microsoft Corporation negli
8
DZ QSG(515815-00)-I 8 11/15/04, 1:44:27 PM
Page 43

KORTE HANDLEIDING
Deze Korte handleiding biedt u een beknopte bedieningsleidraad
voor uw nieuwe camera. Raadpleeg de Gebruikershandleiding op
de CD-rom voor nadere aanwijzingen over het gebruik van alle
camerafuncties. Lees vóór de ingebruikname van de camera aandachtig
alle veiligheidsvoorschriften en waarschuwingen door die in de
Gebruikershandleiding uiteengezet zijn.
NLD
1
1
DZ QSG(515815-00)-Ne 1 11/15/04, 1:49:48 PM
Page 44

1
DE BATTERIJ PLAATSEN
De camera werkt op een 3.7 Volt oplaadbare Li-ion batterij.
1. Druk op de sluitpal van de batterijklep die bovenop het toestel zit om de achterklep te openen.
2. Schuif de batterij in het batterijvak en tot deze op één lijn zit met het metaalcontact.
3. Zet de achterklep er weer in.
DE BATTERIJ OPLADEN
2
Met de Wisselstroomadapter laden
1. Steek het wisselstroomeind van de adaptor in een
standaard wisselstroom-stopcontact.
2. Steek het USB uiteinde van de adaptor in de standaard
USB-poort van de camera. De rode lampje aan de a
chterkant gaat branden.
• Het opladen van de batterij duurt de eerste keer
ongeveer 6 uur. Als de batterij helemaal geladen is dooft
het rode lampje op de achterkant.
• De tweede of een navolgende keer duurt het volledig
opladen van de batterij tenminste 2 uur.
• Wanneer de batterij voor de eerste keer opgeladen
wordt, wordt aanbevolen de wisselstroomadapter in plaats
van de USB-kabel te gebruiken.
Met de PC / het notebook laden
U kunt ook de USB-kabel gebruiken om de batterij op te laden.
1. Sluit het grotere uiteinde van de USB-kabel op de USB-poort van uw
PC of notebook aan.
2. Steek het kleinere eind van de USB-kabel in de USB-poort van de amera.
• Het rode lampje aan de achterkant brandt zolang de batterij
opgeladen wordt en dooft zodra het helemaal geladen is. Helemaal
opladen duurt ongeveer 4-6 uur.
Wisselstroomeind USB-eind
NLD
DE GEHEUGENKAART PLAATSEN
3
De camera werkt met een SD- of een MMC-kaart als geheugen. Plaats
een SD- of MMC-kaart volgens de onderstaande afbeeldingen voordat u
filmpjes of foto’s gaat vastleggen.
Druk om de geheugenkaart te verwijderen met de vingertoppen
voorzichtig tegen de rand van de geheugenkaart om hem op te laten
springen en trek hem er vervolgens uit.
2
DZ QSG(515815-00)-Ne 2 11/15/04, 1:49:49 PM
Page 45

AAN / UIT
4
Aan
De AAN/UIT knop langer dan 1 seconde indrukken om de Camera
aan te zetten. Het LCD-scherm gaat aan.
Uit
De AAN/UIT knop langer dan 1 seconde indrukken.
Waarschuwing:
1. Als de Aan/Uit knop langer dan 1 seconde ingedrukt wordt
terwijl gegevens op de geheugenkaart geschreven worden, zal
de camera uitgaan, maar het schrijven naar het geheugen zal
doorgaan tot het voltooid is.
2. Als de Aan/Uit-knop langer dat 1 seconde ingedrukt wordt
maar de camera gaat niet aan, is mogelijk de batterij
leeg. Laad de batterij en probeer het nogmaals.
5
DE GEBRUIKSMODI VAN DE CAMERA INSTELLEN
1. Druk herhaaldelijk op de MODUS knop om tussen de zeven modi over te schakelen. De gekozen modus
wordt op het scherm gemarkeerd.
• U kunt ook eerst de MODUS knop indrukken, en vervolgens de , ,
of de -knop indrukken om de gewenste modus te kiezen.
DV: Gebruik deze modus om een filmpje op te nemen.
DFC: Gebruik deze modus om een foto te maken.
MP3: Gebruik deze modus om MP3-muziek af te spelen.
SO: Gebruik deze modus om een geluidsfragment op te nemen.
NLD
AFSPELEN: Gebruik deze modus om de opgenomen filmpjes, foto’s of
geluidsfragmenten weer te geven.
INSTELLINGEN: Gebruik deze modus om de camera-instellingen aan te passen.
LICHT: Gebruik deze modus om de camera als een flitslicht te gebruiken.
2. Druk op SET om de gewenste modus te openen.
TAAL INSTELLEN
6
1. Zet de camera aan en ga naar de INSTELLINGEN-modus.
2. Druk op of op om Taal te markeren.
3. Druk op of op SET om het desbetreffende submenu te openen.
4. Druk op of op om de gewenste taal te kiezen.
5. Druk op SET om deze instelling vast te leggen. Of druk op om het
submenu af te sluiten. In dat geval wordt de taal-instelling niet gewijzigd.
Aan/Uit
knop
Set-knop
Menuknop
Sluiterknop
Weergaveknop
(Display)
DE DATUM EN TIJD INSTELLEN
7
1. Zet de camera aan en ga naar de INSTELLINGEN-modus.
2. Druk op of op om Dagstempel te markeren.
3. Druk op of op SET om het desbetreffende submenu te openen.
4. Druk op of op om het te wijzigen veld te markeren.
5. Druk op of op om de waarde voor het gekozen veld te kiezen.
6. Druk op SET om deze instelling vast te leggen.
3
DZ QSG(515815-00)-Ne 3 11/15/04, 1:49:50 PM
Page 46

8
DE GEHEUGENKAART FORMATTEREN
Om de juiste werking van uw geheugenkaart te waarborgen, wordt aanbevolen de geheugenkaart vóór de eerste
ingebruikname te formatteren.
Waarschuwing: Door de formattering worden alle bestanden, ook de beveiligde, uit het geheugen gewist.
1. Zet de camera aan en ga naar de INSTELLINGEN-modus.
2. Druk op of op om Formaat te markeren.
3. Druk op of op SET om het desbetreffende submenu te openen.
4. Druk op of op om Ja of Nee te kiezen.
5. Druk op SET om uw keuze te bevestigen.
• Als u Ja kiest, worden alle bestanden uit het geheugen
verwijderd.
• Kiest u Nee, dan worden er geen wijzigingen doorgevoerd.
EEN FILMPJE OPNEMEN
9
1. Zet de camera aan en open de DV-modus.
2 Roteer de lens om het onderwerp binnen het beeldraam
te plaatsen.
3 Druk op de sluiterknop om de opname te starten. De
opnameduur wordt op het scherm aangegeven.
4 Druk nogmaals op de sluiterknop om de filmopname te
beëindigen.
DV-modus
Resttijd
Batterij
Filmomvang
Belichtingswaarde
FOTOGRAFEREN
10
1. Zet de camera aan en open de DFC-modus.
2 Roteer de lens om het onderwerp binnen het beeldraam
te plaatsen.
• Houd voor de beste resultaten een minimum afstand
van 0,8 meter van het onderwerp aan.
3. Druk op de sluiterknop om de foto te maken.
ZELFFOTOGRAFIE
11
1. Zet de camera aan en open de DV/DFC-modus.
2. Draai de lens naar u toe.
3. Druk op om het beeld op het LCD-scherm om te draaien.
4. Druk de sluiterknop in om een foto van uzelf te nemen.
4
DZ QSG(515815-00)-Ne 4 11/15/04, 1:49:51 PM
Zelffotografie
DFC-modus
Fotoafmetingen
Sluitersnelheid
Resterende foto’s
Batterij
Belichtingswaarde
NLD
Page 47

DE DIGITALE ZOOM GEBRUIKEN
12
De camera heeft een 4x digitale zoom.
1. Druk op om op het onderwerp in te zoomen. De zoomschaal wordt op het LCD-scherm weergegeven.
2. Druk op om uit te zoomen.
13
DE FLITSER VOOR HET FOTOGRAFEREN INSTELLEN
Druk herhaaldelijk op tot het gewenste flitserpictogram op het LCD-scherm verschijnt om de flitsmodus in te
stellen.
Automatisch ( ): De camera beoordeelt automatisch of de flitser vereist is. Als de omgeving donker is,
zal de flitser afgaan. De camera maakt standaard van de flitser gebruik.
Flitser Aan ( ): De flitser zal onder alle belichtingsomstandigheden afgaan.
Flitser Uit ( ): De flitser werkt niet in deze modus.
Opmerking:
1. De flitser verzorgt alleen de bijverlichting. Als de omgeving te donker is, kan de flitser niet voor voldoende
belichting zorgen om heldere foto’s te nemen.
2. Als de batterij op het punt staat leeg te raken, wordt het pictogram Flitser Uit ( ) op het scherm
afgebeeld en zal de flitser niet beschikbaar zijn.
DE FOTO/FILMRESOLUTIE INSTELLEN
14
De resolutie bepaalt de omvang van een vastgelegd bestand. Foto’s met een hogere resolutie bevatten meer
details en hebben een grotere bestandsomvang.
NLD
1. Druk op MENU om het menuscherm te openen.
2. Druk op of op om Afmetingen te markeren.
3. Druk op of op SET om het desbetreffende submenu te openen.
4. Druk op of op om de gewenste resolutie te kiezen.
5. Druk op SET om deze instelling vast te leggen.
6. Druk op MENU om het menuscherm af te sluiten.
DE FOTO/FILMKWALITEIT INSTELLEN
15
De instelling van de kwaliteit bepaalt de mate van compressie die toegepast
wordt om de opgeslagen bestanden lichter te maken teneinde ruimte in het
geheugen vrij te maken.
1. Druk op MENU om het menuscherm te openen.
2. Druk op of op om Kwaliteit te markeren.
3. Druk op of op SET om het desbetreffende submenu te openen.
4. Druk op of op om de gewenste kwaliteitsinstelling te kiezen.
5. Druk op SET om deze instelling vast te leggen.
6. Druk op MENU om het menuscherm af te sluiten.
5
DZ QSG(515815-00)-Ne 5 11/15/04, 1:49:53 PM
Page 48

MP3 AFSPELEN
r
16
1. Sluit de camera op uw computer aan met behulp van de meegeleverde USB-kabel en sleep de gewenste MP3 bestanden van uw computer naar de map \Uitneembare schijf\DCIM\100-DVx. Sluit vervolgens de camera van
uw computer af.
Opmerking: YU kunt ook een kaartlezer gebruiken om MP3-bestanden op een geheugenkaart op te slaan.
Maar als de camera alleen de in de \DCIM\100-DVx \ map opgeslagen MP3-bestanden herkent, moet u de
geheugenkaart eerst formatteren door deze eerst in de camera te gebruiken.
2. Zet de camera aan en ga naar de MP3-modus.
3. Druk op of op om de nummers te kiezen.
4. Druk op of op om het geluidsvolume bij te stellen.
• Het volume is in 21 niveaus (van 00 tot 20) verdeeld.
5. Druk op SET om het gewenste nummer af te spelen.
6. Druk op SET om opname tijdelijk te onderbreken. Druk nogmaals op SET om het afspelen te hervatten.
MP3-modus
5 functietoets
LCD aan/uit
Menu
SPRAAKOPNAMEN MAKEN EN AFSPELEN
17
1. Zet de camera aan en ga naar de OS-modus.
2. Druk op de sluiterknop om de opname te starten.
3. Druk nogmaals op de sluiterknop om de opname stop te zetten.
4. Druk op of op om een spraakopname te kiezen.
5. Druk op SET om de spraakopname af te spelen.
6. Druk op of op om het geluidsvolume bij te stellen.
7. Druk op SET om opname tijdelijk te onderbreken. Druk nogmaals op SET om het afspelen te hervatten.
Batterij
Bestandsnumme
Tijd
Herhaal het
gekozen nummer
A B Volume
Volume
NLD
OS-modus
5 functietoets
LCD aan/uit
Menu
DZ QSG(515815-00)-Ne 6 11/15/04, 1:49:54 PM
Resterende opnametijd
Batterij
Bezig op te nemen
Bestandsnummer
Tijd
Geeft balk weer
Volume
6
Page 49

DE OPGENOMEN FILMFRAGMENTEN, FOTOS OF SPRAAKBESTANDEN
A
geg
18
WEERGEVEN
1. Zet de camera aan en ga naar de AFSPEEL-modus.
2. Druk op of op om het vorige of volgende bestand over te slaan.
3. Gaat het om een filmfragment of een spraakopname,
• Druk op SET om de weergave te starten. Druk nogmaals op SET om het afspelen te onderbreken en te
hervatten.
• Druk op of op om het geluidsvolume bij te stellen.
Bestandsnummer
Afspeelmodus
Film
Foto
Spraak
Vorig bestand
/Alle bestanden
Batterij
Volgende bestand
fspelen / Pauze
9-bestanden weer
BESTANDEN WISSEN
19
1. Zet de camera aan en ga naar de AFSPEEL-modus.
2. Druk op of op om het ongewenste bestand te zoeken.
3. Druk op MENU om het menuscherm te openen.
4. Druk op of op om Wissen te markeren.
5. Druk op of op SET om het desbetreffende submenu te openen.
NLD
6. Druk op of op om Ja of Nee te kiezen.
7. Druk op SET om uw keuze te bevestigen.
• Als u Ja kiest, wordt het bestand verwijderd.
• Kiest u Nee, dan worden er geen wijzigingen doorgevoerd. Druk op
MENU om het menuscherm af te sluiten.
Opmerking: Na verwijdering kan het bestand niet meer hersteld worden.
DE BESTANDEN BEVEILIGEN
20
Om onvrijwillig wissen van de bestanden te voorkomen, kunt u de bestanden
als volgt beveiligen:
1. Zet de camera aan en ga naar de AFSPEEL-modus.
2. Druk op of op om het te beveiligen bestand te zoeken.
3. Druk op MENU om het menuscherm te openen.
4. Druk op of op om Beveiligen te markeren.
5. Druk op of op SET om het desbetreffende submenu te openen.
6. Druk op of op om Ja of Nee te kiezen.
7. Druk op SET om uw keuze te bevestigen.
• Als u Ja kiest, wordt het bestand beveiligd. Het hangslotpictogram(
wordt rechts op het LCD-scherm weergegeven.
• Kiest u Nee, dan worden er geen wijzigingen doorgevoerd. Druk op
MENU om het menuscherm af te sluiten.
Volume
even formaat
)
7
DZ QSG(515815-00)-Ne 7 11/15/04, 2:18:32 PM
Page 50

HET FLITSLICHT GEBRUIKEN
21
1. Zet de camera aan en open de LIGHT-modus.
2. Druk op SET om het flitslicht aan of uit te zetten.
3. Druk op om de helderheid te vergroten. Er zijn drie lichtsterkteniveaus.
4. Druk op om de helderheid te verkleinen.
BESTANDEN NAAR DE COMPUTER LADEN
22
Opmerking voor gebruikers van Win 98 SE: Het besturingsprogramma van de camera moet eerst
geïnstalleerd worden.
Opmerking voor alle Windows gebruikers: Windows Media Player 9 moet eerst geïnstalleerd worden voordat
u de filmpjes op de computer kunt bekijken.
Voor Windows gebruikers
1. Sluit de camera op uw computer aan.
2. Dubbelklik op “Deze computer”.
3. Dubbelklik op “Uitneembare schijf”.
4. Dubbelklik op “DICM”.
5. Dubbelklik op “100-DVx”.
• De op de geheugenkaart opgeslagen foto’s (JPEG), filmpjes (ASF), spraakbestanden (WAV) en MP3-
bestanden worden weergegeven.
6. Versleep en plaats de foto die u op uw computer wilt opslaan.
• Klik om alle bestanden te kiezen op Bewerken > Alles kiezen.
Voor Macintosh gebruikers
1. Sluit de camera op uw computer aan.
• Kort daarna verschijnt het externe harde-schijfstation op het bureaublad.
2. Dubbelklik op de “Concord” uitneembare schijf op uw bureaublad.
3. Dubbelklik op DICM.
4. Dubbelklik op “100-DVx”.
• De op de geheugenkaart opgeslagen foto’s (JPEG), filmpjes (ASF), spraakbestanden (WAV) en MP3-
bestanden worden weergegeven.
5. Versleep en plaats de foto die u op uw computer wilt opslaan.
• Klik om alle bestanden te kiezen op Bewerken > Alles kiezen.
Opmerking: U kunt ook op uw geheugenkaart opgeslagen foto’s en filmpjes naar uw computer overschrijven
met behulp van een geheugenkaartlezer (niet meegeleverd).
NLD
Concord, Concord logo zijn geregistreerde handelsmerken of handelsmerken van de Concord Camera Corp.
in de Verenigde Staten en/of in andere landen. Microsoft
handelsmerken of handelsmerken van de Microsoft Corporation in de Verenigde Staten en/of in andere landen. Mac and
Macintosh zijn geregistreerde handelsmerken of handelsmerken van Apple Computer, Inc. in de
andere landen. Alle andere merken en productnamen zijn of geregistreerde handelsmerken of handelsmerken
,Windows Media Player en Windows zijn geregistreerde
Verenigde Staten en in
8
DZ QSG(515815-00)-Ne 8 11/15/04, 1:49:56 PM
Page 51

GUIA DE INICIALIZAÇÃO RÁPIDA
Este Guia de inicialização rápida fornece uma referência para operar
sua nova câmera. Consulte o Guia do usuário, que pode ser encontrado
no CD-ROM, para obter instruções detalhadas sobre como utilizar
todos os recursos da câmera. Antes de usar a câmera, leia todas as
instruções de segurança e precauções do Guia do usuário.
PTB
1
1
DZ QSG(515815-00)-Po 1 11/15/04, 1:48:31 PM
Page 52

1
COLOCANDO A PILHA
A câmera utiliza uma pilha recarregável de íon de Lítio de 3,7 volts.
1. Pressione a trava da porta do compartimento de pilha que fica na lateral superior da unidade para abrir a tampa.
2. Coloque a pilha no compartimento e alinhe com os contatos de metal.
3. Feche a tampa traseira.
RECARREGANDO A PILHA
2
Carregando com o adaptador AC
1. Conecte a tomada do adaptador AC em um soquete
padrão.
2. Conecte a saída USB do adaptador na porta USB da
câmera. A lâmpada vermelha acenderá.
• A primeira carga da pilha demora cerca de 6 horas.
Quando a pilha estiver totalmente carregada, a lâmpada
vermelha apagará.
• Da segunda vez em diante, o tempo para carregar
totalmente a pilha será de no mínimo 2 horas.
• Ao carregar a pilha pela primeira vez, é recomendável utilizar o
adaptador AC em vez do cabo USB.
Carregando através do PC / Notebook
Também é possível utilizar o cabo USB para carregar a pilha.
1. Conecte a extremidade maior do cabo USB à porta USB do
computador ou do notebook.
2. Conecte a saída menor do cabo USB na porta USB da câmera.
• A lâmpada vermelha ficará acesa enquanto a pilha estiver sendo
carregada e apagará quando a unidade estiver totalmente
carregada. Uma carga completa demora entre 4 e 6 horas.
Tomada AC Saida USB
PTB
3
INSTALANDO O CARTÃO DE MEMÓRIA
A câmera utiliza cartões SD ou MMC para armazenamento. Coloque
um cartão SD ou MMC de acordo com as ilustrações a seguir antes de
registrar fotos ou clipes de vídeo.
Para remover o cartão de memória, empurre suavemente a borda dele
com a ponta do dedo para primeiro ejetá-lo e depois puxá-lo para fora.
2
DZ QSG(515815-00)-Po 2 11/15/04, 1:48:31 PM
Page 53

LIGA/DESLIGA
4
Para ligar
Pressione o botão Liga/desliga por mais de um segundo para ligar
a Câmera. A LCD será ligada.
Para desligar
Pressione o botão Liga/desliga por mais de um segundo.
Atenção:
1. Se o botão Liga/desliga for pressionado por mais de um segundo
enquanto os dados são gravados no cartão de memória, a Câmera
desligará, mas a gravação da memória continuará até terminar.
2. Se o botão Liga/desliga for pressionado por mais de um
segundo e a câmera não ligar, pode ser que a carga da pilha
tenha acabado. Carregue a pilha e tente novamente.
CONFIGURANDO OS MODOS OPERACIONAIS DA CÂMERA
5
1. Pressione repetidamente o botão MODO para alternar entre os sete modos. O modo selecionado será
realçado na tela.
• Também é possível pressionar primeiro o botão MODO e em seguida pressionar os botões , ,
ou para selecionar o modo desejado.
DV: Use este modo para gravar clipes de vídeo.
DSC: Use este modo para fotografar imagens paradas.
MP3: Use este modo para reproduzir músicas em MP3.
VR: Use este modo para gravar clipes de áudio.
PLAY (REPRODUZIR): Use este modo para visualizar as fotos, os
clipes de vídeo ou de áudio gravados.
CONFIGURAR: Use este modo para ajustar as configurações da câmera.
LIGHT (ILUMINAÇÃO): Use este modo para ativar a câmera como uma
luz de flash.
2. Pressione o botão SET para entrar no modo selecionado.
Botão Ligar
(Power)
Botão Set
Botão Menu
Botão do
obturador
Botão Tela
PTB
CONFIGURAÇÃO DO IDIOMA
6
1. Ligue a câmera e alterne para o modo de CONFIGURAR.
2. Pressione os botões ou para realçar o Idioma.
3. Pressione o botão ou SET para entrar no submenu.
4. Pressione os botões ou para selecionar o idioma desejado.
5. Pressione o botão SET para salvar a configuração. Ou pressione o
botão para sair do submenu. Nesse caso, a configuração do idioma não
será alterada
CONFIGURANDO DATA E HORA
7
1. Ligue a câmera e alterne para o modo de CONFIGURAR.
2. Pressione os botões ou para realçar Def data ou Def hora.
3. Pressione o botão ou SET para entrar no submenu.
4. Pressione os botões ou para realçar o campo a ser alterado.
5. Pressione os botões ou para alterar o valor do campo selecionado.
6. Pressione o botão SET para salvar a configuração.
3
DZ QSG(515815-00)-Po 3 11/15/04, 1:48:32 PM
Page 54

8
FORMATANDO O CARTÃO DE MEMÓRIA
Para garantir o funcionamento adequado do cartão de memória, é recomendável formatá-lo ao usar pela
primeira vez.
Atenção: A formatação apagará da memória todos os arquivos, inclusive os arquivos protegidos.
1. Ligue a câmera e alterne para o modo de CONFIGURAR.
2. Pressione os botões ou para realçar o Formatar.
3. Pressione o botão ou SET para entrar no submenu.
4. Pressione os botões ou para selecionar Sim ou Não.
5. Pressione o botão SET para confirmar.
• Se a opção Sim for selecionada, todos os arquivos da memória
serão apagados.
• Se a opção Não for selecionada, nenhuma alteração será feita.
GRAVANDO DE UM CLIPE DE VÍDEO
9
1. Ligue a câmera e entre no modo DV.
2. Gire as lentes para enquadrar o objeto.
3. Pressione o botão do obturador para iniciar a gravação.
O tempo de gravação é indicado na tela.
4. Pressione novamente o botão do obturador para finalizar
a gravação de vídeo.
FOTOGRAFANDO IMAGENS PARADAS
10
1. Ligue a câmera e entre no modo DSC.
2. Gire as lentes para enquadrar o objeto.
• Para obter melhores resultados, fique a uma distância
mínima de 80 cm do objeto.
3. Pressione o botão do obturador para bater a foto.
AUTO-RETRATO
11
1. Ligue a câmera e entre no modo DV/DSC.
2. Direcione a lente para o seu rosto.
3. Pressione o botão para inverter a imagem na LCD.
4. Pressione o botão do obturador para obter imagens ou clipes de
vídeos de você mesmo.
Tamanho
do vídeo
Tamanho
da imagem
Velocidade
do obturador
Modo DV
Auto-retrato
Modo DSC
Tempo restante
Imagens restantes
Pilha
Valor de
exposição
Pilha
Valor de
exposição
PTB
4
DZ QSG(515815-00)-Po 4 11/15/04, 1:48:34 PM
Page 55

12
USANDO O ZOOM DIGITAL
A câmera possui zoom digital de até 4 vezes.
1. Pressione o botão para dar zoom no objeto. As escalas do zoom serão exibidas na LCD.
2. Pressione o botão para cancelar o zoom.
13
CONFIGURANDO O FLASH PARA FOTOGRAFIA
Pressione repetidamente o botão até que o ícone do flash desejado apareça na LCD para configurar o
modo do flash.
Automático ( ): A câmera decide automaticamente se o flash é necessário. Se o ambiente estiver
escuro, o flash disparará. A câmera utiliza por padrão o flash automático.
Flash On (Flash ligado) ( ): O flash disparará em qualquer condição de iluminação.
Flash Off (Flash desligado) ( ): O flash não disparará nesse modo.
Observação:
1. O flash fornece somente iluminação auxiliar. Se o ambiente estiver muito escuro, pode ser que o flash não
consiga exposição suficiente para a obtenção de imagens claras.
2. Se a carga da pilha estiver para terminar, o ícone Flash desligado ( ) será exibido na tela, e neste caso o
flash não ficará disponível.
CONFIGURANDO A RESOLUÇÃO DA IMAGEM/DO VÍDEO
14
A resolução determina o tamanho de um arquivo capturado. As imagens com resolução mais alta contêm mais
detalhes e o tamanho de seus arquivos é maior.
1. Pressione o botão MENU para entrar na tela do Menu.
2. Pressione os botões ou para realçar o Tamanho.
3. Pressione o botão ou SET para entrar no submenu.
4. Pressione os botões ou para selecionar a configuração desejada da
resolução.
PTB
5. Pressione o botão SET para salvar a configuração.
6. Pressione o botão MENU para sair da tela do Menu.
CONFIGURANDO A QUALIDADE DA IMAGEM/DO VÍDEO
15
A configuração da qualidade determina o valor de compressão utilizado para
reduzir o tamanho dos arquivos armazenados para economizar espaço na
memória.
1. Pressione o botão MENU para entrar na tela do Menu.
2. Pressione os botões ou para realçar a Qualidade.
3. Pressione o botão ou SET para entrar no submenu.
4. Pressione os botões ou para selecionar a qualidade desejada.
5. Pressione o botão SET para salvar a configuração.
6. Pressione o botão MENU para sair da tela do Menu.
5
DZ QSG(515815-00)-Po 5 11/15/04, 1:48:35 PM
Page 56

REPRODUZINDO MP3
e
16
1. Conecte a câmera ao computador utilizando o cabo USB fornecido e arraste os arquivos de MP3 desejados do
computador para a pasta \Removable Disk\DCIM\100-DVx. Em seguida, desconecte a câmera do computador.
Observação: Também é possível utilizar um leitor de cartão para salvar arquivos de MP3 no cartão de
memória. Mas como a câmera reconhece somente arquivos de MP3 salvos na pasta \DCIM\100-DVx \, é
necessário formatar o cartão de memória primeiro usando a câmera.
2. Ligue a câmera e alterne para o modo de MP3.
3. Pressione os botões ou para selecionar as músicas.
4. Pressione os botões ou para ajustar o volume.
• O volume é dividido em 21 níveis (de 00 a 20).
5. Pressione o botão SET para reproduzir a música selecionada.
6. Pressione o botão SET para pausar. Pressione novamente o botão SET para continuar a reprodução.
Modo de
MP3
5 Teclas
de funções
Menu
LCD ligada/desligada
GRAVANDO E REPRODUZINDO ARQUIVOS DE VOZ
17
1. Ligue a câmera e alterne para o modo VR.
2. Pressione o botão do obturador para iniciar a gravação.
3. Pressione novamente o botão do obturador para finalizar a gravação.
4. Pressione os botões ou para selecionar um arquivo de voz.
5. Pressione o botão SET para começar a reprodução do arquivo de voz.
6. Pressione os botões ou para ajustar o volume.
7. Pressione o botão SET para pausar. Pressione novamente o botão SET para continuar a reprodução.
Modo
de VR
5 Teclas
de funções
Menu
Pilha
Número
do arquivo
Tem p o
Repetir a música
selecionada
A B Repetir
Volume
Tempo remanescent
de gravação
Pilha
Gravando
Número do arquivo
Tem p o
Barra de
exibição
Volume
LCD ligada/desligada
PTB
6
DZ QSG(515815-00)-Po 6 11/15/04, 1:48:36 PM
Page 57

18
ç
REVISAR CLIPES DE VÍDEO, FOTOS OU ARQUIVOS DE VOZ
1. Ligue a câmera e alterne para o modo de REPRODUÇÃO.
2. Pressione os botões ou para passar pelos arquivos anteriores ou seguintes.
3. Se este for o clipe de vídeo ou o arquivo de voz:
• Pressione o botão SET para iniciar a reprodução. Pressione novamente o botão SET para pausar ou
continuar a reprodução.
• Pressione os botões ou para ajustar o volume.
Número do arquivo
Modo de
reprodução
Vídeo
Imagem
Voz
Arquivo
anterior
/ Total de arquivos
Pilha
Próximo arquivo
Reproduzir
/ Pausar
Formato de exibi
APAGANDO ARQUIVOS
19
1. Ligue a câmera e alterne para o modo de REPRODUÇÃO.
2. Pressione os botões ou para localizar o arquivo indesejado.
3. Pressione o botão MENU para entrar na tela do Menu.
4. Pressione os botões ou para realçar Apagar.
5. Pressione o botão ou SET para entrar no submenu.
6. Pressione os botões ou para selecionar Sim ou Não.
7. Pressione o botão SET para confirmar.
• Se a opção Sim for selecionada, o arquivo será apagado.
• Se a opção Não for selecionada, nenhuma alteração será feita.
Pressione o botão MENU para sair da tela do Menu.
PTB
Observação: Depois que o arquivo for apagado, ele não poderá ser recuperado.
20
TRAVANDO OS ARQUIVOS
Para prevenir a exclusão acidental de arquivos, é possível travá-los executando as seguintes etapas:
1. Ligue a câmera e alterne para o modo de REPRODUÇÃO.
2. Pressione os botões ou para localizar o arquivo a ser protegido.
3. Pressione o botão MENU para entrar na tela do Menu.
4. Pressione os botões ou para realçar Travar.
5. Pressione o botão ou SET para entrar no submenu.
6. Pressione os botões ou para selecionar Sim ou Não.
7. Pressione o botão SET para confirmar.
• Se Sim for selecionado, o arquivo será travado. O ícone da trava (
aparecerá no lado direito da LCD.
• Se a opção Não for selecionada, nenhuma alteração será feita.
Pressione o botão MENU para sair da tela do Menu.
ão de 9 arquivos
Volume
)
7
DZ QSG(515815-00)-Po 7 11/15/04, 1:48:37 PM
Page 58

USANDO A LUZ DO FLASH
21
1. Ligue a câmera e entre no modo LIGHT.
2. Pressione o botão SET para ligar ou desligar a luz do flash.
3. Pressione o botão para aumentar o brilho. Existem três níveis de intensidade.
4. Pressione o botão para reduzir o brilho.
22
DOWNLOAD DE ARQUIVOS DO COMPUTADOR
Observação para usuários do Windows 98 SE: driver da câmera deve ser instalado primeiro.
Observação para todos os usuários do Windows: Windows Media Player 9 deve ser instalado antes de
efetuar a visualização dos clipes de vídeo no computador.
Para usuários do Windows
1. Conecte a câmera ao computador.
2. Clique duas vezes em “Meu computador”.
3. Clique duas vezes em “Disco removível”.
4. Clique duas vezes em “DCIM”.
5. Clique duas vezes em “100-DVx”.
• As imagens (JPEG), clipes de vídeo (ASF), arquivos de voz (WAV) e arquivos de MP3 armazenados no
cartão de memória serão exibidos.
6. Arraste e solte a imagem que você deseja salvar no computador.
• Para selecionar todos os arquivos, clique em Editar > Selecionar todos.
Para usuários do Macintosh
1. Conecte a câmera ao computador.
• Depois de alguns momentos, a unidade de disco externa aparecerá na área de trabalho.
2. Clique duas vezes na unidade removível “Concord” que está em sua área de trabalho.
3. Clique duas vezes em DCIM.
4. Clique duas vezes em “100-DVx”.
• As imagens (JPEG), clipes de vídeo (ASF), arquivos de voz (WAV) e arquivos de MP3 armazenados no
cartão de memória serão exibidos.
5. Arraste e solte a imagem que você deseja salvar no computador.
• Para selecionar todos os arquivos, clique em Editar > Selecionar todos.
Observação: Também é possível transferir para o computador as imagens e clipes de vídeo gravados no
cartão de memória usando um leitor de cartão de memória (vendido separadamente).
PTB
Concord e o logo Concord são marcas registradas de Concord Camera Corp., nos Estados Unidos e/ou outros
países. Mic
Unidos e/ou outros países. Mac e Macintosh são marcas registradas da Apple Computes, Inc. nos Estados Unidos e
outros países. Todas as outras marcas e nomes de produtos são marcas registradas de seu respectivos proprietários.
rosoft, Windows Media Player e Windows são marcas registradas da Microsoft Corporation nos Estados
8
DZ QSG(515815-00)-Po 8 11/15/04, 1:48:38 PM
Page 59

Visit Concord on the Internet
www.concord-camera.com
Concord DVx camcorder Quick Start Guide
Copyright 2004 Concord Camera Corp.
DZ QSG(515815-00)-E 9 11/15/04, 1:35:16 PM
515815-00
Version 1.0
R1
 Loading...