

Page 1

Compaq Server Console Switch
User Guide
Part Number 141555-003
October 2002 (Third Edition)
Page 2

© 2002 Compaq Information Technologies Group, L.P.
Compaq and the Compaq logo are trademarks of Compaq Information Technologies Group,
L.P. in the U.S. and/or other countries.
All other product names mentioned herein may be trademarks of their respective companies.
Compaq shall not be liable for technical or editorial errors or omissions contained herein. The
information in this document is provided “as is” without warranty of any kind and is subject to
change without notice. The warranties for Compaq products are set forth in the express limited
warranty statements accompanying such products. Nothing herein should be construed as
constituting an additional warranty.
Compaq Server Console Switch User Guide
October 2002 (Third Edition)
Part Number 141555-003
Page 3

Contents
About This Guide
Important Safety Information ............................................................................................ix
Symbols on Equipment...................................................................................................... ix
Rack Stability..................................................................................................................... xi
Symbols in Text.................................................................................................................xi
Text Conventions.............................................................................................................. xii
Getting Help......................................................................................................................xii
Compaq Technical Support........................................................................................ xii
Compaq Website .......................................................................................................xiii
Compaq Authorized Reseller ....................................................................................xiii
Reader’s Comments......................................................................................................... xiii
Chapter 1
Introduction
Product Overview ............................................................................................................1-1
Features............................................................................................................................ 1-2
Configurations ................................................................................................................. 1-4
Available Models............................................................................................................. 1-7
Chapter 2
Hardware Installation
Installation Checklist .......................................................................................................2-1
Kit Contents ..............................................................................................................2-1
Required Tools.......................................................................................................... 2-2
Compaq Server Console Switch User Guide iii
Page 4

Contents
Installing the Hardware................................................................................................... 2-2
2-Port Side-Mount 0U Installation ........................................................................... 2-2
Side-Mount 0U Installation ...................................................................................... 2-5
Rear Rack Installation............................................................................................... 2-9
Standard 1U Installation......................................................................................... 2-11
Completing the Installation........................................................................................... 2-15
Chapter 3
Cabling
Cable Information ........................................................................................................... 3-1
Cable Locking Mechanism....................................................................................... 3-2
Connecting the Cables..................................................................................................... 3-3
Connecting the Power Cable to the Dual Console 8-Port DC Switch Box.................... 3-6
Switch Box Startup Behavior.......................................................................................... 3-8
Computer Startup Behavior............................................................................................. 3-9
Configuring the Console Switch..................................................................................... 3-9
Unattended Reboot.......................................................................................................... 3-9
Resetting the Unit............................................................................................................ 3-9
Making Connections Under Power ............................................................................... 3-10
Alternate Configurations............................................................................................... 3-10
Tiered Switch Configurations................................................................................. 3-11
Connecting Tiers while the System is Powered Up................................................ 3-12
Dual Console Configuration.......................................................................................... 3-13
Chapter 4
Using the OSD
On-Screen Display .......................................................................................................... 4-1
Alternate Languages................................................................................................. 4-1
Functions......................................................................................................................... 4-1
iv Compaq Server Console Switch User Guide
Page 5

Contents
Navigation........................................................................................................................4-2
Menu Overview......................................................................................................... 4-4
OSD Main Screen......................................................................................................4-5
Setup Screen.............................................................................................................. 4-7
Commands Screen..................................................................................................... 4-8
Version Screen ........................................................................................................ 4-10
Reset Command ...................................................................................................... 4-11
Devices Screen........................................................................................................ 4-11
Device Modify Screen.............................................................................................4-13
Names Screen.......................................................................................................... 4-15
Menu Screen............................................................................................................4-17
Scan Screen .............................................................................................................4-18
Flag Screen.............................................................................................................. 4-22
Security Screen........................................................................................................4-24
Broadcast Screen..................................................................................................... 4-27
Accessing the OSD at a Secondary Console Switch .....................................................4-30
Switching Between Computers......................................................................................4-31
Performing a Soft Switch........................................................................................4-32
Performing a Screen Capture......................................................................................... 4-32
Chapter 5
Using the Simplified OSD
Launching the OSD .........................................................................................................5-1
Printing a Screen Capture..........................................................................................5-1
Simplified OSD Selection Screen.................................................................................... 5-2
Opening the Simplified OSD or
Accessing the Simplified OSD Selection Screen on a Primary Console Switch ......5-2
Simplified OSD Status Port Symbols ..............................................................................5-3
Simplified OSD Advanced Menus Screen.......................................................................5-3
Opening the Simplified OSD Advanced Menus .......................................................5-3
Exiting the Simplified OSD ......................................................................................5-4
Selecting Computers........................................................................................................5-4
Switching Computers................................................................................................ 5-5
Assigning Unique Names to Computers.......................................................................... 5-5
Changing Menu Attributes...............................................................................................5-7
Effects of Settings on Screen Appearance ................................................................5-8
Compaq Server Console Switch User Guide v
Page 6

Contents
Changing Status Flag Attributes ................................................................................... 5-10
Values and Effects of Settings on Flag Appearance............................................... 5-11
Scanning the Computers......................................................................................... 5-12
Placing the Switch in Scan Mode........................................................................... 5-12
Canceling Scan Mode............................................................................................. 5-12
Setting a Custom Scan Pattern................................................................................ 5-12
Removing a Computer from the Scan List ............................................................. 5-13
Securing Server Access................................................................................................. 5-14
Locking the Screen and Keyboard.......................................................................... 5-15
Turning off the Screen Saver.................................................................................. 5-17
Blanking the Monitor without Locking the Console .............................................. 5-17
Displaying Version Information.................................................................................... 5-18
Saving the Hardware Settings ....................................................................................... 5-19
Resetting the Mouse and Keyboard .............................................................................. 5-19
Assigning Specific Device Types ................................................................................. 5-20
Switching Tiered Systems............................................................................................. 5-21
Appendix A
Regulatory Compliance Notices
Regulatory Compliance Identification Numbers.............................................................A-1
Federal Communications Commission Notice................................................................A-2
Class A Equipment ...................................................................................................A-2
Class B Equipment ...................................................................................................A-3
Declaration of Conformity for Products Marked with the FCC Logo,
United States Only....................................................................................................A-3
Modifications............................................................................................................A-4
Cables .......................................................................................................................A-4
Canadian Notice (Avis Canadien)...................................................................................A-4
Class A Equipment ...................................................................................................A-4
Class B Equipment ...................................................................................................A-5
European Union Notice...................................................................................................A-5
Japanese Notice...............................................................................................................A-6
Taiwanese Notice............................................................................................................A-6
vi Compaq Server Console Switch User Guide
Page 7

Appendix B
Electrostatic Discharge
Grounding Methods........................................................................................................ B-2
Appendix C
Power Cord Set Requirements
General Requirements..................................................................................................... C-1
Country-Specific Requirements...................................................................................... C-2
Appendix D
Specifications
Appendix E
Troubleshooting
Appendix F
Updating Firmware
Index
Contents
Compaq Server Console Switch User Guide vii
Page 8
This guide provides step-by-step instructions for installation and reference
information for operation, troubleshooting, and future upgrades for the Compaq
Server Console Switch.
Important Safety Information
Before installing this product, read the Important Safety Information document
provided.
Symbols on Equipment
The following symbols may be placed on equipment to indicate the presence of
potentially hazardous conditions:
WARNING: This symbol, in conjunction with any of the following symbols,
indicates the presence of a potential hazard. The potential for injury exists if
warnings are not observed. Consult your documentation for specific details.
This symbol indicates the presence of hazardous energy circuits or electric
shock hazards. Refer all servicing to qualified personnel.
WARNING: To reduce the risk of injury from electric shock hazards, do not
open this enclosure. Refer all maintenance, upgrades, and servicing to
qualified personnel.
About This Guide
Compaq Server Console Switch User Guide ix
Page 9
About This Guide
Weight in kg
Weight in lb
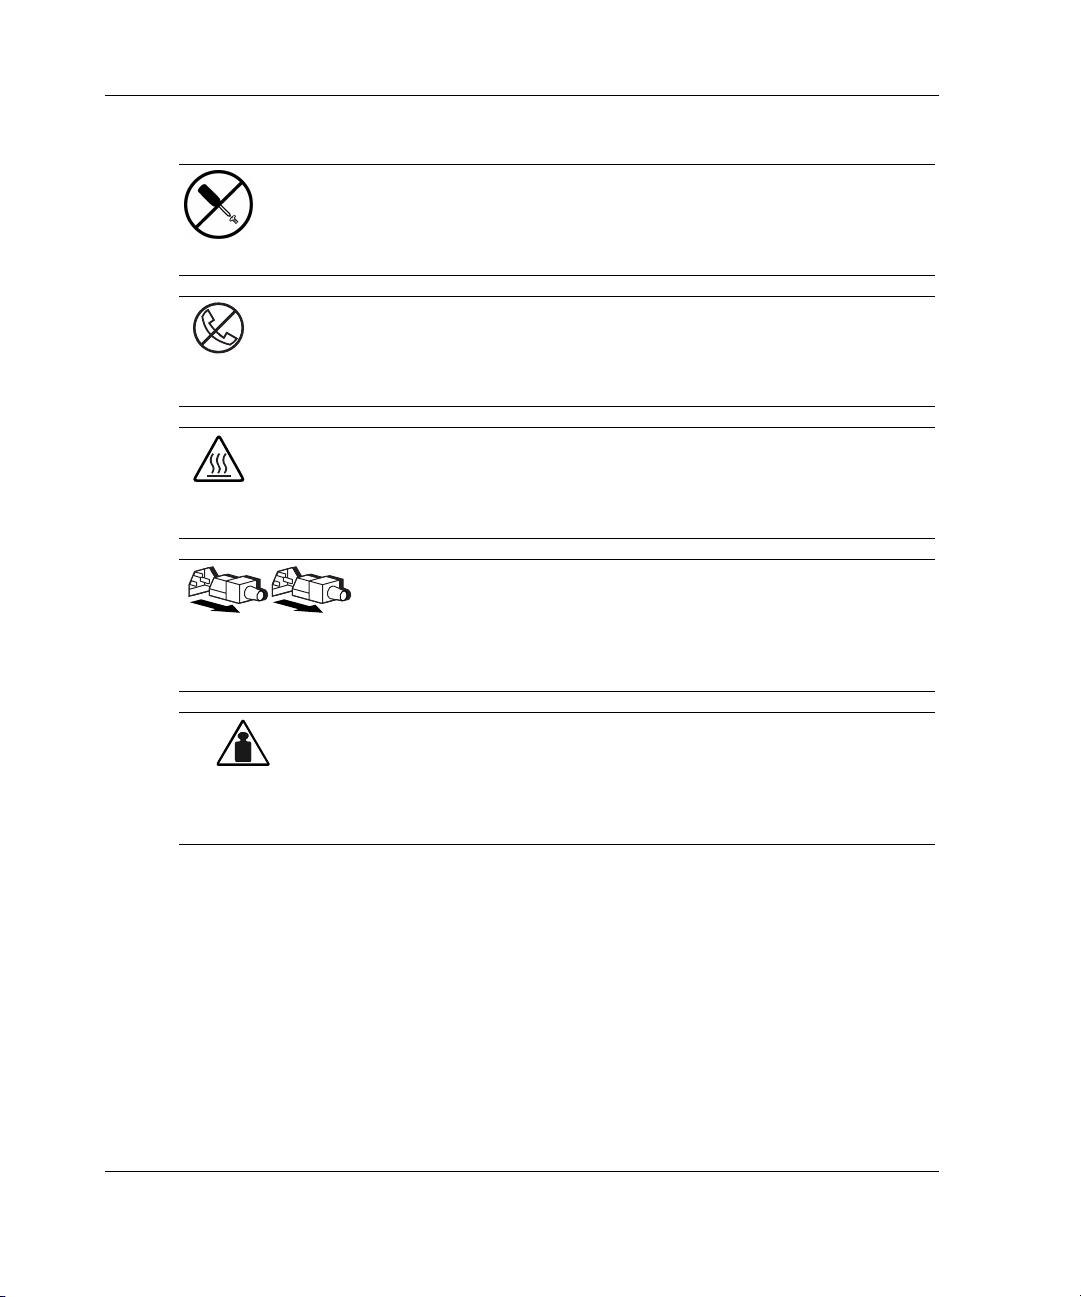
This symbol indicates the presence of electric shock hazards. The area
contains no user or field serviceable parts. Do not open for any reason.
WARNING: To reduce the risk of injury from electric shock hazards, do not
open this enclosure.
This symbol on an RJ-45 receptacle indicates a network interface connection.
WARNING: To reduce the risk of electric shock, fire, or damage to the
equipment, do not plug telephone or telecommunications connectors into this
receptacle.
This symbol indicates the presence of a hot surface or hot component. If this
surface is contacted, the potential for injury exists.
WARNING: To reduce the risk of injury from a hot component, allow the
surface to cool before touching.
These symbols, on power supplies or systems, indicate that the
equipment is supplied by multiple sources of power.
WARNING: To reduce the risk of injury from electric shock,
remove all power cords to completely disconnect power from the
system.
This symbol indicates that the component exceeds the recommended
weight for one individual to handle safely.
WARNING: To reduce the risk of personal injury or damage to the
equipment, observe local occupational health and safety requirements
and guidelines for manual material handling.
x Compaq Server Console Switch User Guide
Page 10

Rack Stability
WARNING: To reduce the risk of personal injury or damage to the equipment,
be sure that:
• The leveling jacks are extended to the floor.
• The full weight of the rack rests on the leveling jacks.
• The stabilizing feet are attached to the rack if it is a single-rack installation.
• The racks are coupled together in multiple-rack installations.
• Only one component is extended at a time. A rack may become unstable if
more than one component is extended for any reason.
Symbols in Text
These symbols may be found in the text of this guide. They have the following
meanings.
WARNING: Text set off in this manner indicates that failure to follow directions
in the warning could result in bodily harm or loss of life.
About This Guide
CAUTION: Text set off in this manner indicates that failure to follow directions could
result in damage to equipment or loss of information.
IMPORTANT: Text set off in this manner presents clarifying information or specific
instructions.
NOTE: Text set off in this manner presents commentary, sidelights, or interesting points of
information.
Compaq Server Console Switch User Guide xi
Page 11

About This Guide
Text Conventions
This document uses the following conventions:
• Italic type is used for complete titles of published guides or variables. Variables
include information that varies in system output, in command lines, and in
command parameters in text.
• Bold type is used for emphasis, for onscreen interface components (window
titles, menu names and selections, button and icon names, and so on), and for
keyboard keys.
Monospace typeface is used for command lines, code examples, screen
•
displays, error messages, and user input.
•
Sans serif typeface is used for uniform resource locators (URLs).
Getting Help
If you have a problem and have exhausted the information in this guide, you can get
further information and other help in the following locations.
Compaq Technical Support
In North America, call the Compaq Technical Support Phone Center at
1-800-OK-COMPAQ. This service is available 24 hours a day, 7 days a week. For
continuous quality improvement, calls may be recorded or monitored. Outside North
America, call the nearest Compaq Technical Support Phone Center. Telephone
numbers for worldwide Technical Support Centers are listed on the Compaq website,
www.compaq.com.
Be sure to have the following information available before you call Compaq:
• Technical support registration number (if applicable)
• Product serial number
• Product model name and number
• Applicable error messages
xii Compaq Server Console Switch User Guide
Page 12

• Add-on boards or hardware
• Third-party hardware or software
• Operating system type and revision level
Compaq Website
The Compaq website has information on this product as well as the latest drivers and
flash ROM images. You can access the Compaq website at
Compaq Authorized Reseller
For the name of your nearest Compaq authorized reseller:
• In the United States, call 1-800-345-1518.
• In Canada, call 1-800-263-5868.
• Elsewhere, see the Compaq website for locations and telephone numbers.
About This Guide
www.compaq.com.
Reader’s Comments
Compaq welcomes your comments on this guide. Please send your comments and
suggestions by email to
Compaq Server Console Switch User Guide xiii
ServerDocumentation@compaq.com.
Page 13

Product Overview
The Compaq Server Console Switch enables the user to control large computer
networks using a single keyboard, video, and mouse (KVM). With a single video
screen, the user can select as many as 64 computers running different operating
systems.
The 4-Port and 8-Port console switches use an On-Screen Display (OSD) interface,
which has menus for accessing each attached computer. Computers can be identified
by name or number, enabling the user to view and select server names.
NOTE: The 2-Port console switch uses a simplified OSD.
A typical Compaq Server Console Switch, also known as a KVM configuration,
consists of the console, the switch unit, and the attached computers. The user can
choose from a single-user system, multiple user system, or a tiered system. Tiering
increases computer access from 4 to 8 computers to as many as 64 by adding
additional Server Console Switches to the primary console switch, allowing the user
to modify the system, as network system needs change.
1
Introduction
Two 8-Port console switch units offer dual console capabilities, allowing console
switch configurations to be controlled from more than one location or by more than
one user.
Compaq Server Console Switch User Guide 1-1
Page 14

Introduction
To switch between computers, simply enter a command at the keyboard. The selected
computer receives characters entered at the keyboard and displays its video output on
the monitor. The user can also use the mouse to interact with the graphic interface of
the selected computer.
The Compaq Server Console Switch family of products is available in 2-, 4-, and
8-Port versions and can be used in various configurations to accommodate large or
small systems. All versions are packaged in space-efficient 1U height (1.71-inch)
cases.
This chapter provides an overview of the Server Console Switch features,
functionality, and sample configurations.
Features
Use the Server Console Switch in various configurations to connect from 2 to 64
servers.
The features of the Server Console Switch include:
• On-Screen Display (OSD)—Displays system-related information on the
monitor, such as power-up test data and configuration menus.
• Programmable Scanning—Evaluates system performance by sequentially
scanning any or all of the computers in the system. Programmable scanning
allows you to determine which computers to include as well as the duration of the
connection.
• Configuration NVRAM—Makes it easy to set configuration information using
commands entered from the keyboard. The non-volatile RAM (NVRAM) stores
the resulting configuration until you decide to change the information, even if the
unit loses power.
• Hardware Reset Switch—Resets the unit without interrupting power to the
system if the keyboard or mouse communication is disrupted.
• Password Protection—Protects against unauthorized users by providing a
password option for security purposes.
1-2 Compaq Server Console Switch User Guide
Page 15

Introduction
• Switch Firmware Update—Allows quick and easy update since the application
code of the switch resides in FLASH. The port communications settings are
automatically configured to allow direct downloading from the connected
computer.
• Alternate Language Selection—Provides alternate languages, available on the
Compaq Server Console Switch Software Utility CD. (Not available for use with
the 2-Port switch.) See this CD for additional information.
• Support for Optional Switch Box Connector Kit—Provides frontal access to
the 4- and 8-Port console switches for a keyboard, monitor, mouse, and power
cord.
Compaq Server Console Switch User Guide 1-3
Page 16

Introduction
Configurations
There are many ways to configure the Server Console Switch to meet specific
organizational needs. Additional information on configuring multiple Server Console
Switches can be found in Chapter 3.
• A single console switch box is used to connect four or eight servers. In this
configuration, the KVM are connected directly to the unit by their respective
cables. The user can connect the Server Console Switch to servers located in the
same or adjoining racks.
Keyboard,
Mouse,
and
Video Cables
HYDR-001.EPS
Figure 1-1: Single 4-Port unit
1-4 Compaq Server Console Switch User Guide
Page 17
Introduction
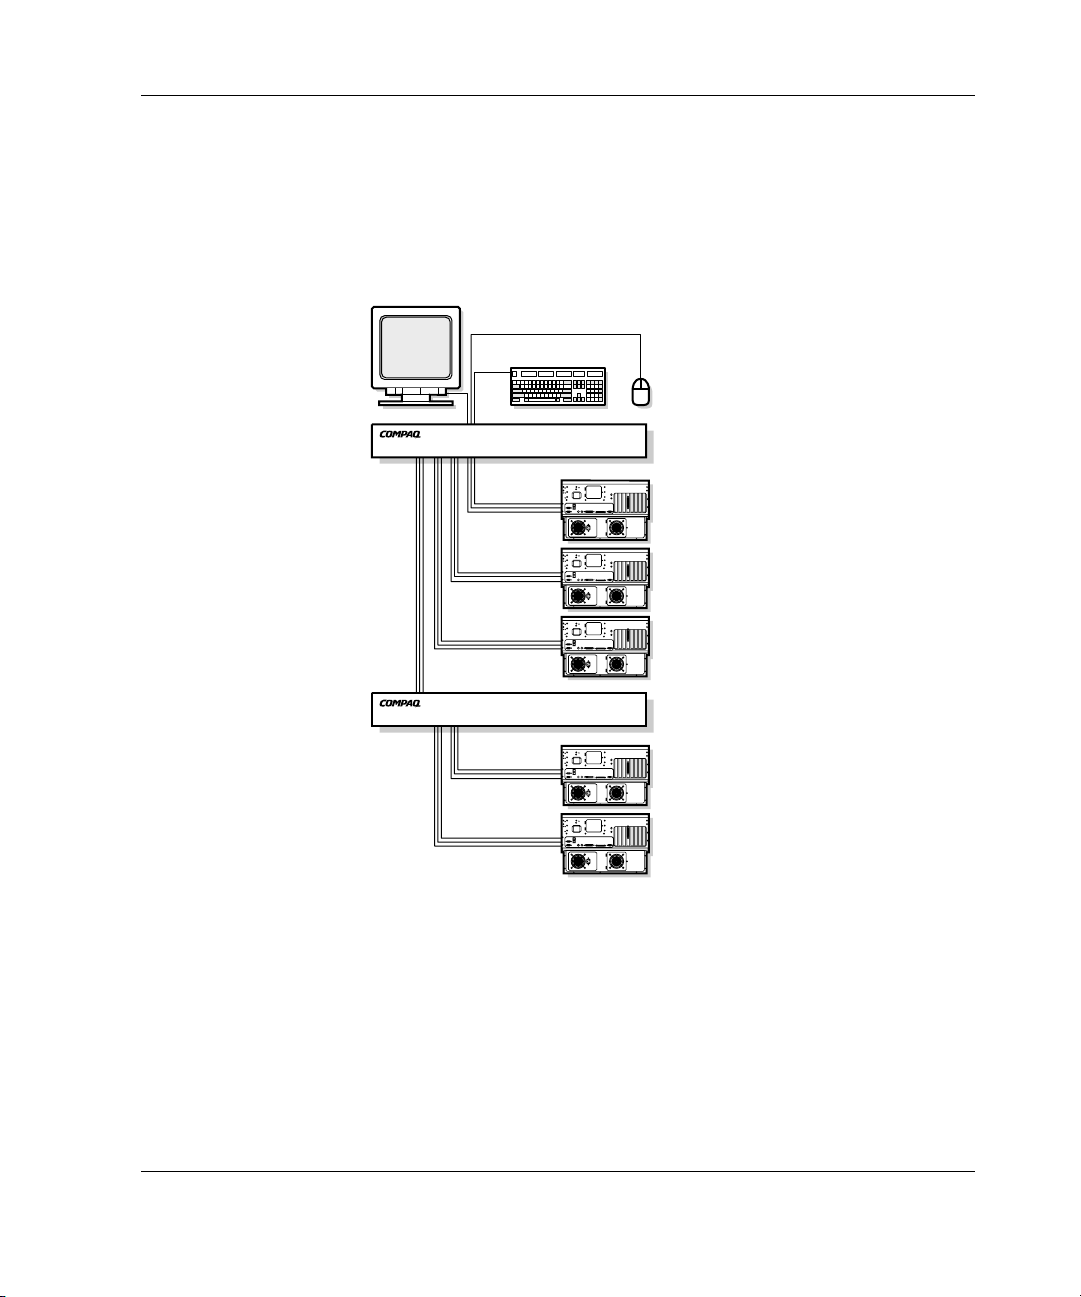
• The user can tier multiple Server Console Switch units to connect up to
64 servers. This configuration is illustrated in Figure 1-3, where the device port
from the secondary unit is connected to one of the computer ports on the original,
or primary unit. Multiple Server Console Switch units can be tiered from the
primary unit.
Primary Switch
Keyboard,
Mouse,
Video Cables
and
HYDR-002.EPS
Secondary Switch
Figure 1-2: Tiered configuration
Compaq Server Console Switch User Guide 1-5
Page 18
Introduction
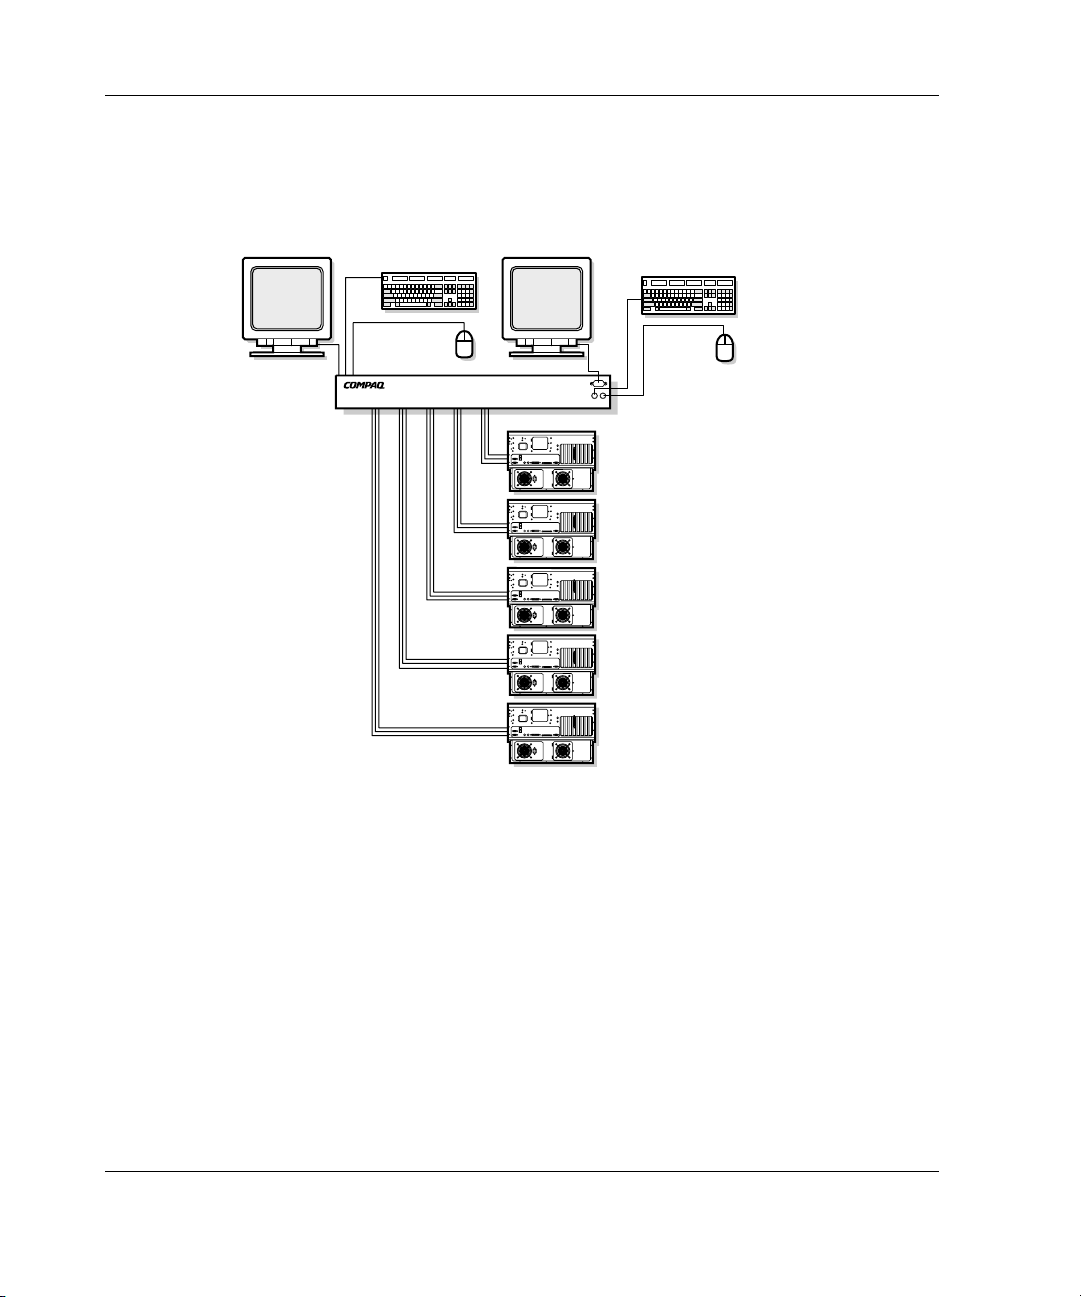
• The Dual Console 8-Port models allow the user to set up two consoles, so that the
console switch system can be controlled from more than one location, or by two
users.
Keyboard,
Mouse,
and
Video Cables
Figure 1-3: Dual console configuration
1-6 Compaq Server Console Switch User Guide
Page 19

Available Models
The Server Console Switch is available in 2-, 4-, and 8-Port versions.
Table 1-1: Model Comparison Chart
Introduction
2-Port 4-Port 8-Port Dual
Console
8-Port
Number of
computer
ports
Number of
consoles
(monitor,
keyboard,
mouse)
Number of
tiered
computers
Switch
connection
mode
control
Power
Supply
2 4 8 8 8
1 1 1 2 2
N/A 32 64 64 64
No No No Yes Yes
110/22
0VAC
110/220V
AC
110/220V
AC
110/220V
AC
Dual
Console
8-Port
DC
48V DC
Compaq Server Console Switch User Guide 1-7
Page 20

The following section outlines the procedures for installing the Server Console
Switch hardware.
Installation Checklist
Before installing the Server Console Switch, refer to the following list to be sure that
all of the listed components were received.
Kit Contents
• Compaq Server Console Switch Rack Option Kit
• Main console switch
• Power cord (except Dual Console 8-Port DC model)
2
Hardware Installation
• Rails with hardware
• Compaq Server Console Switch User Guide
• Serial cable
• Warranty card
You must supply:
• Interconnecting cables for KVM (included in 2-Port Rack Option Kit)
• KVM for each user console
Compaq Server Console Switch User Guide 2-1
Page 21
Hardware Installation
Required Tools
You need a Phillips screwdriver.
Installing the Hardware
2-Port Side-Mount 0U Installation
NOTE: The 2-Port unit should only be installed using the following side-mount procedure.
To side-mount the 2-Port unit:
1. Attach the side-mount brackets to the console switch, using two screws on
each side.
Figure 2-1: Attaching the side-mounting brackets
2-2 Compaq Server Console Switch User Guide
Page 22

Hardware Installation
2. Slide the tabs on the side-mounting brackets into the same U location on each
side of the rack.
Figure 2-2: Mounting the console switch to the side of
the rack
3. Secure the console switch to the rack frame, using one screw on each side.
Figure 2-3: Securing the console switch to the rack
Compaq Server Console Switch User Guide 2-3
Page 23
Hardware Installation
Connecting 2-Port KVM Cables
To connect the 2-Port KVM cables refer to Figure 2-4.
5
Figure 2-4: Connecting the 2-Port KVM cable
Item Description
1
2
3
4
1 Keyboard, monitor, and mouse connectors to
computer 1
2 Monitor connector to switch box console
3 Keyboard and mouse connectors to the console switch
4 Keyboard, monitor, and mouse connectors to
computer 2
5 Power cord
2-4 Compaq Server Console Switch User Guide
Page 24
Side-Mount 0U Installation
Use the following procedure to install the 4-Port, 8-Port, or Dual Console 8-Port unit
on the side of a rack.
Type A
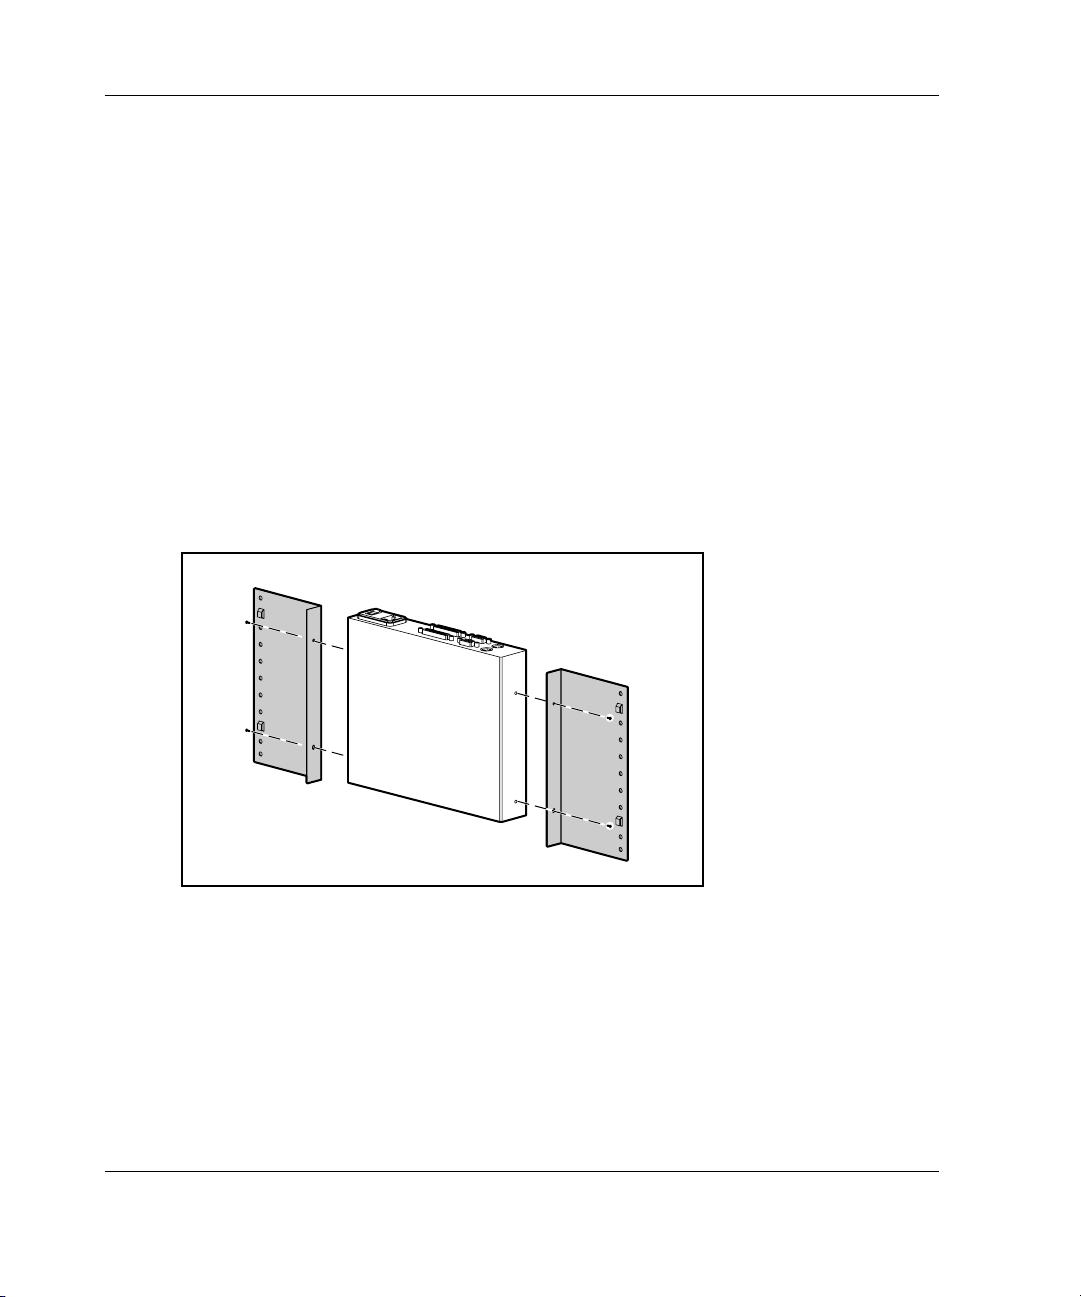
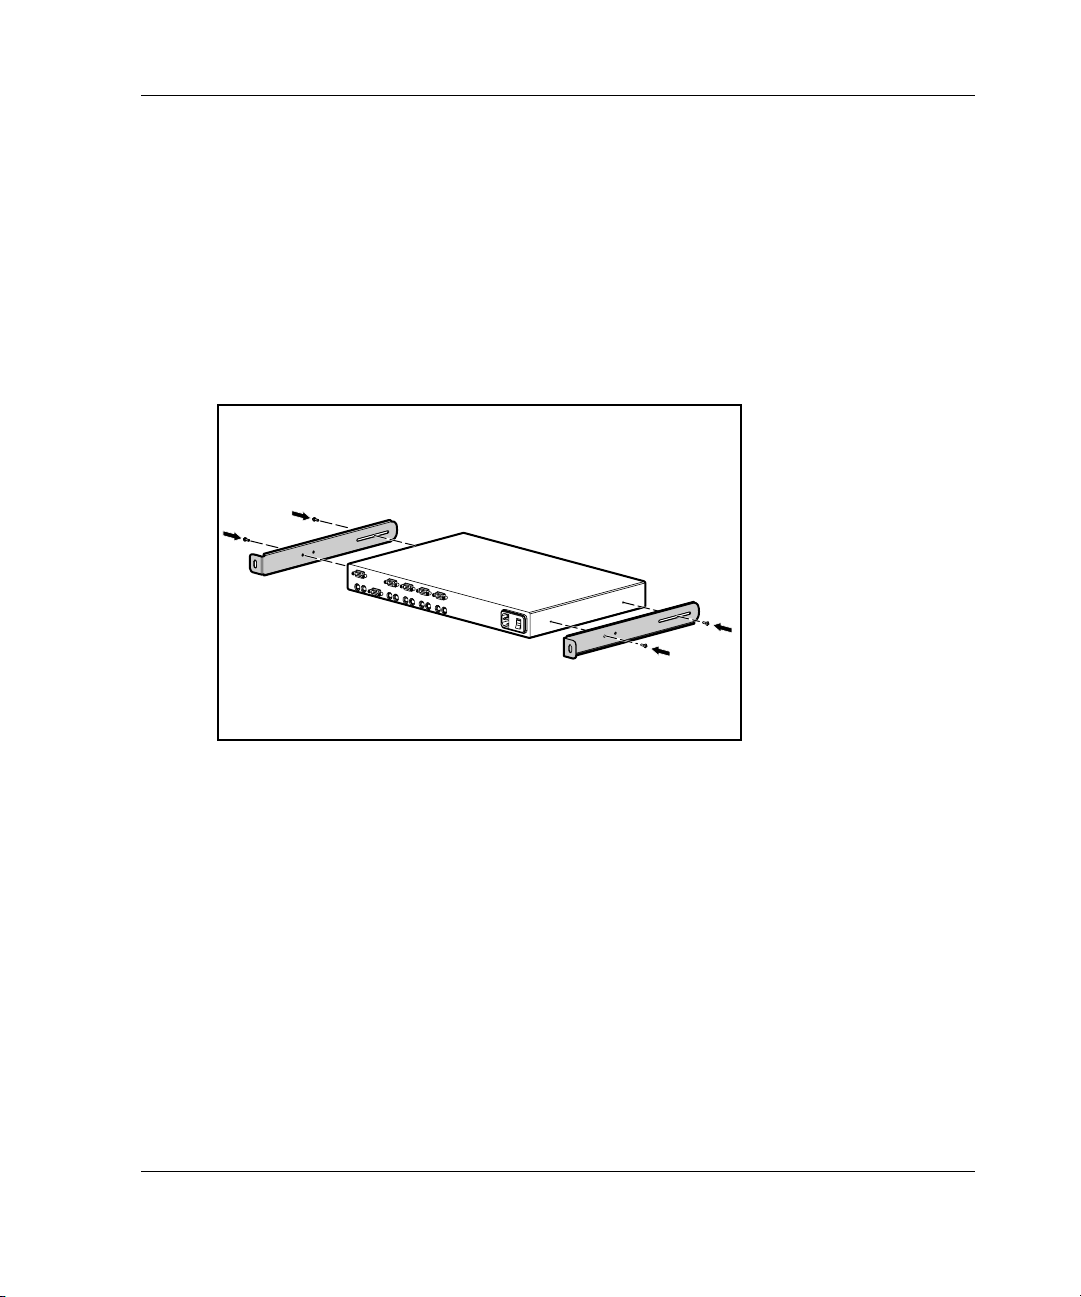
To side-mount the console switch:
1. Attach the side-mount brackets to the console switch, using two screws on
each side.
Hardware Installation
Figure 2-5: Attaching the side-mounting brackets
Compaq Server Console Switch User Guide 2-5
Page 25
Hardware Installation
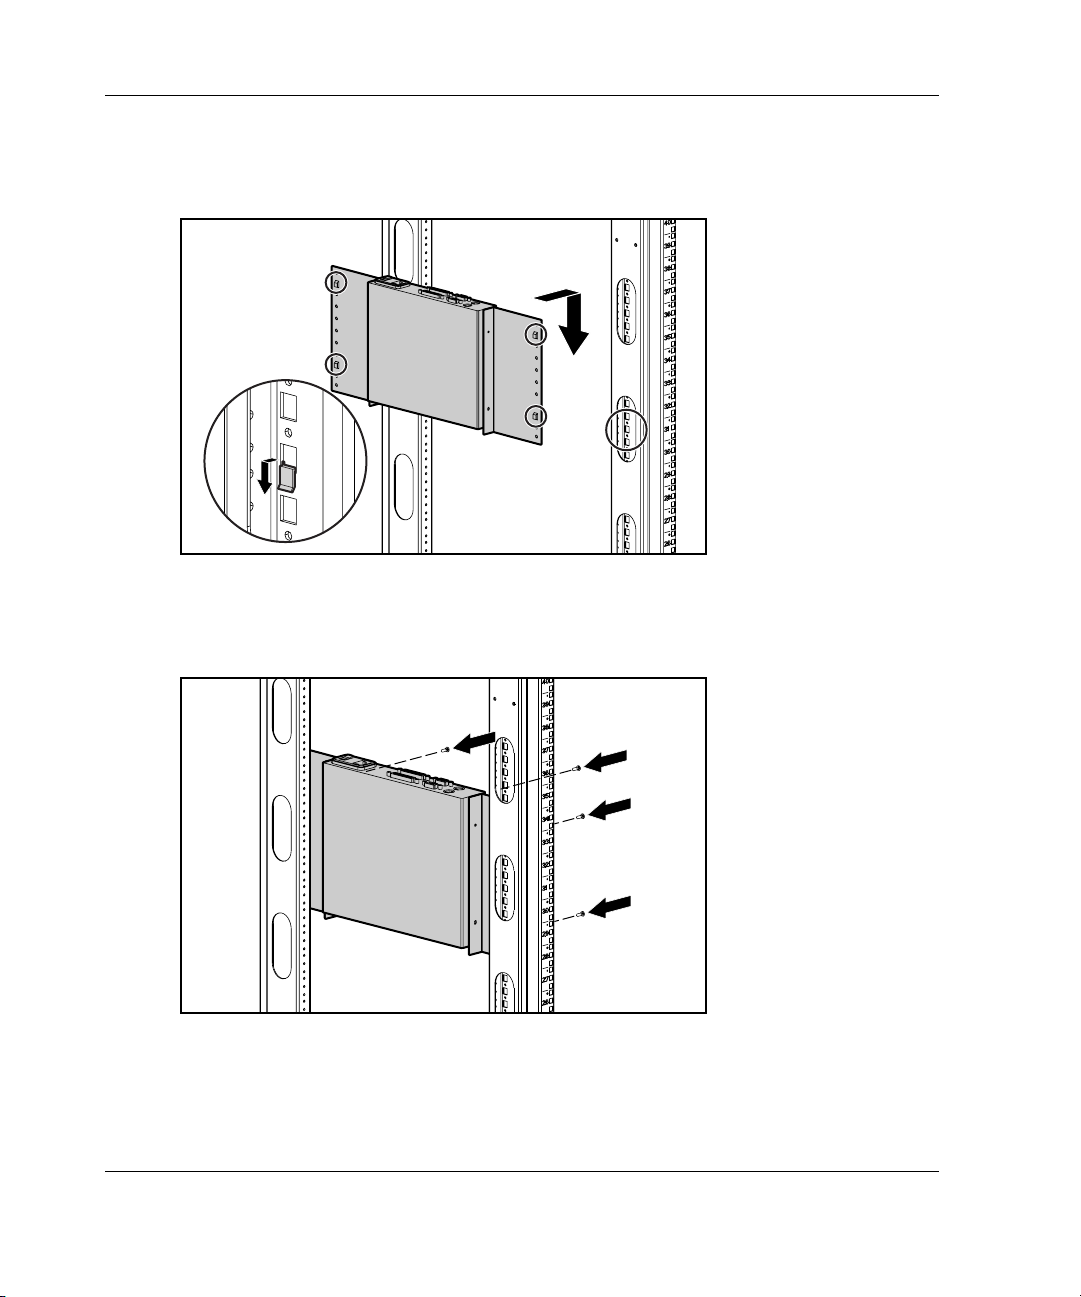
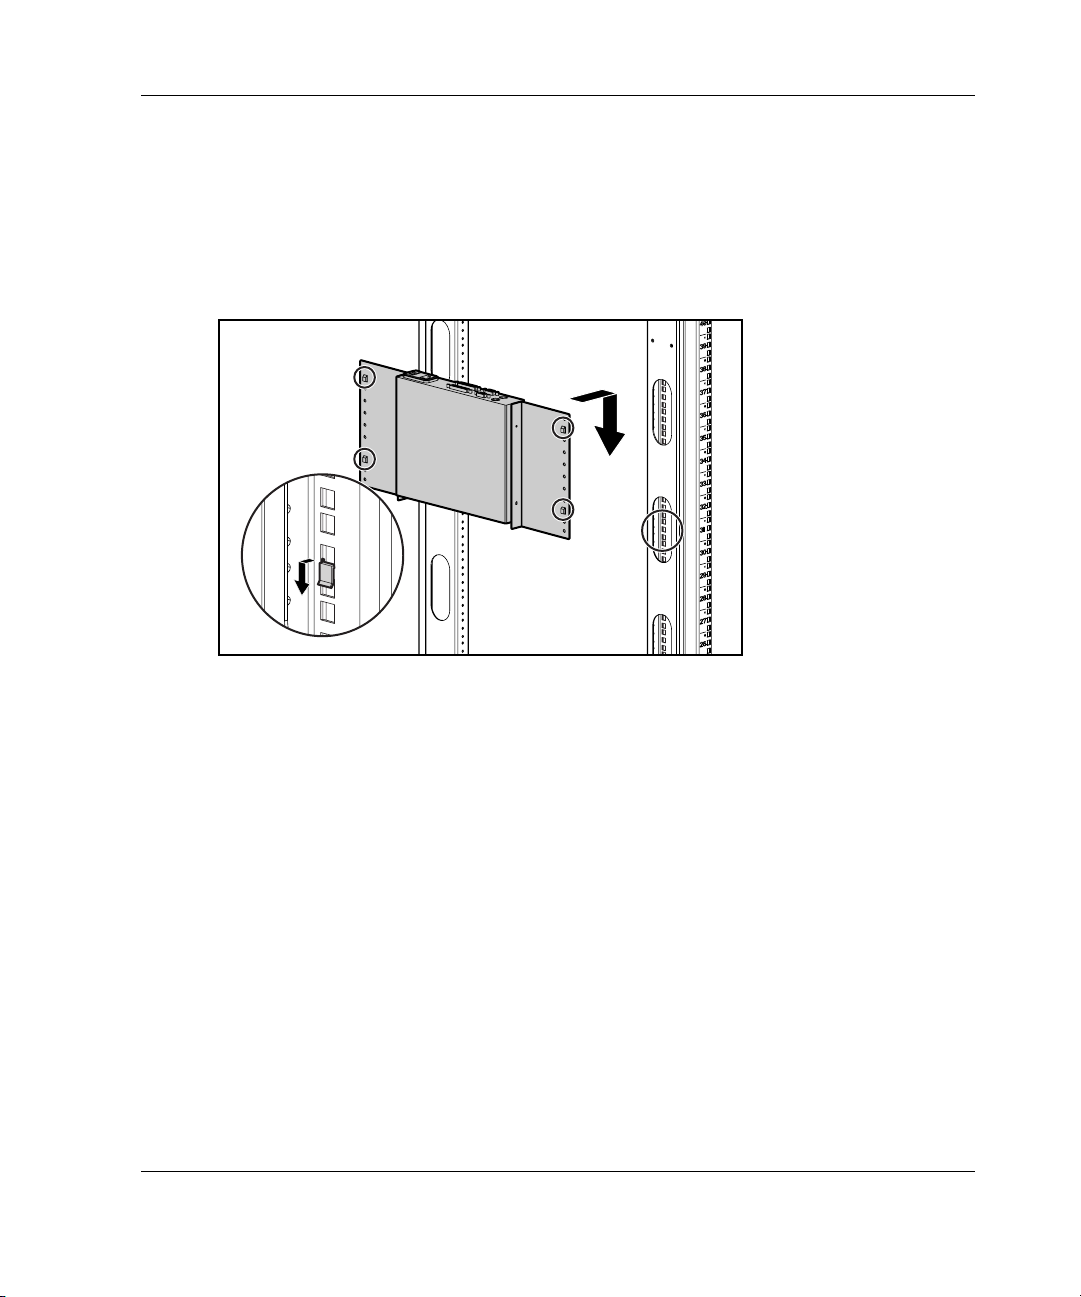
2. Slide the tabs on the side-mounting brackets into the same U location on each
side of the rack.
Figure 2-6: Mounting the console switch to the side of
the rack
3. Secure the console switch to the rack frame, using two screws on each side.
Figure 2-7: Securing the console switch to the rack
2-6 Compaq Server Console Switch User Guide
Page 26
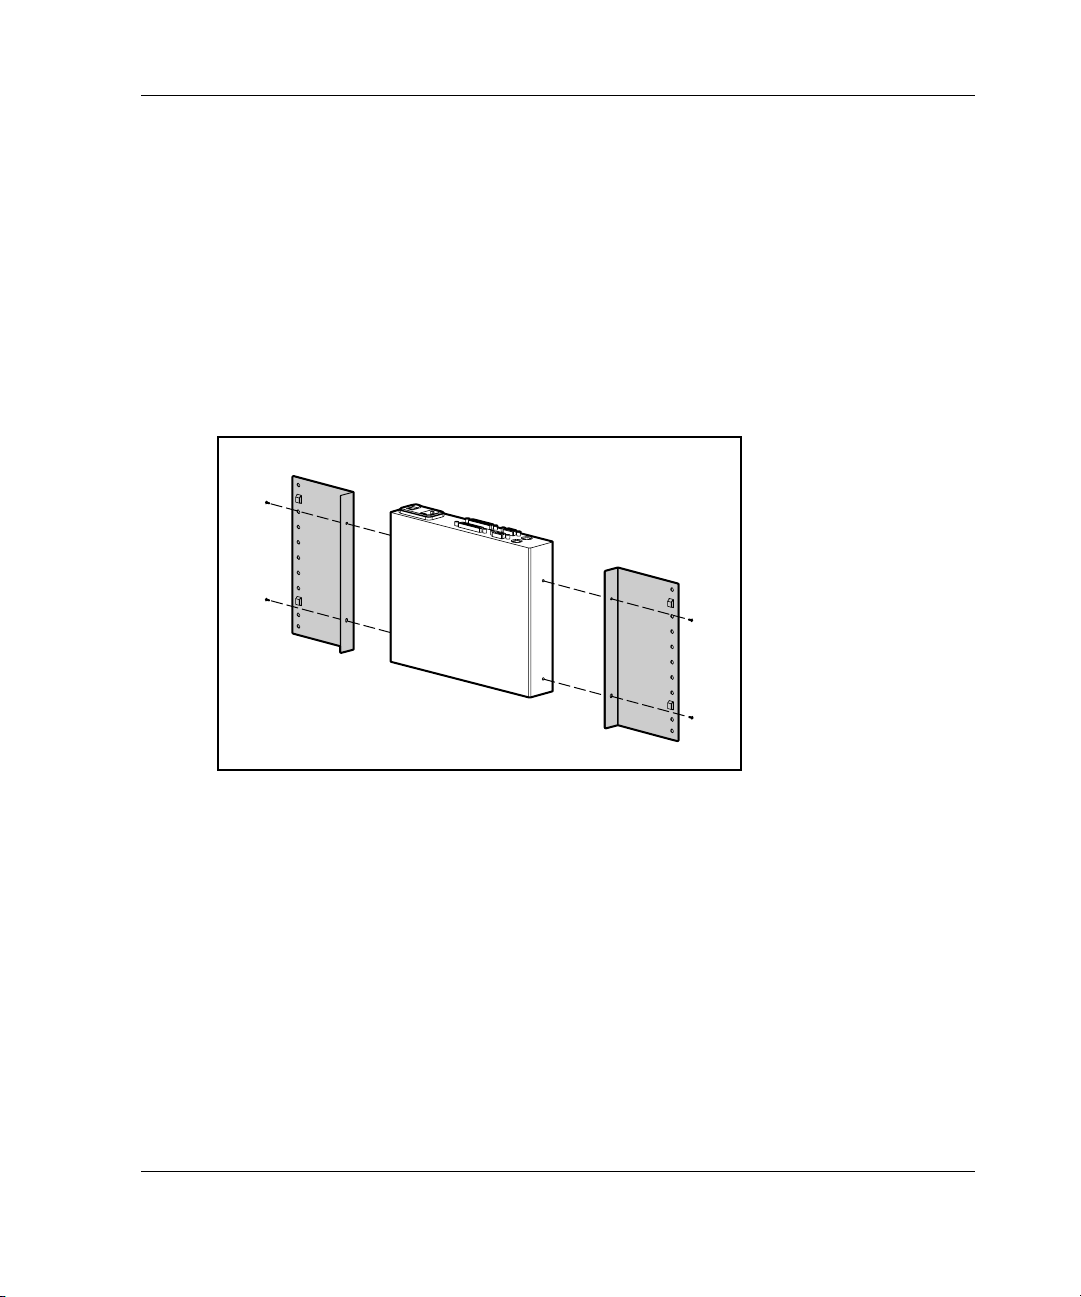
Type B
Hardware Installation
1. Attach the side-mounting brackets to the console switch, using two screws on
each side.
2. Slide the tabs on the side-mounting brackets into the same U location on each
side of the rack.
Figure 2-8: Mounting the console switch to the side of
the rack
Compaq Server Console Switch User Guide 2-7
Page 27

Hardware Installation
3. Insert four cage nuts into the rack frame where the side-mounting bracket holes
are located.
Figure 2-9: Inserting cage nuts
4. Secure the console switch to the rack frame, using two screws on each side.
6
1
5
1
4
1
3
1
2
1
1
1
0
1
9
8
7
6
5
4
3
2
1
2-8 Compaq Server Console Switch User Guide
Page 28
Rear Rack Installation
IMPORTANT: If you are installing a console switch with a 1U component, such as the 1U
Keyboard Drawer Rack Option Kit, additional rack space is not required, making it a 0U
installation.
To install the console switch in the rear of the rack:
1. Attach the slide rail brackets to the console switch, using two screws on
each slide.
Hardware Installation
Figure 2-10: Attaching the slide rail brackets
Compaq Server Console Switch User Guide 2-9
Page 29

Hardware Installation
2. Be sure that a cage nut has been installed behind the rear rail.
3. Slide the console switch with the slide rail brackets into the rail-mounting
brackets already installed in the rack.
Figure 2-11: Sliding the console switch into the rack
4. Secure the slide rail brackets to the rear of the rack, using one screw on each side.
Figure 2-12: Securing the slide rail brackets to the rack
2-10 Compaq Server Console Switch User Guide
Page 30
Standard 1U Installation
To install the console switch:
1. Attach the slide rail brackets to the console switch, using the two screws on each
side.
2. Use the template that was shipped with the component to mark the location of the
mounting hardware.
a. Push back the tabs (marked ) on the top of the template and place them in
the correct holes in the mounting rails.
b. Match up the hole pattern indicated on the sides of the template with the hole
pattern on the mounting rails.
c. Measuring from the top of the component immediately below the new
component, place the template against the front and rear of the rack frame to
mark the attachment points for the mounting rails and rear cage nuts.
Hardware Installation
Figure 2-13: Measuring with the rack template
Compaq Server Console Switch User Guide 2-11
Page 31

Hardware Installation
3. Install two cage nuts into the holes marked by the template at the rear of the rack.
Figure 2-14: Installing cage nuts
4. Loosely attach the wing nuts (1) and extend the adjustable rail-mounting brackets
to the desired length (2).
5. Tighten the wing nuts slightly to stabilize the adjustable rails during installation.
1
2
Figure 2-15: Adjusting rails
2-12 Compaq Server Console Switch User Guide
Page 32

Hardware Installation
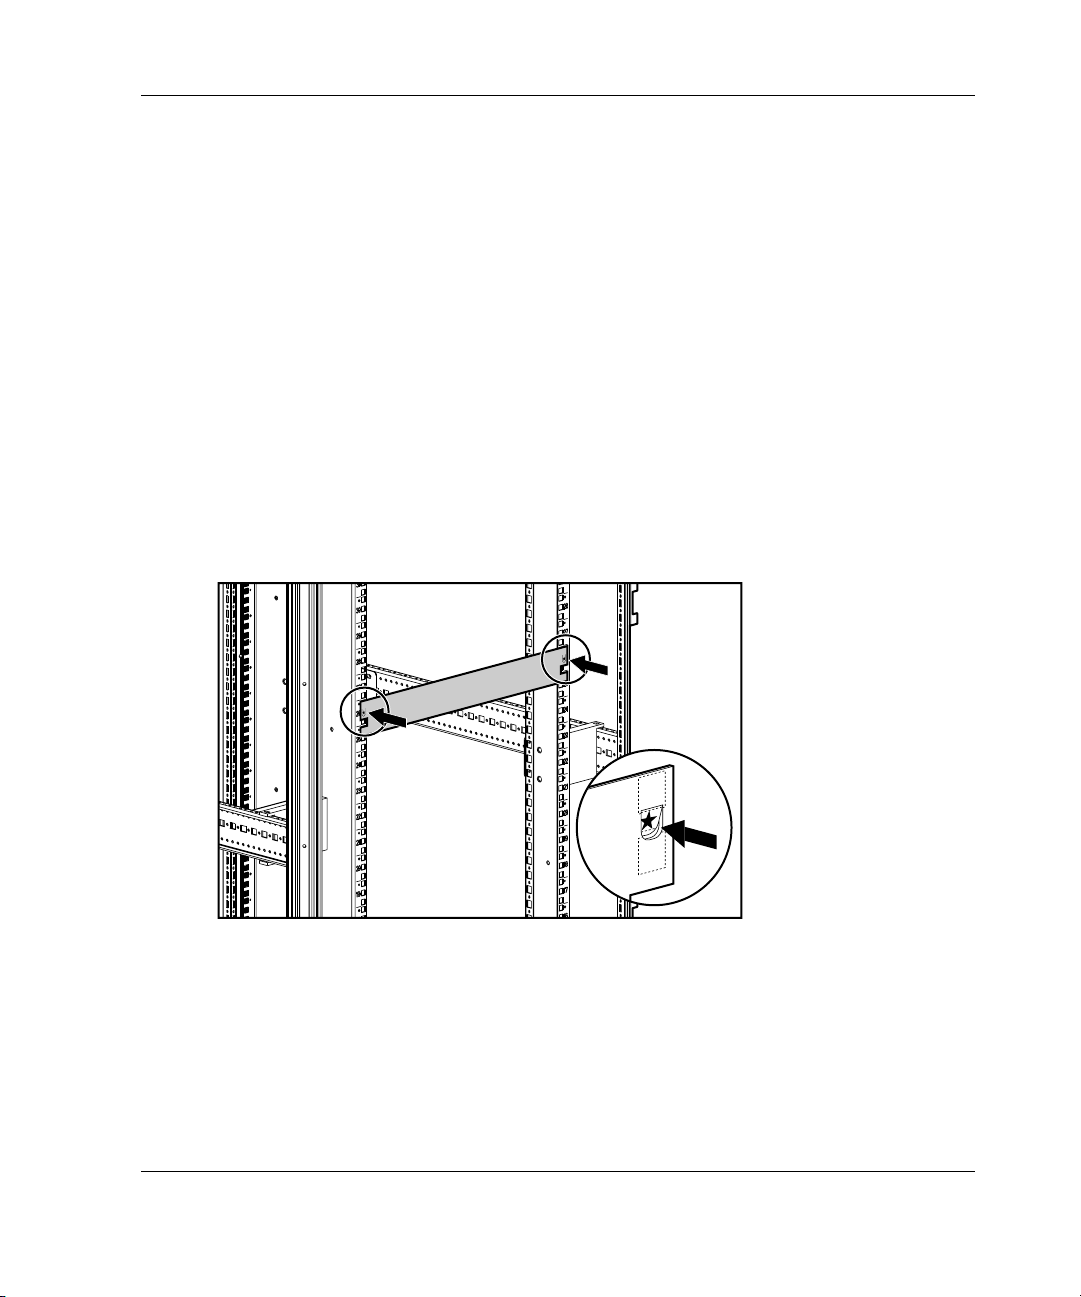
6. Insert an adjustable rail into the rack and hook the tabs into the appropriate holes
at the rear of the rack, aligning the screws holes at the front of the rack.
7. Secure the rear of the adjustable rail, using one screw for each cage nut
previously installed.
Figure 2-16: Securing the adjustable rail
8. Secure the front of the adjustable rail to the rack, using two screws for each rail.
Figure 2-17: Securing the adjustable rail
Compaq Server Console Switch User Guide 2-13
Page 33

Hardware Installation
9. Slide the console switch into the adjustable rails and secure it to the rear of the
rack, using one screw on each side.
Figure 2-18: Securing the console switch to the rack
2-14 Compaq Server Console Switch User Guide
Page 34

Hardware Installation
10. Position the front cover panel and secure it to the front of the rack, using one
screw on each side.
Figure 2-19: Positioning the front cover panel
NOTE: This installation supports the optional Switch Box Connector Kit, which provides frontal
access to a 4- or 8-Port switch for a keyboard, monitor, mouse, and power cord. If desired, use
this option in place of the front cover panel.
Completing the Installation
After your Server Console Switch is installed in the rack using one of the methods
listed in this chapter, proceed to Chapter 3, “Cabling.”
Compaq Server Console Switch User Guide 2-15
Page 35

Cable Information
Cable length affects video quality as well as keyboard and mouse data timing. The
maximum cable length is determined in part by the computer and peripherals used.
Not all systems give satisfactory results at the maximum length.
3
Cabling
Compaq Server Console Switch User Guide 3-1
Page 36

Cabling
Cable Locking Mechanism
The keyboard and mouse cable options for the 4-Port, 8-Port, and Dual Console
8-Port units have a locking mechanism to provide a secure connection. You must use
proper procedures when disconnecting these cables.
CAUTION: Failure to follow proper disconnect procedures could result in damage to
the cable or the unit.
1
2
3
Figure 3-1: Disconnecting the keyboard or mouse cable
To disconnect the keyboard or mouse cable properly:
1. Grasp the housing (1).
2. Slide it back to release the locking mechanism (2).
3. Remove the cable (3).
3-2 Compaq Server Console Switch User Guide
Page 37

Cabling
To insert the cable, plug it into the appropriate connector. The locking mechanism
automatically locks the cable in place.
Connect the cables to the switch in this order:
1. Mouse
2. Monitor
3. Keyboard
This cable connection sequence is particularly important later when installing new
devices to the system. The user can connect a mouse and/or keyboard to the switch
when the system is running. When connecting the new device, the console switch
recognizes the device and configures it to the settings of the currently selected
computer. This allows the user to replace failed devices without having to restart the
system.
When making changes to the switch system, the user should save the hardware
configuration settings. If the settings are not saved, they are lost when power is lost
or turned off. To re-establish keyboard and mouse communication to the switch, the
user might have to reboot each computer. To save the hardware settings, click
Snapshot on the Commands screen. Refer to Chapter 4 for additional information
on using the OSD.
Connecting the Cables
WARNING: To reduce the risk of electric shock or damage to your equipment:
• Do not disable the power cord grounding plug. The grounding plug is an
important safety feature.
• Plug the power cord into a grounded (earthed) outlet that is easily
accessible at all times.
• Disconnect the power from the unit by unplugging the power cord from
either the electrical outlet or the unit.
Compaq Server Console Switch User Guide 3-3
Page 38

Cabling
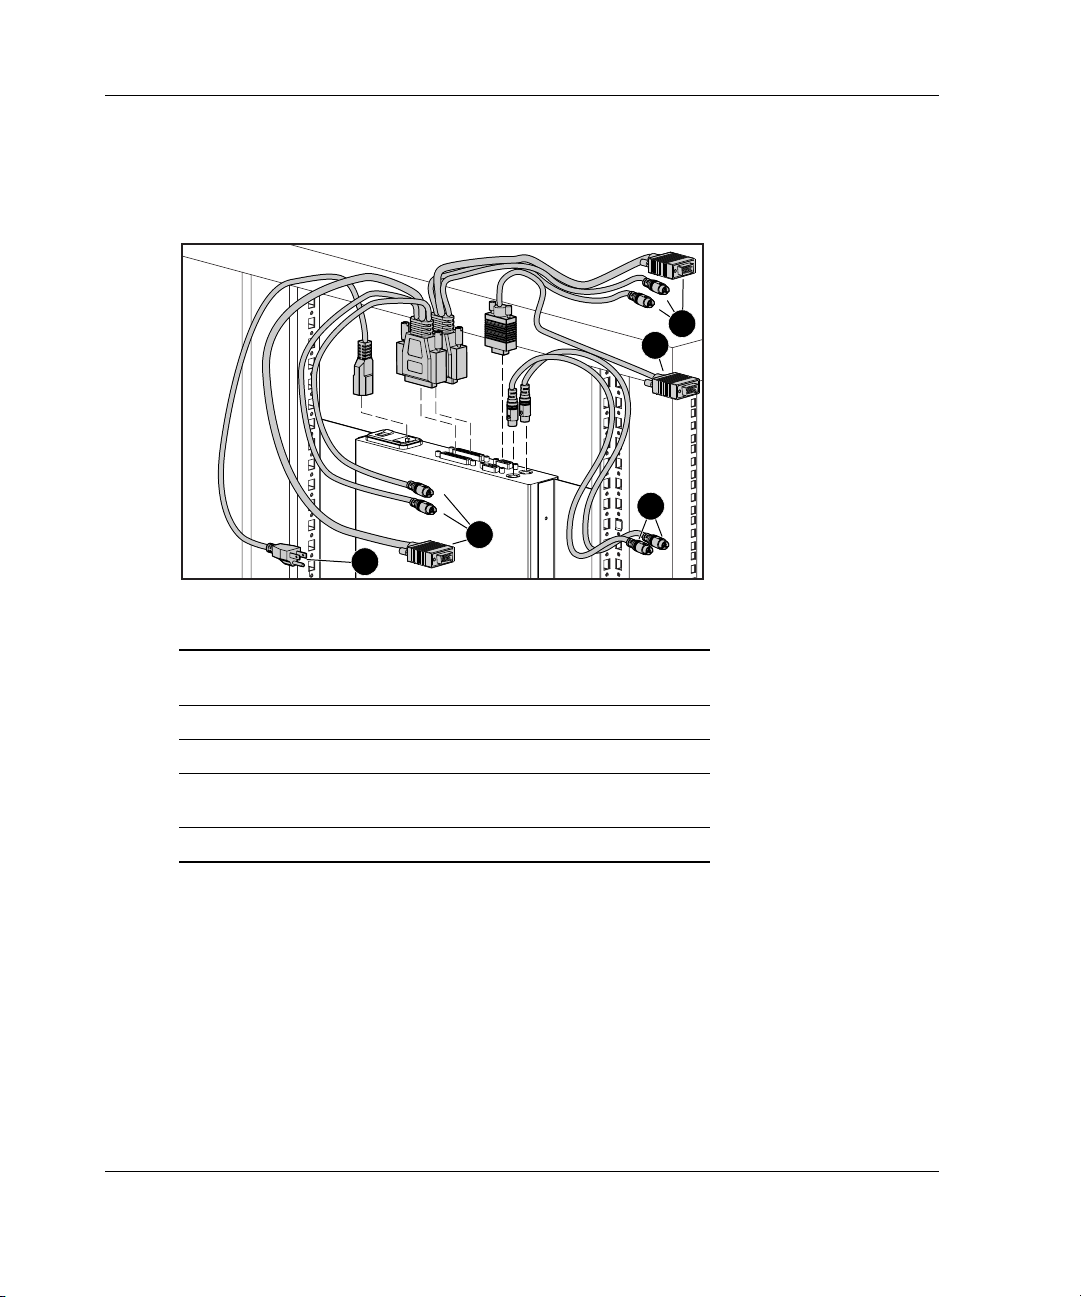
To connect the cables:
1. Connect the KVM cables to the appropriate console switch connectors. Note that
all keyboard and mouse cables are 6-pin mini-DIN PS/2 style, and all the video
cables are 15-pin VGA/SVGA style. (These connectors are located on the left
rear of each of the console switches, with additional connectors on the front for
the Dual Console 8-Port console switches.)
Figure 3-2: 2-Port connectors
Figure 3-3: 4-Port connectors
Figure 3-4: 8-Port connectors
Figure 3-5: Dual Console 8-Port AC connectors
Figure 3-6: Dual Console 8-Port DC connectors
3-4 Compaq Server Console Switch User Guide
Page 39

Cabling
2. Decide which computer is to be connected to port 1.
a. Connect the appropriate connector beneath the port labeled 1 to the mouse.
b. Connect the 15-pin VGA connector to the monitor.
c. Connect the appropriate connector to the keyboard.
d. Bundle and label the cables for easy identification.
3. Repeat step 2 for all remaining computers to be connected to the switch box.
WARNING: To reduce the risk of electric shock or damage to the
equipment, do not disable the power cord grounding feature. This
equipment is designed to be connected to a grounded (earthed) power
outlet that is easily accessible to the operator. The grounding plug is an
important safety feature.
4. Connect the power cord to the console switch.
Compaq Server Console Switch User Guide 3-5
Page 40

Cabling
Connecting the Power Cable to the Dual Console 8-Port DC Switch Box
Use only #18 AWG stranded wire UL 1007 or UL 1015 (not included with the
console switch). The maximum length should not exceed 10 meters (32.8 feet).
WARNING: Always disconnect power before changing any wiring.
WARNING: To reduce the risk of electric shock or damage to the equipment
this product must be installed in accordance with the following guidelines:
• This product is intended to be connected to a DC power source that can
be classified as a secondary circuit in accordance with applicable national
requirements for Information Technology Equipment. Generally, these
requirements are based on the International Standard for Safety for
Information Technology Equipment, IEC 950. The source must have one
pole (Neutral/Return) referenced to earth ground in accordance with
local/regional electric codes and/or regulations.
• This product is intended to be installed only in areas that comply with
ETSI-300-132-2.
• This product must be connected to a power distribution device that
provides a means for disconnecting power from the branch supply circuit.
The power distribution device must be provided with an overcurrent
protective device suitable for interrupting fault currents available from the
main source, and rated no more than 0.3 A at the distribution device. The
green/yellow lead of the power cable assembly must be connected to a
suitable ground/earth terminal on the power distribution unit. Do not rely
on the rack or cabinet chassis to provide adequate ground/earth
continuity.
3-6 Compaq Server Console Switch User Guide
Page 41

1
+ 48VDC -
+
+
2
3
Figure 3-7: Wiring diagram
Item Description
1 Red wire
2 Black wire
3 Green/Yellow striped wire*
4 48 V DC (to external fused 48 V DC supply)
Cabling
+
4
-
* Use chassis ground connection only.
Compaq Server Console Switch User Guide 3-7
Page 42

Cabling
1. Plug connector (1) into receptacle. Do not use ground connection through
connector.
2. Insert stripped wires (2) and tighten screws (3).
+
1
Figure 3-8: Connecting the wires
Switch Box Startup Behavior
It is important to turn on the console switch before turning on the computers because
when the servers boot up, their drivers send device settings to the console switch.
During startup, the console switch does the following:
• Identifies the mouse and keyboard and puts them into default states.
• Switches to port 1 by default, and displays the number “1” in the status flag
displayed on the monitor. If the status flag default setting has been changed to
Names mode, the status flag displays the port name instead of the port number. If
a status flag is not shown on the monitor, make sure the computer is connected
and powered up.
3
2
-
3-8 Compaq Server Console Switch User Guide
Page 43

Power up the system as follows:
1. Press the power switch located on the rear panel of the console switch to the on
position.
2. Power on the computers.
Computer Startup Behavior
During startup, the computers send device settings to the console switch. The unit
then generates standard responses to these commands and allows the computers to
boot successfully without being physically connected to the keyboard, monitor, or
mouse. After the console switch is installed, the user can save these settings to nonvolatile RAM (NVRAM). Refer to Chapter 4 for additional information.
Configuring the Console Switch
When the user first turns on the switch box, no configuration is needed for basic
switching operation. To configure the unit to meet specific needs, such as assigning
unique names for the computers or displaying the computers by their assigned names
or port numbers, refer to Chapter 4.
Cabling
Unattended Reboot
After a power outage, each server connected to the console switch reboots (if
configured to do so) without operator intervention, when power returns. The console
switch generates responses to ensure that the reboot is successful and that it is ready
to switch between computers.
Resetting the Unit
If the keyboard or mouse locks up, press the Reset button on the back panel to reset
the console switch. Pressing the Reset button allows the user to recover the device
settings without power cycling the computers.
Compaq Server Console Switch User Guide 3-9
Page 44

Cabling
Making Connections Under Power
The user can connect additional computers to the console switch while it is powered
up. When powering the newly connected computers, the console switch recognizes
them, and the user can switch to the new computers without taking any additional
steps.
The user can also connect the mouse and/or keyboard to the console switch while the
system is powered up. When connecting a new device, the console switch recognizes
it and configures it to the settings of the currently selected computer. This technique
allows failed devices to be replaced without having to restart the system.
NOTE: When new computers are added to the console switch, or when existing connections
are changed, the new configurations should be saved in NVRAM by using the Snapshot option
from the OSD.
Alternate Configurations
There are other ways to configure the system, including tiered console switch
configurations and dual console configurations.
3-10 Compaq Server Console Switch User Guide
Page 45

Tiered Switch Configurations
In tiered systems, the user can connect additional console switches to ports on a
primary unit. That is, console switches can be tiered in primary/secondary
configurations to allow one primary console switch to switch between computers or
other console switch units. Tiering involves linking the physical keyboard, mouse,
and monitor of the secondary units to computer ports on the primary unit. For
example, one 8-Port primary unit can accommodate eight secondary console switch
units. A system with eight servers connected to each of the eight secondary console
switches would provide a 1x64 concentration.
Cabling
Figure 3-9: Tiered configuration
When connecting a secondary unit to one of the ports of the master unit, the user
must indicate this connection to the primary unit by performing the “Assigning
Specific Device Types” procedure described in Chapter 5. This involves entering a
secondary unit designation for the associated port number instead of a monitor type.
Use the designation 4-Port for a 4-port secondary and 8-Port for an 8-port
secondary.
The OSD allows secondary ports to be treated much like ports on the primary console
switch. It may be helpful to name each secondary unit as described in “Assigning
Unique Names to Computers” in Chapter 5.
Compaq Server Console Switch User Guide 3-11
Page 46

Cabling
Connecting Tiers while the System is Powered Up
If necessary, you can connect a primary unit to a secondary unit while the system is
powered up. This technique can be used to isolate any problems with minimum
disruption to the system. When plugging a primary console switch into a secondary
unit, first connect the mouse and video cables, and then connect the keyboard cable.
This is important because the primary unit interprets the keyboard connection as the
secondary unit’s power up. At this point, the primary unit sends initialization codes to
the secondary unit, triggering device configuration.
Refer to Chapter 4 for information on switching tiered systems.
3-12 Compaq Server Console Switch User Guide
Page 47

Dual Console Configuration
The dual console configuration is available using either of the Dual Console 8-Port
console switches. Use the same methods described previously to connect the cables
to the unit. Then use the ports on the front of the console switch to connect an
additional KVM. Refer to “Menu Screen” in Chapter 4 for information on switching
connection modes.
Keyboard,
Mouse,
and
Video Cables
Cabling
Figure 3-10: 8-Port dual console configuration
Compaq Server Console Switch User Guide 3-13
Page 48

On-Screen Display
The On-Screen Display (OSD) is used with the 4-Port, 8-Port, and Dual Console
8-Port units. If a 2-Port console switch is being used, refer to Chapter 5, “Using the
Simplified OSD.”
Alternate Languages
The Compaq Server Console Switch Software Utility CD contains an update to the
OSD for languages other than English. Refer to the CD for information on using this
utility.
NOTE: Language selection is not available on the 2-Port console switch.
4
Using the OSD
Functions
Use the OSD to perform the following basic functions:
• Assign device types if secondary console switches are attached to a primary
console switch (tiering)
• Assign unique names to computers
• Choose switch connection mode if using the Dual Console 8-Port console switch
Compaq Server Console Switch User Guide 4-1
Page 49

Using the OSD
• Save the hardware settings
• View information about the console switch system
Additional functionality is described in this chapter under each of the screen
headings.
NOTE: The OSD operates independently of the computer operating system.
Navigation
The user can navigate the OSD menus and enter commands using the mouse and
keyboard; however, because the console switch operates independently of the
computer operating systems, OSD keyboard and mouse conventions may differ from
those used when controlling the selected computer. Table 4-1 lists the special
conventions used while navigating the OSD.
Table 4-1: Conventions for Navigating OSD Menus
Item Function
Mouse
Left mouse button Activates commands, highlights line
Right mouse button Closes the current screen and
4-2 Compaq Server Console Switch User Guide
items, and repositions OSD menus
on the desktop (click and drag the
title bar).
returns to the previous. Exits OSD
from the Main screen.
continued
Page 50

Using the OSD
Table 4-1: Conventions for Navigating OSD Menus continued
Item Function
Keyboard
Print Scrn
Page Up/Page Down Pages up and down through the
Enter Completes switch operation on the
Caps Lock
Esc Closes the current screen and
Alt When used in combination with
Alt + X Closes the current screen.
F1 Opens online help.
Screen
Opens the OSD Selection screen.*
name and port lists.
Main screen and exits OSD menus.
Disables OSD. (Use the Shift key to
change case.)
returns to the previous. Exits OSD
from the Main screen.
underlined letter, opens menus or
executes actions.
Pages up and down through the
name and port lists.
Closes the current screen and
returns to the previous screen
without changing settings.
Opens Online Help for each screen.
Accepts changes, closes the current
screen, and returns to the previous
screen.
* To print a screen, refer to “Performing a Screen Capture” in this chapter.
When the OSD is activated by pressing the Print Scrn key, use the mouse instead of
the arrow keys to highlight menu options.
Compaq Server Console Switch User Guide 4-3
Page 51

Using the OSD
Menu Overview
The following table displays the options available from each OSD menu.
Table 4-2: OSD Menu Tree
Main Menu
Setup Commands
Scan Scan Enabled
Menu Broadcast Active
Flag Snapshot
Set Flag Position Reset
Security Version
Broadcast
Devices
Modify
Names
4-4 Compaq Server Console Switch User Guide
Page 52

OSD Main Screen
Press the Print Scrn key to open the OSD menus. The OSD Main screen is
displayed first.
The Main screen lists all of the ports in the system, the associated computer names,
and the status of each port. If a Dual Console 8-Port console switch is being used, an
A or B next to the status symbol identifies the console switch.
Using the OSD
Figure 4-1: Main Screen Functions
Button Function Alternate Method
Names
Port
Setup Displays Setup screen Press the Alt + S key.
Commands Displays Commands
NOTE: Highlighted port indicates selected device.
Compaq Server Console Switch User Guide 4-5
Sorts alphabetically by
names
Sorts by port numbers
screen
Press the Alt + N key.
Press the Alt + P key.
Press the Alt + C key.
Page 53

Using the OSD
Primary ports have a single port number. Secondary ports have the port number of
the primary console switch they are attached to followed by a dash, and then the
number of the secondary port.
Table 4-3: OSD Symbols
Symbol Description
A, B
Computer is connected and running
Connected computer is not running or not operating properly
Tiered console switch is connected and running
Tiered console switch is not running or not operating
properly
Identifies the user in a Dual Console configuration
Console identifier in a Dual Console 8-Port console switch
4-6 Compaq Server Console Switch User Guide
Page 54

Setup Screen
The Setup screen lists menu options to change configurations.
Figure 4-2: Setup screen
Using the OSD
Button Function Alternate Method
Scan
Menu
Flag
Security
Broadcast
Compaq Server Console Switch User Guide 4-7
Sets sequential or
customized scan
pattern
Sets display order,
delay time, and
cooperative or
preemptive mode
Customizes the flag
display
Sets a password and
screen saver
Sets the keyboard and
mouse for
simultaneous control
Press the Alt + S key.
Press the Alt + M key.
Press the Alt + F key.
Press the Alt + C key.
Press the Alt + B key.
continued
Page 55

Using the OSD
Figure 4-2: Setup screen continued
Button Function Alternate Method
Devices
Names
Commands Screen
The Commands screen lists actions the user can initiate.
Establishes monitor
and port settings
Assigns names to
computers
Press the Alt + D key.
Press the Alt + N key.
Figure 4-3: Commands screen functions
Field/Button Function Alternate Method
Scan Enabled
*Broadcast Active
4-8 Compaq Server Console Switch User Guide
Automatically switches
video from port to port
Simultaneously
controls more than one
computer in a single
system
Press the Alt + S key.
Press the Alt + B key.
continued
Page 56

Using the OSD
Figure 4-3: Commands screen functions continued
Field/Button Function Alternate Method
**Snapshot
Reset
Version
* Only one user may select Broadcast Active at a time.
** Snapshot saves the mouse and keyboard information the console switch
uses to boot up the computers. If the user does not save the hardware
settings when installing a console switch system, add or remove computers
from the system, or change the mouse, keyboard, or monitor, they are lost
when power to the console switch is lost or turned off and each computer
must be rebooted.
Records current
keyboard and mouse
settings
Returns to mouse and
keyboard default
settings
Views firmware
version information
Press the Alt + N key.
Press the Alt + R key.
Press the Alt + V key.
Compaq Server Console Switch User Guide 4-9
Page 57
Using the OSD
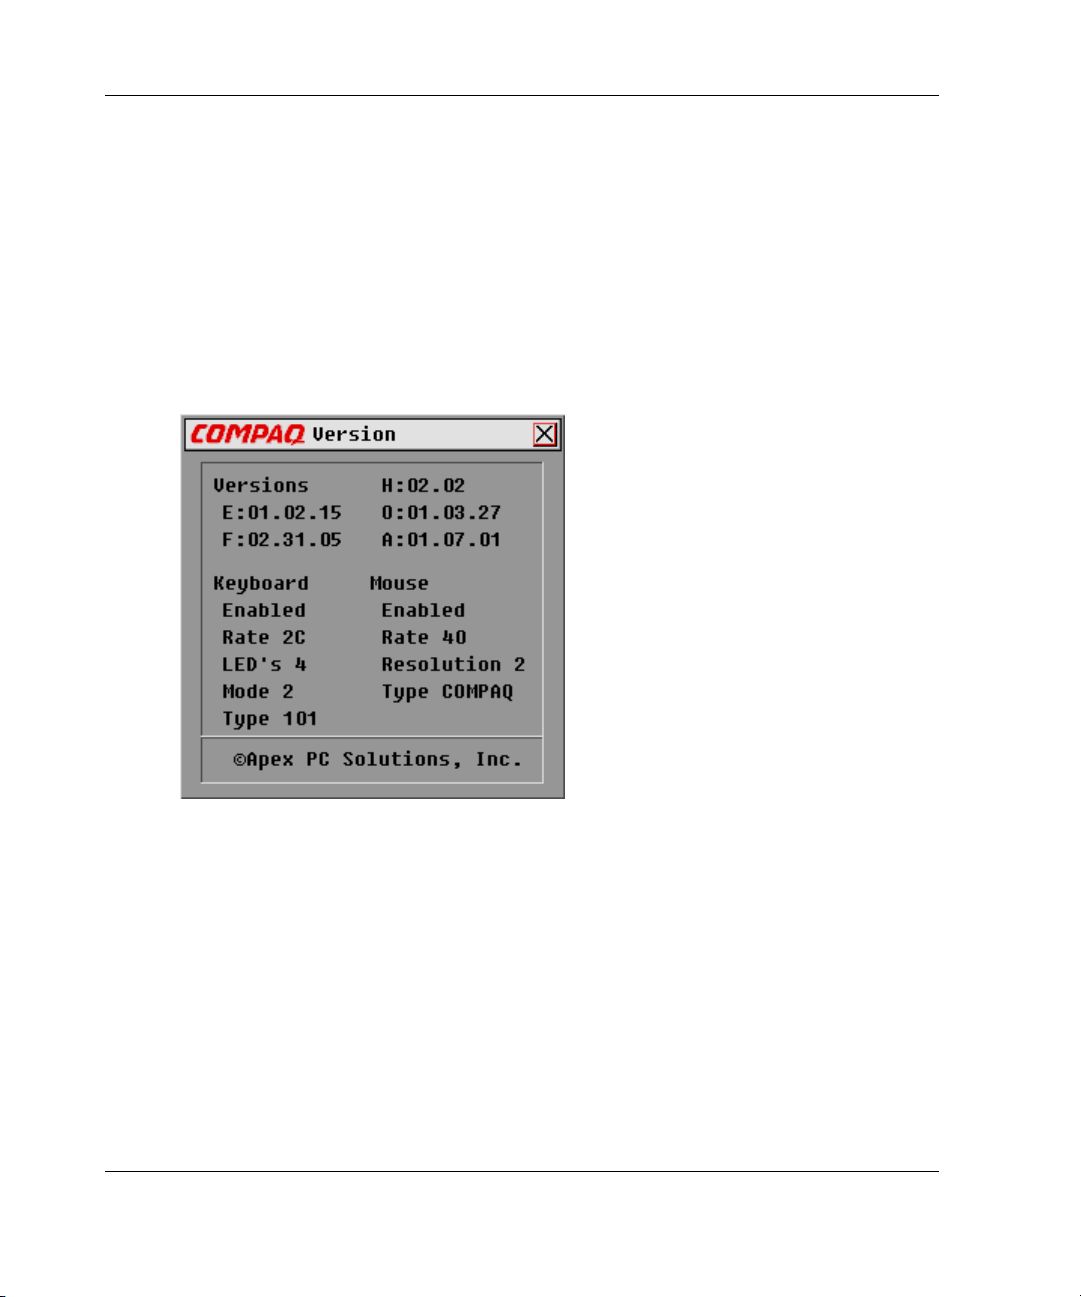
Version Screen
The user can display the version number of the console switch firmware as well as
information about any auxiliary devices connected to the console switch to facilitate
system troubleshooting and support.
The Version screen also displays specific device information for the currently
selected computer. Keyboard information includes enabled/disabled, typematic rate,
LED settings, port mode, and keyboard type. Mouse information includes
enabled/disabled, sample rate, resolution, and mouse type.
Figure 4-4: Version screen
4-10 Compaq Server Console Switch User Guide
Page 58

Reset Command
The console switch stores mouse and keyboard connection and rate data and uses this
information to emulate the physical mouse and keyboard. If communication between
the console switch and mouse and keyboard fails, the selected server may not
function. The Reset command takes the mouse and keyboard information that was
saved in Snapshot and sends it to the server to re-establish connection with the mouse
and keyboard. Resetting the mouse and keyboard attempts to restore the correct
settings for the selected computer.
Because the console switch emulates the physical mouse and keyboard, it allows a
computer without an attached keyboard or mouse to operate as though there were a
physical device attached to it.
To reset the mouse and keyboard values, click Reset.
NOTE: If this does not correct the problem, press the Reset button on the back panel of the
console switch.
Devices Screen
Using the OSD
If the system includes one or more secondary console switches in a tiered
configuration, the user must make the primary console switch aware of the secondary
console switch by assigning a specific device type. In addition, if one or more of the
computers in the console switch system have a special type of monitor, it may be
necessary to assign that monitor type to the port associated with that computer.
Compaq Server Console Switch User Guide 4-11
Page 59

Using the OSD
To modify a device, double-click it or highlight it and then click Modify.
Figure 4-5: Devices screen functions
Button Function Alternate Method
Modify Displays Device
Modify screen to
modify port settings
Defaults
OK
Note: Highlighted port indicates selected device.
4-12 Compaq Server Console Switch User Guide
Uses the default
device type and port
settings
Accepts changes,
closes the current
screen, and returns to
the previous screen
Press Alt + M key.
Press Alt + D key.
Press Alt + O key.
Page 60

Device Modify Screen
Figure 4-6: Device Modify screen functions
Using the OSD
Field/
Button
Standard
No Device
Compaq Server Console Switch User Guide 4-13
Function Alternate Method
Uses basic computer
connection
Deletes this number or
name from the list of
computers on the
Main screen if a
console switch or
computer is not
connected to it
Press the Alt + S key.
Press the Alt + N key.
continued
Page 61

Using the OSD
Figure 4-6: Device Modify screen functions continued
Field/
Button
Function Alternate Method
2 Port
4 Port
8 Port
OK
Assigns a 2-Port
console switch as the
secondary system
Assigns a 4-Port
console switch as the
secondary system
Assigns an 8-Port
console switch as the
secondary system
Accept changes,
closes the current
screen, and returns to
the previous screen
Press the Alt + 2 key.
Press the Alt + 4 key.
Press the Alt + 8 key.
Press the Alt + O key.
4-14 Compaq Server Console Switch User Guide
Page 62

Names Screen
Use this screen to identify a computer by name rather than port number.
NOTE: Before assigning names to computers attached to secondary console switches, the
user must first associate the secondary device with a port. After this is done, the port
numbering structure is reorganized so that the secondary ports are visible to the user. Refer to
the “Devices Screen” and “Device Modify Screen” sections previously in this chapter.
Using the OSD
Figure 4-7: Names menu functions
Button Function Alternate Method
Defaults
OK
Note: Highlighted port indicates selected device.
Compaq Server Console Switch User Guide 4-15
Restores default
settings
Accepts changes,
closes the current
screen, and returns to
the previous screen
Press the Alt + D key.
Press the Alt + O key.
Page 63

Using the OSD
To assign a unique name to a computer:
1. Click the port number of the computer.
2. Enter the device name in the Names field.
Computer names can be up to 15 characters long, including only A–Z upper and
lower case, 0–9, and the dash character. Press the Backspace key or the Delete
key to delete an incorrect entry. Click the cursor anywhere on the line to
overtype.
3. Repeat steps 1 and 2 for each computer to be named.
4. Click OK.
To edit an existing port or name double-click it, make any changes, then click OK.
4-16 Compaq Server Console Switch User Guide
Page 64

Menu Screen
Use this screen to set the display order of the computers on the Main screen. If a
Dual Console 8-Port console switch is being used, use this screen to select a console
switch connection mode.
NOTE: Switch Mode is grayed out in single-user console switches, and Cooperative and
Preemptive are not selectable.
Using the OSD
Figure 4-8: Menu screen functions
Field/
Button
Name
Port
Compaq Server Console Switch User Guide 4-17
Function Alternate Method
Sorts computer display
order by name
Sorts computer display
order by port number
Press the Alt + N key.
Press the Alt + P key.
continued
Page 65

Using the OSD
Figure 4-8: Menu screen functions continued
Field/
Button
Function Alternate Method
Delay Time
Cooperative
Preemptive
OK
* Delay Time allows the user to complete a soft switch without the OSD
menus displaying. Refer to “Performing a Soft Switch” in this chapter.
Scan Screen
Enters the number of
seconds to delay
display to allow soft
switch*
Has the console switch
maintain the current
user connection; this
user will not be
disconnected if
another user console
requests connection
(default setting)
Has the console switch
allow any user console
to select any computer
at any time
Accepts changes,
closes the current
screen, and returns to
the previous screen
Press the Alt + D key.
Press the Alt + C key.
Press the Alt + R key.
Press the Alt + O key.
In scan mode, the console switch automatically switches from port to port (computer
to computer). The user can scan the entire system sequentially or designate a custom
scan pattern by specifying computers and durations.
If the user has a Dual Console 8-Port console switch, scan behavior is influenced by
multiple users and tiered console switches. A multiuser console switch in the primary
position and any single-user console switch in the secondary position can create
situations that change the scan pattern.
4-18 Compaq Server Console Switch User Guide
Page 66

Using the OSD
Example 1—User A is accessing computer 2-4 attached to the secondary console
switch at Port 2 on the primary console switch while user B scans computers attached
to the secondary console switch at Port 1 on the primary console switch.
Behavior—Console switch at Port 1 is available to scan; no user is accessing it. Any
key pressed at the keyboard or a mouse click stops the scanning and passes the
keystrokes or mouse movements to the currently selected computer.
Example 2—User A is accessing computer 2-4 while user B scans computer 2-4.
Behavior — WATCH, monitor activities of user A. Cannot use the keyboard or
mouse to pass the keystrokes or mouse movements to the currently selected
computer.
Example 3—User A is accessing computer 2-4 while user B wants to scan computer
2-6.
Behavior—SKIP, because user A occupies the primary port connection at Port 2,
making 2-6 unavailable to user B.
Example 4—User A is accessing computer 2-4 while user B scans computer 3-2.
Behavior—Console switch at port 3 is available to scan; no user is accessing it. Any
key pressed at the keyboard or a mouse click stops the scanning and passes the
keystrokes or mouse movements to the currently selected computer.
Compaq Server Console Switch User Guide 4-19
Page 67

Using the OSD
Figure 4-9: Scan screen function
Field/
Button
Names
Port
Sec
Defaults
OK
Note: Highlighted port indicates selected device.
Function Alternate Method
Sorts computers
alphabetically by name
Sorts computers by
port number
Enters the length of
time a computer is
selected before the
scan console switches
to the next computer
Returns to default
settings
Saves changes and
returns to the previous
menu
Press the Alt + N key.
Press the Alt + P key.
Press the Alt + S key.
Press the Alt + D key.
Press the Alt + O key.
4-20 Compaq Server Console Switch User Guide
Page 68

Using the OSD
To set a custom scan pattern:
1. Enter the name or port number of the computer in the Name and Port boxes for
the computer to be included in the scan.
2. In the Sec column, enter the number of seconds, from 1 to 255, that this computer
will be selected before switching to the next computer in the sequence.
3. Repeat for each of the remaining computers to be included in the scan.
4. Click OK. The new scan pattern replaces the standard or previous custom scan
pattern.
To start the scan mode, select Scan Enabled from the Commands screen.
To cancel scan mode, deselect Scan Enabled from the Commands screen.
To remove a computer from the scan list:
1. Click the computer to be removed from the scan list.
2. Press the Delete key.
or
Press the Shift + Delete keys to delete the current computer and all computers
below it.
3. Click OK.
Compaq Server Console Switch User Guide 4-21
Page 69

Using the OSD
Flag Screen
The status flag indicates the name or port number of the currently selected computer.
If a Dual Console 8-Port console switch is being used, each console can have
different flag attributes.
Figure 4-10: Flag screen
Figure 4-11: Status flag showing the user is connected
to a computer sorted by name order
Figure 4-12: Status flag showing that broadcasting is
enabled and the user is connected to a tiered computer
sorted by port order
4-22 Compaq Server Console Switch User Guide
Page 70

Using the OSD
Table 4-4: Flag Screen Functions
Field/Button Function Alternate Method
Name
Port
Displayed
Timed
Flag 1, 2, 3, 4
Opaque
Transparent
Set Position
OK
Identifies computers
by name
Identifies computers
by port
Shows flag at all times
Displays flag for only
5 seconds after
switching
Selects a color palette
Has the flag cover the
desktop image
Has the desktop image
seen through the flag
Positions flag on the
screen
Saves current settings
and returns to the
previous screen
To position the status flag on the desktop:
1. Click Set Position.
Press the Alt + N key.
Press the Alt + P key.
Press the Alt + D key.
Press the Alt + T key.
Press the Alt + 1, 2, 3,
or 4 key.
Press the Alt + A key.
Press the Alt + R key.
Press the Alt + S key.
Press the Alt + O key.
2. Click and drag the title bar to where the status flag will be displayed on the
desktop.
3. Click X to exit the dialog box. The setting is saved.
Compaq Server Console Switch User Guide 4-23
Page 71

Using the OSD
Security Screen
The security feature enables the user to lock the keyboard and monitor. When the
keyboard and monitor are locked, the user must enter a password before resuming
operation. The user can also set a time delay before the system is locked by entering
the number of seconds to delay the screen saver.
The user must provide a password to access the fields in the Security screen. After
the correct password is entered, the other fields on the screen are activated. If a Dual
Console 8-Port console switch is being used, each console can have a different
password.
Figure 4-13: Security screen functions
Field/Button Function Alternate Method
New
Repeat
Enable Screen Saver
4-24 Compaq Server Console Switch User Guide
Enters new password
or confirm current
password
Confirms new
password
Enables screen saver
Press the Alt + N key.
Press the Alt + R key.
Press the Alt + C key.
continued
Page 72

Using the OSD
Figure 4-13: Security screen functions continued
Field/Button Function Alternate Method
Time Delay
Energy
Screen
Test
OK
Enters the number of
minutes before the
keyboard and monitor
are locked
Sets the energy saver
feature if the monitor is
Energy Star compliant
(see Caution)
Operates monitor in
normal mode
Immediately starts
screen saver mode
Saves settings and
returns to the previous
menu
Press the Alt + D key.
Press the Alt + E key.
Press the Alt + S key.
Press the Alt + T key.
Press the Alt + O key.
CAUTION: Monitor damage can result from use of Energy Mode with monitors that
are not Energy Star compliant. Do not use this mode if the monitor is not Energy
Star compliant.
To change the password:
1. Enter the new password in the New field. Passwords can be up to eight characters
in length. Passwords are case-sensitive and may contain both alphanumeric.
2. Enter the new password in the Repeat field to confirm the new password.
3. Click OK.
To lock the keyboard and monitor:
1. Enter the password in the New field.
2. Select Enable Screen Saver.
3. In the Time Delay field, enter the number of minutes (from 1 to 254) to delay
activation of the screen saver.
Compaq Server Console Switch User Guide 4-25
Page 73

Using the OSD
4. Choose Energy if the monitor is Energy Star compliant, or Screen if it is not.
5. Click Test to view the screen saver.
6. Click OK.
To blank the monitor without locking the console:
1. Delete the text in the New field and leave the box blank.
2. Select Enable Screen Saver.
3. In the Time Delay field, enter the number of minutes (from 1 to 254) to delay
activation of the screen saver.
4. Choose Energy if the monitor is Energy Star compliant, or Screen if it is not.
CAUTION: Monitor damage can result from use of Energy Mode with monitors
that are not Energy Star compliant. Do not use this mode if the monitor is not
Energy Star compliant.
CAUTION: Monitor damage can result from use of Energy Mode with monitors
that are not Energy Star compliant. Do not use this mode if the monitor is not
Energy Star compliant.
5. Click Test to view the screen saver.
6. Click OK.
IMPORTANT: This action overrides the use of a password. Pressing any key on the
keyboard unlocks the console. The system is not secure.
To disable the screen saver:
1. In screen saver mode, press any key on the keyboard then enter the password if
the console switch is password protected.
2. Press the Print Scrn key to display the Main screen.
3. Click Setup, Security.
4. Enter the password in the New field.
5. Deselect Enable Screen Saver.
6. Click OK.
4-26 Compaq Server Console Switch User Guide
Page 74

Screen Saver Test
Click OK to activate the Screen Saver Test. After 10 seconds the user is returned to
the Security screen.
Figure 4-14: Screen Saver Test
Using the OSD
Broadcast Screen
The broadcast feature enables the user to simultaneously control more than one
computer in a system. This feature is useful when the user wants to ensure that all
selected computers receive identical input. In a tiered system, the user can broadcast
to any combination of computers on the entire system.
Keyboard
The keyboard state must be identical for all computers receiving a broadcast to
interpret keystrokes identically. Specifically, the Caps Lock and Num Lock modes
should be the same on all keyboards.
Compaq Server Console Switch User Guide 4-27
Page 75

Using the OSD
Mouse
For the mouse to work accurately, all systems must have identical mouse drivers,
identical desktops (that is, identically placed icons), and identical video resolutions.
In addition, the mouse must be in exactly the same place on all screens. Because
these conditions are extremely difficult to achieve, broadcasting mouse movement to
multiple systems may have unpredictable results.
The console switch attempts to send keystrokes and mouse movements to the
selected computers simultaneously; however, some computers may inhibit and thus
delay the transmission.
Figure 4-15: Broadcast screen functions
Field/
Button
Defaults
OK
Note: Highlighted port indicates selected device.
4-28 Compaq Server Console Switch User Guide
Function Alternate Method
Returns to default
settings (all off)
Saves changes and
returns to previous
menu
Press the Alt + D key.
Press the Alt + O key.
Page 76

To broadcast to selected computers:
1. Select the keyboard and/or mouse box to receive keystrokes and/or mouse
movements.
2. Click OK.
3. Select Broadcast Active from the Commands screen to start broadcasting.
To turn off broadcast mode, deselect Broadcast Active from the Commands screen.
Broadcasting to Tiered Configurations
In a tiered system, the user can broadcast to any combination of computers on the
entire system.
To broadcast to tiered configurations:
Setting Up Computers Attached to Secondary Console Switches
1. From the Main screen, double-click the computer name or port number of the
secondary console switch to which to broadcast; press the Print Scrn key twice;
the Main screen for the secondary console switch is displayed.
Using the OSD
2. Click Setup, Broadcast.
3. Select the keyboard and mouse box for each computer that receives keystrokes
and/or mouse movements, then click OK.
4. From the Commands screen, select Broadcast Active to turn on the broadcast
mode for the secondary console switch.
5. Press the Print Scrn key to open the Main menu on the primary console switch.
6. Repeat steps 1 through 5 to send broadcast commands to computers attached to
additional secondary console switches.
Compaq Server Console Switch User Guide 4-29
Page 77

Using the OSD
Setting Up Computers Attached to Primary Console Switches
1. From the Main menu on the primary console switch, click Setup, Broadcast.
2. Check the keyboard and mouse for each computer that receives keystrokes and/or
mouse movements, then click OK.
3. From the Commands screen, select Broadcast Active to turn on the broadcast
mode for the primary console switch.
4. From a user console attached to the primary console switch and connected to the
secondary console switch, enter information and/or make mouse movements the
user wants to broadcast.
NOTE: Only broadcast to systems directly connected to a primary console switch or only
to secondary console switches connected to a primary console switch.
To turn off broadcast mode for a tiered configuration:
1. From the Commands screen at the primary console switch, deselect
Broadcast Active.
2. From the Main screen, double-click the port number or name of the secondary
console switch for which the user wants to stop broadcasting commands; press
the Print Scrn twice; the Main screen at the secondary console switch displays.
3. Click Commands.
4. Deselect Broadcast Active.
Accessing the OSD at a Secondary Console Switch
Configuration of the console switch system is accomplished at the primary console
switch. All naming, scanning, status flag attributes, menu attributes, device settings,
passwords, and so on must be set at the primary console switch. The factory defaults
for the OSD should not be changed in a secondary console switch because
adjustments can cause conflicts between the secondary and primary console switches.
Access OSD menus at the secondary console switch to:
• Check version information of the firmware
• Set up broadcasting
4-30 Compaq Server Console Switch User Guide
Page 78

• Add another level of security in tiered configurations
• Use Snapshot to save the hardware settings at the secondary console switch
• Reset mouse and keyboard information at the secondary console switch
To open the Main screen at a secondary console switch:
1. Press the Print Scrn key to open the Main screen at the primary console switch.
2. Double-click the number of the tiered port the user wants to access, or highlight
the tiered port and press the Print Scrn key; the Main screen at the secondary
console switch is displayed.
Switching Between Computers
Switching from one computer to another is a simple process with the Server Console
Switch. Switching disconnects the keyboard, mouse, and monitor from one computer
and connects them to another.
Whenever the user switches between two computers, the Server Console Switch
reconfigures the keyboard and mouse using the settings stored in its memory. For
example, if the current computer selected has the Caps Lock feature turned on, but
the user is switching to a second computer that has the Caps Lock feature turned off,
then the unit turns the Caps Lock feature off to match the setting for the second
computer.
Using the OSD
To switch computers:
1. Press the Print Scrn key to display the Main menu screen.
2. Double-click the computer name or port.
or
Highlight the port and press the Enter key.
or
Enter the port number or first few letters of the computer name to establish it as
unique, and then press the Enter key.
Compaq Server Console Switch User Guide 4-31
Page 79

Using the OSD
Performing a Soft Switch
After opening the OSD menus, the user can switch between computers without
having the OSD menus display.
To perform a soft switch:
1. Click Setup, Menu.
2. Enter in a time to delay displaying the Main OSD menu after the Print Scrn key
is pressed.
3. Click OK.
4. At the Main menu screen, enter the port number or first few letters of the
computer name to establish it as unique and press the Enter key.
5. To switch to another computer, press the Print Scrn key and enter the port
number or first few letters of the computer name. If the switch is performed
before the delay time has expired, the OSD menus do not display.
Performing a Screen Capture
In the Server Console Switch system, pressing the Print Scrn key opens the OSD
menus. To print a screen capture displayed by a computer, use the following
procedures:
• On a computer connected to a primary console switch, press the Print Scrn
key
twice. The first keystroke opens OSD menus in the primary console switch. The
second keystroke clears the screen, sends the keystrokes through to the other
device, then captures or prints the screen.
• On a computer connected to a secondary console switch in a tiered configuration,
press the Print Scrn key four times. The first keystroke brings up the OSD in the
primary console switch. The second keystroke brings up the OSD in the
secondary console switch. The third keystroke brings up both OSDs. The fourth
keystroke clears the screen, then captures or prints the screen.
4-32 Compaq Server Console Switch User Guide
Page 80

The Simplified OSD is used only with the 2-Port console switch.
Launching the OSD
Press the Print Scrn key to access the KVM OSD menus. To print a screen capture
displayed by a computer, use the following procedure.
Printing a Screen Capture
• On a computer connected to a primary console switch, press the Print Scrn key
twice.
The first keystroke opens Simplified OSD menus in the primary console switch.
The second keystroke clears the screen, then captures or prints the screen.
• On a computer connected to a secondary console switch in a tiered
configuration, press the Print Scrn key four times.
5
Using the Simplified OSD
The first keystroke displays the Simplified OSD in the primary console switch.
The second keystroke displays the Simplified OSD in the secondary console
switch. The third keystroke displays both Simplified OSDs. The fourth keystroke
clears the screen, then captures or prints the screen.
Compaq Server Console Switch User Guide 5-1
Page 81

Using the Simplified OSD
Simplified OSD Selection Screen
When the Print Scrn key is pressed to open the Simplified OSD menus, the first
screen that is displayed is called the Simplified OSD Selection screen. Basic
functions such as selecting computers and checking port/computer status are
performed from this screen.
The Simplified OSD Selection screen lists all the ports in the system, the associated
computer names, and the status of each port. It can be organized either by port
number or by computer name. To identify the computers by name, refer to
“Assigning Unique Names to Computers” in this chapter. To change the order in
which computers are listed, refer to the section “Changing Menu Attributes.” On
large systems, the user may need to use the arrow keys or the Page Down key to
scroll through the list of ports.
Opening the Simplified OSD or Accessing the Simplified OSD Selection Screen on a Primary Console Switch
1. Press the Print Scrn key to access the Simplified OSD Selection screen at the
primary console switch.
2. Highlight the number of the port to be accessed. Press the Print Scrn key; the
Simplified OSD Selection screen at the secondary console switch is displayed.
SELECTION SCREEN
Port Name
1 COMPUTER 1 +
2 COMPUTER 2
F1 Help F2 Advanced
Figure 5-1: Selection Screen
The factory defaults for the Simplified OSD should not be changed in a secondary
console switch because adjustments can cause conflicts between the secondary and
the primary console switches.
5-2 Compaq Server Console Switch User Guide
Page 82

Simplified OSD Status Port Symbols
+—Computer is connected and running
x—Secondary console switch is connected and running
NOTE: The Simplified OSD screens in this document are examples. The screens may vary
depending on the configuration.
Simplified OSD Advanced Menus Screen
All commands, other than selecting computers, are performed from the Simplified
OSD Advanced menus. The Advanced Menus screen contains two menus. The
Commands menu displays the commands that cause an action to take place; the
Setup menu displays menu screens to set configurations.
Opening the Simplified OSD Advanced Menus
1. Press the Print Scrn key to open Simplified OSD Selection.
Using the Simplified OSD
2. Press the F2 key.
ADVANCED MENUS
COMMANDS SETUP
Scan
Version
Snapshot
Reset
Broadcast
Figure 5-2: Advanced Menus, Commands
Compaq Server Console Switch User Guide 5-3
Page 83

Using the Simplified OSD
ADVANCED MENUS
COMMANDS SETUP
Scan
Names
OSD
Flag
Devices
Security
Broadcast
Figure 5-3: Advanced Menus, Setup
The Simplified OSD Advanced Menus screen is displayed showing the commands
listed under the Commands menu. Highlighting Setup shows screen selections
available for configuring the console switch. Moving the highlight with the arrow
keys or mouse in either menu selects a specific command or menu screen.
NOTE: Broadcast is not an available option for the 2-Port console switch.
Exiting the Simplified OSD
To exit the Simplified OSD, press the Esc key.
Selecting Computers
Use the Simplified OSD menus to switch computers, that is, to select which computer
receives commands from and displays output to the console. When the user selects a
computer, the console switch reconfigures the keyboard and mouse for the selected
computer using the settings stored in its memory. The current information (for
example, the state of the Caps Lock key) is maintained for each computer in the
system. When configuration is complete, the video output of the selected computer
passes to the monitor.
5-4 Compaq Server Console Switch User Guide
Page 84

Switching Computers
1. If the computers are ordered by the number of the port in the Simplified OSD
Selection screen, enter the port number of the computer to switch to.
or
Use the arrow keys or mouse to select a computer.
or
If the computers are ordered by name, enter the first letters of the computer name
to establish it as unique to select it. To identify computers by name, refer to
“Assigning Unique Names to Computers” in this chapter.
2. Press the Enter key.
3. When finished switching, press the Esc key to exit the Selection Simplified
OSD screen and remove the Simplified OSD menus from the monitor display. If
the status flag is enabled, it remains displayed to indicate the currently selected
computer.
Assigning Unique Names to Computers
Using the Simplified OSD
The user may find it easier to identify the computers in a system by name, rather than
by port number. For example, in a network environment, the user can assign the same
names as those assigned by the network for each computer. To list the computers by
name in the Simplified OSD menus, refer to “Changing Menu Attributes” in this
chapter.
NOTE: Before assigning names to computers attached to a secondary console switch, the
user must first associate the secondary device with a port. Refer to “Assigning Specific Device
Types” in this chapter.
Compaq Server Console Switch User Guide 5-5
Page 85

Using the Simplified OSD
To assign unique names to computers:
1. In the Advanced Menus screen, move the highlight to the Setup menu.
2. Highlight Names and press the Enter key; the Port Name Setup screen is
displayed.
PORT NAME SETUP
Port Name
1 COMPUTER 1
2 COMPUTER 2
Figure 5-4: Port Name Setup screen
3. Select the port number for which a computer name will be entered or changed.
4. Enter a name for the computer. Computer names may be up to 12 characters
long, including only A–Z, 0–9, and the dash character. Lowercase letters are
converted to uppercase. Press the Backspace key to delete an incorrect entry.
5. If necessary, repeat steps 3 and 4 for each computer in the system.
6. Press the Enter key to save the settings and exit the menu.
or
Press the F10 key to restore default settings.
or
Press the Esc key to exit the menu without saving the settings.
5-6 Compaq Server Console Switch User Guide
Page 86

Changing Menu Attributes
In the OSD Attributes screen the user can change the order of computer ports from
displaying the port number to displaying the port name. Other attributes of the
Simplified OSD screens, such as the position and color, can be changed to suit the
particular use of the system.
To change menu attributes:
1. In the Advanced Menus screen, move the highlight to the Setup menu.
2. Highlight OSD and press the Enter key; the OSD Attributes screen is
displayed.
OSD ATTRIBUTES
Resolution 320
Height 56
Horizontal 3
Vertical 4
Background 7
Highlight 6
Text 0
Delay Time 0
Order PORT
Using the Simplified OSD
Figure 5-5: OSD Attributes screen
Compaq Server Console Switch User Guide 5-7
Page 87

Using the Simplified OSD
3. Highlight the settings to change and use the + or – keys to obtain the desired
value.
As the user selects different values, the effect of the changes is reflected
immediately on the display. Table 5-1 describes each of the available menu
attributes.
NOTE: While changing Simplified OSD attributes, it is possible to scramble the menu and
screens, making it difficult to correct the problem. If this occurs, reset the console switch
to its default Simplified OSD values by pressing the Esc + Esc + Print Scrn + F10 + Y +
Enter keys.
4. Press the Enter key to save the settings and exit the menu.
or
Press the F10 key to restore default settings.
or
Press the Esc key to exit the menu without saving the settings.
Effects of Settings on Screen Appearance
Table 5-1: Screen Appearance Settings
To change… Select… Values
Size of screen Resolution Select either 320, 480,
or 640; the lower the
value, the larger the
size.
Size of text Height Higher values display
larger text.
Location of screen Horizontal 0–127
Vertical 0–255
continued
5-8 Compaq Server Console Switch User Guide
Page 88

Table 5-1: Screen Appearance Settings continued
To change… Select… Values
Using the Simplified OSD
Color of screen and
text
Highlight 0–7
Text 0–7
Timing of Simplified
OSD
Order of computers Order Choose to list
Background 0–7
Delay Time Time in seconds the
Selection screen is
delayed before
appearing after the
Print Scrn key is
pressed. Increasing
delay can prevent the
screen from being a
distraction when
performing simple
computer switching
operations.
computers by port
number or
alphabetically by
name.
Compaq Server Console Switch User Guide 5-9
Page 89

Using the Simplified OSD
Changing Status Flag Attributes
The status flag indicates the name or port number of the currently selected computer.
The user can choose to display the status flag at all times, for a few seconds after
switching, or not at all. The user can also change the color of the status flag and its
location on the screen.
To change status flag attributes:
1. In the Advanced Menus screen, move the highlight to the Setup menu.
2. Highlight Flag and press the Enter key; the Flag Configuration screen is
displayed.
FLAG CONFIGURATION
Enabled PORTS ON
Row 14
Column 1
Color 2
Text 0
Mode OPAQUE
Figure 5-6: Flag Configuration screen
3. Highlight the settings to change and use the + or – keys to adjust the values.
Table 5-2 describes each of the available menu attributes.
4. Press the Enter key to save the settings and exit the menu.
or
Press the F10 key to restore default settings.
or
Press the Esc key to exit the menu without saving the settings.
5-10 Compaq Server Console Switch User Guide
Page 90

Values and Effects of Settings on Flag Appearance
Table 5-2: Flag Appearance Settings
Setting Values Effect
Enabled Flag Off Flag does not appear.
Ports On Indicates selected port
number.
Names On Indicates selected
computer by name.
Ports Timed Port number displays
for 5 seconds after
switching.
Names Timed Name displays for
5 seconds after
switching.
Row 0–14 Positions the flag
vertically on the
screen.
Column 0–25 Positions the flag
horizontally on the
screen.
Color 0–7 Sets the flag color.
Text 0–7 Sets the flag text color.
Mode Opaque Makes the flag
opaque.
Transparent Makes the flag
transparent.
Using the Simplified OSD
Compaq Server Console Switch User Guide 5-11
Page 91

Using the Simplified OSD
Scanning the Computers
In scan mode, the console switch automatically switches from port to port (computer
to computer). The user can scan the entire system sequentially or designate a custom
scan pattern by specifying computers and durations.
Placing the Switch in Scan Mode
To place the switch in scanning mode:
1. From the Commands menu in the Advanced Menus screen, move the highlight
to Scan.
2. Press the Enter key.
Canceling Scan Mode
Press any key (except the Print Scrn key) or move the mouse; the scan stops at the
currently selected computer.
Setting a Custom Scan Pattern
To set a custom scan pattern:
1. In the Advanced Menus screen, move the highlight to the Setup menu.
2. Highlight Scan and press the Enter key; the Scan Pattern Setup screen displays
with the first port position (or computer name) highlighted.
SCAN PATTERN SETUP
Port Sec Name
1 20 Computer 1
2 20 Computer 2
F2 for defaults
Figure 5-7: Scan Pattern Setup screen
5-12 Compaq Server Console Switch User Guide
Page 92

3. Enter the port number of the first computer to be included in the scan.
or
If the computers are listed by name, enter the first few letters of the name of the
first computer to be included in the scan.
4. Move the highlight to the Sec column, and enter the number of seconds this
computer is to be selected before switching to the next computer in the sequence.
5. Move the highlight to the next line and repeat steps 3 and 4 for each of the
remaining computers.
6. Press the Enter key to save the settings and exit the menu; the new scan pattern
replaces the standard or previous custom scan pattern.
or
Press the F10 key to restore default settings.
or
Press the Esc key to exit the menu without saving the settings.
Removing a Computer from the Scan List
Using the Simplified OSD
To remove a computer from the scan list:
1. In the Scan Pattern Setup screen, enter the port number of the computer to be
removed.
or
If the computers are listed by name, enter the first few letters of the name of the
computer.
2. Move the highlight to the Sec column.
Compaq Server Console Switch User Guide 5-13
Page 93

Using the Simplified OSD
3. Enter 0 for the number of seconds.
4. Press the Delete key while in the Scan Pattern Setup screen to delete the
highlighted computer and all entries below it.
5. Press the Enter key to save the settings and exit the menu; the new scan pattern
replaces the standard or previous custom scan pattern.
or
Press the F10 key to restore default settings.
or
Press the Esc key to exit the menu without saving the settings.
Securing Server Access
Advanced server applications should be protected against unauthorized users. The
console switch security feature enables the user to lock the keyboard and monitor,
requiring the user to enter a password before resuming operation. The user can also
set a time delay before the system is locked.
The user must always provide a password to access the fields in the Security
Configuration screen. After entering the correct password, the other fields on the
screen are activated.
5-14 Compaq Server Console Switch User Guide
Page 94

Locking the Screen and Keyboard
To lock the screen and keyboard:
1. In the Advanced Menus screen, move the highlight to the Setup menu.
2. Highlight Security and press the Enter key; the Security Configuration screen
is displayed.
SECURITY CONFIGURATION
Password – – – – – – – –
New password – – – – – – – –
Repeat new – – – – – – – –
Time Delay OFF
Mode SCREEN
Test
Using the Simplified OSD
Figure 5-8: Security Configuration screen
3. Enter the password and press the Enter key.
Passwords can be up to eight characters (case sensitive). Enter the new password
twice for confirmation.
NOTE: The factory default password is OSCAR. Because the Caps Lock key is disabled
by default, the user must hold down the Shift key when entering each letter.
4. Highlight Time Delay and select the number of minutes from 1 to 254 before the
screen saver turns on.
5. Highlight Mode and select Energy if using an Energy Star-compliant monitor or
Screen if the monitor is not of that type.
CAUTION: Monitor damage can result from use of Energy Mode with monitors
that are not Energy Star compliant.
Compaq Server Console Switch User Guide 5-15
Page 95

Using the Simplified OSD
6. To enable the screen saver mode press the Enter key either in the Time Delay or
Mode fields.
or
Highlight Test and press the Enter key to start the screen saver mode
immediately. Table 5-3 describes the possible settings.
Table 5-3: Security Configuration Settings
Setting Action
Password Enter current password to activate
New Password Enter new password.
Repeat new Re-enter new password to confirm.
Time Delay Set a value from 1 to 254 minutes or
Mode Energy—Turns off monitor. Use
Test Immediately activates selected
other fields.
select OFF.
only with Energy Star-compliant
monitors that go into low-power
mode when time delay has elapsed.
Screen—Turns off video when time
delay has elapsed. Use with nonEnergy Star-compliant monitors.
mode.
5-16 Compaq Server Console Switch User Guide
Page 96

Turning off the Screen Saver
To turn off the screen saver:
1. If in screen saver mode, press any key on the keyboard and then enter the
password if the console is password protected.
2. In the Advanced Menus screen, move the highlight to the Setup menu.
3. Highlight Security and press the Enter key; the Security Configuration screen
appears.
4. Highlight Time Delay and select OFF. Press the Enter key.
Blanking the Monitor without Locking the Console
To blank the monitor without locking the console:
1. If in screen saver mode, press any key on the keyboard and then enter the
password if the console is password protected.
2. In the Advanced Menus screen, move the highlight to the Setup menu.
3. Highlight Security and press the Enter key; the Security Configuration screen
displays.
Using the Simplified OSD
4. In the Security Configuration screen, press the Enter key twice with the New
Password and Repeat New fields empty.
5. Highlight the settings to change and use the + or – keys to adjust values.
6. Highlight Test and press the Enter key to immediately start screen saver mode.
This action overrides the use of a password. Pressing any key on the keyboard
unlocks the console. The computer will not be protected against unauthorized users.
Compaq Server Console Switch User Guide 5-17
Page 97

Using the Simplified OSD
Displaying Version Information
To facilitate system troubleshooting and support, the user can display the version
number of the switch firmware as well as information about any auxiliary devices
connected to the switch.
The Version screen also displays specific device information for the currently
selected computer, including enabled/disabled, typematic rate, LED settings, port
mode, and keyboard type for the keyboard and enabled/disabled, sample rate,
resolution, and mouse type for the mouse.
To display version information and device settings:
1. From the Commands menu in the Advanced Menus screen, move the highlight
to Version and press the Enter key; the Version screen is displayed.
VERSION
Firmware x.x.x
Hardware x x x
Dip Switch F
Port 1 COMPUTER 1
Keyboard Mouse
ENABLED DISABLED
Rate 2C Rate 100
LEDs 2 Res 2
Mode 2
Type 101 Type Gen
Figure 5-9: Version screen
2. To display version information for an auxiliary device, press the F2 key.
3. Press the Esc key to close the Version screen.
5-18 Compaq Server Console Switch User Guide
Page 98

Saving the Hardware Settings
Whenever computers are added or removed, to or from the system, or whenever the
mouse or monitor is changed, save the hardware settings. If the settings are not saved,
they are lost when power is lost or turned off, and it might be necessary to reboot
each computer to re-establish keyboard and mouse communication.
To save the hardware settings:
1. From the Commands menu in the Advanced Menus screen, highlight
Snapshot.
2. Press the Enter key.
Resetting the Mouse and Keyboard
If the keyboard or mouse locks up, the user may be able to recover the device settings
by resetting the console switch. Resetting the mouse and keyboard attempts to restore
the correct settings for the selected computer.
To reset the mouse and keyboard values:
Using the Simplified OSD
1. From the Commands menu in the Advanced Menus screen, highlight Reset and
press the Enter key.
2. If step 1 does not correct the problem, press the Reset button on the back panel of
the console switch.
Compaq Server Console Switch User Guide 5-19
Page 99

Using the Simplified OSD
Assigning Specific Device Types
If the system includes one or more secondary console switches in a tiered
configuration, the user must make the primary console switch aware of the secondary
console switches by assigning a specific device type. In addition, if one or more of
the computers in the system need a special type of monitor or other device, it may be
necessary to assign that device type to the port associated with that computer.
To assign a device type:
1. In the Advanced Menus screen, move the highlight to the Setup menu.
2. Highlight Devices and press the Enter key; the Device Settings screen is
displayed.
DEVICE SETTINGS
Port Monitor
1 SVGA
2 SVGA
Figure 5-10: Device Settings screen
3. To assign a secondary switch to a port, highlight the port and use the + or – keys
to obtain the appropriate values.
or
To assign a monitor type, highlight the port and use the + or – keys to obtain the
value that corresponds to the particular monitor.
4. Press the Enter key to save the settings and exit the menu.
or
Press the F10 key to restore default settings.
or
Press the Esc key to exit the menu without saving the settings.
5-20 Compaq Server Console Switch User Guide
Page 100

Switching Tiered Systems
To switch the Keyboard/Monitor/Mouse Switch Box to a computer that is connected
to the primary through a secondary unit:
1. Press the Print Scrn key. The OSD Selection window is displayed on the
monitor.
2. Enter the number of the port to which the slave unit is connected followed by a
dash and the number of the port (on the secondary unit) to which the computer is
connected. For example, to switch to the computer connected to port 3 of a
secondary unit connected to port 1 of the primary, press the Print Scrn, 1, -, 3
keys.
3. If the computer/secondaries are listed in the window by name, then enter the
assigned name of the computer. If no secondary unit is connected to the selected
primary port, the command is canceled when the secondary number is entered.
4. Press the Enter key.
Using the Simplified OSD
Compaq Server Console Switch User Guide 5-21
 Loading...