

Page 1

e
p
Installation Guid
www.powerleap.com • www.friendtech.com
PowerLeap PL-P3/SMP™ Installation Guide
Slot 1 Server/Workstation CPU Upgrade Adapter
Before You Start…
Check the website of your sy stem or motherb oard ma nufa cturer to see if t hey are
offering an updated BIOS version for your system. If you need to upgrade your
system BIOS, do so before removing your old CPU.
For more information about BIOS upgrades, refer to “Upgrading Your Computer’s
BIOS” later in this document.
Update your computer’s sound and video drivers.
Select the frontside bus speed and dual CPU pin signal by configuring jumper
settings on the PL-P3/SMP.
Unplug your system and remove the cover.
PL-P3/SMP Jumper Settings
JP1 & JP2: Frontside Bus (FSB) Speed
JP1 JP2
1 1
2 2
3 3
66MHz
JP1 JP2
1 1
2 2
3 3
Auto-Detect (default)
JP1 JP2
1 1
2 2
3 3
JP1 JP2
1 1
2 2
3 3
What is the PowerLeap PL-P3/SMP?
The PowerLeap PL-P3/SMP™ provides an
economical CPU upgrade path for
dual-CPU Slot 1 (Pentium II™- and
Pentium III™-based) servers/workstations.
With the innovative PL-P3/SMP, you can
obtain significantly faster performance (up
to 1.4GHz) from your server/workstation by
upgrading to Intel Pentium III-S™
("Tualatin" core, 512KB L2 cache)
rocessors. The PL-P3/SMP™ also
supports the Intel Pentium III 1.13/1.2GHz
and Celeron 1.0A~1.4GHz CPU for
single-CPU operation.
100MHz
Note: This setting depends on the motherboard circuitry des i gn: some VIA 694
chipset-based SMP m otherboards can only work stably at 100MHz, not 133MHz.
133MHz
JP3: Dual CPU Signal
JP3
1 2
3 4
5 6
BR1# pin
JP3
1 2
3 4
5 6
BR1-X2 pin
1 2
3 4
5 6
BR1-N33 pin (default)
-1-
JP3
JP3
1 2
3 4
5 6
Single CPU
Page 2
e
Installation Guid
Installation
Installing the PL-P3/SMP™ is quick and easy: First, remove the original processors from the motherboard’s
processor slots. Next, insert a processor into the PL-P3/SMP™, apply thermal compound to the processor, and
install the heatsink/fan. Finally, install the PL-P3/SMP™ into the motherboard’s processor slot and make power
connections.
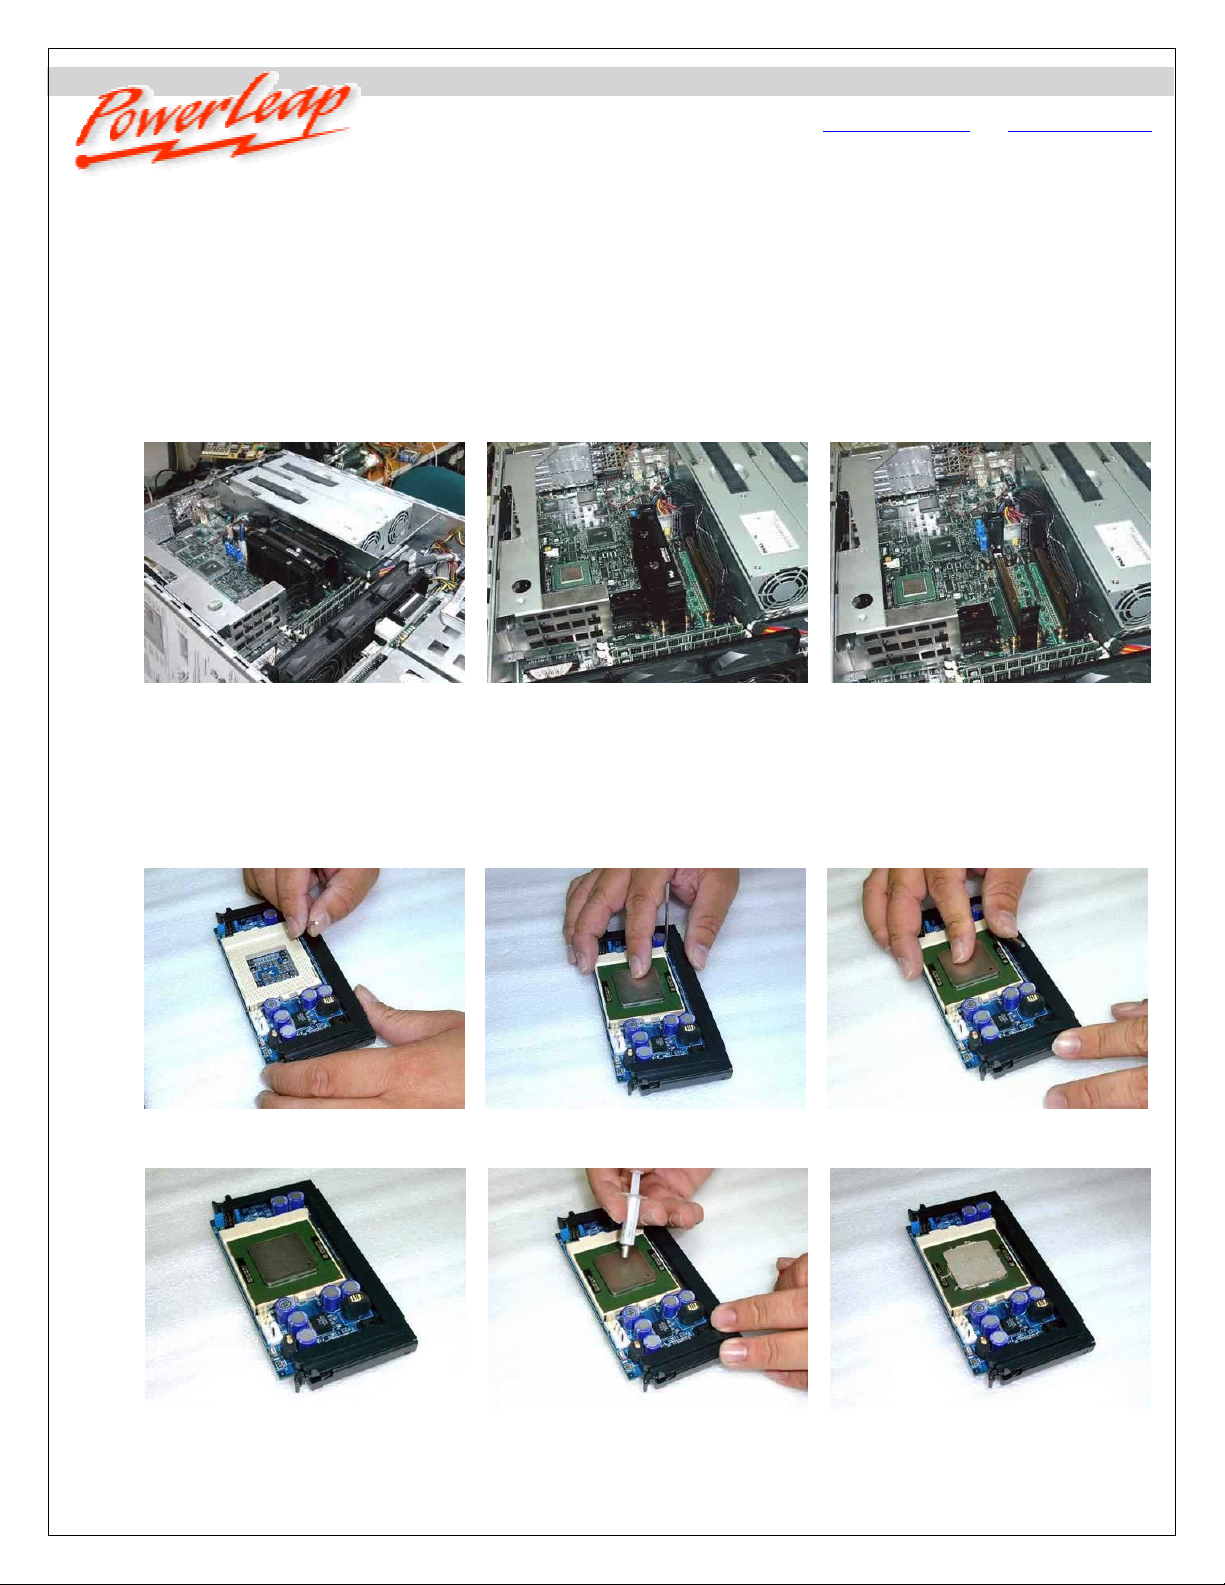
Removing the original processors from the CPU slots
The original Slot 1 processors. Be
sure to disconnect the system
power before continuing with your
processor upgrade.
www.powerleap.com • www.friendtech.com
After removing one of the original
processors (for details, refer to your
motherboard manual).
After removing both original
processors. We recommend using a
small brush to remove any dust from
the slots.
Inserting a processor, applying thermal compound, and installing the heatsink/fan
Before installing the processor in the
PL-P3/SMP.
The PL-P3/SMP with installed
processor.
Installing the processor in the
PL-P3/SMP. (1)
Applying thermal compound to the
processor.
Installing the processor in the
PL-P3/SMP. (2)
The processor after applying thermal
compound.
-2-
Page 3

e
Installation Guid
www.powerleap.com • www.friendtech.com
The heatsink with protective membrane. Peeling off the protective membrane. Installing the heatsink/fan onto the
processor.
Attaching the heatsink/fan's retaining
clip to the ZIF socket. (1)
Attaching the heatsink/fan's retaining
clip to the ZIF socket. (2)
Connecting the fan's power cable to the
PL-P3/SMP.
Installing the PL-P3/SMP™ and connect i ng t o a power supply
For most systems, you can connect the provided power cable directly from the PL-P3/SMP to an unused 4-pin
connector from the power supply.
Connecting the PL-P3/SMP™ power cable to an unused connector from the power supply:
After removing the original CPUs. Connecting the 3-pin end of the
PL-P3/SMP’s power cable to the PW1
connector on the PL-P3/SMP.
Inserting the first PL-P3/SMP into the
processor slot.
-3-
Page 4

e
Installation Guid
www.powerleap.com • www.friendtech.com
Inserting the second PL-P3/SMP into
the processor slot.
Important! Do not connect the PL-P3/SMP to a connector from a hard disk drive or other device.
Connecting the 4-pin end of the
PL-P3/SMP’s power cable to an unused
4-pin connector from the power supply.
The connected cables for two
PL-P3/SMPs.
Other Power Connection Options
If you can’t connect the PL-P3/SMP to an unused connector from your power supply (as shown above)—for
example, your system uses a WTX power supply, or a proprietary power supply (including Dell and Compaq
models) with non-standard pin signal definitions, or your power supply simply does not have any remaining unused
connectors—we can suggest several options:
Consider upgrading the power supply to obtain more reserved connectors (contact your system vendor for information
on power supply upgrades).
Contact PowerLeap for a cu st om-de si gned power cable solution (minimum order: 50 pcs.). The photos below illustrate
using a custom-designed power cable to
connect the PL-P3/SMP to a power supply.
Using a custom-designed power cable to connect the PL-P3/SMP to a power supply:
Disconnecting the WTX power supply
connector from the motherboard.
Connecting the PL-P3/SMP’s power
cable to the WTX power supply
connector.
Connecting the PL-P3/SMP’s power
cable to the motherboard.
-4-
Page 5

e
Installation Guid
www.powerleap.com • www.friendtech.com
Inserting the first PL-P3/SMP into the
processor slot.
Inserting the second PL-P3/SMP into
the processor slot.
Connecting the power cable to the first
PL-P3/SMP.
Connecting the power cable to the
second PL-P3/SMP.
Dual PL-P3/SMPs, installed and
connected.
Troubleshooting
If the computer won’t boot (blank screen) with the PL-P3/SMP™ installed, most likely the CPU is NOT inserted firmly in the
upgrade adapter. Also make sure that you have selected the correct frontside bus speed for the new processor.
If the system stops after memory counting or during system initialization, use more conservative BIOS settings for the main
memory and cache memory (for example, change the “CL=2” to “CL=3”), and load the “Fail-Safe” or “BIOS Default Values”
option in the BIOS setup. For more information, please refer to the BIOS Guide links listed below.
If your PL-P3/SMP encounters stability problems (i.e., periodic system freezes), it should be the result of CPU overheating.
Please make sure the heatsink is properly connected and the fan is working. If overheating is suspected, you need to use
“thermal compound” to improve the heat dissipation. We suggest that you read here (www.arcticsilver.com
SoundBlaster audio card users: please upgrade to the latest drivers, or the system may not work normally. This is a known
problem with SoundBlaster cards when the CPU is changed. Check here: www.soundblaster.com/support/drivers/
For Adobe Photoshop 5.5 (or later) crashes or freezes, Adobe suggests moving the Extensions Folder out of the Plug-Ins
folder. See www.adobe.com/support/techdocs/2256a.htm
If your BIOS can’t detect and report the new CPU speed and type (or displays an error message during POST), but the system
otherwise boots and operates normally, please just ignore the message. The old BIOS was programmed long before the newer
CPU became available. This won’t affect the performance or compatibility at all. Please use benchmarking software such as
WCPUID (www.h-oda.com
) or SiSoftware Sandra (www.sisoftware.demon.co.uk/sandra/index.htm) to identify the new CPU.
for more details.
) for more details.
.
Remove any anti-virus program that you may be running before installing the PL-P3/SMP. You can reinstall the anti-virus
program after the upgrade installation.
-5-
Page 6

e
Installation Guid
www.powerleap.com • www.friendtech.com
Upgrading Your Computer’ s BIOS
Some motherboards may require a BIOS upgrade in order to work with the latest Pentium III and Celeron CPUs. For
information about getting a BIOS upgrade for your computer system, start by visiting the brand-name manufacturer’s web site.
Do this with your original CPU installed in the motherboard. BIOS upgrades may be downloaded from the system vendor or the
motherboard maker’s website(s). If you can’t find BIOS upgrade information there, try the following:
Many brand-name comput er manufacturers use OEM motherboards. C hec k the motherboard maker's ID, then go to th eir site to
look for a BIOS upgrade. Look for upgrades at the sites of your motherboard’s original BIOS manufacturer: AMI
(www.amibios.com
BIOS software.
Wim’s BIOS Page (www.wimsbios.com
(www.lostcircuits.com/advice/bios.html
(www.matrix-bios.nl/frames.html
Optimization Guide (http://www.rojakpot.com/bog.aspx) also offer a wealth of BIOS information.
Important! When installing the latest BIOS for your system, be sure to follow the BIOS upgrade instructions carefully.
), Award (www.award.com), MR BIOS (www.mrbios.com), and Phoenix (www.ptltd.com) produce popular
) discusses BIOS flashing in detail, and so do Lost Circuits
) and FlashBIOS (www.flashbios.org/). The BIOS Setup Information Guide
), Tom’s Hardware BIOS Guide (www.tomshardware.com/bios.html), and the BIOS
Visit our online technical support area at www.powerleap.com/support.
Manual v1.0, March 2003. Copyright 2002-2003 PowerLeap Products , Inc. All Rights Reserved.
PowerLeap is a registered trademark of PowerLeap Products Inc. PL-P3/SMP is a trademark of PowerLeap Product s Inc. Intel, MMX, and
Pentium are registered trademarks of Intel Corporati on. Other product names ment i oned herei n are used for identification purpos es only and
may be trademarks and/ or regi stered trademarks of t hei r respective companies.
The information in this docum ent is subject to change without prior notice in order to improve reliability, design and function and does not
represent a commitment on the part of the manufacturer.
-6-
 Loading...