

Page 1

Page 2

contents
introducing Bluetooth wireless printing . . . . . . . . . . . . . . . . . . . . 1
printing from a desktop or laptop PC . . . . . . . . . . . . . . . . . . . . . 2
3Com wireless Bluetooth PC card . . . . . . . . . . . . . . . . . . . . . . . . . . . . . . 3
3Com wireless Bluetooth USB adapter . . . . . . . . . . . . . . . . . . . . . . . . . . . 5
Microsoft Optical Desktop for Bluetooth (HCRP) . . . . . . . . . . . . . . . . . . . . . 7
TDK Bluetooth USB adapter. . . . . . . . . . . . . . . . . . . . . . . . . . . . . . . . . . 15
printing from a handheld device . . . . . . . . . . . . . . . . . . . . . . . 22
hp Jornada 500 and 700 series . . . . . . . . . . . . . . . . . . . . . . . . . . . . . . 23
Compaq iPAQ Pocket PC . . . . . . . . . . . . . . . . . . . . . . . . . . . . . . . . . . . 34
Palm handheld m500 series . . . . . . . . . . . . . . . . . . . . . . . . . . . . . . . . . 41
printing from other Bluetooth devices . . . . . . . . . . . . . . . . . . . . 48
Nokia Series 60 imaging phones . . . . . . . . . . . . . . . . . . . . . . . . . . . . . 49
troubleshooting . . . . . . . . . . . . . . . . . . . . . . . . . . . . . . . . . . . 58
about the printer’s Bluetooth wireless feature . . . . . . . . . . . . . . . 67
the printer’s Bluetooth wireless feature . . . . . . . . . . . . . . . . . . . . . . . . . . 68
changing the printer’s wireless feature . . . . . . . . . . . . . . . . . . . . . . . . . . 72
index . . . . . . . . . . . . . . . . . . . . . . . . . . . . . . . . . . . . . . . . . . 78
Page 3

notices and acknowledgements
hewlett-packard company notices
The information contained in this document is subject to change without notice.
All rights reserved. Reproduction, adaptation, or translation of this material is
prohibited without prior written permission of Hewlett-Packard, except as allowed
under copyright laws.
acknowledgments
Microsoft, MS, MS-DOS, and Windows are registered trademarks of Microsoft
Corporation.
Pentium is a U.S. registered trademark of Intel Corporation.
TrueType is a U.S. trademark of Apple Computer, Inc.
Palm OS and HotSync are trademarks of Palm, Inc.
BLUETOOTH and the BLUETOOTH logos are trademarks owned by Bluetooth SIG,
Inc., U.S.A. and licensed to Hewlett-Packard.
3Com is a trademark of 3Com Corporation.
Adobe and Acrobat are trademarks of Adobe Systems Incorporated.
PrintPocketCE is a trademark of FieldSoftware Products.
BtPrint is a trademark of IS/Complete Inc.
Documents To Go is a trademark of DataViz.
Compaq and the names of Compaq products referenced herein are either
trademarks and/or service marks or registered trademarks and/or service marks of
Compaq.
Nokia is a trademark of Nokia Corporation.
Copyright 2003 Hewlett-Packard Company
i
Page 4

introducing Bluetooth wireless printing
The HP Deskjet 995c and 995ck series printers support Bluetooth wireless printing.
The Bluetooth feature allows you to print without a cable connection between the
printer and a Bluetooth wireless technology enabled device.
For Bluetooth wireless printing instructions, select the appropriate topic:
• printing from a desktop or laptop PC
• printing from a handheld device
• printing from other Bluetooth devices
updates
Because Bluetooth wireless communication is an emerging technology, the
information in this document is subject to change.
In order to provide the most up-to-date information possible, this document will be
revised and posted on HP’s Web site as needed.
1
Page 5

printing from a desktop or laptop PC
In order to use the printer, the PC must be enabled with Bluetooth wireless
technology.
If your PC has an internal Bluetooth radio, then consult the documentation that came
with the PC for information concerning the PC’s Bluetooth wireless feature.
If your PC does not have an internal Bluetooth radio, then you must use a Bluetooth
PC card or adapter to make the PC Bluetooth wireless technology enabled.
Several devices are available to make your PC Bluetooth wireless technology
enabled. This document contains instructions for the following:
• 3Com wireless Bluetooth PC card
• 3Com wireless Bluetooth USB adapter
• Microsoft Optical Desktop for Bluetooth (HCRP)
• TDK Bluetooth USB adapter
If you are using a Bluetooth wireless device made by another manufacturer, consult
the documentation that came with the device or contact the manufacturer for printing
instructions.
2
Page 6
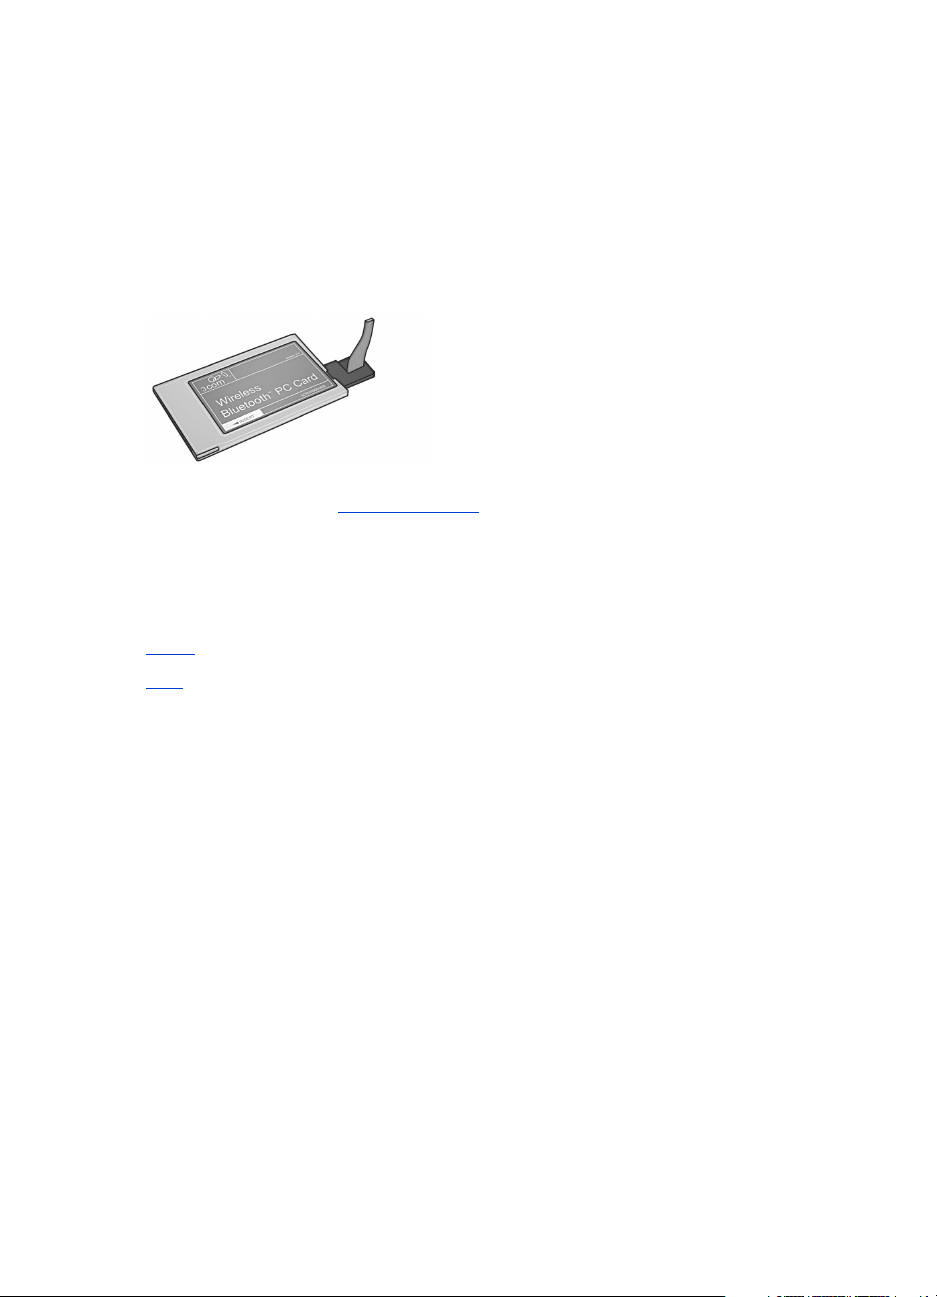
3Com wireless Bluetooth PC card
The printing instructions included in this section apply to PCs using a 3Com wireless
Bluetooth PC card.
requirements
Before you can print, you will need a 3Com wireless Bluetooth PC card and a PC.
Visit 3Com’s Web site at: www.3com.com
.
setup and print
Follow these steps to set up and print over a Bluetooth wireless connection with the
3Com wireless
1. Install
2. Print
install a 3Com Bluetooth wireless PC card
Bluetooth PC card:
a 3Com wireless Bluetooth PC card in the PC.
a file.
To install a 3Com Bluetooth wireless PC card in a laptop, consult the documentation
that came with the PC card.
If you are using a Bluetooth wireless PC card made by another manufacturer, consult
the documentation that came with the PC card or contact the manufacturer for
printing instructions.
3
Page 7
printing instructions
1. Open the file you want to print.
2. Select
3. Click
4. Select the printer.
5. Click the
File > Print.
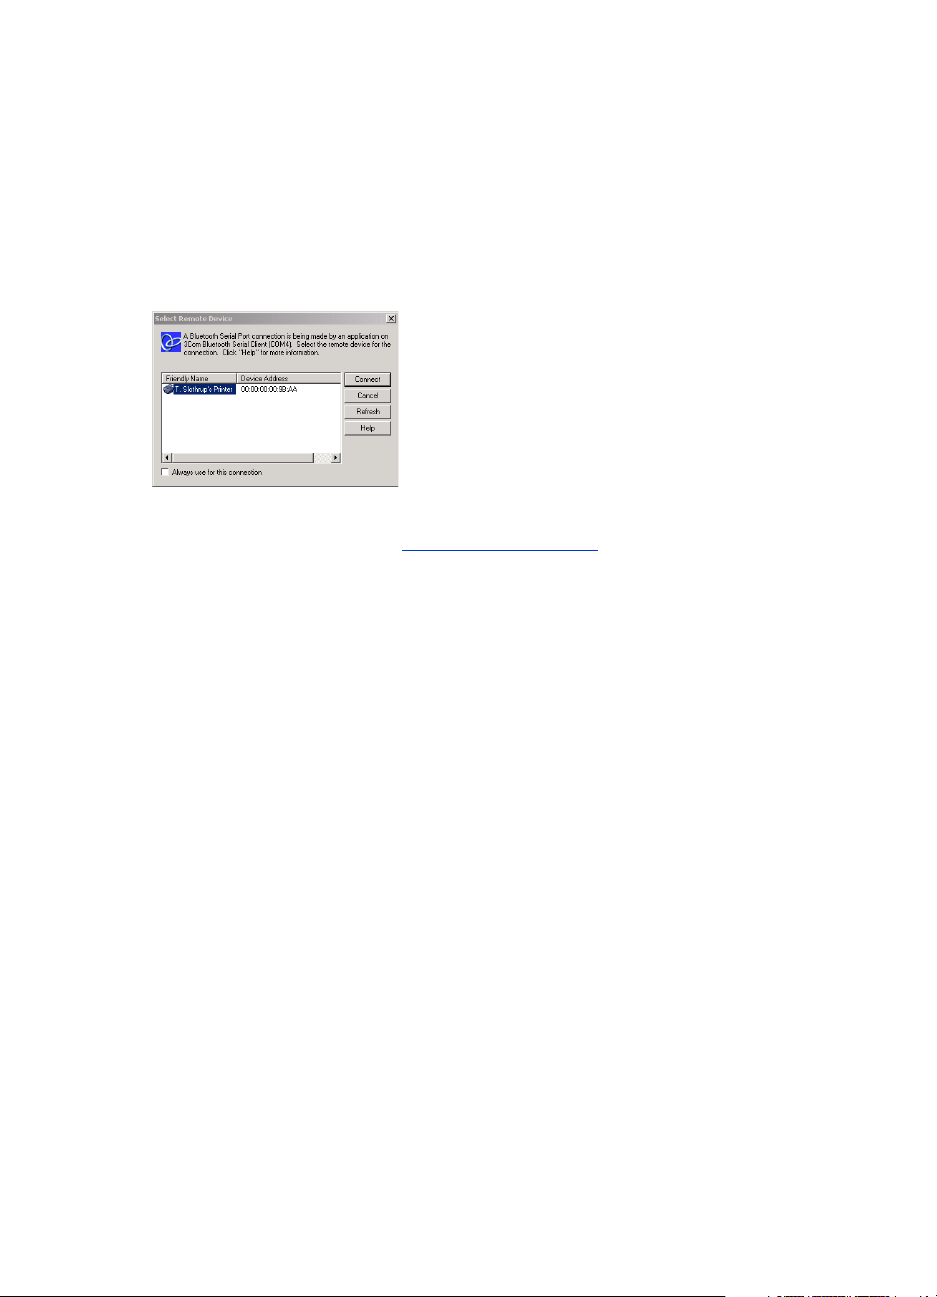
The
Print dialog box appears.
Print.
The
Select Remote Device dialog box appears.
The printer is identified by its Bluetooth device name
To always use this specific printer, click
Connect button.
Always use for this connection.
(see page 69).
When the laptop establishes a Bluetooth wireless connection with the printer, the
Bluetooth LED light flashes.
After the laptop has sent the file to the printer, the laptop disconnects from the
printer, and the Bluetooth LED light stops flashing.
4
Page 8
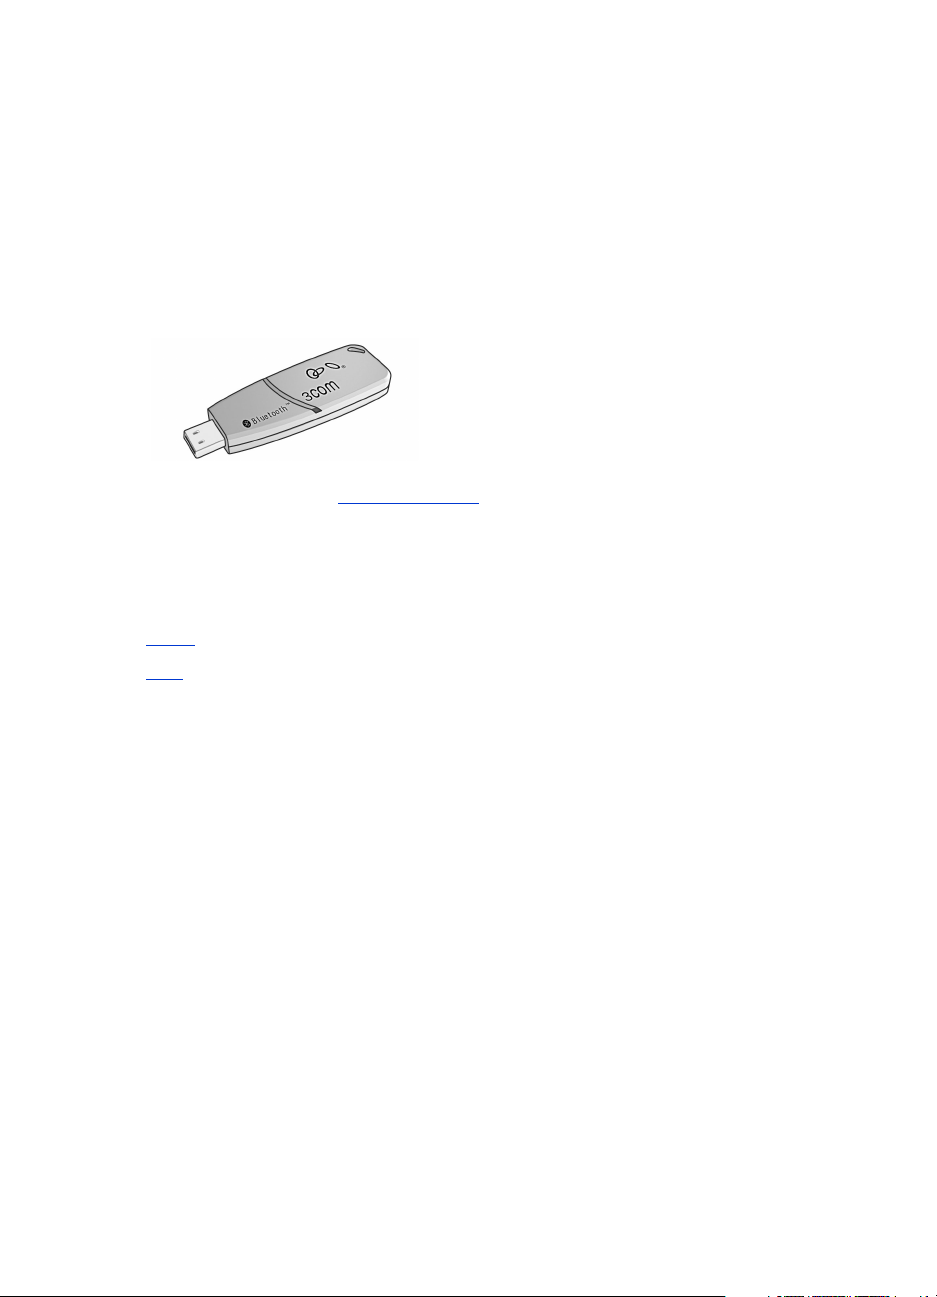
3Com wireless Bluetooth USB adapter
The printing instructions included in this section apply to PCs using a 3Com wireless
Bluetooth USB adapter.
requirements
Before you can print, you will need a 3Com wireless Bluetooth USB adapter and
a PC.
Visit 3Com’s Web site at: www.3com.com
.
setup and print
Follow these steps to set up and print with the 3Com wireless Bluetooth USB adapter
over a Bluetooth wireless connection:
1. Install
2. Print
install a 3Com Bluetooth wireless USB adapter
To install a 3Com wireless Bluetooth USB adapter in a desktop or laptop PC, consult
the documentation that came with the adapter.
If you are using a Bluetooth wireless adapter made by another manufacturer, consult
the documentation that came with the adapter or contact the manufacturer for
printing instructions.
the 3Com wireless Bluetooth USB adapter in the PC.
a file.
5
Page 9
printing instructions
1. Open the file you want to print.
2. Select
3. Click
4. Select the printer.
File > Print.
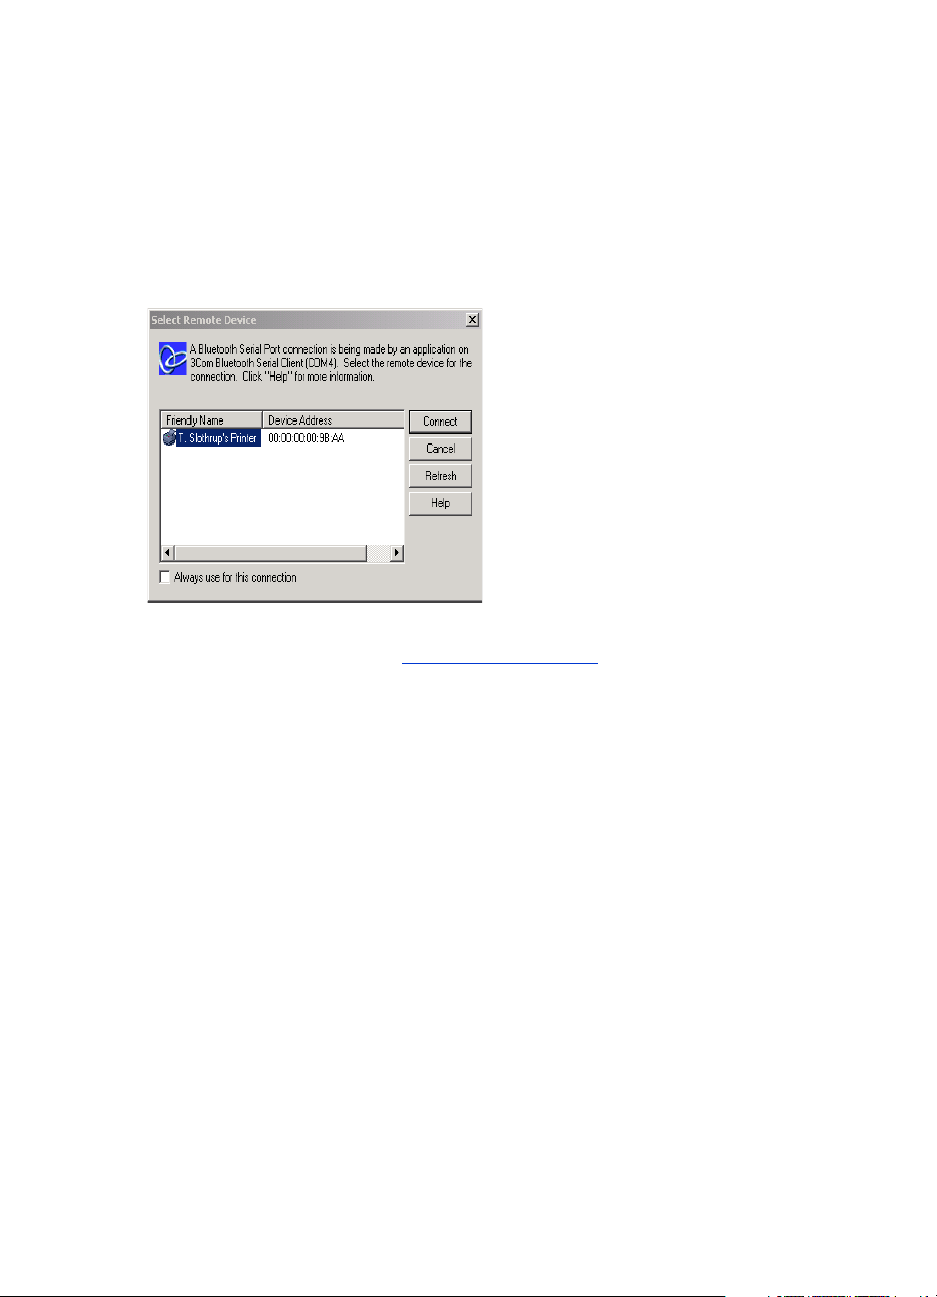
The
Print dialog box appears.
Print.
The
Select Remote Device dialog box appears.
The printer is identified by its Bluetooth device name
To always use this specific printer, click
Always use for this connection.
(see page 69).
5. Click the
Connect button.
When the laptop establishes a Bluetooth wireless connection with the printer, the
Bluetooth LED light flashes.
After the laptop has sent the file to the printer, the laptop disconnects from the
printer, and the Bluetooth LED light stops flashing.
6
Page 10

Microsoft Optical Desktop for Bluetooth (HCRP)
The printing instructions included in this section apply to PCs using the Microsoft
Optical Desktop for Bluetooth (keyboard, mouse, and dongle) and the Microsoft
Windows XP operating system.
The Microsoft Optical Desktop for Bluetooth uses Hardcopy Cable Replacement
Profile (HCRP) which allows your computer to communicate with the printer as though
the computer and the printer were connected by a cable.
requirements
Before you can print, you will need:
• Microsoft Optical Desktop for Bluetooth
• USB cable
•Windows XP
Bluetooth antenna for Microsoft
Optical Desktop for Bluetooth
setup and print
Follow these steps to set up and print with the Microsoft Optical Desktop for Bluetooth
and an HCRP connection:
1. Install
2. Update
3. Connect
4. Print
the Microsoft Optical Desktop for Windows.
the printer firmware and software.
to the printer with Bluetooth and HCRP.
a file.
7
Page 11

install the Microsoft Optical Desktop for Bluetooth
For installation instructions, consult the documentation that came with the Microsoft
Optical Desktop for Bluetooth.
While installing the Microsoft Optical Desktop for Bluetooth, the Windows XP
operating system on your computer will be updated with a Microsoft patch to allow
HCRP printing.
update the printer firmware and printer driver
Because Bluetooth wireless communications is an emerging technology, HP regularly
updates the printer firmware and printer driver.
The firmware is the printer’s internal software. The printer driver is the software that
you use to operate the printer from your computer.
Updating the printer firmware and printer driver is a three-step process:
1. Download
the latest firmware and printer driver.
2. Install
3. Install
the firmware on the printer.
the printer driver on your computer.
download the latest firmware and software
The latest firmware and software are available on the Web.
1. Go to www.hp.com/support/bluetooth
2. Select the appropriate language.
3. Click
4. Click
5. Download and save to your computer each of the following updates:
update software & drivers in the list on the left of the page.
Microsoft Windows XP.
•
HP Deskjet 995c HCRP firmware update
•
HP Deskjet 995c HCRP printer driver for Windows XP
After saving each update, record the filename and location of the update on a
sheet of paper.
.
8
Page 12

install the hp deskjet 995c series firmware
To install the latest firmware, do the following:
1. Locate the hp deskjet 995c HCRP firmware update on your computer.
2. Double-click the hp deskjet 995c HCRP firmware update file.
Run the firmware update from your harddisk drive only. The hp deskjet
995c HRCP firmware update program will not run from CD-ROM.
3. Follow the onscreen instructions to update the firmware on your printer.
install the latest printer driver
To update the printer driver for your hp deskjet 995c series printer, do the following:
1. Locate the hp deskjet 995c HCRP printer driver update on your computer.
2. Double-click the hp deskjet 995c HCRP printer driver update.
3. Follow the onscreen instructions to update your hp deskjet 995c printer driver.
9
Page 13

connect to the printer with Bluetooth and HCRP
To connect the printer to the computer using Bluetooth and HCRP, be sure the
Microsoft Optical Desktop for Bluetooth dongle is connected to your computer, and
then do the following:
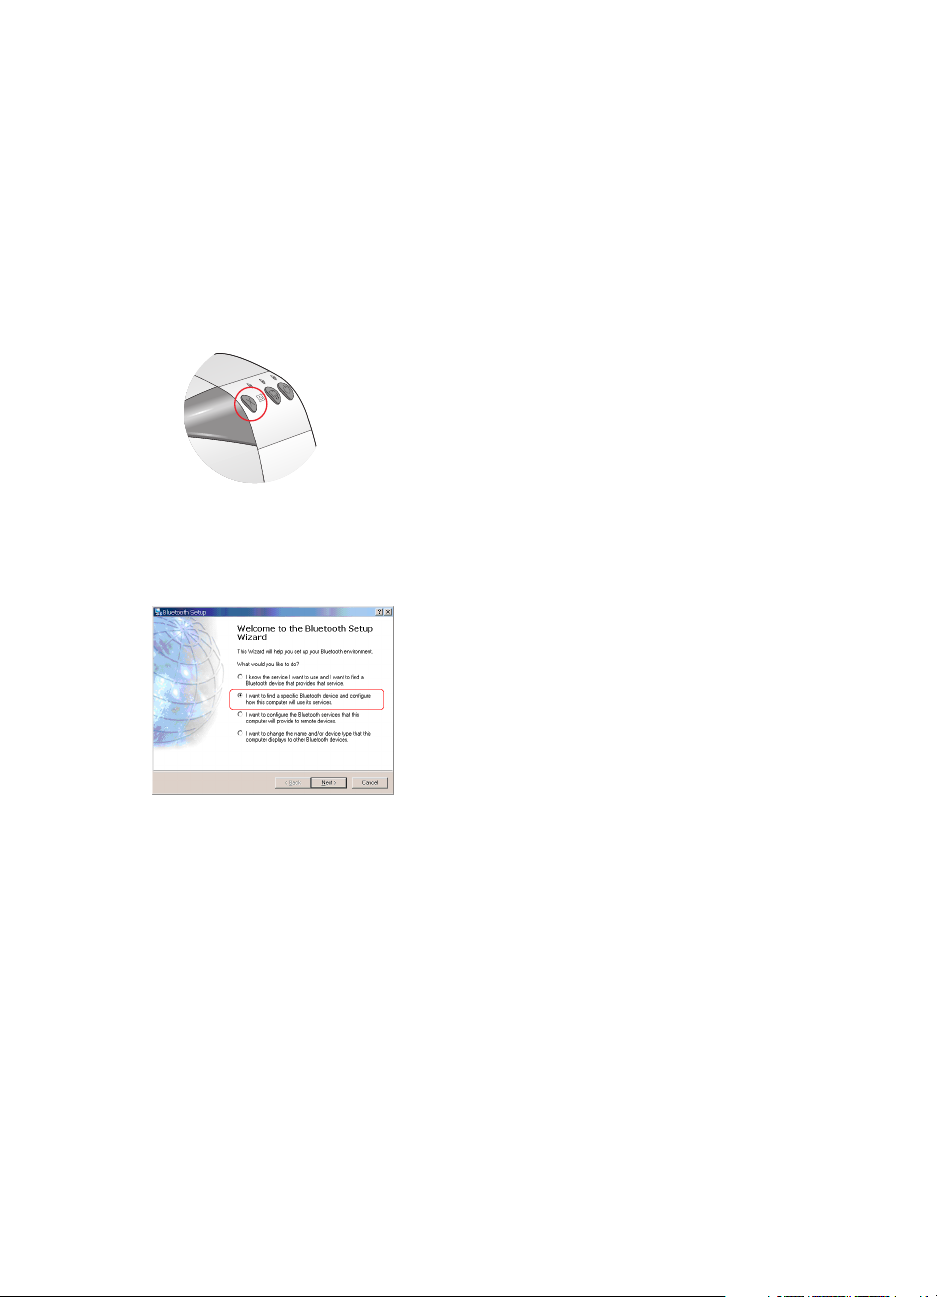
1. Press and hold down the printer’s
Bluetooth Configuration page.
The Bluetooth Configuration page contains information that you will use when
connecting to the printer.
Cancel (X) button for four seconds to print a
2. Click
Start > Control Panel, then do one of the following:
Category View Classic View
Click Printers and other Hardware,
then click the
Wireless Link icon.
Double-click the Wireless Link icon.
10
Page 14
3. Click the
Bluetooth tab.
4. Click the
Add button.
The Bluetooth Connection Wizard appears.
11
Page 15
5. Click
Next.
The computer searches for any Bluetooth wireless technology enabled devices
and displays them in the results list.
if this happens... then do this...
More than one hp
deskjet 995c printer is
in the list
The printer does not
appear
Find the Device Name on the Bluetooth
Configuration page.
Match the device name on the Bluetooth
Configuration page to one of the device names
on the connection wizard.
Click
Refresh once. If you still don’t see the
printer, see troubleshooting
.
12
Page 16
6. Select the printer from the list, then click
The
Authenticate the device? screen appears.
Next.
7. Find the Authentication Required line item on the Bluetooth Configuration page,
then do one of the following:
if the Authentication
then...
Required line reads...
Authentication = 0
Authentication Off
Authentication = 1
Authentication On
Click No, then click Next.
Click Yes, then click Next.
You will be prompted for the printer’s PIN
Code. Enter the PIN code.
The authentication settings must match the settings on your hp deskjet
995c series printer. If you choose
No, and you have already used the
hp deskjet 995c toolbox to change the printer's encryption required
setting, you will not be able to print. You must reset to factory defaults
For more information on changing the printer's wireless features, see
changing the printer’s wireless feature
.
.
13
Page 17
8. Click the
Printing (HCRP) check box.
9. Click
Next, then click Finish.
The hp deskjet 995c series printer icon appears in the list of devices. If you do
not see the icon appear in the list, see the troubleshooting entry after HCRP
installation the printer icon does not appear in My Printers list.
print a file
To verify the printer is successfully communicating with the computer:
1. Click
2. Right-click the printer icon, then click
3. Open an existing document.
4. Choose
Start > Printers and Faxes.
Set As Default Printer.
If there is a check mark next to the icon, the printer is set as the default printer.
File > Print.
14
Page 18

TDK Bluetooth USB adapter
The printing instructions included in this section apply to PCs using a TDK Bluetooth
USB adapter.
The TDK Bluetooth USB adapter uses Hardcopy Cable Replacement Profile (HCRP)
to allow your computer to communicate with the printer without a cable.
requirements
Before you can print, you will need a TDK Bluetooth USB adapter and a PC.
Visit TDK’s Web site at: www.tdksystems.com
.
setup and print
Follow these steps to set up and print with the TDK Bluetooth USB adapter over a
Bluetooth wireless connection:
1. Install
2. Connect
3. Print
install a TDK Bluetooth USB Adapter
To install a TDK Bluetooth USB adapter in a desktop or laptop PC:
1. Install the software from the adapter’s software CD.
2. Plug the adapter into your computer’s USB port and follow the onscreen
For more information, consult the documentation that came with the adapter.
If you are using a Bluetooth wireless adapter made by another manufacturer, consult
the documentation that came with the adapter or contact the manufacturer for
printing instructions.
the TDK Bluetooth USB adapter in the PC.
to the printer with Bluetooth and HCRP.
a file.
instructions to complete the installation.
15
Page 19

connect to the printer with Bluetooth and HCRP
The steps for connecting to the printer vary by Windows version. Select the version
of Windows running on your computer:
• Windows XP
• Windows 2000
If you have a HP Deskjet 995C, you must upgrade your printer firmware
in order to user the TDK Bluetooth USB Adapter. See the deskjet 995c
support website at www.hp.com/support/bluetooth
drivers and downloads.
, and then click on
16
Page 20
Windows XP
Before connecting to the printer, the printer software must be installed on the
computer. If the printer software is not installed, insert the printer software CD in the
computer’s CD-ROM drive and follow the onscreen instructions.
To connect the printer to the computer using Bluetooth and HCRP, be sure the TDK
USB adapter is connected to your computer, and then do the following:
1. Press and hold down the printer’s
Cancel (X) button for four seconds to print a
Bluetooth Configuration page.
2. Double-click the
3. Click
Bluetooth Setup Wizard under the Bluetooth Tasks heading.
The
Bluetooth Setup wizard appears.
My Bluetooth Places icon on the computer desktop.
4. Select I want to find a specific Bluetooth device and configure how this computer
will use its services
, and then click Next.
The wizard searches for any Bluetooth devices within range.
17
Page 21
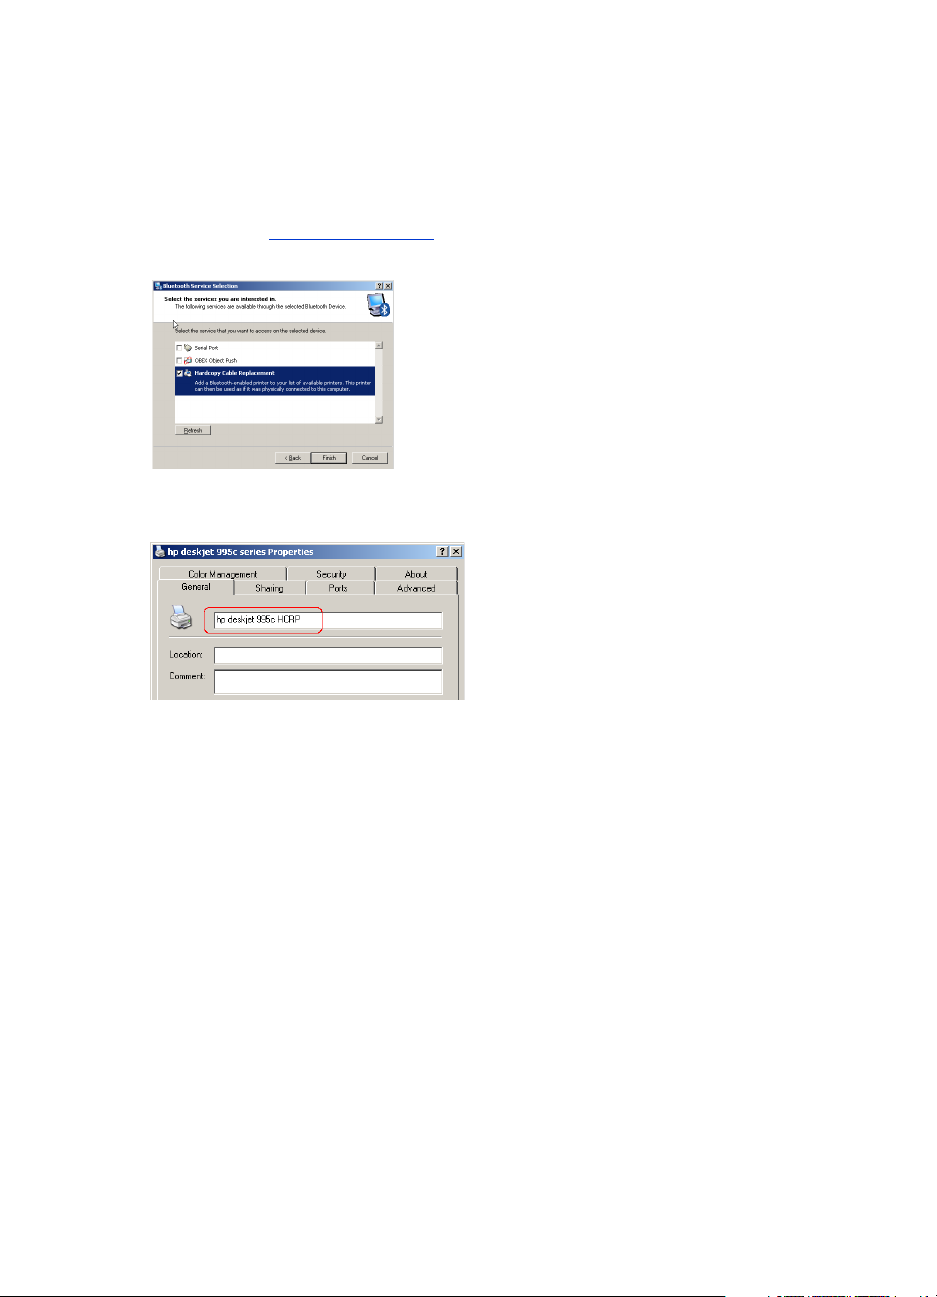
5. Select the printer, and then click
The
Bluetooth Security screen appears.
Next.
6. Click
Skip Pairing.
If you do want to enter a PIN Code, the default is
code with the configuration utility
The
Bluetooth Service Selection screen appears.
.
0. You can change the pin
7. Select Hardcopy Cable Replacement, and then click Finish.
The
hp deskjet 995c series Properties dialog box appears.
8. Change the printer name to
hp deskjet 995c HCRP, and then click OK.
9. Click
OK on the dialog box that appears.
18
Page 22

Windows 2000
Before connecting to the printer, the printer software must be installed on the
computer. If the printer software is not installed, insert the printer software CD in the
computer’s CD-ROM drive and follow the onscreen instructions.
To connect the printer to the computer using Bluetooth and HCRP, be sure the TDK
USB adapter is connected to your computer, and then do the following:
1. Press and hold down the printer’s
Cancel (X) button for four seconds to print a
Bluetooth Configuration page.
2. Double-click the
3. Double-click the
My Bluetooth Places icon on the computer desktop.
Find Bluetooth Devices icon.
The computer displays a list of other Bluetooth enabled devices within range.
Identify the printer by it’s Bluetooth Device Name which can be found on the
Bluetooth Configuration page.
19
Page 23
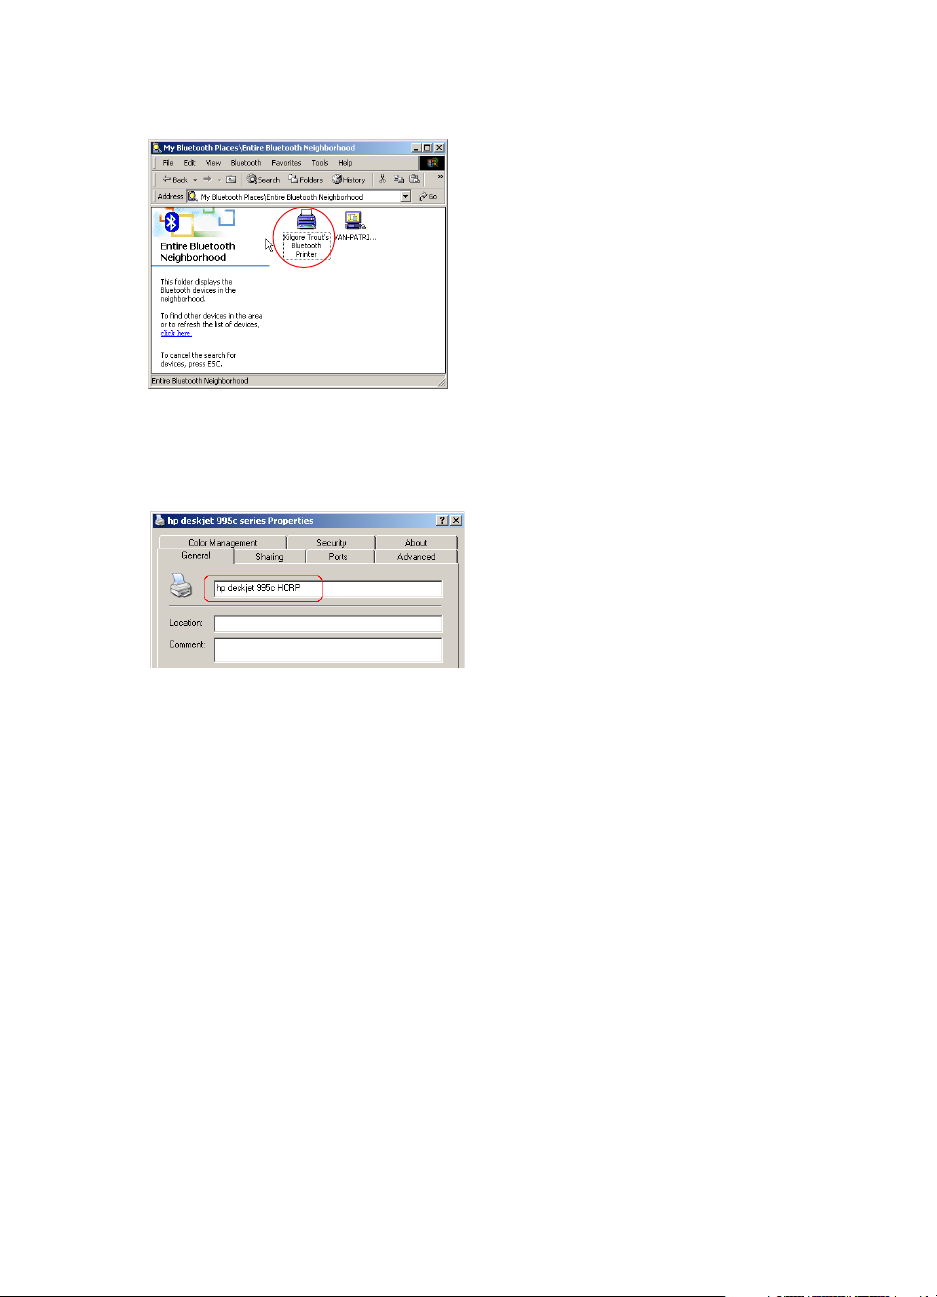
4. Double-click the printer’s icon.
A dialog box asking if you want to install the printer appears.
5. Click
Yes.
6. Change the printer name to
7. Click
OK on the dialog box that appears.
hp deskjet 995c HCRP, and then click OK.
20
Page 24

printing instructions
1. Open the file you want to print.
2. Select
3. Select the printer.
File > Print.
The
Print dialog box appears.
If two copies of the printer icon appear, select the icon labeled
HRCP
.
hp deskjet 995c
When the laptop establishes a Bluetooth wireless connection with the printer, the
Bluetooth LED light flashes.
After the laptop has sent the file to the printer, the laptop disconnects from the
printer, and the Bluetooth LED light stops flashing.
21
Page 25

printing from a handheld device
Many handheld devices that are enabled with Bluetooth wireless technology are
coming onto the market.
This document contains instructions for the following:
• hp Jornada 500 and 700 series
• Compaq iPAQ Pocket PC
• Palm handheld m500 series
If you are using a Bluetooth handheld device made by another manufacturer, consult
the documentation that came with the device or contact the manufacturer for printing
instructions.
22
Page 26

hp Jornada 500 and 700 series
For help printing over a Bluetooth connection with your HP Jornada, select your
Jornada model.
HP Jornada 500 series
HP Jornada 700 series
23
Page 27

hp Jornada 500 series
The HP Jornada 500 series PocketPC supports Bluetooth wireless printing:
requirements
Before you can print, you will need:
• One of the following Bluetooth cards:
• A Socket Communications Bluetooth card and software. Visit the Socket
Communications Web site at: www.socketcom.com
.
—or—
• An AnyCom, Inc. Bluetooth card and software. Visit the AnyCom Web site
at: www.anycom.com.
• A third-party printing application for the HP Jornada 500 series. Visit the
FieldSoftware Products Web site at: www.fieldsoftware.com/
PrintPocketCE.htm.
setup and print
Follow these instructions to setup and print with the HP Jornada 500 series:
1. Install
2. Install
3. Discover
4. Print
a Socket or AnyCom Bluetooth card and software.
a third-party printing application.
the printer.
a file.
24
Page 28
install a Socket or Anycom Bluetooth card
Installation instructions may vary by manufacturer. If your Bluetooth card comes with
installation instructions, follow the instructions that came with your card. Otherwise,
follow the instructions below:
1. Place the Jornada in its cradle.
2. Insert the Bluetooth software CD in the computer’s CD-ROM drive.
3. Follow the onscreen instructions to install the Bluetooth software.
4. After the software has been installed, remove the Jornada from its cradle.
5. Press the
Wait for the Jornada to reboot, then press the
Reset button once.
Reset button again. The Reset
button is located on the back of the Jornada 500.
Caution! Failure to reset the Jornada 500 series twice after installing an
Anycom Bluetooth card prevents the Jornada from printing correctly
over a Bluetooth connection.
6. Insert the Bluetooth card in the expansion slot.
25
Page 29

install a third–party printing application
Pocket PCs, such as the HP Jornada 500 series, require a third-party printing
application, such as PrintPocketCE.
PrintPocketCE is available at: www.fieldsoftware.com/PrintPocketCE.htm
Instructions for third-party products are provided for informational
purposes only. HP does not support these products and cannot
guarantee the accuracy of the instructions. Contact the product
manufacturer with questions or requests for additional information.
discover the printer
Before the Jornada can print, it must discover the printer. See Bluetooth discovery on
page 68.
For discovery instructions, select your Bluetooth card:
• Socket Bluetooth Card
• AnyCom Bluetooth Card
26
Page 30
Socket Bluetooth card for hp Jornada 500 series
From the Desktop on the Jornada, follow these steps to discover the printer:
1. Tap the
2. Tap
Bluetooth icon at the bottom of the screen.
Advanced Features > Bluetooth Devices.
The Bluetooth Devices screen appears.
3. Tap
Tools > Device Discovery.
The Bluetooth Device Discovery wizard appears.
4. Tap
5. Tap
Next.
Any Bluetooth Device, then tap Next.
The Jornada searches for any Bluetooth wireless technology enabled devices
within range. It displays the Bluetooth device name
(see page 69) of any device
it discovers.
6. Tap the checkbox next to the printer’s Bluetooth device name, then tap
7. After the
Congratulations window appears, tap Finish.
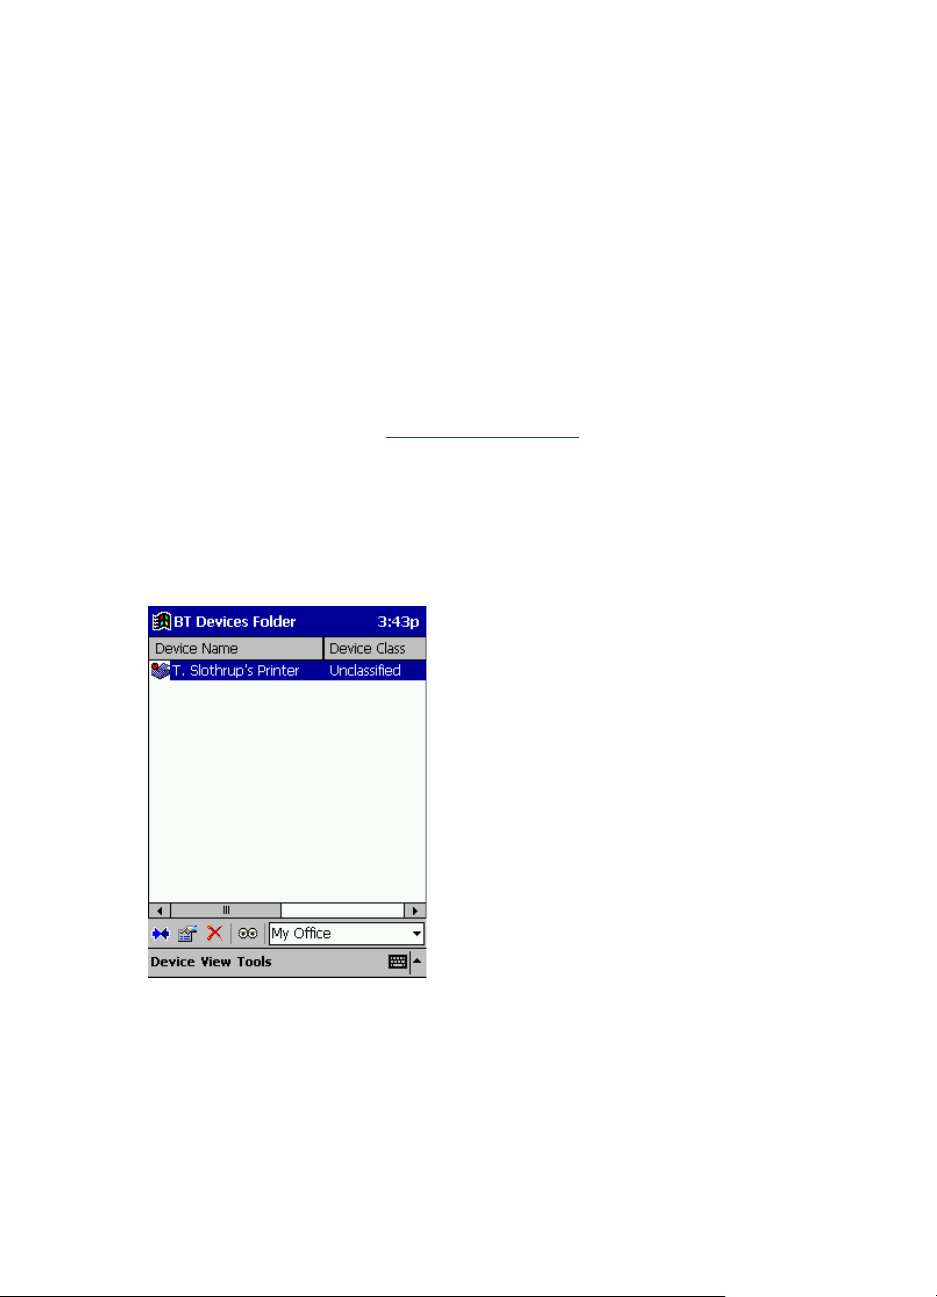
The printer’s Bluetooth device name appears next to a printer icon in the BT
Devices folder.
Next.
8. Tap
9. Tap the
Tools > My Favorite.
My Favorite Device drop-down arrow to view a list of printers.
10. Select the printer, then tap
OK.
27
Page 31

AnyCom Bluetooth card for hp Jornada 500 series
From the Desktop on the Jornada, follow these steps to discover the printer:
1. Tap
Today > Start > Programs > Bluetooth Wizard.
The Bluetooth Wizard screen appears.
If a Bluetooth Wizard icon does not display in the Start menu, tap File
Explorer
Card > Bluetooth Wizard.
2. Tap
3. Tap
Serial Port Connection.
Next.
4. Select an available local COM port, then tap
The Jornada searches for any Bluetooth wireless technology enabled devices
within range. It displays the Bluetooth device name
it discovers. If the printer does not appear, tap
5. Select the printer, then tap
The Bluetooth card associates the COM port with the printer.
> My Device > Program Files > [Bluetooth card name] Bluetooth
Next.
(see page 69) of any device
Search Again.
Next.
6. Tap
Finish, then tap Exit.
The Jornada communicates with the printer through the COM port you selected
in step 4. Note the COM port you selected for future use.
28
Page 32

print a file using hp Jornada 500 series
third–party applications
Printing instructions for the HP Jornada 500 vary according to the third–party
printing application used. Consult the documentation that came with the third–party
printing application for printing instructions.
finding the Bluetooth COM port
When you install a Bluetooth card in a Jornada, the Jornada assigns it to one of the
available COM ports. Some printing applications may require you to know the COM
port for the Bluetooth card.
To find the Bluetooth COM port:
1. Open the file you want to print.
2. Select the available COM ports one at a time until the file prints.
3. Note the COM port for future use.
29
Page 33

hp Jornada 700 series
The HP Jornada 700 series PocketPC supports Bluetooth wireless printing:
requirements
Before you can print, you will need a Socket Communications Bluetooth card and
software. Visit the Socket Communications Web site at: www.socketcom.com
setup and print
Follow these instructions to setup and print with the HP Jornada 700 series:
1. Install
a Socket Bluetooth card and software.
.
2. Discover
3. Print
a file.
the printer.
30
Page 34

install a Socket Bluetooth card
Installation instructions may vary by manufacturer. If your Bluetooth card comes with
installation instructions, follow the instructions that came with your card. Otherwise,
follow the instructions below:
1. Place the Jornada in its cradle.
2. Insert the Bluetooth software CD in the computer’s CD-ROM drive.
3. Follow the onscreen instructions to install the Bluetooth software.
4. After the software has been installed, remove the Jornada from its cradle.
5. Press the
Reset button once with the stylus.
The Reset button is located on the left side of the keyboard.
6. Insert the Bluetooth card in the expansion port or expansion slot.
expansion port expansion slot with
PC card adapter
31
Page 35

discover the printer
From the Desktop on the Jornada, follow these steps to discover the printer:
1. Tap the
Bluetooth icon at the bottom of the screen.
2. Tap
Advanced Features > Bluetooth Devices.
The Bluetooth Devices screen appears.
3. Tap
Tools > Device Discovery.
The Bluetooth Device Discovery wizard appears.
4. Tap
5. Tap
Next.
Any Bluetooth Device, then tap Next.
The Jornada searches for any Bluetooth wireless technology enabled devices
within range. It displays the Bluetooth device name
(see page 69) of any device
it discovers.
6. Tap the checkbox next to the printer’s Bluetooth device name, then tap
7. After the
Congratulations window appears, tap Finish.
The printer’s Bluetooth device name appears next to a printer icon in the BT
Devices folder.
Next.
8. Tap
9. Tap the
Tools > My Favorite.
My Favorite Device drop-down arrow to view a list of printers.
10. Select the printer, then tap
OK.
32
Page 36
print a file using hp Jornada 700 series
The AnyCom Bluetooth card does not support the HP Jornada 700
series. To print over a Bluetooth wireless connection with an HP Jornada
700 series, use a Socket Communications Bluetooth card.
Follow these steps to print over a Bluetooth wireless connection:
1. Insert the Socket Bluetooth card in the Jornada’s expansion slot.
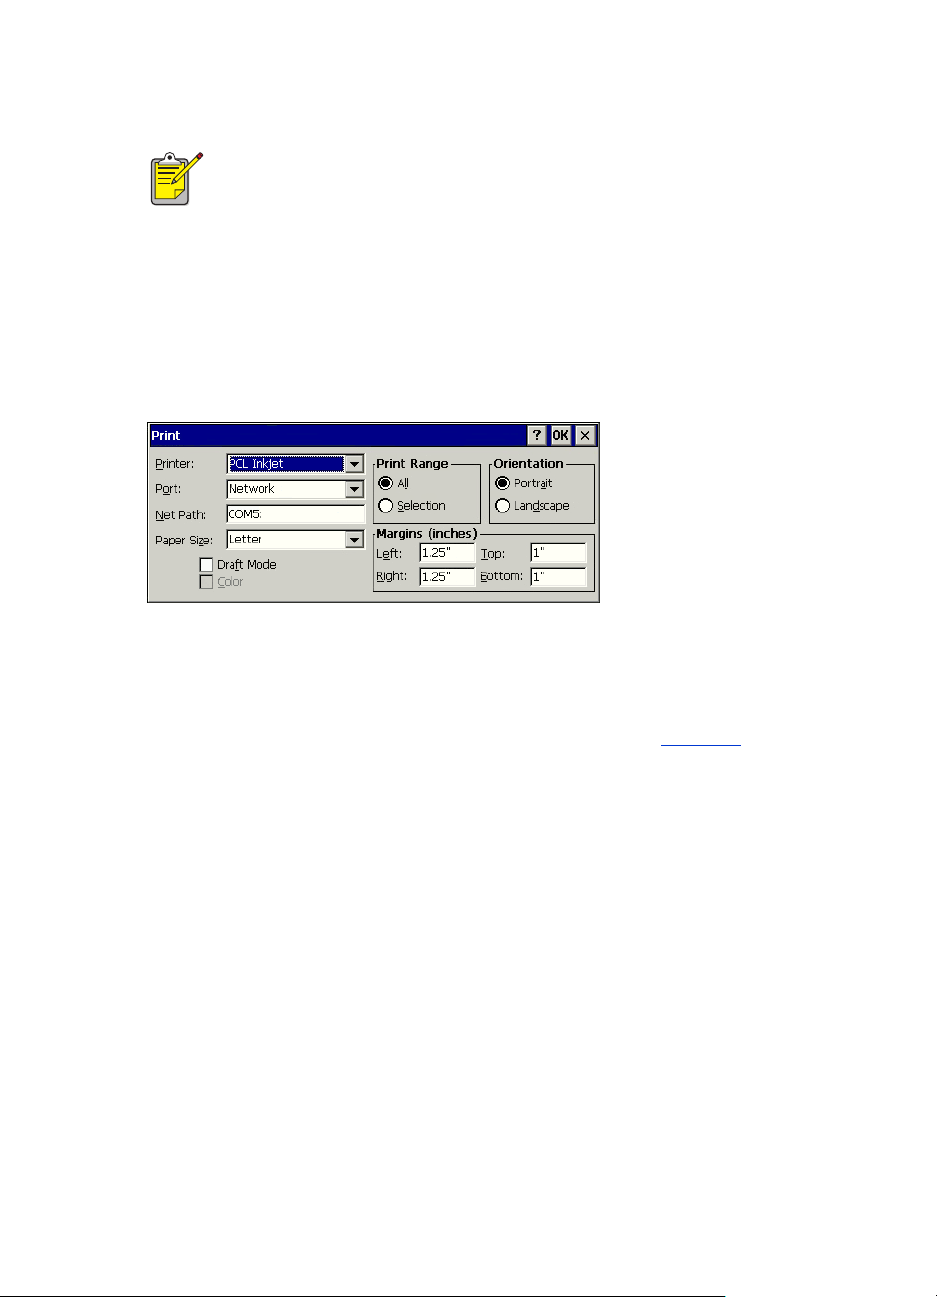
2. Open the file you want to print.
3. Tap
File > Print.
The
Print dialog box appears.
4. Select
5. Select
6. Tap
PCL Inkjet in the Printer menu.
COMx: Bluetooth in the Port menu.
OK.
7. If you are prompted to enter a PIN code, enter the printer’s PIN code
page 70), then tap
OK.
The Jornada connects to the printer, then the file prints.
(see
33
Page 37
Compaq iPAQ Pocket PC
The Compaq iPAQ H3870 supports Bluetooth wireless printing.
Compaq iPAQ H3870
printing requirements
Before you can print, you will need:
• An H3870 series iPAQ Pocket PC
• A third-party printing application. Visit the FieldSoftware Products Web site at:
www.fieldsoftware.com/PrintPocketCE.htm
34
Page 38

setup and print
Follow these instructions to set up and print with the Compaq iPAQ:
1. Install
a third-party printing application.
2. Activate
3. Discover
4. Print
the Compaq iPAQ Bluetooth radio.
the printer.
a file.
install a third-party printing application
The Compaq iPAQ requires a third-party printing application, such as PrintPocketCE.
PrintPocketCE is available at: www.fieldsoftware.com/PrintPocketCE.htm
Instructions for third-party products are provided for informational
purposes only. HP does not support these products and cannot guarantee
the accuracy of the instructions. Contact the product manufacturer with
questions or requests for additional information.
35
Page 39

activate the Compaq iPAQ Bluetooth radio
1. Tap Start > Today.
2. Tap the
Bluetooth icon at the bottom of the screen.
3. Tap
Turn radio On.
discover the printer
Before the Compaq iPAQ can print, it must discover the printer (see Bluetooth
discovery on page 68).
Follow these steps to discover your printer:
1. Tap
2. Tap the
Start > Today.
Bluetooth icon at the bottom right of the screen.
3. Tap
Bluetooth Manager.
36
Page 40
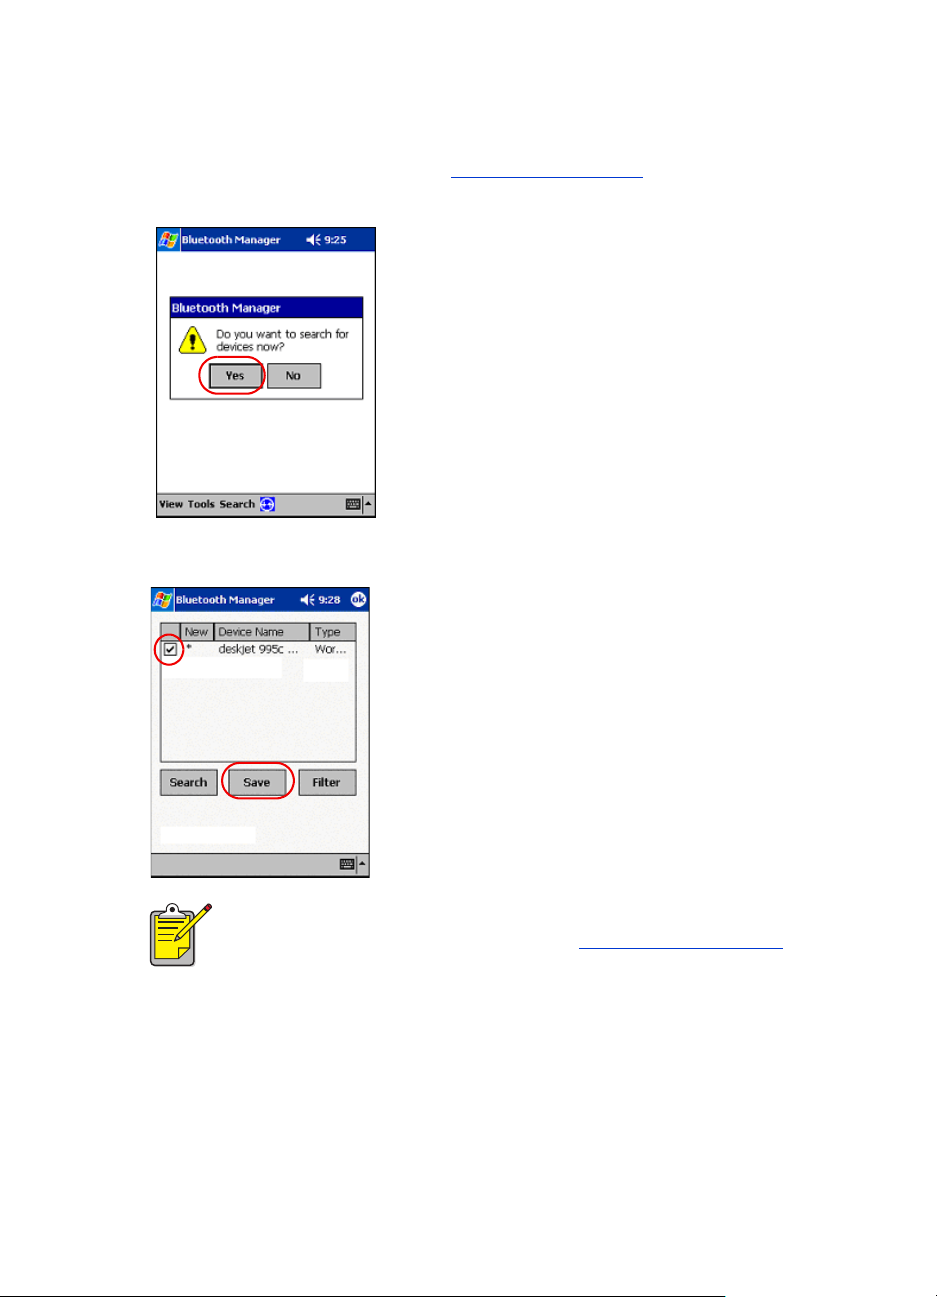
4. Tap
Yes to search for devices now.
The Compaq iPAQ searches for any Bluetooth wireless technology enabled
devices within range. It displays the Bluetooth device name
(see page 69) of any
device it discovers.
5. Tap the checkbox next to the printer’s Bluetooth device name, then tap
If two or more hp deskjet 995c series printers are within range, the
screen above shows each of the printer’s Bluetooth device names
Save.
.
37
Page 41

6. Tap either
Home or Work, then tap OK.
The Bluetooth Manager screen appears again.
7. Tap
ok at the top right of the screen to close the Bluetooth Manager.
8. Tap
Tools > Settings for All Devices.
38
Page 42
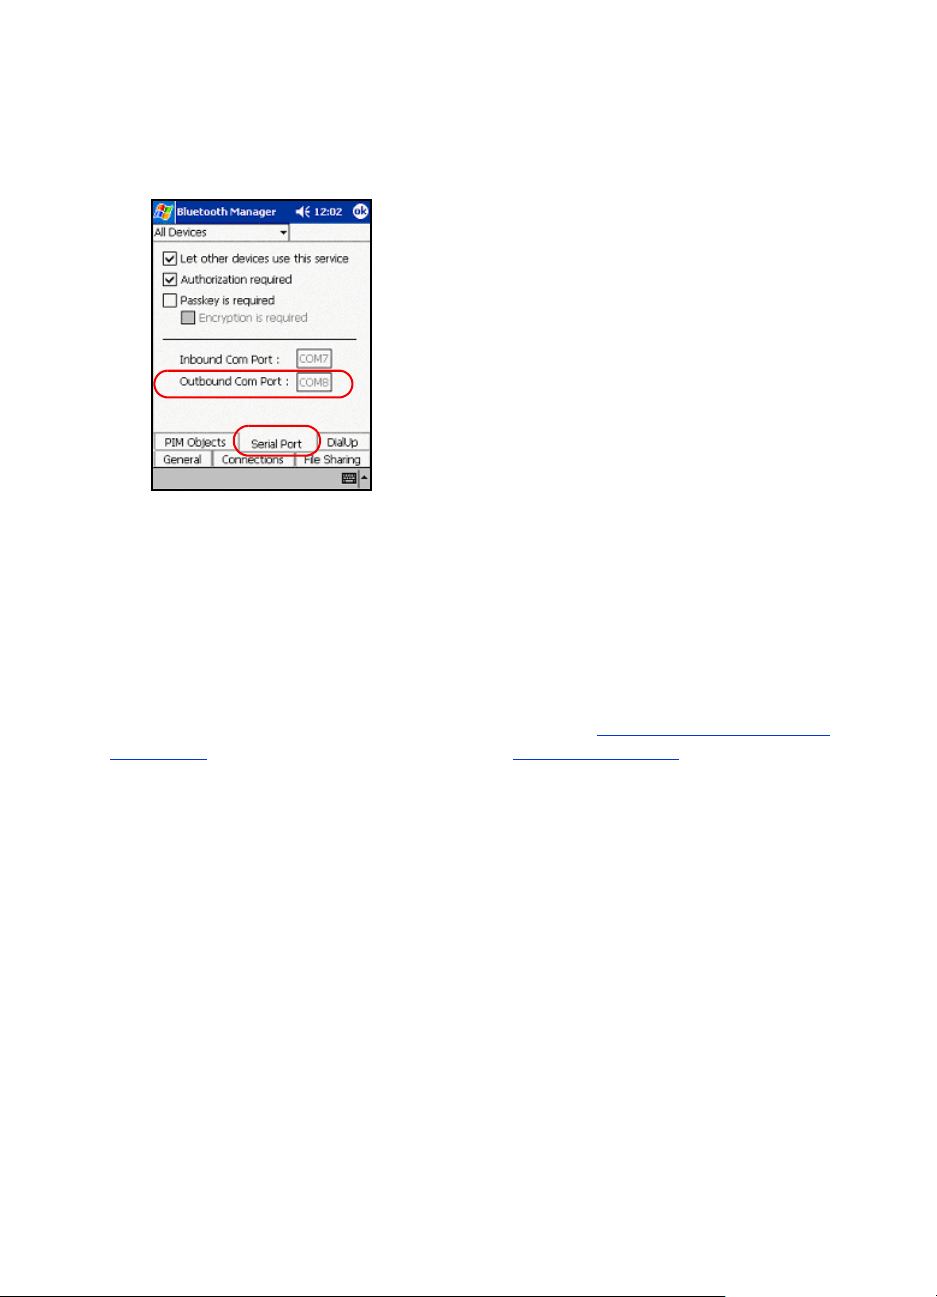
9. Tap the
Serial Port tab. Note the value in the Outbound COM Port field. You will
need this information when printing using third-party applications. In the
example below, the Outbound COM Port is COM8.
print a file using the Compaq iPAQ
third-party applications
Printing instructions for the Compaq iPAQ vary according to the third-party printing
application used. Consult the documentation that came with the third-party printing
application for printing instructions.
printing requirements
Before you can print, you will need printing software (see install a third-party printing
application on page 35) and you will need to discover the printer (see page 36).
Follow these steps to print over a wireless connection:
1. Tap
2. Tap
Start > Today.
Start > Programs and then tap PrintPocketCE.
3. Tap the file you want to print from the list.
39
Page 43

4. Select
HP PCL from the printer list.
5. Tap the
Port list and then tap the printer port (the Outbound COM Port) from
step 8 of the previous section. You can also change other print options on this
screen by tapping
6. Tap
Start Printing.
7. Tap another file to print or tap
More Settings.
Doc Options > Exit when you are finished.
40
Page 44

Palm handheld m500 series
The Palm m500 series supports Bluetooth wireless printing.
Palm m500 series
requirements
Before you can print, you will need:
• A Bluetooth Secure Digital Input/Output (SDI/O) expansion card and software.
Visit Palm’s Web site at: www.palm.com
• (Optional) Documents To Go. Find Documents To Go on the CD that originally
came with your Palm handheld or visit the DataViz Web site at:
www.dataviz.com
.
.
41
Page 45

setup and print
Follow these steps to set up and print with a Palm handheld m500:
1. Install
a Bluetooth SDI/O expansion card.
2. Print
a file.
• Print unformatted documents in the Date Book, Address, To Do List, and
Memo Pad options using send file
• Print formatted documents in the Date Book, Address, To Do List, Memo
Pad, and Mail options using BTPrint
• Print MS Word and MS Excel documents using Documents to Go
.
.
.
install a Bluetooth SDI/O expansion card
Caution! You must install the software files before inserting the Bluetooth card in the
Palm handheld. Otherwise, the card will not function properly.
Follow these steps to install a Bluetooth SDI/O card:
1. Verify that the Bluetooth SDI/O card software has been installed on your
computer.
2. Perform a HotSync operation.
A message appears on the Palm handheld after the HotSync operation is
complete.
3. Insert the SDI/O card in the expansion slot.
42
Page 46

print a file
To print a file, use one of the following methods:
• Send the file
• BtPrint
• Documents To Go
send file
Sending is a Bluetooth wireless communication method that is included as part of
Palm OS 4.0. The printed output is unformatted.
Follow these steps to send an item to print:
1. Tap the
2. Tap one of the following options:
• Address
•Memo Pad
•Date Book
•To Do List
The screen for the selected program appears.
3. Select an item to print.
4. Tap the
5. Tap
The Palm handheld searches for, then displays, a list of available Bluetooth
devices.
6. Tap the checkbox next to the printer’s Bluetooth device name, then tap
If you are prompted to enter a PIN code, enter the printer’s PIN code, then tap
OK. The default PIN code is 0.
The Palm handheld connects to the printer, then the file prints.
Home icon until the Main Menu appears.
Menu icon.
Send.
OK.
43
Page 47
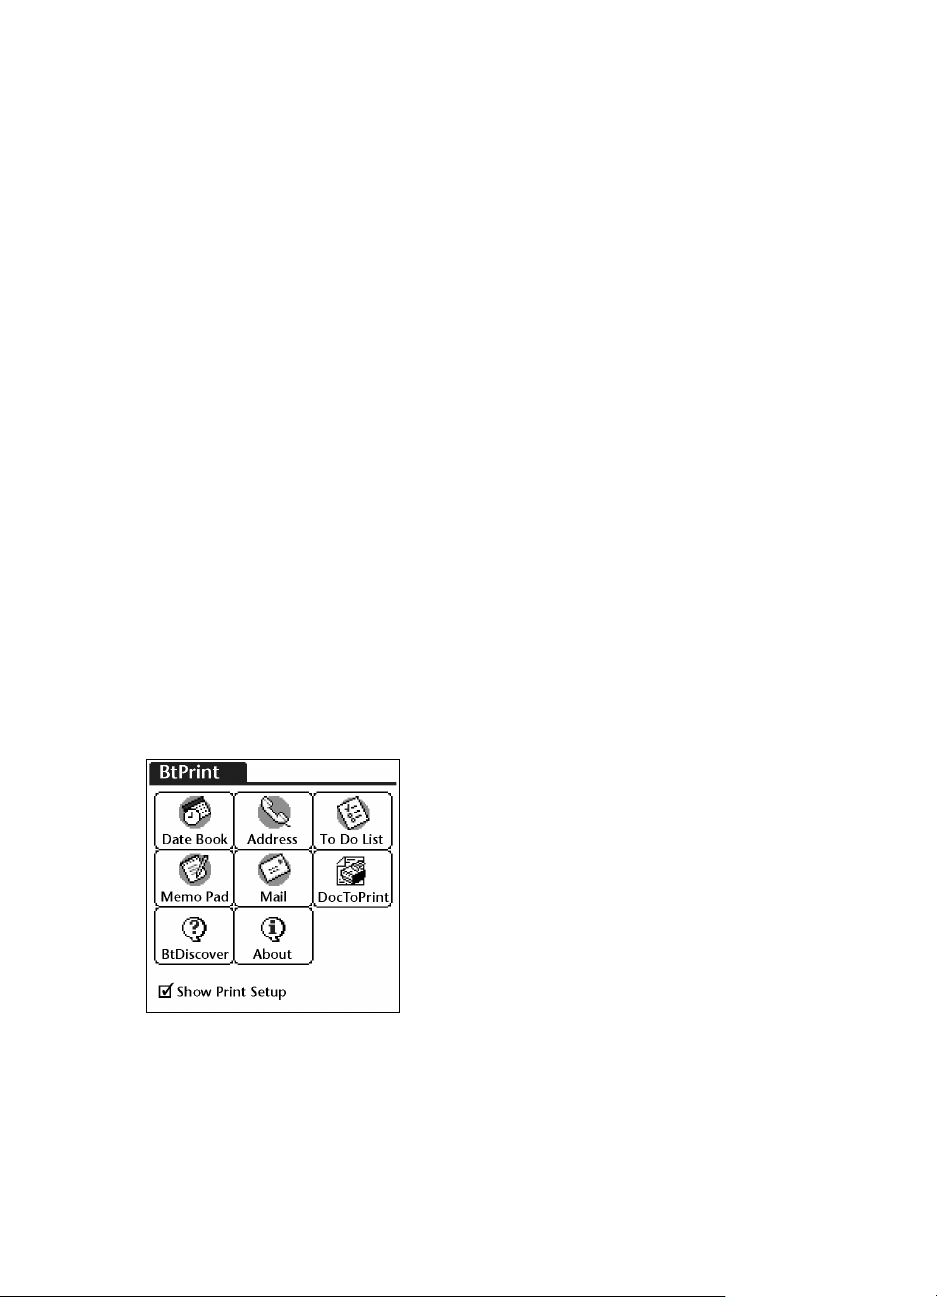
BtPrint (optional)
BtPrint enhances the formatting for documents printed from the Address, Memo Pad,
To Do List, Date Book, and Mail options.
install BtPrint
Verify that the Palm handheld device cradle is attached to your PC and place the
Palm handheld in its cradle.
1. Click the
2. Click
Palm Desktop icon on your PC.
View > Install > Add.
3. Browse to the CD or folder where your Palm handheld SDI/O Bluetooth
software resides.
4. Double-click the
5. Double-click the
6. Select
7. Click
BtPrintVxxxxx.prc where xxxxx is the current version of the program.
Open > Done.
Printing folder.
HP folder.
8. Perform a HotSync operation to install BtPrint on the Palm handheld.
9. Insert the SDI/O Bluetooth card in your Palm handheld.
print using BtPrint
1. Tap the Home icon until the All menu appears.
2. Tap the
BtPrint995c icon.
The BtPrint screen appears.
44
Page 48

3. Tap one of the following options:
•Date Book
• Address
•To Do List
•Memo Pad
•Mail
The screen for the selected program appears.
4. Select the category or file you want to print.
5. Tap the
6. Tap
Menu icon.
BtPrint in the menu. If printing the To Do List, tap Today, Tomorrow, or All to
select the records to print.
The BtPrint Setup screen appears.
If the BtPrint command does not appear in the menu, BtPrint does not
support the selected category or view.
7. Select appropriate options:
•
Copies: number of pages to be printed
•
Paper Size: appropriate paper size
8. Select one of the following print options:
• If you have selected a default printer, tap
OK, then proceed to step 9. For
more information on selecting a default printer, see choose a default printer
• If you want to select a Bluetooth printer, tap
Select Printer. The Palm
handheld searches for Bluetooth devices. When the list of available devices
is displayed, proceed to step 9.
9. Tap the checkbox next to the printer’s Bluetooth device name, then tap
If you are prompted to enter a PIN code
OK. The default PIN code is 0.
, enter the printer’s PIN code, then tap
The Palm handheld connects to the printer, then the file prints.
.
OK.
45
Page 49

choose a default printer (optional)
To select the hp deskjet 995c Bluetooth printer as the default printer:
1. Tap
2. Tap
BtPrint995c.
BTDiscover.
The Palm handheld searches for Bluetooth wireless technology enabled printers
within 30 feet.
3. Tap
4. Tap
5. Tap
Find More.
hp deskjet 995c.
OK.
46
Page 50

Documents To Go (optional)
Documents To Go enables you to print MS Word and MS Excel files. It is included
on the Palm handheld installation CD in the Bonus Software section.
install Documents To Go
Install Documents To Go from the CD that originally came with your Palm handheld,
or visit the DataViz Web site at www.dataviz.com
print using Documents To Go
1. Tap the Home icon until the All menu appears.
2. Tap the
3. Tap the
BtPrint995c icon.
DocToPrint icon.
The DocToPrint screen appears.
4. Click the arrow next to Document Type to select the appropriate document type
option:
• All Types
•DocFile
•Sheet To Go
•Word To Go
5. Select the appropriate Document Type.
The screen for the selected document type appears displaying a list of
applications which can be printed.
6. Select a file and tap
Print.
for more information.
7. Select one of the following options:
• If you have selected a default printer, tap
OK, then proceed to step 9. For
more information on selecting a default printer, see choose a default printer
• If you want to select a Bluetooth printer, tap
Select Printer. The Palm handheld
searches for Bluetooth devices. When the list of available devices is
displayed, proceed to step 8.
8. Tap the printer’s Bluetooth device name to select it, then tap
The BtPrint screen appears.
9. Select the appropriate print options, then tap
OK to print the document.
The Palm handheld connects to the printer and the file prints.
47
.
OK.
Page 51

printing from other Bluetooth devices
Many Bluetooth wireless technology enabled devices are entering the market.
This document contains instructions for the following:
• Nokia Series 60 imaging phones
As new devices become available, this document will be updated.
mobile phones
Printing from your mobile phone may be available. Please refer to your mobile
phone user documentation for more information. If the mobile phone user
documentation
contact your mobile phone manufacturer directly.
You may be required to download additional software for your phone to be able to
support printing.
does not include reference to the possibility of mobile printing, please
48
Page 52

Nokia Series 60 imaging phones
Certain Nokia Series 60 imaging-enabled mobile phones support mobile printing.
Please check the following Web sites for more information:
•Europe and Africa: www.nokia.com
•Americas: www.nokiausa.com
• Asia Pacific Region: www.nokia-asia.com
If you have technical support inquiries in setting up your phone to print, please
contact your mobile phone manufacturer directly.
Nokia Series 60 imaging phones
requirements
Before you can print, you will need:
• A Bluetooth wireless technology enabled Nokia Series 60 imaging phone
• Mobile Printing Application for Nokia Series 60 imaging phones
setup and print
Follow these steps to set up and print with a Nokia 60 Series phone:
1. Install
2. Print
the Mobile Printing Application on the phone.
a file using one of these methods:
• Mobile Printing Application
• Bluetooth Send
49
Page 53

install the Mobile Printing Application on the phone
Follow these steps to install the Mobile Printing Application for Nokia Series 60
imaging phones on the phone:
1. Download the
to a computer from one of these Web sites:
•Europe and Africa: www.nokia.com
•Americas: www.nokiausa.com
• Asia Pacific Region: www.nokia-asia.com
The name of the downloaded file is print.sis.
2. Transfer the
following methods:
transfer method transfer instructions
Email Attach the print.sis file to an email, send the email to
Bluetooth Use your computer’s Bluetooth utility to discover the
Infrared Align the phone’s infrared lens with the computer’s
Mobile Printing Application for Nokia Series 60 imaging phones on
print.sis file from the computer to the phone using one of the
your email address, then open the email on your
phone.
phone, then send the
to the phone.
infrared lens. Use the Wireless Link feature in
Windows to send the
print.sis file from the computer
print.sis to the phone.
For help using one of these transfer methods, see the instructions found in the
Nokia phone’s user guide or visit Nokia’s support Web site.
50
Page 54
3. Depending on the method you used to transfer the file to the phone, open the
print.sis file.:
transfer method opening instructions
Email Go to Messaging > Inbox > Mailbox. Retrieve the email,
then select
Options > Attachments to open the print.sis
file.
Bluetooth Go to
Infrared Go to
Messaging > Inbox, then select the print.sis file.
Messaging > Inbox, then select the print.sis file.
4. Follow the onscreen instructions to install the application.
5. Verify that the Mobile Printing Application has been installed. Press the
Menu key to open the phone’s Main Menu. Scroll through the menu and find
the
Print icon.
If you don’t see the
Print icon, then repeat steps 3—5.
51
Page 55

print a file
Use one of the following methods to print a file:
• Mobile Printing Application
• Bluetooth Send
Mobile Printing Application for Nokia Series 60 imaging phones
The following are instructions for printing the following file types using the Mobile
Printing Application:
• Image
• Message
• Contact
• Calendar
• Note
Before following these steps, verify that the printer is powered on and idle. If the
printer is off or busy, it will not print your file.
52
Page 56

printing an image
Follow these steps to print an image:
1. Press the
Menu key to open the phone’s Main Menu.
2. Scroll to and select the
3. Select
Images.
Print icon.
4. Select the image(s) you want to print.
Selected images have a check next to them. Do not select more than 20 images
for a single print job.
5. Select
Options > Page Format.
6. Select the image layout:
•1 per page
•2 per page
•6 per page
7. Do one of the following:
if the image layout is... then...
1 per page Select the image size: Small,
Medium, or Large.
2 or 6 per page Go to step 8.
8. Select
Options > Print, then do one of the following:
if... then...
More than one printer is discovered Select the appropriate printer.
You can identify the printer by its
device name
The desired printer is not discovered Select
.
Options > Find Printers,
then select the printer.
53
Page 57

printing a message
Files received in an unrecognized file type must be saved as an appropriate file type
(such as, .jpg or .txt) before it can be printed.
Follow these steps to print a message:
1. Press the
2. Scroll to and select the
3. Select
Menu key to open the phone’s Main Menu.
Print icon.
Messaging.
4. Select the folder that contains the message.
5. Scroll to and select the message you want to print.
6. Select
Options > Print, then do one of the following:
if... then...
More than one printer is discovered Select the appropriate printer.
You can identify the printer by its
device name
The desired printer is not discovered Select
.
Options > Find Printers,
then select the printer.
54
Page 58

printing a contact
Follow these steps to print a contact:
1. Press the
Menu key to open the phone’s Main Menu.
2. Scroll to and select the
3. Select
Contacts.
Print icon.
4. Click the box next to the contact you want to print.
5. Select
Options > Print, then do one of the following:
if... then...
More than one printer is discovered Select the appropriate printer.
You can identify the printer by its
device name
The desired printer is not discovered Select
.
Options > Find Printers,
then select the printer.
printing a calendar
Follow these steps to print a calendar:
1. Press the
2. Scroll to and select the
Menu key to open the phone’s Main Menu.
Print icon.
3. Select
4. Select
5. Select
Calendar.
Options > Go To Date, then enter the desired date.
Options > Print, then do one of the following:
if... then...
More than one printer is discovered Select the appropriate printer.
You can identify the printer by its
device name
The desired printer is not discovered Select
.
Options > Find Printers,
then select the printer.
55
Page 59

printing a note
Follow these steps to print a note:
1. Press the
Menu key to open the phone’s Main Menu.
2. Scroll to and select the
3. Select
Notes.
Print icon.
4. Select the note you want to print.
5. Select
Options > Print, then do one of the following:
if... then...
More than one printer is discovered Select the appropriate printer.
You can identify the printer by its
device name
The desired printer is not discovered Select
.
Options > Find Printers,
then select the printer.
56
Page 60

Bluetooth Send
Bluetooth Send is a feature included with your mobile phone. It is not an application
developed by HP.
Bluetooth Send prints unformatted text and images. For example, Bluetooth Send can
only print one calendar item and not a full day. For formatted text and images, use
the Mobile Printing Application
Before following these steps, verify that the printer is powered on and idle. If the
printer is off or busy, it will not print your file.
Follow these steps to print a file with Bluetooth Send:
1. Press the
Menu key to open the phone’s Main Menu.
2. Scroll to and select one of the following:
•Contacts
• Calendar
•Images
•To Do List
•Extras > Notes
The screen for the selected option appears.
3. Select the file to print.
The method for selecting the file varies by the type of file. See the phone’s user
guide for more information.
.
4. Select
5. Select
Options.
Send, then select Via Bluetooth.
6. Select the appropriate printer.
You can identify the printer by its device name
57
.
Page 61

troubleshooting
This section covers Bluetooth wireless printing only. For other troubleshooting
material, see quick help in the HP Printer Assistant.
Select the topic which best describes the problem you are having:
printer
• Bluetooth LED light is flashing or is off
• printer cannot be discovered
• printer is discovered but will not print
desktop and laptop PCs
• more than one hp deskjet 995c is discovered
• after HCRP installation the printer icon does not appear in My Printers list
• print to file error message appears
58
Page 62

troubleshooting the printer
Bluetooth LED light is flashing or is off
This table explains the behavior of the Bluetooth LED light:
the Bluetooth
LED light is…
Flashing The printer may be busy
Flashing
along with
the Resume
light for 5
seconds
Flashing with
the Resume
light for more
than 5
seconds
this means… what you should do…
receiving data over a
Bluetooth wireless
connection.
While the printer is busy,
other devices may not be
able to discover it.
The printer may be in
temporary Public Mode.
A temporary Bluetooth
connection error has
occurred, and the Bluetooth
connection has been
terminated.
An internal printer error has
occurred, such as a paper
jam.
Wait until the light stops
flashing before trying to
discover the printer.
Try to discover or bond
the printer. If you cannot
discover the printer, wait until
the light stops flashing.
Try to discover the printer
again. If the error continues to
occur, move the sending
device or the printer, then try
to discover the printer.
Press the
check the paper supply, then
try to discover the printer.
Resume button,
with
Off The printer may be in
Private Mode, or its
Bluetooth feature may be
turned off.
The printer may not be
plugged in.
59
Press and hold down the
Power button for 3 seconds. If
the light flashes, try to
discover the printer.
Verify that the printer is
plugged in.
Page 63

printer cannot be discovered
Verify the following:
• The printer is plugged in
• The Bluetooth LED light is on
• The Bluetooth LED light is not flashing
If each of the above is true, try to discover the printer again. If the printer cannot be
discovered, try moving the sending device closer to the printer.
If the Bluetooth LED light is off or flashing, see Bluetooth LED light is flashing or is off
on page 59.
printer is discovered but will not print
If the printer will not print, verify the following:
• Paper is in the printer
• The ink cartridges are not empty
• There is no paper jam in the printer
See quick help in the HP Printer Assistant for more information.
If the printer will not print but no error appears, then verify the following:
• The Bluetooth LED light is on
• The Bluetooth LED light is not flashing
If the Bluetooth LED light is off or flashing, see Bluetooth LED light is flashing or is off
on page 59.
If the Bluetooth LED is on and solid, then follow these steps:
1. Press the
2. Disconnect the power cord from the printer.
3. Reconnect the power cord to the printer.
4. Press the
Power button to turn off the printer.
Power button to turn on the printer.
5. Try to print the document again.
If the printer will not print, then press and hold down the
seconds to print a Bluetooth Configuration page. If the Bluetooth device address is
all zeros or reads
Radio Module Not Found, then call HP Support.
60
Cancel (X) button for 4
Page 64

troubleshooting a connection to a PC
more than one hp deskjet 995c is discovered
If two or more hp deskjet 995c series printers are within range, the sending device
will display multiple hp deskjet 995c printer icons.
Each printer icon displays the printer’s Bluetooth device name
To find the Bluetooth device name of a specific printer:
(see page 69).
1. Press and hold down the
Configuration page.
2. Select the icon with the Bluetooth device name listed on the Bluetooth
Configuration page.
Cancel (X) button for 4 seconds to print a Bluetooth
61
Page 65

after HCRP installation the printer icon does not appear in My Printers list
The printer’s encryption settings may be incorrect if the printer icon does not appear
in the
My Printers list after you have done the following:
• Installed the printer software
•Run the
printer
Follow these steps to correct the printer’s encryption settings:
1. Press and hold down the
Configuration page.
2. Find the Encryption Required line item on the Bluetooth Configuration page:
Bluetooth Connection Wizard to establish an HCRP connection to the
Cancel (X) button for 4 seconds to print a Bluetooth
if the Encryption Required
line reads...
Encryption = 0
Encryption Off
Encryption = 1
Encryption On
Then...
The printer does not require encryption.
The printer requires encryption.
62
Page 66

3. Click
Start > Control Panel, then do one of the following:
Category View Classic View
Double-click the Wireless Link icon.
Click Printers and other Hardware,
then click the
4. Click the
Wireless Link icon.
Bluetooth tab.
5. Select the printer from the
Devices list, then click Remove.
63
Page 67

6. Follow the instructions beginning at step 4
On the
Authenticate the device? screen, do one of the following:
on page 11.
if the Encryption Required
line reads...
Encryption = 0
Encryption Off
Encryption = 1
Encryption On
You can also reset your printer to factory defaults
encryption/authentication OFF.
Then...
Click No, then click Next.
Click Yes, then click Next.
You will be prompted for the printer’s PIN
Code. Enter the PIN code.
which has
64
Page 68
print to file error message appears
1. Click Cancel on the Print to File error message, then close all applications.
2. Re-open an appropriate application, then print a document.
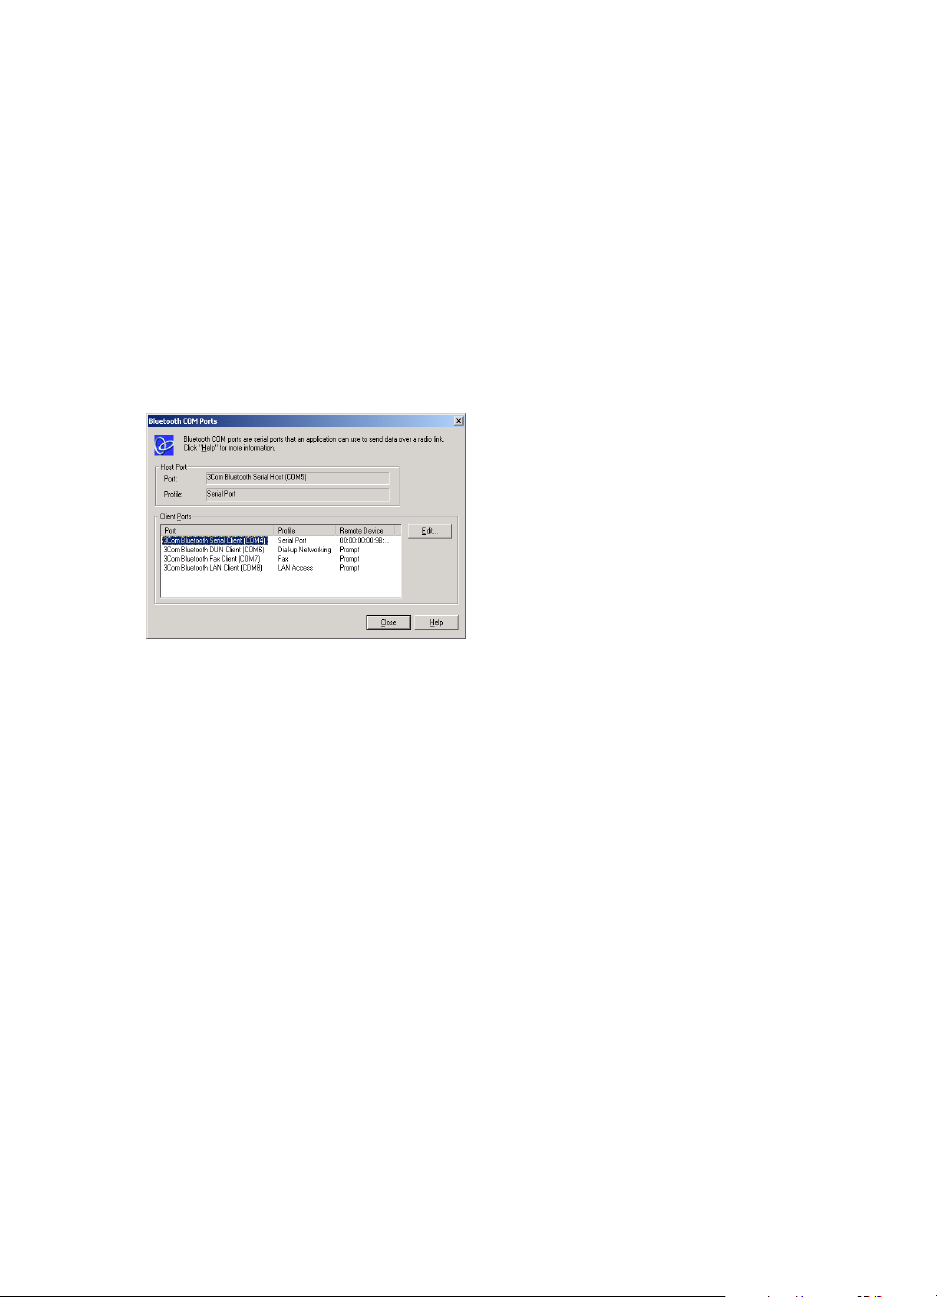
If the problem persists, follow these steps to locate the COM port number:
1. Click
2. Click
3. Click
4. Note the COM port number of the 3Com Bluetooth Serial Client port.
Cancel in the Print to File error message, then close the application.
Start > Programs > 3Com Mobile > Bluetooth Connection Manager.
The Bluetooth Connection Manager opens.
Tools > Com Port.
The Bluetooth COM Ports dialog box appears.
For instance, in the above example the 3Com Bluetooth Serial Client port is
COM4.
5. Click
Close to close the Bluetooth COM Ports dialog box.
Follow these steps to select the appropriate printer and Bluetooth wireless port:
1. Click
2. Click the
3. Click
4. Click the
5. Select the Bluetooth wireless port, click
Start > Settings > Printers.
hp deskjet 995c series printer icon.
File > Properties.
Ports tab.
Apply, then click OK.
6. Open an application, then print a document.
65
Page 69

If the problem persists, follow these steps:
1. Click
Cancel in the Print to File error message, then close the application.
2. Click
Start > Programs > Hewlett-Packard > hp deskjet 995c series > hp deskjet
995c series Uninstall
.
3. Follow the onscreen instructions.
4. Insert the printer software CD into the computer’s CD-ROM drive, then reinstall
the printer software.
66
Page 70

about the printer’s Bluetooth wireless feature
For information concerning the printer’s Bluetooth wireless feature, select the
appropriate topic:
• the printer’s Bluetooth wireless feature
• changing the printer’s wireless feature
67
Page 71

the printer’s Bluetooth wireless feature
This section explains some basic elements of the printer’s Bluetooth wireless feature.
Bluetooth wireless basics
ten meters or less
Bluetooth wireless technology allows devices, such as printers and laptop computers,
to communicate over short distances (10m or less) using radio waves in the 2.4 GHz
spectrum.
10m or less
To be Bluetooth wireless technology enabled, a device must have a Bluetooth
wireless radio module. The hp deskJet 995c series printer has an internal module.
Unlike infrared communications, Bluetooth wireless technology does not require a
direct line of sight between the sending device and the receiving device.
one device at a time
The printer can establish a Bluetooth wireless connection with only one device at a
time.
If the printer is busy with a Bluetooth wireless connection, the Bluetooth LED light
flashes. The printer ignores any other device that tries to establish a connection. The
device must wait until the original connection is closed before it can establish a new
connection.
Bluetooth discovery
Discovery is the process by which a Bluetooth wireless technology enabled device
detects other Bluetooth wireless technology enabled devices that are within range.
When a device discovers the printer, it displays the printer’s Bluetooth device name
(see page 69).
The method of discovery varies according to the type of Bluetooth software used.
68
Page 72

Bluetooth configuration page
The Bluetooth Configuration page shows information you need when using the
printer.
To print a Bluetooth Configuration page, press and hold down the
for 4 seconds.
Cancel (X) button
printer-specific Bluetooth information
Each hp deskjet 995c series printer has the following items which are specific to the
printer:
• Bluetooth device name
• Bluetooth device address
• PIN code
To see the Bluetooth-specific information for your printer, print a Bluetooth
Configuration page (see page 69).
Bluetooth device name
When a device discovers the printer, it displays the printer’s Bluetooth device name.
The printer’s default Bluetooth device name is: hp deskjet 995/[serial number].
You can change the printer’s Bluetooth device name by using the Configure Wireless
Settings dialog box. See change wireless settings
The printer’s Bluetooth device name appears in Bluetooth applications
only. In the Windows Printers folder, the printer is identified as the
hp deskjet 995c series.
on page 73.
Bluetooth device address
Bluetooth devices exchange Bluetooth device addresses when they interact. You
cannot change the printer’s Bluetooth device address.
69
Page 73

PIN code
When the printer is set to encryption required (see page 71), devices attempting to
use the printer are prompted for a PIN code.
The default PIN code is
Wireless Settings dialog box. See change wireless settings
0. You can change the PIN code by using the Configure
on page 73.
access modes
Access modes determine the level of access that Bluetooth wireless technology
enabled devices have to the printer.
The printer has four access modes:
• public mode
• private mode
• turn off Bluetooth
• encryption required
To set the access mode for the printer, use the Configure Wireless Settings dialog
box. See change wireless settings
public mode
When the printer is in Public Mode:
• Any Bluetooth wireless technology enabled device within range can discover
the printer.
• The Bluetooth LED light is on.
on page 73.
private mode
When the printer is in Private Mode:
• Only devices that have stored its Bluetooth device address can discover it.
• The Bluetooth LED light is off when the printer is idle.
• You can put the printer in a temporary Public Mode by pressing and holding
down the
Private Mode after 1 minute.
Power button until the Bluetooth LED light flashes. The printer returns to
turn off Bluetooth
When the printer’s Bluetooth feature is turned off:
• The printer cannot be discovered by other Bluetooth wireless technology
enabled devices.
• The Bluetooth LED light is off when the printer is idle.
70
Page 74

• You can put the printer in a temporary Public Mode by pressing and holding
down the
Private Mode after 1 minute.
Power button until the Bluetooth LED light flashes. The printer returns to
encryption required
The printer can be set to require encryption when it receives data over a Bluetooth
wireless connection.
When the Ecryption Required option is selected, the printer requires that:
• All data sent over a Bluetooth wireless connection is encrypted.
• All users must enter a PIN code
the first time they print.
authentication required
Authentication provides a way of verifying a Bluetooth device. Authentication is
automatically enabled when Encryption Required is checked on the Configure
Wireless Settings dialog box.
All devices must send a PIN code
Encryption Required is selected.
the first time they print when
bonding
When a printer and a sending device bond, they store each other’s Bluetooth device
address.
This allows the device to discover the printer in private mode
limit of 32
The printer can only bond to 32 devices at any one time.
If the printer is bonded to 32 devices and you want to bond to another device, you
must clear all the previously bonded devices from the printer’s memory.
For instructions on clearing previously bonded devices from the printer’s memory,
see reset device access
on page 77.
list of bonded devices
To see a list of devices bonded to the printer, print a Bluetooth configuration page
(see page 69).
(see page 70).
71
Page 75

changing the printer’s wireless feature
USB cable and printer driver required
To change the printer’s wireless settings, you must have the following:
• A PC that is connected to the printer with a USB cable
• A printer driver that has been installed to a USB port
A USB cable is not required for Bluetooth printing.
install USB driver
Follow these steps to install a USB printer driver:
1. Insert the printer software CD into the computer’s CD-ROM drive.
2. Follow the onscreen instructions.
Follow these steps to verify that the USB printer driver has been installed:
1. Click
2. Verify that two versions of the printer driver appear. One version is set to
Start > Settings > Printers.
The Printers window appears.
Bluetoooth wireless printing. The other version, hp deskjet 995c series (Copy
2), is set to the USB port.
72
Page 76
change wireless settings
In order to change the printer’s wireless settings you must connect the printer to your
computer with a USB cable.
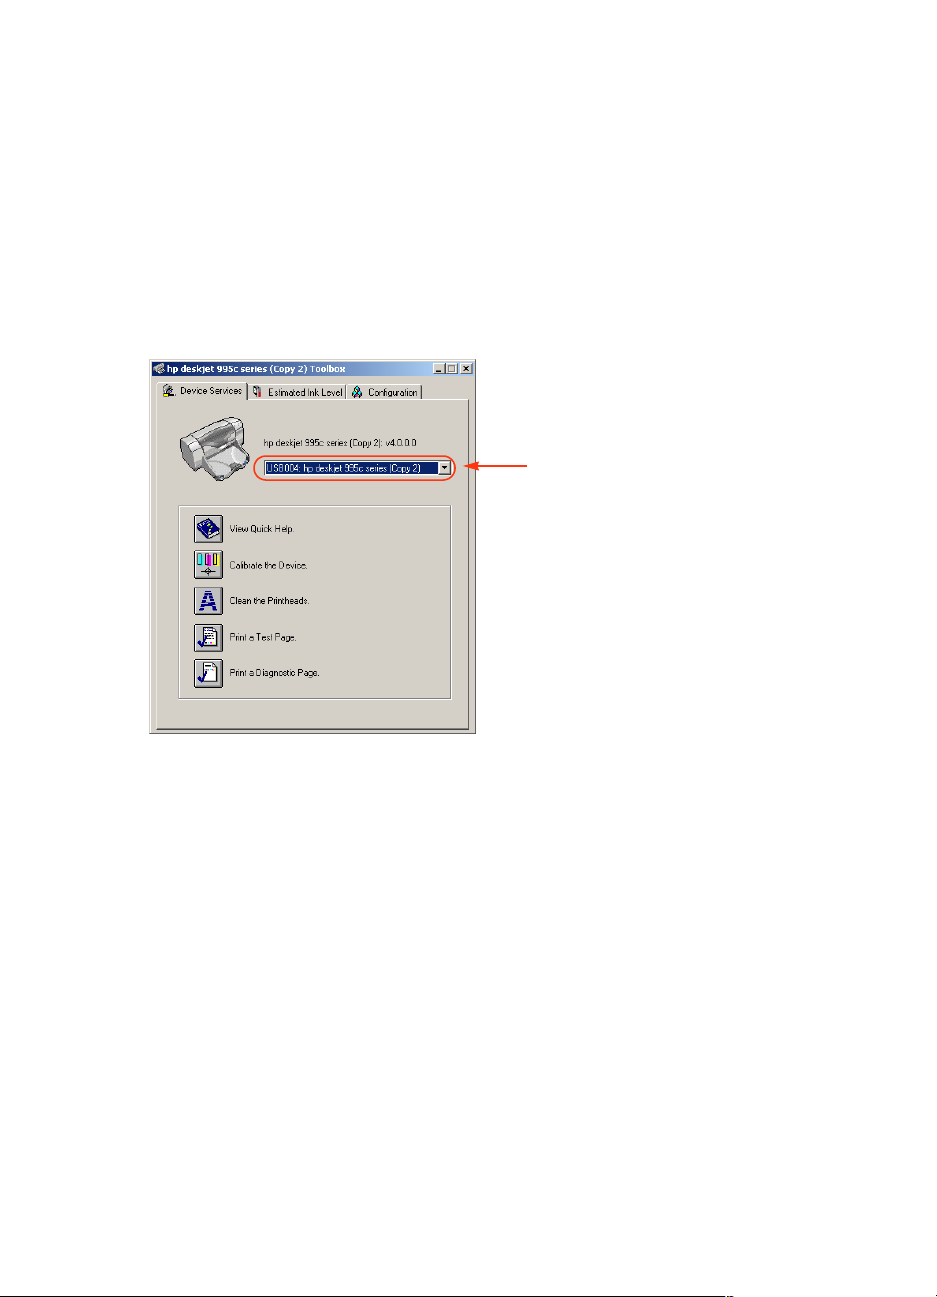
1. Click
2. In the drop-down menu, select the hp desket 995c series driver.
Start > Programs > Hewlett-Packard > hp deskjet 995c series > hp deskjet
995c series Toolbox
The HP Toolbox appears.
The correct driver begins with
.
USB.
1. select the hp deskjet 995c series driver
73
Page 77

3. Click the
Configuration tab.
The configuration panel appears.
4. Click
Wireless, then click Configure Wireless Settings.
The Configure Wireless Setting button appears. If the button is not active, then
click the
5. Click the
Device Services tab and repeat steps 2–4.
Configure Wireless Settings button.
The Configure Wireless Settings dialog box appears.
74
Page 78

6. Select the Bluetooth wireless options that you want.
For a description of the Configure Wireless Setting dialog box, see the
configure wireless settings dialog box.
7. After you have selected the options you want, click OK.
A warning dialog box appears.
8. Click OK to close the warning dialog box.
9. On the Toolbox, click the
series Bluetooth driver in the pull-down menu.
10. Close the Toolbox, then disconnect the USB cable from the printer and the
computer.
Device Services tab, then select the hp deskjet 995c
the configure wireless settings dialog box
Use the Configure Wireless Settings dialog box to set the following options:
1. Device Address: Address by which Bluetooth devices identify the
printer.
Printer Name: Use for change the printer’s Bluetooth device name (see
2.
page 76).
Change PIN Code: Click for change the printer’s PIN code (see page 76).
3.
Setting a PIN code and checking Encryption Required turns
Authentication on. See
encryption required and authentication required
on page 71.
75
Page 79

4. Reset Device Access: Click for reset device access (see page 77) from the
printer’s memory.
Mode: Set the following options:
5.
• Private mode: The printer can be discovered only by devices that have
stored its address. See private mode
•
Public mode: The printer can be discovered by all Bluetooth wireless
technology enabled devices. See public mode
•
Turn off Bluetooth: Disable Bluetooth wireless printing.
•
Encryption Required: When Encryption Required checkbox is selected, all
data sent to the printer is encrypted. This option also automatically sets
authentication. See encryption required
page 71.
on page 70.
on page 70.
and authentication required on
change the printer’s Bluetooth device name
When a Bluetooth device (such as a laptop) discovers the printer, the device
identifies the printer to the user by its Bluetooth device name.
The printer ships with a default printer name. In order to change the printer’s name
you must connect the printer to your computer with a USB cable.
To change the printer’s name:
1. Open the
2. Enter a new printer name of up to 60 characters in the
Toolbox, then open the Configure Wireless Settings dialog box.
Printer Name box.
3. Click
OK.
The printer’s Bluetooth device name is changed.
To restore the printer’s default Bluetooth device name, follow the steps
above and make the Printer Name box blank.
change the printer’s PIN code
When the Encryption Required checkbox is selected, all devices attempting to use
the printer are prompted for a PIN code.
In order to change the printer’s PIN code you must connect the printer to your
computer with a USB cable. Follow these steps to set the PIN code:
1. Make sure the printer is connected to the computer using a USB cable.
2. Open the Toolbox, then open the Configure Wireless Settings dialog box.
76
Page 80

3. Click the
Change PIN Code button.
The Change PIN Code dialog box appears.
4. Enter the new PIN Code.
The default PIN Code is
0.
5. Re-enter the new PIN code.
6. Click
OK.
The PIN code is changed.
reset device access
In order to change the printer’s wireless settings you must connect the printer to your
computer with a USB cable. Follow these steps to clear all bonded devices from the
printer’s memory:
1. Open the Toolbox, then open the Configure Wireless Settings dialog box.
2. Click the
A warning dialog box appears.
3. Click
All bonded devices are removed from the printer’s memory.
Reset Device Access button.
OK to close the warning dialog box.
reset to factory defaults
Follow these steps to reset the printer to the factory default settings:
1. Press and hold down the
2. While holding down the
tap the
3. Release the
Resume button 4 times.
Power button.
Power button.
Power button, tap the Cancel (X) button 4 times, then
77
Page 81

index
Numerics
3Com Bluetooth USB adapter
printing instructions
3Com wireless Bluetooth PC card
printing instructions
3Com wireless Bluetooth USB adapter
printing instructions
A
access modes 70
encryption required 71
private mode 70
public mode 70
B
Bluetooth configuration 72
changing 73
Bluetooth configuration page 69
Bluetooth device address 69
Bluetooth device name 69
changing 76
Bluetooth wireless
Bluetooth device address
Bluetooth device name 69
bonding 71
discovery 68
range 68
bonding 71
reset 77
BtPrint
print instructions
C
Compaq
iPAQ H3870
print instructions
configure wireless settings dialog box 75
5
3
5
69
44
39
D
discovery 68
Documents To Go® 41
DocumentsToPrint
print instructions
47
E
encryption required 71
F
formatted documents 42
H
HotSync® 42
HP Mobile Printing Application
installing
using 52
50
I
install a Bluetooth SDI/O card 42, 50
iPAQ 34
H3870 print instructions 39
J
Jornada
500 series
print instructions
700 series
print instructions
720
print instructions
29
33
33
M
MS Word and MS Excel documents 42
N
Nokia Series 60 imaging phones 49
printing 52
78
P
Palm
Page 82

print instructions
BtPrint
44
DocumentsToPrint 47
printing instructions 41, 49
PIN code 70
changing 76
print
Compaq iPAQ H3870
Jornada 500 series 29
Jornada 700 series 33
Jornada 720 33
Palm
BtPrint
44, 47
print to file error 65
printer
Bluetooth configuration
changing 73
configuration
configure wireless settings dia-
log box
reset access 77
printing
3Com Bluetooth USB adapter
3Com wireless Bluetooth PC card 3
3Com wireless Bluetooth USB adapt-
er
5
Palm 41, 49
TDK Bluetooth USB adapter 15
private mode 70
public mode 70
39
72
75
printer 58
U
unformatted documents 42
USB installation 72
5
S
Socket Bluetooth card 24, 30
installation 25, 31
T
TDK Bluetooth USB adapter 15
printing instructions 15
troubleshooting 58
Bluetooth LED light 59
discovery 60, 61
laptop 58
print to file error 65
79
 Loading...