


Merci d'avoir choisi un CME UF  Professional Master
Clavier MIDI Avec USB incorporé Gardez à l'esprit les information suivantes
Attachez votre facture ICI
Pour reference
Date d'achat |
Serial(à l'arrière du clavier) |
Nom du vendeur et addr. |
|
|
|
Tél. du vendeur. |
|
|
|
Attention:
 Un mauvais branchement peut endommager l'appareil.
Copyright:
 Copyright of the manual belongs to Central Music Co. Anyone must get a written permission from Central Music Co. before copying any part of the manual to any kind of media.
(c) Central Music Co. 2004
Ouverture du colis
Vérifiez bien le contenu du paquet:
 Clavier maitre USB MIDI 1 pcs
 Adaptateur secteur 1 pcs
 Cable USB 1 pcs
 Mode d'emploi 1 pcs
 CD-ROM du driver 1pcs
 Pédale de sustain 1 pcs (uniquement avec UF8, en option pour
UF5/6/7)
1
Clavier maitreUSB MIDI

PRECAUTIONS
IMPORTANT
Always follow the basic precautions listed below to avoid the possibility of serious injury or even death from electrical shock, damages, fire or other hazards. These precautions include, but are not limited to, the follows:
1.Read and understand all the instructions.
2.Always follow the instructions on the instrument.
3.Before cleaning the instrument, always remove the electric plug from the outlet as well as the USB cable. When cleaning, use a soft, dry cloth. Do not use gasoline, alcohol, acetone, turps or any other organic solution; do not use liquid cleaner or spray cleaner, or too wet cloth.
4.Do not use the instrument near water or moisture, such as bathtub, washbasin, or washing poor in the kitchen, or similar places.
5.Do not place the instrument in an unstable position where it might accidentally fall over.
6.Do not jam sinks or holes of the instrument; those sinks of holes are used for air circulation to prevent the instrument from overheating. Do not place the instrument near heat sink or any places with poor air circulation.
7.Always use the AC adaptor included with the instrument; do not use any other AC adaptor.
8.Do not place anything on the power cord. Make sure the power cord is set on a safe place, so nobody will step on it and no body will get trip over by it.
9.Do not overload the outlet and AC cable to avoid fire or electrical shock.
10.Do not insert anything in the instrument, which may cause fire or electrical shock. Do not splash any kind of liquid to the instrument.
11.Do not disassemble the instrument in case of accidental electrical shock.
12.Always take the instrument to qualified service center in need of repair. You will cause yourself in danger if you open or remove the cover, and improper assembly may cause electrical shock in the future use.
13.Unplug all the connectors and take the instrument to qualified service center if anything in the below list happens:
A.The power cord or connector get hurt or worn out.
B.Any liquid get in the instrument.
C.The instrument gets rain or water splash.
D.The instrument dose not work properly after following all the instructions regarding to troubleshooting.
E.The instrument falls down or gets broken.
F.The instrument functions poorly.
14.Do not use the instrument when thundering; otherwise the thundering may cause long-distance electrical shock.
2 |
15. Do not use the instrument when there is gas leak nearby. |
|
|
|
USB MIDI Master Keyboard Traduction personelle de Francis http://www.jurdan.net |

Keep this manual in safe place
CAUTION:
Setting up
 Do not connect the instrument when thundering.
 Do not set up the cord or outlet to moisture place, except for that the outlet is specially designed for moisture.
 When the power cord is connected to the AC outlet, do not touch the naked part of cord or connector.
Always follow the instructions carefully when setting up the instrument.
WARING:
 Do not expose the instrument to rain or moisture, to avoid fire or electrical shock.
Other precautions:
 Keep the instrument away from electrical interface source, such as fluorescent light and electrical motor.
 Keep the instrument away from dust, hear and vibration.
 Do not expose the instrument to sun light.
 Do not place heavy object on the instrument; do not place containers with liquid on the instrument.
 Do not touch connectors with wet hand
 Central Music Co. is not responsible for any damage or data loss caused by improper operation to the instrument.
 All the pictures and LCD display in the manual are used for demonstration; they may be different from a real instrument.
Features
Professional Master MIDI Keyboard with Built-in USB |
|
49/61/76 keys with Initial Touch/Aftertouch(UF5/6/7) |
|
88keys Hammer Effect with Initial Touch/Aftertouch(UF8) |
|
Pitch wheel and Modulation wheel |
|
8 assignable knobs, preset function includes Cutoff / Resonance / Attack / |
|
Release / Pan / Reverb / Chorus / Tempo |
|
9 assignable faders(sliders), preset function includes channel volume(chn1- |
|
chn16) and Master volume, Drawbar organ |
|
LED display 9 control buttons for Program change, Transpose, Octave, |
|
Channel, Split, Dual and others. |
|
6 Sequencer remote control buttons: REC, PLAY, STOP, FF, REW, BACK- |
|
WARD |
|
BC(Breath Controller) port |
|
1 MIDI out port |
|
Sustain pedal and Volume pedal connector |
|
USB MIDI port, power can be supplied with USB |
|
USB Drivers for Win2000/XP and Mac OSX USB MIDI |
|
Compatible with major sequencer and audio software |
|
Optional Firewire expansion board for IEEE 1394 audio interface |
3 |
|
USB MIDI Master Keyboard

Contents
Contents |
|
|
|
1.Connection ............................................................ |
|
5 |
|
1.1Face avant. ................................................................................. |
|
5 |
|
1.2 |
Face arrière ............................................................................... |
|
6 |
1.3 |
Connecter le UF à un générateur de son .............. |
................... 7 |
|
1.4 |
Ajouter l'UF a un ordinateur (musical) ...................................... |
8 |
|
1.5Installation des Drivers............................................................... |
9 |
||
2.Jouer du clavier..................................................... |
9 |
||
2.1 |
Mettre l'instrument en marche .................................................. |
9 |
|
2.2 |
Jouer la chanson démo ............................................................. |
9 |
|
2.3 |
Reset .......................................................................................... |
|
9 |
2.4 |
Réglage et affichage des valeurs ........................................... |
10 |
|
2.5 Choix de voie (canal) ............................................................... |
10 |
||
2.6 |
Roulette Pitch bend ................................................................ |
10 |
|
2.7 |
Roulette de modulation............................................................ |
10 |
|
2.8 |
Régler le volume et personaliser les curseurs ...................... |
10 |
|
2.9 Transposition |
.......................................................................... |
11 |
|
2.10 Décallage d'octave.................................................................. |
11 |
||
2.11 All notes off ..... |
(arreter tout).................................................... |
13 |
|
3. Fonctions avancées ............................................ |
13 |
||
3.1 |
Changer le canal MIDI ............................................................. |
13 |
|
3.2 |
Edition voies et personaliser les boutons ............................... |
13 |
|
3.3 |
Envoi d' initializing sysx ............................................................ |
14 |
|
3.4 Ajuster la courbe de vélocité ..................................................... |
15 |
||
3.5 |
Split ....(séparer en 2)............................................................... |
15 |
|
3.6 |
Dual ....(jouer sur 2 canaux)...................................................... |
16 |
|
3.7 After touch ....... |
(pression de canal)........................................... |
17 |
|
3.8 |
Tirette d'orgue |
......................................................................... |
17 |
4.Connection a l'ordinateur...................................... |
17 |
||
4.1 |
Télécommande de séquenceurs ............................................. |
17 |
|
4.2 router le MIDI...... |
...................................................................... |
18 |
|
5.Appendice ........................................................... |
|
18 |
|
5.1 |
Liste des Controller parameters ............................................ |
18 |
|
5.2 dépannage............. |
.................................................................. |
20 |
|
5.3 Specifications |
.......................................................................... |
21 |
|
|
...................................................5.4 Carte d' implementation MIDI |
22 |
4 |
5.5 Index ......................................................................................... |
23 |
|
|
|
|
USB MIDI Master Keyboard Traduction personelle de Francis http://www.jurdan.net |
|
|
|
|
1.Connection

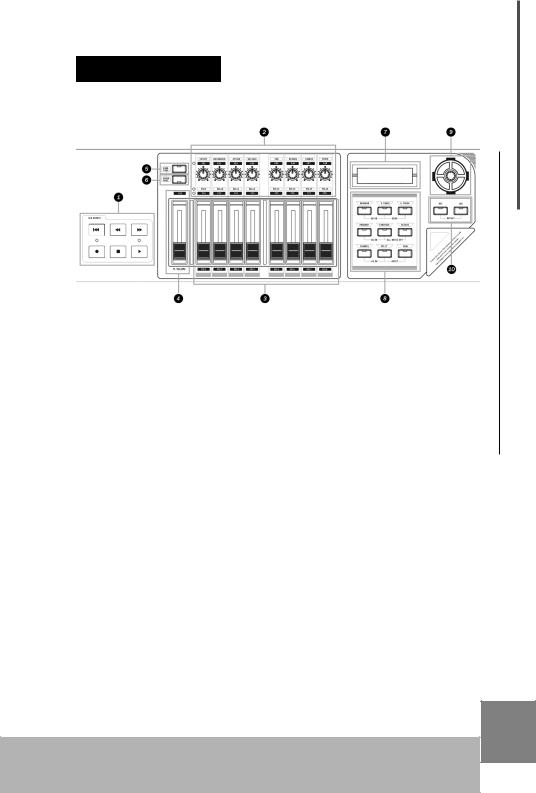
1.1 Face avant
Connection
 Télécommande séquenceur
Ces boutons commandent un séquenceur externe.
 réglages de voie
8 réglages avec preset pour les voies.
 Tirettes de volume
8 curseurs réglables (sliders) with preset pour channel volume.
 Master Volume
Volume général pour séquenceur externe (GM standard.)
 Knob Func
Ce bouton pour choisir entre les fonctions des potentiometres.
 Fader Func
Ce bouton pour choisir entre les fonctions des curseurs.
 Affichage LED
Les LED informent sur les réglages du clavier.
 Bouttons de fonctions
Ces bouttons sont utilisé pour un tas de fonction du clavier.
 Data dial
Roulette permettant d'ajuster la valeur courante.
 Inc/Dec Button
Augmenter/diminuer la valeur courante d'une unité.
5
USB MIDI Master Keyboard
Connection
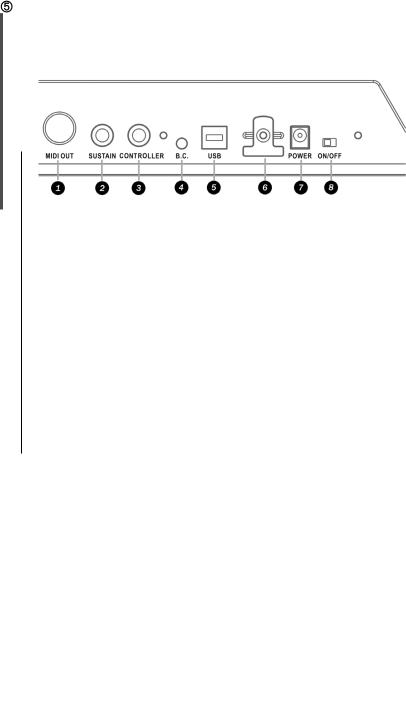
1.2 Rear panel
 MIDI OUT
Tous les messages MIDI du clavierUF ou venant de l'USB sortiront versun appreil MIDI externepar le " MIDI
OUT terminal".
 SUSTAIN PEDAL
Une pédale de sustain externe sera connecté à la prise SUSTAIN PEDAL . La pédale génerera des données MIDI controller #64 .
 CONTROLLER PEDAL
une pédale (volume) peut etre connectée à CONTROLLER PEDAL elle généerea des données de controleur.
Le numéro de controleur désiré # est assignable.Pour assigner
un numéro de CTRL # à la pédale, presser les boutons DRAWBAR et A. simultanément, le controleur actuel # (11) sera
affiché sur les LED, vous pouvez utiliser les boutons DEC/INC ou la roue "data dial" pour changer le ctrl assigné # pour un autre entre 0 et 127.
 B.C.(Breath Control)
Un controleur de souffle (genre YAMAHA BC3) peut etre branché au B.C. jack. Il générera des données de controleur n° #2
réglable.
Pour assigner un controlleur # au B.C.jack, pressez PROGRAM et
OCTAVE simultanément, le controleur actuel # (02) sera affiché sur le LED, et nous pouvons utiliser les boutons DEC/INC ou la "data dial" pour choisir un autre controleur # entre 0 to 127.
Note: Le B.C. jack Ne fonctionne que sur secteur (adaptateur AC branché).
|
USB |
|
6 |
||
Le port USB est prévu pour connecter un ordinateur avec un |
||
|
USB MIDI Master Keyboard Traduction personelle de Francis http://www.jurdan.net |
|
|
|
cable USB pour une comunication bi-directionelle.
 CABLE HOOK
attachez le cable ici afin de préserver une connection franche.
 POWER INLET
la fiche de l'adaptateur secteur se branche au POWER INLET.
 POWER SWITCH
Bouton pour allumer et éteindre le clavier.
Connection
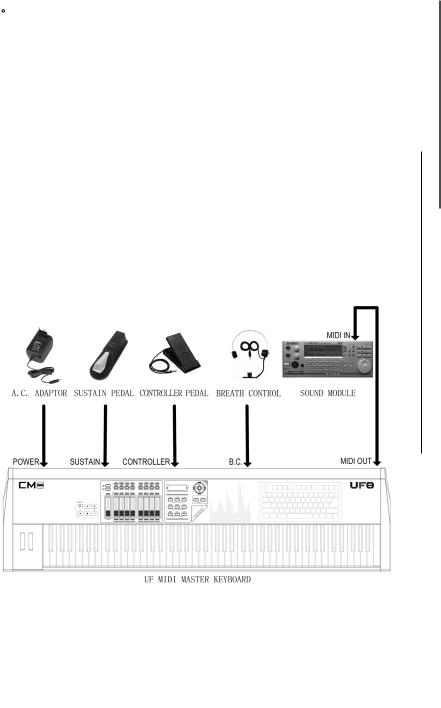
1.3 Connecter l' UF à un générateur sonore
Attention: éteindre tous les appareils avant de dé/connecter
 Connectez le UF à un générateur et vous pourrez jouer
1.3.1Connecter l' UF MIDI OUT a un générateur MIDI IN via le cable MIDI
1.3.2Connecter le generateur au syt d'amplification, ou utiliser le casque s'il est prévu.
1.3.3Réglez votre génératur de son en entrée "MIDI"
voir son mode d'emploi
1.3.4 Brancher l'adaptateur secteur de l'UF à UF DC IN |
|
|
|
1.3.5 Voir le shéma pour la pédale sustain et autre |
7 |
|
|
USB MIDI Master Keyboard |
|
|
|

Connection
8
(fournie avec l' UF8), Controller pedal, ou controleur de souffle(comme un
YAMAHA BC3).
1.3.6Vous pouvez maintenant jouer sur votre générateur avec le clavier.
1.4Connection a un ordinateur
vous pouvez brancher le clavier UF à un ordinateur pour ensuite l'utiliser comme clavier maitre MIDI aussi bien pour jouer de la musique que pour entrer des messages MIDI.
1.4.1Branchez le port USB de l'UF Au port USB de l'ordinateur avec le cable livré avec le clavier UF.
1.4.2Installez le driver sur l'ordinateur(Voir chapitre 1.5)
1.4.3Installez puis démarrez votre logiciel séquenceur et votre logiciel Synthé (comme SampleTank).
1.4.4 Connectez les sortie son de l'ordinateur.
USB MIDI Master Keyboard Traduction personelle de Francis http://www.jurdan.net
 Loading...