

ClearSounds V508, CS-A300 User Manual
1 – ENGLISH
FRANÇAIS ESPAÑOL ENGLISH
CS-A300 DECT 6.0
Cordless Phone
V508

2 – ENGLISH
3 – ENGLISH
Congratulations on your purchase of the CS-A300 Phone from
ClearSounds Communications®. Please read this User Guide carefully
in order to get the very best results from your telephone. Keep the
manual near the telephone for easy reference.
Please visit our web site at www.clearsounds.com to: Register your product,
download additional manuals, and review trouble shooting tips.
Due to the nature of VOIP/Broadband technology results may vary when
used with VOIP/Broadband service
Important Safety Instructions
Read and understand the Installation Guide & User Manual. When using
your telephone equipment, basic safety precautions should always be
followed to reduce the risk of fire, electric shock and injury to person,
including the following:
WARNING: Follow all warnings and instructions marked on the telephone.
WARNING: The ClearSounds A300 is capable of amplifying sounds to a loud
volume. It is important to instruct all potential users of its proper operation.
It is advised to adjust the volume control to the minimum level (Low) when
not in use and alert other users that hearing damage can potentially result
from misuse.
WARNING: To avoid the possibility of electrical shock, do not use this
product near water (For example, near a bathtub, wash basin, kitchen sink
or laundry tub, in a wet basement or near a swimming pool) while in the
bathtub or shower or when you are wet. If the phone becomes submerged
in water, do not attempt to retrieve it until after you have unplugged the
line cord from the modular wall jack. Do not plug the phone back in until it
has dried completely.
WARNING: Avoid using the telephone during electrical storms. There may
be a remote risk of electric shock from lightning. If the electrical storm is
present in your immediate area, possibility of electrical shock exists.
WARNING: Do not use the phone if you suspect a gas leak in the area. The
phone’s electrical contacts could create a spark, which could ignite any
heavy concentration of leaking gas.
WARNING: Unplug this telephone from wall outlet before cleaning. Do not
use liquid cleaners or aerosol cleaners on the telephone. Use a damp cloth
for cleaning.
WARNING: No telephone should ever be placed near an open radiator or
heating register.
WARNING: Occasionally a power surge can occur on electrical lines without
warning. With any electrical device that you plug into an outlet, it is
suggested you use a surge protector. A surge protector will prevent power

3 – ENGLISH
surges from damaging your telephone. Surge protectors are simple devices
available at your local hardware store.
WARNING: Do not overload wall outlet or extension cords, as this can
increase the risk of fire or electrical shock.
WARNING: Never push any objects through the slots in the phone. They can
touch dangerous voltage points or short out parts that could result in a risk
of fire or electrical shock.
Component List
Carefully remove your cordless telephone from its box. Check to be
sure you have all items that come with your telephone. You should
have a TELEPHONE BASE UNIT, TELEPHONE HANDSET, BELT CLIP,
TELEPHONE LINE CORD, AC ADAPTER, 3 AAA Ni-MH RECHARGEABLE
BATTERIES AND OWNER’S MANUAL.

4 – ENGLISH
5 – ENGLISH
HANDSET
FUNCTIONS/KEYS
1 Visual Ringer
2 One-touch memories M1-M4
3 Display
4 Right Soft Key
5 Right Key
6 End
7 Down Key
8 Alphanumeric Keys
9 Microphone
10 Dial Key
11 Left Key
12 Left Soft Key
13 Up key
14 Earpiece
15 Carrying Clip
16 SOS Button
17 Battery Compartment Cover
18 Charging Contacts
19 Headset Jack
BASE
20 Charging Pins
21 Charge Indicator – Lights
steadily while the handset is
charging
22 Page Button
BASE BOTTOM VIEW
23 Phone Line Jack
24 Power Jack

5 – ENGLISH
KEY DESCRIPTION:
Icon Key Function
Dial Key Use to Make or Answer a Call
End Key End a call. Long press to activate power on/off
Up Key Scroll up through lists and menu options. Increase
the earpiece/speakerphone volume during a call.
Enter the CID book as described in section -
Down Key Scroll down through lists and menu options.
Decrease the earpiece/speakerphone volume
during a call. Enter the phonebook as described
in section -
Left Key Set up an internal call to another handset. Transfer
an incoming call with an external line and an
internal handset
Right Key Enter the redial book, as described in section Left/Right
Soft Key
Perform the functions indicated by the text
immediately over it (on the bottom line of the
display) which changes time by time.
Star Key Press and hold to turn on/off keypad lock function.
Set up a conference call, as described in section -
One touch
Dial
You can store up to 5 number in one-touch dialing
buttons M1-M4 and SOS (Located on Back of
Handset)
0 Key In standby mode press and hold this key until the
ZZ icon appears to activate the shake and visual
ringer function. Press and hold this key again until
the Icon disappears to deactivate it.
6 – ENGLISH
7 – ENGLISH
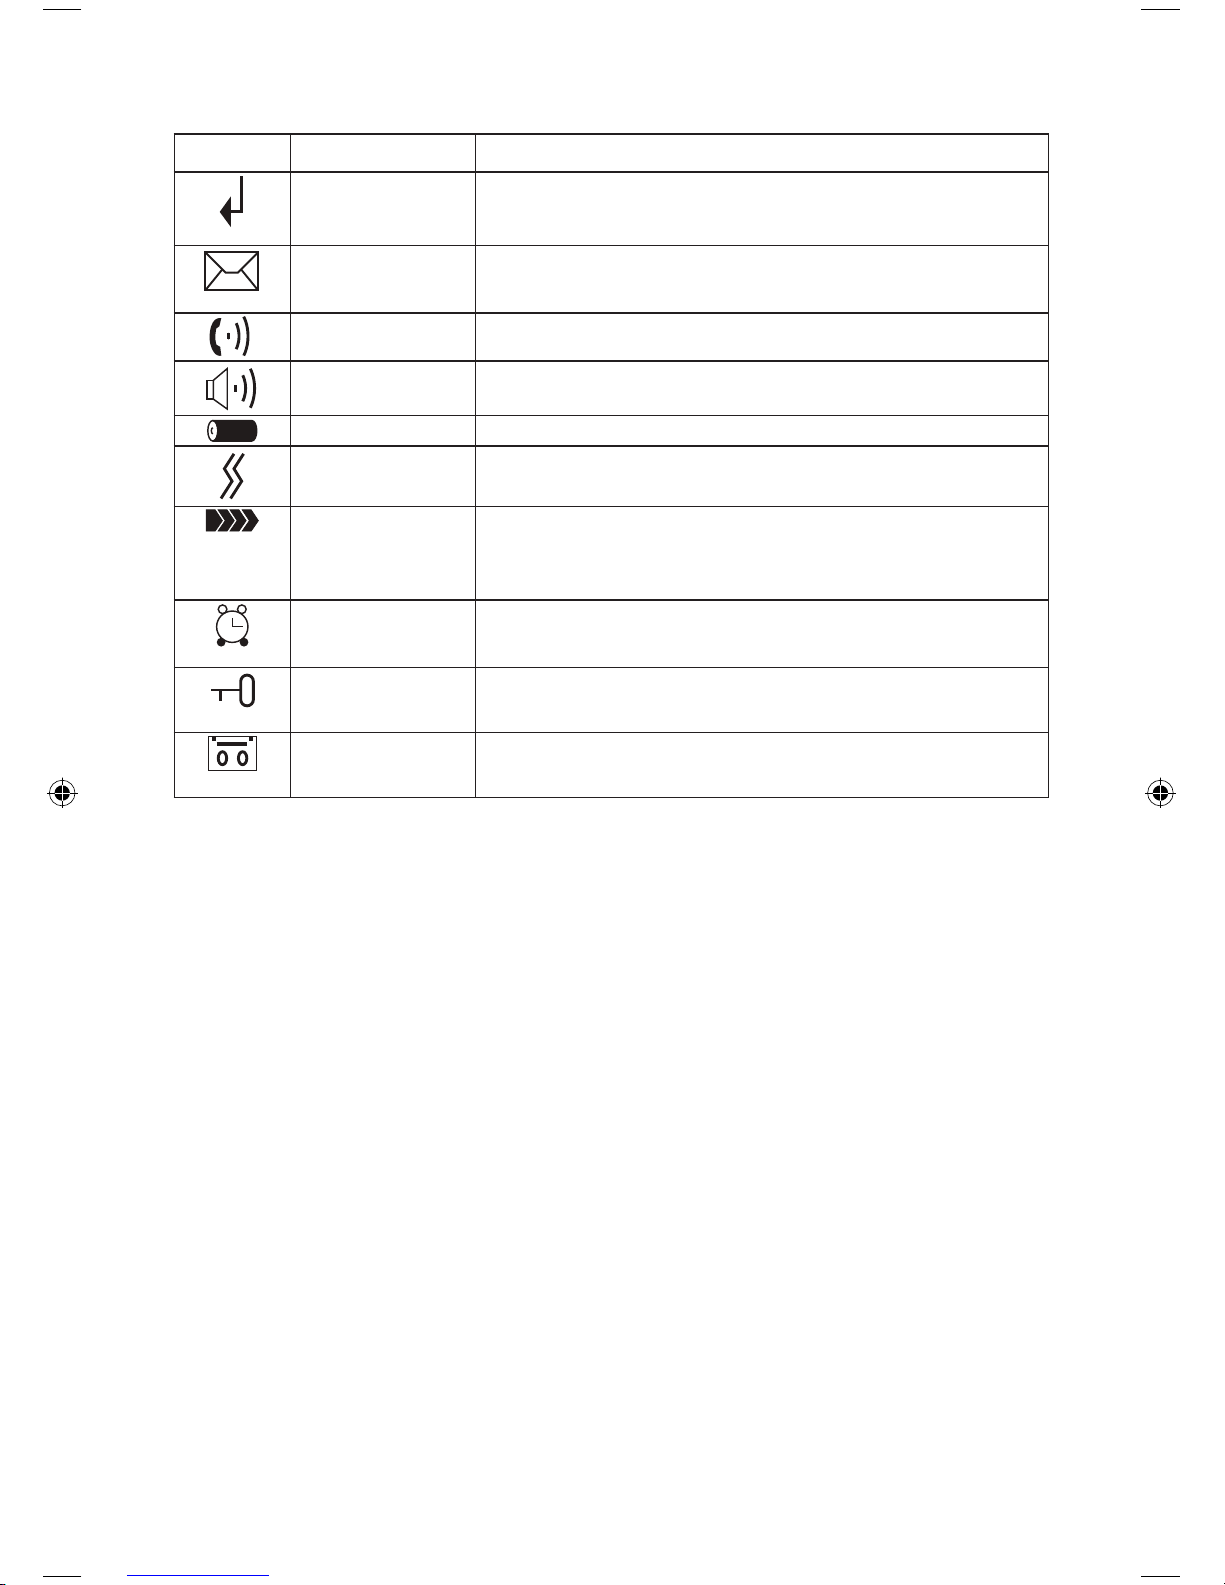
LCD WINDOW ICONS DESCRIPTON
Icon Function
New Call Indicates you have missed one or more calls
MSG Waiting Indicates you have one more voice messages
Off Hook Indicates the line is engaged
Hands-Free Indicates the handsfree function is enabled
Battery Icon Indicates battery charge level
Shake Icon Indicates the shaker and visual ringer is
enabled
Signal Icon Indicates the current signal strength. If the
handset is too far from the base, this icon will
blink on the LCD.
Alarm Icon This Icon appears when you set an alarm to
ring at a specified time.
Keypad Lock This icon appears when the keypad is locked
ICM Icon This icon appears when you have new
messages
Telephone Set-up
Choose a location for the base near an electrical outlet and a telephone jack.
Connect one end of the phone line cord to the base of the phone and
the other end to a standard phone wall outlet.
Connect the modular end of the AC power adapter to the power jack of
the base, and then plug the AC Adapter into a standard AC wall outlet.
Installing Batteries
Handset batteries MUST be connected before beginning initial
charging!
Remove battery compartment cover by removing the memory
dial reference card by sliding it downwards. Then using the small
screwdriver (provided).
Install new batteries. Be sure to observe battery polarity as imprinted
on the base of the compartment
Replace the battery compartment cover and replace the screw to
secure the cover.
NOTE: Reversing the orientation of the batteries may damage the
handset.

7 – ENGLISH
The batteries need to be replaced if they do not recover their full
storage capacity after recharging
When replacing the batteries always use good quality NiMH AAA
rechargeable batteries.
Handset Battery Charging
Place the handset into the base. The charge indicator LED on the
Telephone base will light up.
Choose a location for the base near an electrical outlet and a
telephone jack.
1 Connect one end of the phone line cord to the base of the phone and the
other end to a standard phone wall outlet.
2 Connect the modular end of the AC power adapter to the power jack of
the base, and then plug the AC Adapter into a standard AC wall outlet.
Installing Batteries
Handset batteries MUST be inserted before beginning initial charging!
Remove battery compartment cover by removing the memory 1.
dial reference card by sliding it downwards. Then using the small
screwdriver (provided).
Install new batteries. Be sure to observe battery polarity as 2.
imprinted on the base of the compartment
Replace the battery compartment cover and replace the screw to 3.
secure the cover.
NOTE:
Reversing the orientation of the batteries may damage the •
handset.
The batteries need to be replaced if they do not recover their •
full storage capacity after recharging
When replacing the batteries always use good quality NiMH AAA •
rechargeable batteries.
Handset Battery Charging
Place the handset into the base. The charge indicator LED on the 1.
base will light RED.
IMPORTANT: The batteries in the handset must be fully charged 2.
for 14-16 hours before using the telephone for the first time.
After the batteries are fully charged, check for dial tone by 3.
pressing the talk button on the handset.
Using the Handset Carrying Clip
The handset carrying clip allows you to carry the handset with you,
it clips easily to your belt, waist band, or shirt pocket.
Note: If you want to remove the carrying clip insert a screw driver

8 – ENGLISH
9 – ENGLISH
along the edge of one of the “arms” and release the clip. It should
then lift off easily.
Turning the Handset On/Off
If the handset is in off mode when you place the handset on the base,
it automatically turns on. To turn the handset on or off in standby
mode, follow these steps:
To turn the handset on when it’s off, press and hold the END KEY
until you switch the display on. On power up, the handset will enter
subscription mode and search for a registered base. A message as
shown here will be displayed to the user, and the Antenna Icon will
flash.
To turn the handset off, key the END KEY key pressed until the display
turns off.
NOTES: If the handset is successful in finding a base, the handset
will enter the Standby mode, the display will show handset number
and the handset name, antenna icon, battery icon, and current time.
If the handset is not successful in finding a base, the handset will
behave according to the Out of Range condition.
Nothing will appear on the LCD when battery power is very low. YOU SHOULD
FULLY CHARGE THE HANDSET BEFORE USING.
BASIC A300 OPERATION
Answering a Call
If the handset is off of the base, press the DIAL KEY to receive the call. The
OFF HOOK ICON will appear on the LCD.
Or if you activated the Auto Answer Function - If the handset is in the base,
lift the handset to receive the call.
When you are finished with your call either press the END KEY or
replace the handset on the base.
NOTE: When you finish the call the LCD displays the call duration
time.
Making a Call
Pick up the handset and press the DIAL KEY and wait for a dial
tone.

9 – ENGLISH
Dial the telephone number.
Adjust your Volume and Tone setting if needed.
To end the call, just press the END KEY or return to base or charger.
Pre-Dial
You can also pre-dial a number in standby mode, which will allow
you to make corrections before dialing.
Enter a phone number (up to 32 digits to use a calling card or dial
internationally use the RIGHT key to insert a Pause), review the number.
When the correct number appears, press the DIAL KEY.
NOTES: If you make a mistake while entering a number, press the
ERASE soft key to clear the last digit You can store up to 10 telephone numbers in the memory for automatic dialing You can also
make a call to the last number dialed by using the redial feature. As
featured in Last Number Redial.
Adjusting the Volume while in use
During the conversation you can use the UP or DOWN KEY to adjust
the level of the earpiece (or hands-free speakerphone - if activated)
from V1- V5. The selected volume will be display on the LCD.
You can also select the earpiece volume or the speaker volume by
the Audio Setup menu.
Muting the Microphone
During a conversation you can temporarily switch your phone’s
microphone off, so that the other party cannot hear you.
To mute the microphone Press the MUTE SOFT key during the
conversation. “Call Muted” appears on the LCD screen.
To un-mute the microphone press the MUTE SOFT key again, this will
restore normal condition.
Using the Speakerphone
During a conversation you can turn on the speakerphone built in the
handset. When using the Speakerphone you can simply put your
handset down and enjoy a handsfree conversation.
To turn the speakerphone on, press the DIAL KEY during a call, the
line must be in-use for the speakerphone feature to work.
To turn the speakerphone off, simply press the DIAL KEY again during
your conversation.
NOTE: Before picking up the handset and putting it up to your ear be

10 – ENGLISH
11 – ENGLISH
sure you have turned the speakerphone off.
Using a Headset with your A300
You can use this telephone hands-free when you connect a 2.5mm
headset (purchased separately). To connect, plug the headset into the
HEADSET JACK on the left side of the handset. While in the Headset
Mode, the volume of the headset is controlled by the telephone and
the handset’s earpiece and microphone are disconnected.
Using the Soft Key and Menus
In the LCD screen you will see the Menu and TAM options for setting
up and using your A300.
While in standby mode you will use the Soft Keys to select which
function from the Menu and set-up your phone.
11 – ENGLISH
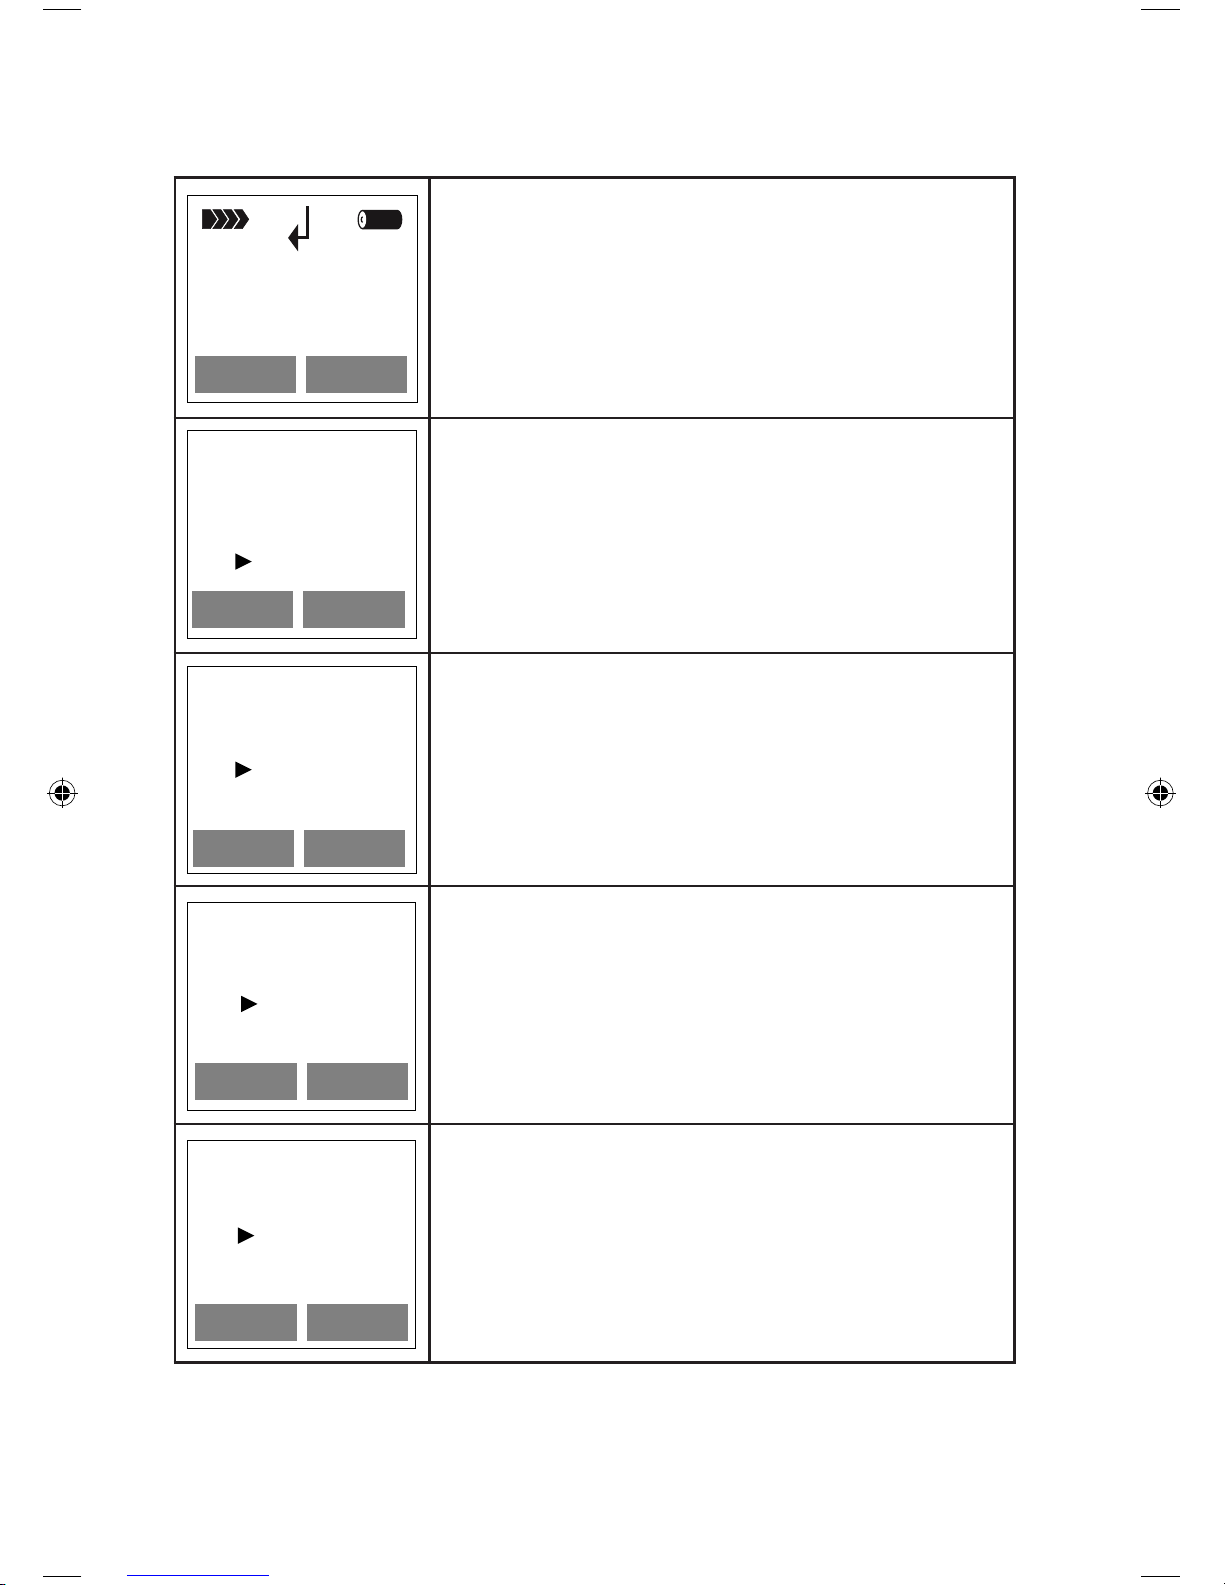
For example:
Setting the Earpiece Volume
TAMMenu
HS1
01/01 05:26 pm
LCD Screen #1
Press the LEFT SOFT KEY under Menu in
the LCD Screen
Press the UP or DOWN KEY to scroll
through the menu and select HS
Settings by pressing the LEFT SOFT KEY
----- Main Menu -----
Phonebook
BS Setting
HS Settings
LCD Screen #2
TAMMenu
BACKSELECT
HS1
01/01 05:26 pm
LCD Screen #1
Press the LEFT SOFT KEY to select HS
Settings
Press the DOWN KEY to scroll through the
menu and select Audio Setup
----- Main Menu -----
Phonebook
BS Setting
HS Settings
LCD Screen #2
LCD Screen #3
TAMMenu
BACKSELECT
BACKSELECT
HS1
01/01 05:26 pm
LCD Screen #1
----- HS Settings -----
Alarm
Audio Setup
Ring Setup
Press the LEFT SOFT KEY to select Audio
Setup
Press the UP or DOWN KEY to scroll
through the menu and select Earpiece V
by pressing the LEFT SOFT KEY
----- Main Menu -----
Phonebook
BS Setting
HS Settings
LCD Screen #2
LCD Screen #3
LCD Screen #4
TAMMenu
BACKSELECT
BACKSELECT
BACKSELECT
HS1
01/01 05:26 pm
LCD Screen #1
----- HS Settings -----
Alarm
Audio Setup
Ring Setup
-----Audio Setup -----
----- END -----
Speaker V
Earpiece V
Press the LEFT SOFT KEY to select
Earpiece V
Press the UP or DOWN KEY to scroll
through the menu and select Volume 5 –
Volume 1 by pressing the LEFT SOFT KEY
----- Main Menu -----
Phonebook
BS Setting
HS Settings
LCD Screen #2
LCD Screen #3
LCD Screen #4
LCD Screen #5
TAMMenu
BACKSELECT
BACKSELECT
BACKSELECT
HS1
01/01 05:26 pm
LCD Screen #1
BACKSAVE
----- HS Settings -----
Alarm
Audio Setup
Ring Setup
-----Audio Setup -----
----- END -----
Speaker V
Earpiece V
----- Earpiece Volume -----
Volume 5
Volume 4
Volume 3
Press the LEFT SOFT KEY to SAVE your
selection. You will hear a confirmation
beep.
You can press the Right Soft Key under the BACK display in the
LCD to move back through the menu selections – OR – you can wait
and in approximately 30 seconds the phone will return to standby
mode.

12 – ENGLISH
13 – ENGLISH
Setting the Ringer Volume
Press the SOFT KEY under Menu in the LCD Screen.
Press the UP or DOWN KEY to scroll through the menu and select
HS Settings by pressing the LEFT SOFT KEY
Press the DOWN KEY again to scroll to RING SETUP then press the
SOFT KEY to make your selection.
Press the DOWN KEY again to select INT RING or EXT RING press
the SOFT KEY to select
Press the DOWN KEY again to select VOLUME press the SOFT KEY
Use the Up and Dow Keys to scroll through the volume selections
Volume 1 through Volume 5 and No Volume. Press the SOFT KEY to
Save. You will hear a confirmation tone to confirm your selection has
been saved.
Setting the Ringer Melody
Press the SOFT KEY under Menu in the LCD Screen.
Press the DOWN KEY to scroll through the menu and select HS
SETTINGS by pressing the SOFT KEY
Press the DOWN KEY again to scroll to RING SETUP then press the
SOFT KEY to make your selection.
Press the DOWN KEY again to select INT RING or EXT RING press
the SOFT KEY to select
Press the DOWN KEY again to select MELODY press the SOFT KEY
Use the UP or DOWN Keys to scroll through the Melody selections
Melody 1 through Melody 10. Press the SOFT KEY to Save. You will
hear two confirmation tones to confirm your selection has been
saved.
NOTE: If you turn the ringer OFF, when a call comes in, only the New
Call information appears on the LCD. If you activate the shaker and
visual ringer function when a call comes in the handset will shake and
the visual ringer will also flash with the ring melody you have set.
Last Number Redial
Press the RIGHT KEY in Standby mode.
The LCD will display the lat number you dialed
Press the DIAL KEY to dial the number
Note: The A300 allows you to retrieve the last 10 numbers you have
dialed and recall them quickly.

13 – ENGLISH
Search for and Dial a number in the Redial book.
Press the RIGHT KEY in standby mode
If you want to scroll through the memory, press the UP or DOWN
KEY until you find the number you want to dial
Press the DIAL KEY to dial the number
NOTE: If no numbers are found “EMPTY” is displayed on the redial
book screen. When the redial book is full, each time you dial a new
number, the oldest number stored in the redial book is automatically
erased, and it is updated.
Use Redial book options.
This allows you to delete a number from your redial book or add a
number to your phone book.
Press the RIGHT KEY in standby mode
Press the UP or DOWN KEY to scroll the memory until you find the
number you want to delete
When the number appears on the screen, press the SOFT KEY to
select MORE. You will have 3 options ADD TO PB, DELETE,
DELETE ALL
ADD to PB, allows you to add the number to your phone book.
Use the RIGHT KEY to enter the redial phonebook
Use the SOFT KEY to select MORE
Use the SOFT KEY to select ADD TO PB
Enter the Name, press the SOFT KEY to select NEXT
Number? Will appear and you can edit the number if needed, if the
number is fine use the SOFT KEY to select NEXT
Press the UP or DOWN KEY to scroll through to select a Melody to
be associated with the number
Use the SOFT KEY to select SAVE
DELETE
Use the RIGHT KEY to enter the redial phonebook
Press the DOWN KEY to scroll through the numbers to select the
number you want to delete
Use the SOFT KEY to select MORE
Use the SOFT KEY to select DELETE

14 – ENGLISH
15 – ENGLISH
The screen will display “CONFIRM” use the SOFT KEY to select DEL
to confirm, you will hear a confirmation tone.
DELETE ALL
Use the RIGHT KEY to enter the redial phonebook
Use the SOFT KEY to select MORE
Press the DOWN KEY to scroll the through the menu and select
DELETE ALL
The screen will display “CONFIRM?”, use the SOFT KEY to select DEL
ALL
ANSWERING MACHINE FUNCTIONS
Recording your Greeting – Announce 1 (this
selection allows your caller to leave a message)
You can record your own greeting our use the standard default greeting
which is “Hello, your call cannot be taken at the moment, to record your
message, please speak after the tone.”
Press the SOFT KEY under TAM in the LCD Screen.
Press the UP or DOWN KEY to scroll through the menu and select
Announce by pressing the SOFT KEY
Press the DOWN KEY again to scroll to ANNOUNCE 1 then press
the SOFT KEY to make your selection.
Press the DOWN KEY again to select RECORD or DEFAULT press
the SOFT KEY to select
If you select RECORD you will be instructed to start speaking after
the tone, when nished with your greeting press the SOFT KEY to
conrm. If you need to stop and start over you can press the SOFT
KEY ICON under OK, during recording the LCD screen will show
“RECORDING….”
Your message will be played back automatically for your review.
Recording your Greeting – Annouce 2 (this feature
is a message only, callers are not allowed to leave
a message if you select this option)
You can record your own greeting our use the standard default
greeting which is “Hello, your call cannot be taken at the moment,
please call back later.”
Press the SOFT KEY under TAM in the LCD Screen.

15 – ENGLISH
Press the UP or DOWN KEY to scroll through the menu and select
Announce by pressing the SOFT KEY
Press the DOWN KEY again to scroll to ANNOUNCE 2 then press
the SOFT KEY to make your selection.
Press the DOWN KEY again to select RECORD or DEFAULT press
the SOFT KEY to select
If you select RECORD you will be instructed to start speaking after
the tone, when nished with your greeting press the SOFT KEY to
conrm. If you need to stop and start over you can press the SOFT
KEY ICON under OK, during recording the LCD screen will show
“RECORDING….”
Your message will be played back automatically for your review.
Playback Announce 1/Annouce 2
To playback your recorded announcement.
Press the SOFT KEY under TAM in the LCD Screen.
Press the UP or DOWN KEY to scroll through the menu and select
Announce by pressing the SOFT KEY
Press the DOWN KEY again to scroll to ANNOUNCE 1 then press
the SOFT KEY to make your selection.
Press the DOWN KEY again to select Playback press the SOFT KEY
to select
You can use the Back Soft Key to stop and exit.
Restore Announce 1/Annouce 2
Press the SOFT KEY under TAM in the LCD Screen.
Press the UP or DOWN KEY to scroll through the menu and select
ANNOUCE 1 OR ANNOUCE 2 by pressing the SOFT KEY
Press the DOWN KEY again to scroll to DEFAULT then press the
SOFT KEY to make your selection.
The LCD will show CONFIRM?. Press the SOFT KEY to Select the
default Announcement or select BACK by using the SOFT KEY to
cancel.
Play New/Saved Messages
Press the SOFT KEY under TAM while in standby mode
Press the DOWN KEY to scroll through the menu and select MESSAGE
then press the SOFT KEY to make your selection

16 – ENGLISH
17 – ENGLISH
Press the DOWN KEY to scroll to either NEW MSG or SAVED MSG
then press the SOFT KEY to make your selection.
The phone will announce “You have XX new message(s)” or “You
have X saved message(s)”. You can use the 0 key to delete the
current message or using the SOFT KEY select BACK to stop playing
the messages and exit.
Delete all Message
Press the Down Key to Scroll through the menu and Select Message
then press the Soft Key to make your selection Press the SOFT KEY
under TAM while in standby mode
Press the DOWN KEY again to scroll through the menu and select
DELETE ALL then press the SOFT KEY to make your selection
The LCD will show CONFIRM?. Press the SOFT ICON KEY to select
OK to delete all the messages or select Cancel to exit.
NOTE: Your A300 can record up to 15 minutes of messages.
Using the Memo Function
You can use your A300 to record a message for someone else in your
home. The memo can be played back as a message.
Press the SOFT KEY under TAM while in standby mode.
Press the DOWN KEY to scroll through the menu and select MESSAGE
then press the SOFT KEY to make your selection
Press the DOWN KEY to scroll to MEMO RECORD then press the
SOFT KEY to conrm.
You can begin to record your message after hearing the tone.
Recording will stop after 3 minutes, you can also confirm and end
the recording by selecting OK using the Soft Key. During recording
the LCD shows “Recording…”
Note: When leaving a memo the ICM ICON will appear on the LCD
screen while in standby mode.
SETTING UP YOUR ANSWERING MACHINE
Turning your Answering Machine On/Off
Press the SOFT KEY under TAM while in standby mode.
Press the DOWN KEY to scroll through the menu and select TAM
SETTING then press the SOFT KEY to make your selection
Press the DOWN KEY to scroll to TAM On/Off then press the SOFT
KEY to conrm.

17 – ENGLISH
Press the DOWN KEY to scroll through the menu and select either
Off or On then press the SOFT KEY to make your selection
Using the The Answering Machine Alert
You can set-up your A300 to alert you with a Tone when you receive
a new message
Press the SOFT KEY under TAM while in standby mode.
Press the DOWN KEY to scroll through the menu and select TAM
SETTING then press the SOFT KEY to make your selection
Press the DOWN KEY to scroll to TAM Alert then press the SOFT
KEY to conrm.
Press the DOWN KEY to scroll through the menu and select either
Off or On then press the SOFT KEY to make your selection
Selecting An Answer Mode
Your A300 answering machine operates in two modes, answer and
record (Announce 1), and answer only (Announce 2).
Press the SOFT KEY under TAM while in standby mode.
Press the DOWN KEY to scroll through the menu and select TAM
SETTING then press the SOFT KEY to make your selection
Press the DOWN KEY to scroll to ANNC Select then press the SOFT
KEY to conrm.
Press the DOWN KEY to scroll through the menu and select either
Announce 1 or Announce 2 then press the SOFT KEY to make your
selection
NOTE: Announce 2 will be played when your answering machine is
full, even if you have selected Announce 1.
Setting the Ring Delay
You can select the number of rings before your answering machine
takes an incoming call. You can select from 2 to 6 rings or Toll Saver
mode.
Press the SOFT KEY under TAM while in standby mode.
Press the DOWN KEY to scroll through the menu and select TAM
SETTING then press the SOFT KEY to make your selection
Press the DOWN KEY to scroll to SET RING then press the SOFT
KEY to conrm.
Press the DOWN KEY to scroll through the menu and select 2 -6
rings or Toll Saver. then press the SOFT KEY to make your selection

18 – ENGLISH
19 – ENGLISH
NOTE: If you select Toll Saver, when there are new messages waiting
to be played back, the answering machine will respond after 3 rings,
if you have no new messages to be reviewed it will answer after 6
rings.
Setting the Language
You can select language for your default Announce 1 or Announce 2.
Press the SOFT KEY under TAM while in standby mode.
Press the DOWN KEY to scroll through the menu and select TAM
SETTING then press the SOFT KEY to make your selection
Press the DOWN KEY to scroll to TAM Language then press the
SOFT KEY to conrm.
Press the DOWN KEY to scroll through the menu and select the
language (English is default) then press the SOFT KEY to make your
selection
Re-setting your Answering Machine
This function allows you to reset your Answering Machine to the
factory default settings.
Press the SOFT KEY under TAM while in standby mode.
Press the DOWN KEY to scroll through the menu and select TAM
SETTING then press the SOFT KEY to make your selection
Press the DOWN KEY to scroll to TAM Default Select then press the
SOFT KEY to conrm.
You will prompted to enter a PIN Code (default is 0000), then press
the SOFT KEY ICON to select RESET. If the PIN Code is validated all
answering machine settings will return to the factory default, otherwise
a warning tone will be heard and the settings will remain as you have
programmed them.
Note: After resetting, the Answering machine will reset and return
to standby mode.
Setting up a Remote Code
This function allows you to operate you answering machine remotely
from another location. For security purposes we recommend that
you change the code (the default is 0000).
Press the SOFT KEY under TAM while in standby mode.
Press the DOWN KEY to scroll through the menu and select TAM
SETTING then press the SOFT KEY to make your selection
19 – ENGLISH
Press the DOWN KEY to scroll to REMOTE CODE then press the
SOFT KEY to conrm.
The LCD will show the current code, enter the new code you want to set
then press the Soft Key to Select OK.
Using the Remote Function
This feature allows you to access your answering machine remotely.
Simply dial your phone number from any touch tone phone, then
enter your 4 digit security code (factory default is 0000).
Dial your phone using any touch tone telephone
When your greeting (or default greeting) begins to play, you can
enter your security code.
After entering the security code, the system will play the menu of
commands. You can then follow the commands to retrieve messages, etc.
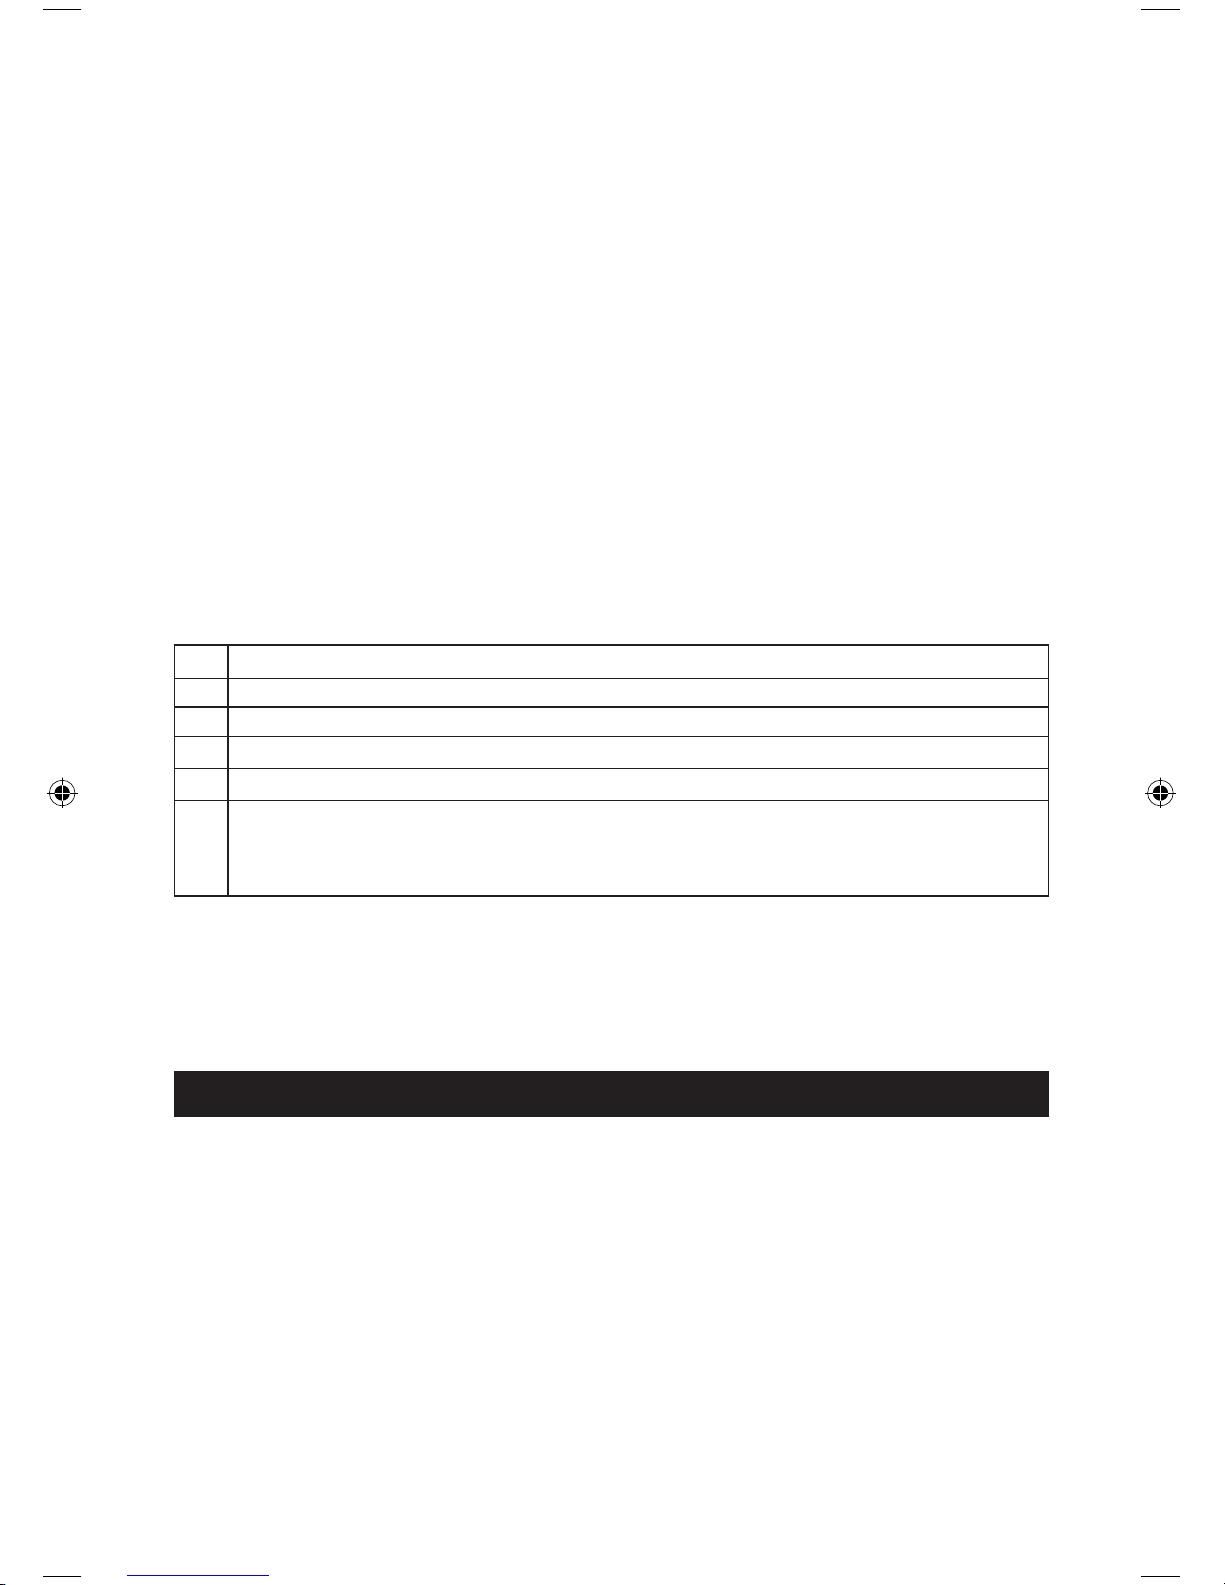
Remote Access Commands
1 Play main menu
2 Play new messages
3 Play saved messages
0 Delete all messages
5 Switch the answering machine on/off
6 Record Announce 1 of 2
(this depends on your announce setting)
Press the # to nish recording
NOTE: If you enter the wrong security code the A300 will announce
you need to enter the code again. You will have a total of 3 tries to
enter the correct security code before the line is disconnected
You should also stop playing messages before ending the call.
PHONE BOOK
The phonebook in your A300 allows you to store frequently called numbers.
Character Map
To enter a specific alphanumeric character, press one or more times the key
for the required character according to the following table: once for the first
character, twice for the second and so on.
Key Character
(spc) 0 ? & / . , !
1 @ _ + - “ ( ) %
A B C a b c 2

20 – ENGLISH
21 – ENGLISH
D E F d e f 3
G H I g h I 4
J K L j k l 5
M N O m n o 6
P Q R S p q r s 7
T U V t u v 8
W X Y Z w x y z 9
Adding names to the phone book
Press the SOFT KEY under MENU while in standby mode.
Press the DOWN KEY to scroll through the menu and select
PHONEBOOK then press the SOFT KEY to make your selection
Press the DOWN KEY to scroll to NEW then press the SOFT KEY to
confirm.
The display will show NAME? Enter the name you want to use, then
press the Soft Key to select NEXT. The display will show NUMBER?
Enter the phone number (up to 20 digits) then using the Soft Key
select NEXT.
Use the DOWN KEY to select the Melody you would like to associate
with the number, using the Soft Key select SAVE to confirm.
Repeat as necessary
NOTE: If you make a mistake while entering a number, use the Soft
Key to select Erase to correct the mistake. To clear all the numbers
or characters, press and hold Erase.
Inserting A Pause
A pause is useful when you a programming a calling card number,
or you need extra time when accessing a interactive voice response
system i.e. banking by phone. A pause provides a delay of 3 seconds,
if you want to insert a pause when you are dialing a number in
standby mode or store a number in memory press the RIGHT KEY
then the letter P will appear.
Viewing Phone Book Entries
In standby mode press the DOWN KEY
Press the UP or DOWN key repeatedly until the desired number is
displayed.
If you want to dial the selected number, simply press the DIAL KEY.

21 – ENGLISH
Editing Phone Book Entries
Press the SOFT KEY under MENU while in standby mode.
Press the DOWN KEY to scroll through the menu and select
PHONEBOOK then press the SOFT KEY to make your selection
Press the DOWN KEY to scroll through the menu and select EDIT
then press the SOFT KEY to make your selection
Press the UP or DOWN KEY to scroll through to find the entry you
would like to edit is selected, press the SOFT KEY to Select
Press the Soft Key to choose ERASE to clear the incorrect digit(s) or
character(s) then enter the correct information, Press the Soft Key
to Choose Next
Use the DOWN KEY to select the ring you would like to associate
with the number, using the Soft Key select SAVE to confirm.
DELETING PHONE BOOK ENTRIES
Deleting a single entry
Press the SOFT KEY under MENU while in standby mode.
Press the DOWN KEY to scroll through the menu and select
PHONEBOOK then press the SOFT KEY to make your selection
Press the DOWN KEY to scroll through the menu and select DELETE
then press the SOFT KEY to make your selection
Press the DOWN KEY to scroll through and select the name you
want to delete, then press the SOFT KEY. The display will show
“CONFIRM?”. You can press the SOFT KEY to Delete the number or
press SOFT KEY to choose CANCEL.
Deleting all numbers
Press the SOFT KEY under MENU while in standby mode.
Press the DOWN KEY to scroll through the menu and select
PHONEBOOK then press the SOFT KEY to make your selection
Press the DOWN KEY to scroll through the menu and select DELETE
ALL then press the SOFT KEY to make your selection

22 – ENGLISH
23 – ENGLISH
Caller ID Book
If you subscribe to Caller ID service from the phone company,
your A300 will store those numbers in your Caller ID phone book.
Additionally, if you miss a call the LCD will display the [NEW CALL
ICON]. If the Caller ID memory is full, the [NEW CALL ICON] will
blink on the LCD.
View and dial any of the Caller ID numbers
Press the SOFT KEY under MENU in the LCD Screen
Press the DOWN KEY to scroll through the menu and select CID Book
by pressing the SOFT KEY any numbers available will be displayed.
You can also access the Caller ID Book directly by pressing the UP
KEY while in standby mode.
Press the DOWN KEY to scroll through the numbers, select the desired
number, then press the DIAL KEY.
Out of Area – This message is displayed when someone calls from an
area where the telephone company is not offering Caller ID service
Private – If the caller has exercised the option to prevent their name
and number from being sent, the PRIVATE message will show on the
LCD.
NOTE: When reviewing your Caller ID screen, incoming calls that
have been reviewed will be marked with a ↑, or with the NEW CALL
icon if the call hasn’t been reviewed yet.
Adding a Caller ID number to the Phone Book
Press the SOFT KEY under MENU in the LCD Screen
Press the DOWN KEY to scroll through the menu and select CID Book
by pressing the SOFT KEY any numbers available will be displayed.
You can also access the Caller ID Book directly by pressing the UP
KEY while in standby mode.
Use the UP or DOWN KEY to scroll through the numbers to select the
desired phone number, when the number is highlighted, press the
SOFT KEY to Select MORE to enter ADD TO PB Menu
Press the SOFT KEY to SELECT, you are then prompted to enter the
name
Enter the name and press the SOFT KEY to select NEXT, then you can
modify the number you want to store
Press the SOFT KEY to select NEXT, now you can select the ring tone
from Melody 1 to Melody 10. Press the SOFT KEY to select SAVE, you
will hear a confirmation beep.

23 – ENGLISH
Deleting a single number from the
Caller ID Book
Press the SOFT KEY under MENU in the LCD Screen
Press the DOWN KEY to scroll through the menu and select CID Book
by pressing the SOFT KEY any numbers available will be displayed.
Press the UP or DOWN KEY to down key to scroll through the numbers,
when the desired number appears on the display, use the SOFT KEY
to select MORE
Use the DOWN KEY to Choose DELETE, press the SOFT KEY to select.
The LCD will display “CONFIRM?”. Press the SOFT KEY to conrm
DEL, you will hear a beep and LCD will display the next number.
Deleting all the numbers from the
Caller ID Book
Press the SOFT KEY under MENU in the LCD Screen
Press the DOWN KEY to scroll through the menu and select CID Book
by pressing the SOFT KEY any numbers available will be displayed.
Press the SOFT KEY to select MORE and use the DOWN KEY to select
Delete All, then press the SOFT KEY to confirm.
The LCD will display “CONFIRM?” press the SOFT KEY to CONFIRM
Delete All
You will hear a confirmation beep, the phone will then return to Standby
Mode after deleting all the numbers from the Caller ID book.
NOTE: If you press the UP KEY to access the Caller ID book, use the
UP or DOWN KEY to scroll to the desired number, then using the
SOFT KEY select MORE to enter the DIAL OPTIONS. If a number is
provided in your Caller ID book, the possible options to choose form
will be either 10 or 11 digits. For example, if the original number in
the Caller ID book was 800-965-9043, when you use the SOFT KEY
to pick SELECT, the display will show 965-9043, 800-965-9043,
and 1-800-965-9043 for you to dial from.
CALLER ID CALL WAITING
When you subscribe to Call Waiting (and Caller ID service) from your
telephone provider, the A300 will display the name and number of
the second caller while you are on the phone.
When you are on the line, the A300 will display the name and number
of the second caller, simply press the SOFT KEY to select FLASH to
answer the second caller.

24 – ENGLISH
25 – ENGLISH
When you have finished, press the SOFT KEY to select FLASH again
to continue your conversation with the first caller.
Programming the One Touch Memory Dial
Buttons
You can store up to 5 one-touch memory dial numbers. All numbers
will also be stored in the phone book.
Storing Memory Numbers
Press the memory key (M1 – m4 or SOS) while in Standby Mode
The display shows “Number?” Enter the desired telephone number
(up to 20 digits), press the SOFT KEY to select NEXT
Using the DOWN KEY scroll through to select the Melody you would
like to associate with this number, press the SOFT KEY to confirm.
Viewing One Touch Memory Dial Numbers
In the standby mode, press the DOWN KEY
Using the UP or DOWN KEY scroll through the numbers until the
desired number is displayed.
Dialing using the One Touch Memory Buttons
In the Standby Mode, press M1 to M4 or the SOS button to dial out
the corresponding number
Editing One Touch Memory Dial Buttons
Press the SOFT KEY under MENU while in standby mode.
Press the DOWN KEY to scroll through the menu and select
PHONEBOOK then press the SOFT KEY to make your selection
Press the DOWN KEY to scroll through the menu and select EDIT
then press the SOFT KEY to make your selection
Press the DOWN KEY to scroll through to nd the entry you would like
to edit is selected, press the SOFT KEY to Select
Press the Soft Key to choose ERASE to clear the incorrect digit(s) or
character(s) then enter the correct information, Press the Soft Key to
Choose Next
Use the DOWN KEY to select the Melody you would like to associate
with the number, using the Soft Key select SAVE to conrm.
Deleting Memory Numbers
Press the SOFT KEY under MENU while in standby mode.

25 – ENGLISH
Press the DOWN KEY to scroll through the menu and select
PHONEBOOK then press the SOFT KEY to make your selection
Press the DOWN KEY to scroll through the menu and select DELETE
then press the SOFT KEY to make your selection
Press the DOWN KEY to scroll through and select the name you want
to delete is displayed, then press the SOFT KEY. The display will show
“CONFIRM?”. You can press the SOFT KEY to Delete the number or
press SOFT KEY to choose CANCEL.
NOTE: The memory default names are M1-M4 and SOS, you can add a
name or something behind them but you cannot delete the default name.
BASE SETTINGS
Flash Time
You can change the FLASH time by using the following steps:
Press the SOFT KEY under MENU while in standby mode
Using the UP or DOWN KEY scroll through the menu and select BS
Settings, press the SOFT KEY to SELECT
Using the DOWN KEY scroll through the menu and select FLASH
TIME, press the SOFT KEY to SELECT
The display shows the current setting. Using the DOWN KEY scroll
through to select Flash-1 (600ms) or Flash-2 (300ms), using the
SOFT KEY select SAVE.
Setting the Dial Mode
Press the SOFT KEY under Menu in the LCD Screen.
Press the UP or DOWN KEY to scroll through the menu and select BS
Settings by pressing the SOFT KEY
Press the DOWN KEY again to scroll to DIAL MODE then press the
SOFT KEY to make your selection.
Press the DOWN KEY again to select TONE or PULSE press the
SOFT KEY to select SAVE
NOTE: If you are not sure which dialing mode to select contact your
local phone service provider.
Modify PIN
You can change the PIN Number of the base. The default pin is
0000.
Press the SOFT KEY under MENU while in standby mode

26 – ENGLISH
27 – ENGLISH
Using the UP or DOWN KEY scroll through the menu and select BS
Settings, press the SOFT KEY to SELECT
Using the DOWN KEY scroll through the menu and select MODIFY
PIN, press the SOFT KEY to SELECT
The display will show “PIN?” enter the current PIN, then press the
NEXT key. If the old PIN code is validated, you will be prompted to
enter a new PIN code. If the old PIN is not validated, a warning beep
will sound an you will be returned to the MODIFY PIN menu.
Enter the new PIN, using the SOFT KEY select NEXT. Please confirm
the PIN Code entered, by entering the New Pin again then using the
SOFT KEY select SAVE to confirm and exit.
Resetting the Base
This function allows you to reset the base setting to the factory
defaults.
Press the SOFT KEY under MENU while in standby mode
Using the UP or DOWN KEY scroll through the menu and select BS
Settings, press the SOFT KEY to SELECT
Using the DOWN KEY scroll through the menu and select BS Reset,
press the SOFT KEY to SELECT. You will prompted to enter your PIN
code.
Enter the PIN Code (default is 0000), then press the SOFT KEY to
select RESET. If the PIN code is validated all base settings will be
reset to the factory default, otherwise the settings will remain as
you have programmed them.
NOTE: After resetting, the base will be reset and the handset will
return to Standy mode.
HANDSET SETTINGS
Setting the Alarm
Press the SOFT KEY under MENU while in standby mode
Using the UP or DOWN KEY scroll through the menu and select HS
Settings, press the SOFT KEY to SELECT
Using the DOWN KEY select ALARM, press the SOFT KEY to
SELECT.
Using the DOWN KEY select ON/OFF, press the SOFT KEY to
SELECT.
If you select ON, you will need to enter the desired alarm time in

27 – ENGLISH
HH:MM format, using the 24-hour format. Use the keypad to enter
the time.
Using the SOFT KEY select NEXT, a beep will sound, using the DOWN
KEY select SNOOZE ON or SNOOZE OFF, press the SOFT KEY to
SAVE
When the alarm sounds, press any key to turn it off.
Note: If you choose SNOOZE ON, the alarm will sound approximately
every 12 minutes. Press the END CALL KEY when the alarm sounds
and the SNOOZE will be turned off.
Audio Set-up
Press the SOFT KEY under MENU while in standby mode
Using the UP or DOWN KEY scroll through the menu and select HS
Settings, press the SOFT KEY to SELECT
Using the DOWN KEY select AUDIO SETUP, press the SOFT KEY to
SELECT.
Using the DOWN KEY select SPEAKER V or EARPIECE V, press the
SOFT KEY to SELECT.
The display will show you the current setting, using the DOWN KEY
scroll through to select the volume level (Volume 1 – Volume 5),
press the SOFT KEY to select SAVE.
Key Tone
Every time you press a key, your handset will acknowledge it with a
beep (key tone). You can disable the key tones and use the A300 in
a silent mode.
Press the SOFT KEY under MENU while in standby mode
Using the UP or DOWN KEY scroll through the menu and select HS
Settings, press the SOFT KEY to SELECT
Using the DOWN KEY select TONE SETUP, press the SOFT KEY to
SELECT.
Using the DOWN KEY select KEYTONE, press the SOFT KEY to
SELECT.
Using the DOWN KEY select ON/OFF, press the SOFT KEY to select
SAVE
Note: When using certain programming functions a warning tone
will sound when an incorrect key is pressed.

28 – ENGLISH
29 – ENGLISH
LCD Contrast Setting
Press the SOFT KEY under MENU while in standby mode
Using the UP or DOWN KEY scroll through the menu and select HS
Settings, press the SOFT KEY to SELECT
Using the DOWN KEY select LCD CONTRAST, press the SOFT KEY
to SELECT.
Using the DOWN KEY you can select between 17 levels of contrast,
press the SOFT KEY to SAVE.
Press the END CALL Key to return to standby mode
DATE AND TIME
Selecting a Date Format
Press the SOFT KEY under MENU while in standby mode
Using the UP or DOWN KEY scroll through the menu and select HS
Settings, press the SOFT KEY to SELECT
Using the DOWN KEY scroll through the menu and select DATE &
TIME, press the SOFT KEY to SELECT
Using the DOWN KEY select DATE FORMAT, press the SOFT KEY to
SELECT.
Using the DOWN KEY you can select between MM-DD or DD-MM
Press the SOFT KEY to select SAVE
Setting the Date
Press the SOFT KEY under MENU while in standby mode
Using the UP or DOWN KEY scroll through the menu and select HS
Settings, press the SOFT KEY to SELECT
Using the DOWN KEY scroll through the menu and select DATE &
TIME, press the SOFT KEY to SELECT
Using the DOWN KEY select SET DATE, press the SOFT KEY to
SELECT.
Using the keypad you can enter the day and month
Press the SOFT KEY to select SAVE
Selecting a Time Format
Press the SOFT KEY under MENU while in standby mode
Using the UP or DOWN KEY scroll through the menu and select HS

29 – ENGLISH
Settings, press the SOFT KEY to SELECT
Using the DOWN KEY scroll through the menu and select DATE &
TIME, press the SOFT KEY to SELECT
Using the DOWN KEY select TIME FORMAT, press the SOFT KEY to
SELECT.
Using the DOWN KEY you can select between 12 or 24 hour time
format
Press the SOFT KEY to select SAVE
Setting the Time
Press the SOFT KEY under MENU while in standby mode
Using the UP or DOWN KEY scroll through the menu and select HS
Settings, press the SOFT KEY to SELECT
Using the DOWN KEY scroll through the menu and select DATE &
TIME, press the SOFT KEY to SELECT
Using the DOWN KEY select SET TIME, press the SOFT KEY to
SELECT.
Using the keypad you can enter the correct time.
Press the SOFT KEY to select SAVE
Note: If you select the 24 hour time format you will need to enter
the time using the correct format.
Resetting the Handset
This function allows you to reset the Handset setting to the factory
default
Press the SOFT KEY under MENU while in standby mode
Using the UP or DOWN KEY scroll through the menu and select HS
Settings, press the SOFT KEY to SELECT
Using the DOWN KEY select HS RESET, press the SOFT KEY to SELECT.
You will be prompted to enter a PIN CODE (default is 0000)
Enter the PIN CODE then press the SOFT KEY to select RESET. If the
PIN CODE is validated all handset setting will return to the factory
default, otherwise a warning tone will be heard and the settings will
remain.
Note: After resetting the handset will return to standby mode.

30 – ENGLISH
31 – ENGLISH
Key Lock
To lock the keys, while the phone is Standby mode just keep the
STAR KEY depressed until “HS LOCKED” appears on the LCD Screen.
At the top of the LCD screen you will notice the KEYPAD LOCK Icon
will appear. To Unlock the phone simple hold the STAR KEY again
until the KEYPAD LOCK Icon disappears from the LCD Screen.
Note: Even is you have locked the keypad, you can answer a call by
pressing the DIAL KEY. If you attempt to dial while the keypad is
locked “HS LOCKED” will be displayed on the LCD Screen.
Selecting a Language
The A300 handset supports multiple predefined languages. You can
change the language used to display your messages.
Press the SOFT KEY under MENU while in standby mode
Using the UP or DOWN KEY scroll through the menu and select HS
Settings, press the SOFT KEY to SELECT
Using the DOWN KEY select LANGUAGE, press the SOFT KEY to
SELECT.
Using the UP or DOWN KEY scroll through to select your language of
choice, press the SOFT KEY to select SAVE.
Auto Answer
This feature will allow you to pick-up the phone from the base and be
automatically connected to your caller without pressing any keys.
Press the SOFT KEY under MENU while in standby mode
Using the UP or DOWN KEY scroll through the menu and select HS
Settings, press the SOFT KEY to SELECT
Using the DOWN KEY select AUTO ANSWER, press the SOFT KEY
to SELECT.
Use the DOWN KEY to select ON/OFF to enable or disable this feature,
press the SOFT KEY to select SAVE.
Note: When using the Answering Machine, this feature is deactivated.
Range Alarm
This feature let’s you know when the handset is out of range from
the base.
Press the SOFT KEY under MENU while in standby mode
Using the UP or DOWN KEY scroll through the menu and select HS
 Loading...