

ClearSounds A300 Operation Manual

1 – ENGLISH
Operating Manual
ClearSounds® A300
DECT 6.0 Cordless Phone
with Sound Boost

2 – ENGLISH
TABLE OF CONTENTS
PRIOR TO USE
Pg. 4 Congratulations
Pg. 5-6 Important Safety Instructions
Pg. 7-8 Location of Controls
Pg. 9-10 Keys Descriptions
Pg. 10-11 LCD Icons Descriptions
Pg. 12-14 Installation Steps
MENU NAVIGATION
Pg. 16-17 Menu Map
BASIC PHONE FUNCTIONS
Pg. 17-18 Handset Registration
Pg. 18 Amplification
Pg. 18-19 Speakerphone
Pg. 19-20 Ringer Setting
Pg. 20 Handset Power On/Off
Pg. 20 Hearing Aid and Cochlear Implant Users
Pg. 21 Answer a Call
Pg. 22 Make a Call
PHONE BASE SETTINGS
Pg. 23 Dialing Mode
Pg. 23-24 Call Waiting/Flash
Pg. 24-25 Modify PIN
Pg. 25 Delete/Terminate Handset
Pg. 25-26 Base Reset
PHONE HANDSET SETTINGS
Pg. 26-27 Name Handset/ Reset Handset
Pg. 27 Select Base
Pg. 28 Out of Range Alarm
Pg. 28 Auto Answer
Pg. 29 Audio Set-up
Pg. 30 Keys Tones Set-up

3 – ENGLISH
Pg. 30-31 One-Touch Memory
Pg. 31-32 Mute, Redial
Pg. 33 Languages
DISPLAY SETTINGS
Pg. 34 Set Contrast
Pg. 34-35 Set Date & Time
Pg. 35 LCD Description
Pg. 35-36 Reviewing Voice Mail Messages
CALLER ID (CID)
Pg. 36 General Information
Pg. 36-37 Receiving & Storing Caller ID Records
Pg. 37 Caller ID on Call Waiting
Pg. 38 Review Caller ID
Pg. 38 Dial from Caller ID
Pg. 39 Delete Caller ID
Pg. 39-40 Store Caller ID
PHONE ANSWERING MACHINE (TAM)
Pg. 40 General Information
Pg. 40 Turn On/Off
Pg. 40-42 TAM Settings
Pg. 42-44 Announcement Settings
Pg. 45-46 Message Options
Pg. 46 Record a Memo
Pg. 47-48 Remote Code & Remote Access
Pg. 49 TAM Reset
PHONEBOOK
Pg. 49-50 General Information
Pg. 50-51 Add Phonebook Entries
Pg. 51 Using Pause
Pg. 51 View Phonebook Entries
Pg. 51 Dial a Phonebook Number
Pg. 52-53 Phonebook Edit, Delete, Status

4 – ENGLISH
ADDITIONAL HANDSET FUNCTIONS
Pg. 53-54 Intercom/Conference Call
Pg. 55 Paging
Pg. 55 Key Lock
Pg. 55-56 Alarm
Pg. 50 Torch
TROUBLESHOOTING GUIDE
TECHNICAL SPECIFICATIONS
REGULATORY COMPLIANCE
Important FCC Information for Customers
INDUSTRY CANADA
WARRANTY POLICY
Congratulations on your purchase of the A300 phone from
ClearSounds Communications®. Please read this User Manual
carefully in order to get the best use out of your new phone.
This phone is designed for individuals with mild to severe
hearing loss. Keep this manual near the phone for easy
reference.
Please visit our website at www.clearsounds.com to register
your product, download additional manuals and review troubleshooting tips.
Be sure to save your sales receipt as your proof of purchase
should you need warranty service. The serial number for this
product is located on the underside of the base and looks like:
A300_BLK_XXX000XXX00.
Warranty Service – This product is designed to provide years
of quality service. However, if there is a malfunction and the
troubleshooting recommendations on pages 56-58 do not resolve
the problem, follow the warranty procedure on pages 62-63.
PRIOR TO USE

5 – ENGLISH
█ IMPORTANT SAFETY INSTRUCTIONS
Read and understand the Installation Guide and User Manual.
When using your phone equipment, basic safety precautions
should always be followed to reduce the risk of fire, electric
shock and injury to person, including the following:
WARNING: The A300 phone is capable of amplifying sounds
to a loud volume. It is important to instruct all potential users
of its proper operation. It is advised to adjust the volume
control to the minimum level (Low) when not in use and alert
other users that hearing damage can potentially result from
misuse.
WARNING: Use only the power supply indicated in the User’s
Manual.
WARNING: To avoid the possibility of electrical shock, do not
use this product near water (For example, near a bathtub, wash
basin, kitchen sink or laundry tub, in a wet basement or near
a swimming pool) while in the bathtub or shower or when you
are wet. If the phone becomes submerged in water, do not
attempt to retrieve it until after you have unplugged the AC
adapter from the electrical outlet and the line cord from the
modular wall jack. Do not plug the phone back in until it has
dried completely.
WARNING: Avoid using the phone during electrical storms.
There may be a remote risk of electric shock from lightning.
If the electrical storm is present in your immediate area,
possibility of electrical shock exists.
WARNING: Do not use the phone if you suspect a gas leak in
the area. The phone’s electrical contact could create a spark,
which could ignite any heavy concentration of leaking gas.
WARNING: When cleaning, unplug the phone first, and then
use a damp cloth to wipe. Do not use liquid cleaners or aerosol
cleaners on the phone.
WARNING: No phone should ever be placed near an open
radiator or heating register.

6 – ENGLISH
WARNING: Occasionally a power surge can occur on electrical
lines without warning. With any electrical device that you plug
into an outlet, it is suggested you use a surge protector. A
surge protector will prevent power surges from damaging your
phone. Surge protectors are simple devices available at your
local hardware store.
WARNING: Do not overload wall outlets or extension cords as
this can increase the risk of fire or electrical shock.
WARNING: Never push any object through the slots in the
phone. They can touch dangerous voltage points or short out
parts that could results in risk of fire or electrical shock.
WARNING: Do not cover slots and opening on the units, they
are needed for ventilation and protection against overheating.
WARNING: Stop using the phone if dropped or if it becomes
damaged.
WARNING: If you or a member of your household has a
pacemaker or other medical devices, consult your physician
or the manufacturer of the pacemaker or medical device
before using this product. The product should be used in
accordance with the guidelines provided by your physician or
the manufacturer of the pacemaker or medical device.
WARNING: Ring volume is very loud and can damage your
hearing. Never put your ear close to the ringer.
WARNING: Pay attention to the polarity of the batteries and
insert the rechargeable batteries in accordance with the polarity
symbols. Use only batteries identified as acceptable and never
use alkaline batteries, which can cause personal injury as well
as damage to the unit.
Hearing Aid Compatibility (HAC)
This phone meets the FCC standards for Hearing Aid
Compatibility.
IMPORTANT: YOUR RECEIPT IS PART OF YOUR WARRANTY
AND MUST BE RETAINED AND PRODUCED IN THE EVENT OF A
WARRANTY CLAIM.
PLEASE SAVE THESE INSTRUCTIONS
7 – ENGLISH
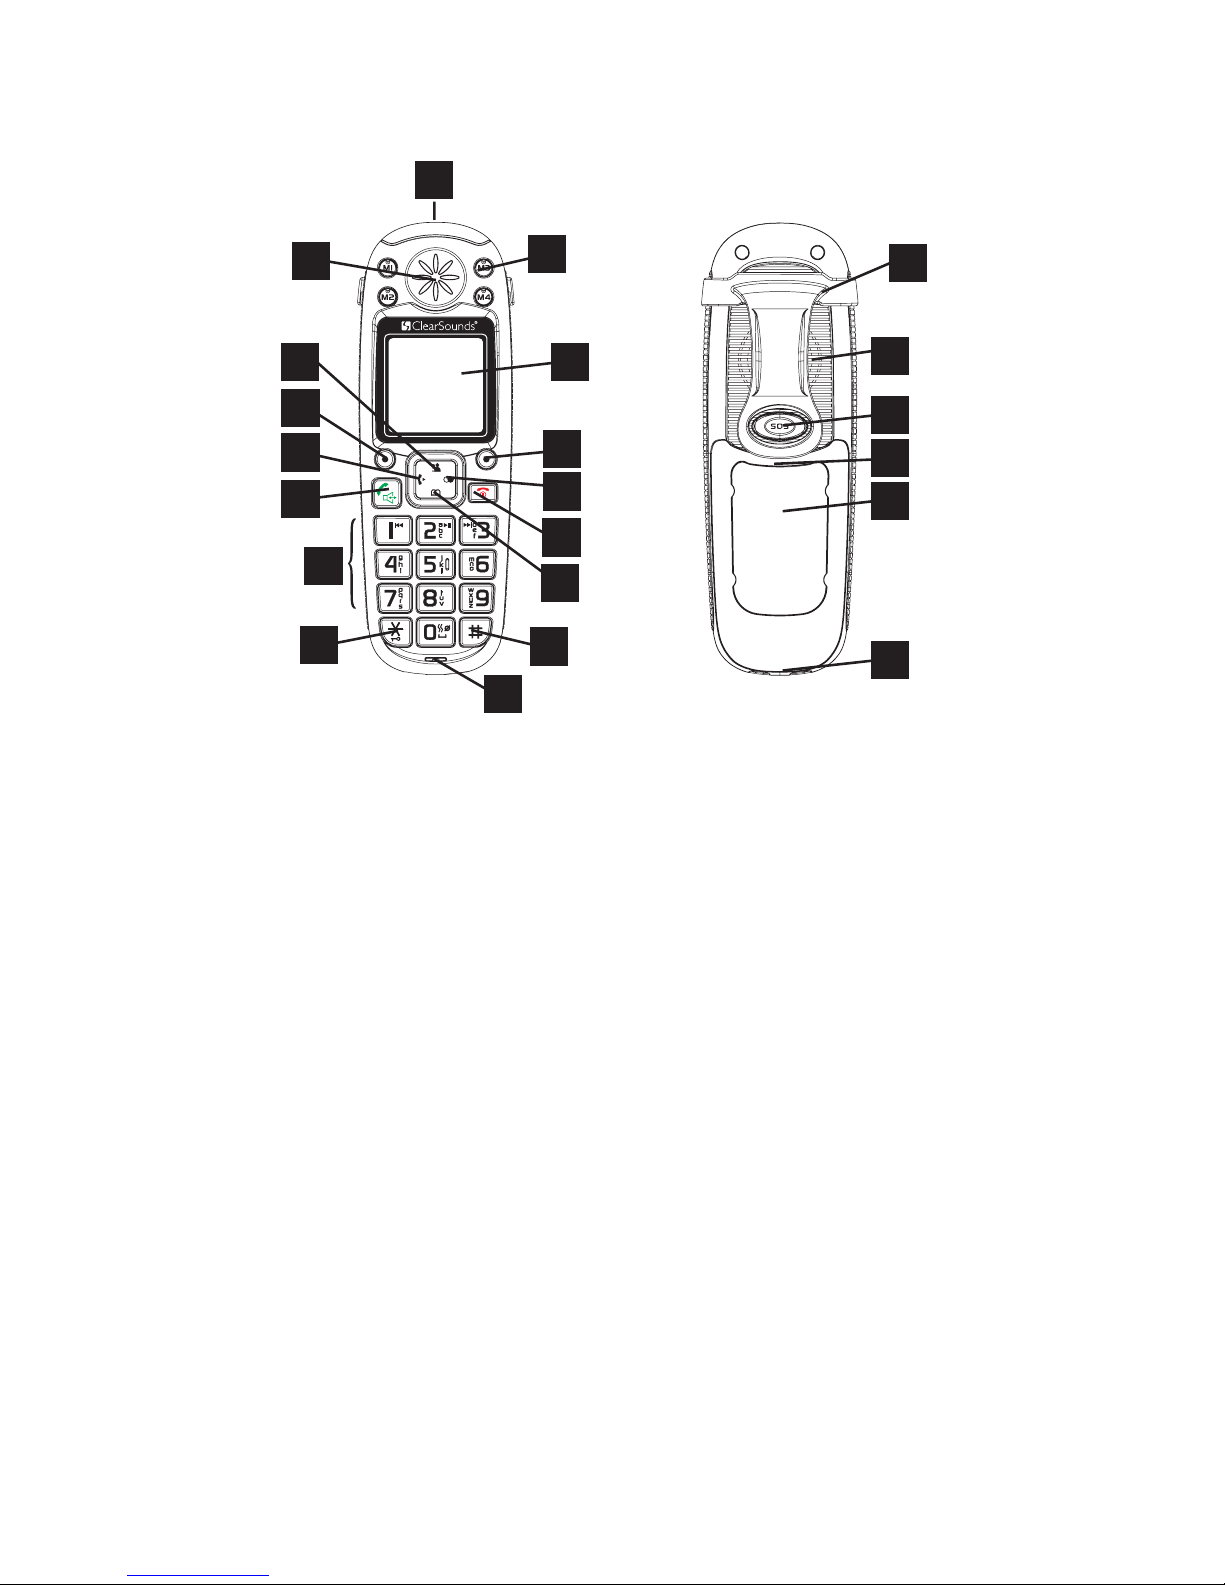
█ LOCATION OF CONTROLS
1 Visual Phone Ringer
2 (4) 1-Touch Memory
Dial Keys
3 Large LCD/Caller ID Screen
4 Right Soft Key
5 Right/Redial Key
6 End Key
7 Down/Phonebook Key
8 Hash (Pound) Key
9 Microphone
10 Star Key
11 Lighted Keypad
12 Dial/Speakerphone Key
13 Left/Intercom Key
14 Left Soft Key
15 Up/Caller ID Key
16 Earpiece
17 Carrying Clip
18 Speaker
19 SOS Key
20 Screw Eye
21 Battery Compartment
Cover
22 Charging Contacts
1
2
3
7
8
6
4
9
5
10
11
12
13
14
15
16
17
19
18
20
21
22
8 – ENGLISH
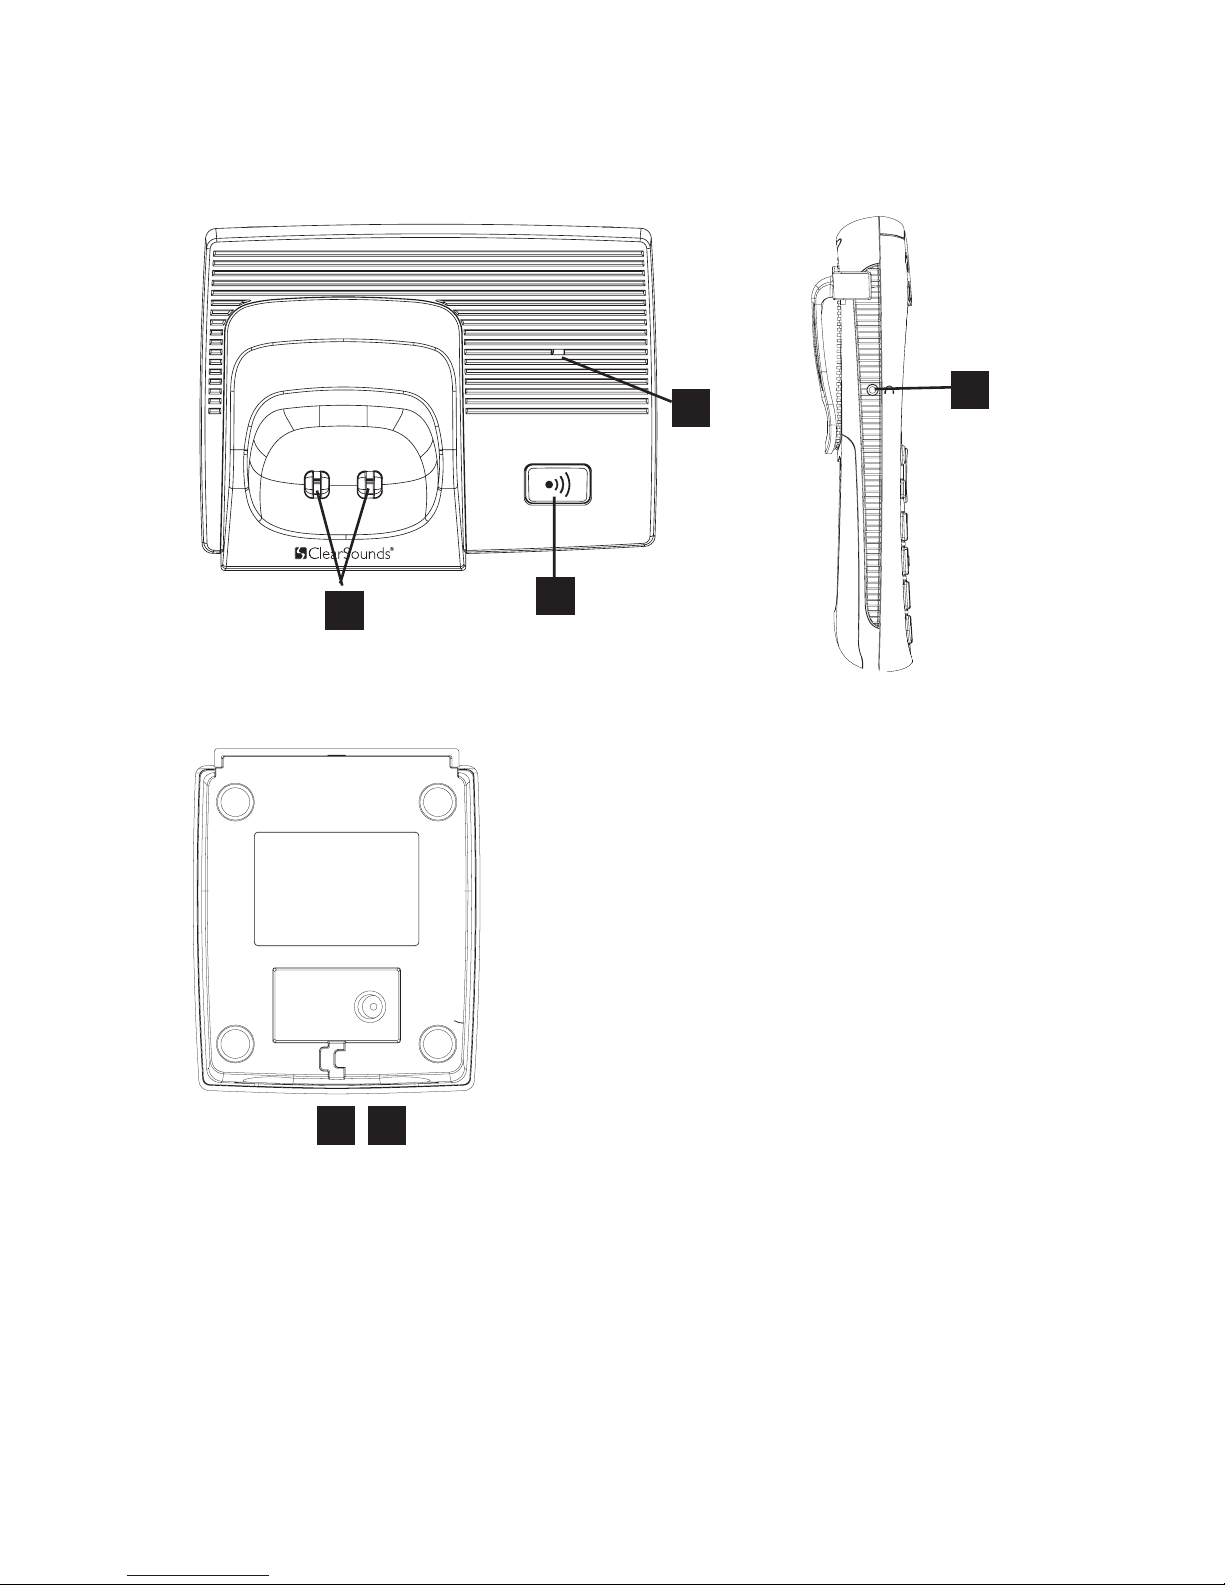
LOCATION OF CONTROLS (continued)
TOP OF BASE LEFT SIDE
BOTTOM OF BASE
TOP OF BASE
23 Charge Indicator
24 Page Key
25 Charging Pins
BOTTOM OF BASE
27 Phone Line Cord Jack
28 AC Power Adapter Jack
23
25
24
26
2827
LEFT SIDE
26 Phone (2.5mm)
Headset /
Neckloop Jack

9 – ENGLISH
█ KEYS DESCRIPTIONS
Handset
Dial Key
Make/Answer a call.
Activates the speakerphone if pressed during a
call, as described on page 18.
End Key
End a call.
Long press to activate power on/off, as described
on page 20.
Navigation Key:
Up scroll for lists and menu options
Increase the earpiece/speakerphone
volume during a call.
Enter the Caller ID (CID) book, as
described on page 38.
Down scroll for lists and menu options
Decrease the earpiece/speakerphone
volume during a call.
Enter the Phonebook, as described on
page 51.
Set up an internal call to another handset
Transfer an incoming call to another
handset.
Set up a conference call with an external
line and an internal handset, as described
on page 53.
Enter the redial list as described on page 32.
Insert a pause when pre-dialing a number
or storing a phonebook entry.

10 – ENGLISH
Soft Keys – Two soft keys are used to select
functions displayed directly above each of the
soft keys (on the bottom line of the display).
Functions displayed above the soft key will
change as you move through the menu.
Star Key - Press and hold to turn on/off keypad
lock function.
Set up a conference call, as described on page 54.
One-touch memories – Store up to 4 numbers
for one-touch memory dialing, as described on
page 30.
0 Key – In standby mode, press and hold this
key until the icon appears to activate the shaker
and visual ringer function. Press and hold this
key again until the icon disappears to deactivate
it.
Base
Page Key
Used in the handset registration process
Used to help locate the handset if you can’t find it.
█ LCD WINDOW ICONS DECRIPTIONS
New Call (top center)
Indicates you have missed one or more calls.
Message Waiting (top center)
Indicates you have one or more voice mail
messages.

11 – ENGLISH
Off Hook (top right)
Indicates the line is engaged.
Hands-Free (top right)
Indicates the hands-free function (handset
speakerphone) is engaged, as
described on page 18.
Battery Icon (top right)
Indicates battery charge level.
Shaker Icon (top center)
Indicates the shaker and visual ringer are
enabled, as described on page 20.
Signal Icon (top left)
Indicates the current signal strength. If the
handset is too far from the base, this icon will
blink on the LCD.
Alarm Icon (top center)
Appears when you set an alarm to ring at a
specific time, as described on page 55.
Keypad Lock (top left)
Appears when the keypad is locked, as described
on page 55.
Incoming Message Icon (center right)
Appears when you have new answering machine
message(s).

12 – ENGLISH
█ INSTALLATION STEPS
Installation of your ClearSounds® A300 DECT 6.0 Cordless
Phone with Sound Boost is easy. There are some basic steps
you need to take when you set-up your phone for the first
time.
If, at any time, you have questions about your phone after
reading this manual, please contact the ClearSounds
®
Customer Service Department at 1-800-965-9043.
1. PARTS CHECKLIST
Check the contents of the box - The A300 should contain:
Phone base Cordless Handset Batteries Phone Line Cords
AC Adapter Carrying Clip User Manual
2. PHONE INSTALLATION
The phone should be located in an area where it is easy to see
the visual display and lighted ringer. Choose an area near a
phone wall jack (RJ11C) and power outlet. The phone may be
placed on a shelf or table or may be fixed to the wall. To avoid
potential interference, the phone should not be located near
electronic equipment, such as personal computers, television
or microwave ovens.
Begin by removing the clear plastic Caller ID protective tab.
This film tab is only for display and to protect your Caller ID
display during shipping.

13 – ENGLISH
Bottom of base
Desk / Table Mounting
1. Connect one end of the 6 ft phone
cord to the line jack on the back
of the base and connect the other
end to a modular phone jack.
2. Plug the AC power adapter into the jack on the bottom
of the base, then plug the AC adapter into a standard
electrical outlet or surge protector.
NOTE: The adapter is required for the phone to work.
Wall Mounting
1. Install two self-tapping screws (not supplied) at
a distance of 86.5 mm apart from each other on a
horizontal line.
2. Plug the AC power adapter into the jack on the bottom of
the base. NOTE: The adapter is required for the phone
to work.
3. Connect one end of the 8-inch phone cord to the line
jack on the bottom of the base and connect the other
end to a modular phone jack.
4. Holding the base slightly above the mounting screws on
the wall jack, push the base against the mounting screws
so they are hooked into the left and right keyhole slots
on the back of the phone. Slowly slide the base down
until it snaps into place.
5. Plug the AC power adapter into the electrical outlet.
CAUTION: To reduce risk of personal injury, fire, or
damage use only the adapter provided.
Installing Batteries Three AAA re-chargeable Ni-MH batteries
come with your phone. You must install the batteries before
using your phone.
1. Remove the memory dial reference card by sliding it
downwards.
2. Use the screwdriver provided to remove the screw.
3. Remove the battery compartment cover by sliding it
downwards.
14 – ENGLISH
4. Insert the new batteries. Be sure to observe battery
polarity as imprinted on the inside of the compartment.
5. Replace the battery compartment cover by sliding upward
until it clicks into place and then use the screwdriver to
insert the screw.
6. Replace the memory dial reference card.
NOTE: The batteries need to be replaced if they do not recover
their full storage capacity after recharging. Check the battery
icon on the LCD to see the battery charge level.
When replacing the batteries, always use good quality Ni-MH
AAA re-chargeable batteries.
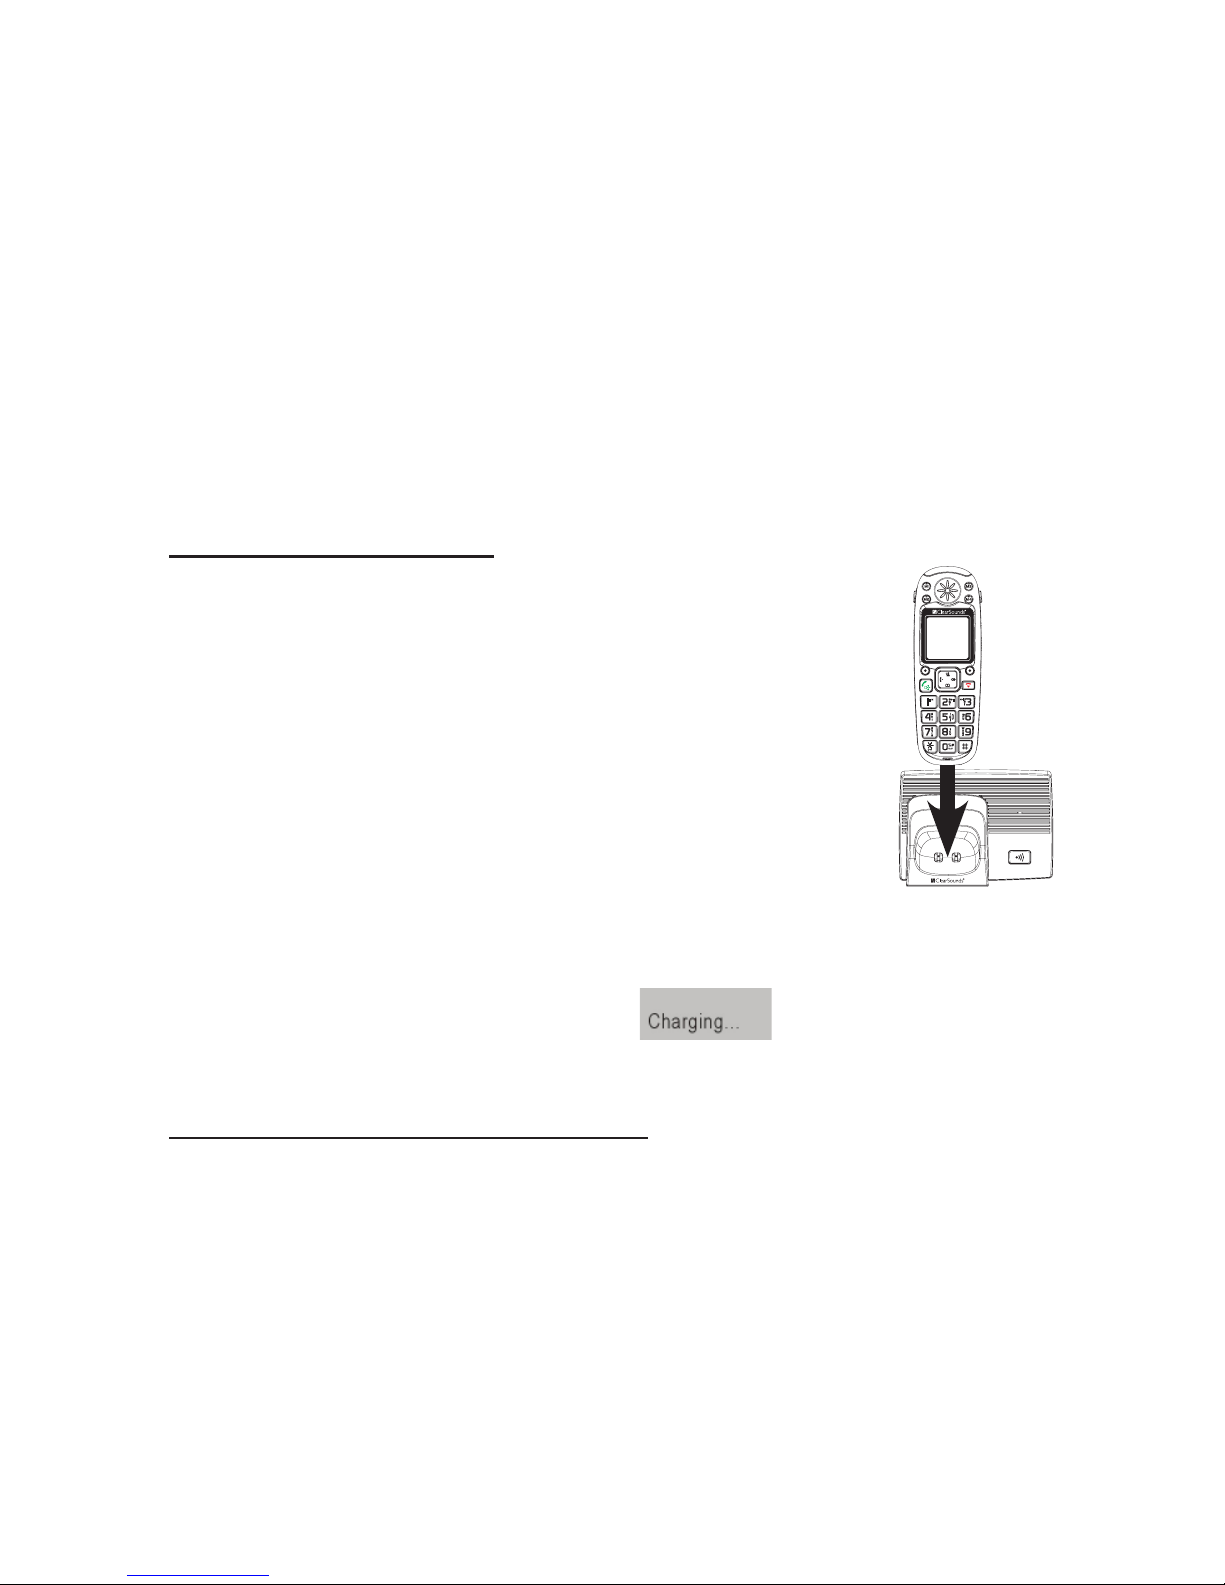
Charging the Handset
1. Place the handset into the base. The LCD
screen will light up, the Charge indicator
light turns on and you will hear a beep to
indicate charging has begun.
2. Important: Before initial operation,
you should fully charge the handset for
at least 14-16 hours.
3. After the batteries are fully charged,
check for dial tone by pressing the dial
key on the handset.
When battery power is very low and you place the handset on
the base, the display will show
. Check the battery
icon on the LCD to see the battery charge level.
Using the Handset Carrying Clip
You may choose to use the optional belt clip provided with
your handset.
1. To attach, slide the belt clip down onto the grooves.
Press the tabs on the belt clip
into the slots to attach.
2. To remove, insert a screwdriver
along the edge of one of its
“arms” and release the clip and
then lift it off.

15 – ENGLISH
█ MENU
Screen Navigation
If you press the Back soft key from any menu, the phone
returns to the previous screen. To return to the main screen
at any time, press
. The phone will automatically return
to the main screen from any menu if no key is pressed for 40
seconds.
“Standby” can mean that you are at the main screen or can
also mean that you are not on a live call and do not have dial
tone engaged.
In standby mode, you can press
to turn the LCD backlight
on/off.
To Access a MENU Option
1. To display the menu list, press the Menu soft key.
2. To scroll through menu options, press up
or down
repeatedly. You will see an arrow to the left of the
menu item that is currently selected.
3. To select one of the menu options, Press the Select soft
key when the desired menu item appears with the arrow
to its left.
MENU NAVIGATION

16 – ENGLISH
MENU MAP – this identifies how the menu is displayed for navigation
Main Menu
CID (Caller ID) Book
(p. 36)
Phonebook (p. 49)
BS (Base) Settings
(p. 23)
HS (Handset) Settings
(p. 26)
Registration (p. 17)
Submenu I
Add to PB
(
Phonebook
)(p.39)
Delete (p.39)
Delete All (p.39)
New (p.50)
Edit (p.52)
Delete (p.52)
Delete All (p.52)
PB Status (p.53)
Terminate HS
(Headset)(p.25)
Dial Mode (p.23)
Flash Time (p.23)
Modify PIN
(Personal
Identification Number)
(p.24)
BS Reset (p.25)
Alarm (p.55)
Audio Setup (p.29)
Ring Setup (p.19)
Tone Setup (p.28,30)
Language (p.33)
HS Name (p.26)
Auto Answer (p.28)
LCD Contrast (p.34)
Date & Time (p.34-35)
Select Base (p.27)
HS Reset (p.27)
Submenu II
Speaker V.(volume)(p.29)
Earpiece V.(volume)(p.29)
INT (Internal) Ring (p.19)
EXT (External) Ring (p.19)
Key Tone (p.30)
Range Alarm (p.28)
Date Format (p.34)
Time Format (p.34)
Set Date (p.35)
Set Time (p.35)

17 – ENGLISH
█ Registering the Handset
The supplied handset is already registered to the base unit,
and you can register up to 4 additional handsets to the base.
1. Before registering an additional handset to the base,
you should press and hold the page key
, which
is located on the main base, for about 5 seconds and
then release it.
2. Press the Menu soft key on the handset you are
registering to display the main menu list.
3. Press up
or down to scroll to Registration and
then press the Select soft key.
4. Press up
or down to scroll through the base list
and select one of the bases and then press the Select
soft key. The handset will search for the requested
base.
5. If the base is found, and the handset is successfully
registered, you will be prompted to enter the PIN code
(the default PIN is 0000). Upon validation of the PIN,
Main Menu
Announce (p.42)
Message (p.45)
TAM Setting (p.40)
Submenu I
New MSG (p.45)
Saved MSG (p.45)
Delete All (p.46)
Memo Record (p.46)
TAM On/Off (p.40)
TAM Alert (p.42)
ANNC Select (p.44)
Set Ring (p.40)
TAM Language (p.41)
Remote Code (p.47)
TAM Default (p.49)
Submenu II
TAM (Telephone Answering Machine) Menu Map
BASIC PHONE FUNCTIONS

18 – ENGLISH
the Registration tone will sound and the base assigns a
number to the handset. If the PIN entered is invalid, a
warning tone will sound and the handset will return to
the previous registration state.
6. If the base is not found, the handset will behave
according to the Out of Range description found on
page 28.
█
Using the Handset Amplification Function
Your ClearSounds® A300 is equipped with a specialized
amplification function designed to adjust to your needs.
Flexibility in the management of amplification is important
when trying to achieve listening clarity. Be sure to try all levels
of amplification to find the best level for your hearing needs.
During a call, adjust the volume to fit your hearing
requirements by pressing up
or down on the navigation
key. The handset volume can also be pre-selected by following
the instructions in Audio Setup, found on page 29.
█
Using your Handset Speakerphone
The handset has a built-in speakerphone. When using the
speakerphone, you can enjoy the convenience of hands-free
conversation. To activate the speakerphone:
In standby mode:
1. Press
twice to turn the speakerphone on. The
icon will appear on the LCD.
2. Press
to turn the speakerphone off and switch to
handset mode. The
icon will disappear from the
LCD.
During a call:
1. Press
to turn the speakerphone on. The icon
will appear on the LCD.
2. Press
to turn the speakerphone off and return to
handset mode. The
icon will disappear from the
LCD.

19 – ENGLISH
To adjust the volume, press up or down on the
navigation key. You may also pre-select your speakerphone
volume by following the instructions in Audio Setup, found
on page 29.
For optimal speakerphone performance, avoid the following:
• Areas with high background noise (The microphone might
pick up these sounds and prevent the speakerphone from
going into the receiving mode when you finish talking).
• Surfaces affected by vibration.
• Recessed areas such as in a corner, under a cupboard, or
next to a cabinet, which can generate an echo effect.
█
Ringer Setting
Audible Ringer
You can adjust the ringer of your phone as high as +85 dB
and you can select separate ring tones for external calls (EXT)
received through the phone network (outside calls) and internal
calls (INT) received from other A300 handsets registered to
the base.
1. Press the Menu soft key to display the main menu list.
2. Press up
or down to scroll to HS Settings and
then press the Select soft key.
3. Press down
to scroll to Ring Setup and then press
the Select soft key.
4. Press the Select soft key to select INT Ring or press
down
to select EXT Ring, and then press the Select
soft key.
5. Press up
or down to select Melody or Volume
and then press the Select soft key. You can select the
ring tone from Melody 1-Melody 10 and adjust the
volume from Volume 1-Volume 5, or Off. When adjusting
the Melody or Volume, the handset plays the selected
melody/loudness.
6. Press the Save soft key to confirm.
7. Press the Back soft key to return to the previous menu
and select INT Ring or Ext Ring to repeat the process.

20 – ENGLISH
NOTE: If you set the volume to “Off”, when a call comes in,
only the New Call information appears on the LCD and the
phone will not ring.
NOTE: You can also adjust the ringer volume while you are
receiving an incoming call. Press up
or down to
increase or decrease the volume while the phone is ringing.
Visual and Vibrating Ringer
You can activate the visual ringer and vibrating handset
function. A bright LED light will flash and the handset will
vibrate when the phone rings. To turn this feature on/off:
1. In standby mode, press and hold
until the icon
appears to activate and press and hold
again to
deactivate.
█
Turning the Handset “Power On/Off” Mode
The A300 handset can be turned to “Power Off” mode, which
can be a convenient way to prevent the phone from ringing
without having to change the ringer setting. When you turn the
handset to “Power Off” mode, calls can’t be made or received
until you turn the power back “On”.
In Standby Mode (not during a live call):
1. To turn the handset “Off”, simply press and hold
until the display turns off.
2. To turn the handset “On”, you can either:
a. Place the handset back into the base and the
handset will automatically power on.
b. Press and hold
until the display turns on.
█ Using your Phone with Hearing Aids and Cochlear
Implants
Your phone can be used with hearing aids and cochlear implants
equipped with a telecoil (T-coil). Adjust your hearing aid “Tswitch” to the “T” position. Make sure to hold the handset
close to your T-coil.
 Loading...