


RAV 600/900 User Manual
ClearOne Communications, Inc. ~ 1825 Research Way, Salt Lake City, UT 84119 ~ tel 1-800-945-7730 ~ fax 1-800-933-5107

|
ii |
|
RAV — Table of Contents |
Table of Contents
Introduction . . . . . . . . . . . . . . . . . . . . . . . . . . . . . . . . . . . . . . . . . . . . . . . . . . . .1
The RAV 600/900 . . . . . . . . . . . . . . . . . . . . . . . . . . . . . . . . . . . . . . . . . . . . . . . . . . . . . . .2
Product Overview . . . . . . . . . . . . . . . . . . . . . . . . . . . . . . . . . . . . . . . . . . . . . . . . . . . . . . .4
Basic Room Design . . . . . . . . . . . . . . . . . . . . . . . . . . . . . . . . . . . . . . . . . . . . . . . . . . . . . .7
Installation Overview . . . . . . . . . . . . . . . . . . . . . . . . . . . . . . . . . . . . . . . . . . . . . . . . . . . . .9
Connecting the RAV . . . . . . . . . . . . . . . . . . . . . . . . . . . . . . . . . . . . . . . . . . . . .13
Basic Connections . . . . . . . . . . . . . . . . . . . . . . . . . . . . . . . . . . . . . . . . . . . . . . . . . . . . . . .14
Auxiliary Devices . . . . . . . . . . . . . . . . . . . . . . . . . . . . . . . . . . . . . . . . . . . . . . . . . . . . . . . .18
RAV-Ware Software Configuration . . . . . . . . . . . . . . . . . . . . . . . . . . . . . . . . . .25
Introduction . . . . . . . . . . . . . . . . . . . . . . . . . . . . . . . . . . . . . . . . . . . . . . . . . . . . . . . . . . .26
Configuring System Settings . . . . . . . . . . . . . . . . . . . . . . . . . . . . . . . . . . . . . . . . . . . . . . .31
Customizing RAV Components . . . . . . . . . . . . . . . . . . . . . . . . . . . . . . . . . . . . . . . . . . . . .35
Line Input and Output . . . . . . . . . . . . . . . . . . . . . . . . . . . . . . . . . . . . . . . . . . . . . . . . . . . .38
Record and Playback . . . . . . . . . . . . . . . . . . . . . . . . . . . . . . . . . . . . . . . . . . . . . . . . . . . .40
Camera Controls . . . . . . . . . . . . . . . . . . . . . . . . . . . . . . . . . . . . . . . . . . . . . . . . . . . . . . . .42
Dialer and Phonebook Usage . . . . . . . . . . . . . . . . . . . . . . . . . . . . . . . . . . . . . . . . . . . . . .43
Advanced Features . . . . . . . . . . . . . . . . . . . . . . . . . . . . . . . . . . . . . . . . . . . . . . . . . . . . . .46
Using the RAV . . . . . . . . . . . . . . . . . . . . . . . . . . . . . . . . . . . . . . . . . . . . . . . . . .51
Using the Controller . . . . . . . . . . . . . . . . . . . . . . . . . . . . . . . . . . . . . . . . . . . . . . . . . . . . .52
Programming Phone Preferences . . . . . . . . . . . . . . . . . . . . . . . . . . . . . . . . . . . . . . . . . . .54
Web Interface . . . . . . . . . . . . . . . . . . . . . . . . . . . . . . . . . . . . . . . . . . . . . . . . . .63
Overview . . . . . . . . . . . . . . . . . . . . . . . . . . . . . . . . . . . . . . . . . . . . . . . . . . . . . . . . . . . . . .64
Appendix . . . . . . . . . . . . . . . . . . . . . . . . . . . . . . . . . . . . . . . . . . . . . . . . . . . . . .71
Maintenance . . . . . . . . . . . . . . . . . . . . . . . . . . . . . . . . . . . . . . . . . . . . . . . . . . . . . . . . . . .72
Troubleshooting . . . . . . . . . . . . . . . . . . . . . . . . . . . . . . . . . . . . . . . . . . . . . . . . . . . . . . . . .72
Pinouts . . . . . . . . . . . . . . . . . . . . . . . . . . . . . . . . . . . . . . . . . . . . . . . . . . . . . . . . . . . . . . .75
Specifications . . . . . . . . . . . . . . . . . . . . . . . . . . . . . . . . . . . . . . . . . . . . . . . . . . . . . . . . . .76
Compliance . . . . . . . . . . . . . . . . . . . . . . . . . . . . . . . . . . . . . . . . . . . . . . . . . . . . . . . . . . . .116
Index . . . . . . . . . . . . . . . . . . . . . . . . . . . . . . . . . . . . . . . . . . . . . . . . . . . . . . . . . . . . . . . .120
RAV 600/900 Installation and Operation Manual
ClearOne Part No. 800-153-001 Rev. 1.1 March 2005
© 2004 ClearOne Communications, Inc. All rights reserved. No part of this document may be reproduced in any form or by any means without written permission from ClearOne Communications. Printed in the United States of America. ClearOne Communications reserves specific privileges. Information in this document is subject to change without notice.
Technical Services Group ~ 1-800-283-5936 (USA) ~ 1-801-974-3760
iii
Warranty information can be found on the ClearOne website.
www.clearone.com
Technical Services Group ~ 1-800-283-5936 (USA) ~ 1-801-974-3760
|
|
Introduction |
1 |
|
|
|
|
|
2 |
|
Introduction — The RAV 600/900 |
The RAV 600/900
The RAV product line is the first out-of-the-box room audio conferencing solution with the sound quality and flexibility of a professionally installed system. The RAV includes an audio conferencing mixer that uses distributed acoustical echo-cancelling technology to provide the most intelligible full-duplex audio conference experience possible. Features include:
•Audio mixer for high-quality audio performance in all acoustical environments.
•RF (radio frequency) controller with call controls including auto-answer, flash duration adjustment, ringer adjustment and phonebook with speed dial capabilities.
•Internal telephone hybrid with touch-tone dialing capability.
•Microphone pods provide 360º audio pickup so every participant within the microphone pick-up range can be heard.
•Ceilingor wall-mount Bose® loudspeakers allow everyone in the room to experience rich, natural sounding audio.
Services and support
If you need additional information on how to install, set up or operate your RAV 600/900, please contact us. We welcome and encourage your comments so we can continue to improve our products and serve your needs.
Technical support |
Sales and customer service |
||
Tel: |
1-800-283 5936 (USA) or |
Tel: |
1-800-945-7730 (USA) or |
|
1-801-974-3760 |
|
1-801-975-7200 |
Fax: |
1-801-974-3669 |
Fax: |
1-800-933-5107 (USA) or |
|
|
|
1-801-977-0087 |
E-mail: |
tech.support@clearone.com |
E-mail: |
sales@clearone.com |
Web: |
www.clearone.com |
|
|
Product returns
All product returns require a return materials authorization (RMA) number. Please contact ClearOne Technical Support before attempting to return your product. Make sure you return all the items that shipped with your product and include a brief description of how the product was being used when the problem occurred.
— The RAV Introduction600/900 |
|
3 |
|
|
|
|
|
|
|
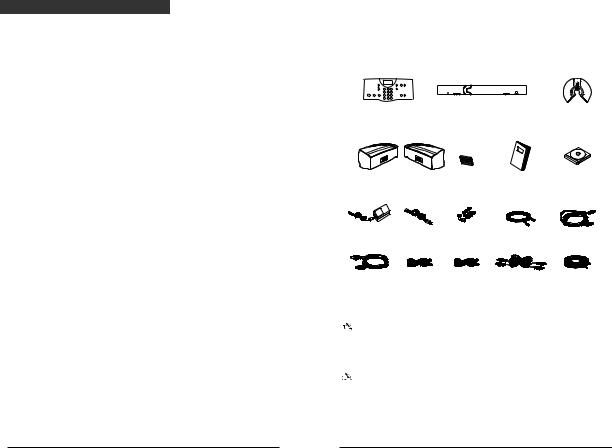
Unpacking
Carefully remove all components of the RAV system from the packaging. Ensure that you received the following items:
RAV 600/900
*
RF Controller |
Audio Mixer |
Mic Pods |
|
|
Qty: 2 with RAV 600 |
|
|
Qty: 3 with RAV 900 |
Ceiling-Mount Speakers |
AAA Batteries |
RAV Quick Start Guide |
RAV-Ware Software |
|
|
or |
Qty: 4 |
|
and Documentation CD |
Wall-Mount Speakers |
|
|
|
|
Power Supply |
6' Power Cord |
Screw/Washer Rack Kit |
12' Telephone Cable |
7 ' RJ-45 Cable |
|
|
Qty: 4 |
|
|
6' USB Cable |
25' RJ-45 Cable |
12' RJ-45 Cable |
6' RCA Cable |
50' Speaker Wire |
|
|
Qty: 1 for RAV 600 |
Qty: 2 |
Qty: 2 |
|
|
Qty: 2 for RAV 900 |
|
|
Figure 1.1 RAV unpacking
: RackNotemount ears are attached to the Mixer box. Refer to the Quick Start Guide or Chapter 2 of this manual for installation instructions.
If any parts are missing, please call the Technical Support Group at 1-800-283-5936 (USA) or 1-801-974-3760.
Note: ClearOne is not responsible for product damage incurred during shipment. You must make claims directly with the carrier. Inspect your shipment carefully for obvious signs of damage. If the shipment appears damaged, retain the original boxes and packing material for inspection by the carrier. Contact your carrier immediately.
Technical Services Group ~ 1-800-283-5936 (USA) ~ 1-801-974-3760 |
Technical Services Group ~ 1-800-283-5936 (USA) ~ 1-801-974-3760 |
|
4 |
|
Introduction — Product Overview |
Product Overview
RF (Radio Frequency) Controller
The RF controller allows you to manage all calls, program user preferences and adjust settings for your RAV.
1 |
2 |
3 |
4 |
5 |
6 |
7 |
8 |
9 |
* |
0 |
# |
Key Functions
|
LCD Icon |
Function |
|
||||
|
|
|
|
|
|
Indicates commands are received and acknowledged by base unit |
|
|
|
|
|
|
|
||
|
|
|
|
|
|
||
|
|
ANTENNA |
and represents the signal strength from the base unit to the controller. |
||||
|
|
SIGNAL |
|
|
|||
|
|
|
|
|
|
Indicates battery level |
|
|
|
|
|
|
|
||
|
|
BATTERY |
|||||
|
|
|
|
||||
|
|
|
|
|
|
|
|
|
|
|
Key |
Function |
|||
|
|
|
|
|
|
|
|
|
|
|
|
|
|
Press to activate the phone and access the dial tone. Press |
|
|
|
ON/OFF |
again to hang up the phone. |
||||
|
|
|
|
||||
|
|
|
|
|
|
Press to use call forwarding, access call waiting, or make a three-way |
|
|
|
FLASH |
conference call (if supported by your telephone service). |
||||
|
|
|
|
||||
|
|
|
|
|
|
|
|
|
|
|
|
|
|
Press once to mute microphones during a call. |
|
|
|
MUTE |
Press again to unmute. |
||||
|
|
|
|
||||
|
|
|
|
|
|
|
|
|
|
|
|
|
|
Press and hold for two seconds to display the status of the RAV. |
|
|
|
STATUS |
|
|
|||
|
|
|
|
|
|
|
|
|
|
|
|
|
|
Press once to dial the last number called. |
|
|
|
REDIAL |
|
|
|||
|
|
|
|
|
|
Press once to access the controller programming menu. |
|
|
|
MENU |
Once you are in the Menu, this key serves as the Enter key. |
||||
|
|
|
|
||||
|
|
ENTER |
|
|
|||
|
|
|
|
|
|
Press once to dial stored numbers. |
|
|
PHONEBOOK |
When you are in the Phonebook, use this key to delete characters or to |
|||||
|
go back to the previous screen. |
||||||
|
|
CLEAR |
|||||
|
|
|
|
|
|
|
|
|
|
|
|
|
|
Press down or up to navigate through the menu and phonebook. |
|
|
DOWN UP |
|
|
||||
|
|
|
|
|
|
|
|
|
|
VOLUME |
Press while on a call to adjust call volume and ringer. |
||||
|
|
||||||
|
|
|
|
||||
|
|
|
|
|
|
|
|
— Product OveIntroductionview |
|
5 |
|
|
|
|
|
|
|
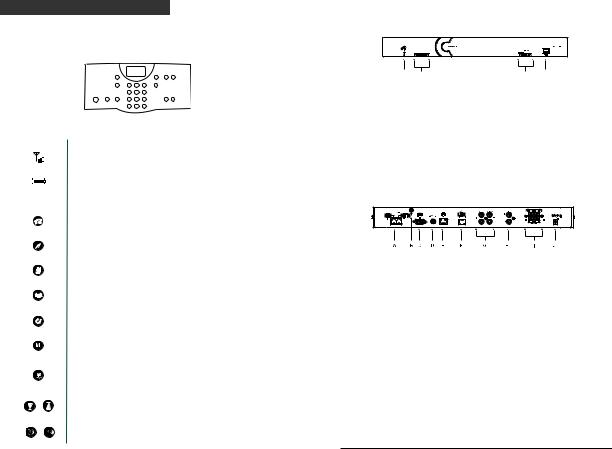
Mixer
Front
A B C D
Figure 1.2. Mixer front
A.Telephone LED.This indicator lights red when the RAV is powered, but the telco is on hook (not in use).The indicator lights green when the telco is off hook (in use) and flashes green during an incoming call.
B.Microphone status LEDs. Nine indicators (RAV 900) or six indicators (RAV 600) indicate the activation status of the microphone elements. When a microphone element is activated, the corresponding LED lights green. When microphones are muted, all LEDs turn red.
C.Meter LEDs. These LEDs represents audio from all inputs.
D.USB port.This port enables USB connection to a PC.
Back
ANTENNA |
Figure 1.3. Mixer back
A.Telephone Set, Line. RJ-11 connection to an analog telephone jack and an analog telephone set.
B.RF antenna connector. Connect the external RF antenna to this port.
C.RS-232. RS-232 control port for connection to a control system such as AMX or Crestron or to a computer.
D.Camera Control. VISCA camera control port.This connection enables microphone activation to trigger camera presets (voice tracking).
E.LAN.This is a 10/100 BaseT auto-detecting Ethernet port for system control through a data network.
F.Mic Pod In. Use a Cat. 5 cable with RJ-45 connectors to connect the microphone pods.
G.Playback In/Record Out. RCA connection to record/playback devices such as a VCR.
H.Line In/Out. RCA connection to a codec, amplifier or sound card.
I.Speaker Output. Use speaker wire to connect these push terminals to the Bose loudspeakers.
J.Power 12 VDC. Power supply.
Technical Services Group ~ 1-800-283-5936 (USA) ~ 1-801-974-3760 |
Technical Services Group ~ 1-800-283-5936 (USA) ~ 1-801-974-3760 |

|
6 |
|
Introduction — Product Overview |
Microphone Pods
A
B
Figure 1.4. Microphone pods
A.Mute Button. Press to mute or unmute all microphones in the RAV system.
B.LEDs.These two LEDs illuminate green when the microphones are not muted and illuminate red when the microphone is muted.The LEDs flash red if the microphones are not connected properly.
A
Figure 1.5. Speakers
Speakers (ceilingor wall-mount)
A.Push Terminal connectors. Connect to the RAV mixer using speaker wire (wall-mount speakers are pictured).
— Basic RoomIntroductionDesign |
|
7 |
|
|
|
|
|
|
|
Basic Room Design
Basic Room Design for RAV
To ensure best microphone and loudspeaker placement (ceilingor wall-mount), please use the following guidelines. For more information on Room Design, or to view the RAV online training course, visit www.clearone.com.
Microphones
Center mic pods on the table at an equal distance apart. Place the controller on the same table as the mics. In typical conferencing environments, participants should be seated 4–8' from a mic pod.
Mic pick-up range is dependent on room conditions. Background noise, reflective hard surfaces and the number of participants may affect the pick-up range. Use the following guidelines for best placement of your RAV mic pods and then adjust for your specific room conditions.
RAV 900
4'
4'
Figure 1.6. Recommended microphone placement
Technical Services Group ~ 1-800-283-5936 (USA) ~ 1-801-974-3760 |
Technical Services Group ~ 1-800-283-5936 (USA) ~ 1-801-974-3760 |

|
8 |
|
Introduction — Basic Room Design |
Loudspeakers
Ceiling-mount loudspeakers
For best performance, ceiling loudspeakers should be installed directly above the microphone pods. If you have a RAV 900 with three mic pods, install the ceiling loudspeakers above the first and third mic pods. The ceiling speakers must be set to 8 Ohms. Please refer to the Bose user manual for instructions.
Wall-mount loudspeakers
Place the left channel loudspeaker on the left side of the room and the right channel loudspeaker on the right. (Refer to the label on the back of each loudspeaker.) Make sure the back of each loudspeaker is parallel to the front wall.
Figure 1.7 Recommended ceiling-mount speaker placement
RAV 600 |
Loudspeaker |
6' |
6' |
Loudspeaker |
Figure 1.8 Recommended wall-mount speaker placement
For best controller performance
•Do not install the RAV mixer in a metal cabinet unless you are using the remote antenna accessory. Part number 910-153-050.
•Keep the mixer within line of sight of the controller, such as on the top of a credenza.
•Ensure antenna is connected to the back of the mixer and is pointed up.
•If installing the mixer in an equipment rack, make sure it is placed at or near the top of the rack.
For best audio performance
•Use the provided cables.
•Do not move microphones while on a call.
•Speak at a normal conversation level and direct your voice toward the microphones.
•Do not place microphones next to fans, projectors or computers.
— InstallationtroductionOverview |
|
9 |
|
|
|
|
|
|
|
Installation Overview
Read the user manual
Please read through the RAV Quick Start Guide and print user manual to familiarize yourself with the RAV system. Refer to the Help file in RAV-Ware for information on the software. Read through all requirements and safety information to be sure you set up and configure your RAV correctly.
Make sure your network is ready
Review all system requirements. Then check with your network administrator to be sure your network meets all the RAV requirements.
Connect cables
Connect cables. If you are planning on using the RAV for web or videoconferencing, you’ll need to connect peripheral equipment. See pages 14–22.
Install software
Install RAV-Ware and then use to adjust sound levels and to configure settings for additional equipment such as a video codec or a recording device. See pages 26–49.
Begin using
Use the controller to answer and make calls. See pages 52–61.
Technical Services Group ~ 1-800-283-5936 (USA) ~ 1-801-974-3760 |
Technical Services Group ~ 1-800-283-5936 (USA) ~ 1-801-974-3760 |

|
10 |
|
Introduction — Installation Overview |
|
|
|
11 |
|
System Requirements for RAV-Ware
Component |
Requirement |
|
|
Windows 98 SE |
64 MB RAM |
Operating System and RAM |
Windows 2000 |
256 MB RAM |
|
Windows XP |
256 MB RAM |
|
|
|
Processor |
300 MHz Pentium III or better |
|
|
|
|
Monitor |
1024 x 768 SVGA (16 bit) high color |
|
|
|
|
Video Card |
SVGA 1024 x 768 minimum |
|
|
|
|
Free Hard Disk Space |
20 MB minimum |
|
|
|
|
RS-232 COM port |
Up to 115,200 baud rate |
|
|
|
|
USB port |
USB 1.1–2.0 |
|
|
|
|
Flash Support |
Macromedia Flash Player 6.0 |
|
|
|
|
Note: Using a USB to serial adapter is not recommended.
Network Information
To use RAV over a local area network (LAN), you need to know if the LAN uses Dynamic Host Configuration Protocol (DHCP) or if you need a static IP address.
If the LAN uses DHCP, there is no need to make any network adjustments unless you want to assign a static IP address.
If the LAN does not use DHCP, gather the following information prior to LAN setup:
•The IP address to be assigned to the RAV
•The subnet mask
•The IP address of the default gateway
Technical Services Group ~ 1-800-283-5936 (USA) ~ 1-801-974-3760 |
Technical Services Group ~ 1-800-283-5936 (USA) ~ 1-801-974-3760 |
|
|
Connecting the RAV |
2 |
|
|
|
|

|
|
|
|
|
|
|
15 |
|
|
14 |
— Basic ConnectionsConnecting the RAV |
— Basic ConnectionsConnecting the RAV |
|
||||
|
|
|
|
|
|
|
|
|
Basic Connections
Connecting the RAV should take less than one hour. Once basic connections for audio conferencing are made, the system is ready to use.
Audio conferencing
To set up audio conferencing
1.If you are installing the mixer into a rack, remove the side panels, rotate them and then reattach.
Figure 2.1. Attach rack ears
2. Connect first microphone pod to the mixer with the 25' Cat. 5 cable.
Figure 2.2. Connect to first microphone pod
3.Connect the second and third microphone pod using the 12' Cat. 5 cables. (Third microphone on the RAV 900 only).
 IN
IN
OUT
Figure 2.3. Connect additional microphones
4. Connect the speakers to the mixer.
L + |
R + |
L - 
 R -
R -
SPEAKER
Figure 2.4. Connect speakers
Note: For best performance, speakers must be installed properly. If you are using the ceilingmount loudspeakers, you must change the setting to 8 Ohms. Refer to the instructions included in the Bose loudspeaker box.
5. Using the RJ-11 cable, connect an analog telephone jack to the Line jack on the mixer.
Figure 2.5. Connect telephone cable
 Note: For instructions on connecting to a digital telephone line, refer to page 22.
Technical Services Group ~ 1-800-283-5936 (USA) ~ 1-801-974-3760 |
Technical Services Group ~ 1-800-283-5936 (USA) ~ 1-801-974-3760 |
|
|
|
|
|
|
|
17 |
|
|
16 |
— Basic ConnectionsConnecting the RAV |
— Basic ConnectionsConnecting the RAV |
|
||||
|
|
|
|
|
|
|
|
|
6.Using an RJ-11 cable (not supplied), connect an analog telephone set to the Set jack on the mixer (optional).
Figure 2.6. Connection to network
7.Using the 7' Cat. 5 cable, connect the mixer to the network. (Network settings can be changed in RAV-Ware.)
CAMERA
RS-232 CONTROL
Figure 2.7. Connection to network
8. Using the power supply cords, connect the mixer to an electrical outlet.
- +
12VDC 2.
Figure 2.8. Connection to electrical outlet
9. Attach the external antenna and turn it it is upright.
TELEPHONE
RS-232
LINE |
SET |
Figure 2.9. Attach external antenna
10. Insert four AAA batteries into the RF controller.
Batteries
Back of Controller
Figure 2.10. Insert batteries
Technical Services Group ~ 1-800-283-5936 (USA) ~ 1-801-974-3760 |
Technical Services Group ~ 1-800-283-5936 (USA) ~ 1-801-974-3760 |

|
|
|
|
|
|
|
19 |
|
|
18 |
— Auxiliary Devices Connecting the RAV |
— Auxiliary Devices Connecting the RAV |
|
||||
|
|
|
|
|
|
|
|
|
Auxiliary Devices
The mixer allows connection to a number of different audio and video peripherals, such as video codecs, VCRs, cameras and computers.
Connecting video codecs, amplifiers and sound cards
Line input/output devices such as video codecs, amplifiers and sound cards can be connected to the Line In or Line Out connectors on the RAV mixer. These connectors provide mono-audio.
To connect to a video codec
1.Using an RCA cable, connect the Line In on the RAV mixer to the line out on a video codec.
2.Using an RCA cable, connect the Line Out on the RAV mixer to the line in on a video codec.
LINE
IN
OUT
Figure 2.11. Connecting a Line In/Out device
To connect to a sound card
1.Using an RCA cable, connect the Line In on the RAV mixer to the line out on a sound card.
2.Using an RCA cable, connect the Line Out on the RAV mixer to the line in on a sound card.
Figure 2.12. Connecting a sound card
To connect to amplifier
•Using an RCA cable, connect the Line Out on the RAV mixer to the line in on an amplifier.
Figure 2.13. Connecting an amplifier
NoteRAV-Ware to adjust the equalization and volume of these devices. Refer to pages
38–42 for more information. When using RAV-Ware, be sure to drag the amplifier to the correct device (either line out or record). This will properly assign the reference and change the volume command on the controller to control the external amplifier volume.
Technical Services Group ~ 1-800-283-5936 (USA) ~ 1-801-974-3760 |
Technical Services Group ~ 1-800-283-5936 (USA) ~ 1-801-974-3760 |

|
|
|
|
|
|
|
21 |
|
|
20 |
— Auxiliary Devices Connecting the RAV |
— Auxiliary Devices Connecting the RAV |
|
||||
|
|
|
|
|
|
|
|
|
Connecting VCRs and DVD players
You can record your audio/video conference or play audio using a playback device such as a VCR or DVD player.
Note: You can also connect a mono-signal device or a non-record/playback device to these line in/out connectors.
PLAYBACK / RECORD
Figure 2.14. Connecting a Record/Playback device
To connect to record/playback
•For recording, connect the Left and Right Audio Out on the RAV to the left and right audio in on the VCR or DVD player.
•For playback, connect the Left and Right Audio In on the RAV to the left and right out on the VCR or DVD player.
Connecting PTZ cameras
The RAV system provides voice-tracking capabilities through VISCA control port connection to a Pan,Tilt, Zoom camera. Voice Tracking allows the camera to move to preset positions based on microphone activation. For instructions on programming the presets, see page 42.
CAMERA
CONTROL
Figure 2.15. Connecting a camera
To add a camera
•Connect the camera to the Camera Control port on the mixer.
 Note:The camera video out signal connects to a video codec.
Connecting for serial control
You can connect a computer or a control device, such as an AMX or Crestron, to the RAV mixer through the serial control port. See the page 78 for a list of the serial commands.
To connect a computer serial port
•Connect computer to Control port on the back of the mixer using a 9-pin serial cable.
LAN
Figure 2.16. Connecting a computer serially
Connecting for USB control
You can also connect a computer to the RAV through the USB port.
To connect a computer through the USB port
•Connect computer to the USB port on the front of the mixer using a USB cable.
Figure 2.17. Connecting a computer through the USB
 Note:The USB drivers are installed when you install RAV-Ware.
Technical Services Group ~ 1-800-283-5936 (USA) ~ 1-801-974-3760 |
Technical Services Group ~ 1-800-283-5936 (USA) ~ 1-801-974-3760 |

|
|
|
|
|
|
|
23 |
|
|
22 |
— Auxiliary Devices Connecting the RAV |
|
|
|
|||
Digital phones
If you have a digital (PBX) telephone service, you need to run an analog extension from the PBX (recommended for best performance) or use a digital-to-analog telephone line converter. For more information, contact ClearOne Technical Support.
: If youNoteconnect the RAV through a digital-to-analog line converter, you will not be able
to use the tabletop controller or the RAV-Ware dialing interface to make calls.You will instead need to dial from the digital phone. The phone handset must be kept off hook for the duration of the call.
Phone Jack
Electrical
Outlet
Digital, PBX,
or Multi-line phone
AC Adapter
Digital-to-Analog
Converter
RAV mixer
Handset
Figure 2.18. Connecting the RAV mixer to digital-to-analog converter
To connect to a digital phone
1.Connect one end of the telephone cable into the telephone line on the back of the mixer and the other end into the digital-to-analog converter.
2.Connect the converter's power adapter into an electrical outlet.
3.Connect a second telephone cable from the converter to a PBX phone. Consult the converter user manual for more information.
Technical Services Group ~ 1-800-283-5936 (USA) ~ 1-801-974-3760 |
Technical Services Group ~ 1-800-283-5936 (USA) ~ 1-801-974-3760 |
|
|
RAV-Ware |
3 |
|
|
Software Configuration |
|
|
|

|
26 |
|
RAV-Ware — Introduction |
|
RAV-Ware — Introduction |
|
27 |
|
Introduction |
RAV-Ware overview |
Getting started with RAV-Ware™
Please ensure that you have administrative privileges before attempting to install RAV-Ware™ on computers running Windows 2000 or later. You should also review the System Requirements on page 10 to ensure software will run correctly and that you have all the necessary network information.
Install RAV-Ware
1.Close all programs or applications running on your PC or laptop and insert the RAV-Ware CD into the CD-ROM drive.
•If the Autorun feature is enabled on the PC, the CD will open automatically.
•If the Autorun window does not open, select Run from the Start menu.Type <drive>:\\rav.exe where <drive> is the letter of the CD-ROM drive (e.g., D:\\rav.exe).
2.Follow the on-screen instructions.
ClearOne’s RAV-Ware software provides an easy interface for configuring system settings and customizing the audio in your RAV 600/900 conferencing system. While the RAV system is designed to work out of the box for audio conferencing, RAV-Ware is required to adjust audio levels and equalizer settings for the RAV components as well as the auxiliary audio devices. Once installed, RAV-Ware allows configuration locally through USB or RS-232 connection, or remotely through the Ethernet connection.
Menus and Toolbar
Connections
Device Toolbox
Configuration
Screen
Online/Offline
Status Indicators
Figure 3.3. Installing RAV-Ware
:The NoteDisk Cost button allows you to view all available disk space.
: Easily create, openMenusor saveandfiles,Toolbarfind RAV systems on the network, add
phonebook entries, configure regional settings and view the event log.
: Lists availableConnecunitionsconnected through serial or USB ports, or on the network.
Figure 3.1. Installing RAV-Ware
Device Toolbox: Lists common brands of auxiliary audio products (video codecs, sound cards, VCRs and amplifiers). The audio settings for these devices have been optimized for use with the RAV system.
: Quickly access the configurationConfigurationwindowsScreenfor the RAV system by clicking the icons.
Online/Offline Indicator: Shows connection status of RAV-Ware (online/offline) and the name of the connected unit.
: Status for CommunicationsStatus Indicators(green = online, red = offline),Telephone In
Use (red = not in use, green = in use) and Mic Mute (red = mute).
Figure 3.2. Disk Cost
Technical Services Group ~ 1-800-283-5936 (USA) ~ 1-801-974-3760 |
Technical Services Group ~ 1-800-283-5936 (USA) ~ 1-801-974-3760 |

|
28 |
|
RAV-Ware — Introduction |
RAV-Ware connections
When you connect to the RAV unit, RAV-Ware automatically finds all RAV units connected serially or on the same subnetwork and lists them in the Connections pane.
To connect to the RAV
1.Double-click the RAV-Ware desktop icon or select RAV-Ware from the Start menu (Start/Programs/RAV-Ware/RAV-Ware.exe).
Figure 3.4. RAV-Ware units
2Click the RAV icon you want to configure in the Connections pane.
•If you are connected serially or USB, the RAV configuration window appears.
•If you are connected through the network, you will be prompted to enter a user name and password.The default user name is ClearOne and the default password is RAV. (User name and password are not case sensitive)
:To connNotect to a RAV unit on a different subnetwork, use Network Find. See page 30.
Connected RAV unit
Configuration Screen
Online indicator with
RAV unit name
Figure 3.5. Configuration window
RAV-Ware — Introduction |
|
29 |
|
RAV-Ware files
You can save current RAV-Ware files, create new files, edit existing files and import files using the menus and toolbar icons. When connected to a RAV unit, any changes made to a RAV-Ware file are updated immediately within the RAV unit. The file must be saved to remain permanent within the RAV-Ware file.
To save a file
1.From the File menu, select Save File.
2.Browse to the desired location and enter the name of the file.
3.Click Save.
Tip:You can right-click on the configuration window and select Save File to save your file. You can also select Save As to rename and save the file you are working on.
To create a new file
1.Click the New File toolbar icon.
2.Select either the RAV 600 or RAV 900 depending on your system.This will open the Configuration Screen where you can set user preferences for your RAV system.
3.Save the file.
To edit an existing file
1.Click the Edit File toolbar button.
2.Locate and select the file you want to edit.
3.Click. Open
4.Make desired changes to the file.
5.Save the file.
: TheNotechanges will only take effect after they have been imported to a connected RAV system.
To import a file
1.Connect to a RAV unit.
2.From the File menu, select Import.
3.Choose your RAV file.
4.Click Open.The RAV unit will reboot and then update with all the file changes.
Tip:You can also right-click on the configuration window and select
Import to import a saved RAV file.
Technical Services Group ~ 1-800-283-5936 (USA) ~ 1-801-974-3760 |
Technical Services Group ~ 1-800-283-5936 (USA) ~ 1-801-974-3760 |

|
30 |
|
RAV-Ware — Introduction |
Network Find
Network Find allows you to connect to any RAV system on your network using its IP address or a unique network name. Use Network Find to access RAV units not listed in the Connections pane, but which reside on the same network.
To open the Network Find
•Click the Network Find icon on the toolbar.
To connect to a system on the network
1.Enter the IP address or name of the RAV system to which you want to connect.
2.Click OK.
3.You will see a password prompt window. Enter the User name and Password of the networked system. The default user name is ClearOne and the default password is RAV.
4.Click OK.The system icon will appear in the Connection list and the Configuration screen will open.
Note: Once you have connected to a RAV unit using Network Find, a shortcut connection icon for that unit will display as long as RAV can find the unit on the network. If RAV cannot find the unit, the shortcut icon will be removed.
Figure 3.6. Network Find
Figure 3.7. User name/Password
RAV-Ware — Configuring System Settings |
|
31 |
|
Configuring System Settings
System settings include Communication, Regional and Telephone settings.
Communication Settings
The Communication Settings window allows you to adjust the connectivity settings of external devices that communicate with the RAV, including the network, serial or USB connections. You can connect a PTZ camera to the Camera port and use the Voice Tracking feature. You can also change the RF frequency to match the frequency of your controller or if you are experiencing interference on the current channel.
To open Communication Settings
•Click the Communications icon in the Configuration screen.
Note: When RAV is connected to a DHCP network, the network, IP, gateway and subnetwork addresses are automatically assigned. Unless you want to specify a static IP address, there is no need to configure network settings.
To create a static IP address
: ContactNote the network administrator for network settings.
1.In the Networking tab, create a unique network name and enter it in the Device Name field. (Default is ClearOne-XX where XX is the last two digits of the MAC address.)
Use2.DHCP, IPlear the |
option and enter the |
Subnet and Gateway addresses.
3.Select Use DNS if you have a Domain Name Server and want name resolution (to use a network name) for your static IP address.
4.In the IP Filters section, enter specific IP addresses that will be allowed to access the RAV system.
You can specify a range of IP addresses by using zeros. For example, entering 192.168.105.0 will allow any IP addresses in the 192.168.105.1 to 192.168.105.254 range to access the RAV system.
5.Click OK.
6.Click Yes to save your settings.
Figure 3.8. Network settings
Figure 3.9. Confirm changes
Technical Services Group ~ 1-800-283-5936 (USA) ~ 1-801-974-3760 |
Technical Services Group ~ 1-800-283-5936 (USA) ~ 1-801-974-3760 |
|
32 |
|
RAV-Ware — Configuring System Settings |
To change the User Name and Password
1.In the Networking tab, click User/Password.
2.Specify the User name.
3.Type the Password.
4.Retype the password to confirm.
5.Click OK to save changes and close the window.
Note: This option is only available when you are |
Figure 3.10. User name/Password |
connected to a RAV unit.
To configure the Camera port
1.In the Serial tab, set the Baud Rate to match the baud rate indicated in the camera specifications.
2.Select Flow Control to enable hardware flow control.
3.Click OK to save settings and close the window.
To configure the Control port
1. |
Set the Control Port Baud Rate to match the baud |
|
|
rate of the PC COM port or the control device. |
Figure 3.11. Serial settings |
2. |
Select Flow Control to enable hardware flow |
|
|
control. (Flow Control is selected as default.) |
|
3. |
Click OK to save settings and close the window. |
|
: FlowNoteControl is the regulation of information between two devices that are connected to one another. ClearOne recommends enabling Flow Control on the RAV system.
Attention: If you are connected to the RAV unit through the serial port, you will need to reboot
!
the unit before the baud rate and flow control changes take place. If you are connected to the RAV unit through the USB port, changes are made instantly.
To change RF frequency channel
1.In the Frequency tab, select a frequency.
2.Click OK to save settings and close the window
Note: The channel frequency allows the mixer to communicate with the controller. The frequency used by RAV-Ware must match the frequency used by the controller. See page 58 to set the controller frequency.
!Attention: If you are using the European or South African version of RAV Frequency 1 and Frequency 8 are the same frequency.
Figure 3.12. Frequency settings
RAV-Ware — Configuring System Settings |
|
33 |
|
Regional Settings
In the Regional Settings window, you can configure the date and time to ensure an accurate time stamp on log files.
To open Regional Settings
•Click the Regional Settings icon in the Configuration screen.
To set date and time
1.Select Use Local Time if you want to use the time on your local computer.
– Or –
Clear the Use Local Time checkbox and enter the IP address for the time server.
2.Select Use Daylight Savings if your region observes daylight savings time.
3.Select your Time Zone and click OK.
4.Click Yes to confirm changes.
Figure 3.13. Date/Time settings
Telephone Settings
In the Telephone Settings window you can set telephone preferences such as auto-answer, auto-disconnect, ringer melody and program the local number. You can also adjust the telco level control, country setting and the flash settings.
To open Telephone Settings
•Click the Telephone Settings icon in the Configuration screen.
Technical Services Group ~ 1-800-283-5936 (USA) ~ 1-801-974-3760 |
Technical Services Group ~ 1-800-283-5936 (USA) ~ 1-801-974-3760 |
 Loading...