

Page 1
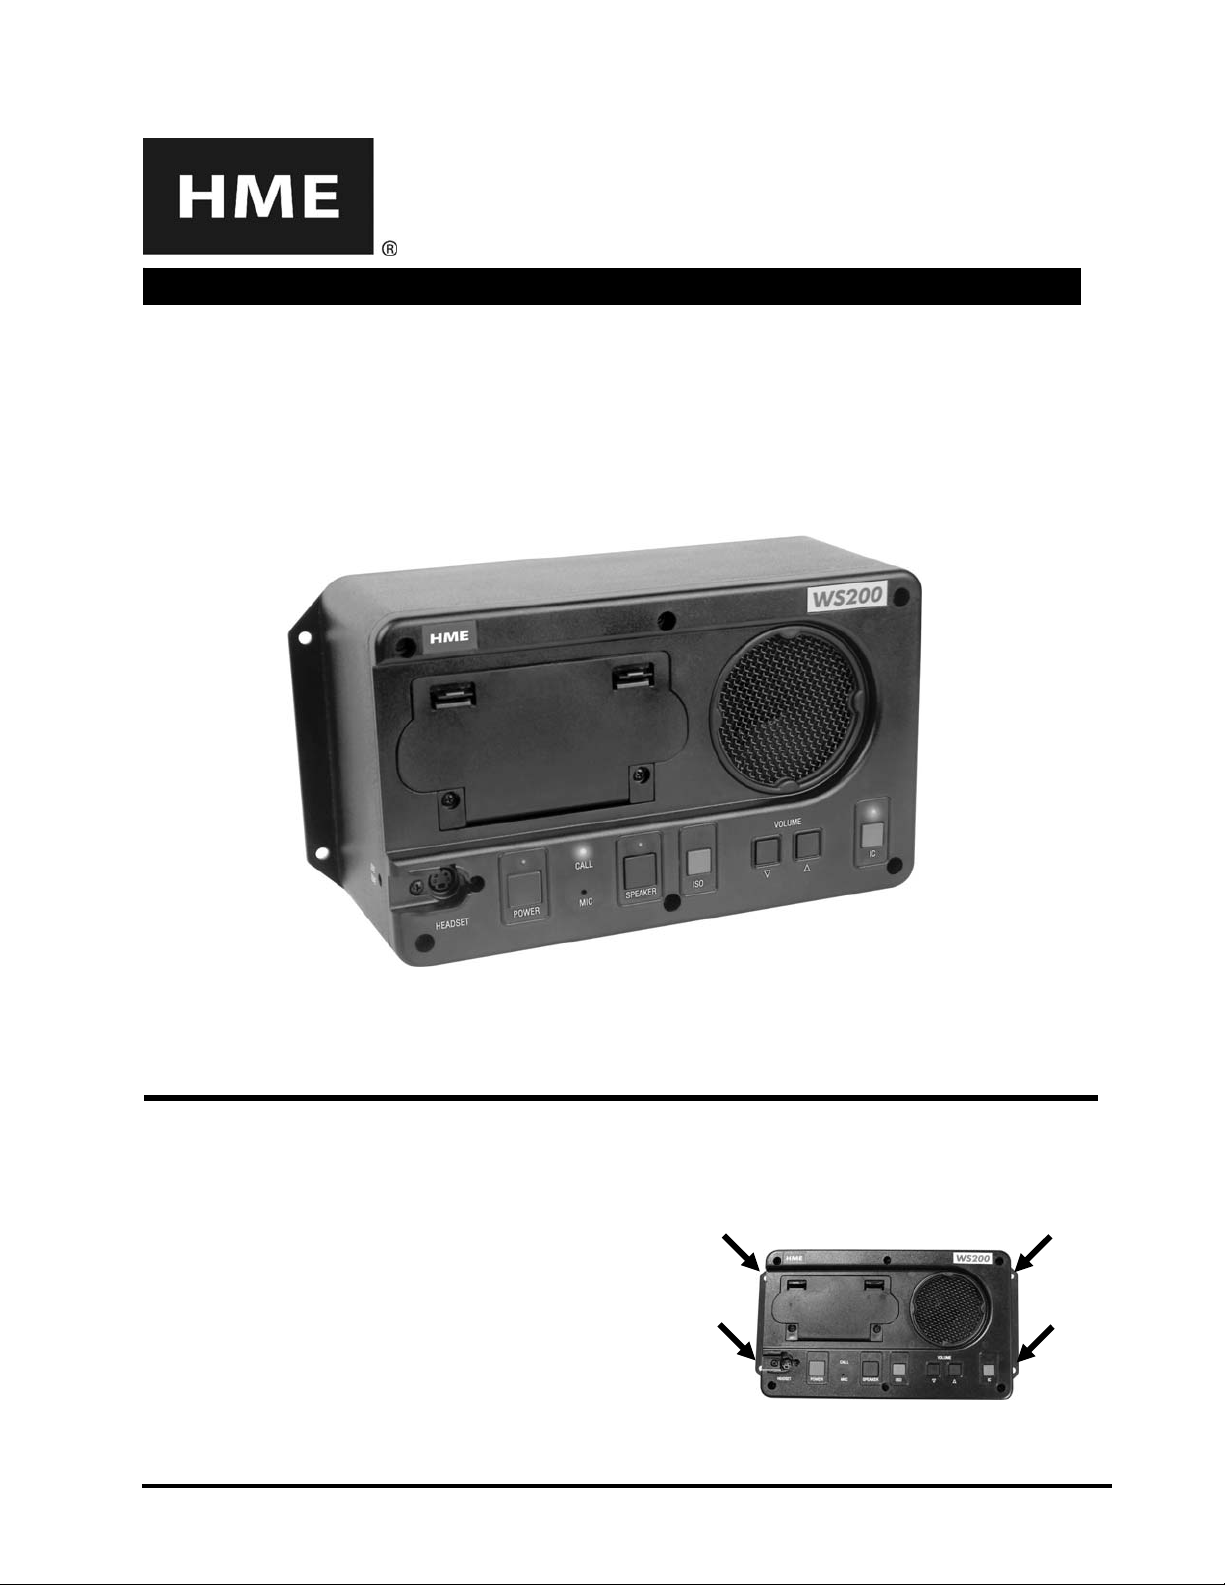
WS200
Wireless Speaker Station
The WS200 Speaker Station can be used with a DX100 or DX200 system, together with Beltpacs and WH200
All-in-one Headsets. It provides wireless communication through its built-in microphone and speaker or a plug-in
headset. A remote speaker can also be connected to the unit. The Speaker Station can be used on a table top or
mounted on the wall. It can be operated with standard AC power, 12-14VDC or with six AA batteries or an optional
rechargeable battery. A power supply with cord and a battery sled are provided.
OPERATING INSTRUCTIONS
SETUP
Wall Mounting
If you choose to mount the WS200 on the wall and if AC operation is required, it must be mounted close enough to an
electrical outlet to be reached with the power supply and cord.
• Hold the unit against the wall where you will mount it and
mark the wall through the four holes in the flanges on its left
and right sides.
• Drill holes in the wall at the four marked spots, and mount
the WS200 over the holes with your
selected hardware (not provided).
HM ELECTRONICS, INC. 14110 Stowe Drive, Poway, CA 92064 USA • Phone: 1-800-848-4468 Fax: (858) 552-0172
1
3
2
4
HME# 400G612
Rev B 7/3/08
Page 2

Power Setup
d
AC Power Operation
If using the WS200 with AC power ⎯
• Plug the connector at the end of the power supply cord into the 12-14 VDC power connector on right side
of the unit. Turn the sleeve on the connector clockwise to secure it to the unit.
• Plug the large female connector at one end of the AC power cord into the power supply. Plug the other end
of the AC power cord into an electrical outlet.
Power supply cor
Having a fully charged (or new) battery in its battery compartment when operating the WS200 with AC or
external DC power can prevent interruption of communication during a power outage. The WS200 will
automatically switch to battery power.
Power supply
AC power cord
Battery Operation
If using the WS200 with battery power ⎯
• Press down and pull out on the two battery cover
release latches and lift the cover to open the
battery compartment.
• Insert six AA batteries into the battery sled, in the
positions shown inside the sled, and install the sled in
the battery compartment.
NOTE: An HME BAT850 Rechargeable
NiMH Battery can be used instead.
• Close the battery compartment by pressing
down on its cover next to both of the latches
at the same time until they snap in place.
Battery sled
with batteries
Battery
compartment
Battery cover
release latches
Battery
sled
2
Page 3
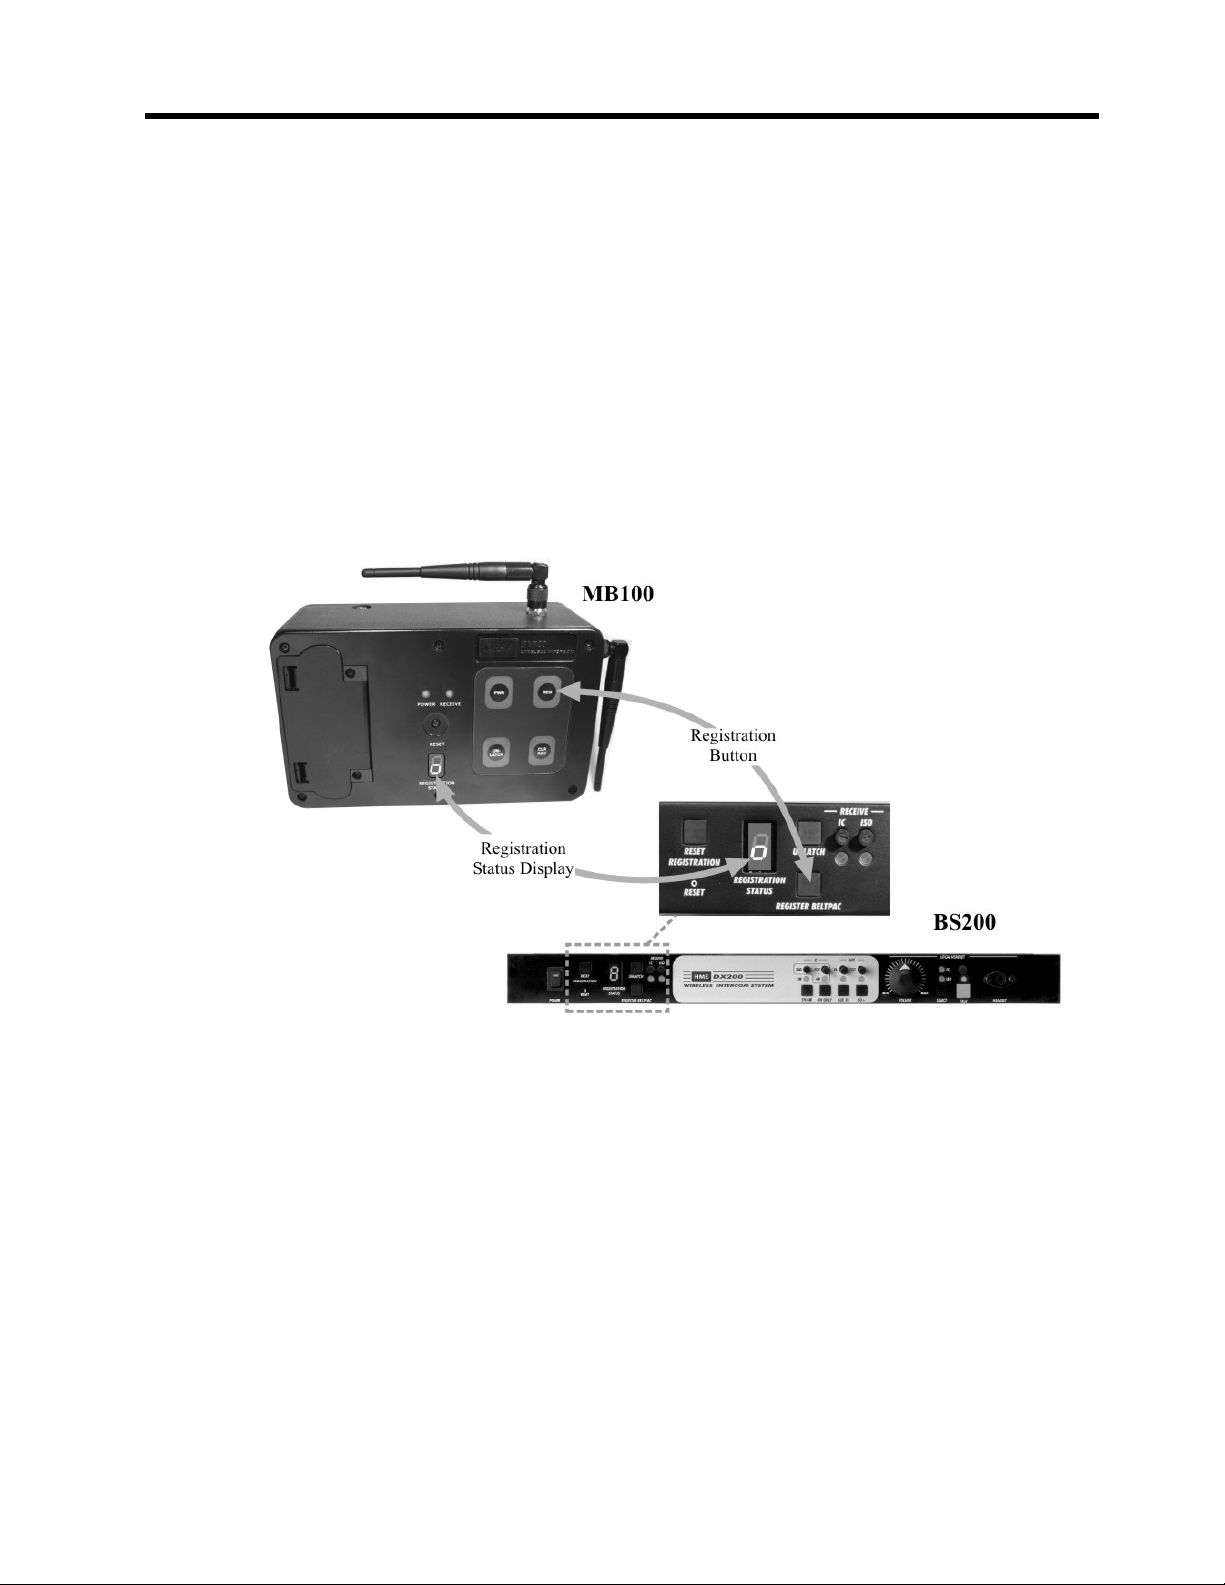
WS200 Registration
The first time you operate the WS200, you must register it for use with a specific DX100 or DX200 Base Station.
The base station will then recognize the WS200 when its power is on, and will be able to tell the difference between
it and other electronic equipment operating on similar frequencies, or DX family Beltpacs or All-in-one Headsets.
NOTE: The WS200 must be within 6 feet (1.83 meters) of the base station while being registered.
Registration Procedure:
• Be sure the WS200 is turned off and the base station power is on.
• On the base station, press and release the REG/REGISTER BELTPAC but ton.
⎯ The REGISTRATION STATUS display will show a small “o” for open.
• On the WS200, press and hold the ISO button while you press and release the PWR/POWER button to turn the
unit on, and then release the ISO button. This will cause the WS200 to enter the registration mode.
⎯ The REGISTRATION STATUS display on the base station will continue t o show a small “o.”
⎯ The ISO and IC lights on the WS200 will be blinking red then will change to a steady green IC light.
Registration buttons and indicators on MB100 and BS200 Base Stations
When registration is successfully completed:
• If you have a headset plugged into the WS200 or if the speaker is on, you will hear a voice message in the
headset or speaker saying “Power on, Speaker, Version #, Begin registration, Registration complete…”
• The REGISTRATION STATUS display on the base station will show the ID number assigned to the
WS200, for about 10 seconds.
NOTE: ID numbers are assigned sequentially to registered Beltpacs, All-in-one Headsets and Speaker
Stations as 0 thru 9, A, b, C, d and E (up to 15 total).
• The IC light on the WS200 will remain on steady green.
3
Page 4

If registration failed:
• A voice message will say “Power on, Speaker, Version #, Begin registration, …”
The ISO and IC lights on the WS200 will be blinking red, and there may be a delay of up to
90 seconds before you hear “Registration failed.”
• Press the RESET button on the base station. When the REGISTRATION STATUS display becomes
blank, press the REG / REGISTER BELTPAC button on the base station and register the WS200 again.
If registration fails again, call your dealer for assistance.
If you try to register more than 15 Beltpacs, All-in-one Headsets or Speaker Stations:
• An F will appear on the REGISTRATION STATUS display on the base station and you will hear
“Registration failed.”
REGISTRATION
STATUS
REGISTRATION
STATUS
display
MB100 Base Station BS200 Base Station
• Clear all current registrations as follows:
— If you have a MB100 Base Station,
press the CLR REG button and the RESET button
at the same time. Continue holding the CLR REG
button after you release the RESET button, until
the clear code “c” (lower case) appears on the
REGISTRATION STATUS display.
— If you have a BS200 Base Station,
press the RESET REGISTRATION button
and the RESET button at the same time. (To press
the RESET button, insert a small paper clip or similar
object into the RESET hole below the RESET
REGISTRATION button.) Continue holding the
RESET REGISTRATION button after you release the
RESET button, until the clear code “c” (lower case)
appears on the REGISTRATION STATUS display.
• Register all active Beltpacs, All-in-one Headsets and Speaker Stations, one at a time.
All previously registered units must be re-registered.
display
RESET
button
REGISTRATION
STATUS
display
RESET
REGISTRATION
button
RESET
button
(recessed)
MB100 Base Station
REGISTRATION
STATUS
display
BS200 Base Station
CLR REG
button
4
Page 5

OPERATION
r
Headset
connecto
Headset Connection
If you are using a headset with the WS200, plug it into the headset connector. When using a headset, if the red light
over the SPEAKER button is on, incoming communication can be heard through the headset and the speaker. If the
red light over the SPEAKER button is off, incoming communication can only be heard through the headset.
Push-To-Talk (PTT) or Hands-Free (HF) Mode Setting
• Be sure the WS200 power is off.
• To set up the WS200 for operation in the PTT mode, press and hold the VOLUME down ▼ and ISO buttons
while you press and release the POWER button to turn the unit on. Then release the VOLUME down ▼ and
ISO buttons.
• To set up the WS200 for operation in the HF mode, press and hold the VOLUME up ▲ and ISO buttons while
you press and release the POWER button to turn the unit on. Then release the VOLUME up ▲ and ISO buttons.
NOTE: Mode settings are saved in memory, and only need to be reset if you want to change between PTT and HF
operation. Mode settings affect both ISO and IC communication.
5
Page 6

Routine Operation
Power On/Off
• To turn WS200 power on, press and release the POWER button.
— Red lights will go on over the POWER, ISO and IC buttons.
— If listening with a headset, or the speaker is turned on, you will hear “Power on, Speaker #, Version #.”
— The light over the ISO button will go off.
— The light over the IC button will change to green.
• To turn WS200 power off, press and hold t he POWER button for 2 seconds.
ISO / IC Buttons
The ISO button is used to communicate with Beltpac and All-in-one Headset users registered to your base
station, and in the case of the BS200 Base Station, with the base station operator. Pressing the ISO button on
the WS200 will also send audio to any wired product connected to AUX OUT on the BS200 Base Station if the
ISO+ button on the base station is on. The ISO feature can be locked out, causing the ISO button to function
the same as the IC button.
The IC button is used to communicate with Beltpac and All-in-one Headset users registered to your base
station, and in the case of the BS200 Base Station, with the base station operator. Pressing the IC button on the
WS200 will also send audio to the 2-wire and/or 4-wire connector on the rear panel of the BS200 Base Station.
Push-To-Talk Mode
• Press and hold the ISO or IC button while speaking.
— The green light over the button will be flashing when the unit is transmitting.
• Release button to listen on headset speaker or internal speaker, if “ON.”
— The green light over the button will be on steady.
• Adjust volume level with VOLUME up ▲ and down ▼ buttons if necessary.
Hands-Free Mode
You must be using a headset plugged into the WS200, and the speaker must be off for hands-free operation.
• Quickly press and release the ISO or IC button.
— The green light over the button will be flashing.
• Speak and listen as in a normal telephone conversation.
• Adjust volume level with the VOLUME up ▲ and down ▼ buttons if necessary.
• Press and release the ISO or IC button again to end communication.
— The green light over the IC button will be on steady.
• Press and release the ISO or IC button if you want to speak again.
— The green light over the button will begin flashing again.
• Pressing and holding the ISO or IC button for more than a half second will result in PTT operation.
ISO Lockout Mode
To set the WS200 with the ISO feature locked out, with the power off, press and hold the IC button while you
press and release the POWER button. You will hear “Power on, Speaker #, Version #, ISO off.” When set up
for the ISO Lockout mode, the ISO button will operate the same as the IC button, in either hands-free or PTT
communication.
To reset the ISO feature for normal ISO button communication, with the power off, press and hold the ISO and IC
buttons while you press and release the POWER button. You will hear “Power on, Speaker #, Version #, ISO on.”
CALL Light Function
If the CL200 (optional) Call Light button is pressed, or a call tone from an RTS or ClearCom intercom system
is received through the CL200 on the 2-wire circuit:
• One short beep will sound in the WS200 speaker or headset, and will also be heard through all Beltpacs or All-
in-one Headsets registered to the same base station as the WS200.
• The yellow CALL light next to the POWER button on the WS200 will flash 3 times and pause, then flash
3 times and pause, then flash 3 final times.
6
Page 7

Headset Microphone Gain Adjustment
Some users speak louder or softer than others. The headset microphone gain adjustment helps to compensate for
these differences, raising or lowering the voice level of the user speaking into the microphone. Increase microphone
gain for softer voices, decrease for louder voices.
• To adjust microphone gain, first be sure the internal speaker is off.
• Press and hold the ISO button while pressing the VOLUME up ▲ or down ▼ arrow.
― When you reach maximum microphone gain, you will hear “Maximum.”
― When you reach minimum microphone gain, you will hear a double beep.
There are 16 steps between maximum and minimum microphone gain levels.
Headset Sidetone Adjustment
Sidetone is the level of your own voice that you hear in the headset earpiece as you speak into the microphone.
• To increase or decrease the sidetone level, first be sure the internal speaker is off.
• Press and hold the IC button while pressing the VOLUME up ▲ or down ▼ arrow.
― When you reach maximum sidetone level, you will hear “Maximum.”
― When you reach minimum sidetone level, you will hear a double beep.
There are 5 steps between maximum and minimum sidetone levels.
NOTE: A trim pot is provided for fine tuning adjustments with a small screwdriver, through the hole labeled
SIDE TONE on the left side of the WS200.
Changing Batteries
When batteries are becoming weak, you will hear “Change battery” from the speaker or headset. When this happens,
remove the battery sled from the WS200 and replace the six batteries in it with fresh AA batteries. Be sure battery
polarity is correct when replacing the batteries.
Rechargeable BAT850 Batteries
If you are using the optional HME BAT850 Rechargeable Battery, remove the battery from the WS200 and
replace it with a fully charged battery. Recharge the battery in the optional AC850 Battery Charger according to
the instructions received with the charger. Charging time is approximately 3 hours.
AC850 Battery Charger
Auxiliary Speaker Connection
An 8 ohm auxiliary speaker can be connected to the right side of the WS200, using the enclosed
2-position connector plug. Adjustments affecting the WS200 speaker will also affect the parallel
auxiliary speaker.
7
Page 8

EQUIPMENT SPECIFICATIONS
Frequency Range: 2400 – 2483.5 MHz
Frequency Response: 200 Hz to 3.5 kHz
Power Requirements: Six AA batteries (NiMH optional),
12-14VDC or 100-240VAC, 50-60Hz
Temperature Range: -4 to 131°F (-20 to 55°C) typical
Size: 9.38” x 5.16” x 3.34” (23.83 x 13.11 x 8.48 cm)
Weight: 2.56 lb with battery (1.16 kg)
Headset Connector: 4-Pin Mini-DIN
Microphone: Electret
Speaker: 1.5W min into 8Ω
Headset Output: 160mW into 32Ω
Controls and Connectors
Top Panel: Headset connector
Power button
Speaker button
ISO button
Volume up ▲ and down ▼ buttons
IC button
Indicator lights (red/green/yellow)
Left Panel: Side Tone adjustment
Right Panel: 12-14 VDC power connector
8Ω speaker connector
8
Page 9

This device complies with Part 15 of the FCC Rules. Operation is subject to the following two conditions: (1) This device may not
cause harmful interference, and (2) This device must accept any interference received, including interference that may cause
undesired operation.
This equipment has been tested and found to comply with the limits for Class B Digital Device, pursuant to Part 15 of the FCC Rules.
These limits are designed to provide reasonable protection against harmful interference in a residential installation. This equipment
generates and can radiate radio frequency energy and, if not installed and used in accordance with the instructions, may cause harmful
interference to radio communications. However, there is no guarantee that interference will not occur in a particular installation.
Any changes or modifications not expressly approved by HM Electronics, Inc. could void the user’s authority to operate the
equipment. To comply with FCC radiation exposure requirements, use of this device is limited to configurations tested and
approved by HM Electronics. Other accessories used with this device must not contain any metallic components.
This device is a radio transmitter and receiver. When it is on, it receives and sends out RF energy. In August 1996, the U.S. Federal
Communications Commission (FCC) adopted RF exposure guidelines with safety levels for hand-held wireless devices. These guidelines
are consistent with the safety standards previously set by both U.S. and international standards bodies in the following reports:
• ANSI C95.1 (American National Standards Institute, 1999)
• NCRP Report 86 (National Council on Radiation Protection and Measurements, 1986)
• ICNIRP (International Commission on Non-Ionizing Radiation Protection, 1996)
This device complies with the standards set by these reports and the FCC guidelines.
The term “IC:” before the certification/registration number only signifies that the Industry Canada technical specifications were met.
Hereby, HM Electronics, Inc. declares that this device is in compliance with the essential requirements and other relevant provisions
of R&TTE Directive 1999/5/EC.
This device operates in the 2400 to 2483.5 MHz frequency range. The use of this frequency range is not yet harmonized between all
countries. Some countries may restrict the use of a portion of this band or impose other restrictions relating to power level or use.
You should contact your Spectrum authority to determine possible restrictions.
Waste Electrical and Electronic Equipment (WEEE)
The European Union (EU) WEEE Directive (2002/96/EC) places an obligation on producers (manufacturers, distributors and/or
retailers) to take-back electronic products at the end of their useful life. The WEEE Directive covers most HME products being
sold into the EU as of August 13, 2005. Manufacturers, distributors and retailers are obliged to finance the costs of recovery
from municipal collection points, reuse, and recycling of specified percentages per the WEEE requirements.
Instructions for Disposal of WEEE by Users in the European Union
The symbol shown below is on the product or on its packaging which indicates that this product was put on the market after
August 13, 2005 and must not be disposed of with other waste. Instead, it is the user’s responsibility to dispose of the user’s
waste equipment by handing it over to a designated collection point for the recycling of WEEE. The separate collection and
recycling of waste equipment at the time of disposal will help to conserve natural resources and ensure that it is recycled in a
manner that protects human health and the environment. For more information about where you can drop off your waste
equipment for recycling, please contact your local authority, your household waste disposal service or the seller from whom you
purchased the product.
9
 Loading...