

Page 1

Page 1 399G107 Rev C 08/07/15
Battery terminals
Battery upper side
Battery compartment door
Press to slide open
the battery latch
Quick
Guide
FreeSpeak II™ wireless beltpack
A FreeSpeak II wireless beltpack gives you simultaneous access to up to five channels of talk/listen
communication, with the ability to switch among them as desired. It communicates with the following FS II
components:
For more information about the system, see the FreeSpeak II User Guide.
Start
• The Base station (FSII-BASE) that routes communication to and from the beltpacks and other audio
devices.
• Transceiver/Antennas (FSII-TCVR-19, FSII-TCVR-24) that provide custom coverage zones in which the
beltpacks operate.
• Antenna splitters (PD2203) that run up to 5 separate transceiver/antennas.
Charging the beltpack
Use your thumb to slide open the battery latch, and
insert the battery into the battery compartment with
the battery terminals facing inwards. The beltpack
can use a rechargeable Li-Ion battery or three AA
batteries. A dedicated drop-in battery charger can
charge up to five Li-Ion batteries simultaneously.
You can also insert the beltpack containing the
battery onto the charger.
You can also recharge batteries by using the
supplied USB cable.
Using the Beltpack
Ensure the beltpack has a charged battery and press and hold the recessed power button for three seconds
to switch it on. If you are using the beltpack with a FreeSpeak II Base station, the system has a default audio
set-up so the system can simply be wired and powered before basic use. The default set-up has two partyline
(conference) audio channels (A and B). Each channel talks to:
• All the beltpacks on that channel
• The head set on the Base station.
To turn the beltpack off, press and hold the power button for three seconds.
To customize an audio channel configuration, please refer to the FreeSpeak II User Guide.
Page 2
Page 2 399G107 Rev C 08/07/15
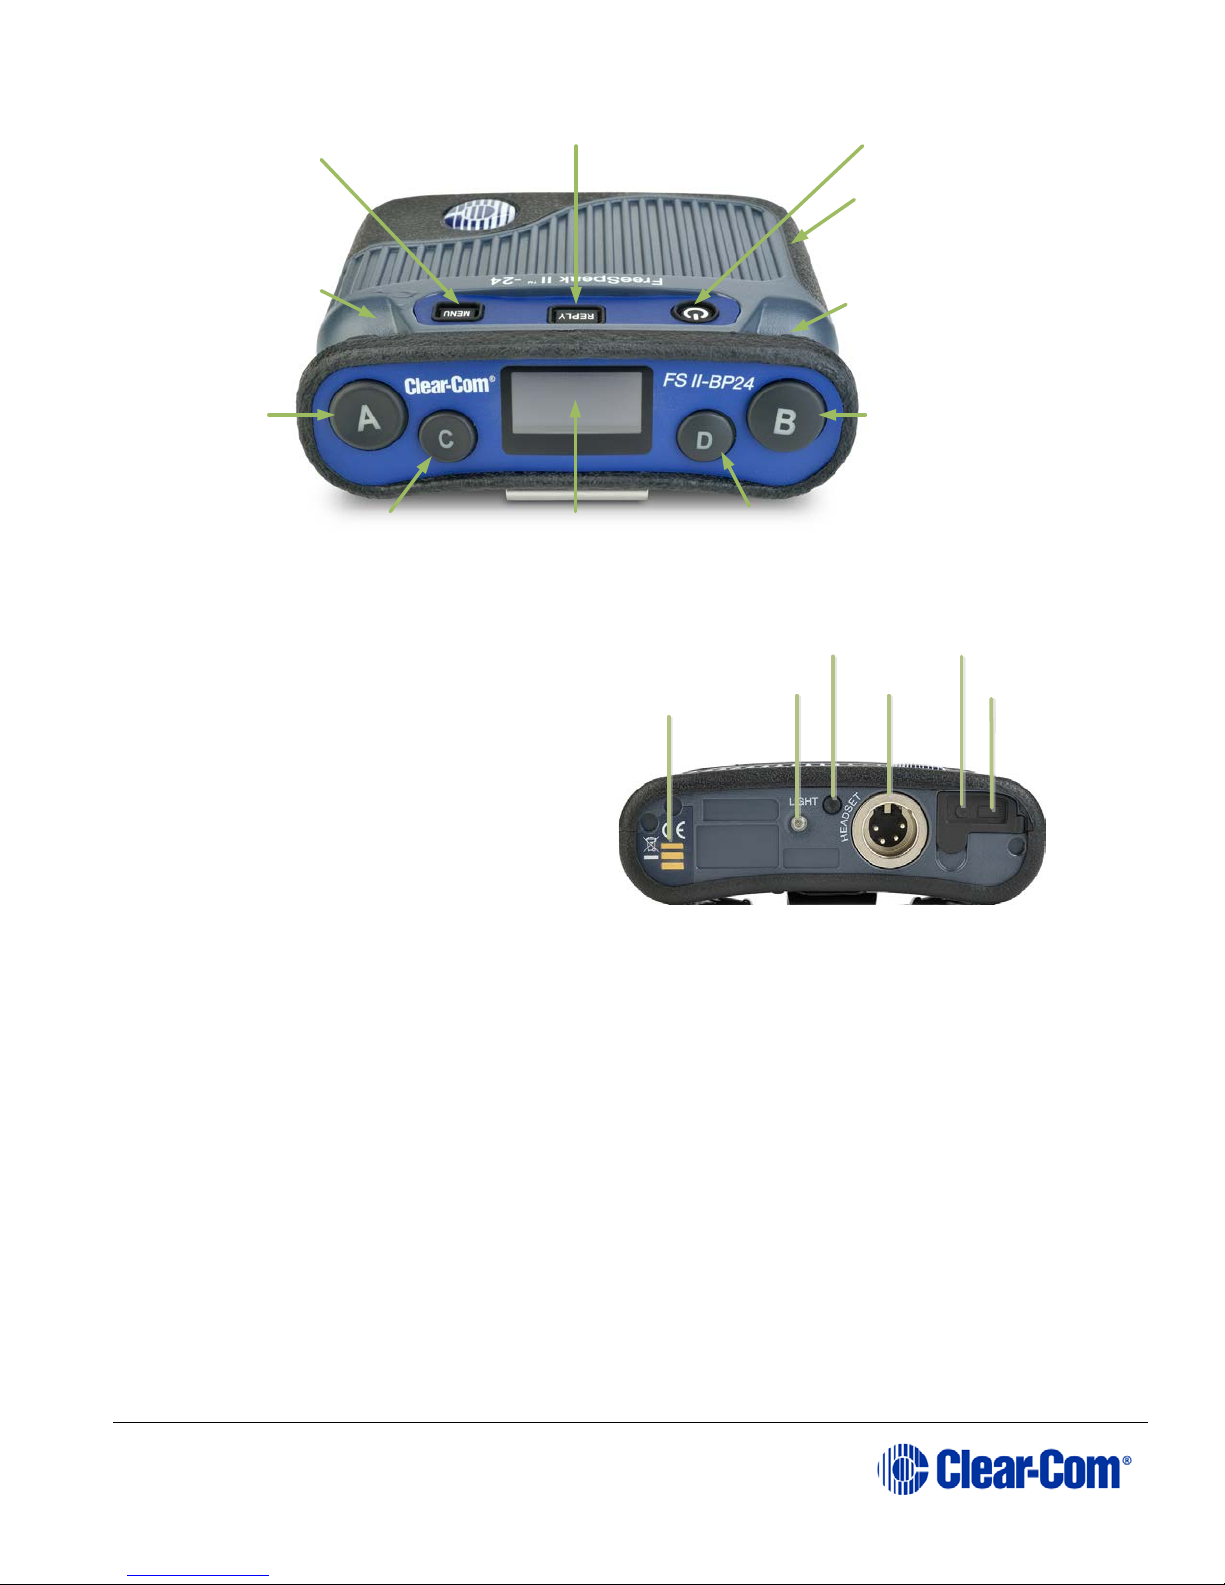
The beltpack has four keys labelled A, B, C, and
Battery
Compartment
Rotary control, audio
levels Channel A (also
menu navigation in
menu mode)
On/Off button (3 second
press and hold)
Rotary control,
audio levels
Channel B (also
menu navigatio n in
menu mode)
Channel A
Talk button
Channel A Call button
(also cancels menu selection
when in menu mode)
Beltpack information
screen (also displays
menu options when in
menu mode
Channel B
Talk button
Channel B Call button
(also menu select when in menu mode )
Menu b utton (2 second
press and hold)
Reply button
LED
flashlight
LED flashlight
control
Headset
socket
3.5 mm stereo
jack line input
Micro USB connecto r
Drop-in charging
contacts
D. You can program each of these keys to
determine their communication destinations, and
the type of communication possible.
1) Connect a headset, using the XLR
2) Press the appropriate key. While the key
3) Speak into the headset microphone.
4) To adjust the volume of incoming audio
5) You can configure the beltpack Reply
Entering and exiting Menu mode
Use Menu mode to:
• Configure the settings for the beltpack
• Read beltpack information such as software version
• Perform a site survey to maximize signal strength and coverage.
To enter Menu mode, press and hold the Menu key for three seconds. To ex it Menu mode, press the Menu
key again. For more information about using Menu mode on the beltpack, see the FreeSpeak User Guide.
Quick Start Guide | FreeSpeak II ™ wireless beltpack (FSII BP19, FSII BP24)
connector on the base / rear of the
beltpack.
is held down, audio transmits on that
channel. When the key is released,
audio no longer transmits. To latch a
key on for hands-free use, quickly tap
the key. Press the key to release the
latch.
for a channel, turn the appropriate
rotary control.
key to reply to incoming calls or to call a
specified destination. See
FreeSpeak II User Guide.
the
Copyright © 2015 HME Clear-Com Ltd. All rights reserved.
FS II Beltpack connectors
 Loading...