


Cleanmate
CC901 Instruction Manual
Robot Window Cleaner
Cleanmate S 5000
USER MANUAL

Contents
1. Important Safety Instructions..........................................................................1
2. Package Contents and Technical Specifications...............................................2
2.1 Package Contents........................................................................................2
2.2 Specifications.........................................................................
.....................2
2.3 Product Diagram.........................................................................................3
3. Operating CC901 .............................................................................................4
3.1 Notes before Cleaning................................................................................4
3.2 Attach Cleaning Pad......................................
..............................................5
3.3 Assemble Power Adapter............................................................................5
3.4 Install Safety Tether.....................................................................................5
3.5 Place Safety Pod.........................................................................................6
3.6 Spray Cleaning Solution..............
................................................................6
3.7 Start............................................................................................................7
3.8 Pause..........................................................................................................8
3.9 Stop................................................................................................
............9
4. Maintance........................................................................................................10
4.1 Cleaning Pad...............................................................................................10
4.2 Fan, Sensors and Squeegees.......................................................................10
4.3 Driving Treads............................................
.................................................11
5. Status Indicator Light and Sounds...................................................................12
6. Troubleshooting...............................................................................................13
Congratulations on the purchase of your CC901! We hope it brings you many years of
satisfaction. We trust the purchase of your new robot will help keep your home clean and
provide you more quality time to do other things.
Should you counter situations that have not be properly addressed in this Instruction Manual,
please contact our Customer Service Center where a technician can address your specific
problem or question.
The company reserves the right to make technological
for continuous improvemt.
and/or design changes to this product
Thank you for choosing CC901!

Contents
1. Important Safety Instructions..........................................................................1
2. Package Contents and Technical Specifications...............................................2
2.1 Package Contents........................................................................................2
2.2 Specifications.........................................................................
2.3 Product Diagram.........................................................................................3
3. Operating CC901 .............................................................................................4
3.1 Notes before Cleaning................................................................................4
3.2 Attach Cleaning Pad......................................
3.3 Assemble Power Adapter............................................................................5
3.4 Install Safety Tether.....................................................................................5
3.5 Place Safety Pod.........................................................................................6
3.6 Spray Cleaning Solution..............
3.7 Start............................................................................................................7
3.8 Pause..........................................................................................................8
3.9 Stop................................................................................................
4. Maintance........................................................................................................10
................................................................6
..............................................5
.....................2
............9
4.1 Cleaning Pad...............................................................................................10
4.2 Fan, Sensors and Squeegees.......................................................................10
4.3 Driving Treads............................................
5. Status Indicator Light and Sounds...................................................................12
6. Troubleshooting...............................................................................................13
.................................................11

1
When using an electrical appliance, basic precautions should always be followed, including the following:
2. Do not use the Appliance in extremely hot or cold vironmts (below 0˚C/32˚F or above40˚C/104˚F). The Appliance
1. Important Safety Instructions
READ ALL INSTRUCTIONS BEFORE USING THIS APPLIANCE. SAVE THIS INSTRUCTION MANUAL.
1. This Appliance is not intended to be used by children under or anyone lacking knowledge on proper use.
Supervision may be necessary. Do not allow children to play with theAppliance.
can be used to clean outside windows if it is properly tethered to the Safety Pod, winds are calm, and it is not
raining or snowing.
3. Please sure the Appliance is plugged in while it is cleaning. The Appliance has a Back-Up Battery that charges
during use. The Back-Up Battery powers the Appliance if it becomes unplugged or the electricity fails.
4. Do not leave the Appliance unattended when it is plugged in.
5. For household use ONLY. Do not use the Appliance in commercial or indu
6. Do not use the Appliance on cracked glass.
7. Only use accessories recommended or supplied by the manufacturer. Only use the Power Adapter supplied
by the manufacturer. Please make sure your power supply voltage matches the power voltage marked on the
Power Adapter.
8. Do not use the Appliance on a framed window with a frame smaller than 5mm (0.2 inches).
9. Do not use the Appliance on wet or greasy windows.
10. Store the Appliance away from heat and flammabl
11. Do not use the Appliance if it does not firmly attach to the glass or has visible signs of damage.
12. To reduce the risk of electrical shock, do not put the Appliance in water or other liquid. Do not place or store
Appliance where it can fall or be pulled into a tub or sink.
13. Do not touch power plug or the Appliance with wet hands.
14. Do not charge the Appliance in extremely hot or cold vironmts, or it may affect battery life span.
15. When charging the Appliance, do no
16. Take care not to damage the power cord. Do not pull on or carry the Appliance by the power cord, use the power
cord as a handle, close a window on the power cord, or put heavy weights on the power cord. Keep power cord
away from hot surfaces.
17. Do not use with a damaged power cord or receptacle. Do not use the Appliance if it is not working properly, has
be dropped, damaged, or come in contact with water. I
In order to avoid a hazard.
18. If the supply cord is damaged, it must be replaced by the manufacturer or its service agt in order to avoid a hazard.
19. The plug must be removed from the receptacle before cleaning or maintaining the Appliance. Do not unplug the
Power Adapter by pulling on the power cord.
20. The Back-Up Battery must be replaced by the manufacturer or its service agent in order to avoid a hazard.
21. The Back-Up
the Appliance.
22. The Appliance must be disconnected from the receptacle before removing the battery for disposal of the
Appliance.
23. Please dispose of used batteries according to local laws and regulations.
24. Do not incinerate the Appliance ev if it is severely damaged. The battery can explode in a fire.
25. The Appliance must be used in accordance with the directions in t
cannot be held liable or responsible for any damages or injuries caused by improper use.
Battery must be removed and discarded according to local laws and regulations before disposal of
t place it on other electrical appliances and keep it away from fire and liquid.
e materials.
t must be repaired by the manufacturer or its service agt
strial vironmts.
his Instruction Manual. Product manufacturer

2
2.1 Package Contents
2. Package Contents and Technical Specific
CC901 Power Adapter Instruction Manual Extension Cord (1.5m/4’11
Safety Pod and Tether Remote Control Cleaning Pads Cleaning Solution
2.2 Unit Specification
Model No CC901
Working Voltage 24V DC Rated Power 75W
Remote Control
Rated output voltage 3V DC
Power Adapter: GQ90-240375-E2
Input:100-240v~50/60Hz 2.0A Max Output:24V DC 3.75A
* Technical and design specifications may be changed in the course of continuous product improvement.

3
2.3 Product Diagram
8. Undefined
2. Package Contents and Technical Specific
1. Front Bumper
2. Status Indicator Light
3. START/PAUSE Button
4. Handle
5.Upgrade port(for after-sale service)
6. Speaker
7. Rear Bumper
8. Power Cord
9. Edge Detection Sensors
10. Cleaning Pad
11. Squeegees
12. Cleaning Pad
13. Fan
14. Driving Treads
15. Suction Sensor
16. Bottom Power Switch
17. Side Rollers
18. Status Indicator Light
CC901 Unit
1、前档
1、前档
2、状态指示灯
2、状态指示灯
3、开始/暂停开关
3、开始/暂停开关
、手柄
、手柄
、升级端口(售后专用)
、升级端口(售后专用)
6、音孔
6、音孔
CC901 Remote Control
7、后档
7、后档
8、电源线
8、电源线
9、防跌落感应器
9、防跌落感应器
10、前擦布
10、前擦布
11、刮条
11、刮条
12、擦窗布
12、擦窗布
1. Direction Control Stick
2. START/PAUSE Button
3. Wheel Clean Button
4. Right Part Clean Butoon
5. N Cleaning Mode Button
6. Z Cleaning Mode Button
7. Repeat Clean Butoon
13、风机
13、风机
14、驱动轮
14、驱动轮
15、吸力传感器
15、吸力传感器
16、底部电源开关
16、底部电源开关
17、滑轮
17、滑轮
18、底部状态指示灯
18、底部状态指示灯

4
3.1 Notes Before Cleaning
3. Operating CC901
D
w
w
C
g
1
9
I
c
b
If CC901 ’s Status Indicator Light flashes
RED after powering ON, please conncet
the power cord to unit and powr on.
If the blue lights flashes, the Back-Up
Battery requires charging. Keep CC901
plugged in to charge the Back-Up Battery
until the Status Indicator Light turns to
solid BLUE(about 2 hours). CC901 will
not clean when the RED light flashes.
o not use CC901 on a framed windo
ith a frame smaller than 5mm (0.2").
C901 can clean framed or frameless
lass, larger than 50 x 50cm (19.7’’x
.7’’).
f the window is covered with dirt,
lean a small area on the glass
efore use and place CC901 there.

5
Please sure there is a 13cm (5.1") clearance between the glass and obstacles in the room like curtains or furniture.
ABC
D
3. Operating CC901
CC901 can clean horizontally mounted glass but only when using the Direction Control Buttons on the Remote
Control.
CC901 can clean glass mounted at an angle but may not operate normally; in such a case, a person should be in
the vicinity to assist should there be a problem.
Do not use CC901 upside down.
CC901 should only be used with CC901 Cleaning Solution.
performance and can damage the robot.
Please refer to the manufacturer's care and cleaning instructions before using CC901 on glass with an uneven
surface, such as frosted, textured, patterned, or coated glass. Product Manufacturer cannot be responsible for
damage due to improper use on these surfaces.
Using other cleaners significantly reduces CC901’s
3.2 Attach the Cleaning Pad
Turn CC901 over and attach the Cleaning Pad to the bottom of
CC901 smoothly. The whiteside of the Cleaning Pad attaches to the
Velcro,and the gray microfiber side faces out. Make surethe Cleaning
Pad does not cover the Edge Detection Sensors, front bumper
sensor and rear bumper sensors.
3.3 Assemble the Power Adapter
3.4 Install the Safety Tether
A: CC901 Power Cord B: Power Adapter Power Cord C: Safety Pod D: Safety Tether

6
CAUTION:
1 Loop one end of the
Safety Tether to end A
on the CC901 Power
Cord and tight.
2 Connect end A and end B and tight.
3 Loop the other end of the Safety Tether
around the Safety Pod’s channel and
pull it tight.
3. Operating CC901
* If the length of the power cord restricts CC901’s movemt, a CC901 Extension Cord can be used. Disconnect end A
and end B, and connect them with both ds of the Extension Cord respectively and tight.
* Only one Extension Cord can be used for CC901 .
3.5 Place the Safety Pod
Wipe the surface of the Safety Pod’s suction cup clean with the provided Finishing Cloth.
If CC901 is being used to clean an inside window:
Press the Safety Pod FIRMLY on the top corner of the inside window.
Make sure the Safety Pod is attached securely in Place.
If CC901 is being used to clean an outside window:
Press the Safety Pod FIRMLY on the inside of the window being
cleaned. Makesure the Safety Pod is attached and securely in place.
3.6 Spray Cleaning Solution
CAUTION:
* CC901 is recommded to be used with CC901 Cleaning Solution. Using other cl
performance.
* Spray the upper and lower sides of the Cleaning Pad with the provided CC901 Cleaning Solution times each. After
spraying, wipe the bottom of CC901 with a dry cloth.
eaners may reduce CC901’s

7
3.7 Start
1 Plug in CC901
3. Operating CC901
CAUTION: * Do not unplug CC901 while it is cleaning.
2 Power ON
Move the Power Switch to the "--" position. CC901 is powered
ON when the Status Indicator Light flashes BLUE.
CAUTION: * Keep objects away from CC901’s Fan to avoid bl
ockage.
3 Place on the Glass
Place CC901 on the window at least 10cm(4") from window
corners or other obstacles. CC901 has successfully attached to
the window when the Status Indicator Light glows a continuous BLUE.
CAUTION: * Please make sure there is a 13cm (5.1")
clearance between the glass and obstacles in the room
like curtains or furniture.
4 Start
Start CC901 using one of the methods below.
Press the START/PAUSE button on CC901 or on the Remote
Control to begin cleaning. CC901
will automatically
Chooses “ N ” or " Z " cleaning path.
Choose your own cleaning path by pressing the “ N ” or " Z "
Cleaning Mode Button on the Remote Control to begin cleaning.

8
" N " Cleaning Mode is Best
Direct CC901 to move forward, backward,
left and right using the Direction Control
stick on the Remote Control when Paused.
CC901 cleans when the Direction Control
stick are used. Switch to a different Cleaning
Mode using the Cleaning Mode Buttons
on the Remote Control when Paused.
3. Operating CC901
for tall windows.
CC901 cleans in an " N " path.
CAUTION: If the remote control not able to command the CC901 unit. Please check below steps matc
hcode for CC901 and the remote control.
Follow above preparation steps and stick the CC901 onto window glass.
1. Press the CC901 left rear bumper without release, at the same time press the START/PAUSE button on
robot handle. The START/PAUSE button will begin twinkles between blue and red light. Then release your
two hands.
2. Press the “ Z ” and "Repeat Clean" button on the remote control at the same time.
3. The START/PAUSE button will turns to solid red light. At the same time the speaker will buzz. It means
the remot
e control successfully matchcode with robot cleaner.
" Z " Cleaning Mode is best
for wide windows. CC901
cleans in a " Z " path.
3.8 Pause
Pause CC901 during cleaning by pressing the
START/PAUSE button on the robot or on the
Remote Control.

9
3.9 Stop
3. Operating CC901
When CC901 completes its cleaning cycle, it returns to the place it started and beeps.
1 Remove CC901
Grasp CC901’s Handle. Press and hold for
approximately 5 seconds and the fan will
stop. Remove CC901 from the window.
Polish away any marks left on the glass
from CC901’s removal with a mopping
cloth.
2 Power OFF
Move the Power Switch to the "o"
position.
3 Remove the Safety Pod.
Polish away any marks left on the glass
from the Safety Pod’s removal with the
provided Finishing Cloth.
CAUTION: If CC901 has a problem and the alarm Light flashes RED, please firstly check if the power cord
connected well and the unit is powered on. The LED light should be in blue color if the
power connection is good, and it will automatically starts cleaning. If the RED light keeps
flashing though power connection is good, please use remote control direction stick
operate CC901 leave current position. When the blue light turns solid, press START/PAUSE
button to restart.
4 Unplug CC901

10
4. Maintance
F
T
t
w
S
T
R
e
E
T
D
m
S
T
w
Before performing cleaning and maintance on CC901, Power OFF and unplug CC901 from the glasses.
4.1 Cleaning Pad
Turn CC901 over and remove the Cleaning Pad. Soak the Cleaning Pad in 20℃, clean water for 2 minutes. Hand
wash with mild detergent and lay flat to dry. Allow it to dry completely before re-attaching it to CC901 .
CAUTION :
Do NOT use a wet Cleaning Pad on CC901 or it may slip on the window. Washing the Cleaning Pad regularly can
extend its service life. If the Cleaning Pad
with a new one to achieve best cleaning performance.
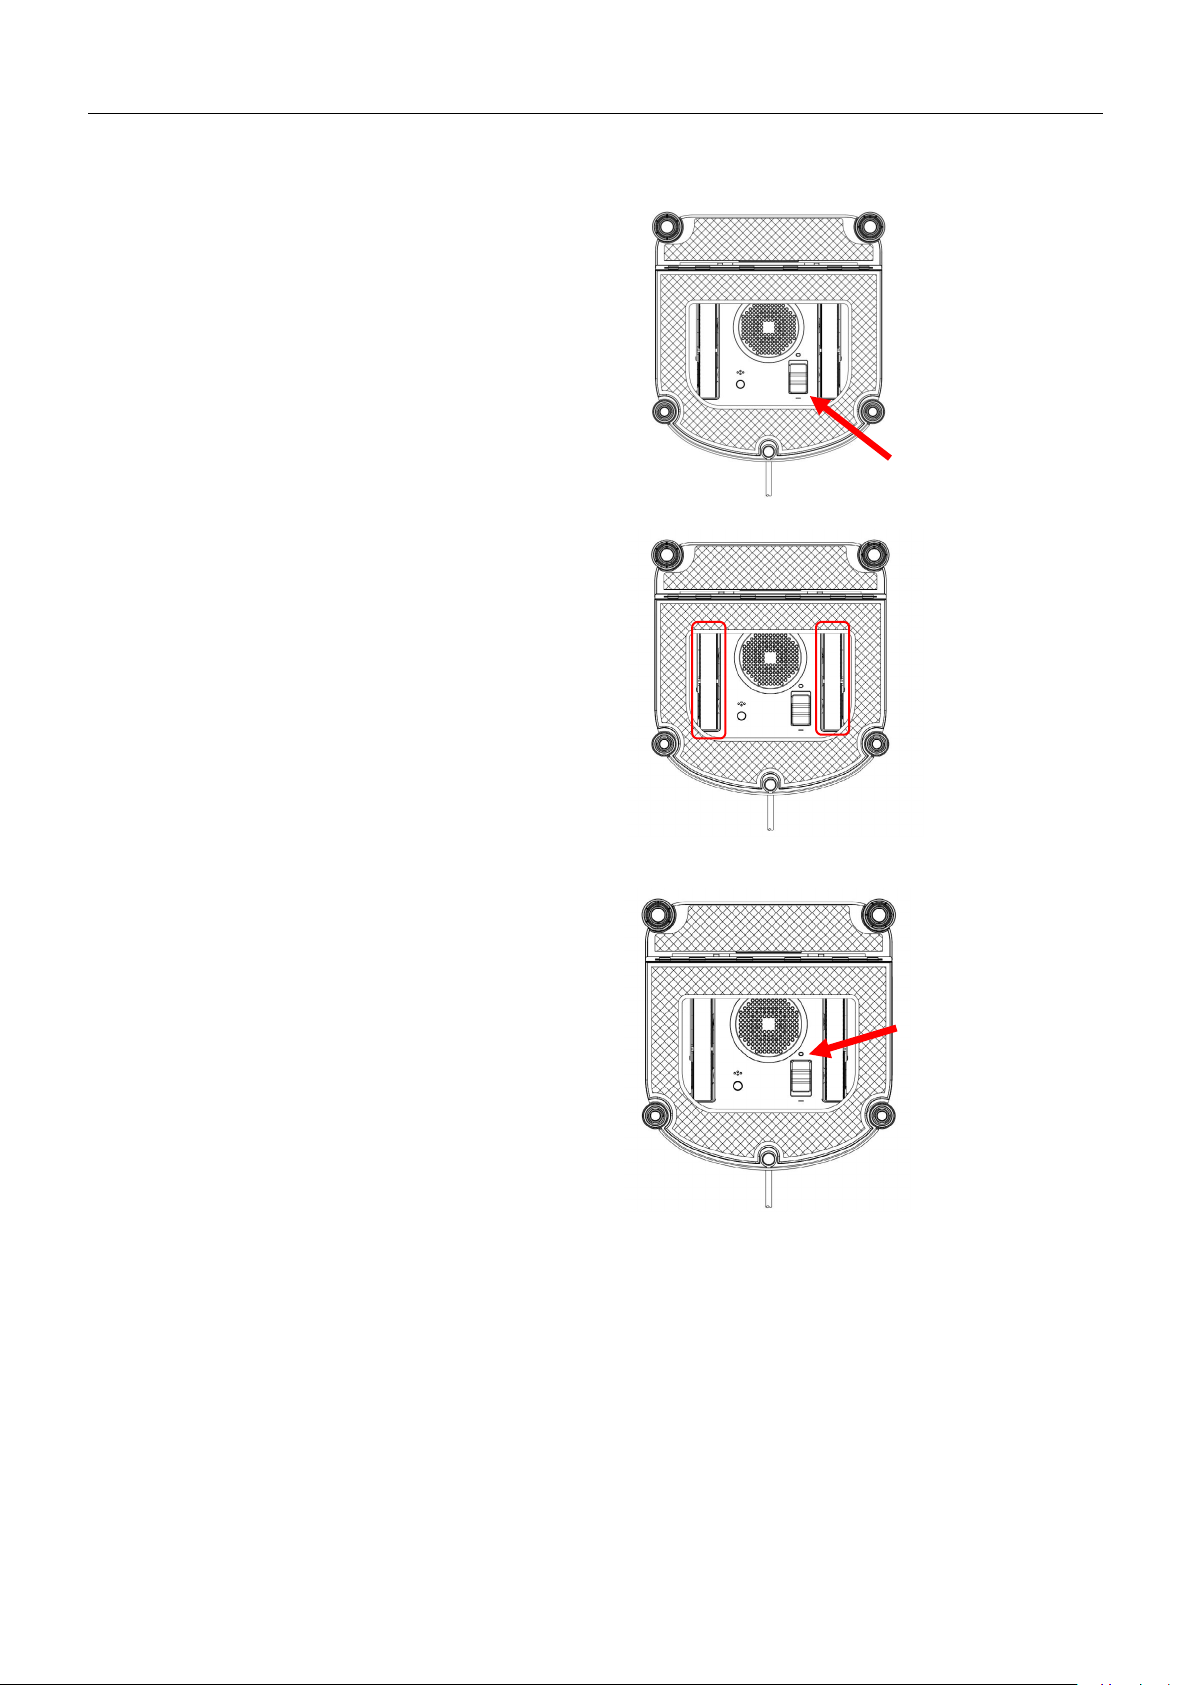
4.2 Unit Bottom Maintance
becomes worn or no longer fits properly within the velcro area, replace it
an
urn CC901 over and wipe any debris from
he Fan with a dry cloth to maintain suction
ell.
dge Detection Sensors
urn CC901 over and wipe the five Edge
etection Sensors clean with a dry cloth to
aintain their effectivess.
ide Rollers
urn CC901 over and wipe the four Side
ollers with dry cloth to maintain their
ffectivess.
queegees
urn CC901 over and wipe the squeegees
ith a dry cloth to maintain their effectivess.
11
T
S
w
P
r
w
I
T
o
T
M
S
4. Maintance
4.3 Driving Treads
urn CC901 over and move the Power
witch to "--" position. The fan motor
ill shut down about 8 seconds later.
ress the "Wheel Clean" button on
emote control start to clean the
heels.
nspect the Driving
reads by using the START/PAUSE button
n the Remote Control. Stop the Driving
reads and use dry cloth clean it if dirt
is seen on the Treads.
ove the Power
witch to the "O" position.

12
Twinkles Blue (slowly) CC901 will not clean until the Back-Up Battery is properly charged.
5. Status Indicator Light and Sounds
Flashes Blue (quicker) CC901 is powered ON and ready to be placed on the glass.
Solid Blue CC901 has successfully adhered itself to the glass and is ready to clean.
Flashes Red CC901 power connection has a problem or the vacuum is not good enough. Please refer to section 6.
.
Circle Running LED light
Running LED lights will be lights on in counterclockwise sequence while CC901 was turned on
Running LED lishts turns to solid when vacuum is enough and ready.
Only partial Running LED lishts on when vacuum is not enough and not ready.

13
6. Troubleshooting
No Malfunction Possible Causes Solutions
Status Indicator light flashes
BLUE when CC901 adhered
1
to glass
2
Status Indicator light flashes
RED
3
Cleaning pads was installed
improperly
Edge detection sensors with
problem
There is too much dirt and debris on
the window.
Int
erruption of electricity while
CC901 was cleaning due to power
failure,plug displacement,or loose
Connection to the PowerAdapter.
CC901 has moved over a problem
area and is losing suction.
Remove the cleaning pad and adhere neatly onto the velcro.
Check if the edge detection sensors was stucked by cleaning pad or dirts.
Clean the window by hand to have a clean area for the CC901 adhere to
first.
A. Connect CC901 to the Power
Adapter and plug into the wall outlet. Press Start/Pause button on CC901 or
on theRemote Control. CC901 will resume cleaning.
B. In case of power failure, and the above solution does not work, please use
theDirection Stick on the Remote Control to direct CC901 to a position on the
Window where you can safely reach it
the wind ow. If power has resumed, place CC901 on the window again and rest
art.
CAUTION: *It is risky to use direction stick command unit, please make
sure there is always people standby the product.
Please use the Direction Stick on the Remote Control to direct CC901 to a
Safety position .
CAUTION: *It is risky to use direction stick command unit, please make
sure there is always people
, turn off the fan and remove it from
standby the product.
Unit moves in an irregular
4
Pattern during cleaning.
Remote control does not
5
work
Edge Detection Sensors are with
problem
There is too much dirt and debris on
glasson the window.
While the CC901 is in cleani
mode,only the "START/PAUSE"
button works
Unit didn’t matched code with
Remote control
ng
Please check if edge detection sensors was stucked and clean the dirts on
it. If it still does not work, please contact customer service.
A. Clean the Driving Treads as described in section 4.
B. Replace the Cleaning Pad and restart the cleaning cycle.
Press "START/PAUSE" button to stop cleaning first, then press other
buttons to command CC901.
 Loading...