


Table of Contents
Introduction
Safety Introductions
Production Features
Main Unit and Accessories
Battery Connection
Battery Charging Method
Unit Operations and panel Display
Remote Control
Portable Cleaner Operations
Installing Accessories
2
2
3
4
5
6
7、8、9
10
10、11
12
Dust-bin Cleaning
Useful Tips
Specification
12、13
14、15
16
ays here to help
Web Support:
Email Support:
Please read all instructions. Save this manual for future references.
This product is for indoor use only.
Only use factory supplied battery charger and genuine battery when you
operate the CleanMate.
It is a electrical device . Do not use it on wet floor or spill water on your
CleanMate.
Do not handle battery charger and battery with wet hand.
Do not sit or stand on your CleanMate.
Pay attention to toddlers & pets when using CleanMate in your house.
Do not use it to clean burning cigarette, or lit match, etc.
Do not use it to clean a floor with water or any other liquid.
Do not use it to clean a floor with bleach or any other chemicals.
Do not block the air vent of the CleanMate unit.
To achieve best cleaning result, remove large loose & fragile objects from
the floor (power cord, cable wire, phone cord clothing, long bind &
curtain drapes, loose rug fringes, etc).
Clean the debris tangled around brushes and wheels to avoid over loading it.
After each use, empty dust bin, clean filter and brushes to keep it at top
performance.
If you do not plan to use it for a long period of time, fully charge the battery
and then remove the battery from CleanMate unit and store it in a dry, cool
environment.
2

Product Features
There are 2 unique features of this portable portable vacuum cleaner
installed in main unit. It can operate automatic or manually handheld.
Top Cover
LED Panel
Power switch
Charging Socket
Work ing time settin g
Main power switch
Portable vacuum
Remote control
holder.
Dust Bin
High performance & low noise vacuuming for best cleaning result.
2 obstacle detection methods: No-collision (No-Impact) and
Soft-impact.
Side brushes for better cleaning along wall/furniture edges.
5 drop sensors to keep it from falling off stairs.
Spot cleaning with spiral movement pattern.
Cleaning a wide variety of floor types.
Low profile design enable it to clean under beds and other furnitures.
Build-in IR-dust-sensor. If detect dust, cleaner will force to
Spot-cleaning-pattern.
Remote control holder in main unit, easy to find.
3

Main Unit and Accessories
QQ4 Main unit
Remote control
Filter and HEPA
Rechargeable battery
Charger
Suction nozzle
User manual
Side Brush
特性介绍
2
3
(inside)
(HEPA+1)
x2(inside)
x1(inside)
x2 (Spare+1)
4
1
5
6
7
Robot ic Vacuum C leane r
R
Cle anMat e
★Portable v acuum c leane r insid e
★Ultrason ic dete ction t echno logy
Model : QQ4
USER MA NUAL
Model N o.:QQ 4
★IR dust dete ction
Seri es
8
4

Battery connection
Please connect batteries of portable cleaner and main unit before
first use.
Portable cleaner battery connection
Fig 1.Take off the
top cover
Attent ion to the di rection o f th e conne ct or.
Fig3 .Depress a nd sl ide
back war ds, take off
the ba tte ry cover
Fig 4. Con nect battery an d cover it
Main unit battery connection
Take off the batte ry co ver
Fig 2. Tak e out t he
hand y cle aner
Attent ion to the di rection
of the con nector.
Conn ect b attery and
cove r it
5


Unit Operations and Panel Display
Button
Main Power Switch:
Press this power switch button once to power on the QQ4, and
press it again will start operation.
Operation timer:
User can use timer to set up the maximum running time of QQ4
when you power on the QQ4. Default timer setting is 80 minutes.
User can change the timer setting in 10 minutes intervals with
one shot press the button (8 7 6 5 4 3 2 1 8)
QQ4 can remember the latest timer setting when user power it on
again.
Display
5
4
123
1.Power-on indication light is solid Blue.
2.During charging:
Blinking in Blue Battery charging is in progress.
Solid Blue Battery is fully charged
:Battery low indication blinking in Red.
:Timer, Moving Mode and error code indication.
1.Timer:Please see above Button/operation timer.
7
Unit Operations and Panel Display
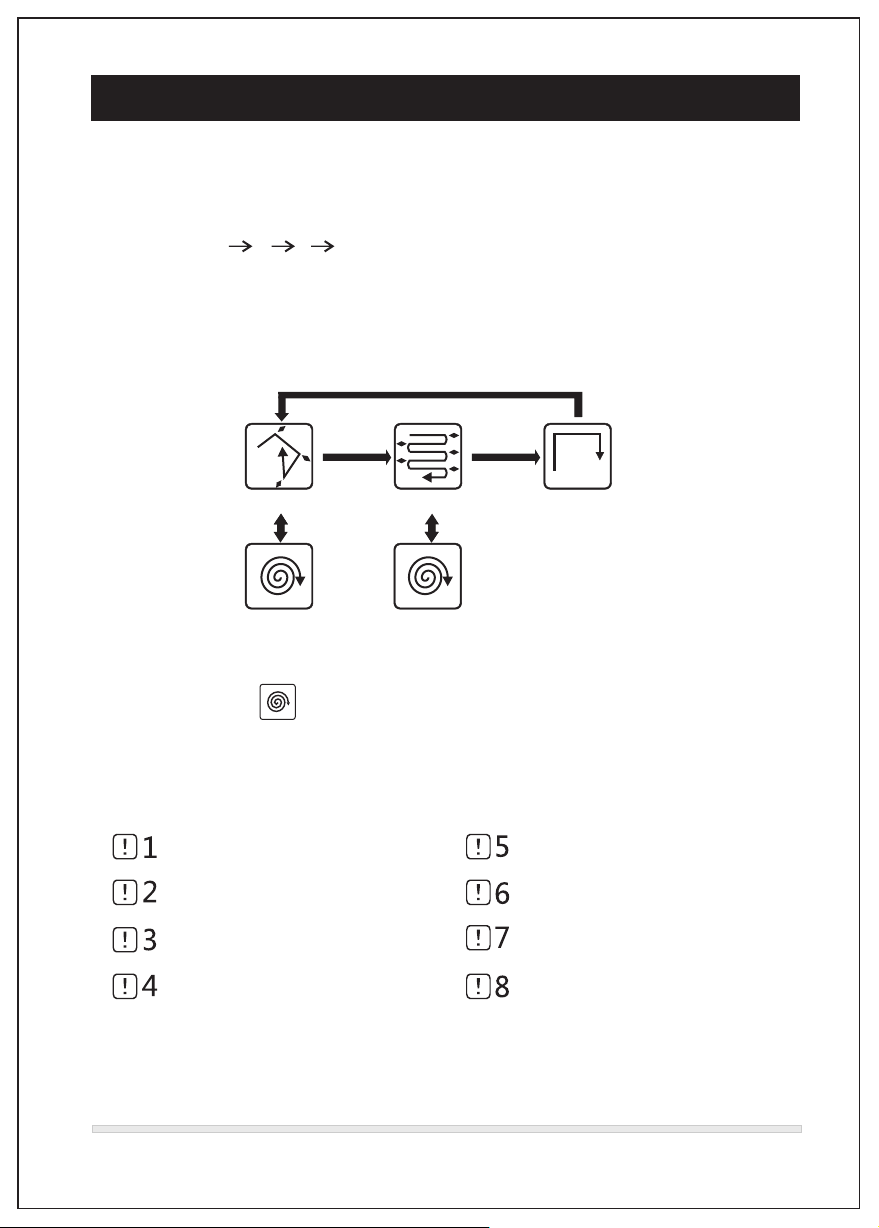
2.Moving Mode: When you turn the QQ4 on, the default moving
pattern is set to Automatic mode. Users have the option to select
any of the following 4 moving patterns with the remote control:
MODE:A b C d
“A” Automatic(automatically going through all patterns)
“b” Random(Special Bounce)
“C” S Shape
“d” Along Wall
Random
Spot
Dust sensoring
”S”Shape Along Wall
Spot
Dust sensoring
Force spot spiral cleaning
3. Error Code: When the cleanmate QQ4 encountered an abnormal
problem, it shows one of the following error codes (1-8) on the
multi-function LED display. The red Error light will also be on.
: Front drop sensor error
: Unit lift off ground
: Left wheel problem
: Right wheel problem
: Side brush problem
: Battery charging error
: Vacuum battery overheat
: Main unit battery overheat
8

Unit Operations and Panel Display
1.Vacuum Fan indicator:
When the Cleanmate QQ4 is powered on, vacuum fan is on and
the corresponding Green indicator light is on. User can use rem
ote control to turn off the vacuum fan, and this Green indicator
will be off.
2.During charging:
Blinking in Green-main battery charging is in progress.
Solid Green-Main Battery is fully charged.
: Error indicator: When the Cleanmate QQ4 has an error this indicator
LED light will turn on in red. Please refer to the error code,
displayed in the timer number, for details.
Remote control
5
4
3
6
7
4
2
8
1
4
Function of each Button:
POWER: Press “Power” button to p ower ON/O FF the Cleanmate QQ4
1.
2.
START: Press it once to start QQ4 cle aning.
9

Remote control
Tim er: Set cleaning time from 10 min to 80 min (in 10 min
3.
increment).Actual Cleanmate QQ4 running time varies
depending on battery power left.
4.
5.
6.
7.
8.
LEFT/RIGHT/REVERSE: Dire ction keys. If any direction key is pressed
and hold down, QQ4 will keep movin g toward
that direction.
FORWARD : When pre ss Forward, QQ4 go forward and the suction fan is
working, until user release th e keypad. If touched obstacle, QQ4w ill return.
MODE: Select one of the 4 cleaning p atterns: “b”,”C”,”d”and”A”(Auto mode).
Auto mode is the default cleaning mode when QQ4 powered on QQ4
will automaticall y go throug h all the moving patterns in Auto mode.
About”b”,”C”,”d” detail, see page 8.
VAC: Turn the va cuum motor on or off.
Stop: Press it once to stop QQ4.
Portable cleaner operations
Take out portable cleaner. Please see Fig1、2.
1
Press handle button
Fig1
Fig2
10

Portable cleaner operation
Turn on the power switch. Please see Fig3.
2
F
F
O
ON
Fig3
Use the Suction nozzle to clean corner or hair.
3
please see Fig4、5、6.
Press hook to take nozzle
Fig4
11
Fig5
Fig6

Installing Accessories
Side Brush Installation and Removal
Fig1
To remove the side
brush, firmly hold its
base and pull the brush
out.
Fragrance Installation and Removal
The QQ4 has a compartment built in to it for adding fragrance to the air as the
unit cleans. Any solid scent packet, insert, or dryer shee t can be used.
DO NOT use any type of Liquid or Oil Fragrance w ith this un it.
To install the side brush,
push it down to mounting
hole until it clicks.
Fig1
Fig2
Fig2
Dust-bin cleaning
1
Take out the dust-bin,please see Fig1.
Fig1
12

Dust-bin cleaning
2
Dump the debris, please see Fig2、3.
Fig2
3
Clean Filter and HEPA. Please see Fig. 4、5、6.
Fig3
(Use the small brush of nozzle, Fig6)
Fig4
4
Wash the dust-bin, HEPA and filter. Please see Fig7、8、9.
Fig7 Fig8
Fig5
Fig6
Fig9
13

4
0
c
m
Useful Tips
Tip#1: Prepare the cleaning area and remove large debris, loose
cables, wires, and items that can be easily tangles with brush or
knocked over.
Remove vases, glasses, or small
lamps, etc.
Tip# 2:Leave enough clearance space(15"or more)for QQ4 to
operate
Tip#3: Do not let loose edges of rugs, drapes, table cloths, etc to get
caught by QQ4brushes, Roll the loose edges of rugs underneath.
Remove small items that might
obstruct QQ4 operation for faster
and better cleaning.
Fold the rug edges that have
loose ends under it
14

Useful Tips
Tip# 4: Fixing jams: If some object gets caught with side brush,
turn the QQ4’s power off immediately. Remove anything that
caused the jam before using the cleaner again
QQ4 will make a
beeping sound when
jammed.
Block off certain areas with objects to get better
cleaning result.
Take out portable cle aner
Clean the vacuum
entry
QQ4
and prevent it from
15
主体及附件
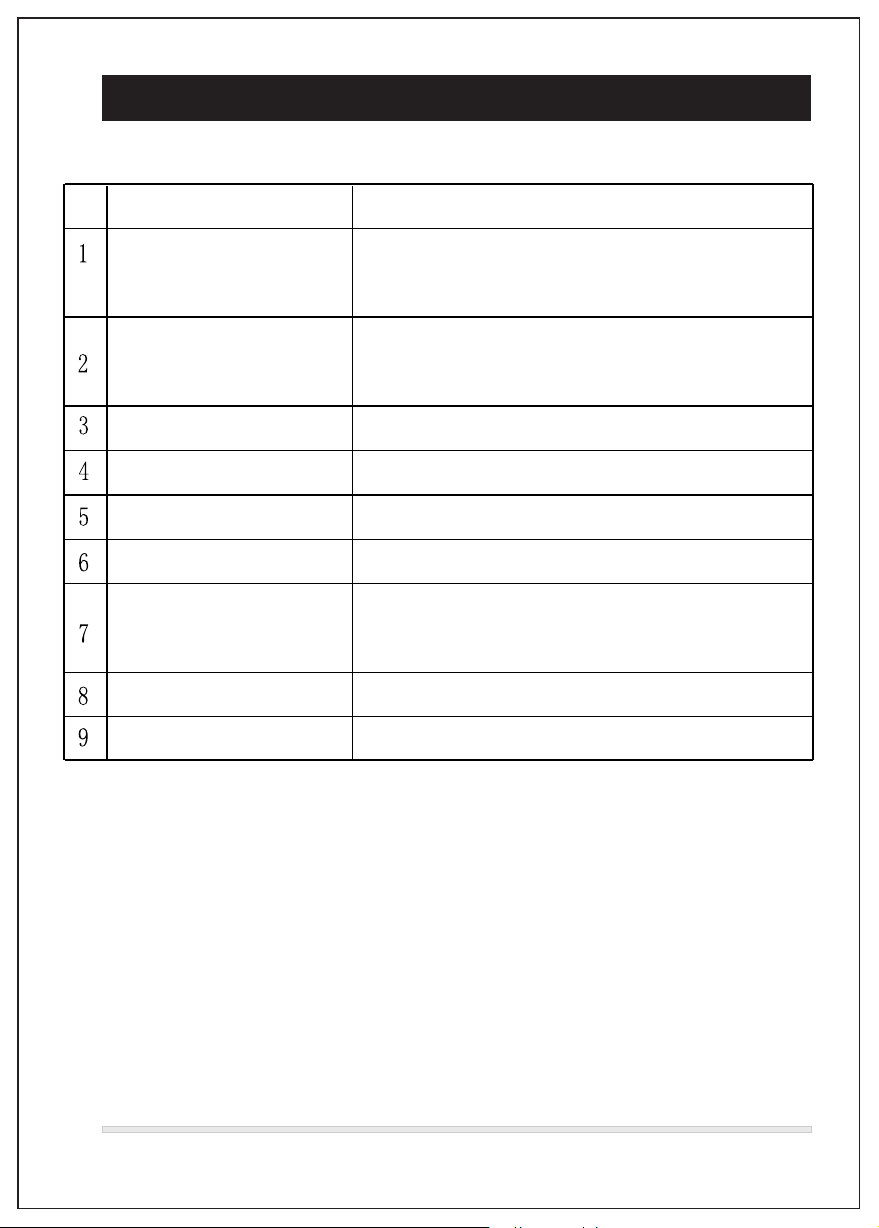
Specification
Item Spec.
Battery Type
Adapter/charger
Obstacle avoidance Ultrasonic sensor
Capacity of dust bin 0.35L
Moving speed 23-27cm/sec.( 9-11 in/sec.)
Remote control IR Type, Reception 5-7m(16-23 FT)
Types of movement Random,Along wall, S-Shape,
Auto, Spot-sprial
Dimension 35(L)X20(W)X10(H)cm
Weight 2.2 Kg
NiMH 12.0V Rechargeable, 1200mAh, 2Pcs,
2.5hours ofcharging time
Input:100-24Vac,50- 60Hz, Max. 0.4A
Output:20Vdc,1000mA
Specification
16

150804
 Loading...