

Clavia Nord Rack 3 Owner's Manual
Owner’s ManuOwner’s Manu
Owner’s ManuOwner’s Manu
Owner’s Manu
alal
alal
al
SofSof
SofSof
Sof
tware Vtware V
tware Vtware V
tware V
ersion 1.2xersion 1.2x
ersion 1.2xersion 1.2x
ersion 1.2x
bb
bb
b
y Clay Cla
y Clay Cla
y Cla
via DMI ABvia DMI AB
via DMI ABvia DMI AB
via DMI AB
Part No. 2700,2101
Warning - When using electric products, basic precautions
should always be followed, including the following:
1. Read all the instructions and observe the graphic symbols
above before using the product.
2. Do not use this product near water - for example near a
bathtub, washbowl, kitchen sink, in a wet basement, near or
in a swimming pool, a swamp or the like.
3. This product should be used only with a cart or a stand that
is recommended by the manufacturer.
4. This product, either alone or in combination with an
amplifier and headphones or speakers may be perfectly
capable of producing sound levels that could cause permanent
hearing loss. Do not operate for a long period of time at a
high volume level or at a level that is uncomfortable. If you
experience any hearing loss or ringing in the ears, you should
consult an audiologist.
5. The product should be located so that its location or
position does not interfere with or obstruct its normal flow of
ventilation.
6. The product should be located away from heat sources such
as radiators, heat registers or other products that produce
heat.
The lightning flash with the arrowhead symbol within an
equilateral triangle is intended to alert the user to the
presence of uninsulated voltage within the products
enclosure that may be of sufficient magnitude to constitute
a risk of electric shock to persons.
Le symbole éclair avec le point de flèche à l´intérieur d´un triangle
équilatéral est utilisé pour alerter l´utilisateur de la presence à
l´intérieur du coffret de ”voltage dangereux” non isolé d´ampleur
suffisante pour constituer un risque d`éléctrocution.
The exclamation mark within an equilateral triangle is
intended to alert the user to the presence of important
operating and maintenance (servicing) instructions in the
literature accompanying the product.
Le point d´exclamation à l´intérieur d´un triangle équilatéral est
employé pour alerter l´utilisateur de la présence d´instructions
importantes pour le fonctionnement et l´entretien (service) dans le
livret d´instructions accompagnant l´appareil.
Instructions pertaining to a risk of fire, electric shock or injury to persons.
IMPORTANT SAFETY INSTRUCTIONS
SS
SS
S
AA
AA
A
VE THESE INSTRUCTIONSVE THESE INSTRUCTIONS
VE THESE INSTRUCTIONSVE THESE INSTRUCTIONS
VE THESE INSTRUCTIONS
CAUTION AVIS
RISK OF ELECTRIC SHOCK
DO NOT OPE
N
RISQUE DE SHOCK ELECTRIQUE
NE PAS OUVRIR
CAUTION: TO REDUCE THE RISK OF ELECTRIC
SHOCK DO NOT REMOVE COVER (OR BACK).
NO USER SERVICEABLE PARTS INSIDE.
REFER SERVICING TO QUALIFIED PERSONNEL.
ATTENTION:POUR EVITER LES RISQUES DE CHOC
ELECTRIQUE, NE PAS ENLEVER LE COUVERCLE.
AUCUN ENTRETIEN DE PIECES INTERIEURES PAR L´USAGER.
CONFIER L´ENTRETIEN AU PERSONNEL QUALIFE.
AVIS: POUR EVITER LES RISQUES D´INCIDENTE OU
D´ELECTROCUTION, N´EXPOSEZ PAS CET ARTICLE A LA PLUIE
OU L´HUMIDITET.
7. The product should be connected to a power supply only
of the type described in these operation instructions or as
marked on the product.
8. The power supply cord of the product should be unplugged
from the outlet when the product is left unused for a long
period of time.
9. Care should be taken so that objects do not fall, or liquids
are not spilled into the enclosure through openings.
10. The product should be serviced by qualified service
personnel when:
A. The power supply cord has been damaged; or
B. Objects have fallen or liquids have been spilled
onto the product; or
C. The product has been exposed to rain; or
D. The product does not appear to operate normally or
exhibits a marked change in performance; or
E. The product has been dropped or the enclosure
has been damaged.
11. Do not attempt to service the product beyond those
means described in this operating manual. All other
servicing should be referred to qualified service personnel.
Trademarks: The Nord Lead logo is registred trademark of Clavia DMI AB. All other
trademarks mentioned in this publication are the properties of their respective holders.
Specifications and appearances are subject to change without notice.
Copyright by Clavia DMI AB, 2001

NORD LEAD 3 V1.2x Table of contents
I
Table of contents
Table of contentsTable of contents
Table of contents
1.
1. 1.
1. Introduction
IntroductionIntroduction
Introduction .........................................................
..................................................................................................................
......................................................... 7777
Welcome
WelcomeWelcome
Welcome .......................................................................................
..............................................................................................................................................................................
....................................................................................... 7777
About this manual
About this manualAbout this manual
About this manual ......................................................................
............................................................................................................................................
...................................................................... 7777
Reading the manual in Adobe Acrobat Reader..........................................................................7
Clavia on the Internet
Clavia on the InternetClavia on the Internet
Clavia on the Internet ...............................................................
..............................................................................................................................
............................................................... 7777
2.
2. 2.
2. Overview
OverviewOverview
Overview ................................................................
................................................................................................................................
................................................................ 8888
Nord Lead 3 and Rack 3 front panels
Nord Lead 3 and Rack 3 front panelsNord Lead 3 and Rack 3 front panels
Nord Lead 3 and Rack 3 front panels.....................................
..........................................................................
..................................... 8888
Left (Top) panel section............................................................................................................8
Right (bottom) panel section ....................................................................................................9
Nord Lead 3 and Rack 3 rear panel
Nord Lead 3 and Rack 3 rear panelNord Lead 3 and Rack 3 rear panel
Nord Lead 3 and Rack 3 rear panel.........................................
..................................................................................
......................................... 9999
Connections ...........................................................................................................................10
Connecting pedals ..................................................................................................................10
Nord Lead 3 block diagram
Nord Lead 3 block diagramNord Lead 3 block diagram
Nord Lead 3 block diagram .....................................................
..........................................................................................................
..................................................... 11
1111
11
Advanced Subtractive Synthesis
Advanced Subtractive SynthesisAdvanced Subtractive Synthesis
Advanced Subtractive Synthesis............................................
........................................................................................
............................................ 11
1111
11
3.
3. 3.
3. Getting started
Getting startedGetting started
Getting started ..................................................
....................................................................................................
..................................................12
1212
12
Basic MIDI settings
Basic MIDI settingsBasic MIDI settings
Basic MIDI settings ..................................................................
....................................................................................................................................
.................................................................. 12
1212
12
Note Trig (Nord Rack 3)........................................................................................................13
Selecting Programs
Selecting ProgramsSelecting Programs
Selecting Programs .................................................................
..................................................................................................................................
................................................................. 13
1313
13
Using the Slots
Using the SlotsUsing the Slots
Using the Slots ........................................................................
................................................................................................................................................
........................................................................ 13
1313
13
Layering
LayeringLayering
Layering .....................................................................................
..........................................................................................................................................................................
..................................................................................... 14
1414
14
Activating Slots.......................................................................................................................14
Deactivating Slots...................................................................................................................14
Polyphony ..............................................................................................................................14
Replacing a Program in the layer.............................................................................................14
Keyboard Split
Keyboard SplitKeyboard Split
Keyboard Split ..........................................................................
....................................................................................................................................................
.......................................................................... 15
1515
15
Setting the Split Point.............................................................................................................15
Combining Split and Layer.....................................................................................................16
Performances
PerformancesPerformances
Performances ............................................................................
........................................................................................................................................................
............................................................................ 17
1717
17
Alternating between Program Mode and Performance Mode
Alternating between Program Mode and Performance ModeAlternating between Program Mode and Performance Mode
Alternating between Program Mode and Performance Mode17
1717
17
Polyphonic and monophonic operation
Polyphonic and monophonic operationPolyphonic and monophonic operation
Polyphonic and monophonic operation ..................................
....................................................................
.................................. 17
1717
17
Unison....................................................................................................................................18
Pitch Stick and Modulation Wheel
Pitch Stick and Modulation WheelPitch Stick and Modulation Wheel
Pitch Stick and Modulation Wheel .........................................
..................................................................................
......................................... 18
1818
18
Pitch Stick (Nord Lead 3 only)...............................................................................................18
Pitch Bend range settings........................................................................................................18
Modulation Wheel and Mod Wheel MIDI data .....................................................................19
Master Tune ...........................................................................................................................19
Using a sustain pedal
Using a sustain pedalUsing a sustain pedal
Using a sustain pedal ..............................................................
............................................................................................................................
.............................................................. 20
2020
20
Using a control (expression) pedal
Using a control (expression) pedalUsing a control (expression) pedal
Using a control (expression) pedal........................................
................................................................................
........................................ 20
2020
20
The ‘Panic’ button
The ‘Panic’ buttonThe ‘Panic’ button
The ‘Panic’ button.....................................................................
..........................................................................................................................................
..................................................................... 20
2020
20

Table of contents NORD LEAD 3 V1.2x
II
4.
4. 4.
4. Editing Programs
Editing ProgramsEditing Programs
Editing Programs ...............................................
..............................................................................................
............................................... 21
2121
21
Editing a Program
Editing a ProgramEditing a Program
Editing a Program .....................................................................
..........................................................................................................................................
.....................................................................21
2121
21
The knobs with circular LED graphs ..................................................................................... 21
The buttons ........................................................................................................................... 22
Editing a Program in a layer
Editing a Program in a layerEditing a Program in a layer
Editing a Program in a layer....................................................
........................................................................................................
....................................................22
2222
22
Reverting to the original Program
Reverting to the original ProgramReverting to the original Program
Reverting to the original Program .........................................
..................................................................................
.........................................22
2222
22
Using ‘Sound Init’ and ‘FM Init’
Using ‘Sound Init’ and ‘FM Init’Using ‘Sound Init’ and ‘FM Init’
Using ‘Sound Init’ and ‘FM Init’ ...............................................
..............................................................................................
...............................................22
2222
22
Muting parameter sections
Muting parameter sectionsMuting parameter sections
Muting parameter sections ......................................................
............................................................................................................
......................................................23
2323
23
Storing a Program
Storing a ProgramStoring a Program
Storing a Program ....................................................................
........................................................................................................................................
....................................................................23
2323
23
Storing without changing the Program name......................................................................... 24
Storing with the possibility to select Category and/or change the Program name ................... 24
Searching for and loading Programs
Searching for and loading ProgramsSearching for and loading Programs
Searching for and loading Programs .....................................
..........................................................................
.....................................26
2626
26
Search for a Program in a specific Category............................................................................ 26
Search for a Program in alphabetical order............................................................................. 27
Copying Programs
Copying ProgramsCopying Programs
Copying Programs .....................................................................
..........................................................................................................................................
.....................................................................27
2727
27
From one memory location to another................................................................................... 27
From one Slot to another....................................................................................................... 28
Deleting Programs
Deleting ProgramsDeleting Programs
Deleting Programs ....................................................................
........................................................................................................................................
....................................................................28
2828
28
Downloading Programs via MIDI
Downloading Programs via MIDIDownloading Programs via MIDI
Downloading Programs via MIDI..............................................
............................................................................................
..............................................28
2828
28
5.
5. 5.
5. Morph groups
Morph groupsMorph groups
Morph groups .....................................................
..........................................................................................................
..................................................... 29
2929
29
Assign parameters to a Morph group
Assign parameters to a Morph groupAssign parameters to a Morph group
Assign parameters to a Morph group .....................................
..........................................................................
.....................................29
2929
29
Deassign parameters from a Morph group
Deassign parameters from a Morph groupDeassign parameters from a Morph group
Deassign parameters from a Morph group ............................
........................................................
............................31
3131
31
Copy a Morph Group to another source
Copy a Morph Group to another sourceCopy a Morph Group to another source
Copy a Morph Group to another source................................
................................................................
................................31
3131
31
A word about Keyboard Morph
A word about Keyboard MorphA word about Keyboard Morph
A word about Keyboard Morph ................................................
................................................................................................
................................................31
3131
31
A word about Control Pedal Morph
A word about Control Pedal MorphA word about Control Pedal Morph
A word about Control Pedal Morph.......................................
..............................................................................
.......................................31
3131
31
Morphing clock-synched parameters
Morphing clock-synched parametersMorphing clock-synched parameters
Morphing clock-synched parameters ......................................
............................................................................
......................................31
3131
31
6.
6. 6.
6. Performances
PerformancesPerformances
Performances .....................................................
..........................................................................................................
..................................................... 32
3232
32
What is a Performance?
What is a Performance?What is a Performance?
What is a Performance? ...........................................................
......................................................................................................................
...........................................................32
3232
32
Recalling a Performance
Recalling a PerformanceRecalling a Performance
Recalling a Performance..........................................................
....................................................................................................................
..........................................................32
3232
32
Creating a Performance
Creating a PerformanceCreating a Performance
Creating a Performance ...........................................................
......................................................................................................................
...........................................................33
3333
33
Selecting Programs for the Slots............................................................................................. 33
Editing................................................................................................................................... 33
Solo single sounds in a Performance....................................................................................... 33
Keyboard Split....................................................................................................................... 34
Storing a Performance
Storing a PerformanceStoring a Performance
Storing a Performance .............................................................
..........................................................................................................................
.............................................................36
3636
36
Storing without changing the name ....................................................................................... 36
Storing with the possibility to change the name ..................................................................... 36
Naming single sounds in Performances.................................................................................. 38
Extracting single sounds from a Performance
Extracting single sounds from a PerformanceExtracting single sounds from a Performance
Extracting single sounds from a Performance .....................
..........................................
.....................39
3939
39
Extract a sound and save it as a Program................................................................................ 39
Extract a sound, rename it and save it as a Program ............................................................... 39
Deleting Performances
Deleting PerformancesDeleting Performances
Deleting Performances ............................................................
........................................................................................................................
............................................................40
4040
40

NORD LEAD 3 V1.2x Table of contents
III
Exiting Performance Mode
Exiting Performance ModeExiting Performance Mode
Exiting Performance Mode.......................................................
..............................................................................................................
....................................................... 40
4040
40
What a Performance contains
What a Performance containsWhat a Performance contains
What a Performance contains .................................................
..................................................................................................
................................................. 41
4141
41
For each Slot...........................................................................................................................41
For the entire instrument........................................................................................................41
Downloading Performances via MIDI
Downloading Performances via MIDIDownloading Performances via MIDI
Downloading Performances via MIDI......................................
............................................................................
...................................... 41
4141
41
7.
7. 7.
7. Panel reference
Panel referencePanel reference
Panel reference..................................................
....................................................................................................
..................................................42
4242
42
LFO 1 & 2
LFO 1 & 2LFO 1 & 2
LFO 1 & 2...................................................................................
......................................................................................................................................................................
................................................................................... 42
4242
42
Rate ........................................................................................................................................42
Waveform...............................................................................................................................44
Destination.............................................................................................................................45
Amount ..................................................................................................................................46
Env/KB snc ............................................................................................................................46
Mono .....................................................................................................................................46
LFO behavior in Mono mode.................................................................................................46
LFO modulation table............................................................................................................48
Modulation Envelope
Modulation EnvelopeModulation Envelope
Modulation Envelope ...............................................................
..............................................................................................................................
............................................................... 49
4949
49
Attack.....................................................................................................................................49
Decay/Release.........................................................................................................................49
Destination.............................................................................................................................50
Amount ..................................................................................................................................51
Repeat ....................................................................................................................................52
Mod Envelope modulation table.............................................................................................52
Oscillator 1 & 2
Oscillator 1 & 2Oscillator 1 & 2
Oscillator 1 & 2.......................................................................
..............................................................................................................................................
....................................................................... 53
5353
53
Waveform selector, Shape and Sync........................................................................................53
Oscillator Sync .......................................................................................................................60
Oscillator 2
Oscillator 2Oscillator 2
Oscillator 2 ..............................................................................
............................................................................................................................................................
.............................................................................. 63
6363
63
Waveform selector, Shape and Sync........................................................................................63
KBT off ..................................................................................................................................66
Fine tune ................................................................................................................................67
Coarse tune.............................................................................................................................67
The Pitch LED Display ..........................................................................................................67
OOOOscillator
scillator scillator
scillator Modulation
ModulationModulation
Modulation ............................................................
........................................................................................................................
............................................................ 70
7070
70
Modulation amount ...............................................................................................................70
Mode......................................................................................................................................70
Oscillator Mixer
Oscillator MixerOscillator Mixer
Oscillator Mixer.......................................................................
..............................................................................................................................................
....................................................................... 77
7777
77
Osc Mix..................................................................................................................................77
Oscillator Mixer Noise (Noise3).............................................................................................77
Amplifier Envelope
Amplifier EnvelopeAmplifier Envelope
Amplifier Envelope....................................................................
........................................................................................................................................
.................................................................... 78
7878
78
Attack.....................................................................................................................................79
Decay .....................................................................................................................................79
Sustain....................................................................................................................................80
Release....................................................................................................................................80
ADSR Envelope behavior .......................................................................................................80
Output Level
Output LevelOutput Level
Output Level .............................................................................
..........................................................................................................................................................
............................................................................. 81
8181
81
Filter overview
Filter overviewFilter overview
Filter overview..........................................................................
....................................................................................................................................................
.......................................................................... 82
8282
82

Table of contents NORD LEAD 3 V1.2x
IV
Filter Envelope
Filter EnvelopeFilter Envelope
Filter Envelope .........................................................................
..................................................................................................................................................
.........................................................................82
8282
82
Attack .................................................................................................................................... 83
Decay..................................................................................................................................... 83
Sustain................................................................................................................................... 83
Release................................................................................................................................... 83
Velocity, EnvAmt and Invert ................................................................................................. 83
Single Filter Modes
Single Filter ModesSingle Filter Modes
Single Filter Modes ..................................................................
....................................................................................................................................
..................................................................84
8484
84
Frequency1 ............................................................................................................................ 85
Filter slope (roll-off)............................................................................................................... 85
Resonance.............................................................................................................................. 85
Filter type .............................................................................................................................. 87
KB Track............................................................................................................................... 89
Multi Filter Modes
Multi Filter ModesMulti Filter Modes
Multi Filter Modes ....................................................................
........................................................................................................................................
....................................................................90
9090
90
Freq2/Dist ............................................................................................................................. 90
Multi Filter type .................................................................................................................... 91
Osc2Byp/Noise3 only............................................................................................................ 96
Filt.Env.................................................................................................................................. 96
The left (top) panel section
The left (top) panel sectionThe left (top) panel section
The left (top) panel section .....................................................
..........................................................................................................
.....................................................97
9797
97
Arpeggio ................................................................................................................................ 97
Vibrato ................................................................................................................................ 105
Glide (portamento).............................................................................................................. 106
Voice mode.......................................................................................................................... 106
Polyphonic Legato with polyphonic Glide ........................................................................... 108
Unison................................................................................................................................. 109
Keyboard Split..................................................................................................................... 110
Octave Shift......................................................................................................................... 111
Note Trig (Nord Rack 3)..................................................................................................... 112
Chord Memory.................................................................................................................... 112
Stack.................................................................................................................................... 113
KB Hold.............................................................................................................................. 114
Panic.................................................................................................................................... 115
Pitch Stick (Nord Lead 3).................................................................................................... 115
Pitch bend range.................................................................................................................. 115
Modulation Wheel............................................................................................................... 116
Active Device....................................................................................................................... 116
Menu functions
Menu functionsMenu functions
Menu functions.......................................................................
..............................................................................................................................................
....................................................................... 117
117117
117
Master Clock ....................................................................................................................... 117
MIDI................................................................................................................................... 119
Dump One .......................................................................................................................... 122
Synth ................................................................................................................................... 123
FM Init................................................................................................................................ 129
Sound .................................................................................................................................. 130
Sound Init ........................................................................................................................... 132
Useful functions
Useful functionsUseful functions
Useful functions....................................................................
........................................................................................................................................
.................................................................... 133
133133
133
Monitor............................................................................................................................... 133
Copy & Paste....................................................................................................................... 133
Mute.................................................................................................................................... 134
Special information in the Display....................................................................................... 135

NORD LEAD 3 V1.2x Table of contents
V
8.
8. 8.
8. Factory Presets and OS
Factory Presets and OSFactory Presets and OS
Factory Presets and OS.................................
..................................................................
................................. 137
137137
137
Flash memory
Flash memoryFlash memory
Flash memory...........................................................................
......................................................................................................................................................
...........................................................................137
137137
137
Factory presets
Factory presetsFactory presets
Factory presets ......................................................................
............................................................................................................................................
......................................................................137
137137
137
Restoring the factory presets .................................................................................................137
OS upgrades
OS upgradesOS upgrades
OS upgrades............................................................................
........................................................................................................................................................
............................................................................137
137137
137
9.
9. 9.
9. Basic MIDI functions
Basic MIDI functionsBasic MIDI functions
Basic MIDI functions.......................................
..............................................................................
....................................... 138
138138
138
About the MIDI implementation
About the MIDI implementationAbout the MIDI implementation
About the MIDI implementation .............................................
..........................................................................................
............................................. 138
138138
138
Note On/Off ........................................................................................................................138
Pitch Bend............................................................................................................................138
Controllers............................................................................................................................138
Aftertouch ............................................................................................................................138
Program Change...................................................................................................................139
Bank Select ...........................................................................................................................139
MIDI SysEx (System Exclusive)............................................................................................139
Using Nord Lead 3 with a sequencer
Using Nord Lead 3 with a sequencerUsing Nord Lead 3 with a sequencer
Using Nord Lead 3 with a sequencer ...................................
......................................................................
................................... 139
139139
139
Connections .........................................................................................................................139
Local On/Off........................................................................................................................139
MIDI channels .....................................................................................................................140
Program Change & Bank Select............................................................................................140
Controllers............................................................................................................................140
MIDI Clock .........................................................................................................................141
Some notes about Controllers and “Chasing” .......................................................................141
Program/Performance SysEx dumps
Program/Performance SysEx dumpsProgram/Performance SysEx dumps
Program/Performance SysEx dumps .....................................
..........................................................................
..................................... 141
141141
141
Send a single Program/Performance Dump ..........................................................................141
Send a Bank Dump ..............................................................................................................142
Receive a Bulk Dump ...........................................................................................................142
10.
10. 10.
10. MIDI implementation
MIDI implementationMIDI implementation
MIDI implementation ......................................
............................................................................
...................................... 143
143143
143
MIDI Controller List
MIDI Controller ListMIDI Controller List
MIDI Controller List .............................................................
..........................................................................................................................
............................................................. 143
143143
143
System Exclusive implementation
System Exclusive implementationSystem Exclusive implementation
System Exclusive implementation .........................................
..................................................................................
......................................... 147
147147
147
General Message format........................................................................................................147
Program Dumps ...................................................................................................................147
Patch (Program) Dump Request...........................................................................................150
Performance Dump ..............................................................................................................151
Performance Dump Request.................................................................................................154
All Controllers Request (Message Type $40) ........................................................................155
Program and Performance data formats ................................................................................155
Patch (Program) dump format..............................................................................................156
Morph group parameter list..................................................................................................158
Performance data format.......................................................................................................159
MIDI Implementation Chart
MIDI Implementation ChartMIDI Implementation Chart
MIDI Implementation Chart ....................................................
........................................................................................................
.................................................... 160
160160
160
Index
IndexIndex
Index ......................................................................
............................................................................................................................................
...................................................................... 161
161161
161


NORD LEAD 3 V1.2x 1. Introduction: Welcome
Page 7
1. I
1. I1. I
1. IN
NN
NTTTTRRRRO
OO
OD
DD
DU
UU
UC
CC
CTTTTIIIIO
OO
ON
NN
N
WWWW
EEEELLLLCCCCOOOOMMMMEEEE
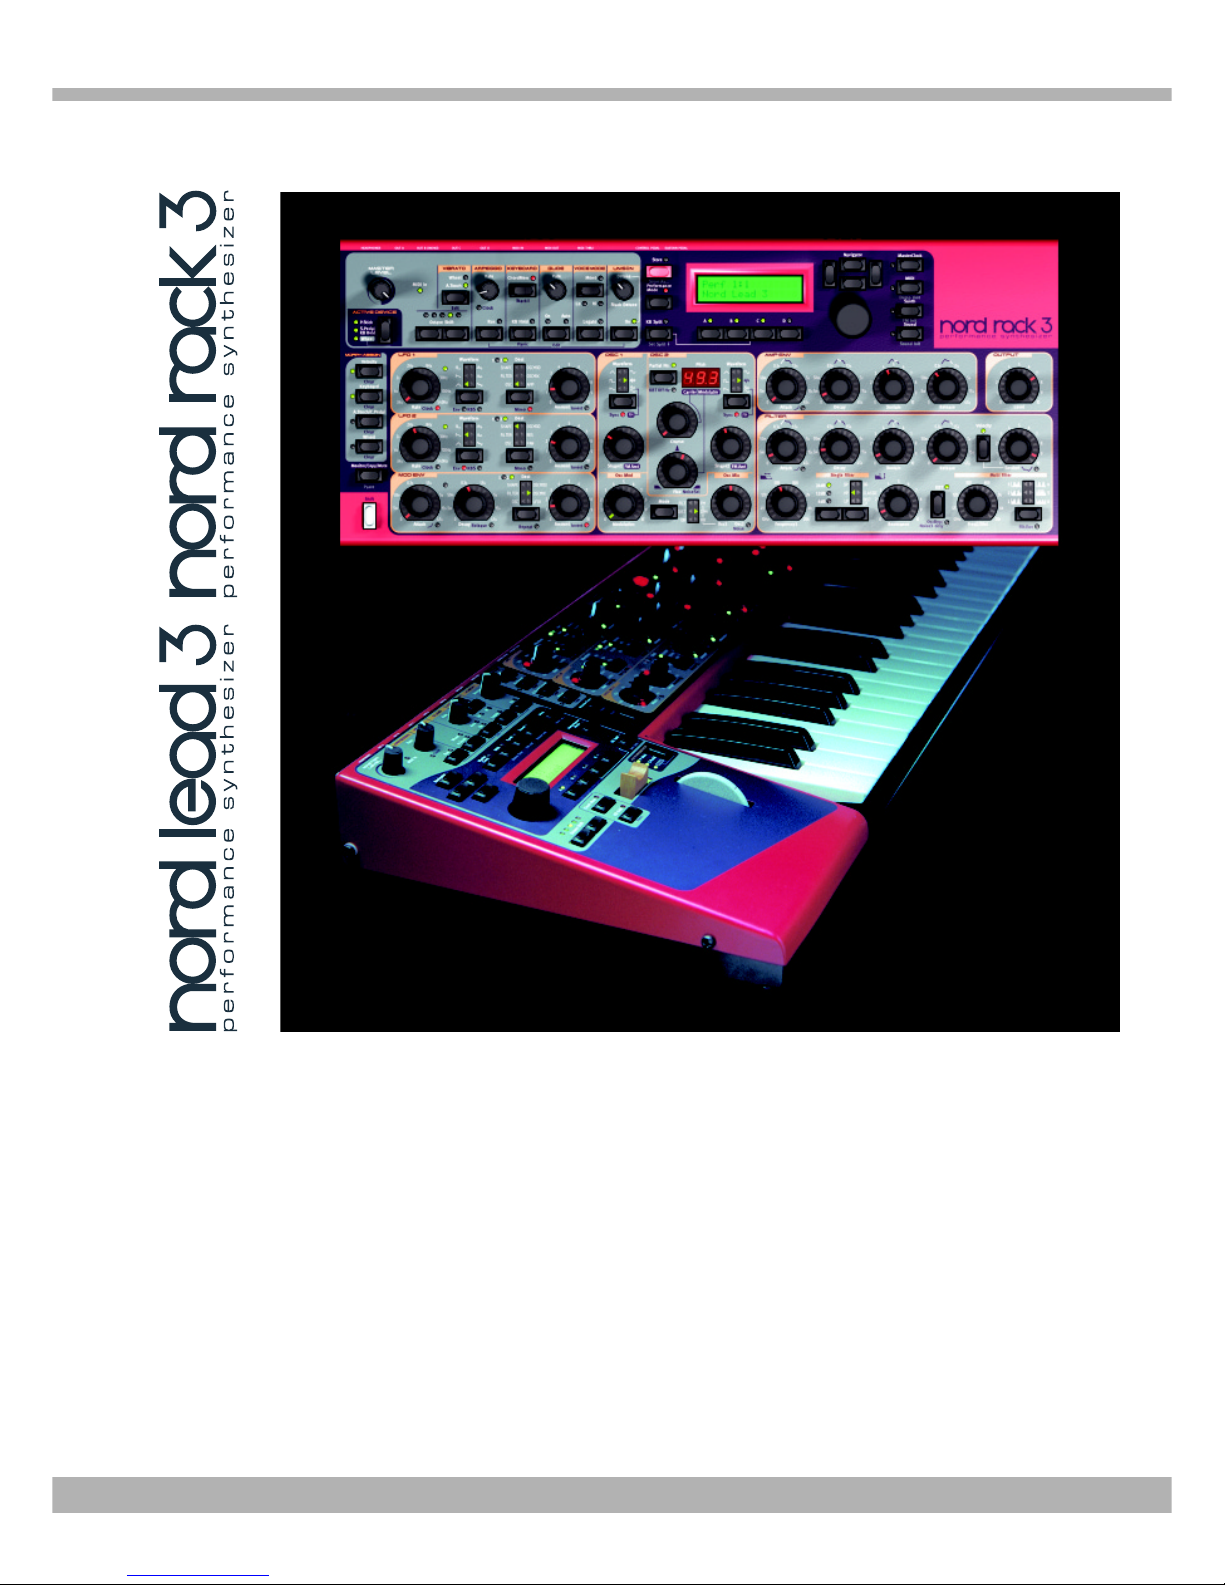
We’d first like to thank you for purchasing the Nord Lead 3/Nord Rack 3 Advanced Subtractive Performance Synthesizer. Nord Lead 3 is the third generation of the Nord Lead series. With the first Nord
Lead back in 1995, Clavia introduced the 'Virtual Analog' concept: analog synthesis emulated in realtime by digital signal processors. With Nord Lead 3 'Virtual Analog' is not a correct definition anymore
- it can do so much more. The Nord Lead 3 sound engine offers a combination of traditional shapable
analog waveforms and an extremely user-friendly 2 or 4 operator FM engine. It's about all you need to
create most types of electronic sounds. Add to this the new adjustable Unison to beef up the sound without reducing the poly-phony. But not all the magic lies in the sound generation. A major part is in the
front panel. With Nord Lead 3 Clavia introduces the industry’s most user-friendly and intuitive user interface. Rotary encoders combined with circular LED graphs give you total and immediate control. Creating and editing sounds has never been easier. With Nord Lead 3 the 'Virtual Analog' synthesizer steps
up to the next level. Welcome to the 'Advanced Subtractive Performance Synthesizer'.
AAAA
BBBBOOOOUUUUTTTT
TTTTHHHHIIIISSSS
MMMMAAAANNNNUUUUAAAALLLL
If you have some basic knowledge about programmable analog synthesizers, you probably won’t need this
manual much. If you don’t have that much experience of synthesis, there are detailed descriptions and
graphs explaining the theoretics behind the different “modules” of the Nord Lead 3. The manual is arranged mainly as a reference manual describing all the functions of Nord Lead 3. In many cases you’ll get
tips on how to practically use the functions, alone and also together with other functions. Every function
described in this manual also applies to the rack version of Nord Lead 3, the Nord Rack 3, unless otherwise is stated.
Every time this manual wants your attention to an object on the synthesizer, the name of that object will
be printed
LIKE THIS
, e.g. ‘click on the S
TORE
button’. The backlit LCD on Nord Lead 3 is always re-
ferred to as the D
ISPLAY
. Whenever there is a reference to the ‘keyboard’, that reference will also apply to
any incoming MIDI notes to the Nord Lead 3 instrument.
RRRR
EEEEAAAADDDDIIIINNNNGGGG
TTTTHHHHEEEE
MMMMAAAANNNNUUUUAAAALLLL
IIIINNNN
A
A A
A
DDDDOOOOBBBBEEEE
A
A A
A
CCCCRRRROOOOBBBBAAAATTTT
R
R R
R
EEEEAAAADDDDEEEERRRR
This manual is also available in the digital PDF-file format. It can be downloaded, free of charge, from
Clavia’s web site at http://www.clavia.se
. When reading the manual as PDF-file, you will need Adobe Ac-
robat Reader 4.0 or later. This program can be downloaded, free of charge, at http://www.adobe.com
.
With Adobe Acrobat Reader it is possible to use special navigation features like hyperlinks. This means
that you can click with the mouse on a word or sentence and automatically get to the location indicated
by the word/sentence. To better show what words or sentences are hyperlinked in this manual, these
words are written in magenta.
CCCC
LLLLAAAAVVVVIIIIAAAA
OOOONNNN
TTTTHHHHEEEE
I
I I
I
NNNNTTTTEEEERRRRNNNNEEEETTTT
If you have access to the Internet, you’re very welcome to visit http://www.clavia.se. There you will find
the latest information about Nord Lead 3 and other Clavia products. In the future you’ll also be able to
download new Nord Lead 3 sounds and software upgrades, free of charge.
2. Overview: Nord Lead 3 and Rack 3 front panels NORD LEAD 3 V1.2x
Page 8
2. O
2. O2. O
2. OV
VV
VEEEERRRRVVVVIIIIEEEEW
WW
W
NNNN
OOOORRRRDDDD
L
L L
L
EEEEAAAADDDD
3
3 3
3
AAAANNNNDDDD
R
R R
R
AAAACCCCKKKK
3
3 3
3
FFFFRRRROOOONNNNTTTT
PPPPAAAANNNNEEEELLLLSSSS
LLLL
EEEEFFFFTTTT
(T
(T (T
(T
OOOOPPPP
)
) )
)
PPPPAAAANNNNEEEELLLL
SSSSEEEECCCCTTTTIIIIOOOONNNN
MMMM
AAAASSSSTTTTEEEERRRR
LLLL
EEEEVVVVEEEELLLL
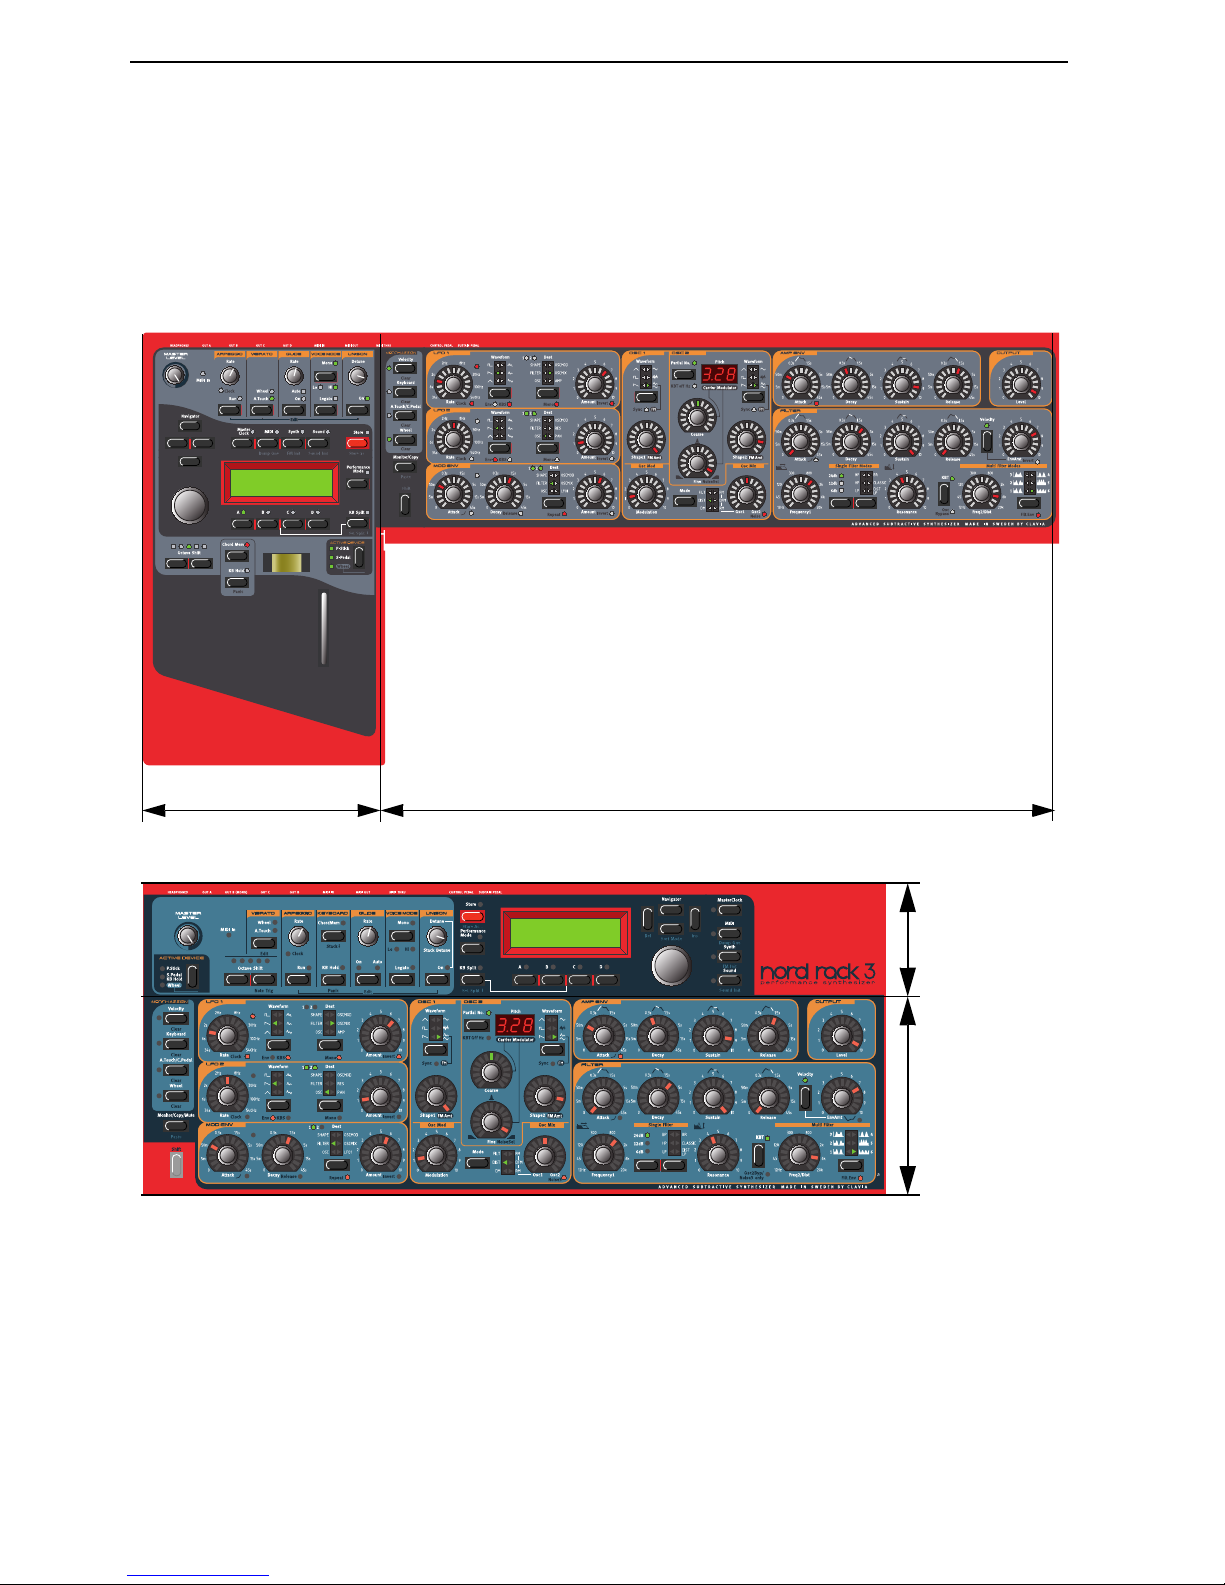
The M
ASTER LEVEL
knob controls the output level of all four OUT jacks and the H
EADPHONES
output.
The M
ASTER LEVEL
knob does not send or receive any MIDI CC# but is used to control the entire
instrument’s output level. (For info on how to control the level(s) of the individual sounds and via
MIDI, please refer to “Output Level” on page 81).
Left panel section
Right panel section
Prg 1:1
Chops Bass TB
Top panel section
Bottom panel
section
Prg 1:1
Chops Bass TB
NORD LEAD 3 V1.2x 2. Overview: Nord Lead 3 and Rack 3 rear panel
Page 9
NNNN
AAAAVVVVIIIIGGGGAAAATTTTOOOORRRR
BBBBUUUUTTTTTTTTOOOONNNNSSSS
,
, ,
, RRRR
OOOOTTTTAAAARRRRYYYY
D
D D
D
IIIIAAAALLLL
AAAANNNNDDDD
DDDD
IIIISSSSPPPPLLLLAAAAYYYY
Below the M
ASTER LEVEL
knob is a set of four buttons, the N
AVIGATOR
buttons. These are used to nav-
igate in the D
ISPLAY
and to select different functions. Below the N
AVIGATOR
buttons is the R
OTARY DI
-
AL
. With the R
OTARY DIAL
you can select sounds, enter various kind of data etc.
SSSS
LLLLOOOOTTTT
BBBBUUUUTTTTTTTTOOOONNNNSSSS
Below the D
ISPLAY
are the four S
LOT
buttons (A, B, C and D). You can load one sound in each of the
Slots at a time.
PPPP
EEEERRRRFFFFOOOORRRRMMMMAAAANNNNCCCCEEEE
CCCCOOOONNNNTTTTRRRROOOOLLLLSSSS
Below the D
ISPLAY
section you find various performance controls, such as the P
ITCH STICK
(not Nord
Rack 3), M
OD WHEEL
(not Nord Rack 3), C
HORD MEMORY
, H
OLD
and A
CTIVE DEVICE
.
RRRR
IIIIGGGGHHHHTTTT
(
( (
(
BBBBOOOOTTTTTTTTOOOOMMMM
)
) )
)
PPPPAAAANNNNEEEELLLL
SSSSEEEECCCCTTTTIIIIOOOONNNN
MMMM
OOOORRRRPPPPHHHH
A
A A
A
SSSSSSSSIIIIGGGGNNNN
BBBBUUUUTTTTTTTTOOOONNNNSSSS
The four M
ORPH ASSIGN
buttons are used when you want to control several parameters in a sound from
single control sources.
TTTT
HHHHEEEE
S
S S
S
HHHHIIIIFFFFTTTT
BBBBUUUUTTTTTTTTOOOONNNN
Below the M
ORPH ASSIGN
buttons is the S
HIFT
button. It’s used to alternate parameter functions and
also to activate various other functions.
SSSS
OOOOUUUUNNNNDDDD
PPPPAAAARRRRAAAAMMMMEEEETTTTEEEERRRRSSSS
All parameters (knobs and buttons) surrounded by yellow frames are used for creating and controlling
sounds. Here you also find the new type of intuitive knobs combined with circular LED graphs that make
creating and editing sounds extremely easy.
NNNN
OOOORRRRDDDD
L
L L
L
EEEEAAAADDDD
3
3 3
3
AAAANNNNDDDD
R
R R
R
AAAACCCCKKKK
3
3 3
3
RRRREEEEAAAARRRR
PPPPAAAANNNNEEEELLLL
2. Overview: Nord Lead 3 and Rack 3 rear panel NORD LEAD 3 V1.2x
Page 10
CCCC
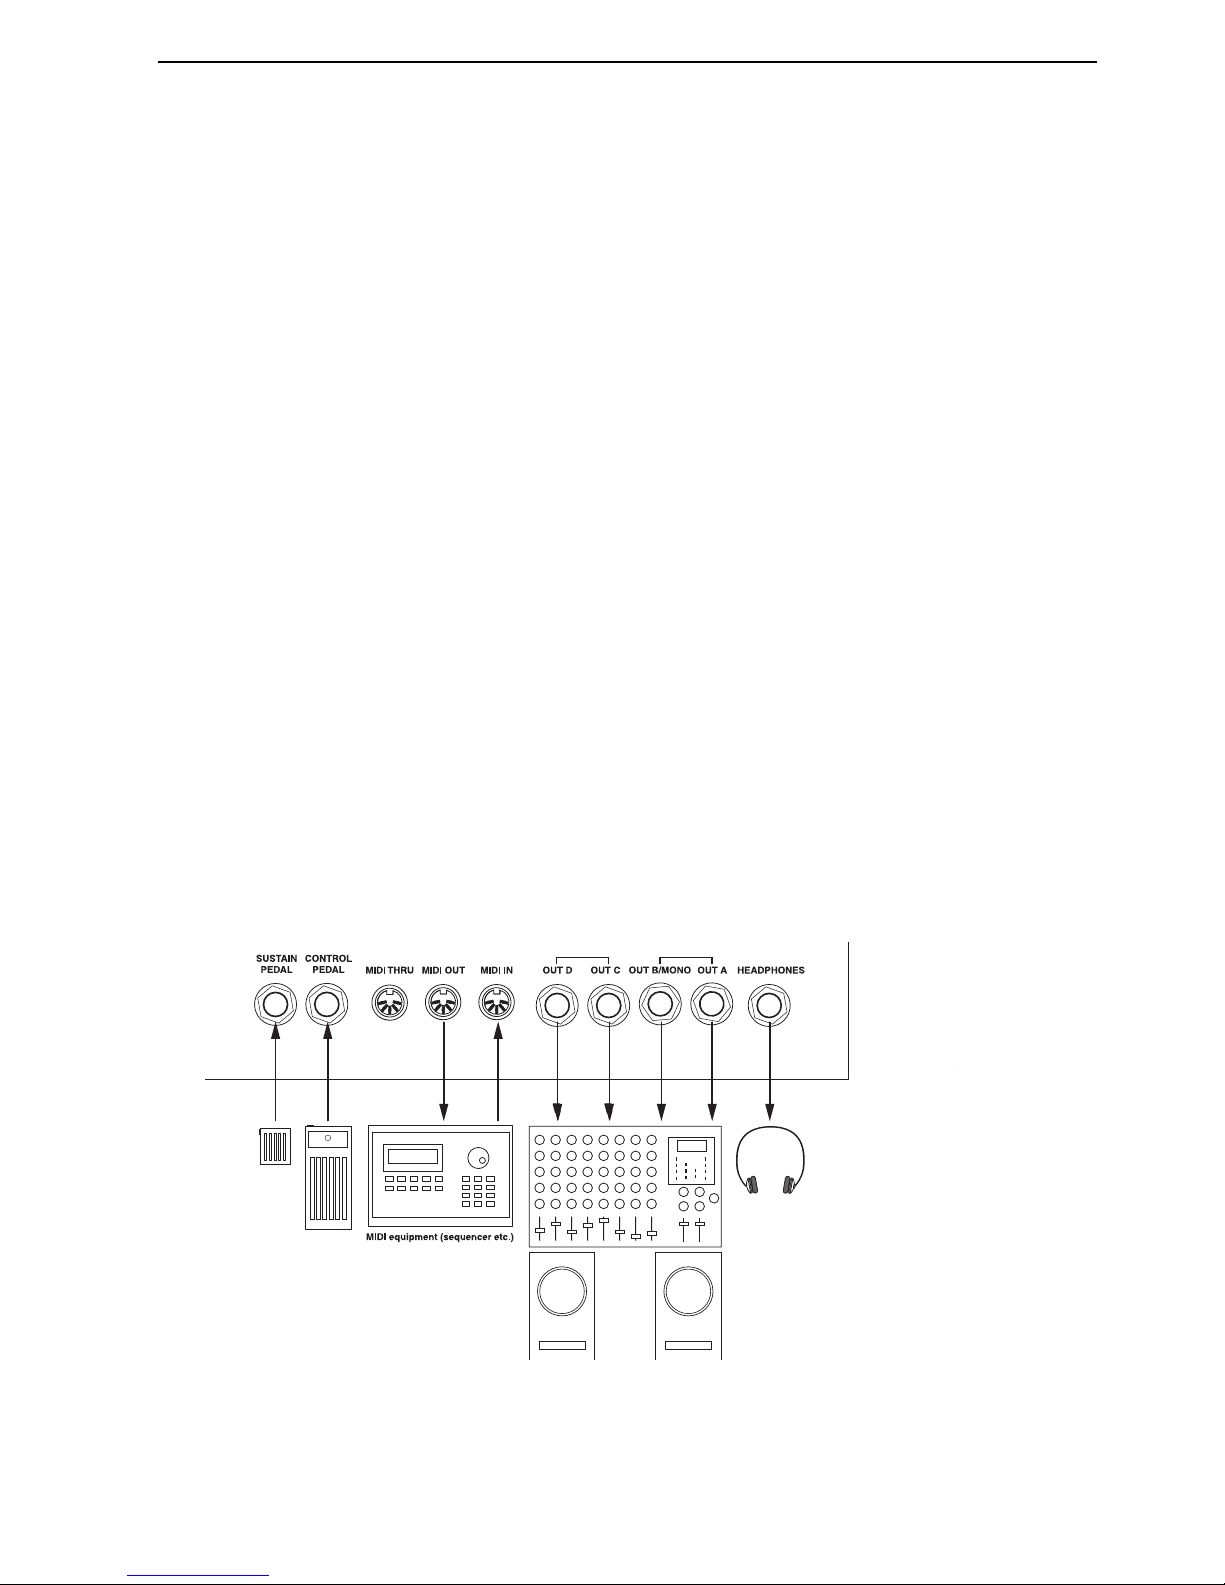
OOOONNNNNNNNEEEECCCCTTTTIIIIOOOONNNNSSSS
• Make all connections before turning on your power amplifier!
• If you are using a Nord Lead 3 together with a MIDI keyboard, connect a MIDI cable from MIDI
Out on the keyboard to MIDI I
N
on the Nord Lead 3.
• All signal cables used with the Nord Lead 3 must be shielded.
• All four mono outputs (O
UT
A, OUT B, OUT C, OUT D) are line level and unbalanced. If you want
the sum of the signals on one separate output only, use O
UT
B.
• If you connect the Nord Lead 3 in stereo to your audio equipment, you should use O
UT
A in pair with
O
UT
B or OUT C in pair with OUT D.
CCCC
OOOONNNNNNNNEEEECCCCTTTTIIIINNNNGGGG
PPPPEEEEDDDDAAAALLLLSSSS
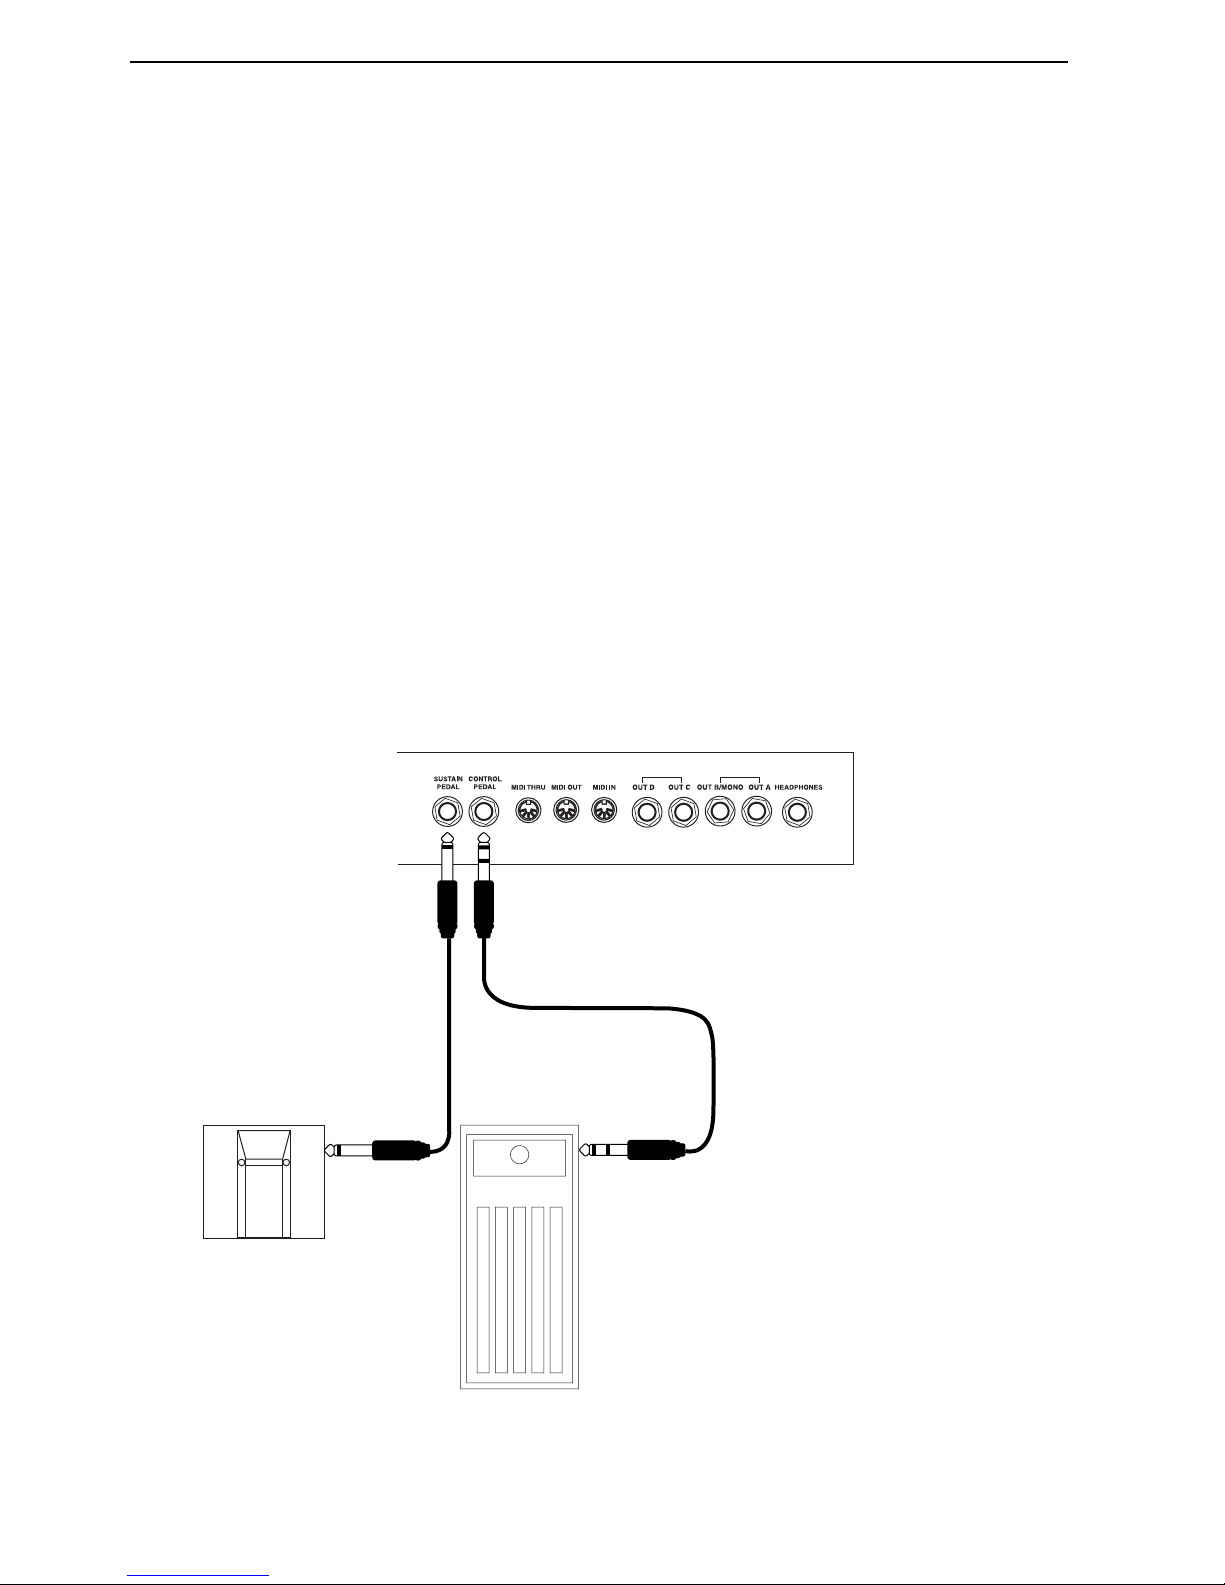
The Nord Lead 3 has two pedal inputs, one for a sustain pedal and one for a control pedal (an expressiontype pedal, used to control various parameters). Connect the pedals as shown in the figure below:
• When connecting an expression-type pedal to the Control Pedal input, you should use a stereo cable
(Tip-Ring-Sleeve). Please note that the pedal must have a stereo output jack. The resistance range of
the Control Pedal should be 10 kOhm to 50 kOhm.
(For more detailed information on how to set up Nord Lead 3 for use with sustain and expression pedals,
see page 20).
NORD LEAD 3 V1.2x 2. Overview: Nord Lead 3 block diagram
Page 11
NNNN
OOOORRRRDDDD
L
L L
L
EEEEAAAADDDD
3
3 3
3
BBBBLLLLOOOOCCCCKKKK
DDDDIIIIAAAAGGGGRRRRAAAAMMMM
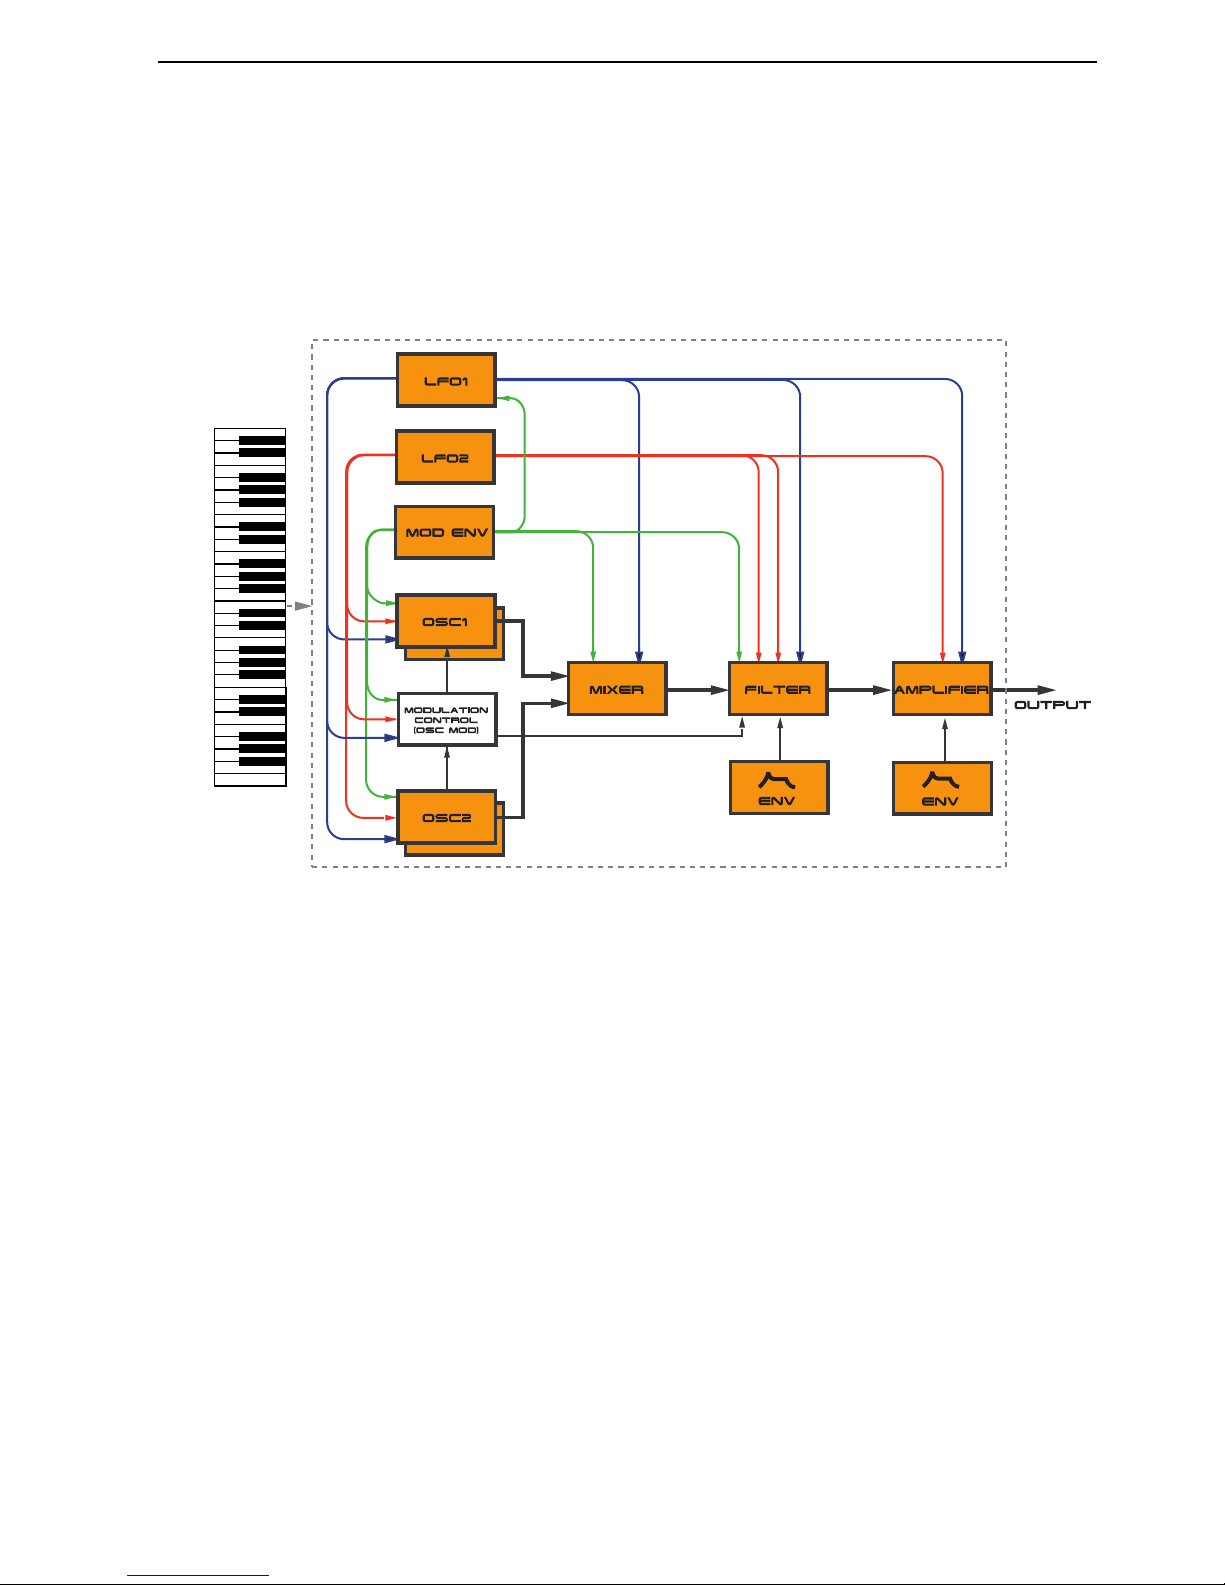
Below is a schematic overview of the sound and modulation building blocks and the signal flows in Nord
Lead 3. The filled lines indicate audio signal routings and the dashed lines control signal routings. The
diagram does not include the routing possibilities for the Morph Groups. The Morph function lets you
control up to 26 parameters from four separate control sources (4 x 26 parameters). There would be too
many lines in the diagram if all possible Morph routings were to be shown.
As you can see, Nord lead 3 offers vast control and modulation possibilities. Each of the building blocks
also has extensive possibilities for internal configurations. This is described in detail in Chapter "7. Panel
reference” on page 42.
AAAA
DDDDVVVVAAAANNNNCCCCEEEEDDDD
S
S S
S
UUUUBBBBTTTTRRRRAAAACCCCTTTTIIIIVVVVEEEE
S
S S
S
YYYYNNNNTTTTHHHHEEEESSSSIIIISSSS
Nord Lead 3 is the first “hard-wired” synthesizer to employ what Clavia call ‘Advanced Subtractive Synthesis’. The philosophy behind Advanced Subtractive Synthesis is to offer a flexible sound engine that
features both traditional “subtractive” waveforms and powerful and extremely user-friendly FM synthesis.
Each oscillator offers six different shapable waveforms to choose among. These waveforms can also be
synched using the additional sync oscillator of each oscillator group. The big advantage of having an extra
sync oscillator is that you don’t need to sacrifice an audio oscillator just to sync another. In other words,
you will always have at least two audio oscillators per voice even when using oscillator sync! The FM mode
of the oscillators is called ‘Dual Sine FM’. In this mode each oscillator forms a 2-operator FM engine, for
a total of 4 operators per voice. The oscillator section also boosts a number of exciting modulation possibilities, including the new Distortion Modulation and Filter FM. No matter what mode the oscillators
are in, you are always able to route their signals through the high-quality multi filter for further shaping.
This is what we mean by Advanced Subtractive Synthesis.
3. Getting started: Basic MIDI settings NORD LEAD 3 V1.2x
Page 12
3. G
3. G3. G
3. GE
EE
ETTTTTTTTIIIIN
NN
NG
GG
G
S
SS
STTTTAAAAR
RR
RTTTTEEEED
DD
D
BBBB
AAAASSSSIIIICCCC
MIDI
MIDI MIDI
MIDI
SSSSEEEETTTTTTTTIIIINNNNGGGGSSSS
If you are controlling the Nord Lead 3 from an external MIDI keyboard, the Nord Lead 3 must be set to
receive on the same MIDI channel that the MIDI keyboard transmits on.
1. Set the MIDI keyboard to transmit and receive on MIDI Channel 1. (This is the default setting
when Nord Lead 3 is shipped from factory).
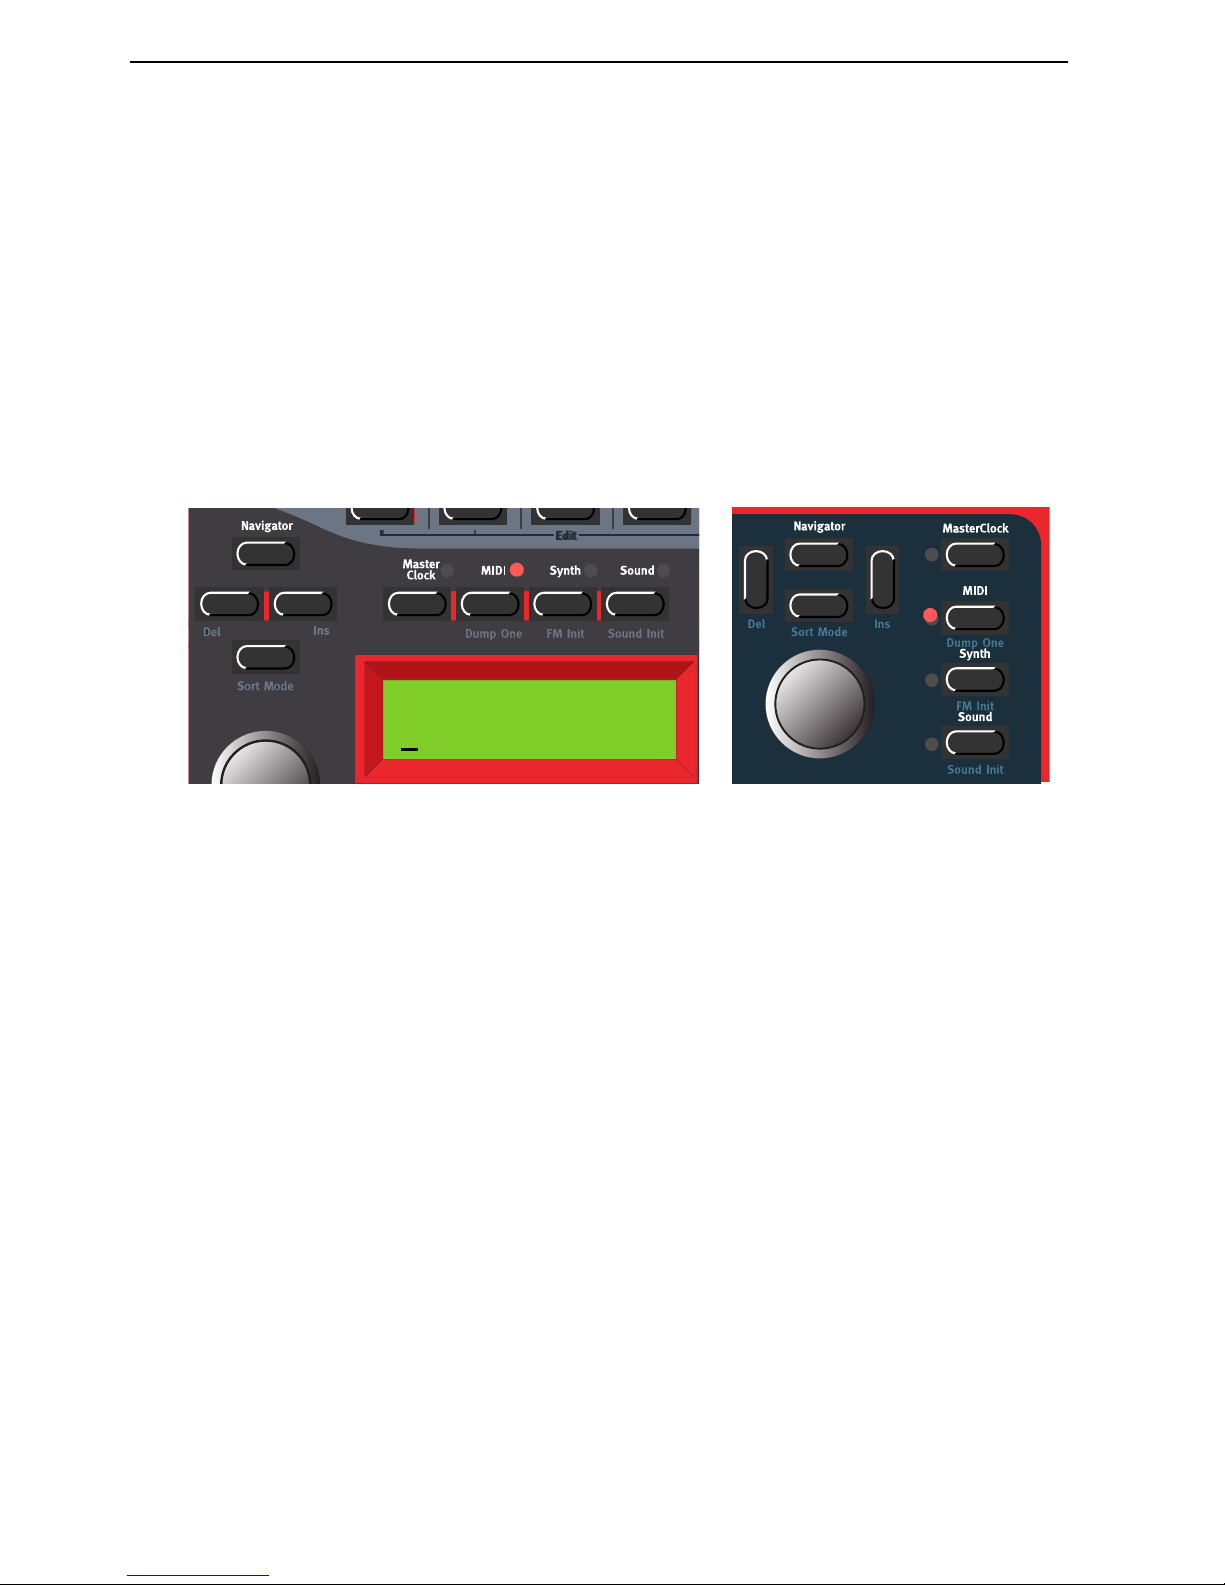
2. Press the MIDI button and the U
P/DOWN NAVIGATOR
button until the D
ISPLAY
reads:
3. Scroll with the R
OTARY DIAL
to select MIDI Channel 1 for Slot A.
4. Select MIDI Channels for the other three Slots by pressing the respective S
LOT
button and scrolling
with the R
OTARY DIAL
. Select, for example, MIDI Channel 2 for Slot B, 3 for Slot C and 4 for Slot
D.
5. Press the MIDI button to exit.
If you use Slot A when you play the Nord Lead 3 (if you like, together with other Slots), this basic
setting should be sufficient in most situations - also when playing Layers and Performances, as described later in this manual. For information on how to set up Nord Lead 3 for use with an external
sequencer, see “Using Nord Lead 3 with a sequencer” on page 139.
Slot Channels
1
2 3 4
NORD LEAD 3 V1.2x 3. Getting started: Selecting Programs
Page 13
NNNN
OOOOTTTTEEEE
T
T T
T
RRRRIIIIGGGG
(N
(N (N
(N
OOOORRRRDDDD
R
R R
R
AAAACCCCKKKK
3)
3) 3)
3)
If you shouldn’t have a MIDI keyboard connected to your Nord Rack 3 it can sometimes be convenient
to trig a note to audition a Program or Performance. You do this by pressing S
HIFT+RIGHT OCTAVE
S
HIFT
(N
OTE TRIG
) buttons. This will generate the note C4 for as long as you keep the buttons de-
pressed.
SSSS
EEEELLLLEEEECCCCTTTTIIIINNNNGGGG
P
P P
P
RRRROOOOGGGGRRRRAAAAMMMMSSSS
Programs are single sounds that are stored in the internal memory of Nord Lead 3. The internal Program
memory in Nord Lead 3 consists of 8 Banks with 128 Programs each. All Programs are stored in Flash
Memory and can be edited and replaced as you wish. There are also four Slots labelled A to D. The Slots
can be used for layering and quickly switching between Programs as described below. They are also used
when the Nord Lead 3 is played via MIDI.
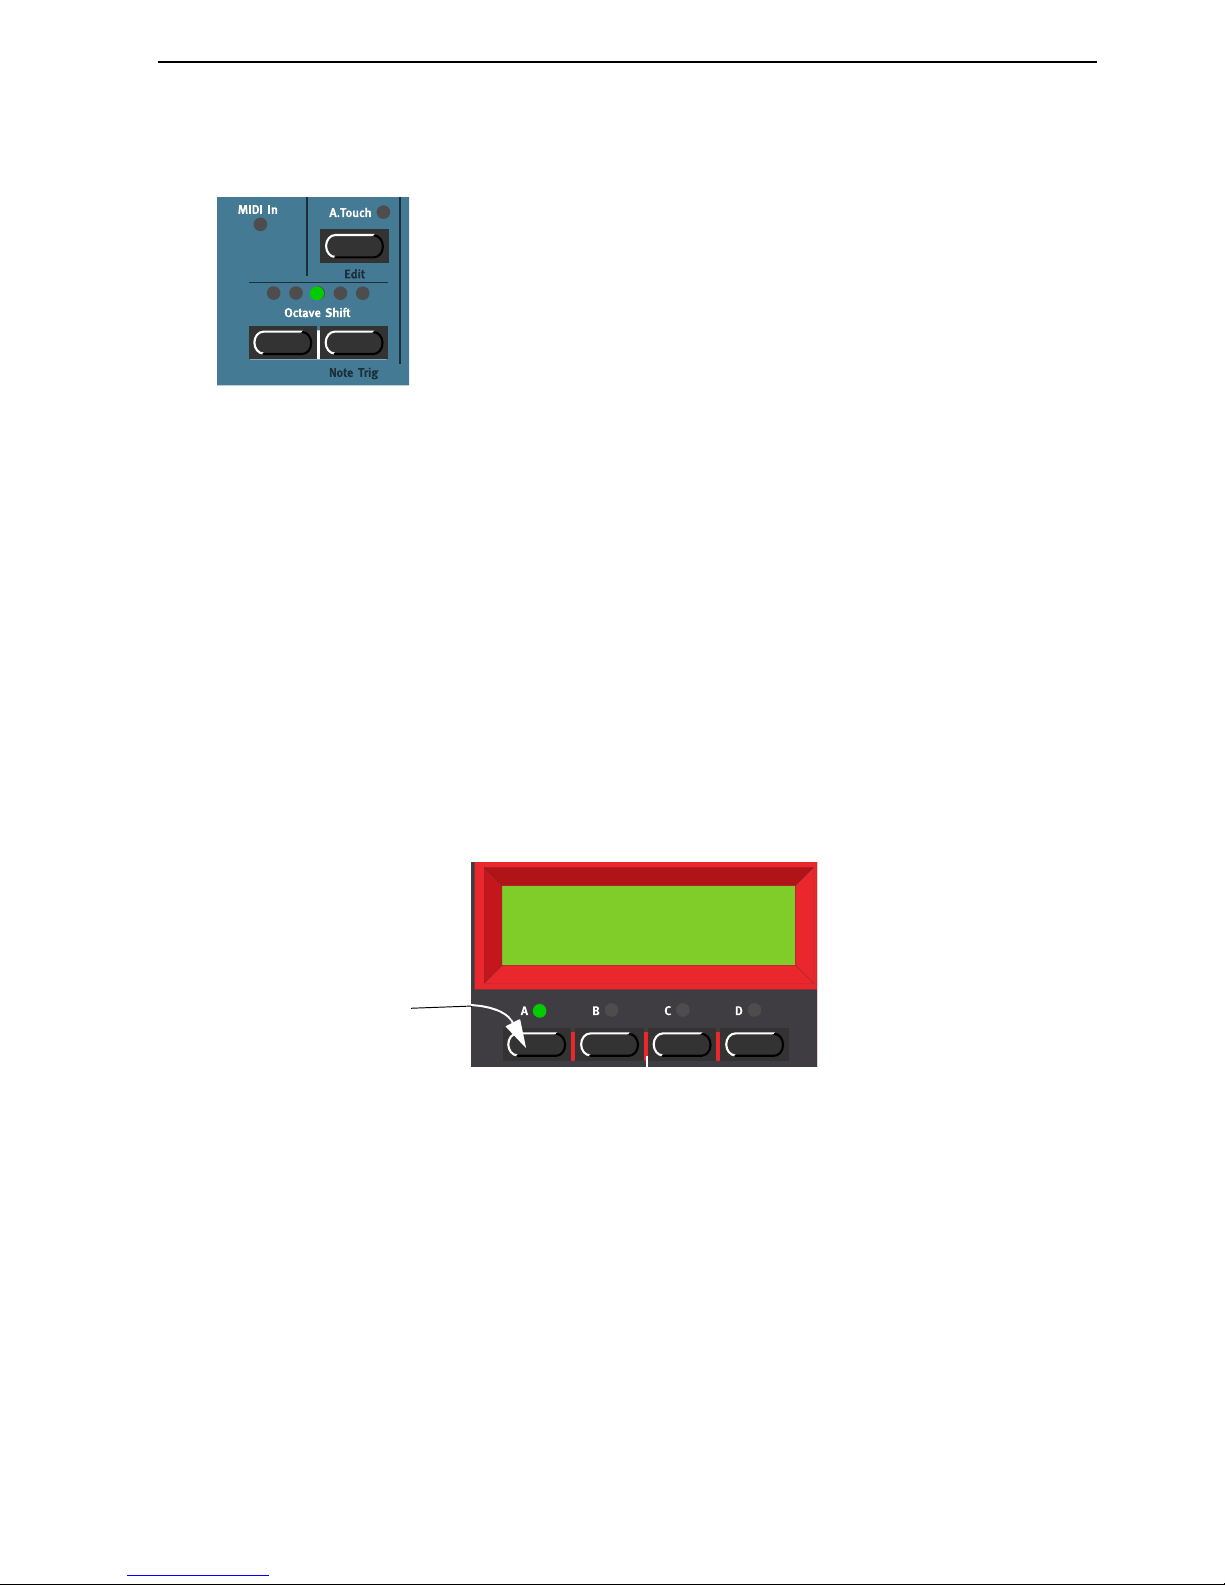
1. Select the Slot to use by pressing one of the four S
LOT
buttons A to D. When you are only playing
one sound at a time, as you will now, you can select any Slot.
2. Use the R
OTARY DIAL
to select a Program for the selected Slot. To switch between Banks, press the
U
P/DOWN NAVIGATOR
buttons. The Bank is indicated by the leftmost digit and the Program by
the rightmost digit in the D
ISPLAY
.
It’s also possible to select Programs by Category or in alphabetical order. See “Searching for and
loading Programs” on page 26.
UUUU
SSSSIIIINNNNGGGG
TTTTHHHHEEEE
SSSS
LLLLOOOOTTTTSSSS
The four Program Slots A to D can be thought of as four temporary memories (edit buffers) that you can
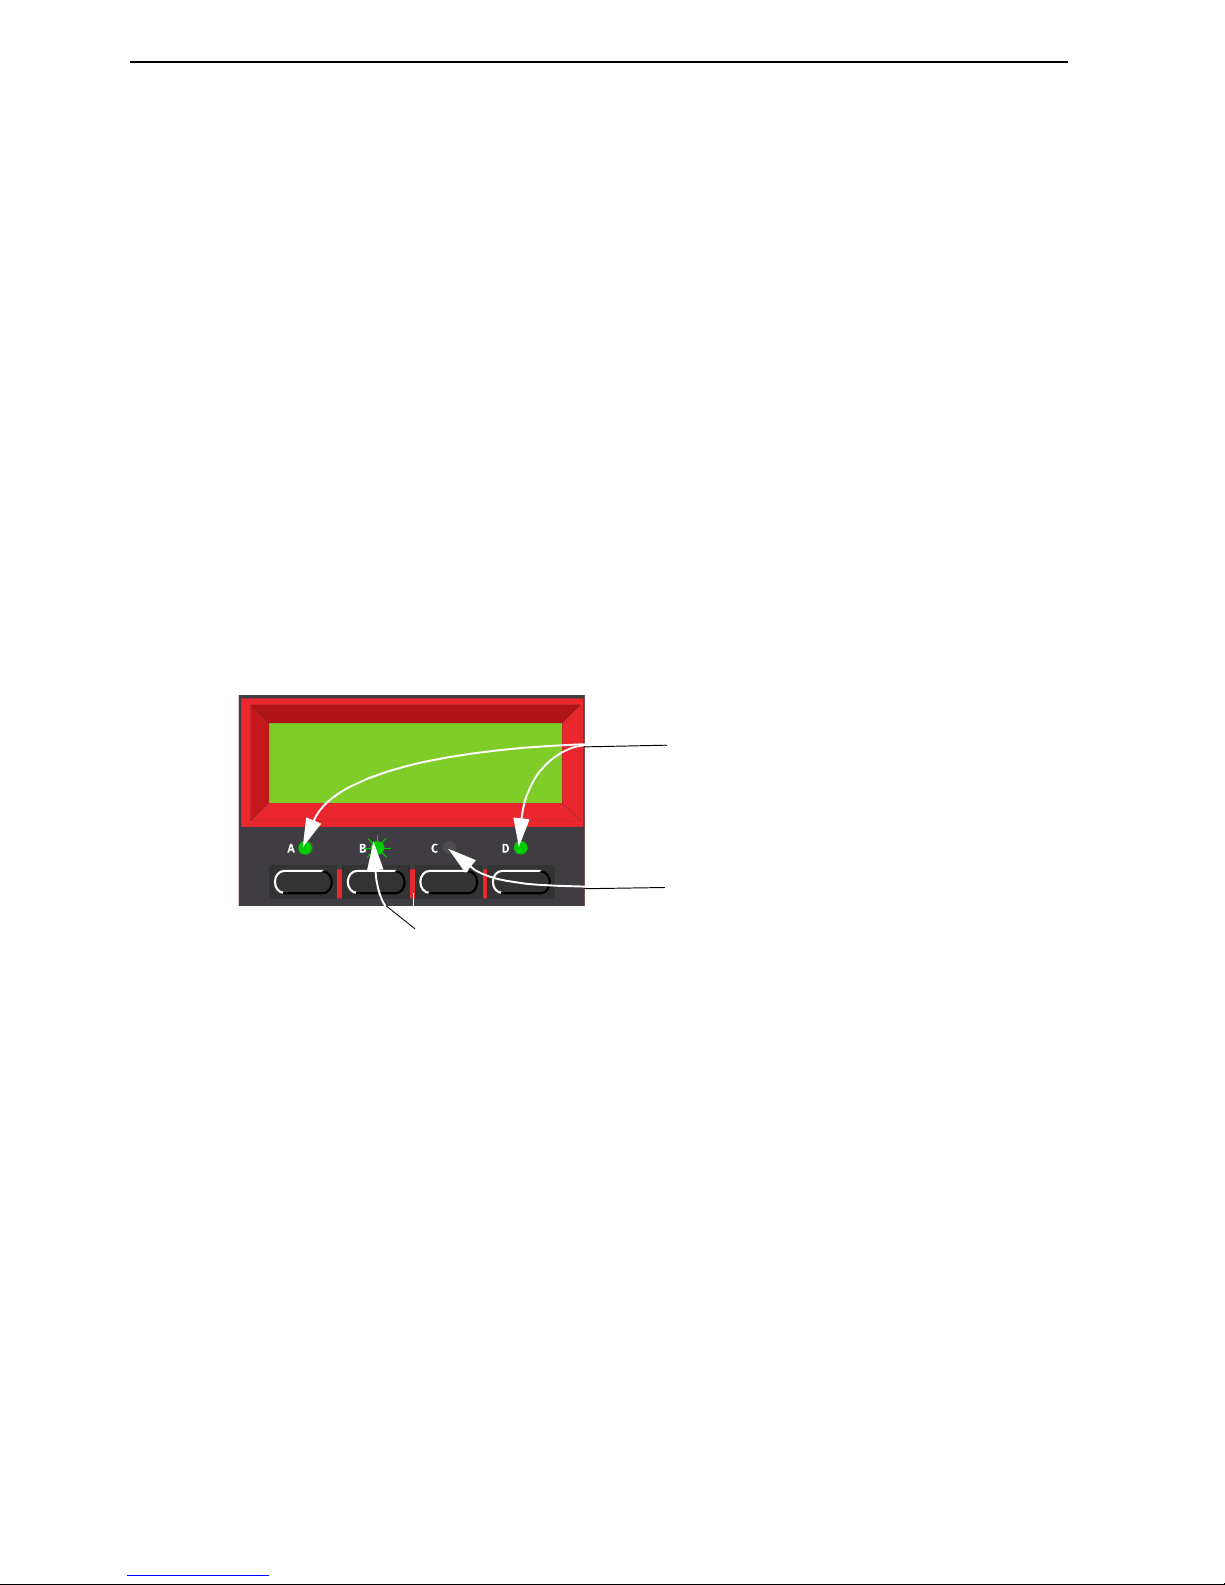
load Programs into for playing and editing. When you select one of the Slots you will switch to play the
Prg 1:1
F-A-T right
Press one of the four
S
LOT
buttons to activate a Slot. The corresponding LED will
light up.
3. Getting started: Layering NORD LEAD 3 V1.2x
Page 14
Program selected for that Slot. For live performance, for example, you can set up each Slot to play a different Program and quickly switch between them by pressing the S
LOT
buttons A to D.
Note! The four Slots share the same internal memory, i.e. a given Program will sound the same regardless which Slot you load it to. You could actually load the same Program to all four Slots and edit them
separately. However, as soon as you save the Program again to its original memory location from any
of the Slots, the original Program will of course be overwritten.
LLLL
AAAAYYYYEEEERRRRIIIINNNNGGGG
AAAA
CCCCTTTTIIIIVVVVAAAATTTTIIIINNNNGGGG
SSSS
LLLLOOOOTTTTSSSS
You can play more than one Program at a time. Proceed as follows:
1. Set up the Slots to play the Programs you want to use.
2. To activate more than one Slot, simply press all the S
LOT
buttons you want to use, at the same time.
All the Slots’ LEDs light up. The one you pressed last is flashing. This will be the one you are editing
from the front panel, but more on this in “Editing a Program in a layer” on page 22.
DDDD
EEEEAAAACCCCTTTTIIIIVVVVAAAATTTTIIIINNNNGGGG
S
S S
S
LLLLOOOOTTTTSSSS
To deactivate a Slot in the layer, press S
HIFT
and the S
LOT
button.
PPPP
OOOOLLLLYYYYPPPPHHHHOOOONNNNYYYY
Nord Lead 3 has 24 notes polyphony - also when you use stereo Unison (see page 109).
RRRR
EEEEPPPPLLLLAAAACCCCIIIINNNNGGGG
AAAA
P
P P
P
RRRROOOOGGGGRRRRAAAAMMMM
IIIINNNN
TTTTHHHHEEEE
LLLLAAAAYYYYEEEERRRR
You might want to select another Program for one of the Slots in the layer:
1. Press the S
LOT
button that you want to select a new Programs for. Its LED will flash to indicate that
it is the active Slot.
2. Select a new Program for the Slot with the R
OTARY DIAL
. To switch between Banks faster you can
use the U
P/DOWN NAVIGATOR
buttons.
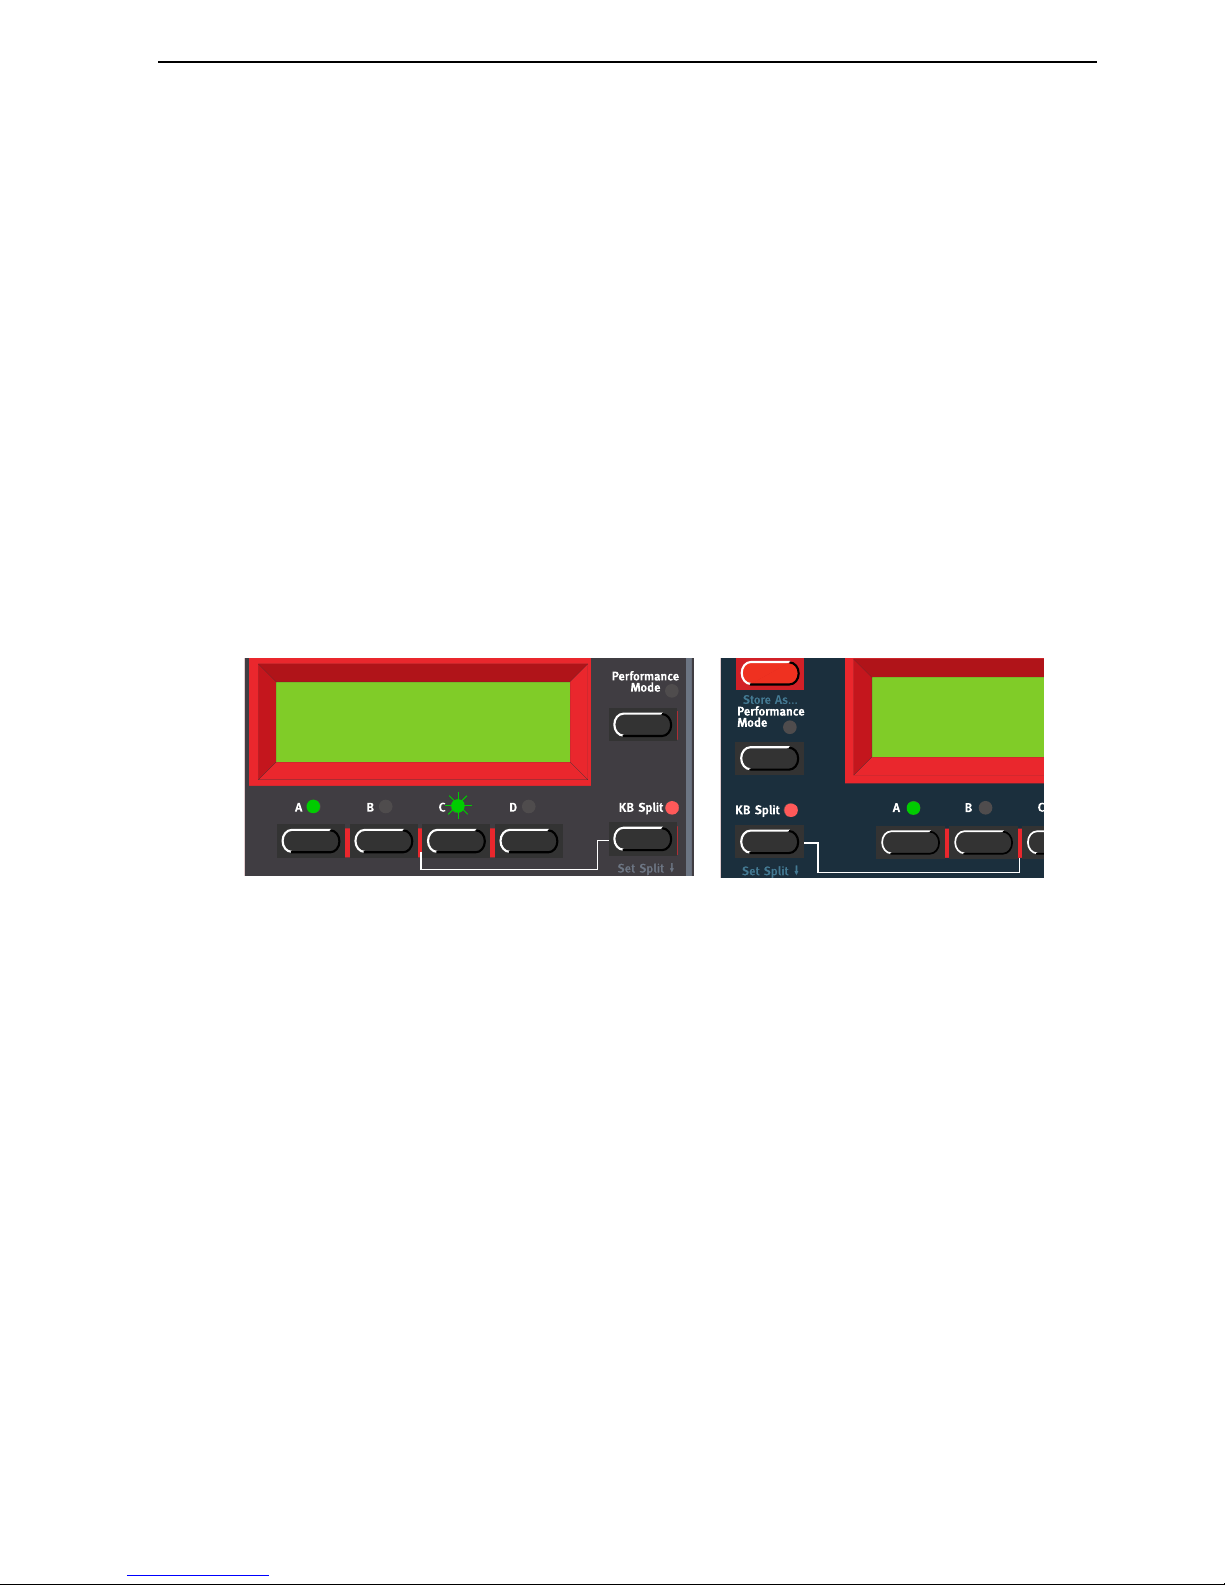
Prg 1:28
Wide Pad
Slot B (flashing) is selected. Any editing will apply
to the Program in this Slot.
Slots A and D (LEDs lit) are activated.
Slot C (LED dark) is not activated.
NORD LEAD 3 V1.2x 3. Getting started: Keyboard Split
Page 15
KKKK
EEEEYYYYBBBBOOOOAAAARRRRDDDD
SSSS
PPPPLLLLIIIITTTT
The Keyboard Split function allows you to split the keyboard in two sections, each playing separate Programs. This can be very useful when you are playing live, since it lets you use the Nord Lead 3 as if it were
two independent synthesizers, with different sounds. When Keyboard Split is activated, Slots A and B
will be played from the lower part of the keyboard, while Slots C and D will be played from the upper
part. Activate Keyboard Split as follows:
1. Press S
LOT
A and select a Program for it. This will be the sound heard when you play the lower part
of the keyboard.
2. Select S
LOT
C and select a Program for it. This will be the sound heard when you play the upper part
of the keyboard.
3. Press the S
LOT
A and S
LOT
C buttons at the same time so that the LEDs above both Slot buttons
light up (the LED for the last pressed Slot button will flash).
4. Press the K
EYBOARD SPLIT
button. The red LED above the button lights up to indicate that the key-
board is split.
If you now play the keyboard, you will hear the sound of Slot A from the left part of the keyboard,
and the sound of Slot C from the right part of the keyboard.
5. To exit the Keyboard Split mode, press the K
EYBOARD SPLIT
button again.
SSSS
EEEETTTTTTTTIIIINNNNGGGG
TTTTHHHHEEEE
SSSS
PPPPLLLLIIIITTTT
PPPP
OOOOIIIINNNNTTTT
You set the Split Point (the key where the keyboard should be split) in the following way:
1. Hold down S
HIFT
and press the K
EYBOARD SPLIT
button.
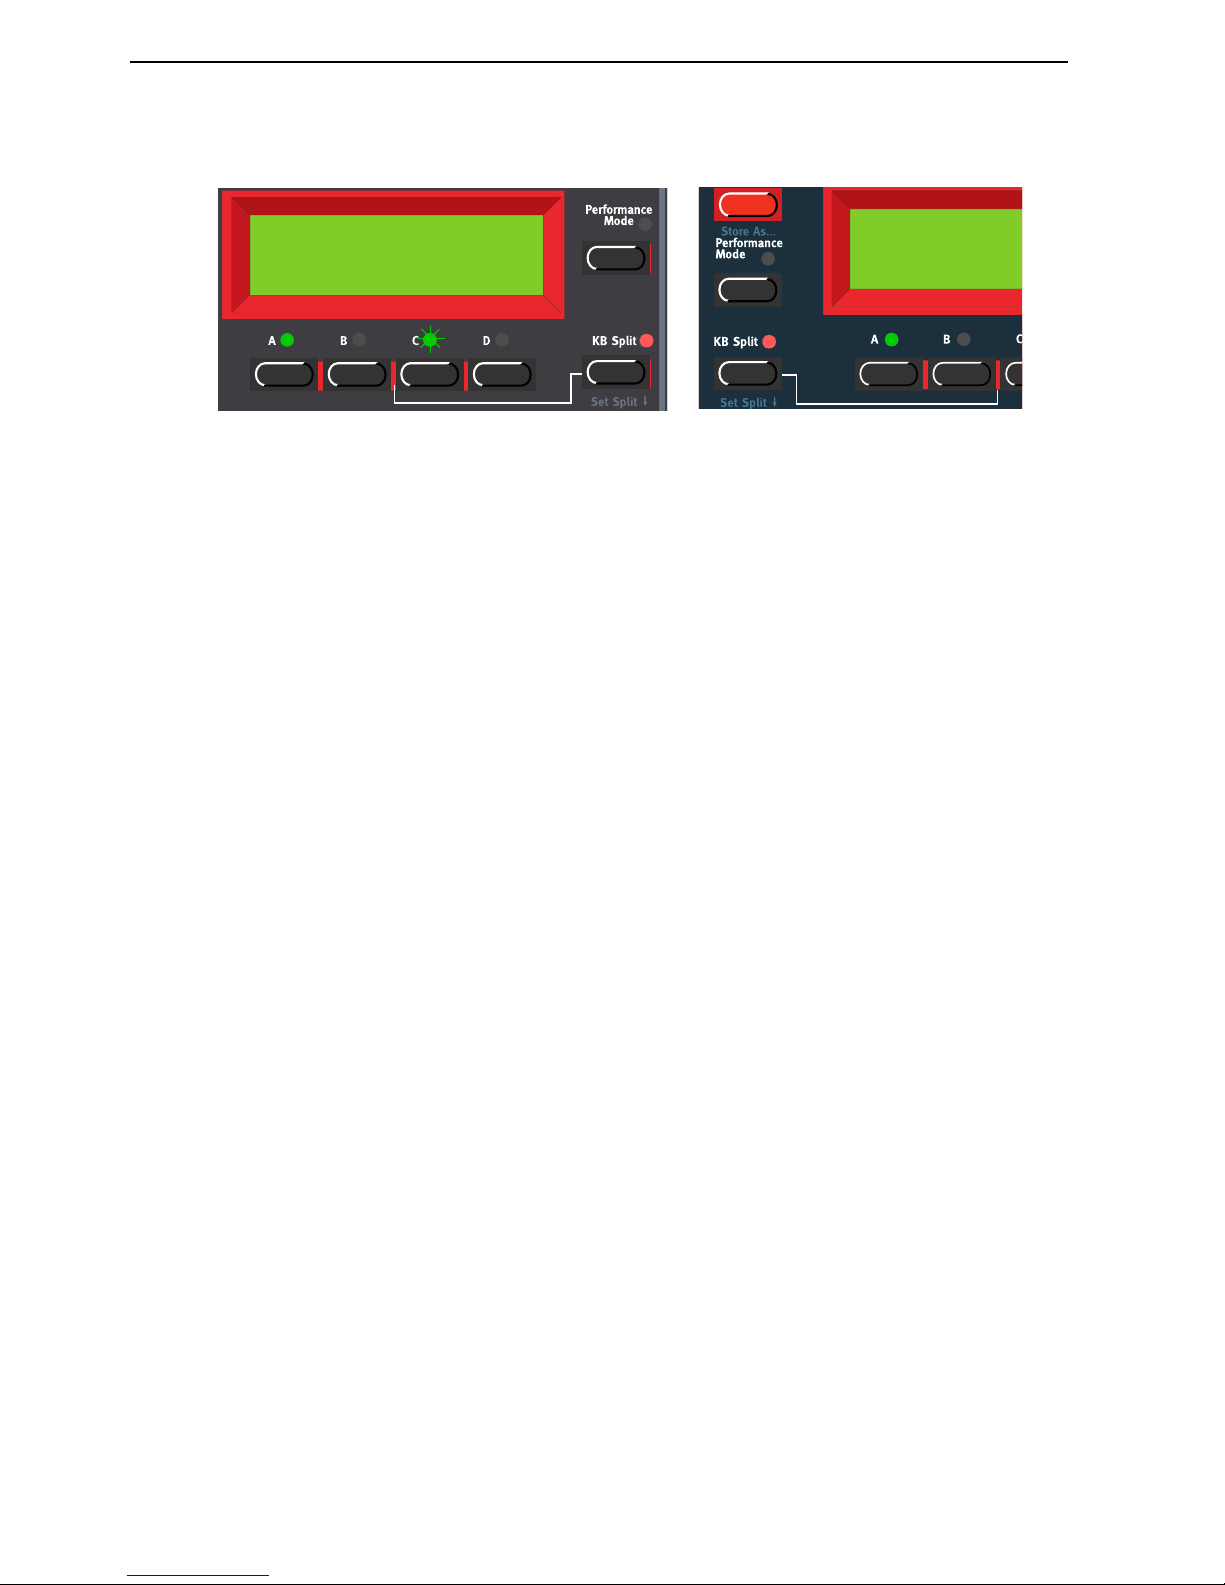
Prg 2:98
Pro5 click
Prg 2:98
Pro5 clic
k
3. Getting started: Keyboard Split NORD LEAD 3 V1.2x
Page 16
The display shows the current Split Point for as long as you keep both buttons depressed.
2. While holding down both the S
HIFT
and K
EYBOARD SPLIT
buttons, press the lowest key for the
upper split section of the keyboard.
Important! On Nord Rack 3, first hold down both the S
HIFT
and K
EYBOARD SPLIT
buttons, and
then release the buttons. Press the lowest key for the upper split section on the MIDI keyboard.
The display shows the key you press.
3. On Nord Lead 3, release the S
HIFT
and K
EYBOARD SPLIT
buttons to exit. On Nord Rack 3, release
the key on the MIDI keyboard to exit. Note! On Nord Rack 3 you can also exit by pressing S
HIFT
(without needing to set a new Split Point from the MIDI keyboard).
CCCC
OOOOMMMMBBBBIIIINNNNIIIINNNNGGGG
S
S S
S
PPPPLLLLIIIITTTT
AAAANNNNDDDD
L
L L
L
AAAAYYYYEEEERRRR
Since Slots A and B will be played from the lower part of the split keyboard, and Slots C and D from the
upper part, you can split the keyboard and play layers of two sounds on each keyboard half. Just select all
Slots, and activate Keyboard Split.
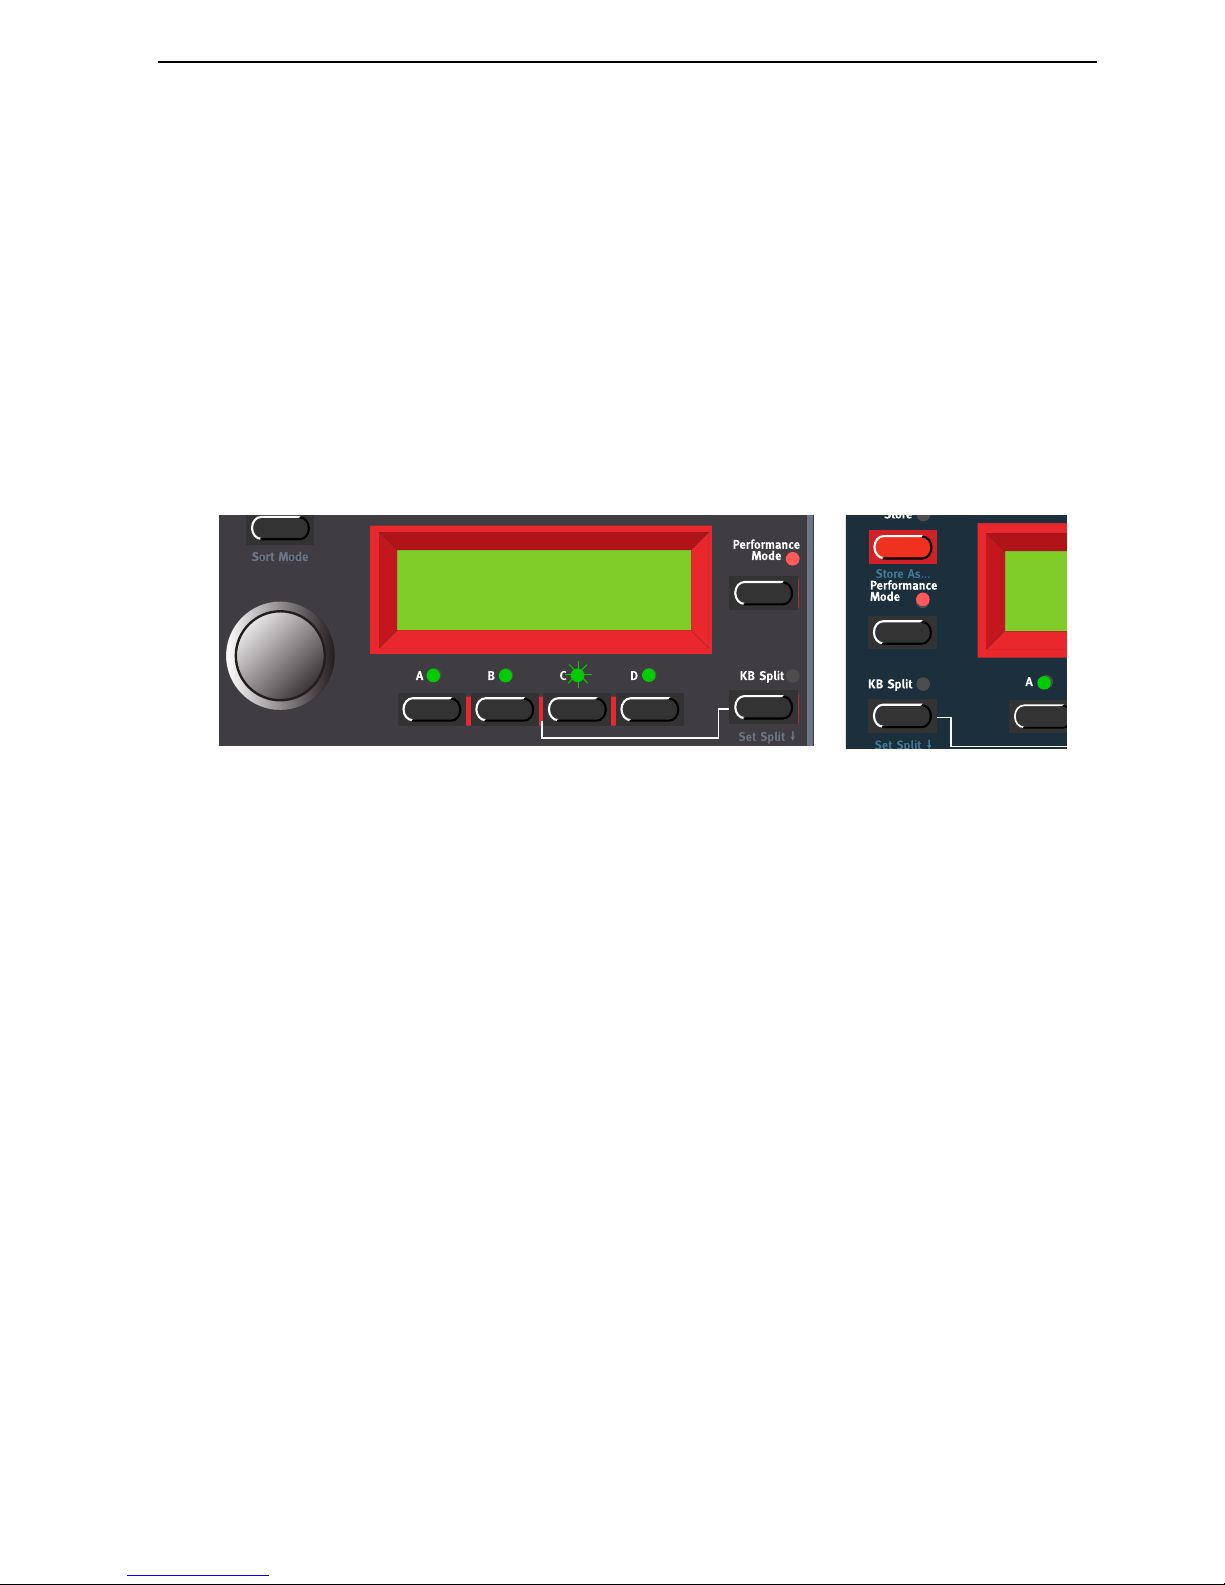
Split Point
G4
Split Poi
n
G4
NORD LEAD 3 V1.2x 3. Getting started: Performances
Page 17
PPPP
EEEERRRRFFFFOOOORRRRMMMMAAAANNNNCCCCEEEESSSS
A Performance is a collection of up to four Programs, one for each Slot. Furthermore, the Performance
contains information about which Programs should be active (layered), and settings for Keyboard Split.
A Performance also contains information about what MIDI Channels to use for each slot, and a number
of other settings, but this is described in detail in Chapter "6. Performances” on page 32. This text is only
meant as a quick introduction to playing the factory Performances.
1. If you are controlling the Nord Lead 3 via MIDI, make sure you transmit/receive on MIDI Channel
16. This is because the factory Performances are set to receive on MIDI Channel 16. Naturally, you
can change MIDI Channels for a Performance. See “MIDI Global” on page 120.
2. Enter Performance mode by pressing P
ERFORMANCE MODE
. The D
ISPLAY
shows the latest selected
Performance. The Performances are organised in two Banks with 128 memory locations each.
3. Select a Performance by scrolling with the R
OTARY DIAL
. The Performance is instantly loaded and
you can try it out.
4. To exit Performance Mode, press the P
ERFORMANCE MODE
button.
AAAA
LLLLTTTTEEEERRRRNNNNAAAATTTTIIIINNNNGGGG
BBBBEEEETTTTWWWWEEEEEEEENNNN
P
P P
P
RRRROOOOGGGGRRRRAAAAMMMM
M
M M
M
OOOODDDDEEEE
AAAANNNNDDDD
P
P P
P
EEEERRRR
----
FFFFOOOORRRRMMMMAAAANNNNCCCCEEEE
M
M M
M
OOOODDDDEEEE
When you switch between Program Mode and Performance Mode, the Slots are automatically loaded
with the latest selected Slot/sound configuration. In certain situations you might want to “transfer” a layer
you have been working on in Program Mode to the Performance Mode. To do this, hold down S
HIFT
and press the P
ERFORMANCE MODE
button. Now, the Slot configuration you have in Program Mode
will be copied to Performance Mode. This operation can also be done if you want to switch from Performance Mode to Program Mode and keep the same Slot/sound configuration.
PPPP
OOOOLLLLYYYYPPPPHHHHOOOONNNNIIIICCCC
AAAANNNNDDDD
MMMMOOOONNNNOOOOPPPPHHHHOOOONNNNIIIICCCC
OOOOPPPPEEEERRRRAAAATTTTIIIIOOOONNNN
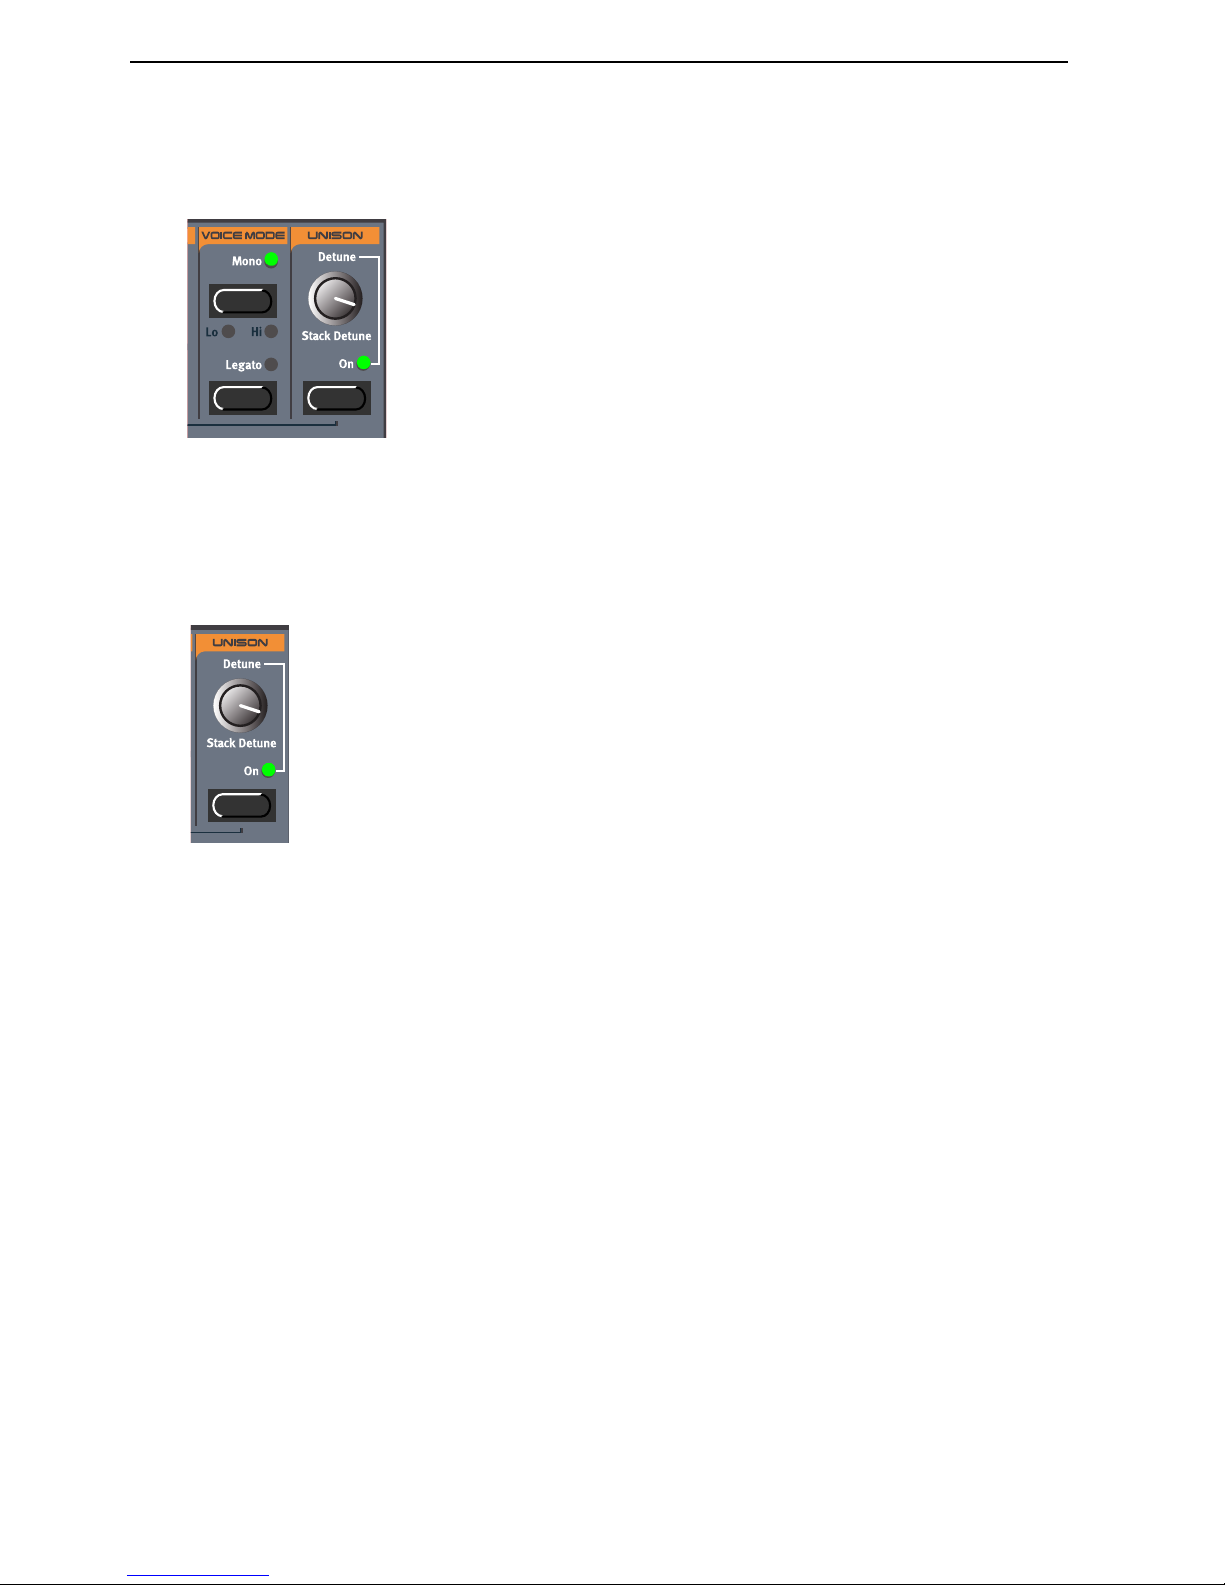
For each Program you can select Voice Mode (Poly, Mono, Legato). The exact nature of these modes are
described in “Voice mode” on page 106. If you are using more than one output, or headphones, you
might want to know something about how the sounds get positioned in the stereo image. This depends
Perf 1:4
Arpeggiomania
Per
Arp
3. Getting started: Pitch Stick and Modulation Wheel NORD LEAD 3 V1.2x
Page 18
on the Audio Routing settings described on page 125. By default, the Audio Routing setting is prepared
for Stereo. All you have to do to get a stereo effect in your sound is pressing the U
NISON
button
UUUU
NNNNIIIISSSSOOOONNNN
To make a sound fatter, you can activate the Unison function. You adjust the detune by turning the D
E
-
TUNE
knob. Note that the Unison function is in stereo (if the Audio Routing is set to stereo, see page
125.) and does not reduce the polyphony!
PPPP
IIIITTTTCCCCHHHH
S
S S
S
TTTTIIIICCCCKKKK
AAAANNNNDDDD
M
M M
M
OOOODDDDUUUULLLLAAAATTTTIIIIOOOONNNN
W
W W
W
HHHHEEEEEEEELLLL
PPPP
IIIITTTTCCCCHHHH
S
S S
S
TTTTIIIICCCCKKKK
(N
(N (N
(N
OOOORRRRDDDD
L
L L
L
EEEEAAAADDDD
3
3 3
3
OOOONNNNLLLLYYYY
))))
The P
ITCH STICK
is used to bend the notes, just as with a pitch bend wheel on traditional synthesizers.
The pitch stick differs from other pitch bend devices in a couple of ways:
• There is no dead center in the middle of the throw. This allows you to use the pitch stick for natural
vibrato, pretty much like a guitarist can.
• The effect on the pitch is exponential, that is, the further you move the stick away from the center
position, the more drastic the effect.
PPPP
IIIITTTTCCCCHHHH
B
B B
B
EEEENNNNDDDD
RRRRAAAANNNNGGGGEEEE
SSSSEEEETTTTTTTTIIIINNNNGGGGSSSS
The P
ITCH STICK
bend range is set globally for the entire instrument. It’s possible to set different ranges
for bending down and up. To set the bend ranges of the P
ITCH STICK
and for incoming MIDI pitch
bend data, proceed as follows:
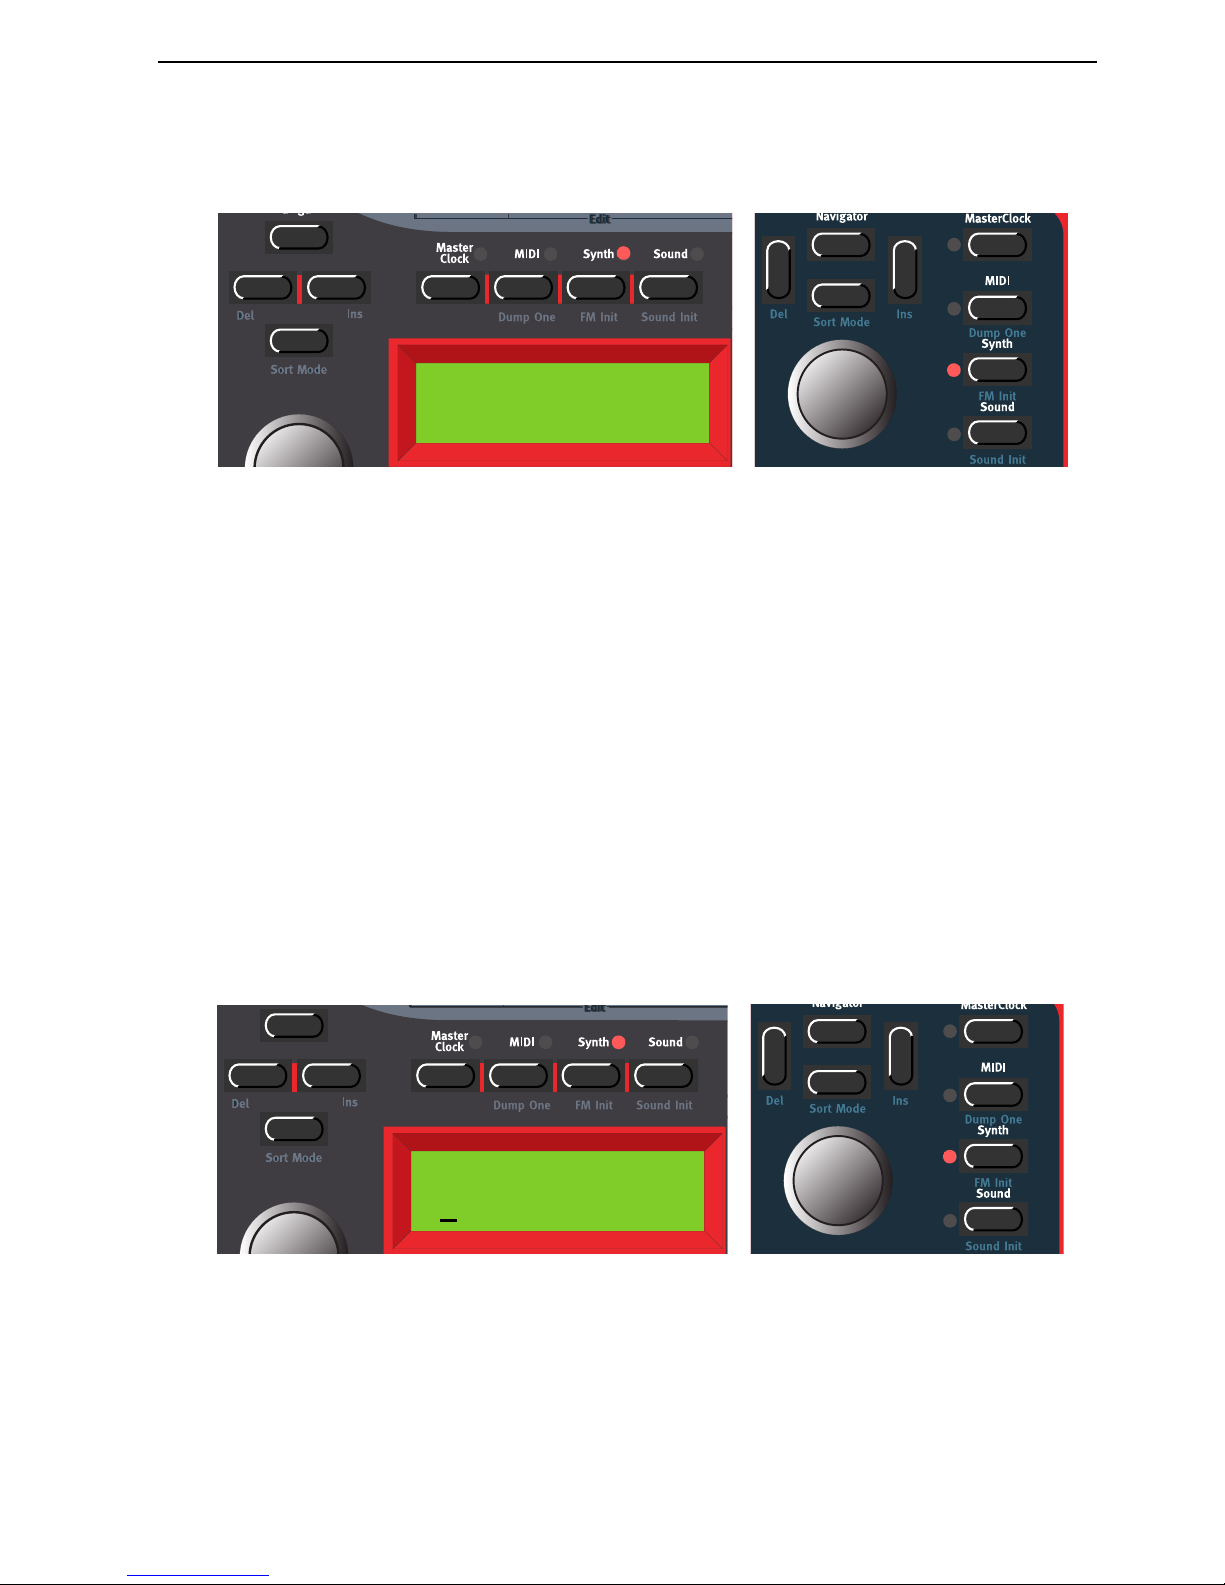
NORD LEAD 3 V1.2x 3. Getting started: Pitch Stick and Modulation Wheel
Page 19
1. Press the S
YNTH
button and then the D
OWN NAVIGATOR
button till the D
ISPLAY
reads ‘Bend
Range’.
2. Change the bend range, in semitones, with the R
OTARY DIAL
. Select between the ‘Down’ and ‘Up’
ranges by pressing the L
EFT
or R
IGHT NAVIGATOR
buttons. The maximum range is +/-12 semitones
(+/-1 octave).
3. Exit by pressing the S
YNTH
button.
MMMM
OOOODDDDUUUULLLLAAAATTTTIIIIOOOONNNN
W
W W
W
HHHHEEEEEEEELLLL
AAAANNNNDDDD
M
M M
M
OOOODDDD
W
W W
W
HHHHEEEEEEEELLLL
MIDI
MIDI MIDI
MIDI
DDDDAAAATTTTAAAA
The effect of moving the M
ODULATION WHEEL
can be different for each Program. You decide what you
want it to affect by assigning parameters to the Wheel Morph function (see Chapter "5. Morph groups”
on page 29.). The M
ODULATION WHEEL
can also be set to control the global Vibrato function described
on page page 105.
MMMM
AAAASSSSTTTTEEEERRRR
T
T T
T
UUUUNNNNEEEE
The Master Tune function is global for the instrument, i.e. it affects all Slots. To tune Nord Lead 3 to
other instruments, proceed as follows:
1. Press the S
YNTH
button and then the U
P NAVIGATOR
button until the D
ISPLAY
reads ‘Master
Tune’.
2. Change the master tune, in semitones, with the R
OTARY DIAL
. ‘0’ is normal 440Hz tuning. The
range is +/- 6 semitones in steps of 1 semitone. Press the R
IGHT NAVIGATOR
button to change the
Master Tune, in cents, with the R
OTARY DIAL
. The range is +/- 1 semitone in steps of 1 cent
(hundreds of a semitone).
3. Exit by pressing the S
YNTH
button.
Bend Range
Down: 2 Up: 3
Master Tune
0
semi 0 cent
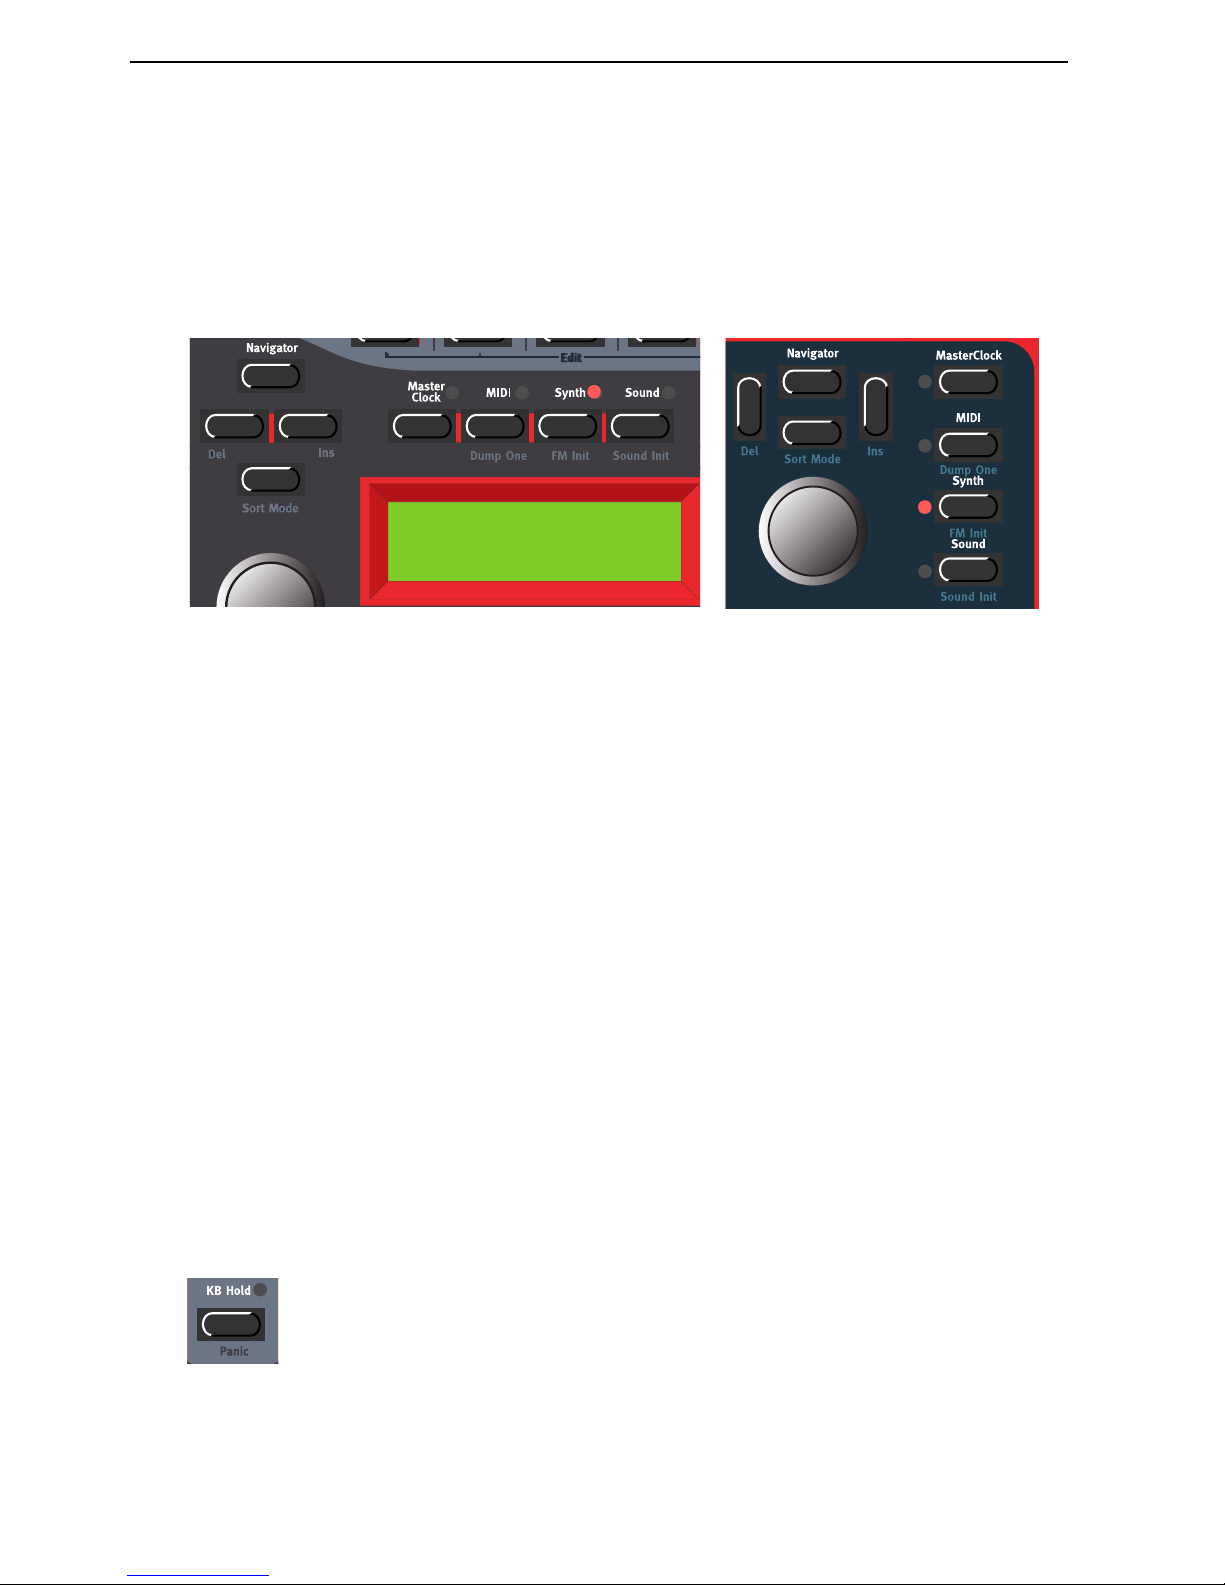
3. Getting started: Using a sustain pedal NORD LEAD 3 V1.2x
Page 20
UUUU
SSSSIIIINNNNGGGG
AAAA
SSSSUUUUSSSSTTTTAAAAIIIINNNN
PPPPEEEEDDDDAAAALLLL
A foot switch connected to the S
USTAIN PEDAL
input works like a sustain pedal on a piano. Set it up as
follows:
1. Press the S
YNTH
button and then the D
OWN NAVIGATOR
button till the D
ISPLAY
reads ‘Sustain
Pedal’.
2. Change sustain pedal polarity between ‘Open’ (open when pressed) and ‘Closed’ (closed when
pressed) with the R
OTARY DIAL
.
3. Exit by pressing the S
YNTH
button.
Nord Lead 3 will also send and receive Sustain Pedal messages via MIDI (CC# 64).
Note: You can choose to enable/disable the Sustain Pedal function separately for each Slot. This is especially useful when you are creating a Performance and only want some Slots to respond to sustain.
See “Active Device” on page 116.
UUUU
SSSSIIIINNNNGGGG
AAAA
CCCCOOOONNNNTTTTRRRROOOOLLLL
(
( (
(
EEEEXXXXPPPPRRRREEEESSSSSSSSIIIIOOOONNNN
)
) )
)
PPPPEEEEDDDDAAAALLLL
As indicated in the illustration on page 10, a regular resistive (range 10 kOhm to 50 kOhm) expression
pedal can be connected to the Control Pedal input, using a stereo (Tip-Ring-Sleeve) cable. The connected
pedal can be used to control a separate Morph Group in a Program (see Chapter "5. Morph groups” on
page 29.), i.e. any single parameter or combination of parameters featuring a circular LED graph.
Nord Lead 3 will also send and receive Expression pedal messages via MIDI (CC# 11).
TTTT
HHHHEEEE
‘P
‘P‘P
‘P
AAAANNNNIIIICCCC
’
’ ’
’
BBBBUUUUTTTTTTTTOOOONNNN
If notes should “hang” or the Nord Lead 3 should behave strange, all you need to do is hold down the
S
HIFT
button and press KB H
OLD
(P
ANIC
). This will execute an internal All Notes Off, and reset certain
parameters to their normal values.
Sustain Pedal
Open
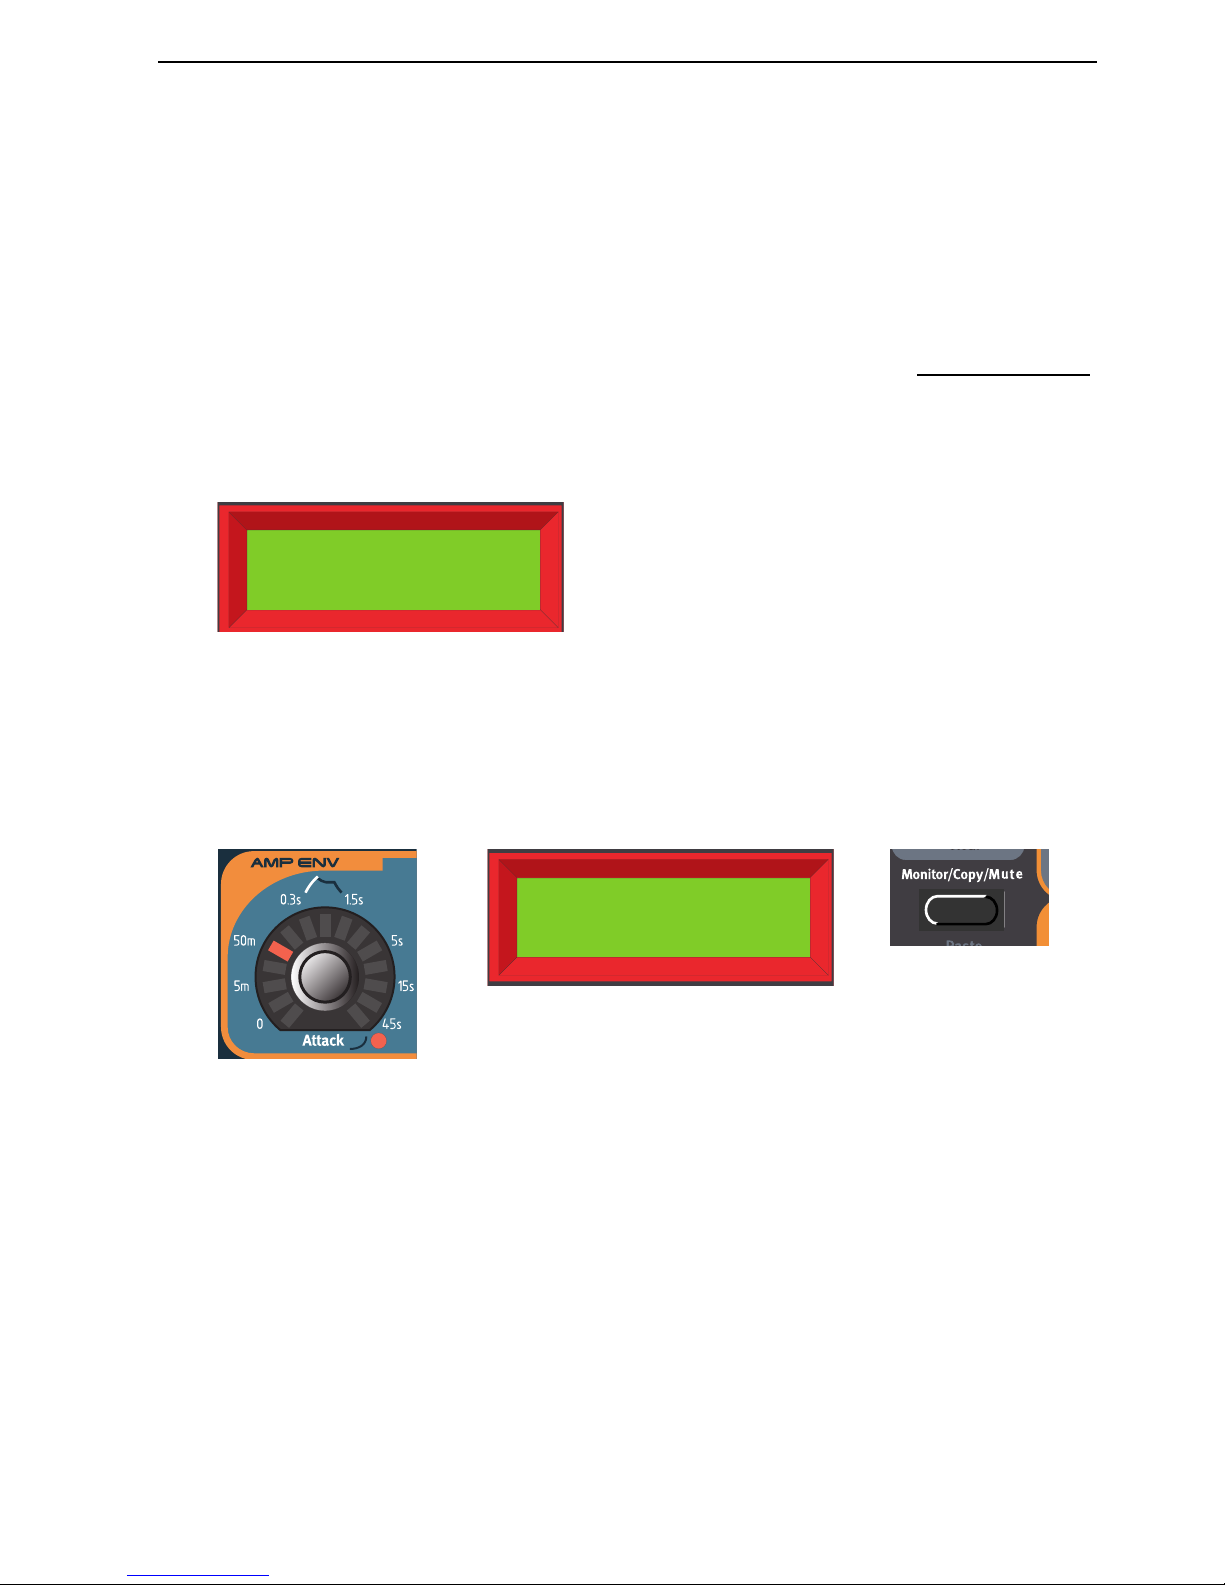
NORD LEAD 3 V1.2x 4. Editing Programs: Editing a Program
Page 21
4. E
4. E4. E
4. ED
DD
DIIIITTTTIIIIN
NN
NG
GG
G P
P P
PR
RR
RO
OO
OG
GG
GRRRRAAAAM
MM
MSSSS
EEEE
DDDDIIIITTTTIIIINNNNGGGG
AAAA
P
P P
P
RRRROOOOGGGGRRRRAAAAMMMM
Actually, how to change a programmed sound can be described in one sentence: “tweak the knobs and
press the buttons”. It is as simple as that! Don’t be afraid to edit and overwrite the factory Programs. If
you want to restore any of the original factory programs later, you can fetch them at http://www.clavia.se
and download to your Nord Lead 3 as MIDI SysEx.
To indicate that a Program has been edited (changed from the stored version), an asterisk is shown after
the Program number in the D
ISPLAY
:.
TTTT
HHHHEEEE
KKKKNNNNOOOOBBBBSSSS
WWWWIIIITTTTHHHH
CCCCIIIIRRRRCCCCUUUULLLLAAAARRRR
LED
LED LED
LED
GGGGRRRRAAAAPPPPHHHHSSSS
The K
NOBS
combined with the circular LED
GRAPHS
gives you instant information about the parameter
settings. The LED
GRAPH
gives a coarse indication of the parameter value and the D
ISPLAY
shows the
exact value with the corresponding unit (’Hz’ for frequency, ’s’ for seconds etc.). It’s also possible to monitor a parameter’s exact setting without changing its value. Hold down the M
ONITOR/COPY
button and
turn the K
NOB
for the parameter you want to monitor.
Several K
NOBS
have alternative functionality (printed in blue below some K
NOBS
on the front panel),
which you can activate by holding down the S
HIFT
button and turning the K
NOB
clockwise. The red
LED next to the parameter indicates when you use the alternative functionality. To deselect the alternative functionality, hold down S
HIFT
and turn the K
NOB
counter-clockwise.
Prg 2:98*
Pro5 click
AmpEnv Atc
48.6ms
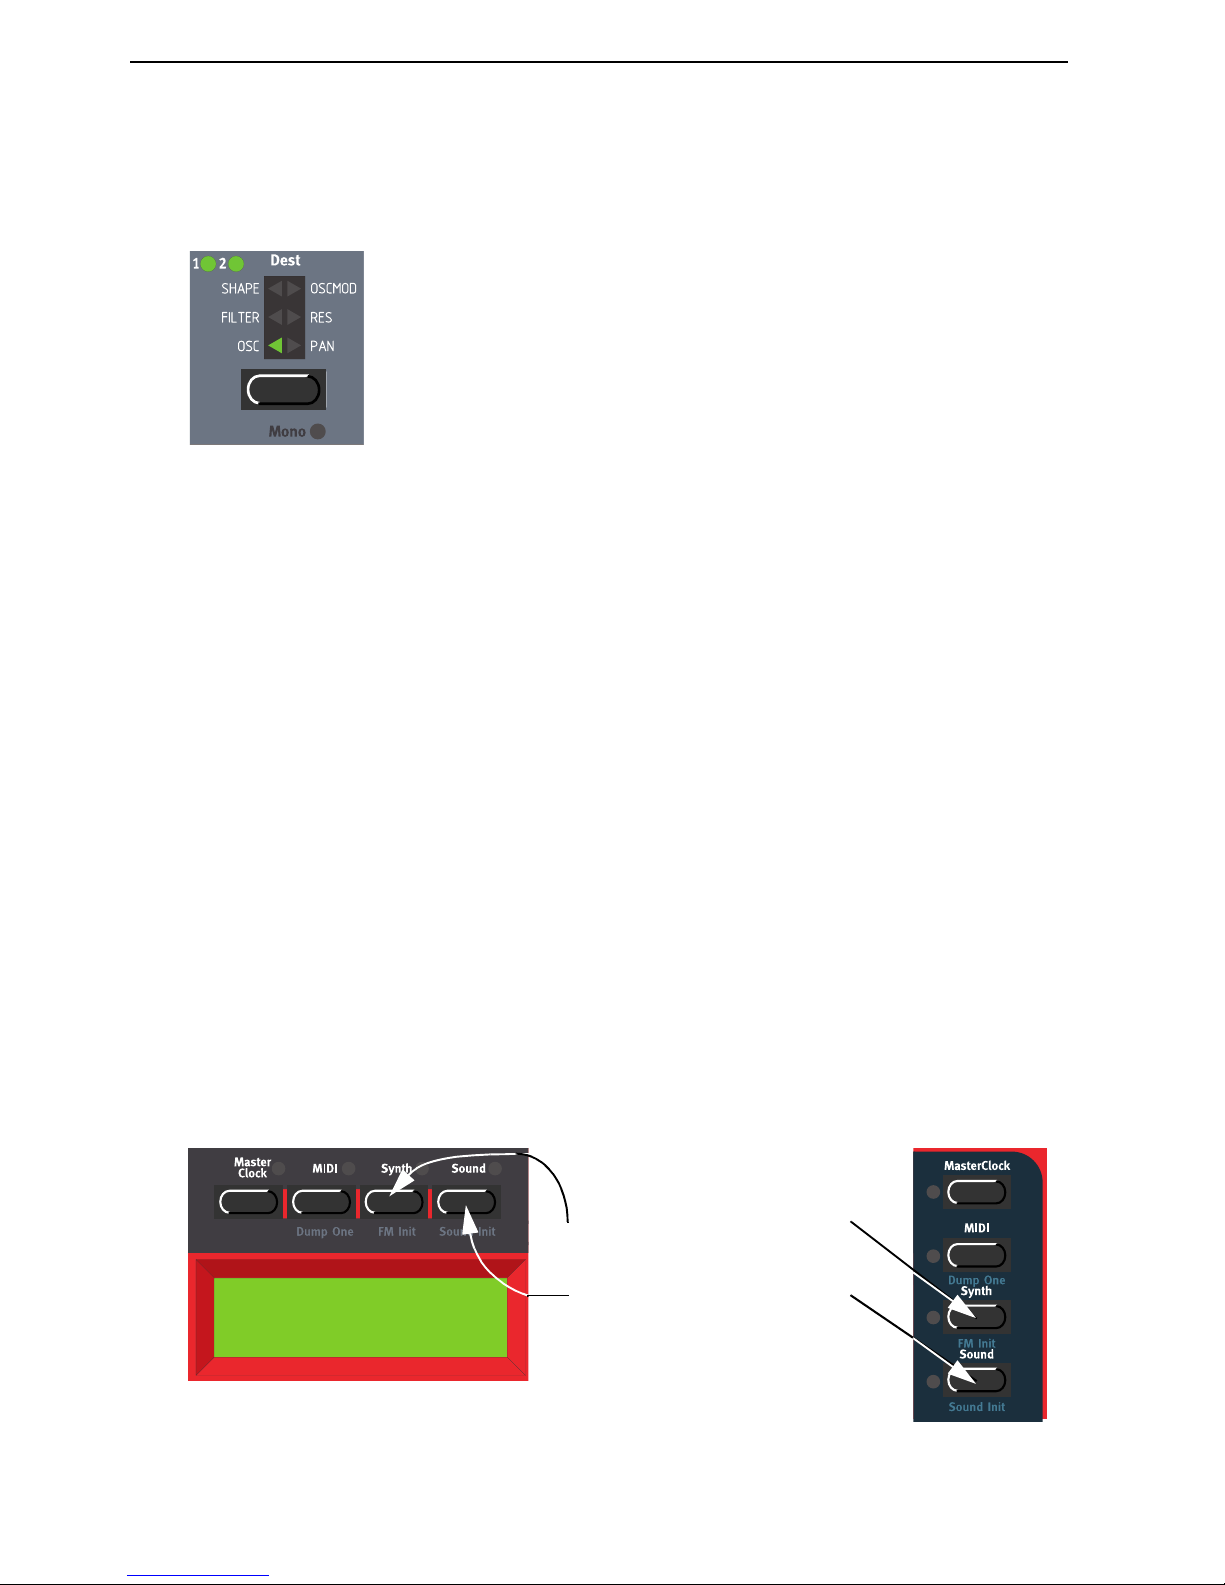
4. Editing Programs: Editing a Program in a layer NORD LEAD 3 V1.2x
Page 22
TTTT
HHHHEEEE
BBBBUUUUTTTTTTTTOOOONNNNSSSS
Press a B
UTTON
to select between functions printed in white. Hold down S
HIFT
and press the B
UTTON
to select alternative functions (printed in blue below some B
UTTONS
).
EEEE
DDDDIIIITTTTIIIINNNNGGGG
AAAA
P
P P
P
RRRROOOOGGGGRRRRAAAAMMMM
IIIINNNN
AAAA
LLLLAAAAYYYYEEEERRRR
When you have layered sounds you can edit one of the sounds at a time from the front panel. Do like this:
1. Press the S
LOT
button with the Program that you want to edit. The S
LOT
LED will flash to indicate
it’s the active Slot.
2. Edit the sound.
RRRR
EEEEVVVVEEEERRRRTTTTIIIINNNNGGGG
TTTTOOOO
TTTTHHHHEEEE
OOOORRRRIIIIGGGGIIIINNNNAAAALLLL
P
P P
P
RRRROOOOGGGGRRRRAAAAMMMM
If you have edited a Program and want to get back to the stored original, proceed as follows:
1. Select another Program for that Slot with the R
OTARY DIAL
.
2. Select the original Program again by turning the R
OTARY DIAL
in the opposite direction. The sound
has now reverted back to the way it was when you originally selected it.
UUUU
SSSSIIIINNNNGGGG
‘S
‘S‘S
‘S
OOOOUUUUNNNNDDDD
I
I I
I
NNNNIIIITTTT
’
’ ’
’
AAAANNNNDDDD
‘FM I
‘FM I‘FM I
‘FM I
NNNNIIIITTTT
’’’’
If you want to create a sound from “scratch” but don’t want to edit an existing Program, there are two
functions that make it much easier to get started: ‘Sound Init’ and ‘FM Init’. ‘Sound Init’ can be used
when you want to create an “analog-style” subtractive sound. ‘Sound Init’ automatically resets all parameters to a basic default setting. From here it’s often easier to start with the editing than from an existing
Program. ‘FM Init’ can be used in the same way and is intended as a base for creating FM sounds.
Prg 2:98
Sound Init
Hold down
S
HIFT
and press
S
YNTH
to perform an ‘FM Init’.
Hold down
S
HIFT
and press
S
OUND
to perform a ‘Sound Init’.
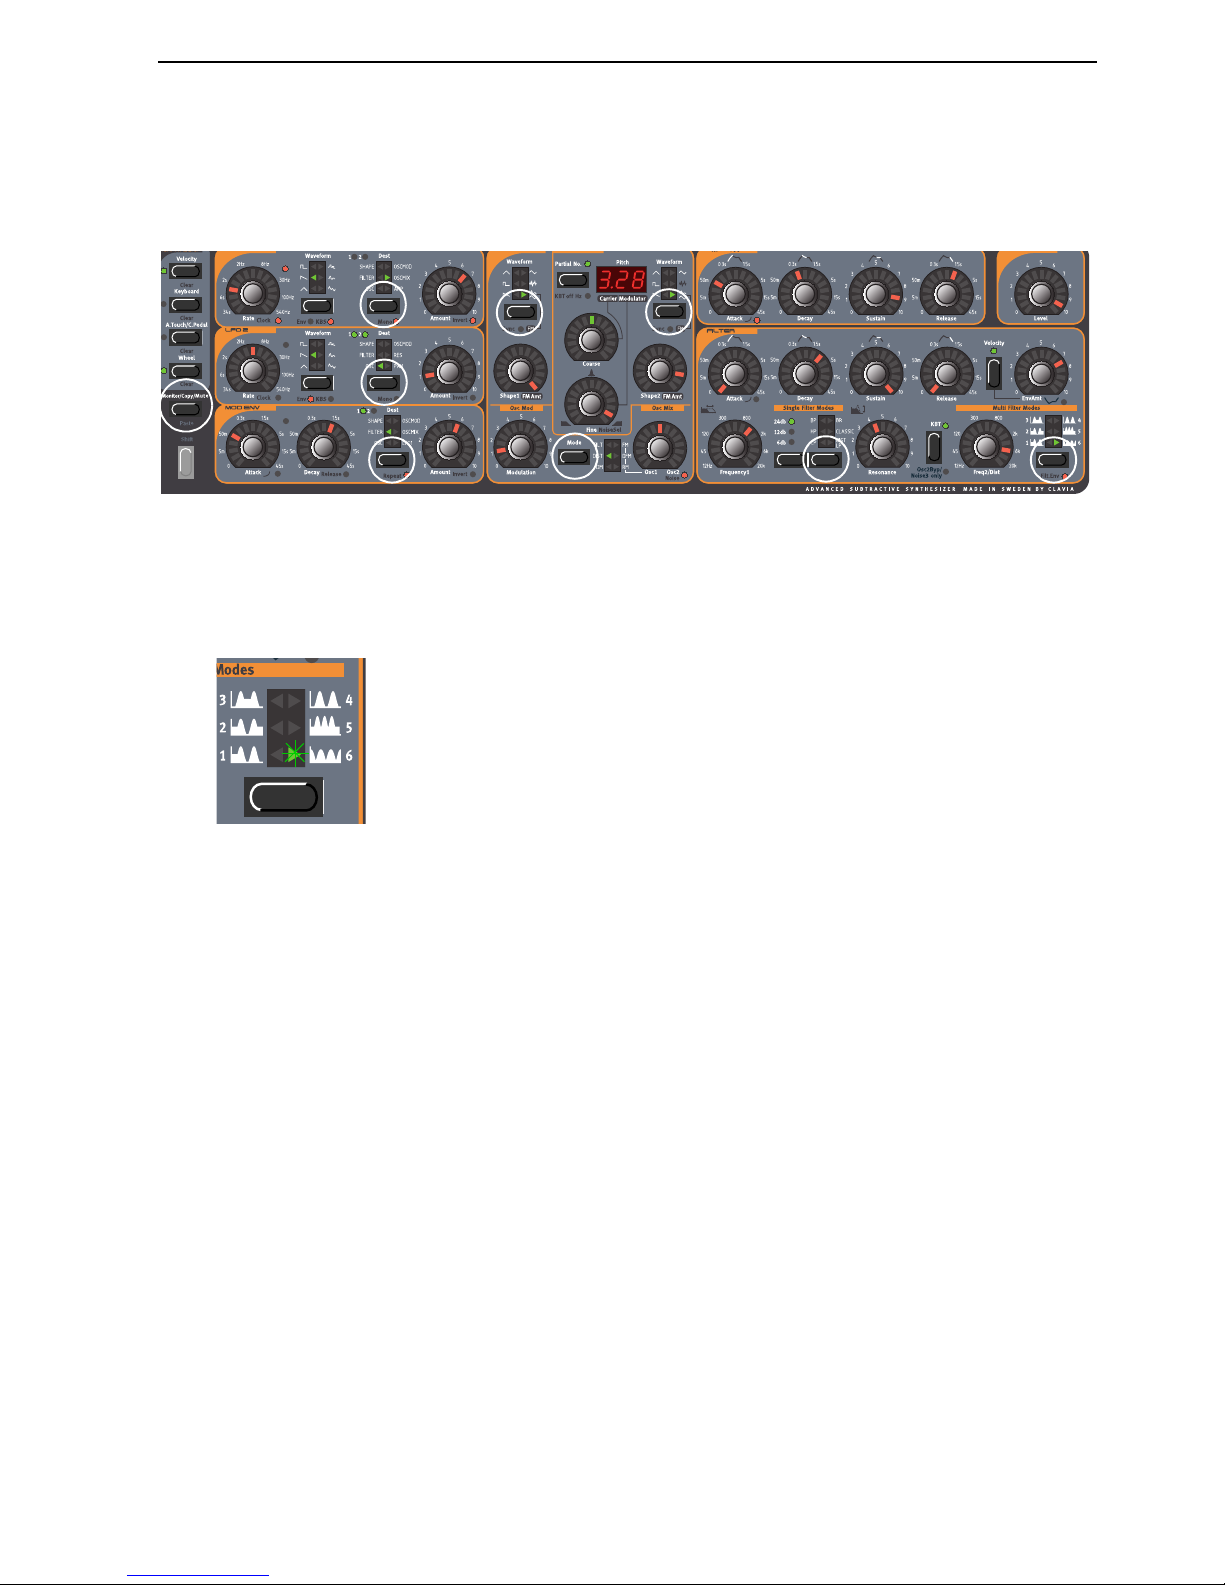
NORD LEAD 3 V1.2x 4. Editing Programs: Muting parameter sections
Page 23
MMMM
UUUUTTTTIIIINNNNGGGG
PPPPAAAARRRRAAAAMMMMEEEETTTTEEEERRRR
SSSSEEEECCCCTTTTIIIIOOOONNNNSSSS
When you’re editing a Program it may sometimes be convenient to temporarily mute certain parameter
sections so you can hear how they affect the sound
By holding the M
ONITOR/COPY/MUTE
button and pressing any of the following S
ELECTOR
buttons,
the selected parameter section is temporarily muted (disabled): LFO1 or 2 Destination, MOD ENV Destination, OSC1 or 2 Waveform, OscMod Mode and Filter Type.
A muted parameter section is indicated by the corresponding S
ELECTOR
LED flashing.
To revert to normal state, and thus activate the parameter section/function again, press the corresponding
S
ELECTOR
button or the M
ONITOR/COPY/MUTE
button together with the corresponding S
ELECTOR
button.
Note! You cannot store any Mute settings with the Program.
SSSS
TTTTOOOORRRRIIIINNNNGGGG
AAAA
P
P P
P
RRRROOOOGGGGRRRRAAAAMMMM
Storing is done identically regardless if you are saving an edited Program or if you have used ‘Sound Init’
or ‘FM Init’ to create a sound from scratch. Storing a Program will permanently overwrite an existing
Program. Be careful so that you don’t accidentally erase a Program you’d like to keep!
Note! When Nord Lead 3 is shipped from factory, Memory Protect is set to ‘On’. To be able to store
Programs, first disable the Memory Protect function. See “Memory Protect” on page 129.
Storing a Program can be done in two ways:
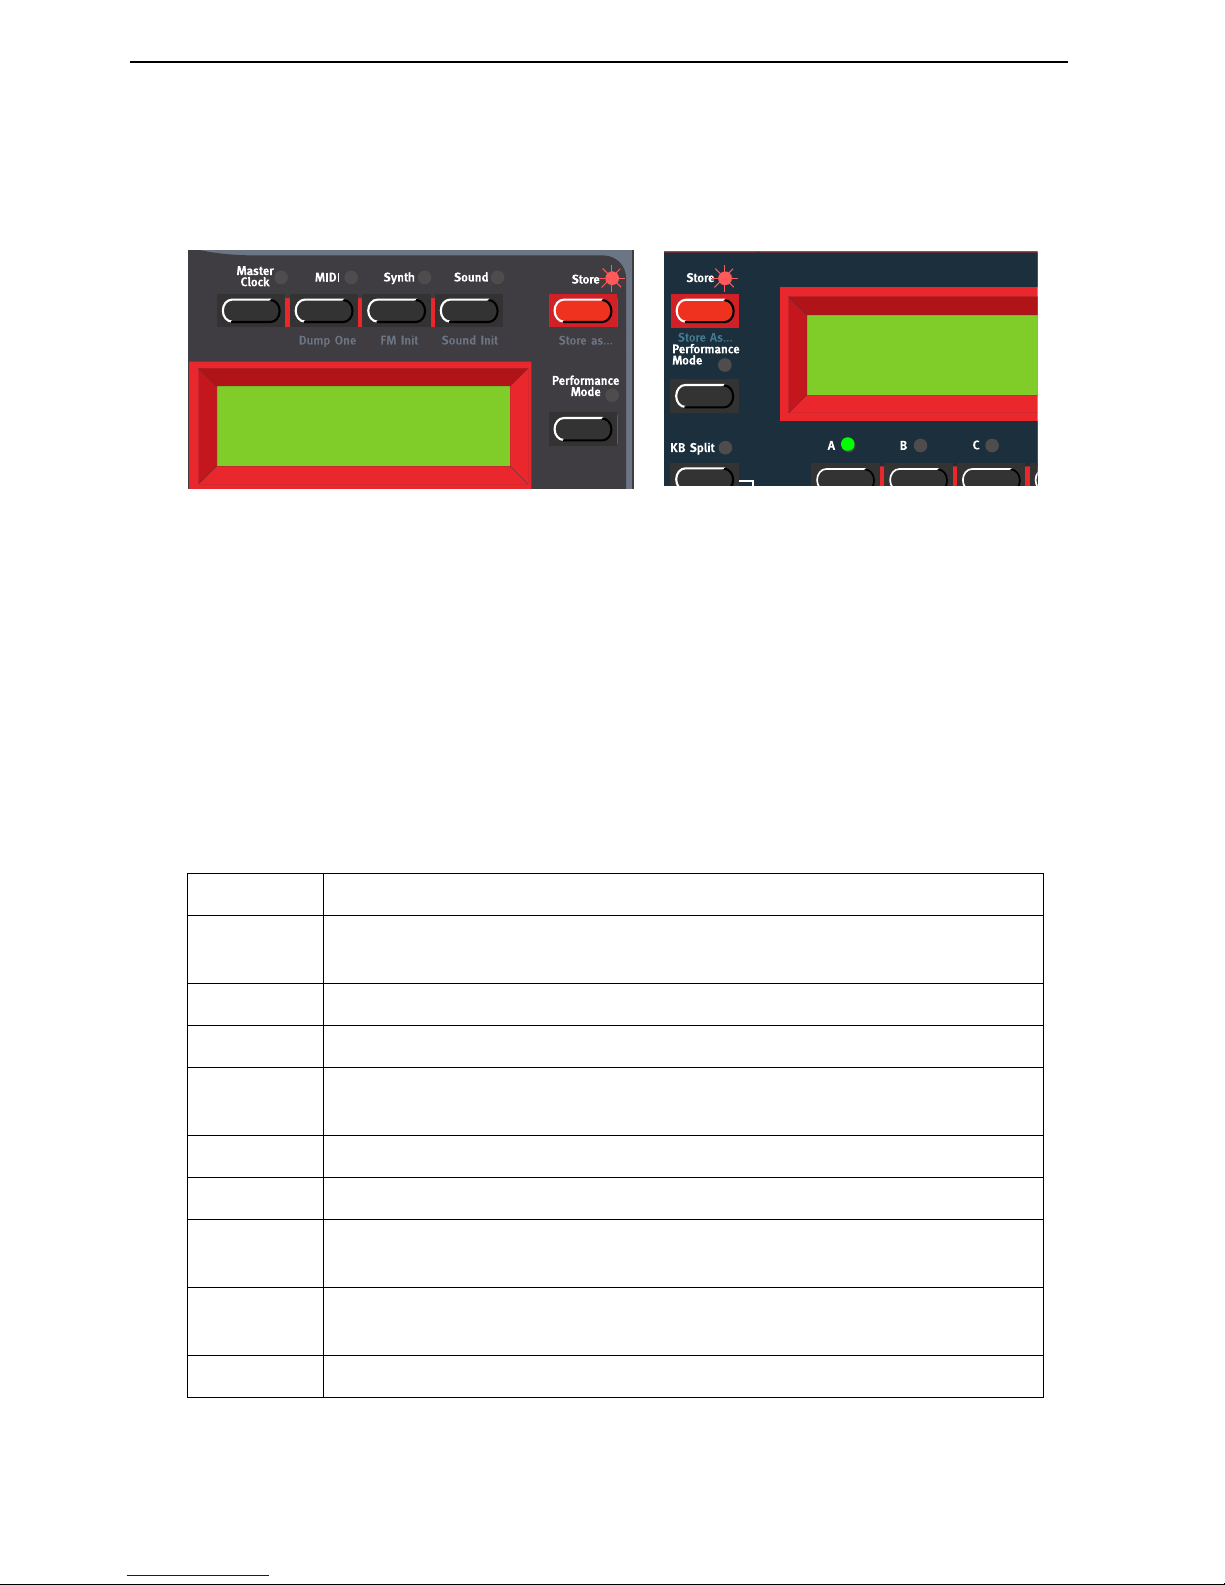
4. Editing Programs: Storing a Program NORD LEAD 3 V1.2x
Page 24
SSSS
TTTTOOOORRRRIIIINNNNGGGG
WWWWIIIITTTTHHHHOOOOUUUUTTTT
CCCCHHHHAAAANNNNGGGGIIIINNNNGGGG
TTTTHHHHEEEE
P
P P
P
RRRROOOOGGGGRRRRAAAAMMMM
NNNNAAAAMMMMEEEE
1. Press the S
TORE
button once. The LED above it starts flashing.
2. Select memory location by turning the R
OTARY DIAL
. Switch between Banks 1-8 by pressing the
U
P/DOWN NAVIGATOR
buttons. As you scroll through the memory locations, you can play and
hear the Program currently shown in the D
ISPLAY
. This prevents you from overwriting a sound that
you want to keep.
3. Press S
TORE
again to store your Program. (To cancel the operation, press a S
LOT
button.)
SSSS
TTTTOOOORRRRIIIINNNNGGGG
WWWWIIIITTTTHHHH
TTTTHHHHEEEE
PPPPOOOOSSSSSSSSIIIIBBBBIIIILLLLIIIITTTTYYYY
TTTTOOOO
SSSSEEEELLLLEEEECCCCTTTT
CCCC
AAAATTTTEEEEGGGGOOOORRRRYYYY
AAAANNNNDDDD
////
OOOORRRR
CCCCHHHHAAAANNNNGGGGEEEE
TTTTHHHHEEEE
PPPP
RRRROOOOGGGGRRRRAAAAMMMM
NNNNAAAAMMMMEEEE
To make it easier to find different types of sounds in the synth’s memory it’s possible to save Programs
in separate Categories. When you’re looking for a specific sound you can search either by category, in
alphabetical order or numerically. There are 12+2 different categories to choose between:
CCCC
AAAATTTTEEEEGGGGOOOORRRRYYYY
DDDD
EEEESSSSCCCCRRRRIIIIPPPPTTTTIIIIOOOONNNN
Acoustic Sounds with an acoustic character like flutes, violins, guitars, ethnic sounds, bells,
mallets etc. Doesn’t necessarily have to be emulations of existing instruments
Arpeggio All sorts of arpeggio and “groove” sounds
Bass All sorts of bass sounds
Classic Traditional “clean” analog types of polyphonic synth sounds based on the classic
waveforms
Drum Drum and percussion sounds
Fantasy Melodic effects sounds and textures, often with rhythmic modulations
FX Atonal effects sounds like water, laser guns, explosions etc. Sometimes with heavy
modulations. Quite often built up using Noise “waveforms”
Lead Sounds meant for lead lines. Usually monophonic sounds. Also lead “chord mem-
ory” sounds
Organ Different types of organ sounds
Store To 2:98
Pro5 click
Store To 2:98
Pro5 click
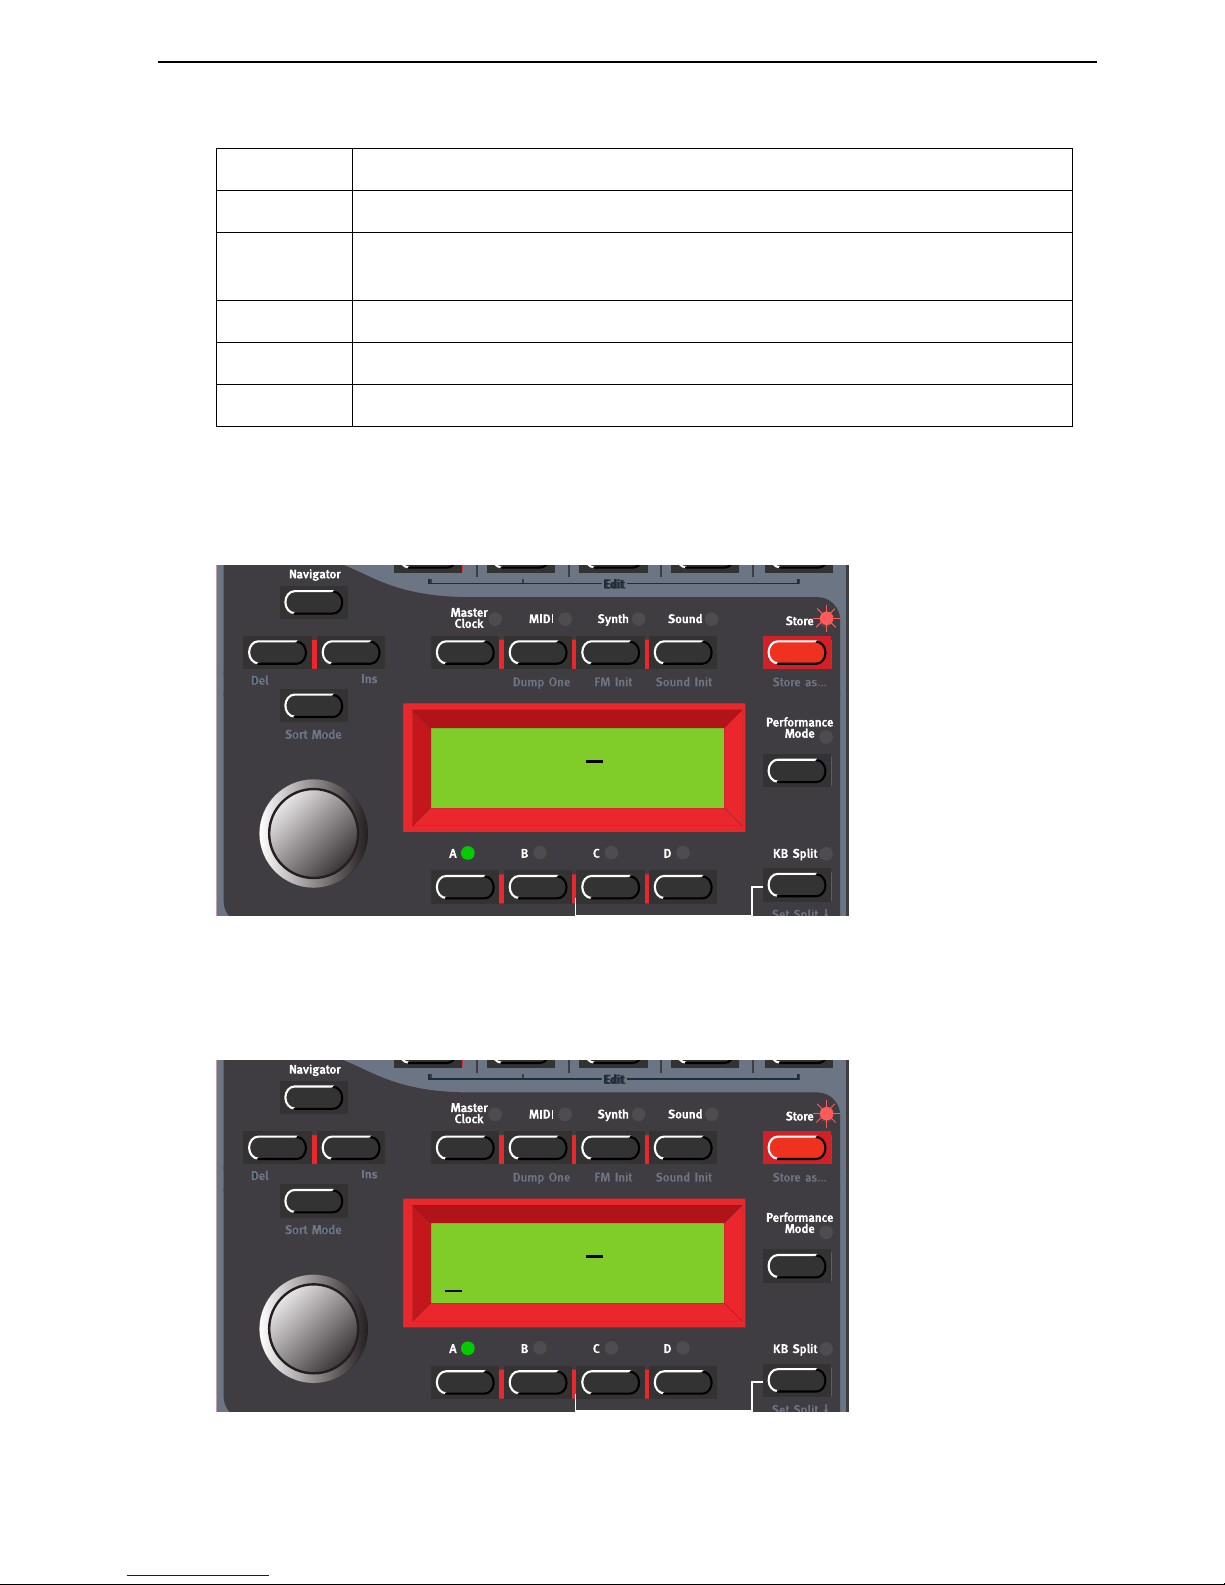
NORD LEAD 3 V1.2x 4. Editing Programs: Storing a Program
Page 25
To store a Program in a Category and change the Program name, do like this:
1. Hold down S
HIFT
and press S
TORE
(Store as...). The S
TORE
LED starts flashing and the D
ISPLAY
shows the current Sound Category or, if no Sound Category was selected, ’Name: No Cat’.
2. Select Category with the R
OTARY DIAL
. Let’s say we select ‘Synth’ in this example.
3. Press the R
IGHT NAVIGATOR
button once and select letters for the Program name by turning the
R
OTARY DIAL
. Change the cursor position with the L
EFT
and R
IGHT NAVIGATOR
buttons.
Pad Melodic polyphonic “chord” sounds with fairy slow attacks like strings, choirs etc.
Piano Piano type sounds like Rhodes and Wurlitzer emulations and FM based piano
sounds
Synth All sorts of melodic polyphonic synth sounds
User1 Reserved for your own sounds
User2 Reserved for your own sounds
CCCC
AAAATTTTEEEEGGGGOOOORRRRYYYY
DDDD
EEEESSSSCCCCRRRRIIIIPPPPTTTTIIIIOOOONNNN
Name: No Cat
Init sound
Name: Synth
I
nit sound
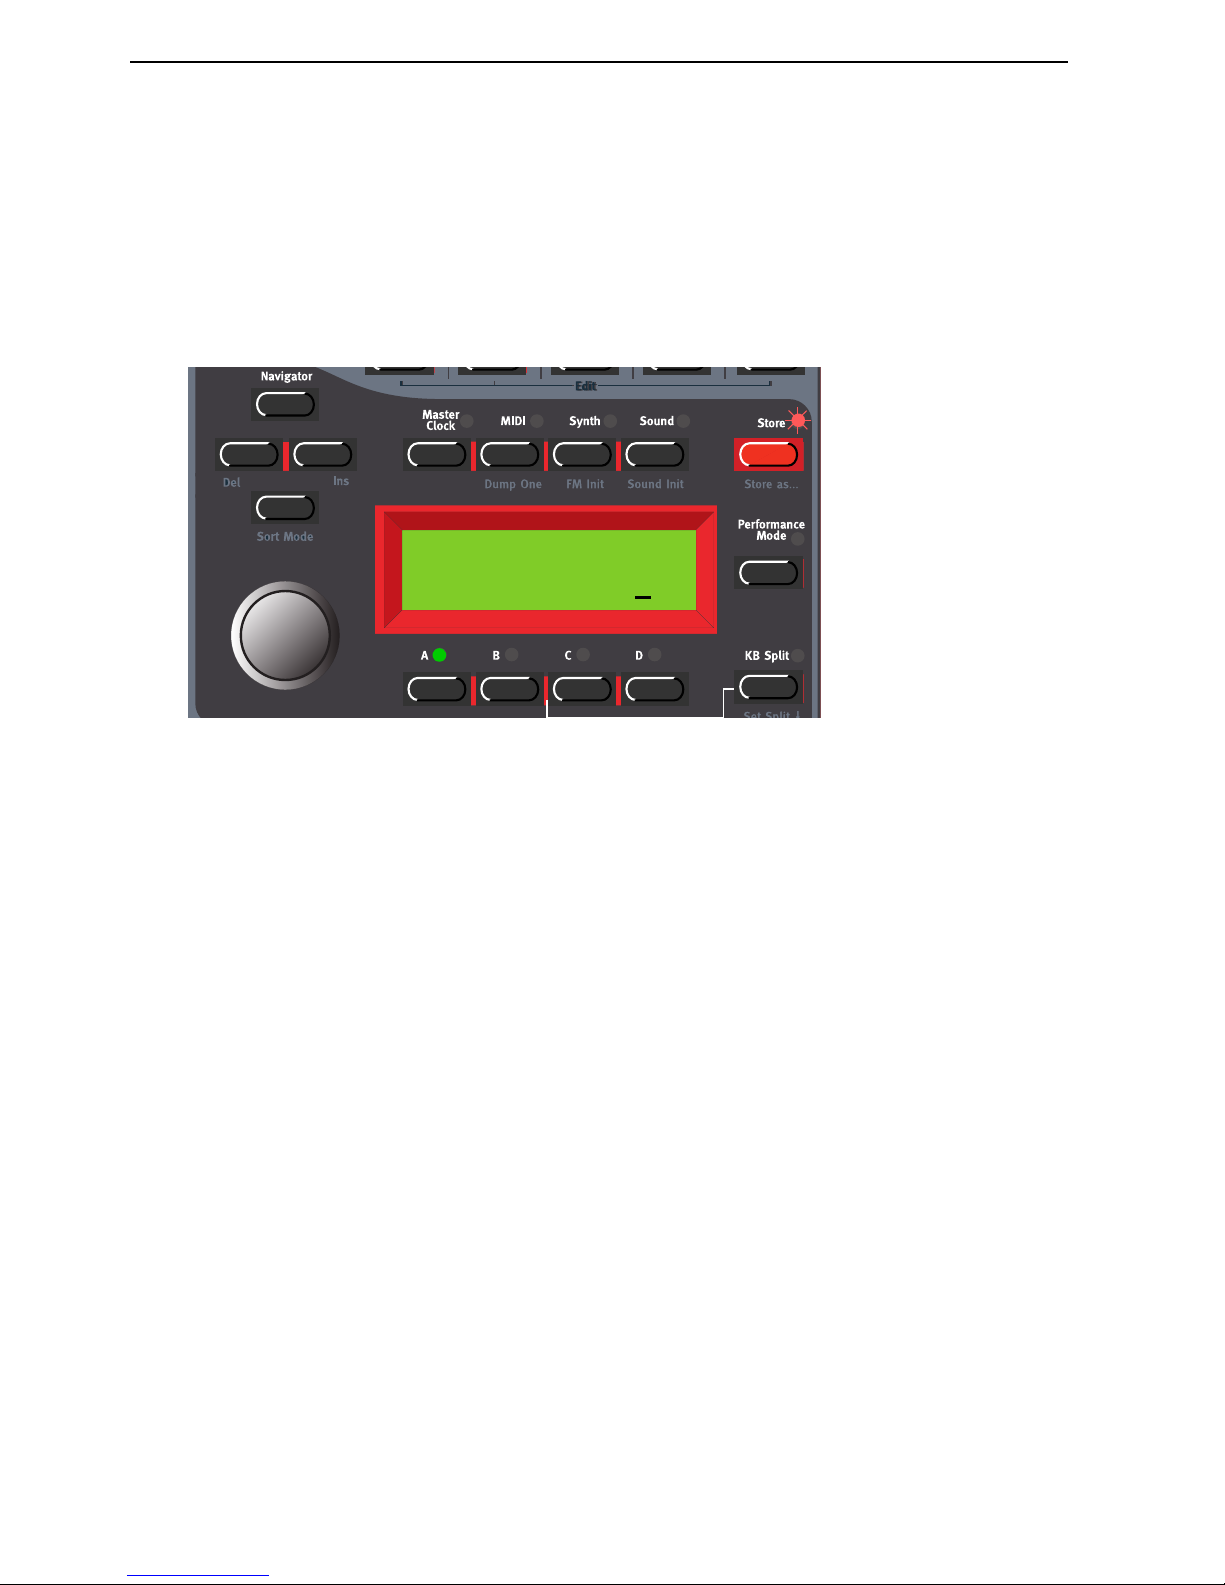
4. Editing Programs: Searching for and loading Programs NORD LEAD 3 V1.2x
Page 26
Alternatively, press and hold the D
OWN NAVIGATOR
button and select letters with the R
OTARY DI
-
AL
. Each time you release the D
OWN NAVIGATOR
button the cursor in the D
ISPLAY
advances one
step. Repeat the procedure for the entire Program name. If you want to delete a letter/position and
thus move all the letters to the right of the cursor one step back, hold down S
HIFT
and press the L
EFT
N
AVIGATOR
(DEL) button. (This function is the same as using the Delete key on a computer keyboard.) If you want to move all letters to the right of the cursor one step forward and thus make room
for more letters, hold down S
HIFT
and press the R
IGHT NAVIGATOR
(INS) button.(Press a S
LOT
but-
ton to cancel the Storing operation).
4. Press S
TORE
again. The S
TORE
LED continues flashing. Select memory location by turning the
R
OTARY DIAL
. Switch between Banks 1-8 by pressing the U
P/DOWN NAVIGATOR
buttons. As you
scroll through the memory locations, you can play and hear the Program currently shown in the D
IS
-
PLAY
. This prevents you from overwriting a sound that you want to keep.
5. Press S
TORE
again to store your Program. (To cancel the operation, press a S
LOT
button.)
SSSS
EEEEAAAARRRRCCCCHHHHIIIINNNNGGGG
FFFFOOOORRRR
AAAANNNNDDDD
LLLLOOOOAAAADDDDIIIINNNNGGGG
P
P P
P
RRRROOOOGGGGRRRRAAAAMMMMSSSS
By default, when you load a Program into a Slot by first selecting Bank with the U
P/DOWN NAVIGATOR
buttons and then turning the R
OTARY DIAL
, the Programs are displayed (and loaded) in numerical order.
However, you can change the search mode to either alphabetical or by Category.
SSSS
EEEEAAAARRRRCCCCHHHH
FFFFOOOORRRR
AAAA
P
P P
P
RRRROOOOGGGGRRRRAAAAMMMM
IIIINNNN
AAAA
SSSSPPPPEEEECCCCIIIIFFFFIIIICCCC
C
C C
C
AAAATTTTEEEEGGGGOOOORRRRYYYY
By holding down S
HIFT
and pressing the D
OWN NAVIGATOR
button twice you will be able to load Pro-
grams by Categories rather than by memory location number. The Programs within a Category will be
Name: Synth
My synth sound
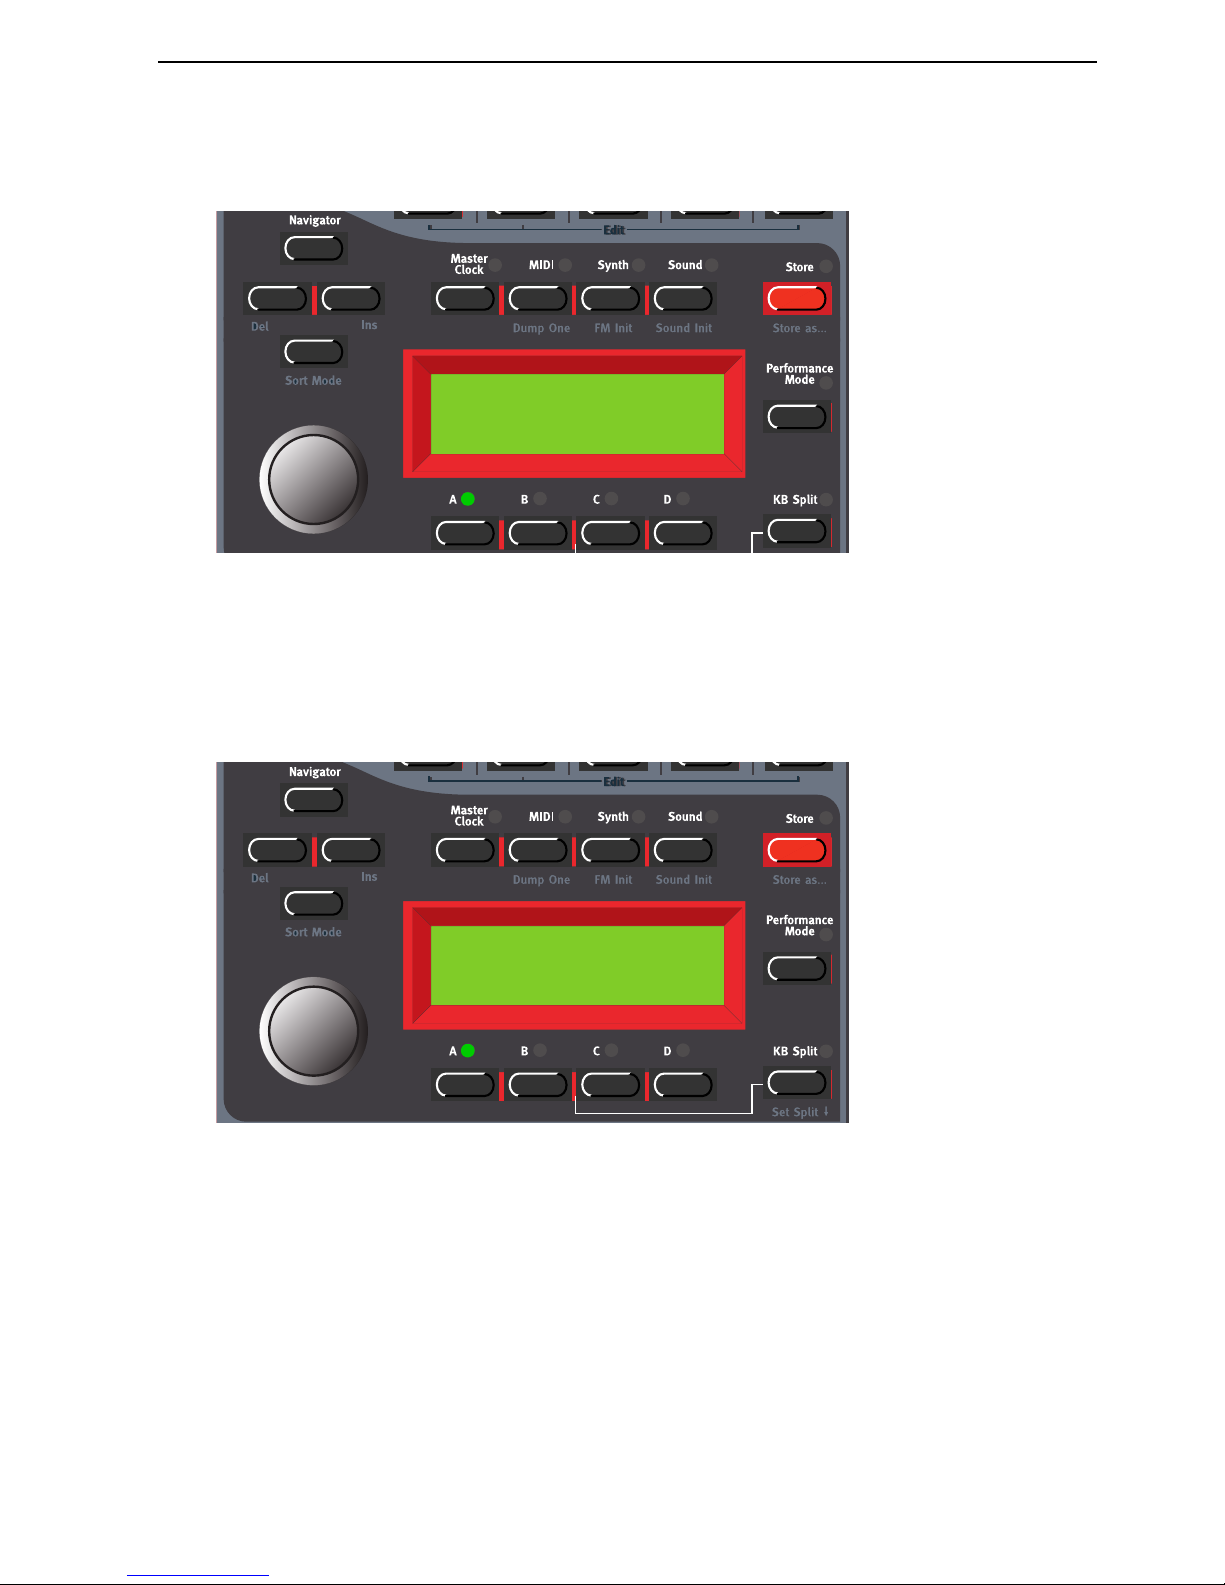
NORD LEAD 3 V1.2x 4. Editing Programs: Copying Programs
Page 27
displayed and loaded in alphabetical order. Select Category by pressing the U
P/DOWN NAVIGATOR
but-
tons and select Program with the R
OTARY DIAL
or with the L
EFT/RIGHT NAVIGATOR
buttons.
SSSS
EEEEAAAARRRRCCCCHHHH
FFFFOOOORRRR
AAAA
P
P P
P
RRRROOOOGGGGRRRRAAAAMMMM
IIIINNNN
AAAALLLLPPPPHHHHAAAABBBBEEEETTTTIIIICCCCAAAALLLL
OOOORRRRDDDDEEEERRRR
By default, when you load a Program into a Slot by turning the R
OTARY DIAL
, the Programs are dis-
played (and loaded) in numerical order. By pressing the S
HIFT
+ D
OWN NAVIGATOR
buttons you will
be able to load Programs in alphabetical order rather than by memory location number. Select letter by
pressing the U
P/DOWN NAVIGATOR
buttons and select Program with the R
OTARY DIAL
or with the
L
EFT/RIGHT NAVIGATOR
buttons.
Note: The selected ‘Program Sort mode’ (numerically, by category or alphabetically) can be saved using the ‘Store System Settings’ command in the Synth menu. (This way the selected search mode will
be active every time you power on your Nord Lead 3.)
CCCC
OOOOPPPPYYYYIIIINNNNGGGG
P
P P
P
RRRROOOOGGGGRRRRAAAAMMMMSSSS
FFFF
RRRROOOOMMMM
OOOONNNNEEEE
MMMMEEEEMMMMOOOORRRRYYYY
LLLLOOOOCCCCAAAATTTTIIIIOOOONNNN
TTTTOOOO
AAAANNNNOOOOTTTTHHHHEEEERRRR
Copying Programs from one memory location to another is just a variation of storing:
Synth 4:36
My synth sound
M 4:36
My synth sound
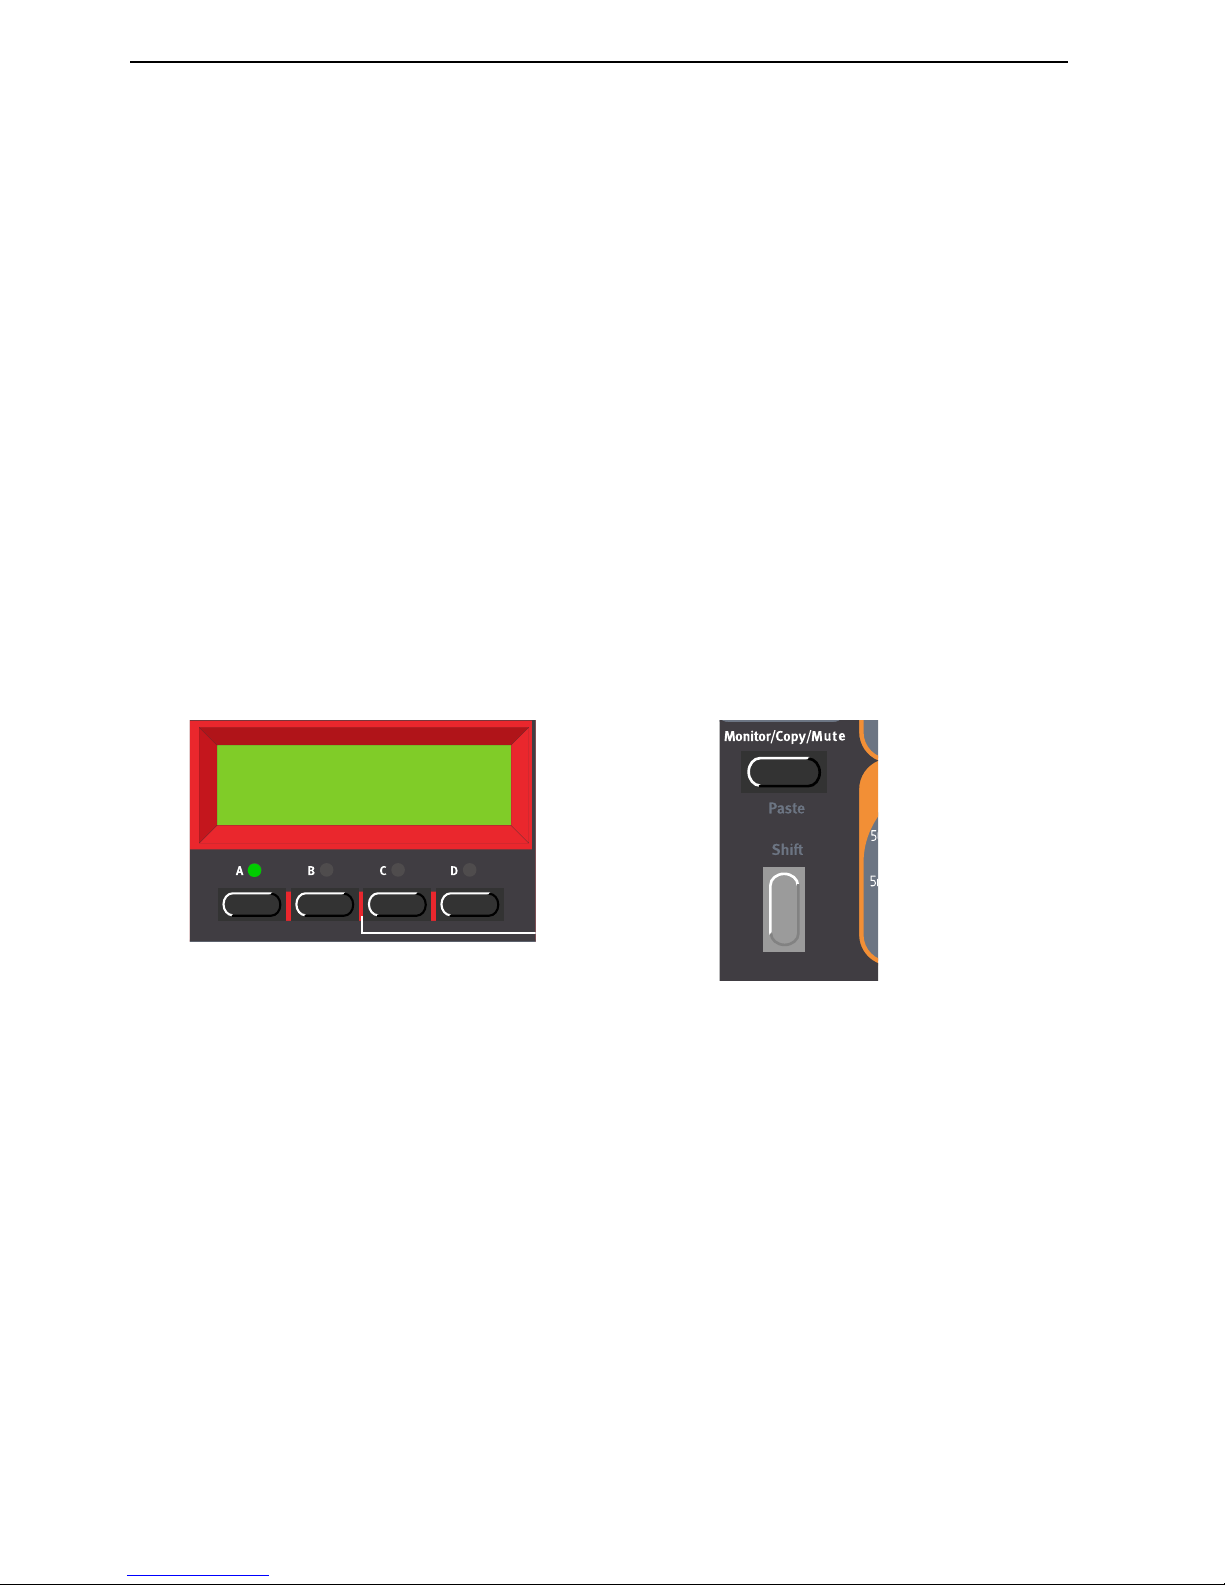
4. Editing Programs: Deleting Programs NORD LEAD 3 V1.2x
Page 28
1. Select the Program you want to copy. Press the S
TORE
button once. The LED above it starts flash-
ing.
2. Select the destination memory location by turning the R
OTARY DIAL
. Switch between Banks by
pressing the U
P/DOWN NAVIGATOR
buttons. As you scroll through the memory locations, you can
play and hear the Program currently shown in the D
ISPLAY
. This prevents you from overwriting a
sound that you want to keep.
3. Press S
TORE
again to store your Program. (To cancel the operation, press a S
LOT
button.)
Of course you could also copy a Program to a new memory location and change the Program name. Just
follow the instructions in the paragraph ‘Storing with the possibility to change the Program name’ above.
FFFF
RRRROOOOMMMM
OOOONNNNEEEE
SSSS
LLLLOOOOTTTT
TTTTOOOO
AAAANNNNOOOOTTTTHHHHEEEERRRR
You can also copy a Program from one Slot and paste it to another Slot. To copy and paste a Program
from one Slot to another, do like this:
Press and hold the M
ONITOR/COPY
button and while holding it press the S
LOT
button containing the
Program you want to copy. Release all buttons. Press and hold S
HIFT+MONITOR/COPY
(Paste) and
while holding them press the destination S
LOT
button.
Note: The copied Program is not stored in any memory location with this operation. It is only copied
to the new Slot’s edit buffer.
(For more information about the Monitor/Copy function, please refer to page 133.)
DDDD
EEEELLLLEEEETTTTIIIINNNNGGGG
P
P P
P
RRRROOOOGGGGRRRRAAAAMMMMSSSS
There is no command for deleting single Programs from the internal memory. What you do to “delete”
a Program is simply saving a new Program and replacing the old one in a specific memory location. However, you can erase complete Banks of Programs with a single command. You do this by using the ‘Program Bank Receive’ function described on page 126. After you have selected a Bank to erase and erased
it, you simply exit without downloading a new Bank of Programs.
DDDD
OOOOWWWWNNNNLLLLOOOOAAAADDDDIIIINNNNGGGG
P
P P
P
RRRROOOOGGGGRRRRAAAAMMMMSSSS
VVVVIIIIAAAA
MIDI
MIDI MIDI
MIDI
You can receive MIDI SysEx data for one Program at a time into a Slot’s edit buffer. For example, if you
use Nord Lead 3 together with a sequencer, it is often practical to record a SysEx Program data dump in
the beginning of your song to download sounds. See “Dump One” on page 122 for info on how to per-
form a single Program SysEx dump. It’s also possible to receive a complete Program Bank via MIDI
SysEx. See “Program Bank Receive” on page 126.
Prg 2:98
Pro5 click
 Loading...