


User Manual
Nord Lead A1
Nord Lead A1R
OS Version 1.3x
Part No. 50425 |
Copyright Clavia DMI AB |
Print Edition: F |
|

CAUTION -ATTENTION
RISK OF ELECTRIC SHOCK
DO NOT OPEN
RISQUE DE SHOCK ELECTRIQUE
NE PAS OUVRIR
CAUTION: TO REDUCE THE RISK OF ELECTRIC SHOCK
DO NOT REMOVE COVER (OR BACK).
NO USER SERVICEABLE PARTS INSIDE.
REFER SERVICING TO QUALIFIED PERSONNEL.
ATTENTION:POUR EVITER LES RISQUES DE CHOC ELECTRIQUE, NE
PAS ENLEVER LE COUVERCLE.
AUCUN ENTRETIEN DE PIECES INTERIEURES PAR L´USAGER.
CONFIER L´ENTRETIEN AU PERSONNEL QUALIFE.
AVIS: POUR EVITER LES RISQUES D´INCIDENTE OU D´ELECTROCUTION, N´EXPOSEZ PAS CET ARTICLE A LA PLUIE OU L´HUMIDITET.
The lightning flash with the arrowhead symbol within an equilateral triangle is intended to alert the user to the presence of uninsulated voltage within the products enclosure that may be of sufficient magnitude to constitute a risk of electric shock to persons.
Le symbole éclair avec le point de flèche à l´intérieur d´un triangle équilatéral est utilisé pour alerter l´utilisateur de la presence à l´intérieur du coffret de ”voltage dangereux” non isolé d´ampleur
suffisante pour constituer un risque d`éléctrocution.
The exclamation mark within an equilateral triangle is intended to alert the user to the presence of important operating and maintenance (servicing) instructions in the literature accompanying the product.
Le point d´exclamation à l´intérieur d´un triangle équilatéral est employé pour alerter l´utilisateur de la présence d´instructions importantes pour le fonctionnement et l´entretien (service) dans le livret d´instructions accompagnant l´appareil.
Instructions pertaining to a risk of fire, electric shock or injury to persons.
IMPORTANT SAFETY INSTRUCTIONS
SAVE THESE INSTRUCTIONS
Warning - When using electric products, basic precautions should always be followed, including the following:
1) |
Read these instructions. |
10) Protect the power cord from being walked on or pinched |
|
2) |
Keep these instructions. |
particularly at plugs, convenience receptacles, and the point |
|
where they exit from the apparatus. |
|||
3) |
Heed all warnings. |
||
11) Only use attachments/accessories specified by the manu- |
|||
|
|
||
4) |
Follow all instructions. |
facturer. |
|
5) |
Do not use this apparatus near water. |
12) Use only with the cart, stand, |
|
6) |
Clean only with dry cloth. |
tripod, bracket, or table specified by the |
|
manufacturer, or sold with the apparatus. |
|||
|
|
||
7) |
Do not block any ventilation openings. Install in accordance |
When a cart is used, use caution when |
|
with the manufacturer’s instructions. |
moving the cart/apparatus combination to |
||
8) |
Do not install near any heat sources such as radiators, heat |
avoid injury from tip-over. |
|
13) Unplug this apparatus during lightning |
|||
registers, stoves, or other apparatus (including amplifiers) that |
|||
produce heat. |
storms or when unused for long periods of time. |
||
9) |
Do not defeat the safety purpose of the polarized or |
14) Refer all servicing to qualified service personnel. Servicing |
|
grounding-type plug. A polarized plug has two blades with one |
is required when the apparatus has been damaged in any way, |
||
wider than the other. A grounding type plug has two blades |
such as power-supply cord or plug is damaged, liquid has been |
||
and a third grounding prong. The wide blade or the third prong |
spilled or objects have fallen into the apparatus, the apparatus |
||
are provided for your safety. If the provided plug does not fit |
has been exposed to rain or moisture, does not operate nor- |
||
into your outlet, consult an electrician for replacement of the |
mally, or has been dropped. |
||
obsolete outlet.
Additional Safety Information
No naked flame sources, such as lighted candles, should be placed on the apparatus;
Do not use the apparatus in tropical climates.
WARNING: To reduce the risk of fire or electric shock, do not expose this apparatus to rain or moisture.
The apparatus shall not be exposed to dripping or splashing and that no objects filled with liquids, such as vases, shall be placed on the apparatus.
The maims plug is used as the disconnect device and shall remain readily operable.
Il convient de ne pas placer sur l´appareil de sources de flammes nues, telles que des bougies allumées;
L´appareil n’est pas destiné á étre utilisé sous un climat tropical.
L´appareil ne doit pas étre exposé á des égouttements d´eau ou des éclaboussures et de plus qu´aucun objet rempli de liquide tel que des vases ne doit étre placé sur l´appareil.
Lorsque la prise du résau d’alimentation est utilisée comme dispositif de déconnexion, ce dispositif doit demeuré aisément accessible.
Trademarks: The Nord logo is a trademark of Clavia DMI AB. All other trademarks mentioned in this publication are the properties of their respective holders.
Specifications and appearances are subject to change without notice.
Copyright © Clavia DMIAB
|
| 3 |
Nord Lead A1 User Manual
|
|
|
|
|
|
|
|
|
Hold |
|
|
|
18 |
|
|
|
|
|
|
|
|
|
. . . . . . . . . . . . . . . . . . |
. . |
. |
||
1 Introduction |
|
|
|
|
4 Slots and Memory |
|
|
|
|
|
|||
|
|
|
|
|
|
Hold Enable . . . . . . . . . . . . . . . . . |
. . . |
. |
. 18 |
||||
The Lead For Speed . . . . . . . . . . |
. |
. |
5. . . . .General. |
Overview |
11. |
|
Shift/Exit |
. . . . . . . . . . . . . . . . . . . . |
. . . |
. . |
18 |
||
|
Pitch Stick |
|
|
18 |
|||||||||
2 models - keyboard and tabletop |
|
|
5 |
|
Slot Handling |
11 |
|
. . . |
. . |
||||
. . |
. |
|
|
Modulation Wheel |
|
|
19 |
||||||
|
|
|
|
|
Split |
|
11 |
|
. . . |
. . |
|||
|
|
|
|
|
.. .. .. .. .. .. .. .. .. .. .. .. .. .. .. .. .. .. .. .. .. .. .. .. .. .. |
|
Arpeggiator |
|
|
19 |
|||
|
|
|
|
|
Solo |
|
11 |
|
. . . |
. . |
|||
|
|
|
|
|
. . . . . . . . . . . . . . . . . . . . . . . . . . |
|
Arpeggio Run |
|
|
19 |
|||
|
|
|
|
|
|
|
|
|
. . . |
. . |
|||
2 Overview |
|
|
|
|
Multi Focus . . . . . . . . . . . . . . . |
. 11. . . . . .Arpeggio Rate . . . . . . . . . . . . . . |
. . |
. . |
19. . |
||||
|
|
|
|
|
Program Handling . . . . . . . . . . . . . . . |
.12. |
|
Arpeggio Mst Clk |
|
|
19 |
||
|
|
|
6 |
|
Programs |
12 |
|
. . . |
. . |
||||
The Panel |
|
|
|
|
Arpeggio Range |
|
|
19 |
|||||
. . |
|
|
Performances |
12 |
|
. . . |
. . |
||||||
Oscillator, Filter & Amp Env |
|
|
6 |
|
. . . |
Arpeggio Directions |
|
|
19 |
||||
. . |
|
. |
Performance Mode |
12 |
|
. . . |
. . |
||||||
Modulation |
|
|
6 |
|
|
Panic |
|
|
|
19. |
|||
. . |
|
|
Loading |
12 |
|
. . . . . . . . . . . . . . . . . . . . |
. . |
. . |
|||||
Effects and Output |
|
|
6 |
|
|
Voice Mode |
|
|
19 |
||||
. . |
|
|
Storing |
12 |
|
. . . |
. . |
||||||
Voice Mode |
|
|
6 |
|
|
Unison |
|
|
|
19 |
|||
. . |
|
. |
Copying Slots to a Performance . . . . |
. 12. |
|
. . . . . . . . . . . . . . . . . . . . |
. . . |
. . |
|||||
Pitch Stick |
|
|
6 |
|
|
Mono . . . . . . . . . . . . . . . |
. . |
. |
.19. . . . . . |
||||
. . |
|
|
Copying a Performance to Program . . |
12. |
|
||||||||
Mod Wheel . . . . . . . . . . . . . |
. . |
|
|
|
|
Legato |
|
|
|
19 |
|||
|
. 6. . . . . . . |
|
|
|
. . . . . . . . . . . . . . . . . . . . |
. . . |
. |
||||||
Arpeggiator . . . . . . . . . . . . . . . . . |
. |
. |
.6. |
. . |
|
|
|
|
Glide . . . . . . . . . . . . . . . . |
. . |
. |
.19. . . . . . |
|
Program and Performance . . . . . |
. . |
. 6. . . |
|
|
|
|
Multi Focus . . . . . . . . . . . . |
. . |
. |
. 19. . . . . . |
|||
|
|
|
|
||||||||||
5 Morph |
|
|
|||||||||||
Morph . . . . . . . . . . . . . . . . . . . |
. |
. |
6. |
. . . |
|
|
Bend Range |
|
|
19. |
|||
Editing |
|
|
7 |
|
|
|
. . . |
. |
|||||
. . |
. |
|
Morphing |
13. |
|
Vibrato . |
. . . . . . . . . . . . . . . . |
. . |
. . |
19. . . . . |
|||
|
|
|
|
|
|
Init Sound . . . . . . . . . . . . |
. . |
. |
. 19. . . . . . |
||||
Buttons . . . . . . . . . . . . . . . . . . . 7. . . . . . . . |
|
13 |
|
||||||||||
On/Off buttons . . . . . . . . . . . . . . . |
. . |
. |
.7. |
|
The Morphs . . . . . . . . . . . . . . . . . |
. . . |
Low Frequency Oscillator (LFO/ENV) |
. . . . . 20 |
|||||
Selector buttons . . . . . . . . . . . . . . . . |
. . |
|
. 7 |
|
Wheel/Control Pedal . . . . . . . . . . . . |
. 13. . |
|
Rate/Time . . . . . . . . . . . . . . |
. . . |
. |
20. . . . . |
||
Shift button . . . . . . . . . . . . . . . . . . . . |
. . |
|
. 7 |
|
Velocity . . . . . . . . . . . . . . . . . . . . . . . . . |
13 |
|
LFO Master Clock (Mst Clk) . . . |
. . |
. . |
20. . |
||
Master Clock (Mst Clk) . . . . . . . . . . |
. . |
|
. 7. |
|
Assign a Morph source to a parameter . 13 |
LFO Waveform Selector . . . . . . . . |
. . . |
. . |
20 |
||||
Knobs & dials . . . . . . . . . . . . . . . . . . . . |
. . |
|
. 7 |
|
Morph parameters . . . . . . . . . . . . . . . . . |
13 |
|
Envelope . . . . . . . . . . . . . . . . |
. . |
. |
. 20. . . . |
||
Knobs . . . . . . . . . . . . . . . . . . . . . . . . |
. . |
|
. 7 |
|
Editing Morphs . . . . . . . . . . . . . . |
. 14. . |
. . . |
LFO Modulation Polarities . . . . . . |
. . . |
. . |
20 |
||
Knobs with Shift features . . . . . . . . |
. |
. |
.7. |
|
Morph Programming Latch . . . . . . . . |
14. . . . |
Modulation Envelope . . . . . . . . . . |
. . |
. . |
20. . |
|||
Dials . . . . . . . . . . . . . . . . . . . . . . |
. |
. |
.7. |
. . |
|
|
|
|
Attack . |
. . . . . . . . . . . . . . |
. . |
. . |
20. . . . . . . |
Master Level . . . . . . . . . . . . . . . . . . . |
. . |
|
. 7 |
|
|
|
|
|
Decay .. |
.. .. .. .. .. .. .. .. .. .. .. .. .. .. .. .. .. .. .. .. |
.. .. .. |
.. .. |
20 |
|
|
|
|
|
|
|
|
|
|
||||
Rear Panel . . . . . . . . . . . . . . . . . . . . . . |
. . |
|
. 8 |
|
6 Mutator, Randomize & Like |
|
|
Release |
. . . . . . . . . . . . . . . . . . |
. . |
. . |
20. . . |
|
Audio Connections . . . . . . . . . . . . . . . . . |
. . |
|
. 8 |
|
|
|
|
|
Inverted Envelope . . . . . . . . . . . . |
. . . |
. . |
21 |
|
Headphones . . . . . . . . . . . . . . . |
. |
. |
.8 . |
. . |
. Mutator |
. . . . . . . . . . . . . . . . . . . . . . . . . . |
15 |
|
Env Vel . |
. . . . . . . . . . . . . . . . . . . . |
. . . |
. . |
21 |
1, 2, 3 & 4 Outputs . . . . . . . . . . . . . . . |
. . |
|
. 8 |
|
Executing the Mutation . . . . . . . . . . . . . |
15 |
|
Oscillators . . . . . . . . . . . . . . . . . . . |
. . . |
. . |
21 |
||
General guide on audio connections . |
. . |
|
. 8 |
|
Randomize . . . . . . . . . . . . . . . . . . . . . . . . |
15 |
|
Panel Analog Waveforms . . . . . |
. . |
. . |
21. . |
||
MIDI Connections . . . . . . . . . . . . . |
. . |
|
.8. |
. . |
. Mutate Morph |
15 |
|
Extended Analog Waveforms . . . . |
. . . |
. . |
21 |
||
MIDI OUT |
|
|
8 |
|
|
Fixed Pulse Waveforms |
|
|
21. |
||||
. . |
|
|
Like |
|
16 |
|
. . . |
. |
|||||
MIDI IN |
|
|
8 |
|
. . . . . . . . . . . . . . . . . . . . . . . . . . |
|
Drawbar Organ Waveforms |
|
|
21 |
|||
. . |
|
|
Program Likes |
16 |
|
.. .. .. |
.. .. |
||||||
USB Connection . . . . . . . . . . . . |
. |
. |
|
|
|
Bells and Tines . . . . . . . . . |
. . |
. |
. 21. . . . . . |
||||
8. . . . . . . |
|
16 |
|
||||||||||
USB MIDI |
|
|
8 |
|
Performance Likes . . . . . . . . . . . . . . . . . |
|
Digital |
|
|
|
22 |
||
. . |
|
|
Select a Like to Store |
16 |
|
. . . . . . . . . . . . . . . . . . . . |
. . . |
. . |
|||||
Pedal Connections |
|
|
8 |
|
|
Electric |
|
|
|
22 |
|||
. . |
|
|
|
|
|
|
. . . . . . . . . . . . . . . . . . . . |
. . . |
. . |
||||
Sustain pedal . . . . . . . . . . . . . . . . . . . |
. . |
|
. 8 |
|
|
|
|
|
Formants . . . . . . . . . . . . . . . . . . . |
. . . |
. . |
22 |
|
Control pedal |
|
|
8 |
|
|
|
|
|
Oscillator Configuration |
|
|
22 |
|
. . |
|
|
7 Panel Reference |
|
|
. . . |
. . |
||||||
|
|
|
|
|
|
|
Single Oscillator Configurations . . |
. . . |
. . |
22 |
|||
|
|
|
|
|
Master Level . . . . . . . . . . . . . . . . . . . . |
17. . |
|
Pitch . . |
. . . . . . . . . . . . . . . . . . . . |
. . . |
. . |
22 |
|
3 Getting Started |
|
|
|
|
|
Shape |
|
|
|
22 |
|||
|
|
|
|
MIDI LED |
17. |
|
. . . . . . . . . . . . . . . . . . . . |
. . . |
. . |
||||
|
|
|
|
|
Sync |
|
|
|
22 |
||||
|
|
|
|
|
Morph |
|
17 |
|
.. .. .. .. .. .. .. .. .. .. .. .. .. .. .. .. .. .. .. .. |
.. .. .. |
.. .. |
||
Slots |
|
|
9 |
|
. . . . . . . . . . . . . . . . . . . . . . . . . . |
|
Dual Oscillator Configurations |
|
|
22. |
|||
|
|
|
Program/Value Dial |
17 |
|
. . |
. . |
||||||
. . |
. |
|
|
Detune |
|
|
|
22 |
|||||
Selecting a Program |
|
|
9 |
|
. |
|
|
|
|||||
|
|
|
LED Display |
17 |
|
. . . . . . . . . . . . . . . . |
. . |
. |
|||||
. . |
|
|
|
Sine, Tri, Saw and Pulse Mix |
|
|
23 |
||||||
Editing a Program |
|
|
9 |
|
Performance Mode/Execute |
17 |
|
. . . |
. . |
||||
. . |
|
. . |
|
Modulation Configurations |
|
|
23 |
||||||
Storing a Program |
|
|
9 |
|
|
. . . |
. . |
||||||
. . |
. |
|
Store |
|
17 |
|
FM (Frequency Modulation) |
|
|
23 |
|||
Layering Programs |
|
|
9 |
|
. . . . . . . . . . . . . . . . . . . . |
. . . |
. . . |
. . |
|||||
. . |
|
|
Copy/Monitor |
17 |
|
AM (Amplitude Modulation) |
|
|
23 |
||||
Soloing a Slot |
|
|
9 |
|
|
. . . |
. . |
||||||
. . |
|
|
Paste |
|
17 |
|
Amp Envelope |
|
|
23 |
|||
Multi Focus . . . . . . . . . . . . . . |
. |
. |
|
|
. . . . . . . . . . . . . . . . . . . . . . . . . . |
|
|
|
|||||
.9. . . . . . |
|
|
|
. . . |
. |
||||||||
Creating a Split . . . . . . . . . . . . |
. |
. 10. . . . |
. Slot A - D . . . . . . . . . . . . . . . . |
.18. . . . |
. Attack. . |
. . . . . . . . . . . . . . . |
. . |
. |
. 23. . . . . . . |
||||
Setting the Split point |
|
|
10 |
|
Deactivate a Slot . . . . . . . . . . . . . . . |
.18. |
. |
Decay .. |
.. .. .. .. .. .. .. .. .. .. .. .. .. .. .. .. .. .. .. .. |
.. .. .. |
.. .. |
23 |
|
. . |
|
|
Panel Focus |
18 |
|
Release |
|
|
|
23 |
|||
Working with Performances |
|
|
10 |
|
|
. . . . . . . . . . . . . . . . . . |
. . |
. . |
|||||
. . |
|
|
Multi Focus |
18 |
|
Env Vel |
|
|
|
23 |
|||
Selecting Performances |
|
|
10 |
|
|
. . . . . . . . . . . . . . . . . . . . |
. . . |
. . |
|||||
. . |
|
|
Soloing a Slot |
18 |
|
Filter |
|
|
|
24 |
|||
Editing a Performance . . . . . . . . . . . . |
. . |
|
10 |
|
|
. . . . . . . . . . . . . . . . . . . . |
. . . |
. . |
|||||
Storing a Performance . . . . . . . . . . . . |
. . |
|
10 |
|
Incoming MIDI . . . . . . . . . . . . . . . . . . |
.18. |
|
Filter Frequency (Freq) . . . . . . . . . |
. . . |
. . |
24 |
||
Storing Programs as a Performance . |
. |
. |
10 |
|
System - MIDI - Sound . . . . . . . . . . . . . |
18 |
|
Filter Resonance . . . . . . . . . . . |
. . |
. |
.24. . . |
||
Setting up a Morph . . . . . . . . . . . |
. . |
|
10. . |
. |
Master Clock .. .. .. .. .. .. .. .. .. .. .. .. .. .. .. .. .. .. .. .. .. |
18 |
|
LFO Amount . . . . . . . . . . . |
. . |
. . 24. . . . . . |
|||
|
|
|
|
|
Octave Shift . . . . . . . . . . . . . . . . . . . . . . . |
18 |
|
Modulation Envelope Amount . . . |
. . |
. |
. 24. |
||
|
|
|
|
|
Keyboard Octave Shift . . . . . . . . . . . . . . |
18 |
|
Keyboard Tracking (KB Track) . . . |
. . . |
. . |
24 |
||
|
|
|
|
|
Split . . |
. . . . . . . . . . . . . . . . . . . . . . . . . . |
18 |
|
Drive . . |
. . . . . . . . . . . . . . . . . . . . |
. . . |
. . |
24 |
|
|
|
|
|
Setting the Split point . . . . . . . . . . . . . . . |
18 |
|
Filter Type . . . . . . . . . . . . |
. . |
. |
. 24. . . . . . |
||

4 | Nord Lead A1 User Manual v1.3x
LP 12, 24 |
|
|
24 |
|
|
|
|
|
|
. . . . . . . . . |
. . |
|
|
|
|
|
|
||
|
|
10 The Menus |
|
|
|||||
LP M . . . . . . . . . . . . |
. . . . . . . |
. |
.24. . . |
|
|
||||
LP TB . . . . . . . . . . . . . . . . |
. . . . . . . . . . |
. |
25 |
|
|
|
|
30 |
|
BP . . . . . . . . . . . . . . . . . . |
. . . . . . . . . . |
. |
25 |
|
|
System Menu . . . . . . . . . . . . . . . |
|||
HP . . . . . . . . . . . . . . . . . |
. . . . . . . . . . |
. |
.25 |
|
|
1 |
- Memory Protect . . . . . . . . . . |
. . . . . .30 |
|
FX . . . . . . . . . . . . . . . . . . . |
. . . . . . . . . . |
. |
25 |
|
|
2 |
- Transpose . . . . . . . . . . . . . . . . |
. . . . . 30 |
|
Flanger . . . . . . . . . . . . . . . |
. . . . . . . . . . |
. |
25 |
|
|
3 |
- Fine Tune . . . . . . . . . . . . . |
. . . . 30. . . . |
|
Phaser . . . . . . . . . . . . . . . |
. . . . . . . . . . |
. |
25 |
|
|
4 |
- Sustain Pedal Polarity . . . . . . . |
. . . . . 30 |
|
RM . . . . . . . . . . . . . . . . . . |
. . . . . . . . . . |
. |
25 |
|
|
5 |
- Wheel Mode . . . . . . . . . . . . . . |
. . . . . 30 |
|
Chorus . . . . . . . . . . . . . . . |
. . . . . . . . . . |
. |
25 |
|
|
6 |
- Ctrl Pedal Mode .. .. .. .. .. .. .. .. .. .. .. |
.. .. .. .. .. 30 |
|
Ensemble . . . . . . . . . . . . . |
. . . . . . . . . . |
. |
25 |
|
|
7 |
- Ctrl Pedal Type . . . . . . . . . . . . . |
. . . . 30 |
|
Drive . . . . . . . . . . . |
. . . . . . |
|
|
|
|
8 |
- Ctrl Pedal Gain . . . . . . . . . . . . . |
. . . . 30 |
|
. .25. . . . . . . . |
|
|
|||||||
Mutate Sound . . . . . . . |
. . . . . . . . |
|
. 25. . . . |
|
|
9 |
- Mutator Protect . . . . . . . |
. . . . 30. . . . . |
|
Delay . . . . . . . . . . . |
. . . . . . . |
. 25. . . |
. . |
.A.B. C D - Slot Output Routing . . . . |
. . . . 30 |
||||
Tempo . . . . . . . . . . . . . . |
. . . . . . . . . . |
. |
.25 |
|
|
MIDI Menu . . . . . . . . . . . . . . . . . . |
. . . . .31. |
|
|
Tap Tempo . . . . . . . . . . . . |
. . . . . . . . . . |
. |
26 |
|
|
G - Global MIDI Channel . . . . . . |
. . . . 31. . |
||
Mst Clk . . . . . . . . . |
. . . . . . . |
|
|
|
|
A, B, B, D - Slot MIDI Channel . . . . |
. . . . 31 |
||
. 26. . . . . . . . |
|
|
|||||||
Feedback . . . . . . . . . . . . . |
. . . . . . . . . . |
. |
26 |
|
|
t - Soft Thru MIDI Channel . . . . . . . |
. . . . 31 |
||
Ping Pong . . . . . . . . . |
. . . . . . . |
. |
.26. . . |
. |
. |
1 |
- Local Control . . . . . . . . . . . |
. . . .31. . . |
|
Sound Menu Delay Mode |
. . . . . . . . 26. . . |
|
|
2 |
- Control Change (CC) Mode . |
. . . . 31. . |
|||
On/Off . . . . . . . . . . . . . |
. . . . . . . . . |
. |
.26. . |
|
|
3 |
- Program Change Mode . . . . . |
. . . .31. |
|
Randomize Sound . . . . . . |
. . . . . . . . . . |
. |
26 |
|
|
4 |
- Pitch Bend Mode . . . . . . . . . . |
. . . . 31. |
|
Output |
|
|
26 |
|
|
5 |
- Send CC . . . . . . . . . . . . . . . |
. . . . .31. |
|
. . . . . . . . . . |
. |
|
|
6 |
- Dump One |
31 |
|||
Level . . . . . . . . . . . |
. . . . . . . |
. |
|
|
|
||||
.26. . . . . . . |
31 |
||||||||
Pan . . . . . . . . . . . . |
. . . . . . . |
. |
|
|
|
7 |
- Dump Program Bank . . . . . . . |
||
26. . . . . . . . |
31 |
||||||||
Reverb |
|
|
26 |
|
|
Sound Menu . . . . . . . . . . . . . . |
|||
. . . . . . . . . . |
. |
|
|
1 |
- Mst Clk Kbd Sync |
31 |
|||
Dry/Wet |
|
|
26 |
|
|
||||
. . . . . . . . . . |
. |
|
|
2 |
- Delay Mode . . . . . . . . . . |
. . . . 31. . . . . |
|||
Reverb Select . . . . . . |
. . . . . . . |
. |
26. . . . |
. . |
|||||
On/Off |
|
|
26 |
|
|
3 |
- Vibrato Rate . . . . . . . . . . . . . . . |
. . . . 31 |
|
. . . . . . . . |
. |
|
|
4 |
- Vibrato Amount |
31 |
|||
Like |
|
|
26 |
|
|
||||
. . . . . . . . |
. |
. |
. |
|
|
|
|
||
Note Trig (Nord Lead A1R) |
. . . . . . . |
. |
.26. . . |
|
|
|
|
|
|
8 Master Clock
Master Clock . . . . . . . . . . . . . . . . . . . . . . . 27 External Sync . . . . . . . . . . . . . . . . . . . . . 27
Arpeggio with Mst Clk . . . . . . . . . . . . . . . . 27 Synced Delay repeats . . . . . . . . . . . . 28. . Sync the LFO . . . . . . . . . . . . . . . . . . . . . 28 Across the Slots . . . . . . . . . . . . . . . . . . . 28 Sound Menu Kbd Sync . . . . . . . . . . . . .28
9 Nord Sound Manager
System requirements . . . . . . . . . . . . . . . 29
11 MIDI
Nord Lead A1 MIDI operation . . . . . . . . . . |
. 32 |
MIDI Settings . . . . . . . . . . . . . . . . . . . . |
. 32 |
Global MIDI Channel . . . . . . . . . . . |
. .32. . |
Slot MIDI Channels . . . . . . . . . . . |
.32. . . . |
Sequencing: Global MIDI Channel . . . . |
. 32. . |
Recording parameter changes . . . . |
. 32. . |
Sequencing: Slot MIDI Channels . . . . . |
.32. . |
Control Slots with another keyboard . . . |
.33. |
Message types . . . . . . . . . . . . . . . . . . . . |
. 33 |
Program Changes and Bank Select . . . |
. 33 |
Control Change messages . . . . . . . |
.33. . |
Pedal Control Change . . . . . . . . . . . . . |
. 33 |
Volume . . . . . . . . . . . . . . . . . . . . . . . . . |
. 33 |
Pan CC . . . . . . . . . . . . . . . . . . |
. 33. . . . . . |
MIDI Local . . . . . . . . . . . . . . . . . . . . |
. 33. . |
MIDI Thru . . . . . . . . . . . . . . . . . . . . . . . |
. 33 |
MIDI Clock . . . . . . . . . . . . . . . . . . . . . . |
. 33 |
USB MIDI . . . . . . . . . . . . . . . . . . . . . . . |
. 33 |
Panic . . . . . . . . . . . . . . . . . . . . . . . . . . |
. 33 |
MIDI Dumps . . . . . . . . . . . . . . . . . . . . |
. 33. . |
Transmit settings . . . . . . . . . . . . . . . . . |
. 33 |
Receive Programs or Banks . . . . . |
. 33. . . |
MIDI Controller list . . . . . . . . . . . . . . |
. 34. . . |
MIDI Implementation Chart . . . . . . . |
. 35. . |
12 Appendix
Specifications . . . . . . . . . . . . . . . . . . . . . . 36
Display Messages . . . . . . . . . . . . . . . . . . . 37
13 Index
Index . . . . . . . . . . . . . . . . . . . . . . . . . . . 38.

1 Introduction
The Lead For Speed
Producing stand-out sounds for live or for the studio, the Lead A1 is ideal for all musical genres. Thanks to its carefully thought-out user interface, the Lead A1 encourages experimentation, allows for far speedier programming than would otherwise be possible, and ultimately delivers sensational sonic results.
Our best-ever analog modeling …
At the heart of the Lead A1 is our new analog modeling engine. Taking our virtual analog synthesis to a new level, this modeling recreates a total analog signal path with uncanny realism, and is capable of immense sonic variety. With a 26-voice polyphony and four simultaneous synthesizer parts, the Lead A1 is a true synthesizer powerhouse that goes far beyond the current trend for limited capability analog reissues.
... combined with our most intuitive interface
Fundamental to the design of the Lead A1 is a brand new simple yet sophisticated front panel interface. The Lead A1 allows easy patch creation and experimentation thanks to a new and unique oscillator section, pre-programmed modulation matrix, and simplified ADR/ASR envelopes.
Like-button
The Like function is a unique feature that is invaluable during the patch creation process. “Like” up to 50 versions of a patch as you design it, scroll between them to choose your favorite to save to actual memory, or go back to an earlier version to edit in a different way.
Sound Manager
Chapter 1 Introduction |
| 5 |
Hardware
Like all Nord keyboards the Lead A1 is handmade in Nord’s Stockholm factory with incredible attention to detail and quality control. The Fatar® 49-key keybed (keyboard version only), all-metal chassis, tactile knobs, and unfaltering emphasis on quality complete a synthesizer designed to last a lifetime.
2 models - keyboard and tabletop
The Nord Lead A1 comes either as a 49-key velocity sensitive keyboard with a modulation wheel and wooden pitch stick, or as a tabletop unit - the Nord Lead A1R. It has 4 line level outputs, 1 headphone output, MIDI IN & OUT, a USB port with MIDI capabilities and inputs for a sustain pedal and a control pedal.
The Lead A1 is compatible with the Nord Sound Manager application for OS X and Windows. Sound Manager is a dedicated librarian that allows for easy reorganizing, back-up and transfer of programs.
6 | Nord Lead A1 User Manual v1.3x
2 Overview
9 7
8 |
|
4 |
2 |
5 |
|
6 |
|
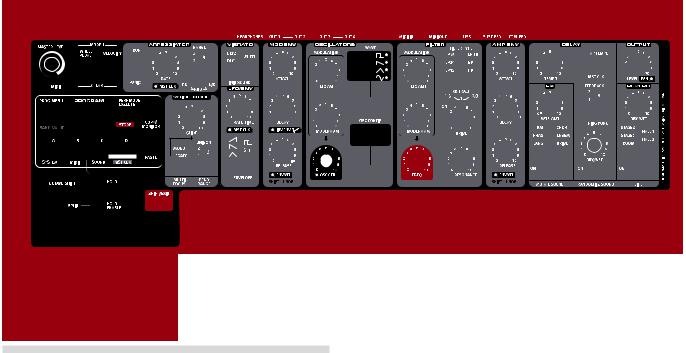
The Panel
We will familiarize ourselves briefly with the controls on the panel here.
1 Oscillator, Filter & Amp Env
The Lead A1’s new Oscillator section generates 47 different waveforms from classic analog to digital harmonic and inharmonic waves, whilst unique Oscillator Configuration Shortcuts make programming more immediate than ever. Start with a single Oscillator waveform and select an Oscillator Configuration Shortcut - Pitch, Detune, Shape, Sync, Sub Mix, FM, AM or Noise - and use the Adjust knob to adjust the settings of the configuration.
The Lead A1’s filter section features classic 12 and 24 dB Low Pass, a High Pass and a Band Pass filter, together with stunning emulations of the diode and ladder filters from the legendary Mini and the TB-303 synthesizers. The Lead A1’s modeling of these filters capture the true
character and response of the originals, allowing supremely flexible and precise sound design.
2 Modulation
The Lead A1 features an LFO with a choice of waveforms and a threestage ADR/ASR Modulation Envelope. The LFO rate can be sync’d
to the Lead A1’s master clock. The Mod Envelope can be inverted. Thanks to the intuitive design of the front panel it is very easy to see what modulations have been applied and to design incredible sounding patches.
3 Effects and Output
The Lead A1’s effects section features two stunning brand new analog models of an Ensemble and Chorus, modeled from specific vintage synths and adding classic warmth and analog feel. Alongside these, choose from great-sounding Ring Modulation, Phaser, Flanger, or Drive per slot, and in addition a separate Delay and Reverb for each slot.
1 |
3 |
4 Voice Mode
The Voice Mode Unison parameter can be used to stack several voices on top of each other to create a fatter sound. Mono and Legato are two monophonic behaviors.
5 Pitch Stick
The Pitch Stick is used to bend the notes, with different ranges for each program if you like. There is no dead centre in the middle of the throw. This allows you to use the Pitch Stick for natural vibrato, pretty much like a guitarist do. The effect on pitch is logarithmic, that is, the further you move the Pitch Stick away from the centre position, the more drastic the effect.
6 Mod Wheel
Use the Mod Wheel to add vibrato and act as a Morph controller to change parameters in real time.
MM Physical Pitch Bend and Mod Wheel controls are not available on the Nord Lead A1R but it will have an identical performance as the keyboard model when it responds to incoming MIDI Pitch Bend and Mod Wheel messages.
7 Arpeggiator
The Lead A1 features four separate Arpeggiators with Up/Down and Random modes and a 4-octave range. Arpeggios can be synchronized to the Lead A1’s master clock.
8 Program and Performance
The Program Dial and its associated LED display is used to load individual programs or performances that can consist of up to 4 individual slots, each with its own sound.
9 Morph
A classic Nord feature,the Morph function allows you to control multiple parameters of the Lead A1 simultaneously via Mod Wheel, Velocity or pedal. Morph is exceptionally easy to set-up and use - just hold the Morph button and adjust any desired knob.

Chapter 2 Overview |
| 7 |
Editing
Grab a knob or press a button, it is that easy to change a sound in the Nord Lead A1. There are a few different types of buttons, and some of the controls change their behavior depending on overlying modes
that may be activated. Let’s look at some of the things you will find and work with on the panel.
Buttons
On/Off buttons
On/Off buttons are used for activating a parameter or a group of parameters such as effects. The LED next to them indicates the On or Off status.
Selector buttons
Selector buttons are used to activate a setting in an array of two or more. Selector buttons have a set of round or triangular LEDs to indicate the current setting. Press the button several times to cycle through the possible options.
Shift button
Quite a few buttons have a secondary function, which will be available if you hold down Shift while pressing the button. The name of the secondary function is printed below the button. Pressing Shift and Filter Type for example will select one of the Filter Keyboard Tracking settings.
Master Clock (Mst Clk)
The Master Clock button (Shift + Slot D) can be used to set a tempo in two different ways: by holding the button and turning the Program Dial, or by tapping the button in the tempo you wish to use.
Knobs & dials
Knobs
The knobs control the continuously variable parameters in the Nord Lead A1.
A parameter value can be totally different from the  knob’s physical position when you load a program. As soon as you start turning the knob, the value will ‘snap’ to the knob’s physical position. Most of the knobs have a green LED indicator below them. This LED indicates when a parameter is connected to a Morph source. Look at page 13 for more information on morphing.
Knobs with Shift features
There are a few knobs with Shift-features that are activated by holding Shift and turning the knob. This is used to for example, set the panning of the sound. These knobs have the parameter name in a black box with a LED next to it.
Dials
There are three endless dials, each accompanied by an LED display. One of these dials allows you to change programs and performances, the other changes oscillator parameters.
Master Level
The Master Level knob at the upper left on the panel controls the overall amplitude for the audio outputs, the line level outputs and headphone output. The Master Level knob’s actual position always indicates the output level.
MM Master Level is not stored in programs or performances.
8 | Nord Lead A1 User Manual v1.3x
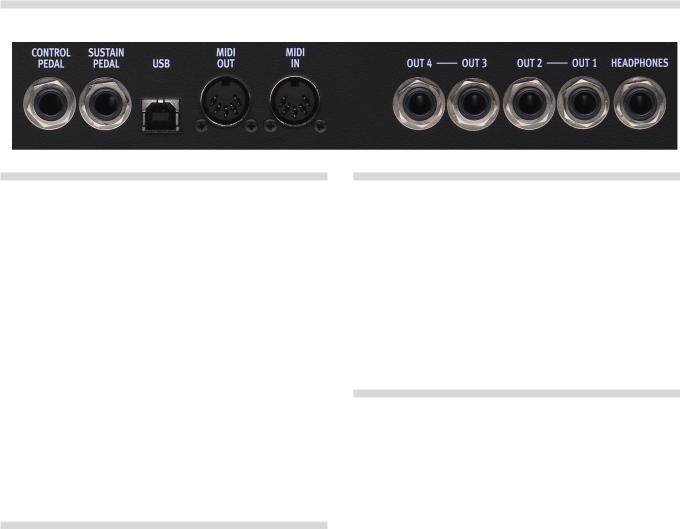
Rear Panel
Audio Connections |
USB Connection |
Headphones
A 1/4" stereo connector for headphones.
EE Playing at a high volume level can result in hearing impairments such as permanent hearing loss.
MM Only Slots that are routed to outputs 1 & 2 are present at the headphone output.
1, 2, 3 & 4 Outputs
Unbalanced line level outputs with 1/4" connectors to connect the Nord Lead A1 to an sound system or recording equipment.
The USB connection connects the Nord Lead A1 to a personal computer. The computer can run the Nord Sound Manager application or be used if the Nord Lead A1 operating system needs to be updated.
USB MIDI
The USB connection on the Nord Lead A1 can also transmit and receive MIDI messages.
EE Computers running Microsoft Windows operating systems need a driver for the USB connection to function. The driver can be found at the Nord web site in the Download area.
General guide on audio connections
•Make all the connections before you turn on the power of your amplifier.
•Turn on the power of your amplifier last.
•Turn off the power of your amplifier first.
The routing of the audio signals to the outputs are made in the System Menu.
MIDI Connections
MIDI OUT
MIDI connection used for transmitting MIDI from the Nord Lead A1 to other units such as sound modules, sequencers or computers.
MIDI IN
MIDI connection used to receive MIDI from other units such as keyboards, sequencers and computers.
Pedal Connections
There are two pedal inputs; one for a sustain pedal and one for a control pedal.
Sustain pedal
1/4" connector for a switch type pedal. When a connected pedal is operated, the notes you play will be sustained.
Two kinds of pedal polarities can be used, open or closed. Select the type that applies to your sustain pedal, in the System menu.
Control pedal
1/4" stereo connector for continuous pedals (also know as expression pedals). This can be used as a source for the Morph function or to control the overall volume.
An expression pedal connected to to the Control Pedal input, must use a stereo connector (Tip-Ring-Sleeve).
The most common pedal models (Roland, Yamaha, Korg and Fatar) are pre-configured in the Nord Lead A1. Select the type of pedal that you use in the System menu.

3 Getting Started
Slots
The Nord Lead A1 has four
Slots labelled A, B, C and D. Each slot represents a complete synthesizer setup,
a program. Slots can be used for layering sounds or quickly switch between programs.
Selecting a Program
1 Press the Perf Mode button so that the Perf Mode LED is not lit. You are now in (single) Program mode, the Slot LEDs will be red.
2Press Slot A, its LED should be the only Slot LED lit.
If not, deselect the other Slots by holding A while pressing the other Slot buttons.
3Play on the keyboard and listen to the sound. Turn the Program Dial when you want to select a different program.
Editing a Program
Editing a program is just as easy as turning a knob or pressing a button.
1 Select the Slot to be edited.
2 Play on the keyboard, listen and change the sound parameters.
Editing will not destroy the original program. To retrieve the original program, just turn the Program Dial first one step back and then one step forward. To keep changes you have made, you have to store the program in the memory.
When you have changed any setting in a program, a dot (.) will appear in the display to the right of the program number. This is to alert you of the fact that the program have been
changed but not yet stored.
Storing a Program
If you are happy with an edit that you have made, you should probably store the program. Before you can do this for the first time, there is a Memory Protect function that is set to On when the Lead A1 leaves the factory. This needs to be turned Off in the System Menu before you (and your cat) can store anything.
1Hold Shift and press the System button. Turn the Program Dial to select the first setting - “1.ON”.
2Hold Shift and turn the Program Dial to select “1.OF”, exit the Menu by pressing Exit.
With the protection turned off, we can now store our edited program.
Chapter 3 Getting Started |
| 9 |
3Hold Shift and press Store. The display starts flashing.
4If you want to overwrite the original program number, just press Shift + Store a second time.
To Store to another program number, select a new location with the Program Dial and then press Shift + Store a second time. Your edited program has now replaced the previous one in the location you specified.
To cancel the store procedure, press any buttons on the panel.
When searching for a new program location, there is a pre-lis- tening feature that can prevent you from overwriting your favorite programs.
Layering Programs
1Press and hold the Slot A button and then press the Slot B button. Both the Slot A and B LEDs are lit and both programs will be active on the keyboard.
If you have a layer, it is the focused Slot with its LED blinking that will be edited. The blinking Slot LED indicates the Slot in focus.
2 Press the other Slot button to move the focus to the other Slot.
3 Hold Slot A and press again on Slot B. This will deactivate Slot B.
Soloing a Slot
Since a performance may be using up to 4 different programs at once, there is a Solo function available, to be able to listen to only one Slot. Double-tap on an active Slot button in a multi-slot selection to solo this Slot. Press on any of the Slot buttons to exit.
Multi Focus
All parameters can be changed on all active Slots in a layer at the same time. This is called Multi Focus and is activated by holding Shift and pressing the Multi Focus button. All the active Slot LEDs will start to flash, and all Slots will then respond to any parameter changes you make on the panel. Press Multi Focus again to exit.
10 | Nord Lead A1 User Manual v1.3x
Creating a Split
When the Split function is ON, the lower part of the keyboard plays on Slots A and B and the upper part on Slots C and D.
1 Hold Slot A and press Slot C to activate both these slots.
2Hold Shift and press Split. This splits the keyboard in two halves. Slots A and B will be to the left, Slots C and D to the right.
Setting the Split point
Hold Shift and press and hold the Split button. A note number will be indicated in the display. While still holding the buttons, play a key on the keyboard, this key will be the lowest key of the upper range.
Copy and Paste between Slots
Settings from one Slot can be copied to a virtual clipboard and then be pasted to another Slot. This can be useful if a program needs to be moved from the lower part (A and B) to the upper part (C and D).
1Hold Copy and press the source Slot button.
“CP” and a letter that indicates which Slot you have copied will be shown in the display.
2Hold Shift + Paste, and press the Slot button where you want your settings to be copied to. “PS” and the destination Slot will be shown in the display.
The content of the virtual clipboard will remain until you copy another setting or parameter, or turn off the Nord Lead A1. This makes it possible to paste the same data to several destinations.
MM If you want to keep the new settings you have created by copying, make sure to save the program or performance.
Working with Performances
To handle layers, splits on/off, split points and keyboard octave shift, there is a need for storing and loading complex scenarios. This is done with the Performance Mode function.
In Performance Mode, all slots and their active status are stored.
Selecting Performances
1 Press the Perf Mode button to select the Performance Mode.
2 Turning the Program Dial will scroll through the 200 performances, “A. 1” to “d.50”. As you will notice, some of the performances are made with
several Slots on top of each other, others are in split configurations with different sounds to either side of the keyboard.
Editing a Performance
Storing a Performance
Storing a performance uses the same procedure as storing programs, see page 9.
Storing Programs as a Performance
If you have made layers or splits in Program Mode, you can transfer this to a Performance during the Store process.
1Hold Shift and press Store. The display starts flashing.
2 Press Perf Mode to activate Performance Mode.
3Select the desired Performance location and press Shift + Store a second time.
Setting up a Morph
The Morph is a powerful method to control one or several parameters in real-time, with the Modulation Wheel or Keyboard Velocity. A Morph is very easy to set up.
1Hold one of the Morph buttons, let’s use the Wheel in this example.
2 While holding the Wheel Morph button, turn a parameter knob, like the Filter Freq.
3Release the Morph Wheel button. The Modulation Wheel can
now be used to control the filter frequency.
MM The range that the Morph (Modulation Wheel) controls will be the range that was set when you turned the Filter Freq knob.
Read more about Morphing on page 13.
To replace one of the programs in a performance, hold the Slot button with the program you wish to replace and turn the Program Dial.
Chapter 4 Slots and Memory | 11
4 Slots and Memory
General Overview
The Nord Lead A1 is a four part multi timbral synthesizer. This means that you have four independent synthesizers to be used simultaneously. The synthesizers are divided into Slots, where each Slot contains one synthesizer. The Slots are called A, B, C and D.
The panel shows and edits the features of one Slot at a time. Which Slot that is edited is determined by the Slot focus.
A Slot can either be active or not. All active Slots respond to keyboard input as shown in Figure 1. If several Slots are active it is called a layer.
|
|
Keyboard |
|
||
Active |
yes |
yes |
no |
no |
|
Mod. |
A |
B |
C |
D |
|
Wheel |
|||||
|
|
|
|
||
Pitch |
|
|
|
|
|
Stick |
|
|
|
|
|
Slot Handling
The Slot buttons, labelled A to D, are used to set the Slot focus, and the active state of the Slots.
To change focus to another Slot, simply press that Slot button. If focus is set to an inactive Slot, that Slot will become active, and the others deactivated.
If only one Slot is active, the focused Slot LED will be lit. When several slots are active, the focused Slot LED will be flashing, and the other active slots will have their LEDs lit.
A layer is created by pressing several Slot buttons at once. You can also hold one of the Slot buttons pressed, then tap another Slot button to activate / deactivate it.
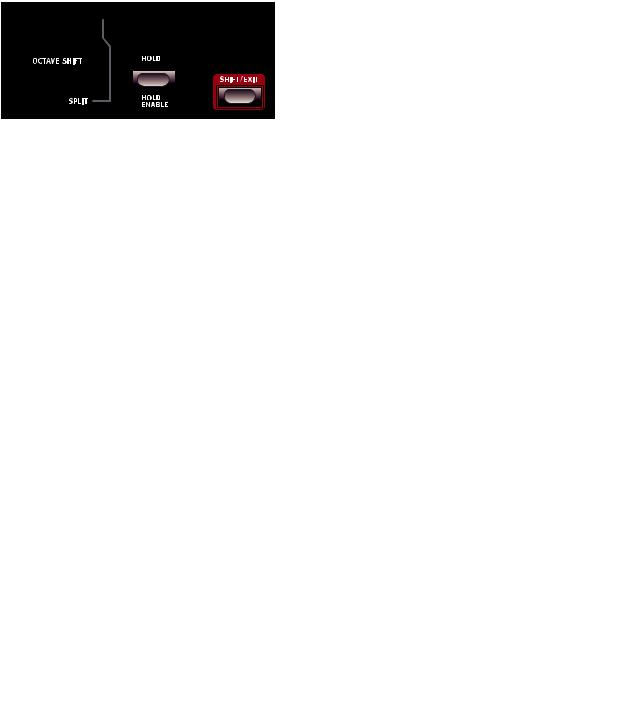
Split
By creating a Split point, the keyboard is divided into two zones, where the lower zone (the left part) plays on Slot A and B, and the upper on Slot C and D. Create a Split Point by holding Shift + Split and pressing the note on the keyboard where you want the Split Point.
Solo
If you double-tap on a Slot button, that Slot enters Solo mode. The other Slots are temporarily deactivated and any audio from them is muted. The Solo mode is indicated with a single flashing Slot LED. Press any Slot button to exit Solo mode and return to the previous state.
All active Slots respond to keyboard input. Modulation Wheel, Pitch Stick and Control Pedal always reach all slots.
Each of the Slots can listen to different MIDI channels and respond to different keyboard zones. Pitch Stick, Modulation Wheel and Control Pedal reaches all Slots regardless of focus and their active state.
MIDI Input |
|
|
|
MIDI Output |
Global Channel |
|
|
Global Channel |
|
G |
|
|
|
G |
Active |
yes |
yes |
no |
no |
Slot Channel |
A |
B |
C |
D |
|
|
|
|
|
A |
|
|
|
|
B |
|
|
|
|
C |
|
|
|
|
D |
|
|
|
|
Multi Focus
By using Multi Focus, Slot focus can be set to multiple Slots simultaneously. Any changes that are made on the panel then affect all the focused Slots. To turn Multi Focus on, simply press Shift + Multi Focus and all active slots become focused. The focused Slots are indicated with flashing Slot LEDs.
The global channel acts just like playing on the keyboard. The individual slot channels give multi timbrality. MIDI output is always sent on the global channel.
12 | Nord Lead A1 User Manual v1.3x
Program Handling
The A1 handles two different program entities; Programs and Performances. The memory contains 400 Programs divided into 8 banks, and 200 Performances divided into 4 banks.
Programs
A Program contains parameter settings for a single synthesizer Slot. A program can be loaded into any of the Slots.
Program |
A |
B |
C |
D |
Settings |
|
|
|
|
|
|
||
. |
|
|
|
|
|
|
. |
|
|
|
|
|
|
. |
|
|
|
|
|
|
|
... |
|
|
|
|
|
. |
|
|
|
|
|
|
A Program contains parameter data for a single slot.
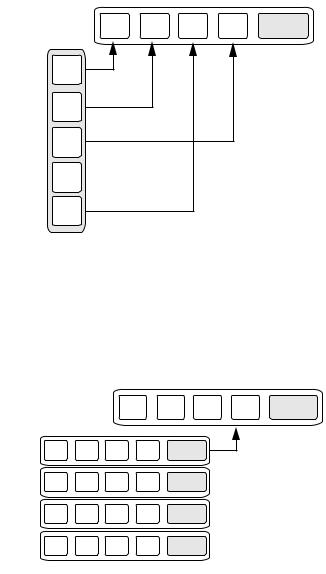
Performances
A Performance contains parameter data for all four Slots at once. The parameter data for each slot is stored in the Performance – it is not a reference to a Program. Furthermore the Performance contains settings about Slot Focus, Slot Activation, Hold, Split On/Off, Split Point, Keyboard Octave Shift and Multi Focus.
Performance |
A |
B |
C |
D |
Settings |
|
|
|
|
|
|
||
. |
|
|
|
|
|
|
. |
|
|
|
|
|
|
... |
|
|
|
|
|
|
. |
|
|
|
|
|
|
A Performance contains parameter data for all four slots and common settings.
Performance Mode
The Perf Mode button is used to cycle between Performance Mode and Program Mode.
When in Performance Mode the Slot LEDs are green and the display shows the current bank as a letter: “A”, “b”, “C” or “d”.
In Program Mode, the Slot LEDs are red and the bank is shown as a single digit “1” to “8”.
Program Mode and Performance Mode have separate Slot buffers. This means that the changes to you make in Performance Mode, will not affect the Slots in Program Mode, and vice versa.
A Performance is useful not only to create layers, but to load four Slots at once. You can then quickly change between these sounds with the press of a button instead of using the Program Dial.
Loading
To load from memory, simply turn the Program Dial. When in Performance Mode entire Performances are loaded and all Slots are affected. In Program Mode only the focused Slot is loaded, leaving the others untouched.
A Performance can be built from existing Programs by loading separate Slots in Performance Mode. Load the Slot by pressing and holding a Slot button, and turning the Program Dial. The Program is then loaded into the selected Slot, not affecting the others. The program focus for that Slot is stored in the Performance as an indication to where that sound came from.
Storing
Storing works exactly as loading, but the other way around. In Performance Mode all four Slots and their common settings are stored to Performance Memory. In Program Mode, only the focused Slot is stored to Program Memory.
To store a sound, press Shift + Store. The location to where the sound will be stored in Memory will flash on the display. Change the store location by turning the Program Dial. The sound in that location is temporarily loaded so that you can hear what you are about to overwrite. Confirm the store operation by pressing Shift + Store again.
While selecting the store location you can change between Performance and Program Mode. This is very useful to store all Slots as a Performance, or to store one Slot in a Performance as a Program.
Details about storing for the first time can be found in the Getting Started chapter on page 9.
Copying Slots to a Performance
If you have added several slots together with the Lead A1 in Program mode, a Performance can be easily created with this selection. Hold Copy and press Perf Mode to copy the slots and their settings to a Performance. The display will show the current performance bank and two dashes “- -“ to alert you that this performance have not yet been stored.
Copying a Performance to Program
It is possible to copy all the individual Slots in a Performance, to become a multi-slot selection in Program mode. While in Performance Mode, hold Copy and press Perf Mode. The Lead A1 will switch from Performance to Program mode, with all the Slot settings as they were in the Performance.
 Loading...