


 Loading...
Owners Manual
Software Version 2.x – English
© Clavia DMI AB 1996

CAUTION |
RISK OF ELECTRIC SHOCK |
DO NOT OPEN |
ATTENTION: RISQUE DE CHOC ELECTRIQUE - NE PAS OUVRIR |
CAUTION: TO REDUCE THE RISK OF ELECTRIC SHOCK |
DO NOT REMOVE COVER (OR BACK) |
NO USER SERVICABLE PARTS INSIDE. |
REFER SERVICING TO QUALIFIED SERVICE PERSONELL |
The lighting flash with the arrowhead symbol within an equilateral triangle is intended to alert the user to presence of uninsulated “dangerous voltage” within the product’s enclosure that may be of sufficient magnitude to constitute a risk of electric shock to persons.
The exclamation point within an equilateral triangle is intended to alert the user to the presence of important operating and maintenance (servicing) instructions in the literature accompanying the product.
INSTRUCTIONS PERTAINING TO A RISK OF FIRE, ELECTRIC SHOCK, OR INJURY TO PERSONS.
IMPORTANT SAFETY INSTRUCTIONS
SAVE THESE INSTRUCTIONS
WARNING - When using electric products, basic precautions should always be followed, including the following:
1.Read all the instructions and observe the graphic symbols above before using the product.
2.This product must be grounded. If it should malfunction or break down, grounding provides a path of least resistance for electronic current, to reduce the risk of electric shock. This product is equipped with a power supply cord having an equipment grounding conductor and a grounding plug. The plug must be plugged into an appropriate outlet which is properly installed and grounded in accordance with all local codes and ordinances. DANGER: Improper connection of the equipment grounding conductor can result in a risk of electric shock. Do not modify the plug provided with the product. If it will not fit the outlet, have a proper outlet installed by a qualified electrician. Do not use an adaptor which defeats the function of the equipment-grounding conductor. If you are in doubt as to whether the product is properly grounded, check with a qualified serviceman or electrician.
3.Do not use this product near water – for example, near a bathtub, washbowl, kitchen sink, in a wet basement, or near a swimming pool, or the like.
4.This product should be used only with a cart or stand that is recommended by the manufacturer.
5.This product, either alone or in combination with an amplifier and headphones or speakers, may be capable of producing sound levels that could cause permanent hearing loss. Do not operate for a long period of time at a high volume level or at a level that is uncomfortable. If you experience any hearing loss or ringing in the ears, you should consult an audiologist.
For the USA - for equipment with polarized line plug:
6.The product should be located so that its location or position does not interfere with its proper ventilation.
7.The product should be located away from heat sources such as radiators, heat registers, or other products that produce heat.
8.The product should be connected to a power supply only of the type described in the operating instructions or as marked on the product.
9.The power supply cord of the product should be unplugged from the outlet when left unused for a long period of time.
10.Care should be taken so that objects do not fall and liquids are not spilled into the enclosure through openings.
11.The product should be serviced by qualified service personnel when:
A.The power supply cord or the plug has been damaged; or
B.Objects have fallen, or liquid has been spilled onto the product; or
C.The product has been exposed to rain; or
D.The product does not appear to operate normally or exhibits a marked change in performance; or
E.The product has been dropped or the enclosure damaged.
12.Do not attempt to service the product beyond that described in the user-maintenance instructions. All other servicing should be referred to qualified service personnel.
This product may be equipped with a polarized line plug (one blade wider than the other). This is a safety feature. If you are unable to insert the plug into the outlet, contact an electrician to replace your obsolete outlet. Do not defeat the safety purpose of the plug.
For Canada - for equipment with polarized line plug:
CAUTION: TO PREVENT ELECTRIC SHOCK; MATCH WIDE BLADE OF PLUG TO WIDE SLOT; FULLY INSERT.
ATTENTION: POUR EVITER LES CHOCS ELECTRIQUES, INTRODUIRE LA LAME LA PLUS LARGE DE LA FICHE DANS LA BORNE CORRESPONDANCE DE LA PRISE ET POUSSER JUSQU’ AU FOND.
Table Of Contents |
Page 1 |
Table Of Contents
Introduction |
5 |
Welcome! . . . . . . . . . . . . . . . . . . . . . . . . . . . . . . . . . . . . . . . . . . . . . . . . . . . . . . . . . . . . . . . . . . . . . . . . . . . . . 5 About This Manual . . . . . . . . . . . . . . . . . . . . . . . . . . . . . . . . . . . . . . . . . . . . . . . . . . . . . . . . . . . . . . . . . . . . . . 5 Clavia on the Net . . . . . . . . . . . . . . . . . . . . . . . . . . . . . . . . . . . . . . . . . . . . . . . . . . . . . . . . . . . . . . . . . . . . . . . 5
Connections |
7 |
Connecting a Pedal. . . . . . . . . . . . . . . . . . . . . . . . . . . . . . . . . . . . . . . . . . . . . . . . . . . . . . . . . . . . . . . . . . . . . |
. 8 |
Basic Operations |
9 |
Demo Play Function. . . . . . . . . . . . . . . . . . . . . . . . . . . . . . . . . . . . . . . . . . . . . . . . . . . . . . . . . . . . . . . . . . . . . 9 Basic MIDI Settings for the Nord Rack. . . . . . . . . . . . . . . . . . . . . . . . . . . . . . . . . . . . . . . . . . . . . . . . . . . . . . 10 Selecting Programs . . . . . . . . . . . . . . . . . . . . . . . . . . . . . . . . . . . . . . . . . . . . . . . . . . . . . . . . . . . . . . . . . . . . . 11 Selecting Percussion Kits . . . . . . . . . . . . . . . . . . . . . . . . . . . . . . . . . . . . . . . . . . . . . . . . . . . . . . . . . . . . . . . . 12 Using the Slots To Switch Programs . . . . . . . . . . . . . . . . . . . . . . . . . . . . . . . . . . . . . . . . . . . . . . . . . . . . . . . 12 Layering . . . . . . . . . . . . . . . . . . . . . . . . . . . . . . . . . . . . . . . . . . . . . . . . . . . . . . . . . . . . . . . . . . . . . . . . . . . . . 13 Replacing One Program In the Layer. . . . . . . . . . . . . . . . . . . . . . . . . . . . . . . . . . . . . . . . . . . . . . . . . . . . . . . 13 Selecting Performances . . . . . . . . . . . . . . . . . . . . . . . . . . . . . . . . . . . . . . . . . . . . . . . . . . . . . . . . . . . . . . . . . 14 Monophonic and Polyphonic Operation. . . . . . . . . . . . . . . . . . . . . . . . . . . . . . . . . . . . . . . . . . . . . . . . . . . . 15 Stereo/Mono . . . . . . . . . . . . . . . . . . . . . . . . . . . . . . . . . . . . . . . . . . . . . . . . . . . . . . . . . . . . . . . . . . . . . . . . . . 15 Pitch Stick and Modulation Wheel. . . . . . . . . . . . . . . . . . . . . . . . . . . . . . . . . . . . . . . . . . . . . . . . . . . . . . . . . 15 Master Tune . . . . . . . . . . . . . . . . . . . . . . . . . . . . . . . . . . . . . . . . . . . . . . . . . . . . . . . . . . . . . . . . . . . . . . . . . . 16 Pedal . . . . . . . . . . . . . . . . . . . . . . . . . . . . . . . . . . . . . . . . . . . . . . . . . . . . . . . . . . . . . . . . . . . . . . . . . . . . . . . . 17 The “Panic” button . . . . . . . . . . . . . . . . . . . . . . . . . . . . . . . . . . . . . . . . . . . . . . . . . . . . . . . . . . . . . . . . . . . . . 19
Editing Programs |
21 |
Changing An Existing Program . . . . . . . . . . . . . . . . . . . . . . . . . . . . . . . . . . . . . . . . . . . . . . . . . . . . . . . . . . . 21
Changing One Sound In A Layer . . . . . . . . . . . . . . . . . . . . . . . . . . . . . . . . . . . . . . . . . . . . . . . . . . . . . . . . . . 21
Getting Back To The Programmed Sound. . . . . . . . . . . . . . . . . . . . . . . . . . . . . . . . . . . . . . . . . . . . . . . . . . . 21
Using Manual Mode . . . . . . . . . . . . . . . . . . . . . . . . . . . . . . . . . . . . . . . . . . . . . . . . . . . . . . . . . . . . . . . . . . . . 22
Customizing Manual Mode. . . . . . . . . . . . . . . . . . . . . . . . . . . . . . . . . . . . . . . . . . . . . . . . . . . . . . . . . . . . . . . 22
Storing Programs . . . . . . . . . . . . . . . . . . . . . . . . . . . . . . . . . . . . . . . . . . . . . . . . . . . . . . . . . . . . . . . . . . . . . . 23
Copying Programs . . . . . . . . . . . . . . . . . . . . . . . . . . . . . . . . . . . . . . . . . . . . . . . . . . . . . . . . . . . . . . . . . . . . . 23
Using PCMCIA Cards . . . . . . . . . . . . . . . . . . . . . . . . . . . . . . . . . . . . . . . . . . . . . . . . . . . . . . . . . . . . . . . . . . . 24
Programming Velocity Sensitivity |
25 |
The Filter Velocity Function. . . . . . . . . . . . . . . . . . . . . . . . . . . . . . . . . . . . . . . . . . . . . . . . . . . . . . . . . . . . . . 25
Making Any Parameter Velocity Dependent . . . . . . . . . . . . . . . . . . . . . . . . . . . . . . . . . . . . . . . . . . . . . . . . . 25
Clearing Velocity Programming For One Knob. . . . . . . . . . . . . . . . . . . . . . . . . . . . . . . . . . . . . . . . . . . . . . . 27
Clearing All Velocity Programming . . . . . . . . . . . . . . . . . . . . . . . . . . . . . . . . . . . . . . . . . . . . . . . . . . . . . . . . 27
Morphing . . . . . . . . . . . . . . . . . . . . . . . . . . . . . . . . . . . . . . . . . . . . . . . . . . . . . . . . . . . . . . . . . . . . . . . . . . . . 28

Page 2 Table Of Contents
Percussion Kits |
29 |
Selecting and playing a Percussion Kit . . . . . . . . . . . . . . . . . . . . . . . . . . . . . . . . . . . . . . . . . . . . . . . . . . . . . 29 Editing the sounds in a Percussion Kit . . . . . . . . . . . . . . . . . . . . . . . . . . . . . . . . . . . . . . . . . . . . . . . . . . . . . 30 Copying, Extracting and Importing individual Percussion sounds . . . . . . . . . . . . . . . . . . . . . . . . . . . . . . . 31 Saving Percussion Kits . . . . . . . . . . . . . . . . . . . . . . . . . . . . . . . . . . . . . . . . . . . . . . . . . . . . . . . . . . . . . . . . . . 31 Sys Ex Dumps of Percussion Kits . . . . . . . . . . . . . . . . . . . . . . . . . . . . . . . . . . . . . . . . . . . . . . . . . . . . . . . . . 32 Using Percussion Kits in Performance Mode . . . . . . . . . . . . . . . . . . . . . . . . . . . . . . . . . . . . . . . . . . . . . . . . 32
Performances |
33 |
What Are Performances? . . . . . . . . . . . . . . . . . . . . . . . . . . . . . . . . . . . . . . . . . . . . . . . . . . . . . . . . . . . . . . . . 33 Recalling A Performance . . . . . . . . . . . . . . . . . . . . . . . . . . . . . . . . . . . . . . . . . . . . . . . . . . . . . . . . . . . . . . . . 33 Editing the Performance . . . . . . . . . . . . . . . . . . . . . . . . . . . . . . . . . . . . . . . . . . . . . . . . . . . . . . . . . . . . . . . . 34 Extracting Single Sounds from a Performance . . . . . . . . . . . . . . . . . . . . . . . . . . . . . . . . . . . . . . . . . . . . . . . 35 Saving a Performance . . . . . . . . . . . . . . . . . . . . . . . . . . . . . . . . . . . . . . . . . . . . . . . . . . . . . . . . . . . . . . . . . . 35 Exiting Performance Mode . . . . . . . . . . . . . . . . . . . . . . . . . . . . . . . . . . . . . . . . . . . . . . . . . . . . . . . . . . . . . . 36 What a Performance contains . . . . . . . . . . . . . . . . . . . . . . . . . . . . . . . . . . . . . . . . . . . . . . . . . . . . . . . . . . . . 36
Panel Reference |
37 |
Oscillator 1 . . . . . . . . . . . . . . . . . . . . . . . . . . . . . . . . . . . . . . . . . . . . . . . . . . . . . . . . . . . . . . . . . . . . . . . . . . . 37 Oscillator 2 . . . . . . . . . . . . . . . . . . . . . . . . . . . . . . . . . . . . . . . . . . . . . . . . . . . . . . . . . . . . . . . . . . . . . . . . . . . 38 Settings For Both Oscillators . . . . . . . . . . . . . . . . . . . . . . . . . . . . . . . . . . . . . . . . . . . . . . . . . . . . . . . . . . . . . 39 Amplifier. . . . . . . . . . . . . . . . . . . . . . . . . . . . . . . . . . . . . . . . . . . . . . . . . . . . . . . . . . . . . . . . . . . . . . . . . . . . . 40 Filter . . . . . . . . . . . . . . . . . . . . . . . . . . . . . . . . . . . . . . . . . . . . . . . . . . . . . . . . . . . . . . . . . . . . . . . . . . . . . . . . 42 LFO 1 . . . . . . . . . . . . . . . . . . . . . . . . . . . . . . . . . . . . . . . . . . . . . . . . . . . . . . . . . . . . . . . . . . . . . . . . . . . . . . . 47 LFO 2/Arpeggiator . . . . . . . . . . . . . . . . . . . . . . . . . . . . . . . . . . . . . . . . . . . . . . . . . . . . . . . . . . . . . . . . . . . . . 48 Modulation Envelope. . . . . . . . . . . . . . . . . . . . . . . . . . . . . . . . . . . . . . . . . . . . . . . . . . . . . . . . . . . . . . . . . . . 50 Mod Wheel Destination . . . . . . . . . . . . . . . . . . . . . . . . . . . . . . . . . . . . . . . . . . . . . . . . . . . . . . . . . . . . . . . . . 52 Poly Legato Mono . . . . . . . . . . . . . . . . . . . . . . . . . . . . . . . . . . . . . . . . . . . . . . . . . . . . . . . . . . . . . . . . . . . . . 53 Unison . . . . . . . . . . . . . . . . . . . . . . . . . . . . . . . . . . . . . . . . . . . . . . . . . . . . . . . . . . . . . . . . . . . . . . . . . . . . . . 53 Portamento. . . . . . . . . . . . . . . . . . . . . . . . . . . . . . . . . . . . . . . . . . . . . . . . . . . . . . . . . . . . . . . . . . . . . . . . . . . 54 Oct Shift . . . . . . . . . . . . . . . . . . . . . . . . . . . . . . . . . . . . . . . . . . . . . . . . . . . . . . . . . . . . . . . . . . . . . . . . . . . . . 54
Shift Functions |
55 |
Accessing The Shift Functions . . . . . . . . . . . . . . . . . . . . . . . . . . . . . . . . . . . . . . . . . . . . . . . . . . . . . . . . . . . . 55
Tune (Master Tune) . . . . . . . . . . . . . . . . . . . . . . . . . . . . . . . . . . . . . . . . . . . . . . . . . . . . . . . . . . . . . . . . . . . . 57
Out Mode . . . . . . . . . . . . . . . . . . . . . . . . . . . . . . . . . . . . . . . . . . . . . . . . . . . . . . . . . . . . . . . . . . . . . . . . . . . . 57
Local . . . . . . . . . . . . . . . . . . . . . . . . . . . . . . . . . . . . . . . . . . . . . . . . . . . . . . . . . . . . . . . . . . . . . . . . . . . . . . . . 58
Prog/Ctrl. . . . . . . . . . . . . . . . . . . . . . . . . . . . . . . . . . . . . . . . . . . . . . . . . . . . . . . . . . . . . . . . . . . . . . . . . . . . . 59
MIDI Channel. . . . . . . . . . . . . . . . . . . . . . . . . . . . . . . . . . . . . . . . . . . . . . . . . . . . . . . . . . . . . . . . . . . . . . . . . 59
Special . . . . . . . . . . . . . . . . . . . . . . . . . . . . . . . . . . . . . . . . . . . . . . . . . . . . . . . . . . . . . . . . . . . . . . . . . . . . . . 61
System . . . . . . . . . . . . . . . . . . . . . . . . . . . . . . . . . . . . . . . . . . . . . . . . . . . . . . . . . . . . . . . . . . . . . . . . . . . . . . 66
MIDI |
67 |
About the MIDI Implementation . . . . . . . . . . . . . . . . . . . . . . . . . . . . . . . . . . . . . . . . . . . . . . . . . . . . . . . . . . 67
Using Nord Lead With a Sequencer . . . . . . . . . . . . . . . . . . . . . . . . . . . . . . . . . . . . . . . . . . . . . . . . . . . . . . . 69
Bulk Dump. . . . . . . . . . . . . . . . . . . . . . . . . . . . . . . . . . . . . . . . . . . . . . . . . . . . . . . . . . . . . . . . . . . . . . . . . . . 71

Table Of Contents Page 3
About Subtractive Synthesis |
73 |
Introduction . . . . . . . . . . . . . . . . . . . . . . . . . . . . . . . . . . . . . . . . . . . . . . . . . . . . . . . . . . . . . . . . . . . . . . . . . . 73
The Building Blocks . . . . . . . . . . . . . . . . . . . . . . . . . . . . . . . . . . . . . . . . . . . . . . . . . . . . . . . . . . . . . . . . . . . . 73
Connections . . . . . . . . . . . . . . . . . . . . . . . . . . . . . . . . . . . . . . . . . . . . . . . . . . . . . . . . . . . . . . . . . . . . . . . . . . 74
The Oscillators and Waveforms . . . . . . . . . . . . . . . . . . . . . . . . . . . . . . . . . . . . . . . . . . . . . . . . . . . . . . . . . . . 74
The Filter. . . . . . . . . . . . . . . . . . . . . . . . . . . . . . . . . . . . . . . . . . . . . . . . . . . . . . . . . . . . . . . . . . . . . . . . . . . . . 79
The Amplifier . . . . . . . . . . . . . . . . . . . . . . . . . . . . . . . . . . . . . . . . . . . . . . . . . . . . . . . . . . . . . . . . . . . . . . . . . 84
Envelopes . . . . . . . . . . . . . . . . . . . . . . . . . . . . . . . . . . . . . . . . . . . . . . . . . . . . . . . . . . . . . . . . . . . . . . . . . . . . 84
LFOs . . . . . . . . . . . . . . . . . . . . . . . . . . . . . . . . . . . . . . . . . . . . . . . . . . . . . . . . . . . . . . . . . . . . . . . . . . . . . . . . 87
MIDI Implementation |
89 |
Controller Number List . . . . . . . . . . . . . . . . . . . . . . . . . . . . . . . . . . . . . . . . . . . . . . . . . . . . . . . . . . . . . . . . |
. . 89 |
System Exclusive Implementation . . . . . . . . . . . . . . . . . . . . . . . . . . . . . . . . . . . . . . . . . . . . . . . . . . . . . . . . |
. 91 |
Factory Settings |
99 |
Factory Programs . . . . . . . . . . . . . . . . . . . . . . . . . . . . . . . . . . . . . . . . . . . . . . . . . . . . . . . . . . . . . . . . . . . . . . 99 Factory Percussion Kits . . . . . . . . . . . . . . . . . . . . . . . . . . . . . . . . . . . . . . . . . . . . . . . . . . . . . . . . . . . . . . . . 100 Factory Performances. . . . . . . . . . . . . . . . . . . . . . . . . . . . . . . . . . . . . . . . . . . . . . . . . . . . . . . . . . . . . . . . . . 102 About the Organ Sounds . . . . . . . . . . . . . . . . . . . . . . . . . . . . . . . . . . . . . . . . . . . . . . . . . . . . . . . . . . . . . . . 103 About the Prophet-5 factory sound recreations. . . . . . . . . . . . . . . . . . . . . . . . . . . . . . . . . . . . . . . . . . . . . . 105 Restoring the Factory Programs in RAM . . . . . . . . . . . . . . . . . . . . . . . . . . . . . . . . . . . . . . . . . . . . . . . . . . . 106
MIDI Implementation Chart |
107 |
Index |
109 |
Page 4 |
Table Of Contents |
Introduction |
Page 5 |
1. Introduction
Welcome!
We’d first like to thank you and congratulate to the purchase of a Nord Lead. You’re about to begin a journey into the world of virtual analog synthesis. Analog because the Nord Lead mimics traditional analog synthesizers in a way no one thought was possible. Virtual because the Nord Lead is actually a digital instrument, remaining true to the traditional analog concept, and still managing to go beyond it!.
But not all the magic lies in the sound creation. A major part is in the front panel, comprehensive, clearly laid out and smooth to operate.
About This Manual
If you have some basic knowledge about programmable synthesizers, you probably won’t need this manual much. Therefore it is arranged mainly as a reference text for those rare situation where something isn’t as obvious as it should be.
Clavia on the Net
If you have access to the World Wide Web you can get free sounds for your NordLead on www.clavia.se. Here you will also find all the latest information about the Nord Lead and other Claiva products.
Page 6 |
Introduction |
Connections |
Page 7 |
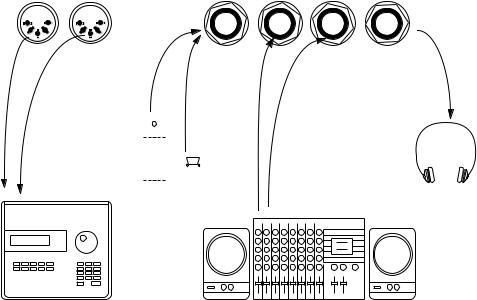
2.Connections
▼Make all connections before turning on your power amplifier!
▼If you are using a Nord Rack together with a MIDI keyboard, connect a MIDI cable from MIDI Out on the keyboard to MIDI In on the Nord Rack.
▼All signal cables used with the Nord Lead must be shielded.
▼The L/R Outputs are line level.
Midi in Midi out |
|
|
|
|
|
|
|
|
|
|
|
Pedal |
R out |
L out Headphone |
||||||||||
|
|
|
|
|
|
|
|
|
|
|
|
|
|
|
|
|
|
|
|
|
|
|
|
|
|
|
|
|
|
|
|
|
|
|
|
|
|
|
|
|
|
|
|
|
|
|
|
|
|
|
|
|
|
|
|
|
|
|
|
|
|
|
|
|
|
|
|
|
|
|
|
|
|
|
|
|
|
|
|
|
|
|
|
|
|
|
|
|
|
|
|
|
|
|
|
|
|
|
|
|
|
|
|
|
|
|
|
|
|
|
|
|
|
|
|
|
|
|
|
|
|
|
|
|
|
|
|
|
|
|
|
|
|
|
|
|
|
|
|
|
|
|
|
|
|
|
|
|
|
|
|
|
|
|
|
|
|
|
|
|
|
|
|
|
|
|
|
|
|
|
|
|
|
|
|
|
|
|
|
|
|
|
|
|
|
|
|
|
|
|
|
|
|
|
|
|
|
|
|
|
|
|
|
|
|
|
|
|
|
|
|
|
|
|
|
|
|
|
|
|
|
|
|
|
|
|
|
|
|
|
|
|
|
|
|
|
|
|
|
|
|
|
|
|
|
|
|
|
|
|
|
|
|
|
|
|
|
|
|
|
|
|
|
|
|
|
|
|
|
|
|
|
|
|
|
|
|
|
|
|
|
|
|
|
|
|
|
|
|
|
|
|
|
|
|
|
|
|
|
|
|
|
|
|
|
|
|
|
|
|
|
|
|
|
|
|
|
|
|
|
|
|
|
|
|
|
|
|
|
|
|
|
|
|
|
|
|
|
|
|
|
|
|
|
|
|
|
|
|
Expression pedal |
Headphones |
or footswitch |
|
|
R |
MIDI equipment (sequencer etc.) |
Audio equipment (mixer, PA etc) |
Page 8 |
Connections |
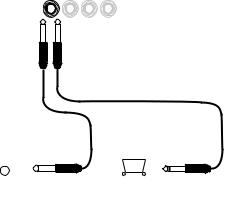
Connecting a Pedal
▼If the Pedal input should be used for sustain, a regular footswitch and cable can be used.
▼If the Pedal input should be used as a replacement for the modulation wheel, an “expression” pedal with a “stereo cable” should be used.
|
|
|
|
|
|
|
|
|
|
|
|
|
|
|
|
Pedal |
R out |
L out Headphone |
|
|
|
||||
|
|
|
|
|
|
|
|
|
|
|
|
|
|
|
|
|
|
|
|
|
|
|
|
|
|
|
|
|
|
|
|
|
|
|
|
|
|
|
|
|
|
|
|
|
|
|
|
|
|
|
|
|
|
|
|
|
|
|
|
|
|
|
|
|
|
|
|
|
|
|
|
|
|
|
|
|
|
|
|
|
|
|
|
|
|
|
|
|
|
|
|
|
|
|
|
|
|
|
|
|
|
|
|
|
|
|
|
|
|
|
|
|
|
|
|
|
|
|
|
|
|
|
|
|
|
|
|
|
|
|
|
|
|
|
|
|
|
|
|
|
|
|
|
|
|
|
|
|
|
|
|
|
|
|
|
|
|
|
|
|
|
|
|
|
|
|
|
|
|
|
|
|
|
|
|
|
|
|
|
|
|
|
|
|
|
|
|
|
|
|
|
|
|
|
|
|
|
|
|
|
|
|
|
|
|
|
|
|
|
|
|
|
|
|
|
|
|
|
|
|
|
|
|
|
|
|
|
|
|
|
|
|
|
|
|
|
|
|
|
|
|
|
|
|
|
|
|
|
|
|
|
|
|
|
|
|
|
|
|
|
|
|
|
|
|
|
|
|
|
|
|
|
|
|
|
|
|
|
|
|
|
|
|
|
|
▼ For information on how to set the Nord Lead up for sustain or expression pedal, see page 17.
Basic Operations |
Page 9 |
3. Basic Operations
Demo Play Function
Before you try out the new features for yourself, you may want to listen to what can be done with the instrument. Luckily, the Nord Lead is equipped with a built-in demo playback function! There are six demo songs in ROM, showing the instrument’s versatility and features in different contexts. To listen to the demo songs, proceed like this:
1. Simultaneously press the Shift and Sync (Demo) buttons.
FM AMT. |
|
OSC 2 |
|
|
Amount |
|
Portamento |
POLY |
|
LEGATO |
|
MONO |
AUTO |
SPECIAL |
SYSTEM |
|
LFO 1 |
|
OSC 2 |
|
FM AMT |
|
FILTER |
SHIFT  MORPH
MORPH
OSC 1 OSC 2
|
SYNC |
|
|
|
Pulse width |
DEMO |
OSC 1 |
Mix |
OSC 2 |
|
p o l y p h o n i c l e a d
The Shift and Sync buttons.
Playback starts. During playback, all knobs and buttons on the panel are disabled, except for Master Volume.
2.The demo songs are played back one after the other. If you want to move to the next or previous demo song, press the Up or Down button in the Program section of the panel.
3.To exit demo play mode, press any other button on the panel.
Please note that some of the demo songs make use of 12 voices, and will therefore only be played back on an expanded Nord Lead. If you use a 4-voice Nord Lead, you will not be able to select these demo songs.
Page 10 |
Basic Operations |
Basic MIDI Settings for the Nord Rack
If you are using the Nord Rack and controlling it from a MIDI keyboard, the Nord Rack must be set to receive on the same MIDI channel that the keyboard transmits on. To get started, proceed as follows:
1.Set the keyboard to transmit on MIDI Channel 1.
2.Press the Program Slot A button, so that the LED above the button is lit.
|
Program |
STORE |
|
A |
B |
C |
D |
TUNE |
OUT MODE |
LOCAL |
PRG.CTRL. |
3. Hold down the Shift button and press the MIDI Ch (Unison) button.
|
|
LEGATO |
|
|
D |
UNISON |
MONO |
AUTO |
|
TRL. |
MIDI CH |
SPECIAL |
SYSTEM |
|
|
|
|
LFO 1 |
The MIDI Ch button |
|
|
|
OSC 2 |
|
|
|
|
FM AMT |
|
|
Pitch bend |
|
FILTER |
|
|
SHIFT |
MORPH |
|
|
|
|
|
||
|
|
|
|
|
|
|
|
|
The Shift button |
The display will now show the MIDI Channel setting for Slot A (1 – 16 or off).
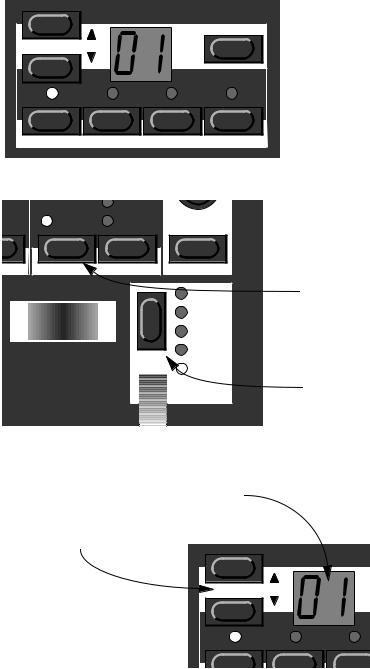
4. Use the Program Up/Down buttons to select MIDI Channel 1.
MIDI Channel 1 selected.
The Program Up/Down |
|
|
buttons |
Program |
|
A |
B |
C |
5.Press Shift again to return to the normal play mode.
If you use Slot A when you play the Nord Rack (if you like, together with other Slots), this simple setting should be sufficient in most situations - even when playing Layers and Performances, as described later in this manual. For more information, see page 69.

Basic Operations |
Page 11 |
Selecting Programs
Program are sounds that you have prepared in advance. The basic memory in the Nord Lead contains 99 Programs. 40 of these can be used for storing your own Programs, see below.
There are also four Program slots labelled A to D. The slots can be used for layering and quickly switching between programs as described below. They are also used when the Nord Lead is played via MIDI.
1.Select a Program Slot to play by pressing one of the four buttons A to D.
When you are only playing one sound at a time, as you are now, you can select any slot.
Use these four buttons to select a “Program slot”.
|
Program |
STORE |
|
||
|
|
|
|
This “slot” is |
|
A |
B |
C |
D |
selected (lit |
|
up). |
|||||
|
|
|
|
||
TUNE |
OUT MODE |
LOCAL |
PRG.CTRL. |
|
|
2.Use the Program Up/Down keys to select a Program for that slot.
Holding down a button scrolls the value quickly. Holding down the Shift key (the button above the Modulation wheel) while pressing the buttons makes the value change in steps of ten.
Press these buttons to increase/ decrease the Program number.
|
Program |
|
STORE |
A |
B |
C |
D |
If you hold down the Shift button while you press the Up/Down keys, the Program value will change in steps of ten.

 LFO 1
LFO 1
 OSC 2
OSC 2
 FM AMT
 FILTER
SHIFT  MORPH
MORPH
There are 99 Programs to select from. If you have a PCMCIA card inserted in the holder on the back (to do this you must have the expansion card installed), you may have another 297 on this, arranged in three banks. Dots to the right and between the numeral in the display indicate new Banks.
A single dot to the right indicates Bank 1. |
A single dot between the numerals |
|
indicate Bank 2. |
 Dots both to the right and between the numerals, indicate Bank 3.
Page 12 |
Basic Operations |
Selecting Percussion Kits
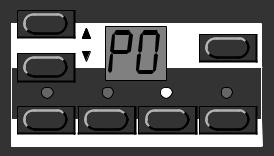
In addition to the 99 Programs in the basic memory, there are 10 Percussion Kits. Each Percussion Kit consists of eight different virtual analog percussion sounds, arranged in zones across the keyboard. The Kits are located “above” Program number 99, and numbered “P0” to “P9”.
▼To select a Percussion Kit for a Slot, proceed just as when selecting a regular Program: Use the Program Up/Down buttons to scroll to the desired Percussion Kit location.
|
Program |
STORE |
|
A |
B |
C |
D |
TUNE |
OUT MODE |
LOCAL |
PRG.CTRL. |
Percussion Kit P0 selected.
For detailed information about how to play and edit the Percussion Kits, see page 29.
Using the Slots To Switch Programs
The four Program Slots A to D can be thought of as four independent synthesizers, each capable of playing one Program or Percussion Kit. When you select one of the slots you will switch to play the Program set for that slot.
For live performance, for example, you can set up each slot to play a different Program and quickly switch between those four by pressing the buttons A to D.

Basic Operations |
Page 13 |
Layering
Activating
You can play more than one Program at a time. Proceed as follows:
1.Set up the Program slots to play the Programs you want to use.
2.To activate more than one Program slot, simply press all the Program Slot buttons you want to use, at the same time.
All those slots’ LEDs light up. The last one you pressed, is blinking. This will be the one you are editing from the front panel, but more on this on page 21.
|
Program |
STORE |
|
A |
B |
C |
D |
TUNE |
OUT MODE |
LOCAL |
PRG.CTRL. |
Slots A and D (LEDs lit) are activated.
Slot C (LED dark) is not activated.
Slot B (blinking) is selected. Any editing will apply to this Program slot.
Deactivating
To turn of the layer, press a slot button that is not part of the layer, or press all the buttons that make up the layer.
Polyphony
How many notes you can play when layering sounds depends on two things:
1. How many voices you have in your instrument (the basic four or the expanded twelve). 2. What Play modes and Unison settings each Program uses. See page 53.
Replacing One Program In the Layer
You might want to select another Program for one of the slots in the layer:
1.Press the Program Slot button that you want to select Programs for.
Its LED will flash to indicate it is the active slot.
2.Select a new Program for that slot.
Page 14 |
Basic Operations |
Selecting Performances
A Performance is a collection of four Programs, one for each slot. Furthermore, the Performance contains information about which Programs should be active (layered).
In fact, a Performance also contains information about what MIDI Channels to use for each slot, and a number of other settings, but this is described in detail on page 33. This text is only meant as a quick introduction to playing the factory Performances.
1.If you have the rack version of the Nord Lead, make sure you transmit on MIDI Channel 1.
This is because the factory Performances are set to receive on MIDI Channel 1.
2.Enter Performance mode by holding down Shift and pressing Performance (Manual).
The display shows the latest selected Performance.
The Performances are organised in 10 Banks, named alphabetically from A to L (the letters I and K are excluded because they’re hard to write clearly on the display). In each Bank there are 10 Performances, for a total of 100. If you have a PCMCIA card inserted, the Banks on the card are found after the internal (ROM) Banks and labelled in the same way, but indicated with a dot to the right of the digits in the display.
3.If you want to select another Bank (A to L), hold down Shift and press the Up and Down buttons.
4.To select a Performance in the Bank use the Up and Down buttons.
The Performance is instantly loaded and you can try it out. For a list of the factory Performances, see page 102.
Use the Up/Down buttons to change Performance (indicated by the digit 1-9 to the right in the display).
|
|
|
If you hold down the Shift button, |
||
|
|
|
you can change Performance Bank |
||
|
Program |
(A-L) with the Up/Down buttons. |
|||
|
STORE |
|
|||
|
|
|
|
LFO 1 |
|
|
|
|
|
OSC 2 |
|
A |
B |
C |
D |
FM AMT |
|
FILTER |
|||||
|
|
|
|
||
|
|
|
SHIFT |
MORPH |
|
|
|
|
|
||
TUNE |
OUT MODE |
LOCAL |
PRG.CTRL. |
|
|
5. When you are done, exit Performance mode by again holding down Shift and pressing Performance (Manual).
Basic Operations |
Page 15 |
Monophonic and Polyphonic Operation
For each Program you can set a Play Mode (Poly, Mono, Legato). The exact nature of these modes is described on page 53.
To make a sound fatter, you can activate Unison. This reduces polyphony. See page 53 for details.
Press this button to turn Unison on and off. The LED above the button indicates that Unison is activated.
|
POLY |
|
LEGATO |
UNISON |
MONO |
MIDI CH SPECIAL
Portamento
AUTO |
SYSTEM |
Stereo/Mono
If you are using both the Left and Right outputs, or headphones, you might want to know something about how the sounds get positioned in the stereo image.
The complex answer is that this depends on the Out Mode settings as described on page 57. However, the simple truth is that in the basic mode, which the Nord Lead is set to when it comes from the factory, all Programs are in mono. In fact, there’s one exception: If a Program is set to Unison, the instrument is switched to stereo operation.
Pitch Stick and Modulation Wheel
Pitch Stick
The Pitch Stick is used to bend the notes, just as with a pitch bend wheel on traditional instruments. The pitch stick differs from other pitch bend devices in a couple of ways:
▼There is no dead centre in the middle of the throw. This allows you to use the pitch stick for natural vibrato, pretty much like a guitarist can.
▼The effect on pitch is logarithmic, that is, the further you move the stick away from the centre position, the more drastic the effect will be.
To set the range of the Pitch Stick, proceed as follows:
1. Hold down the Shift button.

Page 16 |
Basic Operations |
2. With the Shift button down, press the button labelled System.
|
|
|
Hold down the Shift button... |
|
|
|
|
|
LFO 1 |
|
|
|
|
OSC 2 |
UNISON |
MONO |
AUTO |
|
FM AMT |
|
|
|||
|
|
|
|
FILTER |
|
|
|
SHIFT |
MORPH |
|
|
|
|
|
MIDI CH |
SPECIAL |
SYSTEM |
...and press the button labelled System |
|
|
|
|
||
|
|
|
(the LED above the button lights up). |
|
3.Press the System button repeatedly until the character to the left in the display says “b” (for Bend).
4.Use the Program Up/Down buttons to the left of the display, to change the value.
The table on page 66 shows you how many semi-tones each value in the display represents.
If the Pitch Stick should be malfunctioning on startup, the display will scroll the message “PITCH BEND ERROR.”. The Nord Lead will then work as usual, but the Pitch Stick will be disabled.
Modulation Wheel
The effect of moving the Modulation wheel can be different for each Program. You can change the function by pressing the button just above the Modulation wheel. It steps between five possibilities. A description of each can be found on page 52.
Master Tune
To tune the Nord Lead to other instruments, proceed as follows:
1.Hold down the Shift button.
2.With the Shift button down, press the button labelled Tune.
|
Program |
|
Hold down the Shift button... |
||
|
STORE |
|
|
||
|
|
|
|
|
LFO 1 |
|
|
|
|
|
OSC 2 |
A |
B |
C |
D |
|
FM AMT |
|
|
|
|
|
FILTER |
|
|
|
|
SHIFT |
MORPH |
|
|
|
|
|
|
TUNE |
OUT MODE |
LOCAL |
PRG.CTRL. |
|
|
|
|
|
|
...and press the button labelled Tune |
|
|
|
|
|
(the LED above the button lights up). |
|
3.Use the Program Up/Down buttons to the left of the display, to change the value.
00 is normal 440Hz tuning. Lower pitches are indicated by a dot to the right of the number and values higher than normal pitch are indicated without a dot. The values are in cents (hundreds of a semitone).
4.Press the Shift button again.

Basic Operations |
Page 17 |
Pedal
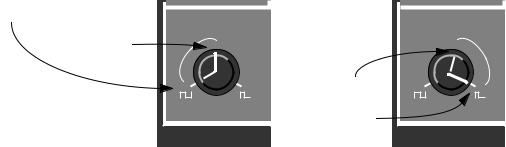
As shown in the picture on page 8, the Pedal input accepts either a foot switch or an expression pedal. The procedures for setting up and using a connected foot pedal differs depending on the pedal type:
Using a Foot Switch
A connected foot switch works as a sustain pedal. Set it up as follows:
1.Hold down the Shift button, and press the “System” button.
2.Press the System button until the left digit in the display is “P”.
3.Use the Program Up/Down buttons to switch the right digit between “1” (Sustain pedal – closed when pressed) and “2” (Sustain Pedal – open when pressed).
4.Press the Shift button again.
Using an Expression pedal
As indicated in the illustration on page 8, a regular expression pedal can be connected using a stereo cable. The connected pedal will either duplicate the Modulation wheel or independently control one of a number of parameters. Set it up as follows:
1.Hold down the Shift button, and press the “System” button.
2.Press the System button until the left digit in the display is “P”.
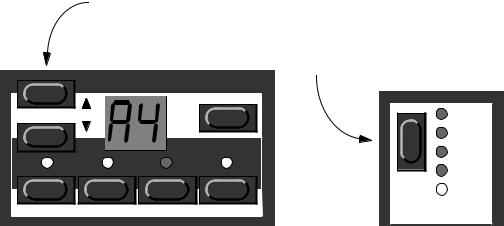
3.Use the Program Up/Down buttons to switch the right digit to “E”.
This tells the Nord Lead that the connected pedal is supposed to be an expression pedal. Now it’s time to assign a control function for the pedal:
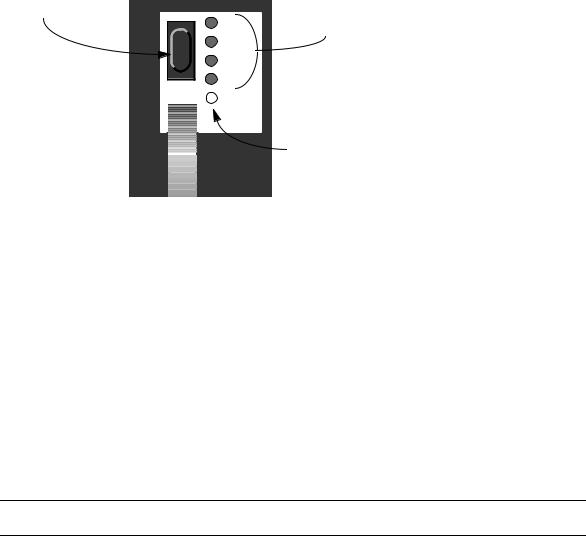
4.While holding down the Shift button, press the Special button.
5.Press the Special button repeatedly, until the left character in the display is an “E” (for “Expression Pedal”).
6.Select a slot for which you want to set the pedal function by pressing one of the buttons A to D.
7.If you want the connected pedal to duplicate the functionality of the Modulation wheel, press the Program Down button until the right character in the display is a dash (“–”).
Program |
STORE |
With this setting, the expression pedal will have the same function as the Modulation wheel.
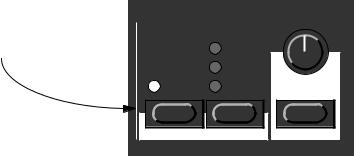
8.If you instead want to select an independent control function for the pedal, press Store.
The display will flash, showing one of the abbreviations in the table below.
Page 18 |
Basic Operations |
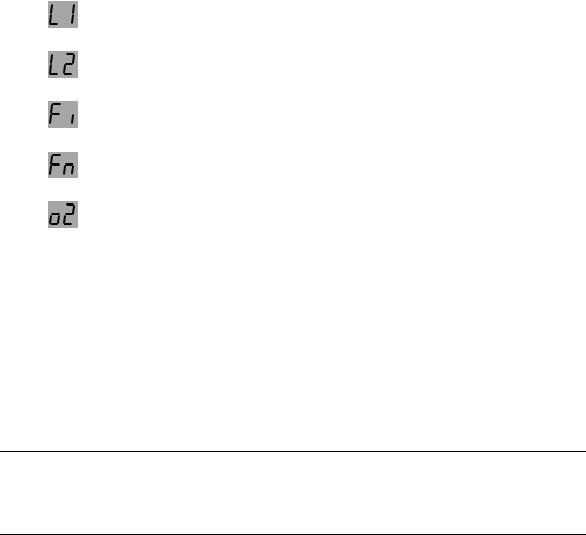
9. ‘Use the Program Up/Down buttons to select one of the following control functions:
Display shows: |
Pedal assigned to: |
||
|
|
|
|
|
|
|
|
|
|
|
LFO 1 Amount. |
|
|
|
|
|
|
|
|
|
|
|
|
|
|
|
LFO 2 Amount. |
|
|
|
|
|
|
|
|
|
|
|
|
|
|
|
Filter Cutoff Frequency. |
|
|
|
|
|
|
|
|
|
|
|
|
|
|
|
FM Amount. |
|
|
|
|
|
|
|
|
|
|
|
|
|
|
|
Oscillator 2 Pitch. |
|
|
|
|
|
|
|
|
|
|
|
|
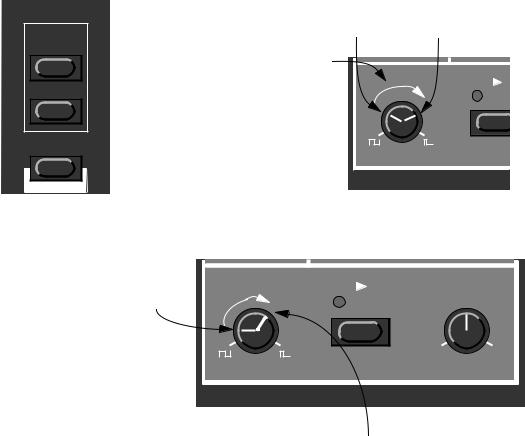
10.After you have made your choice, press Store again.
You return to the “E” display.
11.Use the Program Up/Down buttons to select a control amount value (“1” to “7”).
This value (shown to the right of the “E” in the display) determines the range of the pedal control signal. Lower values give a smaller difference between the pedal’s “full up” and “full down” states. High values give a big difference between the pedal’s up and down states.
12.If needed, repeat steps 5 to 10 to set pedal control function for the other slots.
13.Press Shift to exit the Special menu and return to play mode.
No matter which function is selected for the Pedal input (“E”, “1” or “2” on the System menu), the Nord Lead will recognize Sustain and Expression pedal messages via MIDI (Controller message 64 and 11, respectively). For example, it is possible to connect a regular sustain pedal to the Pedal input on the Nord Lead, and simultaneously accept Expression pedal messages via MIDI, controlling a parameter assigned as described above.
Basic Operations |
Page 19 |
The “Panic” button
If notes “get stuck” or the Nord Lead behaves strangely all you need to do is hold down the Shift button and press “Panic” (the Kbd Track button in the Filter section). This will execute an internal All Notes Off, and reset certain parameters to normal values.
Filter
Filter type
BP
NOTCH +LP
HP 24 dB LP 24 dB LP 12 dB
Attack |
Decay |
Sustain |
Release |
Frequency |
Resonance |
Envelope amount |
VELOCITY |
KBDTRACK |
|
PANIC |
The Panic button.
Page 20 |
Basic Operations |
Editing Programs |
Page 21 |
4. Editing Programs
Changing An Existing Program
Actually, how to change a programmed sound can be described in one sentence: “twist the knobs and press the buttons”. It is as simple as that!
▼For information about editing Percussion Kits, refer to page 30.
▼Don’t be afraid to edit and overwrite the RAM Programs in the internal memory (Program 01 - 40). If later you want to restore any of the original RAM factory programs, they are backed up as ROM Performances as described on page 106.
Changing One Sound In A Layer
If you have layered sounds you can still edit one of the sounds from the front panel. Proceed as follows:
1.Press the Program Slot button that you want to edit.
Its LED will flash to indicate it is the active slot.
2.Use the front panel to change the sound.
Getting Back To The Programmed Sound
If you have edited a Program and want to get back to the programmed original, proceed as follows:
1.Select another Program for that slot.
2.Select the first Program again.
It will now have reverted back to the way it was when you selected it last.

Page 22 |
Editing Programs |
Using Manual Mode
 Master
level
Velocity / morph
ACTIVE |
The Manual button. |
|
SET |
||
|
||
CLEAR |
|
 MANUAL
PERF. MODE
If you want to use the front panel to make up a sound from scratch, press the Manual button. This leaves you with exactly the sound that the knobs and buttons on the panel indicate (just as if the Nord Lead was an old non-programmable instrument).
When you press the Manual button, the instrument only plays one Program, layering is not possible.
Customizing Manual Mode
When you press Manual mode, the button functions (waveform select, modulation destinations etc.) will be set to some default values, for a basic sound. However, if you would like Manual mode to be different the next time you turn on power, proceed as follows:
1.Enter manual mode.
2.Set all button functions as you want them.
3.Press Store twice.

Editing Programs |
Page 23 |
Storing Programs
Storing is done identically regardless if you are saving an edited Program or if you are saving from Manual mode.
Saving a Program will permanently overwrite an existing Program. Be careful so that you don’t accidentally erase a Program you’d like to keep! However, there is no danger of permanently losing the Factory Programs in RAM locations 01-40, since these are backed up as ROM Performances (see page 106).
1.Press the Store button.
The display flashes.
2.Use the Program Up/Down button to select a Program number.
You can play the now selected Program, in this mode, to decide if you want to replace it or not.
Only Program numbers up to 40 in internal memory Bank can be used for saving!. If you try to save in higher program numbers, nothing will happen!
3.If you change your mind at this point, press the Program Slot you want to return to or press the Manual button to return to Manual Mode.
4.If you decide to go ahead with overwriting the existing Program, press Store again.
The display stops flashing to indicate the Program has been saved.
Copying Programs
Copying Programs between memory slots is just a variation on Storing:
1.Select the Program you want to copy.
2.Press Store.
3.Use the Program Up/Down button to specify the memory location you want to copy the program to.
4.Press Store again.

Page 24 |
Editing Programs |
Using PCMCIA Cards
If you have the eight voice expansion card installed in your Nord Lead, you can use a standard PCMCIA computer memory card in the slot at the back of the instrument. This allows you to save another three Banks for a total of 297 programmable memory slots and 30 programmable Percussion Kit locations, and 100 Performances (which in practice includes an additional 400 Programs). PCMCIA cards are also perfect for “backing up” (making safety copies of important Programs and Performances).
You can purchase Clavia cards at your Nord Lead dealer. These come with sounds for your instrument, but can be used to store your won. Ask your dealer for the Nord Lead Sound Library Series.
If you purchase the card at a computer retailer you should ask for this: A 64 kilobyte S-RAM-based, bat- tery-backed PCMCIA card. There are cards with larger memory capacity than 64 kByte but using one with the Nord Lead is simply a waste of money.
Formatting of New Cards
For the Nord Lead to be able to use a new PCMCIA card, it has to be formatted. The instrument will do this for you, if you perform the following steps:
1.Check that the card is not write protected.
This is done with a switch located directly on the card.
2.Insert the card.
The display will flash with the letters “Fo”.
3.To format the card, press Store.
Storing Programs On the Card
This is nothing different from storing into the internal memory Bank. When specifying where to store Program, simply select one of the memory slots above “99”, as when selecting Programs from the card (see page 11).
Storing Performances On the Card
This is described on page 35.
Before storing, make sure the card is not write protected. If it is write protected, the display will not stop flashing when you press Store the second time, to indicate the Program hasn’t been stored.
Updating Older Cards
A number of new parameters were introduced with the Nord Lead Software version 2.x. If you have a PCMCIA S-RAM card formatted with a previous Nord Lead software version, you need to update the card to be able to properly save settings for the new parameters. This updating procedure will not erase or alter any sound already on the card. Proceed as follows:
1.Check that the card is not write protected.
2.Insert the card.
The display will flash with the letters “UP”.
3. To update the card, press Store.

Programming Velocity Sensitivity |
Page 25 |
5. Programming Velocity
Sensitivity
The Filter Velocity Function
Press this button to make the Filter Envelope Amount respond to velocity.
The LED indicates that the Velocity function is activated.
|
|
VELOCITY |
Frequency |
Resonance |
Envelope amount |
The quickest way to make a Program velocity sensitive, is to activate the Velocity function in the Filter section. This makes the Filter Envelope Amount vary with striking force, to a pre-determined degree. See page 46 for details.
Making Any Parameter Velocity Dependent
You can make any continuous parameter (those controlled with knobs) react to velocity. You can also set the maximum and minimum boundaries for this, yourself.
Setting The Range
1.Set the parameter to the value you want it to deliver when you play with minimum force.
2.Press the Active Set button in the Velocity/Morph section.
The LED over the button will flash, indicating that the Nord Lead is in “Velocity Learn” mode.
3.Turn the knob to the value you want it to have at maximum striking force.
You can try out different settings for maximum velocity until you find the most suitable. While the Nord Lead is in “Velocity Learn” mode, you can set ranges for as many parameters as you wish.
4.Press the Velocity/Morph button again.
Page 26 |
Programming Velocity Sensitivity |
The Velocity/Morph LED is now lit to indicate that at least one parameter in the sound is velocity dependant. What you have done now is to set the range, the span within which the parameter will change with velocity.
Velocity / morph
 ACTIVE
SET
CLEAR
 MANUAL
PERF. MODE
If you press the Velocity/Morph button...
...and move a knob from here to there...
...this range will be the |
|
|
one that the parameter |
OSC 1 OS |
|
varies within. |
||
SYNC |
||
|
||
|
DEMO |
|
|
Pulse width |
p o l y p h o n i c
5.Turn the knob back to the value you want it to have when you play with minimum force.
What you did now was moving the entire range, as described below.
Set the value you want the parameter to have when you play with minimum force.
Move the knob backOSC 1downOSC to2 set the values that should correspondSYNC to the lowest
velocity value. |
Pulse width |
DEMO |
OSC 1 Mix |
OSC 2 |
|
p o l y p h o n i c l e a d s y n
If you have set the range as described in the previous picture, the value you get when playing with maximum force will be this.
6.Play the Program to try out the effect.
Please note that any two values can be used when setting the range. To make a parameter value decrease when you play with more force, i.e. have “reversed” velocity response, simply use a low value for the “maximum force “setting and a higher value for the “minimum force” setting, when you are defining the range.
Programming Velocity Sensitivity |
Page 27 |
Moving the Range
As explained above, step 1 to 4 sets the range of the parameter, how far it should be between the minimum and maximum values.
If you then turn a knob that has been programmed for velocity sensitivity, without holding any buttons or anything, you will adjust the minimum value only and the maximum value will move with it, accordingly.
If you adjust the value for a parameter programmed for velocity control, you move the entire velocity control range up/down:
This minimum value |
|
will result in |
this |
maximum value. |
|
Pulse width
This minimum val- |
|
|
ue will result in this |
Pulse width |
|
maximum value. |
||
|
p o l y p h o n i c |
p o l y p h |
Clearing Velocity Programming For One Knob
1.Turn the knob to its lowest value.
2.Press the Velocity/Morph button.
3.Turn the knob a bit up and then back to its lowest value.
4.Press the Velocity/Morph button again.
The Velocity/Morph function is now cleared for the knob.
5.Turn the knob back up to any desired value.
When velocity programming is cleared for all knobs, the Velocity/Morph LED goes out.
Clearing All Velocity Programming
To clear all velocity programming, press the Clear button in the Velocity/Morph section.
Page 28 |
Programming Velocity Sensitivity |
Morphing
Morphing is a term used to describe a continuous blend or “transfer” between two images, sounds or similar. As described above, Nord Lead’s Velocity/Morph function is normally controlled by velocity. But you can route the function to the modulation wheel instead which allows you to continuously fade between two sounds – morphing!
The only thing you have to do to activate morphing for a sound that’s already set up for velocity control is to press the Mod Wheel destination button until all the LEDS for the Mod Wheel destination go out.
Push this button...
|
LFO 1 |
|
OSC 2 |
|
FM AMT |
|
FILTER |
SHIFT |
MORPH |
|
...until none of these four LEDs are lit.
When the four LEDs are dark, the fifth, printed Morph “LED” is considered lit.
However, if you are setting up a Morph sound from scratch, we recommend the following procedure:
1.Press the Mod Wheel destination button until all the LEDS for the Mod Wheel destination go out.
2.Make sure the Modulation wheel is all the way down.
3.Set up the basic Program as you want it.
4.Move the Modulation wheel all the way up.
5.Press Velocity/Morph button and adjust the knobs so that the Program sounds the way you want it at “the other end” of the Morph.
6.Press Velocity/Morph again.
7.Play and move the Mod Wheel to try out the effect.
You can also use an Expression pedal for Morphing, see page 17.
Please note that the Velocity function in the Filter section can be used even if Morphing is active, so that a Program can be basically Velocity sensitive even though Morphing is activated.
Loading...