

Page 1
Owner’s ManuOwner’s Manu
Owner’s Manu
Owner’s ManuOwner’s Manu
alal
al
alal
Part No. 2700,2000
SofSof
Sof
SofSof
bb
b
bb
tware Vtware V
tware V
tware Vtware V
y Clay Cla
y Cla
y Clay Cla
via DMI ABvia DMI AB
via DMI AB
via DMI ABvia DMI AB
ersion 2.0xersion 2.0x
ersion 2.0x
ersion 2.0xersion 2.0x
Page 2
CAUTION AVIS
RISK OF ELECTRIC SHOCK
DO NOT OPE
N
RISQUE DE SHOCK ELECTRIQUE
NE PAS OUVRIR
CAUTION: TO REDUCE THE RISK OF ELECTRIC
SHOCK DO NOT REMOVE COVER (OR BACK).
NO USER SERVICEABLE PARTS INSIDE.
REFER SERVICING TO QUALIFIED PERSONNEL.
ATTENTION:POUR EVITER LES RISQUES DE CHOC
ELECTRIQUE, NE PAS ENLEVER LE COUVERCLE.
AUCUN ENTRETIEN DE PIECES INTERIEURES PAR L´USAGER.
CONFIER L´ENTRETIEN AU PERSONNEL QUALIFE.
AVIS: POUR EVITER LES RISQUES D´INCIDENTE OU
D´ELECTROCUTION, N´EXPOSEZ PAS CET ARTICLE A LA PLUIE
OU L´HUMIDITET.
Instructions pertaining to a risk of fire, electric shock or injury to persons.
IMPORTANT SAFETY INSTRUCTIONS
The lightning flash with the arrowhead symbol within an
equilateral triangle is intended to alert the user to the
presence of uninsulated voltage within the products
enclosure that may be of sufficient magnitude to constitute
a risk of electric shock to persons.
Le symbole éclair avec le point de flèche à l´intérieur d´un triangle
équilatéral est utilisé pour alerter l´utilisateur de la presence à
l´intérieur du coffret de ”voltage dangereux” non isolé d´ampleur
suffisante pour constituer un risque d`éléctrocution.
The exclamation mark within an equilateral triangle is
intended to alert the user to the presence of important
operating and maintenance (servicing) instructions in the
literature accompanying the product.
Le point d´exclamation à l´intérieur d´un triangle équilatéral est
employé pour alerter l´utilisateur de la présence d´instructions
importantes pour le fonctionnement et l´entretien (service) dans le
livret d´instructions accompagnant l´appareil.
SS
AA
VE THESE INSTRUCTIONSVE THESE INSTRUCTIONS
S
A
VE THESE INSTRUCTIONS
SS
AA
VE THESE INSTRUCTIONSVE THESE INSTRUCTIONS
Warning - When using electric products, basic precautions
should always be followed, including the following:
1. Read all the instructions and observe the graphic symbols
above before using the product.
2. Do not use this product near water - for example near a
bathtub, washbowl, kitchen sink, in a wet basement, near or
in a swimming pool, a swamp or the like.
3. This product should be used only with a cart or a stand that
is recommended by the manufacturer.
4. This product, either alone or in combination with an
amplifier and headphones or speakers may be perfectly
capable of producing sound levels that could cause permanent
hearing loss. Do not operate for a long period of time at a
high volume level or at a level that is uncomfortable. If you
experience any hearing loss or ringing in the ears, you should
consult an audiologist.
5. The product should be located so that its location or
position does not interfere with or obstruct its normal flow of
ventilation.
6. The product should be located away from heat sources such
as radiators, heat registers or other products that produce
heat.
7. The product should be connected to a power supply only
of the type described in these operation instructions or as
marked on the product.
8. The power supply cord of the product should be unplugged
from the outlet when the product is left unused for a long
period of time.
9. Care should be taken so that objects do not fall, or liquids
are not spilled into the enclosure through openings.
10. The product should be serviced by qualified service
personnel when:
A. The power supply cord has been damaged; or
B. Objects have fallen or liquids have been spilled
onto the product; or
C. The product has been exposed to rain; or
D. The product does not appear to operate normally or
exhibits a marked change in performance; or
E. The product has been dropped or the enclosure
has been damaged.
11. Do not attempt to service the product beyond those
means described in this operating manual. All other
servicing should be referred to qualified service personnel.
Trademarks: The Nord Electro logo is trademark of Clavia DMI AB. All other
trademarks mentioned in this publication are the properties of their respective holders.
Specifications and appearances are subject to change without notice.
Copyright by Clavia DMI AB, 2002
Page 3

NORD ELECTRO 2 V2.0x Table of contents
Table of contents
Table of contents
Table of contentsTable of contents
1.
1. Introduction
Introduction .........................................................
1. 1.
IntroductionIntroduction
Welcome
Welcome .......................................................................................
WelcomeWelcome
About the Owner’s Manual ......................................................................................................5
Reading the manual in Adobe Acrobat Reader..........................................................................5
Clavia on the Internet
Clavia on the Internet ...............................................................
Clavia on the InternetClavia on the Internet
2.
2. Overview
Overview ................................................................
2. 2.
OverviewOverview
The Nord Electro 2 front panel
The Nord Electro 2 front panel ..............................................
The Nord Electro 2 front panelThe Nord Electro 2 front panel
The left panel section................................................................................................................7
The Organ section....................................................................................................................8
The Instrument Select button...................................................................................................8
The Piano section .....................................................................................................................8
The Effects section....................................................................................................................8
The Keyboard...........................................................................................................................8
Nord Electro 2 rear panel
Nord Electro 2 rear panel .......................................................
Nord Electro 2 rear panelNord Electro 2 rear panel
Connections .............................................................................................................................9
Nord Electro 2 block diagram
Nord Electro 2 block diagram................................................
Nord Electro 2 block diagramNord Electro 2 block diagram
....................................................................................... 5555
..............................................................................................................................................................................
................................................................ 7777
................................................................................................................................
......................................................... 5555
..................................................................................................................
............................................................... 6666
..............................................................................................................................
.............................................. 7777
............................................................................................
....................................................... 9999
..............................................................................................................
................................................ 11
................................................................................................
11
1111
3.
3. Getting started
Getting started ..................................................
3. 3.
Getting startedGetting started
Selecting Programs
Selecting Programs .................................................................
Selecting ProgramsSelecting Programs
Octave Shift
Octave Shift..............................................................................
Octave ShiftOctave Shift
Transpose
Transpose ..................................................................................
TransposeTranspose
Using a sustain pedal
Using a sustain pedal ..............................................................
Using a sustain pedalUsing a sustain pedal
Setting up the sustain pedal polarity .......................................................................................13
Setting up the sustain pedal configuration ..............................................................................14
Using a Rotor Speed switch pedal
Using a Rotor Speed switch pedal .........................................
Using a Rotor Speed switch pedalUsing a Rotor Speed switch pedal
Using a control (expression) pedal
Using a control (expression) pedal........................................
Using a control (expression) pedalUsing a control (expression) pedal
Basic MIDI settings
Basic MIDI settings ..................................................................
Basic MIDI settingsBasic MIDI settings
About the dynamic ranges of the Pianos
About the dynamic ranges of the Pianos...............................
About the dynamic ranges of the PianosAbout the dynamic ranges of the Pianos
.............................................................................. 12
............................................................................................................................................................
.................................................................................. 13
....................................................................................................................................................................
..................................................12
....................................................................................................
................................................................. 12
..................................................................................................................................
.............................................................. 13
............................................................................................................................
......................................... 14
..................................................................................
........................................ 14
................................................................................
.................................................................. 15
....................................................................................................................................
............................... 15
..............................................................
12
1212
12
1212
12
1212
13
1313
13
1313
14
1414
14
1414
15
1515
15
1515
I
Page 4

Table of contents NORD ELECTRO 2 V2.0x
4. Editing Programs
4. Editing Programs ...............................................
4. Editing Programs4. Editing Programs
What’s a Program?
What’s a Program? ....................................................................
What’s a Program?What’s a Program?
Editing a Program
Editing a Program .....................................................................
Editing a ProgramEditing a Program
The knobs.............................................................................................................................. 16
The buttons ........................................................................................................................... 16
Selecting instrument (Organ or Piano)................................................................................... 17
Reverting to the original Program
Reverting to the original Program .........................................
Reverting to the original ProgramReverting to the original Program
Storing a Program
Storing a Program ....................................................................
Storing a ProgramStoring a Program
Copying Programs
Copying Programs .....................................................................
Copying ProgramsCopying Programs
Deleting Programs
Deleting Programs ....................................................................
Deleting ProgramsDeleting Programs
Downloading Programs via MIDI
Downloading Programs via MIDI..............................................
Downloading Programs via MIDIDownloading Programs via MIDI
5.
5. Panel reference
Panel reference .................................................
5. 5.
Panel referencePanel reference
The Organ section
The Organ section .....................................................................
The Organ sectionThe Organ section
The Drawbars ........................................................................................................................ 20
Drawbar presets ..................................................................................................................... 20
User Drawbar presets ............................................................................................................. 21
Percussion.............................................................................................................................. 21
Vibrato .................................................................................................................................. 22
Manual .................................................................................................................................. 22
Swell control (from expression pedal)..................................................................................... 23
Rotary Speaker....................................................................................................................... 23
Key click control.................................................................................................................... 24
Output routing (hard pan)..................................................................................................... 24
The Piano section
The Piano section ......................................................................
The Piano sectionThe Piano section
Type ...................................................................................................................................... 25
Presence................................................................................................................................. 26
Presence with the Mega Clavinet sound ................................................................................. 26
Output routing (hard pan)..................................................................................................... 27
The Effects section
The Effects section ..................................................................
The Effects sectionThe Effects section
Modulations .......................................................................................................................... 29
Effects.................................................................................................................................... 30
Overdrive............................................................................................................................... 31
Rotary Speaker....................................................................................................................... 31
Output Level ......................................................................................................................... 31
Treble & Bass ........................................................................................................................ 32
The left panel section
The left panel section ..............................................................
The left panel sectionThe left panel section
Master Level .......................................................................................................................... 32
Navigator buttons.................................................................................................................. 32
Display .................................................................................................................................. 32
Store ...................................................................................................................................... 32
Program buttons .................................................................................................................... 32
Octave Shift........................................................................................................................... 33
The Shift button .................................................................................................................... 33
............................................... 16
..............................................................................................
....................................................................16
........................................................................................................................................
.....................................................................16
..........................................................................................................................................
.........................................17
..................................................................................
....................................................................17
........................................................................................................................................
.....................................................................18
..........................................................................................................................................
....................................................................18
........................................................................................................................................
..............................................18
............................................................................................
................................................. 19
..................................................................................................
.....................................................................19
..........................................................................................................................................
......................................................................25
............................................................................................................................................
..................................................................28
....................................................................................................................................
..............................................................32
............................................................................................................................
16
1616
16
1616
16
1616
17
1717
17
1717
18
1818
18
1818
18
1818
19
1919
19
1919
25
2525
28
2828
32
3232
II
Page 5

NORD ELECTRO 2 V2.0x Table of contents
System functions
System functions......................................................................
System functionsSystem functions
MIDI Ch................................................................................................................................33
Lower Ch................................................................................................................................34
Local.......................................................................................................................................34
Tune.......................................................................................................................................35
Mem Lock ..............................................................................................................................35
Transpose ...............................................................................................................................35
Ped. Pol ..................................................................................................................................36
Config ....................................................................................................................................36
Key click control.....................................................................................................................37
Output routing (hard pan) .....................................................................................................37
Dump.....................................................................................................................................38
Panic.......................................................................................................................................38
6.
6. Factory Presets and OS
Factory Presets and OS....................................
6. 6.
Factory Presets and OSFactory Presets and OS
Internal memory
Internal memory........................................................................
Internal memoryInternal memory
Factory presets
Factory presets ........................................................................
Factory presetsFactory presets
Restoring the factory presets ...................................................................................................39
Downloading Piano instruments via USB
Downloading Piano instruments via USB...............................
Downloading Piano instruments via USBDownloading Piano instruments via USB
OS upgrades
OS upgrades..............................................................................
OS upgradesOS upgrades
.............................................................................. 39
............................................................................................................................................................
...................................................................... 33
............................................................................................................................................
....................................39
........................................................................
........................................................................ 39
................................................................................................................................................
........................................................................ 39
................................................................................................................................................
............................... 39
..............................................................
33
3333
39
3939
39
3939
39
3939
39
3939
39
3939
7.
7. MIDI functions
MIDI functions ....................................................
7. 7.
MIDI functionsMIDI functions
About the MIDI implementation
About the MIDI implementation ...............................................
About the MIDI implementationAbout the MIDI implementation
Note On/Off ..........................................................................................................................40
Pitch Bend..............................................................................................................................40
Controllers..............................................................................................................................40
Keyboard Velocity ..................................................................................................................40
Program Change.....................................................................................................................40
MIDI Sysex (System Exclusive) ..............................................................................................41
Using Nord Electro 2 with a sequencer
Using Nord Electro 2 with a sequencer ...............................
Using Nord Electro 2 with a sequencerUsing Nord Electro 2 with a sequencer
Connections ...........................................................................................................................41
Local On/Off..........................................................................................................................41
MIDI channel.........................................................................................................................41
Program Change.....................................................................................................................41
Controllers..............................................................................................................................41
Some notes about Controllers and “Chasing” .........................................................................41
Program and Controller
Program and Controller dumps
Program and Controller Program and Controller
Receive MIDI Sysex Dumps...................................................................................................43
8.
8. MIDI implementation
MIDI implementation ...........................................
8. 8.
MIDI implementationMIDI implementation
MIDI Controller list
MIDI Controller list ................................................................
MIDI Controller listMIDI Controller list
MIDI Implementation Chart
MIDI Implementation Chart ......................................................
MIDI Implementation ChartMIDI Implementation Chart
....................................................40
........................................................................................................
............................................... 40
..............................................................................................
............................... 41
..............................................................
dumps .............................................
dumpsdumps
...........................................44
......................................................................................
................................................................ 44
................................................................................................................................
...................................................... 47
............................................................................................................
............................................. 42
..........................................................................................
40
4040
40
4040
41
4141
42
4242
44
4444
44
4444
47
4747
III
Page 6

Table of contents NORD ELECTRO 2 V2.0x
9.
9. History
History ................................................................
9. 9.
HistoryHistory
The story behind the Electro 2 instruments
The story behind the Electro 2 instruments ........................
The story behind the Electro 2 instrumentsThe story behind the Electro 2 instruments
What is an ‘electromechanical’ instrument?............................................................................ 48
How does an electromechanical pick-up work? ...................................................................... 48
The Electro 2 organ section ................................................................................................... 49
The Electro 2 piano section ................................................................................................... 54
The Wurlitzer EP................................................................................................................... 59
The Hohner Clavinet.............................................................................................................61
Book suggestions.................................................................................................................... 63
Web suggestions .................................................................................................................... 63
Music suggestions .................................................................................................................. 63
Index
Index .......................................................................
IndexIndex
....................................................................... 65
..............................................................................................................................................
................................................................ 48
................................................................................................................................
........................48
................................................
48
4848
48
4848
65
6565
IV
Page 7

NORD ELECTRO 2 V2.0x 1. Introduction: Welcome
1. I
1. IN
1. I1. I
WWWW
EEEELLLLCCCCOOOOMMMMEEEE
NTTTTRRRRO
NN
We’d first like to thank you for purchasing the Nord Electro 2 - Virtual Electromechanical stage keyboard. Clavia’s goal when developing the Nord Electro instrument was to create the best emulations of
traditional electromechanical keyboard instruments on the market, and to make the instrument compact
and lightweight. Nothing else. No brass banks, no orchestral sounds. No compromises. Just outstanding
electromechanical keyboard sounds with true feel, from natural keyboard response to authentic sound.
To make a great tool you have to put all the focus on a few things, and that’s what we did with the Electro.
Think about it, the best tool isn’t a Swiss army knife.
The organ section in the Electro is based on a digital simulation of the mechanical tone wheels of the B3 organ. It offers innovative solutions to mimic the typical B-3 sound, for example:
• An extremely accurate digital model of the original chorus and vibrato scanner.
OD
DU
OO
DD
UC
CTTTTIIIIO
UU
CC
ON
N
OO
NN
• Modeling of the individual random contact bounces for each partial.
• Modeling of the unique frequency characteristics of the built-in pre-amplifier which forms the ”body”
of the B-3 sound.
• Simulation of the energy stealth on the tone wheels that results in the typical ”compressed” sound.
The piano section in Nord Electro 2 OS V2.0 comprises five carefully multi-sampled electric piano instruments: Clavinet D6, Wurlitzer 200A, Rhodes Mk I Stage Piano, a Rhodes Mk I Suitcase Piano with
a brighter sound and the custom modified Clavia Electric Grand Model G. The Electro features a unique
multi-sample playback, catching every nuance from soft to hard key strokes. Nord Electro comes right
out of the box with these five electric piano sounds stored in Flash memory. As an extra bonus we also
included an acoustic grand piano (concert model) - in stereo! The big advantage with Flash memory is
that you can replace instruments with new ones and that no backup battery is required. The Electro also
sports a USB interface for quick and easy download of new piano sounds. On the CD-R that comes with
the Electro 2 there are currently three additional Piano sounds: Rhodes3 (Shallow), CP-80 Electric Grand
and the previous Acoustic Grand (in mono). More pianos will be available soon at http://www.clavia.se.
AAAA
BBBBOOOOUUUUTTTT
The manual is arranged mainly as a reference manual. In many cases you’ll get tips on how to practically
use the functions, alone and also together with other functions. Every time the manual wants your attention to an object on the Electro, the name of that object will be printed
button’. The LED display on Nord Electro is always referred to as the D
erence to the ‘keyboard’, that reference also applies to any incoming MIDI note messages.
TTTTHHHHEEEE
O
O
O O
WWWWNNNNEEEERRRR
’’’’
M
M
SSSS
AAAANNNNUUUUAAAALLLL
M M
LIKE THIS
ISPLAY
, e.g. ‘press the S
. Whenever there is a ref-
TORE
RRRR
EEEEAAAADDDDIIIINNNNGGGG
This manual is also available in the digital PDF-file format. It can be downloaded, free of charge, from
Clavia’s web site at http://www.clavia.se. When reading the manual as PDF-file, you will need Adobe Acrobat Reader 4.0 or later. This program can be downloaded, free of charge, at http://www.adobe.com.
TTTTHHHHEEEE
MMMMAAAANNNNUUUUAAAALLLL
IIIINNNN
A
A
A A
DDDDOOOOBBBBEEEE
A
A
CCCCRRRROOOOBBBBAAAATTTT
A A
R
R
EEEEAAAADDDDEEEERRRR
R R
Page 5
Page 8

1. Introduction: Clavia on the Internet NORD ELECTRO 2 V2.0x
With Adobe Acrobat Reader it is possible to use special navigation features like hyperlinks. This means
that you can click with the mouse on a word or sentence and automatically get to the location indicated
by the word/sentence. To better show what words or sentences are hyperlinked in this manual, these
words are written in magenta.
CCCC
LLLLAAAAVVVVIIIIAAAA
If you have access to the Internet, you’re very welcome to visit http://www.clavia.se. There you will find
the latest information about Nord Electro 2 and other Clavia products. In the future you’ll also be able
to download new Nord Electro sounds and software upgrades, free of charge.
OOOONNNN
TTTTHHHHEEEE
I
I
NNNNTTTTEEEERRRRNNNNEEEETTTT
I I
Page 6
Page 9
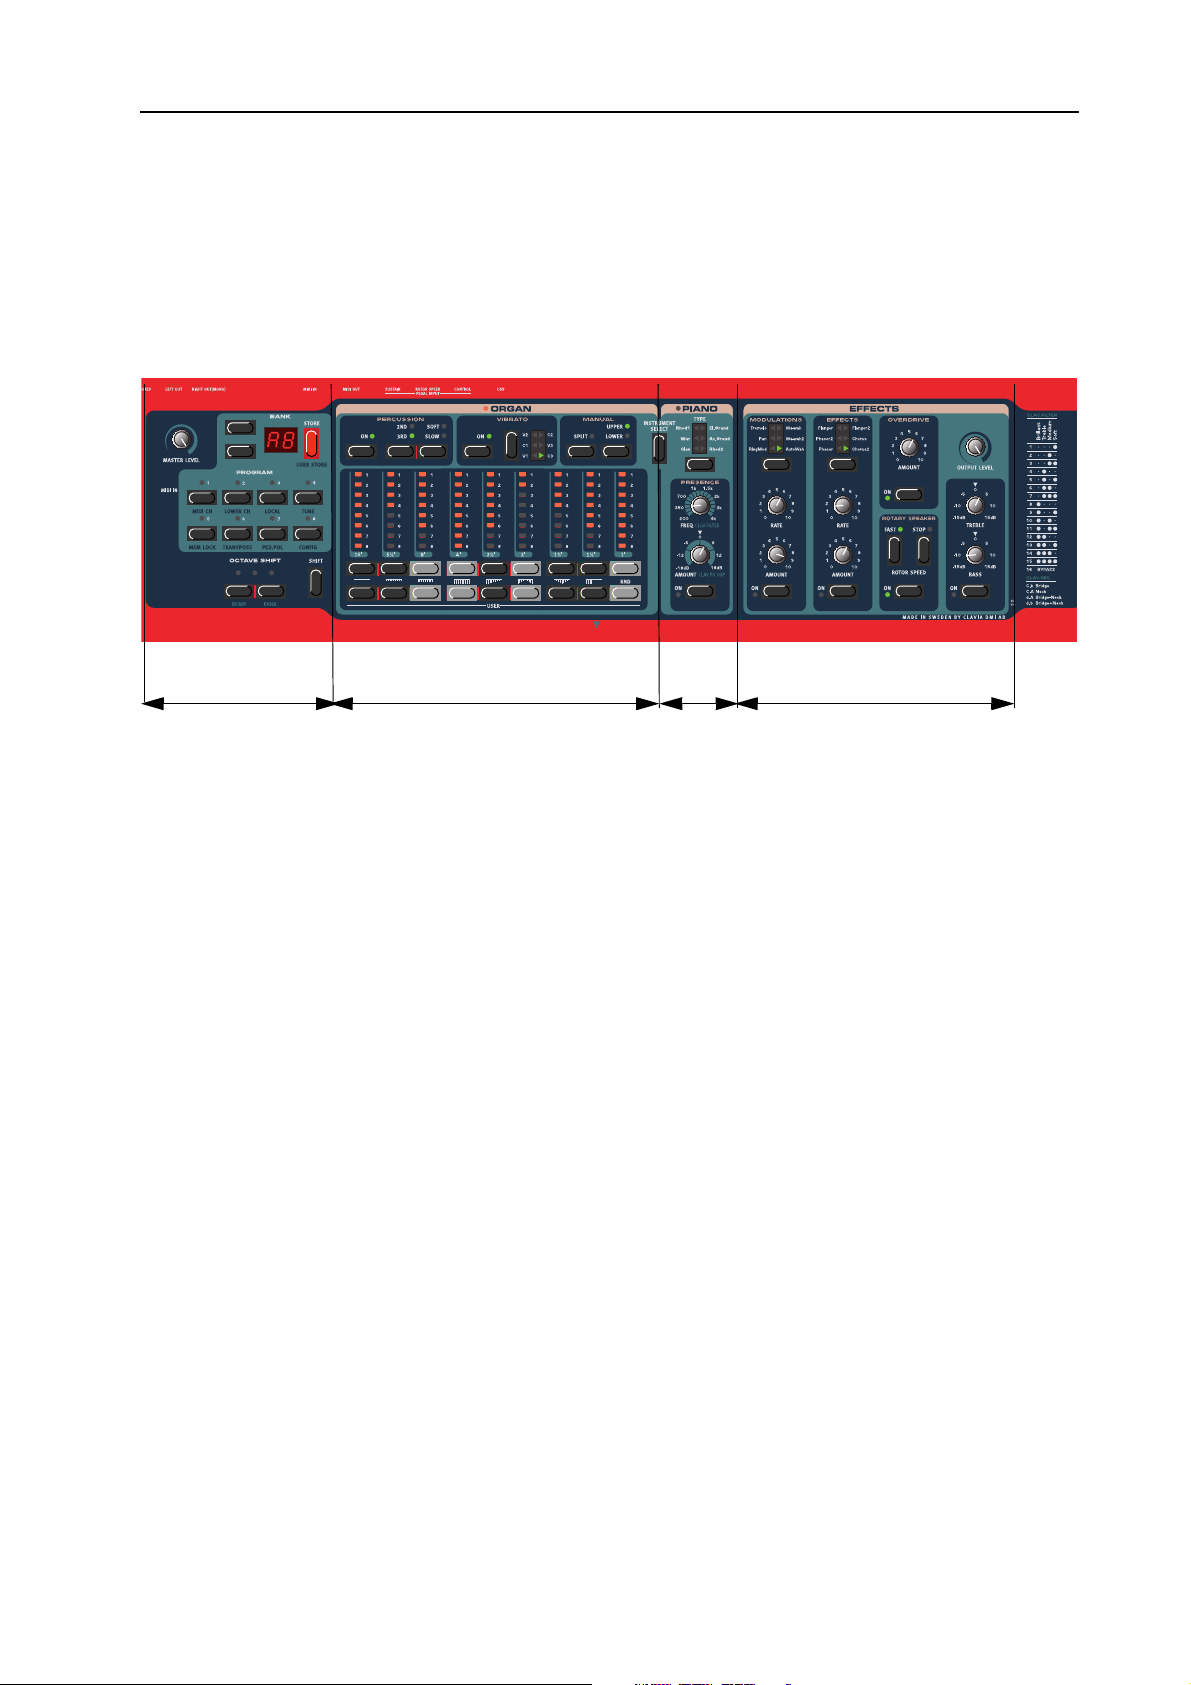
NORD ELECTRO 2 V2.0x 2. Overview: The Nord Electro 2 front panel
2. O
2. OV
2. O2. O
VEEEERRRRVVVVIIIIEEEEW
VV
W
WW
TTTT
N
N
HHHHEEEE
Left panel section
TTTT
HHHHEEEE
OOOORRRRDDDD
N N
LLLLEEEEFFFFTTTT
AAAASSSSTTTTEEEERRRR
MMMM
ASTER LEVEL
The M
put. The M
instrument’s output level. (For info on how to control the level of an individual Program and via MIDI,
please refer to “Output Level” on page 31).
E
E
LLLLEEEECCCCTTTTRRRROOOO
E E
PPPPAAAANNNNEEEELLLL
EEEEVVVVEEEELLLL
L
L
L L
knob controls the output level from the two OUT jacks and the H
ASTER LEVEL
2
2
FFFFRRRROOOONNNNTTTT
2 2
The Organ section
SSSSEEEECCCCTTTTIIIIOOOONNNN
knob does not send or receive any MIDI CC# but is used to control the entire
PPPPAAAANNNNEEEELLLL
The Piano section
The Effects section
EADPHONES
out-
NNNN
AAAAVVVVIIIIGGGGAAAATTTTOOOORRRR
To the right of the M
select Program Banks (A-F) and various system functions. To the right of the N
D
ISPLAY
HHHHEEEE
S
S
TTTT
S S
To the right of the D
a Program” on page 17) and also when executing various system commands.
RRRROOOOGGGGRRRRAAAAMMMM
PPPP
Below the D
various system functions.
HHHHEEEE
TTTT
S
S
S S
Below the P
etc.
CCCCTTTTAAAAVVVVEEEE
OOOO
These buttons are used to transpose the notes +/- 2 octaves (if the selected instrument supports this).
BBBBUUUUTTTTTTTTOOOONNNNSSSS
. It’s used to display Program Banks and also various system parameters.
TTTTOOOORRRREEEE
HHHHIIIIFFFFTTTT
BBBBUUUUTTTTTTTTOOOONNNN
BBBBUUUUTTTTTTTTOOOONNNNSSSS
ISPLAY
BBBBUUUUTTTTTTTTOOOONNNN
ROGRAM
HHHHIIIIFFFFTTTT
S
S
S S
are the eight P
BBBBUUUUTTTTTTTTOOOONNNNSSSS
AAAANNNNDDDD
D
D
D D
ASTER LEVEL
ISPLAY
buttons is the S
knob are two buttons, the N
is the red S
ROGRAM
IIIISSSSPPPPLLLLAAAAYYYY
AVIGATOR
TORE
button. This is used when storing Programs (see “Storing
buttons (1 - 8). Use them to select Programs and to select
HIFT
button. It’s used to access various kinds of system functions
buttons. These are used to
AVIGATOR
buttons is the
Page 7
Page 10

2. Overview: The Nord Electro 2 front panel NORD ELECTRO 2 V2.0x
TTTT
O
O
HHHHEEEE
The Organ section comprises four sub sections: the Percussion section, the Vibrato/Chorus section, the
Manual section and the Drawbar section. The nine drawbars of Nord Electro are represented by up/down
buttons and LED chain graphs instead of ordinary mechanical drawbars. This gives you a big advantage:
when you change presets, the correct drawbar settings are shown immediately by the LEDs. In other
words, no need for the regular ’trial and error’ method.
TTTT
HHHHEEEE
Inbetween the Organ and Piano sections is the I
the Organ section or Piano section.
TTTT
HHHHEEEE
The Piano sections consists of two sub sections: the instrument Type section and the Presence section.
With the T
add parametric equalization to your piano sound. With the V2.0 Mega Clavinet D6 sound the Presence
parameters act as filter and pick-up selectors (see “Presence with the Mega Clavinet sound” on page 26)
RRRRGGGGAAAANNNN
O O
I
I
NNNNSSSSTTTTRRRRUUUUMMMMEEEENNNNTTTT
I I
P
P
IIIIAAAANNNNOOOO
P P
SSSSEEEECCCCTTTTIIIIOOOONNNN
S
S
EEEELLLLEEEECCCCTTTT
S S
SSSSEEEECCCCTTTTIIIIOOOONNNN
YPE
button you select the Piano instrument to use and with the Presence parameters you can
BBBBUUUUTTTTTTTTOOOONNNN
NSTRUMENT SELECT
button. Press this button to select
TTTT
E
E
TTTT
HHHHEEEE
HHHHEEEE
FFFFFFFFEEEECCCCTTTTSSSS
E E
Here you’ll find the numerous effects and modulations you could use to add that extra flavour to your
sounds. The Effects section also features a tube type Overdrive distortion, Rotary Speaker simulation and
a Treble & Bass EQ. Here you’ll also find the O
each individual Program.
KKKK
EEEEYYYYBBBBOOOOAAAARRRRDDDD
The keyboard of Nord Electro is either 5 octaves (Nord Electro SixtyOne) or 6 octaves (Nord Electro
SeventyThree). Both versions feature the specially designed, semiweighted, velocity sensitive “waterfall”
(square front) keyboard for optimal feel and response. The semiweighted action is ideal for use with both
Organ and Piano sounds. The keyboard also sends Keyboard Velocity over MIDI.
SSSSEEEECCCCTTTTIIIIOOOONNNN
UTPUT LEVEL
control which is the volume control for
Page 8
Page 11
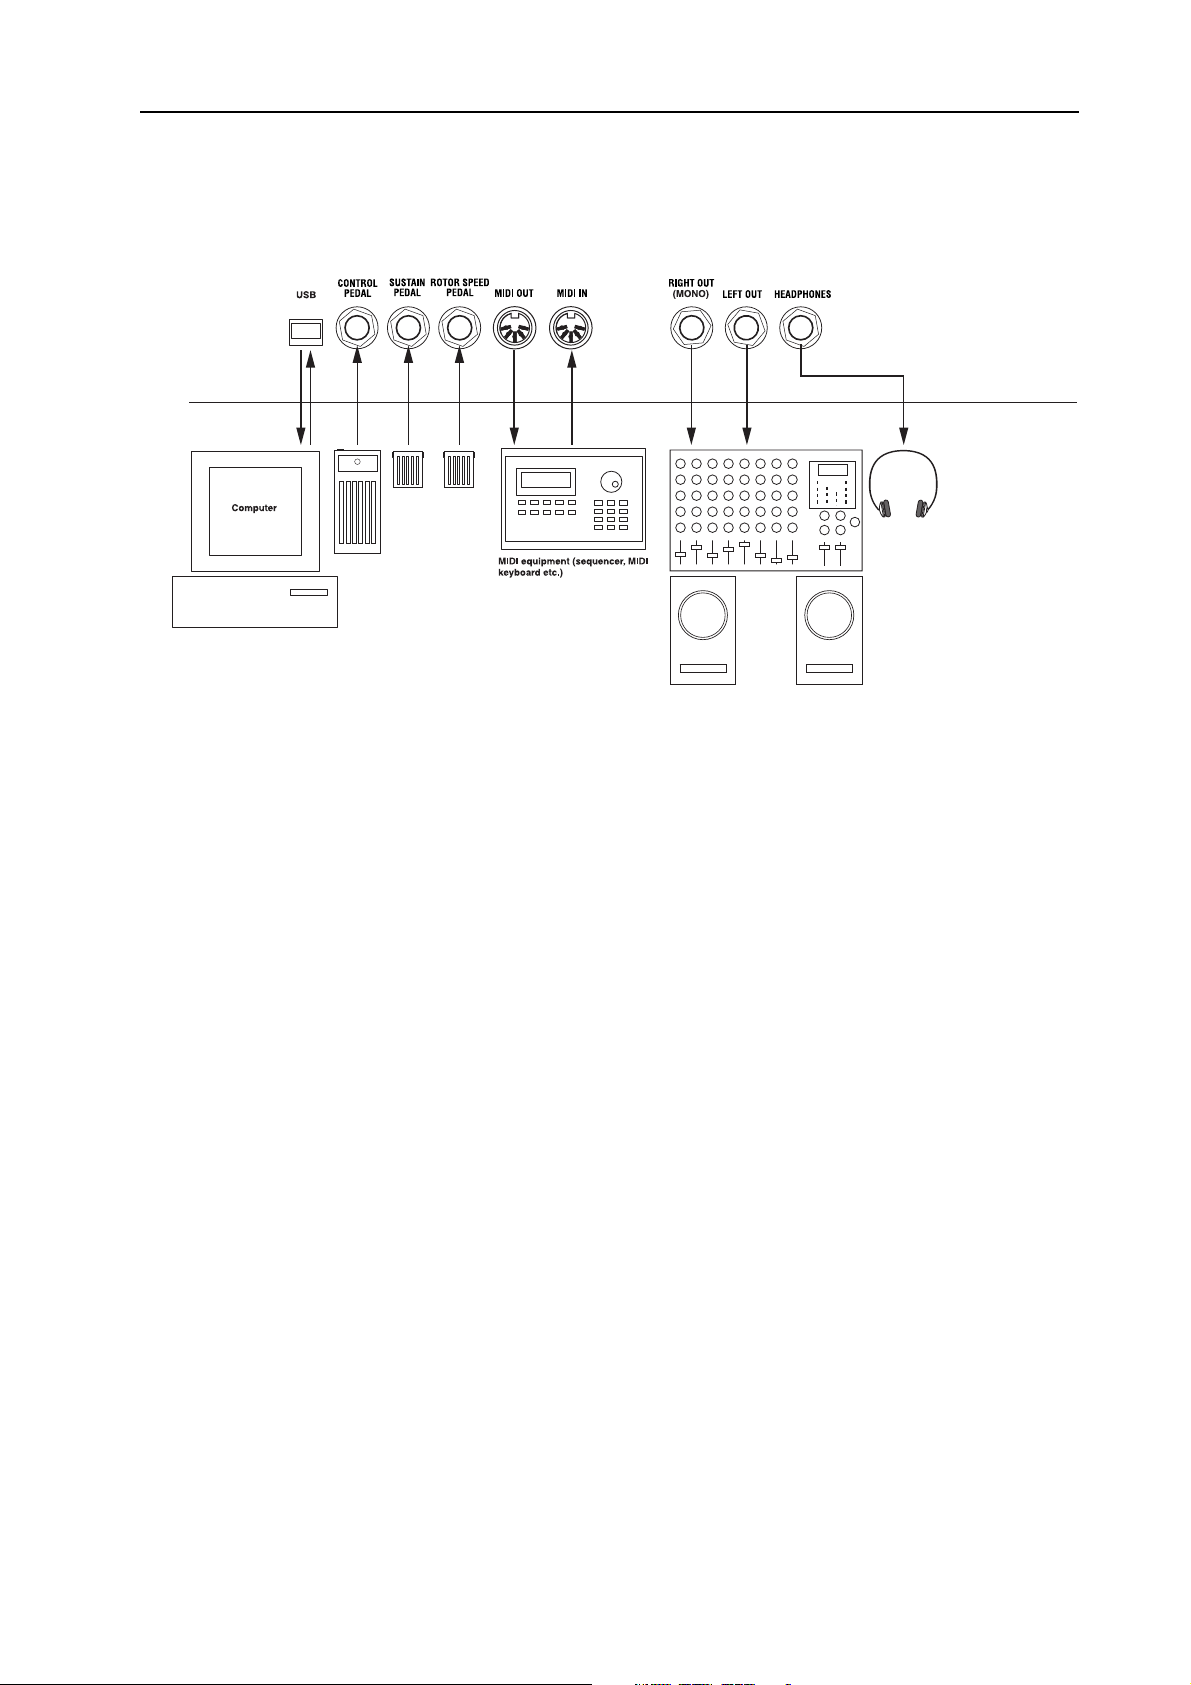
NORD ELECTRO 2 V2.0x 2. Overview: Nord Electro 2 rear panel
NNNN
OOOORRRRDDDD
CCCC
E
E
LLLLEEEECCCCTTTTRRRROOOO
E E
OOOONNNNNNNNEEEECCCCTTTTIIIIOOOONNNNSSSS
• Make all connections before turning on your power amplifier!
2
2
2 2
RRRREEEEAAAARRRR
PPPPAAAANNNNEEEELLLL
• If you are using a Nord Electro 2 together with a MIDI keyboard, connect a MIDI cable from MIDI
Out on the keyboard to MIDI I
• All signal cables used with the Nord Electro must be shielded.
• The two audio outputs (L
sum of the signals on one separate output only, use R
• If you connect the Nord Electro 2 in stereo to your audio equipment, you should use L
pair with R
• If you choose the option to route Organ sounds and Piano sounds to a separate output each (see “Out-
put routing (hard pan)” on page 37), the R
the Organ sound.
OOOONNNNNNNNEEEECCCCTTTTIIIINNNNGGGG
CCCC
The Nord Electro 2 has three pedal inputs, one C
Wah-Wah), one S
slow selection). Connect the pedals as shown in the figure below:
When connecting an expression-type pedal to the C
(Tip-Ring-Sleeve). Please note that the pedal must have a stereo output jack. The resistance range of the
Control Pedal should be 0 to between 10 kOhm and 50 kOhm. Pedals like the Roland EV-5 and control/
expression pedals from Proel works well with the Electro 2. Control/Expression pedals from Yamaha have
different characteristics and are not suitable for use with the Electro 2.
IGHT OUT
PPPPEEEEDDDDAAAALLLLSSSS
USTAIN PEDAL
.
N
on the Nord Electro 2.
EFT OUT
and R
IGHT OUT
IGHT OUT
input (sustain) and one R
) are line level and unbalanced. If you want the
IGHT OUT
is for the Piano sound and the L
ONTROL PEDAL
ONTROL PEDAL
.
EFT OUT
EFT OUT
input (for controlling Organ Swell or
OTOR SPEED
input (for rotary speaker fast/
input, you should use a stereo cable
in
for
Page 9
Page 12
2. Overview: Nord Electro 2 rear panel NORD ELECTRO 2 V2.0x
It’s also possible to use only one single Sustain pedal connected to the S
sustain for Piano sounds and Rotary Speaker speed selection for organ sounds (see page 14 for details on
how to configure this).
USTAIN PEDAL
input to control
(For more detailed information on how to set up Nord Electro 2 for use with sustain and expression pedals, see page 13).
Page 10
Page 13

NORD ELECTRO 2 V2.0x 2. Overview: Nord Electro 2 block diagram
NNNN
OOOORRRRDDDD
E
E
LLLLEEEECCCCTTTTRRRROOOO
E E
Below is a schematic overview of the sound and modulation building blocks and the signal flows in Nord
Electro 2. The filled lines indicate audio signal routings and the dashed black lines control signal routings.
The ‘/2’ sign printed next to some filled lines indicates that the signal is/can be in stereo. The circles with
a ‘+’ sign inside indicates that any input stereo signals will be summarized into a mono signal before routed to the specific effect. For example, the V2.0 stereo Acoustic Grand will be in mono if you apply any
effect except for the Pan, Tremolo or EQ.
2
2
2 2
BBBBLLLLOOOOCCCCKKKK
DDDDIIIIAAAAGGGGRRRRAAAAMMMM
As you can see, the internal configuration of Nord Electro 2 is pretty straight-forward, yet very powerful
and flexible. Each of the building blocks also offers possibilities for internal configurations. This is described in detail in Chapter "5. Panel reference” on page 19.
Page 11
Page 14
3. Getting started: Selecting Programs NORD ELECTRO 2 V2.0x
3. G
3. GE
3. G3. G
ETTTTTTTTIIIIN
EE
NG
NN
G
S
GG
STTTTAAAARRRRTTTTEEEED
SS
D
DD
SSSS
EEEELLLLEEEECCCCTTTTIIIINNNNGGGG
Programs are single sounds that are stored in the internal memory of Nord Electro 2. The Program memory in Nord Electro 2 consists of 6 Banks each holding 8 Programs for a total of 48 Programs. All Programs can be edited and replaced at any time. To select a Program for playing/editing, do like this:
1. Select Bank (A-F) by pressing
the U
buttons if you want to change
Bank.
2. Select Program by pressing one
of the eight P
tons 1 to 8.
OOOO
CCCCTTTTAAAAVVVVEEEE
P
P
RRRROOOOGGGGRRRRAAAAMMMMSSSS
P P
P/DOWN NAVIGATOR
but-
S
S
S S
ROGRAM
HHHHIIIIFFFFTTTT
Press the
N
AVIGATOR
select Program Bank A-F
Press one of the eight
P
ROGRAM
select a Program to
play. The corresponding LED will light up.
U
or
P
buttons to
buttons to
D
OWN
The two O
can be used to transpose the notes two octaves up or down (if the selected instrument supports this). A flashing O
dicates +/- 2 octaves note shift.
Note: Due to the actual key range of the original Piano instruments,
some sounds cannot be octave shifted up and/or down. For organ sounds, the Octave Shift will only
generate notes that are within the 73-key note range of Nord Electro 2 73. This means that using Octave Shift for Organ sounds in Nord Electro 2 73 won’t produce any sound in the lowest or highest
octave.
CTAVE SHIFT
buttons to the bottom left on the front panel
CTAVE SHIFT
LED in-
Page 12
Page 15
NORD ELECTRO 2 V2.0x 3. Getting started: Transpose
TTTT
RRRRAAAANNNNSSSSPPPPOOOOSSSSEEEE
It’s also possible to transpose a sound up or down in
semitone steps. Press the S
(TRANSPOSE) buttons. The D
Press the U
pose the sound up or down in semitone steps. The
range is +/- 6 semitones in steps of 1 semitone. Press
any button (except for the S
D
OWN
Note: Due to the actual key range of the original Piano instruments, the lowest keys may not produce
any sound when transposed down. The same goes
for the highest keys when the instrument is transposed up. For organ sounds, the Transpose function
will only generate notes that are within the 73-key note range of Nord Electro 2 73. This means that
using the Transpose function for Organ sounds in Nord Electro 2 73 will cause the lowest or highest
notes of the keyboard to be silent.
P/DOWN NAVIGATOR
buttons) to exit.
HIFT
HIFT
ROGRAM
+ P
ISPLAY
buttons to trans-
, S
TORE
6
reads ‘0’.
or UP/
UUUU
SSSSIIIINNNNGGGG
SSSS
EEEETTTTTTTTIIIINNNNGGGG
AAAA
SSSSUUUUSSSSTTTTAAAAIIIINNNN
A foot switch connected to the S
• As a sustain pedal for both the Piano and Organ sounds (see Sustain Pedal Configuration below)
• As a sustain pedal for Piano sounds and as a Rotor Speed switch for the Organ sounds (see Sustain
Pedal Configuration below)
UUUUPPPP
Set up the pedal polarity as follows:
1. Press the S
tons. The D
2. Change sustain pedal polarity between ‘OP’
(Open) (open when pressed) and ‘CL’ (Closed)
(closed when pressed) with the U
GATOR
3. Press any button (except for the S
U
P/DOWN
HIFT
ISPLAY
buttons.
buttons) to exit.
TTTTHHHHEEEE
+ P
reads ‘CL’ or ‘OP’.
PPPPEEEEDDDDAAAALLLL
USTAIN PEDAL
SSSSUUUUSSSSTTTTAAAAIIIINNNN
ROGRAM
7 (PED.POL) but-
input can be set to act in two different ways:
PPPPEEEEDDDDAAAALLLL
P/DOWN NAVI
, S
HIFT
TORE
or
PPPPOOOOLLLLAAAARRRRIIIITTTTYYYY
-
Page 13
Page 16
3. Getting started: Using a Rotor Speed switch pedal NORD ELECTRO 2 V2.0x
SSSS
EEEETTTTTTTTIIIINNNNGGGG
1. Press the S
1. Change sustain pedal functionality between ‘P.S’
2. Press any button (except for the S
Nord Electro 2 sends and receives Sustain Pedal messages as MIDI (CC# 64). Note! If you have selected ‘P.t’, Rotor Speed selection is sent from the sustain
pedal as MIDI CC#82 - not CC#64!
UUUU
SSSSIIIINNNNGGGG
A foot switch connected to the R
speed for the Rotary Speaker effect (see page 31). Nord Electro 2 will also send and receive Rotor Speed
switch messages via MIDI (CC# 82).
UUUUPPPP
HIFT
tons. The D
‘P.t’ (Pedal toggle).
(Sustain for both Piano and Organ sounds) and
‘P.t’ (sustain for Piano sounds and Rotor Speed
switch for Organ sounds) with the U
N
AVIGATOR
U
P/DOWN
AAAA
ISPLAY
buttons) to exit.
R
R
R R
TTTTHHHHEEEE
buttons.
OOOOTTTTOOOORRRR
SSSSUUUUSSSSTTTTAAAAIIIINNNN
ROGRAM
+ P
reads ‘P.S’ (Pedal Sustain) or
S
S
S S
8 (CONFIG) but-
HIFT
PPPPEEEEEEEEDDDD
OTOR SPEED
PPPPEEEEDDDDAAAALLLL
P/DOWN
, S
TORE
SSSSWWWWIIIITTTTCCCCHHHH
input can be used to switch between Slow and Fast rotor
CCCCOOOONNNNFFFFIIIIGGGGUUUURRRRAAAATTTTIIIIOOOONNNN
or
PPPPEEEEDDDDAAAALLLL
Note: The Pedal Polarity setting that you made for the S
the R
OTOR SPEED
UUUU
SSSSIIIINNNNGGGG
AAAA
As indicated in the illustration on page 9, a regular resistive (range 10 kOhm to 50 kOhm) expression
pedal can be connected to the C
nected pedal can be used to control either Organ Swell (the characteristic B3 volume control) or WahWah modulation. Pedals like the Roland EV-5 and control/expression pedals from Proel works well with
the Electro 2. Control pedals from Yamaha have different characteristics and are not suitable for use with
the Electro 2. Nord Electro 2 will also send and receive Expression pedal messages via MIDI (CC# 11).
input.
CCCCOOOONNNNTTTTRRRROOOOLLLL
(
(
EEEEXXXXPPPPRRRREEEESSSSSSSSIIIIOOOONNNN
( (
ONTROL PEDAL
input, using a stereo (Tip-Ring-Sleeve) cable. The con-
USTAIN PEDAL
)
)
PPPPEEEEDDDDAAAALLLL
) )
input (see above) also affects
Page 14
Page 17

NORD ELECTRO 2 V2.0x 3. Getting started: Basic MIDI settings
BBBB
AAAASSSSIIIICCCC
MIDI
MIDI
MIDI MIDI
If you are controlling the Nord Electro 2 from an external MIDI keyboard, the Nord Electro 2 must be
set to receive on the same MIDI channel that the external keyboard transmits on. Nord Electro 2 is
monotimbral (or bitimbral when using the Organ section.See“Using an additional “Lower Manual”
MIDI keyboard” on page 22) which means it can only transmit and receive on one MIDI channel at a
time.
1. Set the MIDI keyboard to transmit and receive on MIDI Channel 1. (This is the default setting
when Nord Electro 2 is shipped from factory).
2. Press the S
tons. The D
MIDI channel.
3. Scroll with the U
select MIDI Channel 1 (if it isn’t already selected).
4. Press any button (except for the S
U
P/DOWN
For information on how to set up Nord Electro 2 for
use with an external sequencer, see “Using Nord
Electro 2 with a sequencer” on page 41.
SSSSEEEETTTTTTTTIIIINNNNGGGGSSSS
HIFT
ISPLAY
buttons) to exit.
ROGRAM
+ P
shows the currently selected
P/DOWN NAVIGATOR
1 (MIDI CH) but-
buttons to
HIFT
, S
TORE
or
AAAA
BBBBOOOOUUUUTTTT
TTTTHHHHEEEE
Some of the piano instruments sampled for the Nord Electro 2 have very wide dynamic ranges by nature
and naturally we wanted to capture this as accurately as possible. Therefore, it could be perceived that it
is a little hard to reach the most extreme levels when playing the Nord Electro 2 piano sounds. However,
this is only normal since the dynamic response curves have been very carefully adjusted to match each
original instrument's response characteristics. In other words, Clavia's intention was that when you play
a Rhodes sound, for example, it should almost feel like you are playing a Rhodes piano.
DDDDYYYYNNNNAAAAMMMMIIIICCCC
RRRRAAAANNNNGGGGEEEESSSS
OOOOFFFF
TTTTHHHHEEEE
P
P
IIIIAAAANNNNOOOOSSSS
P P
Page 15
Page 18
4. Editing Programs: What’s a Program? NORD ELECTRO 2 V2.0x
4. E
4. ED
4. E4. E
DIIIITTTTIIIIN
DD
NG
NN
G P
PR
GG
P P
RO
OG
RR
OO
GRRRRA
GG
AM
AA
MSSSS
MM
WWWW
HHHHAAAATTTT
EEEE
DDDDIIIITTTTIIIINNNNGGGG
TTTT
’’’’
P
P
SSSS
AAAA
A Program in Nord Electro 2 consists of a selected Instrument (an Organ sound or a specific Piano
sound), the settings you have made for the instrument, e.g. Drawbar, Percussion and Chorus/Vibrato settings for Organ sounds or Presence settings for a Piano sound, Octave Shift settings plus all the settings
of the Effects section. For Piano based sounds this means that a Program does not contain any samples only the parameter data that affects the selected Piano type. This is important to bear in mind when performing a MIDI Sysex dump of a Piano based Program (see “Dump” on page 38).
Actually, how to change a programmed sound can be described in one
sentence: “tweak the knobs and press the buttons”. It is as simple as
that! Don’t be afraid to edit and overwrite the factory Programs. If
you want to restore any of the original factory programs later, you can
fetch them at http://www.clavia.se and download to your Nord Electro 2 as MIDI Sysex files. To indicate that a Program has been edited
(changed from the stored version), a dot is shown to the right of the Program number in the D
HHHHEEEE
KKKKNNNNOOOOBBBBSSSS
NOBS
All K
when you begin to edit a Program the values of the parameters can be totally different from the K
K
NOB
could generate drastic changes to the sound but that’s normal.
on the Nord Electro 2 are of potentiometer type. This means that
, the parameter value will ‘snap’ to the K
RRRROOOOGGGGRRRRAAAAMMMM
P P
P
P
AAAA
RRRROOOOGGGGRRRRAAAAMMMM
P P
NOBS
physical positions. As soon as you begin turning a
????
NOB’S
physical position. This
ISPLAY
:.
TTTT
HHHHEEEE
BBBBUUUUTTTTTTTTOOOONNNNSSSS
There are three types of buttons for editing sounds on the Nord Electro 2:
EEEELLLLEEEECCCCTTTTOOOORRRR
SSSS
Press the S
corresponding triangular LED (see figure to the right).
NNNN
/O
/O
OOOO
/O/O
N/OFF
The O
RRRRAAAAWWWWBBBBAAAARRRR
DDDD
RAWBAR
The D
rameter when held. I.e. if you hold a D
tinue to increment or decrement (within its range) until you release the button.
Page 16
BBBBUUUUTTTTTTTTOOOONNNNSSSS
ELECTOR
FFFFFFFF
BBBBUUUUTTTTTTTTOOOONNNNSSSS
button repeatedly to select between functions printed next to the
buttons have a LED next to them to indicate the status.
BBBBUUUUTTTTTTTTOOOONNNNSSSS
buttons are special in the way that they auto-increment/decrement the corresponding pa-
RAWBAR
button the corresponding drawbar parameter will con-
Page 19
NORD ELECTRO 2 V2.0x 4. Editing Programs: Reverting to the original Program
SSSS
EEEELLLLEEEECCCCTTTTIIIINNNNGGGG
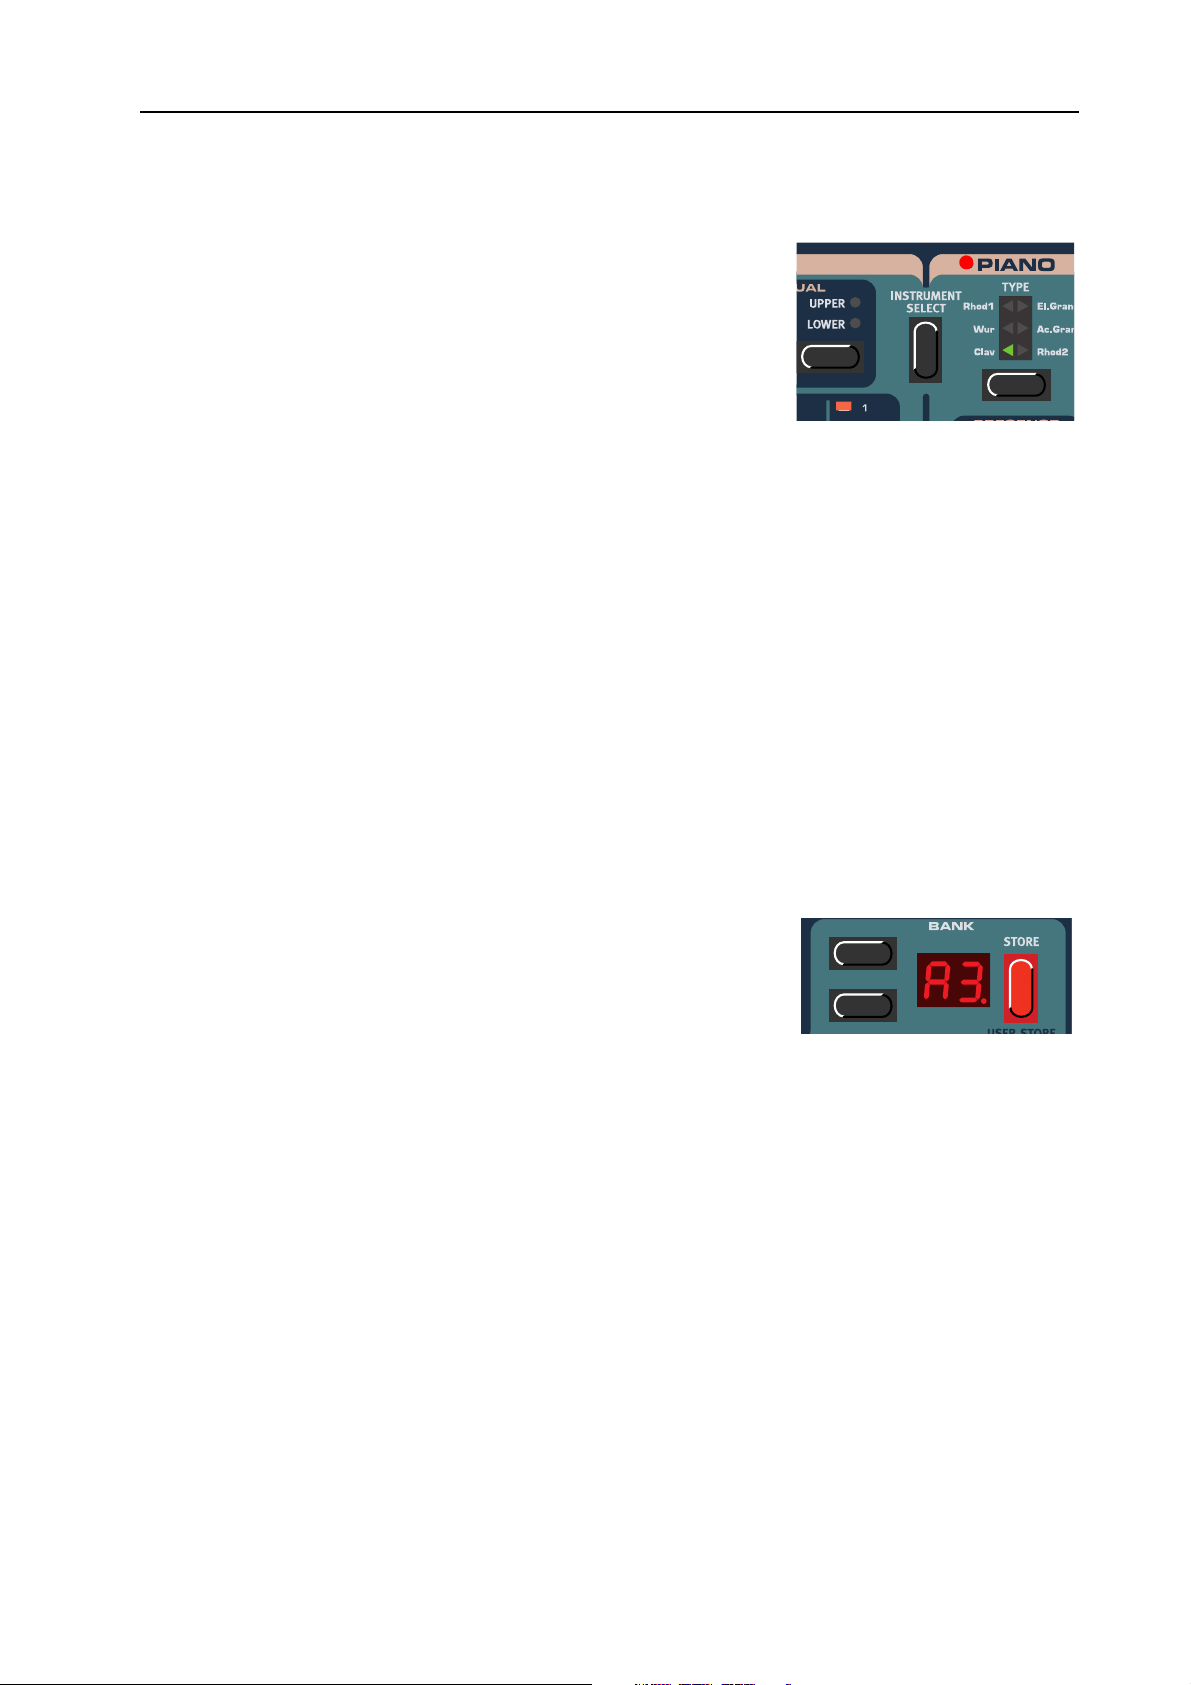
No matter what Program you’re editing, you could always select a
different instrument type at any time. There are two main instrument sections in Nord Electro 2: the Organ section and the Piano
section. You switch between these sections by pressing the I
MENT SELECT
When you have selected an instrument section the other section, with
its sub groups, is automatically disabled (all its LEDs go blank).
However, all settings of the respective groups are memorized so when
you switch back, all parameter values of the instrument group are automatically recalled. The parameters
of the Effects section will always remain unaffected when you switch instrument group.
RRRR
EEEEVVVVEEEERRRRTTTTIIIINNNNGGGG
If you have edited a Program and want to revert to the stored original, just press the corresponding P
GRAM
button again.
SSSS
TTTTOOOORRRRIIIINNNNGGGG
Storing a Program will permanently overwrite the existing Program in the selected memory location. Be
careful so that you don’t accidentally erase a Program you’d like to keep!
IIIINNNNSSSSTTTTRRRRUUUUMMMMEEEENNNNTTTT
button located between the Organ and Piano sections.
TTTTOOOO
TTTTHHHHEEEE
P
P
AAAA
RRRROOOOGGGGRRRRAAAAMMMM
P P
(O
(O
RRRRGGGGAAAANNNN
(O (O
OOOORRRRIIIIGGGGIIIINNNNAAAALLLL
OOOORRRR
P
P
IIIIAAAANNNNOOOO
P P
NSTRU
P
P
RRRROOOOGGGGRRRRAAAAMMMM
P P
))))
-
RO
-
Note! When Nord Electro 2 is shipped from factory, Memory Lock is set to ‘On’. To be able to store
Programs, first disable the Memory Lock function. See “Mem Lock” on page 35.
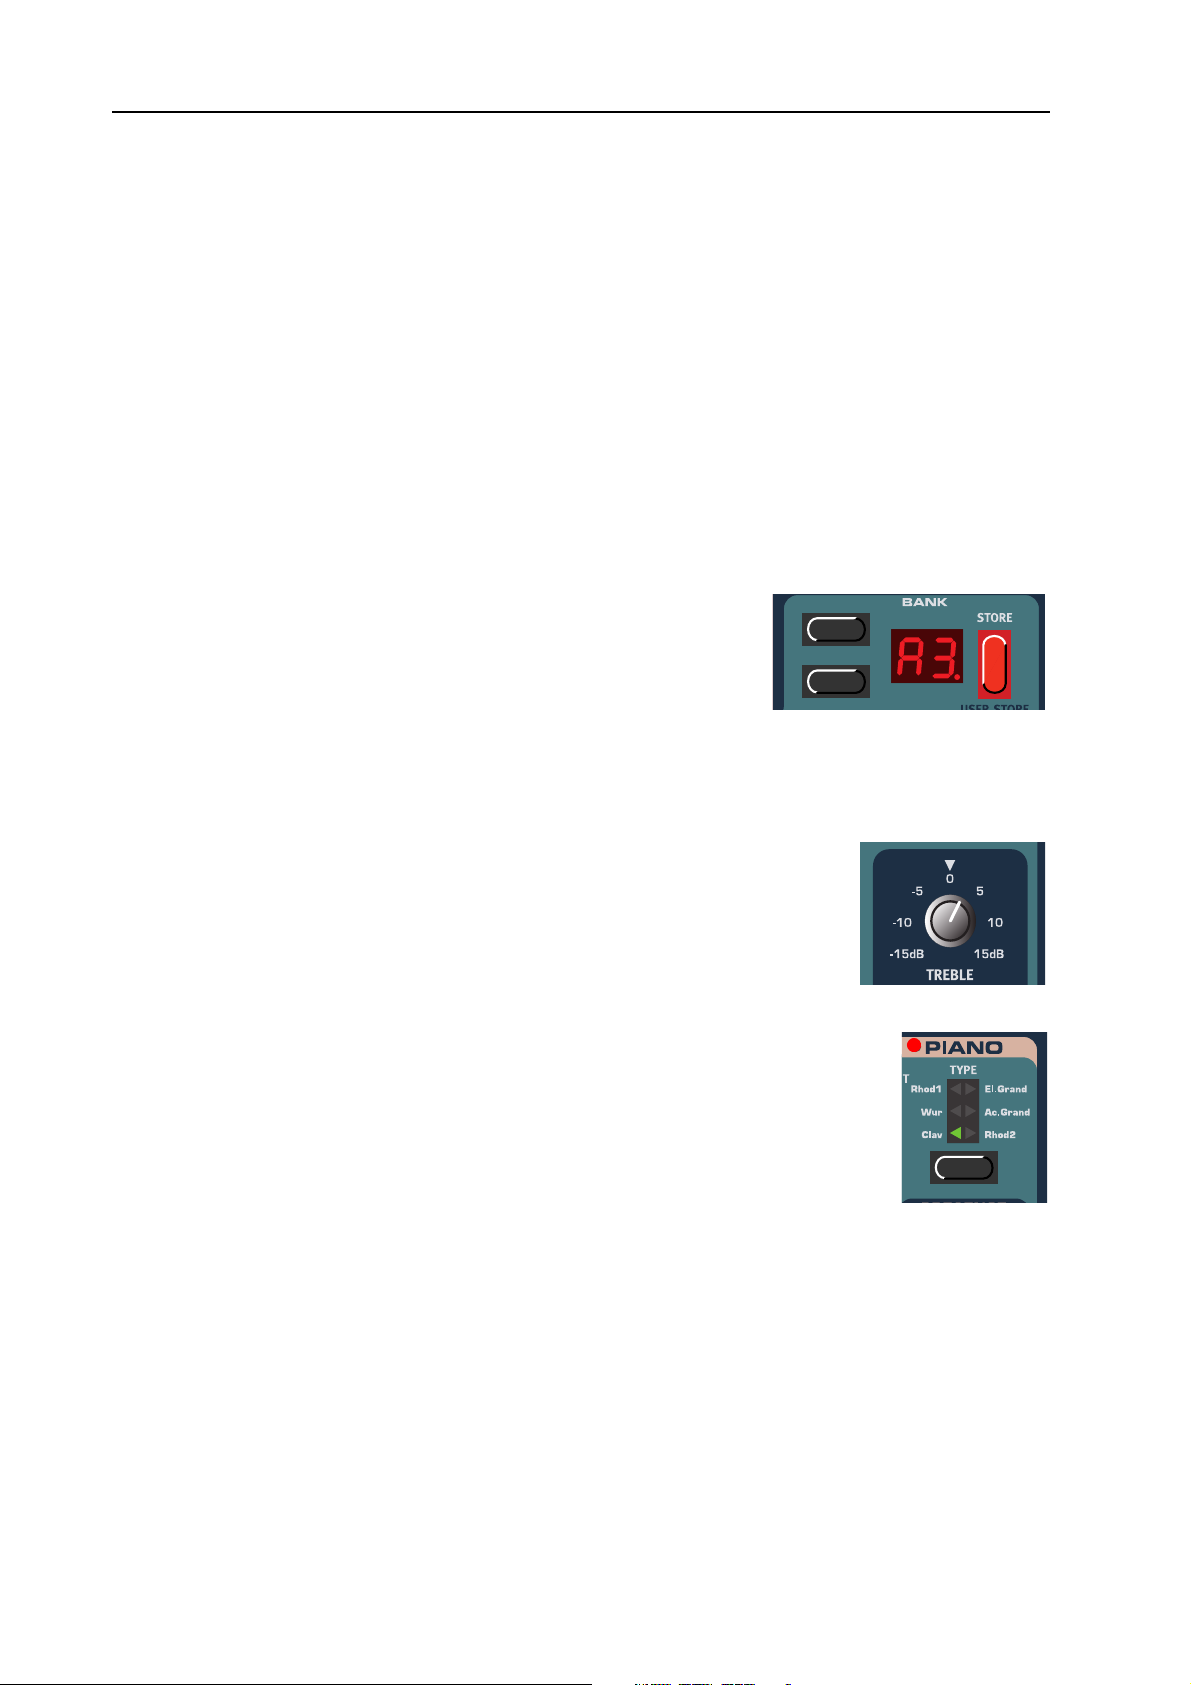
To store a Program do like this:
TORE
1. Press the S
starts flashing in the D
2. Select Bank (A-F) by pressing the U
tons (if you want to change Bank) and then Program location by
pressing the corresponding P
through the memory locations, you can play and hear the Program currently shown in the D
This prevents you from overwriting a sound that you want to keep. (To cancel the operation, press
any button, except for the S
3. Press S
TORE
stops flashing.
button once. The Bank and Program number
ISPLAY
P/DOWN NAVIGATOR
ROGRAM
HIFT
again to store your Program. The D
button (1-8). As you scroll
, P
ROGRAM
, S
TORE
ISPLAY
or UP/D
but-
ISPLAY
OWN
buttons.)
shows the selected memory location and
.
Page 17
Page 20

4. Editing Programs: Copying Programs NORD ELECTRO 2 V2.0x
CCCC
OOOOPPPPYYYYIIIINNNNGGGG
Copying a Program from one memory location to another is just a variation of storing:
1. Select the Program you want to copy. Press the S
once. The Bank and Program number starts flashing in the D
PLAY
1. Select Bank (A-F) by pressing the U
tons (if you want to change Bank) and then Program location by
pressing the corresponding P
you can play and hear the Program currently shown in the D
writing a sound that you want to keep. (To cancel the operation, press any button, except for the
S
2. Press S
stops flashing.
DDDD
EEEELLLLEEEETTTTIIIINNNNGGGG
There is no command for deleting Programs from the internal memory. What you do to “delete” a Program is simply saving a new Program (and thus replacing the old Program) in a specific memory location.
HIFT
P
P
RRRROOOOGGGGRRRRAAAAMMMMSSSS
P P
ROGRAM
, P
ROGRAM
TORE
P
P
P P
, S
again to store your Program. The D
TORE
or UP/D
RRRROOOOGGGGRRRRAAAAMMMMSSSS
TORE
button
-
IS
P/DOWN NAVIGATOR
button (1-8). As you scroll through the memory locations,
OWN
buttons.)
ISPLAY
but-
ISPLAY
. This prevents you from over-
shows the selected memory location and
DDDD
OOOOWWWWNNNNLLLLOOOOAAAADDDDIIIINNNNGGGG
You can receive MIDI Sysex data for one Program at a time into a selected Program location. For example, if you use Nord Electro 2 together with a sequencer, it is often practical to record a Sysex Program
data dump in the beginning of your song to download sounds. It’s also possible to receive an entire Program Bank and even all Program Banks as a bulk (see “Dump” on page 38 and “Receive MIDI Sysex
Dumps” on page 43).
P
P
RRRROOOOGGGGRRRRAAAAMMMMSSSS
P P
VVVVIIIIAAAA
MIDI
MIDI
MIDI MIDI
Page 18
Page 21
NORD ELECTRO 2 V2.0x 5. Panel reference: The Organ section
5. P
5. PA
5. P5. P
AN
NEEEEL
AA
NN
L
R
REEEEFFFFEEEERRRREEEEN
LL
RR
NCCCCEEEE
NN
TTTT
OOOO
HHHHEEEE
RRRRGGGGAAAANNNN
The Organ in the Nord Electro 2 is based on a digital simulation of the mechanical tone wheels of the
B-3 organ. It offers innovative solutions to mimic the typical B-3 sound, for example:
SSSSEEEECCCCTTTTIIIIOOOONNNN
• Full polyphony
• An extremely accurate digital model of the original chorus and vibrato scanner
• Modeling of the individual random contact bounces for each partial
• Modeling of the unique frequency characteristics of the built-in pre-amplifier which forms the ”body”
of the B-3 sound
• Simulation of the energy stealth on the tone wheels that results in the typical ”compressed” sound
• Authentic tuning of the tone wheels according to the original B3 design
• Extremely fast keyboard response
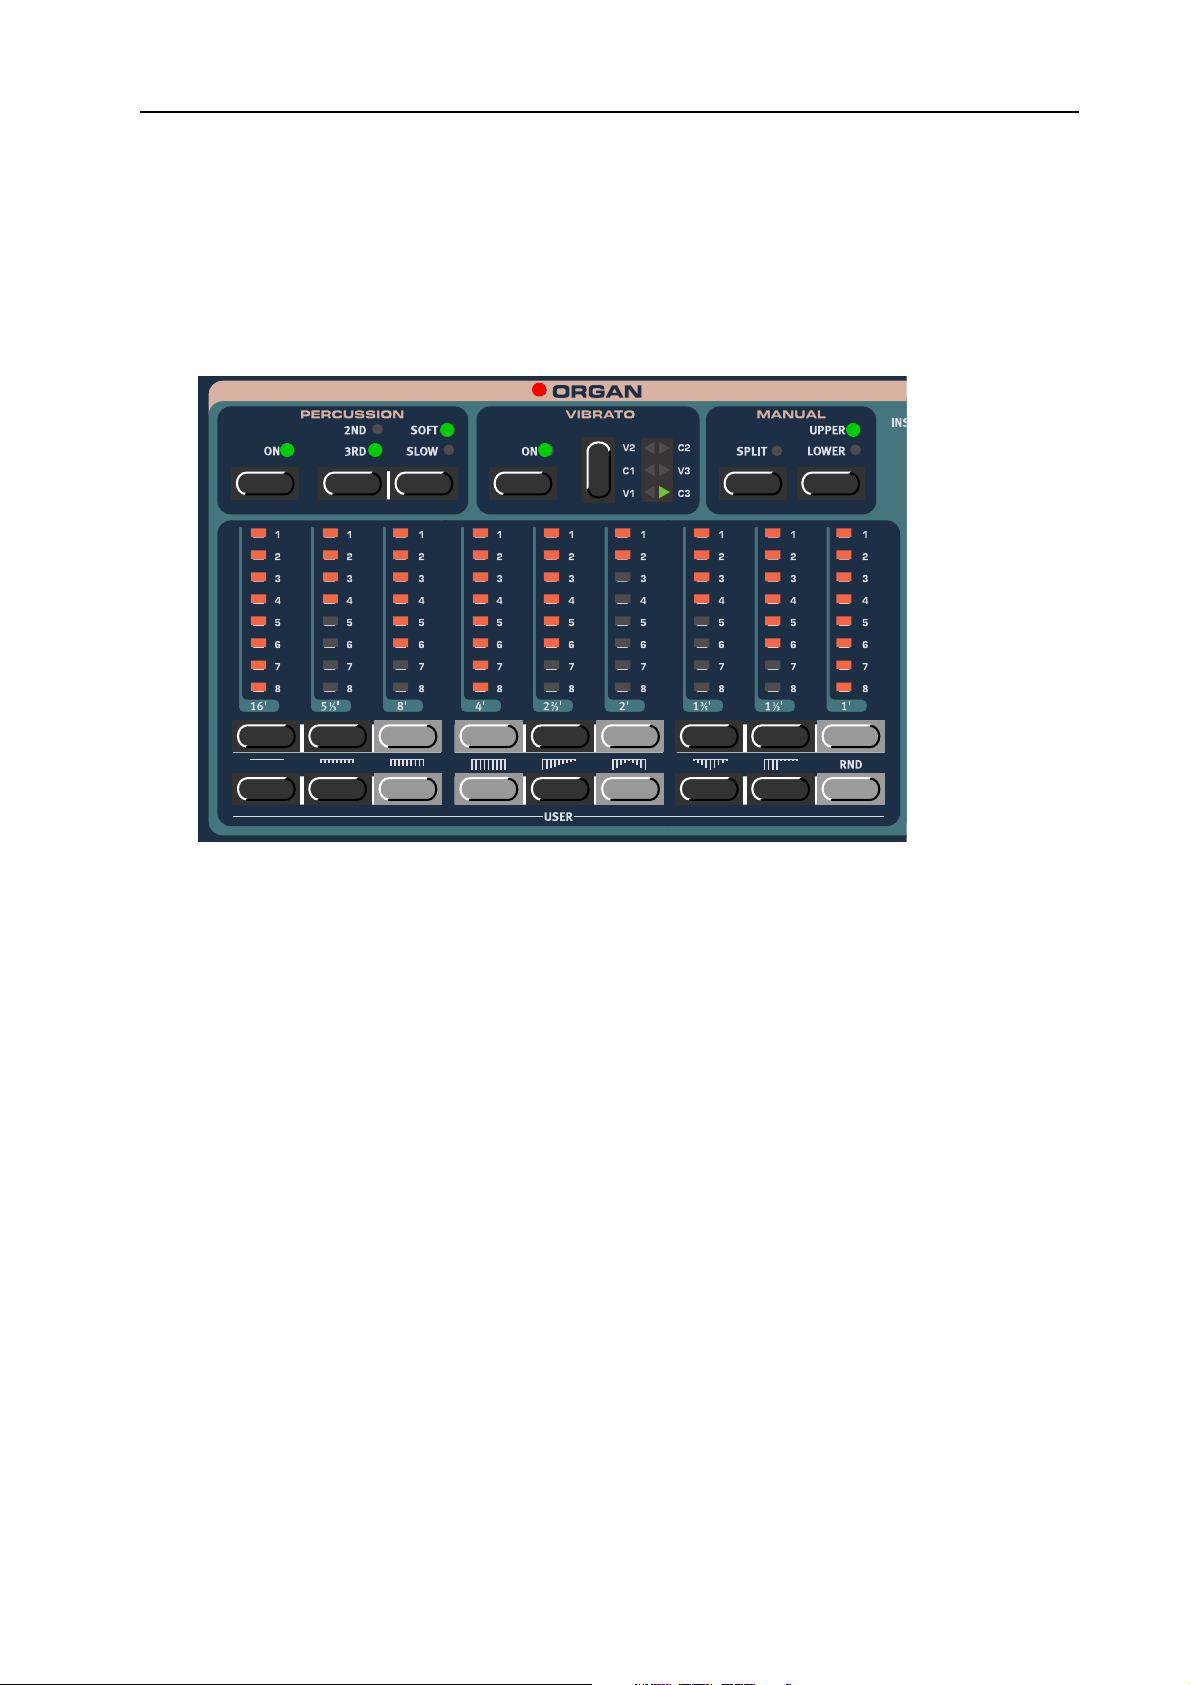
The Organ section comprises a number of sub groups which include all the functions found on the original B-3 organ, such as Percussion and Chorus/Vibrato.
Page 19
Page 22

5. Panel reference: The Organ section NORD ELECTRO 2 V2.0x
TTTT
DDDD
HHHHEEEE
The drawbars of Nord Electro 2 are represented by buttons and LED chain graphs instead of ordinary
mechanical drawbars. This gives you a big advantage: when you change presets or Programs, the correct
drawbar settings are recalled immediately and shown by the LEDs. In other words, no need for the regular
’trial and error’ method. It’s very easy to get the hang of changing the drawbar settings in a natural way
with the buttons.
The drawbars of Nord Electro 2
behave similar to their mechanical counterparts, i.e. you “pull
out” the drawbars by pressing the
L
“push them back in” by pressing
the U
The D
cial in the way that they auto-increment/decrement the drawbar
value when held. I.e. if you hold a
D
sponding drawbar value will continue to increment or decrement
(within its range) until you release
the button. Each drawbar represents a partial. The numbers
printed below each D
LED C
inally, the B-3 was created to
mimic a church organ. The numbers on the B-3’s drawbars referred to pipe sizes on a church organ. That’s why it, for example, says 16’, 5 1/3’ etc. It corresponds to
the church organ’s pipe length in foot. In the figure above you can see the pitch interval among the nine
drawbars. Note that the second drawbar from the left actually lies a 5th above the basic partial. However,
in most situations it’s perceived as sounding below the basic partial. When you play different notes on the
keyboard, the whole partial “package” is being transposed up or down with the fixed intervals.
RRRRAAAAWWWWBBBBAAAARRRRSSSS
OWER DRAWBAR
PPER DRAWBAR
RAWBAR
RAWBAR
HAIN
buttons are spe-
button the corre-
have a history. Orig-
buttons and
buttons.
RAWBAR
In the figure above we have chosen C3 as our reference note. The 8’ drawbar
is considered the basic partial in the organ sound. The arrows point at the respective note that each drawbar represents when C3 is our reference note.
DDDD
RRRRAAAAWWWWBBBBAAAARRRR
Below the U
D
RAWBAR
PPPPRRRREEEESSSSEEEETTTTSSSS
PPER
buttons are printed 8
drawbar presets
plus RND (Random). Press
SHIFT
+ the corresponding U
PPER DRAWBAR
button to select one of these presets. There are 8 different
drawbar presets plus the ‘Random drawbar settings’ function. The Random function generates a new random preset every time you activate it.
Page 20
Page 23

NORD ELECTRO 2 V2.0x 5. Panel reference: The Organ section
UUUU
SSSSEEEERRRR
DDDD
RRRRAAAAWWWWBBBBAAAARRRR
PPPPRRRREEEESSSSEEEETTTTSSSS
There are 9 user
configurable
drawbar presets
in addition to the
9 fixed ones described above.
These are located on the L
D
RAWBAR
TTTTOOOORRRREEEE
SSSS
button to select one of the nine user configurable presets.
YYYYOOOOUUUURRRR
OOOOWWWWNNNN
OWER DRAWBAR
RRRRAAAAWWWWBBBBAAAARRRR
D
D
D D
button row. Press S
PPPPRRRREEEESSSSEEEETTTTSSSS
To store your own drawbar preset, do like this:
1. Press the U
PPER DRAWBAR
OWER DRAWBAR
and L
buttons to create the drawbar preset you want to
store.
2. Press S
HIFT
+ S
TORE
(USER STORE) + one of the L
OWER DRAWBAR
for your preset.
PPPP
EEEERRRRCCCCUUUUSSSSSSSSIIIIOOOONNNN
In the original B-3 the Percussion effect is generated by a single envelope generator that controls either the 2nd or 3rd partial. The envelope “opens up” for a short moment in the beginning of the sound
when you press the key(s). The Percussion effect can be set to control
either the 2nd or 3rd partial. The envelope decay time can be set to
Fast or Slow and the volume characteristics to Normal or Soft. You
activate and deactivate the Percussion effect by pressing the O
ton.
N
HIFT
+ the corresponding L
buttons to select a location
but-
OWER
(The horizontal dotted
lines represent the current
drawbar level without
Percussion)
The figure above shows the Percussion envelope
in SOFT mode
The figure above shows the Percussion
envelope in NORMAL mode
Like on the original B-3, the Percussion is a single-triggered non-legato effect. By “single-triggered” we
mean that the percussion is only present when you hit the keys when no other note is sounding. In other
words, if you play a note or a chord and then add on more notes without releasing the previously pressed
keys, there will be no percussion effect in the new notes. You have to release all keys to be able to play
new notes with the percussion effect. Also, like on the original B-3, in Normal Percussion mode the sustain level is significantly lower than in Soft Percussion mode (or with the Percussion effect disabled).
Page 21
Page 24

5. Panel reference: The Organ section NORD ELECTRO 2 V2.0x
VVVV
IIIIBBBBRRRRAAAATTTTOOOO
The original B-3 chorus and vibrato scanner consists of a tapped delay line
in combination with a rotating scanner. For the Vibrato effect, phase shift
is applied to the signal. For the Chorus effect, the phase modulated signal
is added to the original signal. A lot of time and effort have been spent in
accurately recreating the chorus and vibrato scanner effect. Like on the
original, Nord Electro 2 offers three different types of choruses (C1-C3)
and three different types of vibratos (V1-V3). Select one of these types by
pressing the S
ton.
MMMM
AAAANNNNUUUUAAAALLLL
In the Manual section you can choose to split the Nord Electro 2 keyboard into
two sections, the Lower Manual and the Upper Manual. Each Manual can have
its own drawbar, percussion and chorus/vibrato settings. If you don’t use the
Split function you will only have access to the Upper Manual settings from the
internal keyboard.
ELECTOR
button. You activate and deactivate the Vibrato section by pressing the ON but-
EEEEYYYYBBBBOOOOAAAARRRRDDDD
KKKK
Press the S
PPPPLLLLIIIITTTT
SSSS
PLIT
button to divide the Nord Electro 2 keyboard into two sections, the Lower Manual and
Upper Manual sections. The split point on the keyboard is between the keys E4 and F4 (Nord Electro 2
61) and between the keys B3 and C4 (Nord Electro 2 73). This is indicated on the front panel with a
gray triangle pointing between the keys.
PPPPPPPPEEEERRRR
UUUU
AAAANNNNDDDD
L
L
L L
OOOOWWWWEEEERRRR
Press the corresponding button to “highlight” the settings for the respective Manual. Each Manual can
have its own drawbar, chorus/vibrato (on/off) and Octave Shift settings. If you don’t use the Split function, or use an additional MIDI keyboard (see below), you will only be able to play the Upper Manual
from the internal keyboard. Note that the Percussion effect can only be used for the Upper Manual in
any situation.
SSSSIIIINNNNGGGG
UUUU
“L
“L
“L“L
KKKKEEEEYYYYBBBBOOOOAAAARRRRDDDD
OOOOWWWWEEEERRRR
AAAANNNN
AAAADDDDDDDDIIIITTTTIIIIOOOONNNNAAAALLLL
AAAANNNNUUUUAAAALLLL
M
M
M M
” MIDI
” MIDI
” MIDI ” MIDI
As a special feature of Nord Electro
2 you can connect a second keyboard via MIDI In to use as a Lower Manual keyboard. This way you
can play the internal keyboard as
the Upper Manual and the additional MIDI keyboard as the Lower Manual. Since the organ has full
polyphony you’ll have this also
when using an additional Lower
Manual MIDI keyboard! Do like this to set up the Nord Electro 2 for use with a second keyboard:
1. Connect the additional MIDI keyboard’s MIDI Out to the Nord Electro 2’s MIDI I
2. Select a MIDI channel on the external keyboard.
Page 22
N
.
Page 25

NORD ELECTRO 2 V2.0x 5. Panel reference: The Organ section
3. Select the same MIDI channel on the Nord Electro
2 by first pressing S
HIFT
+ P
ROGRAM
CH) buttons and then scroll with the U
N
AVIGATOR
buttons.
Note: The MIDI channel set for reception of the additional MIDI keyboard should be different from the
“public” MIDI Channel (see “MIDI Ch” on page 33).
If the MIDI CH and LOWER CH are the same, playing the additional keyboard would produce a layered
sound of the Upper Manual and Lower Manual sounds
together. This is normally not what you want.
2 (LOWER
P/DOWN
4. Press any button (except for the S
buttons) to exit.
CCCCOOOONNNNTTTTRRRROOOOLLLL
(
(
FFFFRRRROOOOMMMM
( (
SSSS
WWWWEEEELLLLLLLL
U
P/DOWN
HIFT
, S
TORE
or
EEEEXXXXPPPPRRRREEEESSSSSSSSIIIIOOOONNNN
PPPPEEEEDDDDAAAALLLL
))))
Swell is the characteristic B-3 volume function that you control from the B-3’s pedal. Swell is not only a
volume control - it also changes the character of the sound in a special way. To use Swell control on the
Nord Electro 2, simply plug in a standard resistive expression pedal to the C
ONTROL PEDAL
input on
the rear panel (see “Connecting pedals” on page 9).
Note that the expression pedal will only control Swell on Organ sounds - not the volume on Piano
sounds. Also, if you use Wah-Wah as modulation effect (see “Wah-Wah 1&2” on page 29), the ex-
pression pedal will instead control the Wah-Wah effect and not Swell.
RRRR
OOOOTTTTAAAARRRRYYYY
S
S
PPPPEEEEAAAAKKKKEEEERRRR
S S
The Rotary Speaker simulation in Nord Electro 2 can be found in the Effects section. The reason for this is that you can use it also for Piano sounds. The Rotary
Speaker simulation is really something above the ordinary. It’s not only simulating
the rotating speaker and drum but also the built-in amplifier of the original Leslie
122 speaker.
Activate or deactivate the Rotary Speaker simulation by pressing the O
Switch between fast and slow rotor speeds by pressing the F
AST
button. To stop the
rotors (but not disabling the Rotary Speaker simulation), press the S
When you press the S
had when you first pressed S
TOP
button again the rotors will accelerate to the speed they
TOP
.
N
TOP
button.
button.
OOOOTTTTOOOORRRR
RRRR
By plugging in a sustain pedal in the R
from a pedal. It’s also possible to use a sustain pedal connected to the S
SSSSPPPPEEEEEEEEDDDD
CCCCOOOONNNNTTTTRRRROOOOLLLL
FFFFRRRROOOOMMMM
PPPPEEEEDDDDAAAALLLL
OTOR SPEED PEDAL
input you can control the speed selection
USTAIN PEDAL
input to control
the speed selection. Please refer to “Config” on page 36 for information on how to set up Nord Electro
2 for operation with sustain/switch pedals.
Page 23
Page 26

5. Panel reference: The Organ section NORD ELECTRO 2 V2.0x
KKKK
EEEEYYYY
CCCCLLLLIIIICCCCKKKK
On an original B-3 organ, the key click produced by the
random contact bounces is actually an artifact. This artifact later became quite desirable an effect amongst musicians. In the Nord Electro 2 you can select the amount
of key click that should be present in the organ sounds.
The key click level is global for all organ sounds in the
Nord Electro 2.
CCCCOOOONNNNTTTTRRRROOOOLLLL
1. Hold down S
ton twice. The D
HIFT
and press the P
ISPLAY
ROGRAM
reads ‘C.8’ where ‘C’ stands
8 but-
for ‘Click’ and ‘8’ for the current click level.
2. Select key click level by scrolling with the U
D
OWN NAVIGATOR
buttons. ‘C.0’ means mini-
mum key click level and ‘C.9’ maximum level.
3. Press any button (except for the S
OOOO
UUUUTTTTPPPPUUUUTTTT
RRRROOOOUUUUTTTTIIIINNNNGGGG
((((
HHHHAAAARRRRDDDD
HIFT
PPPPAAAANNNN
TORE
))))
, S
If you want to process your sound using external effects,
it can be convenient to route Organ and Piano sounds
to separate outputs of the Nord Electro 2. Note that the
Output routing is not saved, so you will have to reconfigure after power off.
1. Hold down S
HIFT
ton three times. The D
and press the P
ISPLAY
reads ‘H.0’ where ‘H’
ROGRAM
8 but-
stands for ‘Hard pan’ and ‘0’ that both Organ and
Piano sounds are routed to L
O
UT
without separation.
EFT OUT
and R
/
P
or UP/D
IGHT
buttons) to exit.
OWN
2. Select ‘separate outputs’ by pressing the U
GATOR
button so the D
ISPLAY
means that Organ sounds will be output only
through the L
through the R
EFT OUT
IGHT OUT
and Piano sounds only
. Note that any stereo effect you apply to a sound internally will be in
mono in ‘H.1’ mode.
3. Press any button (except for the S
Page 24
P NAVI
reads ‘H.1’. ‘H.1’
HIFT
, S
TORE
or UP/D
-
buttons) to exit.
OWN
Page 27
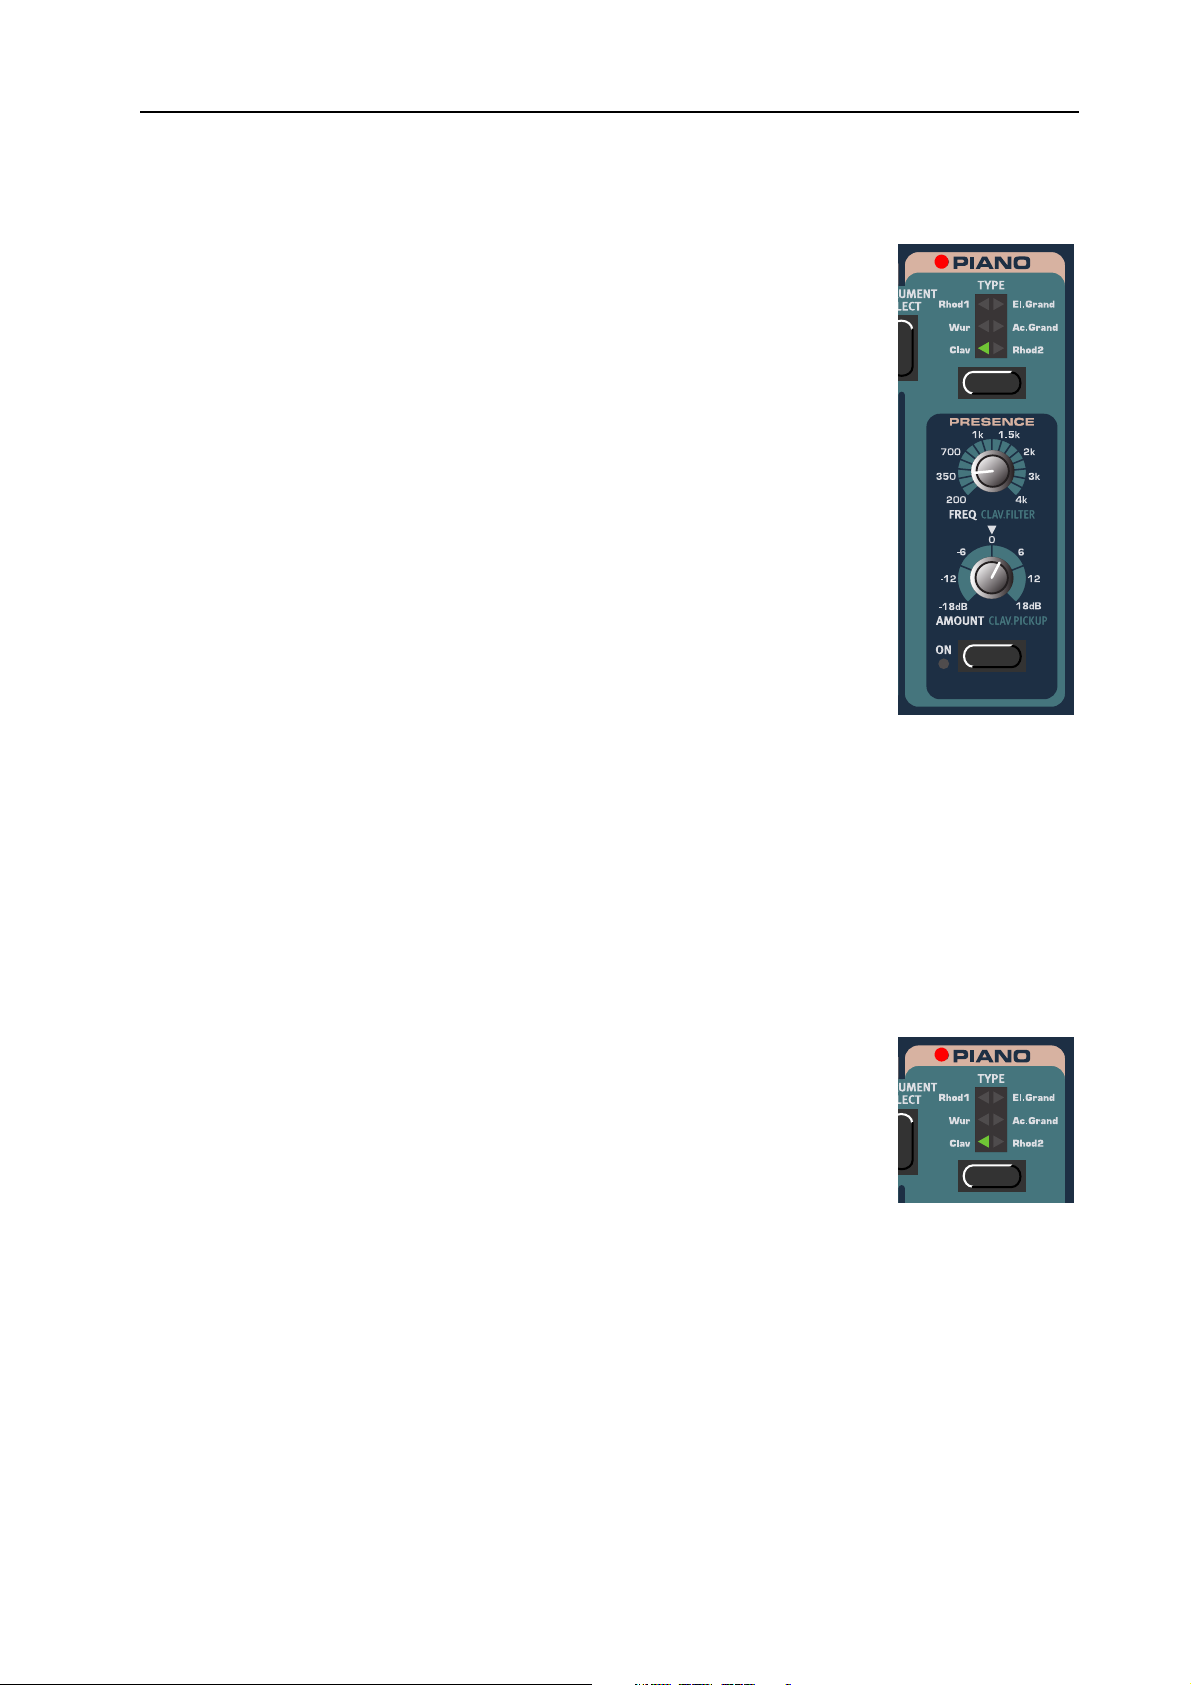
NORD ELECTRO 2 V2.0x 5. Panel reference: The Piano section
TTTT
P
P
HHHHEEEE
IIIIAAAANNNNOOOO
P P
The Piano section of Nord Electro 2 comprises a selection of electromechanical
pianos. Nord Electro 2 features a unique multi-sample playback, catching every
nuance from soft to hard key strokes. Each piano instrument was carefully multisampled in a vast amount of velocity levels. That’s one of the reasons they all
sound and feel so authentic. As an extra bonus we also included an acoustic grand
piano (concert model) - in stereo! Nord Electro 2 comes from factory with the
following piano instruments:
• Mega Clavinet D6 (Clav) including all the possible filter and pick-up combi-
nations of the original Clavinet D6. 60 + 4 different Clavinet sounds out of a
single instrument!
• Wurlitzer 200A (Wur)
• Rhodes Mk I Stage Piano SeventyThree (Rhod1). It was built in May 1978
and was adjusted to “deep timbre adjustment”. The so called volume adjustment is set to ‘Low’. These settings gives the piano a warm sound with a rich
fundamental
• Clavia Electric Grand Model G (El.Grand). The ‘Model G’ is a custom modified 1934 Gärbstedt
acoustic grand piano fitted with CP-80 pick-ups. The Model G produces a very rich and “punchy”
rock piano sound that sounds great across the entire note range
SSSSEEEECCCCTTTTIIIIOOOONNNN
• A Malmsjö acoustic grand piano, sampled and played back in stereo (Ac.Grand)
• Rhodes Mk I SeventyThree Suitcase (Rhod2). It was built in January 1975. We have fine tuned the
mechanics and adjusted the tines according to the “ideal timbre adjustment”. The so called volume
adjustment is set to ‘Close’. These settings gives the piano a sound with a lot of “bite”
TTTT
YYYYPPPPEEEE
Press the T
panel are printed names of the piano instruments loaded from factory. Since all
piano samples are stored in Flash memory you can easily add and/or replace the
stored piano instruments with new ones (see “Downloading Piano instruments
via USB” on page 39). You can download any piano sound to any of the six loca-
tions, i.e. you are not restricted to the configuration printed on the panel. For example, you could have six different Rhodes sounds (when available) in your
Electro 2 at the same time if you like.
YPE
button to select a piano instrument. On the Nord Electro 2 front
Page 25
Page 28

5. Panel reference: The Piano section NORD ELECTRO 2 V2.0x
PPPP
RRRREEEESSSSEEEENNNNCCCCEEEE
The Presence section features a parametric EQ with frequency and amount controls. Use it if you’d like to amplify or attenuate frequency bands of the piano in-
REQ
N
knob.
struments. Activate and deactivate the Presence function by pressing the O
button and set the frequency to be amplified or attenuated with the F
With the A
Note that the Clavinet D6 instrument that comes with OS V2.0 makes use of
the Presence effect in a different way (se below).
MOUNT
knob you set the amplification/attenuation in dB.
PPPP
RRRREEEESSSSEEEENNNNCCCCEEEE
The Mega Clavinet (Clav) sound in the V2.0 factory library makes use of the
Presence section in a different way than the other piano sounds. On an original
Clavinet D6 you can select different pick-up and filter combinations by pressing
a number of rocker switches. This functionality is very faithfully simulated in the
Nord Electro 2 V2.0. It means that from the Mega Clavinet instrument in the
Electro 2 you can get all the 60 different Clavinet D6 sounds plus an additional
4 by selecting different pick-up and filter combinations! This is how it works:
The F
REQ
(sounding) combinations of the ‘Brilliant’, ‘Treble’, ‘Medium’ and ‘Soft’ filters of
the original D6. The filter combinations are described in the figure below.
WWWWIIIITTTTHHHH
knob works as a filter selector with which you can select one of the 15
TTTTHHHHEEEE
M
M
M M
EEEEGGGGAAAA
C
C
LLLLAAAAVVVVIIIINNNNEEEETTTT
C C
SSSSOOOOUUUUNNNNDDDD
By turning the
The filter combination number is briefly shown in the
FREQ
knob you select one of 15 Clavinet D6 filter combinations plus an additional Bypass variation.
Page 26
D
ISPLAY
as you turn the
FREQ
knob.
Page 29

NORD ELECTRO 2 V2.0x 5. Panel reference: The Piano section
A Clavinet D6 has two separate pick-ups, one on the “neck” and one on the “bridge”. By selecting either
one pick-up or both in different combinations you can alter the character of the sound quite drastically.
On the Mega Clavinet sound, the A
below
MOUNT
knob works as the pick-up selector according to the figure
By turning the
net D6 pick-up configurations. The pick-up configuration
number is briefly shown in the
A
The configurations are these:
C.b:
C.A:
d.A:
mental is almost cancelled and the sound becomes pretty thin
d.b:
OOOO
UUUUTTTTPPPPUUUUTTTT
RRRROOOOUUUUTTTTIIIINNNNGGGG
(
(
HHHHAAAARRRRDDDD
( (
PPPPAAAANNNN
))))
If you want to process your sound using external effects,
it can be convenient to route Organ and Piano sounds
to separate outputs of the Nord Electro 2. Note that the
Output routing is not saved, so you will have to reconfigure after power off.
A
MOUNT
MOUNT
knob.
Only the "bridge" pick-up; a bright sound.
Only the "neck" pick-up; a warm, less bright sound.
Both pick-ups on but 180 degrees out of phase; the funda-
Both pick-ups on and in phase; a very full sound
knob you select one of the four Clavi-
D
ISPLAY
as you turn the
1. Hold down S
HIFT
ton three times. The D
and press the P
ISPLAY
ROGRAM
reads ‘H.0’ where ‘H’
stands for ‘Hard pan’ and ‘0’ that both Organ and
Piano sounds are routed to L
O
UT
without separation.
EFT OUT
2. Select ‘separate outputs’ by pressing the U
GATOR
button so the D
ISPLAY
reads ‘H.1’. ‘H.1’
and R
P NAVI
means that Organ sounds will be output only
through the L
through the R
EFT OUT
IGHT OUT
and Piano sounds only
. Note that any stereo effect you apply to a sound internally will be in
mono in ‘H.1’ mode.
, S
3. Press any button (except for the S
HIFT
TORE
8 but-
IGHT
or UP/D
-
buttons) to exit.
OWN
Page 27
Page 30

5. Panel reference: The Effects section NORD ELECTRO 2 V2.0x
TTTT
E
E
HHHHEEEE
FFFFFFFFEEEECCCCTTTTSSSS
E E
The Effects section of Nord Electro 2 can be used for processing both Organ and Piano sounds. It’s fully
programmable and you can configure your effects separately for each Program. The Effects section consists of five sub groups:
SSSSEEEECCCCTTTTIIIIOOOONNNN
• Modulations. Offers six different types of modulations: Ring Modulation, Auto-Panning, Tremolo
Wah-Wah 1&2 and Auto-Wah.
• Effects. Offers three types of vintage style effects with two variations each: Phaser 1&2, Flanger 1&2
and Chorus 1&2.
• Overdrive. Simulates an overdriven tube amplifier.
• Rotary Speaker. Simulates a Leslie rotary speaker including its built-in amplifier
• Treble & Bass EQ. Offers treble and bass amplification/attenuation
In addition to the five sub groups there is also the O
of each of the Programs separately.
UTPUT LEVEL
control for adjusting the output level
Page 28
Page 31

NORD ELECTRO 2 V2.0x 5. Panel reference: The Effects section
MMMM
OOOODDDDUUUULLLLAAAATTTTIIIIOOOONNNNSSSS
The Modulations section offers six different types of modulation. You activate and
deactivate the Modulations section by pressing the O
IIIINNNNGGGG
OOOODDDD
MMMM
RRRR
Stands for Ring Modulation and is a type of modulation where two signals are multiplied with each other. The result is an inharmonic “bell like” sound. Herbie Hancock used this effect a lot in the ‘70s. In the Nord Electro 2 the Piano or Organ signal
is multiplied with an additional sinewave.
N
button.
R
knob you set the basic
ATE
MOUNT
knob you control
MOUNT
knob.
Set the sinewave pitch with the R
AAAANNNN
PPPP
With the
pitch of the additional sinewave.
With the A
the level of ring modulation.
ATE
knob and the amount of ring modulation with the A
The Pan is an auto panning modulation that smoothly pans the signal between the Left and Right outputs.
The filled curve indicates maximum
dashed curves indicate lower
pans between the Left and Right outputs as indicated in the figure.
A
You can control the rate and amount of panning with the R
A
MOUNT
ATE
MOUNT
values. The signal smoothly
and A
value and the
MOUNT
knobs.
RRRREEEEMMMMOOOOLLLLOOOO
TTTT
Tremolo modulation is basically an automatic volume control that continuously varies the output signal
volume. Tremolo is a commonly used modulation, especially on the Wurlitzer electric pianos.
Use the R
ATE
and A
MOUNT
is at maximum level at zero A
AAAAHHHH
AAAAHHHH
-W
-W
1&2
-W-W
1&2
1&2 1&2
WWWW
The filled curve indicates maximum
curves indicate lower
output level is constantly at maximum level (the straight dashed line).
A
MOUNT
A
MOUNT
values. At zero
knobs to control the Tremolo rate and depth. Note that the output volume
MOUNT
setting.
value and the dashed
A
MOUNT
value the
The Wah-Wah modulation is often used for electric guitars to get that characteristic “talking guitar”
sound. Wah-Wah can also be extremely useful on electric piano sounds. Try out the Clavinet sound with
Page 29
Page 32

5. Panel reference: The Effects section NORD ELECTRO 2 V2.0x
Wah-Wah modulation and you’ll understand. Basically, the Wah-Wah modulation is a lowpass type of
filter that can be swept across the frequency range. During the sweep, the filter’s characteristics also
changes.
For the Wah-Wah1 modulation you control the “pedal position” with the R
quency sweep range with the A
with the R
ATE
knob and the total frequency sweep range with the A
Note: If you use an expression pedal connected to the C
MOUNT
knob. For the Wah-Wah2 modulation you control the LFO rate
MOUNT
ONTROL PEDAL INPUT
ATE
knob and the total fre-
knob.
you can control the
filter sweep and thus the Wah-Wah1 effect from the pedal. Also note that if you’re already using an
expression pedal for Organ Swell control (see “Swell control (from expression pedal)” on page 23), the
Wah-Wah function takes precedence and automatically disables the Swell control.
AAAA
UUUUTTTTOOOO
----WWWW
AAAAHHHH
Auto-Wah is a variation of the Wah-Wah modulation described above. The difference is that here you
control the filter sweep range, and thus the Wah-Wah effect, from the signal’s amplitude envelope. For
the Auto-Wah modulation you control the attack time with the R
A
MOUNT
EEEE
FFFFFFFFEEEECCCCTTTTSSSS
knob.
ATE
knob and the sensitivity with the
Nord Electro 2 offers six types of vintage style effects to add that extra flavour to
your sounds. Activate or deactivate the Effects section by pressing the O
HHHHAAAASSSSEEEERRRR
PPPP
1&2
1&2
1&21&2
N
button.
The phaser effect is a very characteristic “sweep” effect and is frequently used in all
sorts of music. You control the rate of the phase shift with the R
phase shift amount with the A
MOUNT
knob.
ATE
knob and the
LLLLAAAANNNNGGGGEEEERRRR
FFFF
1&2
1&2
1&2 1&2
The flanger effect is another type of very characteristic “sweep” effect. It’s quite similar to the phaser effect but has a little different characteristics. You set the flanging
rate 7with the R
HHHHOOOORRRRUUUUSSSS
CCCC
1&2
1&2
1&21&2
ATE
knob and the amount with the A
MOUNT
knob.
The Chorus effect simulates the appearance of several slightly detuned signals. You
set the rate for the chorus effect with the R
A
MOUNT
knob. Note that the Chorus2 effect is in stereo.
ATE
knob and the amount with the
Page 30
Page 33

NORD ELECTRO 2 V2.0x 5. Panel reference: The Effects section
OOOO
VVVVEEEERRRRDDDDRRRRIIIIVVVVEEEE
The Overdrive effect is a simulation of an overdriven tube amplifier. It’s very useful
both on Organ and Piano sounds. Activate or deactivate the Overdrive effect with
the O
N
button and set the overdrive amount with the A
MOUNT
knob.
RRRR
OOOOTTTTAAAARRRRYYYY
S
S
PPPPEEEEAAAAKKKKEEEERRRR
S S
The Rotary Speaker simulation in Nord Electro 2 is really something above the ordinary. It’s not only simulating the rotating speaker and drum but also the built-in
amplifier of the original Leslie speaker.
Activate or deactivate the Rotary Speaker simulation by pressing the O
Switch between fast and slow rotor speeds by pressing the F
rotors, press the S
TOP
button (this does not deactivate the Rotary Speaker simulation - it only stops the rotors). When you press the S
will accelerate to the speed they had when you first pressed S
OOOOTTTTOOOORRRR
RRRR
By plugging in a sustain pedal in the R
SSSSPPPPEEEEEEEEDDDD
CCCCOOOONNNNTTTTRRRROOOOLLLL
FFFFRRRROOOOMMMM
PPPPEEEEDDDDAAAALLLL
OTOR SPEED PEDAL
AST
button. To stop the
TOP
button again the rotors
TOP
input you can control the speed selection
from a pedal. It’s also possible to use a sustain pedal connected to the S
N
button.
.
USTAIN PEDAL
input to control
the speed selection. Please refer to “Config” on page 36 for information on how to set up Nord Electro
2 for operation with sustain/switch pedals.
OOOO
UUUUTTTTPPPPUUUUTTTT
The O
LLLL
EEEEVVVVEEEELLLL
UTPUT LEVEL
knob controls the individual output volume for each P rogram.
It’s fully programmable for each Program and sends/receives MIDI CC# 7 (Main
Volume).
Note: The Output Level is always active even if no other sub groups of the Effects
section are active.
Page 31
Page 34

5. Panel reference: The left panel section NORD ELECTRO 2 V2.0x
TTTT
RRRREEEEBBBBLLLLEEEE
The last group of the effects section is a 2-band equalizer which features controls for
bass and treble. Activate or deactivate the equalizer by pressing the O
just the treble and bass with the corresponding K
are fully programmable for each Program.
TTTT
HHHHEEEE
The left panel section features controls for Program
handling, system functions, MIDI functions etc.
There, you’ll also find the Octave Shift and Transpose functions.
MMMM
AAAASSSSTTTTEEEERRRR
The M
from the two O
put. The M
ceive any MIDI CC# but is used to control the
entire instrument’s output level. (For info on how
to control the level(s) of the individual sounds and
via MIDI, please refer to “Output Level” on
page 31).
& B
& B
& B & B
LLLLEEEEFFFFTTTT
LLLL
ASTER LEVEL
AAAASSSSSSSS
PPPPAAAANNNNEEEELLLL
EEEEVVVVEEEELLLL
knob controls the output level
UT
jacks and the H
ASTER LEVEL
NOBS
SSSSEEEECCCCTTTTIIIIOOOONNNN
EADPHONES
knob does not send or re-
out-
. The bass and treble settings
N
button. Ad-
NNNN
AAAAVVVVIIIIGGGGAAAATTTTOOOORRRR
The UP and D
for selecting Program Banks (A-F) and also for selecting system related functions (see “System func-
tions” on page 33).
DDDD
IIIISSSSPPPPLLLLAAAAYYYY
ISPLAY
The D
related functions described in the ‘System functions’ paragraph below.
SSSS
TTTTOOOORRRREEEE
The red S
system related operations.
PPPP
RRRROOOOGGGGRRRRAAAAMMMM
ROGRAM
The P
cessing the different system functions described below.
BBBBUUUUTTTTTTTTOOOONNNNSSSS
OWN NAVIGATOR
is mainly used for displaying Program Banks and Program numbers. It also displays system
TORE
button is used for storing Programs and Drawbar presets and also for executing various
BBBBUUUUTTTTTTTTOOOONNNNSSSS
buttons 1-8 are used for selecting Programs from the internal memory and also for ac-
buttons are used
Page 32
Page 35

NORD ELECTRO 2 V2.0x 5. Panel reference: System functions
OOOO
CCCCTTTTAAAAVVVVEEEE
The two O
can be used to transpose the notes two octaves up or down (if the selected
instrument supports this). A flashing O
2 octaves note shift.
Note: Due to the actual key range of the original Piano instruments,
some sounds cannot be octave shifted up and/or down. For organ sounds, the Octave Shift will only
generate notes that are within the 73-key note range of Nord Electro 2 73. This means that using Octave Shift for Organ sounds in Nord Electro 2 73 won’t produce any sound in the lowest or highest
octave.
TTTT
HHHHEEEE
To the right of the O
kinds of system functions etc.
SSSS
YYYYSSSSTTTTEEEEMMMM
To access the system functions, press and hold S
press the corresponding P
make in the system parameters are automatically stored in
Nord Electro 2, with some exceptions: ‘MIDI Local Off’,
‘Master Tune’, ‘Transpose’ and ‘Output routing (Hard
pan)’ are not stored.
S
S
S S
S
S
HHHHIIIIFFFFTTTT
S S
CTAVE SHIFT
HHHHIIIIFFFFTTTT
BBBBUUUUTTTTTTTTOOOONNNN
CTAVE SHIFT
FFFFUUUUNNNNCCCCTTTTIIIIOOOONNNNSSSS
buttons to the bottom left on the front panel
LED indicates +/-
HIFT
button. It’s used to access various
HIFT
and
ROGRAM
CTAVE SHIFT
buttons is the S
button. All changes you
MIDI C
MIDI C
MIDI CMIDI C
Press the S
the MIDI Channel function. Here you set the MIDI Channel for the Nord Electro 2 to send and respond to. Select
MIDI Channel with the U
Press any button (except for the S
D
OWN
Range: 1-16, -- (off)
Note: If the MIDI CH and LOWER CH (see below) are
set to the same number, incoming MIDI notes will produce a layered sound of the Upper Manual and Lower
Manual sounds together. This is normally not what you
want, so keep the channels separated from each other.
HHHH
HIFT
buttons) to exit.
+ P
ROGRAM
1 (MIDI CH) buttons to enter
P/DOWN NAVIGATOR
, S
HIFT
TORE
buttons.
or UP/
Page 33
Page 36

5. Panel reference: System functions NORD ELECTRO 2 V2.0x
LLLL
OOOOWWWWEEEERRRR
Press the S
C
C
C C
HHHH
HIFT
+ P
ROGRAM
2 (LOWER CH) buttons to
enter the Lower MIDI Channel function. Here you set the
MIDI channel for the Lower Manual of Nord Electro 2 Organ section to respond to. Select Lower MIDI Channel with
the U
P/DOWN NAVIGATOR
cept for the S
HIFT
, S
TORE
buttons. Press any button (ex-
or UP/D
buttons) to exit.
OWN
See “Using an additional “Lower Manual” MIDI keyboard”
on page 22 for more details on how to use an external “Low-
er Manual” MIDI keyboard.
Range: 1-16, -- (off)
Note: If the LOWER CH and MIDI CH (see above) are
set to the same number, incoming MIDI notes will produce a layered sound of the Upper Manual and Lower
Manual sounds together. This is normally not what you want, so keep the channels separated from
each other.
LLLL
OOOOCCCCAAAALLLL
Press the S
HIFT
+ P
ROGRAM
3 (LOCAL) buttons to enter
the MIDI Local on/off function. Here you set whether the
Nord Electro 2 keyboard and front panel controls should
control internal Programs or only send MIDI. Local On is
the normal “play mode”. In Local Off mode, the front panel
and keyboard actions are transmitted via MIDI only and
does not control the internal sound(s) at all. (The MIDI In
works as usual, though.)
Local Off should be used when you use a sequencer to
record and play back from Nord Electro 2. When using a sequencer, you connect the MIDI Out of Nord Electro 2 to
the sequencer’s MIDI In. Then, from the sequencer’s MIDI
Out back to the Nord Electro 2’s MIDI In. Since the sequencer echoes back incoming MIDI data, Nord Electro 2 will respond normally to your playing and
knob tweaking via the MIDI “loop”. If you use Local On in the sequencer setup described above, you
will get double-notes when you play: from the keyboard internally and via the MIDI “loop”. This is not
what you want. Therefore, always use Local Off together with sequencers.
Select Local On or Local Off with the U
S
HIFT
, S
TORE
or UP/D
buttons) to exit. Note that ‘Local Off’ is not saved, so you will have to
OWN
P/DOWN NAVIGATOR
buttons. Press any button (except for the
reconfigure after power off.
Page 34
Page 37
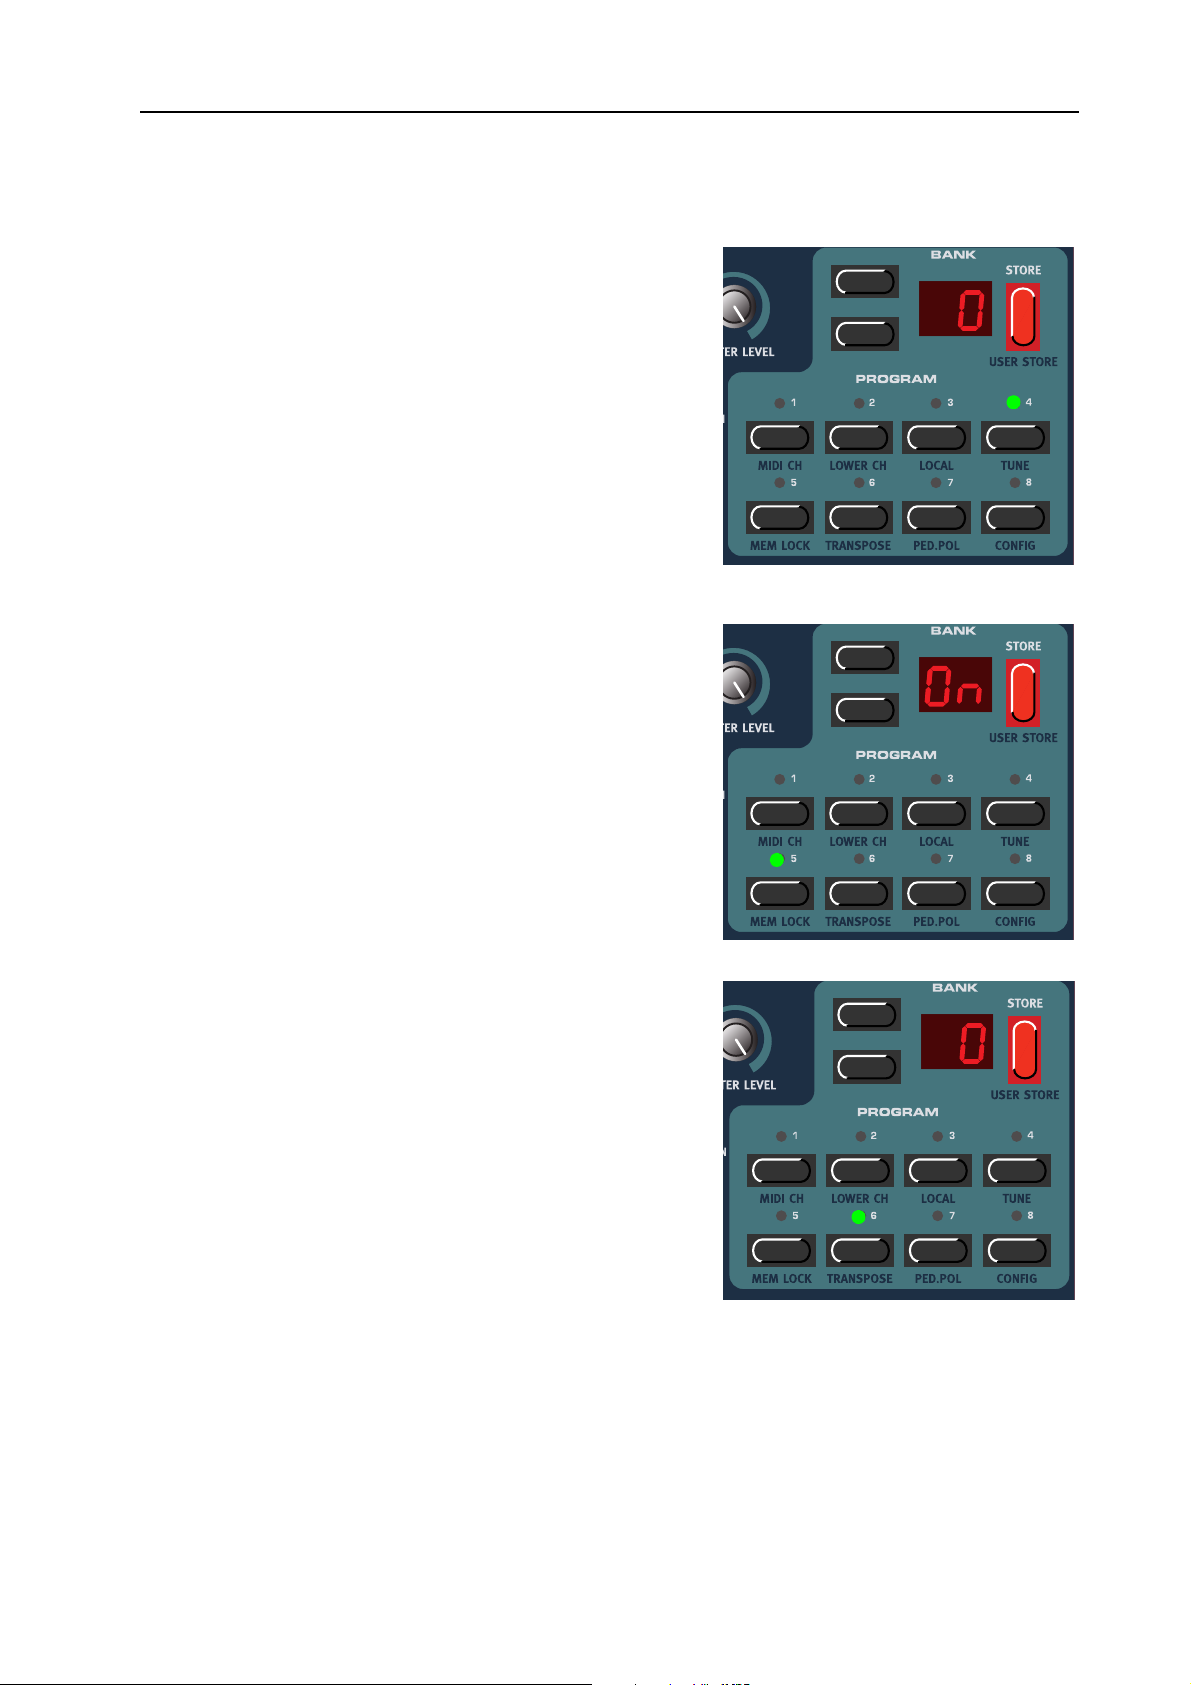
NORD ELECTRO 2 V2.0x 5. Panel reference: System functions
TTTT
UUUUNNNNEEEE
The Master Tune function is global for all sounds in Nord
Electro 2, i.e. changing it will affect all Programs. Press the
HIFT
S
+ P
ROGRAM
Tune function.
4 (TUNE) buttons to enter the Master
1. Change the master tune, in cents, with the U
N
AVIGATOR
buttons. ‘0’ is normal 440Hz tuning. The
P/DOWN
range is +/- 1 semitone in steps of 1 cent (hundreds of a
semitone).
2. Press any button (except for the S
MMMM
EEEEMMMM
Press the S
D
buttons) to exit.
OWN
L
L
OOOOCCCCKKKK
L L
HIFT
+ P
ROGRAM
5 (MEM LOCK) buttons to
HIFT
, S
TORE
or UP/
enter the Memory Lock function. Here you can choose to
memory protect all Programs of the internal memory. Select
Memory Protect ‘On’ or ‘OF’ with the U
TOR
buttons. Press any button (except for the S
S
TORE
or UP/D
buttons) to exit.
OWN
P/DOWN NAVIGA
HIFT
Note! When Nord Electro 2 is shipped from factory,
Memory Lock is set to ‘On’. To be able to store Programs
(and receive MIDI Sysex dumps), set Memory Lock to
‘OF’.
TTTT
RRRRAAAANNNNSSSSPPPPOOOOSSSSEEEE
The Transpose function is global for all sounds in Nord
Electro 2, i.e. changing it will affect all Programs. Press
S
HIFT
PLAY
ROGRAM
+ P
reads ‘0’. Press the U
6 (TRANSPOSE) buttons. The DIS-
P/DOWN NAVIGATOR
buttons to
transpose the sounds up or down in semitone steps. The
range is +/- 6 semitones in steps of 1 semitone. Notes sent to
MIDI O
the S
UT
are also transposed. Press any button (except for
HIFT
, S
TORE
or UP/D
buttons) to exit. Note that
OWN
the Transpose setting is not saved, so you will have to reconfigure after power off.
-
,
Note: Due to the actual key range of the original Piano instruments, the lowest keys may not produce any sound
when the instrument is transposed down. The same goes
for the highest keys when the instrument is transposed up. For organ sounds, the Transpose function
will only generate notes that are within the 73-key note range of Nord Electro 2 73, i.e. F1-F7. This
means that using the Transpose function for Organ sounds in Nord Electro 2 73 will cause the lowest
or highest notes of the keyboard to be silent.
Page 35
Page 38
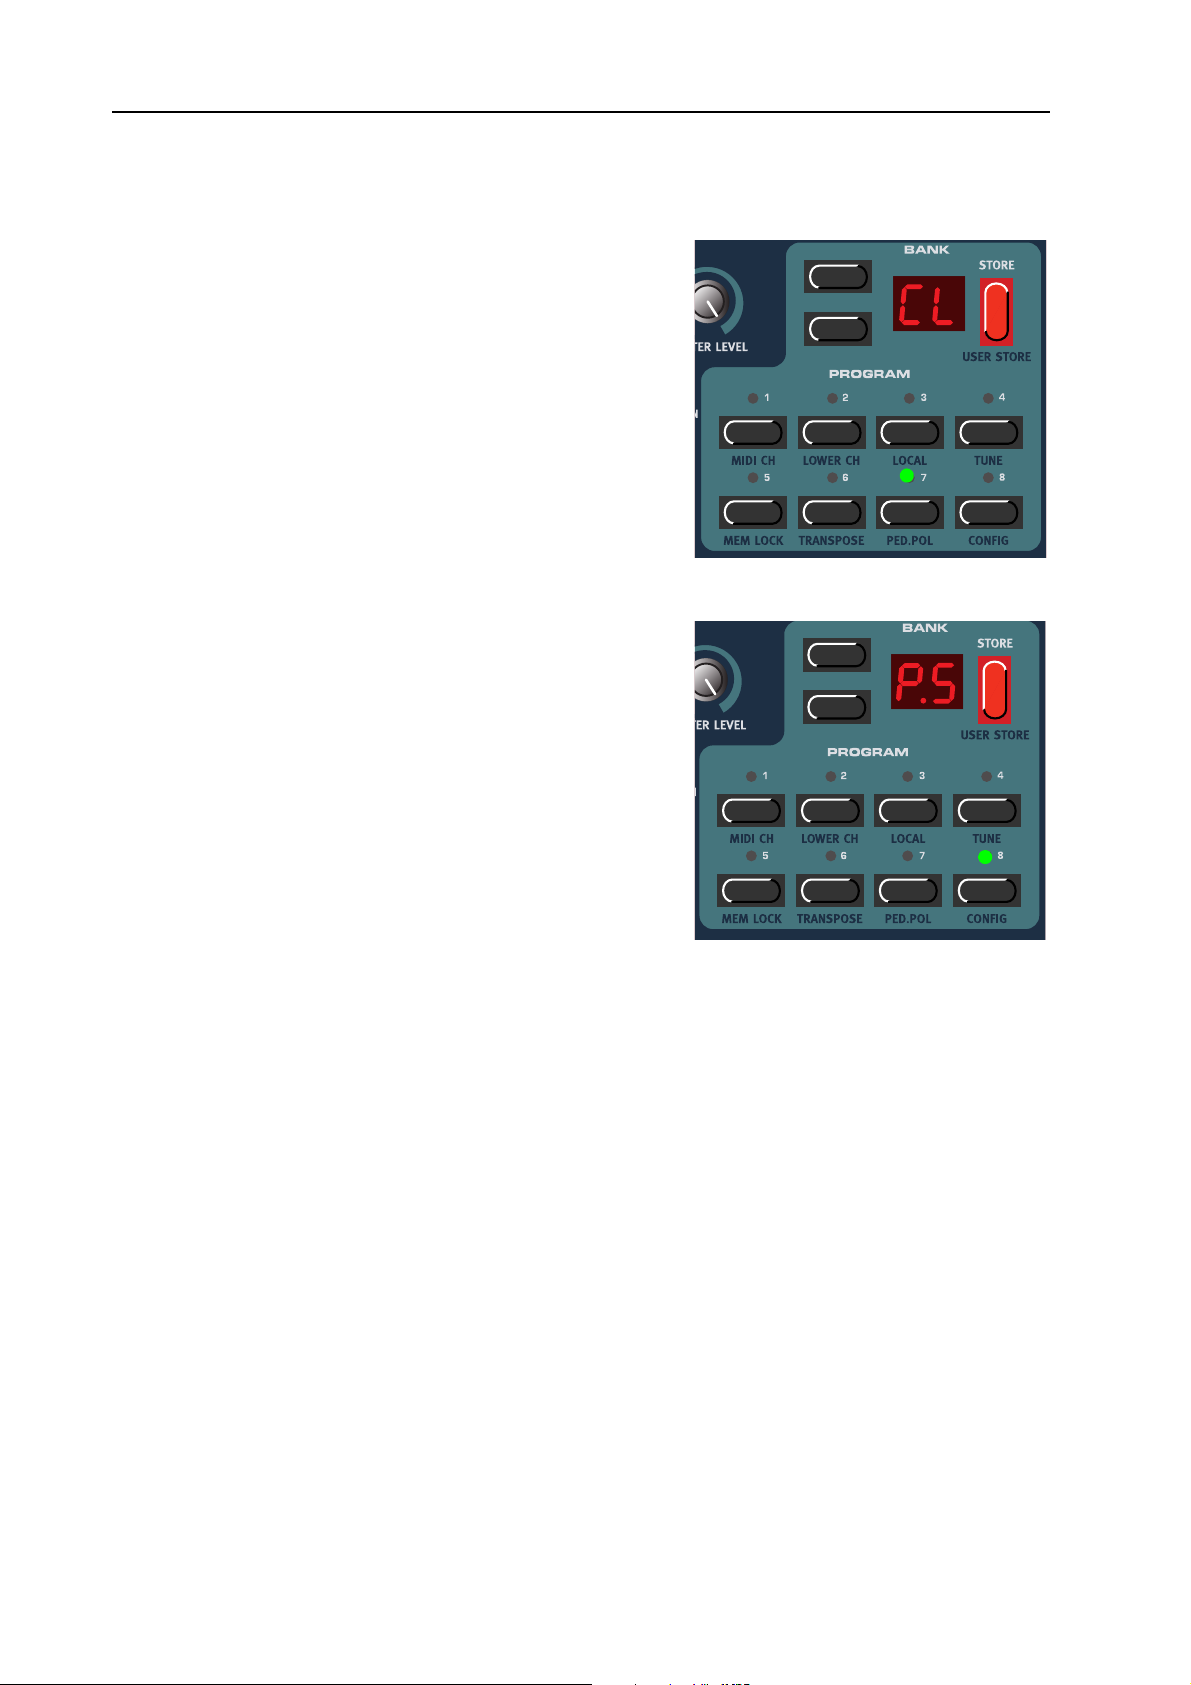
5. Panel reference: System functions NORD ELECTRO 2 V2.0x
PPPP
. P
. P
EEEEDDDD
Press the S
up the Sustain Pedal and Rotor Speed Pedal polarity.
Change pedal polarity between ‘OP’ (Open) (open when
pressed) and ‘CL’ (Closed) (closed when pressed) with the
U
for the S
Nord Electro 2 sends and receives Sustain Pedal messages as
MIDI CC# 64 and Rotor Speed Pedal messages as MIDI
CC#82.
CCCC
OOOONNNNFFFFIIIIGGGG
OOOOLLLL
. P. P
HIFT
P/DOWN NAVIGATOR
HIFT
, S
+ P
TORE
ROGRAM
or UP/D
7 (PED.POL) buttons to set
buttons. Press any button (except
buttons) to exit.
OWN
Press the S
HIFT
+ P
ROGRAM
8 (CONFIG) buttons once to
enter the Pedal Configuration function. Here you select
how you want to configure the S
USTAIN PEDAL
input.
There are two options:
1. If you’re using a single sustain pedal in the S
P
input you may want to use it for sustain with
EDAL
USTAIN
Piano sounds and as a Rotor Speed switch with Organ
sounds. In this case, select ‘P.t’ (Pedal toggle) with the
U
P/DOWN NAVIGATOR
(except for the S
HIFT
buttons. Press any button
, S
TORE
or UP/D
OWN
buttons) to
exit.
2. If you’re using two separate sustain pedals: one in the Sustain Pedal Input and one in the Rotor
Speed Input you probably want to use the sustain pedal in the S
USTAIN PEDAL
with Organ sounds. In this case, select ‘P.S’ (Pedal Sustain) with the U
tons. Exit by pressing any button (except for the S
HIFT
button).
P/DOWN NAVIGATOR
input for sustain also
but-
Note: It’s possible to use this configuration also if you’re only using a single sustain pedal in the
Sustain Pedal input. In that case you’ll have to control the Rotor Speed from the front panel.
Nord Electro 2 sends and receives Sustain Pedal messages as MIDI (CC# 64). Note! If you have selected
‘P.t’, Rotor Speed selection is sent from the sustain pedal as MIDI CC#82 - not CC#64!
Page 36
Page 39
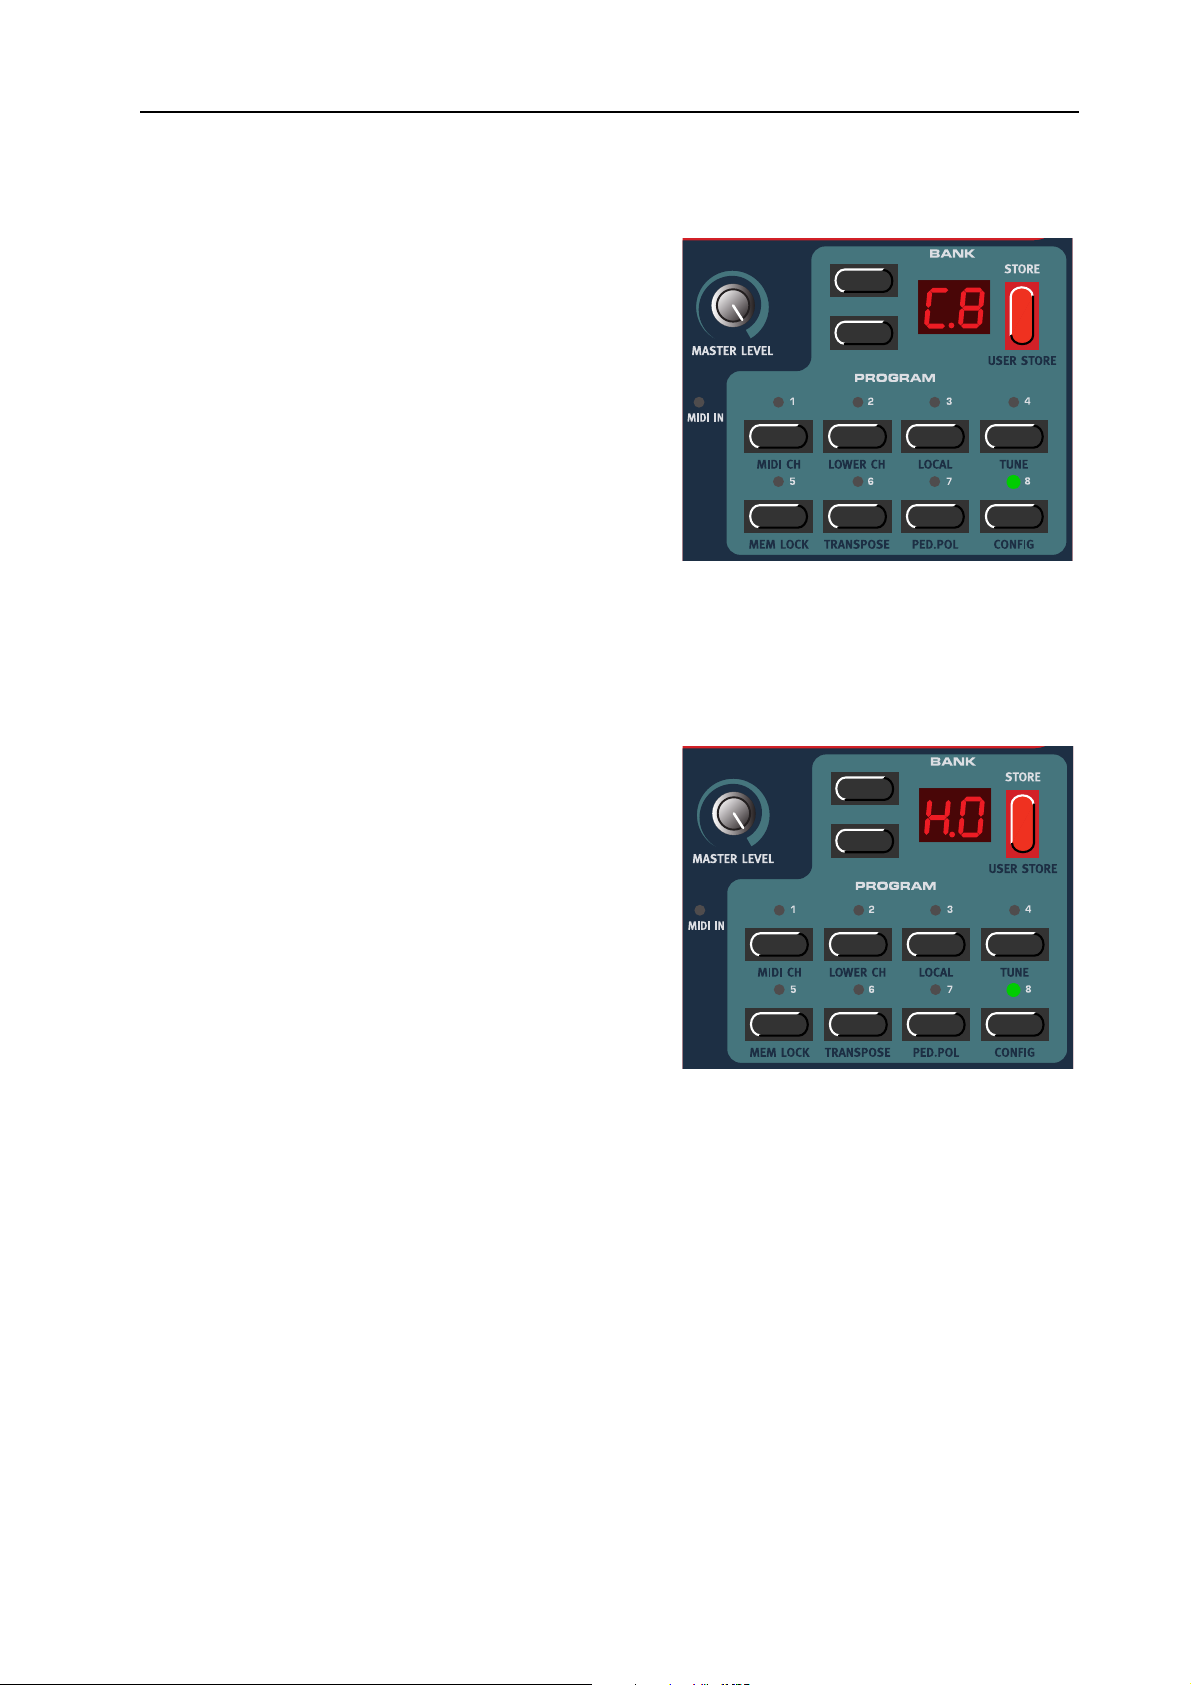
NORD ELECTRO 2 V2.0x 5. Panel reference: System functions
KKKK
EEEEYYYY
CCCCLLLLIIIICCCCKKKK
On an original B-3 organ, the key click produced by the
random contact bounces is actually an artifact. This artifact later became quite desirable an effect amongst musicians. In the Nord Electro 2 you can select the amount
of key click that should be present in the organ sounds.
The key click level is global for all organ sounds in the
Nord Electro 2.
CCCCOOOONNNNTTTTRRRROOOOLLLL
1. Hold down S
ton twice. The D
HIFT
and press the P
ISPLAY
ROGRAM
reads ‘C.8’ where ‘C’ stands
8 but-
for ‘Click’ and ‘8’ for the current click level.
2. Select key click level by scrolling with the U
D
OWN NAVIGATOR
buttons. ‘C.0’ means mini-
mum key click level and ‘C.9’ maximum level.
3. Press any button (except for the S
OOOO
UUUUTTTTPPPPUUUUTTTT
RRRROOOOUUUUTTTTIIIINNNNGGGG
(
(
HHHHAAAARRRRDDDD
( (
HIFT
PPPPAAAANNNN
TORE
))))
, S
If you want to process your sound using external effects,
it can be convenient to route Organ and Piano sounds
to separate outputs of the Nord Electro 2. Note that the
Output routing is not saved, so you will have to reconfigure after power off.
1. Hold down S
HIFT
ton three times. The D
and press the P
ISPLAY
reads ‘H.0’ where ‘H’
ROGRAM
8 but-
stands for ‘Hard pan’ and ‘0’ that both Organ and
Piano sounds are routed to L
O
UT
without separation.
EFT OUT
and R
/
P
or UP/D
IGHT
buttons) to exit.
OWN
2. Select ‘separate outputs’ by pressing the U
GATOR
button so the D
ISPLAY
reads ‘H.1’. ‘H.1’
means that Organ sounds will be output only
through the L
through the R
EFT OUT
IGHT OUT
and Piano sounds only
. Note that any stereo effect you apply to a sound internally will be in
mono in ‘H.1’ mode.
, S
3. Press any button (except for the S
HIFT
P NAVI
TORE
-
or UP/D
buttons) to exit.
OWN
Page 37
Page 40

5. Panel reference: System functions NORD ELECTRO 2 V2.0x
DDDD
UUUUMMMMPPPP
Press the S
HIFT
EFT OCTAVE SHIFT
+ L
to enter the Dump menu. Here you can perform a MIDI
Sysex dump of the currently selected Program or of all Programs of the internal memory. You can also perform a dump
of all MIDI Controllers for the selected Program. Select the
type of dump to perform by pressing the U
GATOR
buttons. ‘Pr’ in the D
ISPLAY
dump, ‘AL’ means All Programs dump and ‘Ct’ means
dump all MIDI Controllers of the currently selected Program. The selected dump type will flash in the D
you want to perform a MIDI Sysex dump of a single Program or of the MIDI Controllers of a Program, select it by
choosing Program Bank with the U
buttons and Program by pressing the corresponding P
GRAM
button. If you’re about to send all Programs (‘AL’) it
doesn’t matter which Program is selected. Press the S
button to send the dump to the MIDI O
2. The Display will stop flashing once the dump has been
sent.
(DUMP) buttons
P/DOWN NAVI
means a single Program
ISPLAY
. If
P/DOWN NAVIGATOR
-
RO
TORE
UT
of Nord Electro
-
Note: For Organ Sysex, the complete settings for the sound will be dumped as MIDI Sysex. For Piano
sounds, all parameters will be sent but NOT the actual instrument samples. Therefore, when dumping
back a Piano sound, make sure the actual instrument samples are already loaded in the Nord Electro
2. Otherwise the parameters in the Sysex message will be applied to another available Piano instrument.
A
A
A A
WWWWOOOORRRRDDDD
AAAABBBBOOOOUUUUTTTT
MIDI C
MIDI C
MIDI C MIDI C
OOOONNNNTTTTRRRROOOOLLLLLLLLEEEERRRR
DDDDUUUUMMMMPPPP
Consider a situation where you record a Controller message, e.g. a Drawbar opening, in the middle of
your sequencer song. Then you “rewind” the sequencer to a position before the recorded Drawbar opening. The problem is that the Nord Electro 2’s Drawbar will remain opened, although it really should be
as it was before you recorded the opening. To solve such problems, several sequencers include a function
called “Controller Chasing”, which keeps track of Controller changes and tries to adjust the settings on
the instrument according to the current position in the sequencer song.
However, in our example this wouldn’t help much, because the Drawbar opening was the first Controller
message recorded in the song. The sequencer has no information about the Drawbar setting before the
recorded change, and therefore cannot “chase” the settings properly. To solve this, you could record a
“snapshot” of all Controller settings of the Nord Electro 2 Program(s) at the beginning of your sequencer
song. In these situations you can use the ‘dump all MIDI Controllers’ function.
PPPP
AAAANNNNIIIICCCC
If notes should hang or the Electro 2 should behave strange in a MIDI
setup, for example, all you need to do is hold down the S
press the R
IGHT OCTAVE SHIFT
(PANIC) buttons. This will execute an
HIFT
button and
internal All Notes Off, and reset certain parameters to their default values.
Page 38
Page 41

NORD ELECTRO 2 V2.0x 6. Factory Presets and OS: Internal memory
6. F
6. FA
6. F6. F
ACCCCTTTTO
AA
OR
OO
RY
Y P
RR
YY
PR
P P
REEEESSSSEEEETTTTS
RR
S
A
SS
AN
ND
AA
NN
D OS
OS
DD
OS OS
IIII
NNNNTTTTEEEERRRRNNNNAAAALLLL
The Operating System, Programs and Piano samples in Nord Electro 2 are stored in a so-called Flash
memory. A Flash memory keeps the data also when the power is shut off. Another big advantage is that
you can replace data in the Flash memory at any time. This means that you will be able to download OS
upgrades and Programs to your Nord Electro 2 from a computer or sequencer without needing to replace
or add any new hardware. Nord Electro 2 also features a USB port for quick and easy download of new
Piano instrument samples.
The internal sound memory of Nord Electro 2 consists of 6 Banks (A-F) holding 8 Programs each for a
total of 48 Programs.
FFFF
AAAACCCCTTTTOOOORRRRYYYY
All factory Programs of Nord Electro 2 can be replaced. To make sure you don’t accidentally overwrite
Programs you want to keep, it’s a good idea to back up your sounds regularly on a computer or on a hardware sequencer that can record and play back MIDI Sysex. data. For information on how to back up Programs please refer to “Dump” on page 38.
RRRR
EEEESSSSTTTTOOOORRRRIIIINNNNGGGG
The factory Programs will be available as a MIDI Sysex file for download at the Clavia web site at
http://www.clavia.se. Please refer to “Receive MIDI Sysex Dumps” on page 43 for information on how
to restore the factory presets.
MMMMEEEEMMMMOOOORRRRYYYY
PPPPRRRREEEESSSSEEEETTTTSSSS
TTTTHHHHEEEE
FFFFAAAACCCCTTTTOOOORRRRYYYY
PPPPRRRREEEESSSSEEEETTTTSSSS
DDDD
OOOOWWWWNNNNLLLLOOOOAAAADDDDIIIINNNNGGGG
This function is supported in the V2.0 Nord Electro 2 operating system when you use the special Electro
Tool USB dump application. With the Electro Tool you will be able to download and add/replace/erase
piano sounds in the Flash memory of the Nord Electro 2. Please visit http://www.clavia.se/nordelectro/
software.htm to download the Electro Tool USB dump application for Mac and PC (Windows) - free of
charge!
OS
OS
OS OS
UUUUPPPPGGGGRRRRAAAADDDDEEEESSSS
The latest OS version for Nord Electro 2 will be available for download at http://www.clavia.se.
PPPP
IIIIAAAANNNNOOOO
IIIINNNNSSSSTTTTRRRRUUUUMMMMEEEENNNNTTTTSSSS
VVVVIIIIAAAA
USB
USB
USBUSB
Page 39
Page 42

7. MIDI functions: About the MIDI implementation NORD ELECTRO 2 V2.0x
7. MIDI
7. MIDI F
7. MIDI 7. MIDI
FU
UN
FF
UU
NCCCCTTTTIIIIO
NN
ON
OO
NSSSS
NN
AAAA
BBBBOOOOUUUUTTTT
The following MIDI messages can be transmitted and received from Nord Electro 2:
NNNN
OOOOTTTTEEEE
• Note On and Note Off messages are of course transmitted when you play the keyboard. If you use the
• Notes can be received over the entire MIDI Note range. However, due to the actual note range of the
PPPP
IIIITTTTCCCCHHHH
• Pitch Bend messages are neither transmitted nor recognized by the Nord Electro 2.
CCCC
OOOONNNNTTTTRRRROOOOLLLLLLLLEEEERRRRSSSS
• If you have an Control/Expression pedal connected to the C
TTTTHHHHEEEE
O
O
O O
O
CTAVE SHIFT
board ± 2 octaves (if the selected instrument supports this).
controlled instrument type, there will be silent notes when exceeding their ranges.
B
B
B B
ted and received as Controller 11 (Expression).
/O
/O
NNNN
/O/O
EEEENNNNDDDD
MIDI
MIDI
MIDI MIDI
FFFFFFFF
function (see “Octave Shift” on page 33), you can transpose the Nord Electro 2 key-
IIIIMMMMPPPPLLLLEEEEMMMMEEEENNNNTTTTAAAATTTTIIIIOOOONNNN
ONTROL PEDAL INPUT
, this is transmit-
• If you have a sustain pedal connected to the S
Controller 64 (Sustain Pedal).
• If you have a sustain pedal connected to the R
Controller 82.
• All other controls (knobs and buttons) on the front panel (except M
ted and received as Control Change messages. This can be used to record your actions on the front
panel into a MIDI sequencer. For a full list of which parameters correspond to which Controller
number, see the MIDI implementation chapter on page 44.
KKKK
EEEEYYYYBBBBOOOOAAAARRRRDDDD
Nord Electro 2 can transmit and receive Keyboard Velocity messages. Note that incoming Keyboard Velocity data is ignored when in Organ mode. Organ sounds will always be played back at nominal level
regardless of incoming MIDI Velocity data.
PPPP
RRRROOOOGGGGRRRRAAAAMMMM
When you select a Program, a Program Change message is transmitted via MIDI on the selected MIDI
Channel. If a Program Change message is received on the selected MIDI Channel, Nord Electro 2 will
change Program accordingly. The 48 Program locations send and respond to Program Change values 047 where 0 is Program A1 and 47 is Program F8.
V
V
EEEELLLLOOOOCCCCIIIITTTTYYYY
V V
C
C
HHHHAAAANNNNGGGGEEEE
C C
USTAIN PEDAL INPUT
OTOR SPEED INPUT
, this is transmitted and received as
, this is transmitted and received as
ASTER LEVEL
), are also transmit-
Page 40
Page 43

NORD ELECTRO 2 V2.0x 7. MIDI functions: Using Nord Electro 2 with a sequencer
MIDI S
MIDI S
MIDI SMIDI S
Single Programs or all Programs can be transmitted and received as a System Exclusive dump (see
“Dump” on page 38.).
YYYYSSSSEEEEXXXX
(S
(S
(S (S
YYYYSSSSTTTTEEEEMMMM
E
E
XXXXCCCCLLLLUUUUSSSSIIIIVVVVEEEE
E E
))))
UUUU
SSSSIIIINNNNGGGG
CCCC
OOOONNNNNNNNEEEECCCCTTTTIIIIOOOONNNNSSSS
LLLL
OOOOCCCCAAAALLLL
MIDI
MIDI
MIDI MIDI
N
N
OOOORRRRDDDD
N N
1. Connect the MIDI Out on the Nord Electro 2 to the MIDI In on your sequencer.
2. Connect the MIDI Out from your sequencer to the MIDI In on the Nord Electro 2.
O
O
/O
/O
NNNN
O O
/O/O
If your sequencer “echoes” all received MIDI signals via its MIDI output(s), the Nord Electro 2 should
be set to Local Off. This is important because otherwise you will get “double-notes”; from the internal
keyboard and via the MIDI loop. See “Local” on page 34.
CCCCHHHHAAAANNNNNNNNEEEELLLL
1. Set up Nord Electro 2 so that it transmits/receives on the desired MIDI channel. See “MIDI Ch” on
page 33 for details on how to set up the MIDI channel.
2. Select the desired Program.
3. If needed, set the sequencer up to record and play back on the desired MIDI Channel.
FFFFFFFF
E
E
LLLLEEEECCCCTTTTRRRROOOO
E E
2
2
2 2
WWWWIIIITTTTHHHH
AAAA
SSSSEEEEQQQQUUUUEEEENNNNCCCCEEEERRRR
4. Activate recording and play the Nord Electro 2.
PPPP
RRRROOOOGGGGRRRRAAAAMMMM
To record a Program Change message, activate recording in the sequencer and simply select a new Bank
(A-F) and Program (1-8) by using the U
48 Program locations send and respond to Program Change values 0-47 where 0 is Program A1 and 47
is Program F8.
CCCC
OOOONNNNTTTTRRRROOOOLLLLLLLLEEEERRRRSSSS
When you record knob movements and button presses, make sure that the sequencer “echoes” the changes back on the correct MIDI Channel, or your changes won’t have any effect.
SSSS
OOOOMMMMEEEE
Consider a situation where you record a Controller message, e.g. a Drawbar opening, in the middle of
your sequencer song. Then you “rewind” the sequencer to a position before the recorded Drawbar opening. The problem is that the Nord Electro 2’s Drawbar will remain opened, although it really should be
as it was before you recorded the opening. To solve such problems, several sequencers include a function
called “Controller Chasing”, which keeps track of Controller changes and tries to adjust the settings on
the instrument according to the current position in the sequencer song.
C
C
C C
NNNNOOOOTTTTEEEESSSS
HHHHAAAANNNNGGGGEEEE
AAAABBBBOOOOUUUUTTTT
P/DOWN NAVIGATOR
C
C
OOOONNNNTTTTRRRROOOOLLLLLLLLEEEERRRRSSSS
C C
AAAANNNNDDDD
buttons and the P
“C
“C
HHHHAAAASSSSIIIINNNNGGGG
“C “C
ROGRAM
””””
buttons. The
Page 41
Page 44
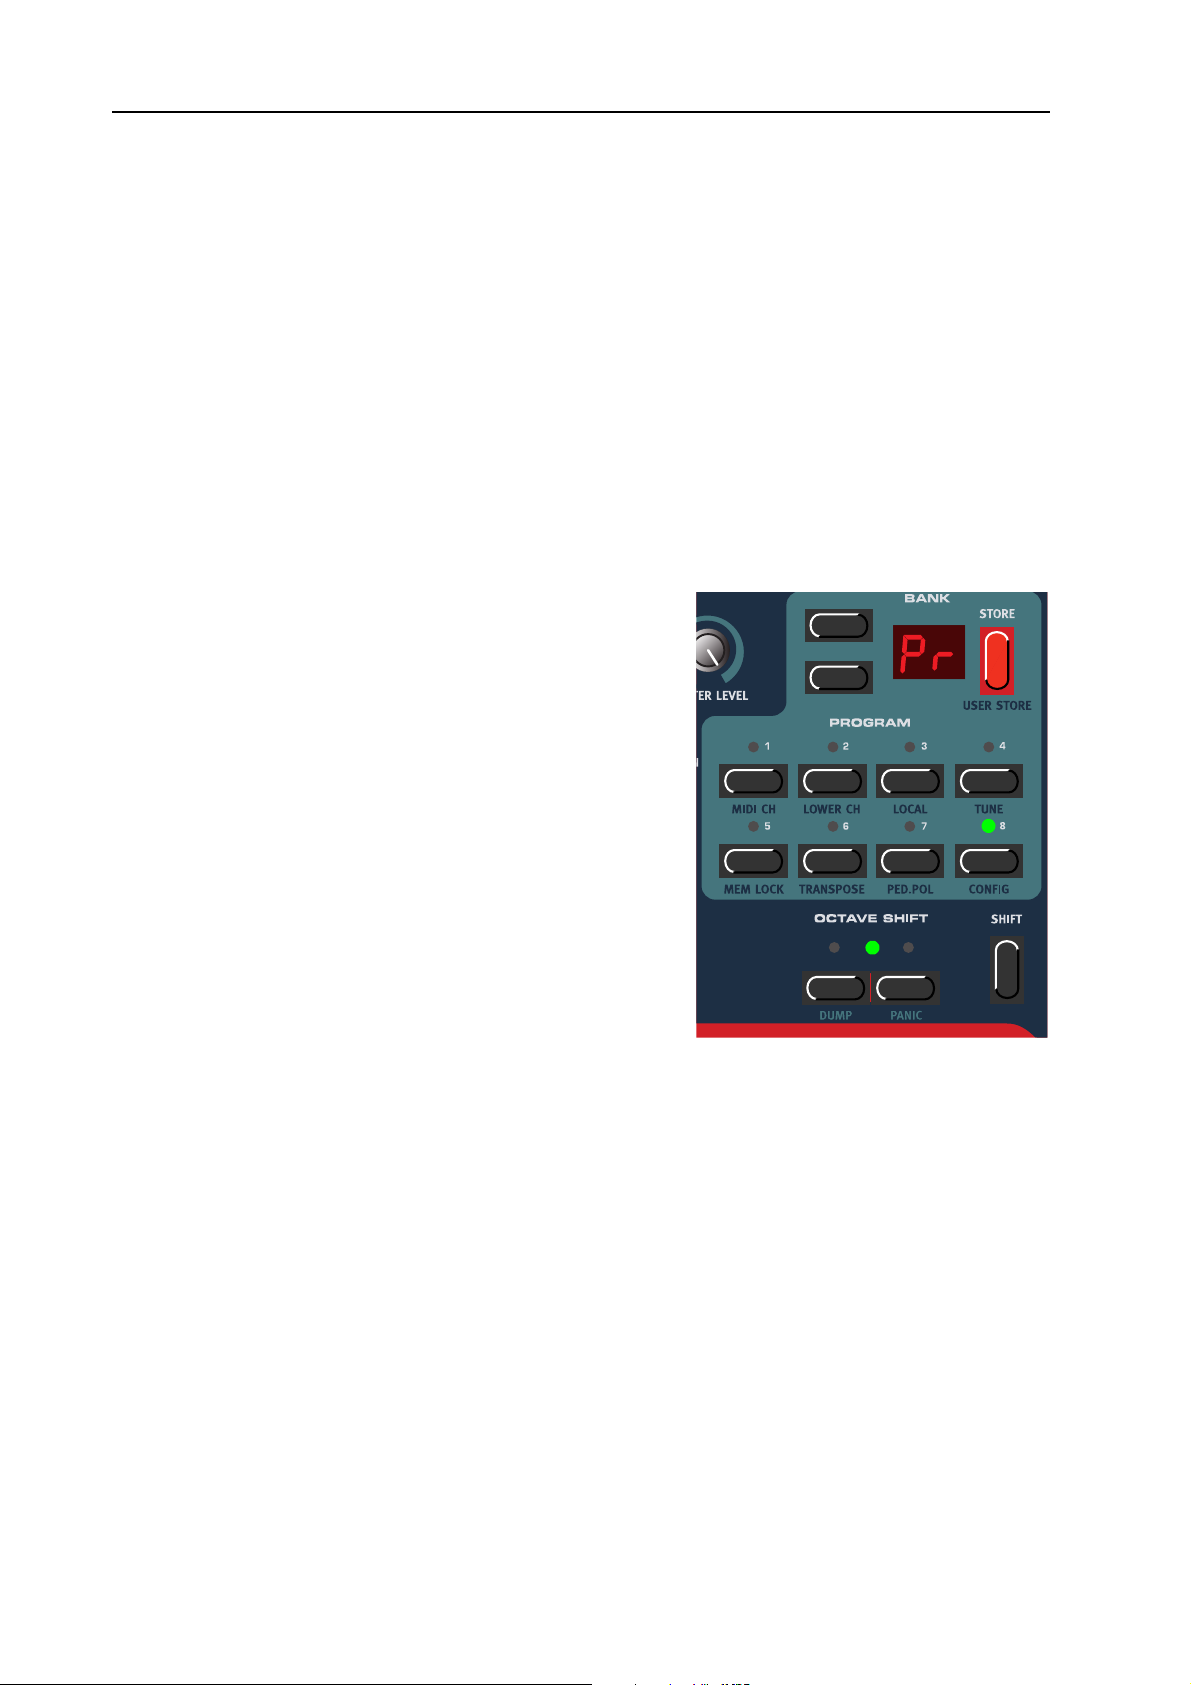
7. MIDI functions: Program and Controller dumps NORD ELECTRO 2 V2.0x
However, in our example this wouldn’t help much, because the Drawbar opening was the first Controller
message recorded in the song. The sequencer has no information about the Drawbar setting before the
recorded change, and therefore cannot “chase” the settings properly. To solve this, you could record a
“snapshot” of all Controller settings of the Nord Electro 2 Program(s) at the beginning of your sequencer
song. This can be done by using the ‘MIDI Controllers Dump’ function described below.
PPPP
RRRROOOOGGGGRRRRAAAAMMMM
To dump Program Sysex or MIDI Controllers via MIDI, to another Nord Electro 2 or for recording the
data into another MIDI device, do like this:
1. Connect a cable from MIDI O
2. Set up the receiving device so that it accepts MIDI Sysex and MIDI Controller data.
3. Press the S
the Dump menu. Select what to dump by pressing the
U
P/DOWN NAVIGATOR
D
ISPLAY
Programs Dump’ and ‘Ct’ means ‘MIDI Controllers
Dump’. If you’re about to dump a single Program or
MIDI Controllers for a Program, select the Program by
choosing Program Bank with the U
TOR
P
ROGRAM
4. If needed, set the receiving MIDI device to “recording
mode”.
AAAANNNNDDDD
HIFT
means ‘single Program Dump’, ‘Al’ means ‘All
buttons and Program by pressing the corresponding
button.
C
C
OOOONNNNTTTTRRRROOOOLLLLLLLLEEEERRRR
C C
EFT OCTAVE SHIFT
+ L
buttons. ‘Pr’ flashing in the
DDDDUUUUMMMMPPPPSSSS
UT
on the Nord Electro 2 to MIDI In on the receiving device.
buttons to enter
P/DOWN NAVIGA
-
5. Press the S
UT
O
once the dump has been sent.
Note: For Sysex dumps of Organ sounds, the complete settings for the sound will be dumped as MIDI
Sysex. For Piano sounds, all parameters will be sent but NOT the actual instrument samples. Therefore, when dumping back a Piano Sysex, make sure the actual instrument sound is already loaded in
the Nord Electro 2. Otherwise the parameters in the Sysex message will be applied to another available
Piano instrument. However, the Nord Electro 2 works in an intelligent way regarding substituting Piano sounds.Let’s say you dumped a Program Sysex based on the Rhod1 sound and then erased the
Rhod1 sound. When you load the Program Sysex back to the Electro 2, it will apply another available
Rhodes sound, the Rhod2 or Rhod3, for example. If no Rhodes sound is available, another piano
sound will be applied.
TORE
button to send the dump to the MIDI
of Nord Electro 2. The Display will stop flashing
Page 42
Page 45

NORD ELECTRO 2 V2.0x 7. MIDI functions: Program and Controller dumps
RRRR
EEEECCCCEEEEIIIIVVVVEEEE
To receive a MIDI Sysex Dump, do like this:
1. Connect a cable from the MIDI Out on the transmitting device to MIDI I
2. Initiate the transmission on the transmitting device.
If the dump contained all Programs (AL), it will replace all Programs currently stored in the Nord Electro
2. If the dump contained only a single Program (Pr), it will be temporarily placed in the currently selected
Program memory location. You will then have to store the Program manually to a memory location using
the Store function (see “Storing a Program” on page 17).
Note: For Organ sounds, the complete settings for the sound will be received with the MIDI Sysex file.
For Piano sounds, all parameters will be received but not the actual instrument samples. Therefore,
when receiving a Piano MIDI Sysex file, make sure the instrument samples are already present in the
Nord Electro 2. Otherwise the parameters of the Sysex file will be applied to another available Piano
instrument.
MIDI S
MIDI S
MIDI S MIDI S
YYYYSSSSEEEEXXXX
D
D
D D
UUUUMMMMPPPPSSSS
N
on the Nord Electro 2.
Page 43
Page 46

8. MIDI implementation: MIDI Controller list NORD ELECTRO 2 V2.0x
8. MIDI
8. MIDI I
8. MIDI 8. MIDI
MMMMIDI C
IDI C
IDI CIDI C
OOOONNNNTTTTRRRROOOOLLLLLLLLEEEERRRR
IM
MPPPPLLLLEEEEM
II
MM
LLLLIIIISSSSTTTT
MEEEEN
MM
NTTTTAAAATTTTIIIIO
NN
ON
N
OO
NN
The following is a list of the MIDI Controller numbers used for all K
panel. All parameters use the entire control range 0-127. For B
the range is divided into equally big “sections” depending on the number of states of the parameter. For
example, the M
equally large sections between the values 0 and 127.
Nord Electro 2 Parameter MIDI Controller # MIDI Controller Name
“Play Control” parameters:
Octave Shift Upper Manual (Organ) 27
Octave Shift Lower Manual (Organ) 28
Octave Shift (Piano) 29
Organ section parameters:
16’ Upper Drawbar 16
5 1/3’ Upper Drawbar 17
8’ Upper Drawbar 18
4’ Upper Drawbar 19
2 2/3’ Upper Drawbar 20
ODULATIONS
selector can have 6 different “positions” and are therefore divided into 6
NOBS
UTTONS
and for some other parameters
and B
UTTONS
on the front
2’ Upper Drawbar 21
1 3/5’ Upper Drawbar 22
1 1/3’ Upper Drawbar 23
1’ Upper Drawbar 24
16’ Lower Drawbar 70
5 1/3’ Lower Drawbar 71
8’ Lower Drawbar 72
4’ Lower Drawbar 73
2 2/3’ Lower Drawbar 74
2’ Lower Drawbar 75
1 3/5’ Lower Drawbar 76
1 1/3’ Lower Drawbar 77
1’ Lower Drawbar 78
Page 44
Page 47

NORD ELECTRO 2 V2.0x 8. MIDI implementation: MIDI Controller list
Nord Electro 2 Parameter MIDI Controller # MIDI Controller Name
Percussion Upper On/Off 87
Percussion Upper Fast/Slow, Normal/Soft 88
Percussion Upper 2nd/3rd 95
Vibrato Upper On/Off 85
Vibrato Lower On/Off 86
Vibrato Type 84
Manual Split On/Off 25
Manual Lower/Upper 26
Instrument Select Organ/Piano
13
Piano section parameters:
Piano Type* 12
Piano Sub Type* 44
Presence On/Off 102
Presence Frequency 30
Presence Amount 31
Effects section parameters:
Modulations Type 103
Modulations Rate 104
Modulations Amount 105
Modulations On/Off 106
Effects Type 107
Effects Rate 108
Effects Amount 109
Effects On/Off 110
Overdrive On/Off 112
Overdrive Amount 111
Rotary Speaker On/Off 81
Rotary Speaker Fast/Slow 82
Rotary Speaker Run/Stop 83
Output Level 7 Main Volume
Treble & Bass EQ On/Off 115
Page 45
Page 48
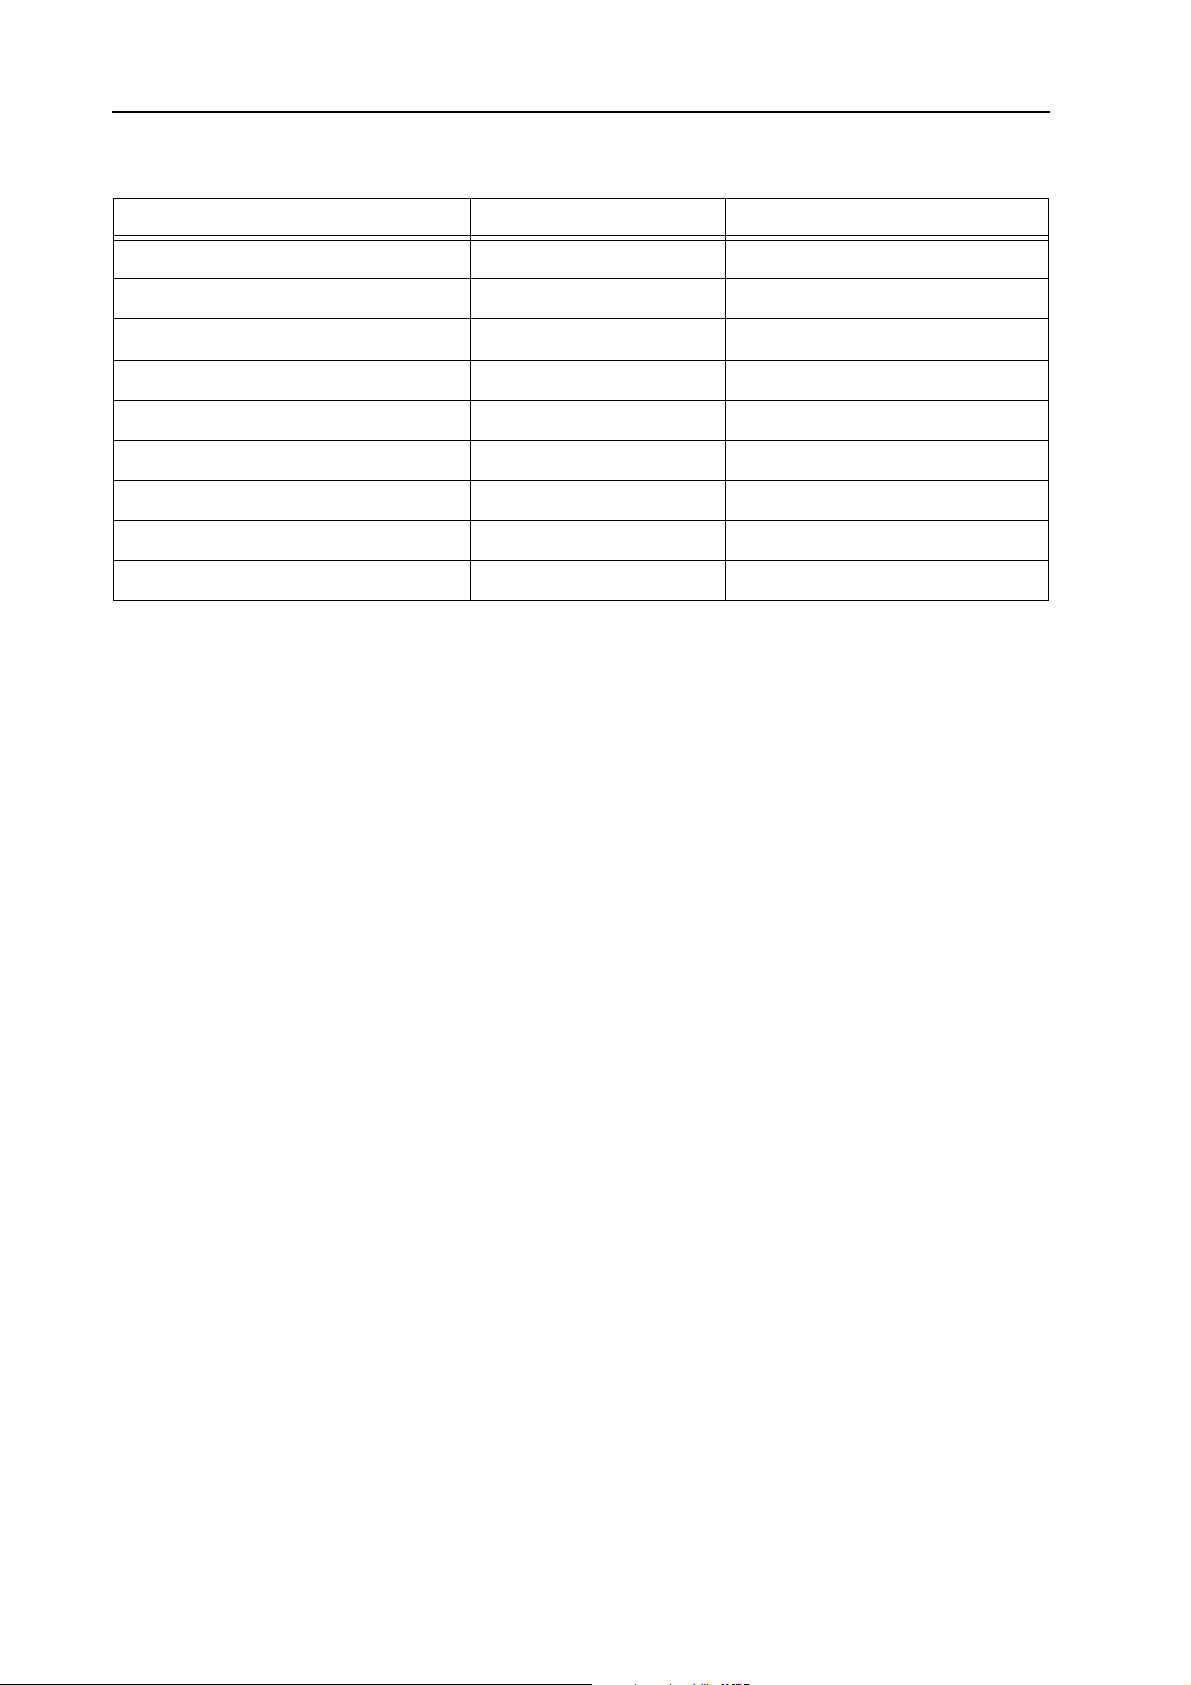
8. MIDI implementation: MIDI Controller list NORD ELECTRO 2 V2.0x
Nord Electro 2 Parameter MIDI Controller # MIDI Controller Name
Treble 113
Bass 114
Future Expansion parameters
Future Expansion #1 116
Future Expansion #2 117
Future Expansion #3 118
Future Expansion #4 119
Future Expansion #5 89
Future Expansion #6 90
* The parameters ‘Piano Type’ and ‘Piano Sub Type’ are used to define the exact type of Piano instrument
used and not its position in the T
YPE
selector.
In addition to the above, following MIDI Controllers are used:
• If an expression pedal is used in the C
• If a sustain pedal is used in the S
ONTROL PEDAL INPUT
USTAIN PEDAL INPUT
, it’s transmitted as Controller 11.
(and configured to be used for ‘Sustain’), it’s
transmitted as Controller 64 (Damper Pedal)
• If a sustain pedal is used in the R
OTOR SPEED INPUT
, or in the S
ured to be used for ‘Rotor Speed’), it’s transmitted as Controller 82.
USTAIN PEDAL INPUT
(and config-
Page 46
Page 49

NORD ELECTRO 2 V2.0x 8. MIDI implementation: MIDI Implementation Chart
MIDI I
MIDI I
MIDI IMIDI I
MMMMPPPPLLLLEEEEMMMMEEEENNNNTTTTAAAATTTTIIIIOOOONNNN
Model: Clavia Nord Electro 2 OS V2.0x Date: 2002-06-11
Function Transmitted Recognized Remarks
C
C
C C
HHHHAAAARRRRTTTT
Basic Default
Channel Channel
Default
Mode Messages
Altered
Note
Number True Voice
Velocity Note ON
Note OFF
Aftertouch Key
Channel
Pitch Bend ✕✕
Control Change OO See “MIDI Controller list” on
Program
Change True #
System Exclusive O O See the MIDI Implementation
System : Song Pos
: Song Sel
Common : Tune
1 – 16
1 – 16
Mode 3
✕
***********
29 – 101
***********
O v = 1 – 127OO v = 1 – 127
✕
✕
O 0 – 47 O 0 – 47
✕
✕
✕
1 – 16
1 – 16
Mode 3
✕
29 – 101
29 – 101
O
✕
✕
✕
✕
✕
incoming Velocity data ignored
in Organ mode
page 44.
section.
System : Clock
Real Time : Commands
Aux : Local ON/OFF
Mes- : All Notes Off
sages : Active Sense
: Reset
Notes
Mode 1: OMNI ON, POLY Mode 2: OMNI ON, MONO O: Yes
Mode 3: OMNI OFF, POLY Mode 4: OMNI OFF, MONO ✕: No
✕
✕
✕
✕
✕
✕
✕
✕
✕
✕
✕
✕
Page 47
Page 50

9. History: The story behind the Electro 2 instruments NORD ELECTRO 2 V2.0x
9. H
9. HI
9. H9. H
IS
STTTTO
II
SS
OR
RYYYY
OO
RR
TTTT
HHHHEEEE
SSSSTTTTOOOORRRRYYYY
The Nord Electro 2 is a stage keyboard focused on vintage instrument sounds -- specifically, sounds from
popular electromechanical keyboards produced from the '50s to the '70s. These instruments are no longer
in production, but they continue to play a remarkably important role in music today. In this chapter, we
will focus on these instruments. For those of you who aren't familiar with these instruments, we will give
you a description of the principals of each instrument and its basic design theory, as well as short histories
of the instruments. For all of you interested in digging even deeper into these instruments, we will recommend some nice literature to read further about them (see the end of this chapter).
WWWW
HHHH
HHHHAAAATTTT
OOOOWWWW
IIIISSSS
One in which some sort of electric pick-up system, either electromagnetic or electrostatic, detects and amplifies certain mechanical movements. The source of these movements can be a spinning tone wheel or
the vibrations of a reed, string, or tine.
DDDDOOOOEEEESSSS
The pick-up system in a Rhodes electric piano is electromagnetic. When you play a note on a Rhodes, a
metallic tine vibrates and changes the magnetic field around a coil that picks up the vibration. These vibrations are slightly amplified to create a musical tone.
The Hohner Clavinet has real strings inside. The vibrations of each string are picked up by an electromagnetic pick-up similar to the magnetic pick-ups of an electric guitar.
AAAANNNN
BBBBEEEEHHHHIIIINNNNDDDD
‘
‘
EEEELLLLEEEECCCCTTTTRRRROOOOMMMMEEEECCCCHHHHAAAANNNNIIIICCCCAAAALLLL
‘ ‘
AAAANNNN
EEEELLLLEEEECCCCTTTTRRRROOOOMMMMEEEECCCCHHHHAAAANNNNIIIICCCCAAAALLLL
TTTTHHHHEEEE
E
E
E E
LLLLEEEECCCCTTTTRRRROOOO
’
’
IIIINNNNSSSSTTTTRRRRUUUUMMMMEEEENNNNTTTT
’ ’
PPPPIIIICCCCKKKK
2
2
IIIINNNNSSSSTTTTRRRRUUUUMMMMEEEENNNNTTTTSSSS
2 2
????
----
UUUUPPPP
WWWWOOOORRRRKKKK
????
An electromagnetic pick-up system is also used in tone wheel Hammond organs such as the famous B-3.
A tone wheel is a rotating disc with notches around its edge. Positioned as close as possible to each of the
96 tone wheels in a B-3 is a magnetic pick-up. Every time a notch passes the pick-up, a change will occur
in the magnetic field, which will induce a small voltage in the pick-up. The number of notches in the
wheel and its rotation speed determine the pitch of the tone produced.
Wurlitzer electric pianos uses an electrostatic pick-up system. A DC voltage is applied between vibrating
reeds and a metal plate placed near the end of the reed. As the reed vibrates, it varies the capacitance between the metal plate and the reed. These changes will generate an electrical signal - the tone (see the
schematic figure to the right).
The Rhodes pick-up system The B-3 pick-up system The Wurlitzer pick-up system
pick-up tine
pick-up
rotating tone wheel
reed
metal plate
Page 48
Page 51

NORD ELECTRO 2 V2.0x 9. History: The story behind the Electro 2 instruments
TTTT
E
E
HHHHEEEE
LLLLEEEECCCCTTTTRRRROOOO
E E
The organ chosen for the task to be simulated was a
Hammond A-100. Except for its cabinet and the inclusion of a built-in sound system, the A-100 works the
same as Hammond's almighty rock 'n' roll organ, the
famous B-3. The Hammond organ was originally designed to be an alternative for churches instead of large
acoustic pipe organs. In the '30s, there was a growing
demand for more compact organs that sounded similar
to pipe organs because small churches couldn't afford
or didn't have the space to install a big pipe organ. The
Hammond organ was designed with drawbars for
sculpting the harmonic content of the organ sound.
They function much like stops on a pipe organ. This
was the standard, and so it became (see figure to the
bottom right of this page).
2
2
2 2
OOOORRRRGGGGAAAANNNN
SSSSEEEECCCCTTTTIIIIOOOONNNN
TTTT
HHHHEEEE
AAAAMMMMMMMMOOOONNNNDDDD
H
H
H H
Has any other keyboard instrument created as much interest as the Hammond organ? The model emulated by
the Nord Electro 2 is the B-3, the most popular version
of all Hammonds produced. Between their release in
1954 and 1974 when they went out of production,
nearly 275,000 B-3 and C-3 organs were built. (The C3 is identical to the B-3 except for its cabinet design;
Hammond didn't keep separate records for the two
models.) No other electric keyboard in the world has
exceeded that number -- so far.
It started in the early 1930s, when inventor Laurens Hammond was looking for different applications for a 60-cycle motor he had designed for his
clock factory. An earlier inventor named Thaddeus
Cahill had, at the beginning of the 20th century,
made an electromechanical instrument called the
Telharmonium, which later caught the attention
of Hammond. Although he wasn't a musician,
Hammond was attracted by the idea to build a
genuine electric musical instrument. Hammond
had a degree in mechanical engineering and had
developed great skill in mechanical design. In his
lab, Hammond and his assistants designed and
built an electromechanical organ based on Cahill's
principles. The basic components of the organ
were tone wheels and electromagnetic pick-ups,
and the instrument is acknowledged as being of excellent mechanical design for its time.
O
O
O O
RRRRGGGGAAAANNNN
OOOOMMMMPPPPAAAANNNNYYYY
C
C
C C
SSSSTTTTOOOORRRRYYYY
This is the Hammond A-100 organ that is simulated
by the Nord Electro 2. The A-100 is electrically similar to the B-3 and C-3 organs, but it features a different cabinet and has a built-in amplifier, speakers,
and spring reverb. This particular unit left the factory
on June 2, 1965. The A-100 was taken out of production four months later.
Page 49
Page 52

9. History: The story behind the Electro 2 instruments NORD ELECTRO 2 V2.0x
Hammond filed a patent for the tone wheel organ in 1934, and one
year later he introduced the first Hammond organ, the Model A. In
the patent, Hammond catalogues the numerous objects that contribute to the complete design. He lists 29 different features. Among
them you can find, for example, feature number 17, which states: "To
provide an instrument of the type which is relatively light in weight
and is portable." Wonder what roadies around the world have to say
about that!
This patent is the backbone of the whole organ line made by Hammond until 1974. The Model A was very expensive at the time, yet
the sales were impressive. The company grew steadily and, over time,
new models were released. Laurens Hammond was correct from the
start to have focused his market for the instrument on churches. He
saw a great potential there in sales, and many organ models had cabinets designed to fit the various religious services. Despite all-new
models, they had more or less the same tone-wheel concept, but with
different styles of cabinets, pedal board, speaker configuration, and
amplification. Hammond and his team continued to experiment with
different ways to deepen the sound, adding effects such as tremolo and
chorus.
The first page of the patent for the
tone wheel organ filed by Laurens
Hammond in 1934.
In 1954, Hammond introduced the B-3 model to the market. It became the best seller of all Hammond
organs. One of the secrets to the B-3's success was its sound, thanks to the integration of the newly developed chorus and tremolo features, as well as the introduction of the Percussion feature and reverberation. All this combined made musicians do a vast amount of new and exciting sounds to play with at the
time. The B-3 is still a very popular instrument and still in use around the world.
Here you can see the knob for selecting the A-100 organ's Vibrato and
Chorus effects. There are six different positions. All of these effects are
simulated in the Nord Electro 2. The rocker tabs control the Vibrato/
Chorus on/off status for the upper (Swell) and lower (Great) manuals.
The tab far to the left is a overall volume switch for the whole organ. This
particular function is not exactly implemented in the Nord Electro 2. Instead, there's a Master level knob.
On the right-hand side of the A-100, there are the Percussion tabs. These
are all simulated in the Nord Electro 2. The Percussion feature is a singletrigger/non-legato effect. Enabling the Percussion on/off switch disarms
the 1' drawbar on the A-100. In the Electro 2, the 1' tone will still be
available if desired. The idea with this effect was to add an attack transient to the tone of the organ. There was the choice to add an octave
above the fundamental (8') -- named the "second" harmonic -- or the octave and a fifth above -- named the "third" harmonic. The Slow/Fast tab defines the release envelope of the percussion effect. This is a great feature that was released in
1954, letting the player give an extra little edge to the solo parts he or she is playing.
Page 50
Page 53

NORD ELECTRO 2 V2.0x 9. History: The story behind the Electro 2 instruments
r
On the left-hand side of both manuals, Hammond tone wheel organs
have one octave of reverse-colored keys. These don't trigger notes; instead,
they call up preset drawbar settings. All tone wheel Hammonds have
double manuals.
What you see here isn't an original component on a Hammond organ;
it's an add-on. It's the controller switch for the Leslie rotating speaker
cabinet. Slow rotation speed is called Chorale, and fast speed is called
Tremolo. In the Nord Electro 2, the Leslie speaker effect is simulated
with this kind of controller. Its positions are called Fast and Slow.
This is the inside of the famous Vibrato
and Chorus scanner. It was designed by
John Hanert, Hammond's #1 engineer.
Hanert was the designer of many patented components in Hammond tone
wheel organs. The scanner was attached
to the drive shaft that all of the tone
wheels were fit upon, just behind the
main motor.
The main motor
The vibrato/
chorus scanner
The tone wheel
assembly box
The spring reverb
The tube amplifier
for the speakers
The drawbars
The speakers
The matching transformer
The tube amplifier
for the organ
The start moto
A close-up view of the main 60Hz
motor. The vibrato scanner is
mounted on the left side.
This is the inside of the drawbars.
Underneath, you can vaguely see
some of the coils for the magnetic
pick-ups.
A close-up picture of the speaker tube
amplifiers.
Page 51
Page 54

9. History: The story behind the Electro 2 instruments NORD ELECTRO 2 V2.0x
Here is a picture of the inside of the Hammond tone wheel box. It's the basic design
that elevated Hammond to the top of the organ manufacturer mountain. Each note
on the Hammond corresponds to a tone wheel. Every tone wheel has it own pickup comprising a magnet with a coil. The pitch of the sine wave generated by a tone
wheel is determined by the number of notches on the edge of the wheel and the
wheel's rotation speed. Every time a notch in the wheel passes the magnetic field, it
induces a voltage in the coil. The more notches and the faster they pass, the higher
the pitch.
Laurens Hammond retired at age 65 in 1960 and passed away in 1973. One year after his death, the factory stopped making tone wheel organs. From then on, the only organs that were produced had electric
circuits -- but that's another story.
HHHHEEEE
EEEESSSSLLLLIIIIEEEE
L
L
TTTT
L L
SSSSPPPPEEEEAAAAKKKKEEEERRRR
The rotating speaker effect in the Nord Electro 2 is a digital
emulation of the Leslie 122 speaker cabinet. Leslie cabinets are
stand-alone devices. Their preliminary design was to amplify
and add modulation effects -- i.e., chorus and tremolo -- to the
sound generated by an electric organ such as those made by the
Hammond Organ Company.
What's the story behind this famous accessory to the Hammond organ? It goes back to 1937, when musician and inventor Don Leslie bought a Hammond Model A. Don was
interested in finding a musical instrument that could sound
like a pipe organ, and he decided to buy the Hammond because he figured it sounded close enough. To save money, he
chose not to invest in an accompanying Hammond tone cabinet because he thought he could make his own speaker system.
However, he wasn't satisfied with the organ sound coming
from his first fixed-speaker design because the sound was too
static. He wanted to create some kind of motion in the organ
sound, much like the way the sound of a pipe organ moves
around a big church because the pipes themselves are spread
out across many large ranks - collections of pipes - that cover
the frequency range across an organ console's keyboard manuals and pedal board. For several years, Don experimented with
various combinations of speaker configurations and rotating
components, and in 1940 he completed his first version of the
rotating-speaker concept.
Leslie 122 rotating-speaker cabinet.
A close-up view of the nice woodwork on a
Leslie 122 speaker cabinet.
Page 52
Page 55

NORD ELECTRO 2 V2.0x 9. History: The story behind the Electro 2 instruments
k
He filed a patent application in 1940. Don Leslie met with Hammond representatives that
same year and gave them the opportunity to
buy his invention, but they refused. Instead, he
started his own company and launched the
product into the market under the name "Vibratone." In 1946 the name was modified to
"Leslie Vibratone". Finally, in 1949, The
name “Vibratone” was dropped and the models where named only “Leslie” after its inventor.
Over the years, Don Leslie improved the design and introduced a vast number of different models. In 1963, he began
shipping the Leslie 122 cabinet and it became the most popular
model. The basic principle behind the Leslie 122 is the incorporation of two rotating objects. One is a spinning drum with
a deflector mounted beneath a downward-facing 15" speaker
for bass frequencies -- those below 800Hz. Higher up inside
the 122 is a compression horn-driver attached to a rotating
dual-bell horn assembly for mid range and treble frequencies.
One of these horns is actually sealed; it's only there to serve as
a counterbalance. Therefore, you only hear higher frequencies
emanating from the open-ended bell. The sound is amplified
by a 40-watt tube amplifier. The 122 also features two rotation
speeds: The slow speed, which creates a chorus effect, is known
as "chorale," and the faster speed was named "tremolo."
Switching between these two speeds at musically appropriate
times creates a wonderful -- and even emotional -- effect.
The patent for the
“Apparatus for
imposing vibrato
on sound” filed by
Don Leslie in
1940.
Inside a Leslie 122. Each rotor has its own mo
tor. A 40-watt tube amplifier drives the spea
er components.
Don Leslie, who turned 91 in
2002, estimates that around
200,000 original Leslie 122 cabinets were built in total. Laurens
Hammond himself never liked the
Leslie cabinet and refused to have
anything to do with this product.
Instead, he tried to manufacture
other solutions hoping he would
make the Leslie obsolete, but he
never succeeded. The Leslie speaker was an instant success. Pairing a
Leslie with a Hammond organ
proved the perfect match, and this
combination became a "must
have" for many Hammond organ
players.
The treble horns in a Leslie 122. One
horn is a dummy to give the right a balance during rotation. Only the horn rotates; the horn driver remains stationary.
At the mouth of the horn is diffuser cone
which widens the dispersion to give a
"more musically pleasing tone".
The bass drum. The deflector inside the
drum isn't visible. A thin cloth covers the
round drum. The Leslie 122's 15" speaker doesn't rotate. It remains stationary
while the drum spins.
Page 53
Page 56

9. History: The story behind the Electro 2 instruments NORD ELECTRO 2 V2.0x
TTTT
E
E
HHHHEEEE
LLLLEEEECCCCTTTTRRRROOOO
E E
The first electromechanical piano we took a close look at for sampling for the Nord Electro 2 was the
Rhodes. Since the first Rhodes piano saw the light of day during World War II, numerous different models have been launched, most of them with basically the same characteristic sound but with improved mechanical design. But -- and this is important -- a Rhodes electric piano can be adjusted to create different
timbres. In acknowledgment of that fact, we simply had to choose several typical Rhodes sounds to be
sampled for the Nord Electro 2.
HHHHEEEE
GGGGEEEENNNNIIIIUUUUSSSS
TTTT
The designer of the Rhodes Electric piano was Harold Rhodes. Harold had a background as piano teacher
during the 1930s, when he ran a successful piano school. He also was an architectural engineering student
and earned a scholarship to the University of Southern California’s School of Architecture. Harold
planned on minoring in music at USC, but he was drafted for the War and joined the Army Air Corps.
He had enrolled in a flight instructors' course, but the Army
closed the school one day before he was to begin his training.
Harold started teaching his Army friends piano lessons and
was spotted by a surgeon who enjoyed his talent for piano instructions. The doctor asked Harold to help rehabilitate
wounded soldiers with a piano method he had developed (see
note). As no pianos were available that were small and light
enough to fit on the lap of someone in the bed, he designed
and built instruments out of recycled aeroplane parts and selfmade keyboards. His therapeutic project was a success and the
War department started to manufacture the piano, which was
called the "Xylette."
OOOOFFFF
2
2
2 2
H
H
H H
PPPPIIIIAAAANNNNOOOO
AAAARRRROOOOLLLLDDDD
SSSSEEEECCCCTTTTIIIIOOOONNNN
HHHHOOOODDDDEEEESSSS
R
R
R R
Note: The basic idea with Harold Rhodes Piano school was to
learn to build your own piano, understand the principles and
then learn to play it. In later days he went back into teaching and
led a teaching program for inner-city kids in LA. He was later
honoured with a special commendation by the Los Angeles county
for his works.
After the war, Harold started his own business and pursued his idea of making a compact, lightweight
piano. In 1946 he released the Pre-Piano, an inexpensive three-octave instrument with a tone somewhat
like a toy piano. It was primarily aimed for home and educational market, but it failed in the marketplace
because of poor manufacturing. Shortly thereafter, Harold invented the "tine," or asymmetric tuning
fork, which he later used to make a 72-key instrument built inside a cabinet that looked like a baby grand
piano.
Harold Rhodes’ patent from 1949 for the
small acoustic piano called the “Xylette”.
Page 54
Page 57

NORD ELECTRO 2 V2.0x 9. History: The story behind the Electro 2 instruments
A
p
In 1959, Harold met a man named Leo Fender and
they decided to do something together. Leo had developed the Fender Stratocaster electric guitar and had a
great knowledge of amplifying strings. Together these
two gentlemen could develop a great electric piano.
Unfortunately, it seems they couldn't cooperate in the
way Harold wanted because Leo didn't like the sound
of the treble tines. As a result, between 1959 and 1965,
they released only one model, a 32-note bass version
called Piano Bass. Nevertheless, during this period Harold continued to develop his ideas further and constructed an 88-note electronic piano.
A Rhodes Suitcase 73 Mark I. The Suitcase models
In January 1965, the large corporation CBS bought the
Fender Company and, as a result, Harold Rhodes finally got the opportunity to put his newly designed instrument into serious production. The model is called the Fender Rhodes Suitcase 73, where the "73" stands
for the number of keys on the piano. This model had a built-in pre-amp, amplifier, and speakers. Although Leo Fender was no longer a part of the company, CBS decided to use both of the gentlemen's
names in conjunction with the product, supposedly for marketing reasons. Fender was a big name at the
time - and still is. Interestingly enough, Fender actually joined the company later on again for a period
of time, and it seems Harold and Leo together developed a new tone generator for the Fender Rhodes
electric piano. As a result, they filed a joint patent on August 4, 1970.
feature built-in speakers facing the audience.
The Fender Rhodes Suitcase 73 was a hit on the market. Harold continued to refine his ideas, and every
year he improved the piano mechanically. After five years, the time came for a new model. It was called
the Fender Rhodes Mark 1 Stage piano. While it featured several hardware improvements, this instrument lacked the built-in amplifier and speakers of the Suitcase model. The target group was, of course,
touring bands who demanded a more lightweight keyboard. While the Mark 1 Stage piano had only a
line-level output and a Bass EQ knob, the Suitcase model sported a "Vibrato" knob for controlling the
stereo effect that Harold had developed. In truth, "Vibrato" wasn't the correct word, as the effect was
really tremolo -- an amplitude modulation effect.
From 1970 to 1979, CBS released two electric pianos: the
Mark I and the flat-topped Mark II. It was during this period that CBS decided to drop "Fender" from the logo and
use only the Rhodes name. In 1980, the Rhodes 54 hit the
market, yet another attempt to fill the needs of touring musicians in search of a more compact and lightweight keyboard. The last Rhodes developed during the CBS era was
the Mark III, which contained a built-in two-voice synthesizer(!). It was not a success. In 1983, Rhodes was sold to
William Schultz and Harold designed the Rhodes Mark V
with the help of Steve Woodyard. Harold himself considered the Mark V the ultimate electric piano. It took Harold
25 years to get to this point. Something like 5,000 units of
the Mark V had been built and, two years after its launch,
the factory closed down. After this there were no more electromechanical Rhodes developed for the market. Harold
Rhodes Stage Piano Mark II. The top was cut
down to make a flat top, perfectly amenable to sup-
orting another keyboard.
Rhodes died on December 17, 2000.
Page 55
Page 58

9. History: The story behind the Electro 2 instruments NORD ELECTRO 2 V2.0x
HHHHEEEE
TTTT
HHHHOOOODDDDEEEESSSS
R
R
R R
It's no easy task to capture the whole character of the Rhodes electric piano. There are numerous ways to
adjust the instrument to get different sounds that were typical for the Rhodes. In an interview with Dominic Milano in a 1977 issue of Keyboard magazine, Harold himself pointed out, "The quality of the
sound is what you make it. A lot of musicians don't know that. They just play their piano and say, 'Gee,
it doesn't sound like Joe's.' They don't know that they can alter their piano so it will sound like Joe's."
This is what we did with the different Rhodes models we have chosen. We adjusted these pianos to create
the different famous Rhodes timbres that have been popular during the electric-piano era.
It's important to know the basic adjustments you can make to a Rhodes piano. The major and most important adjustments are to the instrument's timbre and volume. The timbre adjustment requires positioning the tines vertically in relation to their associated pick-ups. The timbre of each note changes
between pure fundamental (deep) and pure overtones (shallow). Another adjustment of the tines concerns their distance from the pick-ups. This adjustment, described in the Rhodes manual as a volume adjustment, doesn't only change the volume; it also changes the harmonics of the tone. Pulling the tine away
from the pick-up a bit and playing at a low volume makes the sound a bit softer. Pushing the tine in close
creates richer harmonics and a better "bite" in the tone (see the picture below).
SSSSOOOOUUUUNNNNDDDDSSSS
IIIINNNN
TTTTHHHHEEEE
N
N
N N
OOOORRRRDDDD
LLLLEEEECCCCTTTTRRRROOOO
E
E
E E
2
2
2 2
Timbre adjustment:
Volume adjustment:
pick-up tine
DEEP
(PURE FUNDAMENTAL)
LOW
(SOFTER SOUND)
IDEAL
(MORE OVERTONE)
IDEAL CLOSE
(RICH HARMONICS
SHALLOW
(PURE OVERTONE)
Page 56
Page 59
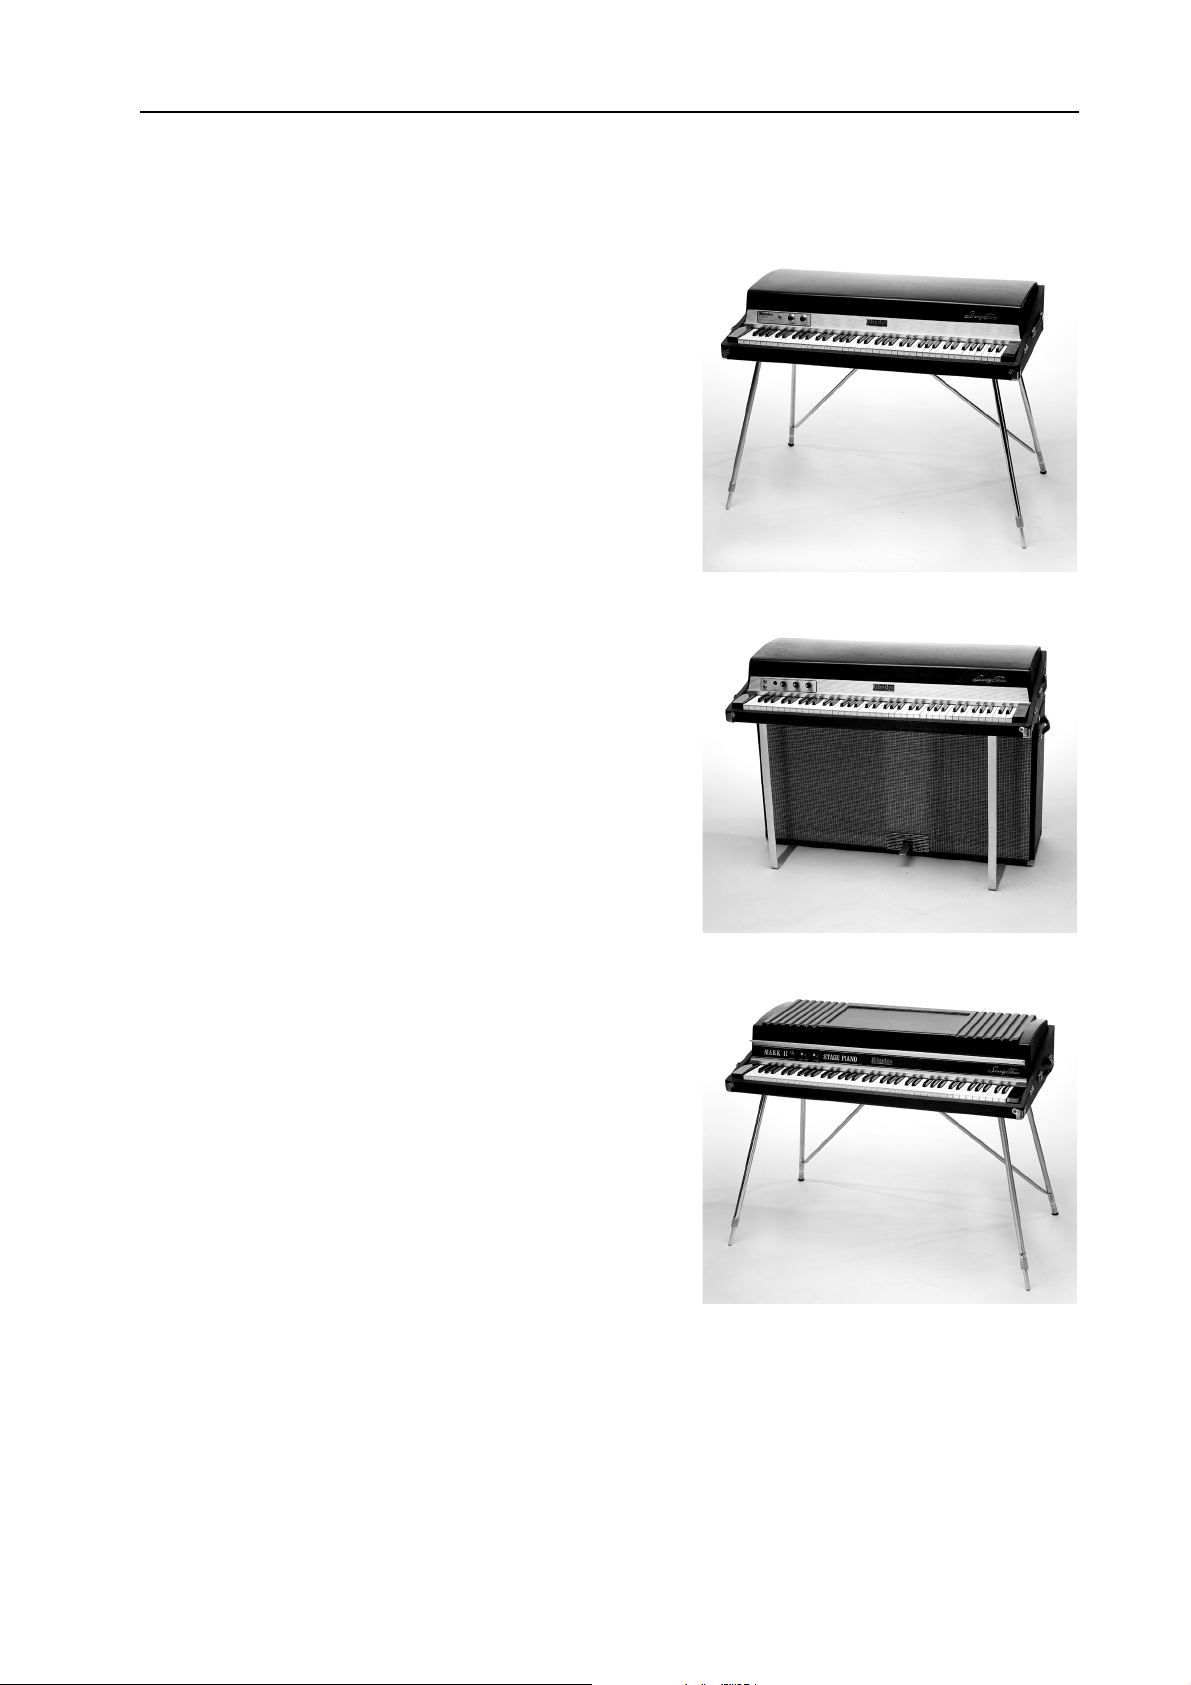
NORD ELECTRO 2 V2.0x 9. History: The story behind the Electro 2 instruments
Here are the Rhodes electric pianos Clavia has sampled for the Nord Electro 2:
1. Rhodes 1 (V2.0 Factory Sound): Rhodes Stage Piano
73 Mark 1, built in May 1978 and adjusted to ‘deep’
timbre. The so-called volume adjustment was set to
‘low’.
2. Rhodes 2 (V2.0 Factory Sound): Rhodes Suitcase 73
Mark I, built in January 1975. We fine-tuned the
mechanics and adjusted the tines according to the
‘ideal’ timbre adjustment. The volume adjustment was
set to ‘close’.
3. Rhodes 3 (additional sound): Rhodes Stage Piano 73
Mark II, built in April 1981 and adjusted to ‘shallow’
timbre. Remember this sound? It became famous
thanks to the great Chick Corea. The volume adjustment is set to ‘close’.
Given our research, we couldn't help but wonder whatever happen with the Mark IV. As far as we can
tell, the Mark IV was on the design table, but for some reason it never went into production. Instead, the
Mark V came out.
Page 57
Page 60

9. History: The story behind the Electro 2 instruments NORD ELECTRO 2 V2.0x
As shown here, Rhodes electric pianos had a different key-mechanism design than
what was used in Wurlitzer electric pianos. The Rhodes mechanism was of simpler construction.
The Rhodes Mark II is very similar in design to the Mark I. The differences include an improved mechanical design, plastic hammers with neoprene rubber instead of felt. The keys were made of plastic and metal; previously, wood was used.
A Rhodes electric piano shown under-the-hood. The basic patent in the Rhodes
comprised the tine, or metallic asymmetric tuning fork, which made the actual
tone. The upper metal parts are the legs of the tuning forks; the underneath parts
comprise the tines. The black part mounted on one of the upper tuning forks helps
alleviate unwanted harmonics.
This shows quite well the tuning-fork design with the tines. This model features
plastic hammers with neoprene tips. The dampers are underneath the tines. Note
the springs attached to each tine. Moving them tuned the note. The coils are the
white things to the left in the figure. The photo also shows the solution for tuning
lower notes when the leg of the tuning fork needs to be curved to get the right
balance and tone (top of picture).
Here is another viewing angle that illustrates the action of a Rhodes electric piano's mechanics. The lower note has been hit and the damper is now muting
the decay. A secondary note is going to be hit. You also can see the magnet tip.
In this case, the piano has been adjusted to "deep" timbre. You can see that the
tine is set a bit above the center of the magnet tip.
Page 58
Page 61

NORD ELECTRO 2 V2.0x 9. History: The story behind the Electro 2 instruments
TTTT
W
W
HHHHEEEE
The next instrument to be sampled for the Nord Electro 2 is the Wurlitzer electric piano model 200. What
became the Wurlitzer electric piano was originally designed by Benjamin Franklin Miessner, born in 1890.
An American inventor who became involved with inno vations in radio during his early years, Miessner designed an electro-acoustic instrument pick-up in 1921.
A company called Amperage manufactured it for guitars in 1928. After selling his radio patents to RCA in
1930, Miessner set up a laboratory to develop his ideas
on electrifying musical instruments with the goal of creating small, affordable electric pianos for educational
use. He experimented with ways of amplifying the
strings in an acoustic piano that lacked a sound board,
and he filed a patent for this design in 1931. Miessner
continued to develop his theories and give the piano a
more powerful tone. He began incorporating metal
reeds in place of strings because the reed timbre and the
decay of their vibrations sounded superior to the muddy quality of the soundboardless strings.
UUUURRRRLLLLIIIITTTTZZZZEEEERRRR
W W
EP
EP
EP EP
A Wurlitzer 200A electric piano -- the most popular
Wurlitzers model ever built. If you compare a Wurlitzer with a Rhodes, you find the Wurlitzer a little
more compact. The Wurlitzer came with 64-note
range A to C.
At this point Miessner's concept garnered lots of interest from
piano manufactures around the country. His ideas reached the
big jukebox and organ company, Wurlitzer, where someone realized the invention had great potential. Wurlitzer bought the
patent and the rights to make this instrument and immediately
started the development of an electric piano. They wanted to
produce an electric piano similar to the Rhodes, but with a more
piano-like action and sound. The basic design incorporated feltdressed hammers similar to those in an acoustic piano to stroke
the metallic reeds. The vibrations from the stroke on the reeds
produced a big, fat, rich tone, which was sensed by the electrostatic pick ups, amplified and routed to the built-in speakers on
the front of the piano. In the patent text from 1959, which
Miessner had originally filed in 1950 with Wurlitzer as the assignee, you can understand his intentions and design goals. He
wanted to built a compact, lightweight instrument with a real piano action. It was also important that the piano sound like an
acoustic piano. Miessner declared that his invention would solve
the tuning problems associated with acoustic pianos.
The patent for an ‘Electronic Piano’ filed
by Benjamin Franklin Miessner in 1950.
Page 59
Page 62
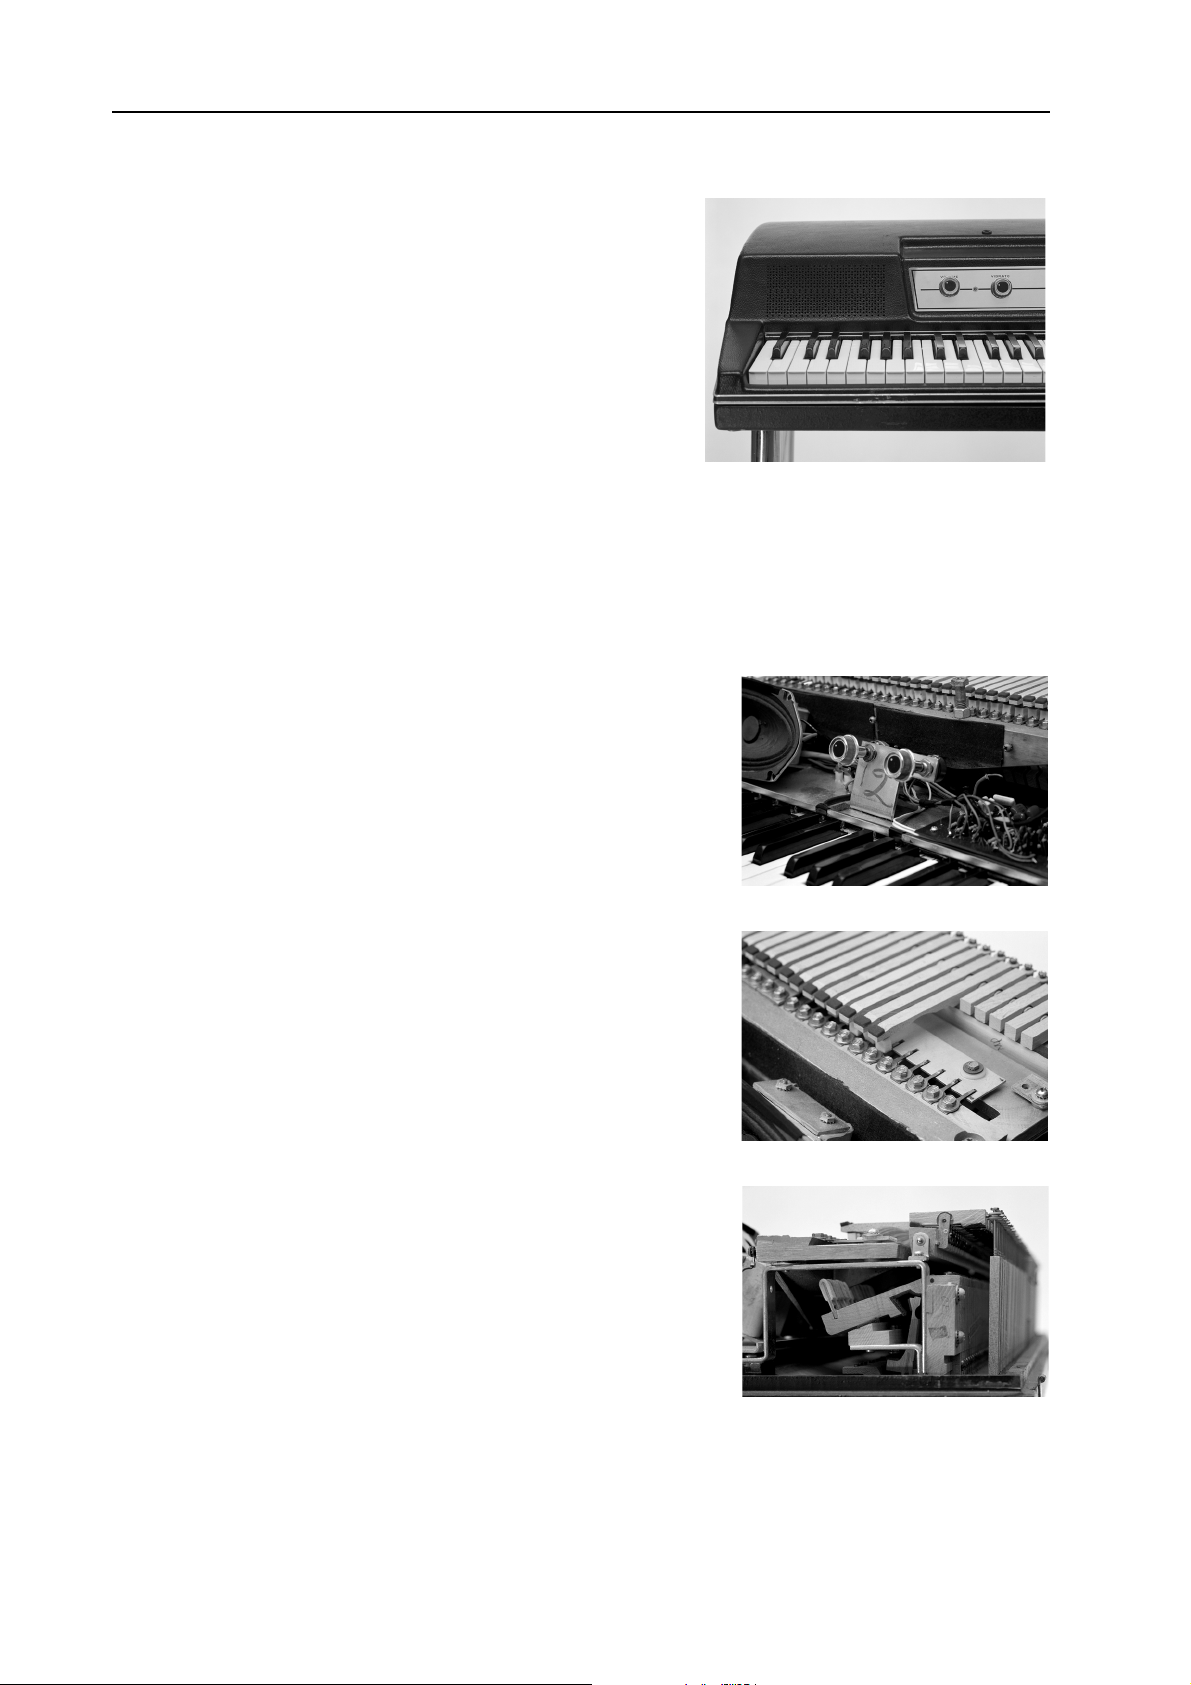
9. History: The story behind the Electro 2 instruments NORD ELECTRO 2 V2.0x
The first electric piano released by Wurlitzer was the model
100, which came to the market in 1954. It was an instant success. The Wurlitzer Company realized the instrument's potential in music education and offered many special
educational models. Miessner's basic design was the backbone
of the product, but one problem remained: It was very difficult to keep a 100-series electric piano in tune, and this problem definitely needed to be solved.
The tuning artifact that plagued early Wurlitzer electric pianos wasn't solved until the release of the 200 series in 1968.
The Wurlitzer 200 was constructed better mechanically and
is the model most known on the rock scene. It became a huge
success and was produced until 1982.
The Wurlitzer sampled by Clavia's is a model 200A. Unfortunately, there is no record of the year it was
built.
On a Wurlitzer 200A, you have a Volume control and a Tremolo knob. The Wurly has an
internal amplifier and two built-in speakers.
A peekaboo look inside a Wurly 200A. The Wurly has its own built-in preamplifier and two speakers facing the player.
The metal reeds in a Wurly. Here you can see the electrostatic design where
two metal plates are connected via a capacitor and a load resistor. When the
reed vibrates, a voltage applied across a load resistor will produce a signal that
generates a musical tone. This tone is fed through the internal amplification
to the instrument's line output. Note the dampers that reside above the reeds.
On the high-pitched notes, there's no need for dampers.
From this angle, you can see the piano-style mechanics with felt-covered hammers that Wurlitzer electric pianos featured.
Page 60
Page 63

NORD ELECTRO 2 V2.0x 9. History: The story behind the Electro 2 instruments
A
TTTT
H
H
HHHHEEEE
OOOOHHHHNNNNEEEERRRR
H H
The Clavinet is another story. It's based on strings and guitar
pick-ups. Ernst Zacharias designed the Clavinet during the
mid-'60s and filed his patent in 1966.
Previously, Zacharias had designed an instrument called the
Cembalet -- a keyboard that used accordion reeds as the tone
source. This instrument was very popular at the time and was
in production for ten years. Hohner released the Pianet L -- an
electrified metal-reed piano -- in 1962. In 1977, the company
introduced another version called the Pianet T, which was the
cheapest, most popular, and final model of the Pianet series.
While designing and building the Pianet series, Zacharias also
worked on another project. As he was very interested in early
keyboard music, he investigated the clavichord to see if he
could make an electric version. This work finally resulted in
the Hohner Clavinet I. It was primarily designed as a home instrument for playing baroque or classic music. Of course later
history proved that this instrument instead had a huge impact
on the rock/funk keyboard player.
C
C
LLLLAAAAVVVVIIIINNNNEEEETTTT
C C
Hohner Clavinet D6. The sound of this instrument was made famous thanks to the fabulous Stevie Wonder song "Superstition".
The mechanics of the Clavinet is similar to what happens in
an electric guitar, and offers a distinct powerful attack. Thanks
to the keys being in direct contact with the the strings, it's easy
to play fast rhythm patterns. Unfortunately, the first Clavinets
were difficult to play in high-volume situations because of
major feedback problems.
The front page of Ernst Zacharias’ patent
for ‘String Instruments Having a Keyboard
filed in 1966.
Page 61
Page 64

9. History: The story behind the Electro 2 instruments NORD ELECTRO 2 V2.0x
s
4
d
e
e
s
e
t
a
h
i
t
f
n
Hohner unleashed the Clavinet C in 1968. This version features a slimmer design and better served the
live keyboard player on stage. Its sales shot rockethigh. In 1971, the Clavinet D6 was launched. It became the most popular model. The D6 sported 15
different filter settings, four different microphone
settings, and a mute function to dampen the strings.
An improved internal string-dampening feature also
reduced the acoustic feedback problem.
The last of the Clavinets -- the E7 -- appeared in
1977. It was especially designed to be taken on the
road by rock bands. The E7's insides were the same
as the D6, with the addition of a special filter to reduce interference from light dimmers and other
electric equipment used on stage. Unfortunately,
this filter proved detrimental to the Clavinet's higher frequencies, which was a serious drawback for the
sound quality.
At that point, polyphonic synthesizers began appearing on the market and the Clavinet was no longer popular. Its production ended in 1980.
Hohner's Clavinet D6 has a pre-amplifier featuring fou
different filters that can be fixed to 16 different setting
as well as four pick-up variations. In total, there are 6
different sound combinations -- which are all simulate
in the Nord Electro 2.
The four fixed filters are designated Brilliant (high-fr
quency), Treble (high-mid), Medium (mid-low), and
Soft (bass). The Pick-up settings are a combination of th
two pick-ups in the Clavinet. With the B and C button
activated, the Bridge pick-up is chosen -- which provid
a warmer sound. When the A and C buttons are activa
ed, the signal is fed through the Neck pick-up, giving
brighter sound. The combination A and D activates bot
microphones, making the sound is more full-bodied. F
nally, with the B and D buttons activated, the signal ge
routed through the Bridge and Neck pick-ups set out o
phase, resulting in a thinner sound with less fundame
tal. The knob is the volume controller.
Under the Clavinet's hood. In the front, you'll notice the damping mechanism after the Neck pick-up. Beneath the keys under the strings, you can see the Bridge
pick-up. The strings are mounted on a metal body that's fastened into the wood
cabinet.
This is the lowest key on a Clavinet D6. The green material is yarn, which serves
to dampen and avoid feedback. The little round detail under the key is the tangent with the rubber tip that hits the string. Underneath the string is an anvil.
The Clavinet strings are more plucked than struck.
Directly from the front. The hammers are mounted beneath the keys. Each hammer has a rubber tip that hits a string. Each tangent has a corresponding anvil
beneath the string. When the tangent hits a string, the string will vibrate. The
screws serve to tune the strings.
Page 62
Page 65

NORD ELECTRO 2 V2.0x 9. History: The story behind the Electro 2 instruments
BBBB
OOOOOOOOKKKK
SSSSUUUUGGGGGGGGEEEESSSSTTTTIIIIOOOONNNNSSSS
The A-Z of Analogue Synthesisers Part One: A-M (Revised) & Part Two: N-Z, by Peter Forrest (Susurreal, Star House, Sandford, Crediton, Devon EX17 4LR, England; +44-1-363-774627;
pforrest@mail.eclipse.co.uk; also available from Keyfax, www.keyfax.com)
The Hammond Organ: Beauty in the B, by Mark Vail (2002, 2nd edition; ISBN 0-87930-705-6)
Keyfax: 2, 4, and The Omnibus Edition, by Julian Colbeck (Keyfax, 505 River St., Santa Cruz, CA
95060; 831-460-0172; www.keyfax.com)
Vintage Synthesizers, by Mark Vail (2000, 2nd edition; ISBN 0-87930-603-3; Backbeat Books,
www.backbeatbooks.com)
WWWW
EEEEBBBB
SSSSUUUUGGGGGGGGEEEESSSSTTTTIIIIOOOONNNNSSSS
HHHHOOOODDDDEEEESSSS
RRRR
EEEELLLLEEEECCCCTTTTRRRRIIIICCCC
PPPPIIIIAAAANNNNOOOO
http://www.fenderrhodes.org/rhodes/supersite/
UUUURRRRLLLLIIIITTTTZZZZEEEERRRR
WWWW
EEEELLLLEEEECCCCTTTTRRRRIIIICCCC
PPPPIIIIAAAANNNNOOOO
http://my.stratos.net/~riderz/wurlitzer.html
LLLLAAAAVVVVIIIINNNNEEEETTTT
CCCC
D6
D6
D6 D6
http://www.clavinet.com
AAAAMMMMMMMMOOOONNNNDDDD
HHHH
TTTTOOOONNNNEEEE
WWWWHHHHEEEEEEEELLLL
OOOORRRRGGGGAAAANNNN
http://theatreorgans.com/grounds/docs/hamco.html
http://theatreorgans.com/hammond/faq/mystery/mystery.html
MMMM
UUUUSSSSIIIICCCC
HHHHOOOODDDDEEEESSSS
RRRR
SSSSUUUUGGGGGGGGEEEESSSSTTTTIIIIOOOONNNNSSSS
EEEELLLLEEEECCCCTTTTRRRRIIIICCCC
PPPPIIIIAAAANNNNOOOO
Chick Corea "Return and forever"
Herbie Hancock "Headhunters"
Stevie Wonder "Innervisions"
UUUURRRRLLLLIIIITTTTZZZZEEEERRRR
WWWW
EEEELLLLEEEECCCCTTTTRRRRIIIICCCC
PPPPIIIIAAAANNNNOOOO
Supertramp "Crime of the century"
George Benson "Absolute Benson"
Donny Hathaway "Live"
LLLLAAAAVVVVIIIINNNNEEEETTTT
CCCC
D6
D6
D6 D6
Stevie Wonder "Talking Book" (the song “superstition”)
Foreigner "Urgent"
Commmodore "Machine gun"
AAAAMMMMMMMMOOOONNNNDDDD
HHHH
TTTTOOOONNNNEEEE
WWWWHHHHEEEEEEEELLLL
OOOORRRRGGGGAAAANNNN
WWWWIIIITTTTHHHH
L
L
L L
EEEESSSSLLLLIIIIEEEE
Joey DeFrancesco "Reboppin"
Jimmy Mcgriff "The countdown"
Jimmy Smith, various
Booker T Jones and the MG’s, various
Page 63
Page 66

Page 67

NORD ELECTRO 2 V2.0x Index
download
Index
Index
IndexIndex
Numerics
Numerics
NumericsNumerics
Programs via MIDI
Drawbar
Dump (Programs/Controllers)
20
20
presets
store your own...
user presets
21
18
21
38
2nd, 3rd (Organ Percussion)
AAAA
Ac.Grand (Piano Type)
Auto-Wah (modulation)
25
30
BBBB
Bank
selecting
Bass (eq)
buttons
using
12
32
16
CCCC
C1-C3 (Organ Chorus)
Chorus (effect)
Chorus (organ)
Clav (Piano Type)
pickup and filter variations
36
Config
connections
audio
MIDI
pedals
control pedal
connecting
technical requirements
using
controllers
dump
list (MIDI)
MIDI transmission and reception
copy
Programs
30
22
9
9, 41
9
9
14
42
44
18
22
25
9
DDDD
delete
Programs
Display
18
7, 32
21
26
40
EEEE
edit
Programs
Effects section
El.Grand (Piano Type)
eq (Treble & Bass)
erase
Programs
expression pedal
connecting
technical requirements
using
16
28
25
32
18
9
14
FFFF
factory presets
restoring
Fast (Rotary Speaker)
Flanger (effect)
front panel
39
39
31
30
7
HHHH
hard pan of outputs
24, 27, 37
IIII
Instrument Select button
internal memory
Internet
6
39
KKKK
key click control (organ)
keyboard
Keyboard Velocity
knobs
8
split (organ)
internal for Piano sounds
MIDI
using
22
40
16
9
17
24, 37
15
Page 65
Page 68

Index NORD ELECTRO 2 V2.0x
LLLL
level
7, 32
master
output (individual per Program)
Local (MIDI)
Lower Ch
Lower Manual (organ)
using external MIDI keyboard
34
22, 34
22
31
22
MMMM
Manual (Upper/Lower)
Master Level
Master Tune
adjusting
Mem Lock
memory (internal)
memory protect (Mem Lock)
MIDI
about the implementation
basic settings
channel
channels
connections
controllers
implementation chart
Keyboard Velocity
local on/off
Program Change
send all MIDI controllers
Sysex dump of all Programs
Sysex dump of single Programs
Sysex reception of Program and Program Banks
7, 32
35
35
33
34
Lower
using with sequencer
41
"chasing" when using a sequencer
44
list
recording in sequencer
34, 41
recording in sequencer
22
39
35
40
15
41
41
47
40
40
41
38, 42
42
42
43
using an external "lower manual" keyboard
MIDI Ch
Modulations
33
29
NNNN
Navigator buttons
Note On/Off
MIDI transmission and reception
7, 32
40
41
22
OOOO
Octave Shift
buttons
Organ section
OS upgrades
output
level
physical
routing
Output Level (individual per Program)
Overdrive distortion
12, 33
7
19
39
7
master
9
24, 27, 37
31
31
PPPP
Pan (modulation)
38
Panic
partials (organ drawbar)
pdf file (reading the manual as...)
Ped. Cnfg
Ped. Pol
pedals
Percussion (organ)
Phaser (effect)
Piano
Piano section
pitch bend MIDI messages
Presence
Program
Program Change (MIDI)
14
13, 36
connecting
control/expression
Rotor Speed
sustain
14
swell
downloading new instruments via USB
25
Type
26
with the Mega Clavinet sound
buttons
copying
deleting
downloading from MIDI
editing
reverting to stored
selecting
storing
What is it?
29
20
5
9
14
14
13
21
30
39
25
40
26
7, 32
18
18
18
16
17
12
17
16
40
Page 66
Page 69

NORD ELECTRO 2 V2.0x Index
RRRR
rear panel
Rhod (Piano Type)
Rhod2 (Piano Type)
RingMod (modulation)
Rotary Speaker
Rotor Speed pedal
9
25
25
29
31
controlling speed from pedal
connecting
9
SSSS
save
7, 32
13
using
17
41
7, 33
11
21
21
31
17
9
14
Programs
sequencing with Nord Electro
Shift button
signal routing (internal)
Slow (Organ Percussion)
Soft (Organ Percussion)
Split (Lower & Upper Manuals)
Stop (Rotary Speaker)
Store
button
store
Programs
sustain pedal
connecting
settings
23
swell
pedal
31
22
VVVV
V1-V3 (Organ Vibrato)
Vibrato (organ)
volume
individual per Program
master
22
7, 32
WWWW
Wah-Wah (modulation)
Wur (Piano Type)
25
22
31
29
TTTT
Transpose
Treble (eq)
Tremolo (modulation)
Tune (Master)
13, 35
32
29
35
UUUU
Upper Manual (organ)
USB (for downloading Piano instruments)
User Store
21
22
39
Page 67
Page 70

 Loading...