

Page 1
USER MANUAL
Part No. 50300 Nord C1 Combo Organ OS V1.0X Copyright Clavia DMI AB 2007
Page 2
CAUTION AVIS
RISK OF ELECTRIC SHOCK
DO NOT OPE
N
RISQUE DE SHOCK ELECTRIQUE
NE PAS OUVRIR
CAUTION: TO REDUCE THE RISK OF ELECTRIC
SHOCK DO NOT REMOVE COVER (OR BACK).
NO USER SERVICEABLE PARTS INSIDE.
REFER SERVICING TO QUALIFIED PERSONNEL.
ATTENTION :POUR EVITER LES RISQUES DE CHOC
ELECTRIQUE, NE PAS ENLEVER LE COUVERCLE.
AUCUN ENTRETIEN DE PIECES INTERIEURES PAR L´USAGER.
CONFIER L´ENTRETIEN AU PERSONNEL QUALIFE.
AVIS : POUR EVITER LES RISQUES D´INCIDENTE OU
D´ELECTROCUTION, N´EXPOSEZ PAS CET ARTICLE A LA PLUIE
OU L´HUMIDITET.
Instructions pertaining to a risk of re, electric shock or injury to persons.
IMPORTANT SAFETY INSTRUCTIONS
SAVE THESE INSTRUCTIONS
The lightning ash with the arrowhead symbol within an
equilateral triangle is intended to alert the user to the
presence of uninsulated voltage within the products
enclosure that may be of sufcient magnitude to constitute
a risk of electric shock to persons.
Le symbole éclair avec le point de èche à l´intérieur d´un triangle
équilatéral est utilisé pour alerter l´utilisateur de la presence à
l´intérieur du coffret de ”voltage dangereux” non isolé d´ampleur
sufsante pour constituer un risque d`éléctrocution.
The exclamation mark within an equilateral triangle is
intended to alert the user to the presence of important
operating and maintenance (servicing) instructions in the
literature accompanying the product.
Le point d´exclamation à l´intérieur d´un triangle équilatéral est
employé pour alerter l´utilisateur de la présence d´instructions
importantes pour le fonctionnement et l´entretien (service) dans le
livret d´instructions accompagnant l´appareil.
Warning - When using electric products, basic
precautions should always be followed, including
the following:
1. Read all the instructions and observe the graphic
symbols above before using the product.
2. Do not use this product near water - for example
near a bathtub, washbowl, kitchen sink, in a wet
basement, near or in a swimming pool, a swamp or
the like.
3. This product should be used only with a cart or a
stand that is recommended by the manufacturer.
4. This product, either alone or in combination with an
amplier and headphones or speakers may be
perfectly capable of producing sound levels that
could cause permanent hearing loss. Do not
operate for a long period of time at a high volume
level or at a level that is uncomfortable. If you
experience any hearing loss or ringing in the ears,
you should consult an audiologist.
5. The product should be located so that its location
or position does not interfere with or obstruct its
normal ow of ventilation.
6. The product should be located away from heat
sources such as radiators, heat registers or other
products that produce heat.
8. The power supply cord of the product should be unplugged
from the outlet when the product is left unused for a long
period of time.
9. Care should be taken so that objects do not fall, or liquids
are not spilled into the enclosure through openings.
10. The product should be serviced by qualied service personnel when:
A. The power supply cord has been damaged; or
B. Objects have fallen or liquids have been spilled onto the
product; or
C. The product has been exposed to rain; or
D. The product does not appear to operate normally or
exhibits a marked change in performance; or
E. The product has been dropped or the enclosure has
been damaged.
11. Do not attempt to service the product beyond those means
described in this operating manual. All other servicing
should be referred to qualied service personnel.
12. To completely disconnect the apparatus from the mains,
remove the mains plug.
13. ensure possible protective earting connections of other
equipment when the apparatus is connected to multimedia
systems.
13. Where the Mains plug is used as the disconnect device, the
disconnect device shall remain readily operable.
7. The product should be connected to a power
supply only of the type described in these operation instructions or as marked on the product.
Trademarks: The Nord logo is registred trademark of Clavia DMI AB. All other trademarks mentioned in this publication are the properties of their respective holders.
Specications and appearances are subject to change without notice.
Copyright by Clavia DMI AB, 2007
Page 3

Nord C1 Combo Organ
OS V1.0X
INTRODUCTION ..................................... 4
Thank you!.............................................................................. 4
Development goals ............................................................ 4
Features .................................................................................. 4
About this User Manual..................................................... 4
OVERVIEW ............................................. 5
The Front panel.................................................................... 5
Master Level knob ............................................................... 5
The Keyboard........................................................................ 5
About knobs.......................................................................... 5
About buttons ...................................................................... 5
CONNECTIONS ....................................... 6
The Rear panel...................................................................... 6
Audio connections.............................................................. 6
MIDI connections ................................................................ 6
USB connection.................................................................... 6
Pedal connections............................................................... 6
THE PROGRAM SECTION ........................8
What is a Program? ............................................................. 8
Loading a Program ............................................................. 8
Storing a Program ............................................................... 8
THE ORGAN SECTION ............................. 9
The Drawbars........................................................................ 9
Preset buttons ...................................................................... 9
The Split Function ............................................................... 9
Selecting Organ Model ..................................................... 9
The Tonewheel model..................................................... 10
The Electric-V model ........................................................ 11
The Electric-F model......................................................... 11
The Synth Bass model...................................................... 12
THE EFFECT SECTION ........................... 13
Delay ...................................................................................... 13
Drive....................................................................................... 13
EQ............................................................................................ 13
Speaker ................................................................................. 13
Unison ................................................................................... 14
Reverb ................................................................................... 14
SYSTEM FUNCTIONS ............................ 15
About System Settings.................................................... 15
Changing System Settings............................................. 15
The System Menu.............................................................. 15
The MIDI Menu................................................................... 15
The Sound Menu ............................................................... 16
MIDI IMPLEMENTATION ...................... 17
MIDI implementation chart........................................... 17
MIDI Continuous Controller list.................................... 17
HOW-TOS ............................................. 18
Connecting a bass pedal unit ....................................... 18
Setting up the Half Moon Switch ................................ 18
Adjusting the pedal polarity ......................................... 18
Adjusting the swell pedal span .................................... 18
Playing an external sound source ............................... 18
Recording MIDI in a sequencer .................................... 19
Installing the USB driver (Windows only) ................. 19
Upgrading the OS ............................................................. 19
ABOUT program Sysex dumps ..................................... 19
INDEX .................................................. 20
3
Page 4

Introduction User Manual
Introduction
THANK YOU!
We would first like to thank you for purchasing the Nord C1
Combo Organ! We hope you will find it to be everything
you wished for and that you’ll have many hours of great
fun with your new instrument.
DEVELOPMENT GOALS
First some history: at the time of designing the Nord C1
Combo Organ, Clavia had already been developing digital
tonewheel organ models for a decade. The first model featured in the Nord Electro series of instruments was designed to fit comfortably in a multi electro-mechanical
instrument along side various piano implementations.
With focus given to fit several mechanical instruments into
a single package, you are always forced to make some
compromises. We never intended the Electro to be the perfect vintage tonewheel organ replacement, but it turned
out to be one of the more popular units on the market,
much due to it’s high quality of sound, portability and attractive price.
Though not surprised we were definitely thrilled when the
Electro started to appear in different magazine’s tonewheel clone tests and shoot-outs. It was included for its
fabulous sound that some found to be better that far more
expensive hard core clone units. However, due to its single
manual and additional piano samples, it was generally included “out of contest”.
With the Nord C1 Combo Organ we wanted to design an
instrument without having to find the right blend of
things; like piano vs. organ keyboard action, or multi-effects suited for a wide array of sounds. We wanted to focus
on the things needed for killer organ sounds, and those
things only.
Also we had developed some great transistor organ models for the Nord Stage series of instruments. An obvious
choice was to include these as well for the ultimate threein-one lightweight vintage organ package.
Some areas we knew were up for improvement prior to the
start of the project, others were found along the way. What
really paid off was focusing on each of the components involved in the sound generating process, rather than just
the sounding outcome. After spending thousands of man
hours leaving no detail untouched - no matter how small
and seemingly insignificant - we believe we have not only
reproduced the perfect tonewheel sound but also the
proper response and feel of playing the original instrument.
FEATURES
The Nord C1 Combo Organ features high quality simulations of three vintage organs, a bunch of effect pedals as
well as several amp and speaker cabinets combinations in
a single lightweight package.
The dual keyboards, bass pedal input and high level outputs allows you to use the instrument in the exact same application and set-up as with the vintage originals - and
several more!
By focusing on each individual component involved in the
sound generating process you get not only a vintage
sound experience but also spot-on response and feel of
playing the original instruments.
The Nord C1 Combo Organ has the following features:
• 1 model of a vintage Tonewheel organ
• 2 models of vintage Electric-V and Electric-F transistor
organs
• 3 Amplifier models
Featuring simulations of the gain and frequency characteristics of two popular combo amps as well as a
rotary speaker cabinet.
•Overdrive
Offering a gentle to massive amount of tube-style distortion.
• Vintage-sounding delay
With tap-tempo function and possibility to limit operation to upper manual.
•3-band EQ
5 types of Reverberation
Room, Stage and Hall-types with variations
• Dual manuals with 2x61 waterfall keys
Featuring high trigger point for the optimal organ keyboard feel and response time.
• Bass pedal board input
Dedicated MIDI connector for use with any MIDI note
sending pedal board.
• High level outputs
Featuring quarter-inch as well as 11-pin Leslie standard
connectors you can connect directly to rotary speakers.
When using the 11-pin connector controls for rotation
speed are transferred as well.
ABOUT THIS USER MANUAL
This manual is arranged mainly as a reference manual. In
many cases you’ll get tips on how to practically use functions. In this manual, references to knobs and buttons on
the unit is printed
The LED-display is referred to as the
there is a reference to the ‘keyboard’, that reference also
applies to incoming MIDI note messages.
LIKE THIS, e.g. ‘press the STORE button’.
DISPLAY. Whenever
We hope this instrument will give you as much fun to play
as it has given us to develop.
4
Page 5
Nord C1 Combo Organ Overview
OS V1.0X
Overview
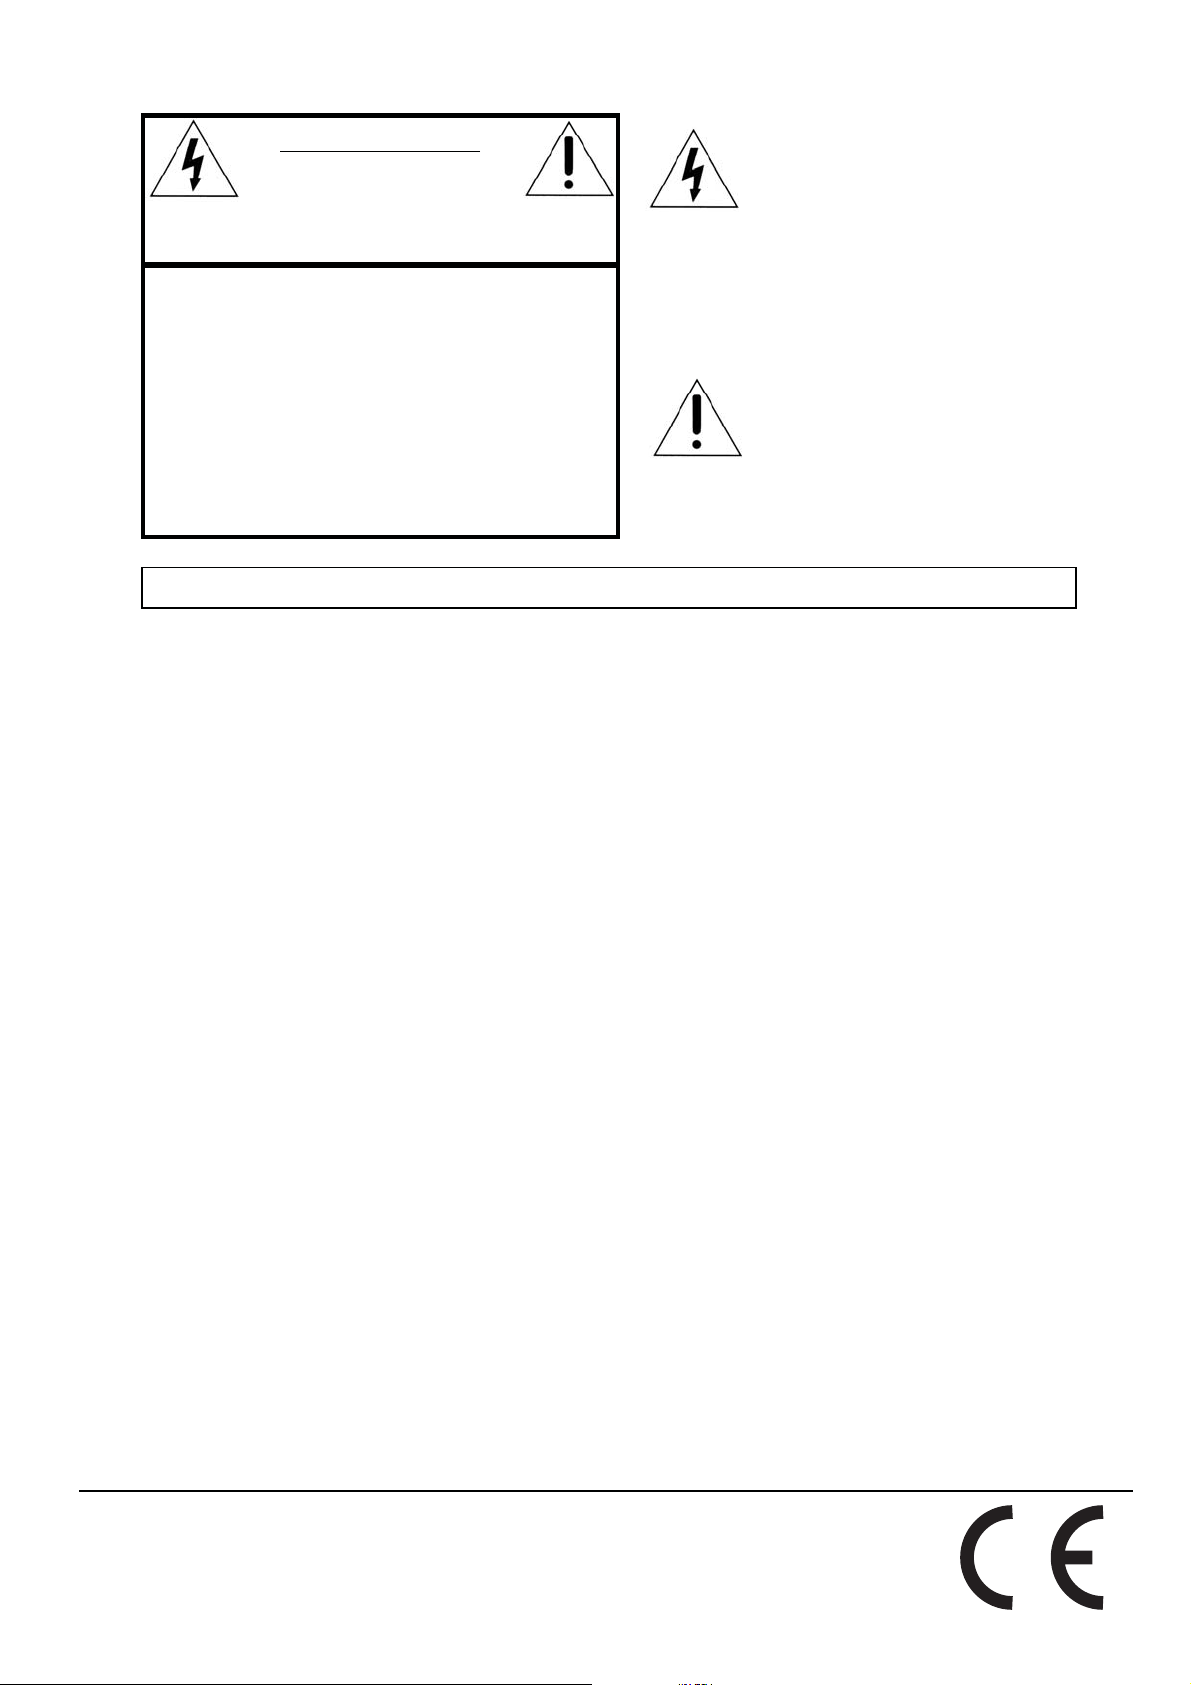
THE FRONT PANEL
The Nord C1 Combo Organ front panel consists of 3 sections:
Organ section
The Organ Section features three different organ models,
and this is where you select what model to play and make
model specific adjustments. Please refer to “The Organ
Section” on page 9.
Effect section
The Effect Section is where you set and adjust settings for
delay, drive, EQ, unison, reverb and speaker simulation.
Please refer to “The Effect Section” on page 13.
THE KEYBOARD
The Nord C1 Combo Organ keyboards have a fast trigger
response which closely mimics the feel and response times
of a real organ. The fast trigger response is not velocity sensitive, which might not be preferable when using external
sound sources. Please refer to “Playing an external sound
source” on page 18.
ABOUT KNOBS
The knobs are of potentiometer type. Except for the
that when you load a Program the values of
the parameters can be totally different
from the knobs physical positions. As soon as you begin
turning a knob, the parameter value will ‘snap’ to the
knob’s physical position.
MASTER LEVEL knob, this means
ABOUT BUTTONS
Buttons have different behaviour depending on their functionality:
Program Section
The Program Section is where you store and recall sound
settings into Programs, and also adjust system specific parameters. Please refer to “The Program Section” on page 8.
MASTER LEVEL KNOB
The MASTER LEVEL knob controls the overall
output level for all audio outputs, including
HIGH LEVEL OUTPUT and HEADPHONE out-
put. The
tion is always the same as the output level.
MASTER LEVEL knob’s physical posi-
Selector buttons
Press the Selector button repeatedly to select between options printed next to the
corresponding LEDs. Note that some options are selected by lighting several LEDs
simultaniously.
On/Off buttons
The On/Off buttons have a LED next to
them to indicate the status.
Shift Button
Some buttons have a secondary
function, available by holding
while pressing the button. The
name of the secondary function is
printed just below the button.
SHIFT
Panic button
By pressing the SHIFT + UNISON MODE buttons all sounding
notes will be silenced.
Note: equipment connected via
MIDI OUT is not affected.
5
Page 6
Connections User Manual
Connections
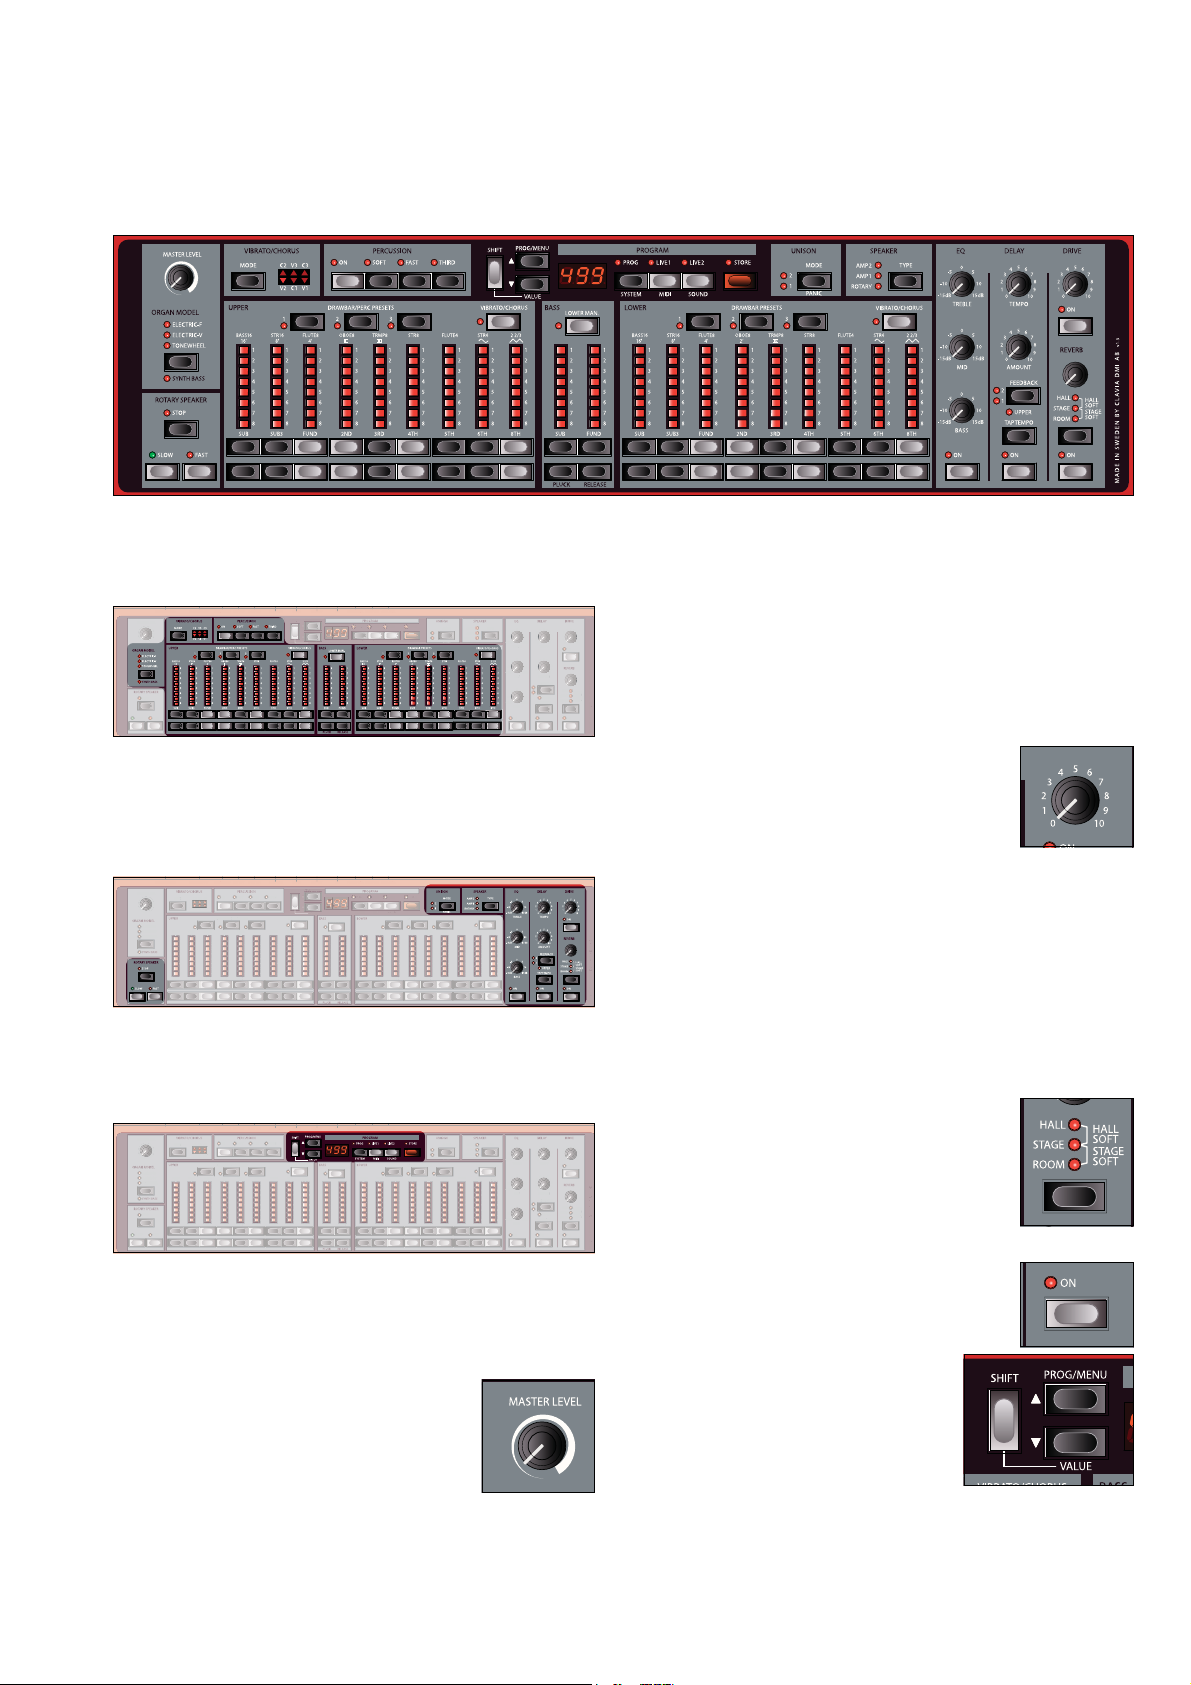
THE REAR PANEL
AUDIO CONNECTIONS
The Nord C1 Combo Organ has three types of audio connectors:
Main stereo output
The main stereo output consist of the LEFT OUT and RIGHT
connectors. These are unbalanced line level outputs.
OUT
Headphone output
Stereo output for connecting headphones.
High level output
The HIGH LEVEL OUTPUT consist of a quarter inch and 11-pin
Leslie standard connector. The
RMS high level and unbalanced, and are only intended to
be used directly connected to a rotary speaker cabinet
with built in amplifier. Any other form of use might result
in damaged equipment.
It is possible to route the tonewheel organ to
HIGH LEVEL OUT, and transistor organs to RIGHT OUT. Please
refer to “Output Routing” on page 15.
General guide for audio connections
• Make all connections before turning on the power to
your amplifier.
• Turn on the power to your amplifier last.
• Turn off the power to you amplifier first.
• Make sure you properly align the guide pin when using
an 11-pin connector.
HIGH LEVEL OUT are 14V
LEFT OUT and
BASS PEDAL
To play the Nord C1 Combo Organ’s dedicated bass registers, connect MIDI OUT of your external controller (preferably a bass pedal board) to the
bass registers will respond to all MIDI note messages received regardless of MIDI channel.
Please refer to “Connecting a bass pedal unit” on page 18
for detailed instructions.
BASS PEDAL connector. The
USB CONNECTION
The USB connector is used for upgrading the system OS.
Please refer to “Upgrading the OS” on page 19.
PEDAL CONNECTIONS
The Nord C1 Combo Organ has three pedal inputs:
Swell Pedal input
Used for controlling the swell level of the selected organ
model. Please note that the pedal must have a stereo output jack, and you must always use a stereo cable (Tip-RingSleeve). Pedals from different manufacturers have various
span characteristics but this can easily be adjusted in the
system menu.
Please refer to “Swell Pedal Type” on page 15, or “Adjusting
the swell pedal span” on page 18 for detailed instructions.
MIDI CONNECTIONS
MIDI transmit and receive behaviour is adjustable via the
MIDI menu. Please refer to “MIDI Implementation” on
page 17 for more information.
The Nord C1 Combo Organ has three MIDI connector ports:
MIDI OUT
Both manuals, all knobs and buttons (SHIFT, STORE and MAS-
TER LEVEL
PEDAL
Please refer to “Playing an external sound source” on
page 18, and “Recording MIDI in a sequencer” on page 19
for more information.
MIDI IN
Used for receiving MIDI messages.
6
excluded), pedal connector ports as well as BASS
input send messages via MIDI OUT.
Rotary Control input
Used for controlling the rotary speaker’s speed. You can
use any standard sustain pedal, switch pedal or the Half
Moon Switch accessory. When using the Half Moon Switch
accessory you will have to configure the Control Pedal
Type in the system menu.
Please refer to “Rotary Pedal Mode” on page 15 or “Setting
up the Half Moon Switch” on page 18 for further instructions.
Note: when using the Half Moon Switch accessory, the
TARY SPEAKER
controls of the front panel are disabled.
RO-
Sustain Pedal input
Used for sustaining notes. You can use any standard sustain type pedal. The polarity can be adjusted in the system
menu.
Page 7

Nord C1 Combo Organ Connections
OS V1.0X
Please refer to “Sustain Pedal Polarity” on page 15 or “Adjusting the pedal polarity” on page 18 for detailed instructions.
For use with external sound devices you can disable the
Nord C1 Combo Organ from responding to sustain messages, but still send them via MIDI out.
Please refer to “Playing an external sound source” on
page 18 for setup instructions.
7
Page 8

The Program Section User Manual
The Program Section
WHAT IS A PROGRAM?
All sound related knob and button settings, including PRE-
can be stored into any of three storage areas; PROG,
SETS
LIVE 1 and LIVE 2, selectable with the corresponding but-
tons.
With
PROG activated, 126 program locations are available.
The current program location is shown in the
Changes need to be stored in order not be lost.
LIVE 1 and LIVE 2 contains one single program each. Chang-
es are saved automatically, so when you load a stored program or even when you power off, all settings will be
exactly as you left them the next time you return to that
live program.
DISPLAY.
LOADING A PROGRAM
When PROG is activated, you can load a program by navigating the
automatically.
PROG/MENU buttons. Programs will be loaded
When a
program in the
buttons, but the program will not be loaded until you press
the
LIVE program is activated, you can select a stored
PROG area by navigating the PROG/MENU
PROG button.
STORING A PROGRAM
To store a program to any of the 126 program locations:
Press the store button.
1
The current program number will flash repeatedly in
the
DISPLAY to indicate you are in store mode.
If the
DISPLAY shows “PRO”, you must turn off memory
protection in the system menu. Please refer to “System
Functions” on page 15.
2
Select program location
Use the PROG/MENU buttons to select a program location to store to.
3
Press the store button
The DISPLAY will briefly indicate “STO” to confirm that
the program has been stored.
8
Page 9

Nord C1 Combo Organ The Organ Section
OS V1.0X
The Organ Section
The Nord C1 Combo Organ features simulations of three
classic organ models; one tonewheel and two transistor
(Electric-V and Electric-F).
The Organ Section features three main areas for control:
• The Drawbar section is where you set-up the basic
organ sound structure. It is divided into three areas
connected to the
BASS PEDAL input.
•The
PERCUSSION area is where you control the percus-
UPPER and LOWER manuals, plus the
sion effect (available to the Tonewheel organ model
only)
•The
VIBRATO/CHORUS area is where you select the cho-
rus and/or vibrato effect depending on the selected
organ model.
THE DRAWBARS
The drawbars of Nord C1 Combo Organ are
represented by buttons and LED chain
graphs instead of ordinary mechanical
drawbars. This gives you a big advantage:
when you change
correct drawbar settings are recalled immediately and shown by the LEDs. In other
words, no need for the regular “trial and error” method. It’s very easy to get the hang of
changing the drawbar settings in a natural
way with the buttons.
The drawbars of Nord C1 Combo Organ behave similar to their mechanical counterparts, i.e. with the Tonewheel and Electric-V models you
“pull out” and “push in” the drawbars using the
buttons. The buttons are special in the way that they autoincrement/decrement the drawbar value when held. I.e. if
you hold a
DRAWBAR button the corresponding drawbar
value will continue to increment or decrement (within its
range) until you release the button.
Also, while holding a
sibling button to momentarily auto-increment/decrement
in the opposite direction.
With the Electric-F model,
switches, toggling each register between on and off.
PRESET or PROGRAM, the
DRAWBAR
DRAWBAR button, you can press its
DRAWBAR buttons functions as
PRESET BUTTONS
The PRESET buttons lets you change back and forth between different drawbar set-ups instantly. Changes are automatically saved and recalled the next time you activate
the same preset.
•The
UPPER and LOWER drawbars have their own set of
preset buttons. Further to storing the drawbar settings,
the
UPPER manuals percussion on/off setting is stored
as well.
•In
PROG mode, PRESET changes will be lost if the pro-
gram is not saved.
THE SPLIT FUNCTION
By activating the LOWER MAN button
you split the lower manual in two sections at the key of C3. The lower section
is now connected to the
BASS drawbars.
The upper section of the lower manual is connected to
LOWER drawbars as usual.
SELECTING ORGAN MODEL
You select which model to play using
the
ORGAN MODEL button. Only one
model can be used at a time.
•When the Tonewheel model is activated, the
tonewheel bass registers.
•When the Electric-V or Electric-F models is activated, the
trol the synth bass model.
• When the Tonewheel model is activated you can activate the Synth Bass model by pressing
MODEL button.
BASS drawbars control the
BASS drawbars con-
SHIFT + ORGAN
9
Page 10

The Organ Section User Manual
THE TONEWHEEL MODEL
This model is based on a digital simulation of the classic
mechanical tone wheel organ. This simulation utilizes innovative and advanced methods to capture every nuance
of the original sound, for example:
• An extremely accurate digital model of the original
chorus and vibrato scanner.
• Modeling of the individual random contact bounces for
each harmonic.
• Modeling of the unique frequency characteristics of the
built-in pre-amplifier which forms the “body” of the
sound.
• Simulation of the energy stealth on the tone wheels
that results in the typical “compressed” sound.
• Authentic tuning of the tone wheels according to the
original design.
• Extremely fast keyboard response.
• Full polyphony.
The Drawbars
The harmonic intervals for the Tonewheel organ are printed below the drawbars.
moment in the beginning of the sound when you press the
key(s).
The Percussion is a single-triggered non-legato effect. By
“single-triggered” we mean that the percussion is only
present when you hit the keys when no other note is
sounding. In other words, if you play a note or a chord and
then add on more notes without releasing the previously
pressed keys, there will be no percussion effect in the new
notes. You have to release all keys to be able to play new
notes with the percussion effect.
The percussion effect is available to the
is activate and deactivate by pressing the
The
SOFT button toggles between Normal and Soft percus-
UPPER manual, and
ON button.
sion level.
The
FAST button toggles between Slow and Fast decay
times.
The
THIRD button toggles between using the 2nd or 3rd
partial as the source for the percussion effect.
level
For basic drawbar operation, please refer to “The Drawbars” on page 9.
Each drawbar represents a partial with a fixed harmonic interval relating to the played note. The illustration below
shows the pitch interval among the nine drawbars when
the key of C3 is played. Note that the SUB3 drawbar actually lies a 5th above the fundamental harmonic. However, in
most situations it is perceived as sounding below the basic
harmonic.
Upper & Lower
Normal level, Slow decay
Normal level, Fast decay
Soft level, Slow decay
Soft level, Fast decay
Drawbar level
time
Note On
The percussion decay time can be fine-tuned for Fast and
Slow mode individually. Please refer to “The Sound Menu”
on page 16 for details.
Note: With the original instrument, you could not use the
percussion effect and 9th drawbar simultaneously. However with Nord C1 Combo Organ you can!
Vibrato
Percussion
The Percussion effect adds extra attack to the sound by
having a single envelope generator controlling either the
2nd or 3rd harmonic. The envelope “opens up” for a short
10
The original vibrato and chorus scanner consists of a
tapped delay line in combination with a rotating scanner.
For the Vibrato effect, phase shift is applied to the signal.
For the Chorus effect, the phase modulated signal is added
to the original signal. Three different types of choruses (C1C3) and three different types of vibratos (V1-V3) are available. Select one of these types by pressing the
MODE button.
The effect can be activated/deactivated for both manuals
individually by pressing the
UPPER and LOWER drawbars.
VIBRATO/CHORUS button of the
Page 11

Nord C1 Combo Organ The Organ Section
OS V1.0X
Please note that the VIBRATO/CHORUS button for the LOW-
manual also controls the effect for the bass registers.
ER
Key click control
The key click produced by the random contact bounces is
actually an audio artifact. This particular artifact later became a desirable effect amongst musicians. You can adjust
the click level by adjusting the
TREBLE control of the EQ sec-
tion.
THE ELECTRIC-V MODEL
The original instrument is probably the most famous of all
the transistor-based combo organs that emerged in the
early 60’s. Transistor technology made it possible to manufacture much more compact and portable organ instruments. Compared to the mighty sound of tonewheel
based organs, transistor organs generally sounded reedier
and weaker, but this one had a distinctive sound character
which together with the portability and cool design (inverse keyboard and chrome “Z-frame” stand) made the instrument massively popular at the time. The sound is
timeless and recreated faithfully in Nord C1 Combo Organ.
val of the 5 drawbars when the key of C3 is played. The intervals vary for the
Upper
UPPER and LOWER manual.
The Drawbars
The labels used for the Electric-V drawbars are printed on
the lower row above the drawbars. Note that only the first
five, and two last drawbars are used for this model.
For basic drawbar operation, please refer to “The Drawbars” on page 9.
The five leftmost drawbars control the level of each partial.
Each partial has a fixed harmonic interval relating to the
played note. The illustration below shows the pitch inter-
Lower
The two rightmost drawbars control the sum of all partials
in the form of a filtered triangle-like signal sounding soft
and dark, and an un-filtered square signal sounding bright
and intense.
If these drawbars are both fully “pushed in”, the organ will
produce no sound.
Vibrato
There is only one type of vibrato available for the ElectricV, which is activated using the
ON button in the Vibrato
section. Note that the Electric-V vibrato is common for
both the upper and lower manual drawbars.
THE ELECTRIC-F MODEL
This typical “buzzy” sound of this vintage instrument is one
of the most distinct and easily recognizable organ sounds
ever created, yet it is actually possible to get quite a wide
range of sounds out of the instrument.
Note that the voices aren’t supposed to replicate the instruments they are named after, but rather to describe the
basic tonal characteristic of the voice;
reedy,
TRUMPET - brassy.
FLUTE - soft, OBOE -
The Register selectors
The labels used for the Electric-F drawbars are printed on
the upper row above the drawbars
.
The drawbars act as on/off switches, or “Register selectors”
when the Electric-F model is selected. Instead of drawbars,
the original instrument featured “rocker”-type switches to
11
Page 12

The Organ Section User Manual
select instrument “voices” (actually different filter settings)
in various footage (octave) ranges.
The Drawbar buttons are used to turn voices on and off.
The drawbar LEDs 5-8 are lit up for an activated voice, and
drawbar LEDs 1-4 are lit up for a deactivated voice.
The table below shows the original registor name.
Register
selector #
Voice Panel Name
1 Bass 16 BASS16
2Strings 16 STR16
3Flute 8 FLUTE8
4Oboe 8 OBOE8
5Trumpet 8 TRMP8
6Strings 8 STR8
7Flute 4 FLUTE4
8Strings 4 STR4
9 A bright voice, pitched an octave
and a fifth above the fundamental.
2 2/3
The illustration below shows the pitch interval between
each voice when the key of C3 is played. Though some
voices have the same pitch, they differ in tonal character.
Upper & Lower
button of the
CHORUS/VIBRATO section is used for selecting
vibrato mode according to the table below.
V1 Light mode, slow.
V2 Light mode, fast.
C1 Heavy mode, slow.
C2 Heavy, fast.
The
VIBRATO/CHORUS buttons are common for both UPPER
and
LOWER manual.
THE SYNTH BASS MODEL
The synth bass model is available when the Electric-V or
Electric-F models are activated. For the Tonewheel model
you can alternate between the original tonewheel bass
registers or the synth bass model by pressing
MODEL buttons.
GAN
The main feature of the synth bass model is a monophonic
2 partial bass synthesizer with adjustable release time, giving you more time to move your foot when using a foot
pedal board. But it can also be played from the lower manual, by pressing the
LOWER MAN button. Please refer to
“The Split Function” on page 9 for detailed information.
SHIFT + OR-
Vibrato
The Electric-F Model has two basic vibrato modes; “Light”
and “Heavy”, with different rates for each mode. The
MODE
The synth bass model also features a pluck control giving
you an extra attack in some ways similar to the percussion
effect of the Tonewheel model.
level
Pluck Level
Drawbar level
Note On
Pluck and release time are adjusted with the
while holding down the
SHIFT key.
Release Time
time
Note Off
BASS drawbars
12
Page 13

Nord C1 Combo Organ The Effect Section
OS V1.0X
The Effect Section
The effect section consists of 7 models, routed as illustrated below.
Tonewheel / Transistor Organ Delay Overdrive EQ Amp Unison Reverb Rotary Speaker
The Overdrive, Amp and Rotary Speaker models are used one at
a time, depending on the
SPEAKER button setting.
If present, the ON button activates/deactivates the effect.
Note: all knobs and buttons will always be active and
change state though the effect needs to be activated in order for the change to be audible.
DELAY
A vintage-sounding delay featuring
echoes/repeats with adjustable tempo
and feedback settings.
The
TEMPO knob controls the delay
time.
The
AMOUNT knob adjusts the balance
between the dry signal and the delayed
repeats.
The
FEEDBACK button selects number of
repeats, starting with 1 repeat (no LEDs
lit) to many (both LEDs lit).
By activating the
FEEDBACK), the delay effect is limited to
the upper manual.
The
TAP TEMPO button allows you to set the delay time by
tapping the button repeatedly.
UPPER function (SHIFT +
EQ
A 3-band EQ featuring controls for bass,
midrange and treble, with ± 15dB cut/
boost for each band.
As the
TREBLE knob operates in the same
frequency area as the click sound, it also
functions as a click level control.
SPEAKER
There are three different amp simulations available, including rotary speaker
simulation, selectable with the
button. The
DRIVE knob controls the
amount of gain applied to the selected
model, or if no model is activated to the overdrive effect.
•
ROTARY SPEAKER model of a L-type rotary speaker cabi-
net.
•
AMP 1 model of a F-type Twin.
•
AMP 2 model of a R-type Jazz Combo.
• When no LED is lit the effect is bypassed.
MODE
DRIVE
The DRIVE knob controls the amount of
gain applied to the Overdrive, Amp or
Rotary Speaker effects respectively, depending on the
SPEAKER effect setting.
When using an external cabinet connected via the high
level outputs the
ROTARY SPEAKER’s LED will flash repeated-
ly if activated to indicate that the internal rotary speaker
simulation is bypassed. Please note that this is dependant
on the external cabinet circuitry, and if the LED do not flash
but lit constantly you will experience a double rotary
speaker effect.
13
Page 14

The Effect Section User Manual
Controlling the Rotary Speaker speed
The rotary speaker speed is set with the
buttons of the
ROTARY SPEAKER section.
You can also connect an external control to the
ROTARY CONTROL input, such
as a sustain pedal or the Half Moon Switch Accessory.
A sustain pedal can operate by momentarily changing the
speed setting or by toggling between
SLOW and FAST.
• When used momentarily the speed is changed
between
• When used in toggle mode you can switch to
SLOW and FAST only.
STOP by
holding the pedal in the down position for the duration
of 1 second.
Please refer to the “System Functions” on page 15 for fur-
a time.
ther information.
UNISON
A chorus pedal simulation. The MODE
button toggles between different presets:
•
UNISON 1 has a stereo setting with
medium intensity.
•
UNISON 2 has a stereo setting with heavy intensity.
• When no LED is lit the effect is bypassed.
REVERB
The reverb simulates the natural sound
reflections in various acoustic environments.
The
REVERB knob sets the balance be-
tween the unprocessed and the processed signal.
By pressing the
choose between five reverb types, indicated by the three LEDs lit one or two at
Hall Soft A reverb with the response and character of a
spacious hall, with a long decay and a mellow
character.
Hall A Hall reverb with a slightly brighter character.
Stage Soft A reverb with a medium decay time and mellow
character.
Stage A medium decay reverb, with slightly brighter
character.
Room Room ambience with a rather short decay time.
REVERB button you can
14
Page 15

Nord C1 Combo Organ System Functions
OS V1.0X
System Functions
ABOUT SYSTEM SETTINGS
System settings are global; they are not stored within a
program, but applies to all programs all of the time.
The system settings are divided into 3 menus:
• System menu
•MIDI menu
• Sound menu
A list of each menu and it’s functions is printed on the front
panel.
CHANGING SYSTEM SETTINGS
To change a a system function:
1
Select the appropriate menu
Press SHIFT + SYSTEM / MIDI / SOUND buttons.
Select function
2
The current functions number is shown in the DISPLAY, as well as it’s current setting. Navigate through
the available functions by using the
tons.
3
Change setting
Press SHIFT + VALUE buttons to navigate though the
functions possible settings.
Changes are automatically saved.
4
Press any of the SYSTEM / MIDI / SOUND buttons to
exit the menu
THE SYSTEM MENU
PROG/MENU but-
4 Fine Tune default value: 40
27 - 53 Sets the tuning from 427 Hz to 453Hz, in steps of 1 Hz.
Default value is 40 (440Hz).
5 Sustain Pedal Polarity default value: CL
CL Pedal Closed: for use with a sustain pedal with closed polar-
ity.
OP Pedal Open: for use with a sustain pedal with open polarity.
6 Sustain Pedal default value: ON
Controls weather the selected organ model should respond to sustain
pedal messages. When a pedal is connected to the SUSTAIN PEDAL
input, sustain pedal messages are always send via MIDI OUT regardless of this setting.
ON Sustain pedal messages enabled.
OFF Sustain pedal messages disabled.
7 Rotary Control Type default value: CL
Specifies the type of controller connected to the Rotary Control input.
If the Half Moon Switch option is selected the speed control buttons
on the front panel are disabled.
HA Half Moon Switch: for use with the Half Moon Switch acces-
sory.
OP Pedal Open: For use with a sustain pedal with open polarity.
CL Pedal Closed: For use with a sustain pedal with closed
polarity.
8 Rotary Pedal Mode default value: HD
TO Toggle: rotary speed is changed between SLOW and FAST
each time the pedal is pressed down. By holding the pedal
pressed downed for the duration of 1 second the speed will
change to STOP.
HD Hold: rotary speed follows the state of the pedal.
9 Swell Pedal Type default value: RO
Here you can match the swell pedal characteristic for various manufacturers.
FA Fat ar.
ER Ernie Ball.
YA Ya ma ha .
RO Roland.
1 Memory protect default value: OF
ON Program store is disabled.
OF Program store is enabled.
2 Output Routing default value: ST
SP Split Output: tonewheel organ is directed to HIGH LEVEL
OUT and LEFT OUT.
Electric-V and Electric-F organs are directed to RIGHT
OUT.
ST Stereo Output.
3 Transpose default value: 0
-6 - +6 Sets transpose of both manuals and BASS PEDAL input in
range of -6 semi notes to + 6 semi notes, steps of 1 semi
note.
10 Factory Reset
Press STORE to recall all system settings. Stored PROGRAM MODE
data is not affected. LIVE 1 and LIVE 2 data will be overwritten.
THE MIDI MENU
1 Upper Channel default value: 1
Sets how messages are sent and received from the UPPER manual via
MIDI IN and MIDI OUT.
OFF Messages are not sent.
15
Page 16

System Functions User Manual
THE SOUND MENU1-16 Note messages are sent on the corresponding MIDI channel
using the fast trigger mode, with fixed velocity data (use
this when recording MIDI events in sequencer for internal
playback). MIDI IN is enabled.
E1 - E9 Note messages are sent on the corresponding MIDI channel
using normal trigger mode, with velocity sensitive data (use
this when controlling other sound sources). MIDI IN is disabled.
2 Lower Channel default value: 2
Same as above, only for lower manual.
3 Bass Channel default value: 3
Same as above, only for controller connected to BASS PEDAL input
and lower section of lower manual when split mode is active.
Note: the BASS PEDAL input is always in OMNI mode.
4Local Control default value: ON
Determines if the organ should respond to local controls (keyboard,
knobs and buttons).
ON Local control is enabled.
OFF Local Control is disabled.
5 Continuous Controller mode default value: SR
Specifies how the front panel’s knobs and buttons are handled via
MIDI.
SR Messages are sent and received.
R Messages are received only.
S Messages are sent only.
OFF Messages are neither sent nor received.
6 Program Change mode default value: SR
Specifies how Program Change messages are handled via MIDI.
SR Messages are sent and received.
R Messages are received only.
S Messages are sent only.
OFF Messages are neither sent nor received.
7 Send Continuous Controller messages
Press STORE to send the current state of the selected organ model’s
buttons and knobs as Continuous Controller messages via MIDI.
Common parameters (including ROTARY SPEED and SWELL) and
Upper-specific parameters are sent on the Upper Channel. Lower-specific parameters are sent on the Lower Channel. Bass-specific parameters are sent on the Bass Channel.
Note: Messages are not sent if Channel setting is set to “OF”.
8Dump One
1 Treble Horn Speed default value: NO
Adjusts the speed setting (fast and slow-speed) of the rotary speaker
simulation’s horn.
HI
NO Normal.
LO Low.
High.
2 Treble Horn Acceleration default value: NO
Adjusts the acceleration and retardation time of the rotary speaker
simulation’s horn.
HI High.
NO Normal.
LO Low.
3 Bass Rotor Speed default value: NO
Adjusts the speed setting (fast and slow-speed) of the rotary speaker
simulation’s rotor.
HI
NO Normal.
LO Low.
High.
4 Bass Rotor Acceleration default value: NO
Adjusts the acceleration and de-acceleration time of the rotary
speaker simulation’s rotor.
HI
NO Normal.
LO Low.
High.
5 Tonewheel mode default value: V1
Controls the level of tonewheel crosstalk and cable leakage artefacts
of the Tonewheel organ.
V2 Vintage 2: high level of artefacts.
V1 Vintage 1: medium level of artefacts.
CL Clean: low level of artefacts.
6 Percussion Fast Decay Time default value: NO
Adjusts the fast mode decay time of the Tonewheel percussion effect.
LO Long.
NO Normal.
SH Short.
Press STORE to send the current program as sysex messages via MIDI.
9Dump All
Press STORE to send all stored program data as sysex messages via
MIDI.
16
7 Percussion Slow Decay Time default value: NO
Adjusts the slow mode decay time of the Tonewheel percussion
effects.
LO Long.
NO Normal.
SH Short.
Page 17

Nord C1 Combo Organ MIDI Implementation
OS V1.0X
MIDI Implementation
MIDI IMPLEMENTATION CHART
Func tion Transmit Receive Comment
MIDI channels 1 - 16
E1 - E9
Aftertouch No No
Pitchbend No No
Control Change Yes Yes
Program Change Yes Yes 0 - 125, 126 = Live 1, 127 =
System Exclusive Yes Yes
MIDI CONTINUOUS CONTROLLER LIST
Func tion
Preset Focus 3 Upper and Lower MIDI channel
Swell pedal 4 Upper MIDI channel
Organ Model 9 Upper MIDI channel
Drawbar1 16 Upper, Lower and Bass MIDI channel
Drawbar2 17 Upper, Lower and Bass MIDI channel
Drawbar3 18 Upper and Lower MIDI channel
Drawbar4 19 Upper and Lower MIDI channel
MIDI CC
Number
1 - 16 Channel setting1 - 16
transmits MIDI Note messages on MIDI channels 1 16 with fixed velocity
data, using the keyboards
fast trigger response. MIDI
In is enabled.
Channel setting E1 - E9
transmits MIDI Note messages on MIDI channel 1 9 with variable velocity
data, using the keyboards
normal trigger response.
MIDI IN is disabled.
Note: fast trigger response
is always used internally.
Live 2
Comment
Functi on
Drawbar5 20 Upper and Lower MIDI channel
Drawbar6 21 Upper and Lower MIDI channel
Drawbar7 22 Upper and Lower MIDI channel
Drawbar8 23 Upper and Lower MIDI channel
Drawbar9 24 Upper and Lower MIDI channel
Bass Pluck 18 Bass MIDI channel
Bass Release 19 Bass MIDI channel
Perc Decay 27 Upper MIDI channel
Perc Level 28 Upper MIDI channel
Delay Upper 75 Upper MIDI channel
Sustain pedal 64 Upper, Lower and Bass MIDI channel
Delay Amount 76 Upper MIDI channel
Delay Tempo 77 Upper MIDI channel
Delay Feedback 78 Upper MIDI channel
Delay On/Off 80 Upper MIDI channel
Speaker Type 81 Upper MIDI channel
Rotary speed 82 Upper MIDI channel
Vibrato Mode 84 Upper MIDI channel
Vibrato On/Off 85 Upper and Lower MIDI channel
PercState On/Off 87 Upper MIDI channel
Perc Harmonic 95 Upper MIDI channel
Reverb Type 96 Upper MIDI channel
Reverb On/Off 97 Upper MIDI channel
Reverb Amount 102 Upper MIDI channel
Unison Mode 109 Upper MIDI channel
Bass Model 110 Upper MIDI channel
Drive Amount 111 Upper MIDI channel
Drive On/Off 112 Upper MIDI channel
Eq Treble 113 Upper MIDI channel
Eq Bass 114 Upper MIDI channel
Eq On/Off 115 Upper MIDI channel
Eq Mid 116 Upper MIDI channel
BassLManual 117 Upper MIDI channel
MIDI CC
Number
Comment
17
Page 18

How-tos User Manual
How-tos
This section contains detailed guides on how to quickly
set-up your instrument to match various conditions.
CONNECTING A BASS PEDAL UNIT
Connect a MIDI cable between MIDI OUT of your bass pedal unit and
• All MIDI messages will be received via the
input regardless of MIDI channel setting.
• MIDI messages received via the
on the
• MIDI messages will be received on the
NEL
• Local Control settings apply to devices connected via
the
SETTING UP THE HALF MOON SWITCH
The Half Moon Switch is an accessory item and sold separately. When set to Half Moon Switch operation, the
RY SPEAKER
Speed Continuous Controller messages received via
are disabled.
IN
Mount the Half Moon Switch following the
1
included instructions.
2 Connect the Half Moon Switch to the ROTARY
CONTROL
3 Press SHIFT + SYSTEM to enter the System Menu
4 Navigate with the PAGE/MENU buttons to
page 7
5 Change setting
Press SHIFT + PAGE/MENU buttons and change setting
to “HA”
6
Press SYSTEM / MIDI / SOUND buttons to exit
menu
ADJUSTING THE PEDAL POLARITY
If you encounter the sustain or rotary control pedal operating “backwards” you can adjust the pedal polarity in the
System Menu.
1
Press SHIFT + SYSTEM to enter the System Menu
2 Navigate with the PAGE/MENU buttons
For adjusting the sustain pedal, navigate to page 5.
For adjusting the rotary pedal, navigate to page 7.
3
Change setting
Press SHIFT + PAGE/MENU buttons to change setting.
Press SYSTEM / MIDI / SOUND buttons to exit
4
menu
BASS PEDAL input.
BASS PEDAL
BASS PEDAL input is sent
BASS MIDI CHANNEL via MIDI OUT.
BASS MIDI CHAN-
via MIDI IN.
BASS PEDAL input.
ROTA-
buttons on the front panel, as well as Rotary
MIDI
input
ADJUSTING THE SWELL PEDAL SPAN
As expression pedals from different manufacturers have
various span characteristics, you can select span preset in
the System Menu.
1
Press SHIFT + SYSTEM to enter the System Menu
2 Navigate with the PAGE/MENU buttons to
page 9
3 Change setting
Press SHIFT + PAGE/MENU buttons to change setting.
FA Fata r
ER Ernie Ball
YA Yam a ha
RO Roland
If the manufacturer of your pedal is not listed above,
you can try operating the pedal to it’s end positions.
The pedal range is briefly shown in the
value between 0 and 100. Select the setting that best
match the range of your pedal.
DISPLAY as a
PLAYING AN EXTERNAL SOUND SOURCE
Since both manuals send MIDI data on separate MIDI channels, it is possible to connect an external sound source and
control it from one manual while playing internally on the
other.
Follow the steps below as necessary:
1
Connect MIDI OUT to MIDI in on the external
device
2 Match MIDI channels
Match the MIDI channel setting of the manual you
want to use with your external device. Please refer to
“The MIDI Menu” on page 15 for detailed instructions.
• MIDI channel setting 1 - 16 uses the fast trigger keyboard response which result in MIDI note messages
being sent with fixed velocity data.
• MIDI channel setting E1 - E9 uses normal trigger
response which result in velocity variable data being
sent via
internally.
3
Set MIDI CC Mode to “Off”
Normally all buttons and knobs send MIDI continuous
controller data, which can lead to undesirable results
when an external sound generator is connected.
This can be turned of by setting the MIDI CC Mode to
“Off” or “Receive”. This is done in the MIDI menu. Please
see “Continuous Controller mode” on page 16 for
detailed instructions.
4
Set Sustain Pedal Mode
If you want the sustain pedal to operate the external
device only, set the sustain pedal setting in the System
menu to “
for detailed instructions.
MIDI OUT. Fast trigger response is still used
OF”. Please refer to “Sustain Pedal ” on page 15
18
Page 19

Nord C1 Combo Organ How-tos
OS V1.0X
5 Set program change mode
Normally program change messages are sent via MIDI
OUT on the channels specified by the UPPER, LOWER
and BASS channel settings in the MIDI menu. This way
your external device will receive program change messages and follow as you change programs.
By setting the Program Change Mode to “Off” or
“Receive” your external device will not follow as you
change programs.
6
Turn off all drawbars for the selected manual
By doing this no sound is generated internally.
Play!
7
RECORDING MIDI IN A SEQUENCER
When recording MIDI in a sequencer you need to keep
track of the MIDI channel setting for
BASS, below referred to as “keyboard”.
UPPER, LOWER and
When recording MIDI data to be played back on the Nord C1 Combo Organ:
• Use channel settings 1 -16 for each keyboard individually. This it the default setting.
• Never set the keyboards to the same channel.
Note: The default behaviour of many sequencer applications is to merge incoming data into one MIDI channel. For
the correct behaviour set the MIDI channel setting of your
sequencer program to OMNI, sometimes also describes as
“Any” or “All”. Please refer to the documentation of your sequencer software for more information.
When recording MIDI data to be played back on other equipment:
• Use channel settings E1 - E9. This setting will use the
keyboards normal trigger response, and incorporate
velocity sensitive data. When using this setting,
is disabled for the selected keyboard.
Please refer to “The Keyboard” on page 5 for more information.
MIDI IN
INSTALLING THE USB DRIVER (WINDOWS ONLY)
A driver is not needed for computers running OS X operating systems. The Windows USB driver is compatible with
the following Windows versions:
• Windows 2000
• Windows XP (x32 and x64 versions)
The Driver can be found at www.clavia.se
1
Connect a USB cable between the unit and
your computer
The “Found New Hardware” wizard should appear. Follow the on-screen instructions.
USB-cable is an accessory item and sold separately.
UPGRADING THE OS
OS upgrades can be found at www.clavia.se when available.
The currently installed OS version is shown in the
power up.
1
Download the latest OS version
2 Connect a USB cable between the unit and
DISPLAY at
your computer
3 Un-compress and run the downloaded appli-
cation
Wait for the application to find your instrument. Click
the UPDATE button. The progress bar will show you
when the update is finished.
ABOUT PROGRAM SYSEX DUMPS
Program Sysex Dumps can be used for storing a single program (Dump One) or the complete program bank (Dump
All) including Live 1 and Live 2 on an external device such
as a computer, or for transferring program data between
two units.
• For sending program Sysex messages, please refer to
“The MIDI Menu” on page 15.
• MIDI Sysex data will be received regardless of MIDI
channel setting.
• For a Dump All to be received, Memory Protect must be
turned off. Please refer to “The System Menu” on
page 15.
• A Dump One will be received regardless of Memory
Protect setting, but needs to be stored in order to not
get lost.
• While Program Sysex messages are received, the display will indicate “
RCV” in a flashing manner.
19
Page 20

Index User Manual
Index
A
Audio connections ...........................6
B
Bass pedal ........................................6
Bass pedal, connecting ................. 18
Buttons & knobs
Bass-section
Drawbars (Electric-F) ................. 11
Drawbars (Electric-V) ................. 11
Drawbars (general) ......................9
L-manual ....................................9
Lower Man. .............................. 12
Pluck ....................................... 12
Release .................................... 12
Chorus/vibrato-section
Mode ....................................... 12
Drive-section
Drive ....................................... 13
EQ-section
Bass ......................................... 13
Mid .......................................... 13
Treble ...............................11, 13
Lower-section ............................ 10
Drawbars (Electric-F) ................. 11
Drawbars (Electric-V) ................. 11
Drawbars (general) ......................9
Preset .........................................9
Vibrato/chorus ......................... 12
Organ model-section ...................9
Panic button .................................5
Percussion-section
Fast ......................................... 10
On ........................................... 10
Soft ......................................... 10
Third ........................................ 10
Program-section
live 1 & 2 .....................................8
Reverb-section .......................... 14
Rotary speaker-section
Fast ......................................... 14
Slow ........................................ 14
Stop ........................................ 14
Shift Button ..................................5
Speaker-section
Mode ....................................... 13
Unison-section
Mode ....................................... 14
Upper-section ............................ 10
Drawbars (Electric-F) ................. 11
Drawbars (Electric-V) ................. 11
Drawbars (general) ......................9
Preset .........................................9
Vibrato/chorus ......................... 12
Vibrato/chorus-section
Mode ....................................... 10
............................... 10
C
Chorus ........................................... 10
Connections .....................................6
Continuous Controller mode ........ 16
D
Delay-section ................................ 13
Drawbars (Electric-F) ..................... 11
Drawbars (Electric-V) ..................... 11
Drawbars (Tonewheel model) ...... 10
Drive-section ................................. 13
Dump All ....................................... 16
Dump One ..................................... 16
E
Electric-F model ............................ 11
Electric-V model ............................ 11
EQ-section ..................................... 13
External sound source .................. 18
F
Factory Reset ................................. 15
Fine Tune ....................................... 15
Flashing Rotary speaker LED ........ 13
Front panel .......................................5
H
Half Moon Switch .......................... 18
Headphone output ..........................6
High level output .............................6
Horn Acceleration ......................... 16
Horn Speed ................................... 16
L
Live-mode ........................................8
M
Main stereo output ..........................6
Master Level .....................................5
Memory protect ............................ 15
MIDI connections .............................6
MIDI Implementation .................... 17
O
On/Off buttons .................................5
Organ-model
Electric V .................................... 11
Electric-F .................................... 11
Synth Bass .................................. 12
Tonewheel ................................. 10
OS, upgrading ............................... 19
Output Routing ............................. 15
P
Pedal connections ............................6
Pedal Polarity ................................ 15
Pedal polarity, adjusting ............... 18
Percussion ..................................... 10
Percussion decay time .................. 16
Program
Loading
Storing ..........................................8
Program change mode ................. 16
Program Section ..............................8
.........................................8
R
Rear panel ........................................6
Register selectors (Electric-F) ........ 11
Reverb-section .............................. 14
Rotary Control ............................... 15
Rotary control ............................... 14
Rotary Control input ........................6
Rotary Pedal Mode ........................ 15
Rotary Speaker Simulation ............ 13
Rotary Speaker speed ................... 14
Rotor Acceleration ........................ 16
Rotor Speed ................................... 16
S
Selector buttons ...............................5
Send Continuous Controller messages
16
Sequencer, recording MIDI ........... 19
Speaker-section ............................. 13
Split-function ...................................9
Sustain Pedal .................................15
Sustain Pedal input ..........................6
Sustain Pedal Polarity ................... 15
Swell Pedal input .............................6
Swell Pedal Type ........................... 15
Synth Bass model .......................... 12
System Functions ..........................15
T
Tonewheel mode .......................... 16
Tonewheel-model ......................... 10
Transpose ...................................... 15
U
Unison-section .............................. 14
USB connection ................................6
USB driver, installing ..................... 19
V
Vibrato (Electric-F) ......................... 12
Vibrato (Electric-V) ........................ 11
Vibrato (Tonewheel) ..................... 10
20
 Loading...